

Page 1
Test
Accessory
User Guide
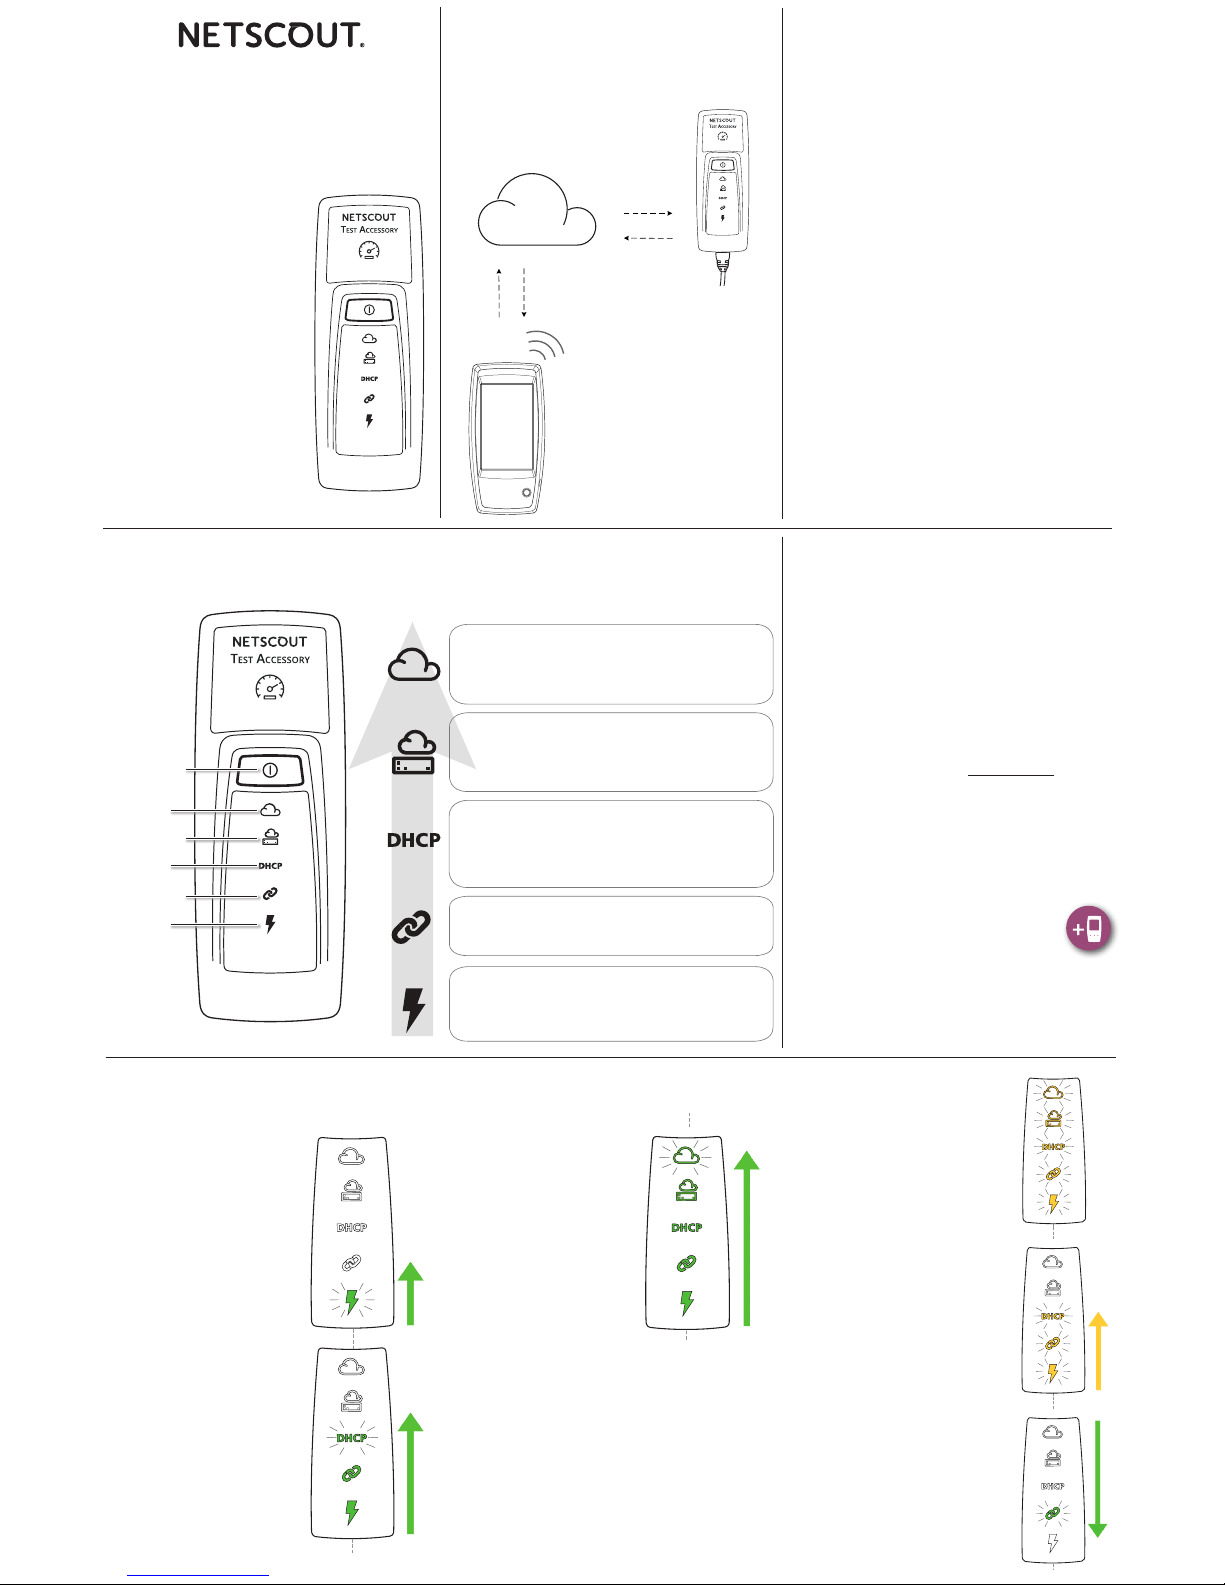
How it Works
The Test Accessory acts as the endpoint for a test
run by a NETSCOUT handheld network tester,
such as an AirCheck G2 Wireless Tester.
Powering On
The Test Accessory operates with either
Power over Ethernet (PoE) or the following AA
battery types: Alkaline (shipped with product),
Rechargeable NiMH, or Lithium.
1. Insert two AA batteries into the back of your
Test Accessory.
2. Ensure that you have an Ethernet cable
connected to an active network with access to
the Internet.
3. If PoE is available on your network
connection, the unit starts up automatically.
If you are using batteries only, press and hold
the power button for two seconds to turn on
the unit.
As soon as you power on the Test Accessory, all of
the LED symbols illuminate yellow for 15 seconds
while the unit starts up.
Then, the accessory attempts to connect to
your network, lighting up each LED with the
corresponding connection step.
NOTE: Once you connect to the cloud, the Test
Accessory may automatically update with the
latest software. See the Software Update LED
Sequence below for more information.
Connection Sequence and LED Symbols
Connection status is indicated by the behavior of the LED symbols on the Test Accessory.
Flashing GREEN: Able to connect to Link-Live
Single YELLOW Flash: Broadcasting presence on
network
Power
button
DHCP/IP
Link
PoE or
battery
status
Gateway
Link-Live
Cloud
Flashing GREEN: Pinging gateway
Solid GREEN: Ping successful
RED: Gateway ping failed
Flashing GREEN: Requesting IP
Solid GREEN: IP address assigned
YELLOW: Duplicate IP assigned
RED: Address assignment failed
Flashing GREEN: Trying to link
Solid GREEN: Linked
GREEN: PoE power
YELLOW: Battery power
RED: Batteries low
NETSCOUT Handheld
Network Tester
NETSCOUT
Test
Accessory
The Test Accessory works
together with other
NETSCOUT Handheld
Network Testers to run
network performance and
availability tests.
This User Guide covers
the basics of connecting
and conguring your
Test Accessory. See the
user documentation for
your main testing tool for
information on running
specic tests and viewing
results.
Detailed LED Behavior
Connection LED Sequence
1. If the unit is running
on PoE, the Power
light (lightning bolt)
illuminates GREEN. If it
is running on batteries,
the Power light stays
YELLOW. If the batteries
need replacing, the
Power light turns RED.
2. The Link status light
(chain link) flashes
GREEN until a link is
established and then
stays solid GREEN.
3. The unit requests an
IP Address and the
DHCP light flashes
GREEN. If a usable IP
address is acquired,
the DHCP light turns
solid GREEN. If the unit
acquires a duplicate IP
address, the DHCP light
turns YELLOW, and if
no IP address can be
acquired, it turns RED.
Connecting
Connecting
Connecting
4. The Test Accessory
communicates with
the default gateway
router. The Gateway
status light flashes
GREEN until it
connects with the
gateway; if successful,
it turns solid GREEN.
If the Test Accessory
cannot reach the
gateway, the light
turns solid RED.
5. The Test Accessory
attempts to communicate with the Link-Live
Cloud Service, and the cloud light flashes
GREEN to indicate internet connectivity.
Your Test Accessory may automatically update if
there is a newer software version available.
NOTE: Do not turn o or try to claim your Test
Accessory to Link-Live during the update process
or the update may fail.
Software Update LED
Sequence
1. First, all five lights flash
YELLOW.
2. Next, starting with the PoE
lightning bolt at the bottom
of the unit, each status light
begins to flash YELLOW in
sequential order up to the
Cloud status light, until all
five are flashing YELLOW
again for several seconds.
3. Then, the unit reboots;
starting with the Cloud
status light, each light
flashes GREEN sequentially
down to the PoE status light.
4. Finally, the Test Accessory
reconnects, beginning with
the PoE status light. Each
light blinks GREEN while
connecting.
Restarting
Updating
Starting Update
Link-Live Cloud Service
Link-Live Cloud Service is a free, online system for
viewing, tracking, and organizing your test results.
Claim the Test Accessory to aid in discovery
from your main testing device and to download
software updates.
NOTE: To view detailed test results, you must also
claim your main NETSCOUT testing device to Link-
Live and congure the settings to upload. See the
user documentation for your main handheld tester
for more information.
Create your user account at Link-Live.com.
Follow the instructions to activate your
account, and then sign in.
Claiming to Link-Live
The rst time you sign in to Link-Live, a pop-up
window appears prompting you to claim a device.
Otherwise, navigate to the Units page from
the left side navigation menu, and click the
Claim Unit button at the lower right corner
of the screen.
Follow the claiming instructions on the screen for
the Test Accessory.
NOTE: You must claim the Test Accessory within
the rst 5 minutes of powering it on.
Page 2
Environmental and Regulatory
Specications
Environmental
Operating
Temperature
32°F to 122°F (0°C to 50°C )
Relative
Humidity
5% to 90%, Non-condensing
Storage
Temperature
-4°F to 140°F (-20°C to 60°C)
Shock and
Vibration
Random 2 g, 5 Hz - 500 Hz (class 2),
1 m drop
Safety
CAN/CSA-C22.2 No. 61010-1-1-12,
UL Std. No. 61010-1 (3rd Edition),
IEC 61010-1:2010, Pollution degree
2s
Operating
Altitude
13,123 ft (4,000 m)
Storage Altitude 39,370 ft (12,000 m)
EMC EN 61326-1:2006
General
Dimensions
4.36 in x 1.6 in x 1.28 in
(11.07 cm x 4.06 cm x 3.25 cm)
Weight 0.25 lb (0.116 kg)
Battery 2 AA Alkaline
LEGAL NOTIFICATION
Use of this product is subject to the End User License
Agreement available at http://www.netscout.com/
legal/terms-and-conditions/ or which accompanies
the product at the time of shipment or, if applicable,
the legal agreement executed by and between
NETSCOUT SYSTEMS, INC., and the purchaser of this
product (“Agreement”).
Open-Source Software Acknowledgment: This product
may incorporate open-source components that are
governed by the GNU General Public License (“GPL”)
or licenses that are compatible with the GPL license
(“GPL Compatible License”). In accordance with the
terms of the GNU GPL, NETSCOUT will make available
a complete, machine-readable copy of the source code
components of this product covered by the GPL or
applicable GPL Compatible License, if any, upon receipt
of a written request. Please identify the product and
send a request to:
NetScout Systems, Inc.
GNU GPL Source Code Request
310 Littleton Road
Westford, MA 01886
Attn: Legal Department
NETSCOUT SYSTEMS, INC. reserves the right, at its sole
discretion, to make changes at any time in its technical
information, specications, service, and support
programs.
Resetting to
Factory Defaults
CAUTION: Resetting a Test Accessory to factory
defaults erases all performance and conguration
data and unclaims it from Link-Live.
1. Ensure the unit is powered off, meaning all
LEDs are off.
2. Hold down the power button for
approximately 30 seconds.
As the unit resets, it begins with all ve status
lights illuminating solid YELLOW for about 15
seconds. Then, the LEDs ash GREEN sequentially
upward to the cloud light for another 15 seconds,
and nally all LEDs ash GREEN simultaneously.
3. Release the power button as soon as the
lights flash GREEN simultaneously, and
BEFORE they flash RED.
If you do not release the power button before the
LEDs ash RED, the LEDs turn YELLOW to indicate
a failed reset attempt, and you will have to start
the reset procedure over.
If the reset is successful, the Test Accessory will
shut down and power o.
WARRANTY
The warranty for your Product is on the NETSCOUT
website; visit http://www.netscout.com/legal/terms-
and-conditions/.
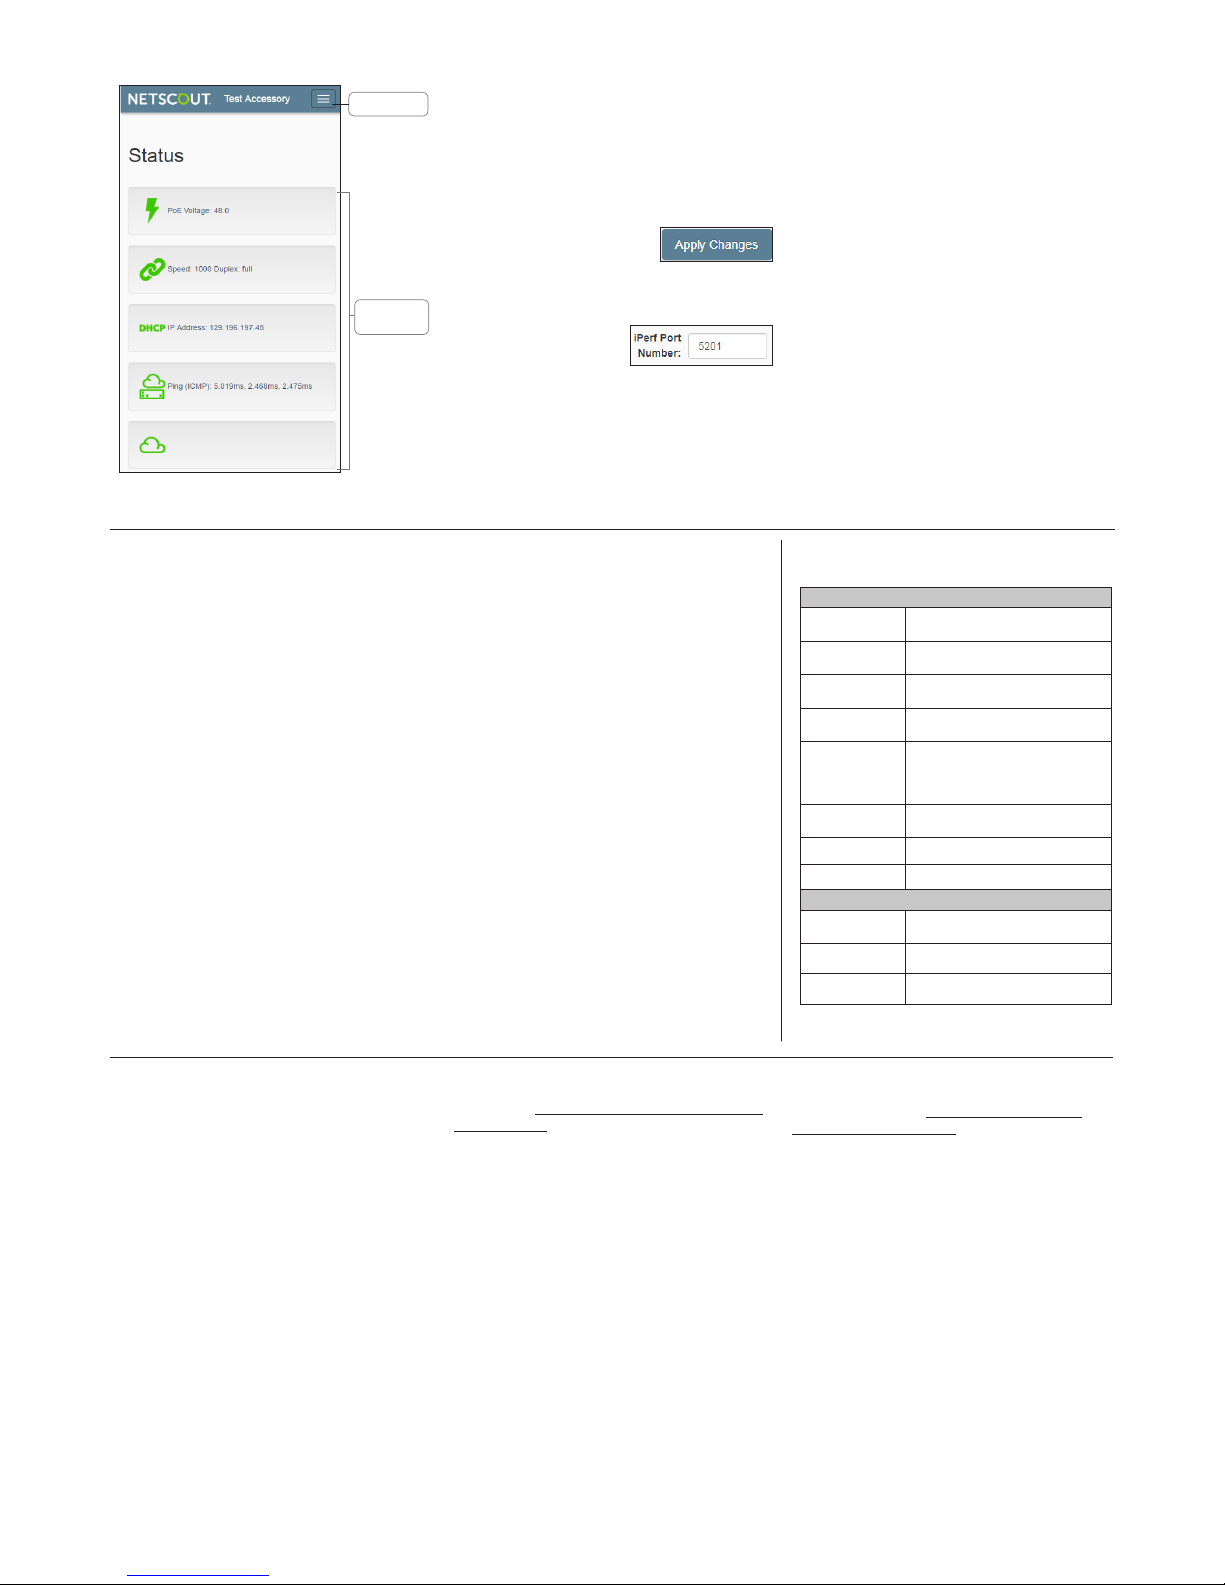
Web Server Interface
Open a web browser, and input the IP address of your Test Accessory. You can acquire the IP address from
Link-Live or by discovering the Test Accessory from your main handheld tester.
Debug Information
This section contains troubleshooting information
for use by NETSCOUT’s technical support.
Log Files
Click the button to Download Log Files.
Log Level
This setting lets you change the threshold at
which events are logged in the Log Files.
Select the drop-down menu, and select a new
setting to adjust the log level.
Click the Default Log Level button to reset to
WARN, the default setting.
Nearest Switch Test
Click the Nearest Switch Test button to cause the
Test Accessory to identify the closest switch and
display its characteristics below.
Language
Select this menu item to chose a dierent
language from the drop-down list.
Status
The Status screen displays the latest connection
results from the Test Accessory.
Settings
The Settings screen allows custom conguration of
the IP address, Port, and Proxy for testing.
Select Apply Changes to save
new settings.
IP Conguration
These settings allow you to chose and congure a
static IP address.
iPerf Port
This eld lets you enter a
Port Number other than the default 5201.
The iPerf Port Number set here must match the
Port in iPerf Settings on the main tester.
Proxy Conguration
This section lets you congure settings for a proxy
server. If you chose Automatic or Manual proxy,
enter the Proxy Address, Port, Username, and
Password as required.
Connection
Status
Top Menu
Powering O the Unit
To turn o the unit, hold the power button for two
seconds until the LEDs begin ashing sequentially
downward, and then release the button.
After the LEDs stop ashing, the Power/PoE
symbol remains on for about 15 seconds until
shutdown completes.
PN 770-000011 11/2017 English
© 2017 NETSCOUT SYSTEMS, Inc.
*770-000011*
The Status screen displays by default. You can
access settings and debug information from the
Top Menu.
 Loading...