

Page 1

Command-Line Tools Guide
Netscape Certificate Management System
Version 6.1
February 2003
Page 2

Netscape Communications Corporation ("Nets ca pe") and it s licensors retain all ownership rights to the software programs of f ered by
Netscape (referred to herein as "Software") and related documentation. Use of the Software and related documentation is governed by the
license agreement for the Software and applicable copyright law.
Your right to copy this documentation is limited by copyright law. Making unauthorized copies, adaptations or compilation works is
prohibited and constitutes a punishable viola tion of the law. Netscape may revise this documentation from tim e to time withou t notice.
THIS DOCUMENTATION IS PROV IDED " AS IS" WITHOUT WA RRANTY OF ANY KI ND. IN NO EVENT SHALL NE TSCAPE BE L IABLE
FOR INDIRECT, SPECIAL, INCIDENTAL, OR CONSEQUENTIAL DAMAGES OF ANY KIND ARISING FROM ANY ERROR IN THIS
DOCUMENTATION, INCLUDING WITHOUT LIMITATION ANY LOSS OR INTERRUPTION OF BUSINESS, PROFITS, USE, OR DATA.
The Software and do cum e n t at ion are copyright © 2001 Sun Microsyste ms, Inc. Portions copyright 1999, 2002-2003 Netscape
Communications Corporation. All rights reserved.
Netscape and the Netscape N logo are registered trademarks of Netscape Communications Corporation in the United States and other
countries. Other Ne ts cape logos, product names, and se rv ice names are also trademarks of Net sc ap e Com munications Corporation , which
may be registered in some countries. Other product and brand names are the exclusive property of their respective owners.
The downloading, exporting, or reexporting of Netscape software or any underlying information or technology must be in full compliance
with all United States and other applicable laws and regulations. Any provision of Netscape software or documentation to the U.S.
government is with restricted rights as descri bed in the li cense agreement for that Software.
Page 3

Contents
About This Guide . . . . . . . . . . . . . . . . . . . . . . . . . . . . . . . . . . . . . . . . . . . . . . . . . . . . . . . . . . . . . . . 7
Who Should Read This Guide . . . . . . . . . . . . . . . . . . . . . . . . . . . . . . . . . . . . . . . . . . . . . . . . . . . . . . . . . . . . . 7
What You Should Know . . . . . . . . . . . . . . . . . . . . . . . . . . . . . . . . . . . . . . . . . . . . . . . . . . . . . . . . . . . . . . . . . . 7
What’s in This Guide . . . . . . . . . . . . . . . . . . . . . . . . . . . . . . . . . . . . . . . . . . . . . . . . . . . . . . . . . . . . . . . . . . . . . 8
Conventions Used in This Guide . . . . . . . . . . . . . . . . . . . . . . . . . . . . . . . . . . . . . . . . . . . . . . . . . . . . . . . . . . 9
Documentation . . . . . . . . . . . . . . . . . . . . . . . . . . . . . . . . . . . . . . . . . . . . . . . . . . . . . . . . . . . . . . . . . . . . . . . . . 11
Chapter 1 Command-Line Tools . . . . . . . . . . . . . . . . . . . . . . . . . . . . . . . . . . . . . . . . . . . . . . . . 13
Chapter 2 CMS Upgrade Utility . . . . . . . . . . . . . . . . . . . . . . . . . . . . . . . . . . . . . . . . . . . . . . . . . 19
Before Upgrading . . . . . . . . . . . . . . . . . . . . . . . . . . . . . . . . . . . . . . . . . . . . . . . . . . . . . . . . . . . . . . . . . . . . . . 20
Backing Up Your Previous CMS Instance . . . . . . . . . . . . . . . . . . . . . . . . . . . . . . . . . . . . . . . . . . . . . . . 20
Upgrading . . . . . . . . . . . . . . . . . . . . . . . . . . . . . . . . . . . . . . . . . . . . . . . . . . . . . . . . . . . . . . . . . . . . . . . . . . . . . 20
After Upgrading . . . . . . . . . . . . . . . . . . . . . . . . . . . . . . . . . . . . . . . . . . . . . . . . . . . . . . . . . . . . . . . . . . . . . . . 31
Chapter 3 Password Cache Utility . . . . . . . . . . . . . . . . . . . . . . . . . . . . . . . . . . . . . . . . . . . . . . 33
Location . . . . . . . . . . . . . . . . . . . . . . . . . . . . . . . . . . . . . . . . . . . . . . . . . . . . . . . . . . . . . . . . . . . . . . . . . . . . . . . 33
Syntax . . . . . . . . . . . . . . . . . . . . . . . . . . . . . . . . . . . . . . . . . . . . . . . . . . . . . . . . . . . . . . . . . . . . . . . . . . . . . . . . 34
Usage . . . . . . . . . . . . . . . . . . . . . . . . . . . . . . . . . . . . . . . . . . . . . . . . . . . . . . . . . . . . . . . . . . . . . . . . . . . . . . . . . 35
Listing the Contents of the Password Cache . . . . . . . . . . . . . . . . . . . . . . . . . . . . . . . . . . . . . . . . . . . . . 35
Generating a new Protection Key for the Password Cache . . . . . . . . . . . . . . . . . . . . . . . . . . . . . . . . . 36
Adding a New Entry to the Password Cache . . . . . . . . . . . . . . . . . . . . . . . . . . . . . . . . . . . . . . . . . . . . 37
Changing the Password of an Entry in the Password Cache . . . . . . . . . . . . . . . . . . . . . . . . . . . . . . . 37
Deleting an Entry From the Password Cache . . . . . . . . . . . . . . . . . . . . . . . . . . . . . . . . . . . . . . . . . . . . 38
3
Page 4

Chapter 4 AuditVerify . . . . . . . . . . . . . . . . . . . . . . . . . . . . . . . . . . . . . . . . . . . . . . . . . . . . . . . . 39
About the AuditVerify Tool . . . . . . . . . . . . . . . . . . . . . . . . . . . . . . . . . . . . . . . . . . . . . . . . . . . . . . . . . . . . . 39
Setting Up the Auditor’s Database . . . . . . . . . . . . . . . . . . . . . . . . . . . . . . . . . . . . . . . . . . . . . . . . . . . . . . . . 39
Audit Verify Tool Syntax . . . . . . . . . . . . . . . . . . . . . . . . . . . . . . . . . . . . . . . . . . . . . . . . . . . . . . . . . . . . . . . . 40
Return Values . . . . . . . . . . . . . . . . . . . . . . . . . . . . . . . . . . . . . . . . . . . . . . . . . . . . . . . . . . . . . . . . . . . . . . . . . 41
Using the Audit Verify Tool . . . . . . . . . . . . . . . . . . . . . . . . . . . . . . . . . . . . . . . . . . . . . . . . . . . . . . . . . . . . . 41
Chapter 5 PIN Generator Tool . . . . . . . . . . . . . . . . . . . . . . . . . . . . . . . . . . . . . . . . . . . . . . . . . . 43
Locating the PIN Generator Tool . . . . . . . . . . . . . . . . . . . . . . . . . . . . . . . . . . . . . . . . . . . . . . . . . . . . . . . . . 43
The setpin Command . . . . . . . . . . . . . . . . . . . . . . . . . . . . . . . . . . . . . . . . . . . . . . . . . . . . . . . . . . . . . . . . . . . 44
Command-Line Syntax . . . . . . . . . . . . . . . . . . . . . . . . . . . . . . . . . . . . . . . . . . . . . . . . . . . . . . . . . . . . . . . 44
Example . . . . . . . . . . . . . . . . . . . . . . . . . . . . . . . . . . . . . . . . . . . . . . . . . . . . . . . . . . . . . . . . . . . . . . . . . 49
How the Tool Works . . . . . . . . . . . . . . . . . . . . . . . . . . . . . . . . . . . . . . . . . . . . . . . . . . . . . . . . . . . . . . . . . . . 49
Input File . . . . . . . . . . . . . . . . . . . . . . . . . . . . . . . . . . . . . . . . . . . . . . . . . . . . . . . . . . . . . . . . . . . . . . . . . . . 51
Output File . . . . . . . . . . . . . . . . . . . . . . . . . . . . . . . . . . . . . . . . . . . . . . . . . . . . . . . . . . . . . . . . . . . . . . . . . 53
How PINs Are Stored in the Directory . . . . . . . . . . . . . . . . . . . . . . . . . . . . . . . . . . . . . . . . . . . . . . . . . 54
Exit Codes . . . . . . . . . . . . . . . . . . . . . . . . . . . . . . . . . . . . . . . . . . . . . . . . . . . . . . . . . . . . . . . . . . . . . . . . . . 54
Chapter 6 Extension Joiner Tool . . . . . . . . . . . . . . . . . . . . . . . . . . . . . . . . . . . . . . . . . . . . . . . 57
Location . . . . . . . . . . . . . . . . . . . . . . . . . . . . . . . . . . . . . . . . . . . . . . . . . . . . . . . . . . . . . . . . . . . . . . . . . . . . . . 58
Syntax . . . . . . . . . . . . . . . . . . . . . . . . . . . . . . . . . . . . . . . . . . . . . . . . . . . . . . . . . . . . . . . . . . . . . . . . . . . . . . . . 58
Usage . . . . . . . . . . . . . . . . . . . . . . . . . . . . . . . . . . . . . . . . . . . . . . . . . . . . . . . . . . . . . . . . . . . . . . . . . . . . . . . . . 58
Chapter 7 Backing Up and Restoring Data . . . . . . . . . . . . . . . . . . . . . . . . . . . . . . . . . . . . . . . 61
Backup and Restore Tools . . . . . . . . . . . . . . . . . . . . . . . . . . . . . . . . . . . . . . . . . . . . . . . . . . . . . . . . . . . . . . . 61
Backing Up Data . . . . . . . . . . . . . . . . . . . . . . . . . . . . . . . . . . . . . . . . . . . . . . . . . . . . . . . . . . . . . . . . . . . . . . . 62
What the Backup Tool Does . . . . . . . . . . . . . . . . . . . . . . . . . . . . . . . . . . . . . . . . . . . . . . . . . . . . . . . . . . . 63
What the Backup Tool Does Not Do . . . . . . . . . . . . . . . . . . . . . . . . . . . . . . . . . . . . . . . . . . . . . . . . . . . . 65
Running the Backup Tool . . . . . . . . . . . . . . . . . . . . . . . . . . . . . . . . . . . . . . . . . . . . . . . . . . . . . . . . . . . . . 65
After You Finish a Backup . . . . . . . . . . . . . . . . . . . . . . . . . . . . . . . . . . . . . . . . . . . . . . . . . . . . . . . . . . . . 66
Signing Backup Data Using cmsutil . . . . . . . . . . . . . . . . . . . . . . . . . . . . . . . . . . . . . . . . . . . . . . . . . . . . . . . 67
Verifying Signed Backup Data using cmsutil . . . . . . . . . . . . . . . . . . . . . . . . . . . . . . . . . . . . . . . . . . . . . . . 69
Restoring Data . . . . . . . . . . . . . . . . . . . . . . . . . . . . . . . . . . . . . . . . . . . . . . . . . . . . . . . . . . . . . . . . . . . . . . . . . 70
Before You Restore Data . . . . . . . . . . . . . . . . . . . . . . . . . . . . . . . . . . . . . . . . . . . . . . . . . . . . . . . . . . . . . . 71
Running the Restore Tool . . . . . . . . . . . . . . . . . . . . . . . . . . . . . . . . . . . . . . . . . . . . . . . . . . . . . . . . . . . . . 72
Chapter 8 ASCII to Binary Tool . . . . . . . . . . . . . . . . . . . . . . . . . . . . . . . . . . . . . . . . . . . . . . . . . 77
Location . . . . . . . . . . . . . . . . . . . . . . . . . . . . . . . . . . . . . . . . . . . . . . . . . . . . . . . . . . . . . . . . . . . . . . . . . . . . . . 77
Syntax . . . . . . . . . . . . . . . . . . . . . . . . . . . . . . . . . . . . . . . . . . . . . . . . . . . . . . . . . . . . . . . . . . . . . . . . . . . . . . . . 77
Example . . . . . . . . . . . . . . . . . . . . . . . . . . . . . . . . . . . . . . . . . . . . . . . . . . . . . . . . . . . . . . . . . . . . . . . . . . . . . . 78
4 Netscape Certificate Management System Command-Line Tools Guide • February 2003
Page 5

Chapter 9 Binary to ASCII Tool . . . . . . . . . . . . . . . . . . . . . . . . . . . . . . . . . . . . . . . . . . . . . . . . . 79
Location . . . . . . . . . . . . . . . . . . . . . . . . . . . . . . . . . . . . . . . . . . . . . . . . . . . . . . . . . . . . . . . . . . . . . . . . . . . . . . . 79
Syntax . . . . . . . . . . . . . . . . . . . . . . . . . . . . . . . . . . . . . . . . . . . . . . . . . . . . . . . . . . . . . . . . . . . . . . . . . . . . . . . . 79
Example . . . . . . . . . . . . . . . . . . . . . . . . . . . . . . . . . . . . . . . . . . . . . . . . . . . . . . . . . . . . . . . . . . . . . . . . . . . . . . . 80
Chapter 10 Pretty Print Certificate Tool . . . . . . . . . . . . . . . . . . . . . . . . . . . . . . . . . . . . . . . . . . 81
Location . . . . . . . . . . . . . . . . . . . . . . . . . . . . . . . . . . . . . . . . . . . . . . . . . . . . . . . . . . . . . . . . . . . . . . . . . . . . . . . 81
Syntax . . . . . . . . . . . . . . . . . . . . . . . . . . . . . . . . . . . . . . . . . . . . . . . . . . . . . . . . . . . . . . . . . . . . . . . . . . . . . . . . 81
Examples . . . . . . . . . . . . . . . . . . . . . . . . . . . . . . . . . . . . . . . . . . . . . . . . . . . . . . . . . . . . . . . . . . . . . . . . . . . . . . 82
Chapter 11 Pretty Print CRL Tool . . . . . . . . . . . . . . . . . . . . . . . . . . . . . . . . . . . . . . . . . . . . . . . 85
Location . . . . . . . . . . . . . . . . . . . . . . . . . . . . . . . . . . . . . . . . . . . . . . . . . . . . . . . . . . . . . . . . . . . . . . . . . . . . . . . 85
Syntax . . . . . . . . . . . . . . . . . . . . . . . . . . . . . . . . . . . . . . . . . . . . . . . . . . . . . . . . . . . . . . . . . . . . . . . . . . . . . . . . 85
Example . . . . . . . . . . . . . . . . . . . . . . . . . . . . . . . . . . . . . . . . . . . . . . . . . . . . . . . . . . . . . . . . . . . . . . . . . . . . . . . 86
Index . . . . . . . . . . . . . . . . . . . . . . . . . . . . . . . . . . . . . . . . . . . . . . . . . . . . . . . . . . . . . . . . . . . . . . . . 89
5
Page 6

6 Netscape Certificate Management System Command-Line Tools Guide • February 2003
Page 7

About This Guide
The Command-Line Tools Guide describes various command-line tools or utilities
that are bundled with Netscape Certificate Management System (CMS). It provides
the information such as the command syntax, platform support, examples, and so
on, required to use these tools.
This preface has the following sections:
• Who Should Read This Gui de
• What You Should Know
• What’s in This Guide
• Conventions Used in This Guide
• Documentation
Who Should Read This Guide
This guide is intended for experienced system administrators who are planning to
deploy Certificate Management System. CMS agents should refer to CMS Agent’s
Guide for information on how to perform agent tasks, such as handling certificate
requests and revoking certificates.
What You Should Know
This guide assumes th at you
• Are familiar with the basic concepts of public-key cryptography and the Secure
Sockets Layer (SSL) protocol.
7
Page 8

What’s in This Guide
❍ SSL cipher suites
❍ The purpose of and major steps in the SSL handshake
• Understand the concepts of intranet, extranet, and the Internet security and the
role of digital certificates in a secure enterprise. These include the following
topics:
❍ Encryption and decryption
❍ Public keys, private keys, and symmetric keys
❍ Significance of key lengths
❍ Digital signatures
❍ Digital certificates, including vario us types of digital certificates
❍ The role of digital certificates in a public-key infrastruct ure (PKI)
❍ Certificate hierarchies
If you are new to these concepts, we recommend that you read the
security-related appendixes of the accompanying manual, Managing Servers
with Netscape Console.
What’s in This Guide
This guide contains the following topics:
Chapter 1 “Command-Line
Tools”
Chapter 2 “CMS Upgrade
Utility”
Chapter 3 “Password Cache
Utility”
Chapter 4 “AuditVerify” Describes how to use the tool used to verify
8 Netscape Certificate Management System Command-Line Tools Guide • February 2003
Provides an overview of the command-line tools
provided with Certificate Management System,
including the ones that are not covered in this
documentation.
Describes how to use the utility to upgrade fro m
a previous release of Certificate Management
System.
Describes how to use the tool for managing the
single sign-on passw ord cache.
signed audit logs.
Page 9

Conventions Used in This Guide
Chapter 5 “PIN Generator
Tool”
Chapter 6 “Extension Joiner
Tool”
Chapter 7 “Backing Up and
Restoring Data”
Chapter 8 “ASCII to Binary
Tool”
Chapter 9 “Binary to ASCII
Tool”
Chapter 10 “Pretty Print
Certificate Tool”
Chapter 11 “Pretty Print
CRL Tool”
Describes how to use the tool for generating
unique PINs for your users and for populating
their directory entries with PINs.
Describes how to use the tool for joining
MIME-64 encoded formats of certificate
extensions to create a single blob.
Describes how to use the tools for backing up,
signing, verifying, and restoring dat a to a CMS
instance.
Describes how to use the tool for converting
ASCII data to its binary equivalent.
Describes how to use the tool for converting
binary data to its ASCII equivalent.
Describes how to use the tool for
viewing the contents of a certificate stored as ASCII
base-64 encoded data in a human-readable form.
printing or
Describes how to use the tool for printing or
viewing the contents of a CRL stored as ASCII base-6 4
encoded data in a human-readab le form .
Conventions Used in This Guide
The following conventions are used in this guide:
Monospaced font
Italic Italic type is used for emphasis, book titles, and
Boldface Boldface type is used for various UI components such
This typeface is used for any text that appears on the
computer screen or text that you should type. It’s also
used for filenames, functions, and examples.
Example:
Server Root is the directory where the CMS
binaries are kept.
glossary terms.
Example: This control depends on the access
permissions the supe r administrator has set up f or you.
as captions and field names, and the terminology
explained in the glossary.
About This Guide 9
Page 10

Conventions Used in This Guide
Example:
Rotation frequency. From the drop-down list, select the
interval at which the server should rotate the active
error log file. The available choices are Hourly, Daily,
Weekly, Monthly, and Yearly. The default selecti on is
Monthly.
Monospaced []
Monospaced <>
/
Square brackets enclose commands that are optional.
Example:
PrettyPrintCert <input_file> [<output_file>]
<input_file>
specifies the path to the file that contains
the base-64 encoded certificate.
<output_file> specifies the path to the file to write the
certificate. This argument is optional; if you don’t
specify an output file, the certificate information is
written to the standard output.
Angle brackets enclose variables or placeholders. When
following examples, replace the angle brackets and
their text with text that applies to your situation. For
example, when path names appear in angle brackets,
substitute the path names used on your computer.
Example: Using Netscape Communicato r 4.7 or later,
enter the URL for the Netscape Administration Server:
http://<hostname>:<port_number>
A slash is used to separate directories in a path.
Notes and Cautions:
NOTE A note alerts you to information that may be of interest to you.
CAUTION A caution signals a pote ntial risk of losing data, damaging software
or hardware, or otherwise disrupting system performance.
10 Netscape Certificate Management System Command-Line Tools Guide • February 2003
Example: Except for the Security Module Database
Tool, you can find all the other command-line utilities
at this location:
<server_root>/bin/cert/tools
Page 11

Documentation
All documentation is insta lled with the product and can be accessed from the help
system. Further, the documentation can also be accessed from the installed product
in the following directory:
<server_root>/manual/en/
The documentation set for CMS includes the following:
Managing Servers with Netscap e Console
Provides background informa tion on basic cryptography concepts and the role of
Netscape Console.
CMS Administrator’s Guide
Describes how to plan for, install, and administer CMS.
CMS Command-Line Tools Guide (this guide)
Provides detailed reference information on CMS tools.
Documentation
CMS Customization Guide
Provides detailed reference information on customizing the HTML-based agent
and end-entity interfaces.
CMS Agent’s Guide
Provides detailed reference information on CMS agent interfaces. To access this
information from the Agent Services pages, click any help button.
About This Guide 11
Page 12

Documentation
12 Netscape Certificate Management System Command-Line Tools Guide • February 2003
Page 13

Chapter 1
Command-Line Tools
Netscape Certificate Management System (CMS) is bund led with various
command-line utilities. This chapter sum marizes these utilities and provides
pointers to chapters that further explain them.
Table 1-1 summarizes the comma nd-line utilities that are bundled with Certificate
Management Syst em .
Table 1-1 Summary of command-line utilities
Utility/Tool Function
Batch/Shell Scripts located under <server_root>/bin/cert/tools/ (requires
<server_root>/bin/cert/jre/bin/java): :
AtoB
(ASCII to Binary Tool)
AuditVerify
(Signed Audit Verification Tool)
BtoA
(Binary to ASCII Tool)
CMCEnroll
(CMC Enrollment Utility)
CMCRevoke
(CMC Revocation Utility)
CRMFPopClient
(CRMF Pop Request Tool)
Converts ASCII ba se-64 encoded data to binary base-64 enc oded
data. For details, see Chapter 8, “ASCII to Binary Tool.”
A command line utility utilized to verify signatures in signed
audit log files. For details, see Chapter 4, “AuditVerify.”
Converts binary base-64 encoded data to ASCII base-64 encoded
data. For details, see Chapter 9, “Binary to ASCII Tool.”
A command line utility used to sign a certificate enrollment
request with an agent's certificate. For details, see the CMC Enroll
Utility in the Administrator's Guide.
A command line utility used to sign a revocation request with an
agent's certificate. For details, see the CMC Revoke Utility in the
Administrator's Gui de.
A command line utility used to generate CRMF requests with
proof of possession (POP).
13
Page 14

Table 1-1 Summary of command-line utilities (Continued)
Utility/Tool Function
ExtJoiner (Extension Joiner Tool) A command line utility utilized to join a sequence of extensions
together so that the final output can be used in the configuration
wizard for specifying extra extensions in default certificates (i. e. CA certificate, SSL certificate). For details, see Chapter 6,
“Extension Joiner Tool.”
GenExtKeyUsage (Key Usage
Extension Tool)
GenIssuerAltNameExt (Issuer
Alternative Name Extens ion Tool)
GenSubjectAltNameExt (Subject
Alternative Name Extens ion Tool)
PasswordCache
(Password Cache Utility)
A command line utility utilized to generate a DER-encoded
Extended Key Usage extension. The first parameter is the
criticality of the extension, true or false. The OIDs to be included
in the extension are passed as command-line arguments. The
OIDs are described in RFC 2459. For example, the OID for code
signing is 1.3.6.1.5.5.7.3.3.
A command line utility utilized to generate an issuer alternative
name extension in base-64 encoding. The encoding output can be
used with the configuration wizard, using parameter pairs where
the first parameter specifies the general type from among
"DNSName", "EDIPartyName", "IPAddressName", "URIName",
"RFC822Name", "OIDName", or "X500Name", and the second
parameter specifies a general name for this type.
A command line utility utilized to generate a subject alternative
name extension in base-64 encoding. The encoding output can be
used with the configuration wizard, using parameter pairs where
the first parameter specifies the general type from among
"DNSName", "EDIPartyName", "IPAddressName", "URIName",
"RFC822Name", "OIDName", or "X500Name", and the second
parameter specifies a general name for this type.
Manipulates the contents of the single sign-on password cache.
For details, see Chapter 3, “Password Cache Utility.”
PQGGen (PQG Generation Tool) A com mand lin e u til ity util ized to generate the P, Q, an d G va lues
PrettyPrintCert
(Pretty Print Certificate Tool)
PrettyPrintCrl
(Pretty Print CRL Tool)
Executable tools located under <server_root>/bin/cert/tools:
14 Netscape Certificate Management System Command-Line Tools Guide • February 2003
required by the DSA algorithm. See RFC 2459, section 7.3.3: DSA
Signature Keys for more information.
Prints the contents of a certificate stored as ASCII base-64 e ncoded
data in a human-readable form. For details, see Chapter 10,
“Pretty Print Certificate Tool.”
Prints the contents of a CRL stored as ASCII base-64 e ncoded data
in a human-readable form. For details, see Chapter 11, “Pretty
Print CRL Tool.”
Page 15

Table 1-1 Summary of command-line utilities (Continued)
Utility/Tool Function
bulkissuance
(Bulk Issuance Tool)
certutil
(Certificate and Key Database Tool)
A command line utility utilized to send either a KEYGEN or
CRMF enrollment request to the bulk issuance interface for the
automatic creation of certificates.
View and manipulate th e certificat e database (cert8.db) and key
database (key3.db) contents. For details, check the
http://www.mozilla.org/projects/security/pki/nss
/tools/. site.
cmsutil
(Cryptographic Message Syntax tool)
A command line tool used to perform basic Cryptographic
Message Syntax operations related to encrypting, decrypting, and
signing messages using S/MIME. For details, check the
http://www.mozilla.org/projects/security/pki/nss
/tools/. site.
crlutil
(Certificate Revocation List utility)
pk12util
(PKCS #12 utility)
A command line tool used to manage CRLs within the certificate
database.
A command line tool used to import and export keys and
certificates between the cert/key databases and files in PKCS #12
format. For details, check the
http://www.mozilla.org/projects/security/pki/nss
/tools/. site.
revoker (automation utility) A command line tool which may be conveniently utilized to
automate user management scripts used to revoke certif icates.
setpin
(PIN Generator tool)
Generates PINs for end users for dire ctory- and PIN-based
authentication. For details, se e Chapter 5, “PIN Generator Tool.”
This tool utilizes a configuration file called "setpin.conf".
signtool
(Netscape Signing Tool)
Digitally signs any file, including log files. For details, check the
http://www.mozilla.org/projects/security/pki/nss
/tools/. site.
signver
(Netscape Signature Verification Tool)
A command line tool used to create digitally-signed jar archives
containing files and/or code. For details, check the
http://www.mozilla.org/projects/security/pki/nss
/tools/. site.
ssltap
(SSL Debugging Tool)
Used to debug SSL applications. For details, check the
http://www.mozilla.org/projects/security/pki/nss
/tools/. site.
Batch/Shell Scripts located under <server_root>/bin/cert/upgrade/ (requires
<server_root>/bin/cert/jre/bin/java):
Chapter 1 Command-Line Tools 15
Page 16

Table 1-1 Summary of command-line utilities (Continued)
Utility/Tool Function
Upgrade Utility
(Upgrade an old CMS vers ion to CMS
6.1)
Upgrades from a CMS 4.2, CMS 4.2 (SP 2), 4.5, or 6.0 instance to a
CMS 6.1 instance. For details, see Chapter 2, “CMS Upgrade
Utility.”
Batch/Shell Scripts located under <server_root>/cert-<instance> (requires <server_root>/install/perl):
cmsbackup
(Backup a CMS instance)
Copies all of the pertinent data and configuration files for a CMS
instance, the local Administration Server, and local Netscape
Directory Servers that the instance uses int o a compressed archive.
For details, see Chapter 7, “Backing Up and Restoring Data.” This
tool utilizes two Perl support scripts located in
<server_root>/bin/ cer t/t ools called "CMSBackup.pl" and
"CMSCommon.pl".
cmsrestore
(Restore a backed-up CMS
instance)
Opens a named archive, extracts the da ta, and uses it to rest ore th e
configuration of a CMS instance. For details, see Chapter 7,
“Backing Up and Restoring Data.”This tool utilizes two Perl
support scripts located in <server_root>/bin/cert/tools called
"CMSCommon.pl" and "CMSRestore.pl".
Common Criteria Batch/Shell Scripts and executable tools located under <server_root>/bin/cert/tools:
cmssuid (execute
setuid/setgid program tool)
A command line utility existing ONLY on Solaris platform
versions of the CMS server used to launch processes as
setuid/setgid scripts. T his pro gra m is int ended for use with CMS
when it must be set up as a Common Criteria Target of Evaluation.
This tool utilizes a configuration file called "/etc/cmssuid.cfg", a
sample of which is included in the <server_root>/bin/cert/t ools
directory.
toecrle.sh (ld.config Bourne
shell script)
toperms.sh (permissions
Bourne shell script)
Executable tools located under <server_root>/shared/bin:
modutil
(Security Module Database Tool)
Third-party executable tools located under <server_root>/bin/cert/tools:
16 Netscape Certificate Management System Command-Line Tools Guide • February 2003
A Bourne shell script existing ONLY on Solaris platform versions
of the CMS server used to configure the "/var/ld/ld.config"
database. This scri pt is intend ed for use with CMS when it must be
set up as a Common Criteria Target of Evaluation.
A Bourne shell script existing ONLY on Solaris platform versions
of the CMS server used to set permissions on various files and
directories. This script is inte nded for use wi th CMS wh en it must
be set up as a Common Criteria Target of Evaluation.
Used for managing the PKCS #11 module information within
secmod.db files or within hardware tokens. For details, check the
http://www.mozilla.org/projects/security/pki/nss
/tools/. site.
Page 17

Table 1-1 Summary of command-line utilities (Continued)
Utility/Tool Function
dumpasn1
(Display the contents of
binary base-64 encoded data)
Third-party support tools located under <server_root>:
bin/base/jre/bin/jre
(Client JVM runtime)
bin/cert/jre/bin/jre
(Server JVM runtime)
bin/cert/tools/unzip
(Decompression utility)
bin/cert/tools/zip
(Compression utility)
Dumps the conten ts of bina ry base- 64 -enco ded dat a. Note that th e
tool is freeware that is packaged with Certificate Management
System for your convenience. For more information about this
tool, check this site:
http://www.cs.auckland.ac.nz/~pgut001/
This tool utilizes a configuration file called "dumpasn1.cfg". A
statement regarding the licensing of this executable and
configuration file is l ocated in the <server_root>/bin/cert/tools
directory in a file called "README".
Java runtime executable for Netscape Console (utilizes the Client
JVM).
Java runtime executable for Certificate Management System
(utilizes the Server JVM).
Decompression utility executable. The third-party license for this
utility is contained in the <server_root>/bin/cert/tools directory
in a file called "infozip_license".
Compression utility executable. The third-party license for this
utility is contained in the <server_root>/bin/cert/tools directory
in a file called "infozip_license".
install/perl
(Perl scripting language)
The Certificate Database Tool (certutil), Netscape Signing Tool (signtool),
Netscape Signature Verification Tool (signver), PKCS # 12 Utility (pk12util),
Cryptographic Message Syntax Tool (cmsutil), SSL Debugging Tool (
Security Database Tool (
tools. The remaining tools are either CMS-specific tools o r Third-party support
tools.
• The
AtoB, BtoA, PrettyPrintCert, PrettyPrintCrl, and dumpasn1 tools are
useful for converting back and forth between various encodings and form ats
you may encounter when dealin g with keys and certificates.
• The Password Cache Utility can be used to manipulate the contents of an
existing single sign-on password cache and to create a new cache.
• The PIN Generator tool is used to create PINs for directory authentication.
perl scripting language executable.
ssltap), and
modutil) are a part of Network Security Services (NSS)
Chapter 1 Command-Line Tools 17
Page 18

• The Certificate and Key Database Tool and Security Module Database Tool are
useful for a variety of administrative tasks that involve manipulating certificate
and key databases.
• The Netscape Signing Tool can be used to associate a digital signature with any
file, including CMS log files.
• The SSL Debugging Tool is useful for testing and debugging purposes.
If you find any problems with NSS tools, you may obtain the source code and build
instructions for the very latest version of these tools (and/or potentially a binary
image for the newer tool) at the following URL:
http://www.mozilla.org/projects/security/pki/nss/tools/index.html
If you’re familiar with older versions of NSS tools, no tice that all Key Database
Tool functions have now been incorporated into the single tool, Certificate
Database Tool, and that several of the command-line options for many of the tools
may have changed. Be sure to check back often to obtain the very la test version of
the desired security tool, as this site is updated often.
18 Netscape Certificate Management System Command-Line Tools Guide • February 2003
Page 19

Chapter 2
CMS Upgrade Utility
If you have a previous installation of Netscape Certificate Management System
(Certificate Management System) , you ca n use the CMS Upgrade utility for
upgrading to Certificate Management System, version 6.1. The utility enables you
to upgrade from the following releases of Certificate M anagement System (CMS)
to the CMS 6.1 release:
• CMS 4.2
• CMS 4.2 (SP 1)
• CMS 4.2 (SP 1a)
• CMS 4.2 (SP 2)
• CMS 4.5
• CMS 6.0
• CMS 6.01
NOTE: Always perform the steps in the upgrade procedure for each and every
instance to be migrated!
There are three phases to upgrading from a previous CMS instance. This chapter
explains these phases in the following sections:
•“Before Upgrading,” on page 20
•“Upgrading,” on page 20
•“After Upgrading,” on page 31
19
Page 20

Before Upgrading
Before Upgrading
Before upgrading from a CMS 4.2, 4.2 (SP 1), 4.2 (SP 1a), 4.2 (SP 2), 4.5, or 6.0
instance to a CMS 6.1 instance, you mus t complete the following tasks:
• Backing Up Your Previous CMS Instance
Backing Up Your Previous CMS Instance
You must backup your existing CMS 4.2, 4.2 (SP 1), 4.2 (SP 1a), 4.2 (SP 2), 4.5, or 6.0
instance before you can upgrade to CMS 6.1.
• For instru ctions to back up a CMS 4.2, 4.2 (SP 1), 4.2 (SP 1a), 4.2 (SP 2), or 4.5
instance, check the CMS Command-Line Tools Guide that was provided with the
product; open the
You can also find the CMS 4.5 documentation at this site:
http://enterprise.netscape.com/docs/cms/index.html
• For instructions to back up a CMS 6.0 instance, see Chapter 7, “Backing Up and
Restoring Data.”
<server_root>/manual/en/cert/tools/backup.htm file.
Upgrading
This section provides instructions for migrating to CMS 6.1 from earlier versions.
1. Install and Con figure CMS 6.1
2.
3. Copy the key (cert7.db, key3.db) into CMS 6.1's alias directory. To do this,
The migration tools are available in the following directory:
<61_server_root>/bin/cert/upgrade
Stop the CMS 6.1 instance. To stop the instance do the following:
a. Go to th e following directory :
<61_server_root>/cert-<instance>
Execute the following command:
b.
stop-cert
follow these steps:
a. Go to th e following directory :
<old_server_root>
20 Netscape Certificate Management System Command-Line Tools Guide • February 2003
Page 21

Upgrading
b. What you do next depends on which version you are converting. Follow
the steps below that apply to the version you are converting:
For migrating from CMS 4.2/CMS 4.2 (SP 1) or CMS 4.2 (SP 1a):
i. Remove the following file from the new server:
<61_server_root>/alias/cert-<instance>-<hostname>-cert8.d
b
ii.
Copy the following filefrom the old server:
<old_server_root>/cert-<instance>/config/cert7.db
to the following location in the new server:
<61_server_root>/alias/cert-<instance>-<hostname>-cert7.d
b
iii. Copy the following file from the older server:
<old_server_root>/cert-<instance>/config/key3.db
to the following location in the new server:
<61_server_root>/alias/cert-<instance>-<hostname>-key3.db
(overwrite this file)
iv. Copy the following file from the older server:
<old_server_root>/admin-serv/config/secmodule.db
to the following location in the new server:
<61_server_root>/alias/secmod.db
(overwrite this file)
For migrating from CMS 4.2 (SP 2) or CM S 4.5:
i. Remove the following file from the new server:
<61_server_root>/alias/cert-<instance>-<hostname>-cert8.d
b
ii.
Copy the following file from the older server:
<old_server_root>/cert-<instance>/config/cert7.db
to the following location in the new server:
<61_server_root>/alias/cert-<instance>-<hostname>-cert7.d
b
Copy the following file from the older server:
iii.
<old_server_root>/cert-<instance>/config/key3.db
to the following location in the new server:
<61_server_root>/alias/cert-<instance>-<hostname>-key3.db
(overwrite this file)
Chapter 2 CMS Upgrade Utility 21
Page 22

Upgrading
iv. Copy the following file from the older server:
<old_server_root>/admin-serv/config/secmod.db
to the following location in th e new server:
<61_server_root>/alias/secmod.db (overwrite this file)
For migrating from CMS 6.0 or CMS 6.01:
i. Remove the following file from the new server:
<61_server_root>/alias/cert-<instance>-<hostname>-cert8.d
b
ii.
Copy the following file from the older server:
<old_server_root>/alias/cert-<instance>-<hostname>-cert7.
db
to the following location in th e new server:
<61_server_root>/alias/cert-<instance>-<hostname>-cert7.d
b
iii. Copy the following file from the older server:
<old_server_root>/alias/cert-<instance>-<hostname>-key3.d
b
to the following location in th e new server:
<61_server_root>/alias/cert-<instance>-<hostname>-key3.db
(overwrite this file)
iv. Copy the following file from the older server:
<old_server_root>/alias/secmod.db
to the following location in th e new server:
<61_server_root>/alias/secmod.db (overwrite this file)
List the content of pwcache.p 12 (CMS 4.2 / CM S 4.2 (SP 1) / CMS 4.2 (SP 1a)/
4.
CMS 4.2 (SP 2), or CMS 4.5) or pwcache.db (CMS 6.0 / CMS 6.01) in the old
instance.
Migrating from CMS 4.2 / CMS 4.2 (SP 1) / CMS 4.2 (SP 1a)/ CMS 4.2 (SP 2),
or CMS 4.5:
a. Go to th e following directory :
<old_server_root>/cert-<instance>
b. Execute the following command:
<old_server_root>/bin/cert/tools/PasswordCache <password>
list
For example:
<old_server_root>/bin/cert/tools/PasswordCache <password>
list
22 Netscape Certificate Management System Command-Line Tools Guide • February 2003
Page 23

----- Password Cache ----Internal LDAP Database : <password>
Internal Key Storage Token : <password>
Migrating from CMS 6.0 / CMS 6. 01:
a. Go to th e following directory :
<old_server_root>/cert-<instance>/config
Execute the following command:
<old_server_root>/bin/cert/tools/PasswordCache <password> -d
<alias directory> -P <prefix> list
For example:
<old_server_root>/bin/cert/tools/PasswordCache <password> -d
<old_server_root>/alias -P cert-<instance>-<hostname>- list
cert/key prefix = cert-<instance>-<hostname>path = <old_server_root>/alias
about to read password cache
----- Password Cache Content ----internal : <password>
Internal LDAP Database : <password>
Upgrading
Recreate the pwcache.db in CMS 6.1 instance. To do this:
5.
a. Go to th e following directory :
<61_server_root>/cert-<instance>/config
Remove pwcache.db (this is the original password cache file created
b.
during CMS 6.1 configuration)
Chapter 2 CMS Upgrade Utility 23
Page 24

Upgrading
c. Generate protection key.
To do this, execute the following command:
<61_server_root>/bin/cert/tools/PasswordCache <password> -d
<alias directory> -P <prefix> -c <file> rekey
For example:
<61_server_root>/bin/cert/tools/PasswordCache <password> -d
<61_server_root>/alias -P cert-<instance>-<hostname>- -c
pwcache.db rekey
The following will be output to the screen when the command is run:
cert/key prefix = cert-<instance>-<hostname>cert/key db path = <61_server_root>/alias
password cache file = pwcache.db
token name = internal
generating new key...
PWsdrCache: mToken = internal
PWsdrCache: SDR key generated
key generated successfully with key id =
OPHHNSQTY0RUGFJbcaco1g==
Save the VALUE portion of this key id in a local file,
and under variable "pwcKeyid" in CMS.cfg!!
If you have not already done so,
remove the old pwcache.db and use this local file to add
passwords.
d.
Save the value portion of the key id into a local file such as key.txt
e. Save the value portion of the key id into the CMS.cfg file under the variable
"pwcKeyid"
Execute the following command:
touch pwcache.db
(This will recreate an empty file)
24 Netscape Certificate Management System Command-Line Tools Guide • February 2003
Page 25

Upgrading
f. Add password tags and their associated passwords (from step 4.) back to
the cache (You may need to do this mutiple times). Do this by executing
the following command:
<61_server_root>/bin/cert/tools/PasswordCache <password> -d
<alias directory> -P <prefix> -c <file> -k <key file> add
<tag> <associated_tag_password>
For example:
<61_server_root>/bin/cert/tools/PasswordCache <password> -d
<61_server_root>/alias -P cert-<instance>-<hostname>- -c
pwcache.db -k key.txt add "Internal LDAP Database"
<associated_tag_password>
The following output will appear on the screen:
cert/key prefix = cert-<instance>-<hostname>cert/key db path = <61_server_root>/alias
password cache file = pwcache.db
token name = internal
PWsdrCache: mToken = internal
adding Internal LDAP Database:<associated_tag_password>
PWsdrCache: in addEntry
about to read password cache
PWsdrCache: after readPWcache()
adding new tag: Internal LDAP Database
operation completed for pwcache.db
<61_server_root>/bin/cert/tools/PasswordCache <password>
-d <61_server_root>/alias
-P cert-<instance>-<hostname>-
-c pwcache.db
-k key.txt add "Internal Key Storage Token"
<associated_tag_password>
cert/key prefix = cert-<instance>-<hostname>cert/key db path = <61_server_root>/alias
Chapter 2 CMS Upgrade Utility 25
Page 26

Upgrading
password cache file = pwcache.db
token name = internal
PWsdrCache: mToken = internal
adding Internal Key Storage Token:<associated_tag_password>
PWsdrCache: in addEntry
about to read password cache
PWsdrCache: after readPWcache()
adding new tag: Internal Key Storage Token
operation completed for pwcache.db
g.
Confirm everything is OK. Execute the following command:
<61_server_root>/bin/cert/tools/PasswordCache <password> -d
<alias directory> -P <prefix> -c <file> list
For example:
<61_server_root>/bin/cert/tools/PasswordCache <password> -d
<61_server_root>/alias -P cert-<instance>-<hostname>- -c
pwcache.db list
The following is the output for this co mmand:
cert/key prefix = cert-<instance>-<hostname>cert/key db path = <61_server_root>/alias
password cache file = pwcache.db
token name = internal
PWsdrCache: mToken = internal
about to read password cache
----- Password Cache Content ----Internal Key Storage Token : <associated_tag_password>
Internal LDAP Database : <associated_tag_password>
6.
Update server.xml and CMS.cfg files for the the CMS 6.1 instance to use the
appropriate nicknames in the values of any of the parameters. Look for
nickname related parameters. To do this:
a. Go to th e following directory :
<61_server_root>/cert-<instance>/config
26 Netscape Certificate Management System Command-Line Tools Guide • February 2003
Page 27

Upgrading
b. What you do next depends on which version you are converting. Follow
the steps below that apply to the version you are converting:
Migrating from CMS 4.2 / CMS 4.2 (SP 1) / CMS 4.2 (SP 1a)
NOTE: Replace the ca.ocsp_signing.cacertnickname with the
ca.signing.cacertnickname (in CMS.cfg) since one does not exist in CMS 4.2
/ CMS 4.2 (SP 1) / CMS 4.2 (SP 1a)
For example:
servercertnickname (in server.xml)
ca.ocsp_signing.cacertnickname (in CMS.cfg)
ca.signing.cacertnickname (in CMS.cfg)
Migrating from CMS 4.2 (SP 2), CMS 4.5, or CMS 6.0 / CMS 6.01
For example:
servercertnickname (in server.xml)
ca.ocsp_signing.cacertnickname (in CMS.cfg)
ca.signing.cacertnickname (in CMS.cfg)
7.
Dump the old internal directory content into LDIF format. To do this:
a. Go to th e following directory :
<old_server_root>/slapd-<instance>-db
Execute the db2ldif command to export the internal directory content.
b.
Migrating from CMS 4.2 / CMS 4.2 (SP 1) / CMS 4.2 (SP 1a)/ CMS 4.2 (SP
2)/ CMS 4.5 use the followi ng command:
db2ldif
Migrating from CMS 6.0 / CMS 6.01 use the following command:
db2ldif -n userRoot
The LDIF file will be created in the following file:
<old_server_root>/slapd-<instance>-db/ldif
Go to the following directory:
c.
<old_server_root>/slapd-<instance>-db/ldif
Rename the ldif file old.ldif
d.
8. Dump the new internal directory content into LDIF format. To do this:
Chapter 2 CMS Upgrade Utility 27
Page 28

Upgrading
a. Go to th e following directory :
<61_server_root>/slapd-<instance>-db
b.
Execute the following db2ldif command to export the internal directory
content:
db2ldif -n userRoot
The LDIF file will be created in the following directory:
<61_server_root>/slapd-<instance>-db/ldif
c. Go to the following directory:
<61_server_root>/slapd-<instance>-db/ldif
Rename the ldif file new.ldif
d.
9. Adjust the LDIF content. To do this:
Migrating from CMS 4.2 / CMS 4.2 (SP 1) / CMS 4.2 (SP 1a)/ CMS 4.2 (SP 2),
or CMS 4.5:
a. Go to th e following directory :
<old_server_root>/slapd-<instance>-db/ldif
Delete the first 2 entries in old.ldif. They look like the following:
b.
Entry 1: <machine domain>
Entry 2: cn=ldap://:<port>,<machine domain>
For example:
Entry 1: dc=cert,dc=netscape,dc=com
Entry 2: cn=ldap://:38900,dc=cert,dc=netscape,dc=com
c. Replace the following entry with the one in new.ldif from step
8:
cn=aclResources,o=netscapeCertificateServer
Migrating from CMS 6.0 / CMS 6. 01:
a. Repl ace the followin g entry with the one in new.ldif from step 8:
cn=aclResources,o=netscapeCertificateServer
Convert old.ldif into old.txt format by running the following:
10.
a. Unset environmen t variable (JAVA_HOME=)
b. Set environment variable (SERVER_ROOT=<old_server_root>)
c. Export environment variable (export SERVER_ROOT)
28 Netscape Certificate Management System Command-Line Tools Guide • February 2003
Page 29

Upgrading
d. What you do next depends on which version you are converting. Follow
the steps below that apply to the version you are converting:
Migrating from CMS 4.2 / CMS 4.2 (SP 1) / CMS 4.2 (SP 1a)
v. Go to the following directory:
<61_server_root>/bin/cert/upgrade/42ToTxt
Execute the following command:
vi.
run.sh
<old_server_root>/slapd-<instance>-db/ldif/old.ldif >
<old_server_root>/slapd-<instance>-db/ldif/old.txt
Migrating from CMS 4.2 (SP 2)
i. Go to the following directory:
<61_server_root>/bin/cert/upgrade/42SP2ToTxt
Execute the following command:
ii.
run.sh
<old_server_root>/slapd-<instance>-db/ldif/old.ldif >
<old_server_root>/slapd-<instance>-db/ldif/old.txt
Migrating from CMS 4.5
i. Go the following directory:
<61_server_root>/bin/cert/upgrade/45ToTxt
Execute the following command:
ii.
run.sh
<old_server_root>/slapd-<instance>-db/ldif/old.ldif
><old_server_root>/slapd-<instance>-db/ldif/old.txt
Migrating from CMS 6.0 / CMS 6. 01
i. Go to the following directory:
<61_server_root>/bin/cert/upgrade/60ToTxt
ii. Execute the following command:
run.sh
<old_server_root>/slapd-<instance>-db/ldif/old.ldif >
<old_server_root>/slapd-<instance>-db/ldif/old.txt
11.
Move old.txt into CMS 6.1’s ldif directory. To do this:
Chapter 2 CMS Upgrade Utility 29
Page 30

Upgrading
a. Go to th e following directory :
<old_server_root>/slapd-<instance>-db/ldif
b. Move <old_server_root>/slapd-<instance>-db/ldif/old.txt into
<61_server_root>/slapd-<instance>-db/ldif
12.
Convert old.txt into old.ldif (6.1 format) by running:
a. Unset environmen t variable (JAVA_HOME=)
b. Set environment variable (SERVER_ROOT=<61_server_root>)
c. Export environment variable (export SERVER_ROOT)
d. Go to the following directory:
<61_server_root>/bin/cert/upgrade/TxtTo61
e. Execute the following command:
run.sh <61_server_root>/slapd-<instance>-db/ldif/old.txt >
<61_server_root>/slapd-<instance>-db/ldif/old.ldif
13. Stop internal directory instance, import old LDIF file into new instance. To do
this:
a. Go to th e following directory :
<61_server_root>/slapd-<instance>-db
b.
Execute the following command:
stop-slapd
c.
Execute the following command:
ldif2db -n userRoot -i
<61_server_root>/slapd-<instance>-db/ldif/old.ldif
d.
Execute the following command:
start-slapd
14.
Start CMS 6.1
a. Go to th e following directory :
<61_server_root>/cert-<instance>
b. Execute the following command:
start-cert
30 Netscape Certificate Management System Command-Line Tools Guide • February 2003
Page 31

After Upgrading
After upgrading to CMS 6.1, access the End-Entity Services and the Agent Services
interfaces of the new CMS 6.1 instance to ensure that everything is working
properly.
You must also log in to the CMS Console and verify that you can manage the server
via the console.
The port numbers for all these interfaces can be found in this file:
<server_root>/config/server.xml
After Upgrading
Chapter 2 CMS Upgrade Utility 31
Page 32

After Upgrading
32 Netscape Certificate Management System Command-Line Tools Guide • February 2003
Page 33

Chapter 3
Password Cache Utility
During the installation of Netscape Certificate Management System (CMS), the
installation daemon stores all the passwords required by the serve r for starting
up—such as the bind passwords used by Certificate Management System to access
and update the internal LDAP database and the LDAP directory used for
authentication or publishing—in a pa ssword cache. The cache is maintained in a
file encrypted using a symmetric key generated by the cryptographic module
wherein the key resides, and encrypted by the single sign-on password (internal
cryptographic module password) you specify during installation.
Location
The command-line utility named
contents of the password cache. You will be required to manipulate the password
cache for various reasons. For example, assume you’ve configured the Certificate
Manager to publish certificates and CRLs to an LDAP directory and have
configured it to bind to the directory with Directory Manager’s DN and password.
If the directory administrator changes the Directory Manager’s password, the
Certificate Manager will fail to bind to the directory during startup. You can
resolve this problem by modifying the corresponding bind password in the cache
using the
This chapter has the followin g sections:
•“Location,” on page 33
•“Syntax,” on page 34
•“Usage,” on page 35
The PasswordCache utility is located with the rest of the command-line tools in
this directory:
PasswordCache utility.
<server_root>/bin/cert/tools
PasswordCache enables you to manipulate the
33
Page 34

Syntax
Syntax
To run the utility, execute the following command fr om the
<server_root>/cert-<instance_id>/config directory (must be run from this
directory unless the "-c" option is used):
PasswordCache <sso_password> -d <certificate/key db directory> [-h
<token name>]
-P <certificate/key db prefix> [-c <pwcache db directory>] [-k <file
containing base-64 encoded key ID>] <command>
<sso_password>
<certificate/key db directory> specifies the path to the certificate
database (
<server_root>/alias.
<certificate/key db prefix> specifies the prefix for the certificate database
cert8.db) and key database (key3.db) files. The default prefix is in the
(
cert-<instance_id>-<hostname>- format.
<token name> refers to the label given to the attached hardware token (only
cert8.db) and key database (key3.db) files. The default path is
specifies the current single s ign-on password.
relevent when the keys resident on a hardware token). The user may be
prompted to enter the hardware token’s password for access to the hardware
token.
<pwcache db directory> specifies the path to the pwcache.db file. The
default path is the present directory.
<file containing base-64 encoded key ID> specifies the file containing
the ID to the protection key generated from a previous "rekey" command.
<command> can be any of the following:
list lists the contents of the password cache.
rekey generates a protection key and presents the base-64 encoded key ID
on the screen. The administrator should store the blob to a local file (e.g.,
keyID.txt) and replace the value of the "pwcKeyid" in the CMS.cfg file.
add <password_name> <password>
change <password_name> <password>
delete <password_name>
<password_name>
want to add to, or modify or delete from the cache; it is equivalent to the
value assigned to the
configuration file. It is essential that the
34 Netscape Certificate Management System Command-Line Tools Guide • February 2003
specifies the string (describing the password usage) you
bindPWPrompt or tokenname parameter in the CMS
<password_name> coincide with
Page 35

Usage
Usage
the names known by Certificate Management System: for example, the
internal cryptographic module is known as internal, the internal LDAP
bind password is known as Internal LDAP Database, and the LDAP
publishing bind password for the Certificate Manager is known as CA
LDAP Publishing.
<password> specifies the new password.
You can use the PasswordCache utility for the following:
• Listing the Contents of the Password Cache
• Generating a new Protection Key for the Password Cache-
• Adding a New Entry to the Password Cache
• Changing the Password of an Entry in the Password Cache
• Deleting an Entry From the Password Cache
The sections that follow explain how you can accomplish the above mentioned
tasks.
NOTE The server queries the password cache only during start up, and
hence recognizes the changes you’ve made to the cache only if you
restart the server from the command line. If you left any of th e
passwords blank, the server will prompt you to enter that during
startup and from then on stores it in the password cache.
Listing the Contents of the Password Cache
To list or view the contents of the password cache:
1. Open a command window.
2. Go to this directory: <server_root>/cert-<instance_id>/config
3. At the prompt, enter the command below, substituting the variables with
appropriate values:
Chapter 3 Password Cache Utility 35
Page 36

Usage
PasswordCache <sso_password> -d <certificate/key db directory> -P
<certificate/key db prefix> list
For example, assume your single sign-on password is mySsoPwd, the CMS
instance name is
demoCA, and the host name is cmshost. The command would
look like this:
PasswordCache mySsoPwd -d /usr/netscape/servers/alias
-P cert-demoCA-cmshost- list
Generating a new Protection Key for the
Password Cache
To generate a new protection key for the password cache:
1. Execute the following command:
<61_server_root>/bin/cert/tools/PasswordCache <password> -d
<alias directory> -P <prefix> -c <file> rekey
For example:
<61_server_root>/bin/cert/tools/PasswordCache <password> -d
<61_server_root>/alias -P cert-<instance>-<hostname>- -c
pwcache.db rekey
The following will be output to the screen when the command is run:
cert/key prefix = cert-<instance>-<hostname>cert/key db path = <61_server_root>/alias
password cache file = pwcache.db
token name = internal
generating new key...
PWsdrCache: mToken = internal
PWsdrCache: SDR key generated
key generated successfully with key id = OPHHNSQTY0RUGFJbcaco1g==
Save the VALUE portion of this key id in a local file,
and under variable "pwcKeyid" in CMS.cfg!!
If you have not already done so,
remove the old pwcache.db and use this local file to add
passwords.
36 Netscape Certificate Management System Command-Line Tools Guide • February 2003
Page 37

Usage
2. Save the value portion of the key id into a local file such as key.txt
3. Save the value portion of the key id into the CMS.cfg file under the variable
"pwcKeyid"
Adding a New Entry to the Password Cache
To add a new entry to the cache:
1. Open a command window.
2. Go to this directory: <server_root>/cert-<instance_id>/config
At the prompt, enter the command below, substituting the variables with
3.
appropriate values:
PasswordCache <sso_password> -d <certificate/key db directory>
-P <certificate/key db prefix> -k keyID.txt add <password_name>
<password>
For example, assume your single sign-on password is mySsoPwd, the CMS
instance name is
password usage is
the password is
PasswordCache mySsoPwd -d /usr/netscape/servers/alias
-P cert-demoCA-cmshost- -k keyID.txt add
myLdapPubPwd
demoCA, the host name is cmshost, the string describing the
Bind Password for LDAP Publishing Directory, and
myLdapPubPwd. The command would look like this:
“CA LDAP Publishing”
If the password name string includes spaces, be sure to enclose the string in
double quotes as indicated in the above example.
Changing the Password of an Entry in the
Password Cache
To change the password associated with an entry in the password cache:
1. Open a command window.
2. Go to this directory: <server_root>/cert-<instance_id>/config
3. At the prompt, enter the command below, substituting the variables with
appropriate values:
Chapter 3 Password Cache Utility 37
Page 38

Usage
PasswordCache <sso_password> -d <certificate/key db directory>
-P <certificate/key db prefix> -k keyID.txt change
<password_name> <password>
For example, assume your single sign-on password is mySsoPwd, the CMS
instance name is
password usage is
the new password is
PasswordCache mySsoPwd -d /usr/netscape/servers/alias
-P cert-demoCA-cmshost- -k keyID.txt change
myNewLdapPubPwd
demoCA, the host name is cmshost, the string describing the
Bind Password for LDAP Publishing Directory, and
myNewLdapPubPwd. The command would look like this:
“CA LDAP Publishing”
If the password name string includes spaces, be sure to enclose the string in
double quotes as indicated in the above example.
Deleting an Entry From the Password Cache
To delete an entry from the cache:
1. Open a command window.
2. Go to this directory: <server_root>/cert-<instance_id>/config
At the prompt, enter the command below, substituting th e variables with
3.
appropriate values:
PasswordCache <sso_password> -d <certificate/key db directory>
-P <certificate/key db prefix> delete <password_name>
For example, assume your single sign-on password is mySsoPwd, the CMS
instance name is
password usage is
demoCA, the host name is cmshost, the string describing the
Bind Password for LDAP Publishing Directory. The
command would look like this:
PasswordCache mySsoPwd -d /usr/netscape/servers/alias
-P cert-demoCA-cmshost- delete
“CA LDAP Publishing”
If the password name string includes spaces, be sure to enclose the string in
double quotes as indicated in the above example.
38 Netscape Certificate Management System Command-Line Tools Guide • February 2003
Page 39

About the AuditVerify Tool
The AuditVerify tool is used to verify that signed audit logs were signed with the
signed audit private signing key, and that the signed audit log has not been
compromised.
Auditors can verify the authenticity of signed audit logs using the AuditVerify
tool. This tool uses the public key of the signed audit log signing certificate to
verify the digital signatures embedded in a signed audit log. The tool returns
output indicating either that the sign ed audit log was successfully verified or that
the signed audit log was not successfully verified. An unsuccessful verification
warns the auditor that the signature failed to verify, indicating the log file may
have been tampered with (compromised).
Chapter 4
AuditVerify
Setting Up the Auditor’s Database
The AuditVerify tool needs access to a set of security databases containing the
signed audit log signing certif icate and its chain of issuing certificates. One of the
CA certificates in the issuance chain must be marked as trusted in the database.
The auditor should import the audit signing certificate into his/her own certificate
and key databases before running the too l. The auditor should not use the same
security databases as the CMS instance that generated the signed audit log files.
If the auditor does not have a readily accessible certificate and key database, the
auditor will have to create a set of certificate and key databases and import the
signed audit log signing certificate chain.
To create the security databases and import the certificate chain (Note: if the
auditor has a readily accessible certifica te and key database, steps 1 and 2 should
be skipped):
39
Page 40

Audit Verify Tool Syntax
1. As an auditor, create the security database directory in your file system. For
example:
mkdir dbdir
2. Use the certutil tool to create an empty set of certificate databases in the
directory you just created. For example:
certutil -d <dbdir> -N
3.
Import the CA certificate and log signing certificate into the data bases,
marking the CA certificate as trusted. The certificates can be obtained from the
CA in ASCII format.
For example:
If the CA’s certificate is in a file called
in a file called
certutil -d dbdir -A -n "CA Certificate" -t "CT,CT,CT" -a -i
cacert
certutil -d dbdir -A -n "Log Signing Certificate” -a -i
logsigncert
logsigncert, the commands would be:
Audit Verify Tool Syntax
The AuditVerify tool has the following syntax:
AuditVerify -d <dbdir> -n <signing_certificate_nickname> -a
<log_list_file> -P <cert/key_db_prefix> [-v]
where:
dbdir The directory containing the security
signing_certificate_nickname The nickname of the certificate used to sign
cacert, and the log signing certificate is
databases where you have imported the
audit log signing certificate.
the log files. The nickname will be whatever
you used when you imported the log s igning
certificate into that database.
40 Netscape Certificate Management System Command-Line Tools Guide • February 2003
Page 41

Return Values
log_list_file A text file you create containing a comma
separated list (in chronological order) of the
signed audit logs you are verifying (e.g., the
content of the log_list_file would look like
the following:
/user/server/cmsRoot/cert-ca/logs
/signedAudit/ca_cert-ca_audit,/us
er/server/cmsRoot/cert-ca/logs/si
gnedAudit/ca_cert-ca_audit.200302
27102711,/user/server/cmsRoot/cer
t-ca/logs/signedAudit/ca_cert-ca_
audit.20030226094015)
cert/key_db_prefix The prefix to prepend to the certificate and
key database filenames.
In most cases, since the auditor is using his
own personal certificate and key databases,
empty quotation marks (““) should be
specified for this argument, since no prefix
was prepended to the security database files
you created.
-v Specifies verbose output. This argument is
Return Values
When you use the AuditVerify Tool, you will receive one of the following return
values:
0 Indicates that the signed audit log has been successfully verified.
1 Indicates that th e to ol did no t su cc es sf u lly ru n to com p l e tio n.
2 Indicates that one or more invalid signatures were found when running
the tool on the specified file. This means that one or more of the logs that
you were verifying failed to verify.
Using the Audit Verify Tool
optional.
Once you have an appropriately-configured database directory, you can use the
AuditVerify tool by following these steps:
Chapter 4 AuditVerify 41
Page 42

Using th e Audit Verify Tool
1. Create a text fi le containing a comma-separated list of the files you want to
2.
3.
verify. The name of this file will be used in the AuditVerify command to
identify this file. In this example this file is called
logListFile.
For example, this file might contain the following contents:
auditlog.1213, auditlog.1214, auditlog.1215
Got to the following directory:
<server_root>/bin/cert/tools
Issue the AuditVerify command. For example:
AuditVerify -d /user/home/smith/.netscape - n auditsigningcert -a
/etc/audit/logListFile -P "" -v
42 Netscape Certificate Management System Command-Line Tools Guide • February 2003
Page 43

Chapter 5
PIN Generator Tool
For Netscape Certificate Management System (CMS) to use the authentication
plug-in modu le named
contain unique PINs for each end entity to whom you intend to issue a certificate.
To aid you in generating PINs for end-entity entries in a directory, Certificate
Management System provides a command-line tool called the PIN Generator. This
tool allows you to generate unique PINs for entries in an LDAP-compliant user
directory. The tool stores these PINs (as hashed values) in the same directory
against the corresponding user entries, and it copies the PINs to a text file, from
which you can deliver the PINs to end entities by an appropriate, secure means.
UidPwdPinDirAuth your authentication directory must
This chapter explains how to use the PIN Generator. The chapter has the following
sections:
•“Locating the PIN Generator Tool,” on page 43
•“The setpin Command,” on page 44
•“How the Tool Works,” on page 49
Locating the PIN Gener ato r Tool
You can find the PIN Generator at this lo cation:
<server_root>/bin/cert/tools/setpin.exe
43
Page 44

The setpin Command
The setpin Command
You run the PIN Generator by entering the setpin command and its arguments in
a command shell and monitoring the output in the shell window. This section gives
the syntax for the
generating PINs and storing them in your authentication directory, see section
“Setting Up Pin Based Enrollment” in Chapter 9 “Authentication” of CMS
Administrator’s Guide.
Command-Line Syntax
To set up directory for pin usage, modify setpin.conf, then run:
./setpin optfile=/bin/cert/tools/setpin.conf
Usage: ./setpin option=value ... option=value
Table 5-1
setpin command and its arguments. For in structions on
host LDAP host [required]
port LDAP port (default 389)
binddn DN to bind to directory as [required]
bindpw Password associated with above DN
filter Ldap search filter e.g. filter=(uid=*) [required]
basedn Base DN used for LDAP search
length Length of generated pins (default 6)
minlength Minimum length of generated pins (not to be used with ’length’)
maxlength Maximum length of generated pins (not to be used with ’length’)
gen Permitted chars for pin. Type ’setpin gen’ for more info
case Restrict case of pins ’case=upperonly’
objectclass Objectclass of LDAP entry to operate on (default pinPerson)
attribute Which LDAP attribute to write to (default pin)
hash H as h algo rithm used to store pin: ’none’, ’md5’ or ’sha1’ (default)
saltattribute Which attribute to use for salt (default: dn)
input File to use for restricting DN’s, or providing your own pins
44 Netscape Certificate Management System Command-Line Tools Guide • February 2003
Page 45

The setpin Command
Table 5-1
output Redirect stdout to a file
write Turn on writing to directory (ot herwise, pins will not get written)
clobber Overwrite old pins in the directory
testpingen Test pin generation mode. testpingen=count
debug Turn on debugging, or use debug=attrs for even more
optfile Read in options (one per line) from specified file
setup Switch to setup mode
pinmanager Pin Manager user to create in setup mode
pinmanagerpwd password of pin manager user in setup mode
schemachange make schema changes in setup mode
A description for each argument fo llows:
• [host=<host_name> [port=<port_number>]]
<host_name>
specifies the LDAP directory to connect to. This argu ment is
required.
<port_number> specifies the TCP/IP port to bind to; the default port number
is the default LDAP port, 389.
• ["binddn=<user_id>" bindpw=<bind_password>]
<user_id>
specifies the user ID that has read and write permission to the
LDAP directory; the PIN Generator binds to the directory as this user. This
argument is required.
<bind_password> specifies the password for the user ID that has read and
write access to the LDAP directory. If the bind password is not given at the
command line, the tool prompts for it.
• ["filter=<LDAP_search_filter>" [basedn=<LDAP_base_DN>]]
<LDAP_search_filter> Use this argument to filter those DNs in the directory
for which the tool should generate PI Ns. For information on how to specify
filters, see the information available at this URL:
http://developer.netscape.com/docs/manuals/
dirsdk/capi/search.htm
. This argument is required.
Chapter 5 PIN Generator Tool 45
Page 46

The setpin Command
<LDAP_base_DN> specifies the base DN to be utilized by the LDAP search
filter. If this argument is not specified, the filter will begin searching from the
root.
• [length=<PIN_length> | minlength=<minimum_PIN_length>
maxlength=<maximum_PIN_length>]
Use this argument to specify the exact number or a range of characters that a
PIN must contain. The PINs can be either a fixed length or generated to be
between two values (x,y) inclusive (x,y>0).
<PIN_length> specifies the exact length for the PINs. For example, if you want
PIN length to be eight characters, enter
8. PIN length must be an integer
greater than zero.
<minimum_PIN_length> specifies the minimum length for the PINs. For
example, if you want PIN length to be at least six characters, enter
<maximum_PIN_length> specifies the maximum length for the PINs. For
6.
example, if you want PIN length to be nine characters at the most, enter
• [gen=RNG-alpha | RNG-alphanum | RNG-printableascii]
9.
Use this argument to specify the type of characters for PINs. The characters in
the password can be constructed out of alphabetic char acters (
alphanumeric characters (
printableascii).
(
• [case=upperonly]
RNG-alphanum), or any printable ASCII characters
RNG-alpha),
Use this argument with the gen parameter. If you do, the case for all alphabetic
characters is fixed to uppercase only; otherwise, the case is mixed. Restricting
alphabetic characters to uppercase reduces the overall combinations for the
password space significantly.
• [objectclass=<objectclass_to_add>]
Use this argument to specify the object class, if any, the tool should add to the
authentication directory. By default it is
• [attribute=<attribute_name_for_pins>]
pinPerson.
Use this argument to specify the authentication directory attribute to which
PINs should be published. If you don’t specify an attribute, it defaults to
the new attribute added to the authentication-directory schema.
• [hash=sha1 | md5 | none]
pin,
46 Netscape Certificate Management System Command-Line Tools Guide • February 2003
Page 47

The setpin Command
Use this argument to specify the message digest algorithm the tool should use
to hash the PINs before storing them in the authenticati on directory. If you
want to store PINs as SHA-1 or MD5 hashed values in the directory, be sure to
specify an output file for storing PINs in plain text. You will need the PINs in
plain text for delivering them to end entities.
sha1 produces a 160-bit message digest. This option is used by default.
md5 produces a 128-bit message digest.
none does not hash the PINs.
• [saltattribute=<LDAP_attribute_to_use_for_salt_creation>]
Use this argument to specify the LDAP attribute the tool should use for salt
creation. If you specify an attribute, the tool integrates the corresponding value
of the attribute with each PIN, and hashes the resulting string with the hash
routine specified in the hash argument.
If you don’t specify this argument, the DN of the user is used. For details, see
“How PINs Are Stored in the Directory” on page 54.
• [input=<file_name>]
Use this argument to specify the name of the file that contains the list of DNs to
process. Using this argument is optional. If you do, the tool compares the
filtered DNs to the ones specified by the input file and generates PINs for only
those DNs that are also in the file.
• [output=<file_name>]
Use this argument to specify the absolute path to the file to which the tool
should write the PINs as it generates them; this is the file to which the tool will
capture the output.
If you don’t specify a filename, the tool will write the output to the standard
output. In any case, all the error messages will be directed to the stan dard
error.
• [write]
Use this argument to specify whether the tool should write PINs to the
directory. If specified, the tool writes PINs (as it generates) to the directory.
Otherwise, the tool does not make any changes to the directory.
For example, if you want to check PINs—that the PINs are being given to the
correct users and that they are conforming to the length and character-set
restrictions—before updating the directory, do not specify this option. You can
check the PINs before updating the directory by looking at the output file; for
details, see “Output File” on page 53.
Chapter 5 PIN Generator Tool 47
Page 48

The setpin Command
• [clobber]
Use this argument to specify whether the tool should overwrite preexisting
PINs, if any, associated with a DN (user). If specified, the tool overwrites the
existing PINs with the one it generates. Otherwise, it leaves the existing PINs
as they are.
• [testpingen=<count>]
Use this argument to test the pin-generation mode.
<count> specifies the total number (in decimal) of PINs to be generated for
testing purposes.
• [debug]
Use this argument to specify whether the tool should write debugging
information (to the standard error). If
debug=attrs is spe c ified, the t ool writes
much more information about each entry in the directory.
• [optfile]
Use this argument to specify that the too l should read in options (one per line)
from specified file; this option enables you to put all the arguments in a file,
instead of typing them on the command line.
• [setup pinmanager=<pinmanager_user>
pinmanagerpwd=<pinmanager_password>]
When placed in the ’setup’ mode, this executable allows schema modifications
to be performed to add things to the directory schema.
<pinmanager_userd> used in conjunction with setup to specify the pin
manager user that has permission to remove the PIN for the basedn specified.
<pinmanager_password> specifies the password for the pin manager user.
• [setup schemachange=<schema_change>"]
When placed in the ’setup’ mode, this executable allows schema modifications
to be performed to add things to the directory schema.
<schema_change> used in conjunction with setup to specify a schem a ch ange
on the ’pin’ attribute as specified by the ’attribute’ argument (default ’pin’),
and/or the ’pinPerson’ objectclass as specified by the ’objectclass argument
(default: pinperson).
48 Netscape Certificate Management System Command-Line Tools Guide • February 2003
Page 49

Example
The following command generates PINs for all entries that have the CN attribute (in
their distinguished name) defined in an LDAP directory named
listening at port
DirectoryManager and starts searching the directory from the node
dn=o=example.com in the directory tree. The tool overwrites the existing PINs, if
19000. The PIN Generator binds to the directory as user
any, with the new ones.
setpin host=lailing port=19000 "binddn=CN=directory manager"
bindpw=password "filter=(cn=*)" basedn=o=example.com clobber write
How the Tool Works
The Pin Generator allows you to generate PINs for user entries in an
LDAP-compliant directory and update the directory with these PINs. To run the
setpin command, you need at a minimum to specify the following:
How the Tool Works
laiking that is
• The host name (
• The bind DN (
• An LDAP filter (
host) and port number (port) of the LDAP server
binddn) and password (bindpw)
filter) for filtering out the user entries that require PINs
For example:
setpin host=laiking port=19000 "binddn=CN=Directory Manager"
bindpw=netscape "filter=(ou=employees)" basedn=o=example.com
This command, if run, will query the directory for all the entries tha t ma tch the
filter criteria, which in this case is all users belonging to an organizational unit (
called
employees. For each entry matching the filter, information is printed out to
ou)
standard error. Additionally, to the standard output or the file named in output;
see “Output File” on page 53.
You can also provide the tool with an input argument using the
input option. The
argument must be in the form of an ASCII file of pre-prepared DNs and PINs (see
Figure 5-1). Note that the input file is not a substitute for the LDAP directory
entries; the filter attribute must still be provided. If an input file is provided, the
tool updates only those filtered attributes that match the ones in the input file. For
more information about the input file, see “Input File” on page 51.
Chapter 5 PIN Generator Tool 49
Page 50
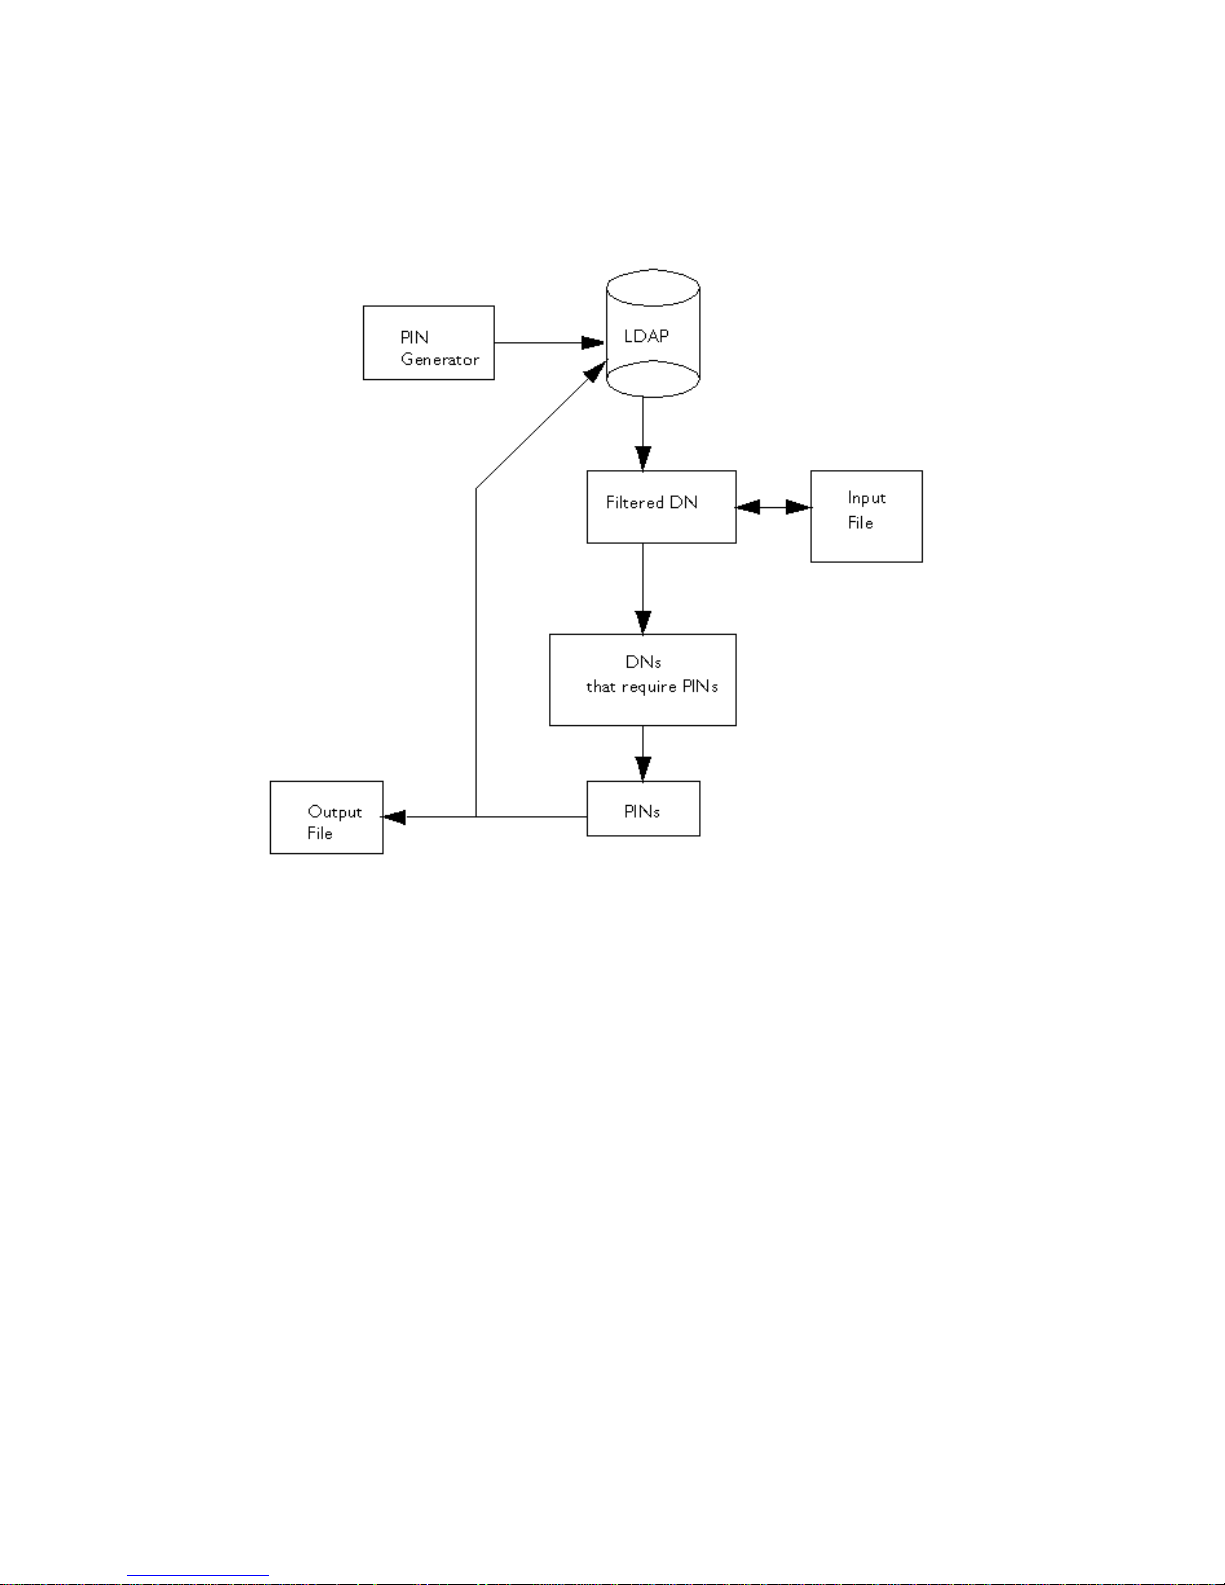
How the Tool Works
Figure 5-1 Using an input and output file for the PIN-generation process
Examples of output follow:
Processing: cn=QA Managers,ou=employees,o=example.com
Adding new pin/password
dn:cn=QA Managers,ou=employees,o=example.com
pin:lDWynV
status:notwritten
Processing: cn=PD Managers,ou=employees,o=example.com
Adding new pin/password
dn:cn=PD Managers,ou=employees,o=example.com
pin:G69uV7
status:notwritten
50 Netscape Certificate Management System Command-Line Tools Guide • February 2003
Page 51

How the Tool Works
Because the PIN Generator makes a lot of changes to your directory, it is important
that you specify the correct filter; otherwise, you may change the wrong entries. As
a safeguard , a
write option is provided that you use to enable writing to the
directory after you verify the output; the tool doesn’t make any change s to the
directory until you specify the
write option on the command line.
The output also contains the status of each entry in the directory. It can be one of
the values specified in Table 5-2.
Table 5-2 PIN Generator status
Exit code Description
notwritten Specifies that the PINs were not written to the directory, because the write
option was not specified on the command line.
writefailed Specifies that the tool made an attempt to modify the directory, but the write
operation was unsuccessful.
added Specifies that the tool added the new PIN to directory successfully.
replaced Specifies that the tool replaced an old PIN with a new one (the clobber option
was specified).
notreplaced Specifies that the tool did not replace the old PIN with a new one (the clobber
option was not specified).
If a PIN already exists for a user, it will by default not be changed if you run the
setpin command a second time. This is so that you can generate PINs for new
users without overwriting PINs for users who have previously been notified of
their PINs. If you want to overwrite a PIN, you should use the
clobber option.
Once you are sure that the filter is matching the right users, you should run the
setpin command again with the write option , and with output set to the name of
the file to capture the unhoused PINs. This output file is in the same format as the
input file. For details about the output f ile, see “Output File” on page 53.
Input File
The PIN Generator can receive a list of DNs to modify in a text file specified by the
input=<file_name> argument. If you specify an input file, the tool compares the
DNs it filtered from the LDAP directory with the ones in the input file, and updates
only those DNs that matched the ones in the input file.
Chapter 5 PIN Generator Tool 51
Page 52

How the Tool Works
The purpose of the input file is multi fold. It enables yo u to provide the Pin
Generator with an exact list of DNs to modify. Via the input file, you can also
provide the PIN Generator with PINs (in plain text format) for all DNs or for
specific DNs.
The following examples explain why you might want to use the input file:
• Assume that you have set PINs for all entries in the user directory. Two new
users joined your organization and you updated the directory with new users’
information. For the new users to get certificates, the directory must contain
PINs. And you want to set PINs for just those user entries without making
changes to any of the other user entries. Instead of constructing a complex
LDAP filter to filter out just these two entries, you can construct a general filter,
put the two users’ DNs in the input file, and run the PIN Generator.
• Assume that you want your users to use their social security numbers as PINs.
You can enter users’ social security numbers as PINs in the input file, and the
PIN Generator will store them as hashed values in the directory.
The format of the input file is the same as that of the output file (see “Output File”
on page 53), with the omission of the status line. In the input file, you can choose to
specify PINs for all the DNs in the file, for specific DNs , or for none of the DNs. If
the PIN attribute is missing for a DN, the tool automatically generates a random
PIN.
For example, you can set up your input file to look like this:
dn:cn=user1, o=example.com
<blank line>
dn:cn=user2, o=example.com
<blank line>
...
dn:cn=user3, o=example.com
You can also provide PINs, in plain-text format, for the DNs in the input file, which
is then hashed according to the command-line arguments. For example, you can set
up your input file to look like this:
dn:cn=user1, o=example.com
pin:pl229Ab
<blank line>
dn:cn=user2, o=example.com
pin:9j65dSf
<blank line>
...
52 Netscape Certificate Management System Command-Line Tools Guide • February 2003
Page 53

How the Tool Works
dn:cn=user3, o=example.com
pin:3knAg60
<blank line>
NOTE You cannot provide hashed PINs to the tool.
Output File
The PIN Generator can capture the output to a text file specified by the
output=<file_name> argument.
The captured output will contain a sequence of records and will be in the following
format:
dn: <user_dn>1
pin: <generated_pin>1
status: <status>1
<blank line>
dn: <user_dn>2
pin: <generated_pin>2
status: <status>2
<blank line>
...
dn: <user_dn>n
pin: <generated_pin>n
status: <status>n
<blank line>
where
<user_dn> is a distinguished name that matched the specified DN pattern
(specified by the DN filter) or that was in the input file (the DN file). By default, the
delimiter is "
<generated_pin> is a string of characters with either fixed or variable length,
;" or the character defined on the command line.
dependent on parameters passed into the command.
<status> is one of the values specified in Table 5-2 on page 51.
The first line in each record will always be the distinguished name. The subsequent
lines, for
pin and status, are optional. The record ends with a blank line. The end
of line (EOL) sequence is as follows:
Chapter 5 PIN Generator Tool 53
Page 54

How the Tool Works
• On Unix: \n
• On Windows NT: \r\n
How PINs Are Stored in the Directory
Each PIN is concatenated with the corresponding user's LDAP attribute named in
saltattribute argument. If this argument is not specified , the DN of the user
the
is used. Then, this string is hashed with the hash routine specified in the hash
argument (the default selection is SHA-1).
Then, one byte is prepended to indicate the hash type used. Here’s how the PIN
gets stored:
byte[0] = X
The value of X depends on the hash algorithm chosen during the PIN generation
process:
X=0 if the hash algorithm chosen is SHA-1.
X=1 if the hash algorithm chosen is MD5.
X=45 if the hash algorithm chosen is none.
byte[1...] = hash("DN"+"pin")
The PIN is stored in the directory as a binary value, not as a base-64 encoded value.
Exit Codes
The PIN Generator returns exit codes to the shell window; for a list of codes, see
Table 5-3. If you plan on automating the PIN-generation process, exit codes are
useful in programming shell scripts.
Table 5-3 Exit codes returned by the PIN Generator
Exit code Description
0 Indicates that PIN gener ation was succe ssful; that is, PINs are set for all the DNs in the
specified directory.
2 Indicates that the tool could not open the certificate da ta ba se specified by the certdb
parameter.
3 Indicates that the tool could not locate the certificate specified by the nickname
parameter in the specified certificate database.
54 Netscape Certificate Management System Command-Line Tools Guide • February 2003
Page 55

How the Tool Works
Table 5-3 Exit codes returned by the PIN Generator (Continued)
Exit code Description
4 Indicates that the tool could not bind to the directory as the user specified by the
binddn parameter (over SSL).
5 Indicates that the tool could not open the output file specified by the output
parameter.
7 Indicates an error parsing command-line arguments.
8 Indicates that the tool could not open the input file specified by the input parameter.
9 Indicates that the tool encountered an internal error.
10 Indicates that the tool found a duplicate entry in the input file specified by the input
parameter.
11 Indicates that the tool didn’t find the salt attribute, specified by the saltattribute
parameter, in the directory.
Chapter 5 PIN Generator Tool 55
Page 56

How the Tool Works
56 Netscape Certificate Management System Command-Line Tools Guide • February 2003
Page 57

Chapter 6
Extension Joiner Tool
Netscape Certificate Management System (CMS) provides many policy plug-in
modules that enable you to add standard and custom X.509 certificate extensions
to end-entity certificates the server issues. Similarly, the wizard that helps you
generate the certificates required by the Certificate Manager, Registrati on
Manager, Data Recovery Manager, and Onlin e Cert if icate Status Manager enables
you to select extensions that you want to include in the certificates. Additionally,
the wizard interface and the request-approval page of the Agent interface contains
a text area, enabling you to paste any extension in its MIME-64 encoded format.
Certificate Management System also provides tools that generate MIME-64
encoded blobs for many standard extensions. You can use these tools for
generating MIME-64 encoded blobs for any extensions that you may want to
include in CA and other certificate requests. The tools are located with the rest of
the command-line utilities in this directory:
The text field provided for pasting the extension in general accepts a single
extension blob. If you want to add multiple extensions, you should first join them
to form a single extension blob and then paste the blob into the text field.
The ExtJoiner is a program that joins a sequence of extensions together so that the
final output can be used in the wizard text field or in the request-approval page of
the Agent interface for specifying multiple extens ions.
This chapter has the followin g sections:
•“Location,” on page 58
•“Syntax,” on page 58
•“Usage,” on page 58
<server_root>/bin/cert/tools
57
Page 58

Location
Location
Syntax
Usage
The ExtJoiner program is located with the rest of the command- line tools in this
directory:
To run the ExtJoiner tool, type the following command:
java ExtJoiner <ext_file0> <ext_file1> ... <ext_fileN>
where <ext_file> specifies the path, including the file name, to files that contain
the base-64 encoded DER encoding of an X.509 extension.
<server_root>/bin/cert/tools
As discussed in the introduction of this chapter, the ExtJoiner program doesn’t
generate an extension in its MIME-64 encoded format, it only joins the extensions
that are in MIME-64 encoded format. The steps below outline how you can use the
ExtJoiner to join multiple custom extensions and add the extensions to a
certificate request.
1. Write the appropriate Java programs for the extensions.
2. Join the extensions usi ng ExtJo iner. To do this:
a. Note the file paths to the files that contain the programs for extensions.
b. Open a command window.
c. Run the ExtJoiner, substituting the appropriate file paths. For example, if
you have two extension files named
them to the same directory as the ExtJoiner, the command would look like
java ExtJoiner myExt1 myExt2
this:
You should see a base-64 encoded blob, similar to the one below, of the
joined extensions on screen:
MEwwLgYDVR0lAQHBCQwIgYFKoNFBAMGClGC5EKDM5PeXzUGBi2CVyLNCQYFU
iBakowGgYDVR0SBBMwEaQPMA0xCzAJBgNVBAYTAlVT
d.
Copy the encoded blob, without any modifications, to a file.
myExt1 and myExt2 and have copied
58 Netscape Certificate Management System Command-Line Tools Guide • February 2003
Page 59

3. Verify that th e extensions are joined correctly before adding them to a
certificate request. To do this, first you’ll need to convert the binary data to
ASCII format using the
dumping the contents of the base-64 encoded blob using the
For information on the
for the
dumpasn1 utility see, Table 1-1 on page 13.
AtoB utility and then verify the binary data by
dumpasn1 utility.
AtoB utility see, Chapter 8, “ASCII to Binary Tool” and
Here’s how you would do this verification:
a. Go to this directory: <server_root>/bin/cert/tools
b. Enter this command: AtoB <input_file> <output_file>, substituting
<input_file> with the path to the file that contains the base-64 encoded
data in ASCII format (from Step 2) and
<output_file> with the path to
the file to write the base-64 encoded data in binary format.
c. Next, enter this command: dumpasn1 <ouput_file>, substituting
<output_file> with the path to the file to that contains the base-64
encoded data in binary format. Your output should look similar to this:
0 30 76: SEQUENCE {
2 30 46: SEQUENCE {
4 06 3: OBJECT IDENTIFIER extKeyUsage (2 5 29 37)
9 01 1: BOOLEAN TRUE
12 04 36: OCTET STRING
: 30 22 06 05 2A 83 45 04 03 06 0A 51 82 E4 42 83
: 33 93 DE 5F 35 06 06 2D 82 57 22 CD 09 06 05 51
: 38 81 6A 4A
: }
50 30 26: SEQUENCE {
52 06 3: OBJECT IDENTIFIER issuerAltName (2 5 29 18)
57 04 19: OCTET STRING
: 30 11 A4 0F 30 0D 31 0B 30 09 06 03 55 04 06 13
: 02 55 53
: }
: }
Usage
0 warnings, 0 errors.
d. If the output doesn’t appear right, repeat steps 1 through 3 to get the
correct output.
4. Copy the base-64 encoded blob in step 2 (the output generated by the
ExtJoiner) to the CMS wizard screen and generate the certificate or the
certificate signing request (CSR), if submitting the request to another CA.
Chapter 6 Extension Joiner Tool 59
Page 60

Usage
60 Netscape Certificate Management System Command-Line Tools Guide • February 2003
Page 61

Chapter 7
Backing Up and Restoring Data
This chapter explains how to back up the Netscape Certificate Management System
(CMS) data and configuration information and how to use the backups to restore
data if there is a need.
The chapter has the following sections:
• Backup and Restore Tools
• Backing Up Data
• Signing Backup Data Using cmsutil
• Verifying Signed Backup Data using cmsutil
• Restoring Data
Backup and Restore Tools
Certificate Management System provides tools to backup and restore the data and
configuration for a CMS instance. These tools can be used, for example, to back up
just your CMS data before you upgrade hardware or software on a machine. You
might also use these tools as part of your overall system backup plan, perhaps to
provide more frequent checkpoints of the CMS data than a nightly disk backup
would record.
Since only CMS configuration and d ata are backed up, you will need to take other
measures to back up data for external PKCS#11 cryptographic or key storage
devices (such as smart card readers). If you rely on an external device for key
storage (for example, to store the CA signing key), make sure that its data is backed
up whenever you back up CMS data. When you restore the CMS data, it will rely
on the external keys still being available. Refer to the PKCS#11 module vendor’s
instructions for how to back up the data.
61
Page 62

Backing Up Data
The backup and restore tools are simple Perl scripts; most Perl programmers
should find no difficulty in customizing or extending them. Read this chapter to
familiarize yourself with ho w the scripts work as well as their capabilities and
limitations.
The Perl scripts that perform the backup or restore are called from shell scripts
installed in the
<server_root>/cert-<instance_id>/ directory of every CMS
instance:
cmsbackup[.bat] copies all of the pertinent data and configuration files for a
•
CMS instance, the local Administration Server, and local Netscape Directory
Servers that the instance uses into an compressed archive (a zip file). See
“Backing Up Data” on page 62 for instructions on how to use this tool.
cmsrestore[.bat] opens a named archive, extracts the data, and uses it to
•
restore the configuration of a CMS instance. You have the option to restore
everything or to select a subset of the archived data. See “Restoring Data” on
page 70 for instructions on how to use this tool.
Be aware that the backup archives contain sensitive information (for example, your
CMS key database). Protect the backup archives as carefully as you protect the
server itself. The backups are stored on a local disk by default. To avoid losing both
the current data and the backup because of a disk failure, move the backup
archives to another medium as soon as they are created. If possible, encrypt the
archives or store them on removable media in a secured location.
CMS backup data files can be optionally signed (and verified) from the
command-line utilizing a separate tool called
<server_root>/bin/cert/tools/cmsutil. For an example of signing backup
data utilizing this tool, see “Sign ing Backup Data Using cmsutil,” on page 67. For
an example of verifying signed backup d ata utilizing this tool, see “Verifying
Signed Backup Data using cmsutil,” on page 69.
Optionally, CMS backup data files can be manually encrypted using some
operating system specific utility; encrypted files must be manually decrypted using
the same operating system specific utility prior to attempting data recovery
Backing Up Data
Backing up your data is actually a very simple process. You run the script, and it
creates an archive that you store securely. This section explains what the backup
cmsbackup) does and does not do so that you can plan your overall system
tool (
maintenance and backup procedures.
62 Netscape Certificate Management System Command-Line Tools Guide • February 2003
Page 63

Backing Up Data
What the Backup Tool Does
There is a script or batch file installed in the instance directory of every CMS
instance. This file calls the Perl script
<server_root>/bin/cert/tools/CMSBackup.pl (using a Perl 5.005 interpreter
bundled with Certificate Management System).
• Creates a log file where all backup actions are logged
• Creates a temporary backup directory
• Copies CMS and non-CMS certificate and key databases and shared files
• Copies files required to configure the Netscape Console and Administration
Server
CMSBackup.pl does the following:
• Backs up the configuration Directory Server using that server’s
db2bak backup
utility (if the server is running locally)
• Backs up the CMS internal database (Directory Server) using that server’s
db2bak backup ut i lity
• Copies CMS global and local class fil e s
• Copies CMS user interface files and templates
• Copies CMS instance configuration files
• Creates a compressed archive of all files in the backup directory
The log file is in
<server_root>/cert-<instance_id>/logs/cmsbackup.log.
You should review the log file after each backup to make sure that all phases of the
backup completed successfully. If all or part of the backup f ails it is usually due to
a directory that is missing or not reada b le by the user running the backup.
The default temporary backup directory is
/var/tmp (Unix) or C:\Temp (Windows
NT). Ensure that access to this directory is restricted so that no one can intercept
backup files while the archive is being built. You can chan ge the working backup
directory by changing the value of
$backup_path_prefix in CMSBackup.pl.
The CMS database, non-CMS databases and shared files that are backed up are:
• <server_root>/alias/*
• <server_root>/shared/config/*.conf
The Administration Server files that are backed up are the following files from
<server_root>/admin-serv/config/:
•
admpw, the Administration Server password cache
Chapter 7 Backing Up and Restoring Data 63
Page 64

Backing Up Data
• *.conf, the Configuration files for the server and its associated LDAP data
The backup tool will use the Netscape Directory Server
db2bak tool to create a
backup of the CMS server instance internal database directory and the
configuration directory (if it is running locally). Check the Netscape Directory
Server documentation for full details on what this tool does. The data backed up
includes all schema and object class definitions and, of course, all entries in the
directory.
These CMS global and local cla ss f iles are Java classes for custom plug-ins used by
CMS servers. To back up this data, all files and subdirectories in the following
directories are backed up:
<server_root>/bin/cert/classes
•
• <server_root>/cert-<instance_id>/classes
The following CMS global con fi guration files, which are used for access control
and the certificate mapping, are also backed up:
<server_root>/adminacl
•
• <server_root>/httpacl
• <server_root>/userdb
The CMS user interface files and templates are the files used to create the forms end
entities and agents use to interact with CMS servers. All of these files for the
instance you are backing up are in
<server_root>/cert-<instance_id>/web-apps
•
• <server_root>/cert-<instance_id>/emails
The CMS configuration files that get backed up are in
<server_root>/cert-<instance_id>/config. The specific files and their
purposes are:
CMS.cfg, the current master configuration file for the instance.
•
•
CMS.cfg.*, previous configuration files, available for reverting to an earlier
configuration.
*.ldif, ldif-format files that describe objects in the configuration database.
•
•
pwcache.db, the server instance password cache.
64 Netscape Certificate Management System Command-Line Tools Guide • February 2003
Page 65

Backing Up Data
All of the data to be backed up is copied to the temporary backup directory. After
all of the data has been copied, the script archives the entire backup directory into a
compressed archive using
<server_root>/bin/cert/tools/zip). The script deletes the backup directory
zip (a copy of zip is installed in
once the zip archive is created.
What the Backup Tool Does Not Do
The cmsbackup script backs up only configuration and data related to a single CMS
server instance. You may need to back up other files to recover from a failure
completely, depending on the nature of the failure. For example, if some entries in
your configuration Directory Server become corrupted then the data backed up by
cmsbackup is sufficient to restore the directory to a previous state. If, however, you
suffer a catastrophic disk failure, you will probably have to reinstall or restore
Certificate Management System, Netscape Console, and Netscape Directory Server
binaries and related tools before you use
configuration.
cmsrestore to recover your previous
The following is a list of items which may be part of your overall CMS deployment,
but which are not backed up by
cmsbackup:
• Other instances of CMS servers in the same server root
Each instance has a copy of the cmsbackup script that backs up only data
related to that instance.
• External PKCS#11 module data
If you use an external PKCS#11 device for key storage, make sure you follow
the vendor’s instructions for backing up its data when ever you back up your
CMS server. It may be possible to extend the
CMSRestore.pl Perl scripts to include this data in the archives used by the
CMSBackup.pl and
CMS backup tools.
• Server binaries, libraries, and tools
These files do not change after installation, and are not backed up. To restore
these files, you can install the softw are a gain from the original media. You can
also use a more generic disk backup tool to archive the contents of all
directories beneath the server root.
Running the Backup Tool
Before you run cmsbackup, make sure that
Chapter 7 Backing Up and Restoring Data 65
Page 66

Backing Up Data
• You are logged in as a user with permission to run cmsbackup, to run db2bak
for the LDAP servers, and to write to the output directory; you may need to
become superuser on a UNIX system or Administrator on a Windows NT
system.
• There is plenty of disk space in the output directory; the size of the backup
archive will vary with the amount of data in your system, so you will learn
from experience how much space you require.
The configuration that you back up, of course, will use all of your current
passwords. You will need to remember the current passwords if you restore this
data after you change some passwords.
To run
1. Log i n to the machine where your CMS instance is running and open a
cmsbackup:
command shell.
2. Change to the CMS server instance directory in the server root. For example, if
your server root is
you want to back up is
# cd /usr/netscape/servers/cert-cmsinstance
3.
Execute the backup script: either cmsbackup on UNIX or cmsbackup.bat on
/usr/netscape/servers and the instance ID of the server
cmsinstance:
Windows NT systems. For ex ample,
# ./cmsbackup
The script will run. Control returns to the command prompt when the script has
finished.
After You Finish a Backup
Immediately after running the backup tool, you should check the log file to make
sure that all systems were archived successfully. The log file is
<server_root>/cert-<instance>/logs/cmsbackup.log
If the any part of the backup was not successful, there will be a message labeled
WARNING or ERROR that tells you why. Most of the time, the problems are the result
of directories or files that are missing or inaccessible to the user running
cmsbackup. If necessary, change the permissions on the required files, delete the
zip archive in the output directory, and run
66 Netscape Certificate Management System Command-Line Tools Guide • February 2003
cmsbackup again.
Page 67

Signing Backup Data Using cmsutil
Once you have a successful zip archive, you should secure it. The output directory
is probably accessible to any user on the system, and it may be on the same
physical disk as the server instance itself. You want to make sure the archive is not
accessible to unauthorized users and that you can use the archive if there is a
system hardware failure. Remember, the archive contains a database of private
keys. Although it is not easy to extract a key from the databas e with out the correct
passwords, you do not want anyone to have the opportunity to try.
Move the zip archive to another machine or removable medium. If possible,
encrypt the archive (do not use the private keys stored in your CMS server’s
database, since they may not be available when you need to restore the data). If you
copy the archive to removable media such as tape or CD, make sure the copy is
kept in a limited-access, locked area.
CMS backup data files can be optionally signed (and verified) from the
command-line utilizing a separate tool called
<server_root>/bin/cert/tools/cmsutil. For an example of signing backup
data utilizing this tool, see “Sign ing Backup Data Using cmsutil,” on page 67. For
an example of verifying signed backup data utilizing this tool, see “Verifying
Signed Backup Data using cmsutil,” on page 69.
Optionally, CMS backup data files can be manually encrypted using some
operating system specific utility; encrypted files must be manually decrypted using
the same operating system specific utility prior to attempting data recovery
Signing Backup Data Using cmsutil
The following provides an example of using the tool called
<server_root>/bin/cert/tools/cmsutil to sign backup data for a specific CMS
subsystem instance on a UNIX system:
1. Generating an EMAIL Signing User Certificate:
❍ Using the browser, issue a request for a user certificate.
❍ Using the browser, approve the request for this user certificate.
❍ Import this user certificate into the browser.
❍ Export this user certificate out of the browser int o a Public Key
Cryptography Standard (PKCS) #12 file.
❍ Move this file to the <server_root>/alias directory.
2. Sign the Backup Data
Chapter 7 Backing Up and Restoring Data 67
Page 68

Signing Backup Data Using cmsutil
❍ Invoke a command-line interface such as a telnet session.
❍ From the command line, assuming a Bourne Shell ("sh") on a Solaris
❍ From the command line, assuming a Bourne Shell ("sh") on a Solaris
❍ Execute the following command:
❍ Execute the following command:
system, set and export the LD_LIBRARY_PATH environment variable:
LD_LIBRARY_PATH=<server_root>/bin/cert/lib:$LD_LIBRARY_PATH
export LD_LIBRARY_PATH
system, set and export the PATH environment variable:
PATH=<server_root>/bin/cert/tools:$PATH
export PATH
cd <server_root>/alias
ln -s <server_root>/alias/cert-<instance>-<hostname>-cert8.db
cert8.db
❍ Execute the following command:
ln -s <server_root>/alias/cert-<instance>-<hostname>-key3.db
key3.db
❍ Import the EMAIL Signing user certificate and corresponding key from the
PKCS #12 file specified in step 1 above into this
cert8.db and key3.db
respectfully by executing the following com ma nd:
pk12util -i <PKCS #12 file> -d .
❍ Execute the following command:
cd /var/tmp
❍ Execute the following command:
certutil -d <server_root>alias -L to obtain the nickname of the
EMAIL Signing user certificate
68 Netscape Certificate Management System Command-Line Tools Guide • February 2003
Page 69

Verifying Signed Backup Data using cmsutil
❍ Sign the CMS backup data file by executing the following command:
cmsutil -S -N <nickname of EMAIL Signing user certificate> -T
-i /var/tmp/<CMS backup data file> -o /var/tmp/<CMS backup
data file signature file> -d <server_root>/alias -p
<password>
where the CMS backup data file signatu re file is of the form
CMS_<instance_name_minus_cert-_prefix>_BACKUP-<YYYYMMDDhhmmss
>.signature
Verifying Signed Backup Data using cmsutil
The following provides an example of using the tool called
<server_root>/bin/cert/tools/cmsutil to verify signed backup data for a
specific CMS subsystem instance on a UNIX system:
1. Verify the Backup D ata Fil e Signature
❍ Invoke a command-line interface such as a telnet session
❍ From the command line, assuming a Bourne Shell ("sh") on a Solaris
system, set and export the LD_LIBRARY_PATH environment variable:
LD_LIBRARY_PATH=<server_root>/bin/cert/lib:$LD_LIBRARY_PATH
export LD_LIBRARY_PATH
❍ From the command line, assuming a Bourne Shell ("sh") on a Solaris
system, set and export the PATH environment variable:
PATH=<server_root>/bin/cert/tools:$PATH
export PATH
❍ Execute the following command:
cd <server_root>/alias
❍ Execute the following command:
ln -s <server_root>/alias/cert-<instance>-<hostname>-cert8.db
cert8.db
❍ Execute the following command:
ln -s <server_root>/alias/cert-<instance>-<hostname>-key3.db
key3.db
Chapter 7 Backing Up and Restoring Data 69
Page 70

Restoring Data
❍ Import the EMAIL Signing user certificate and corresponding key from the
PKCS #12 file specified in “Signing Backup Da ta Using cmsutil,” on page
67 into this
cert8.db and key3.db respectfully by executing the following
command:
pk12util -i <PKCS #12 file> -d .
❍ Execute the following command:
cd /var/tmp
❍ Execute the following command:
certutil -d <server_root>alias -L to obtain the nickname of the
EMAIL Signing user certificate
❍ Verify the CMS backup data file signature by executing the following
command:
cmsutil -D -c /var/tmp/<CMS backup data file> -n -h 1 -i
/var/tmp/<CMS backup data file signature file> -d
<server_root>/alias
where the CMS backup data file signatu re file is of the form
CMS_<instance_name_minus_cert-_prefix>_BACKUP-<YYYYMMDDhhmmss
>.signature
Restoring Data
The purpose of creating back up archives, of course, is to allow you to restore a
previous state of the CMS server instance after a hardware or software failure
corrupts your current state. The restore tool allows you to recover all or part of the
configuration that was backed up. For example, you can use the tool to restore just
the internal database of a CMS server instance.
A special case, automatic restore, allows you to completely restore the
configuration from the latest backup a r chive quickly and without interaction.
70 Netscape Certificate Management System Command-Line Tools Guide • February 2003
Page 71

Restoring Data
Before You Restore Data
Before you can restore from a backup archive, the archive you want to use has to be
available on a disk accessible from the server instance directory. If you want to use
the automatic restore feature, you should put the archive in the output directory
where
UNIX).
Note the full path name to the backup archive; in the instructions later it will be
referred to as
<archive_path> might be
CMS backup data files can be optionally signed (and verified) from the
command-line utilizing a separate tool called
<server_root>/bin/cert/tools/cmsutil. If the file was signed, you might want
to use this utility to verify. For an example of signing backup data utilizing this
tool, see “Signing Backup Data Using cmsutil,” on page 67. For an example of
verifying signed backup data utilizing this tool, see “Verifying Signed Backup Data
using cmsutil,” on page 69.
cmsbackup originally created it (C:\Temp on Windows NT or /var/tmp on
<archive_path>. For example, on a UNIX system, the
/var/tmp/CMS_cmsdemo_BACKUP-19991115093827.zip.
You can use the word
the backup archive. If you use
logs/latest_backup to find the path name of the archive. This file is created by
cmsbackup and contains the name of the last archive created. Note that automatic
automatic instead of a path name to indicate the location of
automatic, the restore tool will read the file
always causes all data to be restored: you will not be able to select only a subset of
the data.
If you moved the zip archive to another machine or removable medium, copy it
back to the local file system. If you encrypted the archive, decrypt it before you try
to restore the data.
You cannot restore data to a CMS instance that has not been configured. If you
re-installed CMS prior to attempting to restore data, you must con fi gure the new
CMS instance. When you configure the new installation, keep the following points
in mind:
• All services should be running on the same network po rts as they were when
the backup archive was created. For example, the administration console port
is a random number by default; be sure to change the default to the same port
that your original installatio n used.
Chapter 7 Backing Up and Restoring Data 71
Page 72

Restoring Data
• During configuration, you still need to create new keys and certificates for any
servers that use the internal token. You only need to create these keys to
complete the configuration process. Your signi ng, SSL, or D RM transport
certificates will be restored (replacing whatever you create during the new
configuration) when you run the restore script.
The user running the restore tool will probably need superuser (UNIX) or
Administrator (Windows NT) privileges. The user running the tool will need
privileges to do the following:
• Read the backup zip archive
• Create a temporary working directory in the directory where the archive is
located
• Create directories and files in the server root and server instance directories
(for example, if the
CMS.cfg file needs to be restored)
• Run the
bak2db tool for any Netscape Directory Servers that are being restored
• (UNIX) Change file ownership of the LDAP database backup files to the
Directory Server user. The Directory Server user is defined by the
parameter in
running
slapd.conf. If the Directory Server user is different from the user
cmsrestore, the user running the tool must be able to run chown to
localuser
change the owner of the files to the LDAP server user (typically only the
superuser has this privilege).
The process of restoring data will require that some servers be stopped and
restarted. If any of your servers re quire passwords to start (for example, if they
need to unlock the key database in order to listen for SSL requests), you will be
prompted for the password. If any passwords have changed since you created the
backup archive, make sure you know the password that was valid at the time the
archive was created.
Running the Restore Tool
To run cmsrestore:
1. Log i n to the machine where the CMS instance you want to restore is installed
and open a command shell.
2. Change to the CMS server instance directory in the server root. For example, if
your server root is
you want to restore is
# cd /usr/netscape/servers/cert-cmsinstance
72 Netscape Certificate Management System Command-Line Tools Guide • February 2003
/usr/netscape/servers and the instance ID of the server
cmsinstance:
Page 73

Restoring Data
3. Execute the restore script: either cmsrestore on UNIX or cmsrestore.bat on
Windows NT systems.
You can either provide the
argument
# ./cmsrestore <archive_path> | automatic
automatic (to read the archive path from logs/latest_backup):
<archive_path> as an argument or use the
For example,
# ./cmsrestore \
/var/tmp/CMS_cmsdemo_BACKUP-19991115093827.zip
If you use automatic as the argument, the restore proceeds automatically; go
to Step 9 when
4. The script asks if you would like to perform a complete or prompted res tore.
cmsrestore completes.
Enter
❍ c (complete) to completely restore the contents of the archive without
further prompts. Proceed with Step 9 when the restore is complete.
❍ p (prompted) to have the script ask you whether you want to restore
specific parts of the archive.
5. If the configuration Directory Server is located in the same server root, the first
prompt asks if you want to restore it. The configuration Directory Server is the
directory used by the Administration Server to store information about
servers, users, and groups.
If you answer
yes, the restore tool stops the Directory Server, restores the data,
then restarts the server. You may be asked to enter a password if one is
required to start the server.
6. Next you are asked if you want to restore selected Administration Server data.
If you answer
no, no Administration Server data will be restored; proceed with
the next step.
If you answer
yes, you will be asked six more questions about specific
Administration Server data you want to restore:
a. Main admin data is data in the Administration Server’s configuration
directory.
b. Non-C MS HTTP ACLs .
c. Non-CMS admin ACLs.
d. Non-CMS user database.
Chapter 7 Backing Up and Restoring Data 73
Page 74

Restoring Data
e. Non-CMS shared data is data in the <server_root>/shared/config
directory.
f. CMS certificate and key databases are the databases in the
<server_root>/alias directory.
After you answer the questions, the Administration Server is stopped, the data
restored from the archive, and the server is started again. If necessary, you will
be prompted to enter a password to start the Administration Server.
7. Next you are asked if you want to restore the CMS internal database Directory
Server. This is the Directory Server this CMS instance uses as its internal
database.
If you answer
yes, the restore tool stops the Directory Server, restores the data,
then restarts the server. You may be asked to enter a password if one is
required to start the server.
8. Next you are asked if you want to restore selected data for this CMS server
instance.
If you answer
yes, you will be asked five more questions about the following
CMS server instance data that you can restore:
a. Gl obal CMS classes are Java classes that are shared by all CMS servers in
the same server root.
b. Critical CMS data includes the configuration files, and password cache in
config directory for this CMS instance.
the
c. Local CMS emails.
d. Local CMS classes are Java classes used only by this server instance.
e. Custom CMS UI data includes all HTML files and templates in the
web-apps and emails directory of this CMS instance.
After you answer these questions, the tool stops the CMS server, restores the
data, then restarts the server. You will be asked to enter the single sign-on
password that unlocks the password cache when the server restarts ( usee
section “Password Cache ” in Chapter 7, “Administrative Basics” of CMS
Administrator’s Guide.)
9. After the tool finishes restoring data, view the cmsrestore.log file in the
server instance
74 Netscape Certificate Management System Command-Line Tools Guide • February 2003
logs directory.
Page 75

Restoring Data
Review each step to make sure there were no errors in restoring the data. If
there were errors or warnings, you may want to run
cmsrestore again. You
may need to change permissions on some files or manually start some servers
before running
cmsrestore again.
The restore tool deletes the working directory where it unpacked the archive, but it
does not delete the archive itself. You probably will not want to keep the backup
archive on disk. Remember that the backup archive contain s sensitive informa tion.
Delete or secure the archive when you are done using it to restore data.
Chapter 7 Backing Up and Restoring Data 75
Page 76

Restoring Data
76 Netscape Certificate Management System Command-Line Tools Guide • February 2003
Page 77

Chapter 8
ASCII to Binary Tool
You can use the ASCII to Binary tool to convert ASCII base-64 encoded data to
binary base-64 encoded data.
This chapter has the followin g sections:
•“Location,” on page 77
•“Syntax,” on page 77
Location
Syntax
•“Example,” on page 78
The tool is located with the rest of the command-line tools in this directory:
<server_root>/bin/cert/tools
To run the ASCII to Binary tool, type the following co mmand:
AtoB[.bat] <input_file> <output_file>
.bat specifies the file extension; this is required only when runnin g the utility
on a Windows NT syste m.
<input_file> specifies the path to the file that contains the base-64 encoded
data in ASCII format.
<output_file> specifies the path to the file to write the base-64 encoded data
in binary format.
77
Page 78

Example
Example
AtoB.bat C:\test\data.in C:\test\data.out
The above command takes the base-64 encoded data (in ASCII format) in the file
named
data.out.
data.in and writes the binary equivalent of the data to the file named
78 Netscape Certificate Management System Command-Line Tools Guide • February 2003
Page 79

Chapter 9
Binary to ASCII Tool
You can use the Binary to ASCII tool to convert binary bas e-64 encoded data to
ASCII base-64 encoded data.
The chapter has the following sections:
•“Location,” on page 79
•“Syntax,” on page 79
Location
Syntax
•“Example,” on page 80
The tool is located with the rest of the command-line tools in this directory:
<server_root>/bin/cert/tools
To run the Binary to ASCII tool, type the following command:
BtoA[.bat] <input-file> <output_file>
.bat specifies the file extension; this is required only when runnin g the utility
on a Windows NT syste m.
<input_file> specifies the path to the file that contains the base-64 encoded
data in binary format.
<output_file> specifies the path to the file to write the base-64 encoded data
in ASCII format.
79
Page 80

Example
Example
BtoA.bat C:\test\data.in C:\test\data.out
The above command takes the base-64 encoded data (in binary format) in the file
named
data.out.
data.in and writes the ASCII equivalent of the data to the file named
80 Netscape Certificate Management System Command-Line Tools Guide • February 2003
Page 81

Chapter 10
Pretty Print Certificate Tool
You can use the Pretty Print Certificate tool to print the contents of a certificate
stored as ASCII base-64 encoded data in a human-readable form.
The chapter has the following sections:
•“Location,” on page 81
•“Syntax,” on page 81
Location
Syntax
•“Examples,” on page 82
The tool is located with the rest of the command-line tools in this directory:
<server_root>/bin/cert/tools
To run the Pretty Print Certificate tool, type the following command:
PrettyPrintCert[.bat] [options] <input_file> [<output_file>]
.bat specifies the file extension; this is required only when runnin g the utility
on a Windows NT syste m.
[options] consists of “-simpleinfo,” which prints limited certificate
information in an easy to parse forma t.
<input_file> specifies the path to the file that contains the ASCII base-64
encoded certificate.
81
Page 82

Examples
Examples
PrettyPrintCert.bat C:\test\cert.in C:\test\cert.out
The above command takes the ASCII base-64 encoded certificate in the cert.in file
and writes the certificate in the pretty-print form to the output file named
cert.out.
<output_file> specifies the path to the file to write the certificate. This
argument is optional; if you don’t specify an output file, the certificate
information is written to the s tandard output.
The base-64 encoded certificate (content of the
this:
-----BEGIN CERTIFICATE-----
MIIC2DCCAkGgAwIBAgICEAwwDQYJKoZIhvcNAQEFBQAwfDELMAkGA1UEBhMCVVMxIzA
hBgNVBAoTGlBhbG9va2FWaWxsZSBXaWRnZXRzLCBJbmMuMR0wGwYDVQQLExRXaWRnZX
QgTWFrZXJzICdSJyBVczEpMCcGA1UEAxMgVGVzdCBUZXN0IFRlc3QgVGVzdCBUZXN0I
FRlc3QgQ0EwHhcNOTkwMjE4MDMMzM5WhcNMDAwMjE4MDM0MzM5WjCBrjELMAkGA1UEB
hMCVVMxJjAkBgNVBAoTHU5ldHNjYXBlIENvbW11bmljYXRpb25zIENvcnAuMRUwEwYD
VQQLEwOZXRzY2FwZSBDTVMxGDAWBEBEwhtaGFybXNlbjEfMB0GA1UEAxWaW50ZGV2Y2
EgQWRtaW5pcwp0frfJOObeiSsia3BuifRHBNw95ZZQR9NIXr1x5bE
-----END CERTIFICATE-----
The certificate in pretty-print form (content of the cert.out file) would look
similar to this:
Certificate:
Data:
Version: v3
Serial Number: 0x100C
Signature Algorithm: OID.1.2.840.113549.1.1.5 -1.2.840.113549.1.1.5
Issuer: CN=Test CA,OU=Widget Makers ’R’Us,O=Example Corporation,
cert.in file) would look similar to
Widgets\,Inc.,C=US
Validity:
Not Before: Wednesday, February 17, 1999 7:43:39 PM
Not After: Thursday, February 17, 2000 7:43:39 PM
Subject: [email protected],CN=testCA Administrator, UID=admin,
OU=IS, O=Example Corporation,C=US
82 Netscape Certificate Management System Command-Line Tools Guide • February 2003
Page 83

Subject Public Key Info:
Algorithm: RSA - 1.2.840.113549.1.1.1
Public Key:
30:81:89:02:81:81:00:DE:26:B3:C2:9D:3F:7F:FA:DF:
24:E3:9B:7A:24:AC:89:AD:C1:BA:27:D1:1C:13:70:F7:
96:59:41:1F:4D:21:7A:F5:C7:96:C4:75:83:35:9F:49:
E4:B0:A7:5F:95:C4:09:EA:67:00:EF:BD:7C:39:92:11:
31:F2:CA:C9:16:87:B9:AD:B8:39:69:18:CE:29:81:5F:
F3:4D:97:B9:DF:B7:60:B3:00:03:16:8E:C1:F8:17:6E:
7A:D2:00:0F:7D:9B:A2:69:35:18:70:1C:7C:AE:12:2F:
0B:0F:EC:69:CD:57:6F:85:F3:3E:9D:43:64:EF:0D:5F:
EF:40:FF:A6:68:FD:DD:02:03:01:00:01:
Extensions:
Identifier: 2.16.840.1.113730.1.1
Critical: no
Value: 03:02:00:A0:
Identifier: Authority Key Identifier - 2.5.29.35
Critical: no
Key Identifier:
EB:B5:11:8F:00:9A:1A:A6:6E:52:94:A9:74:BC:65:CF:
07:89:2A:23:
Examples
Signature:
Algorithm: OID.1.2.840.113549.1.1.5 - 1.2.840.113549.1.1.5
Signature:
3E:8A:A9:9B:D1:71:EE:37:0D:1F:A0:C1:00:17:53:26:
6F:EE:28:15:20:74:F6:C5:4F:B4:E7:95:3C:A2:6A:74:
92:3C:07:A8:39:12:1B:7E:C4:C7:AE:79:C8:D8:FF:1F:
D5:48:D8:2E:DD:87:88:69:D5:3A:06:CA:CA:9C:9A:55:
DA:A9:E8:BF:36:BC:68:6D:1F:2B:1C:26:62:7C:75:27:
E2:8D:24:4A:14:9C:92:C6:F0:7A:05:A1:52:D7:CC:7D:
E0:9D:6C:D8:97:3A:9C:12:8C:25:48:7F:51:59:BE:3C:
2B:30:BF:EB:0A:45:7D:A6:49:FB:E7:BE:04:05:D6:8F:
PrettyPrintCert.bat -simpleinfo C:\test\cert.in C:\test\cert.simple
The above command takes the ASCII base-64 encoded certificate in the cert.in file
and writes simple information con tained within the certificate to the output file
named cert.simple.
The base-64 encoded certificate (content of the cert.in file) would look similar to
this:
Chapter 10 Pretty Print Certificate Tool 83
Page 84

Examples
-----BEGIN CERTIFICATE-----
MIIC2DCCAkGgAwIBAgICEAwwDQYJKoZIhvcNAQEFBQAwfDELMAkGA1UEBhMCVVMxIzA
hBgNVBAoTGlBhbG9va2FWaWxsZSBXaWRnZXRzLCBJbmMuMR0wGwYDVQQLExRXaWRnZX
QgTWFrZXJzICdSJyBVczEpMCcGA1UEAxMgVGVzdCBUZXN0IFRlc3QgVGVzdCBUZXN0I
FRlc3QgQ0EwHhcNOTkwMjE4MDMMzM5WhcNMDAwMjE4MDM0MzM5WjCBrjELMAkGA1UEB
hMCVVMxJjAkBgNVBAoTHU5ldHNjYXBlIENvbW11bmljYXRpb25zIENvcnAuMRUwEwYD
VQQLEwOZXRzY2FwZSBDTVMxGDAWBEBEwhtaGFybXNlbjEfMB0GA1UEAxWaW50ZGV2Y2
EgQWRtaW5pcwp0frfJOObeiSsia3BuifRHBNw95ZZQR9NIXr1x5bE
-----END CERTIFICATE-----
The simple certificate information (content of the cert.simple file) would look
similar to this:
[email protected]
CN=testCA Administrator
UID=admin
OU=IS
O=Example Corporation
C=US
84 Netscape Certificate Management System Command-Line Tools Guide • February 2003
Page 85

Chapter 11
Pretty Print CRL Tool
You can use the Pretty Print CRL tool to print the con tents of a CRL stored as
ASCII base-64-encoded data in a human-readable form.
The chapter has the following sections:
•“Location,” on page 85
•“Syntax,” on page 85
Location
Syntax
•“Example,” on page 86
The tool is located with the rest of the command-line tools in this directory:
<server_root>/bin/cert/tools
To run the Pretty Print CRL tool, type the following command:
PrettyPrintCrl[.bat] <input_file> [<output-file>]
.bat specifies the file extension; this is required only when runnin g the utility
on a Windows NT syste m.
<input_file> specifies the path to the file that contains the ASCII base-64
encoded CRL.
<output_file> specifies the path to the file to write the CRL. This argument is
optional; if you don’t specify an output file, the CRL information is written to
the standard output.
85
Page 86

Example
Example
PrettyPrintCrl.bat C:\test\crl.in C:\test\crl.out
The above command takes the ASCII base-64 encoded CRL in the crl.in file and
writes the CRL in the pretty-print form to the output file named
crl.out.
The base-64 encoded CRL (content of the crl.in file) would look similar to this:
-----BEGIN CRL-----
MIIBkjCBAIBATANBgkqhkiG9w0BAQQFADAsMREwDwYDVQQKEwhOZXRzY2FwZTEXMBUG
A1UEAxMOQ2VydDQwIFRlc3QgQ0EXDTk4MTIxNzIyMzcyNFowgaowIAIBExcNOTgxMjE
1MTMxODMyWjAMMAoGA1UdFQQDCgEBMCACARIXDTk4MTINTEzMjA0MlowDDAKBgNVHRU
EAwoBAjAgAgERFw05ODEyMTYxMjUxNTRaMAwwCgYDVR0VBAMKAQEwIAIBEBcNOTgxMj
E3MTAzNzI0WjAMMAoGA1UdFQQDCgEDMCACAQoXDTk4MTEyNTEzMTExOFowDDAKBgNVH
RUEAwoBATANBgkqhkiG9w0BQQFAAOBgQBCN85O0GPTnHfImYPROvoorx7HyFz2ZsuKs
VblTcemsX0NL7DtOa+MyY0pPrkXgm157JrkxEJ7GBOeogbAS6iFbmeSqPHj8+
-----END CRL-----
The CRL in pretty-print form (content of the crl.out file) would look simi lar to
this:
Certificate Revocation List:
Data:
Version: v2
Signature Algorithm: MD5withRSA - 1.2.840.113549.1.1.4
Issuer: CN=Test CA,O=Example Corporation
This Update: Thu Dec 17 14:37:24 PST 1998
Revoked Certificates:
Serial Number: 0x13
Revocation Date: Tuesday, December 15, 1998 5:18:32 AM
Extensions:
Identifier: Revocation Reason - 2.5.29.21
Critical: no
Reason: Key_Compromise
Serial Number: 0x12
Revocation Date: Tuesday, December 15, 1998 5:20:42 AM
Extensions:
Identifier: Revocation Reason - 2.5.29.21
Critical: no
Reason: CA_Compromise
86 Netscape Certificate Management System Command-Line Tools Guide • February 2003
Page 87

Serial Number: 0x11
Revocation Date: Wednesday, December 16, 1998 4:51:54 AM
Extensions:
Identifier: Revocation Reason - 2.5.29.21
Critical: no
Reason: Key_Compromise
Serial Number: 0x10
Revocation Date: Thursday, December 17, 1998 2:37:24 AM
Extensions:
Identifier: Revocation Reason - 2.5.29.21
Critical: no
Reason: Affiliation_Changed
Serial Number: 0xA
Revocation Date: Wednesday, November 25, 1998 5:11:18 AM
Extensions:
Identifier: Revocation Reason - 2.5.29.21
Critical: no
Reason: Key_Compromise
Signature:
Algorithm: MD5withRSA - 1.2.840.113549.1.1.4
Signature:
42:37:CE:4E:D0:63:D3:9C:77:C8:99:83:D1:3A:FA:28:
AF:1E:C7:C8:5C:F6:66:CB:8A:B1:56:E5:4D:C7:A6:B1:
7D:0D:2F:B0:ED:39:AF:8C:C9:8D:29:3E:B9:17:82:6D:
79:EC:9A:E4:C4:42:7B:18:13:9E:A2:06:C0:4B:A8:85:
6E:67:92:A8:F1:E3:F3:E2:41:1F:9B:2D:24:D9:DF:4C:
2B:A1:68:CE:96:C7:AF:F7:5B:F7:3D:2F:06:57:39:74:
CF:B2:FA:46:C6:AD:18:60:8D:3E:0C:F7:C1:66:52:37:
CF:89:42:B0:D7:33:C4:95:7E:F4:D9:1E:32:B8:5E:12:
Example
Chapter 11 Pretty Print CRL Tool 87
Page 88

Example
88 Netscape Certificate Management System Command-Line Tools Guide • February 2003
Page 89

Index
A
adding
new entries to the password cache 37
ASCII to Binary tool 77
example 78
location 77
syntax 77
B
Binary to ASCII to ol 79
example 80
location 79
syntax 79
C
changing
passwords in the password cache 37
command-line utilities 13
ASCII to Binary 77
Binary to ASCII 79
CMS Upgrade 19
dumpasn1 17
extension joiner 57
for adding extensions to CMS certificates 57
location 13
Password Cache tool 33
PasswordCache tool 14
PIN Generator 43
Pretty Print Cer tificate 81
Pretty Print CRL 85
some guidelines 17
summary table 13
conventions used in this book 9
D
deleting
entries from the password cache 38
documentation
conventions followed 9
dumpasn1 tool 17
E
Extensio nJoiner tool 57
extensions
tool for joining 57
tools for generating 57
Index 89
Page 90

ExtJoiner tool
example 58
location 58
syntax 58
F
fonts used in this book 9
Pretty Print Cer tificate tool 81
example 82
location 81
syntax 81
Pretty Print CRL too l 85
example 86
location 85
syntax 85
S
L
listing
contents of password cache 35
location of
command-line utilities 13
PIN Generator tool 43
P
password cache
tool for managing 33
Password Cache utility 33
adding new entries 37
changing passwords 37
deleting entries 38
listing contents 35
syntax 34
usage 35
where to find 33
PasswordCache tool 14
PIN Generator tool 43
exit codes 54
how it works 49
how PINs are stored in the directory 54
output file 53
checking the directory-entry status 51
format 53
why should you use an output file 51
overwriting existing PINs in the directory 48, 51
where to find 43
setpin command 44
T
type styles used in this book 9
U
upgrading from previous versions 19
90 Netscape Certificate Management System Command-Line Tools Guide • February 2003
 Loading...