

Page 1

Command-Line Tools Guide
Netscape Certificate Management System
Version 4.5
October 2001
Page 2

Netscape Communications Corporation (“Netscape”), a subsidiary of America Online, Inc., and its licensors retain all ownership rights to
the software programs offered by Netscape (referred to herein as “Software”) and related documentation. Use of the Software and related
documentation is governed by the license a greement accompanying the Software and applicable copyright law.
Your right to copy this documentation is limited by copyright law. Making unauthorized copies, adaptations, or compilation works is
prohibited and constitutes a punishable violation of the law. Netscape may revise this documentation from time to time without notice.
THIS DOCUMENTATION IS PROVIDED “AS IS” WITHOUT WARRANTY OF ANY KIND. IN NO EVENT SHALL NETSCAPE BE
LIABLE FOR INDIRECT, SPECIAL, INCIDENTAL, OR CONSEQUENTIAL DAMAGES OF ANY KIND ARISING FROM ANY ERROR IN
THIS DOCUM ENTATION, I NCLUDING WI THOUT LIMITATION ANY LOSS OR INTERRUPTION OF BUSINESS, PROFITS, USE, OR
DATA.
Software applications: © 2001 Sun Microsystems, Inc.
Some software code: © 1999, 2001 Netscape Communications Corporation.
All rights reserved.
Netscape and the Netscape N lo go are registered trademarks of Netscape Communications Corporation in the United States and other
countries. Other Netscape logos, product names, and service names are also trademarksof Netscape Communications Corporation, which
may be registered in other countries. Other product and brand names are the exclusive property of their respective owners.
The downloading, exporting, or reexporting of Netscape software or any underlying information or technology must be in full compliance
with all United States and other applicable laws and regulations. Any provision of Netscape software or documentation to the U.S.
Government is with restricted rights as described in the license agreement accompanying Netscape software.
Page 3

Contents
AboutThisGuide............................................................... 9
WhatYouShouldAlreadyKnow ..........................................................9
What’sinThisGuide....................................................................10
ConventionsUsedinThisGuide .........................................................11
WheretoGoforRelatedInformation......................................................13
Chapter 1 Command-LineTools................................................ 15
Chapter 2 Password Cache Utility . . . . . . . . . . . . . . . . . . . . . . . . . . . . . . . . . . . . . . . . . . . . . . 19
Location...............................................................................19
Syntax ................................................................................20
Usage .................................................................................20
ChangingtheSingleSign-OnPassword.................................................21
ListingtheContentsofthePasswordCache .............................................21
Adding a New Entry to the Password Cache . . . . . . . . . . . . . . . . . . . . . . . . . . . . . . . . . . . . . . . . . . . . 22
ChangingthePasswordofanEntryinthePasswordCache ...............................22
DeletinganEntryFromthePasswordCache ............................................23
CreatingaNewPasswordCache.......................................................24
Chapter 3 KillProcessTool ................................................... 25
Location...............................................................................25
Syntax ................................................................................25
Usage .................................................................................26
Chapter 4 PIN Generator Tool . . . . . . . . . . . . . . . . . . . . . . . . . . . . . . . . . . . . . . . . . . . . . . . . . . 27
LocatingthePINGeneratorTool .........................................................27
3
Page 4

ThesetpinCommand................................................................... 28
Command-LineSyntax ............................................................... 28
Arguments....................................................................... 28
Example ......................................................................... 32
HowtheToolWorks ................................................................... 32
InputFile........................................................................... 35
OutputFile ......................................................................... 36
HowPINsAreStoredintheDirectory ................................................. 37
ExitCodes.......................................................................... 38
Chapter 5 Extension Joiner Tool . . . . . . . . . . . . . . . . . . . . . . . . . . . . . . . . . . . . . . . . . . . . . . . 39
Location .............................................................................. 40
Syntax ................................................................................ 40
Usage.................................................................................40
Chapter 6 BackingUpandRestoringData ....................................... 43
BackupandRestoreTools ............................................................... 43
BackingUpData ....................................................................... 44
WhattheBackupToolDoes........................................................... 44
WhattheBackupToolDoesNotDo.................................................... 46
RunningtheBackupTool............................................................. 47
AfterYouFinishaBackup ............................................................ 48
RestoringData......................................................................... 49
BeforeYouRestoreData.............................................................. 49
RunningtheRestoreTool............................................................. 50
Chapter 7 ASCIItoBinaryTool................................................. 53
Availability . . . . . . . . . . . . . . . . . . . . . . . . . . . . . . . . . . . . . . . . . . . . . . . . . . . . . . . . . . . . . . . . . . . . . . . . . . . . 53
Syntax ................................................................................ 53
Example .............................................................................. 54
Chapter 8 BinarytoASCIITool................................................. 55
Availability . . . . . . . . . . . . . . . . . . . . . . . . . . . . . . . . . . . . . . . . . . . . . . . . . . . . . . . . . . . . . . . . . . . . . . . . . . . . 55
Syntax ................................................................................ 55
Example .............................................................................. 56
Chapter 9 PrettyPrintCertificateTool........................................... 57
Availability . . . . . . . . . . . . . . . . . . . . . . . . . . . . . . . . . . . . . . . . . . . . . . . . . . . . . . . . . . . . . . . . . . . . . . . . . . . . 57
Syntax ................................................................................ 57
Example .............................................................................. 58
4 Netscape Certificate Management System Command-Line Tools Guide • October 2001
Page 5

Chapter 10 PrettyPrintCRLTool............................................... 61
Availability . . . . . . . . . . . . . . . . . . . . . . . . . . . . . . . . . . . . . . . . . . . . . . . . . . . . . . . . . . . . . . . . . . . . . . . . . . . . 61
Syntax ................................................................................61
Example...............................................................................62
Chapter 11 Certificate Database Tool . . . . . . . . . . . . . . . . . . . . . . . . . . . . . . . . . . . . . . . . . . . 65
Availability . . . . . . . . . . . . . . . . . . . . . . . . . . . . . . . . . . . . . . . . . . . . . . . . . . . . . . . . . . . . . . . . . . . . . . . . . . . . 65
Syntax ................................................................................66
OptionsandArguments ..............................................................66
Usage .................................................................................70
Examples..............................................................................71
CreatingaNewCertificateDatabase ...................................................71
ListingCertificatesinaDatabase.......................................................72
CreatingaCertificateRequest .........................................................72
CreatingaCertificate .................................................................73
Adding a Certificate to the Database . . . . . . . . . . . . . . . . . . . . . . . . . . . . . . . . . . . . . . . . . . . . . . . . . . . 73
ValidatingaCertificate ...............................................................74
Chapter 12 KeyDatabaseTool ................................................. 77
Availability . . . . . . . . . . . . . . . . . . . . . . . . . . . . . . . . . . . . . . . . . . . . . . . . . . . . . . . . . . . . . . . . . . . . . . . . . . . . 77
Syntax ................................................................................78
OptionsandArguments ..............................................................78
Usage .................................................................................80
Examples..............................................................................81
CreatingaKeyDatabase..............................................................81
GeneratingaNewKey ...............................................................82
DisplayingPublicKeyInformation.....................................................83
ListingKeyIDs ......................................................................83
DeletingaPrivateKey................................................................84
Chapter 13 Netscape Signing Tool . . . . . . . . . . . . . . . . . . . . . . . . . . . . . . . . . . . . . . . . . . . . . . 85
IntroductiontoNetscapeSigningTool ....................................................85
WhatIsNetscapeSigningTool? .......................................................86
JARFormatandJARArchives.........................................................87
WhatSigningaFileMeans ............................................................88
Object-SigningCertificates ............................................................88
UsingNetscapeSigningTool.............................................................89
GettingReadytoUseNetscapeSigningTool ............................................90
SettingUpYourCertificate .........................................................90
ListingAvailableCertificates .......................................................91
SigningaFile........................................................................92
UsingNetscapeSigningToolwithaZIPUtility ..........................................93
5
Page 6

TipsandTechniques ................................................................. 93
SignToolSyntaxandOptions ............................................................ 95
CommandSyntax ................................................................... 95
CommandOptions ..................................................................95
CommandFileSyntax............................................................... 100
CommandFileKeywordsandExample ............................................... 100
GeneratingTestObject-SigningCertificates ............................................... 102
GeneratingtheKeysandCertificate................................................... 102
UsingNetscapeSigningToolwithSmartCards ........................................... 104
WhatIsaSmartCard? .............................................................. 104
SettingUpaSmartCard............................................................. 104
Usingthe-MOptiontoListSmartCards .............................................. 106
UsingNetscapeSigningToolandaSmartCardtoSignFiles ............................. 106
NetscapeSigningToolandFIPS-140-1 ................................................... 107
UsingFIPS-140Mode ............................................................... 107
VerifyingFIPSMode................................................................ 108
AnswerstoCommonQuestions......................................................... 109
Chapter 14 SSL Debugging Tool . . . . . . . . . . . . . . . . . . . . . . . . . . . . . . . . . . . . . . . . . . . . . . 113
Availability . . . . . . . . . . . . . . . . . . . . . . . . . . . . . . . . . . . . . . . . . . . . . . . . . . . . . . . . . . . . . . . . . . . . . . . . . . . 113
Description........................................................................... 113
Syntax ............................................................................... 114
Options ........................................................................... 114
Examples ............................................................................115
Example1 ......................................................................... 116
Command ...................................................................... 116
Output ......................................................................... 116
Example2 ......................................................................... 120
Command ...................................................................... 120
Output ......................................................................... 120
Example3 ......................................................................... 123
Command ...................................................................... 123
Output ......................................................................... 123
Example4 ......................................................................... 124
Command ...................................................................... 124
Output ......................................................................... 124
UsageTips ........................................................................... 125
Chapter 15 SSLStrengthTool ................................................ 127
Availability . . . . . . . . . . . . . . . . . . . . . . . . . . . . . . . . . . . . . . . . . . . . . . . . . . . . . . . . . . . . . . . . . . . . . . . . . . . 127
Syntax ............................................................................... 127
OptionsandArguments............................................................. 128
6 Netscape Certificate Management System Command-Line Tools Guide • October 2001
Page 7

Usage ................................................................................128
RestrictingCiphers..................................................................129
ExportPolicyandStep-up ...........................................................129
Examples.............................................................................130
Example1 .........................................................................130
Example2 .........................................................................131
Example3 .........................................................................131
Chapter 16 Security Module Database Tool . . . . . . . . . . . . . . . . . . . . . . . . . . . . . . . . . . . . . 133
Availability . . . . . . . . . . . . . . . . . . . . . . . . . . . . . . . . . . . . . . . . . . . . . . . . . . . . . . . . . . . . . . . . . . . . . . . . . . . 133
Syntax ...............................................................................134
OptionsandArguments .............................................................134
Usage ................................................................................137
JARInstallationFile....................................................................138
SampleScript ......................................................................138
ScriptGrammar ....................................................................139
Keys .................................................................................140
GlobalKeys ........................................................................140
Per-PlatformKeys ..................................................................142
Per-FileKeys .......................................................................143
Examples.............................................................................144
CreatingDatabaseFiles..............................................................145
DisplayingModuleInformation ......................................................145
SettingaDefaultProvider............................................................146
EnablingaSlot .....................................................................147
EnablingFIPSCompliance ...........................................................147
Adding a Cryptographic Module . . . . . . . . . . . . . . . . . . . . . . . . . . . . . . . . . . . . . . . . . . . . . . . . . . . . . 148
Installing a Cryptographic Module from a JAR File . . . . . . . . . . . . . . . . . . . . . . . . . . . . . . . . . . . . . . 148
ChangingthePasswordonaToken ...................................................150
Index ....................................................................... 151
7
Page 8

8 Netscape Certificate Management System Command-Line Tools Guide • October 2001
Page 9

About This Guide
The Command-Line Tools Guide describes various command-line tools or utilities
that are bundled with Netscape Certificate Management Sys tem (CMS). It provides
the information such as the command syntax, platform support, examples, and so
on, required to use these tools.
This preface has the following sections:
• What You Should Already Know (page 9)
• What’s in This Guide (page 10)
• Conventions Used in This Guide (page 11)
• Where to Go for Related Information (page 13)
What You Should Already Know
This guide is intended for experienced system administrators who are planning to
deploy Certificate Management System. CMS agents should refer to CMS Agent’s
Guide for information on how to perform agent tasks, such as handling certificate
requests and revoking certificates.
This guide assumes that you
• Are familiar with the basic concepts of public-key cryptography and the Secure
Sockets Layer (SSL) protocol.
❍ SSL cipher suites
❍ The purpose of and major steps in the SSL handshake
9
Page 10

What’s in This Guide
• Understand the concepts of intranet, extranet, and the Internet security and the
role of digital certificates in a secure enterprise. These include the following
topics:
❍ Encryption and decryption
❍ Public keys, private keys, and symmetric keys
❍ Significance of key lengths
❍ Digital signatures
❍ Digital certificates, including various types of digital certificates
❍ The role of digital certificates in a public-key infrastructure (PKI)
❍ Certificate hierarchies
If you are new to these concepts, we recommend that you read the
security-related appendixes ( Appendix D and Appendix E ) of the
accompanying manual, Managing Servers with Netscape Console.
• Are familiar with the role of Netscape Console in managing Netscape version
4.x servers. Otherwise, see the accompanying manual, Managing Servers with
Netscape Console.
• Are reading this guide in conjunction with the documentation listed in “Where
to Go for Related Information” on page 13.
What’s in This Guide
This guide covers the following topics:
• Chapter 1, “Command-Line Tools” Provides an overview of the command-line
tools provided with Certificate Management System, including the ones that
are not covered in this documentation.
• Chapter 2, “Password Cache Utility” Describes how to use the tool for
managing the single sign-on password cache.
• Chapter 3, “Kill Process Tool” Describes how to use the tool for terminating
CMS process if the server fails to respond to a start, restart, or stop commands.
• Chapter 4, “PIN Generator Tool” Describes how to use the tool for generating
unique PINs for your users and for populating their directory entries with
PINs.
10 Netscape Certificate Management System Command-Line Tools Guide • October 2001
Page 11

Conventions Used in This Guide
• Chapter 5, “Extension Joiner Tool” Describes how to use the tool for joining
MIME-64 encoded formats of certificate extensions to create a single blob.
• Chapter 7, “ASCII to Binary Tool” Describes how to use the tool for converting
ASCII data to its binary equivalent.
• Chapter 8, “Binary to ASCII Tool” Describes how to use the tool for converting
binary data to its ASCII equivalent.
• Chapter 9, “Pretty Print Certificate Tool” Describes how to use the tool for
printing or viewing the contents of a certificate stored as ASCII base-64 encoded data in
a human-readable form.
• Chapter 10, “Pretty Print CRL Tool” Describes how to use the tool for printing
or viewing the contents of a CRL stored as ASCII base-64 encoded data in a
human-readable form.
• Chapter 11, “Certificate Database Tool” Describes how to use the tool for
manipulating the certificate database.
• Chapter 12, “Key Database Tool” Describes how to use the tool for
manipulating the key database.
• Chapter 13, “Netscape Signing Tool” Describes how to use the tool to associate
a digital signature with any file, including CMS log files.
• Chapter 14, “SSL Debugging Tool” Describes how to use the tool for testing
and debugging purposes.
• Chapter 15, “SSL Strength Tool” Describes how to use the tool for testing and
debugging purposes.
• Chapter 16, “Security Module Database Tool” Describes the Password Cache
Utility and explains how to use it for managing the single sign-on password
cache.
Conventions Used in This Guide
This guide uses the following conventions:
The following conventions are used in this guide:
Monospaced font—Thistypefaceisusedforanytextthatappearsonthe
•
computer screen or text that you should type. It’s also used for filenames,
functions, and examples.
Example:
Server Root is the directory where the CMS binaries are kept.
About This Guide 11
Page 12

Conventions Used in This Guide
• Italic—Italic type is used for emphasis, book titles, and glossary terms.
Example: This control depends on the access permissions the superadministrator
has set up for you.
• Text within “quotation marks”—Indicates cross-references to other topics
within this guide.
Example: For more information, see “Issuing a Certificate to a New User” on
page 154.
[]—Square brackets enclose commands that are optional.
•
Example:
PrettyPrintCert <input_file> [<output_file>]
<input_file> specifies the path to the file that contains the base-64
encoded certificate.
<output_file> specifies the path to the file to write the certificate. This
argument is optional; if y ou don’t specify an output file, the certificate
information is written to the standard output.
<>—Angle brackets enclose variables or placeholders. When following
•
examples, replace the angle brackets and their text with text that applies to
your situation. For example, when path names appear in angle brackets,
substitute the path names used on your computer.
Example: Using Netscape Communicator 4.7x or later, enter the URL for the
Administration Server:
http://<hostname>:<port_number>
• /—A forward slash is used to separate directories in a path. If you use the
Windows NT operating system, you should replace / with \ in paths.
Example: Except for the Security Module Database Tool, you can find all the
other command-line utilities at this location:
<server_root>/bin/cert/tools
• Sidebar text—Sidebar text marks important information. Make sure you read
the information before continuing with a task.
Examples:
NOTE You can use Netscape Console only when Administration Server is
up and running.
CAUTION A caution note documents a potential risk of losing data, damaging
software or hardware, or otherwise disrupting system performance.
12 Netscape Certificate Management System Command-Line Tools Guide • October 2001
Page 13

Where to Go for Related Information
This section summarizes the documentation that ships with Certificate
Management System, using these conventions:
<server_root> is the directory where the CMS binaries are kept (specified
•
during installation).
<instance_id> is the ID for this instance of Certificate Management System
•
(specified during installation).
The documentation set for Certificate Management System includes the following:
• Managing Servers with Netscape Co nsole
Provides background information on basic cryptography concepts and the role
of Netscape Console.
For the HTML version, open this file:
<server_root>/manual/en/admin/help/contents.htm
Where to Go for Related Information
• CMS Installation and Setup Guid e
Describes how to plan for, install, and administer Certificate Management
System. To access the installation and configuration information from within
the CMS Installation Wizard or from the CMS window (within Netscape
Console), click any help button.
To view the HTML version of this guide, open this file:
<server_root>/manual/en/cert/setup_guide/contents.htm
To view the PDF version of this guide, open this file:
<server_root>/manual/en/cert/pdf/cms45setup.pdf
• CMS Plug-ins Guide
Provides detailed reference information on CMS plug-ins. To access this
information from the CMS window within Netscape Console, click any help
button.
To view the HTML version of this guide, open this file:
<server_root>/manual/en/cert/plugin_guide/contents.htm
To view the PDF version of this guide, open this file:
<server_root>/manual/en/cert/pdf/cms45plugin.pdf
• CMS Command-Line Tools Guide (this guide)
Provides detailed reference information on CMS tools.
About This Guide 13
Page 14

WheretoGoforRelatedInformation
To view the HTML version of this guide, open this file:
<server_root>/manual/en/cert/tools_guide/contents.htm
To view the PDF version of this guide, open this file:
<server_root>/manual/en/cert/pdf/cms45tools.pdf
• CMS Customization Guide
Provides detailed reference information on customizing the HTML-based
agent and end-entity interfaces.
To view the HTML version of this guide, open this file:
<server_root>/manual/en/cert/custom_guide/contents.htm
To view the PDF version of this guide, open this file:
<server_root>/manual/en/cert/pdf/cms45custom.pdf
•CMSAgent’sGuide
Provides detailed reference information on CMS agent interfaces. To access
this information from the Agent Services pages, click any help button.
To view the HTML version of this guide, open this file:
<server_root>/<instance_id>/web/agent/manual/agent_guide/
contents.htm
To view the PDF version of this guide, open this file:
<server_root>/manual/en/cert/pdf/cms45agent.pdf
•End-EntityHelp
Provides detailed reference information on CMS end-entity interfaces. To
access this information from the end-entity pages, click any help button.
To view the HTML version of this guide, open this file:
<server_root>/<instance_id>/web/ee/manual/ee_guide/contents.htm
CAUTION Do not change the default location of any of the HTML files; they are
used for online help. You may move the PDF files to another
location.
For a complete list of CMS documentation, open the
<server_root>/manual/index.html file. For the latest information about
Certificate Management System, check the CMS Release Notes.
14 Netscape Certificate Management System Command-Line Tools Guide • October 2001
Page 15

Chapter 1
Command-Line Tools
Netscape Certificate Management System (CMS) is bundled with various
command-line utilities. This chapter summarizes these utilities and provides
pointers to chapters that further explain them.
Table 1-1 summarizes the command-line utilities that are bundled with Certificate
Management System.
Table 1-1 Summary of command-line utilities
Utility/Tool Function
Batch/Shell Scripts located under <server_root>/bin/cert/tools/ (require jre):
PasswordCache
(Password Cache Utility)
AtoB
(ASCII to Binary Tool)
BtoA
(Binary to ASCII Tool)
PrettyPrintCert
(Pretty Print Certificate
Tool)
PrettyPrintCrl
(Pretty Print CRL Tool)
Executable tools located under <server_root>/bin/cert/tools:
certutil
(Certificate Database Tool)
Manipulates the contents of the single sign-on password cache.
For details, see Chapter 2, “Password Cache Utility.”
Converts ASCII base-64 encoded data to binary base-64 encoded
data. For details, see Chapter 7, “ASCII to Binary Tool.”
Converts binary base-64 encoded data to ASCII base-64 encoded
data. For details, see Chapter 8, “Binary to ASCII Tool.”
PrintsthecontentsofacertificatestoredasASCIIbase-64encoded
data in a human-readable form. For details, see Chapter 9, “Pretty
Print Certificate Tool.”
Prints the contents of a CRL stored as ASCII base-64 encoded data
in a human-readable form. For details, see Chapter 10, “Pretty
Print CRL Tool.”
View and manipulate the certificate database (cert7.db)
contents. For details, see Chapter 11, “Certificate Database Tool.”
keyutil
(Key Database Tool)
View and manipulate the key database (key3.db)contents.For
details, see Chapter 12, “Key Database Tool.”
15
Page 16

Table 1-1 Summary of command-line utilities (Continued)
Utility/Tool Function
killproc
(Kill Process Tool)
setpin
(PIN Generator tool)
signtool
(Netscape Signing Tool)
sslstrength
(SSL Strength Tool)
Kills or terminates system processes in Windows NT. For details,
see Chapter 3, “Kill Process Tool.”
Generates PINs for end users for directory- and PIN-based
authentication. For details, see Chapter 4, “PIN Generator Tool.”
Digitally signs any file, including log files. For details, see Chapter
13, “Netscape Signing Tool.”
Connects to an SSL server and reports back the type and strength
of the encryption cipher that it’s using. For details, see Chapter 15,
“SSL Strength Tool.”
ssltap
(SSL Debugging Tool)
Used to debug SSL applications. For details, see Chapter 14, “SSL
Debugging Tool.”
Perl Scripts located under <server_root> (require_perl):
cmsbackup Copies all of the pertinent data and configuration files for a CMS
instance, the local Administration Server, and local Netscape
DirectoryServersthattheinstanceuses into a compressed archive.
For details, see Chapter 6, “Backing Up and Restoring Data.”
cmsrestore Opens a named archive,extractsthe data, and uses it to restore the
configuration of a CMS instance. For details, see Chapter 6,
“Backing Up and Restoring Data.”
Executable tools located under <server_root>/shared/bin:
modutil
(Security Module Database
Tool)
Used for managing the PKCS #11 module information within
secmod.db files or within hardware tokens. For details, see
Chapter 16, “Security Module Database Tool.”
Third-party executable tools located under <server_root>/bin/cert/tools:
dumpasn1 Dumps the contents of binary base-64-encodeddata. Note that the
tool is freeware that is packaged with Certificate Management
System for your convenience. For more information about this
tool, check this site: http://www.cs.auckland.ac.nz/~pgut001/
Third-party support tools located under <server_root>:
bin/base/jre/bin/jre
bin/cert/jre/bin/jre
Java runtime executable for Netscape Console.
Java runtime executable for Certificate Management System.
Note that the CMS jre is invoked as cms_daemon during CMS
installation and configuration, as cms_watchdog to monitor the
status of the CMS server, and as cms_server to actually run the
CMS server.
16 Netscape Certificate Management System Command-Line Tools Guide • October 2001
Page 17

Table 1-1 Summary of command-line utilities (Continued)
Utility/Tool Function
bin/cert/tools/unzip Decompression utility executable.
bin/cert/tools/zip Compression utility executable.
install/perl perl scripting language executable.
The AtoB, BtoA, PrettyPrintCert, PrettyPrintCrl,anddumpasn1 tools are
useful for converting back and forth between various encodings and formats you
may encounter when dealing with keys and certificates.
The Password Cache Utility can be used to manipulate the contents of an existing
single sign-on password cache and to create a new cache.
The Certificate Database Tool, Key Database Tool, and Security Module Database
Tool are useful for a variety of administrative tasks that involve manipulating
certificate and key databases.
The PIN Generator tool is used to create PINs for directory authentication. The
killproc tool is used to terminate the Java virtual machines, called jre processes,
when Certificate Management System becomes unresponsive.
The Netscape Signing Tool can be used to associate a digital signature with any file,
including CMS log files.
The SSL Strength Tool and SSL Debugging Tool are useful for testing and
debugging purposes.
NOTE If you find any problems in Certificate Database Tool (certutil),
Key Database Tool (
SSL Debugging Tool (
sslstrength), you may obtain the source code and build
(
keyutil),NetscapeSigningTool(signtool),
ssltap), and SSL Strength Tool
instructions for the very latest version of these tools (and/or
potentially a binary image for the newer tool) at the following URL:
http://www.mozilla.org/projects/security/pki/nss/tools/
index.html
Note that all Key Database Tool functions have now been
incorporated into the single tool, Certificate Database Tool, and that
several of the command-line options for many of the tools may
have changed. Be sure to check back often to obtain the very latest
version of the desired security tool, as this site will be updated
often.
Chapter 1 Command -Line Tools 17
Page 18

18 Netscape Certificate Management System Command-Line Tools Guide • October 2001
Page 19

Chapter 2
Password Cache Utility
During the installation of Netscape Certificate Management System (CMS), the
watchdog stores all the passwords required by the server for starting up—such as
passwords for the internal or external tokens, the bind password used by
Certificate Management System to access and update the internal database, the
bind password used by Certificate Management System to access and update the
LDAP directory used for authentication or publishing—in a password cache. The
cache is maintained in a file encrypted using the single sign-on password you
specify during installation.
Location
The command-line utility named
contents of the password cache. You will be required to manipulate the password
cache for various reasons. For example, assume you’ve configured the Certificate
Manager to publish certificates and CRLs to an LDAP directory and have
configured it to bind to the directory with Directory Manager’s DN and password.
If the directory administrator changes the Directory Manager’s password, the
Certificate Manager will fail to bind to the directory during startup. You can
resolve this problem by modifying the corresponding bind password in the cache
using the
This chapter has the following sections:
• Location (page 19)
• Syntax (page 20)
• Usage (page 20)
The PasswordCache utility is located with the rest of the command-line tools in
this directory:
PasswordCache utility.
<server_root>/bin/cert/tools
PasswordCache enables you to manipulate the
19
Page 20

Syntax
Syntax
You can run the utility by executing the following command from the
<server_root>/cert-<instance_id> directory:
PasswordCache <sso_password> <command>
where <sso_password> specifies the current single sign-on password and
<command> can be any of the following:
❍ list
❍ add <password_name> <password>
❍ change <password_name> <password>
❍ delete <password_name>
❍ changesso <new_sso_password>
❍ create
Usage
<password_name>
specifies the string (describing the password usage) you
want to add to, or modify or delete from the cache; it is equivalent to the
value assigned to the
bindPWPrompt or tokenname parameter in the CMS
configuration file.
<password> specifies the new password.
<new_sso_password> specifies the new single sign-on password.
NOTE Youmustrunthe
<server_root>/cert-<instance_id> directory.
PasswordCache utility from the
You can use the PasswordCache utility for the following:
• Changing the single sign-on password
• Listing or viewing the contents of the password cache
• Adding a new entry to the cache
• Changing the password associated with an entry
• Deleting an entry in the cache
20 Netscape Certificate Management System Command-Line Tools Guide • October 2001
Page 21

Usage
The sections that follow explain how you can accomplish the above mentioned
tasks.
NOTE The server queries the password cache only during start up, and
hencerecongnizesthe changes you’ve made to the cache only if you
restart the server from the command line. If you left any of the
passwords blank, the server will prompt you to enter that during
startup and from then on stores it in the password cache.
Changing the Single Sign-On Password
To change the single sign-on password:
1. Open a command window.
2. Go to this directory: <server_root>/cert-<instance_id>
3. At the prompt, enter the command below, substituting <sso_password> with
the single sign-on password and
sign-on password.
<new_sso_password> with the new single
PasswordCache <sso_password> changesso <new_sso_password>
For example, if your old password is mySsoPwd and new password is
myNewSsoPwd, the command would look like this:
PasswordCache mySsoPwd changesso myNewSsoPwd
Listing the Contents of the Password Cache
To list or view the contents of the password cache:
1. Open a command window.
2. Go to this directory: <server_root>/cert-<instance_id>
3. At the prompt, enter the command below, substituting <sso_password> with
the single sign-on password:
PasswordCache <sso_password> list
For example, if your single sign-on password is mySsoPwd,thecommand
would look like this:
PasswordCache mySsoPwd list
Chapter 2 Password Cache Utility 21
Page 22

Usage
In response, you should see something similar to this:
----- Password Cache ----Internal LDAP Database : myIdbPwd
Internal Key Storage Token : myTokenPwd
LDAP Publishing: myLdapPubPwd
Adding a New Entry to the Password Cache
To add a new entry to the cache:
1. Open a command window.
2. Go to this directory: <server_root>/cert-<instance_id>
3. At the prompt, enter the command below, substituting <sso_password> with
the single sign-on password,
password usage, and
<password> with the actual password:
<password_name> with a string describing the
PasswordCache <sso_password> add <password_name> <password>
For example, if your single sign-on password is mySsoPwd, the string
describing the password usage is
Directory
,andpasswordismyLdapPubPwd, the command would look like
Bind Password for LDAP Publishing
this:
PasswordCache mySsoPwd add “Bind Password for LDAP Publishing
Directory
” myLdapPubPwd
Ifthepasswordnamestringincludesspaces,besuretoenclosethestringin
double quotes as indicated in the above example.
Changing the Password of an Entry in the
Password Cache
To change the password associated with an entry in the password cache:
1. Open a command window.
2. Go to this directory: <server_root>/cert-<instance_id>
22 Netscape Certificate Management System Command-Line Tools Guide • October 2001
Page 23

Usage
3. At the prompt, enter the command below, substituting <sso_password> with
the single sign-on password,
the password usage, and
PasswordCache <sso_password> change <password_name> <password>
<password_name> with the string that describes
<password> with the new password:
For example, if your single sign-on password is mySsoPwd, the string
describing the password usage is
Directory
,andthenewpasswordismyNewLdapPubPwd, the command would
Bind Password for LDAP Publishing
look like this:
PasswordCache mySsoPwd change “Bind Password for LDAP Publishing
Directory
” myNewLdapPubPwd
Ifthepasswordnamestringincludesspaces,besuretoenclosethestringin
double quotes as indicated in the above example.
Deleting an Entry From the Password Cache
To delete an entry from the cache:
1. Open a command window.
2. Go to this directory: <server_root>/cert-<instance_id>
At the prompt, enter the command below, substituting <sso_password> with
3.
the single sign-on password and
<password_name> with the string that
describes the password usage:
PasswordCache <sso_password> delete <password_name>
For example, if your single sign-on password is mySsoPwd and the string
describing the password usage is
Directory
PasswordCache mySsoPwd delete “Bind Password for LDAP Publishing
Directory
, the command would look like this:
”
Bind Password for LDAP Publishing
Ifthepasswordnamestringincludesspaces,besuretoenclosethestringin
double quotes as indicated in the above example.
Chapter 2 Password Cache Utility 23
Page 24

Usage
Creating a New P assword Cache
If you have changed CMS startup so that the server prompts for all the required
passwords, instead of just the single sign-on password, and want to revert back to
starting the server with a single sign-on password, you must create a new
password cache. Before creating a new password cache, decide on the single
sign-on password to protect the cache.
To create a new, empty password cache:
1. Open a command window.
2. Go to this directory: <server_root>/cert-<instance_id>
At the prompt, enter the command below, substituting <sso_password> with
3.
a password to protect the cache:
PasswordCache <sso_password> create
For example, if the password you want to use to protect the single sign-on
cache is
mySsoPwd, the command would look like this:
PasswordCache mySsoPwd create
24 Netscape Certificate Management System Command-Line Tools Guide • October 2001
Page 25

Chapter 3
Kill Process Tool
If an error causes Netscape Certificate Management System (CMS) to become
unresponsive, and all attempts to stop it from Netscape Console fail, it may be
necessary to kill the server processes manually. This chapter describes the
killproc utility, which enables you to terminate CMS processes manually.
This chapter has the following sections:
• Location (page 25)
Location
Syntax
• Syntax (page 25)
• Usage (page 26)
The killproc tool is located with the rest of the command-line tools in this
directory:
The killproc command takes one argument, the process ID of the process to be
killed:
killproc <process_id>
where <process_id> specifies the ID of the process that needs to be
terminated.
<server_root>/bin/cert/tools
25
Page 26

Usage
Usage
If an error causes Certificate Management System to become unresponsive, and all
attempts to stop it from Netscape Console fail, it may be necessary to kill the server
processes manually. The processes that should be killed are identified as follows:
• cms_server
• cms_watchdog
• cms_daemon
On a Windows NT system, the server processes will have .exe file extension and
will be listed in the Windows NT Task Manager. However, because they are
system processes, you cannot terminate them from the Task Manager. Instead, you
should terminate them using the
killproc command-line tool.
In order to kill system processes, the user that runs
killproc command must have
the Debug Programs permission. By default, this permission is given only to the
Administrators group, although this can be changed in the Windows NT User
Manager. Assuming it is not changed,
member of the Administrators group (such as the user
killproc command must be run by a
Administrator).
You can obtain the process ID from the Windows NT Task Manager. For example,
to kill the
c:\> killproc 255
Killed process 255.
c:\>
jre process whose process ID is 255, you should type:
NOTE The killproc tool should only be used as a last resort. Because it
forces the process to terminate abruptly, the process is not able to
cleanup or to save its internal state before exiting.
26 Netscape Certificate Management System Command-Line Tools Guide • October 2001
Page 27

Chapter 4
PIN Generator Tool
For Netscape Certificate Management System (CMS) to use the authentication
plug-in module named
contain unique PINs for each end entity to whom you i ntend to issue a certificate.
To aid you in generating PINs for end-entity entries in a directory, Certificate
Management System provides a command-line tool called the PIN Generator.This
tool allows you to generate unique PINs for entries in an LDAP-compliant user
directory. The tool stores these PINs (as hashed values) in the same directory
against the corresponding user entries, and it copies the PINs to a text file, from
which you can deliver the PINs to end entities by an appropriate, secure means.
UidPwdPinDirAuth your authentication directory must
This chapter explains how to use the PIN Generator. The chapter has the following
sections:
• Locating the PIN Generator Tool (page 27)
• The setpin Command (page 28)
• How the Tool Works (page 32)
Locating the PIN Generator T ool
You can find the PIN Generator at this location:
<server_root>/bin/cert/tools/setpin.exe
27
Page 28

The setpin Command
The setpin Command
You run the PIN Generator by entering the setpin command and its arguments in
a command shell and monitoring the output in the shell window. This section gives
the syntax for the
generating PINs and storing them in your authentication directory, see section
“Configuring Authentication for End-User Enrollment” in Chapter 15, “Setting Up
End-User Authentication” of CMS Installation and Setup Guide.
Command-Line Syntax
Use the following command in a Unix or DOS command shell:
setpin [arguments]
setpin [optfile=filename] [param1] [param2]
Arguments
setpin command and its arguments. For instructions on
The setpin command takes the following arguments and options:
setpin
[host=<host_name> [port=<port_number>]]
[certdb=<path> nickname=<certificate_nickname> | "binddn=<user_id>"
bindpw=<bind_password> [SSL=yes | no]]
[objectclass=<objectclass_to_add>]
[attribute=<attribute_name_for_pins>]
["filter=<LDAP_search_filter>"]
[input=<file_name>]
[length=<PIN_length> | minlength=<minimum_PIN_length>
maxlength=<maximum_PIN_length>]
[gen=RNG-alpha | RNG-alphanum | RNG=printableascii]
[case=upperonly]
[hash=sha1 | md5 | none]
[output=<file_name>]
[clobber]
[write]
[saltattribute=<LDAP_attribute_to_use_for_salt_creation>]
[debug]
A description for each argument follows:
• [host=<host_name> [port=<port_number>]]
<host_name> specifies the LDAP directory to connect to.
28 Netscape Certificate Management System Command-Line Tools Guide • October 2001
Page 29

The setpin Command
<port_number> specifies the TCP/IP port to bind to; the default port number
is the default LDAP port, 389.
• [certdb=<path> nickname=<certificate_nickname> |
"binddn=<user_id>" bindpw=<bind_password> [SSL=yes | no]]
Use this argument to speci fy how the tool should connect to the directory:
whether to use basic authentication, SSL, or SSL with client authentication. By
default, SSL is not used (
❍ If you want the tool to use basic authentication, you must turn off SSL
SSL=no) and enter the bind DN and password information. Do not enter
(
SSL=no).
values for the remaining options.
❍ If you want the tool to use SSL, you must turn on SSL (SSL=yes)andenter
the bind DN and password information. Do not enter values for the
remaining options.
❍ If you want the tool to use SSL with client authentication, you must turn on
SSL=yes) and enter the nickname of the certificate to use for SSL client
SSL (
authentication and the path to the certificate database that contains this
certificate. You don’t have to provide the bind DN and password.
<path> specifies the path to the certificate database containing the client
authentication certificate to use for SSL client authentication. If you provide the
path to the certificate database (
cert7.db in Netscape Directory Server), it is
assumed that the LDAP directory has been set up for SSL-based access. You
must also specify the certificate for SSL client authentication to the directory.
<certificate_nickname> specifies the nickname of the certificate to use for
SSL client authentication to the directory. The tool looks for this certificate in
the database specified by the
path parameter value. If you want the tool to use
a client certificate residing on a token or smart card to access the directory,
prefix the nickname with the word module (
module:nickname); then a PKCS
#11 module will be used.
<user_id> specifies the user ID that has read and write permission to the
LDAP directory; the PIN Generator binds to the directory as this user.
<bind_password> specifies the password for the user ID that has read and
write access to the LDAP directory.
If the bind password is not given at the command line, the tool prompts for it.
• [objectclass=<objectclass_to_add>]
Use this argument to specify the object class, if any, the tool should add to the
authentication directory. By default it is
pinPerson.
Chapter 4 PINGenerator Tool 29
Page 30

The setpin Command
• [attribute=<attribute_name_for_pins>]
Use this argument to specify the authentication directory attribute to which
PINs should be published. If you don’t specify an attribute, it defaults to
the new attribute added to the authentication directory schema.
• ["filter=<LDAP_search_filter>"]
Use this argument to filter those DNs in the directory for which the tool should
generate PINs. For information on how to specify filters, see the information
available at this URL:
dirsdk/capi/search.htm
• [input=<file_name>]
http://developer.netscape.com/docs/manuals/
Use this argument to specify the name of the file that contains the list of DNs to
process. Using this argument is optional. If you do, the tool compares the
filtered DNs to the ones specified by the input file and generates PINs for only
those DNs that are also in the file.
• [length=<PIN_length> | minlength=<minimum_PIN_length>
maxlength=<maximum_PIN_length>]
pin,
Use this argument to specify the exact number or a range of characters that a
PIN must contain. The PINs can be either a fixed length or generated to be
between two values (x,y) inclusive (x,y>0).
<PIN_length> specifies the exact length for the PINs. For example, if you want
PIN length to be eight characters, enter
8. PIN length must be an integer
greater than zero.
<minimum_PIN_length> specifies the minimum length for the PINs. For
example, if you want PIN length to be at least six characters, enter
<maximum_PIN_length> specifies the maximum length for the PINs. For
6.
example, if you want PIN length to be nine characters at the most, enter
• [gen=RNG-alpha | RNG-alphanum | RNG-printableascii]
Use this argument to speci fy the type of characters for PINs. The characters in
the password can be constructed out of alphabetic characters (
alphanumeric characters (
printableascii).
(
• [case=upperonly]
RNG-alphanum), or any printable ASCII characters
RNG-alpha),
Use this argument with the gen parameter. If you do, the case for all alphabetic
characters is fixed to uppercase only; otherwise, the case is mixed. Restricting
alphabetic characters to uppercase reduces the overall combinations for the
password space significantly.
9.
30 Netscape Certificate Management System Command-Line Tools Guide • October 2001
Page 31

The setpin Command
• [hash=sha1 | md5 | none]
Use this argument to specify the message digest algorithm the tool should use
to hash the PINs before storing them in the authentication directory. If you
wanttostorePINsasSHA-1orMD5hashedvaluesinthedirectory,besureto
specify an output file for storing PINs in plain text. You will need the PINs in
plain text for delivering them to end entities.
sha1 produces a 160-bit message digest. This option is used by default.
md5 produces a 128-bit message digest.
none does not hash the PINs.
• [output=<file_name>]
Use this argument to specify the absolute path to the file to which the tool
should write the PINs as it generates them; this is the file to which the tool will
capture the output.
If you don’t specify a filename, the tool will write the output to the standard
output. In any case, all the error messages will be directed to the standard
error.
• [clobber]
Use this argument to specify whether the tool should overwrite preexisting
PINs, if any, a ssociated with a DN (user). If specified, the tool overwrites the
existing PINs with the one it generates. Otherwise, it leaves the existing PINs
as they are.
• [write]
Use this argument to specify whether the tool should write PINs to the
directory. If specified, the tool writes PINs (as it generates) to the directory.
Otherwise, the tool does not make any changes to the directory.
For example, if you want to check PINs—that the PINs are being given to the
correct users and that they are conforming to the length and character-set
restrictions—before updating the directory, do not specify this option. You can
check the PINs before updating the directory by looking at the output file; for
details, see “Output File” on page 36.
• [saltattribute=<LDAP_attribute_to_use_for_salt_creation>]
Use this argument to specify the LDAP attribute the tool should use for salt
creation. If you specify an attribute, the tool integrates the corresponding value
of the attribute with each PIN, and hashes the resulting string with the hash
routine specified in the hash argument.
Chapter 4 PINGenerator Tool 31
Page 32

How the Tool Works
If you don’t specify this argument, the DN of the user is used. For details, see
“How PINs Are Stored in the Directory” on page 37.
• [debug]
Use this argument to specify whether the tool should write debugging
information (to the standard error). If
debug=attrs is specified, the tool writes
much more information about each entry in the directory.
• [testpingen=<count>]
Use this argument to test the pin-generation mode.
<count> specifies the total number (in decimal) of PINs to be generated for
testing purposes.
• [optfile]
Use this argument to specify that the tool should read in options (one per line)
from specified file; this option enables you to put all the arguments in a file,
instead of typing them on the command line.
Example
The following command generates PINs for all entries that have the CN attribute (in
their distinguished name) defined in an LDAP directory named
listening at port
DirectoryManager and starts searching the directory from the node
dn=o=siroe.com in the directory tree. The tool overwrites the existing PINs, if
19000. The PIN G enerator binds to the directory as user
any, with the new ones.
setpin host=lailing port=19000 "binddn=CN=directoryManager"
bindpw=password "filter=(cn=*)" basedn=o=siroe.com clobber write
How the Tool Works
The Pin Generator allows you to generate PINs for user entries in an
LDAP-compliant directory and update the directory with thes e PINs. To run the
setpin command, you need at a minimum to specify the following:
• The host name (
•ThebindDN(
host) and port number (port) of the LDAP server
binddn) and password (bindpw)
laiking that is
• An LDAP filter (
32 Netscape Certificate Management System Command-Line Tools Guide • October 2001
filter) for filtering out the user entries that require PINs
Page 33
How the Tool Works
For example:
setpin host=laiking port=19000 "binddn=CN=Directory Manager"
bindpw=netscape "filter=(ou=employees)" basedn=o=siroe.com
This command, if run, will query the directory for all the entries that match the
filter criteria, which in this case is all users belonging to an organizational unit (
called
employees. For each entry matching the filter, information is printed out to
standard error. Additionally, to the standard output or the file named in output;
see “Output File” on page 36.
ou)
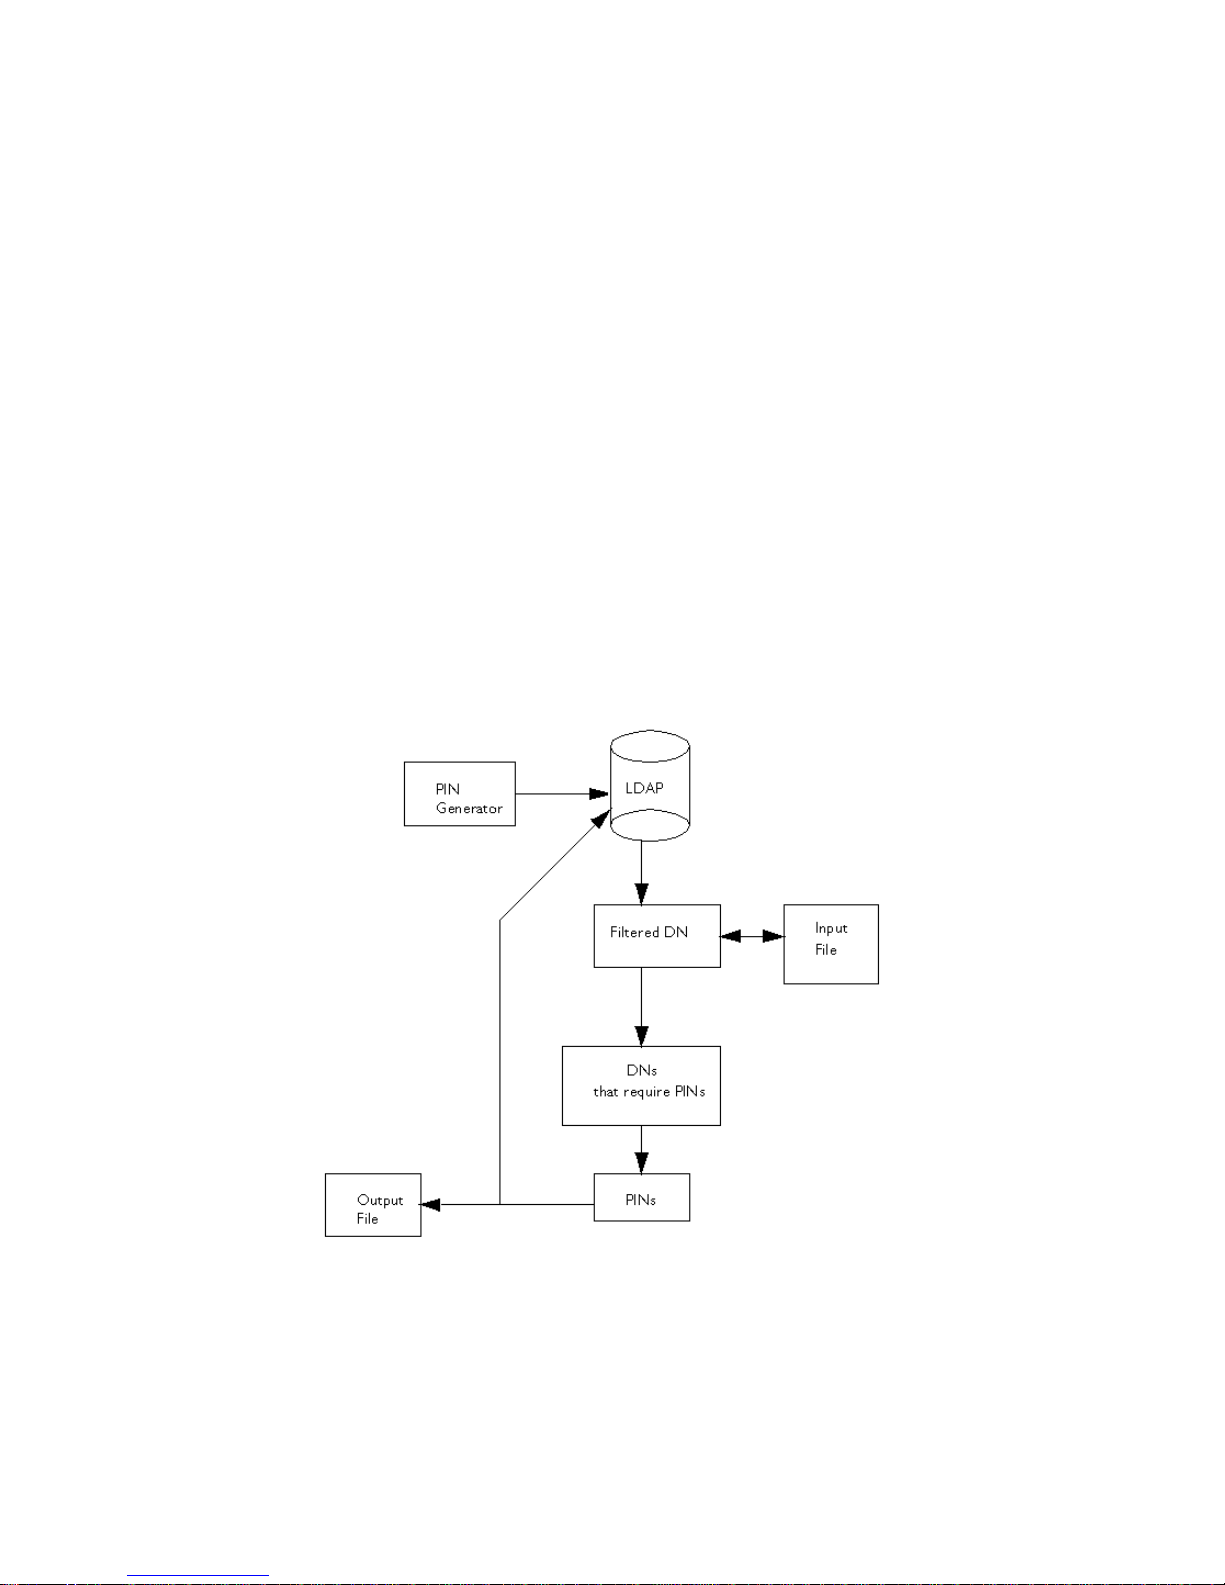
You can also provide the tool with an input argument using the
input option. The
argument must be in the form of an ASCII file of pre-prepared DNs and PINs (see
Figure 4-1). Note that the input file isn’t a substitute for the LDAP directory entries;
the filter attribute must still be provided. If an input file is provided, the tool
updates only those filtered attributes that match the ones in the input file. For more
information about the input file, see “Input File” on page 35.
Figure 4-1 Using an input and output file for the PIN-generation process
Chapter 4 PINGenerator Tool 33
Page 34

How the Tool Works
Examples of output follow:
Processing: cn=QA Managers,ou=employees,o=siroe.com
Adding new pin/password
dn:cn=QA Managers,ou=employees,o=siroe.com
pin:lDWynV
status:notwritten
Processing: cn=PD Managers,ou=employees,o=siroe.com
Adding new pin/password
dn:cn=PD Managers,ou=employees,o=siroe.com
pin:G69uV7
status:notwritten
Because the PIN Generator makes a lot of changes to your directory, it is important
that you specify the correct filter; otherwise, you may change the wrong entries. As
a safeguard, a
write option is provided that you use to enable writing to the
directory after you verify the output; the tool doesn’t make any changes to the
directory until you specify the
write option on the command line.
The output also contains the status of each entry in the directory. It can be one of
the values specified in Table 4-1.
Table 4-1 PIN Generator status
Exit c ode Description
notwritten Specifies that the PINs were not written to the directory,because the write
option was not specified on the command line.
writefailed Specifies that the tool made an attempt to modify the directory, but the write
operation was unsuccessful.
added Specifies that the tool added the new PIN to directory successfully.
replaced Specifies that the tool replaced an old PIN with a new one (the clobber option
was specified).
notreplaced Specifies that the tool did not replace the old PIN with a new one (the clobber
option was not specified).
34 Netscape Certificate Management System Command-Line Tools Guide • October 2001
Page 35

How the Tool Works
If a PIN already exists for a user, it will by default not be changed if you run the
setpin command a second time. This is so that you can generate PINs for new
users without overwriting P INs for users who have previously been notified of
their PINs. If you want to overwrite a PIN, you should use the
clobber option.
Once you are sure that the filter is matching the right users, you should run the
setpin command again with the write option, and with output set to the name of
the file to capture the unhashed PINs. This output file is in the same format as the
input file. For details about the output file, see “Output File” on page 36.
Input File
The PIN Generator can receive a list of DNs to modify in a text file specified by the
input=<file_name> argument. If you specify an input file, the tool compares the
DNs it filtered from the LDAP directory w ith the ones in the input file, and updates
only those DNs that matched the ones in the input file.
The purpose of the input file is multifold. It enables you to provide the Pin
Generator with an exact list of DNs to modify. Via the input file, you can also
provide the PIN Generator with PINs (in plain text format) for all DNs or for
specific DNs.
The following examples explain why you might want to use the input file:
• Assume that you have set PINs for all entries in the user directory. Two new
users joined your organization and you updated the directory with new users’
information. For the new users to get certificates, the directory must contain
PINs. And you want to set PINs for just those user entries without making
changes to any of the other user entries. Instead of constructing a complex
LDAP filter to filter out just these two entries, you can construct a general filter,
put the two users’ DNs in the input file, and run the PIN Generator.
• Assume that you want your users to use their social security numbers as PINs.
You can enter users’ social security numbers as PINs in the input file, and the
PIN Generator will store them as hashed values in the directory.
The format of the input file is the same as that of the output file (see “Output File”
on page 36), with the omission of the status line. In the input file, you can choose to
specify PINs for all the DNs in the file, for specific DNs, or for none of the DNs. If
the PIN attribute is missing for a DN, the tool automatically generates a random
PIN.
Chapter 4 PINGenerator Tool 35
Page 36

How the Tool Works
For example, you can set up your input file to look like this:
dn:cn=user1, o=siroe.com
<blank line>
dn:cn=user2, o=siroe.com
<blank line>
...
dn:cn=user3, o=siroe.com
You can also provide PINs, in plain-text format, for the DNs in the input file, which
is then hashed according to the command-line arguments. For example, you can set
up your input file to look like this:
dn:cn=user1, o=siroe.com
pin:pl229Ab
<blank line>
dn:cn=user2, o=siroe.com
pin:9j65dSf
<blank line>
...
dn:cn=user3, o=siroe.com
pin:3knAg60
<blank line>
NOTE You cannot provide hashed PINs to the tool.
Output File
The PIN Generator can capture the output to a text file specified by the
output=<file_name> argument.
The captured output will contain a sequence of records and will be in the following
format:
dn: <user_dn>1
pin: <generated_pin>1
status: <status>1
<blank line>
36 Netscape Certificate Management System Command-Line Tools Guide • October 2001
Page 37

How the Tool Works
dn: <user_dn>2
pin: <generated_pin>2
status: <status>2
<blank line>
...
dn: <user_dn>n
pin: <generated_pin>n
status: <status>n
<blank line>
where
<user_dn> is a distinguished name that matched the specified DN pattern
(specified by the DN filter) or that was in the input file (the DN file). By default, the
delimiter is "
<generated_pin> is a string of characters with either fixed or variable length,
;"orthecharacterdefinedonthecommandline.
dependent on parameters passed into the command.
<status> is one of the values specified in Table 4-1 on page 34.
The first line in each record will always be the distinguished name. The subsequent
lines, for
pin and status, are optional. The record ends with a blank line. The end
of line (EOL) sequence is as follows:
• On Windows NT:
\r\n
•OnUnix:\n
How PINs Are Stored in the Directory
Each PIN is concatenated with the corresponding user's LDAP attribute nam e d in
saltattribute argument. If this argument is not specified, the DN of the user
the
is used. Then, this string is hashed with the hash routine specified in the hash
argument (the default selection is SHA-1).
Then, one byte is prepended to indicate the hash type used. Here’s how the PIN
gets stored:
byte[0] = X
The value of X depends on the hash algorithm chosen during the PIN generation
process:
X=0 if the hash algorithm chosen is SHA-1.
X=1 if the hash algorithm chosen is MD5.
X=45 if the hash algorithm chosen is none.
Chapter 4 PINGenerator Tool 37
Page 38

How the Tool Works
byte[1...] = hash("DN"+"pin")
The PIN is stored in the directory as a binary value, not as a base-64 encoded value.
Exit Codes
The PIN Generator returns exit codes to the shell window; for a list of codes, see
Table 4-2. If you plan on automating the PIN-generation process, exit codes are
useful in programming shell scripts.
Table 4-2 Exit codes returned by the PIN Generator
Exit c ode Description
0 Indicates that PIN generation was successful; that is, PINs are set for all the DNs in the
specified directory.
2 Indicates that the tool could not open the certificate database specified by the certdb
parameter.
3 Indicates that the tool could not locate the certificate specified by the nickname
parameter in the specified certificate database.
4 Indicates that the tool could not bind to the directory as the user specified by the
binddn parameter (over SSL).
5 Indicates that the tool could not open the output file specified by the output
parameter.
7 Indicates an error parsing command-line arguments.
8 Indicates that the tool could not open the input file specified by the input parameter.
9 Indicates that the tool encountered an internal error.
10 Indicates that the tool found a duplicate entry in the input file specified by the input
parameter.
11 Indicates that the tool didn’t find the salt attribute, specified by the saltattribute
parameter, in the directory.
38 Netscape Certificate Management System Command-Line Tools Guide • October 2001
Page 39

Chapter 5
Extension Joiner Tool
Netscape Certificate Management System (CMS) provides many policy plug-in
modules that enable you to add standard and custom X.509 certificate extensions
to end-entity certificates the server issues. Similarly, the wizard that helps you
generate the certificates required by the Certificate Manager, Registration
Manager, and Data Recovery Manager enables you to select extensions that you
want to include in the certificates. Additionally, the wizard interface and the
request-approval page of the Agent interface contains a text area, enabling you to
paste any extension in its MIME-64 encoded format.
Certificate Management System a lso provides tools that generate MIME-64
encoded blobs for many standard extensions. You can use these tools for
generating MIME-64 encoded blobs for any extensions that you may want to
include in CA and other certificate requests. The tools are located with the rest of
the command-line utilities in this directory:
The text field provided for pasting the e xtension in general accepts a single
extension blob. If you want to add multiple extensions, you should first join them
to form a single extension blob and then paste the blob into the text field.
The ExtJoiner is a program that joins a sequence of extensions together so that the
final output can be used in the wizard text field or i n the request-approval page of
the Agent interface for specifying multiple extensions.
This chapter has the following sections:
• Location (page 40)
• Syntax (page 40)
• Usage (page 40)
<server_root>/bin/cert/tools
39
Page 40

Location
Location
Syntax
Usage
The ExtJoiner program is located with the rest of the command-line tools in this
directory:
To run the ExtJoiner tool, type the following command:
java ExtJoiner <ext_file0> <ext_file1> ... <ext_fileN>
where <ext_file> specifies the path, including the filename, to files that contain
the base-64 encoded DER encoding of an X.509 extension.
<server_root>/bin/cert/tools
As discussed in the introduction of this chapter, the ExtJoiner program doesn’t
generate an extension in its MIME-64 encoded format, it only joins the extensions
that are in MIME-64 encoded format. The steps below outline how you can use the
ExtJoiner to join multiple custom extensions and add the extensions to a
certificate request.
1. Write the appropriate Java programs for the extensions.
2. Join the extensions using ExtJoiner. To do this:
a. Note the file paths to the files that contain the programs for extensions.
b. Open a command window.
c. Run the ExtJoiner, substituting the appropriate file paths. For example, if
you have two extension files named
them to the same directory as the ExtJoiner, the command would look like
java ExtJoiner myExt1 myExt2
this:
You should see a base-64 encoded blob, similar to the one below, of the
joined extensions on screen:
MEwwLgYDVR0lAQHBCQwIgYFKoNFBAMGClGC5EKDM5PeXzUGBi2CVyLNCQYFU
iBakowGgYDVR0SBBMwEaQPMA0xCzAJBgNVBAYTAlVT
d.
Copy the encoded blob, without any modifications, to a file.
myExt1 and myExt2 and have copied
40 Netscape Certificate Management System Command-Line Tools Guide • October 2001
Page 41

3. Verify that the extensions are joined correctly before adding them to a
certificate request. To do this, first you’ll need to convert the binary data to
ASCII format using the
dumping the contents of t he base-64 encoded blob using the
For information on the
for the
dumpasn1 utility see, Table 1-1 on page 15.
AtoB utility and then verify the binary data by
dumpasn1 utility.
AtoB utility see, Chapter 7, “ASCII to Binary Tool” and
Here’s how you would do this verification:
a. Go to this directory: <server_root>/bin/cert/tools
b. Enter this command: AtoB <input_file> <output_file>, substituting
<input_file> with the path to the file that contains the base-64 encoded
data in ASCII format (from Step 2) and
<output_file> with the path to
the file to write the base-64 encoded data in binary format.
c. Next, enter this command: dumpasn1 <ouput_file>, substituting
<output_file> with the path to the file to that contains the base-64
encoded data in binary format. Your output should look similar to this:
0 30 76: SEQUENCE {
2 30 46: SEQUENCE {
4 06 3: OBJECT IDENTIFIER extKeyUsage (2 5 29 37)
9 01 1: BOOLEAN TRUE
12 04 36: OCTET STRING
: 302206052A83450403060A5182E44283
: 3393DE5F3506062D825722CD09060551
: 38816A4A
:}
50 30 26: SEQUENCE {
52 06 3: OBJECT IDENTIFIER issuerAltName (2 5 29 18)
57 04 19: OCTET STRING
: 3011A40F300D310B3009060355040613
: 025553
:}
:}
Usage
d. If the output doesn’t appear right, repeat steps 1 through 3 to get the
correct output.
4. Copy the base-64 encoded blob in step 2 (the output generated by the
ExtJoiner) to the CMS wizard screen and generate the certificate or the
certificate signing request (CSR), if submitting the request to another CA.
0 warnings, 0 errors.
Chapter 5 Extension Joiner Tool 41
Page 42

Usage
42 Netscape Certificate Management System Command-Line Tools Guide • October 2001
Page 43

Chapter 6
Backing Up and Restoring Data
This chapter explains how to back up the Netscape Certificate Management System
(CMS) data and configuration information and how to use the backups to restore
data if there is a need.
The chapter has the following sections:
• Backup and Restore Tools (page 43)
• Backing Up Data (page 44)
• Restoring Data (page 49)
Backup and Restore Tools
Certificate Management System provides tools to backup and restore the data and
configuration for a CMS instance. These tools can be used, for example, to back up
just your CMS data before you upgrade hardware or software on a machine. You
might also use these tools as part of your overall system backup plan, perhaps to
provide more frequent checkpoints of the CMS data than a nightly disk backup
would record.
Since only CMS configuration and data are backed up, you will need to take other
measures to back up data for external PKCS#11 cryptographic or key storage
devices (such as smart card readers). If you rely on an external device for key
storage (for example, to store the CA signing key), make sure that its data is backed
up whenever you back up CMS data. When you restore the CMS data, it will rely
on the external keys still being available. Refer to the PKCS#11 module vendor’s
instructions for how to back up the data.
43
Page 44

Backing Up Data
The backup and restore tools are simple Perl scripts; most Perl programmers
should find no difficulty in customizing or extending them. Read this chapter to
familiarize yourself with how the scripts work as well as their capabilities and
limitations.
The Perl scripts that perform the backup or restore are called from shell scripts
installed in the
instance:
cmsbackup[.bat] copies all of the pertinent data and configuration files for a
•
CMS instance, the local Administration Server, and local Netscape Directory
Servers that the instance uses into an com pressed archive (a zip file). See
“Backing Up Data” on page 44 for instructions on how to use this tool.
cmsrestore[.bat] opens a named archive, extracts the data, and uses it to
•
restore the configuration of a CMS instance. You have the option to restore
everything or to select a subset of the archived dat a. See “Restoring Data” on
page 49 for instructions on how to use this tool.
Be aware that the backup archives contain sensitive information (for example, your
CMS key database). Protect the backup archives as carefully as you protect the
server itself. The backups are stored on a local disk by default. To avoid losing both
the current data and the backup because of a disk f ailure, move the backup
archives to another medium as soon as they are created. If possible, encrypt the
archives or store them on removable media in a secured location.
<server_root>/cert-<instance_id>/ directory of every CMS
BackingUpData
Backing up your data is actually a very simple process. You run the script, and it
creates an archive that you store securely. This section explains what the backup
cmsbackup)doesanddoesnotdosothatyoucanplanyouroverallsystem
tool (
maintenance and backup procedures.
What the Backup Tool Does
There is a script or batch file installed in the instance directory of every CMS
instance. This file calls the Perl script
<server_root>/bin/cert/tools/CMSBackup.pl (using a Perl 5.003 interpreter
bundled with Certificate Management System).
• Creates a log file where all backup actions are logged
• Creates a temporary backup directory
44 Netscape Certificate Management System Command-Line Tools Guide • October 2001
CMSBackup.pl does the following:
Page 45

Backing Up Data
• Copies non-CMS certificate and key databases and shared files
• Copies files required to configure the Netscape Console and Administration
Server
• Backs up the configuration directory server using that server’s
db2bak backup
utility (if the server is running locally)
• Backs up the CMS internal database directory server u sing that server’s
db2bak
backup utility
• Copies CMS global and local class files
• Copies CMS user interface files and templates
• Copies CMS instance configuration files
• Creates a compressed archive of all files in the backup directory
The log file is in
<server_root>/cert-<instance_id>/logs/cmsbackup.log.
You should review the log file after each backup to make sure that all phases of the
backup completed successfully. If all or part of the backup fails it is usually due to
a directory that is missing or not readable by the user running the backup.
The default temporary backup directory is
/var/tmp (Unix) or C:\Temp (Windows
NT). Ensure that access to this directory is restricted so that no one can intercept
backup files while the archive is being built. You can change the working backup
directory by changing the value of
$backup_path_prefix in CMSBackup.pl.
The non-CMS databases and shared files that are backed up are:
• <server_root>/alias/*
• <server_root>/shared/config/*.conf
The Administration Server files that are backed up are the following files from
<server_root>/admin-serv/config/:
admpw, the Administration Server passw ord cache
•
*.conf, the Configuration files for the server and its associated LDAP data
•
*.db, the certificate and key databases for the Administration Server and
•
secmodule.db (database of PKCS#11 modules available to all server instances)
The backup tool will use the Netscape Directory Server
db2bak tool to create a
backup of the CMS server instance internal database directory and the
configuration directory (if it is running locally). Check the Netscape Directory
Server documentation for full details on what this tool does. The data backed up
includes all schema and object class definitions and, of course, all entries in the
directory.
Chapter 6 Backing Up and Restoring Data 45
Page 46

Backing Up Data
These CMS global and local class files are Java classes for custom plug-ins used by
CMS servers. To back up this data, all files and s ubdirectories in the following
directories are backed up:
• <server_root>/bin/cert/classes
• <server_root>/cert-<instance_id>/classes
The CMS user interface files and templates are the files used to create the forms end
entities and agents use to interact with CMS servers. All of these files for the
instance you are backing up are in
• <server_root>/cert-<instance_id>/web
The CMS configuration files that get backed up are in
<server_root>/cert-<instance_id>/config. The specific files and their
purposes are:
CMS.cfg, the current master configuration file for the instance.
•
CMS.cfg.*, previous configuration files, available for reverting to an earlier
•
configuration.
*.db, the server instance k ey and certificate databases.
•
*.ldif, ldif-format files that describe objects in the configuration database.
•
pwcache.p12, the server instance password cache.
•
All of the data to be backed up is copied to the temporary backup directory. After
all of the data has been copied, the script archives the entire backup directory into a
compressed archive using
<server_root>/bin/cert/tools/zip). The script deletes the backup directory
zip (a copy of zip is installed in
once the zip archive is created.
What the Backup Tool Does Not Do
The cmsbackup script backs up only configuration and data related to a single CMS
server instance. You may need to back up other files to recover from a failure
completely, depending on the nature of the failure. For example, if some entries in
your configuration directory server become corrupted then the data backed up by
cmsbackup is sufficient to restore the directory to a previous state. If, however, you
suffer a catastrophic disk failure, you will probably have to reinstall or restore
Certificate Management System, Netscape Console, and Netscape Directory Server
binaries and related tools before you use
configuration.
cmsrestore to recover your previous
46 Netscape Certificate Management System Command-Line Tools Guide • October 2001
Page 47

Backing Up Data
The following is a list of items which may be part of your overall CMS deployment,
but which are not backed up by
cmsbackup:
• Other instances of CMS servers in the same server root
Each instance has a copy of the cmsbackup script that backs up only data
related to that instance.
• External PKCS#11 module data
If you use an external PKCS#11 device for key storage, make sure you follow
the vendor’s instructions for backing up its data whenever you back up your
CMS server. It may be possible to extend the
CMSRestore.pl Perl scripts to include this data in the archives used by the
CMSBackup.pl and
CMS backup tools.
• Server binaries, libraries, and tools
These files do not change after installation, and are not backed up. To rest ore
these files, you can install the software again from the original media. You can
also use a more generic disk backup tool to archive the contents of all
directories beneath the server root.
Running the Backup Tool
Before you run cmsbackup,makesurethat
• You are logged in as a user with permission to run
for the LDAP servers, and to write to the output directory; you may need to
become superuser on a UNIX system or Administrator on a Windows NT
system.
• There is plenty of disk space in the output directory; the size of the backup
archive will vary with the amount of data in your system, so you will learn
from experience how much space you require.
The configuration that you back up, of course, will use all of your current
passwords. You will need to remember the current passwords if you restore this
data after you change some passwords.
To run
1. Log in to the machine where your CMS instance is running and open a
cmsbackup:
command shell.
cmsbackup,torundb2bak
Chapter 6 Backing Up and Restoring Data 47
Page 48

Backing Up Data
2. Change to the CMS server instance directory in the server root. For example, if
your server root is
youwanttobackupis
# cd /usr/netscape/server4/cert-cmsinstance
3. Execute the backup script: either cmsbackup on UNIX or cmsbackup.bat on
/usr/netscape/server4 and the instance ID of the server
cmsinstance:
Windows NT systems. For example,
# ./cmsbackup
The script will run. Control returns to the command prompt when the script h as
finished.
After You Finish a Backup
Immediately after running the backup tool, you should check the log file to make
sure that all systems were archived successfully. The log file is
<server_root>/cert-<instance>/logs/cmsbackup.log
If the any part of the backup was not successful, there will be a message labeled
WARNING or ERROR that tells you why. Most of the time, the problems are the result
of directories or files that are missing or inaccessible to the user running
cmsbackup. If necessary, change the permissions on the required files, delete the
zip archive in the output directory, and run
cmsbackup again.
Once you have a successful zip archive, you should secure it. The output directory
is probably accessible to any user on the system, and it may be on the same
physical disk as the server instance itself. You want to make sure the archive is not
accessible to unauthorized users and that you can use the archive if there is a
system hardware failure. Remember, the archive contains a database of private
keys. Although it is not easy to extract a key from the database without the correct
passwords, you do not want anyone to have the opportunity to try.
Move the zip archive to another machine or removable medium. If possible,
encrypt the archive (do not use the private keys stored in your CMS server’s
database, since they may not be available when you need to restore the data). If you
copy the archive to removable media such as tape or CD, make sure the copy is
kept in a limited-access, locked area.
48 Netscape Certificate Management System Command-Line Tools Guide • October 2001
Page 49

Restoring Data
The purpose of creating back up archives, of course, is to allow you to restore a
previous state of the CMS server inst ance after a hardware or software failure
corrupts your current state. The restore tool allows you to recover all or part of the
configuration that was backed up. For example, you can use the tool to restore just
the internal database of a CMS server ins tance.
A special case, automatic restore, allows you to completely restore the
configuration from the latest backup archive quickly and without interaction.
Before You Restore Data
Before you can restore from a backup archive, the archiveyou want to use has to be
available on a disk accessible from the server instance directory. If you want to use
the automatic restore feature, you should put the archive in the output directory
where
UNIX).
cmsbackup originally created it (C:\Temp on Windows NT or /var/tmp on
Restoring Data
Note the full path name to the backup archive; in the instructions later it will be
referred to as
<archive_path> might be
/var/tmp/CMS_cmsdemo_BACKUP-19991115093827.zip.
You can use the word
thebackuparchive.Ifyouuse
logs/latest_backup to find the path name of the archive. This file is created by
cmsbackup and contains the name of the last archive created. Note that automatic
always causes all data to be restored: you will not be able to select only a subset of
the data.
If you moved the zip archive to another machine or removable medium, copy it
back to the local file system. If you encrypted the archive, decrypt it before you try
to restore the data.
You cannot restore data to a CMS instance that has not been configured. If you
re-installed CMS prior to attempting to restore data, you must configure the new
CMS instance. When you configure the new installation, keep the following points
in mind:
• All services should be running on the same network ports as they were when
the backup archive was created. For example, the administration console port
isarandomnumberbydefault;besuretochangethedefaulttothesameport
that your original installation used.
<archive_path>. For example, on a UNIX system, the
automatic instead of a path name to indicate the location of
automatic, the restore tool will read the file
Chapter 6 Backing Up and Restoring Data 49
Page 50

Restoring Data
• During configuration, you still need to create new keys and certificates for any
servers that use the internal token. You only need to create these keys to
complete the configuration process. Your signing, SSL, or DRM transport
certificates will be restored (replacing whatever you create during the new
configuration) when you run the restore script.
The user running the restore tool will probably need superuser (UNIX) or
Administrator (Windows NT) privileges. The user running the tool will need
privileges to do the following:
• Read the backup zip archive
• Create a temporary working directory in the directory where the archive is
located
• Create directories and files in the server root and server instance directories
(for example, if the
CMS.cfg file needs to be restored)
•Runthe
bak2db tool for any Netscape Directory Servers that are being restored
• (UNIX) Change file ownership of the LDAP database backup files to the
directory server user. The directory server user is defined by the
localuser
parameter in slapd.conf. If the directory server user is different from the user
running
cmsrestore, the user running the tool must be able to run chown to
change the owner of the files to the LDAP server user (typically only the
superuser has this privilege).
The process of restoring data will require that some servers be stopped and
restarted. If any of your servers require passwords to start (for example, if they
need to unlock the key database in order to listen for SSL requests), you will be
prompted for the password. If any passwords have changed since you created the
backup archive, make sure you know the password that was valid at the time the
archive was created.
Running the Restore Tool
To run cmsrestore:
1. Log in to the machine where the CMS instance you want to restore is installed
andopenacommandshell.
2. Change to the CMS server instance directory in the server root. For example, if
your server root i s
youwanttorestoreis
# cd /usr/netscape/server4/cert-cmsinstance
50 Netscape Certificate Management System Command-Line Tools Guide • October 2001
/usr/netscape/server4 and the instance ID of the server
cmsinstance:
Page 51

Restoring Data
3. Execute the restore script: either cmsrestore on UNIX or cmsrestore.bat on
Windows NT systems.
You can either provide the
argument
# ./cmsrestore <archive_path> | automatic
automatic (to read the archive path from logs/latest_backup):
<archive_path> as an argument or use the
For example,
# ./cmsrestore \
/var/tmp/CMS_cmsdemo_BACKUP-19991115093827.zip
If you use automatic as the argument, the restore proceeds automatically; go
to Step 9 when
4. The script asks if you would like to perform a complete or prompted restore.
cmsrestore completes.
Enter
❍ c (complete) to completely restore the contents of the archive without
further prompts. Proceed with Step 9 when the restore is complete.
❍ p (prompted) to have the script ask you whether you want to restore
specific parts of the archive.
5. If the configuration directory server is located in the same server root, the first
prompt asks if you want to restore it. The configuration directory server is the
directory used by the Administration Server to store information about
servers, users, and groups.
If you answer
yes, the restore tool stops the directory server, restores the data,
then restarts the server. You may be asked to enter a password if one is
required to start the server.
6. Next you are asked if you want to restore selected Administration Server data.
If you answer
no, no Administration Server data will be restored; proceed with
the next step.
If you answer
yes, you will be asked three more questions about specific
Administration Server data you want to restore:
a. Main admin data is data in the Administration Server’s config directory.
b. Non-CMS shared data is data in the <server_root>/shared/config
directory.
c. Non-CMS certificate and key databases are the databases in the
<server_root>/alias directory; CMS instances maintain their own
alias directories in the instance subdirectories.
Chapter 6 Backing Up and Restoring Data 51
Page 52

Restoring Data
After you answer the questions, the Administration Server is stopped, the d ata
restored f rom the archive, and the server is started again. If necessary, you will
be prompted to enter a password to start the Administration Server.
7. Next you are asked if you want to restore the CMS internal database directory
server. This is the directory server this CMS instance uses as its internal
database.
If you answer
yes, the restore tool stops the directory server, restores the data,
then restarts the server. You may be asked to enter a password if one is
required to start the server.
8. Next you are asked if you want to restore selected data for this CMS server
instance.
If you answer
yes, you will be asked four more questions about the following
CMS server instance data that you can restore:
a. Global CMS classes are Java classes that are shared by all CMS servers in
thesameserverroot.
b. Critical CMS data includes the configuration files, certificate and key
databases, and password cache in the
config directory for this CMS
instance.
c. LocalCMSclassesareJavaclassesusedonlybythisserverinstance.
d. Custom CMS UI data includes all HTML files and templates in the web
subdirectory of this CMS instance.
After you answer these q uestions, the tool stops the CMS server, restores the
data, then restarts the server. You will be asked to enter the single sign-on
password that unlocks the password cache when the server restarts ( see
section “Password Cache” in Chapter 8, “Starting and Stopping CMS
Instances” of CMS Installation and Setup Guide.)
9. After the tool finishes restoring data, view the cmsrestore.log file in the
server instance
Review each step to make sure there were no errors in restoring the data. If
there were errors or warnings, you may want to run
may need to change permissions on some files or manually start some servers
before running
The restore tool deletes the working directory where it unpacked the archive, but it
does not delete the archive itself. You probably will not want to keep the backup
archive on disk. Remember that the backup archive contains sensitive information.
Delete or secure t he archive when you are done using it to restore data.
52 Netscape Certificate Management System Command-Line Tools Guide • October 2001
logs directory.
cmsrestore again. You
cmsrestore again.
Page 53

Chapter 7
ASCII to Binary Tool
You can use the ASCII to Binary tool to convert ASCII base-64 encoded data to
binary base-64 encoded data.
This chapter has the following sections:
• Availability (page 53)
• Syntax (page 53)
• Example (page 54)
Availability
This tool is available for AIX 4.3, OSF/1 v4.0D, Solaris 2.6 (SunOS 5.6), Solaris 8,
and Windows NT 4.0.
Syntax
To run the ASCII to Binary tool, type the following command:
AtoB[.bat] <input_file> <output_file>
.bat specifies the file extension; this is required only when running the utility
on a Windows NT system.
<input_file> specifies the path to the file that contains the base-64 encoded
data in ASCII format.
<output_file> specifies the path to the file to write the base-64 encoded data
in binary format.
53
Page 54

Example
Example
AtoB.bat C:\test\data.in C:\test\data.out
The above command takes the base-64 encoded data (in ASCII format) in the file
named
data.out.
data.in and writes the binary equivalent of the data to the file named
54 Netscape Certificate Management System Command-Line Tools Guide • October 2001
Page 55

Chapter 8
Binary to ASCII Tool
You can use the Binary to ASCII tool to convert binary base-64 encoded data to
ASCII base-64 encoded data.
The chapter has the following sections:
• Availability (page 55)
• Syntax (page 55)
• Example (page 56)
Availability
This tool is available for AIX 4.3, OSF/1 v4.0D, Solaris 2.6 (SunOS 5.6), Solaris 8,
and Windows NT 4.0.
Syntax
To run the Binary to ASCII tool, type the following comm and:
BtoA[.bat] <input-file> <output_file>
.bat specifies the file extension; this is required only when running the utility
on a Windows NT system.
<input_file> specifies the path to the file that contains the base-64 encoded
data in binary format.
<output_file> specifies the path to the file to write the base-64 encoded data
in ASCII format.
55
Page 56

Example
Example
BtoA.bat C:\test\data.in C:\test\data.out
The above command takes the base-64 encoded data (in binary format) in the file
named
data.out.
data.in and writes the ASCII equivalent of the data to the file named
56 Netscape Certificate Management System Command-Line Tools Guide • October 2001
Page 57

Chapter 9
Pretty Print Certificate Tool
You can use the Pretty Print Certificate tool to print the contents of a certificate
stored as ASCII base-64 encoded data in a human-readable f orm.
The chapter has the following sections:
• Availability (page 57)
• Syntax (page 57)
• Example (page 58)
Availability
This tool is available for AIX 4.3, OSF/1 v4.0D, Solaris 2.6 (SunOS 5.6), Solaris 8,
and Windows NT 4.0.
Syntax
To run the Pretty Print Certificate tool, type the following comm and:
PrettyPrintCert[.bat] <input_file> [<output_file>]
.bat specifies the file extension; this is required only when running the utility
on a Windows NT system.
<input_file> specifies the path to the file that contains the base-64 encoded
certificate.
<output_file> specifies the path to the file to write the certificate. This
argument is optional; if y ou don’t specify an output file, the certificate
information is written to the standard output.
57
Page 58

Example
Example
PrettyPrintCert.bat C:\test\cert.in C:\test\cert.out
The above command takes the base-64 encoded certificate in the cert.in file and
writes the certificate in the pretty-print form to the output file named
cert.out.
The base-64 encoded certificate (content of the
this:
-----BEGIN CERTIFICATE-----
MIIC2DCCAkGgAwIBAgICEAwwDQYJKoZIhvcNAQEFBQAwfDELMAkGA1UEBhMCVVMxIzA
hBgNVBAoTGlBhbG9va2FWaWxsZSBXaWRnZXRzLCBJbmMuMR0wGwYDVQQLExRXaWRnZX
QgTWFrZXJzICdSJyBVczEpMCcGA1UEAxMgVGVzdCBUZXN0IFRlc3QgVGVzdCBUZXN0I
FRlc3QgQ0EwHhcNOTkwMjE4MDMMzM5WhcNMDAwMjE4MDM0MzM5WjCBrjELMAkGA1UEB
hMCVVMxJjAkBgNVBAoTHU5ldHNjYXBlIENvbW11bmljYXRpb25zIENvcnAuMRUwEwYD
VQQLEwOZXRzY2FwZSBDTVMxGDAWBEBEwhtaGFybXNlbjEfMB0GA1UEAxWaW50ZGV2Y2
EgQWRtaW5pcwp0frfJOObeiSsia3BuifRHBNw95ZZQR9NIXr1x5bE
-----END CERTIFICATE-----
The certificate in pretty -print form (content of the cert.out file) would look
similar to this:
Certificate:
Data:
Version: v3
Serial Number: 0x100C
Signature Algorithm: OID.1.2.840.113549.1.1.5 -1.2.840.113549.1.1.5
cert.in file) would look similar to
Issuer: CN=Test CA,OU=Widget Makers 'R'Us,O=Siroe Corporation,
Widgets\,Inc.,C=US
Validity:
Not Before: Wednesday, February 17, 1999 7:43:39 PM
Not After: Thursday, February 17, 2000 7:43:39 PM
Subject: [email protected],CN=testCA,Administrator, UID=admin,
OU=IS, O=Siroe Corporation,C=US
Subject Public Key Info:
Algorithm: RSA - 1.2.840.113549.1.1.1
Public Key:
30:81:89:02:81:81:00:DE:26:B3:C2:9D:3F:7F:FA:DF:
24:E3:9B:7A:24:AC:89:AD:C1:BA:27:D1:1C:13:70:F7:
96:59:41:1F:4D:21:7A:F5:C7:96:C4:75:83:35:9F:49:
E4:B0:A7:5F:95:C4:09:EA:67:00:EF:BD:7C:39:92:11:
31:F2:CA:C9:16:87:B9:AD:B8:39:69:18:CE:29:81:5F:
58 Netscape Certificate Management System Command-Line Tools Guide • October 2001
Page 59

F3:4D:97:B9:DF:B7:60:B3:00:03:16:8E:C1:F8:17:6E:
7A:D2:00:0F:7D:9B:A2:69:35:18:70:1C:7C:AE:12:2F:
0B:0F:EC:69:CD:57:6F:85:F3:3E:9D:43:64:EF:0D:5F:
EF:40:FF:A6:68:FD:DD:02:03:01:00:01:
Extensions:
Identifier: 2.16.840.1.113730.1.1
Critical: no
Value: 03:02:00:A0:
Identifier: Authority Key Identifier - 2.5.29.35
Critical: no
Key Identifier:
Signature:
Algorithm: OID.1.2.840.113549.1.1.5 - 1.2.840.113549.1.1.5
Signature:
3E:8A:A9:9B:D1:71:EE:37:0D:1F:A0:C1:00:17:53:26:
6F:EE:28:15:20:74:F6:C5:4F:B4:E7:95:3C:A2:6A:74:
92:3C:07:A8:39:12:1B:7E:C4:C7:AE:79:C8:D8:FF:1F:
D5:48:D8:2E:DD:87:88:69:D5:3A:06:CA:CA:9C:9A:55:
DA:A9:E8:BF:36:BC:68:6D:1F:2B:1C:26:62:7C:75:27:
E2:8D:24:4A:14:9C:92:C6:F0:7A:05:A1:52:D7:CC:7D:
E0:9D:6C:D8:97:3A:9C:12:8C:25:48:7F:51:59:BE:3C:
2B:30:BF:EB:0A:45:7D:A6:49:FB:E7:BE:04:05:D6:8F:
Example
EB:B5:11:8F:00:9A:1A:A6:6E:52:94:A9:74:BC:65:CF:
07:89:2A:23:
Chapter 9 Pretty Print Certificate Tool 59
Page 60

Example
60 Netscape Certificate Management System Command-Line Tools Guide • October 2001
Page 61

Chapter 10
Pretty Print CRL Tool
You can use the Pretty Print CRL tool to print the contents of a CRL stored as
ASCII base-64-encoded data in a human-readable form.
The chapter has the following sections:
• Availability (page 61)
• Syntax (page 61)
• Example (page 62)
Availability
This tool is available for AIX 4.3, OSF/1 v4.0D, Solaris 2.6 (SunOS 5.6), Solaris 8,
and Windows NT 4.0.
Syntax
To run the Pretty Print CRL tool, type the following command:
PrettyPrintCrl[.bat] <input_file> [<output-file>]
.bat specifies the file extension; this is required only when running the utility
on a Windows NT system.
<input_file> specifies the path to the file that contains the base-64 encoded
CRL.
<output_file> specifies the path to the file to write the CRL. This argument is
optional; if you don’t specify an output file, the CRL information is written to
the standard output.
61
Page 62

Example
Example
PrettyPrintCrl.bat C:\test\crl.in C:\test\crl.out
The above command takes the base-64 encoded CRL in the crl.in file and writes
the CRL in the pretty-print form to the output file named
crl.out.
The base-64 encoded CRL (content of the
-----BEGIN CRL-----
MIIBkjCBAIBATANBgkqhkiG9w0BAQQFADAsMREwDwYDVQQKEwhOZXRzY2FwZTEXMBUG
A1UEAxMOQ2VydDQwIFRlc3QgQ0EXDTk4MTIxNzIyMzcyNFowgaowIAIBExcNOTgxMjE
1MTMxODMyWjAMMAoGA1UdFQQDCgEBMCACARIXDTk4MTINTEzMjA0MlowDDAKBgNVHRU
EAwoBAjAgAgERFw05ODEyMTYxMjUxNTRaMAwwCgYDVR0VBAMKAQEwIAIBEBcNOTgxMj
E3MTAzNzI0WjAMMAoGA1UdFQQDCgEDMCACAQoXDTk4MTEyNTEzMTExOFowDDAKBgNVH
RUEAwoBATANBgkqhkiG9w0BQQFAAOBgQBCN85O0GPTnHfImYPROvoorx7HyFz2ZsuKs
VblTcemsX0NL7DtOa+MyY0pPrkXgm157JrkxEJ7GBOeogbAS6iFbmeSqPHj8+
-----END CRL-----
crl.in file) would look similar to this:
The CRL in pretty-print form (content of the crl.out file) would look similar to
this:
Certificate Revocation List:
Data:
Version: v2
Signature Algorithm: MD5withRSA - 1.2.840.113549.1.1.4
Issuer: CN=Cert40 Test CA,O=Siroe Corporation
This Update: Thu Dec 17 14:37:24 PST 1998
Revoked Certificates:
Serial Number: 0x13
Revocation Date: Tuesday, December 15, 1998 5:18:32 AM
Extensions:
Identifier: Revocation Reason - 2.5.29.21
Critical: no
Reason: Key_Compromise
Serial Number: 0x12
Revocation Date: Tuesday, December 15, 1998 5:20:42 AM
Extensions:
Identifier: Revocation Reason - 2.5.29.21
Critical: no
Reason: CA_Compromise
62 Netscape Certificate Management System Command-Line Tools Guide • October 2001
Page 63

Serial Number: 0x11
Revocation Date: Wednesday, December 16, 1998 4:51:54 AM
Extensions:
Identifier: Revocation Reason - 2.5.29.21
Critical: no
Reason: Key_Compromise
Serial Number: 0x10
Revocation Date: Thursday, December 17, 1998 2:37:24 AM
Extensions:
Identifier: Revocation Reason - 2.5.29.21
Critical: no
Reason: Affiliation_Changed
Serial Number: 0xA
Revocation Date: Wednesday, November 25, 1998 5:11:18 AM
Extensions:
Identifier: Revocation Reason - 2.5.29.21
Critical: no
Reason: Key_Compromise
Signature:
Algorithm: MD5withRSA - 1.2.840.113549.1.1.4
Signature:
42:37:CE:4E:D0:63:D3:9C:77:C8:99:83:D1:3A:FA:28:
AF:1E:C7:C8:5C:F6:66:CB:8A:B1:56:E5:4D:C7:A6:B1:
7D:0D:2F:B0:ED:39:AF:8C:C9:8D:29:3E:B9:17:82:6D:
79:EC:9A:E4:C4:42:7B:18:13:9E:A2:06:C0:4B:A8:85:
6E:67:92:A8:F1:E3:F3:E2:41:1F:9B:2D:24:D9:DF:4C:
2B:A1:68:CE:96:C7:AF:F7:5B:F7:3D:2F:06:57:39:74:
CF:B2:FA:46:C6:AD:18:60:8D:3E:0C:F7:C1:66:52:37:
CF:89:42:B0:D7:33:C4:95:7E:F4:D9:1E:32:B8:5E:12:
Example
Chapter 10 Pretty Print CRL Tool 63
Page 64

Example
64 Netscape Certificate Management System Command-Line Tools Guide • October 2001
Page 65

Chapter 11
Certificate Database Tool
Certificate Database Tool is a command-line utility that can create the certificate
database file (
list, generate, modify, or delete certificates within the file.
Certificate database management tasks are part of a process that typically also
involves managing key databases (
management process generally begins with creating keys in the key database, then
generating and managing certificates in the certificate database.
cert7.db) for Certificate Management System. The utility can also
key3.db files). The key and certificate
This chapter discusses certificate database management:
• Availability (page 65)
• Syntax (page 66)
• Usage (page 70)
• Examples (page 71)
For information on key database and security module database management, see
Chapter 12, “Key Database Tool” and Chapter 16, “Security Module Database
Tool.”
Availability
This tool is available for AIX 4.3, OSF/1 v4.0D, Solaris 2.6 (SunOS 5.6),
Solaris 8, and Windows NT 4.0.
65
Page 66

Syntax
Syntax
To run Certificate Database Tool, type the following command:
certutil option [arguments]
where options and arguments are combinations of the options and arguments listed
in the following section. Each command takes one option. Each option may take
zero or more arguments. To see a usage string, issue the command without
options, or with the
-H option.
Options and Arguments
Options specify an action and are uppercase. Option arguments modify an action
and are lowercase. Certificate Database Tool command options and their
arguments are defined as follows:
Table 11-1 Command options and their arguments
Option Description
-N Create a new certificate database.
-S Create an individual certificate and add it to a certificate database.
-R Create a certificate-request file that can be submitted to a certificate
authority (CA) for processing into a finished certificate. Output defaults to
standard out unless you use -o output-file argument.
Use the -a argument to specify ASCII output.
-C Create a new binary certificate file from a binary certificate-request file. Use
the -i argument to specify the certificate-request file. If this argument is not
used Certificate Database Tool prompts for a filename.
-A Add an existing certificate to a certificate database. The certificate database
should already exist; if one is not present, this option will initialize one by
default.
-L Listall the certificates, or display information about a named certificate, in a
certificate database.
Use the -h tokenname argument to specify the certificate database on a
particular hardware or software token.
-V Check the validity of a certificate and its attributes.
-M Modify a certificate’s trust attributes using the values of the -t argument.
66 Netscape Certificate Management System Command-Line Tools Guide • October 2001
Page 67

Syntax
Table 11-1 Command options and their arguments
-H Displaya list of the options and arguments used by Certificate Database
Tool.
Argument
-a Use ASCII format or allow the use of ASCII format for input or output. This
formattingfollows RFC #1113. For certificate requests, ASCII output
defaults to standard output unless redirected.
-b
validity-time Specify a time at which a certificate is required to be valid. Use when
checking certificate validity with the -V option. The format of the
validity-time argument is "YYMMDDHHMMSS[+HHMM|-HHMM|Z]".
Specifying seconds (SS) is optional. When specifying an explicit time, use
"YYMMDDHHMMSSZ". When specifying an offset time, use
"YYMMDDHHMMSS+HHMM" or "YYMMDDHHMMSS-HHMM". If this option is not
used, the validity check defaults to the current system time.
issuer Identifythe certificate of the CA from which a new certificate will derive its
-c
authenticity. Use the exact nickname or alias of the CA certificate, or use the
CA’s email address. Bracket the issuer string with quotation marks if it
contains spaces.
certdir Specify a directory containinga certificate database file. On Unix Certificate
-d
DatabaseTool defaults to $HOME/.netscape (that is, ~/.netscape
). On
Windows NT the default is the current directory.
The cert7.db and key3.db database files must reside in the same
directory.
-e Check a certificate’s signature during the process of v alidating a certificate.
password-file Specify a file that will automatically supply the password to include in a
-f
certificate or to access a certificate database. This is a plain-text file
containing one password. Be sure to prevent unauthorized access to this
file.
-h tokenname Specify the name of a token to use or act on. Unless specified otherwise the
default token is an internal slot (specifically, internal slot 2). This slot can
also be explicitly named with the string “internal”. An internal slots is a
virtual slot maintained in software, rather than a hardware device. Internal
slot2isusedbykeyandcertificateservices.Internalslot1isusedby
cryptographic services.
-i cert|cert-request-file Specify a specific certificate, or a certificate-request file.
-k
shortkeyID Specify the public key to use when creating a certificate or certificate
request. The shortkeyID is the first few bytes of the keyID (as shown by the
keyutil -L command), starting from the second byte, with a length
sufficient to identify it uniquely.
Chapter 11 Certificate Database Tool 67
Page 68

Syntax
Table 11-1 Command options and their arguments
-l Display detailed information when validating a certificate with the -V
option.
-m serial-number Assign a unique serial number to a certificate being created. This operation
should be performed by a CA. The default serial number is 0 (zero). Serial
numbers are limited to integers.
-n
certname Specify the nickname of a certificate t o list, create, add to a database,
modify, or validate. Bracket the certname string with quotation marks if it
contains spaces.
-o
output-file Specify the output file name for new certificates or binary certificate
requests. Bracket the output-file string with quotation marks if it contains
spaces. If this argument is not used the output destination defaults to
standard output.
phone Specify a contact telephone number to include in new certificates or
-p
certificate requests. Bracket this string with quotation marks if it contains
spaces.
-r Display a certificate’s binary DER encoding when listing information about
that certificate with the -L option.
-s subject Identify a particular certificate owner for new certificates or certificate
requests. Bracket this string with quotation marks if it contains spaces. The
subject identification format follows RFC #1485.
trustargs Specifythe trust attributes to modify in an existing certificate or to apply to
-t
a certificate when creating it or adding it to a database.
There are three available trust categories for each certificate, expressed in
this order: "SSL, email, object signing". In each category position use zero or
more of the following attribute codes:
p Valid peer
P Trusted peer (implies p)
c Valid CA
T Trusted CA to issue client certificates (implies c)
C Trusted CA to issue server certificates (SSL only)
(implies c)
u Certificate can be used for authentication or signing
w Send warning (use with other attributes to include a warning when the
certificate is used in that context)
The attribute codes for the categories are separated by commas, and t he
entire set of attributes enclosed by quotation marks. For example:
-t "TCu,Cu,Tuw"
Use the -L option to see a list of the current certificates and trust attributes
in a certificate database.
68 Netscape Certificate Management System Command-Line Tools Guide • October 2001
Page 69

Table 11-1 Command options and their arguments
-u certusage Specify a usage context to apply when validating a certificate with the -V
option. The contexts are the following:
C (a s an SSL client)
V (as a n SSL server)
S (as a n email signer)
R (as an email recipient)
valid-months Setthe number of months a new certificatewill be valid. The validity period
-v
begins at the current system time unless an offset is added or subtracted
with the -w option. If this argument is not used, the default validity period
is three months. When this argument is used, the default three-month
period is automatically added to any value given in the valid-month
argument. For example, using this option to set a value of 3 would cause 3
to be added to the three-month default, creating a validity period of six
months. You can use negative values to reduce the default period. For
example, setting a value of -2 would subtract 2 from the default and create
a validity period of one month.
offset-months Set an offset from the current system time, in months, for the beginning of a
-w
certificate’svalidity period. Use when creating the certificate or adding it to
a database. Express the offset in integers, using a minus sign (-)toindicate
a n egative offset. If this argument is not used, the validity period begins at
the current system time. The length of the validity period is set with the -v
argument.
Syntax
-x Use Certificate Database Tool to generate the signature for a certificate
being created or added to a database,ratherthanobtaininga signaturefrom
a separate CA.
-y rsa|dsa Specify the type of key used to generate a new certificate, either RSA or
DSA. The default is rsa.
-1 Adda key usage extension to a certificate that is being created or added to a
database. This extension allows a certificate’s key to be dedicated to
supporting specific operations such as SSL server or object signing.
Certificate Database Tool will prompt you to select a particular usage for
the certificate’s key. These usages are described under "Standard X.509 v3
Certifiate Extensions’ in Appendix C of CMS Plug-ins Guide.
-2 Add a basic constraint extension to a certificate that is being created or
added to a database. This extension supports the certificate chain
verification process. Certificate Database Tool will prompt you to select the
certificate constraint extension. Constraint extensions are described in
"Standard X.509 v3 Certifiate Extensions’ in Appendix C of CMS Plug-ins
Guide.
Chapter 11 Certificate Database Tool 69
Page 70

Usage
Table 11-1 Command options and their arguments
-3 Add an authority key ID extension to a certificate that is being created or
added to a database. This extension supports the identification of a
particular certificate, from among multiple certificates associated with one
subject name, as the correct issuer of a certificate. Certificate Database Tool
will prompt you to select the authority key ID extension. Authority key ID
extensions are described under "Standard X.509 v3 Certifiate Extensions’ in
Appendix C of CMS Plug-ins Guide.
-4 Add a CRL distribution point extension to a certificate that is being created
or added to a database. This extension identifies the URL of a certificate’s
associated certificate revocation list (CRL). Certificate Database Tool
prompts you to enter the URL.
Usage
Certificate Database Tool’s capabilities are grouped as follows, using these
combinations of optionsand arguments. Options and arguments in square brackets
are optional, those without square brackets are required.
• Creating a new
-N [-d certdir]
cert7.db file:
• Creating a new certificate and adding it to the database with one command:
-S -k shortkeyID -y rsa|dsa -n certname -s subject
[-c issuer |-x] -t trustargs [-h tokenname]
[-m
serial-number] [-v valid-months] [-w offset-months]
[-d
certdir] [-p phone] [-f password-file] [-1] [-2] [-3] [-4]
• Making a separate certificate request:
-R -k shortkeyID -y rsa|dsa -s subject [-h tokenname]
[-d
certdir] [-p phone] [-o output-file] [-f password-file]
• Creating a new binary certificate from a binary certificate request:
-C [-c issuer |-k shortkeyID -y rsa|dsa -x] [-f password-file]
[-h
tokenname]-icert-request-file -o output-file [-m serial-number]
[-v
valid-months][-woffset-months] [-d certdir] [-1] [-2] [-3]
[-4]
70 Netscape Certificate Management System Command-Line Tools Guide • October 2001
Page 71

Examples
• Adding a certificate to an existing database:
-A -n certname -t trustargs [-h tokenname][-dcertdir] [-a]
[-i
cert-request-file]
• Listing all certificates or a named certificate:
-L [-n certname] [-d certdir] [-r] [-a]
• Validating a certificate:
-V -n certname -b validity-time -u certusage [-e] [-l] [-d certdir]
• Modifying a certificate’s trust attribute:
-M -n certname -t trustargs [-d certdir]
• Displaying a list of the options and arguments used by Certificate Database
Tool:
-H
Examples
This section contains examples for the following tasks:
• Creating a New Certificate Database
• Listing Certificates in a Database
• Creating a Certificate Request
• Creating a Certificate
• Adding a Certificate to the Database
• Validating a Certificate
Creating a New C ertificate D atabase
This example creates a new certificate database (cert7.db file) in the specified
directory:
certutil -N -d certdir
You must generate the associated
Database Tool or other tools.
key3.db and secmod.db files by using the Key
Chapter 11 Certificate Database Tool 71
Page 72

Examples
Listing Certificates in a Database
This example lists all the certificates in the cert7.db file in the specified directory:
certutil -L -d certdir
Certificate Database Tool displays output similar to the following:
Certificate Name Trust Attributes
Uptime Group Plc. Class 1 CA C,C,
VeriSign Class 1 Primary CA ,C,
VeriSign Class 2 Primary CA C,C,C
AT&T Certificate Services C,C,
GTE CyberTrust Secure Server CA C,,
Verisign/RSA Commercial CA C,C,
AT&T Directory Services C,C,
BelSign Secure Server CA C,,
Verisign/RSA Secure Server CA C,C,
GTE CyberTrust Root CA C,C,
Uptime Group Plc. Class 4 CA ,C,
VeriSign Class 3 Primary CA C,C,C
Canada Post Corporation CA C,C,
Integrion CA C,C,C
IBM World Registry CA C,C,C
GTIS/PWGSC, Canada Gov. Web CA C,C,
GTIS/PWGSC, Canada Gov. Secure CA C,C,C
MCI Mall CA C,C,
VeriSign Class 4 Primary CA C,C,C
KEYWITNESS, Canada CA C,C,
BelSign Object Publishing CA ,,C
BBN Certificate Services CA Root 1 C,C,
p Valid peer
P Trusted peer (implies p)
c Valid CA
T Trusted CA to issue client certs (implies c)
C Trusted CA to issue server certs(for ssl only) (implies c)
u User cert
w Send warning
Creating a Certificate Request
This example generates a binary certificate request file named e95c.req in the
specified directory:
certutil -R -s "CN=John Smith, O=Netscape, L=Mountain View,
ST=California, C=US" -p "650-555-8888" -k e95c -o e95c.req -d
72 Netscape Certificate Management System Command-Line Tools Guide • October 2001
certdir
Page 73

Examples
Before it creates the request file, Certificate Database Tool prompts you for a
password:
Enter Password or Pin for "Communicator Certificate DB":
Creating a Certificate
A valid certificate must be issued by a trusted CA. If a CA key pair is not available,
you can create a self-signed certificate (for purposes of illustration) with the
argument. This example creates a new, self-signed binary certificate named
e95c.crt, from a binary certificate request named e95c.req, in the specified
directory.
certutil -C -i e95c.req -o e95c.crt -k e95c -m 1234
password-file -x -d certdir
-f
-x
The following example creates a new binary certificate named
binary certificate request named
the self-signed certificate created above,
certutil -C -m 2345 -i one.req -o one.crt -c e95c.crt -d certdir
one.req, in the specified directory. It is issued by
e95c.crt.
one.crt,froma
Adding a Certificate to the Database
This example adds a certificate to the certificate database:
certutil -A -n [email protected] -t "C,C,C" -i e95c.crt
-d
certdir
You can see this certificate in the database with this command:
certutil -L -n [email protected] -d certdir
Certificate Database Tool displays output similar to the following:
Certificate:
Data:
Version: 3 (0x2)
Serial Number: 0 (0x0)
Signature Algorithm: PKCS #1 MD5 With RSA Encryption
Issuer: CN=John Smith, O=Netscape, L=Mountain View,
ST=California, C=US
Validity:
Chapter 11 Certificate Database Tool 73
Page 74

Examples
Not Before: Thu Mar 12 00:10:40 1998
Not After: Sat Sep 12 00:10:40 1998
Subject: CN=John Smith, O=Netscape, L=Mountain View, ST=California,
C=US
Subject Public Key Info:
Public Key Algorithm: PKCS #1 RSA Encryption
RSA Public Key:
Modulus:
00:da:53:23:58:00:91:6a:d1:a2:39:26:2f:06:3a:
38:eb:d4:c1:54:a3:62:00:b9:f0:7f:d6:00:76:aa:
18:da:6b:79:71:5b:d9:8a:82:24:07:ed:49:5b:33:
bf:c5:79:7c:f6:22:a7:18:66:9f:ab:2d:33:03:ec:
63:eb:9d:0d:02:1b:da:32:ae:6c:d4:40:95:9f:b3:
44:8b:8e:8e:a3:ae:ad:08:38:4f:2e:53:e9:e1:3f:
8e:43:7f:51:61:b9:0f:f3:a6:25:1e:0b:93:74:8f:
c6:13:a3:cd:51:40:84:0e:79:ea:b7:6b:d1:cc:6b:
78:d0:5d:da:be:2b:57:c2:6f
Exponent: 65537 (0x10001)
Signature Algorithm: PKCS #1 MD5 With RSA Encryption
Signature:
44:15:e5:ae:c4:30:2c:cd:60:89:f1:1d:22:ed:5e:5b:10:c8:
7e:5f:56:8c:b4:00:12:ed:5f:a4:6a:12:c3:0d:01:03:09:f2:
2f:e7:fd:95:25:47:80:ea:c1:25:5a:33:98:16:52:78:24:80:
c9:53:11:40:99:f5:bd:b8:e9:35:0e:5d:3e:38:6a:5c:10:d1:
c6:f9:54:af:28:56:62:f4:2f:b3:9b:50:e1:c3:a2:ba:27:ee:
07:9f:89:2e:78:5c:6d:46:b6:5e:99:de:e6:9d:eb:d9:ff:b2:
5f:c6:f6:c6:52:4a:d4:67:be:8d:fc:dd:52:51:8e:a2:d7:15:
71:3e
Certificate Trust Flags:
SSL Flags:
Valid CA
Trusted CA
Email Flags:
Valid CA
Trusted CA
Object Signing Flags:
Valid CA
Trusted CA
Validating a Certificate
This example validates a certificate:
certutil -V -n [email protected] -b 9803201212Z -u SR -e -l
-d
certdir
74 Netscape Certificate Management System Command-Line Tools Guide • October 2001
Page 75

Certificate Database Tool shows results similar to
Certificate:’[email protected]’ is valid.
or
UID=jsmith, [email protected], CN=John Smith, O=Netscape
Communications Corp., C=US : Expired certificate
or
UID=jsmith, [email protected], CN=John Smith, O=Netscape
Communications Corp., C=US : Certificate not approved for this
operation
Examples
Chapter 11 Certificate Database Tool 75
Page 76

Examples
76 Netscape Certificate Management System Command-Line Tools Guide • October 2001
Page 77

Chapter 12
Key Database Tool
KeyDatabaseToolisacommand-lineutilitythatcanmodifythekeydatabasefile
key3.db) of Netscape Certificate Management System (CMS). You can use the
(
utility to create or change the database password, generate new public and private
key pairs, display the contents of the database, or delete key pairs from the
database.
Key database management tasks are part of a process that typically also involves
managing client certificate databases (
management process generally begins with creating keys in the key database, then
generating and managing certificates in the certificate database.
cert7.db file). The key and certificate
This chapter discusses key database management. For information on certificate
database and security module database management, see Chapter 11, “Certificate
Database Tool” and Chapter 16, “Security Module Database Tool.”
This chapter has the following sections:
• Availability (page 77)
• Syntax (page 78)
• Usage (page 80)
• Examples (page 81)
Availability
This tool is available for AIX 4.3, OSF/1 v4.0D, Solaris 2.6 (SunOS 5.6),
Solaris 8, and Windows NT 4.0.
77
Page 78

Syntax
Syntax
To run Key Database Tool, type the command
keyutil option [arguments]
where option and arguments are combinations of the options and arguments listed
in the following section. Each command takes one option. Each option may take
zero or more arguments. To see a usage string, issue the command without
options, or with the
-H option.
Options and Arguments
Options specify an action and are uppercase. Option arguments modify an action
and are lowercase. Key Database Tool options and their arguments are defined as
follows:
Table 12-1 Description of options and arguments
Option Description
-N Create a new key database and set its password.
Use the -h tokenname argument to specify a specific hardware or software token
in which to create the new database.
-C Change the password to a key database.
-G Generate a new public and private key pair within a database. The key database
should already exist; if one is not present, this option will initialize one by
default.
Some smart cards (for example, the Litronic card) can store only one key pair. If
you create a new key pair for such a card, the previous pair is overwritten.
-L List the keyID of keys in the key database. A keyID is the modulus of the RSA
key or the publicValue of the DSA key. IDs are displayed in hexadecimal
(“0x” is not shown).
You can identify keys by a shortkeyID. The shortkeyID is the first few bytes of
the keyID, starting from the second byte, with a length sufficient to identify it
uniquely.
Use the -a argument to list keys of all tokens. Otherwise the list will contain
only keys in the default (internal) slot.
Use the -l argument to list DSA as well as RSA keys.
-P Display public key information on the s creen.
78 Netscape Certificate Management System Command-Line Tools Guide • October 2001
Page 79

Table 12-1 Description of options and arguments (Continued)
-D Delete a private key from a key database. Specify the key to delete with the -k
argument. Specify the database from which to delete the key with the -d
argument.
Use the -t argument to specify explicitly whether to delete a DSA or an RSA
key. If you do not use the -t argument, the option looks for an RSA key
matching the shortkeyID.
When you delete keys, be sure to also remove any certificates associated with
those keys from the certificate database, by using the Certificate Database Tool.
Some smart cards (for example, the Litronic card) do not let you remove a public
key you have generated. In such a case, only the private key is deleted from the
key pair. You can display the public key with the command keyutil -L -h
tokenname.
-H Display a list of the options and arguments used by Key Database Tool.
Argument Description
-a List the RSA keys of all tokens when listing keys in the database.
Syntax
-d
keydir Specify a directory containing a key database file. On Unix Key Database Tool
defaults to $HOME/.netscape (that is, ~/.netscape
), and on Windows NT
the default is the current directory.
The key3.db and cert7.db database files must reside in the same directory.
-e
exp Set an alternate exponent value to use in generating a new RSA public key for
the database, instead of the default value of 65537. The available alternate
values are 3 and 17.
-f noise-file Read a seed value from the specified binary file to use in generating a new RSA
private and public key pair. This argument makes it possible to use
hardware-generated seed values and unnecessary to manually create a value
from the keyboard. The minimum file size is 20 bytes.
-h tokenname Specify the name of a token to act on. Unless otherwise specified, the default
token is an internal slot (specifically, internal slot 2). An internal slot is a virtual
slot maintained in software, rather than a hardware device. Internal slot 2 is
used by key and certificate services. Internal slot 1 is used by cryptographic
services.
Use the Module Database Tool (modutil -list) to get a list of token names in
the module database.
-k shortkeyID Specify a private key by using the key identifier. You can use the complete
keyID (as shown by the -L option), or the shortkeyID. The shortkeyID is the
first few bytes of the keyID, starting from the second byte, with a length
sufficient to identify it uniquely. If you specify a shortkeyID that is not unique,
the first private key that matches the shortkeyID is found.
Chapter 12 Key Database Tool 79
Page 80

Usage
Table 12-1 Description of options and arguments (Continued)
-l List DSA as well as RSA keys when listing keys in the key database.
-q pqgfile Read an alternate PQG value from the specified file when generating DSA key
pairs. If this argument is not used, Key Database Tool generates its own PQG
value. PQG files are created with a separate DSA utility.
-s
size Seta key size to use when generating new public and private key pairs. The
minimum is 256 bits and the maximum is 1024 bits. The default is 1024
bits. Any size between the minimum and maximum is allowed.
-t rsa|dsa Specify the type of a key, either RSA or DSA. The default value is rsa.By
specifying the type of key you can avoid mistakes caused by duplicate
shortkeyIDs.
-w password-file Specify a file to automatically supply the password necessary to access a key
database. This is a plain-text file containing one password. You should not use
this argument if you are accessing an internal slot and hardware tokens that use
different passwords. Be sure to prevent unauthorized access to this file.
Usage
Key Database Tool’s capabilities are grouped as follows, using these combinations
of options and arguments. The specifications in square brackets are optional, those
without square brackets are required.
• Creating a new
-N [-d keydir] [-w password-file]
key3.db file and setting its password:
• Changing the password to a key database file:
-C [-d keydir]
• Generating new RSA key pairs in a key database file:
-G [-h tokenname] [-t rsa] [-s num][-e exp] [-d keydir]
[-f
noise-file] [-w password-file]
• Generating new DSA key pairs in a key database file:
-G [-h tokenname] -t dsa [-q pqgfile -s num]
[-d
keydir] [-w password-file]
• Listing the keyIDs of the keys in a database:
-L [-a] [-l] [-t rsa|dsa] [-h tokenname] [-d keydir]
80 Netscape Certificate Management System Command-Line Tools Guide • October 2001
Page 81

• Displaying public key information from the database:
• Deleting private keys from a key database file:
• Displaying a list of the options and arguments used by Key Database Tool:
Examples
Includes the following:
• Creating a Key Database
-P -k shortkeyID [-t rsa|dsa] [-h tokenname]
[-d
keydir] [-w password-file]
-D -k shortkeyID [-t rsa|dsa] [-h tokenname]
[-d
keydir] [-w password-file]
-H
Examples
• Generating a New Key
• Displaying Public Key Information
• Listing Key IDs
• Deleting a Private Key
Creating a Key Database
This example creates new key database files (key3.db and secmod.db)inthe
specified directory:
keyutil -N -d keydir
KeyDatabaseToolpromptsyouasfollows:
Creating a brand new key database:keydir/key3.db
Database not initialized. Setting password.
Enter new password:
Re-enter password:
After you enter the password, Key Database Tool creates new key3.db and
secmod.db files in the specified directory.
Chapter 12 Key Database Tool 81
Page 82

Examples
Generating a New Key
This example generates a new key in a key database:
keyutil -G -d keydir
Key Database Tool then displays the following:
---------------------------------------------------Netscape Communications Corporation
Key Generation
-------------------------------------------------------Welcome to the key generator. With this program, you can
generate the public and private keys that you use for secure
communications.
A random seed must be generated that will be used in the
creation of your key. One of the easiest ways to create a random
seed is to use the timing of keystrokes on a keyboard.
You have specified the name 'mykey' for your key
If this is correct, press enter:
To begin, type keys on the keyboard until this progress meter is
full. DO NOT USE THE AUTOREPEAT FUNCTION ON YOUR KEYBOARD!
Continue typing until the progress meter is full:
|************************************************************|
Finished. Press enter to continue:
Generating key. This may take a few moments...
Password:
generated public/private key pair
Note that if you do not specify a token name, the key is generated on the internal
slot. This is equivalent to the
If you use the
-f noise-file argument, Key Database Tool does not ask for keyboard
-h internal argument.
input.
If you use the
-w password-file argument, Key Database Tool reads the password
from the file instead of asking for keyboard input. Avoid using this argument
when you are accessing both the internal slot and tokens that have different
passwords.
82 Netscape Certificate Management System Command-Line Tools Guide • October 2001
Page 83

Displaying Public Key Information
This example prints the public key’s information:
keyutil -P -k e95c -d keydir
The public key information appears after you give the correct password:
Password:
It’s the first key found.
RSA Public-Key:
modulus:
00:e9:5c:4a:73:74:39:22:6d:c6:da:4e:b3:1f:01:26:9d:be:
d1:74:ae:cd:c7:7d:65:f9:1d:31:1f:71:fb:60:d0:45:46:5f:
5a:19:e7:61:1e:e7:ce:9f:4a:13:4e:d6:e9:06:90:2a:ba:bd:
0b:5f:7b:a3:28:21:1e:0f:1c:f4:3a:ba:3a:8f:0b:e1:99:91:
cc:e8:fd:17:d2:1c:66:13:6b:95:27:b1:eb:bc:9c:e6:7b:f0:
3a:b9:44:dc:24:a6:f8:83:9a:9e:80:3f:74:48:09:6b:3f:a6:
46:51:be:e0:1b:51:87:8c:44:94:f0:fe:41:fe:b4:9f:4c:0a:
04:a9:a1
publicExponent: 65537 (0x10001)
Examples
Listing Key IDs
This command lists the key IDs in the key database:
keyutil -L -d keydir
After you enter the password, Key Database Tool displays the following:
RSA Public-Key:
modulus:
00:e9:5c:4a:73:74:39:22:6d:c6:da:4e:b3:1f:01:26:9d:be:
d1:74:ae:cd:c7:7d:65:f9:1d:31:1f:71:fb:60:d0:45:46:5f:
5a:19:e7:61:1e:e7:ce:9f:4a:13:4e:d6:e9:06:90:2a:ba:bd:
0b:5f:7b:a3:28:21:1e:0f:1c:f4:3a:ba:3a:8f:0b:e1:99:91:
cc:e8:fd:17:d2:1c:66:13:6b:95:27:b1:eb:bc:9c:e6:7b:f0:
3a:b9:44:dc:24:a6:f8:83:9a:9e:80:3f:74:48:09:6b:3f:a6:
46:51:be:e0:1b:51:87:8c:44:94:f0:fe:41:fe:b4:9f:4c:0a:
04:a9:a1
When unmodified, this command lists all the RSA keys in the default (internal)
slot. You can refine this command’s output with the
-a, -h,and-l arguments.
Chapter 12 Key Database Tool 83
Page 84

Examples
DeletingaPrivateKey
This example deletes a private key from the key database:
keyutil -D -k e95c -d keydir
When you delete keys, be sure to remove any certificates associated with those
keys from the certificate database by using the Certificate Database Tool.
84 Netscape Certificate Management System Command-Line Tools Guide • October 2001
Page 85

Chapter 13
Netscape Signing Tool
This chapter describes how to use version 1.3 of Netscape Signing Tool (signtool
on the command line) to digitally sign software, including binary files intended for
distribution via SmartUpdate, Java class files, and JavaScript scripts. Version 1.3
includes all the capabilities of, and is fully compatible with, previous versions of
Netscape Signing Tool (.50, .60, 1.0, 1.1, and 1.2).
This chapter has these sections:
• Introduction to Netscape Signing Tool (page 85)
• Using Netscape Signing Tool (page 89)
• SignTool Syntax and Options (page 95)
• Generating Test Object-Signing Certificates (page 102)
• Using Netscape Signing Tool with Smart Cards (page 104)
• Netscape Signing Tool and FIPS-140-1 (page 107)
• Answers to Common Questions (page 109)
Introduction to Netscape Signing Tool
This section reviews basic concepts that you need to understand before you begin
using version 1.3 of Netscape Signing Tool to sign files or JavaScript scripts. If you
are already familiar with object-signing concepts, go straight to “Using Netscape
Signing Tool” on page 89.
• What Is Netscape Signing Tool?
• JAR Format and JAR Archives
• What Signing a File Means
85
Page 86

Introduction to Netscape Signing Tool
• Object-Signing Certificates
For a complete introduction to object signing technology, see Netscape Object
Signing: Establishing Trust for Downloaded Software at this URL:
http://developer.netscape.com/docs/manuals/signedobj/trust/index.ht
m
What Is Netscape Signing Tool?
Netscape Signing Tool is a stand-alone command-line tool that creates digital
signatures and uses the Java Archive (JAR) format to associate them with files in a
directory. It is intended for use by sys tem administrators and by developers who
want to distribute software electronically over the Internet.
Netscape Signing Tool 1.3 is available for AIX 4.3, OSF/1 v4.0D, Solaris 2.6 (SunOS
5.6), Solaris 8, and Windows NT 4.0.
This chapter describes how to use Netscape Signing Tool 1.3 to sign Java applets,
JavaScript scripts, plug-ins, and other files and how to package the signed objects
in a JAR archive (also called a JAR file), which is a digital envelope for a compressed
collection of files. Communicator client software uses JAR archives to install or
update software automatically.
Electronic software distribution over any network involves potential security
problems. To help address some of these problems, you can associate digital
signatures with the files in a JAR archive. Digital signatures allow Communicator
to perform two operations that are important to end users:
• Confirm the identity of the individual, company, or other entity whose digital
signature is associated with the files
• Check whether the files have been tampered with since being signed
You do not need to understand the technical details of JAR archives or digital
signatures to use Netscape Signing Tool. However, you do need some familiarity
with the concepts described in the rest of this chapter. If you are already familiar
with basic object-signing concepts, go straight to “Using Netscape Signing Tool” on
page 89.
86 Netscape Certificate Management System Command-Line Tools Guide • October 2001
Page 87

Introduction to Netscape Signing Tool
JAR Format and JAR Archives
The Java Archive (JAR) format is a set of conventions for associating digital
signatures, installer scripts, and other information with files in a directory. Signing
tools such as Netscape Signing Tool allow you to sign files using the JAR format
and package them as a single JAR file. JAR files are used by Communicator client
software to support automatic software installation, user-controlled access to local
system resources by Java applets, and other features that help address potential
security problems.
The JAR file type is a registered Internet MIME type based on the standard
cross-platform ZIP archive format. A JAR file functions as a digital envelope for a
compressed collection of files. The JAR file type is distinct from the JAR format,
which is simply a way of organizing information in a directory.
Because the JAR format doesn’t require a dig ital signature to be stored physically
inside the file with which it is associated, JAR files are extremely flexible. You can
use Netscape Signing Tool to sign any files, including Java class files,
Communicator plug-ins, or any other kind of document or application. You can
also use version 1.1 and later versions of Netscape Signing Tool to sign inline
JavaScript scripts.
YoumustcreateaJARfileifyouwanttotakeadvantageofCommunicator’s
SmartUpdate feature. Communicator can automatically locate, download, and
install components, plug-ins, and Java classes on a user’s machine, thus freeing the
user from this chore. Automatic software installation also helps both software
developers who want to distribu te software and updates over the Internet and
system administrators using Mission Control to manage a corporate intranet.
You don’t need to know anything else about the JAR format to use Netscape
Signing Tool, which takes care of the details for you. For detailed information
about the JAR format, see The Jar Format at this URL:
http://developer.netscape.com/docs/manuals/signedobj/jarfile/index.
html
For detailed information about using the JAR Installation Manager to package your
software for use with SmartUpdate, see Using JAR Installation Manager for
SmartUpdate at this URL:
http://developer.netscape.com/docs/manuals/communicator/jarman/inde
x.htm
Chapter 13 Netscape Signing Tool 87
Page 88

Introduction to Netscape Signing Tool
What Signing a File Means
If you have a signing certificate, you can use Netscape Signing Tool to digitally
sign files and package them as a JAR file. An object-signing certificate is a special
kind of certificate that allows you to associate your digital signature with one or
more files. For information about obtaining an object-signing certificate, see
Object-Signing Tools at this URL:
http://developer.netscape.com/docs/manuals/index.html?content=secur
ity.html
An individual file can potentially be signed with multiple digital signatures. For
example, a commercial software developer might sign the files that constitute a
software product to prove that the files are indeed from a particular company. A
network administrator manager might sign the same files with an additional
digital signature based on a company-generated certificate to indicate that the
product is approved for use within the company.
The significance of a digital signature is comparable to the significance of a
handwritten signature. Once you have signed a file, it is difficult to claim later that
you didn’t sign it. In some situations, a d igital signature may be considered as
legally binding as a handwritten signature. Therefore, you should take great care to
ensure that you can stand behind any file you sign and distribute.
For example, if you are a software developer, you should test your code to make
sure it is virus-free before signing it. Similarly, if you are a network administrator,
you should make sure, before signing any code, that it comes from a reliable source
and will run correctly with the software installed on the machines to which you are
distributing it.
Object-Signing Certificates
Before you can use Netscape Signing Tool to sign files, you must have an
object-signing certificate, which is a special certificate whose associated private key
is used to create digital signatures.
For testing purposes only, you can create an object-signing certificate with
Netscape Signing Tool 1.3. When testing is finished and you are ready to disitribute
your software, you should obtain an object-signing certificate from one of two
kinds of sources:
• An independent certificate authority (CA) that authenticates your identity and
charges you a fee. You typically get a certificate from an independent CA if you
want to sign software that will be distributed over the Internet.
88 Netscape Certificate Management System Command-Line Tools Guide • October 2001
Page 89

Using Netscape Signing Tool
• CA server software running on your corporate intranet or extranet. Netscape
Certificate Management System provides a complete management solution for
creating, deploying, and managing certificates, including CAs that issue
object-signing certificates.
You must also have a certificate for the CA that issues your signing certificate
before you can sign files. If the certificate authority's certificate isn't already
installed in your copy of Communicator, you typically install it by clicking the
appropriate link on the certificate authority's web site, for example on the page
from which you initiated enrollment for your signing certificate. This is the case for
some test certificates, as well as certificates issued by Netscape Certificate
Management System: you must download the the CA certificate in addition to
obtaining your own signing certificate. CA certificates for several certificate
authorities are preinstalled in the Communicator certificate database.
When you receive an object-signing certificate for your own use, it is automatically
installed in your copy of the Communicator client software. Communicator
supports the public-key cryptography standard known as PKCS #12, which
governs key portability. You can, for example, move an object-signing certificate
and its associated private key from one comp uter to another on a credit-card-sized
device called a smart card. For motr information, see “Using Netscape Signing Tool
with Smart Cards” on page 104.
Using Netscape Signing Tool
This section describes how to use Netscape Signing Tool to create digital signatures
for files in a directory and to associate the signatures with the files according to the
JAR format. Netscape Signing Tool also provides an option that automatically
creates a JAR file containing the directory; this option was not implemented in
pre-1.0 versions. For maximum flexibility, and for compatibility with scripts that
used earlier versions of Netscape Signing Tool, you can still use a ZIP utility to
create the JAR file.
• Getting Ready to Use Netscape Signing Tool
• Signing a File
• Using Netscape Signing Tool with a ZIP Utility
• Tips and Techniques
For a complete list of Netscape Signing Tool command-line options, see “SignTool
Syntax and Options” on page 95.
Chapter 13 Netscape Signing Tool 89
Page 90

Using Netscape Signing Tool
Getting Ready to Use Netscape Signing Tool
Before using Netscape Signing Tool, you must have the signtool executable in
your path environment variable. You must also have an object-signing certificate.
Netscape Signing Tool includes an option that allows you to generate an
object-signing certificate for testing purposes. For information about using this
option, see “Generating Test O bject-Signing Certificates” on page 102.
Although suitable for testing purposes, the object-signing certificate produced by
Netscape Signing Tool is not recommended for signing finished software that will
be widely distributed over the Internet or an intranet. When you are ready to sign
finished software, you will need to get an object-signing certificate from your
company’s internal certificate authority, if it has one, or from a third-party
certificate authority.
The sections that follow describe how to prepare Netscape Signing Tool for signing
files.
Setting Up Your Certificate
These instructions apply to an object-signing certificate obtained from a third party
or an in-house CA for use in signing finished code. During development, you may
wish to use a special certific ate generated by Netscape Signing Tool for testing
purposes.
If you obtained your object-signing certificate while running Communicator on a
system that’s different from the system on which you intend to sign files, you need
to copy your certificate and private key files to the new system. Communicator’s
certificate and key databases are portable among all platforms.
On the computer where you ran Communicator to get the object-signing certificate,
locate the files
system, these files are found at
You must copy these files to the system where you intend to sign pages. (If you use
FTP, be sure to transfer in binary mode.)
If you are running Netscape Signing Tool on a Unix system and you don’t already
have a
~/.netscape directory, first run Communicator once to create one. If you
want to maintain w hatever certificates are already in your
put the existing
replacing them with the versions that include the object-signing certificate you
want to use with Netscape Signing Tool.
key3.db and cert7.db. For example, on a typical Windows NT
C:\Program Files\NETSCAPE\USERS\username\.
~/.netscape directory,
key3.db and cert7.db files in some other directory before
If you are using Unix, set up an alias to call
90 Netscape Certificate Management System Command-Line Tools Guide • October 2001
signtool, or place it in your path.
Page 91

Using Netscape Signing Tool
If you are using Windows 95 or NT, the signtool executable doesn't know where
your certificates are, so either put the
directory and use “
-d.”oruse-d to point to the directory in which they are
key3.db and cert7.db files in the current
located.
CAUTION Keep copies of the key3.db and cert7.db files somewhere separate
from the copies you use with the
signtool executable. This ensures
that you won’t lose your certificates if you accidentally damage the
files. If your keys are on external tokens, such as smart cards, you
should keep a copy the
secmod.db file.
Listing Available Certificates
You use the -L option to list the nicknames for all available certificates and check
which ones are signing certificates, as shown in this Unix example:
% signtool -L
using certificate directory: /u/jsmith/.netscape
S Certificates
- ------------
BBN Certificate Services CA Root 1
IBM World Registry CA
VeriSign Class 1 CA - Individual Subscriber - VeriSign, Inc.
GTE CyberTrust Root CA
Uptime Group Plc. Class 4 CA
* Verisign Object Signing Cert
Integrion CA
GTE CyberTrust Secure Server CA
AT&T Directory Services
* test object signing cert
Uptime Group Plc. Class 1 CA
VeriSign Class 1 Primary CA
- ------------
Certificates that can be used to sign objects have *'s to their left.
%
In the above example, two signing certificates are displayed: Verisign Object
Signing Cert
You use the
CA for each, as shown in this Unix example:
% signtool -l
using certificate directory: /u/jsmith/.netscape
Object signing certificates
---------------------------------------
and test object signing cert.
-l option to get a list of signing certificates only, including the signing
Chapter 13 Netscape Signing Tool 91
Page 92

Using Netscape Signing Tool
Verisign Object Signing Cert
test object signing cert
Certificate (960187691))
--------------------------------------For a list including CAs, use "signtool -L"
Signing a File
To sign a file using Netscape Signing Tool, follow these steps:
1. Create an empty directory.
2. Put some file into it.
Issued by: VeriSign, Inc. - Verisign, Inc.
Expires: Tue May 19, 1998
Issued by: test object signing cert (Signtool 1.0 Testing
Expires: Sun May 17, 1998
% mkdir signdir
% echo boo > signdir/test.f
3. Specify the name of your object-signing certificate and sign the directory.
If you are using Unix, this example assumes you have put your
~/.netscape directory, as explained in “Setting Up Your Certificate” on
.db files in the
page 90.
% signtool -k MySignCert -Z testjar.jar signdir
using key "MySignCert"
using certificate directory: /u/jsmith/.netscape
Generating signdir/META-INF/manifest.mf file..
--> test.f
adding signdir/test.f to testjar.jar
Generating signtool.sf file..
Enter Password or Pin for "Communicator Certificate DB":
At the prompt, type the password to your private-key database.
4.
If it accepts the password,
adding signdir/META-INF/manifest.mf to testjar.jar
adding signdir/META-INF/signtool.sf to testjar.jar
adding signdir/META-INF/signtool.rsa to testjar.jar
tree "signdir" signed successfully
signtool respondsasfollows:
92 Netscape Certificate Management System Command-Line Tools Guide • October 2001
Page 93

Using Netscape Signing Tool
5. Test the archive you j ust created.
% signtool -v testjar.jar
using certificate directory: /u/jsmith/.netscape
archive "testjar.jar" has passed crypto verification.
status path
------------ ------------------verified test.f
You can also use Netscape Signing Tool from within a script to automate some
aspects of signing. For example, here’s a Windows script that starts with an
unsigned JAR file, unpackages it, signs it, and then repackages it:
rem Expand the jar file into a new directory
unzip -qq myjar.jar -d signjar
del myjar.jar
rem Sign everything in the new directory and recompress
signtool -k MySignCert -Z myjar.jar signdir
Using Netscape Signing Tool with a ZIP Utility
To use Netscape Signing Tool with a ZIP utility, you must have the utility in your
path environment variable. You should use the
pkzip.exe, which cannot handle long filenames.
You can use a ZIP utility instead of the
-Z option to package a signed archive into a
zip.exe utility rather than
JAR file after you have signed it:
% cd signdir
% zip -r ../myjar.jar *
adding: META-INF/ (stored 0%)
adding: META-INF/manifest.mf (deflated 15%)
adding: META-INF/signtool.sf (deflated 28%)
adding: META-INF/signtool.rsa (stored 0%)
adding: text.txt (stored 0%)
%
Tips and Techniques
• If you are storing JAR files or their components in CVS, store them as binary
files.
Chapter 13 Netscape Signing Tool 93
Page 94

Using Netscape Signing Tool
• If you are signing metadata only and not files, you still need to create a blank
• When using the Windows NT version of Netscape Signing Tool, always use a
directory for Netscape Signing Tool to sign.
relative path.
•Thecommand
asterisk (
*) beside it. If it doesn’t, you cannot sign files.
signtool -L should list your object-signing certificate with an
• If you are having problems using the JAR file from within Navigator, check
signtool -v on your final archive.
• Don’t use Netscape Signing Tool’s
-G option writes to the security databases as it generates certificates, and
The
-G option while Communicator is running.
corruption could occur if Communicator simultaneously attempts to write to
these files. All other Netscape Signing Tool options are read-only and can’t
harm these files.
• If you see the error
Unknown issuer, you need to get the certificate of the
certificate authority that issued your signing certificate. Alternatively, you may
have the certificate authority’s certificate, but it may not be trusted for object
signing.
• If you see the error
Issuer not trusted, open Communicator on the system
you used when you obtained the certificate and follow these steps:
a. Click the Security button in a Navigator window.
b. Click Signers under Certi ficates in the left frame.
c. Select the CA that issued your signing certificate.
d. Click the Edit button.
e. Select the “Accept this Certificate Authority for Certifying software
developers” checkbox.
f. Click OK.
You then need to transfer the
cert7.db file to the appropriate directory on the
system on which you are running Netscape Signing Tool, as described in
“Setting Up Your Certificate” on page 90.
94 Netscape Certificate Management System Command-Line Tools Guide • October 2001
Page 95

SignTool Syntax and Options
This section summarizes the syntax and options for Netscape Signing Tool 1.3.
• Command Syntax
• Command Options
• Command File Syntax
• Command File Keywords and Example
Command Syntax
To run Netscape Signing Tool, type
SignTool Syntax and Options
signtool
where options can be any sequence of the options listed in this chapter.
Each argument for each
spaces or other nonalphanumeric characters.
options
signtool option must be in quotes if it contains any
Command Options
Options for signtool are defined as follows:
Table 13-1 Description of options
Option Description
-b basename Specifies the base filename for the .rsa and .sf files in the META-INF directory
(required by The JAR Format). For example,
-b signatures
causesthefilestobenamedsignatures.rsa and signatures.sf.The
default is signtool.
The -b option is available in Netscape Signing Tool 1.0 and later versions only.
Chapter 13 Netscape Signing Tool 95
Page 96

SignTool Syntax and Options
Table 13-1 Description of options
-c# Specifies the compression level for the -J or -Z option. The symbol # represents
a number from 0 to 9, where 0 means no compression and 9 means maximum
compression. The higher the level of compression, the smaller the output but the
longer the operation takes.
If the -c# option is not used with either the -J or the -Z option, the default
compression value used by both the -J and -Z optionsis6.
-d certdir Specifies your certificate database directory; that is, the directory in which you
placed your key3.db and cert7.db files. To specify the current directory, use
“-d.” (including the period).
The Unix version of signtool assumes ~/.netscape unless told otherwise.
The NT version of signtool always requires the use of the -d option to specify
where the database files are located.
-e extension Tells signtool to sign only files with the given extension; for example, use
-e".class" to sign only Java class files. Note that with Netscape Signing Tool
version 1.1 and later this option can appear multiple times on one command
line, making it possible to specify multiple file types or classes to include.
-f commandfile Specifies a text file containing Netscape Signing Tool options and arguments in
keyword=value format. All options and arguments can be expressed through this
file. For more information about the syntax used with t his file, see “Tips and
Techniques” on page 93.
-i scriptname Specifies the name of an installer script for SmartUpdate. This script installs files
from the JAR archive in the local system after SmartUpdatehas validated the
digital signature. For more details, see the description of -m that follows. The -i
option provides a straightforward way to provide this information if you don’t
need to specify any metadata other than an installer script.
-j directory Specifies a special JavaScript directory. This option causes the specified
directory to be signed and tags its entries as inline JavaScript. This special type
of entry does not have to appear in the JAR file itself. Instead, it is located in the
HTML page containing the inline scripts. When you use signtool -v,these
entries are displayed with the string NOT PRESENT.
96 Netscape Certificate Management System Command-Line Tools Guide • October 2001
Page 97

SignTool Syntax and Options
Table 13-1 Description of options
-k key ... directory Specifies the nickname (key)ofthecertificateyouwanttosignwithandsigns
the files in the specified directory. The directory to sign is always specified as
the last command-line argument. Thus, it is possible to write
signtool -k MyCert -d . signdir
You may have trouble if the nickname contains a single quotation mark. To
avoid problems, escape the quotation mark using the escape conventions for
your platform.
It’s also possible to use the -k option without signing any files or specifying a
directory. For example, you can use it with the -l option to get detailed
information about a particular signing certificate.
-G nickname Generates a new private-public k ey pair and corresponding object-signing
certificate with the given nickname.
The newly generated keys and certificate are installed into the key and
certificate databases in the directory specified by the -d option. With the NT
version of Netscape Signing Tool, you must use the -d option with the -G
option. With the Unix version of Netscape Signing Tool, omitting the -d option
causes the tool to install the keys and certificate in the Communicator key and
certificate databases. If you are installing the keys and certificate in the
Communicator databases, you must exit Communicator before using this
option; otherwise, you risk corrupting the databases. In all cases, the certificate
is also output to a file named x509.cacert, which has the MIME-type
application/x-x509-ca-cert.
Unlike certificates normally used to sign finished code to be distributed over a
network, a test certificate created with -G is not signed by a recognized
certificate authority. Instead, it is self-signed. In addition, a single test signing
certificatefunctionsas both an object-signing certificate and a CA. When you are
using it to sign objects, it behaves like an object-signing certificate. When it is
imported into browser software such as Communicator, it behaves like an
object-signing CA and cannot be used to sign objects.
The -G option is available in Netscape Signing Tool 1.0 and later versions only.
By default, it produces only RSA certificates with 1024-byte keys in the internal
token. However, you can use the -s option specify the required key size and the
-t option to specify the token. For more information about the use of the -G
option, see “Generating Test Object-Signing Certificates” on page 102.
-l Lists signing certificates, including issuing CAs. If any of your certificates are
expired or invalid, the list will so specify. This option can be used with the -k
option to list detailed information about a particular signing certificate.
The -l option is available in Netscape Signing Tool 1.0 and later versions only.
Chapter 13 Netscape Signing Tool 97
Page 98

SignTool Syntax and Options
Table 13-1 Description of options
-J Signs a directory of HTML files containing JavaScript and creates as many
archive files as are specified in the HTML tags. Even if signtool creates more
than one archive file, you need to supply the key database password only once.
The -J option is available only in Netscape Signing Tool 1.0 and later versions.
The -J option cannot be used at the same time as the -Z option.
If the -c# option is not used with the -J option, the default compression value
is 6.
Note that versions 1.1 and later of Netscape Signing Tool correctly recognizes
the CODEBASE attribute, allows paths to be expressed for the CLASS and SRC
attributes instead of filenames only, processes LINK tags and parses HTML
correctly, and offers clearer error messages.
-L Lists the certificates in your database. An asterisk appears to the left of the
nickname for any certificate that can be used to sign objects with signtool.
--leavearc Retains the temporary .arc (archive) directories that t he -J option creates.
These directories are a utomatically erased by default. Retaining the temporary
directories can be a n aid to debugging.
-m metafile Specifies the name of a metadata control file. Metadata is signed information
attached either to the JAR archive itself or to files within the archive. This
metadata can be any ASCII string, but is used mainly for specifying an installer
script.
The metadata file contains one entry per line, each with three fields:
• field #1: file specification, or + if you want to specifyglobalmetadata(that is,
metadata about the JAR archive itself or all entries in the archive)
• field #2: the name of the data you are specifying; for example:
Install-Script
• field #3: data corresponding to the name in field #2
For example, the -i option uses the equivalent of this line:
+ Install-Script: script.js
This example associates a MIME type with a file:
movie.qt MIME-Type: video/quicktime
For information about the way installer script information appears in the
manifest file for a JAR archive, see The JAR Format on Netscape DevEdge.
98 Netscape Certificate Management System Command-Line Tools Guide • October 2001
Page 99

SignTool Syntax and Options
Table 13-1 Description of options
-M Lists the PKCS #11 modules available to signtool, including smart cards.
The -M option is available in Netscape Signing Tool 1.0 and later versions only.
For i nformation on using Netscape Signing Tool with smart cards, see “Using
Netscape Signing Tool with Smart Cards” on page 104.
For information on using the -M option to verify FIPS-140-1 validated mode, see
“Netscape Signing Tool and FIPS-140-1” on page 107.
--norecurse Blocks recursion into subdirectories when signing a directory’s contents or
when parsing HTML.
-o Optimizes the archive for size. Use this only if you are signing very large
archives containing hundreds of files. This option makes the manifest files
(required by the JAR format) considerably smaller, but they contain slightly less
information.
--outfile outputfile Specifies a file to receive redirected output from Netscape Signing Tool.
-p password Specifies a password for the private-key database. Note that the password
entered on the command line is displayed as plain text.
-s keysize Specifies the size of the key for generated certificate. Use the -M option to find
out what tokens are available.
The -s option can be used with the -G option only.
-t token Specifies which available token should generate the key and receive the
certificate. Use the -M option to find out what tokens are available.
The -t option can be used with the -G option only.
-v archive Displays the contents of a n archive and verifies the cryptographic integrity of
the digital signatures it contains and the files with which they are associated.
This includes checking that the certificate for the issuer of the object-signing
certificate is listed in the certificate database, that the CA’s digital signature on
the object-signing certificate is valid, that the relevant certificates have not
expired, and so on.
--verbosity value Sets the quantity of information Netscape Signing Tool generates in operation.
Avalueof0 (zero) is the default and gives full information. A value of -1
suppresses most messages, but not error messages.
-w archive Displays the names of signers of any files in the archive.
-x directory Excludes the specified directory from signing. Note that with Netscape Signing
Tool version 1.1 and later this option can appear multiple times on one
command line, making it possible to specify several particular directories to
exclude.
Chapter 13 Netscape Signing Tool 99
Page 100

SignTool Syntax and Options
Table 13-1 Description of options
-z Tells signtool not to store the signing time in the digital signature.This option
is useful if you want the expiration date of the signature checked against the
current date and time rather than the time the files were signed.
-Z jarfile Creates a JAR file with the specified name. You must s pecify this option if you
want signtool to create the JAR file; it does not do so automatically. If you
don’t specify -Z, you must use an external ZIP tool to create the JAR file.
The -Z option cannot be used at the same time as the -J option.
If the -c# option is not used with the -Z option, the default compression value
is 6.
Command File Syntax
Entries in a Netscape Signing Tool command file have this general format:
keyword
Everything before the
= sign to the end of line is a value. The value may include = signs; only the first =
=value
= sign on a single line is a keyword, and everything from the
sign on a line is interpreted. Blank lines are ignored, but white space o n a line with
keywords and values is assumed to be part of the keyword (if it comes before the
equal sign) or part of the value (if it comes after the first equal sign). Keywords are
case insensitive, values are generally case sensitive. Since the
= sign and newline
delimit the value, it should not be quoted.
Command File Keywords and Example
Here are the command file keywords and their values:
Keyword Value
basename Same as -b option.
compression Same as -c option.
certdir Same as -d option.
extension Same as -e option.
generate Same as -G option.
installscript Same as -i option.
100 Netscape Certificate Management System Command-Line Tools Guide • October 2001
 Loading...