


MODEL: S1G-100-LEL and S2G-100-LEL with PE1100
UNI-TROL GAS CONTROLLER
™
Single-Channel Field Mount Controller with LEL Sensor
REVISED: MAY, 1998

WARRANTY POLICY
The products of Net Safety Monitoring Inc, are carefully designed and manufactured from high
quality components and can be expected to provide many years of trouble free service. Each
product is thoroughly tested, inspected and burned-in prior to shipment. Failures can occur which
are beyond the control of the manufacturer. Failures can be minimized by adhering to the
operating and m ainte nance instructions herein. W here the absolute greatest of reliability is
required, redundancy should be designed into the system.
Net Safety Monitoring Inc, warrants its sensors and detectors against defective parts and
workmanship for a period of 24 months from date of purchase and other electronic assemblies for
36 months from date of purchase.
No other warranties or liability, expressed or implied, will be honoured by Net Safety
Monitoring Inc.
Contact Net Safety Monitoring Inc. or the authorized distributor for details.

Table of Contents
Unit I - GENERAL INFORMATION
DESCRIPTION ............................................................... 1
FEATURES .................................................................. 1
SPECIFICATIONS ............................................................ 1
Figure 1 - Controller Dimensions in Inches ................................... 2
Figure 2 - Controller Front Panel ........................................... 2
BASIC OPERATION ........................................................... 2
FACEPLATE DESCRIPTION .............................................. 2
OUTPUTS ............................................................ 3
RELAY OUTPUTS ...................................................... 3
RECOMMENDATI ON .......................................................... 3
CURRENT OUTPUTS ................................................... 3
Figure 3 - Jumper Selections For Isolated or Non-Isolated Current Output . . . . . . . . . . . 4
Table 1 - Current Outputs................................................. 4
PROGRAMMING OPTIONS .................................................... 4
Table 2 - Selectable Output Options ........................................ 5
EXTERNAL RESET ..................................................... 5
AUTOMATIC DIAGNOSTICS AND FAULT IDENTIFICATION . . . . . . . . . . . . . . . . . . . . 5
OPERATING MODES .......................................................... 5
NORMAL OPERATING MODE ............................................ 6
RESET MODE ......................................................... 6
FORCED RESET MODE ................................................. 6
SENSOR REPLACEMENT MODE(SrP) ..................................... 6
SENSOR CALIBRATION MODE(CAL) ...................................... 6
SET-POINT DISPLAY (Spd) .............................................. 7
ADDRESS SET (Adr Set) ................................................. 7
ERROR MESSAGE DISPLAY (ErrChc) ...................................... 7
UNIT II - GENERAL INFORMATION (SENSOR) ............................. 7
DESCRIPTI ON......................................................... 7
FEATURES ........................................................... 8
SPECIFICATIONS ...................................................... 8
Figure 4 - Sensor and Transmitter Dimensions ................................ 9
LOWER EXPLOSIVE LIMIT ..................................................... 9
Table 3 - Flammable Gas Volume for 100% LEL . . . . . . . . . . . . . . . . . . . . . . . . . . . . . . . 9
OPERATIONS OVERVIEW .................................................... 10
Table 4 - K Factor for Various Gases....................................... 11
UNIT III - GENERAL INFORMATION (SENSOR)
INSTALLATION .............................................................. 12
SENSOR LOCATIONS ................................................. 12
GENERAL WIRING .................................................... 12
CONTROLLER WIRING ................................................ 13
Figure 5a - W iring for S1G with Non-Isolated Current Output . . . . . . . . . . . . . . . . . . . . 14
Figure 5b - Wiring for S1G With Isolated Current Output . . . . . . . . . . . . . . . . . . . . . . . . 15
Figure 6a - Wiring for S2G with Non-Isolated Output . . . . . . . . . . . . . . . . . . . . . . . . . . . 16
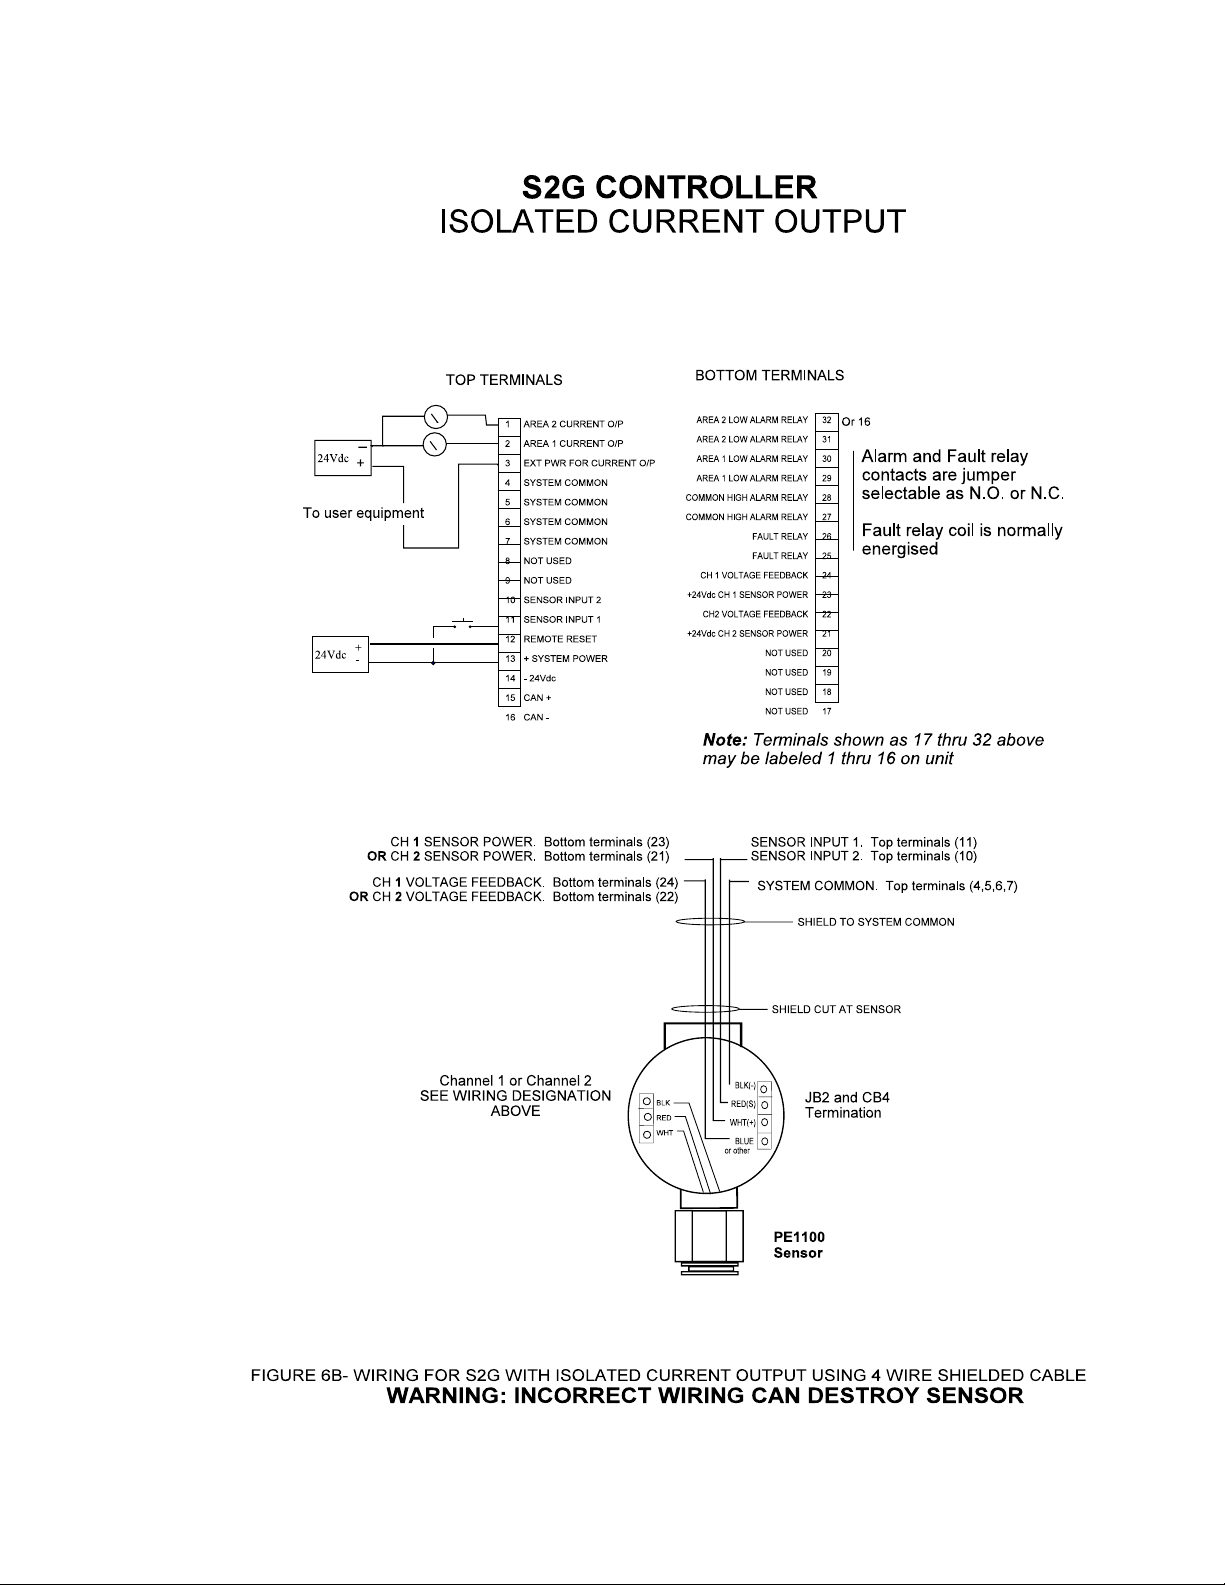
Figure 6b - Wiring for S2G With Isolated Current Output . . . . . . . . . . . . . . . . . . . . . . . . 17
DIP SWITCH SETTINGS ...................................................... 18
Figure 7a - Dip Switch Position ........................................... 18
Figure 7b - Dip Switch .................................................. 18
ACTIVE CHANNELS ................................................... 18
CALIBRATION GAS CONCENTRATION ................................... 18
POW ER-UP TIME DELAY ............................................... 19
ALARM SETTINGS .................................................... 19
LATCHING/NON-LATCHING SELECTION .................................. 20
Table of Contents (Cont)

ENERGIZED/DE-ENERGIZED SELECTION ........................................ 21
RELAY SETTINGS ............................................................21
Figure 9a - Relay Positions ...............................................21
Figure 9b - Relay Settings ................................................ 21
Table 5 - Summary of Dip Switch Settings ...................................22
UNIT IV - SYSTEM OPERATION ........................................... 22
MENU AND FUNCTION SELECTION .............................................22
Table 6a - Menu and Function Selection.....................................22
Table 6b - Main Menu Selection ........................................... 23
Table 7 - Special Function Menu Selection . . . . . . . . . . . . . . . . . . . . . . . . . . . . . . . . . . . 23
START-UP PROCEDURE ...................................................... 24
MAIN MENU SELECTIONS .....................................................24
ERROR CHECK MODE(ERR CHC) ........................................24
SET-POINT DISPLAY MODE (SPd) ........................................ 25
Table 8 - System Status Codes............................................ 26
SENSOR CALIBRATION (CAL) .................................................. 27
GENERAL INFORMATION ............................................... 27
CALIBRATION PROCEDURE ............................................27
SENSOR REPLACEMENT MODE (SrP) .................................... 28
SPECIAL FUNCTION MENU SELECTIONS ........................................ 29
FORCED CURRENT OUTPUTS (FoP) ..................................... 29
CURRENT CALIBRATION MODE (CuC) ....................................29
ADDRESS MODE (Adr Set) ..............................................29
CHANNEL DISPLAY (Chd) ...............................................29
BYPASS (bPS) ........................................................29
OPERATING MODES ......................................................... 30
RESET MODE ......................................................... 30
FORCED RESET MODE ................................................ 30
NORMAL OPERATING MODE ............................................ 30
FORCED DISPLAY (FdP) ................................................ 31
UNIT V - SYSTEM MAINTENANCE
ROUTINE MAINTENANCE ..................................................... 32
MANUAL CHECK OF OUTPUT DEVICES ................................... 32
SYSTEM CHECK IN NORMAL MODE ...................................... 32
SENSOR REPLACEMENT .....................................................32
TROUBLESHOOTI NG ......................................................... 33
REPLACEMENT PARTS ....................................................... 33
DEVICE REPAIR AND RETURN ................................................. 34
Table 10 - Troubleshooting Guide .......................................... 34

GENERAL INFORMATION (CONTROLLER)
DESCRIPTION
Unit I
TheS1G and S2G Uni-Trol Controller accepts input directly from PE1100 combustible gas
sensors. The controller is designed to accept the millivolt signal from the SC1100 LEL sensor
without the need for a transmitter to change the signal to a 4-20mA current signal. Controller
response includes actuation of relays for direct control of field response devices, 4-20mA DC
current output and, a full array of faceplate indicators.
™
FEATURES
< Controller accepts millivolt inputs (PE1100 LEL sensor).
< Two digital displays, one bar graph display, and high intensity LEDs indicate important
system status information.
< AutoCal feature provides easy and accurate calibration.
< Microprocessor-based controller is easily field programmable.
< 4-20mA current output send important system information to other devices.
< Relay alarm and fault outputs.
SPECIFICATIONS
< Operating Voltage:
24 Volts DC. Device can operate between 18 and 32 Volts DC
< Power Consumption (Controller Only):
3.0 Watts nominal, 5.2 Watts maximum (125 mA nominal, 215 mA maximum at
24 Volts DC).
Maxim um startup current is 1.0 Am peres for 5 seconds. Power supplies with fold
back current limiting are not recommended
< Maximum Ripple:
Ripple should not exceed 5 Volts peak-to-peak. The sum of DC plus ripple must
be $18 Volts DC and #32 Volts DC.
< Temperature Range:
Operating: -40ºC to +85ºC (-40ºF to +185ºF)
Storage: -55ºC to +150ºC (-65ºF to +302ºF)
< Relay Contacts:
Form C normally open/norm ally closed contacts rated for 5 Am peres at 30 Volts
DC/ 250 Volts AC
< Current Outputs:
One 4-20mA DC current, with a maximum external loop resistance of 600S at 1832 Volts DC.
< Dimensions:
Refer to Figure 1
-1-

< Shipping Weight (Approximate):
6 lbs. (2.7 kilograms)
< Certification:
CSA certified for hazardous locations, Class 1, Division 1, Groups B, C, and D.
Figure 1 - Controller Dimensions in Inches
Figure 2 - Controller Front Panel
BASIC OPERATION
FACEPLATE DESCRIPTION
The controller faceplate provides LEDs for identifying status conditions, two digital displays and a
bar graph display for indicating the sensor input, and magnetically activated MENU/SET and
SELECT/RESET reed switches (see the appendix for activation instructions) for programming,
calibrating and resetting the system. Refer to Figure 2 for the location of indicators and switches.
< Digital Displays - Two digital displays are used to display the sensor input in both the
Normal and Calibrate Modes; one display indicates the channel and one display indicates
the corresponding sensor input. In the event of a fault, it identifies the nature of the fault
using an alphanumeric code. In the Normal Operating Mode the gas concentration at the
sensor is shown. In other operating modes, the digital displays show the alarm set-points,
programmed calibration gas concentration, output current, or the communication
addresses for the CAN interface. A negative zero drift condition is indicated by a minus
sign in the left-hand digit. Since at least one display is always lit, they also function as a
power indicator.
< Bar Graph Display - The common 10-segment bar graph display provides readings of
the sensor input in 5% LEL increments, from 0% to 50% LEL; all 10 segm ents are
illuminated when 50% LEL is exceeded.
< High Alarm LED (HI) - Flashes in response to a sensor signal that exceeds the high
alarm set-point.
< Low Alarm LED (LOW) - Flashes in response to a sensor signal that exceeds the low
alarm set-point.
< Calibrate LED (CAL) - is illuminated while the controller is in the Calibration Mode.
-2-

< Fault LED (Fault) - is illuminated upon detection of an overall system fault or a channel
related fault.
< Channel LEDs - are illuminated when status on the corresponding channel is displayed
on the common indicators (digital displays and bar graph). During power-up, a channel
LED is on if the channel is selected for operation.
< MENU/SET Reed Switch - is used for changing the menu display resetting the controller
calibration and other system programming and calibration functions.
< SELECT/RESET Reed Switch - is used for menu selection, and other system
programming, for resetting the controller.
OUTPUTS
Relay Outputs:
The relay outputs have SPDT contacts rated for 5 Amperes at 30 Volts DC or 250 Volts AC. The
four relays include an Area 1 low alarm (channel 1), an Area 2 low alarm (channel 2) one common
high alarm, and fault alarm.
RECOMMENDATION
The fault relay output should not be used to activate an automatic shutdown procedure.
The fault output indicates a potential problem with the controller, not an alarm condition.
Current Outputs:
Two 4-20mA DC current output for transmitting system information to other devices are also
included. The current outputs can be wired for isolated or non-isolated operation by changing the
jumpers as shown in Figure 3. Refer to Table 1 for a description of the current output signal
levels.
-3-

Figure 3 - Jumper Selections For Isolated or
Non-isolated Current Output
Current Output Situation
0mA Open or shorted signal output, or loss of power
1mA Fault or Power-Up
2m A Power Fault
3mA Calibration
4mA to 20mA 0 to 100% LEL gas concentration
Table 1 - Current Outputs
-4-

PROGRAMMING OPTIONS
A set of dip-switches, located on the circuit board, can be used to “program” various options and
set-points, including:
< channels selected for operation,
< low and high alarm settings,
< calibration gas concentration,
< power-up delay time (either 45 or 90 seconds),
< latching / non-latching relay action
< energized / de-energized relay action
The alarm relays are programmable for either normally energized or normally de-energized
operation (programm able as a group only, not individually). The fault relay is normally energized.
The low alarm relays are programmable for either latching or non-latching operation. The high
alarm relay is always latching and the fault relay is non-latching. Refer to Table 2.
Jumper selections are provided for normally open or normally closed relay outputs and for isolated
or non-isolated current outputs.
Selectable Normally
OUTPUT
12
LOW Y Y Y
Open/Closed
HIGH Y Y N
FAULT Y N N
Selectable Normally
Energized/De-Energized
23
45
Selectable
Latching/Non-latching
Table 2 - Selectable Output Options
1 Low alarms are programed together, not individually
2
3
4
5
Programmable together, not individually
High alarm relay is always latching
Fault relay is normally energized
Fault relay is non-latching
EXTERNAL RESET
A normally open, momentary closure switch can be connected between the external reset terminal
and the negative power terminal to provide remote reset capabilities.
AUTOMATIC DIAGNOSTICS AND FAULT IDENTIFICATION
The microprocessor-based controller features self-testing circuitry that continuously checks for
problems that could prevent proper system response. W hen power is applied, the m icroprocessor
automatically tests mem ory. In the Normal Operating Mode, it continuously monitors the input
signals from the sensor to ensure proper functioning. In addition, a "watchdog" timer is maintained
to ensure that the program is running correctly. The timer resets the m icro-controller if it enters
erroneous processor states within a reasonable period of time.
-5-

If a fault is detected, the Fault LED illuminates, the digital display identifies that a fault has
occurred, the fault relay output becomes de-energized, and the current output drops to less than 1
mA.
The nature of the fault can be identified by a numeric code, which can be viewed in the Fault
Message Display mode.
OPERATING MODES
The controller can operate in any of the modes discussed in this section. Operating modes other
than Normal are selected by activating the appropriate MENU/SET and SELECT/RESET switches
located on the controller front panel. Refer to Figure 2 for a diagram of the controller front panel.
NOTE
This section is intended to acquaint the user with the basic operation of the controller.
Refer to “Unit III” for detailed instructions and description.
Normal Operating Mode:
If no alarms or faults are present, the Module will be in a Level 1 Display Mode; the bar graph and
digital display indicate the sensor inputs. Relay outputs are in their normal state, and the current
output corresponds to the sensor input.
If a low alarm condition occurs, the controller will be in a Level 2 Display Mode; the bar graph and
digital display will display the gas concentration at the sensor. The low alarm LED will flash, the
low alarm relay changes state, and the current output changes to indicate the alarm. If the signal
decreases below the low set-point again, the low alarm relay returns to its norm al state if
programmed for non-latching operation and remains unchanged if programmed for latching
operation. The current output returns to normal. The low alarm LED will remain illum inated, but
will no longer flash.
If a high alarm condition occurs, the module will be in a Level 3 Display Mode; the bar graph and
digital display will display the gas concentration at the sensor and the high alarm LED will flash.
Reset Mode:
The system is reset by activating the SELECT/RESET switch located on the front panel of the
controller. (Refer to Figure 2) W hen the SE LECT/RESET switc h is activated m omentarily, all
outputs return to their norm al condition if no alarms or faults are present. (basic reset).
Forced Reset Mode:
If the controller receives a signal beyond 100% LEL from the sensor, a reset will not clear the
alarms, even if the channel has returned to levels below the low alarm set point. The error
resulting from this occurrence must be cleared and a forced reset applied. To apply a forced
reset, activate the SELECT/RESET switch for 1 second, the LEDs turn off and the outputs return
to their normal condition. The remote reset performs a forced reset.
NOTE
The remote reset performs a reset function only. It cannot be used for other controller
functions.
Sensor Replacem ent Mode (SrP):
This mode inhibits all controller outputs to allow replacement of the sensor without removing
power from the controller. Alarm set-points and calibration gas concentration are not affected.
The left display will show ‘SrP’ while in the sensor replace mode. The right display will show the
status of the sensor being replaced (‘NoS’ means no sensor is connected). The fault LED is on
and the fault relay is de-energized. The channel LED will be on for the sensor being replaced.
-6-

All other display features will be inhibited. In order to exit this mode the SELECT/RESET switch
must be activated.
Sensor Calibration Mode (CAL):
The Uni-Trol Controller uses a fully autom atic calibration procedure that requires no adjustm ents
™
by the operator. The controller displays ‘Air’ on the left display and channel status on the right
display while automatically performing the zero adjustments. Next the controller will signal the
user to apply calibration gas by alternating ‘gAS’ and ‘in’ on the left display. When the controller
detects that the gas has been applied to the sensor, the left display will read ‘gAS’. Once the
controller has finished the gain adjustm ents it will alternate ‘C ut’ and ‘gAS’ on the left display,
telling the user that it is time to remove the calibration gas. Upon completion of calibration the
controller will automatically return to normal operating mode, after the gas level has dropped
below 50% of the low alarm setting.
If the operator fails to complete the calibration procedure, if an error in the calibration procedure
occurs, or if a successful calibration cannot be com pleted, the m icroprocessor will automatically
return to the Normal Operating Mode and continue to use the previous calibration data. A fault
indication will be displayed until a reset occurs. If the microprocessor determines that the sensor
is approaching the end of its useful life, a fault code will indicate this.
W hile in the calibration m ode, all controller outputs are inhibited and the ‘Cal’ LED is illum inated.
Set-Point Display (Spd):
In this mode, the digital display sequentially shows the
programmed low and high alarm set-points, calibration gas concentration, and communication
addresses. Each value is displayed for approximately 2 seconds.
Address Set (Adr Set): DO NOT USE THIS FUNCTION
The communication addresses for the CAN bus are set in this mode, which is found in the special
function menu. The MENU/SET and SELECT/RESET switches are used to raise and lower the
address. This mode can only be exited by allowing ten seconds to go by without activating either
switch.
Error Message Display (ErrChc):
The microprocessor-based controller features self-testing circuitry that continuously checks for
problems that could prevent proper system response. As a diagnostic and troubleshooting tool,
identifiable faults are displayed on the digital display, using error codes, during the Error Message
Display Mode. The controller will also display an error message after the last channel in the
cycling routine.
NOTE
If no errors exist, this function is hidden and can not be accessed.
-7-

Unit II
GENERAL INFORMATION (SENSOR)
DESCRIPTION
The Net Safety Monitoring Inc. SC1100 combustible gas sensor head consists of an explosionproof enclosure, which contains sensor electronic circuitry. The sensors used are catalytic
oxidation sensors, or pellistors, designed to provide continuous monitoring of combustible gasses
such as methane and butane, etc. in the percent lower explosive limits (LEL). Each sensor is a
matched pair of detector and reference elements which are operated in a Wheatstone Bridge
circuit.
FEATURES
High degree of poison resistance means sensors will maintain their sensitivity over extended
periods of operation.
< Designed and manufactured for low drift over temperature extremes.
SPECIFICATIONS
< Range:
0 to 100% LEL
< Operating Humidity Range:
0 to 100% relative hum idity
< Response Time:
Less than 30 seconds to reach 90% of full scale reading with methane (in still air).
< Zero Drift:
Typically less than 2% LEL per m onth
< Sensor Life:
Operation: 2 to 5 years expected.
Storage: Indefinite
< Calibration Cycle:
60 to 90 Days Groups
< Certification:
CSA certified for hazardous locations,
Class 1, Division 1, Groups B, C, and D.
-8-

Figure 4 - Sensor and Transmitter Dimensions
LOWER EXPLOSIVE LIMIT
A combustible gas is one that will burn when mixed with air (or oxygen) and ignited. The lower
explosive limit (LEL), or lower flammable limit (LFL), of a combustible gas is defined as the
smallest amount of the gas that will support a self-propagating flame when mixed with air and
ignited. In gas detection systems, the amount of gas present is specified in terms of % LEL; 0%
LEL being a combustible gas-free atmosphere and 100% LEL being an atmosphere in which the
gas mix is at its lower explosive limit. The relationship between % LEL and % by volume differs
from gas to gas. Refer to Table 3.
GAS, 100% LEL CONCENTRATION
Hydrogen (H ) 4.0%
Methane (CH ) 5.0%
Ethane (C H ) 3.0%
Ethylene (C H ) 2.7%
Pentane (C H ) 1.5%
Propane (C H ) 2.2%
2
4
26
24
512
38
Table 3 -Flammable Gas Volume for 100% LEL
For data on other gases, refer to NFPA 5th Edition 325M.
-9-

The LEL of gas is affected by temperature and pressure. As the temperature increases, the LEL
decreases and hence the explosion hazard increases.
The relationship between LEL and pressure is fairly complex, but at approximately one
atm osphere, a pressure increase usually lowers the LEL. The LEL of a gas is not significantly
affected by the humidity fluctuations normally encountered in the operation of a gas detection
system.
OPERATION OVERVIEW
The sensors used are catalytic oxidation sensors, or pellistors, designed to measure
concentrations of combustible gases in air up to their lower explosive limit. Each sensor is a
matched pair of detector and reference elements which are operated in a Wheatstone Bridge
circuit. The active elem ent, which comprises a coil of platinum wire em bedded within a catalytic
bead is capable of oxidizing combustible gases while the inert reference element compensates for
changes in ambient temperature and humidity. The heat generated during oxidation increases the
temperature and resistance of the detector element, producing an out-of-balance signal in the
Wheatstone Bridge circuit proportional to the concentration of combustible gas.
Table 4 lists the theoretical factors by which the signal with a calibration gas should be multiplied
to give the signal for other gases. The following formula may be used:
NOTE
These figures are theoretical, and may differ from sensor to sensor. For best results, the
sensors should be calibrated with the gas they are intended to detect.
Example: For an instrument calibrated with Methane and used to detect Propane.
K = 112.0
METHANE
K = 61.8
PROPANE
Signal shown for 50%LEL Propane is calculated as follows:
Signal = 50% x 61.8 / 112 = 27.6%
-10-

GAS K GAS K GAS K
Acetaldehyde 67.3 n-Decane 36.7 Dimethyl Ether 70
Acetic Acid 60.8 Diethylam ine 54.6 Methylethylether 49.3
Acetic Anhydride 51.5 Dimethylam ine 64.7 Methylethylketone 46.2
Acetone 57.8 2,3-Dimethylpentane 44.6 Methyl Formate 75
Acetylene 63.6 2,2-Dimethylpropane 44.4 Methylm ercaptan 67.9
Alkyl Alcohol 57.1 Dimethylsulphide 48.6 Methylpropionate 57.2
Amm onia 142 1,4-Dioxane 50 Methyl n-propylketone 45.4
n-Am yl Alcohol 36.6 Ethane 75.8 Naphthalene 38.1
Aniline 44.1 Ethyl Acetate 57.4 Nitrom ethane 64.8
Benzene 45.6 Ethyl Alcohol 81.5 n-Nonane 35.2
Biphenyl 28 Ethylam ine 58.9 n-Octane 41.9
1,3-Butadiene 62.5 Ethyl Benzene 39.9 n-Pentane 51.3
n-Butane 65.5 Ethylcyclopentane 44.4 iso-Pentane 51.9
iso-Butane 57.8 Ethylene 79.1 Propane 61.8
Butene-1 50.8 Ethyleneoxide 57.9 n-Propyl Alcohol 52.7
cis-Butene-2 54.2 Diethyl Ether 51.8 n-Propylamine 54.1
trans-Butene-2 56.7 Ethyl Formate 49.5 Propylene 57.7
n-Butyl Alcohol 38.4 Ethylmercaptan 62.8 Propyleneoxide 51.2
iso-Butyl Alcohol 59.2 n-Heptane 43.2 iso-Propylether 48.8
tert-Butyl Alcohol 83.1 n-Hexane 41.2 Propyne 46.5
n-Butyl Benzene 35.2 Hydrazine 50.4 Toluene 45.2
iso-Butyl Benzene 35.8 Hydrogencyanide 53.4 Triethylamine 44.6
n-Butyric Acid 42.5 Hydrogen 85.8 Trim ethylamine 54.3
Carbon Disulphide 19.8 Hydrogen Sulphide 45.6 Vinylethylether 46.9
Carbon M onoxide 84.4 Methane 112 o-Xylene 40.1
Carbon O xysulphide 105 Methyl Acetate 55.6 m-Xylene 43.8
Cyanogen 99.9 Methyl Alcohol 96.2 p-Xylene 43.8
Cyclohexane 46 Methylamine 86.5
Cyclopropane 69.7 Methylcyclohexane 49.4
Table 4 - K Factor for Various Gases
-11-

Unit III
SYSTEM INSTALLATION
INSTALLATION
SENSOR LOCATIONS
Proper location of the sensors is essential for providing maximum protection. The method for
deciding the most effective number and placement of sensors varies depending on the conditions
at the job site. The individual performing the installation must rely on experience, common sense,
and knowledge of plant operations to determine the number of sensors needed and the best
controller locations to prote ct the area adequately.
The following factors are important and should be considered for every installation:
< Sensors should be located where they are safe from potential sources of contamination.
< Refer to sensor application manuals and follow guidelines for sensor installation.
< Sensors must be accessible for testing and calibration.
< Exposure to excessive heat or vibration can cause premature failure of electronic devices,
and should be avoided if possible.
GENERAL WIRING REQUIREMENTS
NOTE
The wiring procedures in this manual are intended to ensure proper functioning of the
device under normal conditions. However, because of the many variations in wiring codes
and regulations, tota l compliance to these ordinances cannot be guaranteed. Be certain
that all wiring complies with applicable regulations that relate to the installation of
electrical equipment in a hazardous area. If in doubt, consult a qualified official before
wiring the system.
The use of shielded cable is highly recommended for any signal wires to protect against
interference caused by extraneous electrical 'noise'. This includes power and current outputs;
relay outputs do not require shielded cable. In applications where the wiring cable is installed in
conduit, the conduit must not be used for wiring to other electrical equipment.
NOTE
The S1G and S2G controllers have been certified, as ‘No Seal Required’ since it will not
ignite an explosive atmosphere, under norm al operating conditions. Net Safety
Monitoring Inc. does, however, recommend conduit seals to prevent moisture damage.
Since moisture can be detrimental to electronic devices, it is im portant that moisture not be
allowed to contact the electrical connections of the system. Moisture in the air can become
trapped within sections of conduit. Therefore, the use of conduit seals is recommended to
prevent damage to electrical connections caused by condensation within the conduit.
These seals must be watertight and explosion-proof and should be installed even if they are not
required by local wiring codes. A seal should be located as close to the device as possible. Never
should this seal be located more than 18 inches (46 cm) from the device. When an explosionproof installation is required, an additional seal may be needed at any point where the conduit
enters a non-hazardous area. Always observe the requirements of local codes.
-12-

W hen pouring a seal, the use of a fibre dam is required to assure proper form ation of the seal.
The seals should never be poured in temperatures that are below freezing, since the water in the
sealing compound will freeze and the compound will not dry properly. Contamination problems
can then result when temperatures rise above the freezing point and the compound thaws.
The shielding of the cable should be stripped back to permit the seal to form around the individual
leads, rather than around the outside of the shield. This will prevent any siphoning action that can
occur through the inside of the shield.
It is recom m ended that conduit breathers also be used. In som e applications, alternate changes in
temperature and barometric pressure can cause 'breathing', which allows the entry and circulation
of moist air throughout the conduit. Joints in the conduit system and its components are seldom
tight enough to prevent this 'breathing'. Moisture in the air can condense at the base of vertical
conduit runs and equipment enclosures, and can build up over a time. This can be detrimental to
electronic devices. To eliminate this condition, explosion-proof drains and breathers should be
installed to bleed off accumulated water autom atically.
The maximum distance between the sensor and controller is limited by the resistance of the
connecting wiring, which is a function of the gauge of the wire being used. Three wire, 18 AWG,
shielded cable is recommended. If the recommended wire is used, the sensors may be located
up to 500 feet from the controller.
CAUTION
All terminations between the controller and sensors must be good tight electrical
connections. If proper connections are not made, the voltage monitoring circuit in the
controller will not function properly and the sensors may be damaged or operate
incorrectly.
CONTROLLER WIRING
NOTE
The controller contains semiconductor devices that are susceptible to damage by
electrostatic discharge. An electrostatic charge can build up on the skin and discharge
when an object is touched. Therefore, use caution when handling, taking care not to touch
the terminals or electronic components. For more information on proper handling, refer to
the Appendix.
The sensor direct, Unitrol controllers (S1G and S2G) can be configured for an isolated or non-
isolated current output by changing a jumper on one of the controllers circuit boards (see 6a
Figure 3). Figure 5 and 6 show the terminal configuration for the controllers. Figures 5a and 6a
show the proper wiring of the controller for a non-isolated current output. Figure 5b and 6b show
the proper wiring of the controller for an isolated current output.
NOTE
If local wiring codes permit, and if a ground fault monitoring system is not being used, the
minus side of the DC power source can be connected to chassis (earth) ground.
Alternatively, a 0.47 microfarad, 100 Volt capacitor can be installed between the minus
side of the DC power supply and chassis ground for best immunity against
electromagnetic interference.
-13-

-14-

-15-

-16-
-17-

DIP SWITCH SETTINGS
It is essential that the controller be properly programmed before applying power to the system.
There are three banks of dip switches located on the controller. Each switch bank has eight
individual switches that can be set to an ‘ON’ or ‘OFF’ position.
NOTE
The dip switches are located on the bottom side of the display circuit board. The switch
banks are num bered from right to left as numbers SW 3, SW 4, and SW5. Refer to
Figure 8a. Individual switches are referenced as “X.Y”, where “X” refers to the bank
number and “Y” refers to the switch number on “X” bank. For example, switch 3.4 (SW3.4)
is switch number four on bank number three. ‘Switches are set as either “ON” or “OFF”.
Refer to Figure 8b.
NOTE
IT IS VERY IMPORTANT THAT POW ER TO THE CONTROLLER IS RECYCLED
AFTER ANY DIP SWITCH CHANGES, TO MAKE THE CHANGES TAKE EFFECT!
Figure 7a - Dip Switch Position
ACTIVE CHANNELS
Switches for setting the active channels (the channels that are to have sensors/transm itters
attached) can be found on Switch Bank 3, switch 1 (SW 3.1). Set the designated switch to “OF F” if
the channel is to be connected (sensor attached), and “ON” if the channel is not to be used.
SW3.1 will be set to the ‘OFF’ position for you.
SW3.1: OFF: channel 1 connected
ON: channel 1 not connected
NOTE
SW 3.2 to S W 3.4 are not u s ed and s hould be turn e d ‘O N ’.
CALIBRATION GAS CONCENTRATION:
Calibration gas concentration is set using the dip switches on the circuit board. To select the
calibration gas concentration of 50% LEL, set SW 3.5 to ‘OFF.’ If a selectable value (from 20% to
99%) is required, set SW3.5 to ‘ON’; SW4.1 through SW4.7 must then be used to select the
calibration gas concentration. SW 3.5 is factory set to the ‘OFF’ position.
Figure 7b - Dip Switch
-18-

SW3.5: OFF: calibration gas set to 50%
(ignore SW4.1 - SW4.7)
ON : calibration gas selectable
(set SW4.1 - SW4.7)
NOTE
If SW 3.5 is set to ‘ON’, it is very important to accurately set SW 4.1 to SW4.7. If SW 3.5 is
set to ‘OFF’ position, the settings of S W 4.1 to SW 4.7 are inconsequential.
If the selectable option is chosen (above), the calibration gas concentration must be set. This is
done on Switch Bank 4, switches 1 through 7 (SW4.1 to SW4.7). The required calibration gas
concentration must be set with these switches using the binary counting system. “ON” selects the
value listed below; “OFF” selects a zero.
SW4.1: ON: 1%
SW4.2: ON: 2%
SW4.3: ON: 4% calibration
SW4.4: ON: 8% gas
SW4.5: ON: 16% concentration
SW4.6: ON: 32%
SW 4.7: ON: 64%
The switches can be used in com bination to select concentrations from 20% to 99% LEL.
Example:
SW4.1 OFF
SW4.2 OFF
SW4.3 ON calibration gas
SW4.4 ON concentration
SW4.5 ON = 60% LEL
SW4.6 ON
SW4.7 OFF
NOTE
If a calibration gas concentration greater than 99% or less than 20% is programmed, the
controller will give a configuration error (E90) when power is applied.
POWER-UP TIME DELAY
SW 3.6 is used to select the power-up time delay:
SW3.6: OFF: 45 seconds
ON: 90 seconds
NOTE
SW3.7 and SW3.8 are not used.
ALARM SETTINGS
Switch bank 4, switch 8 (SW 4.8) is used to set the Low and High alarm to a default or selectable
value. If SW4.8 is ‘OFF’ the Low Alarm will be set to 20% LEL and the High Alarm to 40% LEL.
If SW4.8 is ‘ON’, the low and high alarm are selectable, using SW 5.3 to SW 5.8. Switch 4.8 is set
to the ‘OFF’ position at the factory.
SW4.8: OFF: low alarm @ 20%
high alarm @ 40%
(ignore SW5.3 - SW5.8)
-19-

ON: selectable alarm
(set SW5.3 - SW5.8)
NOTE
If SW 4.8 is set to ON , it is very important to accurately set SW 5.3 to SW5.8. If SW 4.8 is
set to the ‘OFF’ position, the settings of S W 5.3 to SW 5.8 are inconsequential.
If the selectable option is chosen (SW4.8 is ‘ON’), the alarms must be set with SW5.3 to SW5.8.
The low alarm can be set from 5% to 40% LEL and the high alarm is automatically set at twice the
low alarm value. The low alarm value is set using the binary counting system. ‘ON’ selects the
value listed below; ‘OFF’ selects a zero.
SW5.3: ON: 1%
SW5.4: ON: 2%
SW5.5: ON: 4%
SW5.6: ON: 8%
SW5.7: ON: 16%
SW5.8: ON: 32%
The switches can be used in combination to select low alarm settings from 5% to 40% LEL. If a
low alarm level less than 5% or greater than 40% is programm ed, the controller will give a
configuration error(E90) upon power up.
Example:
SW5.3 OFF
SW5.4 OFF
SW5.5 ON low alarm 12% LEL
SW5.6 ON high alarm 24% LEL
SW5.7 OFF
SW5.8 OFF
NOTE
IT IS VERY IMPORTANT THAT POW ER TO THE CONTROLLER IS RECYCLED
AFTER ANY DIP SWITCH CHANGES, TO MAKE THE CHANGES TAKE EFFECT!
LATCHING/NON-LATCHING SELECTION
Switch Bank 5, switch 1 is used to set the low alarm relays for latching or non-latching operation;
the high alarm is always latching and the fault is always non-latching.
SW5.1: OFF: low alarm relay latching operation
ON: low alarm relay non-latching operation
NOTE
IT IS VERY IMPORTANT THAT POW ER TO THE CONTROLLER IS RECYCLED
AFTER ANY DIP SWITCH CHANGES, TO MAKE THE CHANGES TAKE EFFECT!
Refer to Table 3, at the end of this unit, for a summary of the dip switch settings.
ENERGIZED/DE-ENERGIZED SELECTION
Switch Bank 5, switch 2 (SW 5.2) is used to set the high and low alarm relays for norm ally
energized or norm ally de-energized operation; the fault relay is always norm ally energized. SW 5.2
is factory set to the ‘ON’ position.
SW5.2: OFF: alarm relays normally energized
ON: alarm relays normally de-energized
-20-

RELAY SETTINGS
There are three relays on the controller circuit board that can be set up for normally open or
normally closed operation by moving the jumpers which are located below the relays. See Figure
9a for the location of the relays on the circuit board and Figure 9b for the correct settings.
Figure 9a - Relay Positions
Figure 9b - Relay Settings
INSTALLATION CHECKLIST
The following checklist is provided as a m eans of double check ing the system to be sure that all
phases of system installation are complete and have been perform ed correct.
T Controller is securely mounted and sensor is oriented correctly
T All cable shields are properly grounded at one end only
T Explosion-proof conduit seals have been insta lled at all conduit entries (if conduit
is being used)
T Sensor to controller wiring is correct
T Power wiring to the controller is installed and power source is operational
T External loads are properly connected to the controller
T Controller is programmed as needed. Record this information for future
reference. A table is provided in the appendix for this purpose
T Controller is properly installed in the housing
-21-

T Proper ventilation is provided to prevent overheating of the controller
SWITCH OPEN (OFF) CLOSED (ON)
SW3.7 & SW3.8 NOT USED
SW3.1 Channel 1 connected Channel 1 not connected
SW3.2 Channel 2 connected Channel 2 not connected
SW3.3 Channel 3 connected Channel 3 not connected
SW3.4 Channel 4 connected Channel 4 not connected
SW 3.5 Calibration gas concentration is
set to 50% of full scale (ignore
SW4.1 to SW4.7)
SW3.6 Power-up time delay is 45 seconds Power-up time delay is 90 seconds
SW 4.1 - SW 4.7 Set calibration gas concentration from 20% to
SW 4.8 LOW alarm @ 20% of full
scale/HIG H alarm @ 40% of full
scale (ignore SW 5.3 to SW5.8)
SW5.1 LOW alarm relay is latching LOW alarm relay is non-latching
SW 5.2 LOW and HIGH alarm relays
normally energized
SW5.3 - SW5.8 Set LOW alarm settings from 5% to 40% of
Table 5 - Summary of Dip Switch Settings
Calibration gas concentration is selectable
using SW 4.1 to SW 4.7
99% of full scale
Selectable alarm settings using SW 5.3 to
SW5.8 (LOW = 5% to 40% of full scale; HIGH
= 2 x LOW)
LOW and HIGH alarm relays normally deenergized
full scale (HIGH alarm is twice the LOW alarm
setting)
Unit IV
SYSTEM OPERATION
MENU AND FUNCTION SELECTION
The controller has various functions and menus that can be entered by activating the MENU/SET
(and SELECT/RESET) switches for a specified am ount of tim e. Table 6, below, indicates how to
enter the various menus and functions.
SWITCH TIME FUNCTION OR MENU
SELECT/RESET
SELECT/RESET
MENU/SET
MENU/SET
MENU/SET & SELECT/RESET
Sim ultaneously
Table 6a - Menu and Function Selection
< 0.5 sec Basic Reset
1 sec Forced Reset
2 sec Forced Display [FdP]
5 sec Main Menu
20 sec Special Function Menu
-22-

Further explanation on how to enter the functions will be given in the following discussion. The
Main Menu has five functions within it (See Table 7) and the Special Function Menu has five
functions (See Table 8).
To enter the Main Menu, activate the MENU/SET switch for approximately 5 seconds, until ‘Err
Chc’ or ‘Spd’ is displayed, then release it. Once in the Main Menu, the next selection can be
brought up by activating the MENU/SET switch. The SELECT/RESET switch is used to accept a
currently displayed selection.
Failure to activate any switches for a period of 10 seconds will result in the controller returning to
the Normal Operating Mode. Selecting the Return function will also return the controller to the
Normal Operating Mode. When “rtn” is on the lower digital display, momentarily activate the
SELECT/RESET switch.
Summary of Main Menu:
Enter Main Menu: MENU/SET for 5 sec.
Find Desired Function: MENU/SET
Select Function: SELECT/RESET
Next Function: MENU/SET
Exit Main Menu: no buttons for 10 sec. or Select RETURN function
LEFT DIGITAL
DISPLAY
Err Chc Error Check (hidden if no errors)
blank SPd Set Point Display
blank CAL Calibration
blank SrP Sensor Replacement
blank rtn Return
Table 6b - Main Menu Selection
LEFT DIGITAL
DISPLAY
blank FOP Forced current output
blank CUC Current output calibration
Adr SEt Set network address
blank Chd Channel display
blank bPS Bypass
blank rtn Return
Table 7 - Special Function Menu Selection
RIGHT DIGITAL
DISPLAY FUNCTION
RIGHT DIGITAL
DISPLAY FUNCTION
START-UP PROCEDURE
2 O utput loads that are normally actuated by the system should be secured.
Remove power from all of the output devices to prevent undesired activation
3 Check all external wiring for proper connections. Be sure that the sensor has
been wired properly
-23-

4 Before installing the controller, inspect it to verify that it has not been physically
damaged in shipment. Check the dip switches on the controller for proper
programming
5 Apply power to the system.
NOTE
The controller has a 45 or 90 second delay (as programmed), before beginning normal
operation, after power is applied to the system. During this time the outputs are inhibited,
the Fault LED is illuminated, the left digital display cycles through the active channels, and
the right digital display counts down from 45 or 90. This delay allows time for the sensors
to stabilize before beginning normal operation.
6 Put the controller in the Set-point Display Mode to check the present alarm set-
points and calibration gas concentration. If changes are required, refer to the ‘Dip
Switch Setting’ section of the manual
7 Calibrate the sensor(s); refer to the Sensor Calibration Procedure
8 Remove mechanical blocking devices (if used) and restore power to the output
loads
MAIN MENU SELECTIONS
ERROR CHECK MODE (Err Chc)
The microprocessor-based controller features self-testing circuitry that continuously checks for
problems that could prevent proper system response. As a diagnostic and troubleshooting tool,
identifiable faults are displayed on the digital display during the Error Message Display Mode.
Two types of faults are identified: system faults and channel faults. Table 7 lists the codes and
the corresponding conditions.
If a fault should occur:
< the norm ally energized fault output is de-energized,
< the Fault LED is illuminated, and
< if no alarm is occurring and the controller is sequentially displaying each sensor input, the
message ‘Err’ ‘Fnd’ (left and right displays) will be displayed after each sequence.
To view the fault code, enter the Main Menu, then momentarily activate the SELECT/RESET reed
switch when ‘Err’ is displayed on The right digital display. Next, activate the MENU/SET reed
switch repeatedly; the left digital display will sequentially show:
‘SYS’ - system faults
‘CH1' - channel 1 faults
‘CH2' - channel 2 faults
‘CH3' - channel 3 faults
‘CH4' - channel 4 faults
‘Clr’ - clear faults
NOTE
If no errors exist, this function is hidden and can not be accessed.
To select the fault to be displayed, momentarily activate the SELECT/RESET reed switch when
the required fault is being displayed on the left digital display. The left digital display will show the
channel (or system) and the right digital display will show the fault code, for 5 seconds then move
to the next channel.
-24-

NOTE
Faults that affect the actual function of the controller (50, 60, 70, 9X) can impair the ability
of the controller to maintain an alarm output.
All faults automatically reset except the 9X, 20, and 10 faults. After the fault condition has been
corrected, the fault output automatically switches to the normal (energized) state, the DC current
output returns to normal, and the Fault LED turns off. Clearing 9X faults requires removing
operating power from the controller for approximately one second. Clearing 20 and 10 requires a
reset.
CAUTION
The fault detection circuitry does not monitor the operation of external response
equipment or the external wiring to these devices. It is important that these devices be
checked periodically to ensure that they are operational.
SET-POINT DISPLAY MODE (SPd)
1 In this mode, the digital displays sequentially display the low and high alarm and
calibration gas concentration automatically. This function is used to check the
present alarm and calibration gas set-point values.
2 To enter the Set-point Display Mode, enter the Main Menu, activate the
MENU/SET reed switch repeatedly until ‘Spd’ is displayed on the right digital
display, then momentarily activate the SELECT/RESET reed switch
3 The Low LED goes on, ‘LoA’ is shown on the left digital display, and the low
alarm set-point is shown on the right digital display for 2 seconds
4 The Low LED goes out, the High LED goes on, ‘HiA’ is shown on the left digital
display, and the high alarm set-point is shown on the right display for 2 seconds
5 The High LE D goes out, the Cal LED goes on, ‘CAL’ is shown on the left display,
and the calibration gas concentration (in percent LEL) is shown on the right
display for 2 seconds
6 The Cal LED goes out, ‘Adr’ is shown on the left display and the right digital
display shows the comm unication address for the CAN interface for 2 seconds.
Address setting is not used
7 Finally, the controller returns to the normal operating mode (it is no longer in the
main menu)
8 If adjustm ents to the set-points are required, the settings on the programm ing dip
switches must be changed; Refer to ‘DIP SWITCH SETTINGS’ in the ‘SYSTEM
INSTALLATIONS’ section of this manual for instructions. W hen the set-point
levels are acceptable, record this information for future reference and proceed to
‘CALIBRATION.’
NOTE
IT IS VERY IMPORTANT THAT POWER TO THE CONTROLLER IS RECYCLED
AFTER ANY DIP SWITCH CHANGES, TO MAKE THE CHANGES TAKE EFFECT!
STATUS CONDITION WHAT TO DO
E90 Dip Switch Configuration error Check dip switch settings and recycle
power
-25-

E91 RAM or processor failure Consult the Factory
E94 Set-point and calibration data lost Consult the Factory
E95 Internal 5 volt supply failure during
start-up
E96 External 24 volt supply failure during
start-up
E97 EEPROM failure Consult the Factory
E98 Duplicate CAN address. Check CAN address and change to a
E99 Lost communication. Check comm unication wiring, disconnect
CHx E80 Sensor output is more than 26 mA Check wiring and signal output from
CHx E70 External reset switch has been
activated for 15 seconds or longer.
Self clearing when switch is released.
CHx E40 Sensor (or transmitter) input failure;
input is below 1 mA.
CHx E30 Negative zero drift; sensor (or
transmitter) is -9% full scale or lower.
CHx E20 Time ran out while waiting for the user
to apply gas to the sensor.
CHx E21 Sensor (or transmitter) output is too
low; enough offset to get an accurate
calibration is not being generated.
CHx E22 Sensor can not be calibrated. Calibrate transmitter or replace sensor.
CHx E23 Sensor is too sensitive for the detector
to read 100% full scale.
CHx E24 Zero point is more than 6% below
standard value
CHx E25 Zero point is more than 6% above
standard value
CHx E10 Calibration was successful, but sensor
reaching end of life or time to change
jumper position on transmitter
CHx goP Over-range error (reading greater than
100% of full range)
Table 8 - System Status Codes
(Chx = Channel number)
Consult the Factory
Consult the Factory
vacant address
controller, and re-connect it. If this does
not help, contact the factory
sensor
Check external reset switch for a short,
or faulty operation
Check wiring and signal output from
sensor.
Calibrate transmitter.
Restart calibration procedure.
Calibrate transmitter or replace sensor.
Calibrate transmitter or replace sensor.
Calibrate transmitter
Calibrate transmitter
Be prepared to calibrate transmitter or
replace sensor at next calibration tim e
Insure area has been de-contaminated
then perform a forced reset
SENSOR CALIBRATION (CAL)
General Information
-26-

Various factors affect the interval betw een periodic calibratio ns. Exposure to certain
contaminants in the air, accumulation of contaminants on the filter, or an extended period of
norm al operation can cause changes in sensitivity. Since each application is different, the length
of time between regularly scheduled calibrations can vary from one installation to the next. In
general, the more a system is checked, the greater the reliability. A calibration must be
performed:
< when a new system is initially put into service,
< when the sensor is replaced, or
< when a controller is replaced.
IMPORTANT
To ensure adequate protection, the detection system must be calibrated on a regularly
scheduled basis.
The Controller uses a fully automatic calibration procedure that requires no adjustments by the
operator. The controller perform s the zero adjustm ents, then signals the operator when to apply
and when to remove the calibration gas.
While in the Sensor Calibrate Mode, all controller outputs are inhibited, the current output is 3mA,
and the Cal LED is illuminated.
NOTE
If the sensor is being replaced, refer to the 'Sensor Replacement' section (under
'Maintenance') in this manual for information regarding replacement and calibration of the
sensor.
Calibration Procedure
1 The sensor should be allowed to stabilize for a m inimum of 4 hours, although it is
best to allow 24 hours for the sensor to stabilize.
2 Be certain that the controller is properly programm ed for the gas concentration
being used for calibration. (Refer to ‘SET-POINT DISPLAY MODE’ to check
programm ed value.) Reprogram the controller if required. (Refer to ‘DIP
SWITCH SETTINGS.’) Failure to do so will greatly impair system response.
NOTE
IT IS VERY IMPORTANT THAT POWER TO THE CONTROLLER IS RECYCLED
AFTER ANY DIP SWITCH CHANGES, TO MAKE THE CHANGES TAKE EFFECT!
3 Be sure that only clean air is present at the sensor. The microprocessor begins
taking zero readings immediately upon entering the Calibrate Mode. If the
possibility of background gases exists, purge the sensor with clean air to assure
an accurate calibration.
4 Enter the Main Menu, activate the MENU/SET reed switch repeatedly until ‘CAL’
is shown on the right digital display, then momentarily activate the
SELECT/RESET reed switch.
5 Once in the sensor calibrate mode, the right digital display will continue to show
‘CAL’ and the left digital display will show ‘Chn’. Activate the MENU/SET reed
switch repeatedly until the desired channel is shown on the left digital display,
then momentarily activate the RESET/SELECT reed switch.
-27-

6 Once the required channel has been selected, the controller will automatically
start taking zero readings. The left digital display will show ‘Air’ and the right
display will flash a value close to zero. W hen the zero calculations are complete
(30 seconds minimum ), the right digital display stops flashing and reads '00'; the
left display will now alternately display ‘gAS’ and ‘in’.
7 Apply the calibration gas to the sensor. The right digital display starts to flash,
and the value indicated on the display rises. The bar graph display also indicates
the level of gas at the sensor, but does not flash. T he left display will show ‘gAS’.
8 W hen the m icroprocessor has com pleted the gain adjustm ents (30 seconds
minim um ), the right digital display stops flashing and the left display will
alternately display ‘Cut’ and ‘gAS’.
9 Remove the calibration gas. When the gas level falls to half the low alarm
set-point, the controller automatically returns to the normal operating mode.
10 If another sensor must also be calibrated, return to step 1.
If the operator fails to complete the calibration procedure or if the sensitivity of the sensor has
deteriorated to the extent that calibrations cannot be successfully com pleted, a calibration fault
(‘E2X’ status) will be generated. The system will automatically revert to the former calibration
settings (after 10 minutes or when the gas level drops below the lowest set-point). If a successful
calibration cannot be accomplished, replace the sensor and calibrate (refer to the
transmitter/sensor manual, as some transmitters will have gain jumpers which need to be
changed and the sensor m ay still be useful).
If the microprocessor determines that the sensor is approaching the end of its useful life or the
gain jum per on the transm itter needs to be changed, ‘E10' will be indicated on the digital display.
This does not indicate a system malfunction, but is intended to notify the operator of this condition.
A successful calibration can still be performed, but the operator should be prepared to change the
sensor at the time of the next calibration. Activate SELECT /RESET after completing calibration to
clear the display.
SENSOR REPLACEMENT MODE (SrP)
This mode inhibits all controller outputs to allow replacement of the sensor(s) without removing
power from the controller. Alarm set-points and calibration gas concentration are not affected.
The left display will show ‘SrP’ while in the sensor replace mode. The right display will show the
status of the sensor being replaced (‘NoS’ means no sensor is connected). The fault LED is on
and the fault relay is de-energized. The channel LED will be on for the sensor being replaced.
All other sensors remain active during sensor replace mode. If an alarm condition occurs on one
of the active channels while in this mode, the appropriate channel LED will flash and relays will act
accordingly. All other display features will be inhibited. In order to exit this mode the
SELECT/RESET reed switch must be activated. The controller will perform a power-up count
down (45 or 90 seconds) for the replaced sensor, and the affected current output will drop to 1mA.
SPECIAL FUNCTION MENU SELECTIONS
FORCED CURRENT OUTPUTS (FoP)
-28-

The forced current output mode is used to check the current output calibration and the operation
of any devices connected to the current outputs.
To enter the forced current output mode, enter the special function menu. When ‘FoP’ is shown
on the right display, activate the SELECT/R ESET reed switch. Upon successful entry into this
mode the left display will flash ‘gPn’. Activate the MENU/SET reed switch until the desired area
output is reached (‘GPA’ = Area 1 and ‘GPb’ = Area 2), then activate the SELECT/RESET reed
switch.
When an area has been chosen for forced current output, the left display will alternate between
‘GPX’ and ‘FoP’ and the right display will show what type of current output (in gas concentration)
is being placed on the current output line.
The push-button switches are used to change the current output. To exit this function, hold the
SELECT/RESET reed switch down until ‘rtn’ is shown on the right display. Release the reed
switch, and the controller will return to the normal operating mode in 10 seconds if no reed
switches are pushed.
CURRENT CALIBRATION MODE (CuC)
The next selection in the special function menu is the current calibration mode. This m ode is
selected to calibrate the current outputs. The Area output to calibrate is chosen as in the Forced
Current Output Mode. Once an area has been selected, the left display will alternate between
‘CuC’ and the area that is being calibrated (‘GPX’). The right display will show a constant which
will rise and fall as the current is adjusted (does not show the current on the outputs). Place a
milliamp metre between the Area current output and system common. Use the magnetic reed
switches to raise and right the current. Once the current measured is as close to 4mA as
possible, do not activate any reed switches for 10 seconds and the constant shown on the right
display will change to a much higher number. This tells the operator that it is time to calibrate the
higher end of the current output range. Use the magnetic reed switches to bring the current level
as close as possible to 20mA. Do not activate any reed switches for 10 seconds and the constant
shown on the display will change to a lower number. Now it is time to calibrate the current output
to 3mA for when the controller is in the calibration mode. Once this current level is set, do not
activate any reed switches for 10 seconds and the controller will return to the normal operating
mode.
ADDRESS SET M ODE (Adr Set) (Do not use)
Do not use the next selection in the special function menu. It is the address set mode, used
to set the controllers address for the CAN system. When the left display shows ‘Adr’ and the right
display shows ‘SEt’ activate the SELECT/RESET reed switch. The left display will alternate
between ‘Adr’ and ‘SEt’ and the right display will show the current address. Use the magnetic
reed switches to raise and lower the address. Once the address is correct, do not activate any
reed switches for 10 seconds and the controller will return to the normal operating mode.
CHANNEL DISPLAY(Chd)
In this mode, the displays can be forced to monitor only one channel, as long as no alarms are
occurring. If any alarm occurs, the controller will return back to the Normal Operating Mode for
the situation when an alarm is occurring.
Enter the Special Function M enu, activate the M ENU/S ET reed switch repeatedly until ‘Chd’ is
displayed on the right digital display, then mom entarily activate the SELECT/RESET reed switch.
The left digital display will show ‘Chn’. Activate the MENU/SET reed switc h repeatedly to toggle
through the channels (CH1, CH2, CH3, or CH4). To select a channel, momentarily activate the
-29-

SELECT/RESET reed switch when the required channel is displayed, on the left digital display.
The displays will now only display the inform ation for the chosen channel.
To return to the normal operating mode, enter the manual display mode again and instead of
selecting a single channel, select ‘ALL’.
BYPASS (bPS)
The bypass mode is entered through the special functions menu. Enter the special functions
menu and activate the MENU/SET reed switch repeatedly until ‘bPS’ is shown on the right digital
display, then m om entarily activate the SELECT/R ESET reed switch. The right digital display will
still show ‘bPS’ and the left display will show ‘gPn’. Select the group to put in bypass mode by
activating the MENU/SET reed switch repeatedly until the desired group is shown, then activate
the SELECT/RESET reed switch m omentarily.
W hile in bypass mode, the alarm outputs for the selected group(s) are inhibited. The HIGH alarm
relay is common to both groups, and is inhibited even if the unselected group has an alarm
condition. CAUTION SHOULD BE USED W HILE IN BYPASS MODE.
To exit the bypass m ode, activate the SELECT/RESET reed switch m omentarily.
OPERATING MODES
RESET MODE
The Reset Function is entered by activating the SELECT/RESET reed switch located on the front
panel of the controller. (Refer to Figure 2.) When the SELECT/RESET reed switch is activated
momentarily, all LEDs turn off and all outputs return to their normal condition if no alarms or
faults are occurring.
FORCED RESET MODE
If any of the channels gets a reading beyond 100% of full scale, a reset will not clear the alarms,
even if the channel has returned to levels below the low alarm set point. The error resulting from
this occurrence must be cleared in the error check mode and then a forced reset must be applied.
To apply a forced reset, activate the SELECT/RESET reed switch for 1 second, the LEDs turn off
and the outputs return to their normal condition. Rem ote reset performs a forced reset.
NOTE
The remote reset performs a reset function only. It cannot be used for other controller
functions.
NORMAL OPERATING MODE
The following discussion covers the situation where no fault condition is occurring. Refer to
‘FAULT IDENTIFICATION’ for a discussion on faults.
In the Normal Operating Mode with no alarm:
< The digital and bar graph displays are on and indicate the sensor(s) input(s). If only one
channel is active, then the displays will stay on that channel; if two or more channels are
active, the displays will sequentially display the channels, for 5 seconds each. The left
digital display will indicate the channel (CH1, CH2, CH3, or CH4) and the right digital
display will indicate the sensor reading.
< The Channel LEDs will indicate which channel the digital display is referring to.
-30-

< All other LEDs are off.
< Alarm relays are in their normal state, energized or de-energized as programmed.
< Fault relay is energized.
In the Normal Operating Mode with a low alarm(s) condition occurring:
< Digital and bar graph displays indicate the sensor input(s) as outlined above.
< If one channel is in alarm, the system will stay at that channel.
< If more than one channel is in alarm, the channel with the ‘highest’ alarm condition will be
displayed. The channel LED of other channels will flash to notify that an alarm condition
exists. To force the display of a channel with a ‘lower’ alarm, go into the Forced Display
Mode, as outlined in the next section.
< Low LED flashes.
< Low alarm relay changes state.
< Fault relay is energized and fault LED is off.
W hen the signal decreases below the low set-point:
< The digital display and bar graph display continue to track the sensor input.
< W ith latching operation programm ed, low alarm relays will not change.
< W ith non-latching operation programm ed, low alarm relays will return to their normal
state.
< Low Alarm LEDs are on steady, while the affected channel is displayed, until reset.
If a high alarm condition occurs, the module will be in a Level 3 Display Mode; the bar graph and
digital display will cycle through all channels with a high alarm condition. W hile one channel is
displayed, the channel LED for any other channel in a high or low alarm state will flash.
NOTE
When 1 or more channels are in a high alarm condition and 1 or more channels are in a
low alarm condition, only the channels in the high alarm condition will be cycled on the
display. The channel LED for any channel in the low alarm condition will flash.
If one or more channels reach an ‘over-range’ (>100% of full scale) condition, the error
must be cleared in the error check mode and then a forced reset must be performed once
the channel has returned to normal. A basic reset will not clear an over-range error.
FORCED DISPLAY (FdP)
In the norm al operating m ode with no alarm s occurring, the digital and bar graph displays will
sequentially display each of the channel sensor readings. If an alarm condition occurs, the
displays will rem ain on the channel with the alarm (or ‘highest’ alarm if m ore than one channel is
in an alarm condition). In this situation, the forced display mode can be used to temporarily view
the sensor readings of the other channels.
To enter the Forced Display Mode, activate the MENU/SET reed switch for 2 seconds, until the
right digital display shows ‘FdP’. Momentarily activate the SELECT/RESET reed switch to select
this function. The digital displays will then sequentially display each of the active channels once
before returning to the Norm al Operating Mode autom atically.
Unit V
SYSTEM MAINTENANCE
-31-

ROUTINE MAINTENANCE
To ensure reliable protection, it is important to check and calibrate the detection system on a
regularly scheduled basis. The frequency of these checks is determined by the requirements of
the particular installation.
MANUAL CHECK OF OUTPUT DEVICES
Fault detection circuitry continuously monitors for problems that could prevent proper system
response. It does not monitor external response equipm ent or the wiring to these devices. It is
important that these devices be checked initially when the system is installed, and periodically
during the ongoing maintenance program.
SYSTEM CHECK IN NORMAL MODE
The system must be checked periodically in the Normal Operating Mode to ensure that those
items not checked by the controller diagnostic circuitry (such as output relays) are functioning
properly.
**CAUTION**
Be sure to secure all output devices actuated by the system to prevent unwanted acti-
vation of this equipment, and remember to place these same output devices back into
service when the checkout is complete.
SENSOR REPLACEMENT
The area must be declassified or power to the sensor must be removed prior to replacing the
sensor in a hazardous area.
11 Enter the Main Menu; momentarily activate the SELECT/RESET reed switch
once the message ‘SrP’ appears on the right digital display
12 Once in the sensor replace mode, the right digital display will continue to show
‘SrP’ and the left digital display will show a channel selection: CH1, CH2, CH3, or
CH4
If the channel that is first displayed corresponds to the senor to be replaced,
momentarily activate the SELECT/RESET reed switch to select that channel. If
the first channel displayed is not the required channel, activate the MENU reed
switch; the left digital display will sequentially display the operational channels
each time the MENU/SET reed switch is activated. Activate the SELECT/RESET
reed switch, once the required channel is displayed.
13 Once the required channel has been selected, the display reads '00' and the
Channel LED and Fault LED are illuminated. The controller is in the Sensor
Replacement Mode.
Once in the Sensor Replacement Mode follow the instructions in the sensor manual for
replacem ent.
NOTE
If power was removed from the controller during the sensor replacement procedure, the
controller will automatically return to the Normal Mode when power is restored (after a 45
or 90 second time delay). To prevent the possibility of alarms, allow the system to warm
up in the Sensor Replacement Mode.
-32-

An adequate supply of spare sensors should be kept on hand for field replacement. For maximum
protection against contamination and deterioration, they should not be removed from the original
protective packaging until the time of installation.
TROUBLESHOOTING
Table 10 is intended to serve as an aid in locating the cause of a system m alfunction. If this table
is not helpful, contact an authorized repair person.
REPLACEMENT PARTS
The Uni-Trol Controller is not designed to be repaired by the customer in the field. If a problem
should develop, first carefully check for proper wiring, program m ing and calibration. If it is
determined that the problem is caused by an electronic defect, the device must be returned to the
factory for repair.
NOTE
The sensor is not intended to be repaired. When calibration can no longer be properly performed,
the sensor must be replaced. The frequency of replacement will be determined by the amount and
type of contamination present at the particular installation. An adequate supply of spare sensors
should be kept on hand for field replacement. Always calibrate the sensor after it has been
replaced.
™
When replacing a controller, remove power before removing the device from the
enclosure or installing the replacement unit.
DEVICE REPAIR AND RETURN
The electronics are under full warranty for THREE years (from date of purchase) and the sensors
are under warranty for 2 years. Net Safety Monitoring Inc. supplies all distributors with advance
replacement units. These units are available to the user during the warranty period. This allows
Net Safety Monitoring Inc. to take the tim e to repair the unit com pletely while customers keep their
operations running sm oothly with the advance replacem ent unit.
Prior to returning devices or components, contact the nearest local distribution office so that an
RMI (Return Material Identification) number can be assigned. A written statement describing the
malfunction must accompany the returned device or component to expedite finding the cause of
the failure, thereby reducing the time and cost of the repair to the customer. Pack the unit or
component properly. Use sufficient packing material in addition to an anti-static bag or alum inum-
backed cardboard as protection from electrostatic discharge.
-33-

PROBLEM POSSIBLE CAUSE
No Faceplate
indicators illuminated.
FAULT LED on, digital
display blank.
E90 to E97 Status < Initialization failure. Repeat power-up. If successful, re-
E96 Status < Input power problem. Check operation of power source and
E70 Status < External reset activated for over 15 seconds. Check external
E40 Status < Sensor input problem. Check sensor and/or transmitter wiring
E30 Status < Negative zero drift. Calibrate sensor.
E20, E21 Status < Calibrate error. Re-calibrate.
E22, E23 Status < Sensor sensitivity out of tolerance. Calibrate transmitter. If
E10 Status < Sensor reaching end of life - no problem at present time. Be
Table 10 - Troubleshooting Guide
< W iring to external power source.
< Input power failure.
< Power-up time delay (45 seconds).
< If condition continues after 45 seconds, repeat power-up. If a
problem continues, check dip switches or replace detector.
program and re-calibrate. If not, replace detector.
power wiring.
switch and wiring.
and calibration.
< Faulty sensor. Replace and calibrate.
< Faulty transmitter. Replace and calibrate.
< Faulty sensor. Replace and calibrate.
< Faulty transmitter. Replace and calibrate.
problem continues, replace sensor and calibrate.
prepared to replace sensor at next calibration (calibration
attempt might fail).
Appendix A
-34-

Net Safety Monitoring Inc.
Electrostatic Sensitive Device Handling Procedure
With the trend toward increasingly widespread use of microprocessors and a wide variety of other
electrostatic sensitive semiconductor devices, the need for careful handling of equipment
containing these devices deserves m ore attention than it has received in the past.
Electrostatic dam age can occur in several ways. The most familiar is by physical contact.
Touching an object causes a discharge of electrostatic energy that has built up on the skin. If the
charge is of sufficient magnitude, a spark will also be visible. This voltage is often more than
enough to damage some electronic components. Some devices can be damaged without any
physical contact. Exposure to an electric field can cause damage if the electric field exceeds the
dielectric breakdown voltage of the capacitive elements within the device.
In some cases, permanent damage is instantaneous and an imm ediate malfunction is realized.
Often, however, the symptoms are not immediately observed. Performance may be marginal or
even seemingly normal for an indefinite period of time, followed by a sudden and mysterious
failure.
Damage caused by electrostatic discharge can be virtually eliminated if the equipment is handled
only in a static safeguarded work area and if it is transported in a package or container that will
render the necessary protection against static electricity. Net Safety Monitoring Inc. modules that
might be damaged by static electricity are carefully wrapped in a static protective material before
being packaged. Foam packaging blocks are also treated with an anti-static agent. If it should
ever becom e necessary to return the m odule, it is highly recom m ended that it be carefully
packaged in the original carton and static protective wrapping.
Since a static safeguarded work area is usually impractical in most field installations, caution
should be exercised to handle the module by its metal shields, taking care not to touch electronic
components or terminals.
In general, always exercise all of the accepted and proven precautions that are normally observed
when handling electrostatic sensitive devices.
A warning label is placed on the packaging, identifying those units that use electrostatic sensitive
semiconductor devices.
*Published in Accordance with E1A
standard 471
-35-

Appendix B
Record Of Dip Switch Settings
DIP SWITCH ON OFF
SW 3.1
SW 3.2
SW 3.3
SW 3.4
SW 3.5
SW 3 .6
SW 3.7
SW 3.8
SW 4.1
SW 4.2
SW 4.3
SW 4.4
SW 4.5
SW 4.6
SW 4.7
SW 4.8
SW 5.1
SW 5.2
SW 5.3
SW 5.4
SW 5.5
SW 5.6
SW 5.7
SW 5.8
-36-

Appendix C
Wire Resistance In Ohms
Distance
(Feet)
100
200 2.03 1.28 0.08 0.51 0.32 0.20 0.13
300 3.05 1.92 1.20 0.76 0.48 0.30 0.19
400 4.06 2.55 1.61 1.01 0.64 0.40 0.25
500 5.08 3.20 2.01 1.26 0.79 0.50 0.31
600 6.09 3.83 2.41 1.52 0.95 0.60 0.38
700 7.11 4.47 2.81 1.77 1.11 0.70 0.44
800 8.12 5.11 3.21 2.02 1.27 0.80 0.50
900 9.14 5.75 3.61 2.27 1.43 0.90 0.57
1000 10.20 6.39 4.02 2.53 1.59 1.09 0.63
1250 12.70 7.99 5.03 3.16 1.99 1.25 0.79
1500 15.20 9.58 6.02 3.79 2.38 1.50 0.94
1750 17.80 11.20 7.03 4.42 2.78 1.75 1.10
2000 20.30 12.80 8.03 5.05 3.18 2.00 1.26
2250 22.80 14.40 9.03 5.68 3.57 2.25 1.41
2500 25.40 16.00 10.00 6.31 3.97 2.50 1.57
AWG #20 AWG #18 AWG #16 AWG #14 AWG #12 AWG #10 AWG #8
1.02 0.64 0.40 0.25 0.16 0.10 0.06
3000 30.50 19.20 12.00 7.58 4.76 3.00 1.88
3500 35.50 22.40 14.10 8.84 5.56 3.50 2.21
4000 40.60 25.50 16.10 10.00 6.35 4.00 2.51
4500 45.70 28.70 18.10 11.40 7.15 4.50 2.82
5000 50.10 32.00 20.10 12.60 7.94 5.00 3.14
5500 55.80 35.10 22.10 13.91 8.73 5.50 3.46
6000 61.00 38.30 24.10 15.20 9.53 6.00 3.77
6500 66.00 41.50 26.10 16.40 10.30 6.50 4.08
7000 71.10 44.70 28.10 17.70 11.10 7.00 4.40
7500 76.10 47.90 30.10 19.00 12.00 7.49 4.71
8000 81.20 51.10 23.10 20.20 12.70 7.99 5.03
9000 91.40 57.50 36.10 22.70 14.30 8.99 5.65
10 000 102.00 63.90 40.20 25.30 15.90 9.99 6.28
NOTE: RESISTANCE SHOWN IS ONE WAY. THIS FIGURE SHOULD BE DOUBLED WHEN
DETERMINING CLOSED LOOP RESISTANCE.
-37-

2721 Hopewell Place NE
Calgary, Alberta, Canada, T1Y 7J7
DISTRIBUTED BY:
 Loading...