

Page 1
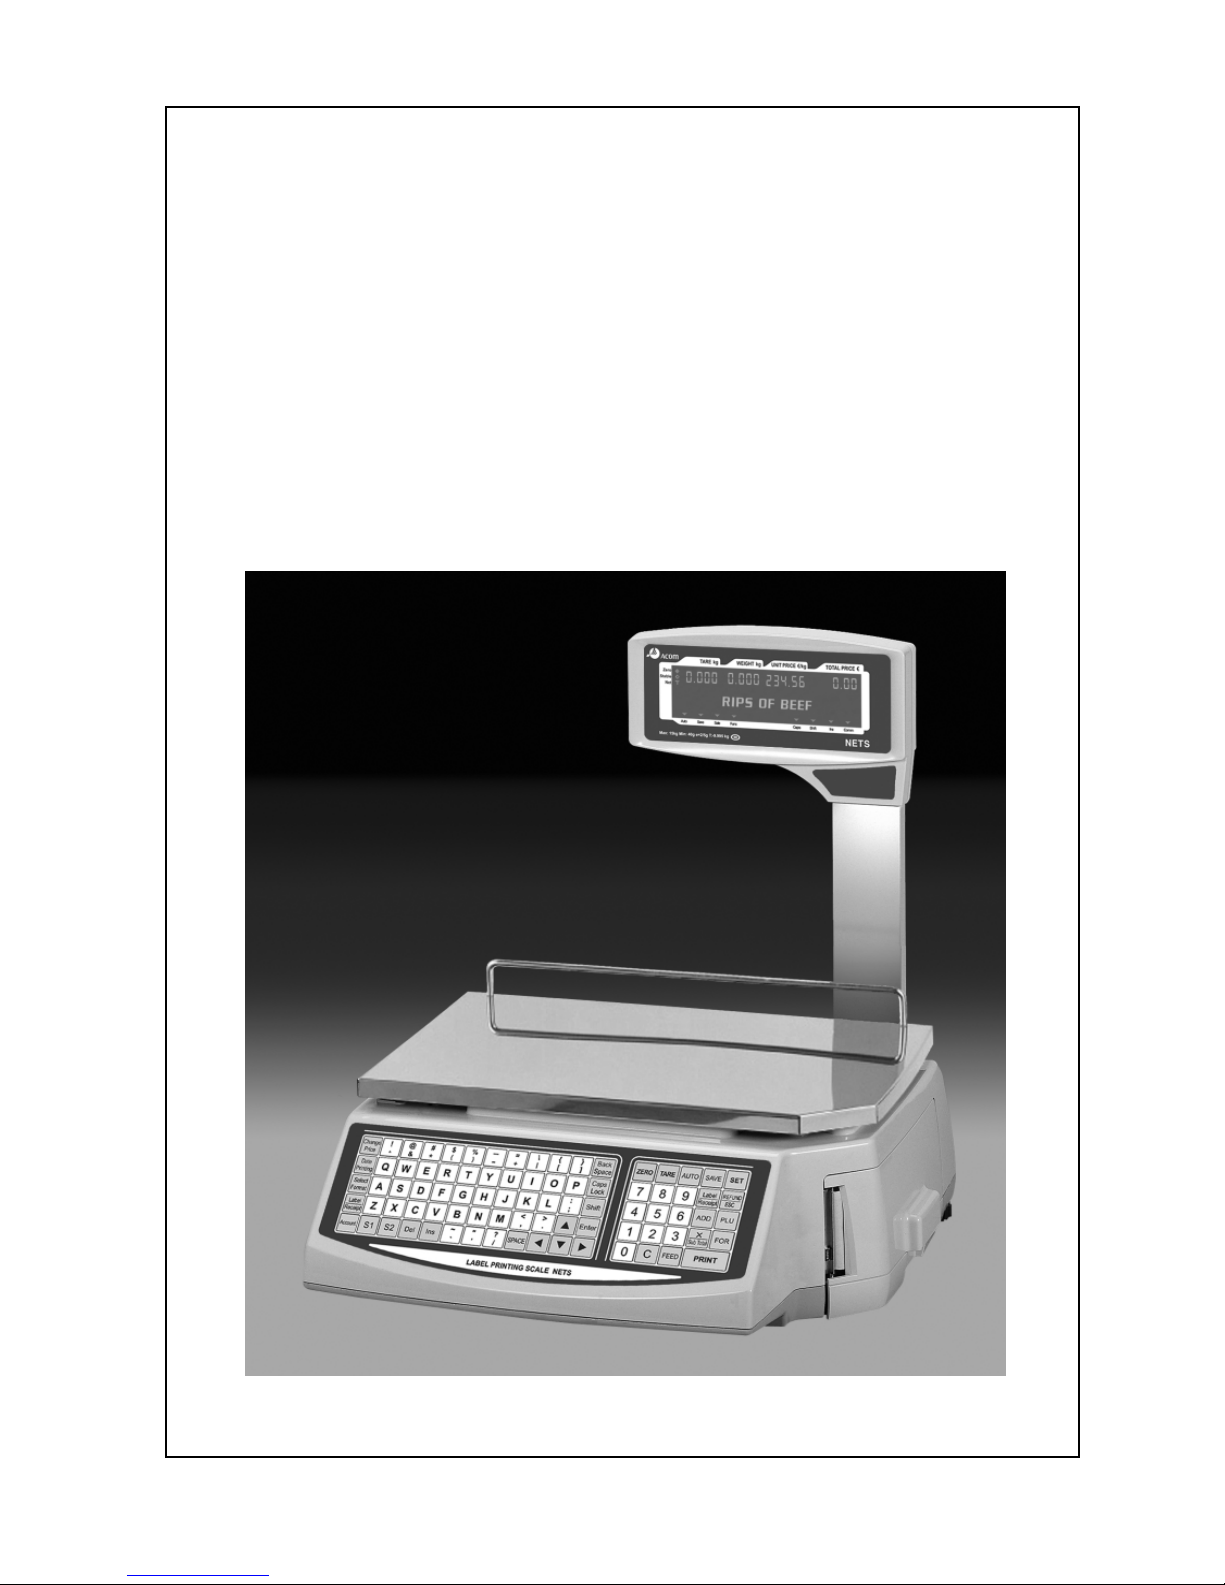
LABEL PRINTING SCALE
NETS
OPERATING MANUAL
FULL GRAPHIC
VER 1.00
Page 2

PREFACE
ACOM® would like to thank you for purchasing our model NETS,
Price
Computing Label/Receipt Printing Scale. We are committed to create
high
quality with low maintenance products and are supplying
diligent customer
service with our valuable customers.
This manual contains information on
the proper assembly and the appropriate usage of the scale.
Page 3

TABLE OF CONTENTS
General
Introduction …………………………………………….. 1
Specifications ………………………………………….. 1
Options & Accessories ……………………………….. 2
Unpacking & Assembly
Box Contents ………………………………………….. 3
Assembling the Display ………………………………. 4
Nomenclature
Scale Overview ………………………………………. 4
Displays ………………………………………………… 7
Printer & Label Installation ………………………….. 8
Numeric Keypad ……………………………………….11
Speed Keys …………………………………………….12
Alpha Keypad ………………………………………….12
Proper Operation
Do’s & Don’ts …….…………………………………..14
Location & Environment …….…………….…………15
Maintenance ………………………………………...15
Power Requirements …………………………………17
Set Up
Quick Start …………………………………………….18
Password ………………………………………………20
Program Mode
Main Menu …………………………………………… 21
1. PLU Create & Edit ……………………………… 23
PLU number ……………………………………… 25
PLU Type ……………………………………….. 25
Commodity Name ……………………………….25
Group Code ……………………………………... 26
UPC code ………………………………………...27
Unit Price …………………………………………27
Disc Weight ………………………………………27
Disc Unit Price ………………………………...... 27
Shelf Life ………………………………………… 28
PLU Tare ………………………………………… 29
Page 4

Label Number …………………………….. 29
Barcode Number …………………………. 30
Ingredients ………………………………… 30
Nutrition Facts ……………………………. 30
Cooking ……………………………………. 31
2. PLU Speed keys ………………………………..31
3. Store Settings ….………………………….......... 32
Store Name ……………………………… 33
Group Name ……………………………... 33
Operator Name …………………………. 34
Sales Message …………………………. 35
Scroll Message ………………………….. 37
Tax ……………………………………….. 38
4. Time & Date ……….…….………………….... 40
1.Year 2.Month 3.Day 4.Hour 5.Minute 6.Second
5. Scale Settings ….…………………..................40
Scale function …………………………… 40
Scale Assignment ………………………. 42
Network Settings ……………………… 45
6. Account Report …………………………….. 50
X1-Report ………………………………. 50
X2-Report ………………………………..56
Z-Report ………………………………..56
7. Label Settings ……………………………….. 57
Label / Receipt ………………………….57
Label Option ……………………………57
Receipt Option …………………………63
Barcode Settings ………………………64
Label Format …………………………..67
Total Label ………………………………68
Select Label Item ………………………69
Sensor Cal ………………………………71
8. System Settings ………………………………71
Self Test ………………………………....72
Print PLU ……………………………..….72
Delete PLUs …………………………..….73
Memory Clear …………………………….74
Page 5

Password Change ……………………..75
Memory Table Test …………………….76
Sales Mode
PLU Key & Calling Up PLUs ………………………77
Zero Key .….…….….….…….….….……………… 79
Tare key ……………………………………………. 79
Save Key(Label) ...….….….….…........…………… 80
Auto Key(Label) ……………………………………. 81
Set Key ……………………………………………… 82
Label/Receipt Key …………………………………... 82
REFUND/Esc Key ….….….….…........……………. 82
ADD Key ………….………………………………….. 83
X/Sub Total Key .….….….….….…..………………84
For Key …….….….….….….…........……………… 85
Clear Key ….….….….….….…........………………. 85
Feed Key ….….….….….….…........………………. 86
Print Key ……………………………………………. 87
Void Function ……………………………………….. 88
Discount Function (Receipt) .……………………….88
Change & Tender Print (Receipt) ..…………………. 89
Multi User Operation (Receipt) …..…………………..89
Advanced Topics
PC-to-Scale Data Transfer ………………………..91
Appendix A: Label Format Library ………………..92
Page 6
1
Introduction
The NETS Label Printing scale has been designed with many advanced
features, user-
friendly menu driven programming, and high quality construction. In a grocery, del
Using an advanced 100mm/second printer, the NETS issues crisp,
clear, and easy-to-read labels every time. With many other features
like 60 Speed Keys, password protection, and high capacity weighing
we are certain that you will find the NETS will meet all of your scale
needs.
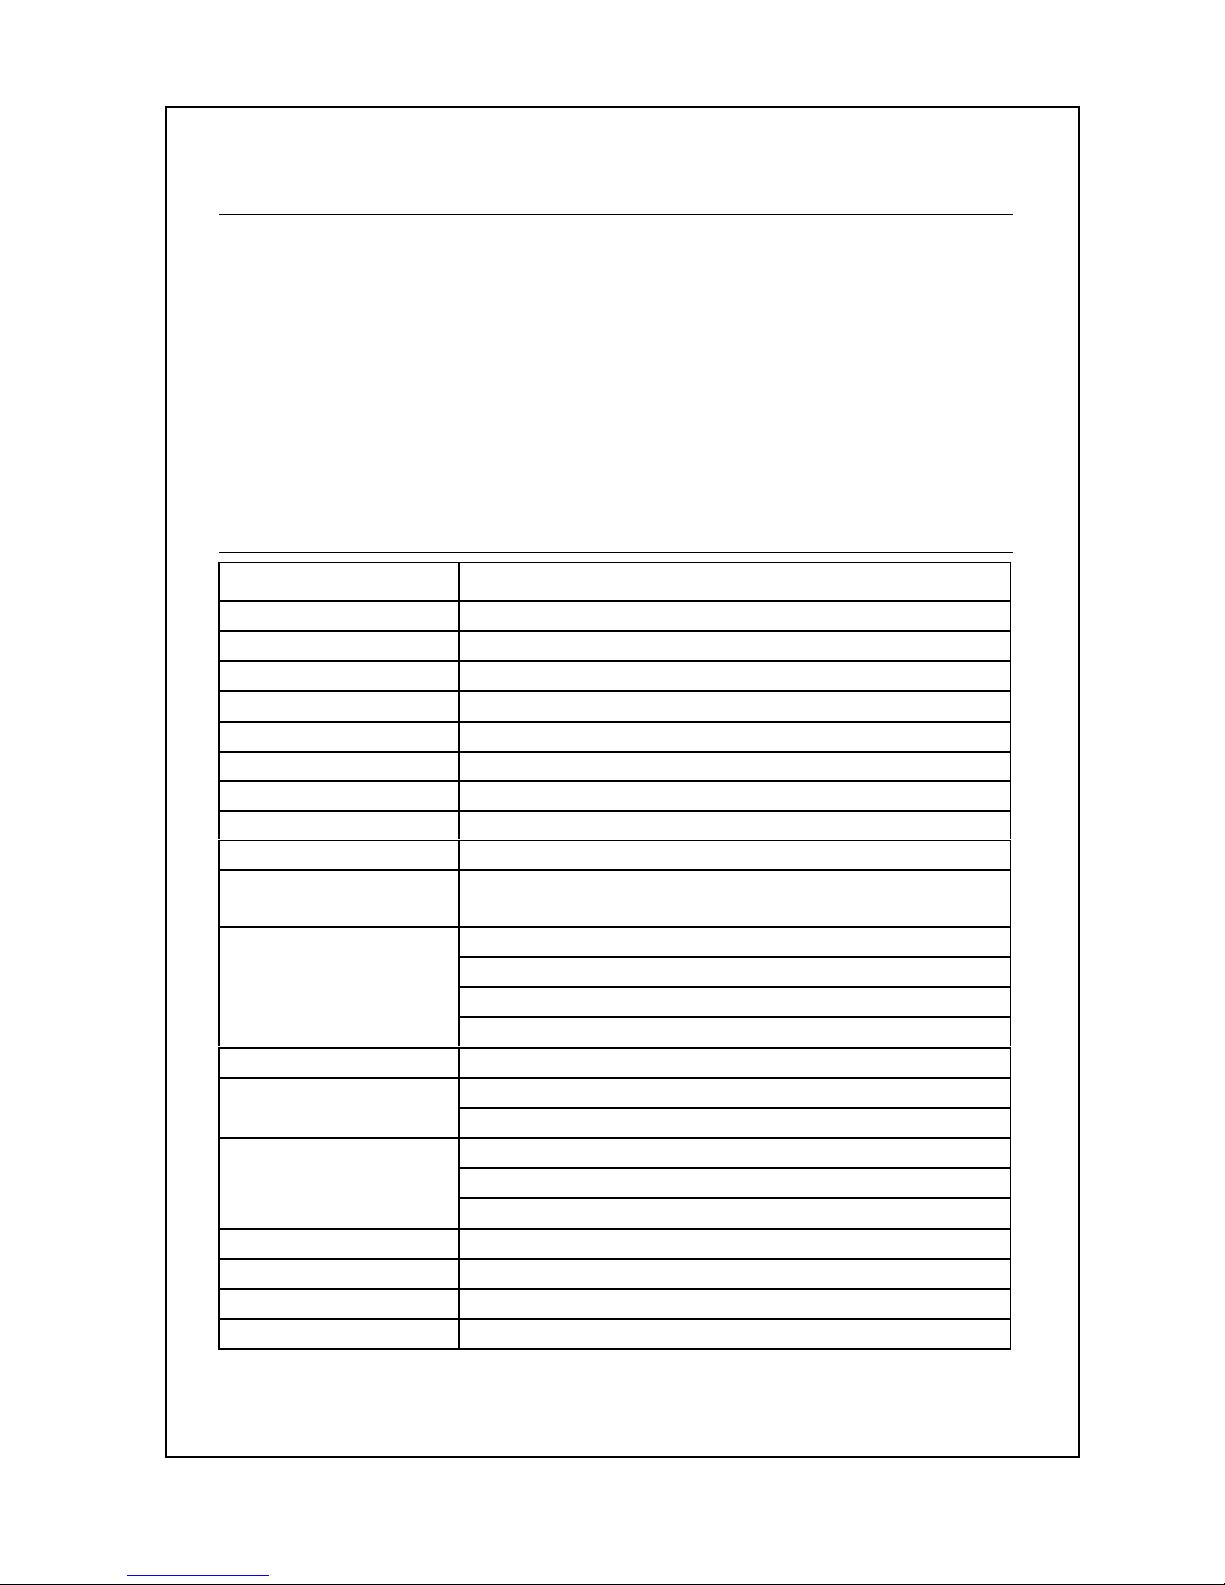
Specifications
Model: NETS
Maximum Capacity: 6kg, 15kg, 30 kg
Minimum Graduation: 1g / 2g, 2g / 5g, 5g / 10g
Maximum Tare: -6.000kg, -9.995kg, -9.995kg
Internal Resolution: 60,000 Counts (minimum)
A/D Conversion Rate: 9 Updates / second
Direct PLU Keys: 60 Direct PLUs (Speed Keys)
PLU Memory: 1000 PLUs Standard
Group Memory: 100 groups, 20 characters per group
Communications: RS-232 , TCP / IP(Option), Cash Drawer Output (Option)
Paper / Label
size
Paper width: 60mm / Label width: 58mm
Printing width: 56mm / Label length: 40~100mm
Tare: 4 Digits, 9.999
Weight: 5 Digits, 99.999
Unit Price: 5 Digits, 999.99 max
LED Numeric Displays:
Total Price: 6 Digits, 9999.99 max
LCD Alpha Display : 256 x 64 pixels
Width: 418 mm / 16.5”
Platter Size:
Length: 260 mm / 10.2”
Width: 460 mm / 18.1”
Length: 440 mm / 17.3”
Product Dimensions:
Height: 470 mm / 18.5”
Power Requirements: 100 ~ 240V AC @ 50/60 Hz
Operating Temp:
−
10 °C ~ 40
°
C, RH 35% ~ 85%(no condensation)
Fuse: 1.6A, 250V, 20mm fuse.
Power consumption: Approx. 40 Watts / Approx. 150 Watts at printing
Page 7
2
Options & Accessories
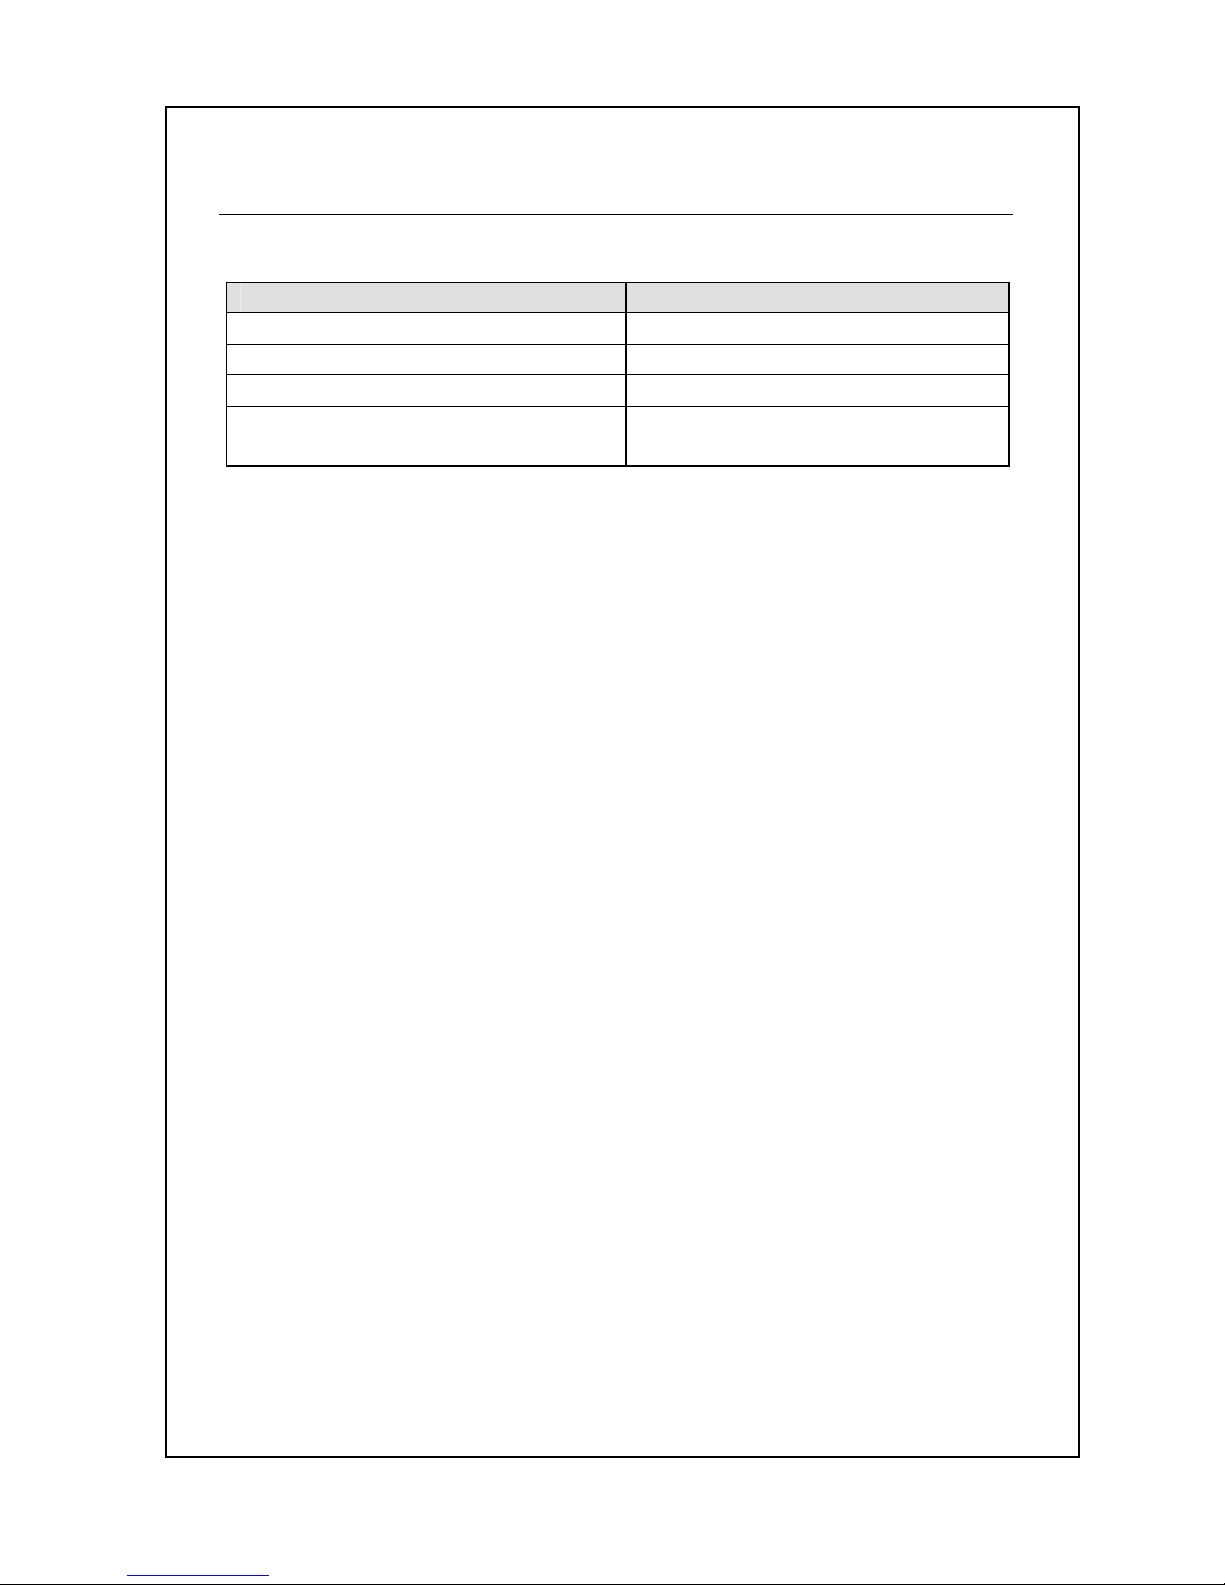
The following options are available through your ACOM dealer:
Description Part Number
TCP/IP communication
260-10007-020010
Cash drawer relay output
RS-232 Scale-to-Scale Cable
600-10007-00001M
NETS Software Package
(Contact your local ACOM
dealer.)
For any type of service or troubleshooting, please contact your nearest
ACOM dealer. Only licensed individuals can service, repair, or
disassemble this or any scale; if you attempt to do this yourself, you
may be subject to fines and may void your warrantee.
Page 8
3
Box Contents
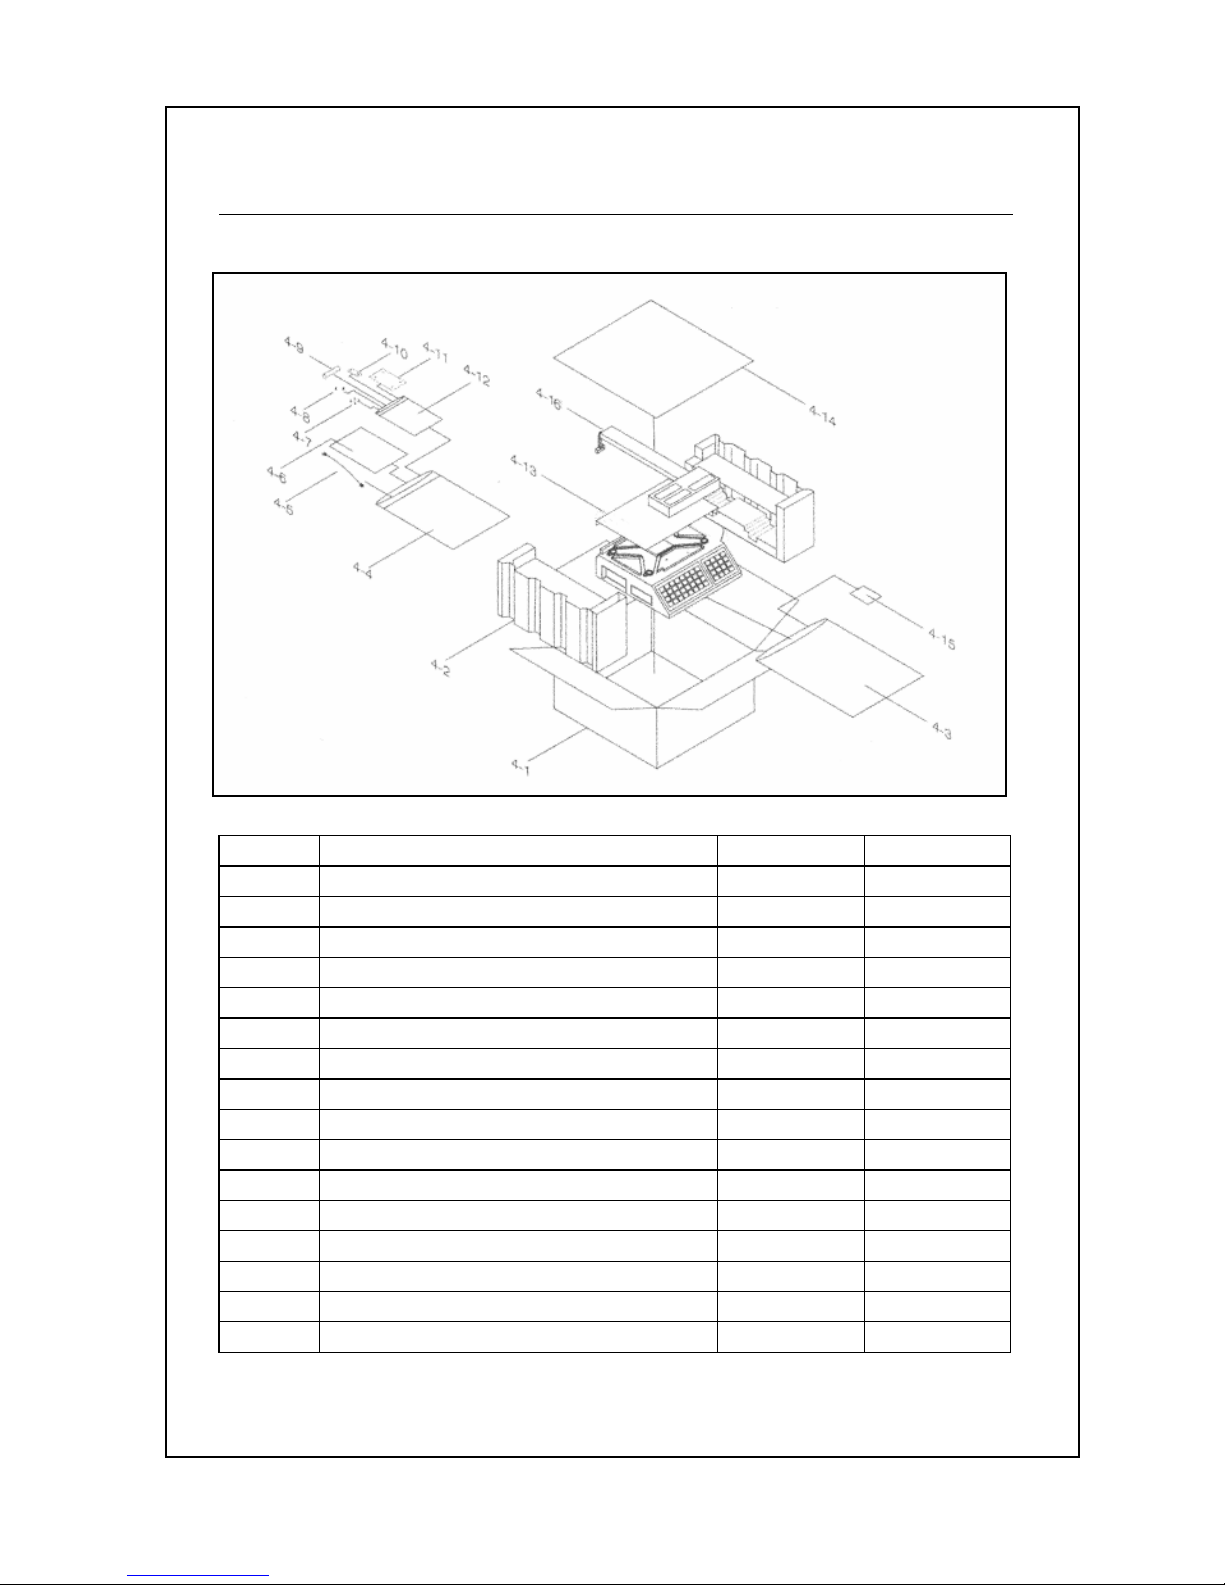
Your Nets scale should come with the following.
NO Parts Name Units QTY
4-1 IN CARTON BOX EA 1
4-2 STYROFOAM EA 2
4-3 BODY POLY BAG EA 1
4-4 MANUAL POLY BAG EA 1
4-5 AC CORD EA 1
4-6 MANUAL EA 1
4-7 PAN SCREWS EA 4
4-8 CAL SEALING EA 2
4-9 FUSE EA 1
4-10 CAL PLATE EA 1
4-11 BRACKET COVER EA 1
4-12 FUSE POLY BAG EA 1
4-13 PLATTER EA 2
4-14 BOX PAD EA 1
4-15 SILICA DESICANT EA 2
4-16 POLE DISPLAY EA 1
Page 9
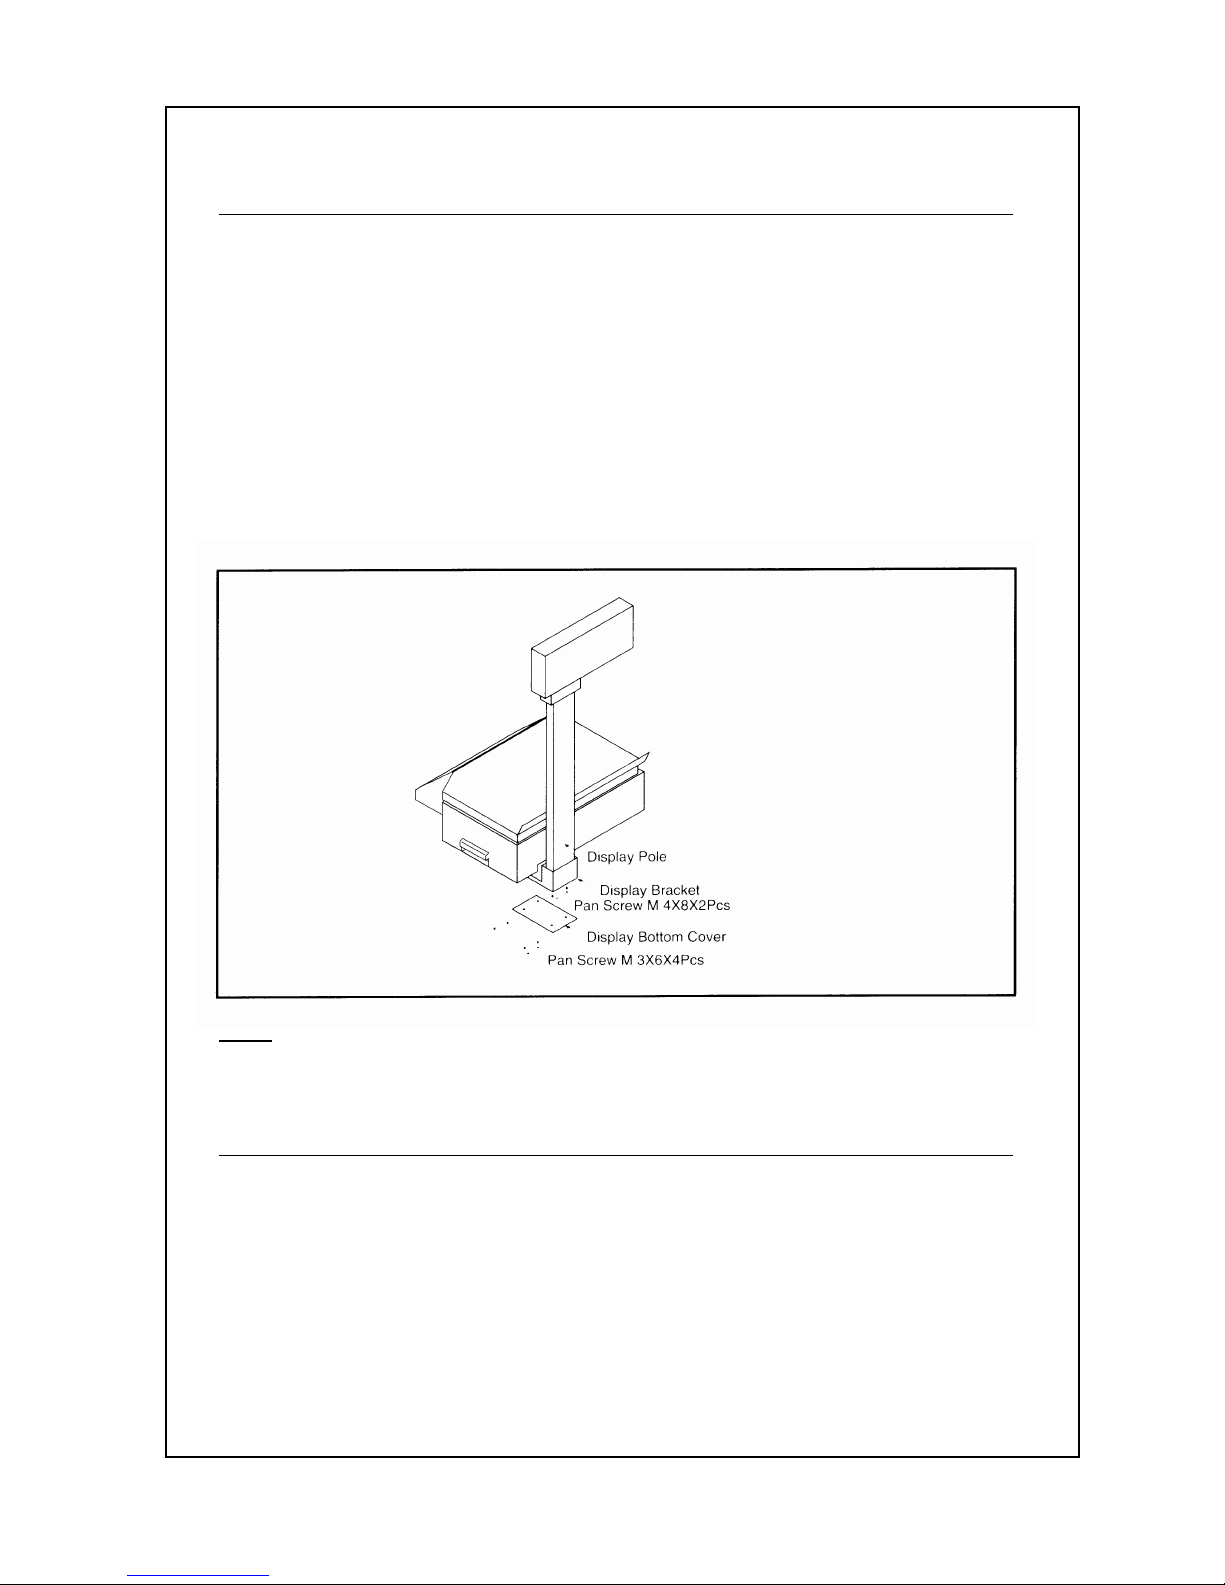
4
Assembling the Display
Once you have unboxed your NETS you must carefully
follow the
instructions below on how to assemble the Pole Display.
Installation Pole Display:
1. Connect the display connectors together.
2. Place the Pole Display properly into the bracket making sure
that the connectors are slipped inside of the pole (upwards.)
3. Attach the two display pole screws (Pan Screw M4x8) to
securely fasten the pole to the bracket.
4. Finally, attach the bracket-plate to the bracket and fasten it
with the 4 smaller screws (Pan Screw M3x6).
Note
: Make certain that none of the wires are being crimped when you
are installing the pole display.
Scale Overview
The NETS is a simple price com
puting label printing scale. There are
certain parts of the scale that you may need to become familiar with in
order to properly maintain and operate the scale.
Take a look at the diagrams provided and the table following
them.
These will point out the
most vital components of the scale that are
involved in day-to-day operations and maintenance.
Page 10
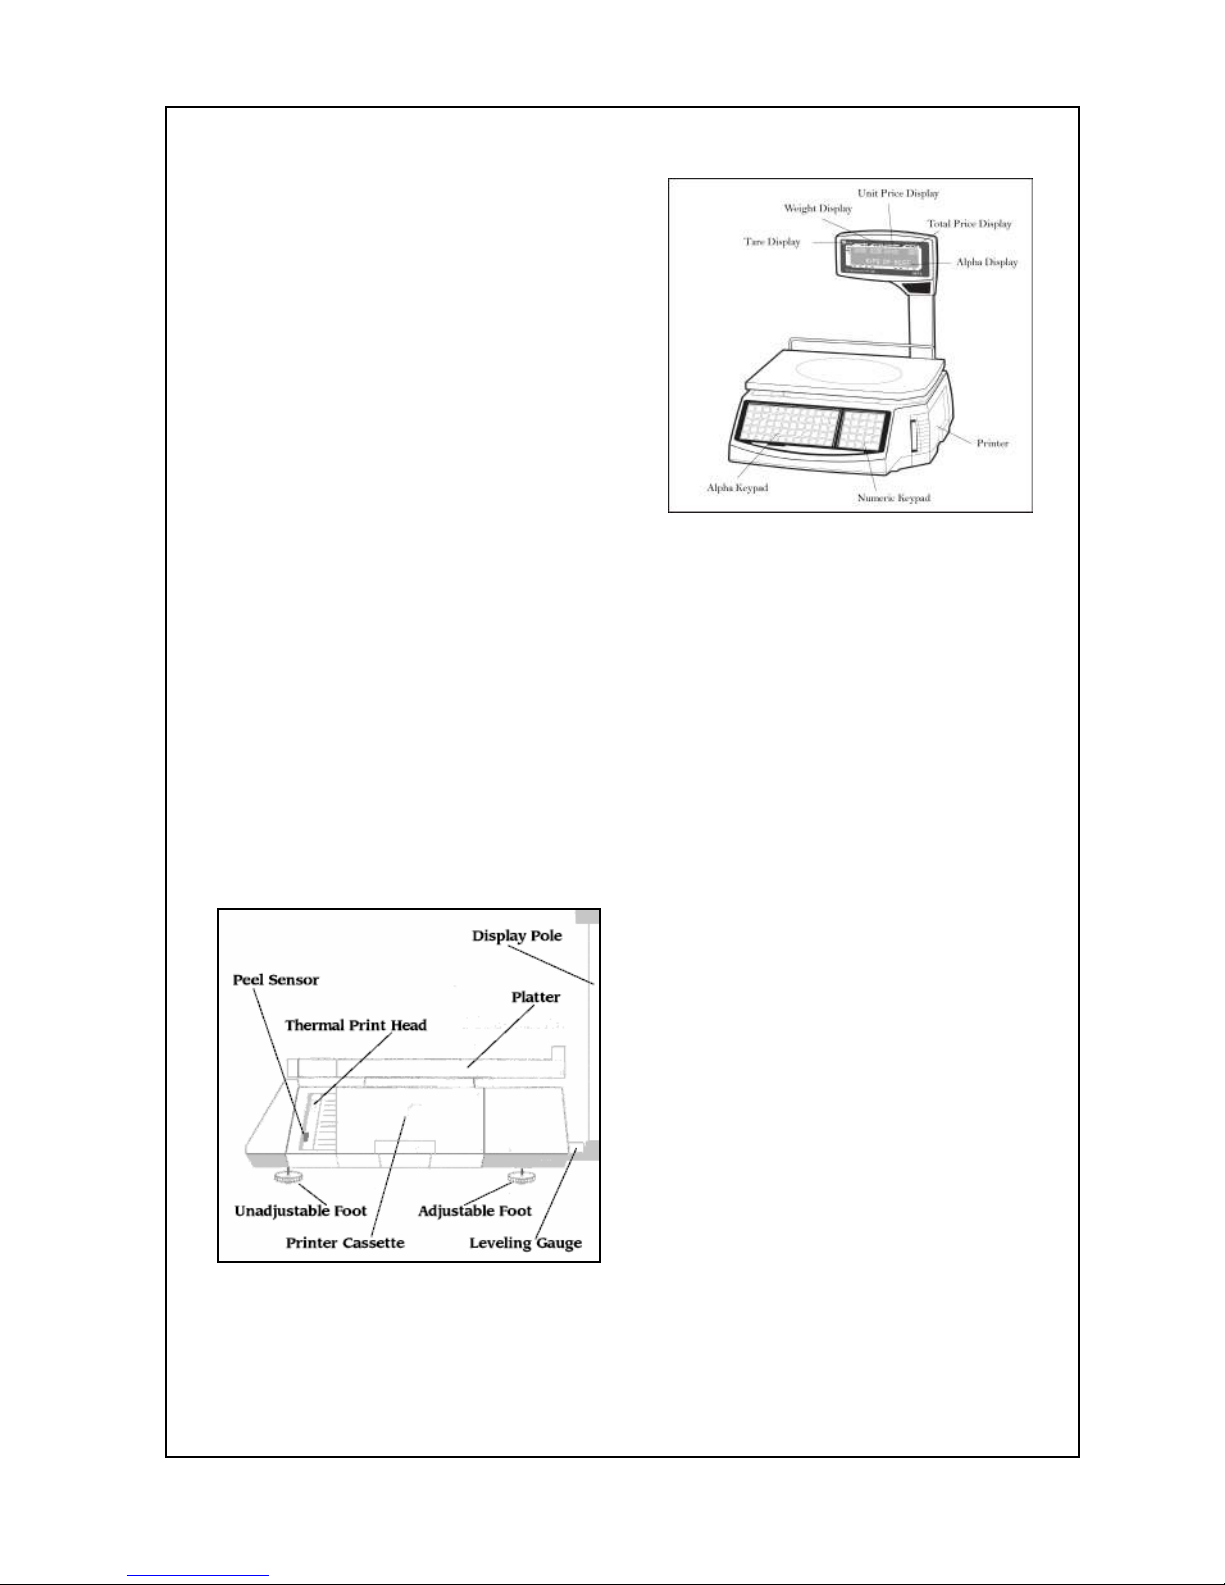
5
Front View:
The Weight Display is where all
weight data is displayed.
The Unit Price Display is where the
scale displays price-per-kilo data
as well as the Piece count for By
Count items.
The Total Price Display is where
the scale shows the Total Price.
The Alpha Display
is where the scale displays the PLU Name. During
programming, this display is also used to display menu information and
text.
The Alpha Keypad is where all of the Speed Keys are located.
During
programming, this keypad is also used to
navigate menus, enter
special functions, and typing text data.
The Numeric Keypad is where all numeric data is entered.
The Printer area is where the label comes out of.
Right Side View:
The Display Pole is what
the
display head is mounted on.
The Leveling Gauge is
used to
make sure that the scale is level.
The Adjustable Foot
can be
adjusted to affect the level of the
scale. It is used with the leveling
gauge during installation.
The Unadjustable Foot cannot be adjusted; instead, use
the other 3 to
adjust the level of the scale.
Page 11
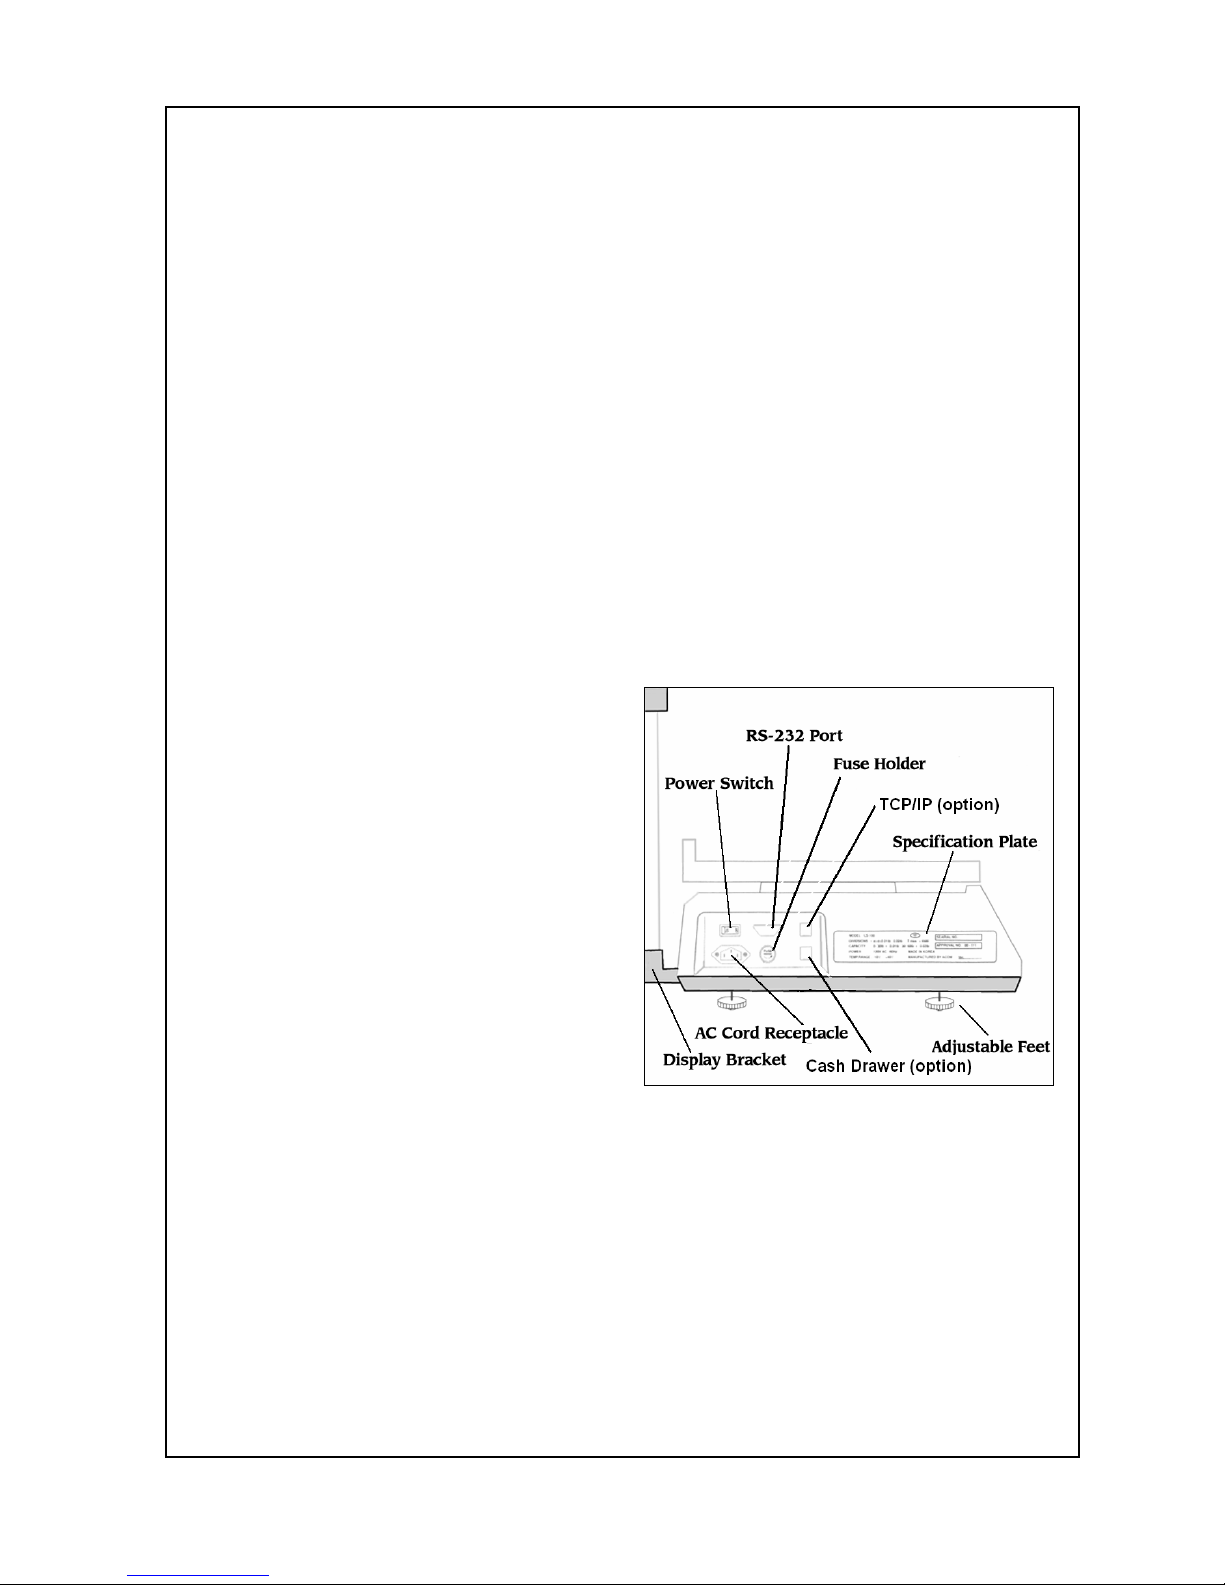
6
The Printer Cassette
is a drawer mechanism that is pulled out of the
scale in order to load new label rolls or service the printer.
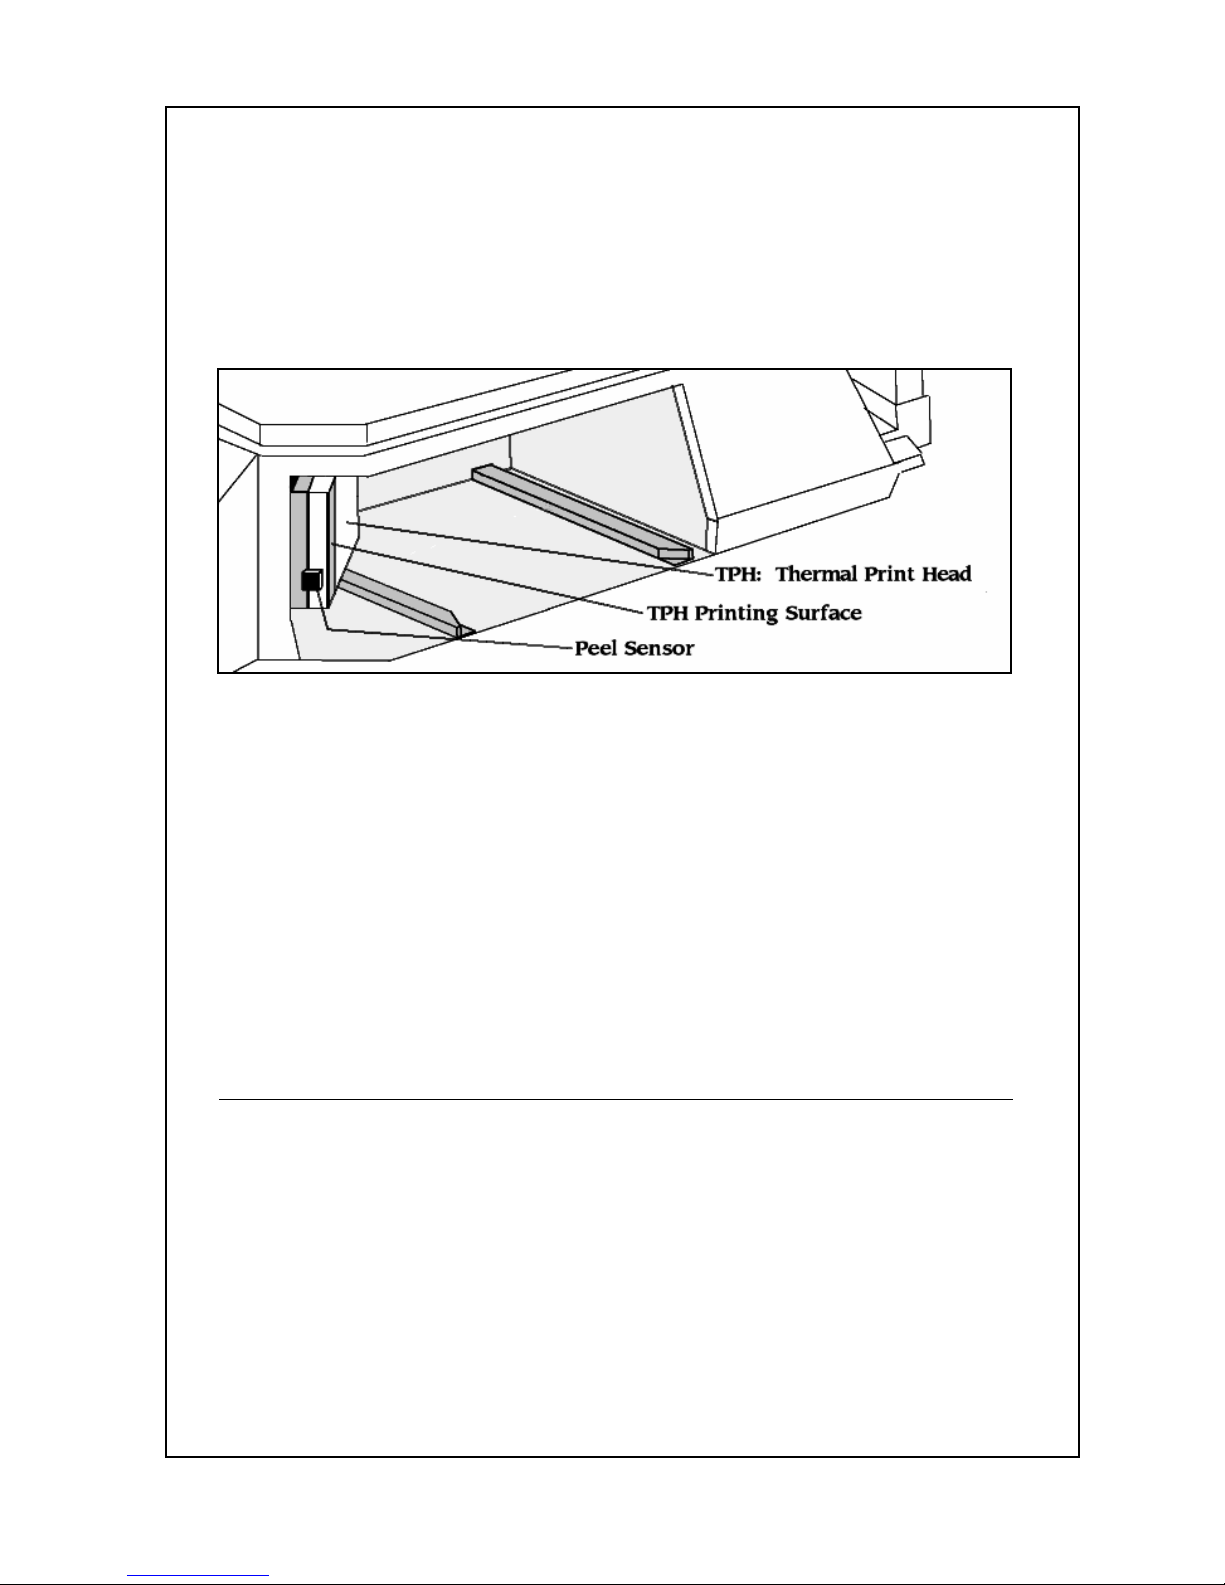
The Thermal Print Head
is the printing element that prints the thermal
labels. Never touch this part as it can get extremely hot
during the
print cycle. From time to time you may need to clean the print head;
see Proper Operation, Maintenance section.
The Peel Sensor
is used by the printer to determine if you have
removed a printed label that is sitting on the peel-off bar. If t
his sensor
becomes blocked, the scale will not print.
The Platter
is used to place commodity items to be weighed and/or
labeled. The platter may need cleaning from time to time; however,
you must remove the platter from the scale platform whenever you
clean it.
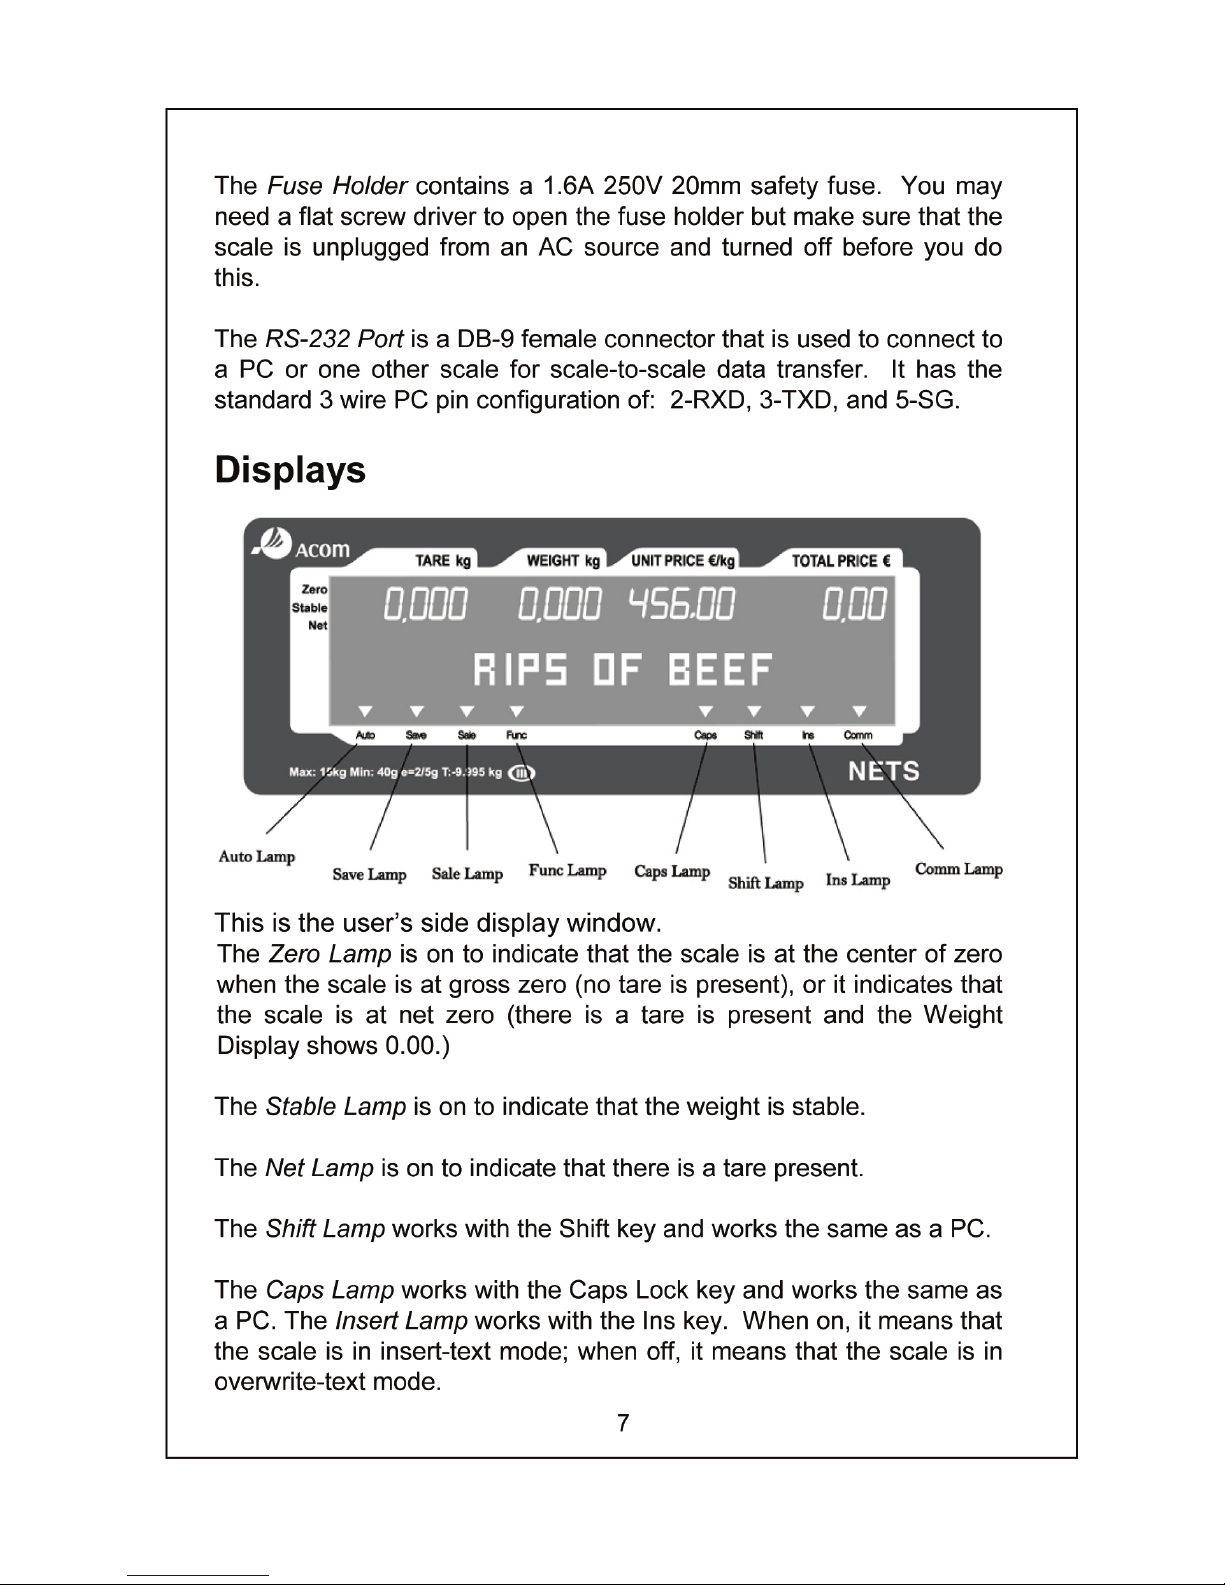
Left Side View:
The Display Bracket is where the
display pole is attached to during
installation.
The Power Switch is used to turn
the scale on or off; however, even
though the switch is in the off
position it is best to unplug the
scale whenever working on any
wiring or during installation.
TCP/IP and Cash drawer must be
illustrated as network option
The AC Cord Receptacle is where the power cord is plugged into.
The Adjustable Feet
can be adjusted to affect the level of the scale.
There are
3 adjustable feet and 1 unadjustable foot which is located
under the printer towards the front of the scale.
The Specification Plate
contains scale data like capacity, serial
number, version, approval numbers, power requirements, and other
manufacturer data.
Page 12
Page 13
8
The Auto Lamp
works with the Auto key. When on, it means that the
scale is in auto-
print mode; when off, it means that the scale is in
manual-print mode. Auto-
print will only print automatically whenever
the weight returns to gross zero.
The Save Lamp
works with the Save key. When on, it means that the
scale is in save mode; when off, it means that the scale is in auto-
clear
mode. Auto-
clear will clear out the tare and price whenever the weight
returns to gross zero.
Printer & Label Installation
The NETS
has a high speed thermal printer that prints at 100 mm per
second (4” per second.) It has a heavy-
duty removable cassette
drawer that is used to load the thermal labels into the scale.
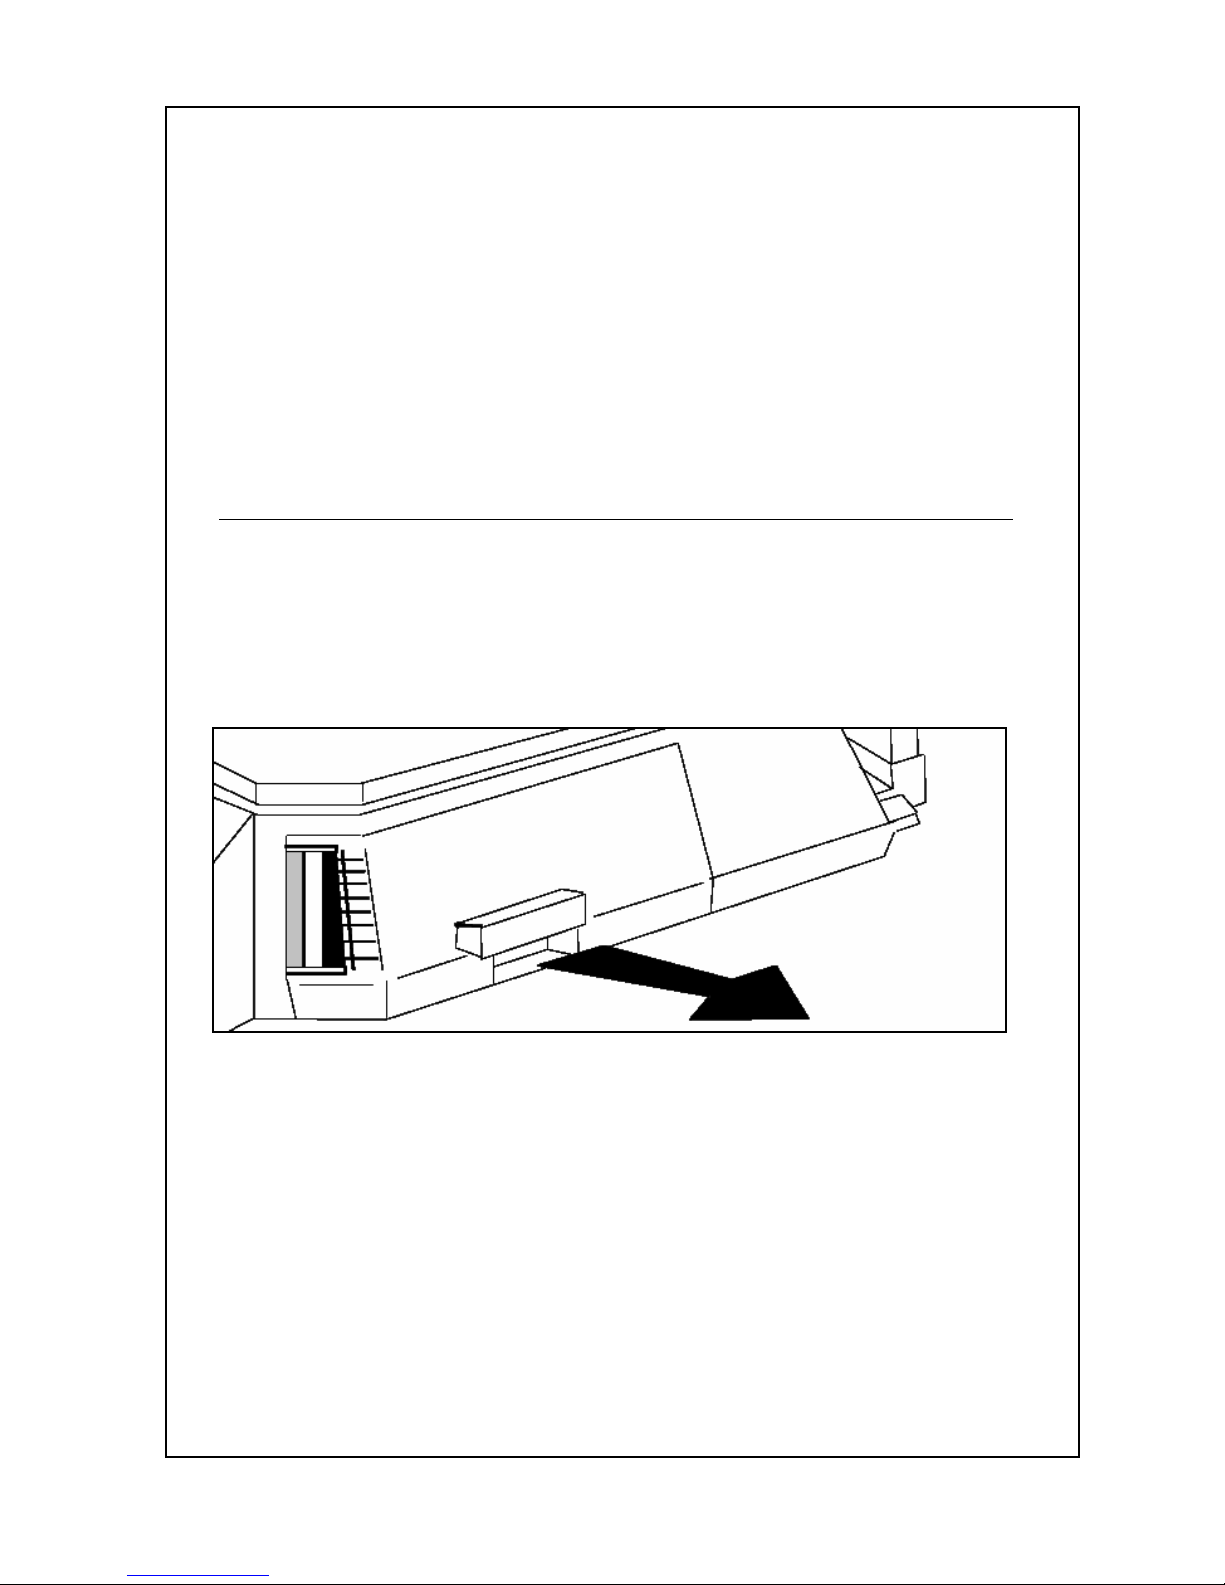
Make sure that the Power Switch is off. Pull on the cassette handle to
remove the cassette drawer.
Once you have removed the cassette drawer you may follow the
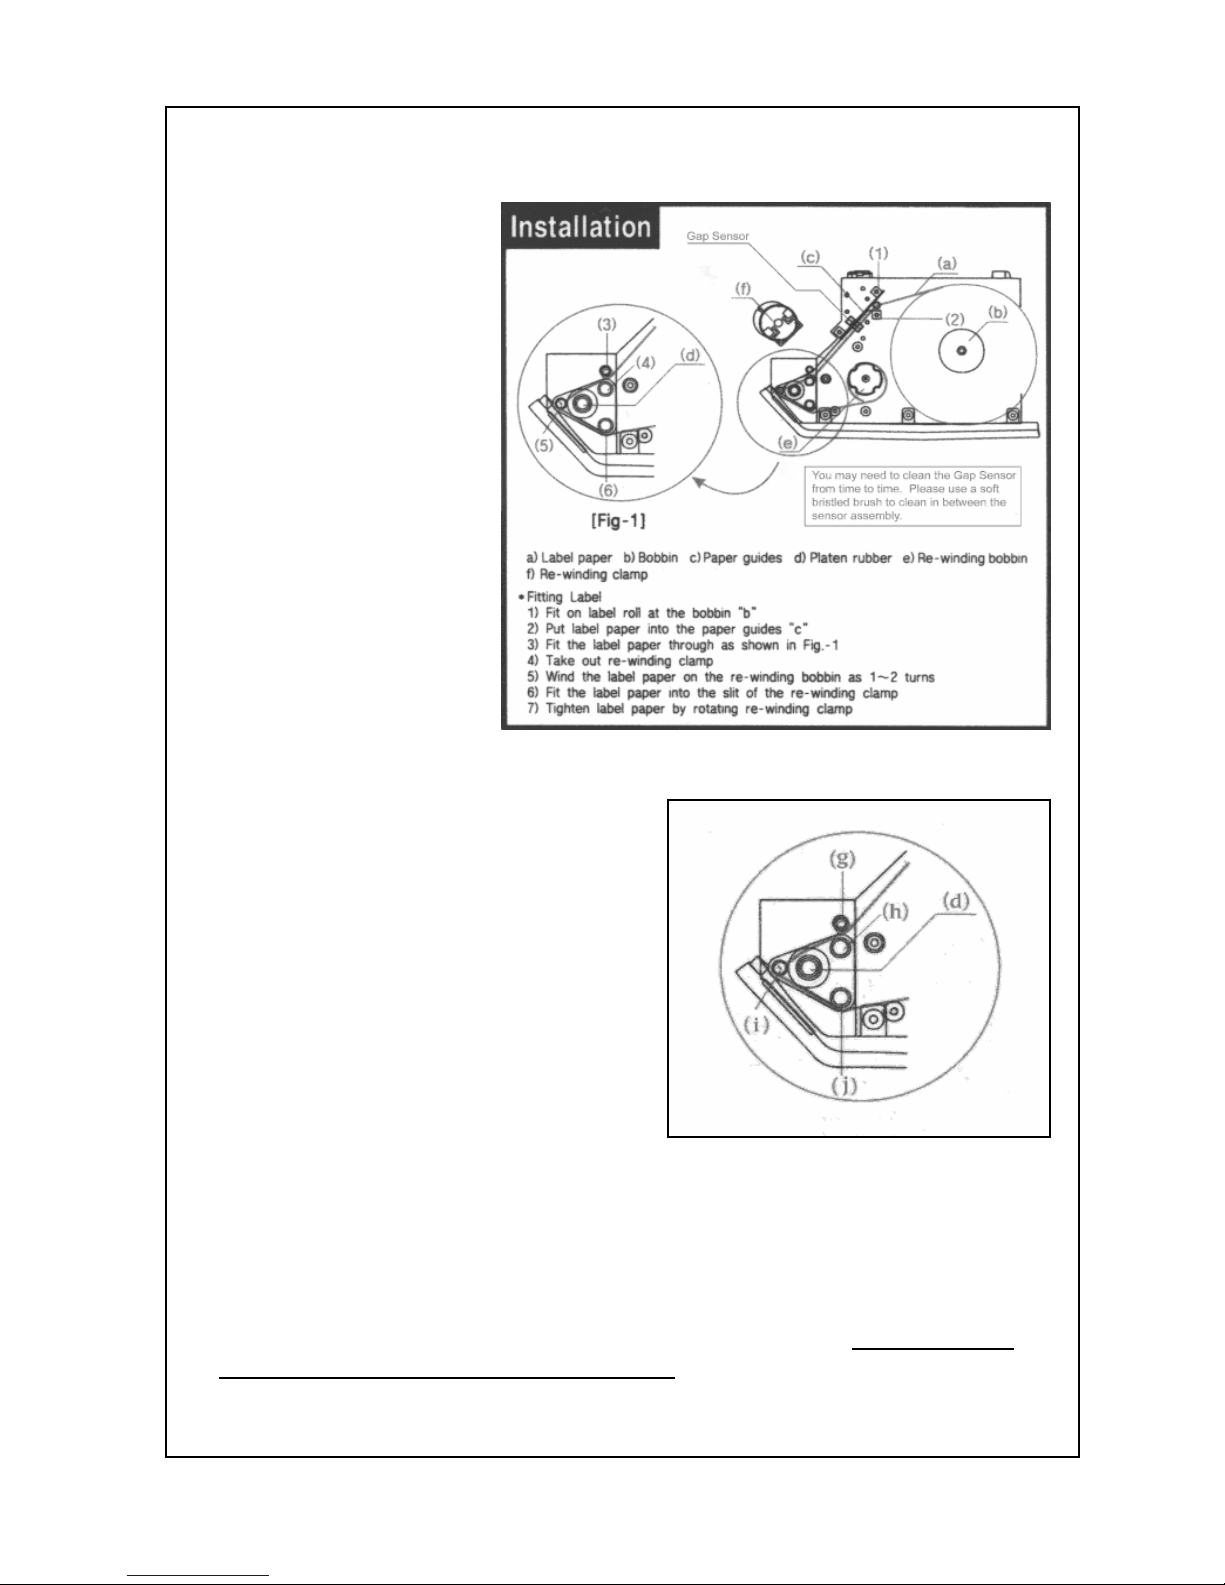
instructions shown on the large sticker labeled “Installation” on the
cassette mechanism.
Removal Labels:
When the printer runs out of labels:
1) Pull and remove the Pick-up Clamp (f). When you do so, some of
the backing paper may rip; this is normal. Remove the excess
collected backing paper from the Pick-up Clamp (f) and discard the
paper making sure NOT to throw out the clamp.
Page 14
9
2) Remove and
discard the
cardboard label core
which should be
located on the Label
Roll Spool (b)
making sure NOT to
throw out the Label
Roll Spool (b). Make
sure to also discard
any excess labels
and/or backing paper
along the label path.
The label path is
shown in red on the
Installation sticker in
the cassette drawer.
Installation Labels:
Once you have followed the
instructions for removing labels you
can install a new label roll by taking
the new label roll and remove about
30 cm (approx. 12”) of labels from the
backing paper of the new label roll
and then do the following:
1) Place the new label roll onto the
Label Roll Spool (b).
2) Thread the backing paper through the Pressure Plate (c).
3) Next, thread the backing paper between the La
bel Guide bobbin (g)
and (h).
4)
Then, thread the backing paper over the Platen (d) and over the
Label Guide bobbin (i) so that the backing paper is
NOT between
Platen (d) and the Label Guide bobbin (i).
Page 15
10
5)
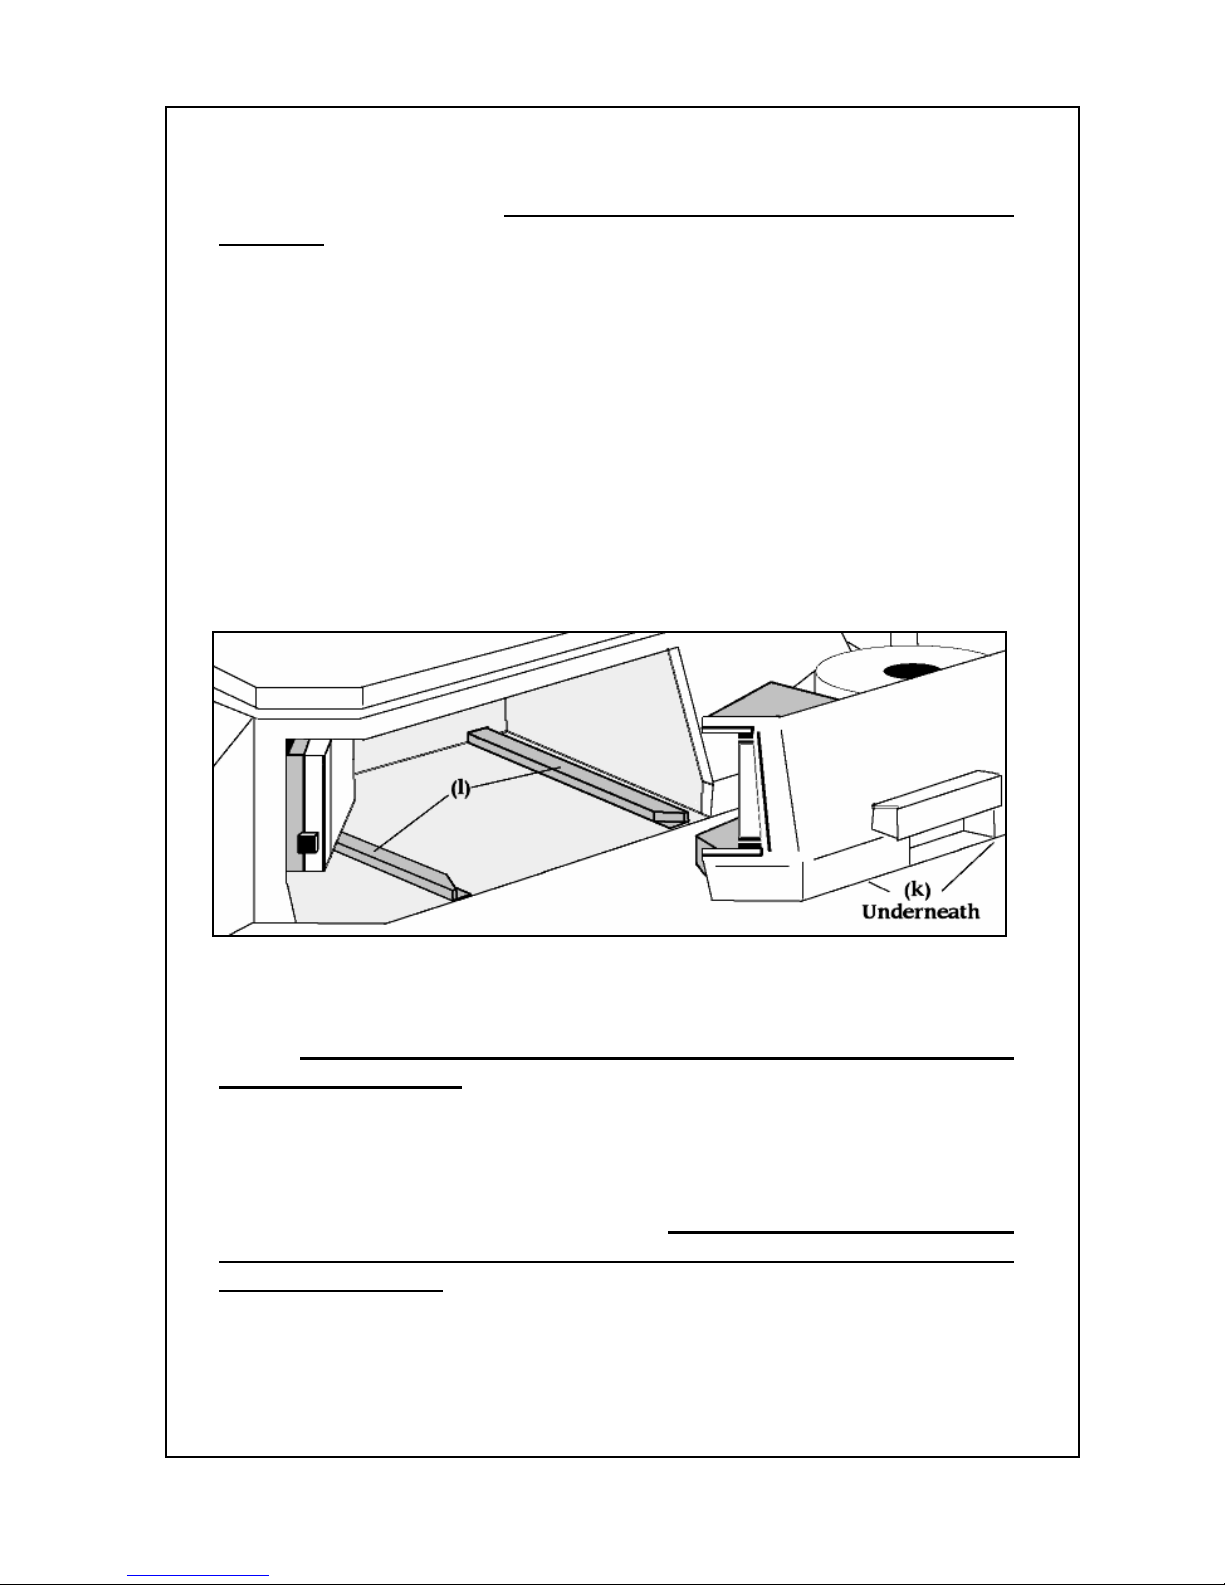
Next, thread the backing paper under the Label Guide bobbin (j) so
that the backing paper is
NOT between Platen (d) and the Label Guide
bobbin (j).
6) Then, wind the backing paper over the Pick-
up Motor Shaft (e)
about 1 turn.
7) Next, fit the Pick-up Clamp (f) over the Pick-
up Motor Shaft (e) so
that the backing paper slides through the slit located on the Pick-
up
Clamp (f). Also, make sure that the Pick-
up Clamp (f) slides all the
way into the Pick-up Motor Shaft (e)
8) Then, wind the Pick-
up Clamp (f) until the edge of the first label is
aligned with the Platen (d). When done, make sure that the lever
located on top of the Pick-up Clamp (f) is folded down against the Pickup Clamp (f).
9) Finally, slide the casse
tte drawer back into the scale making sure to
align the Metal Rails (k) of the cassette with the Plastic Rails (l) of the
scale.
After you turn the scale on you must feed out 2 or 3 labels
using the FEED key.
When you remove the cassette drawer from the
scale the printer bay is
exposed. You should only remove the cassette drawer when replacing
labels or servicing the printer; you should never leave the printer bay
exposed for long periods of time.
Whenever you remove the
cassette drawer, you must feed o
ut 2 or 3 labels using the FEED
key when finished.
Page 16
11
Numeric Keypad
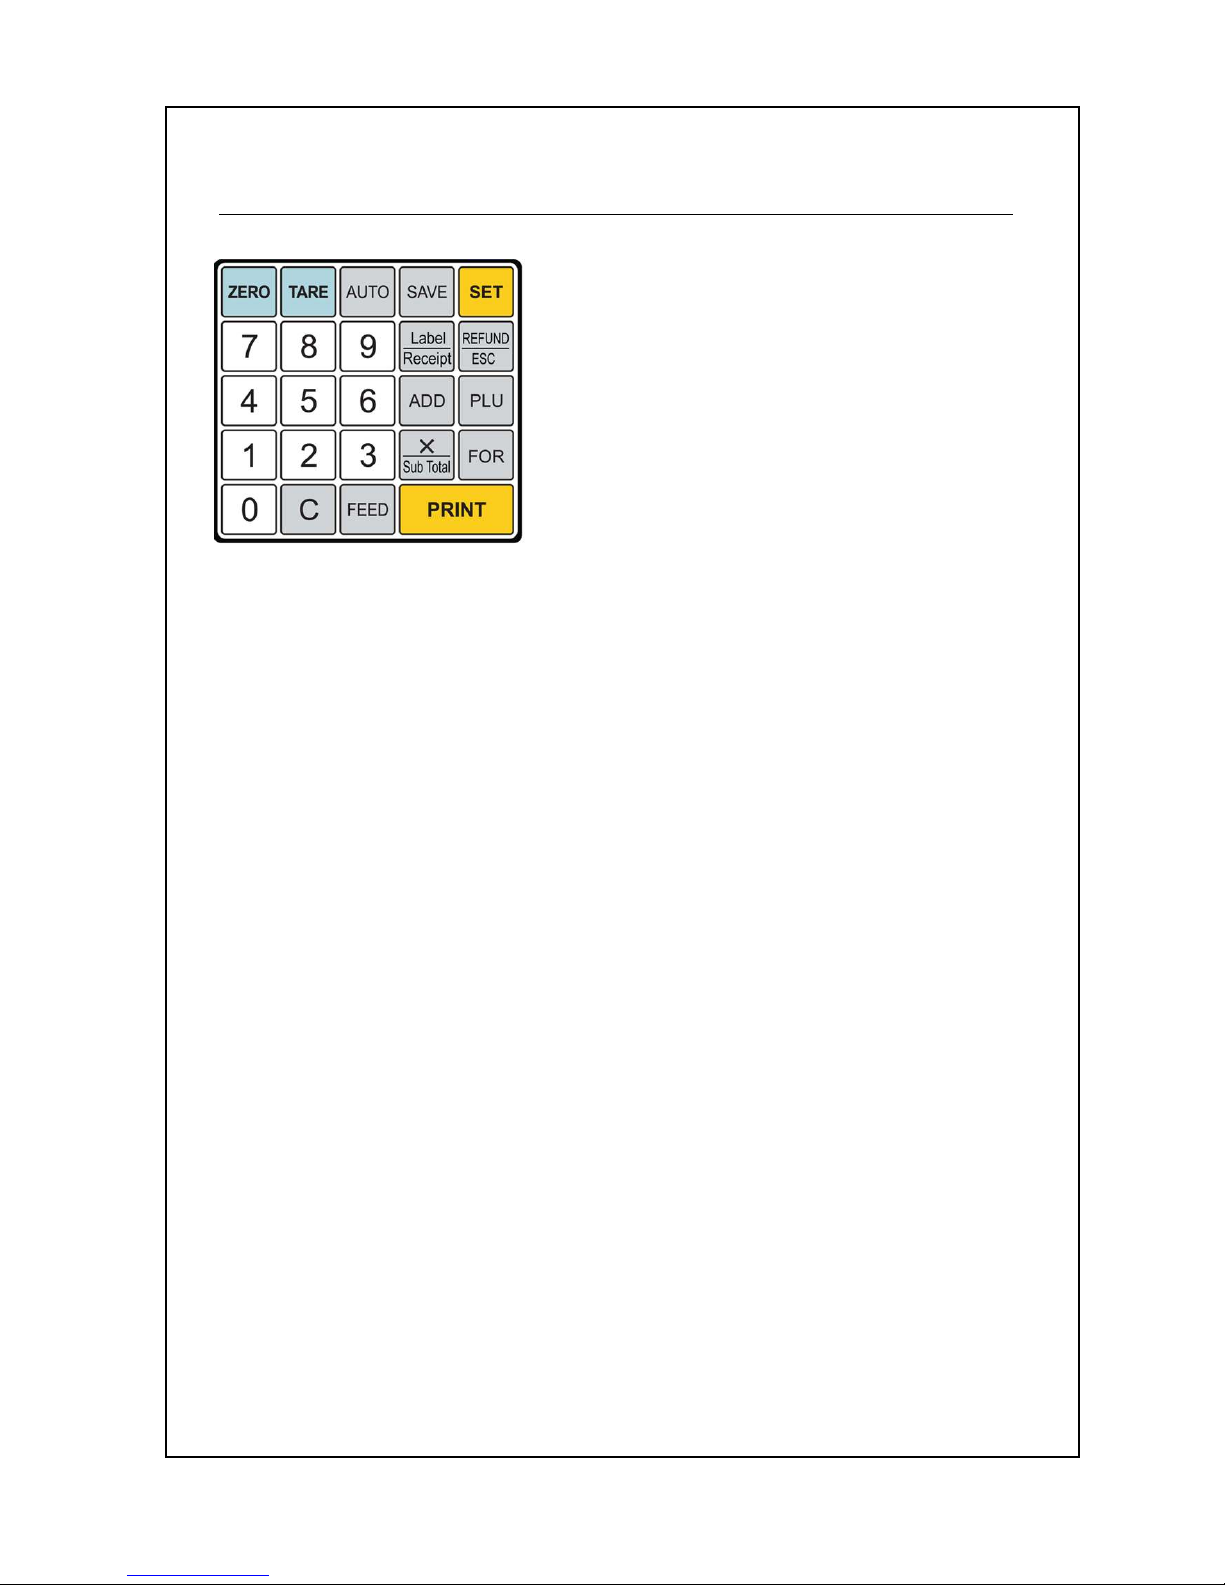
The Numeric keypad is the 25 keys
on
the right-side of the keyboard.
ZERO Key is used to m
anually set the
zero point.
TARE Key
is used to enter and clear
manual or sampled tares.
AUTO Key is used to turn Auto-print mode on or off.
SAVE Key is used to
turn Save mode on or off. When Save mode is
on, the scale will not auto-clear tares and/or
unit prices; when off, tare
and unit prices will auto-clear.
SET Key is used to enter the Main Menu (programming mode.)
You
may be required to enter a password to access programming mode.
Numeric Keys (0 to 9) are used to enter numeric data like tares
, prices,
pieces, etc.
Label/Receipt Key is used to choose the printing mode .
REFUND/ESC Key
is used to enter Sales mode whenever you are at
the Main Menu; refund sales transactions
and void sales transactions.
otherwise, it will backtrack through the menu system.
ADD Key is used to add sold items.
PLU Key is used to call-up PLUs by number.
X/Sub Total Key is used to print copies of labels (multiple labels.)
and
show sub total in receipt mode
FOR Key is used for pricing By Count PLUs and for percent discount.
Page 17
12
C Key
is the Clear key and is used to clear numeric entries. If you
press Clear when the cursor is on a text field, then all text to the right
of the cursor will be erased.
FEED Key
is used to feed out labels so that the printer can be properly
ali
gned. Whenever labels are fed out, a test pattern is also printed on
them so that the user can determine if the print head needs cleaning or
servicing.
PRINT Key
is used to manually print labels and also functions as an
“Enter” key during programming.
Speed Keys
The Alpha Keypad functions as Speed keys whenever you are in sales
mode.
The NETS has 60 Speed keys that are programmable to select
any 60 PLUs you desire. By default, Speed keys 1 to 60 are assigned
PLUs 1 to 60 respectively.
There is a Spe
ed Key Template which you can pull out of the Alpha
Keypad. This template can be used to write or label each of the 60
keys. You can also use our digital template available in Microsoft
®
Word format included with the NETS Software Package
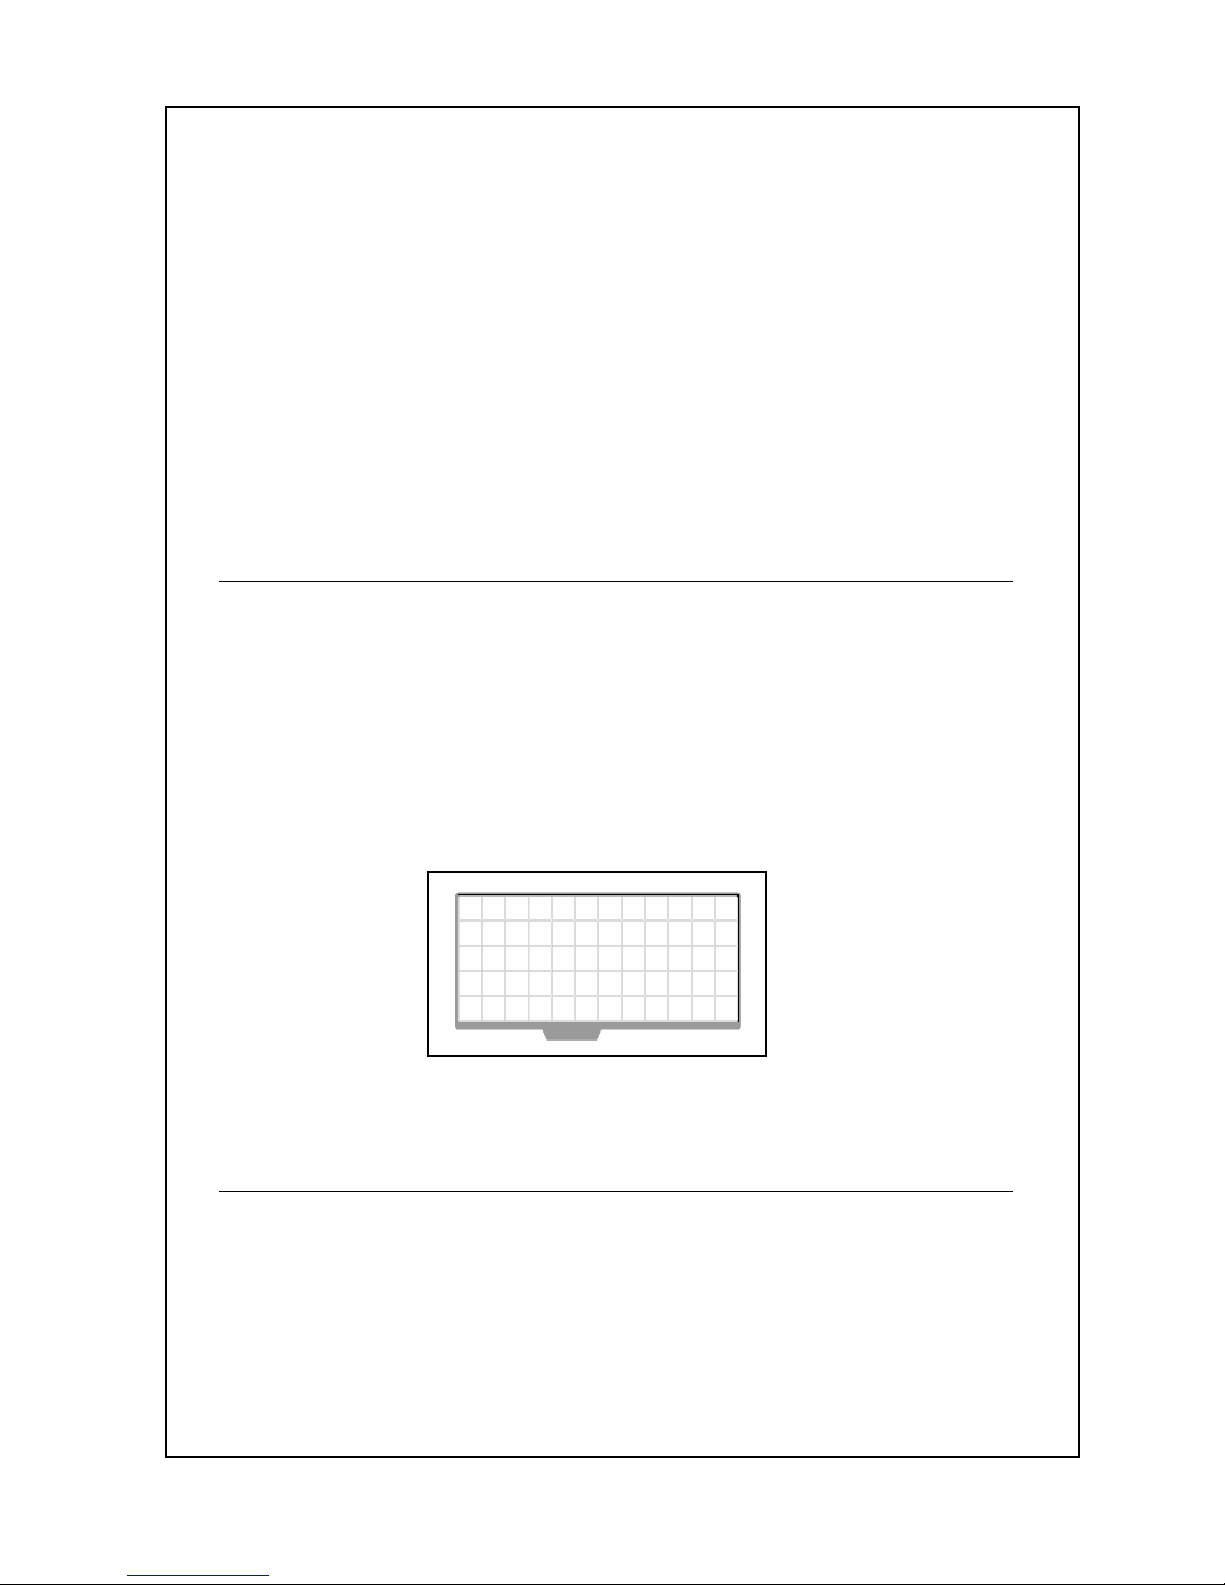
Alpha Keypad
Whenever you need to access the Alpha Keypad, you must remove
the Speed Key Template so that you may see the Al
pha keys that lie
below.
Page 18
13
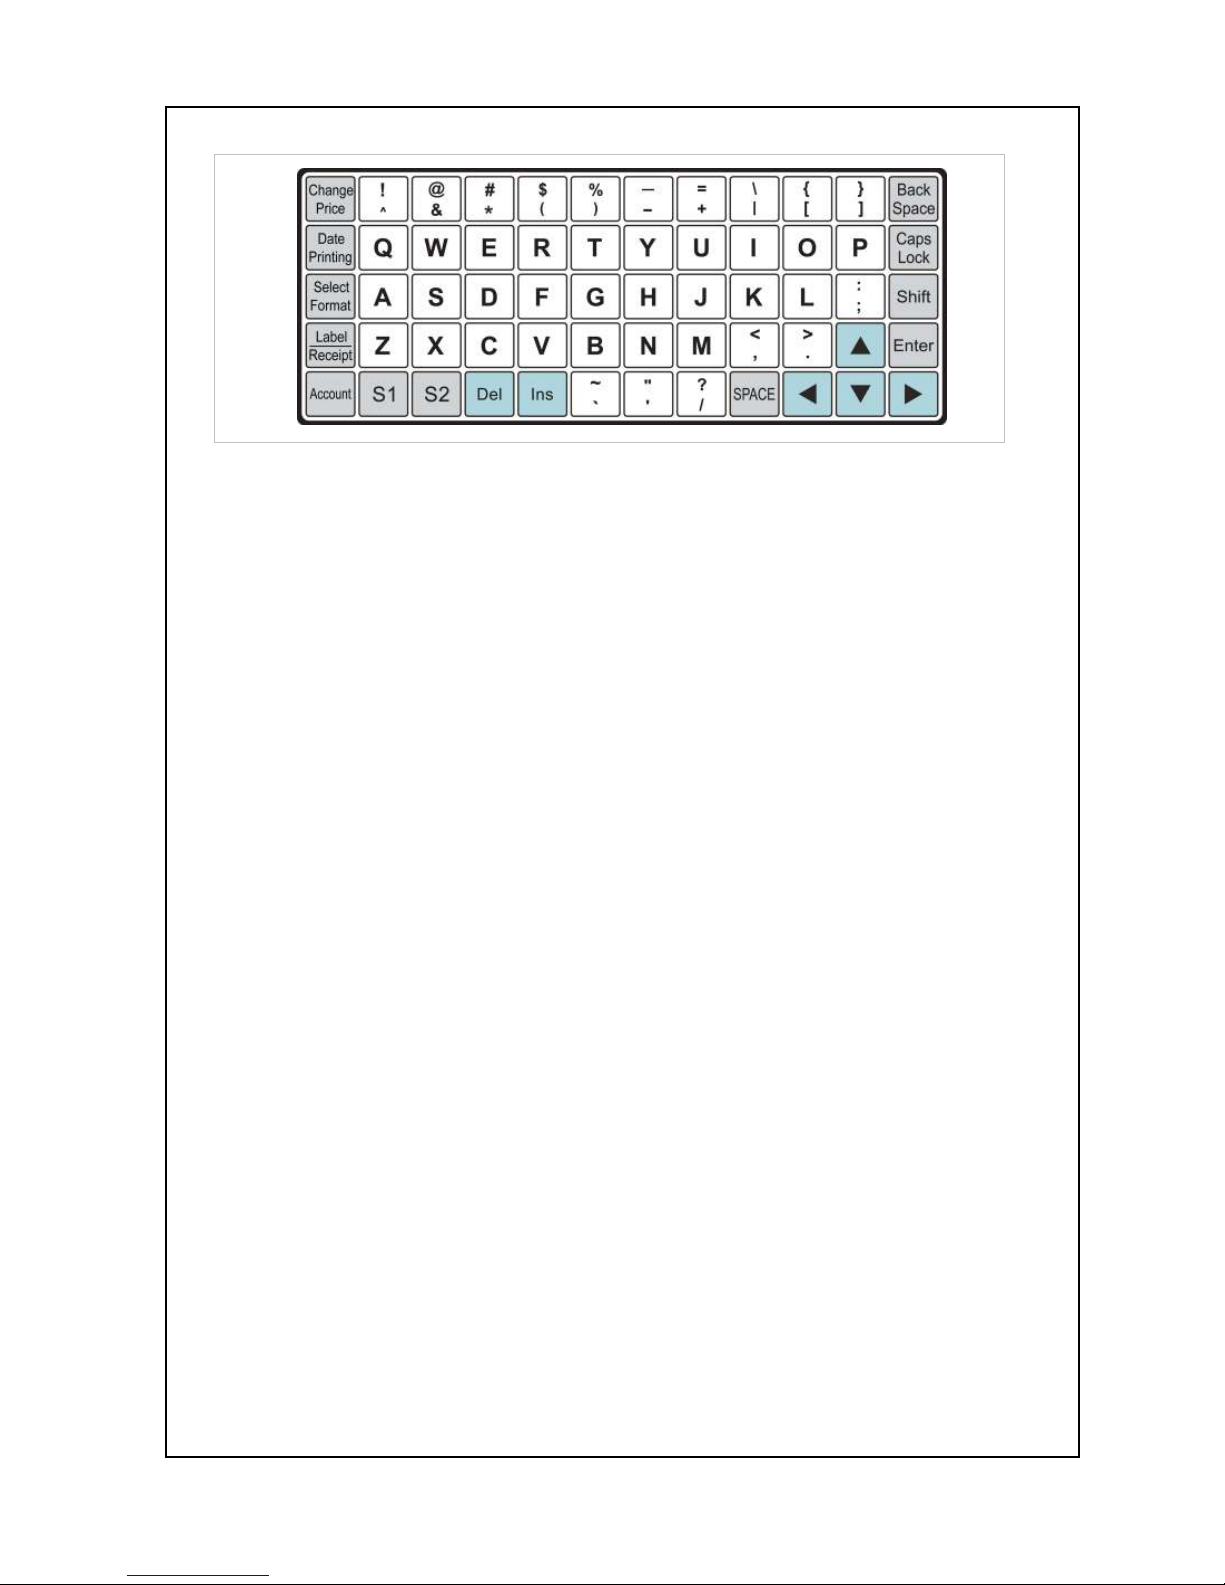
Change Price Key is used to access the PLU Quick Price Change
programming feature from the Main Menu.
Date Printing Key is used to enabl
e & disable the Temporary Date
Print Inhibit.
Select Format Key is used to select the Quick Label Format setting
feature.
Label/Receipt Key is used to
choose between Label mode and Receipt
mode.
Account key is used to access the Quick Account Report.
S1 to S2 Keys are reserved for future use.
Del Key is used to delete characters like on a PC.
Ins Key is used to switch between Insert and Overwrite typing mode.
SPACE Key is used to enter a space character like on a PC.
⊳
keys are used to navigate menus & sub-menus like on a PC.
Enter Key & Caps Lock Key & Back Space Key
is used like Enter,
Caps Lock, Back Space key on a PC.
Shift Key is used like a Shift key on a PC except that it is
temporary:
you must press it before every upper case letter.
Page 19

14
Do’s & Don’ts
Please observe the following:
Unplug and shut the scale OFF whenever you are changing the
label roll or working in the printer bay.
The outlet that the scale is plugged into should be properly
grounded and have the correct voltage supply.
Maintain a static free work area.
Never use any other equipment on the same electrical line; the
scale should have a dedicated line.
Place the scale far from strong RF (radio frequency) interference.
Level the scale using its adjustable feet; however, be
careful not
to try and adjust the foot that is under the printer towards the front
of the scale.
Do not subject the platter to sudden impacts
or drop anything onto
the platter.
Do not spill the water or any other liquid on the scale.
Do not use any solvents to clean the scale.
Do not remove the safety ground on the power cord.
Do not store thermal labels where they may be subject to: direct
sunlight, high humidity, high temperature, or dust. Doing so may
damage and/or hinder the quality of the print on t
he labels. Be
sure to also follow any other label-manufacturer guidelines.
Do not press the keys using
excessive force; the keys will operate
correctly if they are pressed lightly. If any keys should fail to work
,
please contact your ACOM Dealer.
Do not use any label media other than that recommended
by
ACOM. Please contact your ACOM Dealer for details.
Do not attempt to affect repairs to this equipment;
unlicensed
individuals affecting repairs on legal for trade devices can be
subject to fines in all 50 states as well as voiding your warrantee
.
Contact your local ACOM Dealer for service or repairs.
Page 20
15
Location & Environment
This scale must be placed on a flat and stable surface. Please keep
the
scale away from the direct path of ventilation equipment, strong
drafts, or direct sunlight. These air disturbances can be picked up by
the scale’
s sensitive weighing sensors and may cause incorrect weight
readings.
If the scale is not properly leveled,
please adjust the 3 adjustable legs
at the bottom of the scale. DO NOT adjust the leg that is under the
printer and closest to the front of the scale. Adjust the height of each
of the 3 adjusting feet so that the leveling gauge indicates that the
scale
is level. The leveling gauge is located to the right of the display
pole bracket on the rear of the scale. You will know that the gauge
indicates “level” when the bubble is in the center of the marked circle.
Please avoid the following hostile environments:
Temperatures exceeding -10° C to 40° C (14° F to 104° F).
Excessive vibration or instability.
Unstable or flimsy surfaces to use the scale on.
Dusty, dirty, or excessively wet environments of any kind.
The scale should be installed in a dry and liqui
d free environment.
When the scale is installed in a high humidity or wet-
type environment,
be sure to avoid spilling or spraying anything onto the scale. If you
must operate in this type of environment you MUST use the Spill-
Proof
overlay with the NETS.
You can get this optional item from your
ACOM Dealer. Failure to use this item may void your warrantee.
Maintenance
This scale’
s exterior should be cleaned with a damp cloth or rag and a
mild soap solution. Do not spray any liquids directly onto the
NETS.
Always spray any cleaning fluids onto the cloth rag you are using to
wipe the scale. Remember, NEVER to hose-
down the scale. Before
doing any type of cleaning, always make sure to turn the Power Switch
off and unplug the scale from any AC outlet.
Page 21

16
The keyboard should be cleaned with a damp cloth rag and a mild
soap solution. Do NOT spray any liquids or chemicals directly onto the
keyboard as these may cause damage to the seals and then cause the
keyboard to fail. Do
NOT use any harsh solvent or chemicals to clean
the keyboard as these may discolor or completely remove the graphics
on the keyboard.
The displays should be cleaned with a damp cloth rag and a mild soap
solution. Do NOT spray any liquids or chemicals d
irectly onto the
displays as these may cause damage to the seals and then cause the
displays to fail. Do NOT use any harsh solvent or chemicals to clean
the displays as these may discolor or completely remove the graphics
on the display windows.
To clean
the platter, please carefully remove the platter from the scale
platform and wash the platter in a mild soap solution. You can wet or
submerge the platter if desired. Do not use any chemicals that may
cause damage to stainless steel. Make sure that the
platter is
COMPLETELY dry before attaching to the scale platform. Also, do not
use excessive force when reattaching the platter to the scale.
The printer bay also requires cleaning
; however, this process requires
more scrutiny as there are many sensitiv
e components inside the
printer bay. Remember, make sure to turn the Power Switch off and
unplug
the scale from any AC outlet. Remove the cassette drawer
mechanism from the scale. Then, with a soft bristled brush or tooth
brush, swipe away any debris th
at may have accumulated in the printer
bay’
s base. Do NOT touch any other surface ESPECIALLY the
thermal print head. If you scratch the print head, it will need to be
replaced; scratches are not covered under warrantee.
Finally, the TPH (thermal print head) may need cleaning
from time to
time. You must be very careful when cleaning the TPH because
this is
the most expensive and delicate printer element. It is recommended
to
clean the TPH every time you change the label roll or whenever a label
becomes
stuck on the TPH. If you cannot remove a stuck label or
clean the TPH, DO NOT attempt to fix the problem yourself; instea
d,
contact your local ACOM Dealer.
Page 22
17
To clean the TPH, begin by removing the cassette drawer from the
scale. Next, using
a cotton swab dipped in Denatured Alcohol, gently
slide the cotton swab over the TPH Printing Surface. You can do this
until the alcohol evaporates, but never use excessive force on the
TPH. You can also swab down the Peel Sensor as this device may
also accumulate dust or debris.
You can also use a TPH Cleaner Pen instead of the cotton swab and
Denatured Alcohol. The pen is available through your ACOM
Dealer.
When you are done cleaning the TPH, you can replace the cassette
drawer mechanism and test the print quality
using the FEED key.
Make sure that the TPH and the Peel Sensor are COMPLETELY dry of
the alcohol before plugging the scale into an AC outlet.
You may also
need to clean the Gap Sensor from time to time. To do so, please
follow the instructions located on the cassette drawer.
If you require more thorough or robust cleaning
, please contact your
ACOM Dealer.
Power Requirements
The NETS is designed to be used virtually anywhere in the world. Like
many appliances of today, the NETS is designed with an auto
matically
switch power supply (SMPS.) T
his allows operation when connected to
an AC source supplying 85V to 240V AC at 50/60Hz.
Remember, an SMPS does not guarantee
that a bad, noisy, or
improperly wired power outlet will allow the scale to operate trouble
Page 23
18
free. With that in mind, please make sure that the power outlet used
with the NETS is a dedicated line with no high-
noise devices (such as
compressors, motors, etc.) plugged into t
he same line. Also, make
sure that the wiring for the outlet is correct. If you are uncertain,
please contact a certified electrician or your local Dealer.
Be sure to check the NETS
Specification Plate located on the left side
of the scale. The power supply specifications are listed there.
Quick Start
To get started immediately, follow the instructions in the “ACOM NETS
Quick Reference Guide” that is included with your scale.
We still
recommend that you read this manual at least once.
The Quick
Reference Guide states the following:
A. Basic setup:
1.
Take the scale, pole display, platter, and accessories bag
out of the box.
2. Install the pole display: Note
: Make certain that none of
the wires are being crimped when you are installing the
pole display.
a. Connect the display connectors together.
b.
Place the Pole Display properly into the bracket
making sure that the connectors are slipped
inside of the pole (upwards.)
c.
Attach the two display pole screws (2 larger
screws) to securely fasten the pole to the bracket.
d. Finally, attach the bracket-
plate to the bracket
and fasten it with the 4 smaller screws.
3.
Place the scale in the area where it will be used which
should be a rigid and level surface. Using the leveling
feet and leveling gage,
make sure that scale is level. The
leveling gage is located on the right-
side rear of the scale
by the pole bracket; the leveling feet are located at the
bottom of the scale chassis. Note:
The leveling foot
located on the front-right side of the bottom
of the scale
(closest to the numeric keypad) is not
adjustable. Please
do not
try to adjust this leveling foot; instead, use the
other three feet to adjust the level.
Page 24
19
4.
Place the platter on the scale platform and then connect
the AC cord to the NETS
. The AC cord (power cord) goes
connected to the left-
side of the scale; there is a label on
the scale by the connector ports which indicates
what
each connector is for.
5.
Make sure that the power switch is in the OFF position
which is located above the AC cord connector.
6. Plug the scale into an AC source. Note:
The AC source
must be 85V ~ 240V DC 50/60 Hz +2%.
7. Turn
the power switch to the ON position. The scale will
do the display test and then go to zero.
8. Press the
FEED
key 2 or 3 times collecting the labels as
they are fed out each time you press the key.
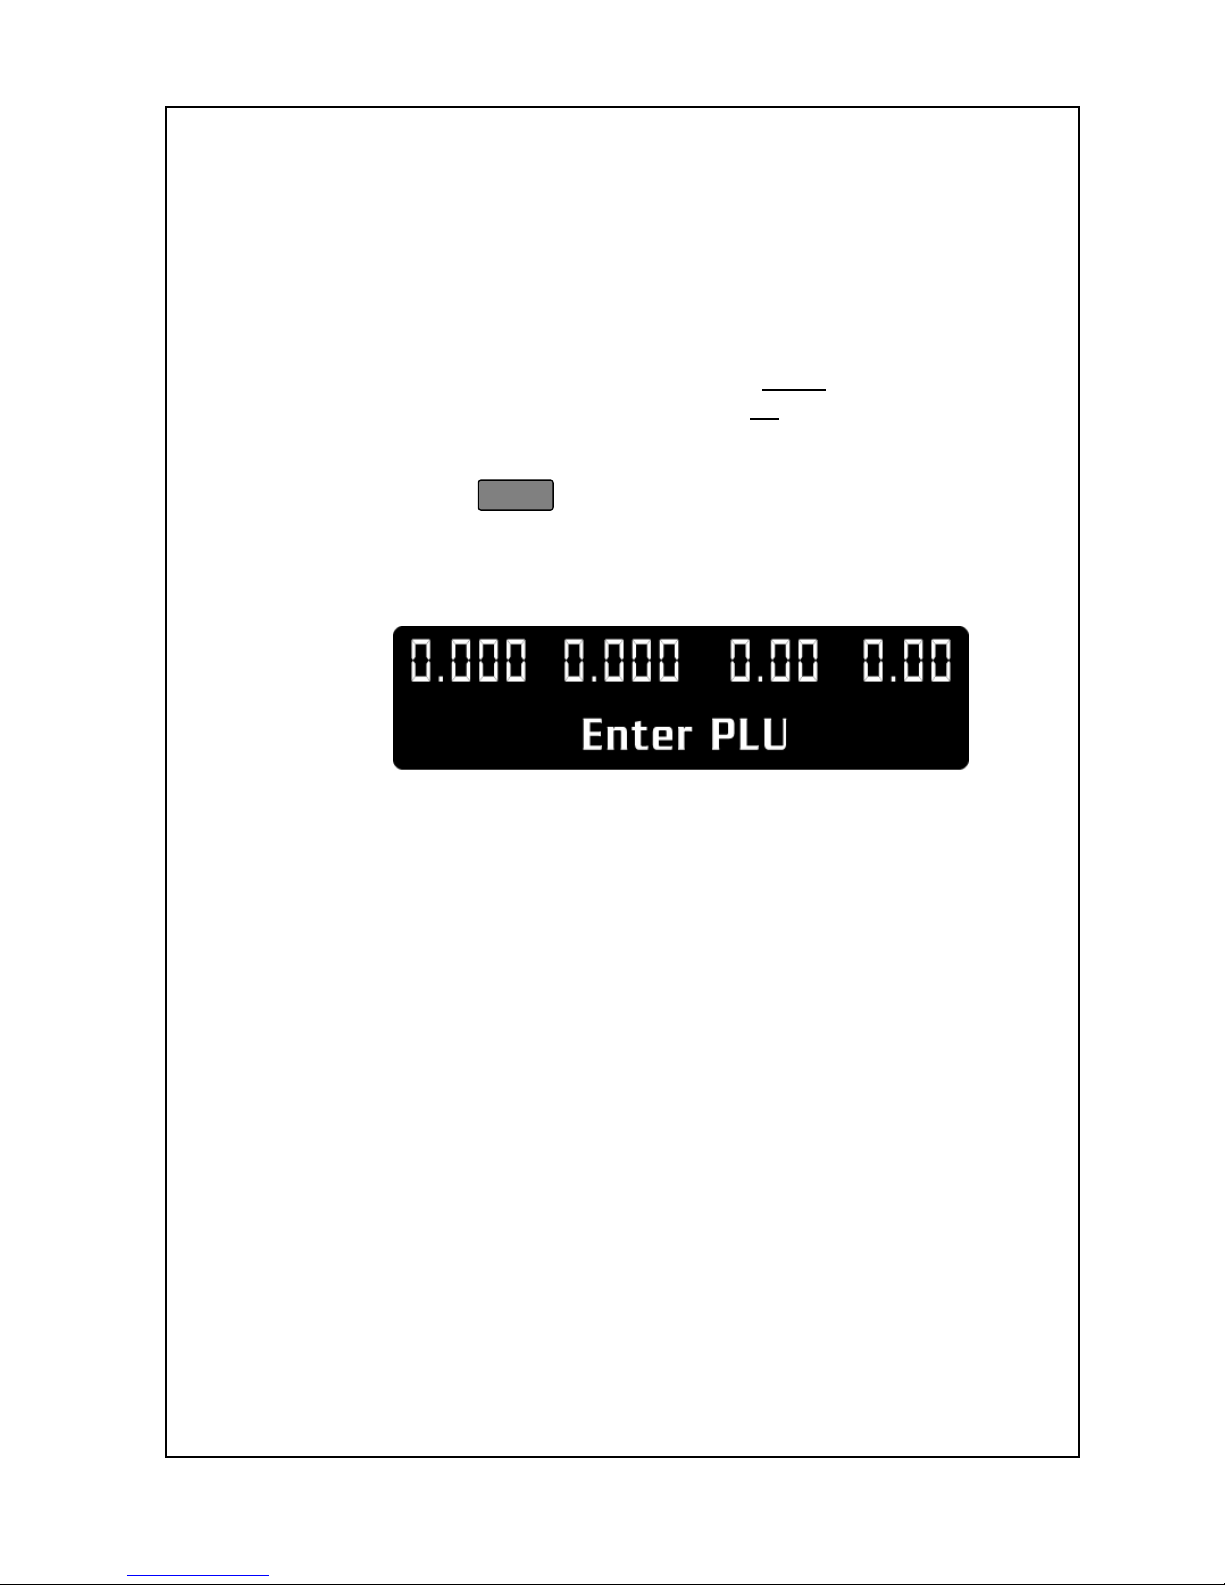
9. The scale should be in the Initial State; all the displa
ys
should read:
This is the Initial State
. Most directions and instructions in this manual
will begin with setting the scale up to the Initial State. Pl
ease
familiarize yourself with how to get the scale to the Initial State
: this
state is achieved by simply turning the scale on.
You are now ready to
use the scale.
Page 25
20
Password
When you purchase the
NETS, it comes with password protection by
default. The initial password is “77559”; 5 digits
. You can disable all
passwords or change the password. If your scale has password
protection enabled, then you can change the password by following the
instructions in the General Programming section under
Password
Change. If y
our scale has password protection disabled or you wish to
disable password protection, you must contact your ACOM
Dealer to
change this feature.
Changing this feature is only permitted by
licensed individuals.
There are only two places where the NETS wil
l show the password
entry screen: 1 to enter the Main Menu and 2
to void PLU sales. If
you press
SET
or
Func.
from Sales Mode (Initial State
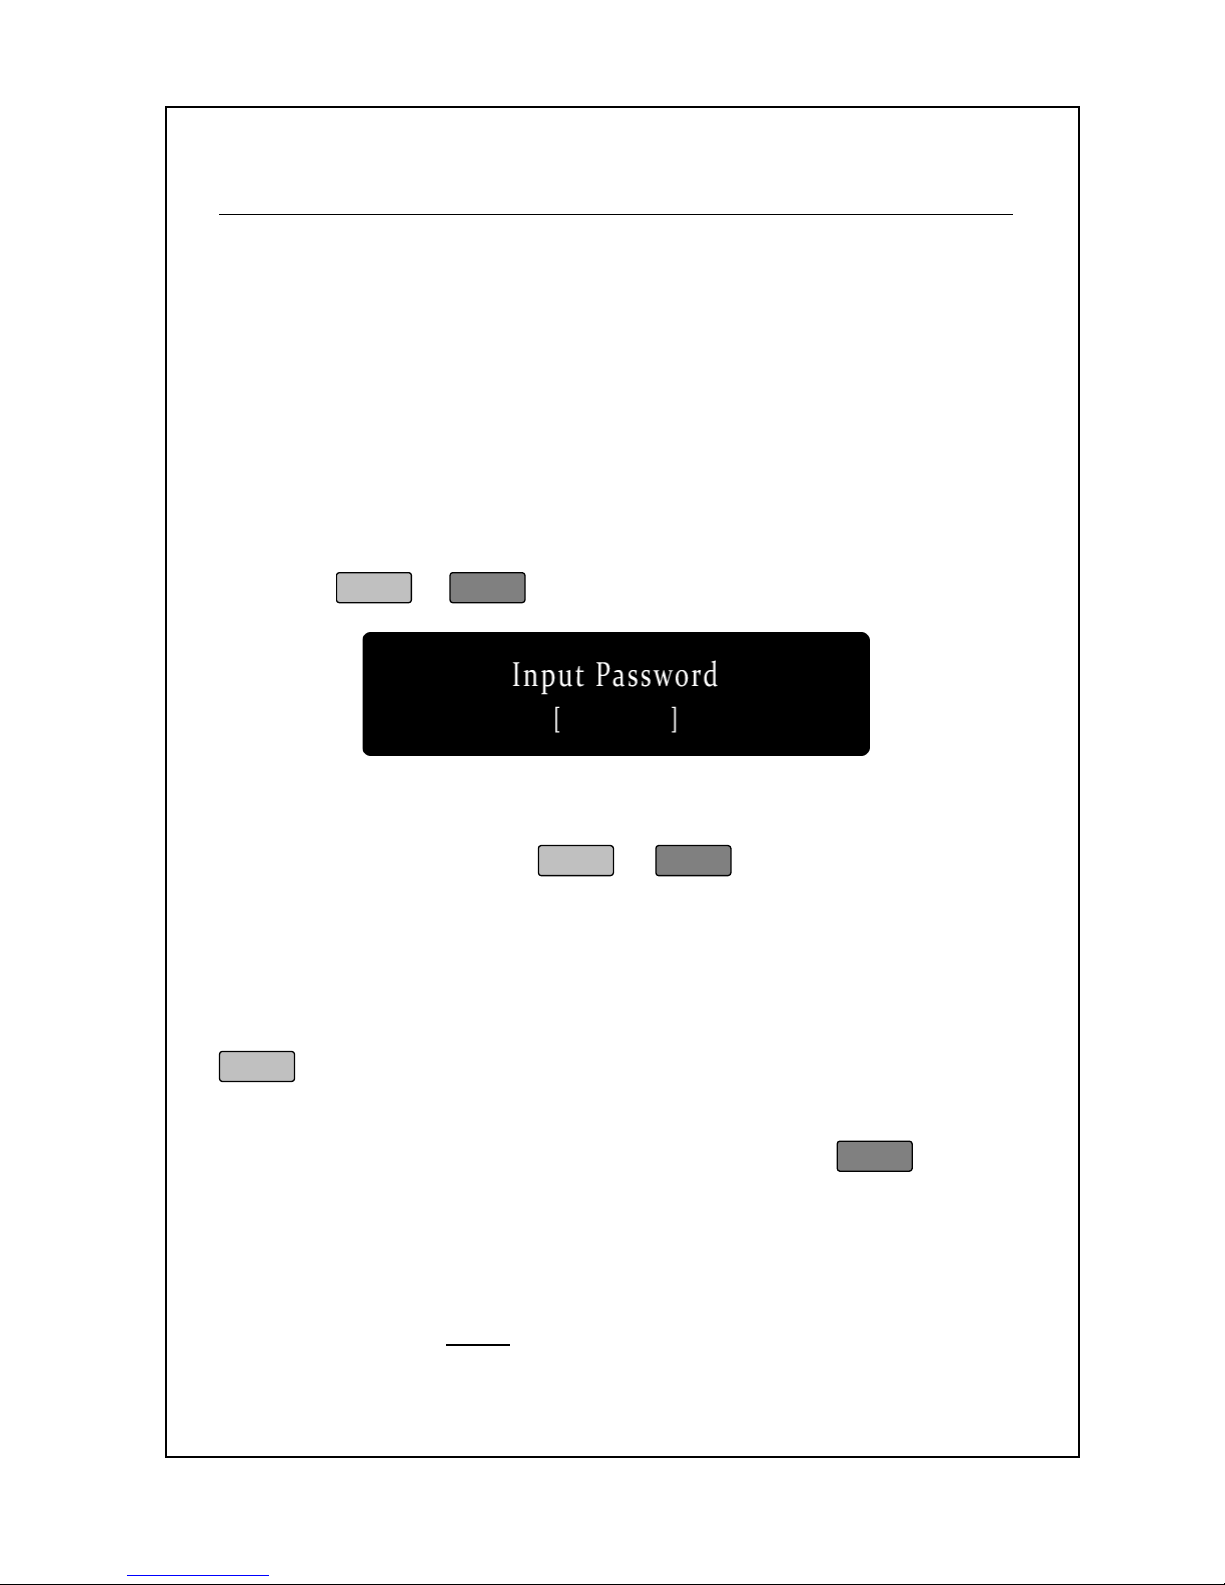
) you will see
the following screen:
This is your cue to enter the password; of course, if passwords are
disabled th
en this screen will always be skipped. For a new scale, you
would simply press 77559
PRINT
or
Enter
and then the scale will
proceed to the next screen.(The scale manager must use [1111].
However, this number possibly to be changed.)
Passwords are composed of the numbers 0 to 9.
As you type your
password, the Total Price display will display a dash for every number
that you press. When you are done entering your password, press
PRINT
. If you entered the correct password you will go on to the next
screen; if not, you will remain at the password entry screen.
If you wish to exit the password entry screen, press
ESC
and you
will go back to Sales mode. Do not forget your password; write it down
somewhere safe. If you forget your password, you will NOT be able to
access
the scale; the only way to correct this problem is to call your
ACOM
Dealer who may have to clear out ALL of the scale’s memory
and completely reprogram the scale, which may or may not incur
additional charges. Note: if you wish not to use passwords, hav
e your
ACOM Dealer set your scale up accordingly.
Page 26
21
Main Menu
The Main Menu is where you can set all of your PLU programming,
system options, and sales reports. The NETS menu tree is organized
as follows:
1. PLU: Create & Edit
2. PLU: Speed Keys
3. Store Settings
1. Store Name
2. Group Name
3. Operator
4. Sales Message
4. Scroll Message
5. Tax
4. Time & Date
5. Scale Settings
1: Min Weight for Auto Print
2: Group Assignment
3: Scale Number
4: Date Format
5: Back Light Settings
6: Barcode Settings
7: Select User(Receipt)
8: Feed length(Receipt)
9: Price Rounding
10: Operator Assignment
11: Sales MSG Assignment
12: Input Scale Counter
13: Sale Function Setting
6. Account Report
1: X1-Report
2: X2-Report
3: Z-Report
7. Label Settings
1: Select Label or Receipt
2: Set Label Length
3: Set Label Gap
4: Select Peel off Sensor
5: Label Feed Adjustment
6: Gap Threshold
7: Peel Off Threshold
8: Label Format Setting
9: Print Fields
10: Select Print Speed
11: Set Print Brightness
12: Set Print Counter
13: Sensor Setting
8. System Settings
1: Self Test
1: A/D Board
2: Key Board
3: Display
4: RS-232C
5: Printer
6: Sensors
7: Sensor Cal
2: Print PLU List
3: Trans Data
4: Price Change
5: Memory Status
6: Display PLU List
7: Delete a PLU
8: Delete All PLUs
9: Password Change
Quick menu at the edge of left
side Alpha keypad
1) Price Change
2) Date Printing
3)Select Format
4)Label
Page 27
22
Italicized
items are menu items that are NOT displayed by the scale
although they are accessible by typing there corresponding menu
numbers. “PLU Quick Price Change” menu item is accessible from
the Main Menu by pressing
F1
. The 8 bolded Items
are listed
by the scale in the Main Menu.
The above chart can be used to
quickly access specific menu items. For example, if you are at the
Main Menu and want to change the scale number you would simple
press
5
and then
3
.
To enter Main Menu:
1. Start From the Initial State and press
SET
.
2. Enter the correct password and press
PRINT
or
Enter
.
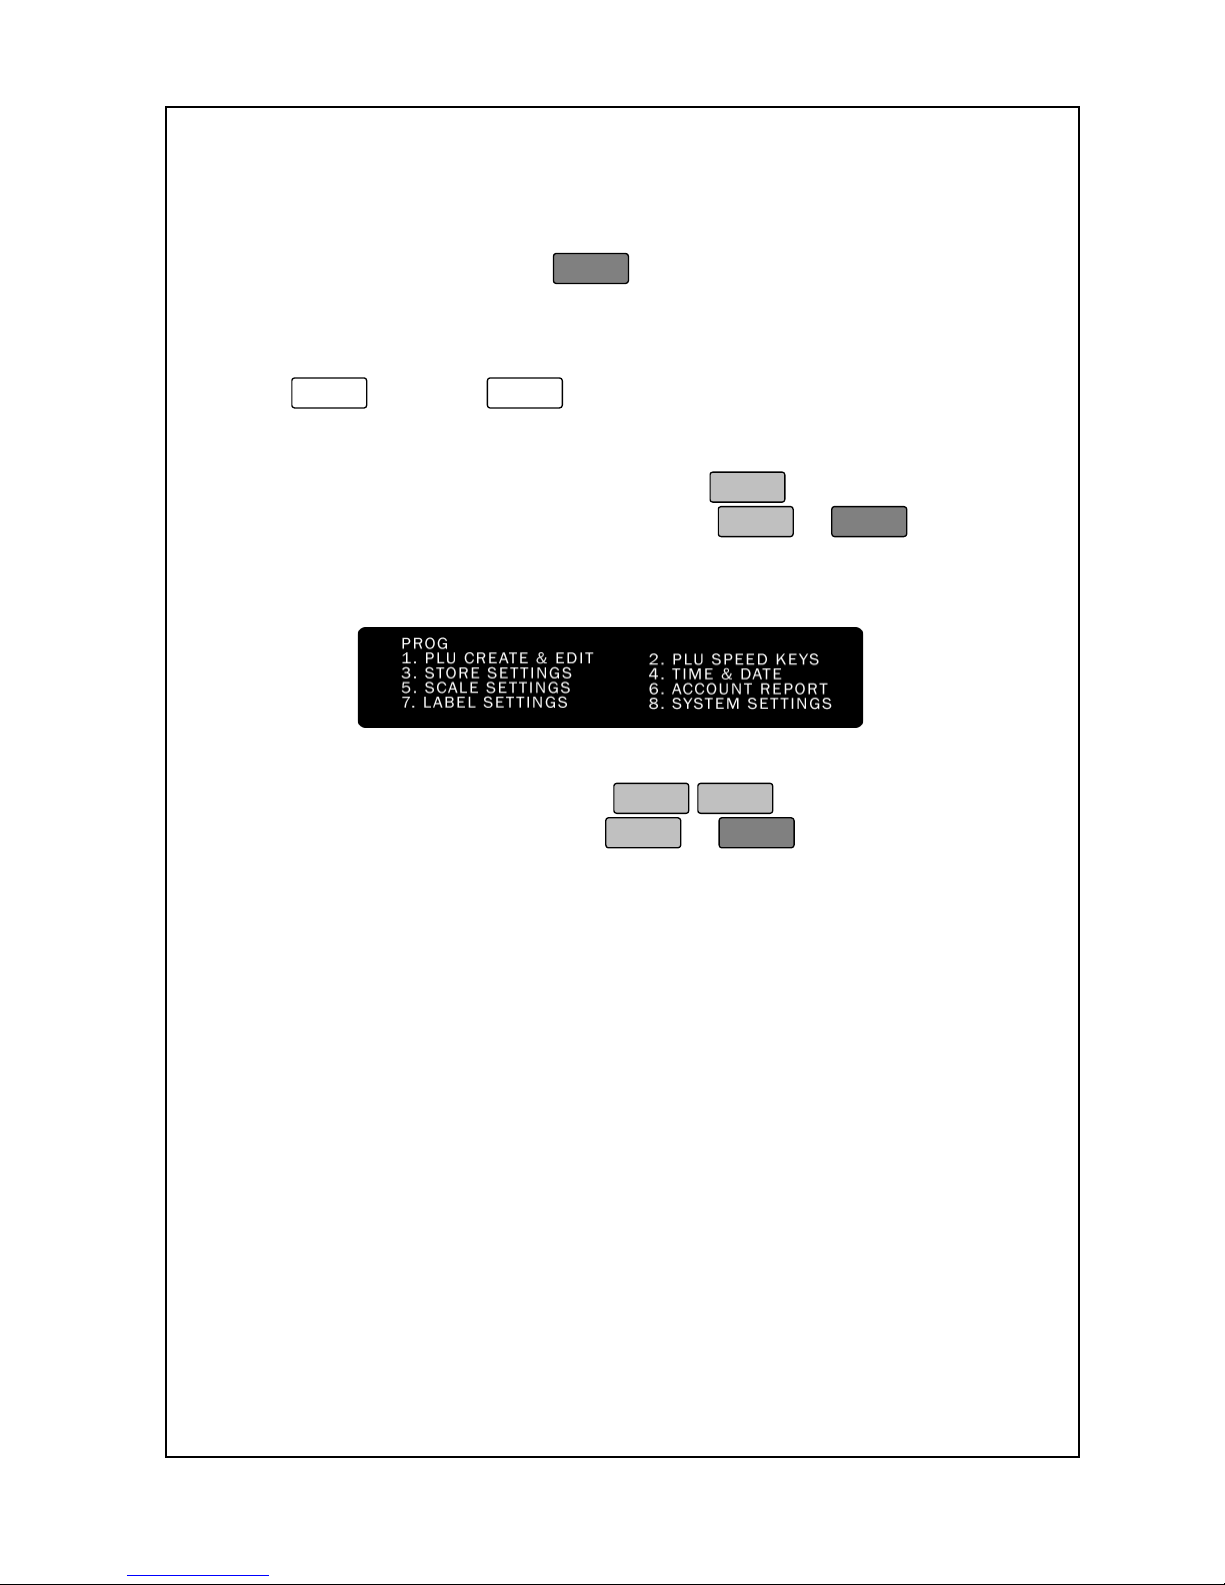
3. The Main Menu display appears as follows:
4. From here you can use the
keys to navigate the
Main Menu and then press
PRINT
or
Enter
when you arrive at
the menu item you wish to select. You can also press the
menu
item’s corresponding numeric key.
Page 28

23
1. PLU Create & Edit
Price Look Ups (PLUs) are the basic stock units of the NETS scale
and are also referred to Stock Keeping Units (SKUs)
; however, these
are r
eally the same thing. PLUs have several properties which can be
programmed by the user. The NETS can have up to 1000 PLUs.
Please carefully read the following guidelines for PLU Creation.
PLU Creation Guidelines:
The most important PLU property is its
number; this is how the user
can reference or “call-
up” a PLU for use in Sales mode. For more
commonly used PLUs, the NETS has 60 Speed Keys which can be
programmed to automatically call-
up a PLU. This saves time and
increases throughput because less keystrokes are needed to call-
up a
PLU by Speed Key than by direct call-
up. Because PLU numbers are
usually 4 to 6 digits long, using direct call-
up can take up to 7 key
strokes! Using the Speed keys allows you to lower the keystroke count
to 1 no matter ho
w long the PLU number is. Careful consideration
should be taken when deciding on PLU numbers. This can be
especially true when you require the use of barcodes; if done
incorrectly, you may have to reprogram ALL your PLUs on the NETS
or your electronic ca
sh register (ECR) or point of sale (POS) system!
Because there are so many makes and models of cash registers and a
myriad of POS software packages, it is not possible to denote a
“works-for-
all” instruction set for numbering PLUs. Instead, there are
some simple principles you can follow:
Try to keep the scale’s PLU number the same as the ECR/POS
PLU number.
This ONLY applies to scale items that the
ECR/POS must scan.
Try to keep each PLU’s UPC Code the same as the PLU number.
Consequently, the PLU # = UPC Code = ECR/POS PLU #
. The
NETS makes the UPC Code the same as the PLU number for all
new PLUs.
The second most important PLU property is PLU Type. Food can only
be sold 1 of 2 ways: by count or by weight. This is why there are also
2 PLU Types.
Page 29

24
When food is sold by weight, it must be accurately weighed and
labeled with certain specific data whose requirements may change
according to jurisdiction.
The minimum requirements for a By
Weight PLU label are: product name, price-per-
pound, net weight,
total price, and a packed on date. The net weight must be verifiable by
an accurate scale.
When food is sold by count (or volume), it must be accurately labeled
with certain specific data whose requirements may change according
to jurisdiction. The minimum requirements for a By Count
PLU
label are: product name, price-per-
piece, net weight statement, total
price, and a packed on date. The price-per-
piece is usually expressed
in the format “Q for P”: Q is a piece count and must
be greater than
zero; P is a price and must be greater than or equal to zero. An
example of a price-per-piece is “1 for $3.49”
A common misconception is that you can simply price something, let’s
say “fixed price”, and then sell it like that. The reali
ty is that this is true
for non-
food items; however, food must be sold either by weight or by
count. Even non-
scaled food items that seem to be “fixed price” and
can be purchased in a supermarket are in fact sold by count. For
example, a can of soup has
a net weight statement on the package
and when you buy it, the ECR/POS receipt will have a quantity (pieces)
and a price. Another example is canned or bottled soda. These items
are sold by volume, have a “net volume statement”
and when you buy
it the ECR
/POS receipt will have a quantity (pieces) and a price.
Additionally, if you were to measure the volume (or net weight) of the
contents you would find that you are getting a slightly larger amount
than stated on the package.
Now you are ready to program PLUs on the NETS!
Page 30
25
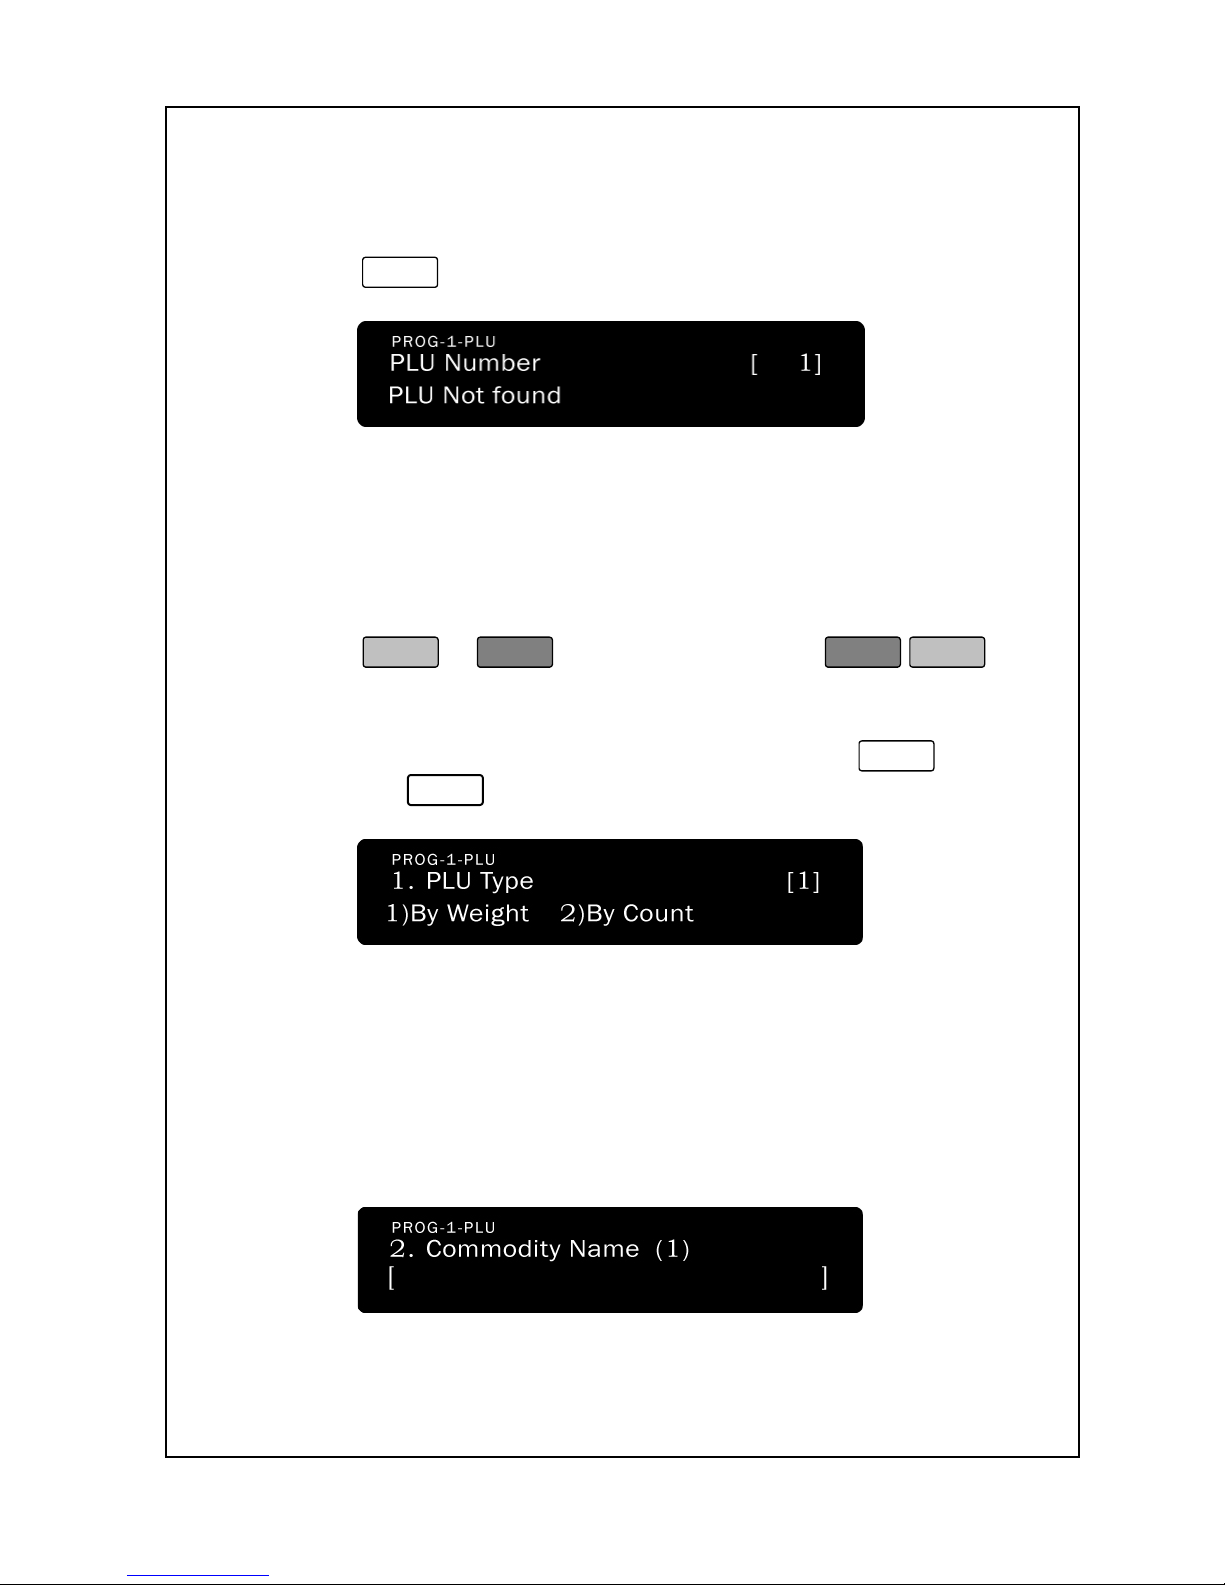
To Create or Edit PLUs:
1. Enter ‘Main menu’, and follow 1 steps below.
2. Press
1
. The displays will show:
3.
Enter the PLU number you wish to create or edit. As you type
the PLU number, you will see it in the Total Price display. The
default PLU number in the Total Price Display (“0”) can change
after you program several PLUs. The
default value is usually
the next available (new) PLU number.
4. Press
PRINT
or
Enter
to go step 5 or press
ESC
SET
to
exit PLU Create & Edit and go back to the Initial State.
5. The next screen is PLU Type selection. Press
1
for By
Weight or
2
for By Count.
6.
The next screen is the Commodity Name Line 1. This is the first
line of your PLU name descriptor. It can be up to 56 characters
long; although, most label formats have a 28 character limit.
Type the commodity name you want for line 1.
The screen
appears as follows:
Page 31
26
7. You can press
SAVE
to store the PLU as-
is and go to step 28
or you can press
PRINT
or
Enter
to continue to step 8.
8. The next screen is the Commodity Name Line 2
. This is the
second
line of your PLU name descriptor. It can be up to 56
chara
cters long; although, most label formats have a 28
character limit. Type the commodity name you want for line 2
.
The screen appears as follows:
9. You can press
SAVE
to store the PLU as-
is and go to step 30
or you can press
PRINT
or
Enter
to continue to step 10.
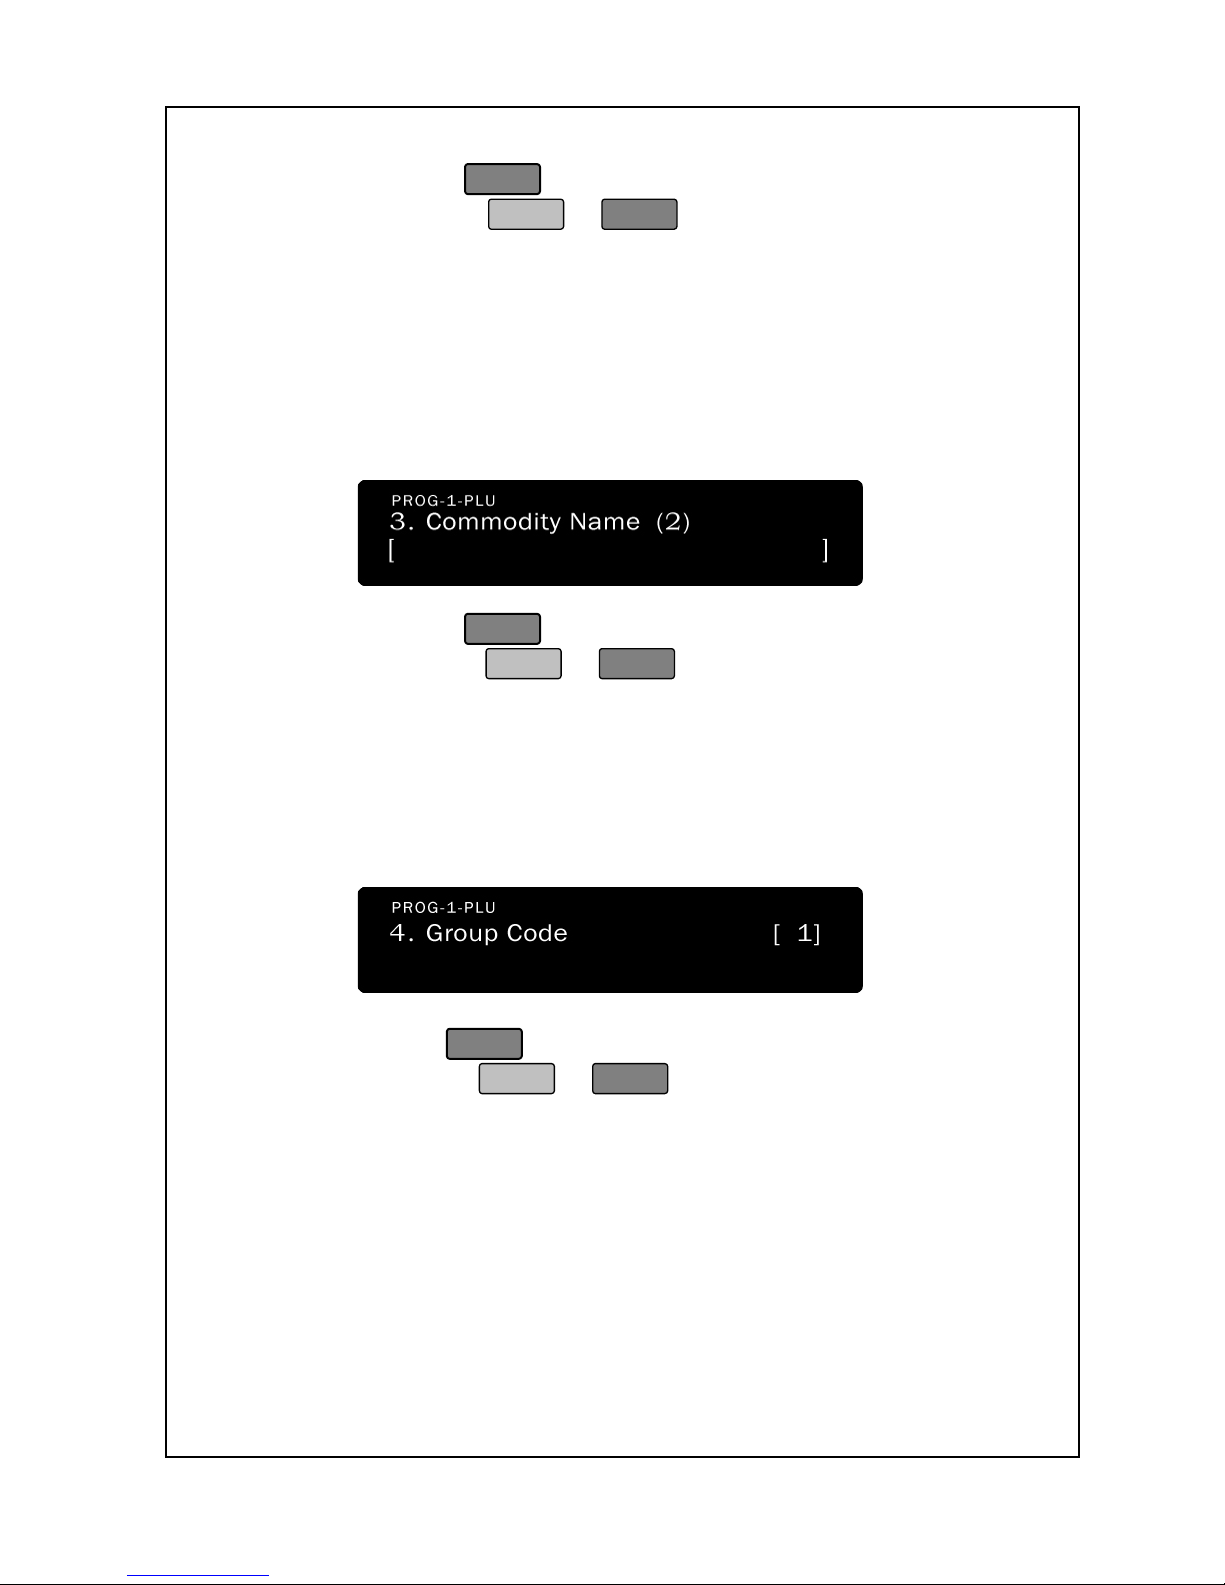
10. The next screen is the Group Code. This is
where you assign the
PLU to a group.
Enter the group number you want; it must be
from 1 to 99. As you type, the number will appear in the Total
Price Display. The screen appears as follows:
11. You can press
SAVE
at to store the PLU as-
is and go to step 30
or you can press
PRINT
or
Enter
to continue to step 12.
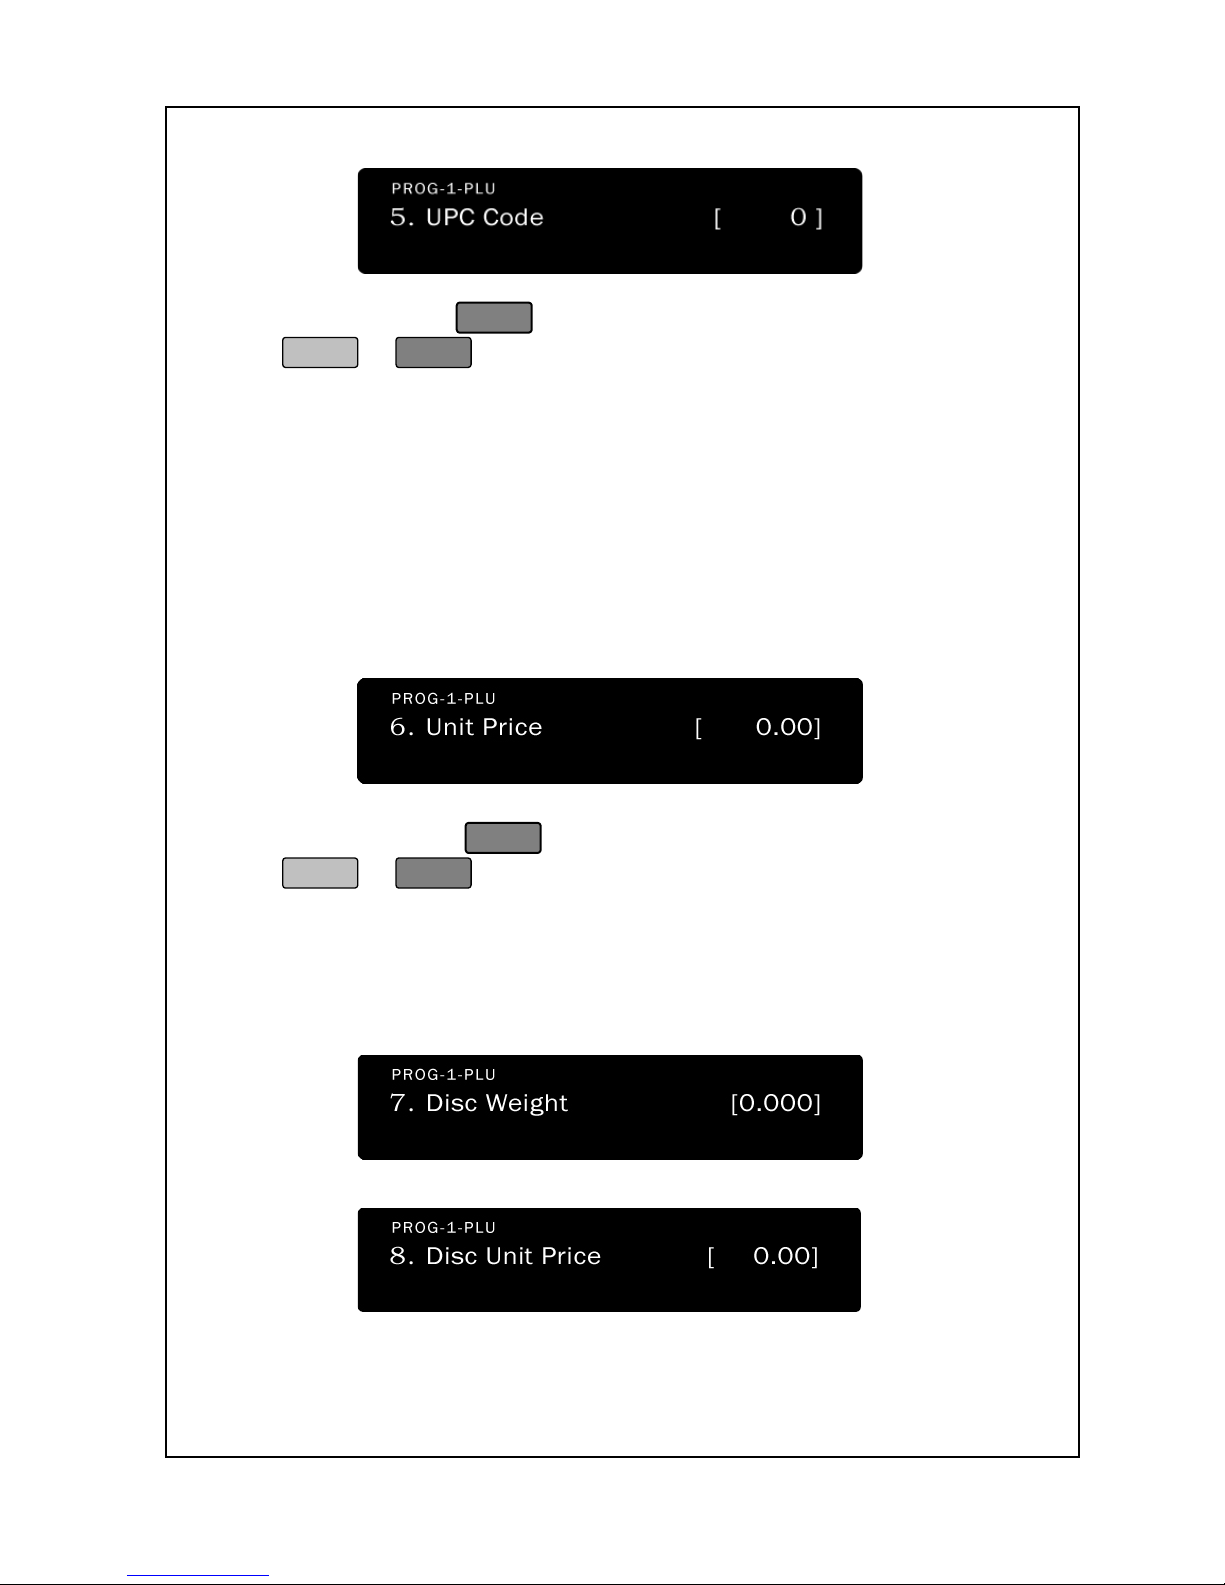
12. The next screen is the UPC Code. This is
where you assign a
UPC number to the PLU.
The UPC Code defaults to be the same
as the PLU number. En
ter the UPC number you want; it must be
from 0 to 999999. As you type, the number will appear in the
Total Price Display. The screen appears as follows:
Page 32
27
13. You can press
SAVE
to store the PLU as-is or you ca
n press
PRINT
or
Enter
or to continue to step 14.
14. The next screen is the PLU Price. This is
where you assign a
price-per-pound for a By Weight PLU or price-per-
piece for a By
Count PLU. The price defaults to 0.00. Enter a price: the price
must be from 0.00 to 999.99
. If you enter 0.00, then you will be
able to change price during sales; if not, you may
not be able to
change the price (see
Advanced Programming, PLU Price
Change section.) The price will appear in the Total Price Display.
15. You can press
SAVE
to store the PLU as-is or
you can press
PRINT
or
Enter
to continue to step 16.
16. The next screen is the Disc Weight and Disc Unit Price. This
function is for when you need to set discount weight or discount
unit price in both “by weight” or “by count” function.
Page 33
28
For example, in “by weight mode”
, if you want to sale the
product with discount
unit price 2.00 from 1.000kg in spite of unit
price 2.10, you need to Input 1.000 to “Disc Weight”
and 2.00 to
“Disc Price.”
In “by count mode, the “Disc Weight” will be shown as “Disc Pcs”.
This function is for when you need to discount price of quantity.
If you want to sale from 10pcs with discount price 2.00 in spite of
2.10, you need to input 10 to “Disc PCS” and 2.00 to “Unit Price”.
If discount price is done in both “by weight” or “by count” mode,
will be flashed on.
17. You can press
SAVE
to store the PLU as-is or
you can press
PRINT
or
Enter
to continue to step 18.
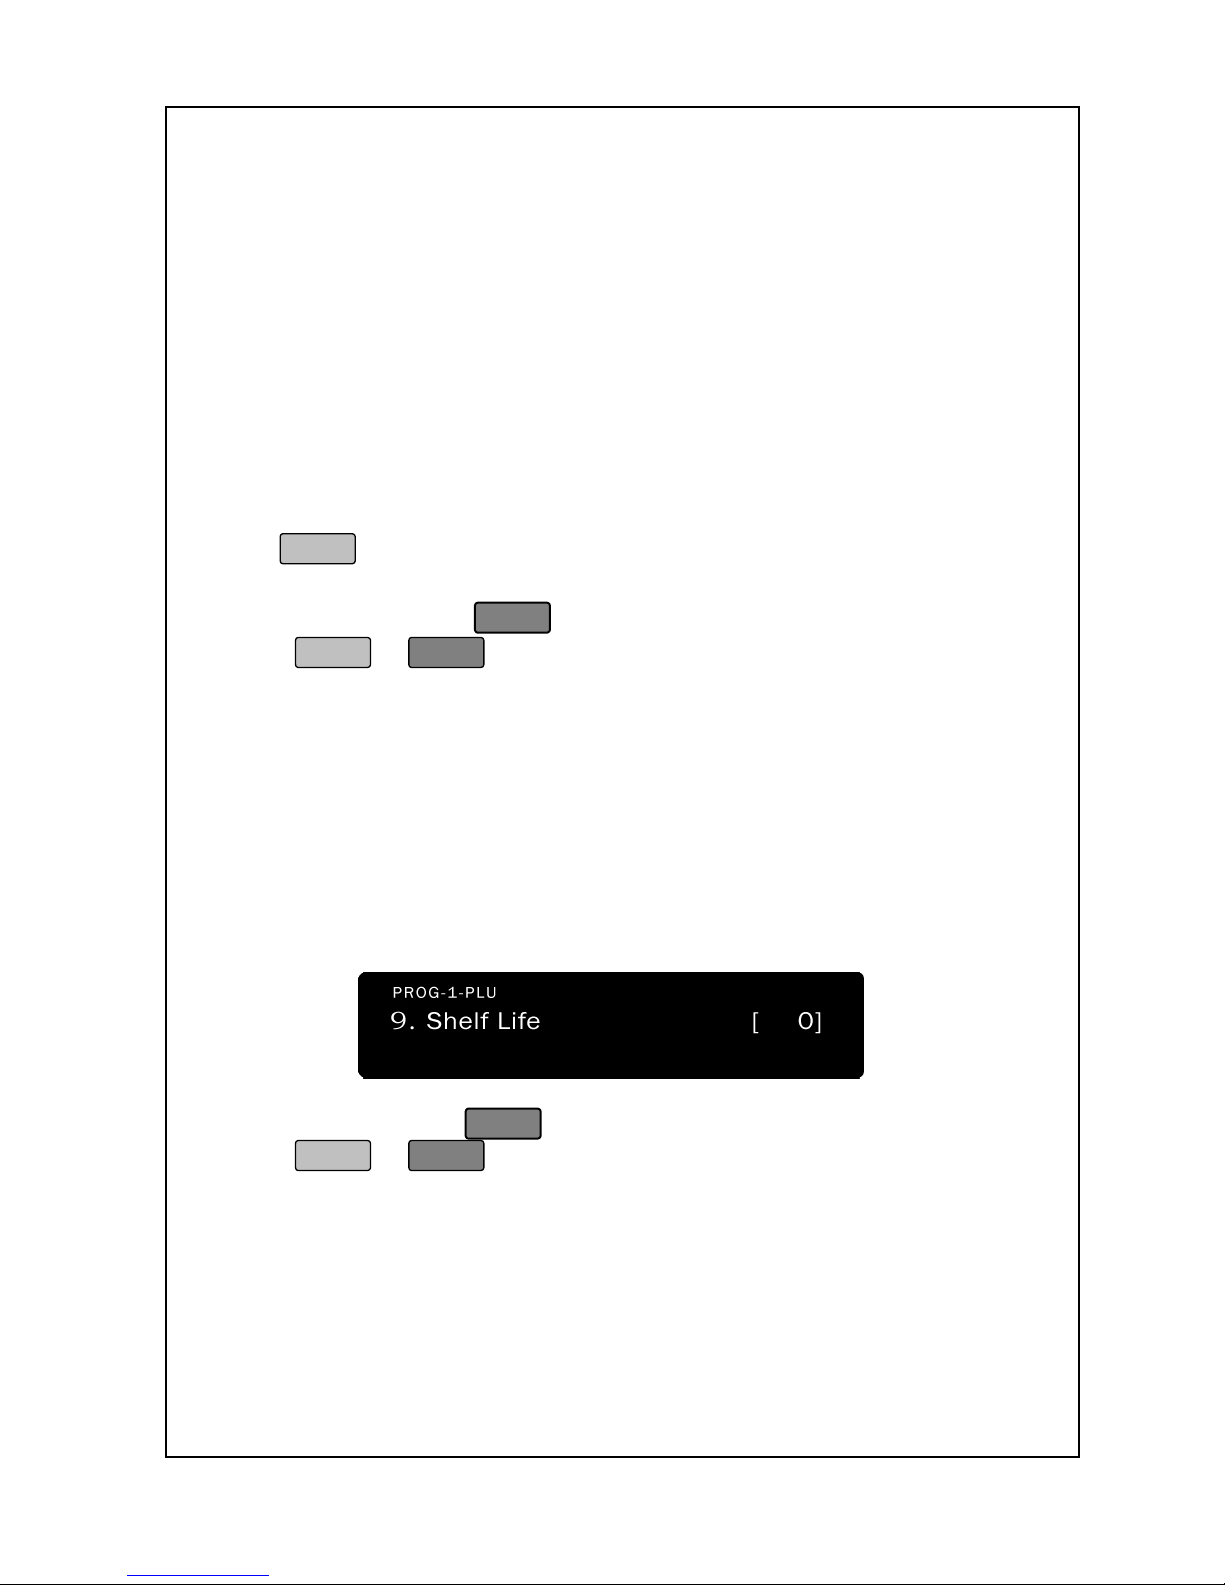
18. The next screen is the PLU Shelf Life. This is
where you assign
a Shelf Life in days that is used to compute the expiration date
(Sell By.)
The shelf life defaults to be 0. Enter the shelf life you
want; it must be from 0 to 366. 0 will not print a Sell b
y Date, 1
will print Sell b
y Date = Packed On Date, 2 will print Sell By
Date = Packed On Date + 1, etc.
As you type, the shelf life will
appear in the Total Price Display.
19. You can press
SAVE
to store the PLU as-is or
you can press
PRINT
or
Enter
to continue to step 20.
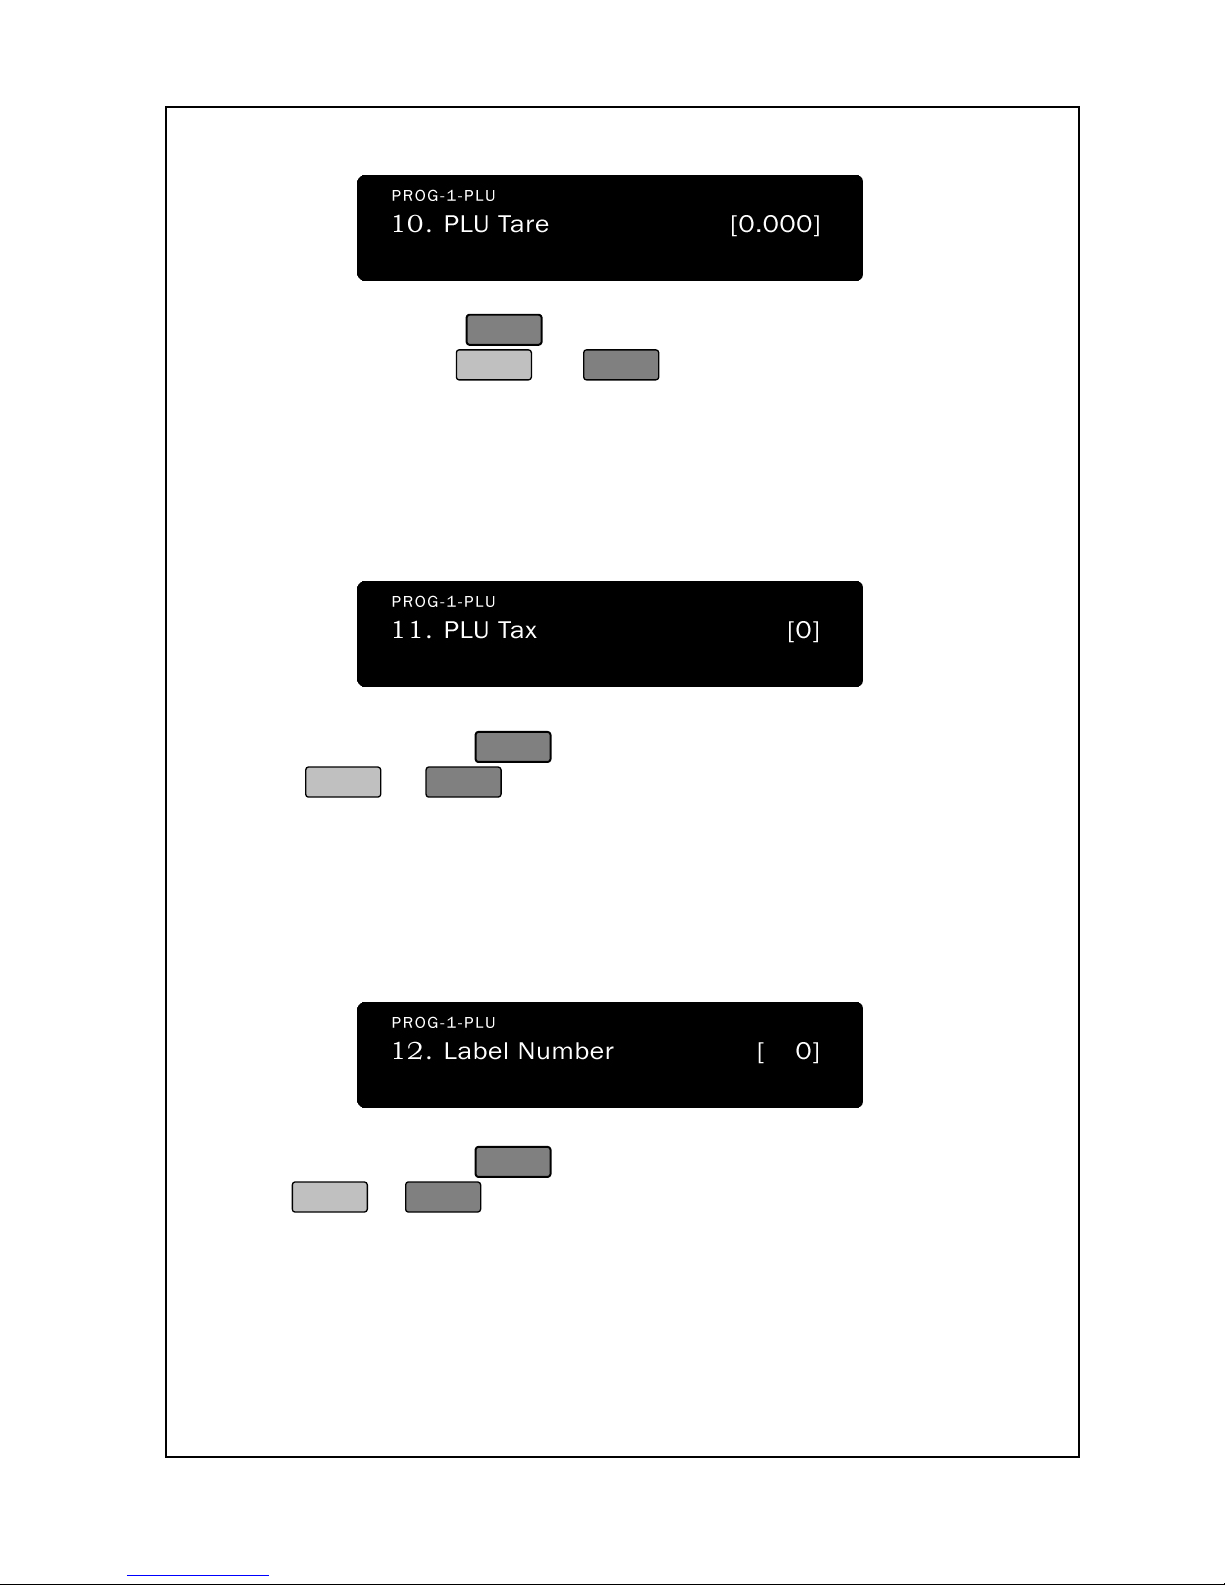
20. The next screen is the PLU Tare. This is where you assign the
PLU to a Tare. Enter the tare number you want; it must be from
0.000~9.999. The screen appears as follows:
Page 34
29
21. You can press
SAVE
to store the PLU as-is and go to step 34 or
you can press
PRINT
or
Enter
to continue to step 22.
22. The next screen is the PLU Tax. This is where you assign the
PLU to a tax. Enter the tax number you want; it must be from
0 to 9. As you type, the tax will appear in the Total Price display.
The screen appears as follows:
23. You can press
SAVE
to store the PLU as-is or you can press
PRINT
or
Enter
to continue to step 24.
24. The next screen is the Label Number. This is based on setting
label format. If label number is selected of PLU, the selected
label number will be printed out. In this case, you must set
same length of label number.
25. You can press
SAVE
to store the PLU as-is or you can press
PRINT
or
Enter
to continue to step 26.
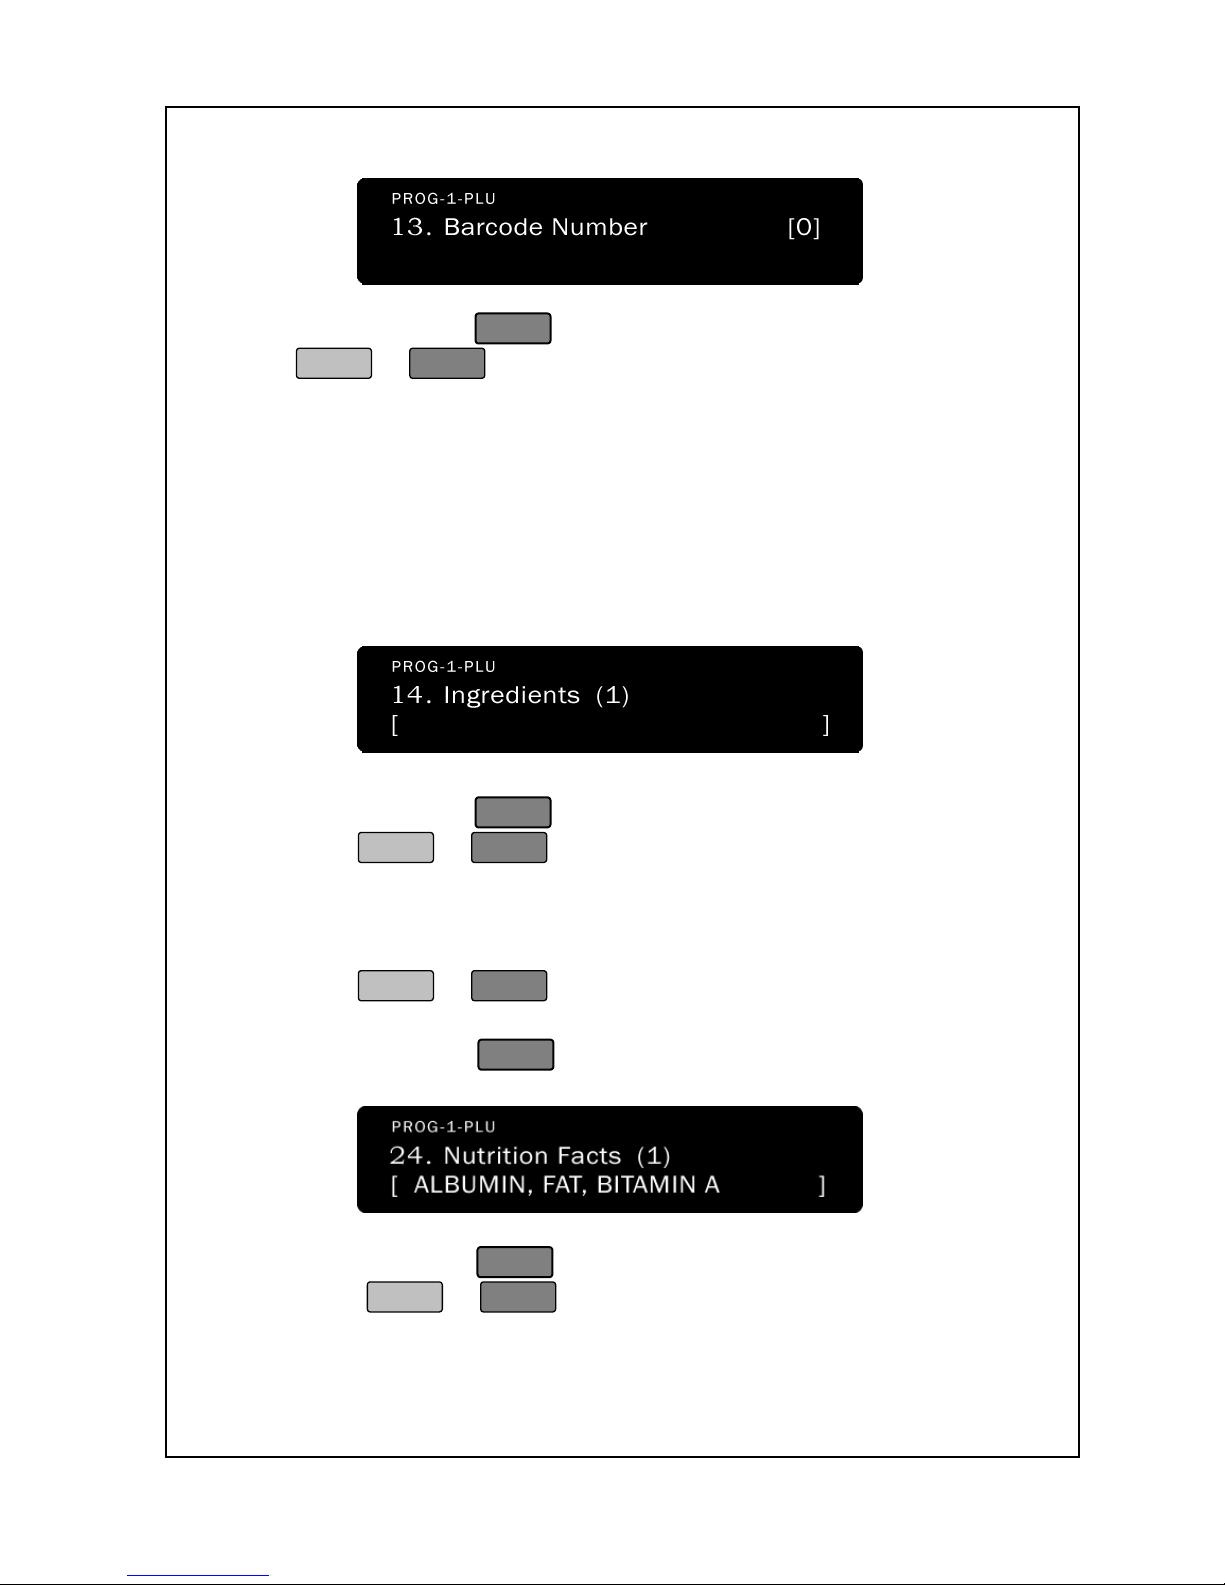
26. The next screen is the Barcode Number. Basically, the
barcode number is 0~9. If PLU uses the different barcode
type, you must choose the selected number and input out
(PROG-7-4: Barcode Settings)
Page 35
30
27. You can press
SAVE
to store the PLU as-is or you can press
PRINT
or
Enter
to continue to step 28.
28. The next screen is the PLU Ingredients Line 1. There are 10
lines of ingredients and 56 characters per line for a maximum
total of 560 characters of ingredients per PLU.
Type the ingredients you want for line 1. As you type, the
ingredients will appear in the Alpha Display. The screens
appear as follows:
29. You can press
SAVE
to store the PLU as-is or you can
press
PRINT
or
Enter
to continue to step 30.
30. The next screen is the PLU Nutrition Facts Line 1.
You can type the Nutrition Fact you want for this line and
press
PRINT
or
Enter
to go to the next line of Nutrition
Facts and repeat this step until you get to Line 10.
You could press
SAVE
at any time to store the PLU as-is.
31. You can press
SAVE
to store the PLU as-is or you can
press
PRINT
or
Enter
to continue to step 32.
Page 36
31
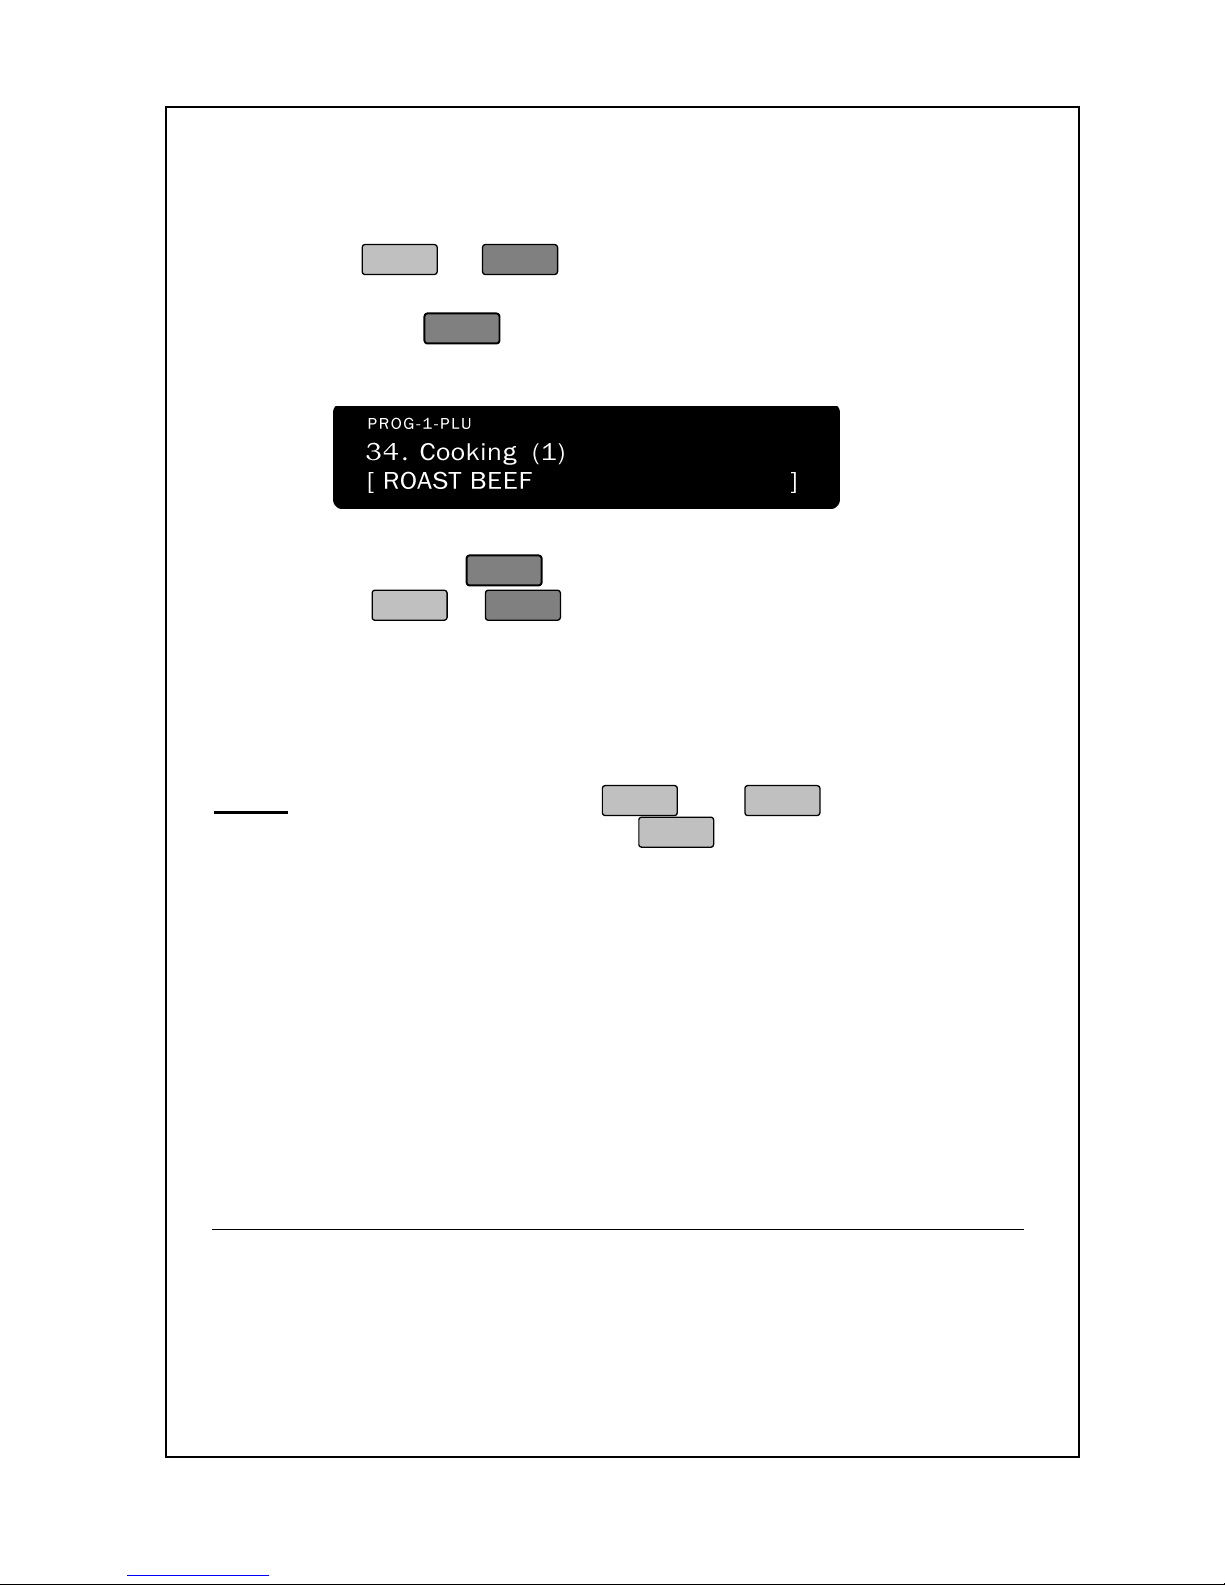
32. The next screen is the PLU Cooking Line 1.
You can type Cooking Instruction you want for this line and
press
PRINT
or
Enter
to go to the next line of Cooking
Instruction and repeat this step until you get to Line 7. You
could press
SAVE
at any time to store the PLU as-is and go
to step 33.
33. You can press
SAVE
to store the PLU as-is and you can
press
PRINT
or
Enter
34. The scale will store the PLU and then return to step 3.
Note1:
You can also use the
and
keys to navigate
through PLU programming. Pressing
is used to backup 1 step.
2. PLU Speed Keys
The NETS has 60 Speed Keys that can be assigned PLU numbers so
that PLUs can be quickly accessed in Sales mode. By default, Speed
Keys 1 to 60 are assigned to PLUs 1 to 60, respectively. If you need to
reassign the Speed Keys follow the programming steps below.
Page 37
32
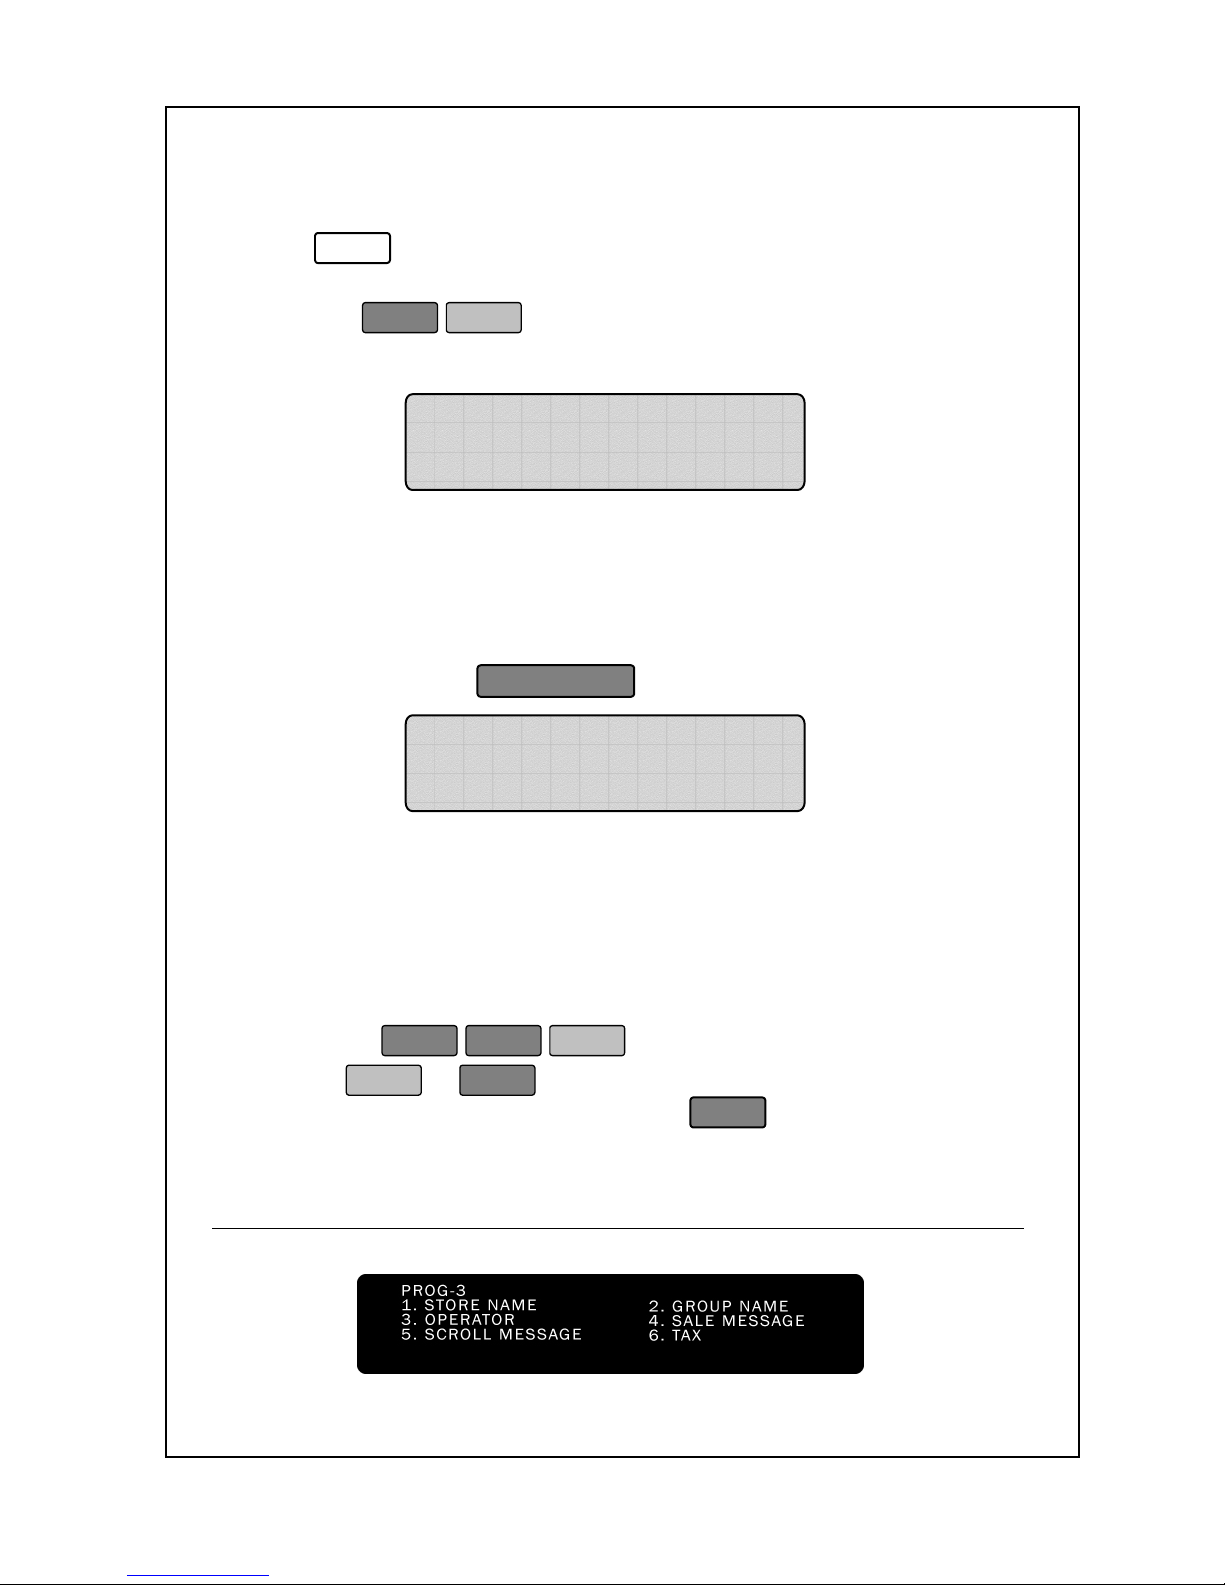
Press Speed Key
1. Enter ‘Main menu’, and follow 1 steps below.
2. Press
2
.
3. Press the Speed key you wish to view or assign and go to step 4
OR press
ESC
SET
to go back to the Initial State.
4. The Alpha Display will show you that key’s current assignment.
5. You can:
Assign Operator keys
To Assign Operator Keys:
5 - 1. Follow Steps 1 to 4 of assigning Speed keys.
5 - 2. Press
5 - 3.Enter the Operator Number you want; It must be from 1
to 25.
Go back to step 3 to view or assign another key or…
Type a PLU number to assign to the currently selected Speed
key and go to step 6 or…
Press
ESC
ESC
SET
to go back to the Initial State.
6. Press
PRINT
or
Enter
to save the new assignment.
To save the PLU numbers, press the
SAVE
key.
3. Store Settings
Speed No.
1
Operator No. [ 1]
X / Sub Total
Speed No.
1
PLU No. [ 1]
Page 38
33
3-1. Store Name
You can print the store name and address or any other pertinent
information, at the bottom of each label; however, not all labels or
label formats have a space for the store name at the bottom.
Additionally, some formats may have a line or character-per-line
limitation not mentioned here.
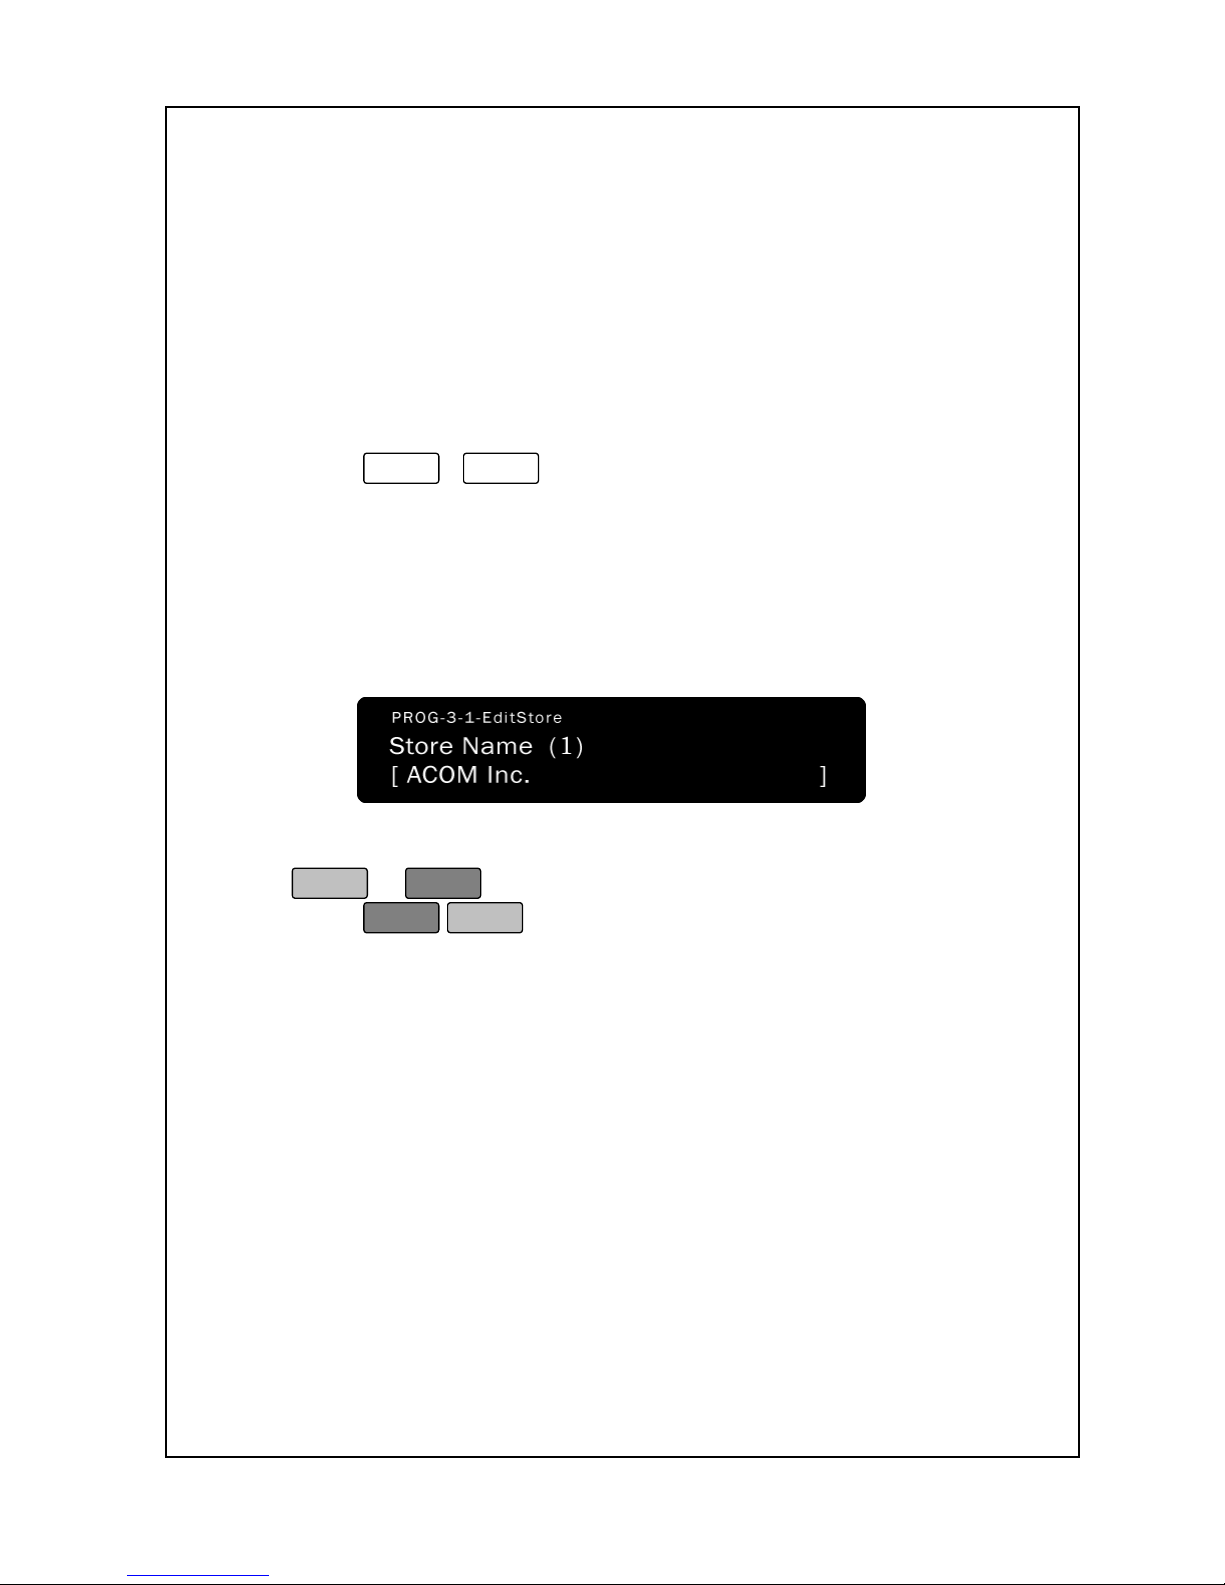
To program the store name and address:
1. Enter ‘Main menu’, and follow 2 steps below.
2. Press
3
-
1
.
3. You can now type the name, address, or any other data you
would like to appear at the bottom of your labels. You can have
up to 3 lines of data and up to 28 characters per line; however,
these can change depending on your label format. As you type,
you will see the text in the Alpha Display.
4. You can type the data you want from 1~3 line press
PRINT
or
Enter
.
5. Press
ESC
SET
.
6. You are back in the Initial State.
3-2. Group Name
In order to better sort your PLUs, you can assign each PLU to any 1 of
20 groups. Just like PLUs can be named, each of the 20 groups can
have a 20 character name. In a meat department, for example, you
can put all of your beef products under group 1 and name group 1
“Beef”. You can also use the groups to separate PLUs by various
“departments” or use any hierarchical combination you desire; but, it is
up to you to maintain the hierarchy. Of course, you do not have to use
groups if you do not need them.
Page 39
34
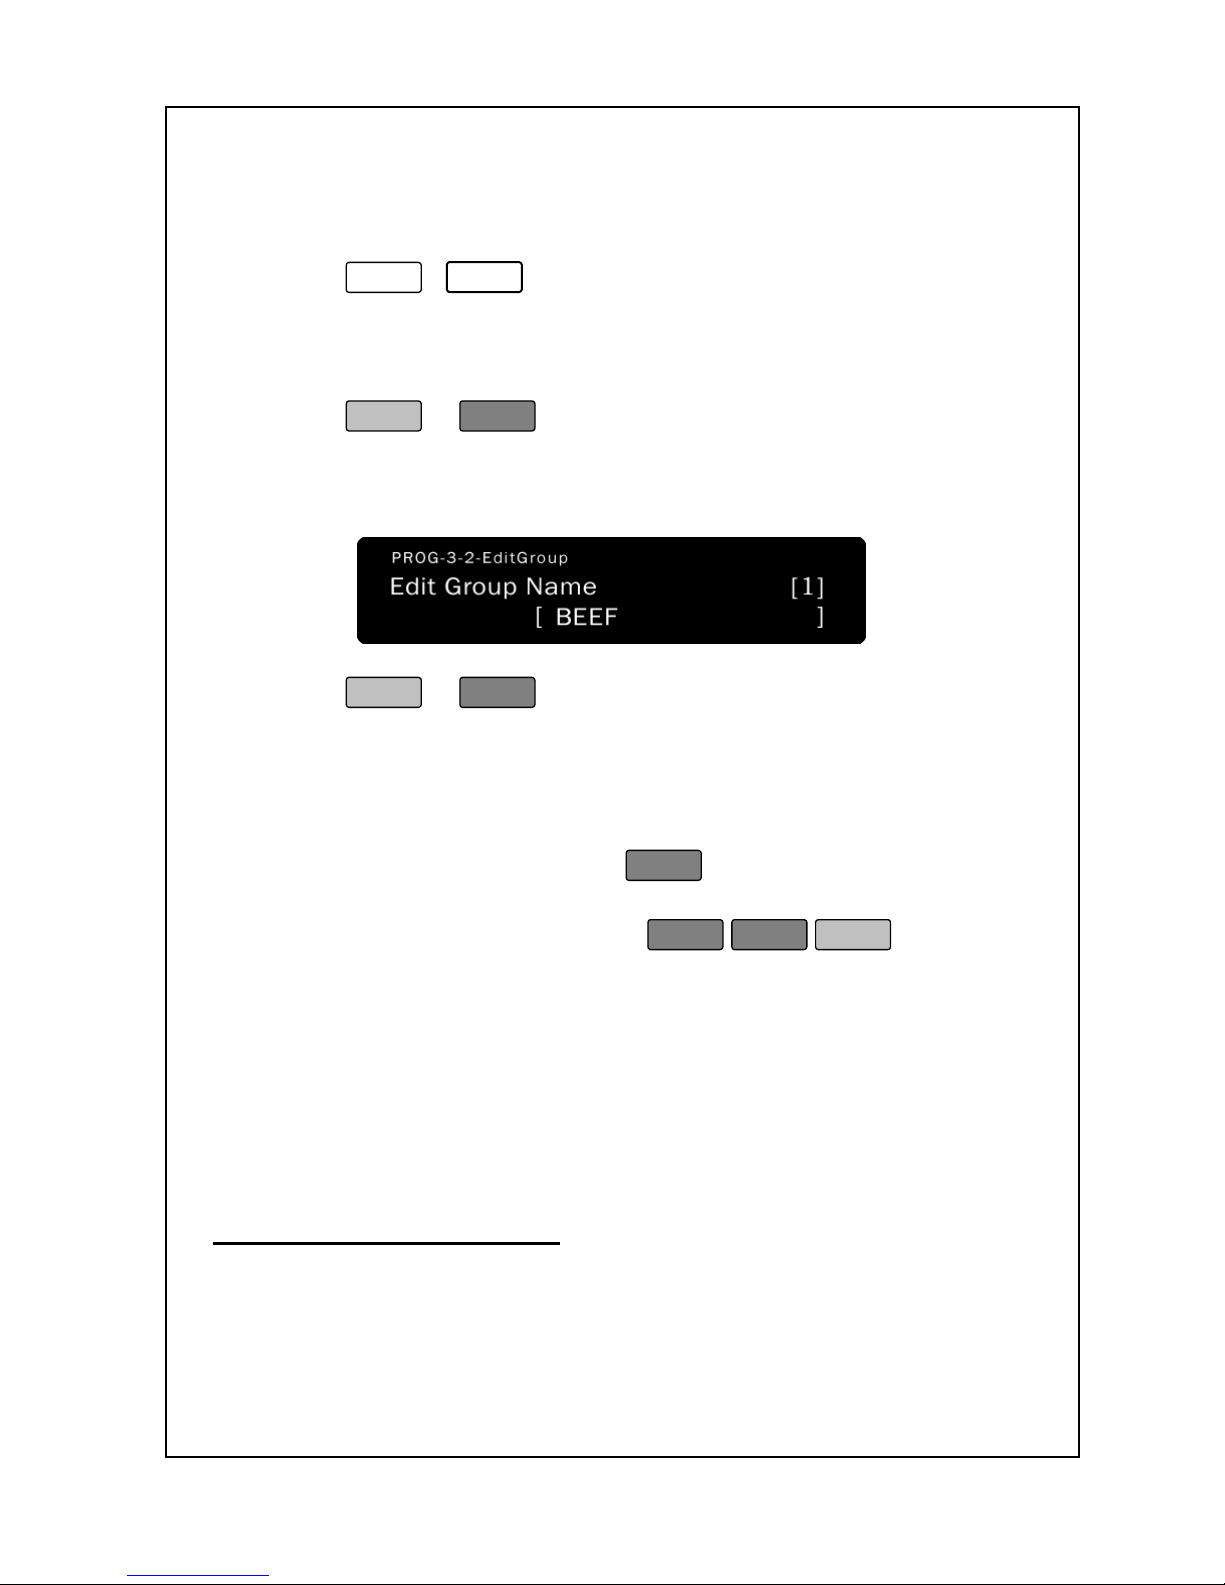
To program the group names:
1. Enter ‘Main menu’, and follow 2 steps below.
2. Press
3
-
2
.
3. Enter the group number you wish to edit. This number must be
from 1 to 20. You will see the group number in the Total Price
Display.
4. Press
PRINT
or
Enter
.
5. Type a group name that you wish to use for this group. As you
type the name, you will see it displayed in the Alpha Display.
6. Press
PRINT
or
Enter
.
7. The group name was stored and the scale automatically moves
on to the next group number which is displayed in the Total Price
display.
8. If you wish to program the next group name, then you can go
back to step 5; otherwise, press
ESC
.
9. You can go back to step 3 to specify another group number you
may wish to edit or you can press
ESC
ESC
SET
to finish.
10. You are back in the Initial State.
3-3. Operator Name
If multiple operators use a scale, you can assign a operator number to
each operator so that you can discern who sold the item. If you wish to
print operator name on label, you should enter the operator number
P5-2-3 Operator Assignment
. Additionally, sales reporting can also be
made easy using operator numbers in receipt mode.
Page 40
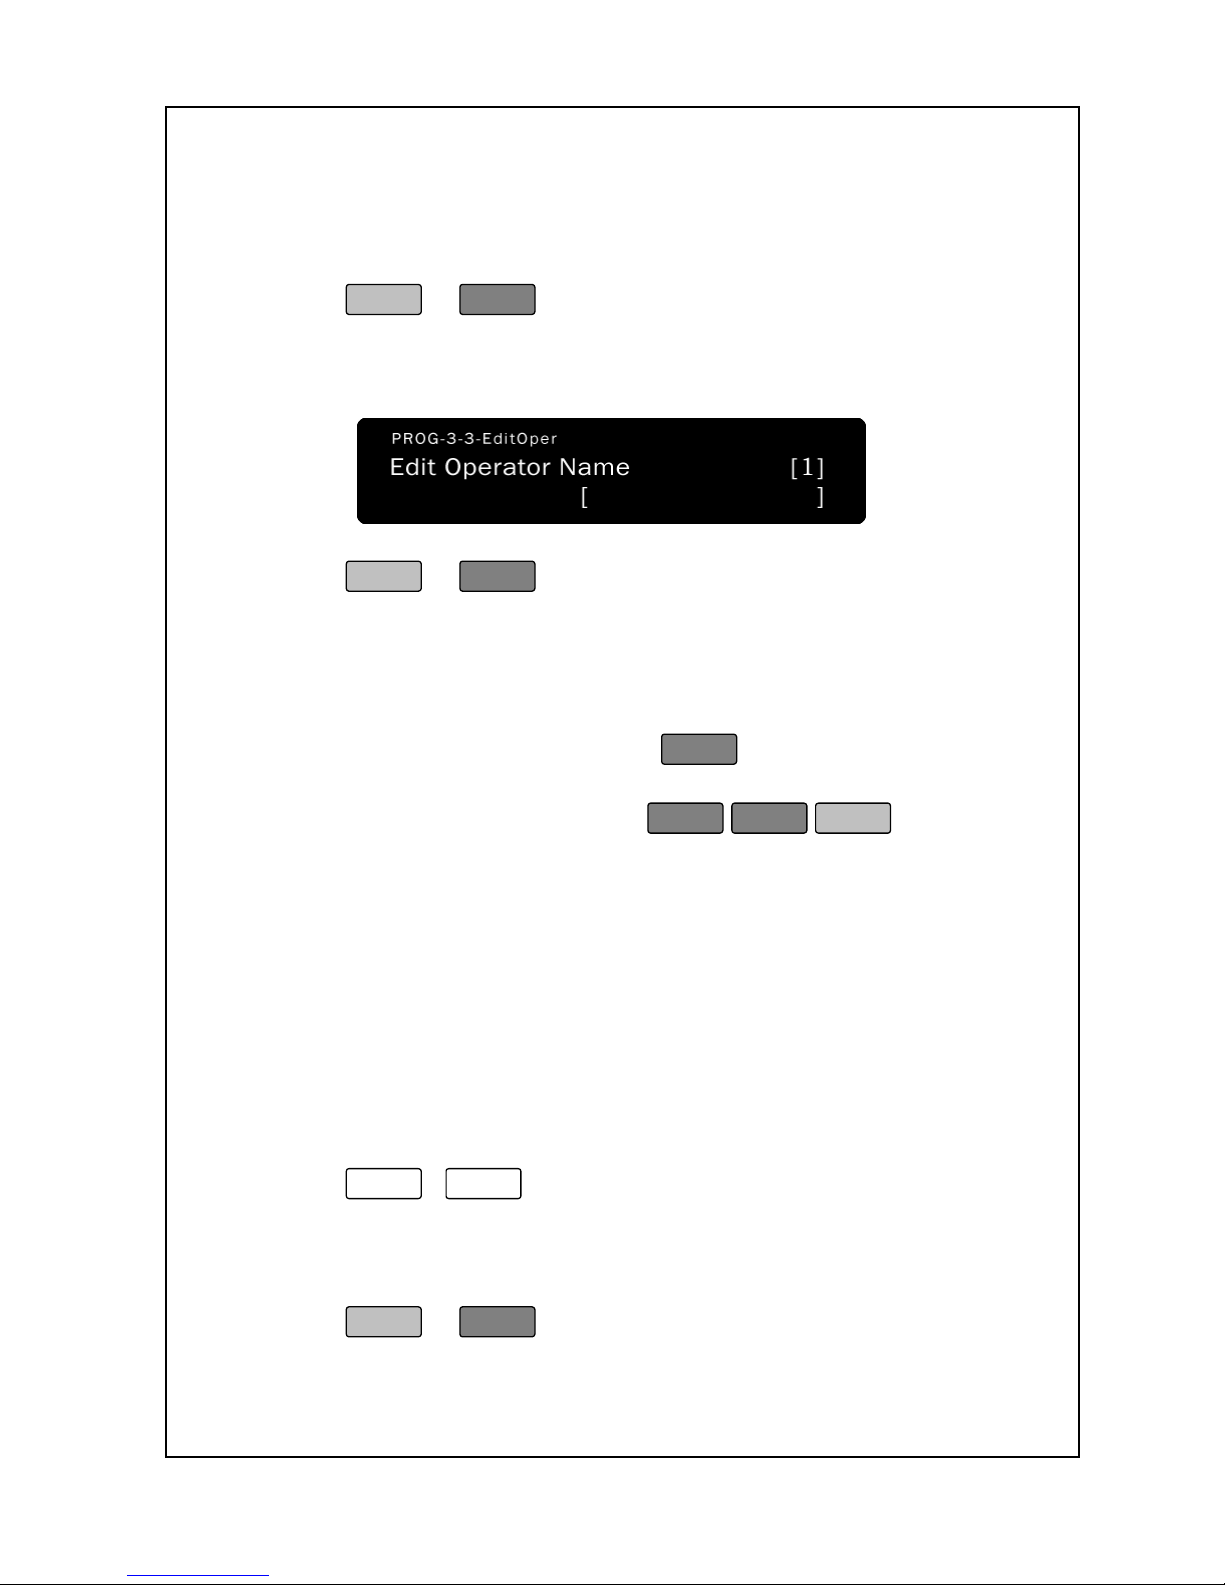
35
3. Enter the operator number you wish to edit. This number must be
from 1 to 25. You will see the operator number in the Total Price
Display.
4. Press
PRINT
or
Enter
.
5. Type a operator name that you wish to use for this operator. As
you type the name, you will see it displayed in the Alpha Display.
6. Press
PRINT
or
Enter
.
7. The operator name was stored and the scale automatically
moves on to the next operator number which is displayed in the
Total Price display.
8. If you wish to program the next operator name, then you can
go back to step 5; otherwise, press
ESC
.
9. You can go back to step 3 to specify another operator number you
may wish to edit or you can press
ESC
ESC
SET
to finish.
10. You are back in the Initial State.
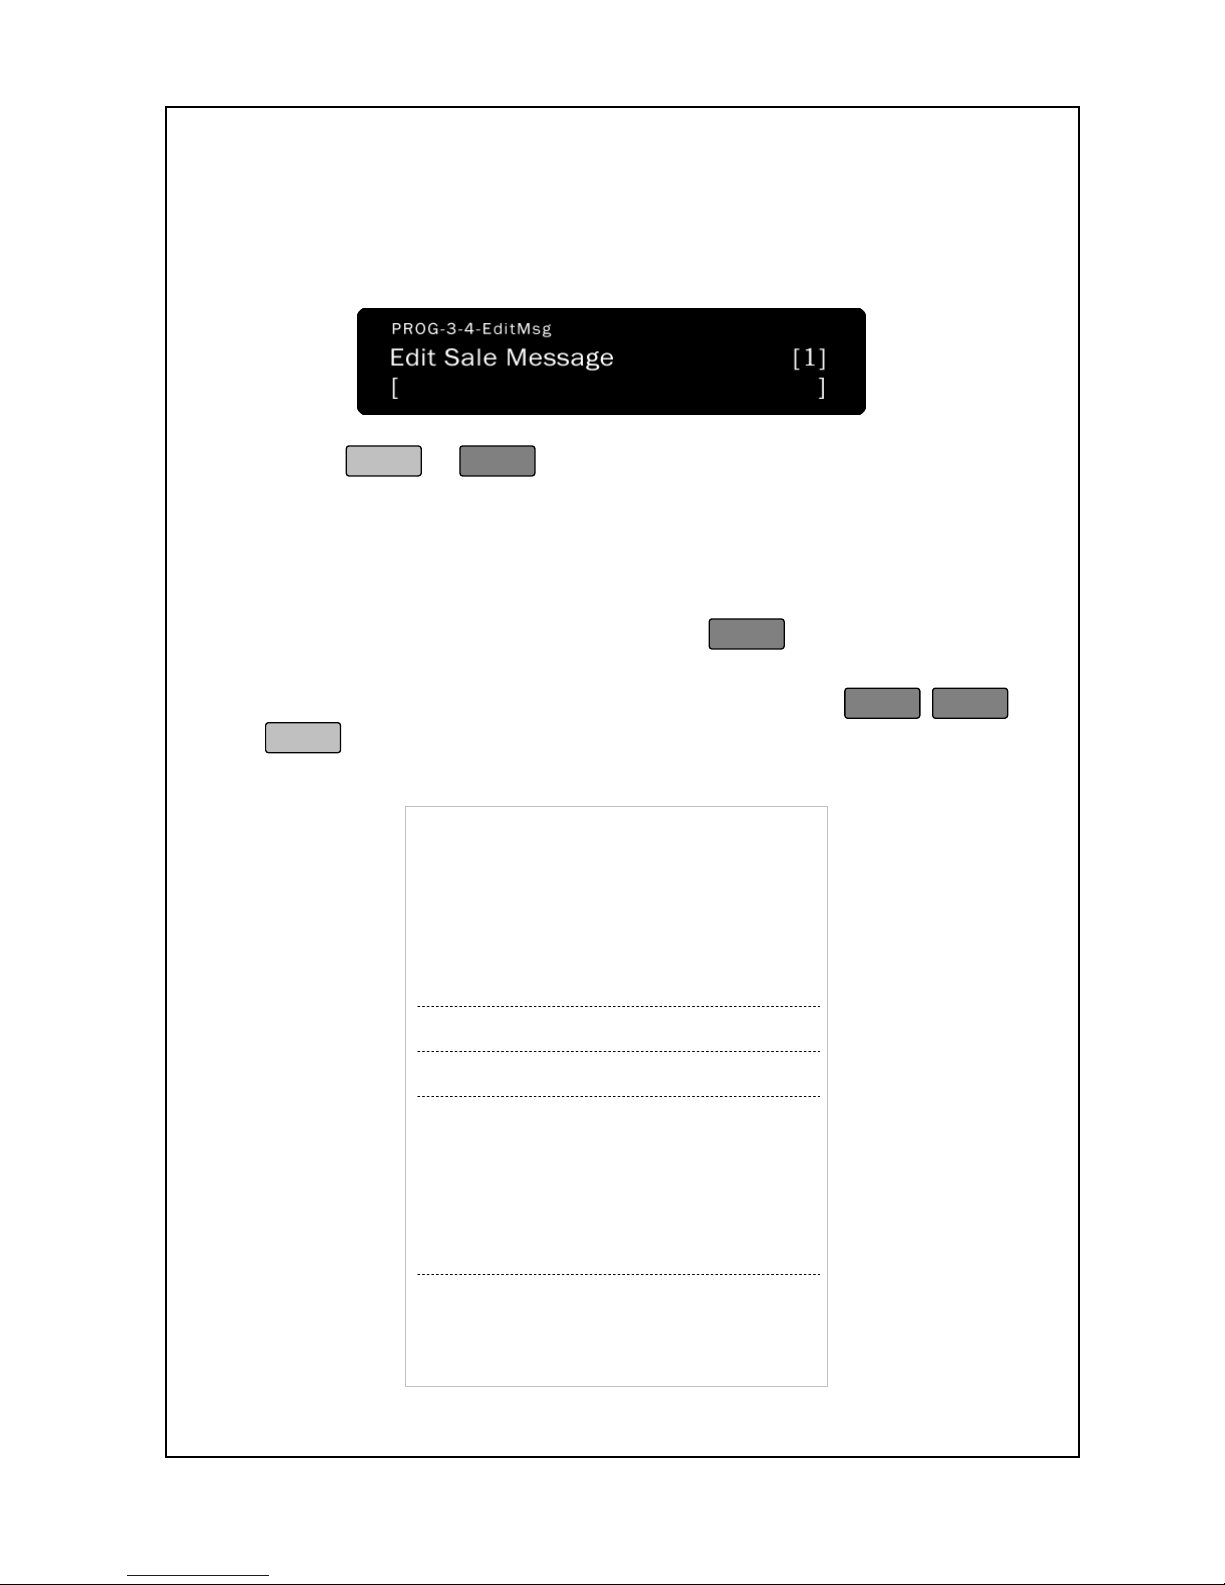
3-4. Sale Message
You can print the sale message and address or any other pertinent
information in receipt mode at the bottom of each receipt; You can type
the message. Additionally, if you wish to print the Sale message at the
bottom of receipt, you should set P7-5-13 Sales Message [1].
To program the Sale Message:
1. Enter ‘Main menu’, and follow 2 steps below.
2. Press
3
-
4
.
3. Enter the sale message number you wish to edit. This number
must be from 1 to 15. You will see the sale Message number in
the Total Price Display.
4. Press
PRINT
or
Enter
.
Page 41
36
5. Type a sale message name that you wish to use for this sale
message. As you type the name, you will see it displayed in the
Alpha Display.
6. Press
PRINT
or
Enter
7. The sale message name was stored and the scale automatically
moves on to the next sale message number which is displayed
in the Total Price display.
8. If you wish to program the next sale message name, then you
can go back to step 5; otherwise, press
ESC
.
9. You can go back to step 3 to specify another sale message
number you may wish to edit or you can press
ESC
ESC
SET
to finish.
10. You are back in the Initial State.
DD.MM.YYYY
Weight/PCS
Unit Price($) Price($)
# Item
SUB TOTAL($)
#.#
TOTAL PRICE($) #.#
TOTAL GST($) #.#
Sale Message
No. ###### SCALE ## OPR
Store Name
– 1
Store Name – 2
Store Name -- 3
Page 42
37
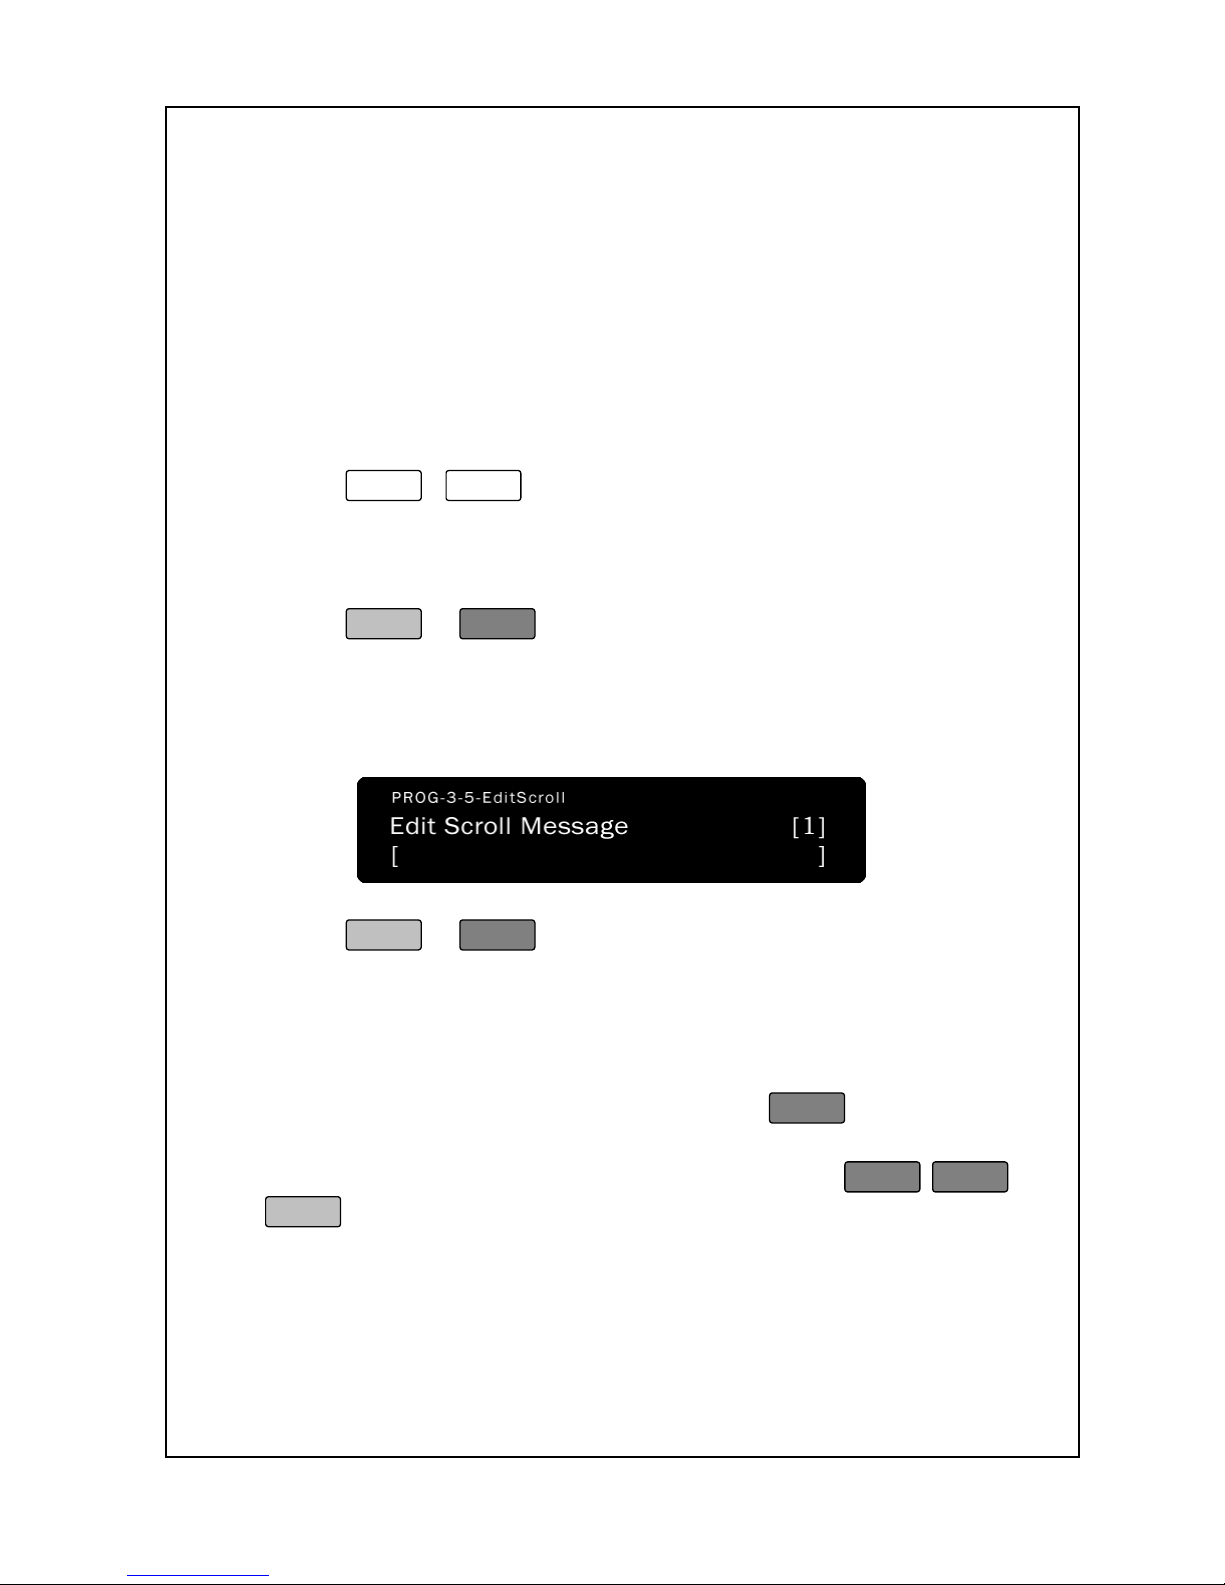
3-5. Scroll Message
You can print the scroll message and address or any other pertinent
information in receipt mode at the bottom of each receipt; You can type
the message.
To program the Sale Message:
1. Enter ‘Main menu’, and follow 2 steps below.
2. Press
3
-
5
.
3. Enter the scroll message number you wish to edit. This number
must be from 1 to 15. You will see the scroll Message number in
the Total Price Display.
4. Press
PRINT
or
Enter
.
5. Type a scroll message name that you wish to use for this scroll
message. As you type the name, you will see it displayed in the
Alpha Display.
6. Press
PRINT
or
Enter
.
7. The scroll message name was stored and the scale automatically
moves on to the next scroll message number which is displayed
in the Total Price display.
8. If you wish to program the next scroll message name, then
you can go back to step 5; otherwise, press
ESC
.
9. You can go back to step 3 to specify another scroll message
number you may wish to edit or you can press
ESC
ESC
SET
to finish.
10. You are back in the Initial State.
Page 43
38
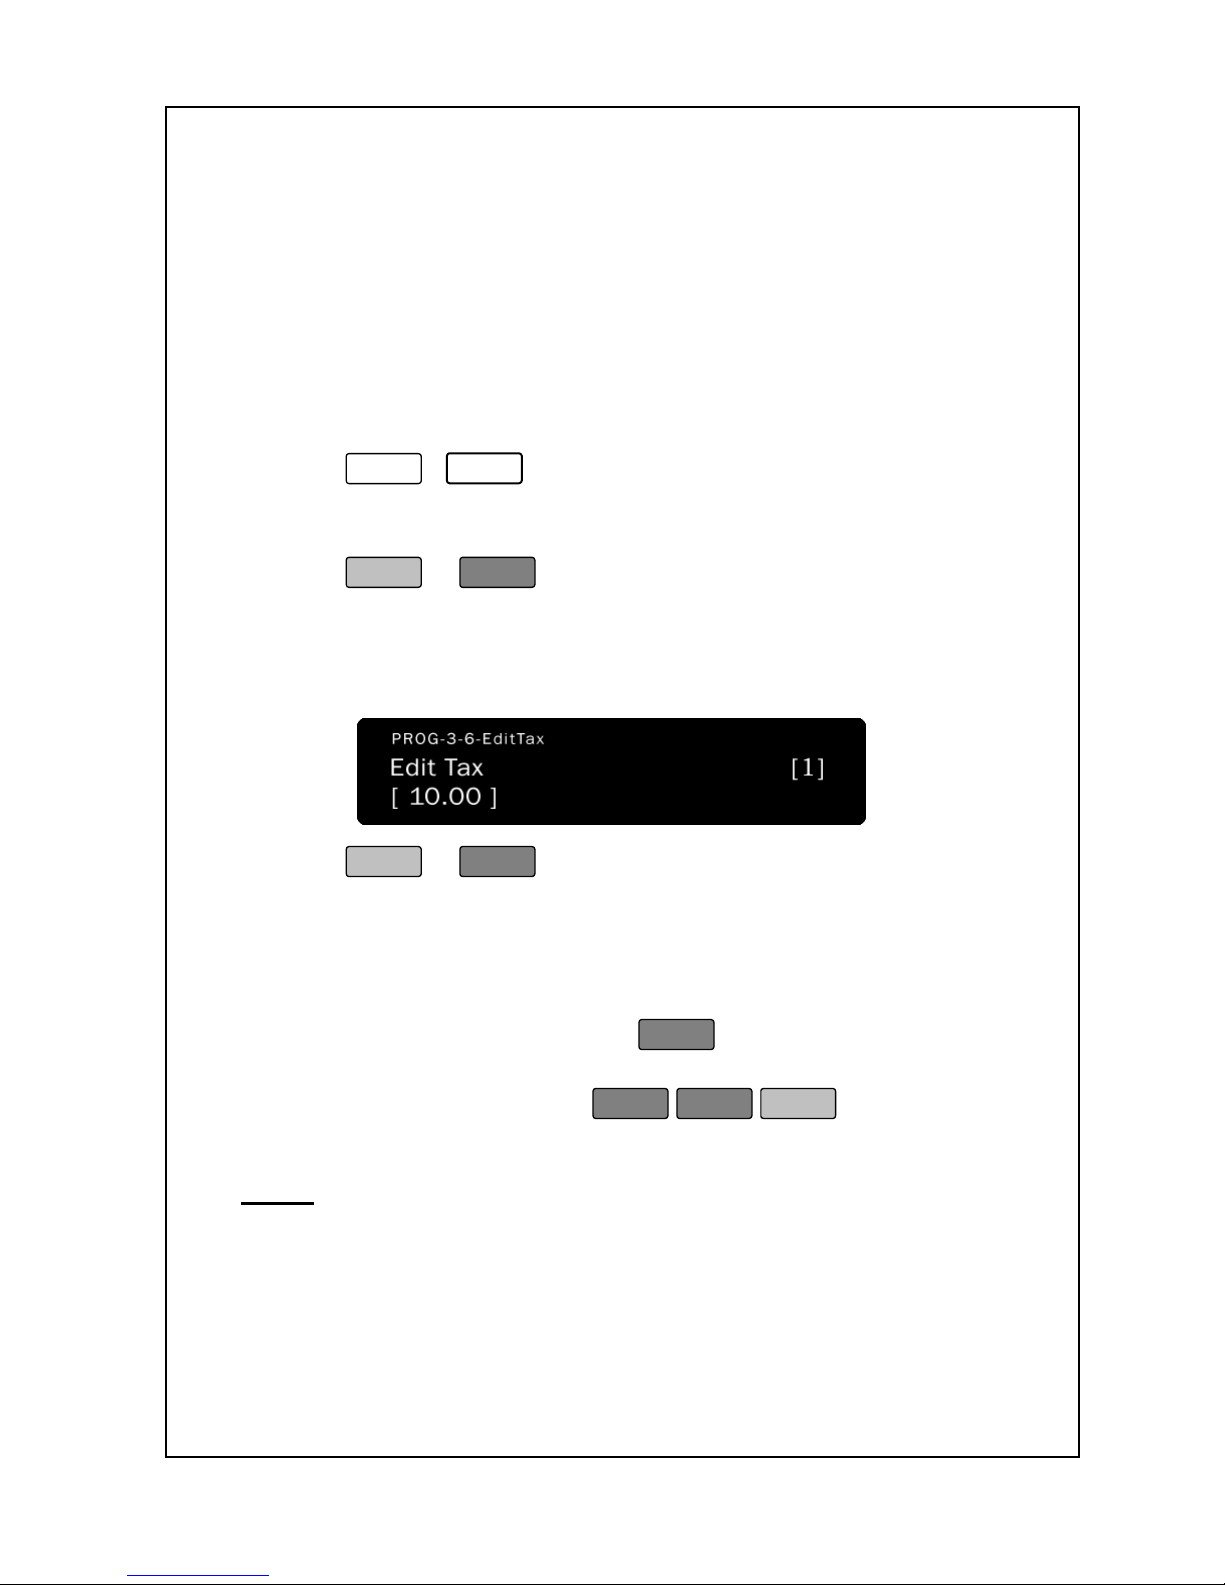
3-6. Tax
You can print the Tax in receipt mode at the bottom of each receipt;
You should enter the percentage of tax. Additionally, If you wish to print
the Tax at the bottom of receipt, you should set P1-11 PLU Tax.
To program the Tax:
1. Enter ‘Main menu’, and follow 2 steps below.
2. Press
3
-
6
.
3. Enter the tax number you wish to edit. This number must be from
1 to 10. You will see the tax number in the Total Price Display.
4. Press
PRINT
or
Enter
.
5. Type a percentage of tax that you wish to use for this tax. The tax
percentage must be from 0 to 99.99. As you type the percentage
of tax, you will see it displayed in the Alpha Display.
6. Press
PRINT
or
Enter
.
7. The tax name was stored and the scale automatically moves on
to the next sale message number which is displayed in the Total
Price display.
8. If you wish to program the next tax name, then you can go
back to step 5; otherwise, press
ESC
.
9. You can go back to step 3 to specify another tax number you may
wish to edit or you can press
ESC
ESC
SET
to finish.
10. You are back in the Initial State.
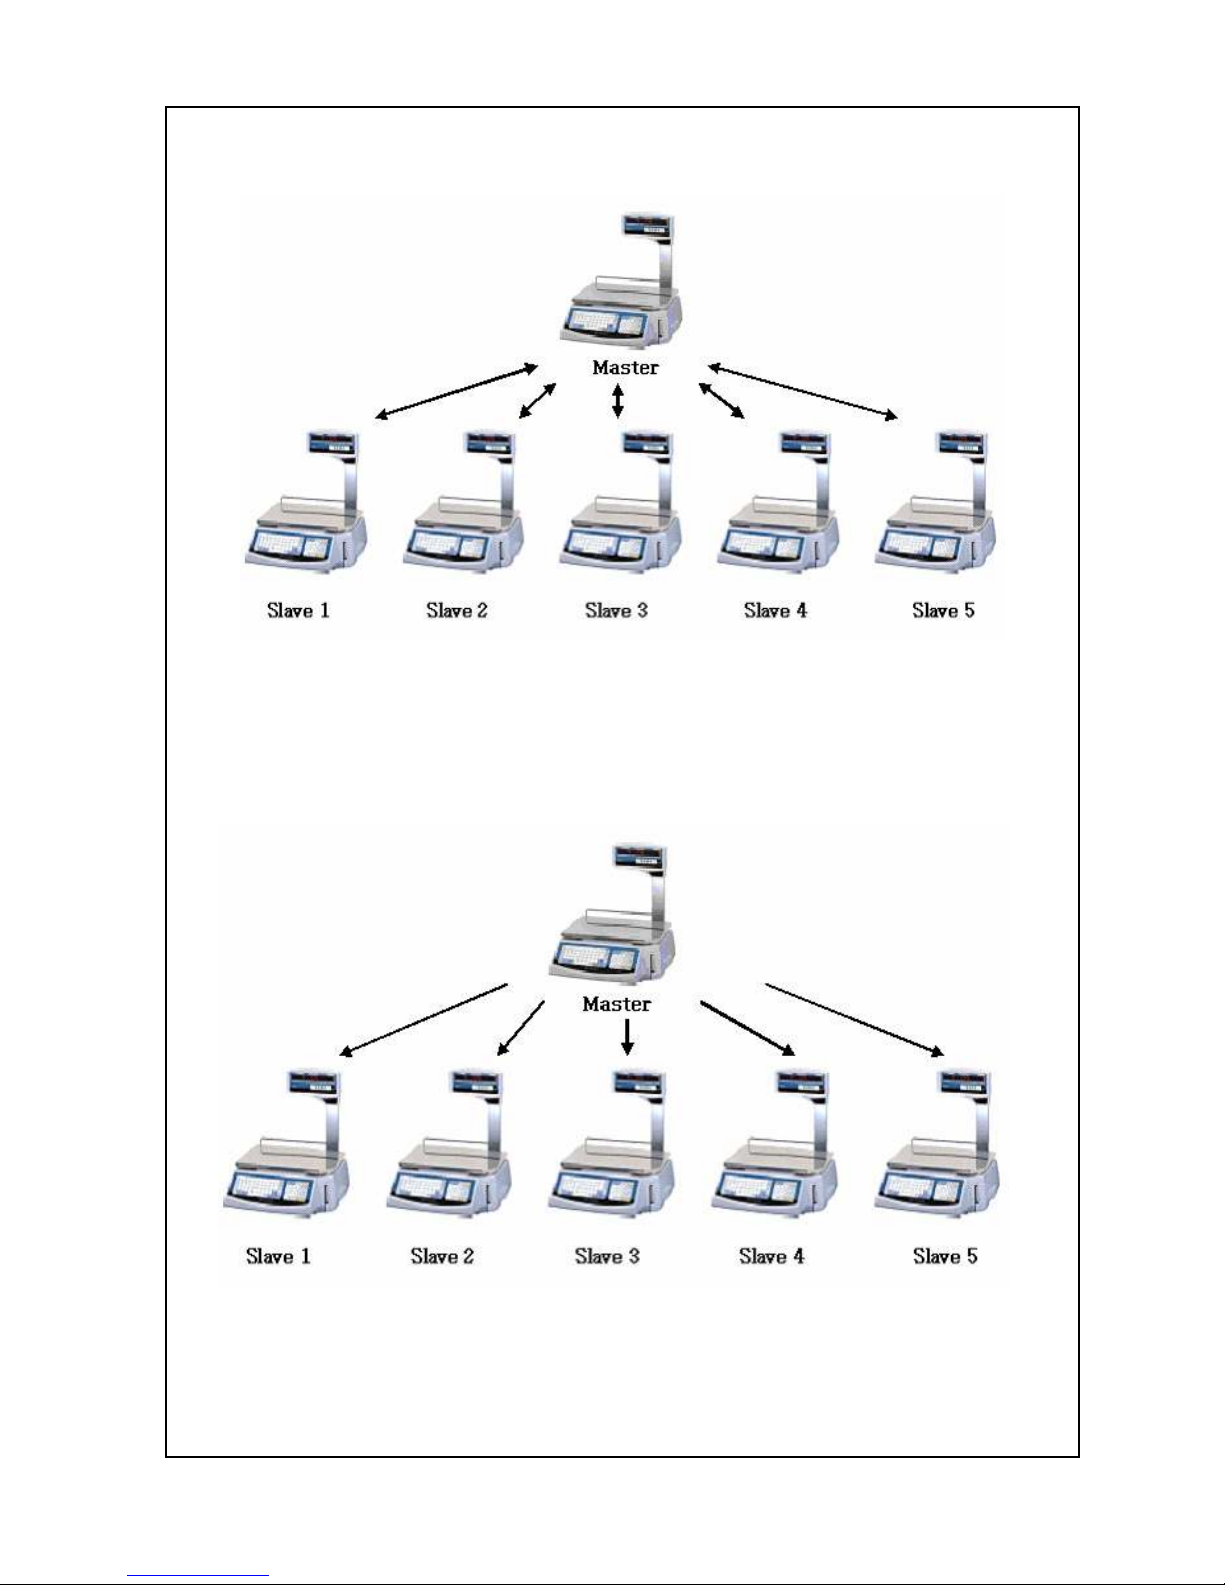
Note1:
If the PLUs data, account, Store name, Group, Operator, Sale
message, and Tax in the master scale is changed, the master scale
sends the changed data to the slave scale. If the PLUs data and
account in the slave scale is changed, the slave scale sends the
changed data to the master scale. If Store name, Group, Operator,
Sale message, and Tax in slave scale is changed, the slave scale
dose not send it to master.
Page 44
39
< PLU data, Account >
< Store name, Group, Operator, Sale MSG, Tax >
Page 45
40
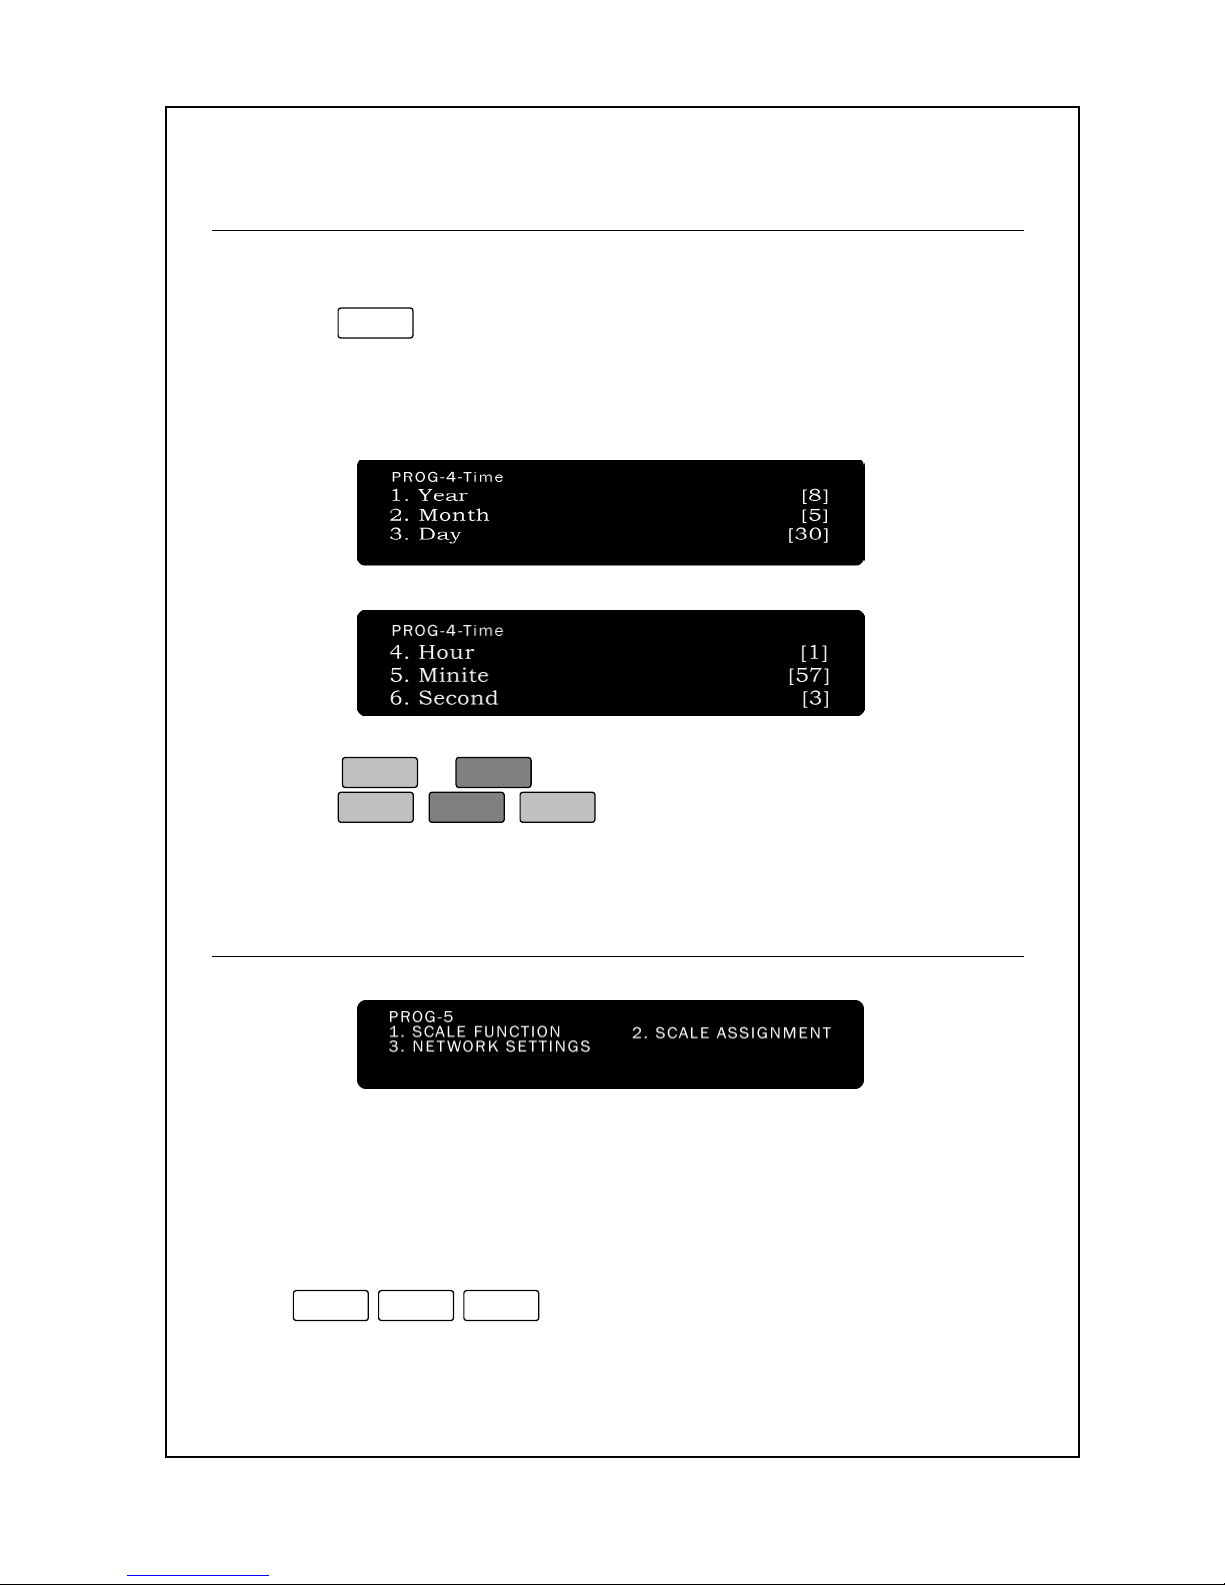
4. Time & Date
To program the scale’s time and date:
1. Enter ‘Main menu’, and follow 1 step below.
2. Press
4
.
3. Using the numeric keys, enter the date in format (1.Year 2. Month
3.Day 4.Hour 5.Minute 6.Second) You will see the date you typed
in the Total Price Display.
4. Press
PRINT
or
Enter
.
5. Press
PRINT
ESC
SET
.
6. You are back in the Initial State.
5. Scale Setting
5-1. Scale Function
Enter a minimum weight according to below and press Enter key.
Below any Weighing result than a minimum weight can not be printed,
Otherwise enter “0” to disable.
Press
5
-
1
-
1
Page 46
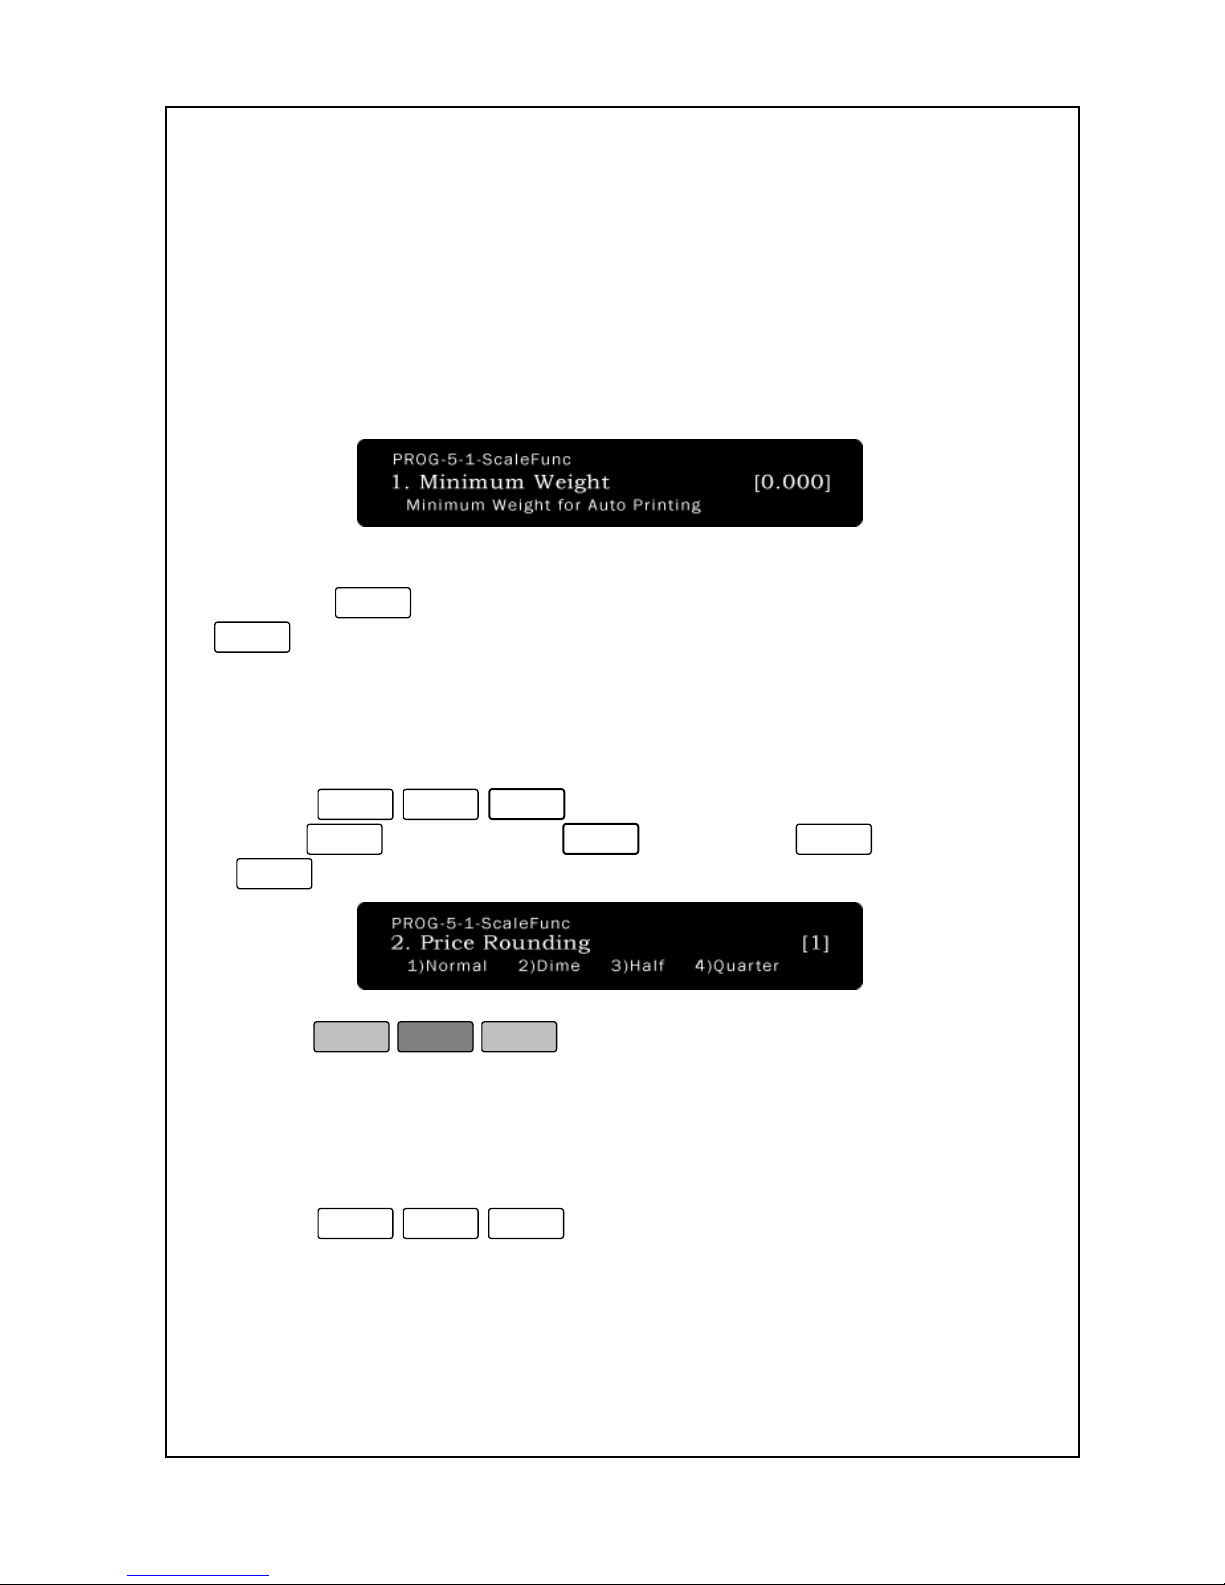
41
*) Capacities
1. 6kg -> 40
2. 6kg dual -> 20
3. 15kg -> 100
4. 15kg dual -> 80
5. 30kg -> 200
6. 30kg dual -> 100
If you set
1
normal, total price can not be rounded. If you set
3
Half, total price can be rounded in receipt mode. Dime and
Quarter reserved for future use.
To modify Price Rounding Settings:
1. Enter ‘Main menu’, and follow 3 steps below.
2. Press
5
-
1
-
2
3.Press
1
for “Normal” or
2
for “Dime” or
3
for “Half” or
4
for “Quarter”. The default setting is 1.
4. Press
PRINT
ESC
SET
to save the setting and return to the
Initial State.
To modify Price Change:
1. Enter ‘Main menu’, and follow 3 steps below.
2. Press
5
-
1
-
3
3. Press 0)No, total price can not be changed. If you press 1)Yes, total
price can be changed in receipt mode.
Page 47
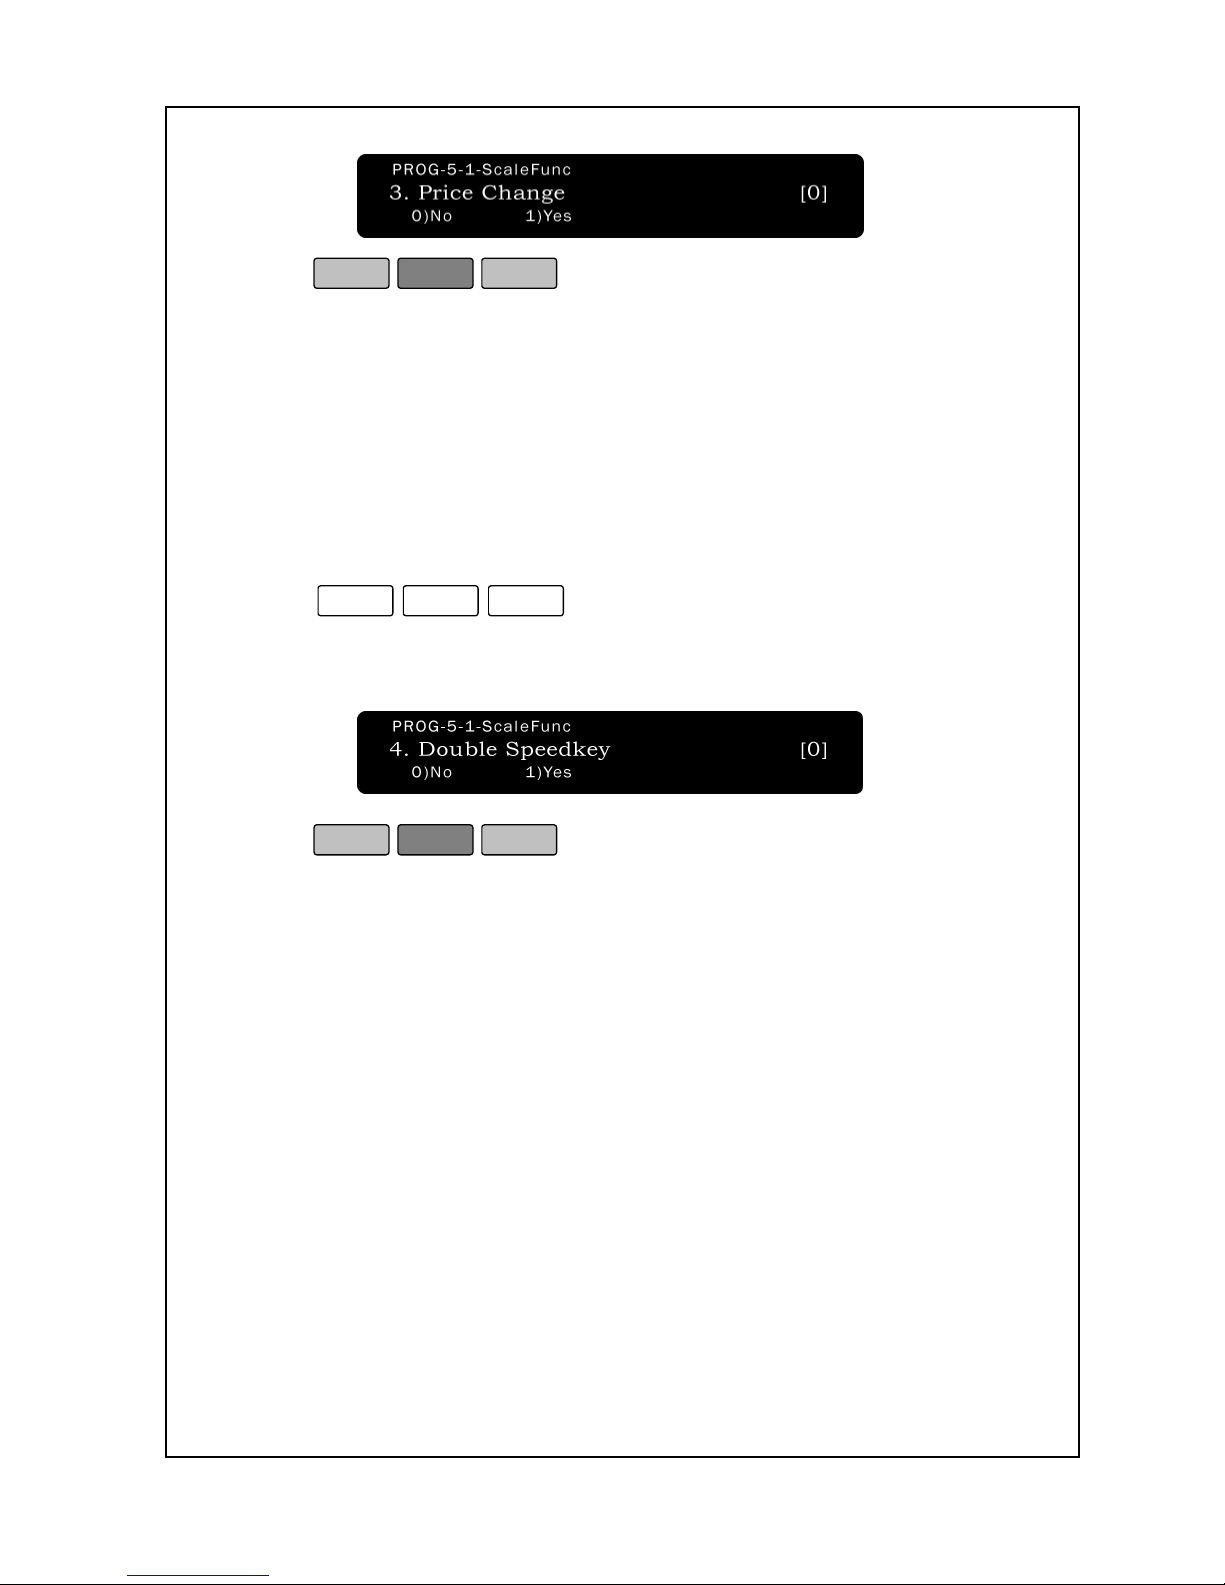
42
4. Press
PRINT
ESC
SET
to save the setting and return to the
Initial State.
Default speedkey is 60. If you want to use 120 speedkey, you can
Use this function. When you press preset key once again, you can
Use new 60 speedkey at keypad.
To select Double Speedkey:
1. Enter ‘Main menu’, and follow 3 steps below.
2. Press
5
-
1
-
4
3. *If you do not want to use this function press 0) No.
*If you want to use this function, press 1) Yes.
4. Press
PRINT
ESC
SET
to save the setting and return to the
Initial State.
5-2. Scale Assignment
You can have multiple operators in a store. You can set "single user"
when using one scale per operator, or "multi user" when using one
scale per several operators. By setting this option, the key pressed will
be changed.
To Select User:
1. Enter ‘Main menu’, and follow 3 steps below.
Page 48
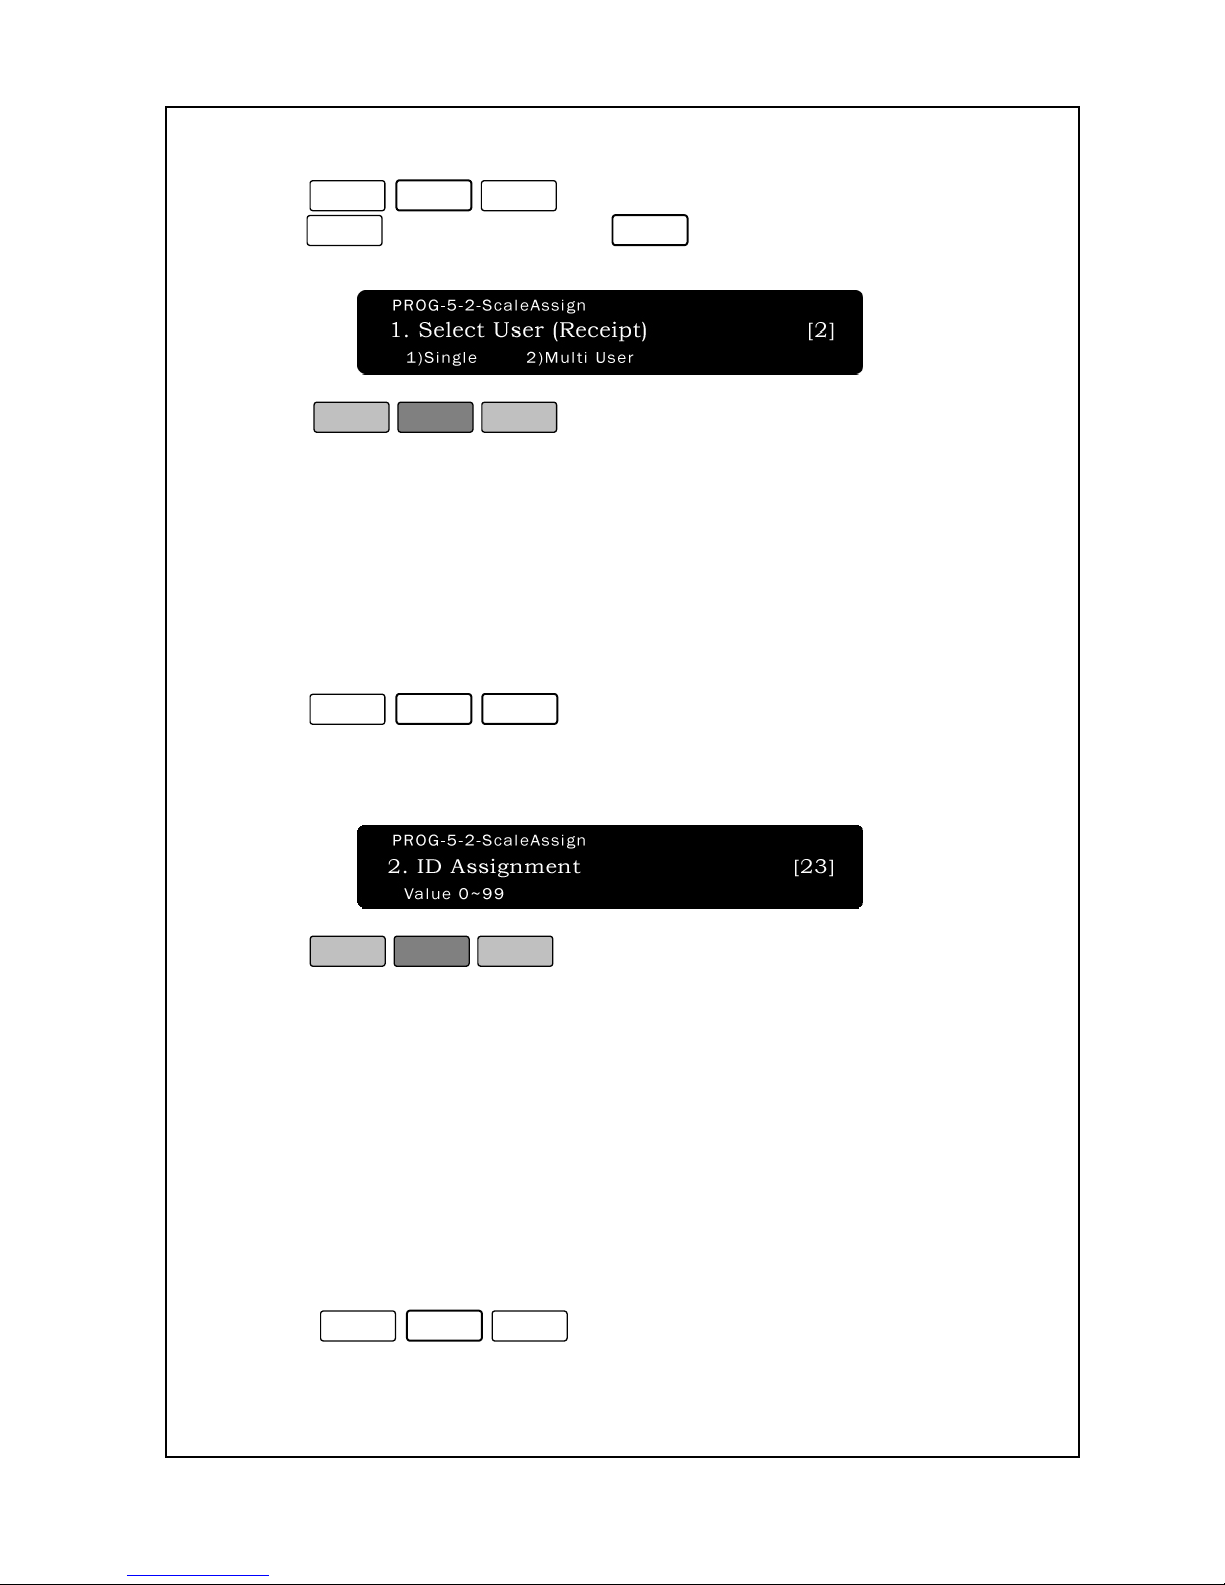
43
2. Press
5
-
2
-
1
3.Press
1
for “Single User” or
2
for “Multi User”. The default
setting is 1.
4. Press
PRINT
ESC
SET
to save the setting and return to the
Initial State.
When 4.EAN-13[DDIIIIPPPPPP] is set in the P7-4-1 barcode type menu,
the 2-digit barcode that created in ID Assignment is printed at the position
of DD. If you want group printing, DD should be GG in the P7-4-1 Barcode.
To set the group assignment for the scale:
1. Enter ‘Main menu’, and follow 3 steps below.
2. Press
5
-
2
-
2
3. Enter the ID number you wish to assign the scale to. This number
must be from 0 to 99.
4. Press
PRINT
ESC
SET
.
5. You are back in the Initial State.
You can print the operator name that typed in P3-3 Operator on label
And the operator number at bottom of each receipt in Single User
Mode. You can enter the number assigned operator number in P3-3
operator. However, not all labels or label formats have a space for the
operator name. And you set operator print [1] in P7-5-16 Print fields.
To set Operator Assignment:
1. Enter ‘Main menu’, and follow 3 steps below.
2. Press
5
-
2
-
3
Page 49
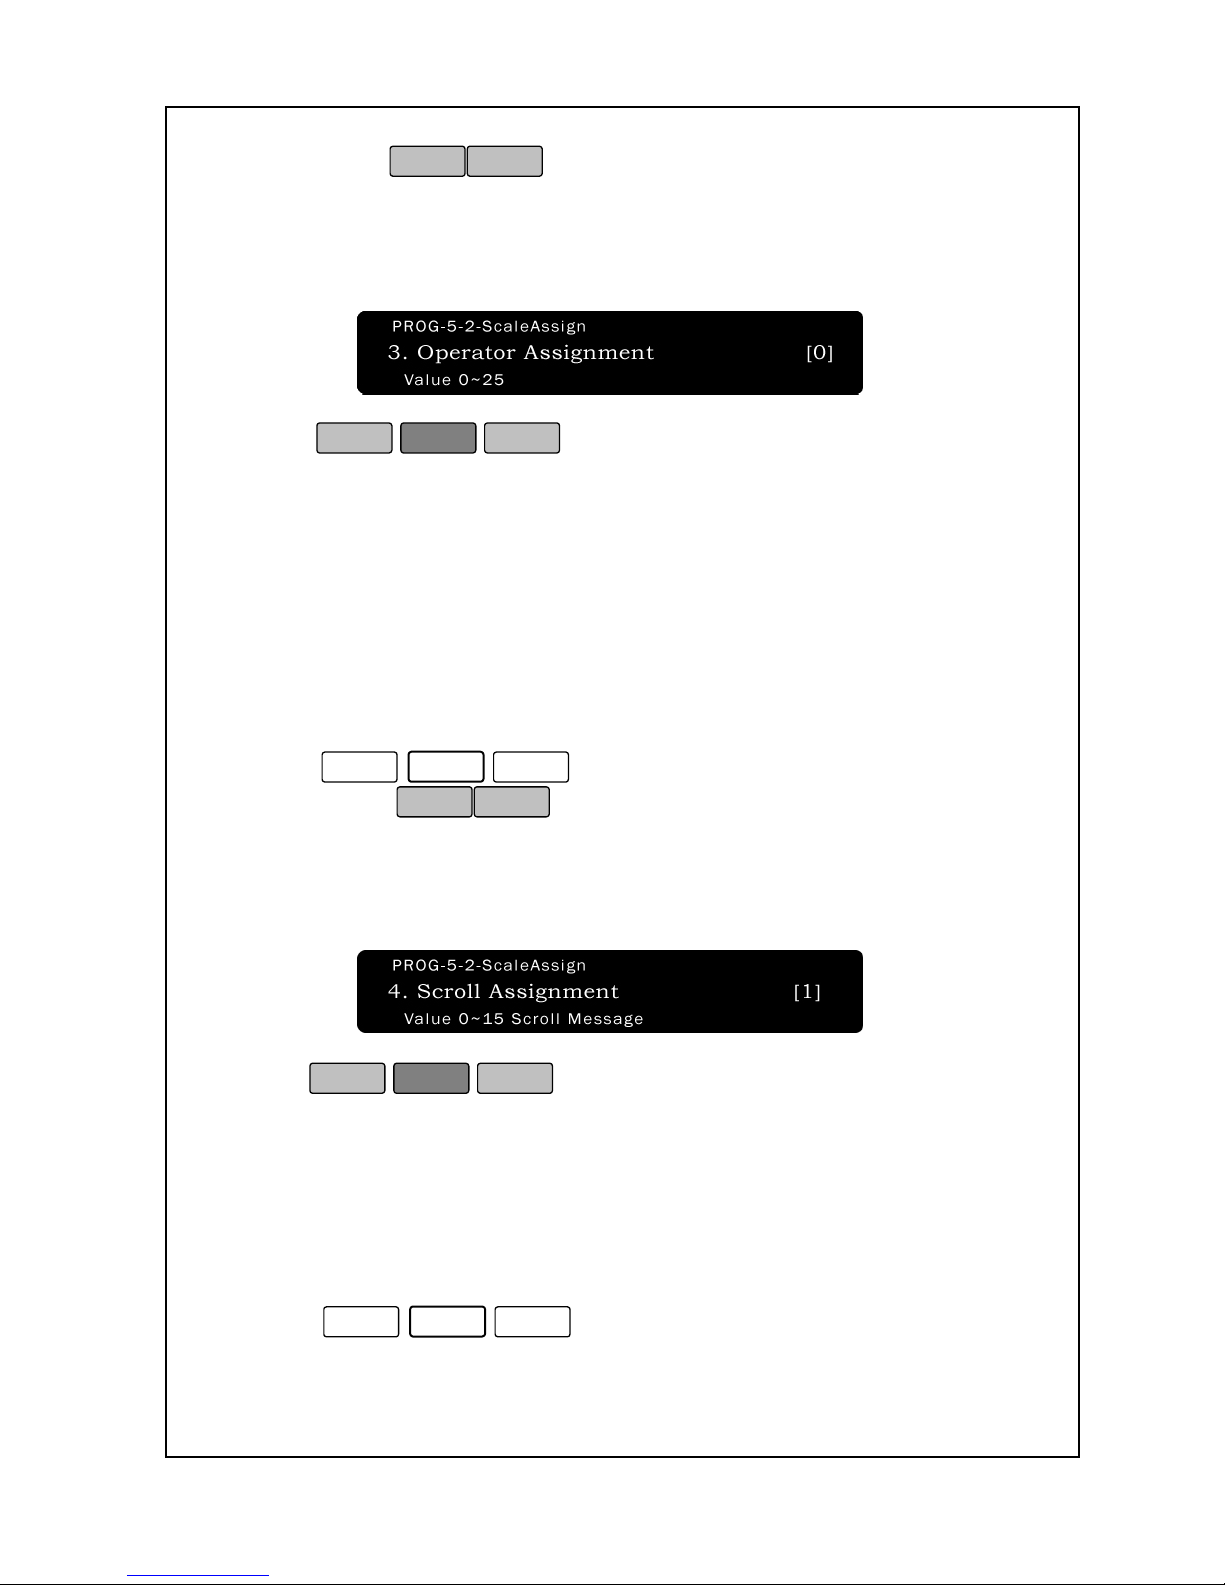
44
3. You can use
to move.
4. Enter the Operator number you wish to assign the scale to. This
number must be from 0 to 25. As you type the number, you will see
it in the Total Price Display.
5. Press
PRINT
ESC
SET
.
6. You are back in the Initial State.
You can print the Sales MSG that recorded in P3-4 Sale Message at
bottom of each receipt. You should enter the number assigned sale
message number in “P3-4 Edit Sale Message”. 0 is default “Thank you
very much”.
To Scroll Assignment:
1. Enter ‘Main menu’, and follow 3 steps below.
2. Press
5
-
2
-
4
3. You can use
to move.
4. Enter the Sales Massage number you wish to assign the scale to.
This number must be from 0 to 15. As you type the number, you
will see it in the Total Price Display.
5.Press
PRINT
ESC
SET
.
6.You are back in the Initial State.
If you do not call any PLU within specified period, appointed message
will be flowed on the display.
To Scroll Start Time :
1. Enter ‘Main menu’, and follow 3 steps below.
2. Press
5
-
2
-
5
Page 50
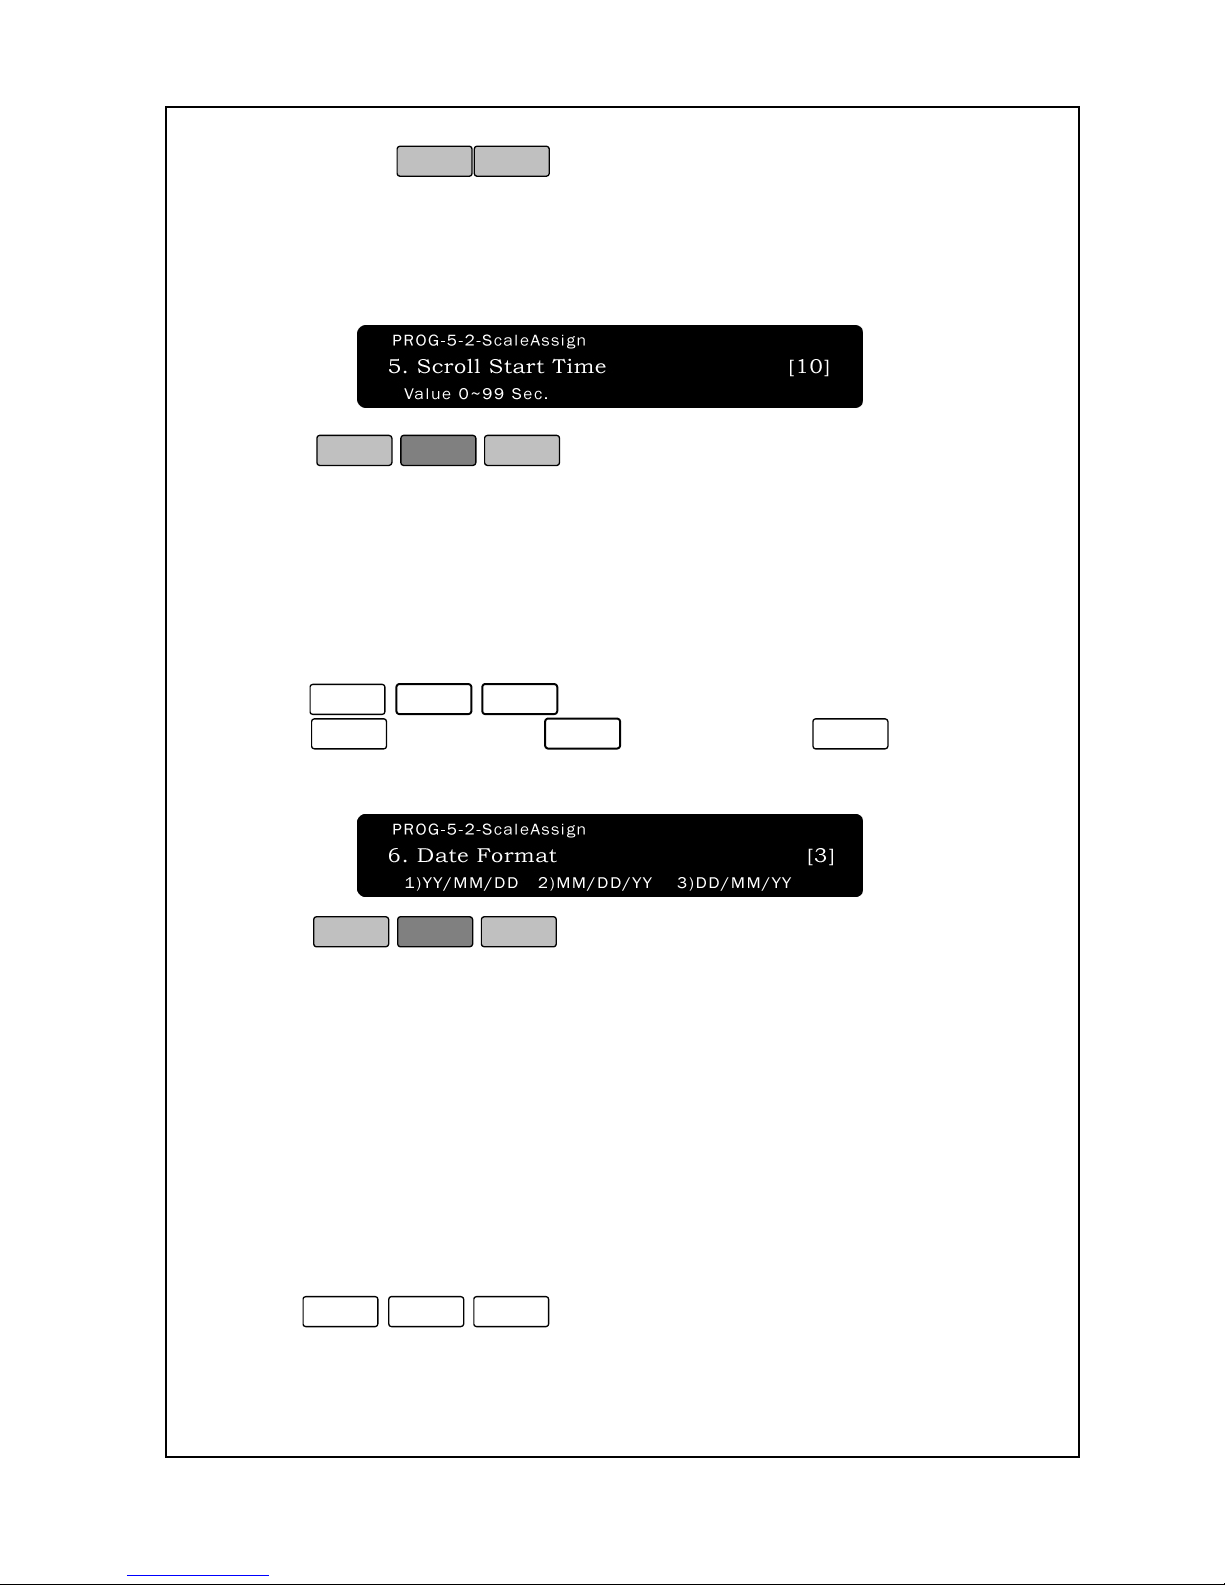
45
3. You can use
to move.
ig) If you select 10 seconds, and you do not call PLU for
10 seconds, the message will be displayed.
* You can appoint this message at P3-5.
4. Press
PRINT
ESC
SET
.
5. You are back in the Initial State.
The NETS can support the printing of various date formats:
Year-Month-Day, Month-Day-Year and Day-Month-Year
To modify the Date Format:
1. Enter ‘Main menu’, and follow 3 steps below.
2. Press
5
-
2
-
6
.
3. Press
1
for “Y-M-D”,
2
for “M-D-Y”, or
3
for “D-M-
Y.” The default setting is 2.
4. Press
PRINT
ESC
SET
to save the setting and return to the
Initial State.
5-3. Network
If you have multiple scales in a store, you can assign a scale number
to each of your scales so that you can discern the origin of generated
labels. Additionally, sales reporting can also be made easy using
scale numbers.
To set the scale number:
1. Enter ‘Main menu’, and follow 3 steps below.
2. Press
5
-
3
-
1
.
Page 51
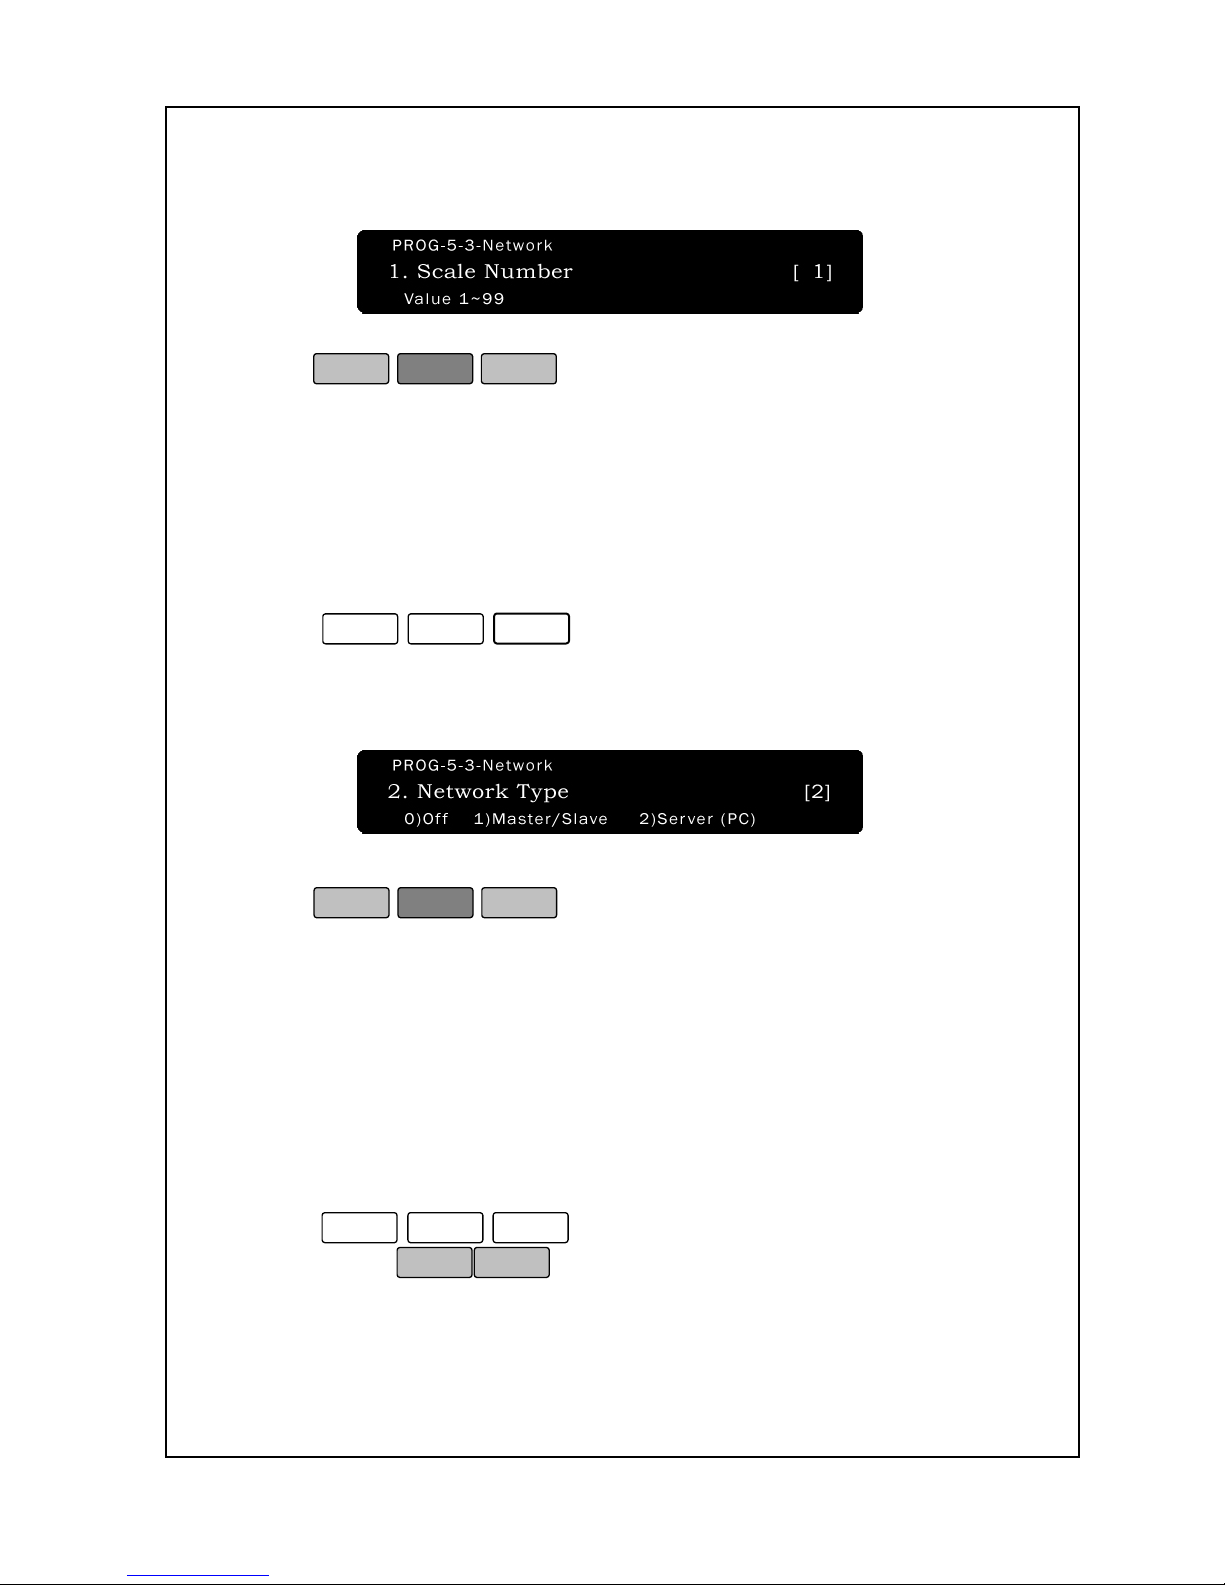
46
3. Enter a scale number. This number must be from 1 to 99. As you
type the number, it will appear in the Total Price Display.
4. Press
PRINT
ESC
SET
.
5. You are back in the Initial State.
If you set “0”, Network will be a “Off”. If you set “1”, Network will be a
“M/S: Master/Slave” If you set “2”, Network will be a “Server (PC)”.
To set network type:
1. Enter ‘Main menu’, and follow 3 steps below.
2. Press
5
-
3
-
2
3. Press “0” for off” or “1” for “M/S: Master/Slave” or “2” for “Server
(PC)”. The default setting is 2.
4. Press
PRINT
ESC
SET
to save the setting and return to the
Initial State.
If you have multiple NETS scale, you can transfer the data between
master scale and slave scale. If you are programming in the Master
scale, Input scale counter is inputted the number of scale you have. Its’
value is “1”. Master value is “1~99”.
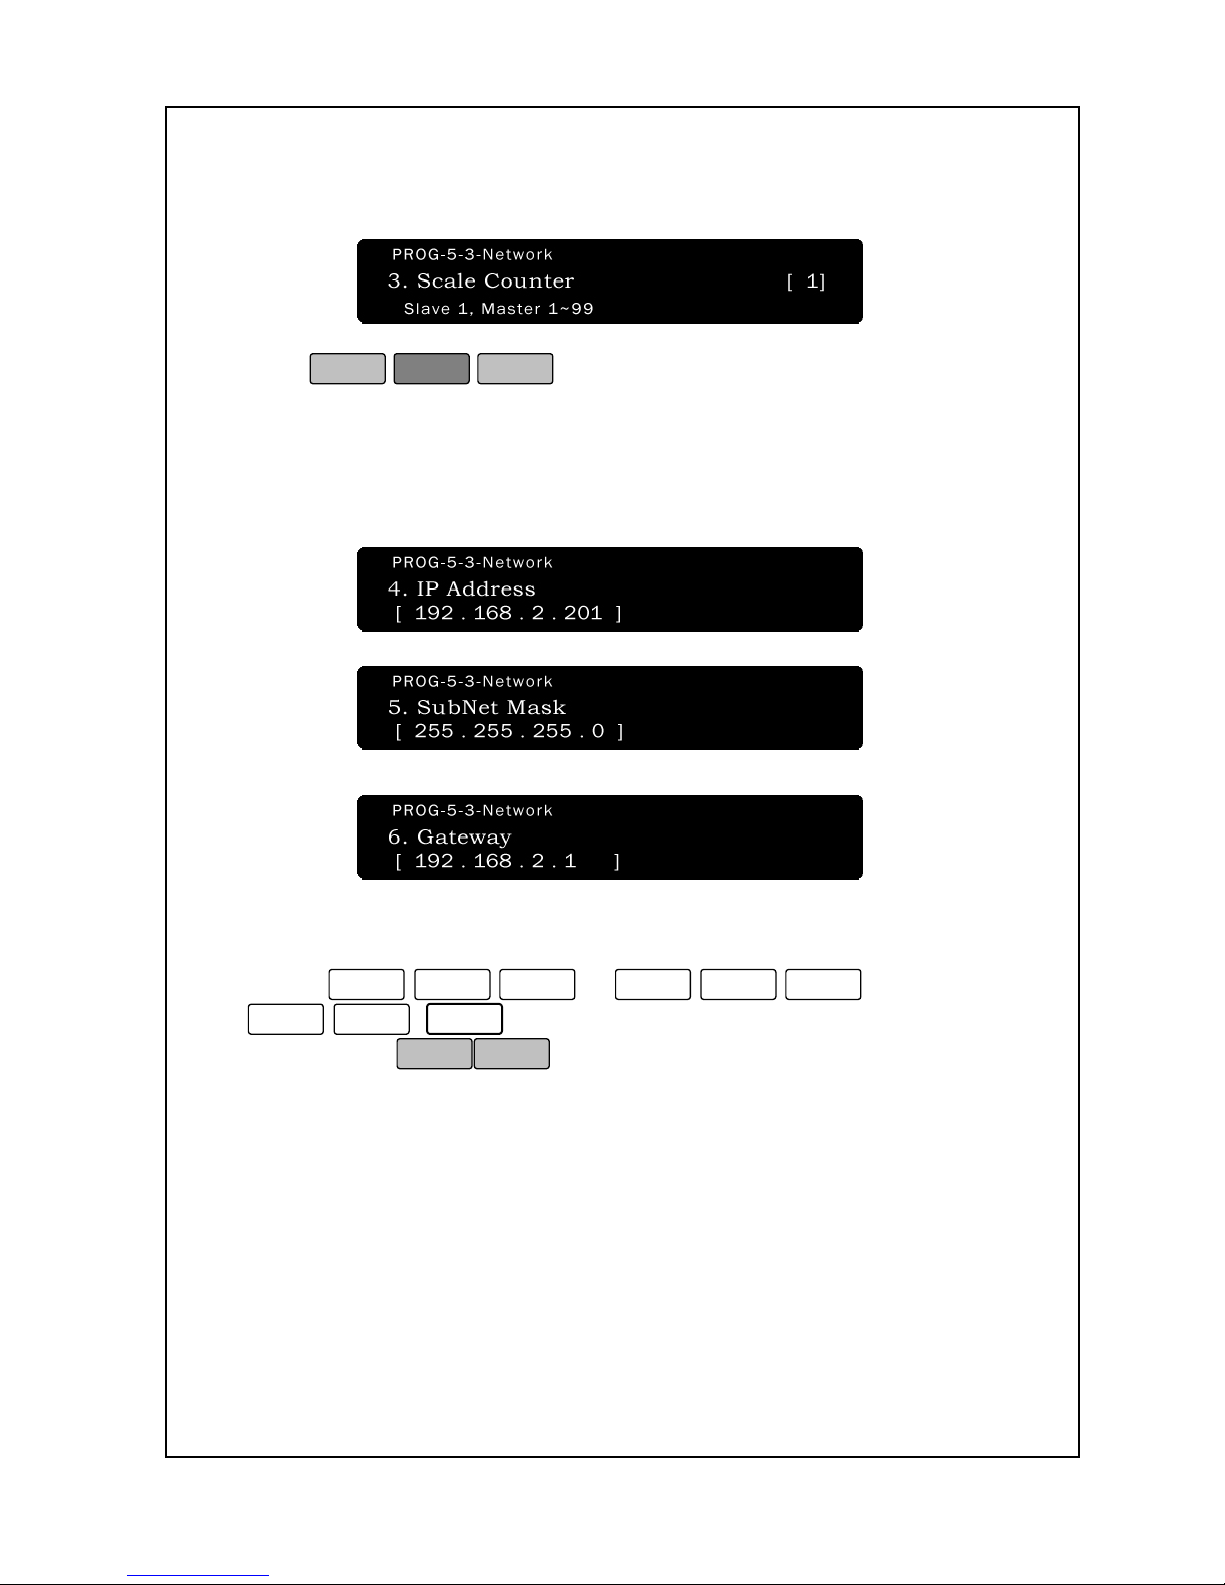
To set Scale Counter:
1. Enter ‘Main menu’, and follow 3 steps below.
2. Press
5
-
3
-
3
3. You can use
to move.
4. Enter the Input scale counter number you wish to assign the scale
to.
Page 52
47
Slave value must be “1”. Master value is “1~99”. As you type the
number, you will see it in the Total Price Display.
5. Press
PRINT
ESC
SET
.
6. You are back in the Initial State.
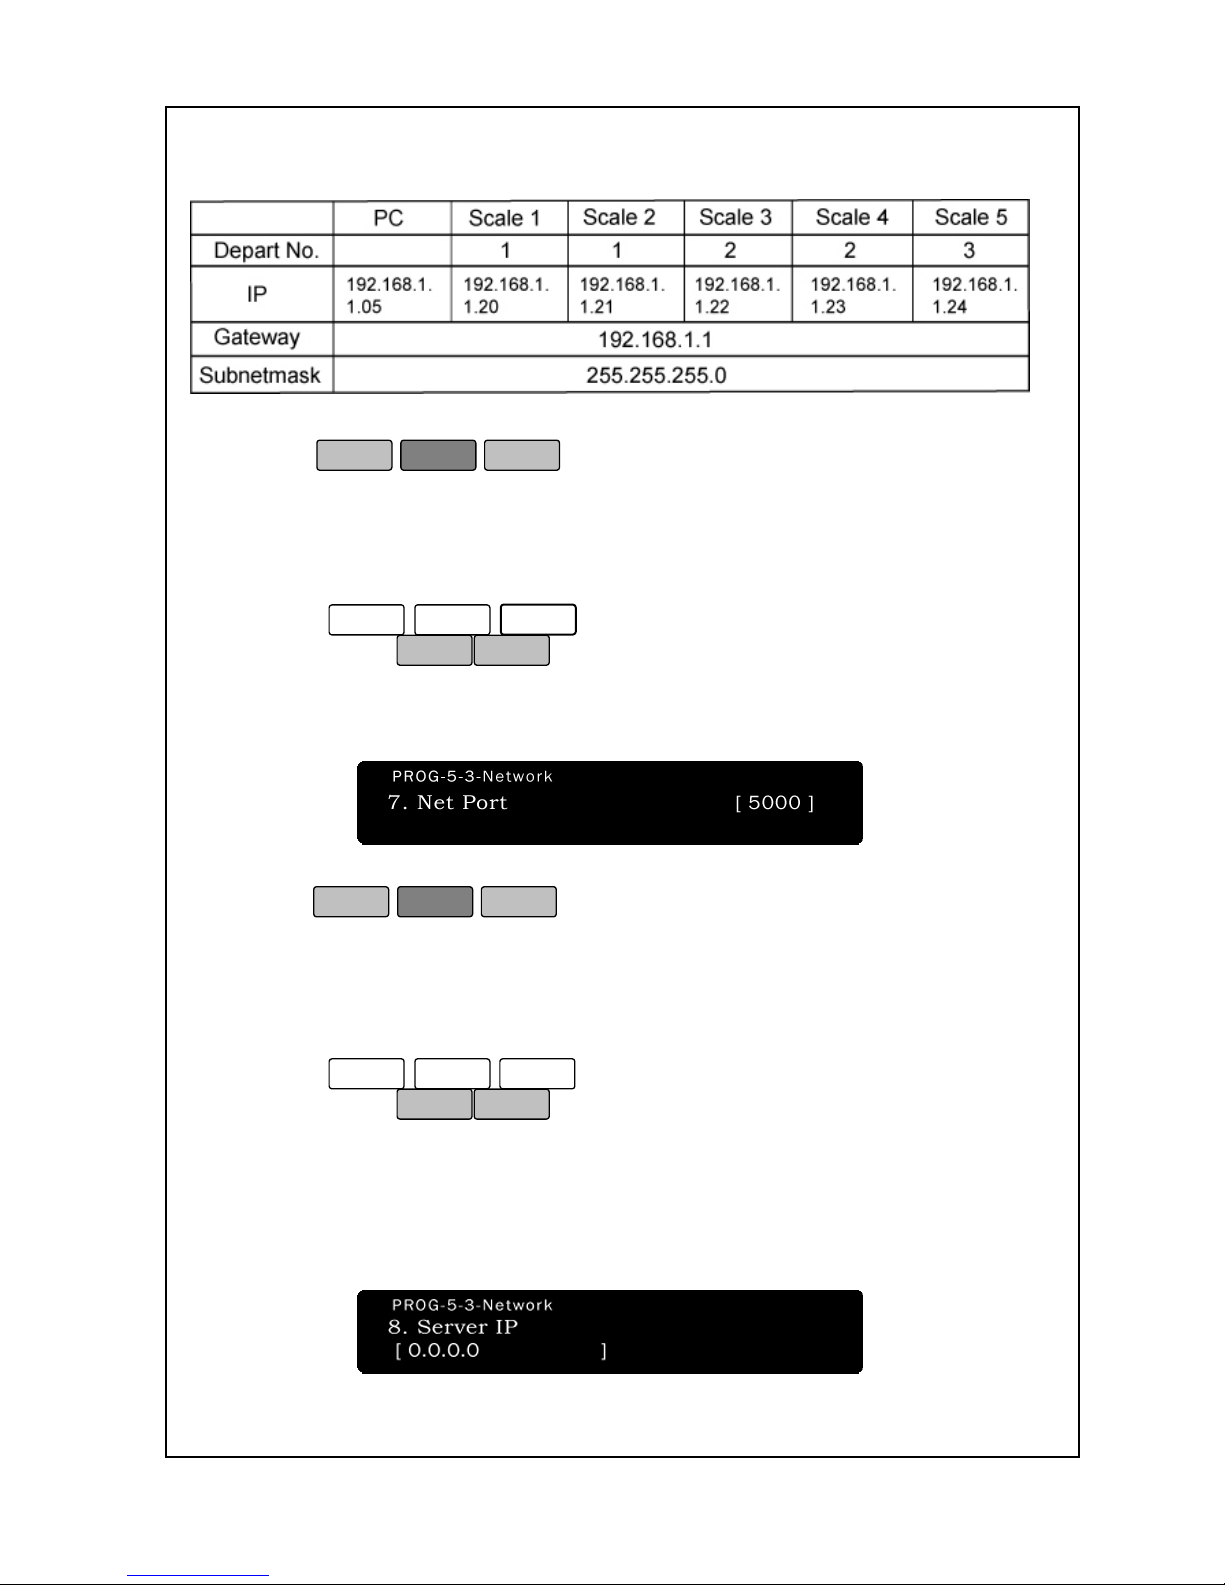
You should input IP, Gateway, Subnet mask in PC & Scale.
If you are using Hub, You must use direct cable. If not, you must use
the cross cable.
To set Scale Network (IP Address, SubNet Mask, and Gateway):
1. Enter ‘Main menu’, and follow 3 steps below.
2. Press
5
-
3
-
4
or
5
-
3
-
5
or
5
-
3
-
6
.
3. You can use
to move.
4. Enter the Input scale counter number you wish to assign the scale to.
For example, you have 5 scales. If the IP of PC is 192.168.1.105,
Gateway is 192.168.1.1, subnet mask is 255.255.255.0, PC and
Scales are same Gateway & subnet mask. And you can input scale
IP you want to do. Please last 3 digits of scales IP address must be
above 100.
In the master slave, IP assignment is set [ IP address + Scale
number ] automatically, so enter same IP address with the
master scale (scale#1).
Page 53
48
5. Press
PRINT
ESC
SET
.
6. You are back in the Initial State.
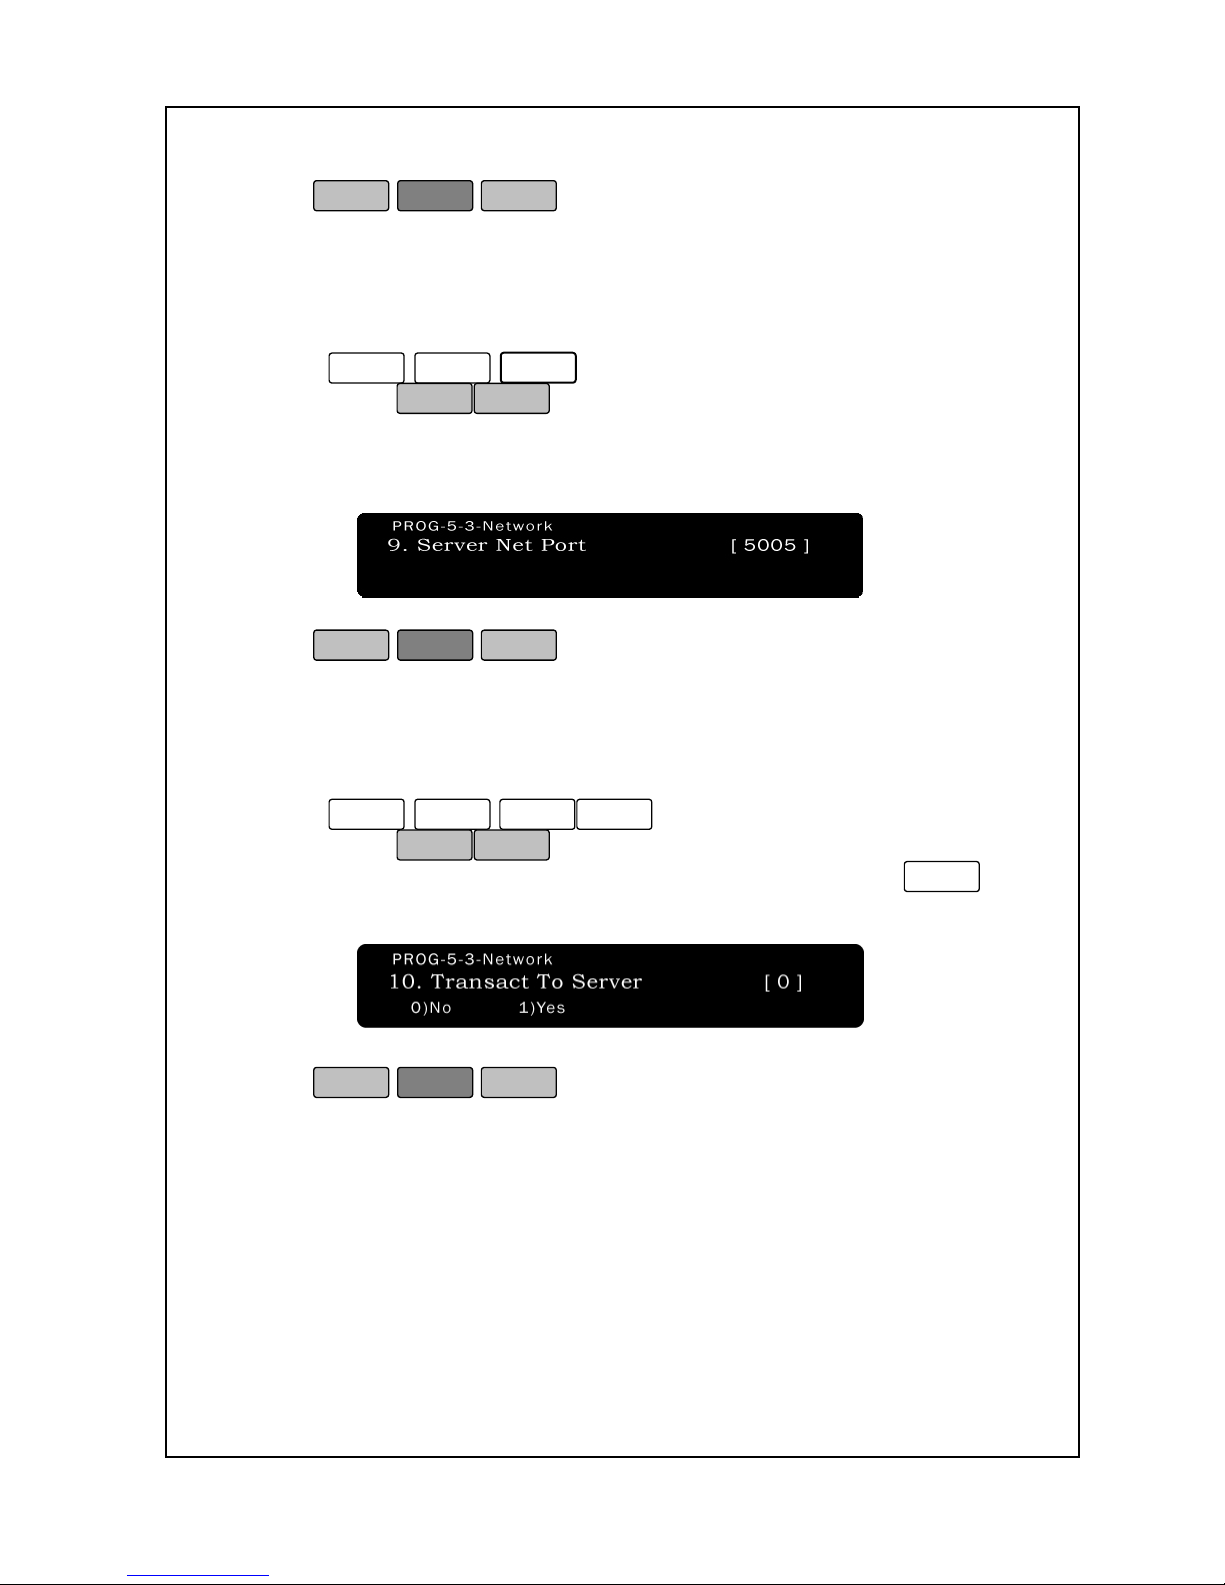
To set Scale Network (Net Port):
1. Enter ‘Main menu’, and follow 3 steps below.
2. Press
5
-
3
-
7
.
3. You can use
to move
4. This is a port number for general TCP/IP network. You can input
and use its’ number as 5000
5. Press
PRINT
ESC
SET
.
6. You are back in the Initial State.
To set Scale Network (Server IP):
1. Enter ‘Main menu’, and follow 3 steps below.
2. Press
5
-
3
-
8
.
3. You can use
to move
4. This function is for when Network type sets as “2)Server (PC)”, you
can make returning of real time sales account processing. You
can input the server(PC) IP. When you press “ipconfig” in your PC,
you can see IP information. You can enroll the IP address
Page 54
49
5. Press
PRINT
ESC
SET
.
6. You are back in the Initial State.
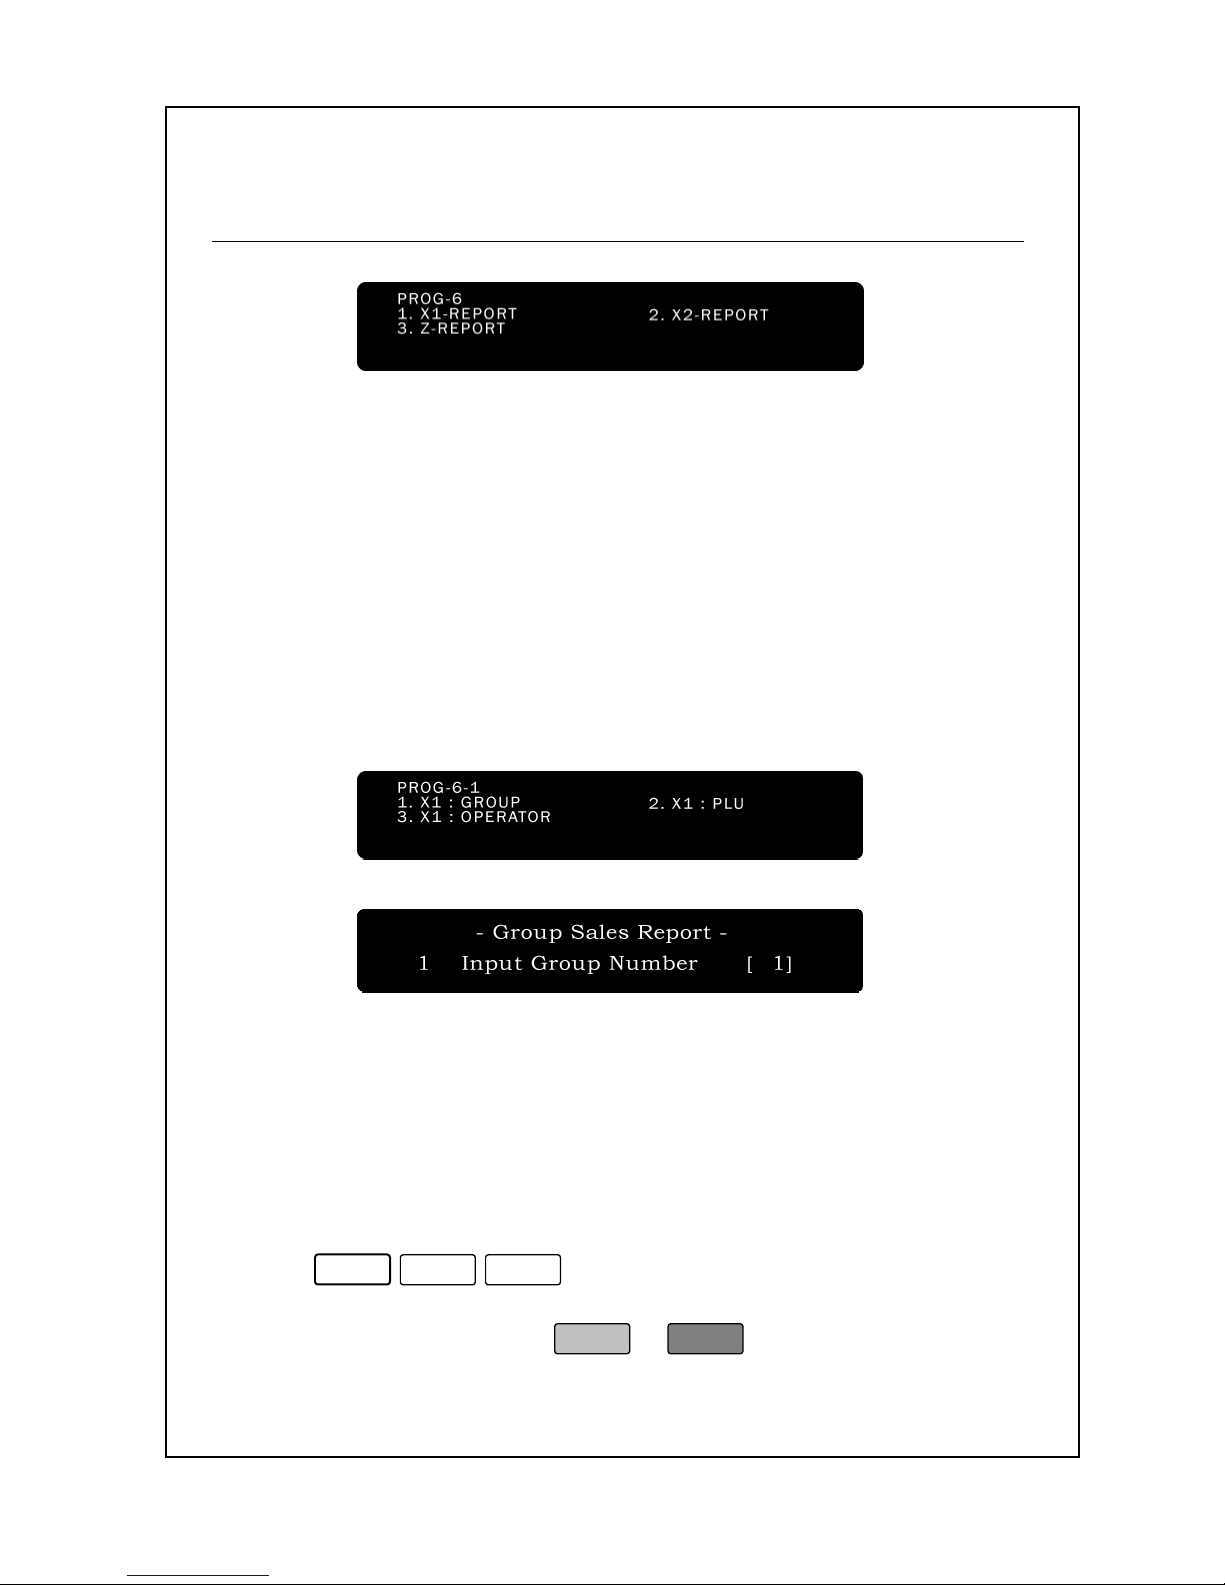
To set Scale Network (Server Net Port):
1. Enter ‘Main menu’, and follow 3 steps below.
2. Press
5
-
3
-
9
.
3. You can use
to move
4. This is for network transaction. You can input and use its’ number
as 5005.
5. Press
PRINT
ESC
SET
.
6. You are back in the Initial State.
To set Scale Network (Server Transact To Server):
1. Enter ‘Main menu’, and follow 3 steps below.
2. Press
5
-
3
-
1
0
.
3. You can use
to move.
4. This is for real time transaction to server PC when you set
1
.
5. Press
PRINT
ESC
SET
.
6. You are back in the Initial State.
Page 55
50
6. Account Report
The NETS has the ability to keep track of the sales transactions that it
issues. Both X1 and X2 are not cleared by those reporting. Those are
cleared by printing and clearing Z1 report and Z2 report. Both X1 and
Z1 report is a pair. And both X2 and Z2 report is a pair.
If Z1 report is performed every day and Z2 report is performed every
week, the period of X1 report is a day, the period of X2 report is a
week. It can keep sales records based on group sales, PLU sales,
operator and scale sales.
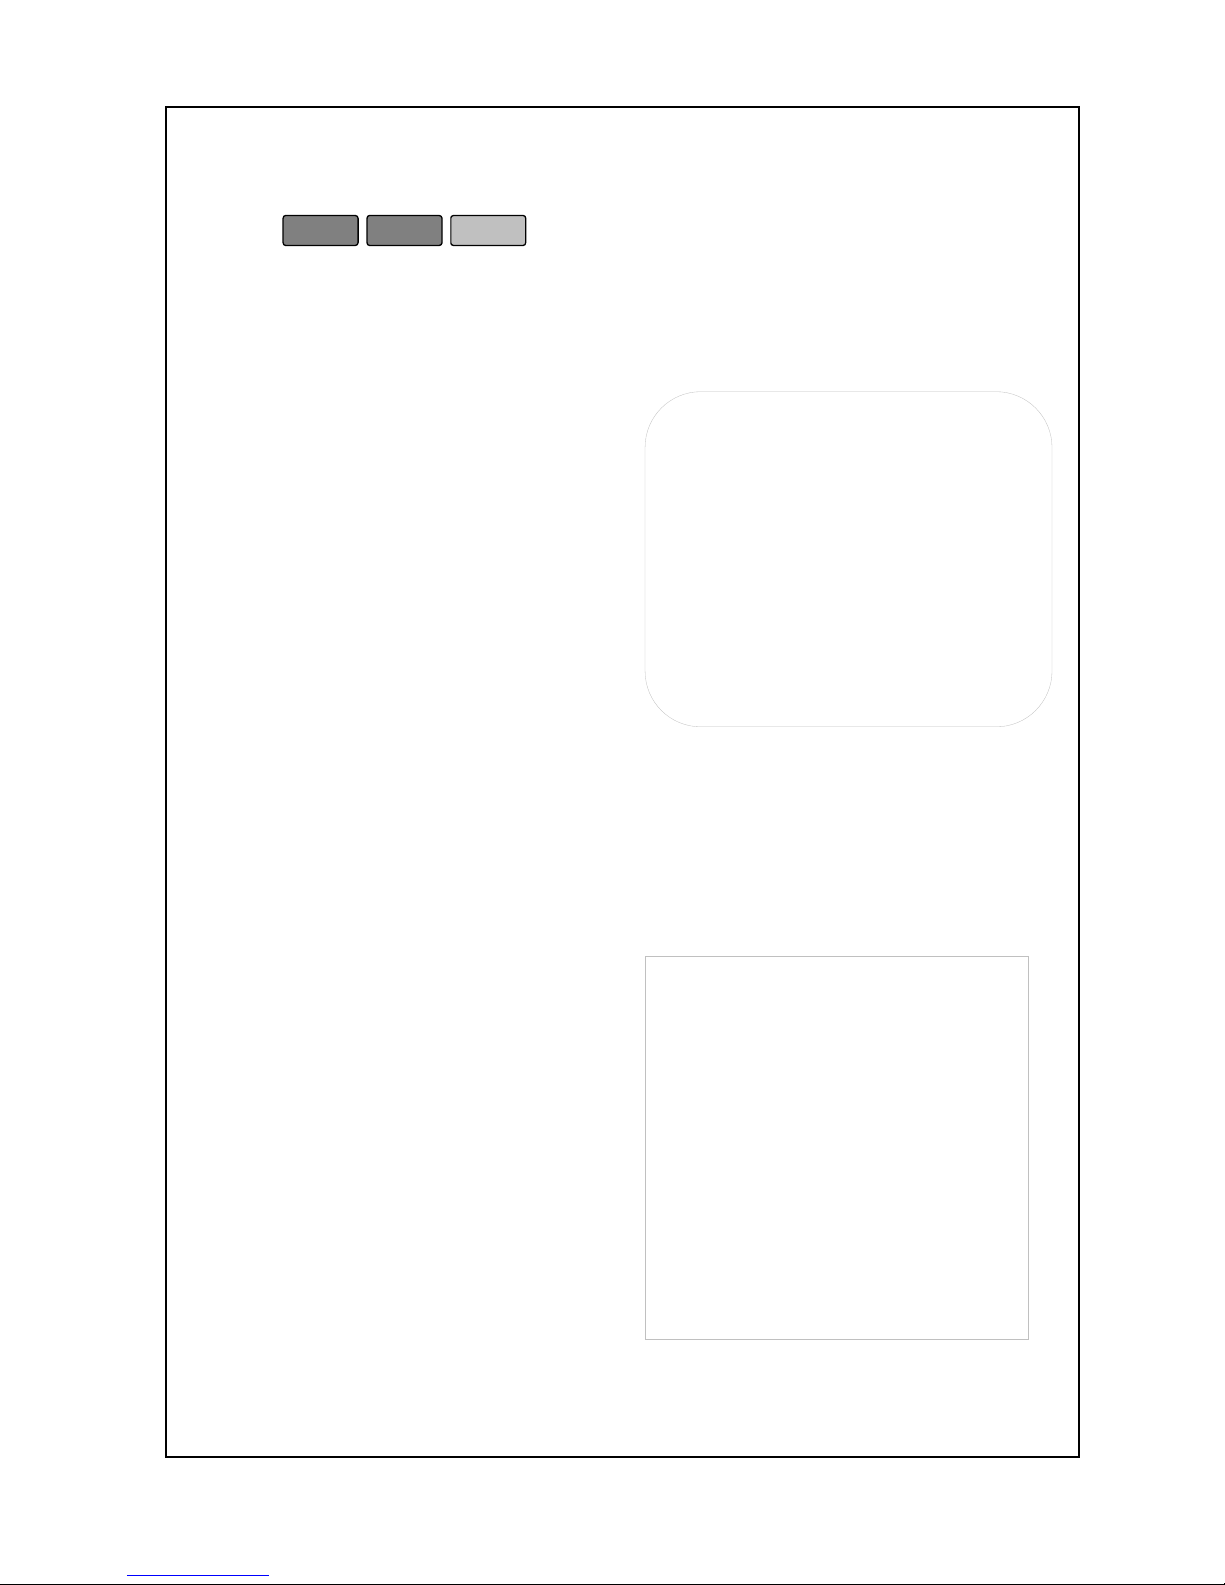
6-1. X1-Report
1. X1 : Group
When you perform a Group Sales Report, the scale will print a report
the one you specify. This report is an X# report because it does not
clear the sales data. Reports can print on any style labels; however,
some labels may require the use of more than 1 label per group
reported.
To generate the Group Sales Report:
1. Enter ‘Main menu’, and follow 3 steps below.
2. Press
6
-
1
-
1
3. Enter the group number you want a report for (1 to 20 or 0 for all
active groups) and then press
PRINT
or
Enter
.
Page 56
51
4. The scale will print the report. When the scale is done, printing
press
ESC
ESC
SET
to return to the Initial State or, go to step 3
if you want a report for another group.
Below is an example of a Group Sales Report which is printed on a
blank label and on receipt:
Group Reports explained (Label):
The 1st line contains the report name.
The 2nd line contains the group
number. The 3rd line contains the
scale number of the scal e tha t
generated this report and today’s
date. The 4th li ne contai ns the
number of transactions for this group.
The 5th line contains the total weight
sold for this Group (By weight). The
6th line contains the total pieces sold for this Group (by count).
The 7th line contains the dollar amount sold for this group.
The 8th line contains the date of the last time the Z# report was taken.
The Z# report clears the sales records.
Group Reports explained:
The 1st line contains the date of the
last time the Z# report was taken.
The 2nd line contains today’s date.
The 3rd line contains the scale
number of the scale that generated
this report. The 4th line contains the
report name and Group Number.
The 5th line contains the Group
name. The 6th line contains the
number of total sold item for this
Group. The 7th line contains the total
weight sold for this Group (By
weight).
Start : DD/MM/
YYYY
-
HH:MM
End : DD/MM/YYYY - HH:MM
SCALE : ##
X# Group ## Total
Group name
Item count : ###
Total Weight : ####
Total PCS : #####
Total AMT($): #####
X#
: GROUP REPORT
Index Number : #
DD/MM/YYYY SCALE:##
Transaction : ##
Total Weight : #####
Total PCS : ###
Total AMT($) : #####
LAST Z DD/MM/YYYY-MM:HH
Page 57
52
The 8th line contains the total pieces sold for this Group (By Count).
The 9th line contains the dollar amount sold for this group.
2. X1 : PLU
When you perform a PLU Sales Report, the scale will print a report the
ones you specify. This report is an X# report because it does not clear
the sales data. Reports can print on any style labels; however, some
labels may require the use of more than 1 label per group reported.
To generate the PLU Sales Report:
1. Enter ‘Main menu’, and follow 3 steps below.
2. Press
6
-
1
-
2
.
3. Enter the PLU number you want a report for (1 to 999999 or 0 for all
active PLUs) and then press
PRINT
or
Enter
.
4. The scale will print the report. When the scale is done, printing
press
ESC
ESC
SET
to return to the Initial State or go to
step 3 if you want a report for another PLU.
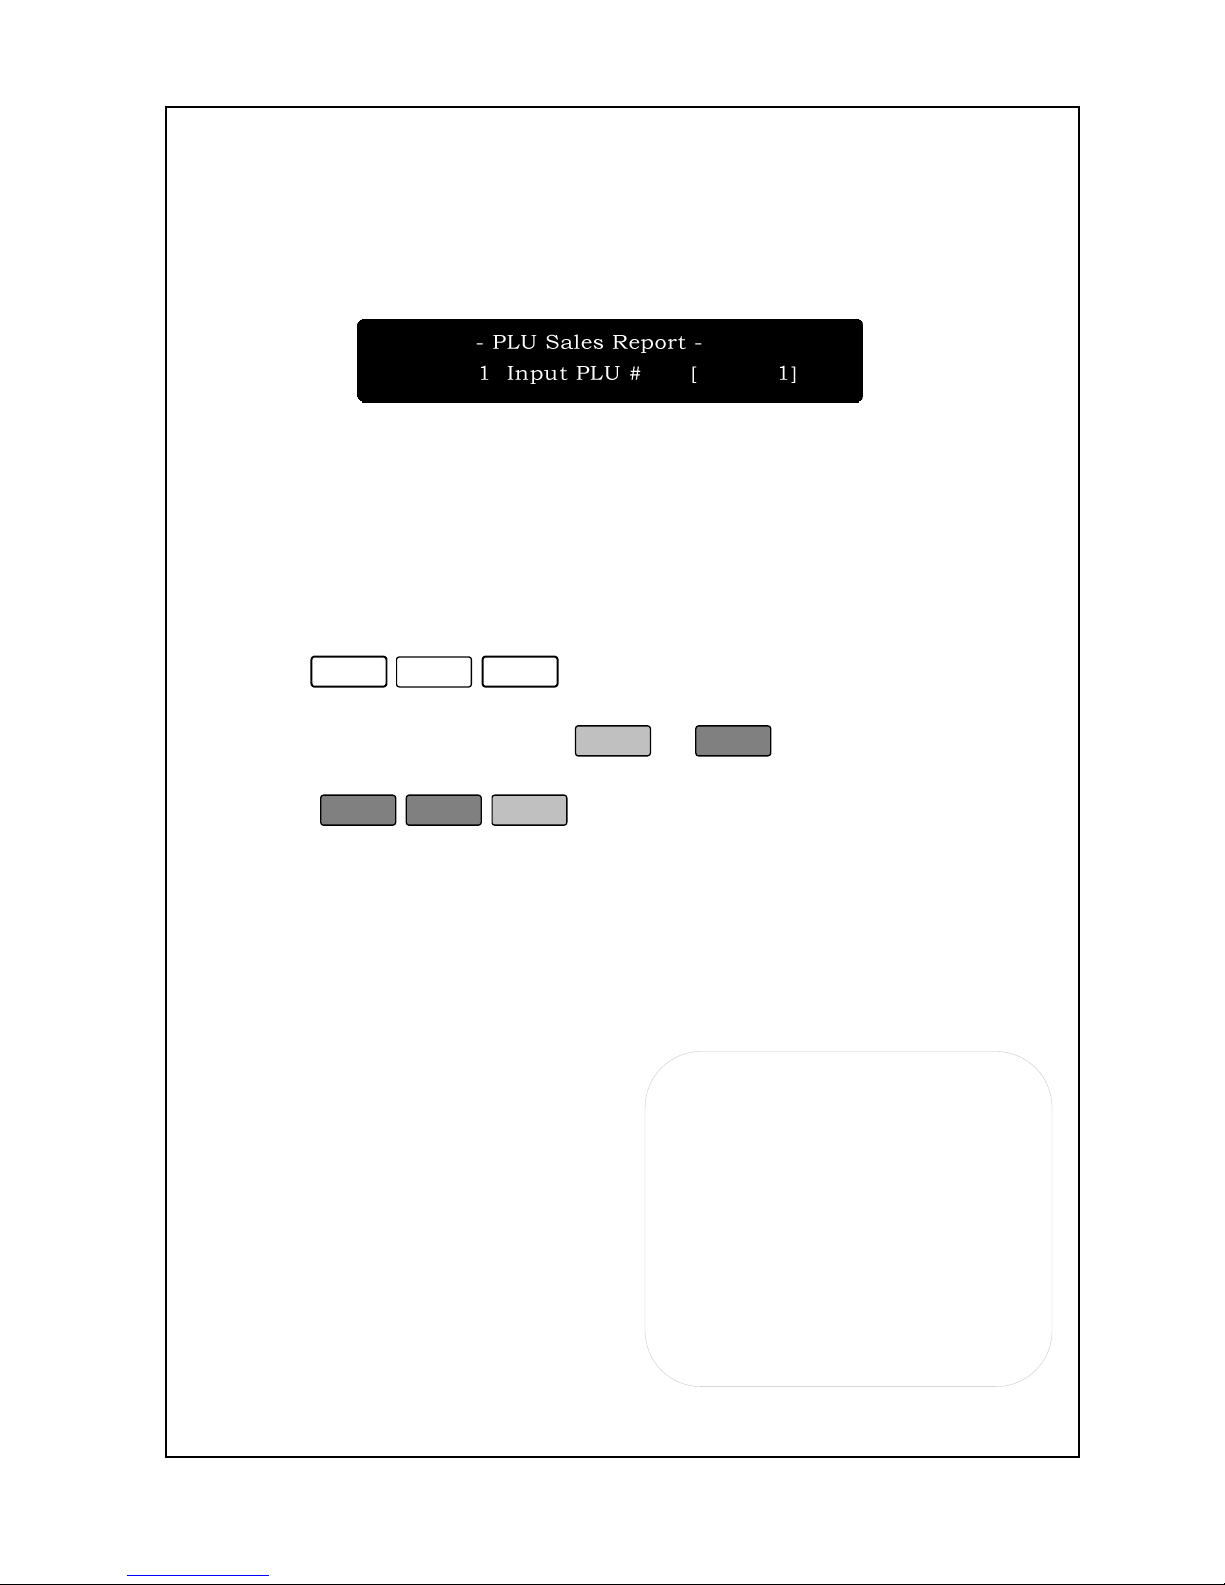
Below is an example of a PLU Sales Report which is printed on a
blank label and on receipt:
PLU Reports explained (Label):
The 1st line contains the report name.
The 2nd line contains the PLU name.
The 3rd line contains today’s date
and the scale number of the scale
that generated this report. The 4th
l i n e c o n t ains t he n u mbe r o f
transactions for this PLU. The 5th
line contains the total weight sold for
this PLU (By Weight). The 6th line
contains the total pieces sold (for By
Count.) The 7th line contains the
dollar amount sold for this PLU.
X# : PLU REPORT
PLU : PLU name
DD/MM/YYYY SCALE:##
Transaction : ##
Total Weight : #####
Total PCS : ###
Total AMT($) : #####
LAST Z DD/MM/YYYY-MM:HH
Page 58
53
The 8th line contains the date of the last time the Z report was taken.
The Z report clears the sales records.
PLU Reports explained:
The 1st line contains the date of the
last time the Z# report was taken.
The 2nd line contains today’s date.
The 3rd line contains the scale
number of the scale that generated
this report. The 4th line contains the
report name and PLU Number. The
5th line contains the PLU name. The
6th line contains the number of total
sold item for this PLU. The 7th line
contains the total weight sold for this
PLU (By weight). The 8th line
contains the total pieces sold for this
PLU (By Count). The 9th line
contains the dollar amount sold for
this PLU.
3. X1 : Operator
When you perform an Operator Report, the scale will print a report the
ones you specify. This report is an X# report because it does not clear
the sales data. Reports can print on only receipt.
To generate the Operator Report:
1. Follow steps 1 to 3 of entering Main Menu.
2. Press
6
-
1
-
3
in only receipt mode.
3. Enter the Operator number you want a report for (1 to 25 or 0 for all
active Operators) and then press
PRINT
or
Enter
.
4. The scale will print the report. When the scale is done, printing
press
ESC
ESC
SET
to return to the Initial State or, go to
step 3 if you want a report for another Operator.
Below is an example of an Operator Report which is printed on receipt:
Start: DD/MM/
YYYY
-
HH:MM
End : DD/MM/YYYY - HH:MM
SCALE: ##
X# PLU ## Total
PLU name
Item Count : ###
PCS Count : ###
Total Weight : ####
Total PCS : #####
Total AMT($): #####
Page 59
54
Operator Reports explained:
The 1st line contains the date of the
last time the Z# report was taken.
The 2nd line contains today’s date.
The 3rd line contains the scale
number of the scale that generated
this report. The 4th line contains the
report name and operator number.
The 5th line contains the Operator
name. The 6th line contains the
number of sale. The 7th line contains
the number of sold item by this
operator. The 8th line contains the
total weight sold by this operator (By
weight). The 9th line contains the
total pieces sold by this operator (By
Count). The 10th line contains the
number of the Discount. The 11th
line contains the dollar amount
discount for this operator. The 12th
line contains the number of void by
this operator.
The 13th line contains the dollar amount of void for this operator. The 14th
contains the number of the reference. The 15th line contains the dollar
amount of reference by the operator. The 16
th
line contains the dollar
amount sold for this operator.
< SCALE >
When you perform a SCALE Report, the scale will print a report the
ones you specify. This report is an X# report because it does not clear
the sales data. Reports can print on any style labels; however, some
labels may require the use of more than 1 label per Scale reported.
To generate the SCALE Report:
1. Enter ‘Main menu’, and follow 3 steps below.
2. Press
6
-
1
-
4
in only receipt mode.
Start : DD/MM/
YYYY
-
HH:MM
End : DD/MM/YYYY - HH:MM
SCALE : ##
X# Operator ## Total
OPR : Operator name
Sale Count : ##
Item Count : ###
Total Weight : ####
Total PCS : #####
DISC. Count : ###
Total DISC($) : ####
Void Count : ####
Total Void($) : #####
Refunds Count : ###
Refunds. ($): ####
Total Sold($): #####
Page 60
55
3. Enter the SCALE number you want a report for (1 to 25 or 0 for all
active SCALE) and then press
PRINT
.
4. The scale will print the report. When the scale is done, printing
press
ESC
ESC
SET
to return to the Initial State or go to
step 3 if you want a report for another operator.
Below is an example of a Scale Report which is printed on a blank
label and on receipt:
SCALE Reports explained (Label):
The 1st line contains the report name.
The 2nd lin e con tai ns the scale
number. The 3rd line contains the
scale number of the scal e tha t
generated this report and today’s
date. The 4th li ne contai ns the
number of transactions for this scale.
The 5th line contains the total weight
sold for this scale (By weight). The
6th line contains the total pieces sold
for this scale (By Count). The 7th line
contains the number of discount for
this scale. The 8th line contains the
dollar amount of discount for this
scale. The 9th line contains line
contains the dollar amount sold for
this scale. The 10th line contains the
dollar amount of tax for this scale.
The last line contains the date of the last time the Z# report was taken.
The Z# report clears the sales records.
X# : SCALE
REPORT
Index Number : #
DD/MM/YYYY SCALE:##
Transaction : ##
Total Weight : #####
Total PCS : ###
Disc. Count : ###
Disc. Price($) : #####
Total Sold($) : #####
TOTAL TAX($) : #####
LAST Z DD/MM/YYYY-MM:HH
Page 61
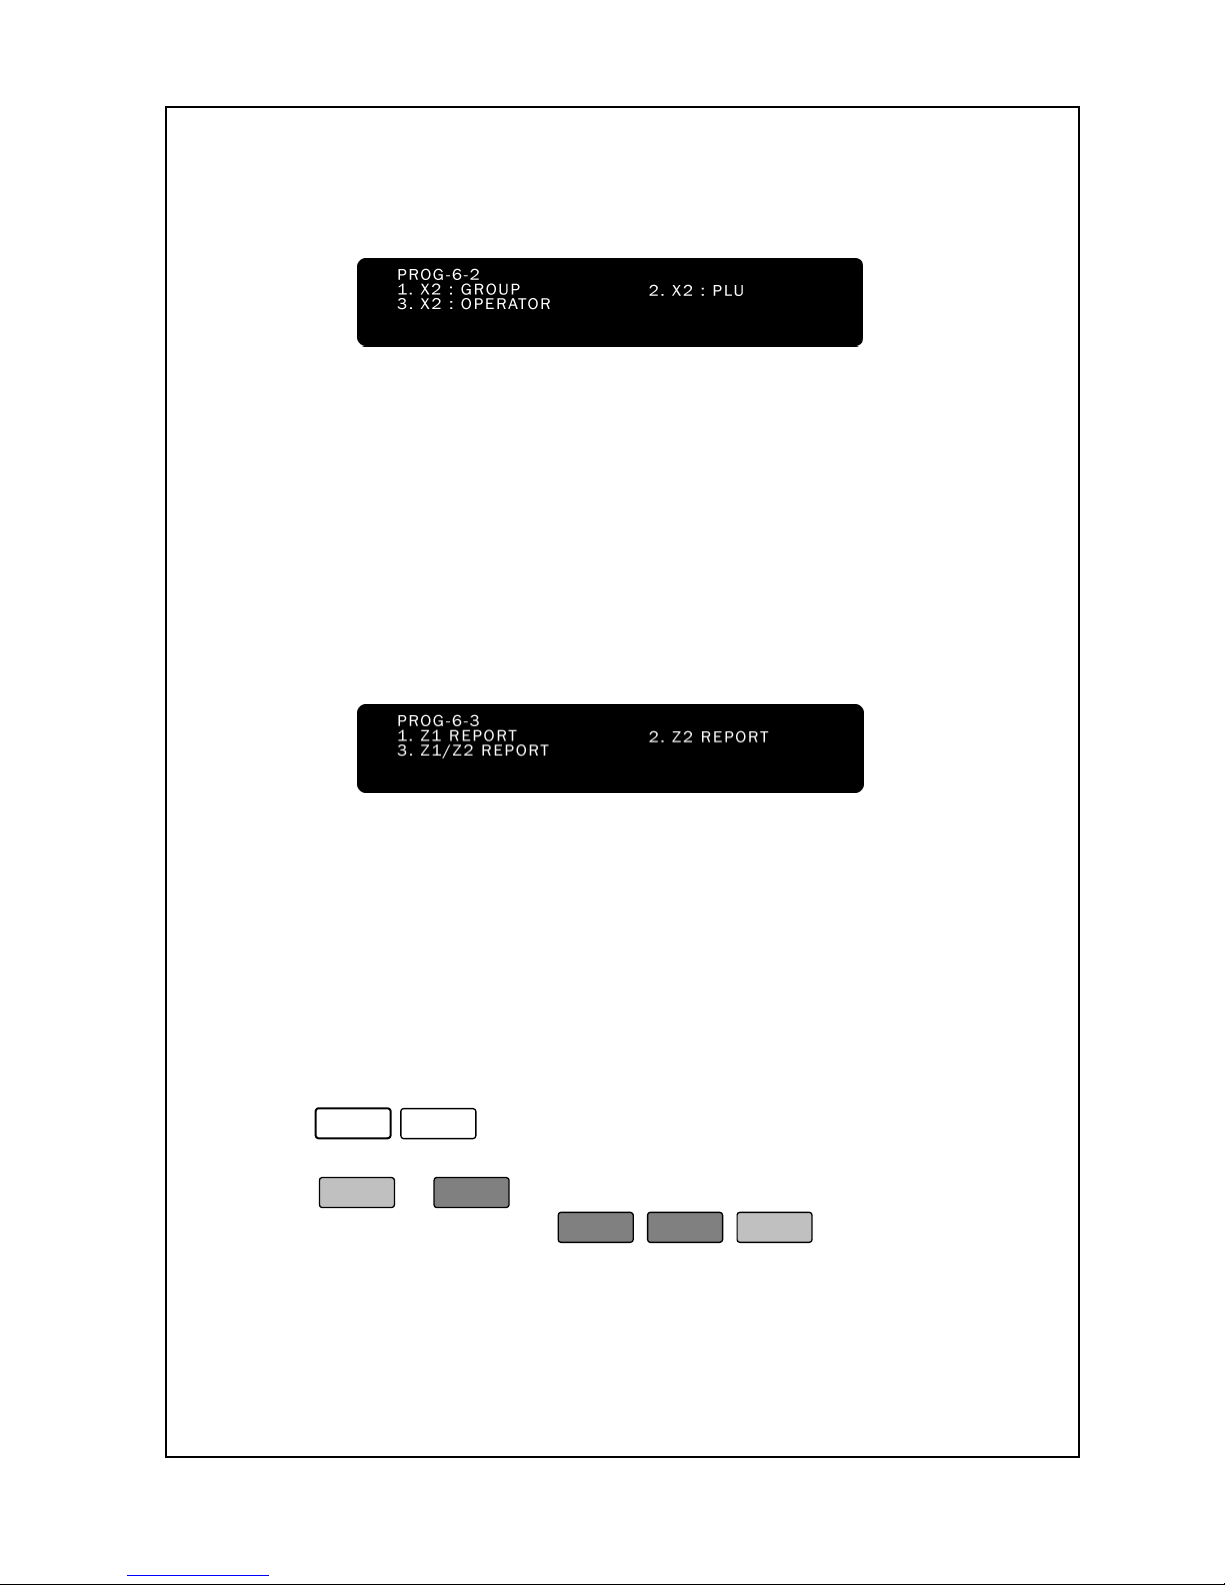
56
6-2. X2-Report
In case of X2-Report.
Has a same procedure to print out with X1-Report.
6-3. Z-Report
When you perform a Z Report, the scale can print a Z Report and then
can clear all sales data. Once you do this report you cannot do any of
the X reports until you generate some sales.
< Z# Report >
When you perform a Z# Report, the scale will print a report the one
you specify. This report is an Z report because you can choose “print &
clear” is performed the sales data. Reports can print on any style
labels; however, some labels may require the use of more than 1 label
per Z reported.
To generate the Z# Sales Report:
1. Enter ‘Main menu’, and follow 2 steps below.
2. Press
6
-
3
.
3. Enter the Z Report number you want a report for (1 to 2).
4. Press
PRINT
or
Enter
. The scale will print the report. When the
scale is done printing press
ESC
ESC
SET
to return to the
Initial State or, go to step 3 if you want a report for another group.
When you press each 1. Z1 Report 2. Z2 Report 3. Z1/Z2 Report,
display will be showed
Page 62
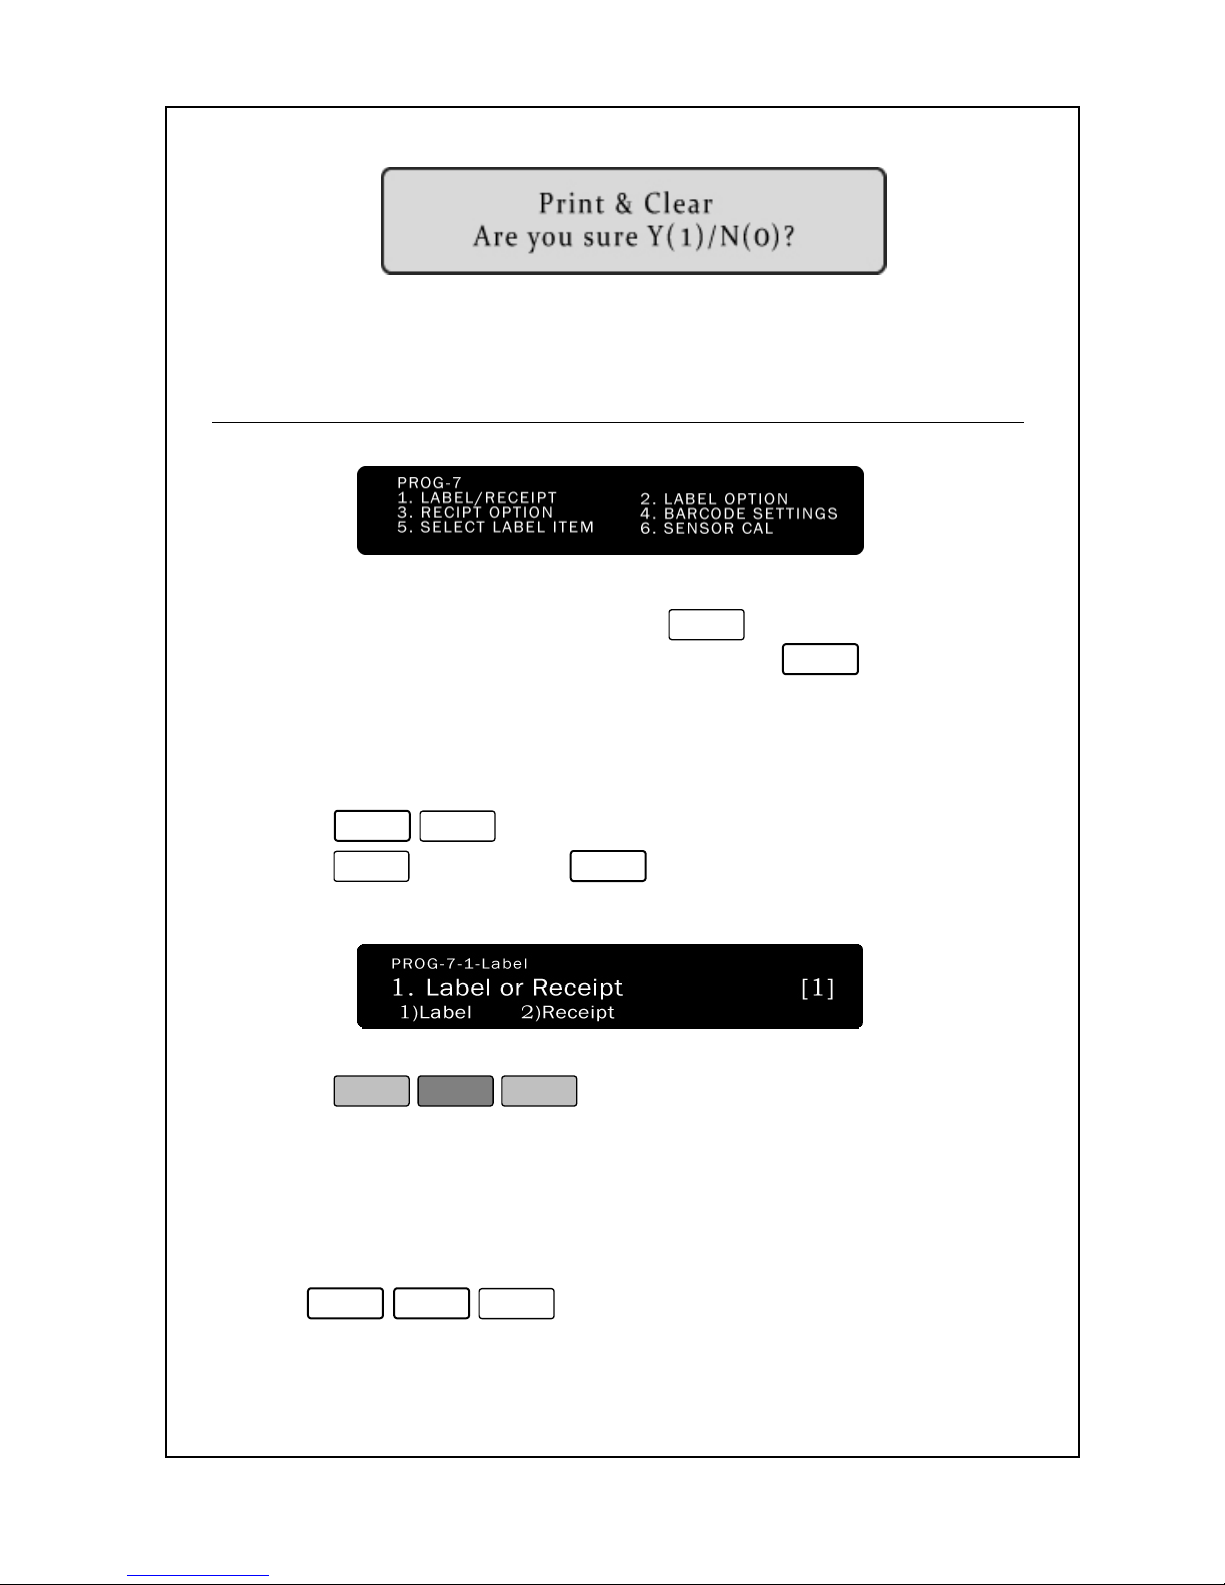
57
You can choose one of them Y(1): Yes, or N(0): No.
7. Label Settings
7-1. Label / Receipt
You can choose the print mode. If you set
1
Label mode, the gap
sensor and the peel off sensor will perform. If you set
2
Receipt
mode, the gap sensor and the peel off sensor will not perform.
And the receipt is printed by operator in sub total view.
Enter ‘Main menu’, and follow 2 steps below.
1. Press
7
-
1
.
2. Press
1
for “Label” or
2
for “Receipt”. The default
setting is “1”.
3. Press
PRINT
ESC
SET
to save the setting and return to the
Initial State.
7-2 Label option
To set Label Length:
1. Enter ‘Main menu’, and follow 3 steps below.
2.Press
7
-
2
-
1
.
Page 63
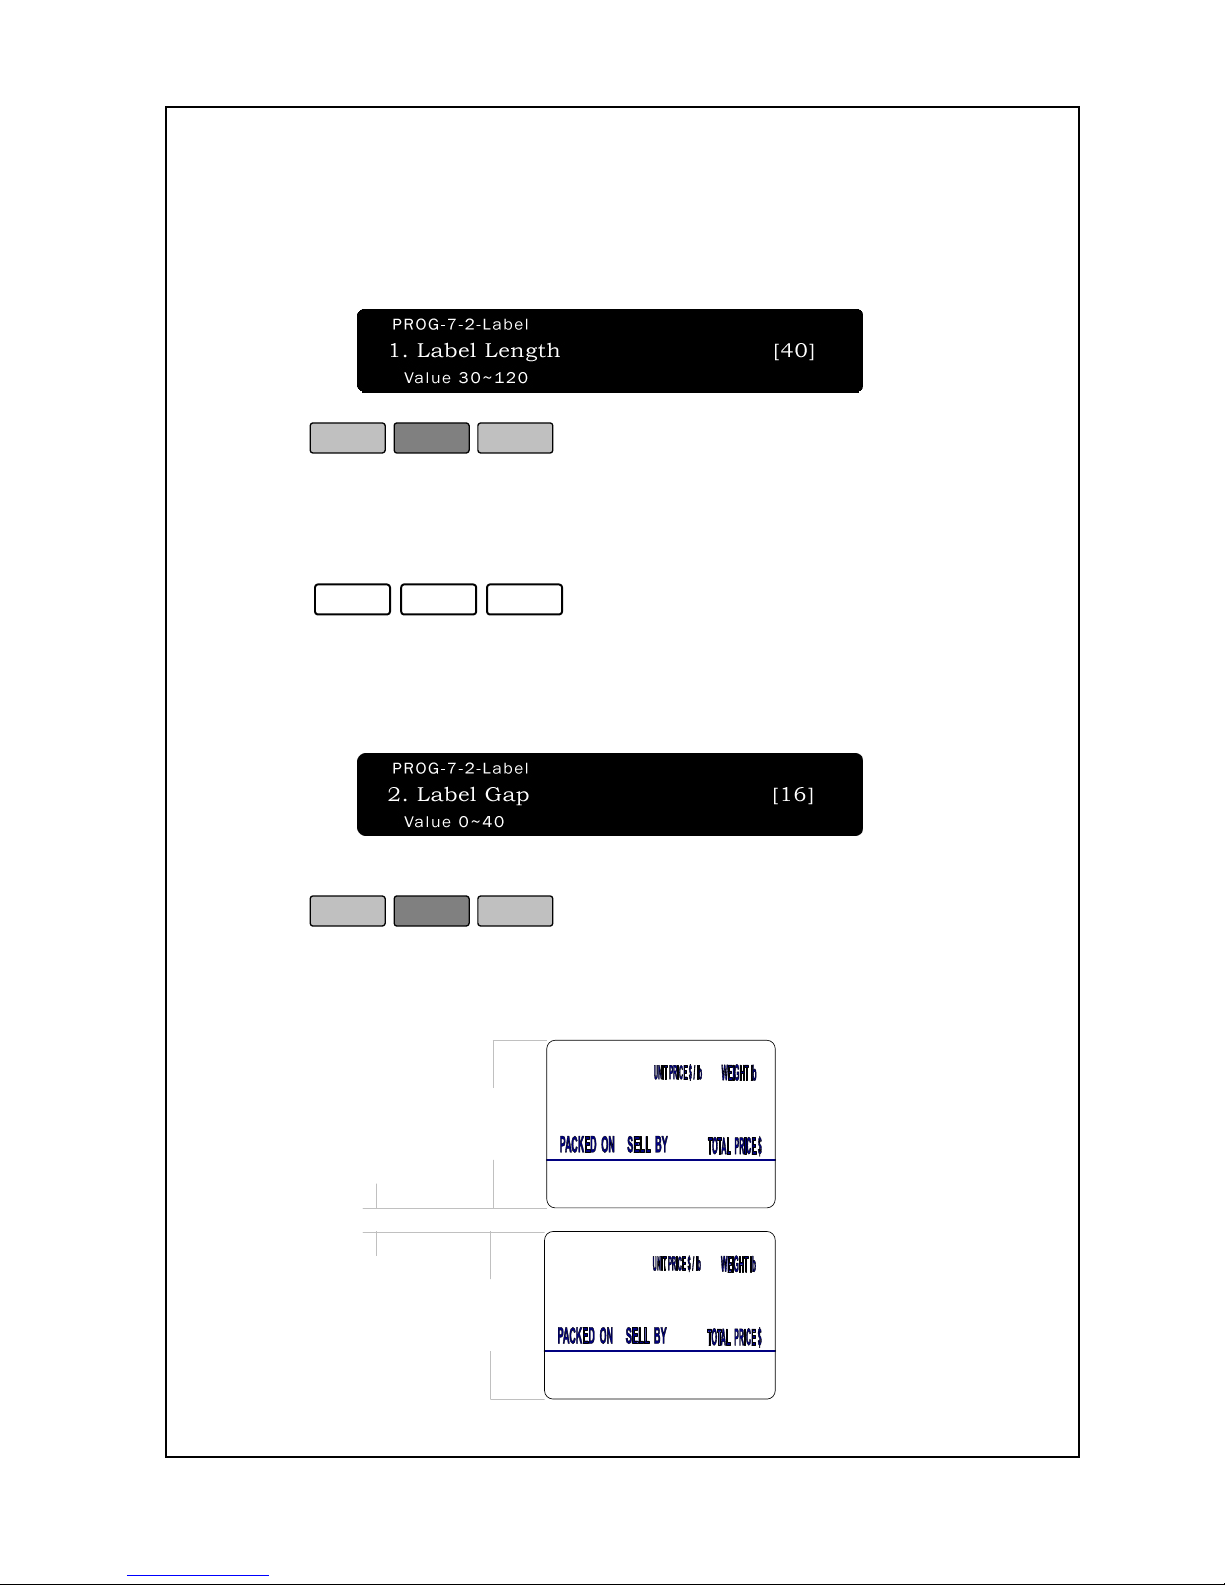
58
3. Enter the Label Length number you wish to assign the scale to.
This number must be from 30 to 120. As you type the number, you
will see it in the Total Price Display.
4. Press
PRINT
ESC
SET
.
5. You are back in the Initial State.
To set Label Gap:
1. Enter ‘Main menu’, and follow 3 steps below.
2. Press
7
-
2
-
2
.
3. Enter the Label Length number you wish to assign the scale to.
This number must be from 0 to 40. As you type the number, you will
see it in the Total Price Display.
4. Press
PRINT
ESC
SET
.
5. You are back in the Initial State.
* Please refer picture 7-2
<Picture 7-2 >
Length
Gap
Length
Page 64
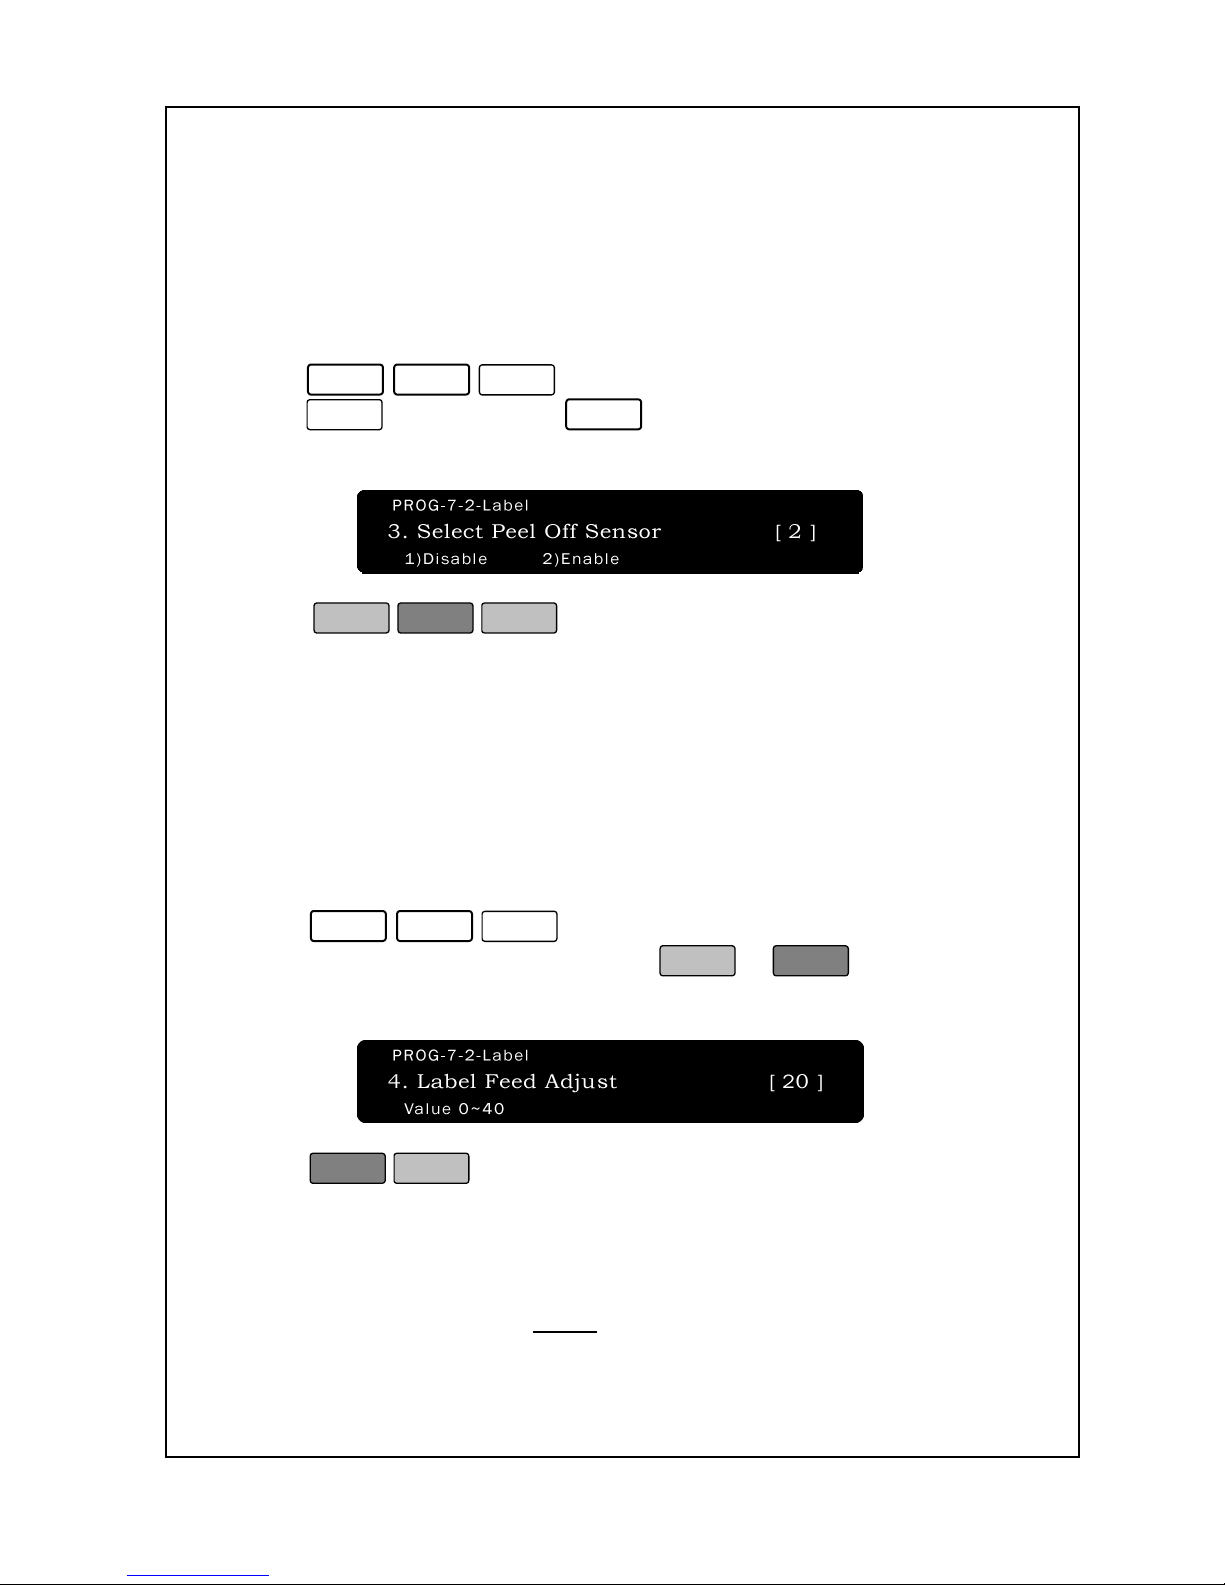
59
Peel off sensor can be used to sense peel off the printed label. You
can choose the way to enable the mode of peel off sensor work or
disable it.
To set Select Peel Off Sensor:
1. Enter ‘Main menu’, and follow 3 steps below.
2.Press
7
-
2
-
3
.
3.Press
1
for “Disable” or
2
for “Enable”. The default setting
is 2.
4. Press
PRINT
ESC
SET
to save the setting and return to the
Initial State.
The LFA (Label Feed Adjustment) adjusts the print position of a label.
It is independent of the LFS number and can range from 0 to 40; 20
being the default value. The higher the number the lower things will
print on the label; the lower the number the higher things will print.
To set the Label Feed Adjustment:
1. Enter ‘Main menu’, and follow 3 steps below.
2. Press
7
-
2
-
4
.
3. Change the LFA number and press
PRINT
or
Enter
; as you type
the number it will appear in the Total Price Display.
4. Press
ESC
SET
.
5. You are back in the Initial State.
You may need to test print 2 or three labels to notice the change in
adjustment. Additionally, you may need to repeat this procedure to
get your desired alignment. Note:
there is no way to individually align
Page 65
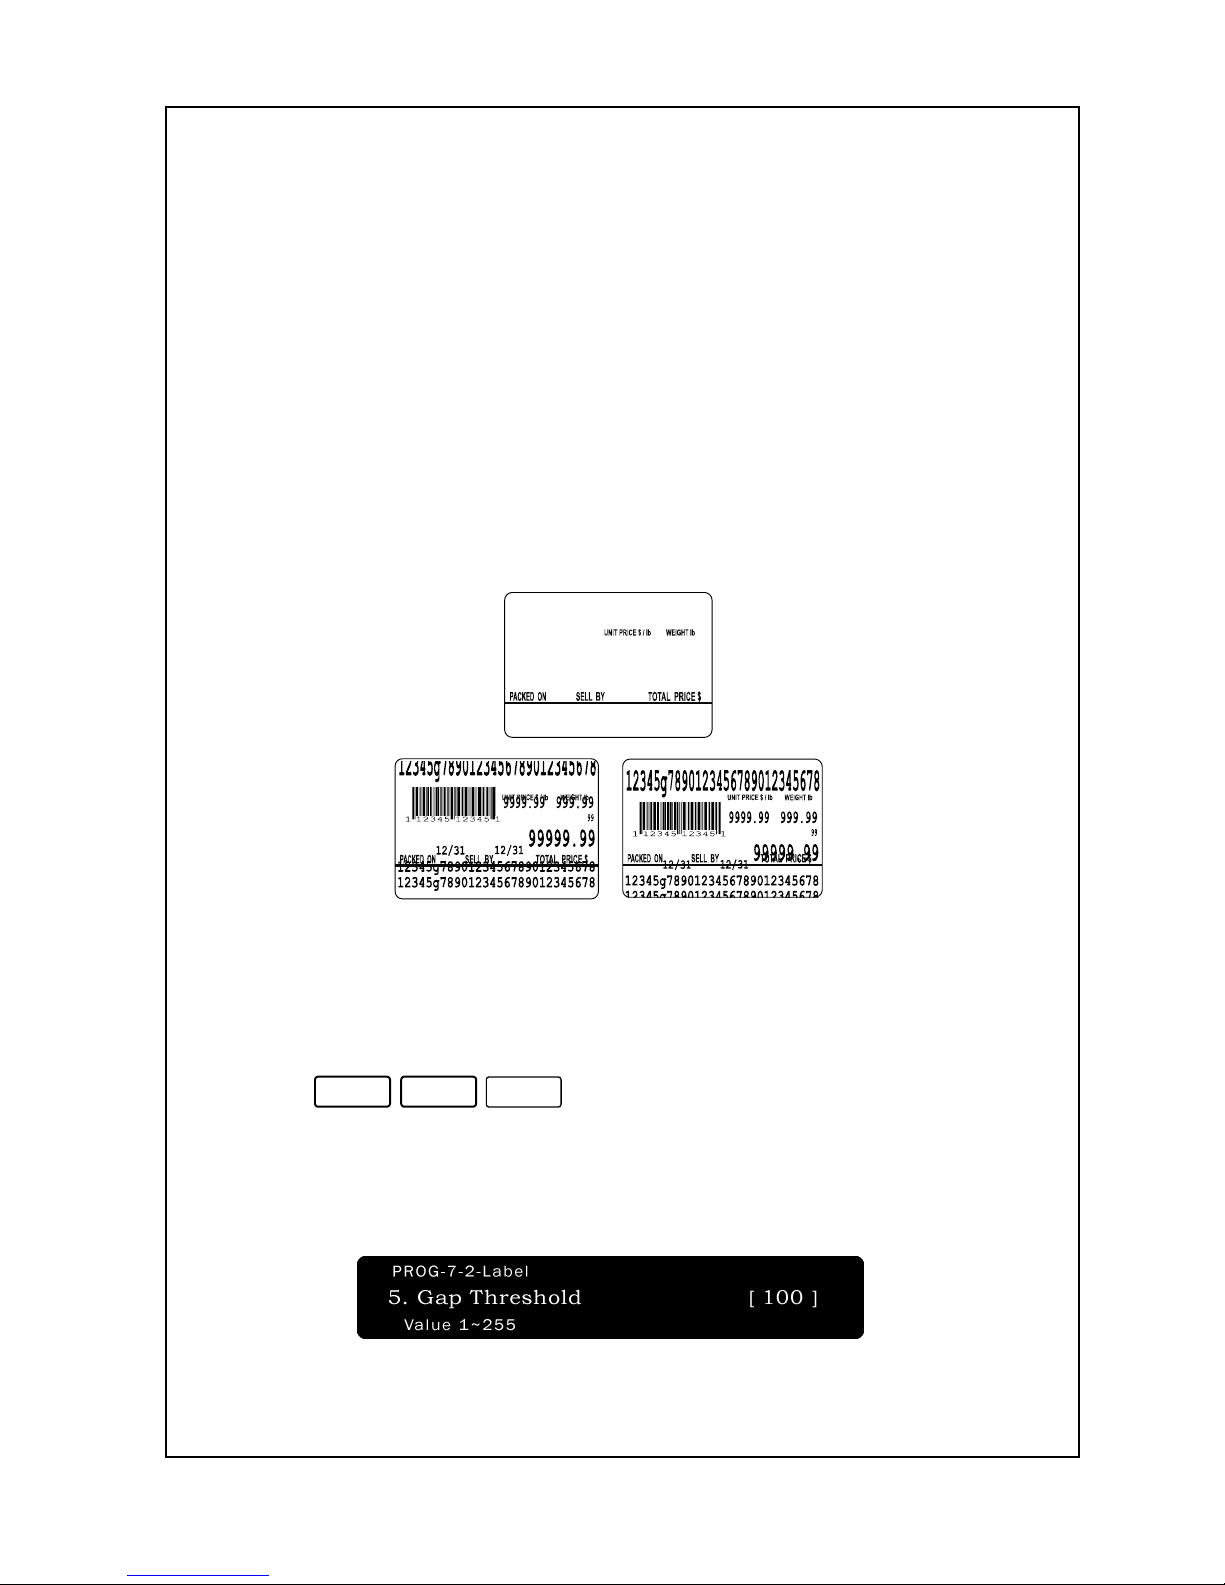
60
any fields (like Total Price, Sell By Date, etc.) If you cannot properly
align the print, then one of the following may have occurred:
You are using the wrong LFS number or have the wrong
labels installed in the scale.
You are using defective labels that have a “shift in
registration” error. This means that when the labels were
manufactured, the pre-printed color items on the label were printed too
high, too low, or incorrectly. This problem occurs most often when you
do not use ACOM Certified Labels.
Here is a sample (blank) of the label that new NETS come with and
some sample prints of labels that need adjustment:
It is recommended that this option is designed for user who was using
that before
To set Gap Threshold:
1. Enter ‘Main menu’, and follow 3 steps below.
2. Press
7
-
2
-
5
.
3. Enter the Gap Threshold value you wish to assign the scale to. This
number must be from 1 to 255. As you type the number, you will see it
in the Total Price Display. The default setting values are 100.
Page 66
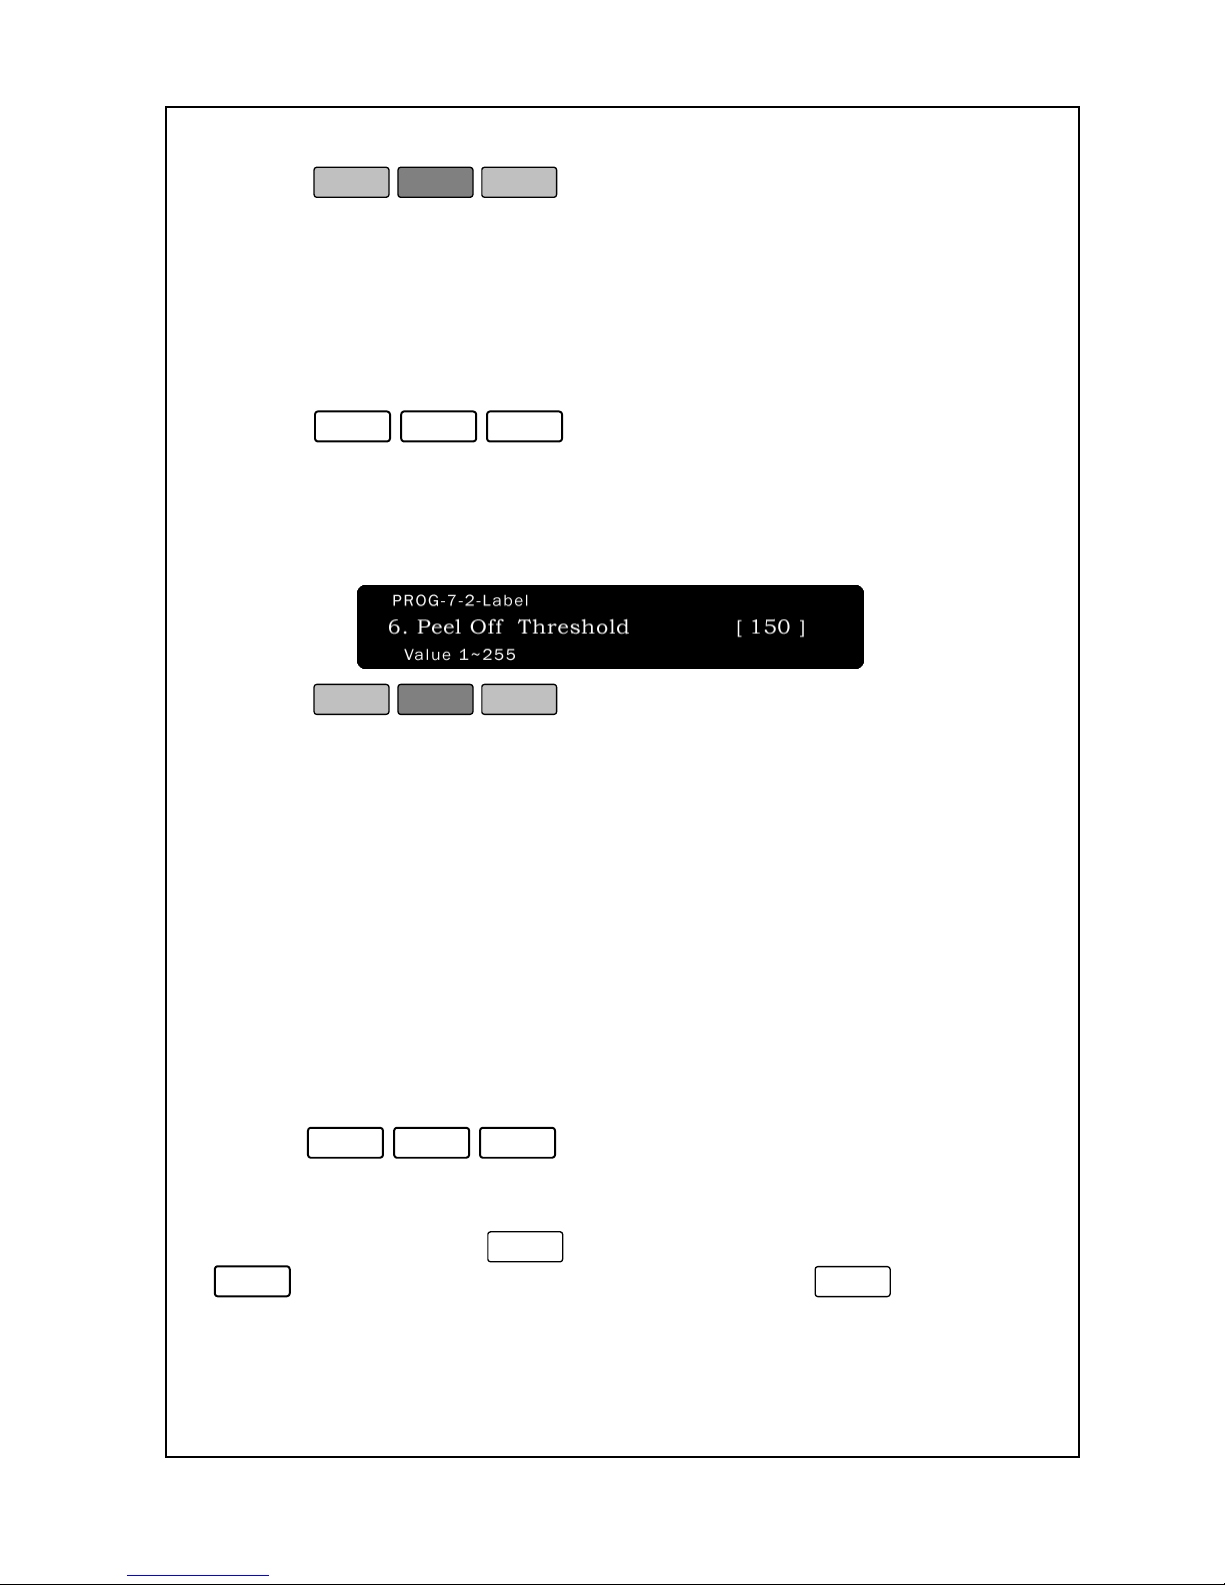
61
4. Press
PRINT
ESC
SET
to save the setting and return to the
Initial State.
It is recommended that this option is designed for user who was using
that before
Peel off Threshold:
1. Enter ‘Main menu’, and follow 3 steps below.
2. Press
7
-
2
-
6
.
3. Enter the Gap Threshold value you wish to assign the scale to. This
number must be from 1 to 255. As you type the number, you will see it
in the Total Price Display. The default setting values are 150.
4. Press
PRINT
ESC
SET
to save the setting and return to the
Initial State.
The LFS (Label Format Setting) tells the scale what label you are using
and how you want it to print on that label. The LFS is a number from 1
to 999; however, the scale will only accept those values listed in the
Label Format Library, Appendix A. The NETS is compatible with many
competitor label formats and labels: please check the appendix.
Common LFS Numbers: 43 .
To set print speed:
1. Enter ‘Main menu’, and follow 3 steps below.
2.Press
7
-
2
-
7
.
3. Enter the number you wish to assign the scale to. This number must
be from 1 to 3. As you type the number, you will see it in the Total
Price Display. If you set
1
, the print speed is set “slow”. If you set
2
, the print speed is set “normal”. If you set
3
, the print
speed is set “fast”. The default setting is 3.
Page 67
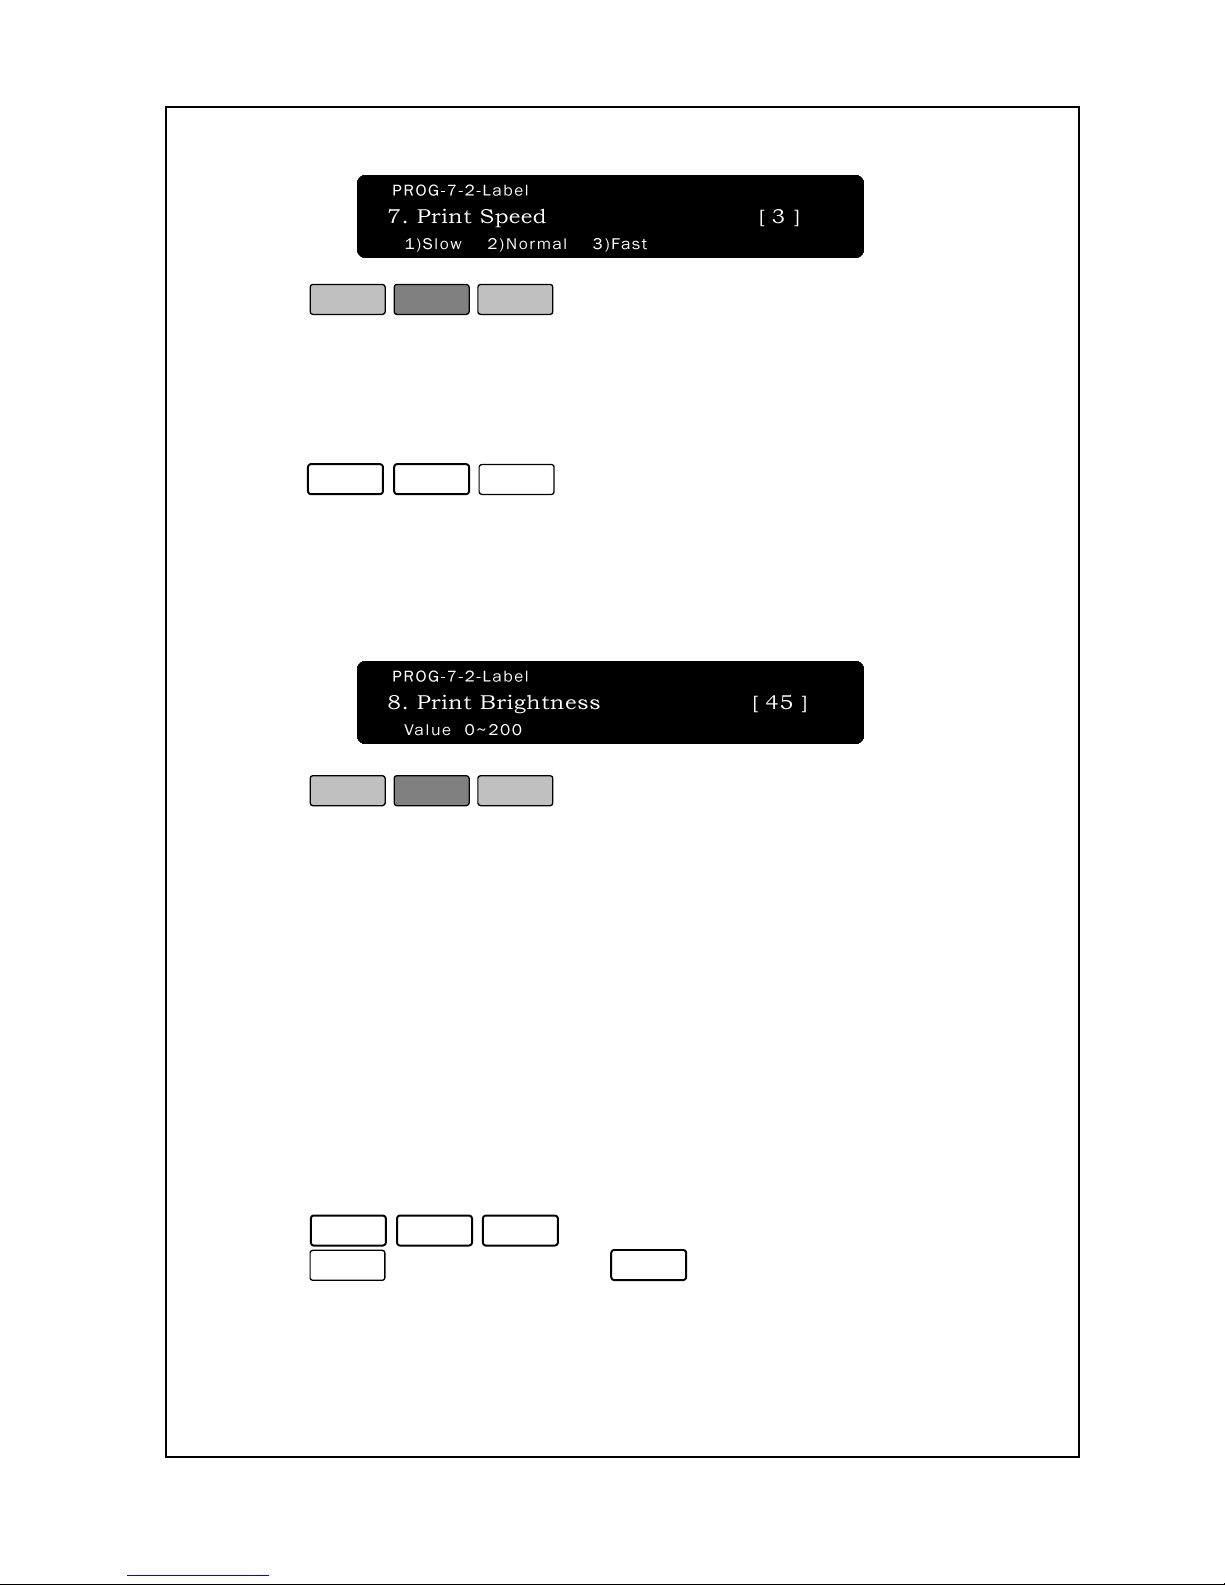
62
4. Press
PRINT
ESC
SET
.
5. You are back in the Initial State.
To set print brightness:
1. Enter ‘Main menu’, and follow 3 steps below.
2.Press
7
-
2
-
8
.
3.Enter level of the brightness and press Print key, levels 0~200 are
available. This function controls printing brightness, high values get
distinctive printing, but the brightness is fixed by program in case of a
high printing speed set (100mm/Sec).
4. Press
PRINT
ESC
SET
.
5. You are back in the Initial State.
The NETS can use the Gap Sensor or the Peel Sensor to Sense gaps
between labels. If you constantly get the error message “Gap Sensor
Error,” you may need to clean the Gap Sensor Assembly; however, if
you get constant label feed or “Gap Sensor Errors” please use this
function to disable the Gap Sensor. After disabling the Gap Sensor
you may need to use the Feed Adjust function in order to align the print.
To Change the Sensor Settings:
1. Enter ‘Main menu’, and follow 3 steps below.
2. Press
7
-
2
-
9
.
3. Press
1
to “Gap” Sensor or
2
to “PEEL_OFF sensor.
Page 68
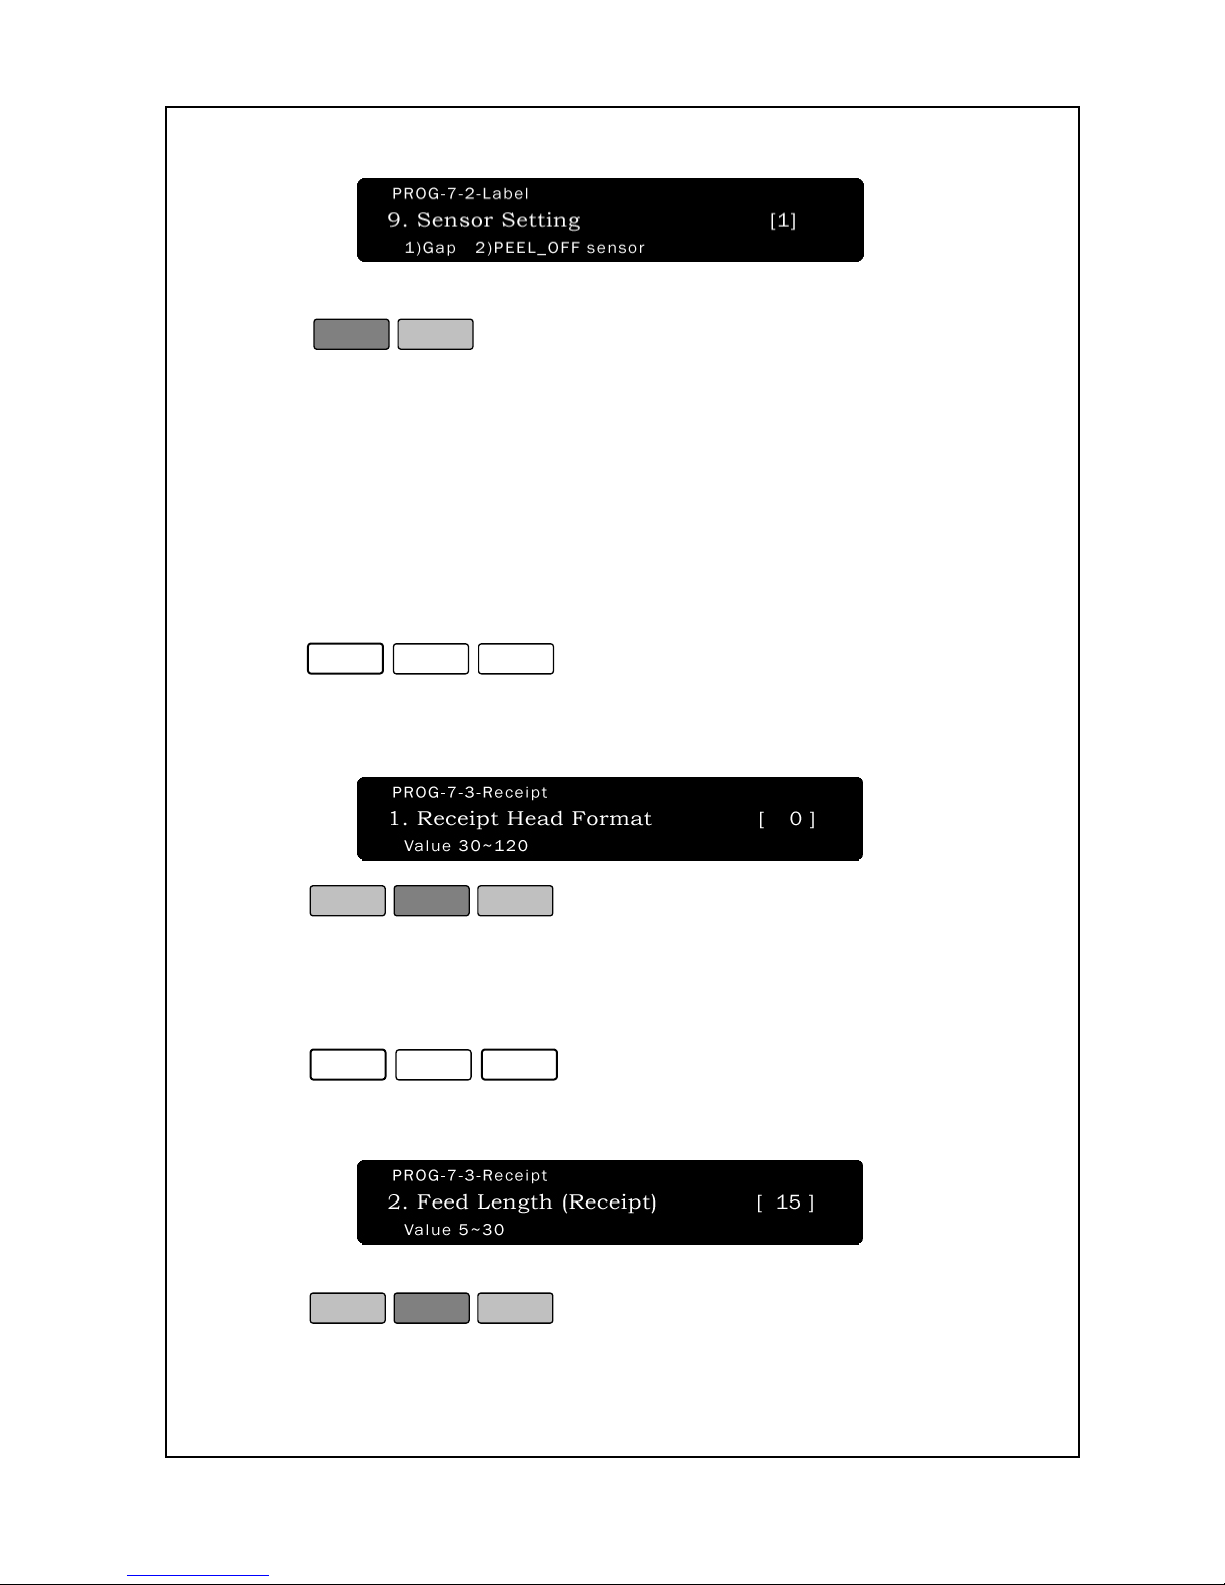
63
4. Press
ESC
SET
to finish and return to Sales Mode.
Note that you may have change the Feed Adjustment value in order to
properly align the printed text on the label.
7-3. Receipt Option
.
To set Receipt Head Format:
1. Enter ‘Main menu’, and follow 3 steps below.
2.Press
7
-
3
-
1
.
3.Enter level of the receipt head format and press Print key, levels
30~120 are available.
4. Press
PRINT
ESC
SET
.
5. You are back in the Initial State.
To set Feed Length(Receipt):
1. Enter ‘Main menu’, and follow 3 steps below.
2.Press
7
-
3
-
2
.
3.Enter level of the feed length and press Print key, levels 5~30 are
available.
4. Press
PRINT
ESC
SET
.
5. You are back in the Initial State.
Page 69
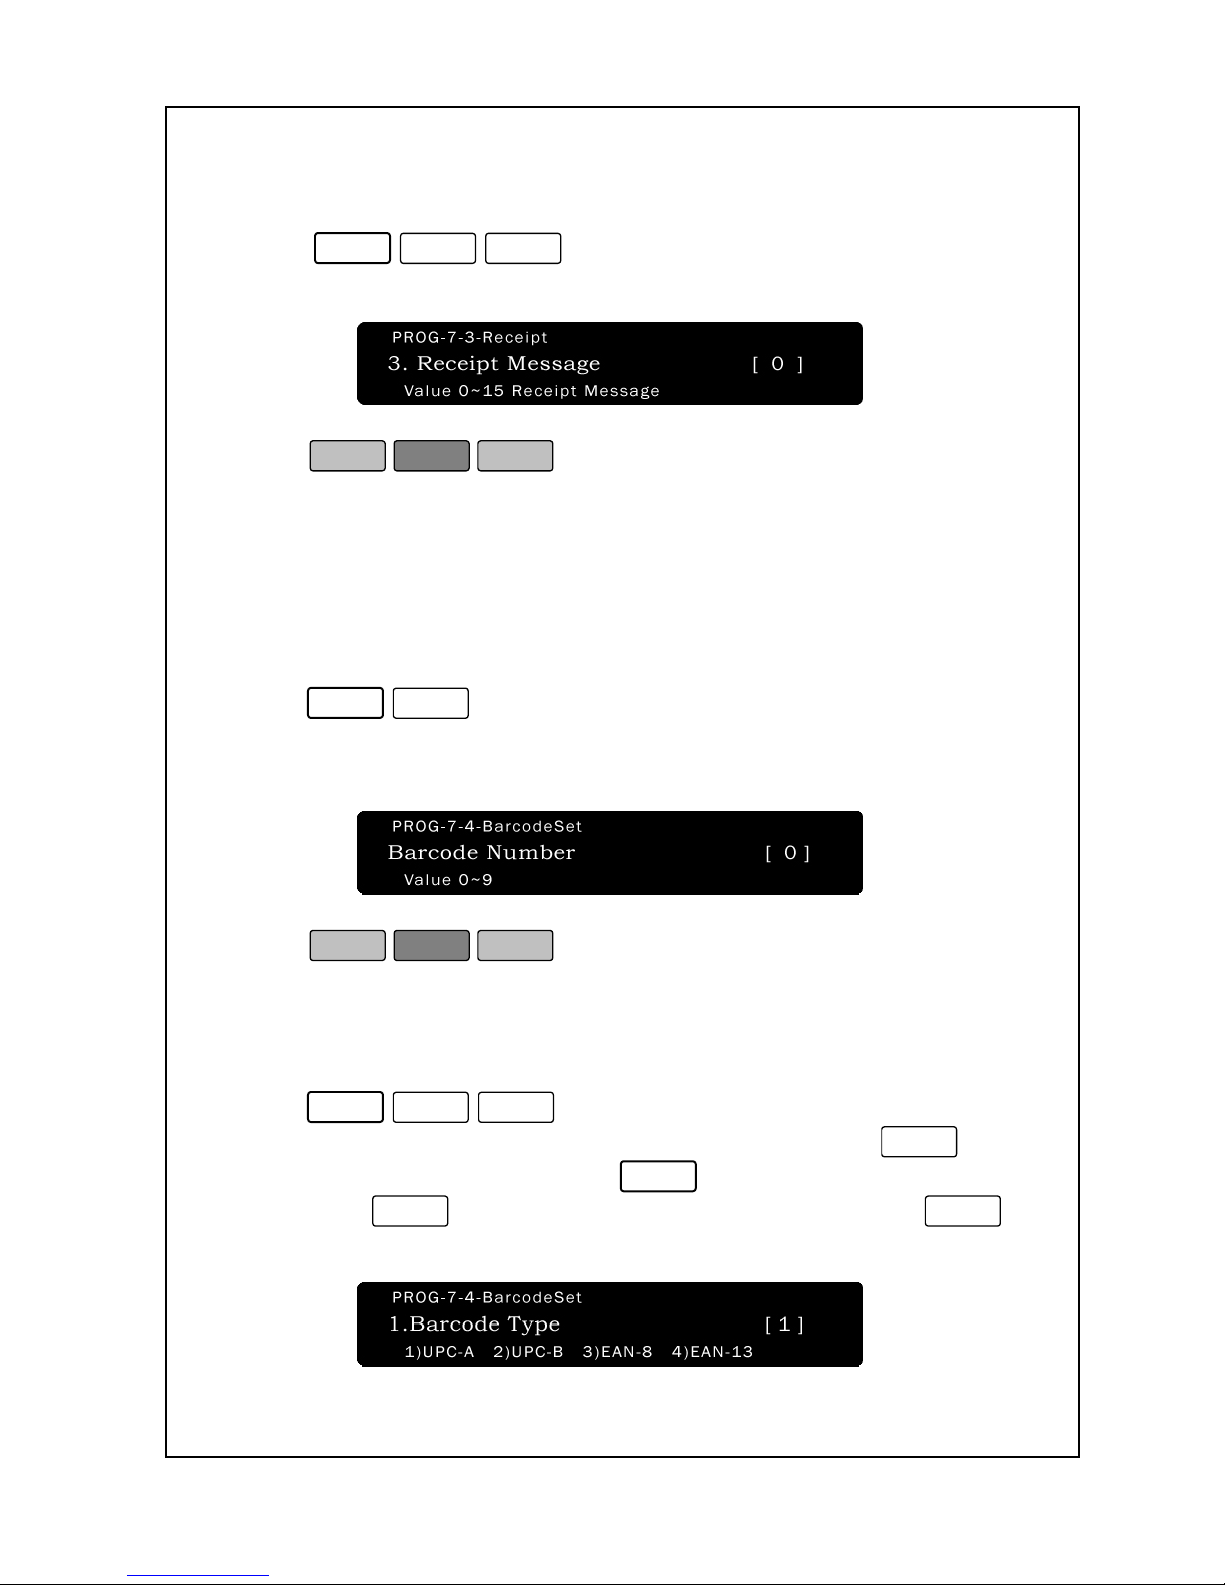
64
To set Receipt Head Format:
1. Enter ‘Main menu’, and follow 3 steps below.
2. Press
7
-
3
-
3
.
3. In the receipt mode, the sale message at P3-4 will be printed.
4. Press
PRINT
ESC
SET
.
5. You are back in the Initial State.
7-4. Barcode Settings
To set Barcode Number:
1. Enter ‘Main menu’, and follow 2 steps below.
2.Press
7
-
4
.
3.Enter level of the barcode number and press Print key, levels 0~9
are available.
4. Press
PRINT
ESC
SET
.
5. You are back in the Initial State.
To set Barcode type:
1. Enter ‘Main menu’, and follow 3 steps below.
2.Press
7
-
4
-
1
.
3.Enter of the barcode type and press Print key. If you set
1
, the
barcode type is “UPC-A”. If you set
2
, the barcode type is “UPC-
B”. If you set
3
, the barcode type is “EAN-8”. If you set
4
,
the barcode type is “EAN-13”.
Page 70
65
4. Press
PRINT
ESC
SET
.
5. You are back in the Initial State.
The NETS can print 4 different barcode styles: UPC-A, UPC-B, EAN-8
and EAN-13. UPC-A is a 12 digit barcode and has been the
predominant standard in the US. UPC-B is a 13 digit barcode that is
usually employed whenever total prices exceed 4 digits. EAN-8 is an 8
digit European barcode that is equivalent to 8 digit UPC barcodes used
in the US. EAN-8 is usually used to label very small packages.
Finally, EAN-13 is a 13 digit barcode and NETS default to EAN-13
barcode. The NETS defaults to EAN-13 barcodes. Only if you are very
knowledgeable in barcoding, should you attempt to change any of
these settings. Many “scanning trouble” errors can be attributed to
improper barcode settings. Please read the next section carefully.
Common Barcode “blues”:
The barcode is a complex and continuously evolving creature; there
are volumes upon volumes of books relating to barcodes. However,
with respect to price computing printing scales, there are a few simple
rules to follow to minimize barcode errors.
First, read the PLU Creation Guidelines in PLU Programming, PLU
Create & Edit section. Keeping PLU numbers equal to UPC Codes
equal to ECR/POS PLU numbers will eliminate a great number of
problems. Secondly, try to coordinate the scale programming and the
ECR/POS programming. Many times there may be more than one
party involved and their failure to communicate properly may result in
errors later on. Finally, make sure that the ECR/POS system is set up
to be able to understand UPC-A barcodes. UPC-A is also known as
UPC-12, price embedded barcode, or random weight barcode.
If you have followed all of our directions but you are still having trouble,
then the trouble is most likely on the ECR/POS side. You need to
make sure that all of the ECR/POS scanner settings are correct as well
as ECR/POS PLU data and settings. If the barcode scanner beeps,
this is a sign that the scanner is functioning properly; most if not all
scanners should be able to read any barcode printed by the NETS.
Because of this, the scanner should never be the source of barcode
troubles unless the output data of the scanner is being rejected by the
Page 71
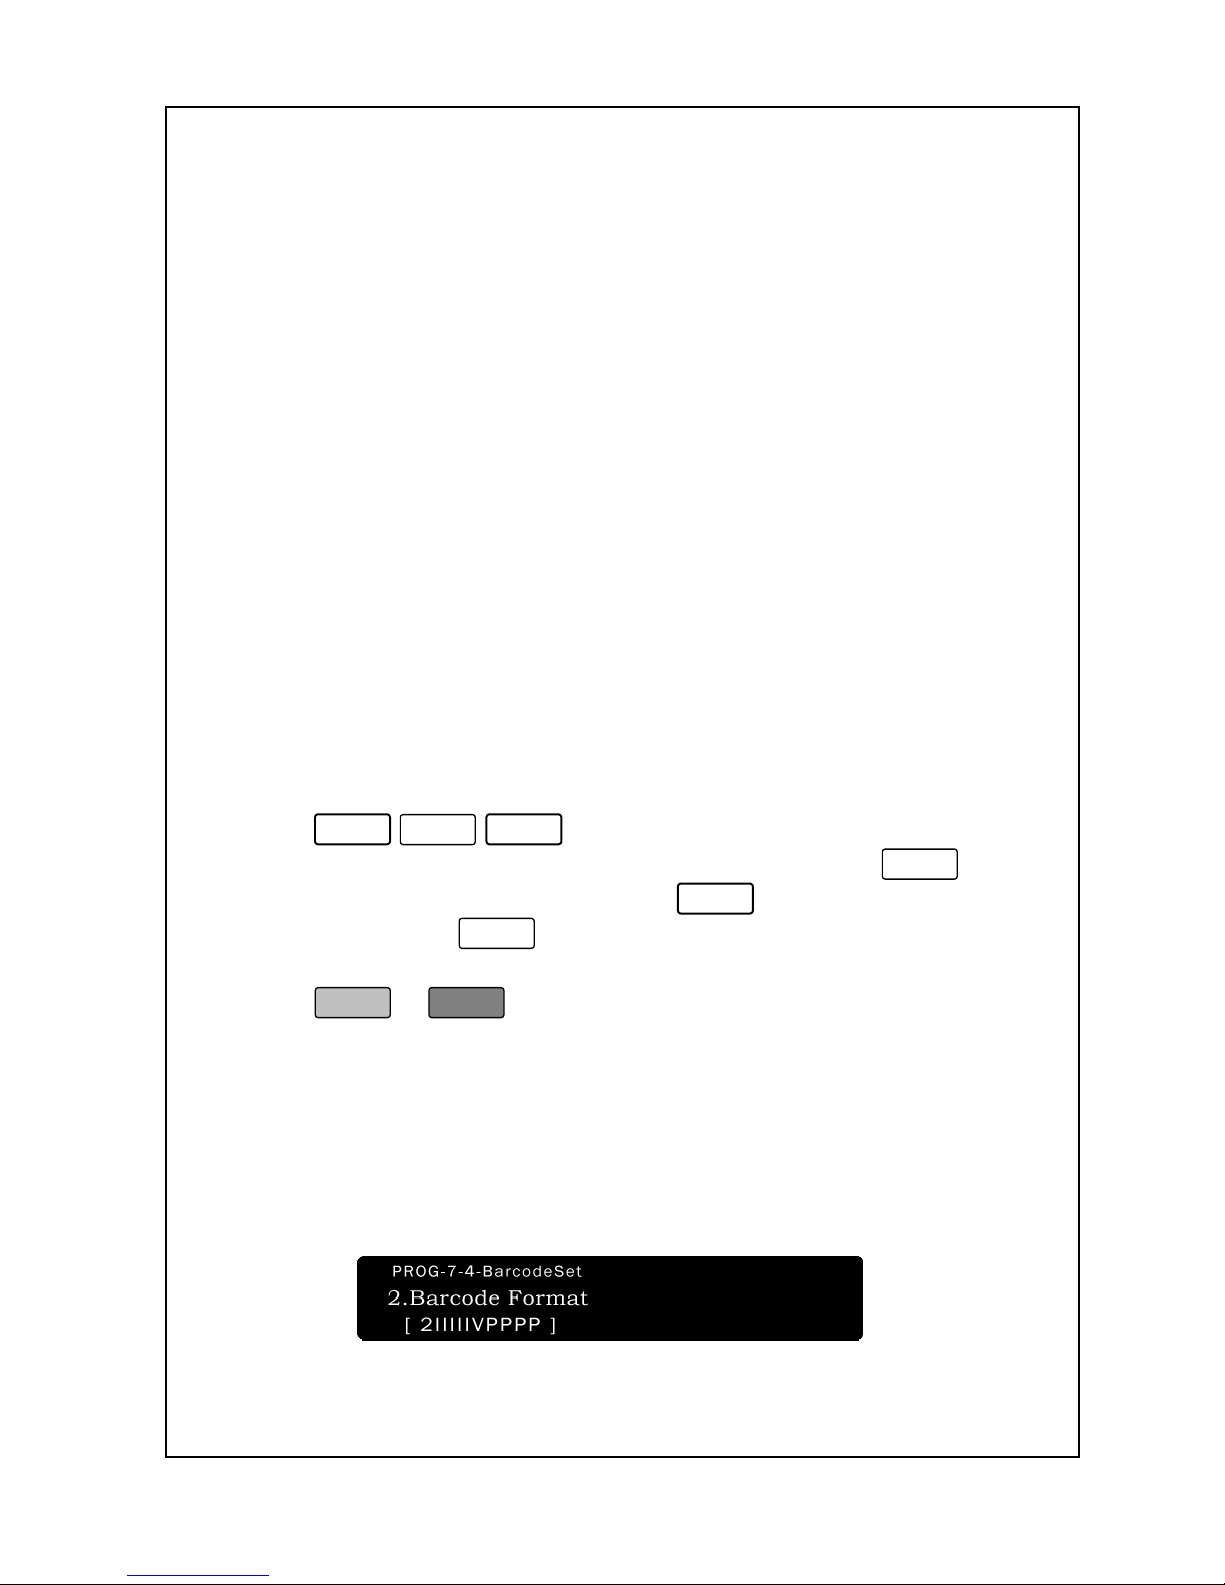
66
ECR/POS system; in which case, you must coordinate your scanner
with your ECR/POS system.
One last tip regarding POS systems: POS systems are usually
personal computers that “look like” ECRs; whereas, ECRs are
hardware devices that are dedicated to ECR use and are not as
flexible and upgradeable as PCs. Because POS systems are PCs in
disguise, they need an operating system (like Windows® XP) and an
application (like Microsoft® Word) that allow it to function as an ECR.
There are a very large number of applications or “software packages”
that are available for POS systems and these are not always written by
big companies that have vast experience in the POS field. Because of
this fact, you may need to check with your software supplier/publisher
for support regarding further scanning errors. In closing, we would
like to mention that most if not all scanning troubles are due to
improper scale programming and improper ECR/POS programming;
the later being the more common.
To modify barcode settings:
1. Enter ‘Main menu’, and follow 3 steps below.
2. Press
7
-
4
-
2
.
3. Enter of the barcode type and press Print key. If you set
1
, the
barcode type is “UPC-A”. If you set
2
, the barcode type is
“UPC-B”. If you set
3
, the barcode type is “EAN-8”. If you set 4,
the barcode type is “EAN-13”. :
4. Press
PRINT
or
Enter
:
The next screen shows you the barcode format string. This string
defines what the numbers in the barcode represent. The default
strings are: “2IIIIIVPPPP”, “02IIIIIVPPPP”, “008IIII” and
“DDIIIIPPPPPP“ for UPC-A, UPC-B, EAN-8 and EAN-13
respectively. We suggest that you only use these format strings
because they are the most prevalent formats in use.
Page 72
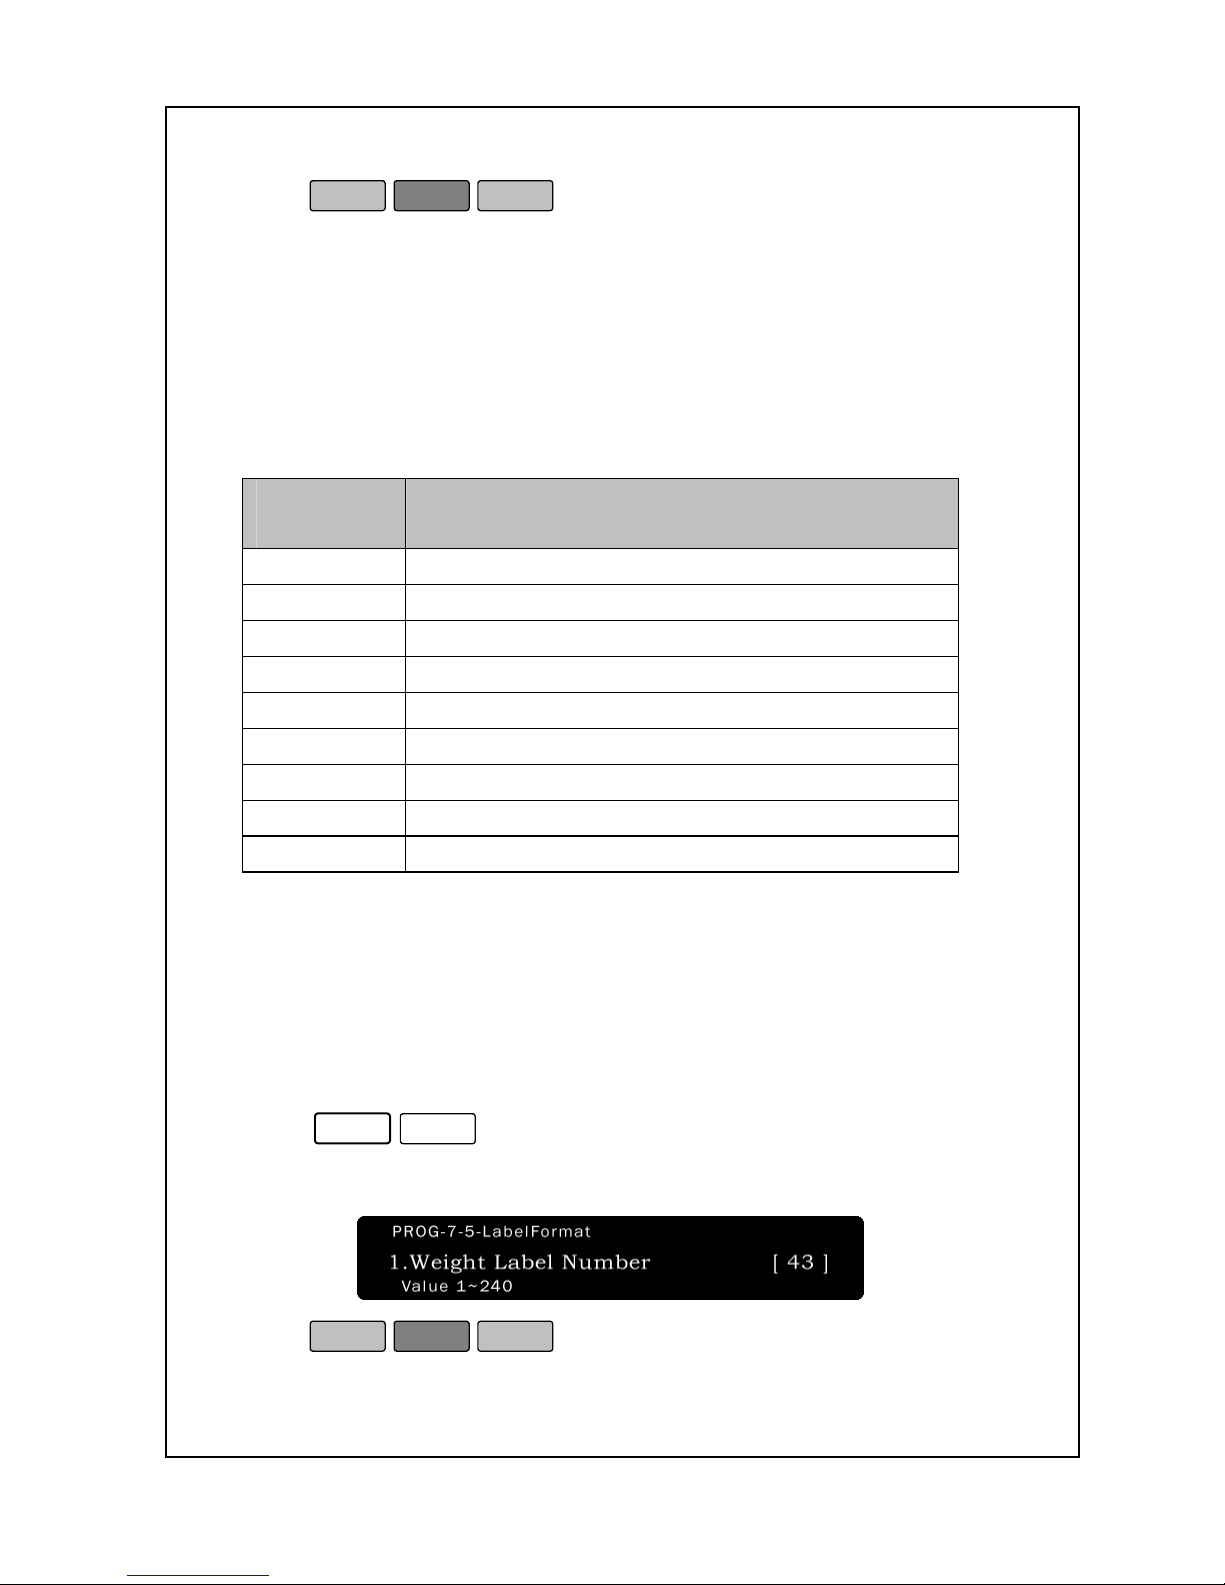
67
5. Press
PRINT
ESC
SET
.
The strings must fill the entire field: UPC-A must be 11 characters long,
UPC-B must be 12 characters long, EAN-8 must be 7 characters long
and EAN-13 must
be 12 characters long. The checksum character is mandatory and will
automatically be appended at the end of the format string. The table
defines the script characters for the format string; if you use other
characters than those mentioned below, your barcodes may not
function properly. See next page for format characters.
Script
Characters
Definition
0 to 9 Will print the actual numbers 0 to 9.
I UPC Code, acquired from the PLU.
V Price verifier
P Total Price
W Weight value
N PLU number
D Identification
G Group
C Checksum Digit
7-5. Label Format
Select the number of the printing label that uses in the sale by weight unit.
To set Weight Label Number:
1. Enter ‘Main menu’, and follow 2 steps below.
2. Press
7
-
5
.
3. Enter a Weight Label Number. This number must be from 1 to 240.
4. Press
PRINT
ESC
SET
.
5. You are back in the Initial State.
Page 73
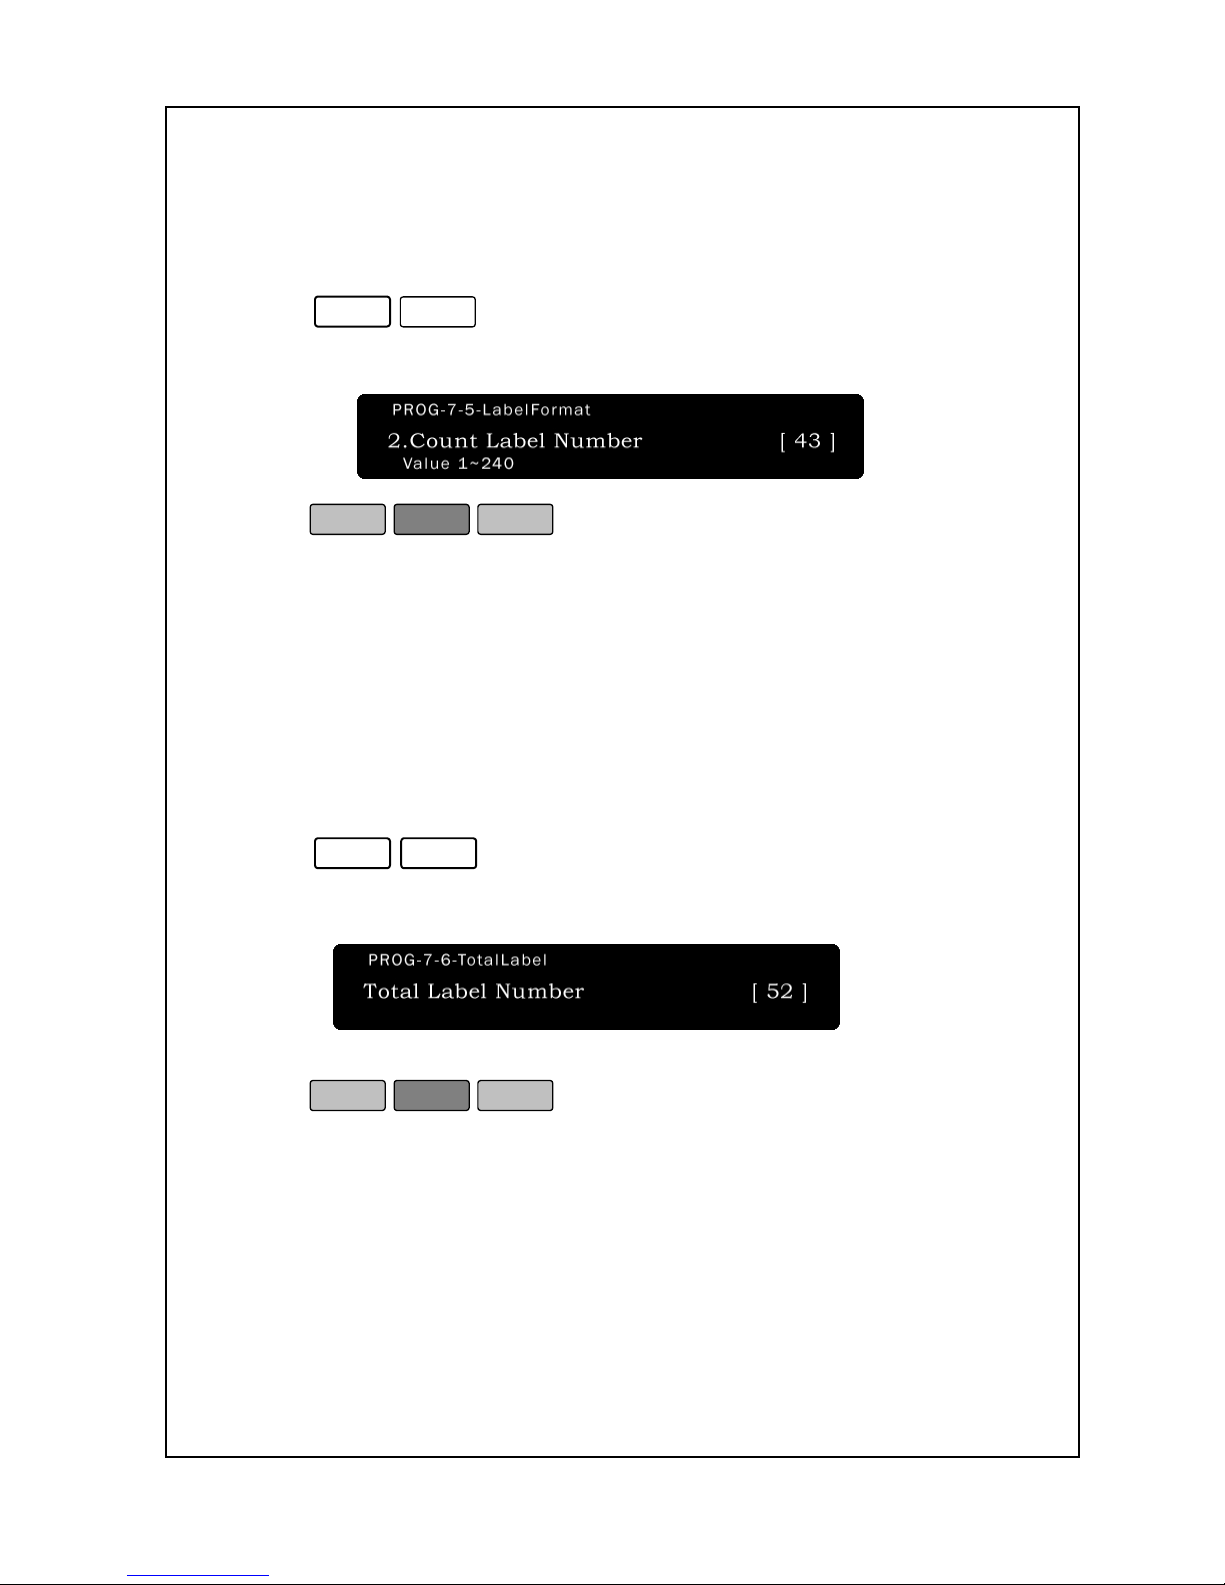
68
Select the number of the printing label that uses in the sale by count unit.
To set Count Label Number:
1. Enter ‘Main menu’, and follow 2 steps below.
2. Press
7
-
5
.
3. Enter a Weight Label Number. This number must be from 1 to 240.
4. Press
PRINT
ESC
SET
.
5. You are back in the Initial State.
7-6. Total Label
Register the number of the printing label that uses in the grand total
.
To set Count Label Number:
1. Enter ‘Main menu’, and follow 2 steps below.
2. Press
7
-
6
.
3. Enter a Total Label Number.
4. Press
PRINT
ESC
SET
.
5. You are back in the Initial State.
Page 74
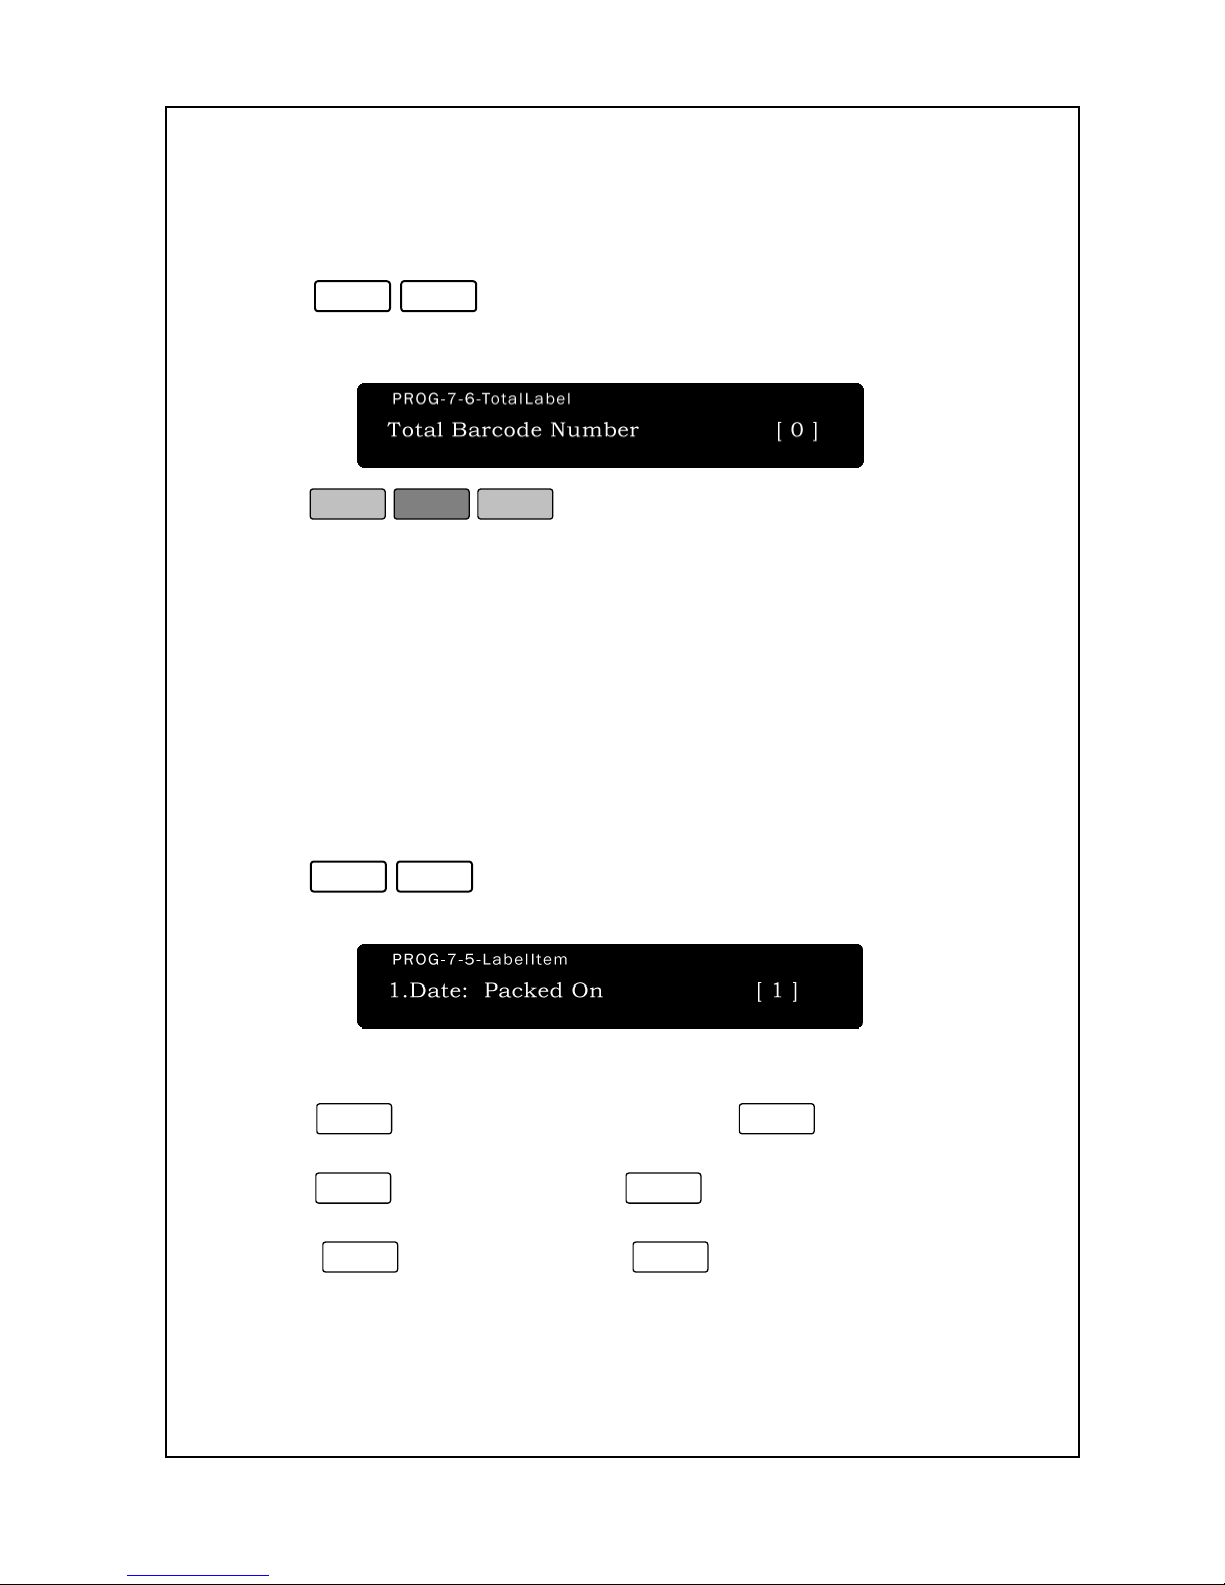
69
Register the number of barcode in the printing label that uses in grand total.
To set Count Label Number :
1. Enter ‘Main menu’, and follow 2 steps below.
2. Press
7
-
6
.
3. Enter a Total Barcode Number.
4. Press
PRINT
ESC
SET
.
5. You are back in the Initial State.
7-7. Select Label Item
The NETS can prevent certain fields from printing on your labels.
You may want to not print barcodes, store names, group codes, etc.
Print Field Suppression allows you to do this.
To suppress the printing of certain fields:
1. Follow steps 1 to 3 of entering Main Menu.
2. Press
7
-
7
.
3. The first field is “Date: Packed On.”
4. Press
1
to allow Packed On to print or
0
not to print.
5. The next field is “Date: Shelf Life.”
Press
1
to allow it to print or
0
not to print.
6. The next field is “PLU Number.”
Press
1
to allow it to print or
0
not to print.
Page 75
70
7. The next field is “Group Code.”
Press
1
to allow it to print or
0
not to print.
8. The next field is “Barcode.”
Press
1
to allow it to print or
0
not to print.
9. The next field is “Weight.” This refers to the Net Weight for By
Weight PLUs. Press
1
to allow it to print or
0
not to print.
10. The next field is “Unit Price.” This refers to the Unit Price of
By Weight and By Count PLUs. Press
1
to allow it to print
or
0
not to print.
11. The next field is “Total Price.” Press
1
to allow it to print or
0
not to print.
12. The next field is “Date : 4 Digit Year.” If
0
is selected then dates
will print with 4 digit years; otherwise, the year will not print.
Press
1
to allow it to print or
0
not to print.
13. The next field is “Store Name.” If
0
is selected then the Store
Name will not print; if
1
, then only Line 1 of the Store Name
will print; if
2
, then lines 1 and 2 will print. if 3, then lines 1,
2 and 3 will print
Currently, there are no 3 line Store Name label formats.
Press
0
,
1
,
2
or
3
.
14. The next field is “Commodity Name.” If
0
is selected then the
Commodity Name will not print; if
1
, then only line 1
of the Commodity Name will print; if
2
, then lines 1 and 2
will print. Press
0
,
1
, or
2
.
15. The next field is “Ingredients.” If
0
is selected then the
Ingredients will not print; if
1
, then only Line 1 of the
Ingredients will print; if
2
, then lines 1 and 2 will print…
if,
1
0
then lines 1 to 10 will print, if Y then all lines will print.
16. The next field is “Sales Message”. Press
1
to allow it to
print or
0
not to print.
17. The next field is “Head Print(Receipt)”. Press
1
to allow it
to print or
0
not to print.
18. The next field is “Scale No(Receipt)”. Press
1
to allow it to
print or
0
not to print.
Page 76
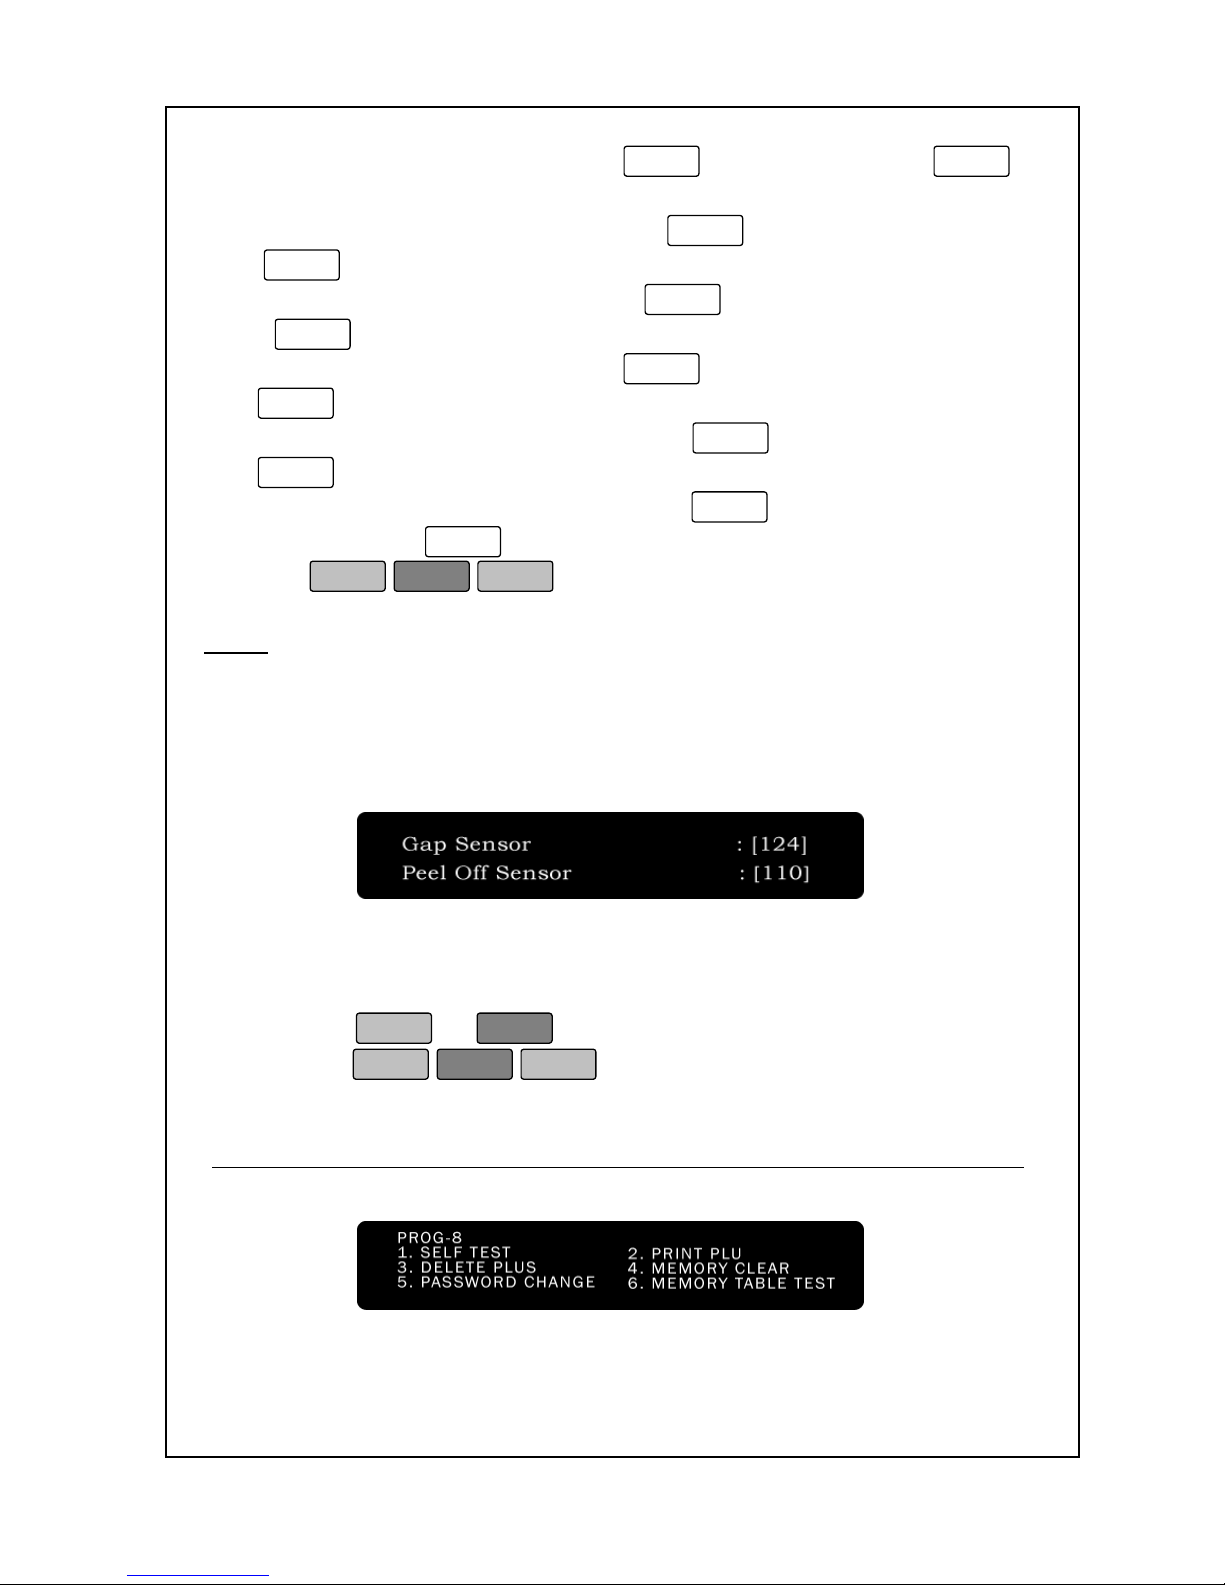
71
19.The next field is “Operator”. Press
1
to allow it to print or
0
not to print.
20.The next field is “Month String”. Press
1
to allow it to print
or
0
not to print.
21. The next field is “Nutritional”. Press
1
to allow it to all line print
or
0
not to print.
22. The next field is “Cooking”. Press
1
to allow it to all line print or
0
not to print.
23. The next field is “Print Currency”. Press
1
to allow it to print or
0
not to print.
24. The last field is “Print SUB and GST” . If
1
is selected then
they will print; if
0
then they will not print.
25. Press
PRINT
ESC
SET
. You are at the Initial State.
Note:
Although you may select things to print, if they are not in the label
format, then the Print Field Suppression setting will be ignored.
For example, if you use a label format that does not have ingredients
then it does not matter what the Print Field Suppression setting for
ingredients is set to: the ingredients will NEVER print on said labels.
1. Press
PRINT
or
Enter
for checking.
2. Press
PRINT
ESC
SET
. You are at the Initial State.
8. System Settings
Page 77
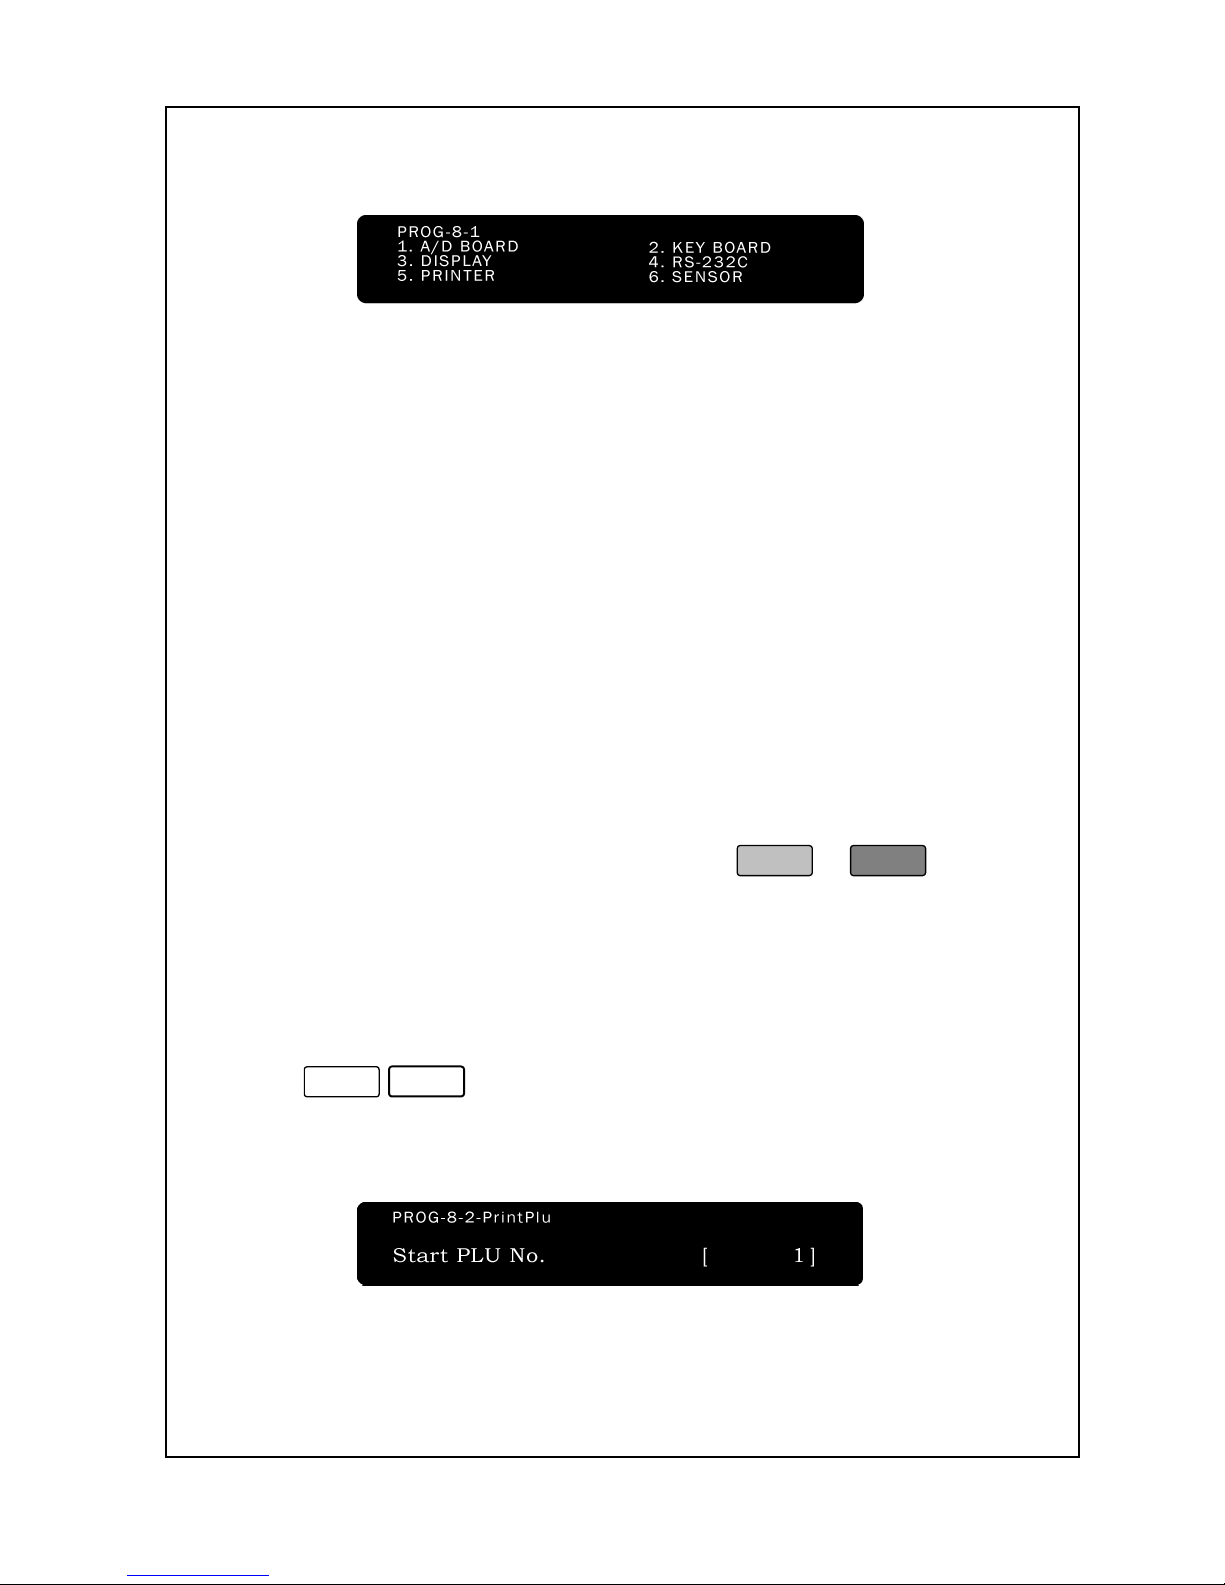
72
8-1. Self Test
The NETS has a several self test features that can help you determine
if things are working correctly. However, these features should only be
used by an ACOM Dealer. Details regarding these features are located
in the NETS Service Manual (Calibration mode: C1-2) available ONLY
to ACOM Dealers.
8-2. Print PLU
The NETS can display or print a list of all the scale’s PLUs. This can
be very helpful when you do not have the NETS Software Package
or do not have access to a computer. Whenever you are generating
a printout of the PLU list, you want to make sure that your scale is
loaded with enough labels to complete the job. The scale will print
a verification label for every PLU in the range that you specify, so it
is recommended that you use a small label format when you do this.
When you display the PLU, you cannot specify a range; therefore, you
must toggle through ALL of the PLUs or press
PRINT
or
Enter
to finish
prematurely. We recommend that you purchase the NETS Software
Package if you are going to be dealing with over 100 PLUs.
To print the PLU List:
1. Enter ‘Main menu’, and follow 2 steps below.
2. Press
8
2
.
3. Make sure that the printer is loaded with enough labels. Using the
numeric keys, type the PLU number that you want the list to start from.
Page 78
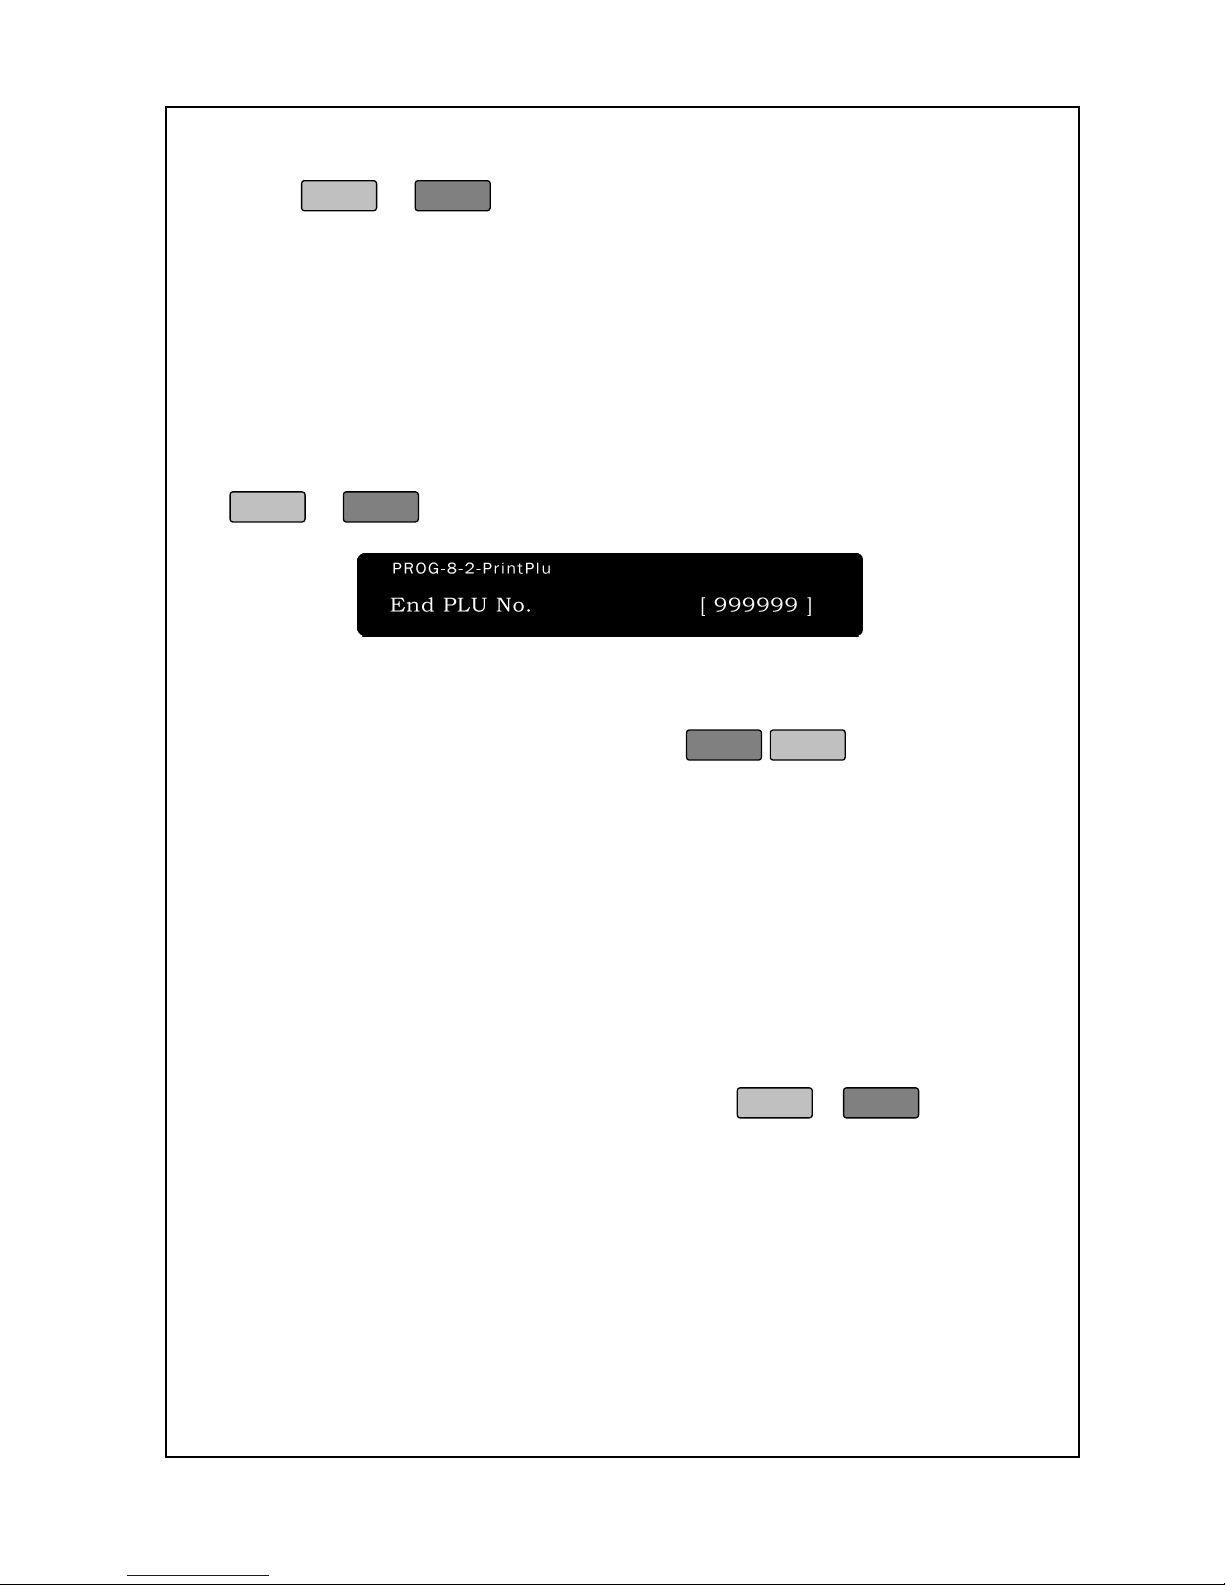
73
4. As you type, the number will appear in the Total Price Display.
Press
PRINT
or
Enter
. Now select the last (ending) PLU number for
your list. The Unit Price Display will show the starting PLU number
and the Total Price Display will show the ending PLU number. When
the scale prints the labels, it will NOT wait for you to take them before
it prints
out the next one; therefore, we recommend that you do not thread the
backing paper to the pick-up spool for this operation. Instead, have
the backing paper feed out with the labels as they are printed so that
they do not “peel-off.” When you are ready to start printing, press
PRINT
or
Enter
.
5. The scale will sequentially go through every PLU in the range that
you specified and print out a verification label for those PLUs that it finds.
6.Once the scale is finished printing, press
ESC
SET
to exit and return
to the Initial State.
8-3. Delete PLU
The NETS can store up to 1000 PLU. Although this is enough for most
applications, there may come a time that you might want to delete some
PLUs to remove unused or erroneous PLUs.
When you display the PLU, you cannot specify a range; therefore, you
Must toggle through ALL of the PLUs or press
PRINT
or
Enter
to finish
rematurely.
We recommend that you purchase the NETS Software Package if you
are going to be dealing with over 100 PLUs.
Page 79
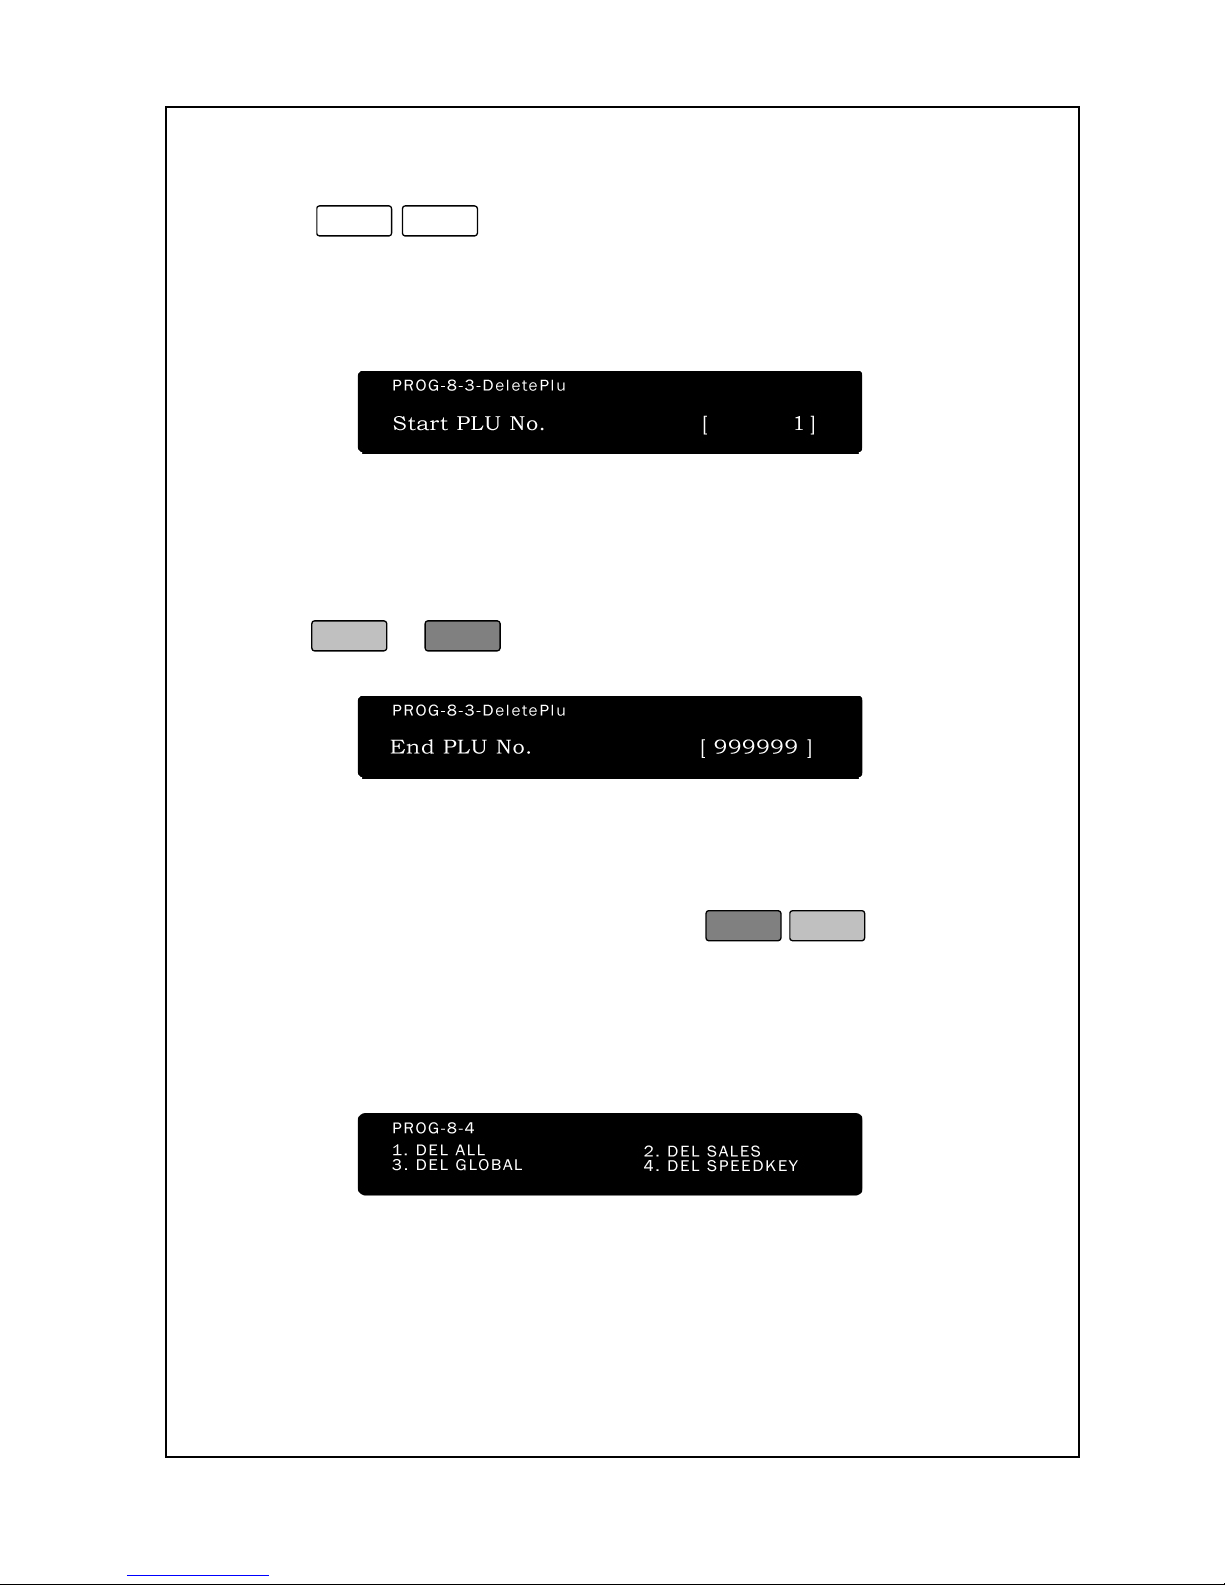
74
To Delete the PLU List:
1. Enter ‘Main menu’, and follow 2 steps below.
2. Press
8
-
3
.
3. Using the numeric keys, type the PLU number that you want the
list to start from.
4. out the next one; therefore, we recommend that you do not thread
the backing paper to the pick-up spool for this operation. Instead,
have the backing paper feed out with the labels as they are printed so
that they do not “peel-off.” When you are ready to start printing,
press
PRINT
or
Enter
.
5. The scale will sequentially go through every PLU in the range that
you specified and print out a verification label for those PLUs that it
finds.
6. Once the scale is finished printing, press
ESC
SET
to exit and
return to the Initial State.
8- 4. Memory Clear
All data(PLU data, Account data and Registration data) can be
deleted(initialization) or deleted by selected data
Page 80
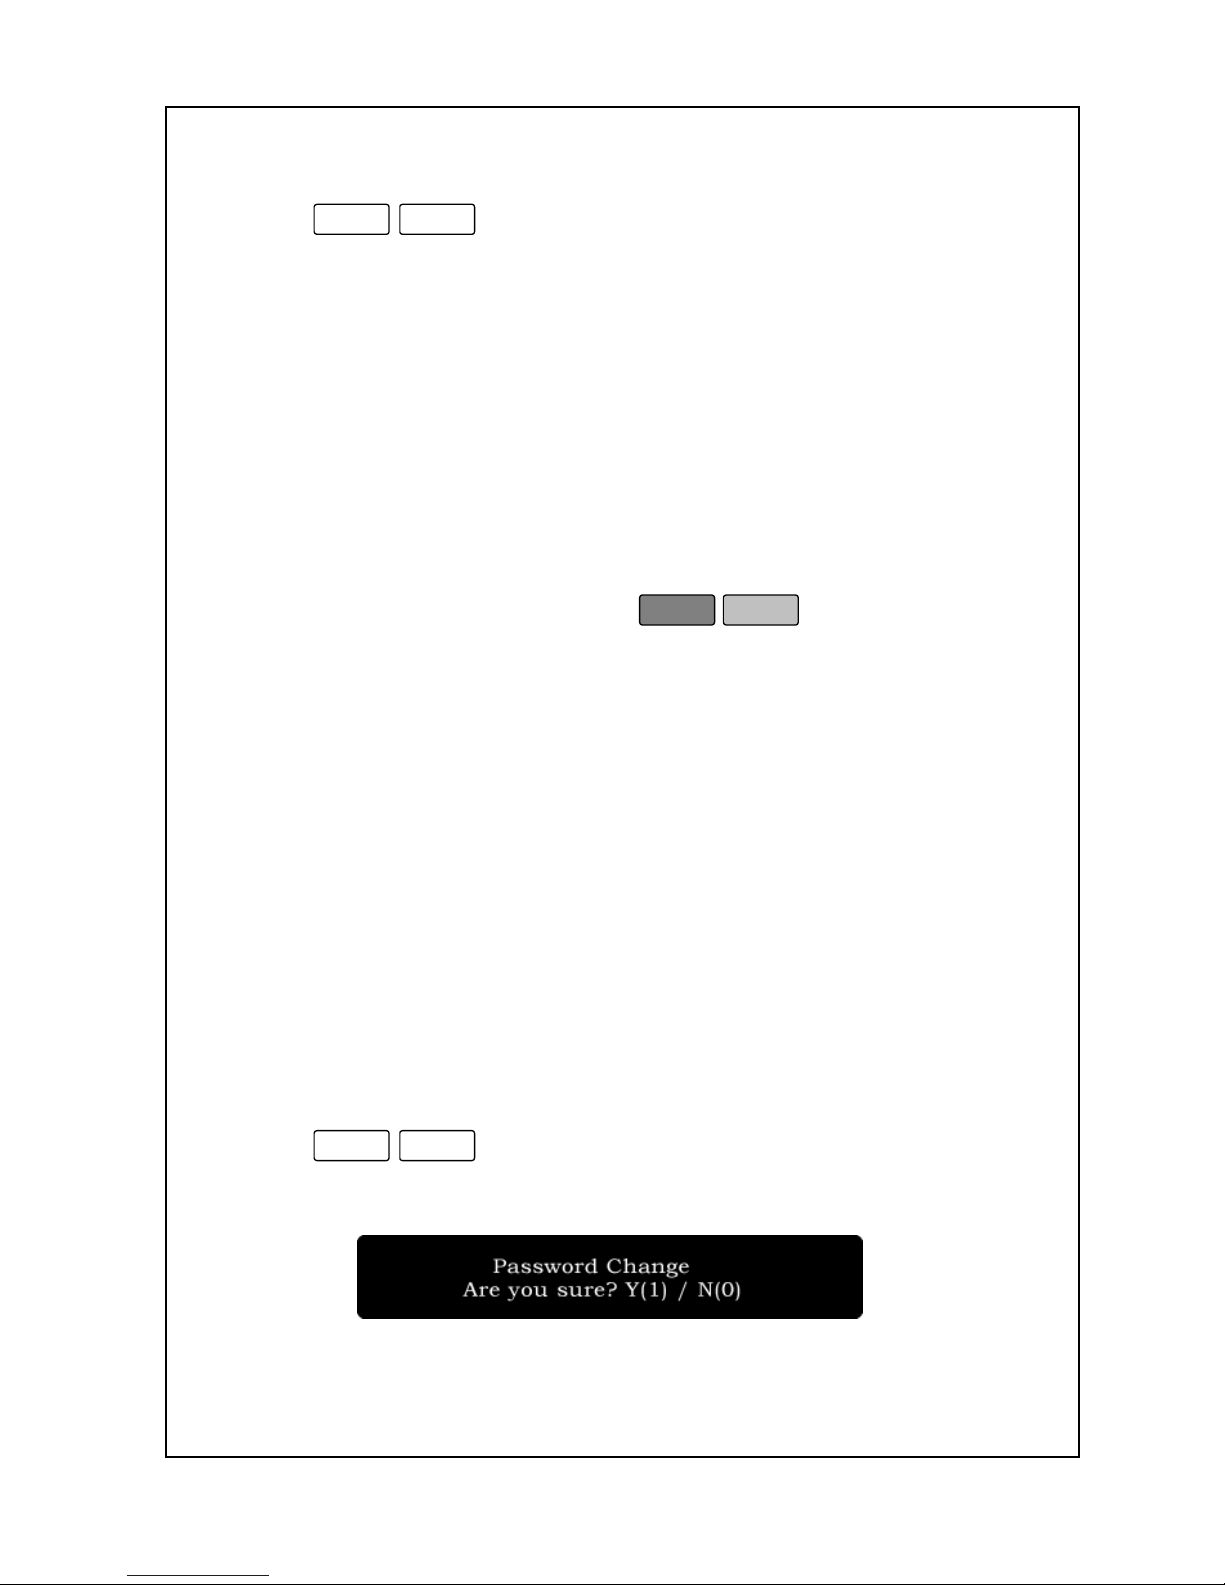
75
To make memory clear:
1. Enter ‘Main menu’, and follow 2 steps below.
2. Press
8
-
4
3. The Alpha Display will show you 4 different cases:
Origins etc
* Del All : Deleting all data,
i.e. PLU data, Account data and Registration data such as
store name, sale message etc.
* Del Sales : Deleting Sales data, i.e. Account data.
* Del Global ; Deleting Store name, Group codes, Titles and
Origins etc
* Del SpeedKey : Deleting SpeedKey.
4. Once the memory is finished, press
ESC
SET
to exit and
return to the Initial State.
8-5. Password Change
You can change the password to any 4 digit number you want.
The initial password is “1111”. Changing this feature is only permitted
by licensed individuals.
Do not forget your password; write it down somewhere safe.
If you forget your password, you will NOT be able to access the scale;
the only way to correct this problem is to call your ACOM Dealer who
may have to clear out ALL of the scale’s memory and completely
reprogram the scale, which may or may not incur additional charges.
To change the password:
1. Enter ‘Main menu’, and follow 2 steps below.
2. Press
8
-
5
.
3. The Alpha Display will show:
Page 81
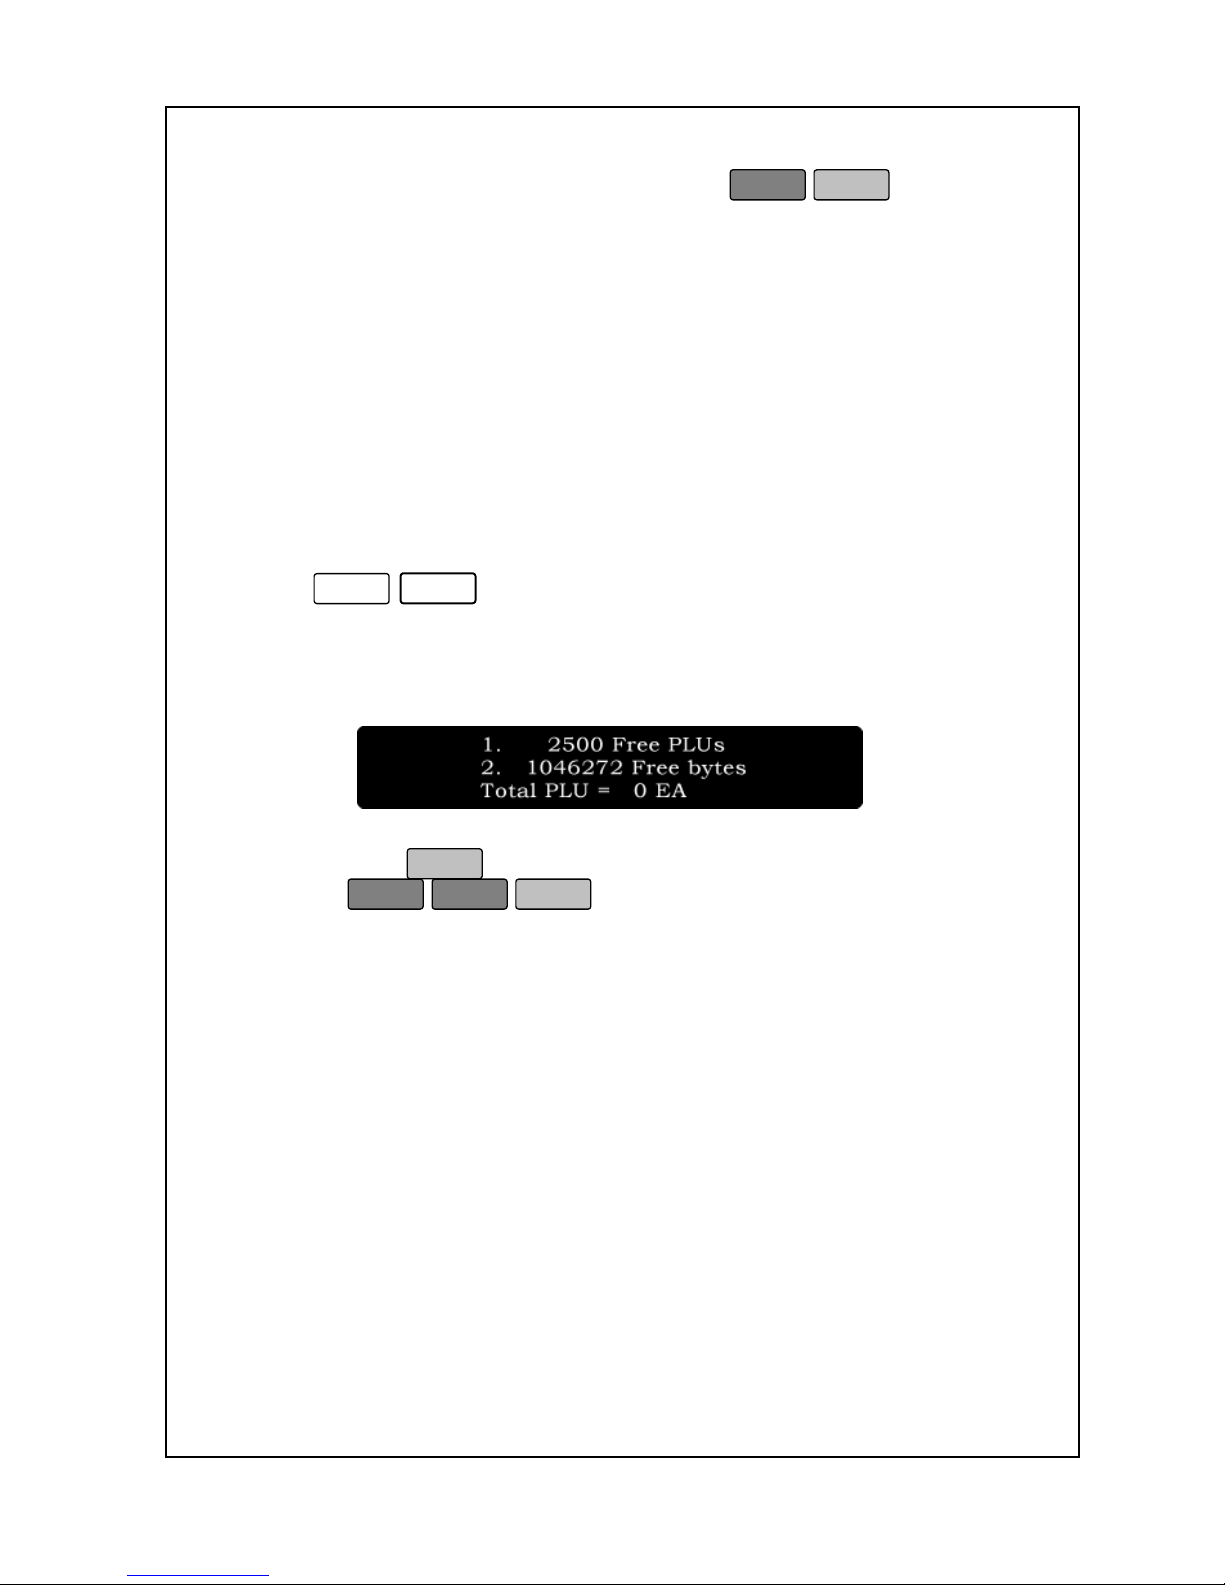
76
Select No.1 is for changing. Select No.2 is for no changing.
4. Once the scale is finished changing, press
ESC
SET
to exit and
return to the Initial State.
8-6. Memory Table Test
If you ever want to know how much more memory space you have left or
how many more PLUs you can program, you can use this feature. This
can be very useful when you have a large number of PLUs or if you are
constantly adding PLUs without deleting unused PLUs.
To check PLU Memory Status:
1. Enter ‘Main menu’, and follow 2 steps below.
2. Press
8
-
6
.
3. The Alpha Display will show you how many more PLUs you can
program (1) and how many bytes of memory are left (2) Also, You can
see the number of the total PLU.
4. You can press
PRINT
go to step 5 or When you are done viewing the
data, press
ESC
ESC
SET
to exit and return to the Initial State
Page 82
77
Other Additional useful functions:
PLU Key & Calling Up PLUs
Sales mode is the Initial State. This is where you do all of your sales
transactions. The basic “blueprint” of a scales transaction is :
In By Weight & Label
Start at the Initial State
Select a PLU (Calling Up a PLU)
Place the item on the scale
Press
PRINT
or
Enter
.
Remove the item from the scale and apply the label
In By Count & Label
Start at the Initial State
Select a PLU (Calling Up a PLU)
The platter is empty and you can type numeric key and
FOR
key.
Press
PRINT
or
Enter
.
Remove the item from the scale and apply the label
In By Weight & Receipt & Single User
Start at the Initial State
Select a PLU (Calling Up a PLU)
Place the item on the scale
Press the
Then the Weight Display is displayed Operator Number. And
the Unit Price Display is displayed the number of the item and
the number of the void. The Total Price Display is displayed
Total Price. The Alpha Display shows “SUB TOTAL”
If you want to add sold item, Press C and go to first step.
When you finished, Press
PRINT
or
Enter
in SUB TOTAL
view
Remove the item from the scale and apply the receipt
ADD
Page 83
78
In By Weight & Receipt & Multi User
Start at the Initial State
Select a PLU (Calling Up a PLU)
Place the item on the scale
Press the assigned operator key.
Then the Weight Display is displayed Operator Number. And
the Unit Price Display is displayed the number of the item and
the number of the void. The Total Price Display is displayed
Total Price. The Alpha Display shows “SUB TOTAL”
If you want to add sold item, Press C and go to first step
Press
PRINT
or
Enter
in SUB TOTAL view
Remove the item from the scale and apply the receipt
This blueprint will always work assuming that you have a non-zero
Total Price. You may want to use a different tare than that of the PLU
that you are calling up, use a different price, use a different piece count.
In any case, these are features that are accessed using different keys
that can add steps to this basic blueprint. All of these features will be
covered in the sections to follow. You may have realized that this
basic blueprint can work for By Count PLUs; although By Count PLUs
need not be weighed, you can place them on the platter when you do a
transaction.
Whenever you call up a PLU, you need to know whether the PLU is By
Count or By Weight. Remember that By Count PLUs do not need to
be weighed so you can save yourself the step of having to place the
item on the scale. This can increase your productivity. The easiest
way to tell the a PLU is By Count is that the Weight Display is C
character.
There are also many other functions and options that can add or some
more steps to the basic blueprint mentioned above, but it is more or
less the same. One important note to mention is that the first 2 steps
are interchangeable; that is, you can either type a price and then place
the item on the scale or place the item on the scale and then type a
price. Additionally, you may not need to press
PRINT
or
Enter
if you
are in Auto-Print mode.
Page 84
79
Selecting or “Calling Up” a PLU:
1. Start in Sales mode.
2. Type the PLU number and press
PLU
or press a Speed Key.
The Zero Key
You can use the
ZERO
key to correct a deviation from zero so long as
there is no PLU called up and the “Net” Lamp is off.
You should never leave items on the platter for any long length of time;
items should only be on the platter for a few minutes. Sometimes,
leaving items on the platter for an extended period of time will cause a
shift in the zero point that you will notice when you remove the item
from the scale. The
ZERO
key can correct this problem. Sometimes
small crumbs or debris may accumulate on the platter. The scale’s
AZTM (Automatic Zero Tracking Mechanism) will automatically “press”
the
ZERO
key for you so that you can continue to use the scale even
though the crumbs or debris may be on the platter. After a while, you
ma y c le an th e p la tt er and then no ti ce a c ha ng e i n zero.
You can use the
ZERO
key to correct this.………………………..
Using the ZERO key:
1. Start in Sales mode making sure that there are no tares set or PLUs
called up and that the platter is completely empty.
2. Press
ZERO
.
If this does not work, then:
1. Remove everything from the platter.
2. Turn the Power Switch off and then back on.
The Tare Key
You can use the
TARE
key to override a PLU’s preset tare, enter a
sampled a tare, enter a manual tare, or clear a tare.
Page 85
80
Sampled tares:
Sampled tares are tares that are acquired from the weight on the
platter. For example, if you have a container that you wish to tare but
you do not know what the weight of it is you can:
1. Start from the Initial State.
2. Place the empty container on the platter.
3. Press
TARE
.
Clearing tares:
Both manual and sampled tares are cleared exactly the same way.
For example, if you have a tare set on the scale and you want to clear
it you can:
1. Remove all items from the platter.
2. Press
TARE
.
The Save Key (Label)
You can use the
SAVE
key to prevent the Auto Clear Function (ACF)
from working. The ACF automatically clears a PLU, tare, or unit price
whenever the scale returns to gross zero.
Auto Clear Function, By Weight:
1. Start from the Initial State.
2. (Optional) Enter a tare.
3. Type a price or call up a By Weight PLU.
4. Place an item on the scale so that the Total Price > 0.00.
5. Once the Stable Lamp is on, remove the item from the platter.
6. The PLU and/or the unit price and tare (if any) are automatically
cleared.
Auto Clear Function, By Count:
1. Start from the Initial State.
2. Call up a By Count PLU with a Unit Price > 0.00.
3. Press
PRINT
or
Enter
.
4. If the Total Price > 0.00, the scale will print a label and the PLU and
is automatically cleared.
Page 86
81
Whenever you wish to use the same tare, price, or PLU for many
transactions you may want to use the
SAVE
key. The
SAVE
key
does not automatically print, it only prevents ACF from happening. If
you want to also automatically print you can use the
AUTO
key in
conjunction with the
SAVE
key.
Whenever the Save Lamp is on it means that the scale will not use the
ACF. You can turn the Save function on or off by pressing
SAVE
.
To turn the Save function on:
1. Start from the Initial State.
2. Press
SAVE
. The Save Lamp turns on.
3. Type a price or call up a PLU.
4. (Optional) Place an item on the scale.
5. (Optional) Enter or change the Piece count and/or Unit Price.
6. Press
PRINT
or
Enter
.
7. (Optional) Remove the item from the platter.
8. The PLU and/or the unit price and tare (if any) are not cleared.
Steps 2 thru 5 can be done in any order.
To turn the Save function off:
1. Start from the Initial State with the Save Lamp on.
2. Press
SAVE
. The Save Lamp turns off.
3. The PLU and/or the unit price and tare (if any) are cleared.
The Auto Key (Label)
You can use the
AUTO
key to have the scale print labels automatically.
Whenever the Auto Lamp is on it means that the scale will print
automatically. You can turn the Auto Print function on or off by pressing
AUTO
at any time. Auto print will only print automatically for By Weight
PLUs; Additionally, the weight must return to gross zero (remove
everything from the platter) before the scale will auto print again. This
key is usually used with the
SAVE
key.
Page 87
82
The Set Key
You can use the
SET
key to enter the Main Menu from the Initial
State or to go to the Initial State from the Main Menu. and you can
discount with numeric key
1
, no sale open with numeric key
2
The Label/Receipt Key
You can use the key to choose the printing mode.
Change the printing mode:
1. Start from the Initial State.
2. Press
3. If you change the printing mode, choose the printing mode.
4. Press
PRINT
or
Enter
.
The REFUND/ESC Key
You can use the key to go the Password request screen
to the Initial State or to back up from any submenus within the Main
Menu, until you get to the Main Menu. Once you are at the Main Menu
you can use the
SET
key to go to the Initial State. The Refund function
is about account of an item. It is different from the void function.
The dollar amount of refund is accounted.
In you have refund item case, how to refund the item:
1. Start from the Initial State.
2. Select a PLU (Calling Up a PLU)
3. If the called PLU is by weight, place the item on the scale.
Otherwise, the platter is empty. If in receipt mode by multi user,
Press the assigned key.
5. Press
1
Label / Receipt
Label / Receipt
REFUND / ESC
REFUND / ESC
Page 88
83
6. The Alpha Display is show the dollar amount of refund.
In you do not have refund item case, how to refund the item :
1. Start from the Initial State.
2. Select a PLU (Calling Up a PLU)
3. Press
4. If the called PLU is by weight type, enter the number of refund
weight. Press
PRINT
or
Enter
. Then enter the number of refund
price. Press
PRINT
or
Enter
If the called PLU is by count type,
enter the number of refund item. Press
PRINT
or
Enter
. If you
really wish to do, press
1
If in receipt mode by multi user,
Press the assigned key.
6. The Alpha Display is show the dollar amount of refund.
The ADD Key
You can use the key to add the sold item.
Using ADD key In receipt mode by only single user :
1. Start at the Initial State
2. Select a PLU (Calling Up a PLU)
3. Place the item on the scale. Then Press the
4. Then the Weight Display is displayed Operator Number. And
the Unit Price Display is displayed the number of sold item and the
number of the void. The Total Price Display is displayed Total
Price. The Alpha Display shows “SUB TOTAL”
5. Press
PRINT
in SUB TOTAL view
6. Remove the item from the scale and apply the receipt
Using ADD key In label mode:
1. Start at the Initial State
2. Select a PLU (Calling Up a PLU)
REFUND / ESC
ADD
ADD
Page 89
84
3. Place the item on the scale
4. Press the then a label is printed.
5. The Weight Display is displayed ADD character. And the Unit
Price Display is displayed the number of sold item and the number
of the void. The Total Price Display is displayed Total Price. The
Alpha Display shows “SUB TOTAL”
6. If you want to add other items, Press
C
and go the step 1.
7. When you finished, Press
PRINT
or
Enter
in SUB TOTAL view. If
at the Initial State, Press then the Alpha Display
shows “SUB TOTAL”.
8. When you are pressing in sub total view, the accumulated total
price is printed on label. Remove the item from the scale and
apply the label.
The X/Sub Total Key
The key acts like a label copier. In other words, it allows
you t o r epe a t t he s a m e sal e s t ra n s act i o n ma n y t ime s .
The key will not work when the Auto Lamp is on.
To use the X key:
1. Start from the Initial State.
2. Call up a PLU. Make sure that the Total Price > 0.00.
3. Press
X
, enter the number of labels you want, and press
PRINT
.
4. The scale will issue the labels you requested.
To use the Sub Total key :
1. Make sure that receipt mode.
2. This is done in order for the scale to keep more accurate sales data.
3. The printing can be in Sub total view.
If at Initial State, Press
ADD
X / Sub Total
X / Sub Total
X / Sub Total
X / Sub Total
Page 90
85
The For Key
The
FOR
key is used to convert By Weight PLUs into By Count
PLUs. And you can use it for percent discount in receipt mode.
To use the For key with By Weight PLUs:
1. Start from the Initial State.
2. Call up a By Weight PLU.
3. Press
FOR
and make sure that the Weight Display is zero.
4. The By Weight PLU temporarily turns into a By Count PLU
The Clear Key
The
C
key is used to clear erroneous numeric entries and to
“unload” or clear a PLU that has been called up in Sales mode.
The Clear key with PLUs:
1. Start from the Initial State.
2. Call up a PLU.
3. If you press the
C
key:
4. The PLU is cleared. You are at the Initial State.
In other words, pressing the
C
key once will clear the Unit Price;
pressing it a second time will then clear the PLU.
The Clear key is also used in Program mode to clear text. If the cursor
is on a text field (Alpha Display) and you press
C
, then all of the
text to the right of the cursor will be deleted.
For example, here we have the cursor in the middle of a text field. In
this example, the cursor is represented by a solid black character
block; in reality the cursor is constantly flashing.
Page 91
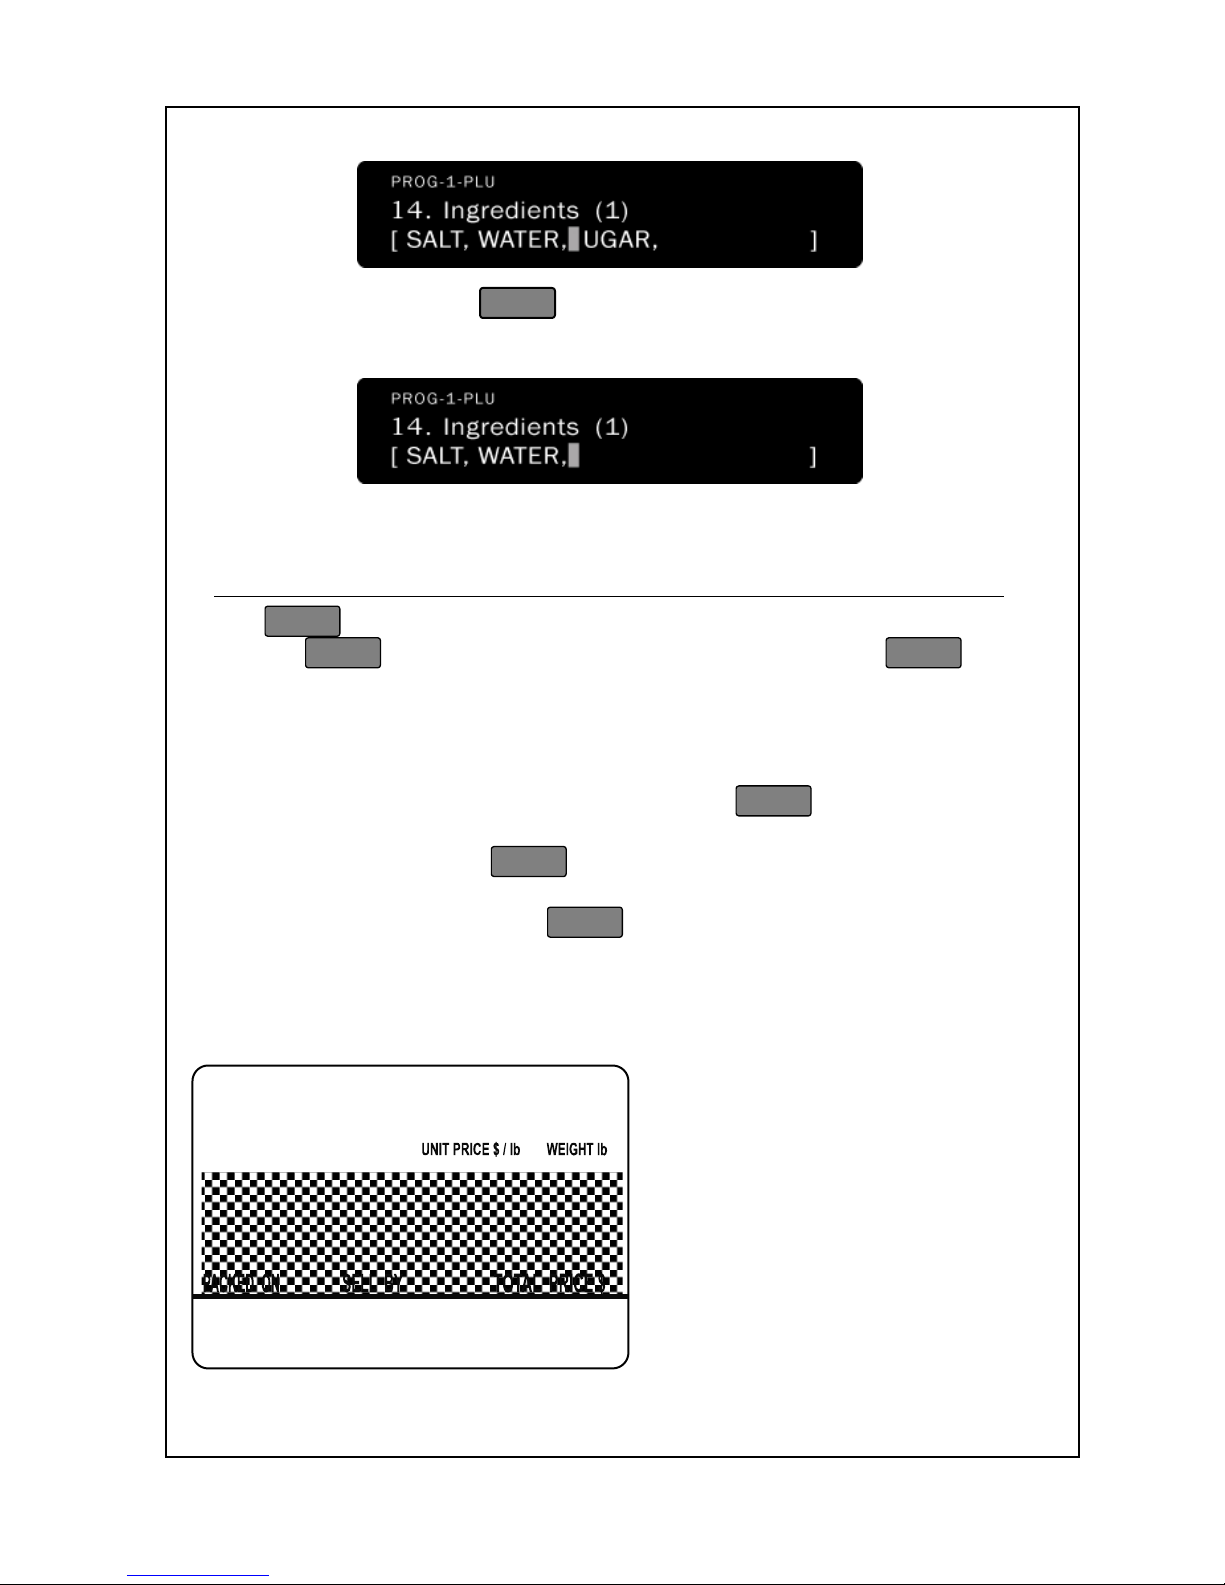
86
If you were to press
C
, then the above text field would be
changed as follows:
The Feed Key
The
FEED
key is used to feed out labels from the printer. You can
use the
FEED
key at any time in Sales mode. To use the
FEED
key
just press it at and a label will be issued immediately.
Whenever you move or remove the cassette drawer mechanism from
the printer bay, you should always use the
FEED
key to align the
labels after you securely replace the cassette drawer mechanism. You
should always press the
FEED
key 2 or 3 times to align the labels.
The labels issued from the
FEED
key have a special “checkered”
pattern printed on them. This pattern is there to let you know the
status of the thermal print head (TPH.)
A good checkered pattern:
This is a good pattern; you
can see that the pattern is
uniform and has no missing or
faded black squares. Also,
the top and bottom edges of
the pattern are parallel to the
label edges.
Page 92
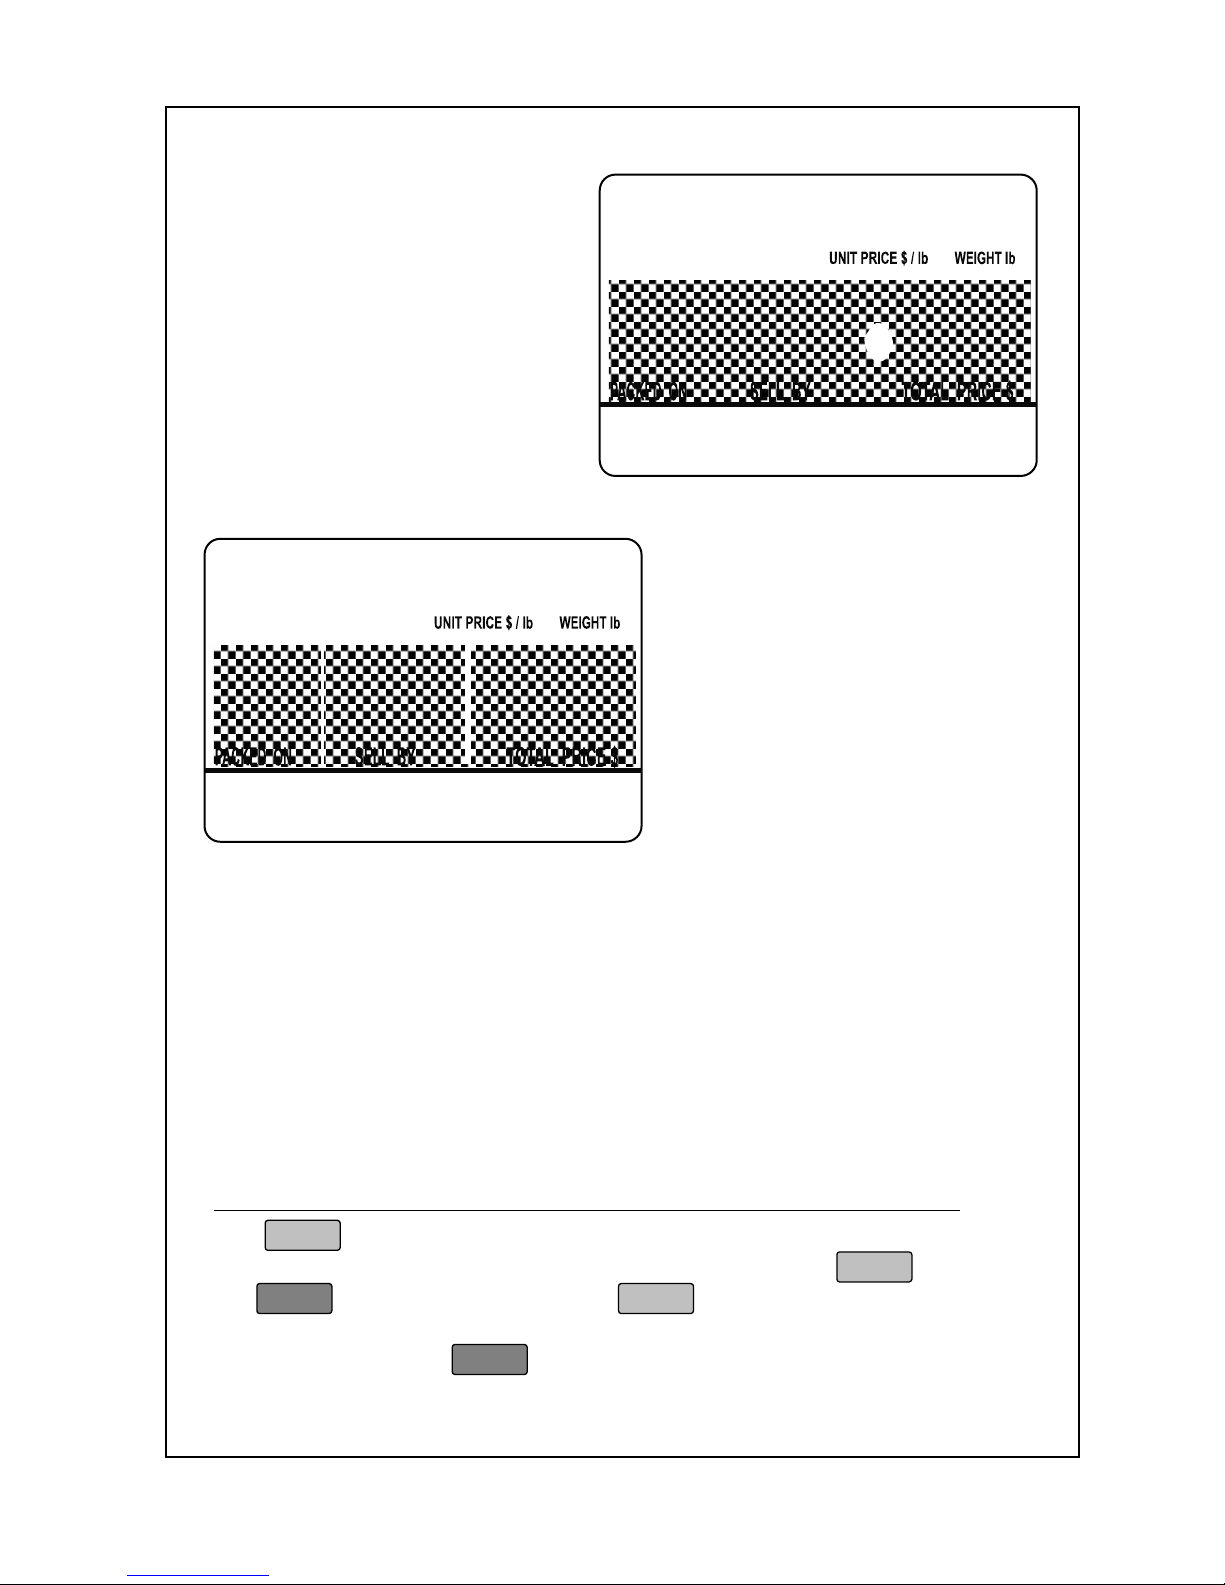
87
Needs cleaning:
This pattern indicates that the
TPH may need cleaning. The
white “spot” inside the pattern
may sometimes also have
parts of the pattern inside the
spot and the spot may not
always appear on every label.
Also may appear faded.
May need service:
There are two problems
depicted here: the leftmost
trouble spot is a very thin line of
“missing” pattern; the right-most
trouble spot is a more
pronounced missing line. Both
will appear completely from top
to bottom.
You can try cleaning the TPH, but this is most likely a scratched TPH.
If you clean the TPH (see Maintenance section) and any of these
problems persist, then it is possible that the platen may be damaged or
that the TPH has been scratched or damaged. Call your ACOM
Dealer for service. Do not attempt to service the TPH yourself! The
TPH has high voltage and can get extremely hot during normal use
and even hotter in some “damaged” conditions. If you attempt to
repair the unit yourself, you risk injury and voiding your warrantee.
The Print Key
The
PRINT
key is used to print labels in Sales mode, and as an Enter
key in Programming mode. In Programming mode, the
PRINT
key and
the
Enter
key are equivalent. The
PRINT
key can only issue labels in
Sales mode when there’s a PLU called up & Total Price > 0.00. It has
a same function with
Enter
.
Page 93
88
Void Function
The acts like a sales voiding key whenever you are
in Sales mode. It is used to subtract the price of damaged or returned
packages whose sales were issued by the scale. This is done in order
for the scale to keep more accurate sales data. No labels are issued
whenever you do a void. The voided items are printed with strike on
receipt.
To use Void function :
1. Start from the Initial State or the SUB TOTAL view.
2. Press .
3. Then “VoId” character will appear in the Weight Display. And
the number of sold item and the number of the void will
appear in the Unit Price Display. The Total Price will appear in
the Total Price Display.
4. Select the sold item you want to void by Pressing
key
Press
SAVE
.
5. When you finished, Press .
Discount Function (Receipt)
To use Discount function :
1. Start from the Initial State.
2. Press
1
SET
.
3. Then The “disc” character will appear in the Weight Display. And
the “Per” character will appear in the Unit Price Display. The
percentage of discount will appear in Total Price Display.
4. Enter the percent of discount: it must be from 0.00 to 99.99.
5. Press
PRINT
or
Enter
.
6.
Press
FOR
in the sub total view
7. The “SUB TOTAL DISC” character will appear in alpha display.
Press
PRINT
or
Enter
.
REFUND / ESC
REFUND / ESC
REFUND / ESC
Page 94
89
Change & Tender Print (Receipt)
You can print change and tender on receipt.
To use Change & Tender function :
1. Start from the Initial State.
2.
Press in the SUB TOTAL view
.
3. Enter the price of tender & change from 0.00 to 999999.99.
4. Press
PRINT
or
Enter
.
Multi User operation (Receipt)
You can have multiple operators in a store. The P3-3 operator data in
master scale is sent to slave scale. But the P3-3 operator data in slave
scale is not sent to master scale.
To use multi user :
1. Start from the Initial State.
2.
Press for choosing the receipt mode
PRINT
or
Enter
.
3.
Press
SET
.
4. Press Password.
5. Press
5
7
6. Choose the Multi user. Press
2
PRINT
7. Press
2
for assigning operators key.
8. Press the alpha key you want to assign, then .
Enter the operator number you wish to assign. Press
PRINT
or
Enter
to save the new assignment and go to step 3.
9. Press
ESC
ESC
SET
to go back to the Initial State.
If you are programming in master scale, the master scale send the
changed operator data to all slave scale. So the assigned
operators are recorded in all slave scale
Label / Receipt
REFUND / ESC
X / Sub Total
X / Sub Total
Page 95
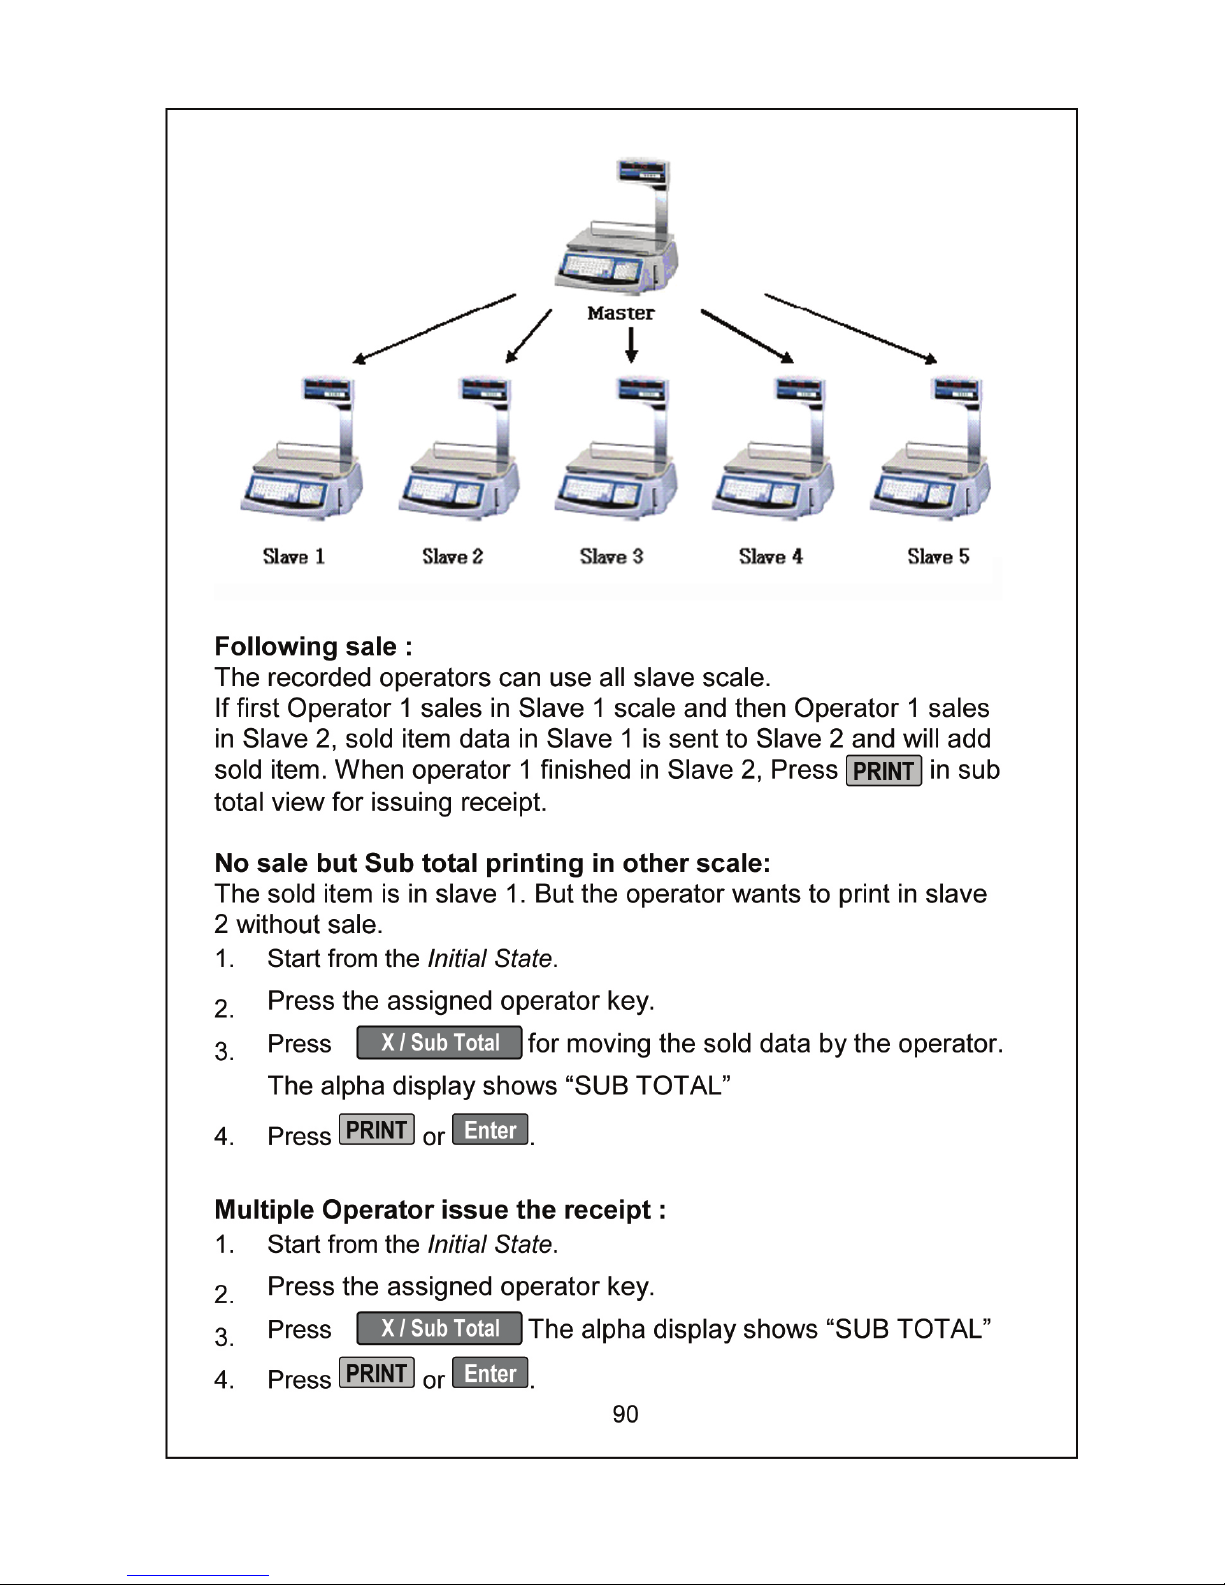
Page 96

91
PC to Scale Data Transfer
You can use your PC to store data files for the NETS scale, all you
need to do is to purchase the NETS Software Package. Contact your
local ACOM Dealer for purchasing options. This is NOT a network
function nor can it become one. PC to scale data transfer uses
serial (RS-232) communication to transfer data, which can only be
wired from 1 PC to 1 scale. For Ethernet TCP/IP networking
availability, please contact dealer:
To transfer data from PC-to-Scale:
1. Place the PC and the scale together.
2. Make sure that the Power Switch is off on both the PC and the
NETS .
3. Connect the PC-to-Scale cable: the female side goes to the PC and
the male side goes to the NETS .
4. Turn the PC on, then turn the scale on, and wait for the scale to go
to the Initial State.
5. Follow the instructions that accompanied your NETS Software
Package.
Note
1
: You can have multiple scales. The master scale manages
the slave sale. If the master scale is connected with pc, the master
scale automatically sends and saves the received data from pc. But
between The slave scale and slave scale can not transmit.
Page 97
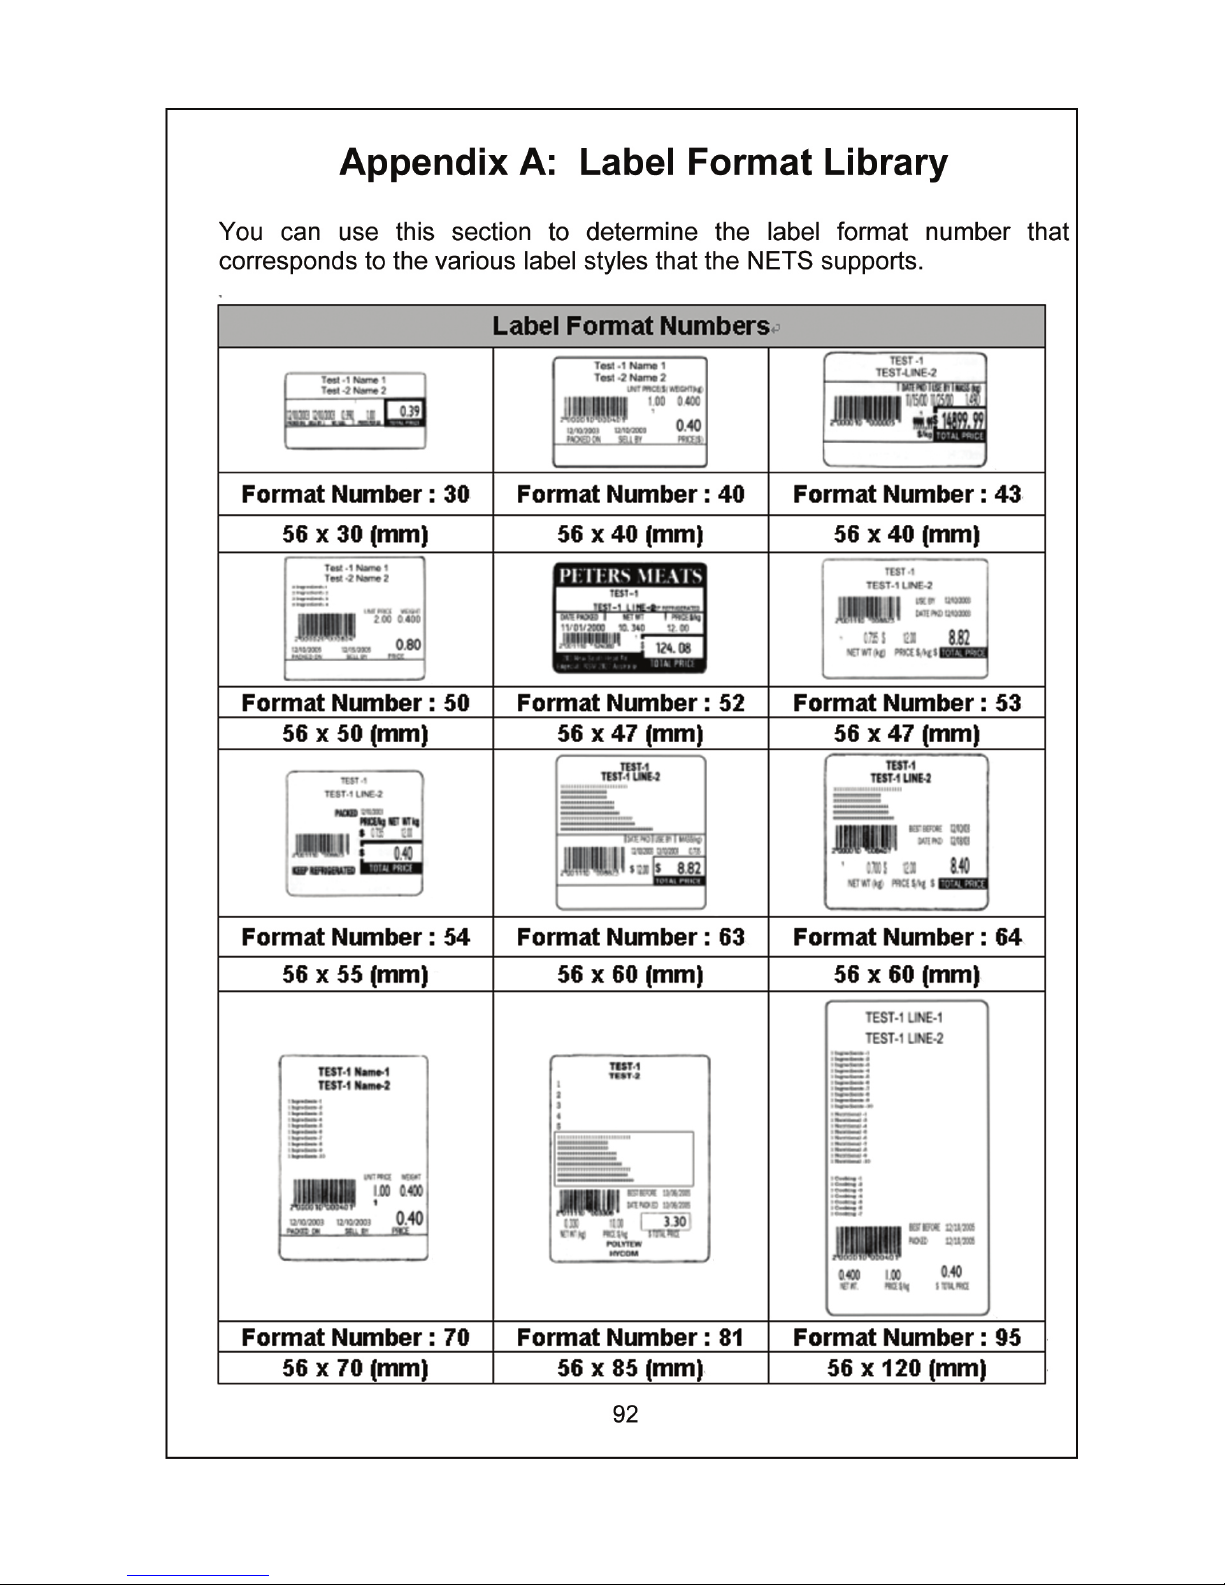
Page 98

ACOM Inc.
Head Office & Factory ;
679-1 Yugyo-Ri, Gunnae-Myun, Pocheon-Si, Kyunggi-Do,
487-872 Korea
Tel : +82 31 531 2205 Fax : +82 31 531 9199
Homepage :
www.acominc.co.kr
E-mail : [email protected]
Printed in Korea
 Loading...