

Page 1
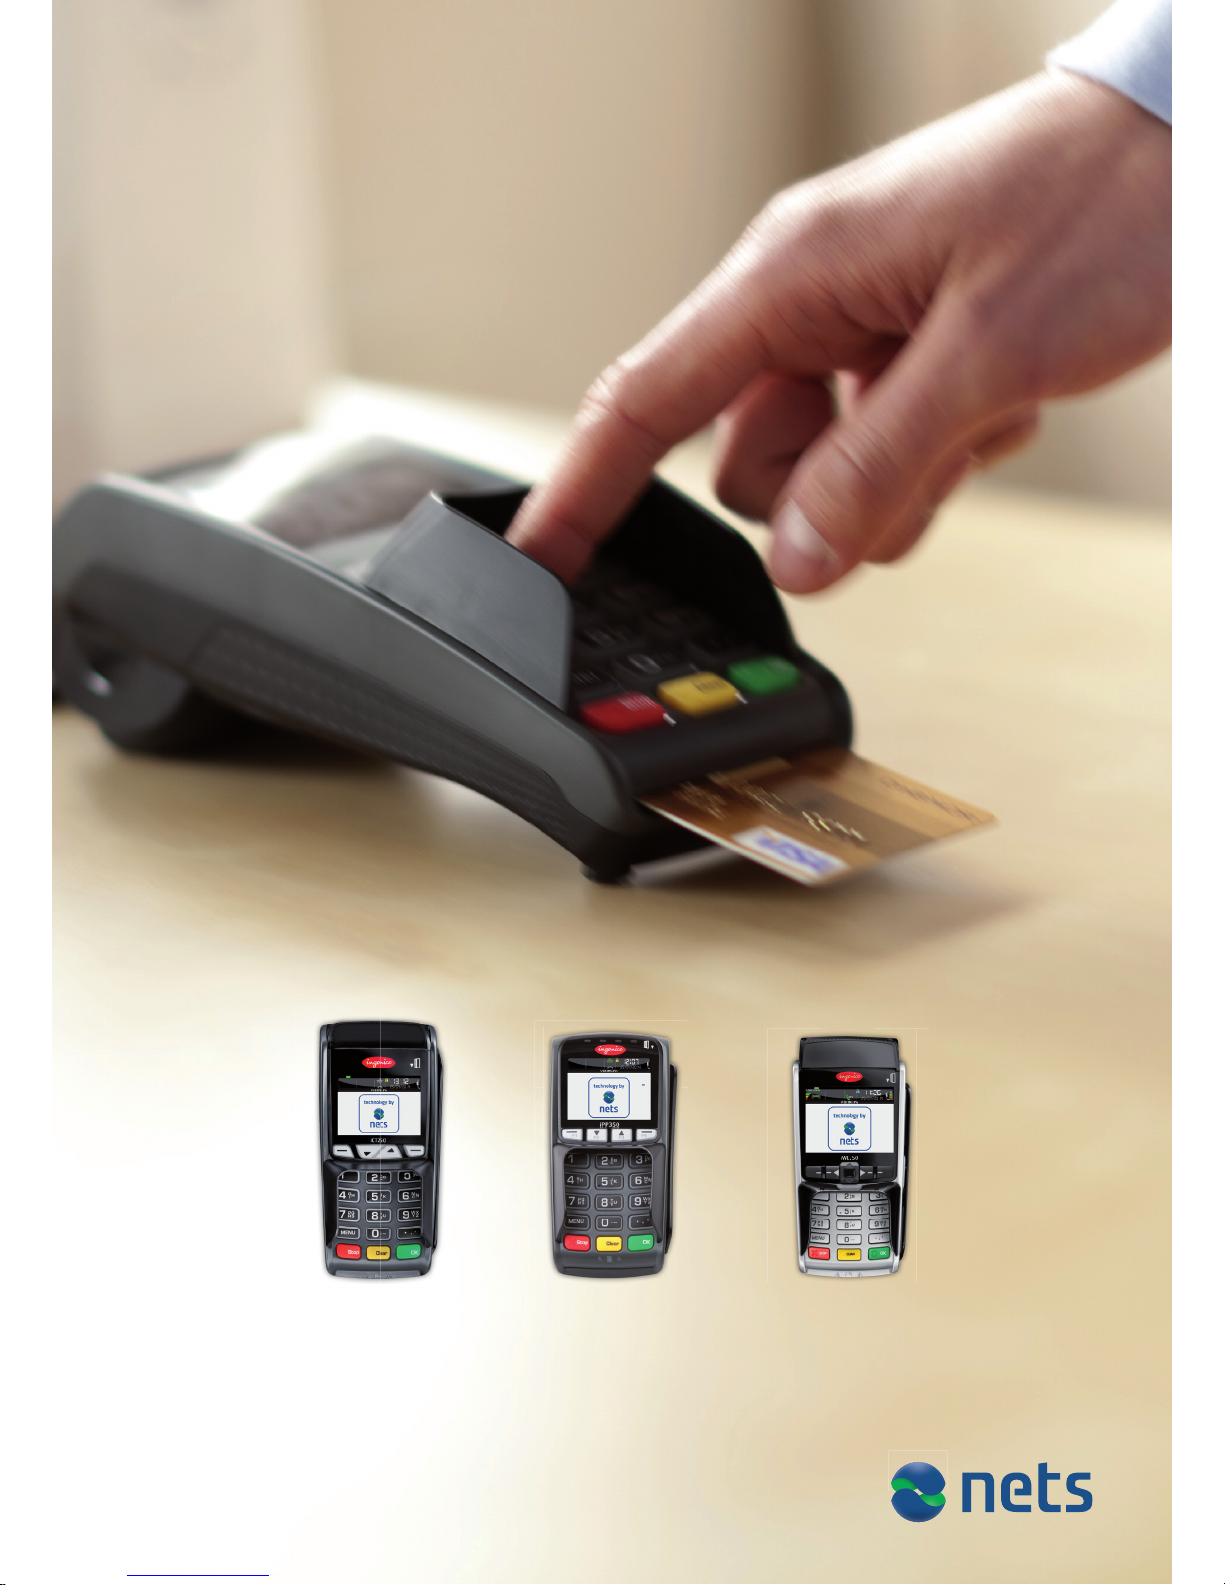
USER GUIDE
PAYMENT TERMINALS
VERSION SEPT. 2014
COUNTERTOP
iCT250E
INTEGRATED
iPP350
MOBILE
iWL250G
iWL250B
Page 2

2
1 GETTING STARTED ............................................................................................................................................. . 3
1.1 What’s in the box ................................................................................................................................................ ... 3
1.2 Installing iC T250E .......................................................................................................... ........................................ 4
1.3 Installing iPP350 ....................................................................................................... ............................................. 6
1.4 Installing iWL250B/G .............................................................................................................................................. 7
1.5 Inserting a receipt roll (iCT250E and iWL250B/G) ................................................................................................... 9
2 MERCHANT CARD ............................................................................................................................................... 10
3 USING PAYMENT CARDS................................................................................................................. .................. 10
4 THE TERMINALS’ KEYPADS ................................................................................................................................. 11
4.1 iCT250E .................................................................................................................................................................... 11
4.2 iPP350 ...................................................................................................................................................................... 11
4.3 iWL250B/G ............................................................................................................................................................... 12
5 STATUS LINE – DESCRIPTIONS ............................................................................................................................ 12
5.1 Ethernet .................................................................................................................................................................... 12
5.2 Bluetooth .................................................................................................................................................................. 13
5.3 GPRS ......................................................................................................................................................................... 13
5.4 Battery and clock ...................................................................................................................................................... 13
6 QUICK MENU ..................................................................................................................................... ............... 14
7 TERMINAL MENU STRUCTURE ..................................................................................................... .................... 15
8 TERMINAL FEATURES – DAILY OPERATION ......................................................................................................... 16
8.1 Purchase .................................................................................................................................................................... 16
8.2 Purchase with cash withdrawal (cashback)............................................................................................................... 17
8.3 Purchase with manual entry of card data ................................................................................................................. 18
8.4 Copy of the last receipt ............................................................................................................................................. 19
8.5 Cancellation (reversal) the last transaction ............................................................................................................... 19
8.6 Return of goods ........................................................................................................................................................ 20
8.7 Tips ............................................................................................................................................................................ 21
8.8 Purchase with tips .................................................................................................................................................... 22
9 CONTACTLESS PAYMENTS (CONTACTLESS/NFC) ................................................................................................. 23
9.1 Wallet solution ......................................................................................................................................................... 23
9.2 Purchases with contactless payment ........................................................................................................................ 23
9.3 Return of goods ......................................................................................................................................................... 23
9.4 Cancellation (reversal) the last transaction .............................................................................................................. 24
10 BACKUP SOLUTION (EOT) ..................................................................................................................................... 25
10.1 Print out backup solution (EOT) .............................................................................................................................. 26
10.2 Submit backup solution (EOT) ................................................................................................................................. 26
11 RECONCILIATION (DAILY STATEMENTS) .............................................................................................................. 27
11.1 Manual reconciliation ............................................................................................................................................... 27
11.2 Automatic reconciliation .......................................................................................................................................... 27
11.3 Copy of last reconciliation ........................................................................................................................................ 27
12 NETS PREPAID GIFT CARDS ................................................................................................................................. 28
12.1 Deposits ................................................................................................................................................................... 28
12.2 Creating replacement cards for a defective prepaid gift card .................................................................................. 29
12.3 See available balance on prepaid gift card ............................................................................................................... 31
13 REPORTS ............................................................................................................................................................ 32
13.1 Transaction list ....................................................................................................................................................... 32
13.2 X-Total ..................................................................................................................................................................... 33
13.3 Z-Total ..................................................................................................................................................................... 33
13.4 Copy of last Z-To tal ................................................................................................................................................. 34
13.5 Operator X-Total ..................................................................................................................................................... 34
13.6 Operator Z-Total ..................................................................................................................................................... 35
14 OPERATORS ........................................................................................................................................................ 36
14.1 Creating a new operator ........................................................................................................................................... 36
14.2 Delete operator ........................................................................................................................................................ 37
14.3 Printing operator list ............................................................................................................................................... 38
14.4 Using Operator ID ................................................................................................................................................... 38
15 MULTITERMINAL ................................................................................................................................................ 39
15.1 Purchases with multi-users ..................................................................................................................................... 39
16 ADMINISTRATION ............................................................................................................................................... 40
16.1 Ter minal card agreements (Issuers)......................................................................................................................... 40
16.2 Downloading card agreements ............................................................................................................................... 40
16.3 Printing card agreements ....................................................................................................................................... 40
16.4 Downloading new software ................................................................................................................................... 40
17 TERMINAL PARAMETERS ................................................................................................................................... 41
18 ERRORS AND TROUBLESHOOTING ...................................................................................................................... 42
19 SUBMITTING PAYMENT TERMINAL FOR SERVICE OR TERMINATION ................................................................. 43
TABLE OF CONTENTS
Page 3
3
1 GETTING STARTED
1.1 What’s in the box
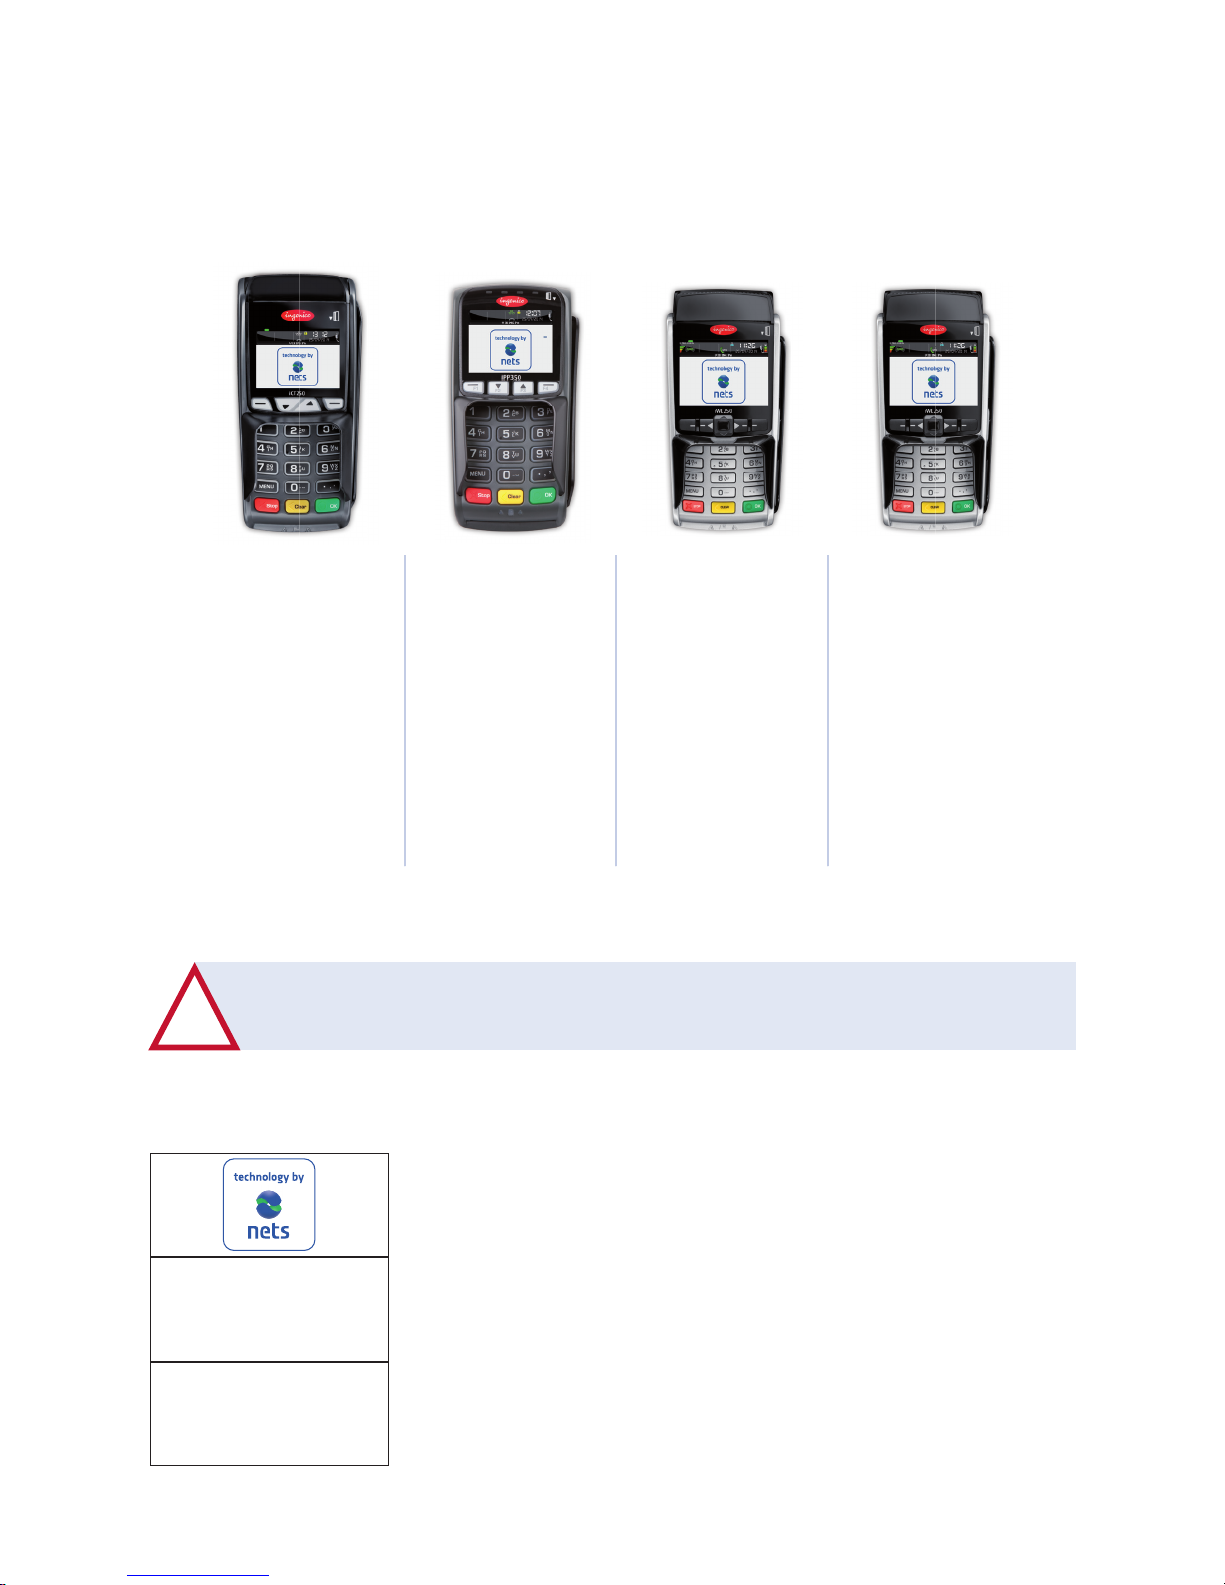
The following equipment is delivered with the payment terminal:
!
You must perform manual reconciliation before the terminal is used for the fi rst time.
Reconciliation of one terminal reconciles all the terminals under the same merchant
number.
iCT250E
(Countertop, broad-
band)
•Powercable
•Networkcable
RJ9 to RJ45
•Merchantcard
•Receiptroll
•Quickguide
iPP350
(Countertop, inte-
grated with till)
•Integrationcable
•Powercable(if
integrated via
RS232 cable)
•Merchantcard
iWL250G
(Mobile, GPRS)
•Powercable
•Chargingunit
•Merchantcard
•Receiptroll
•Quickguide
•SIMcard*
iWL250B
(Mobile, Bluetooth)
•Powercable
•Chargingunit
•Merchantcard
•Receiptroll
•Quickguide
Manual reconciliation, instructions:
Press MENU.
Press numeric key 6
or scroll down using the arrow key to Reconciliation and press OK.
The terminal prints out a receipt showing the number of transactions per card
type and amount. If the terminal is integrated, a reconciliation receipt is printed out via the till system.
Main menu
4 Optional Func
5 Copy menu
6 Reconciliation
Print Pending
*SIMcardsaresuppliedbyNetsunlessotherwiseagreed.
Page 4
4
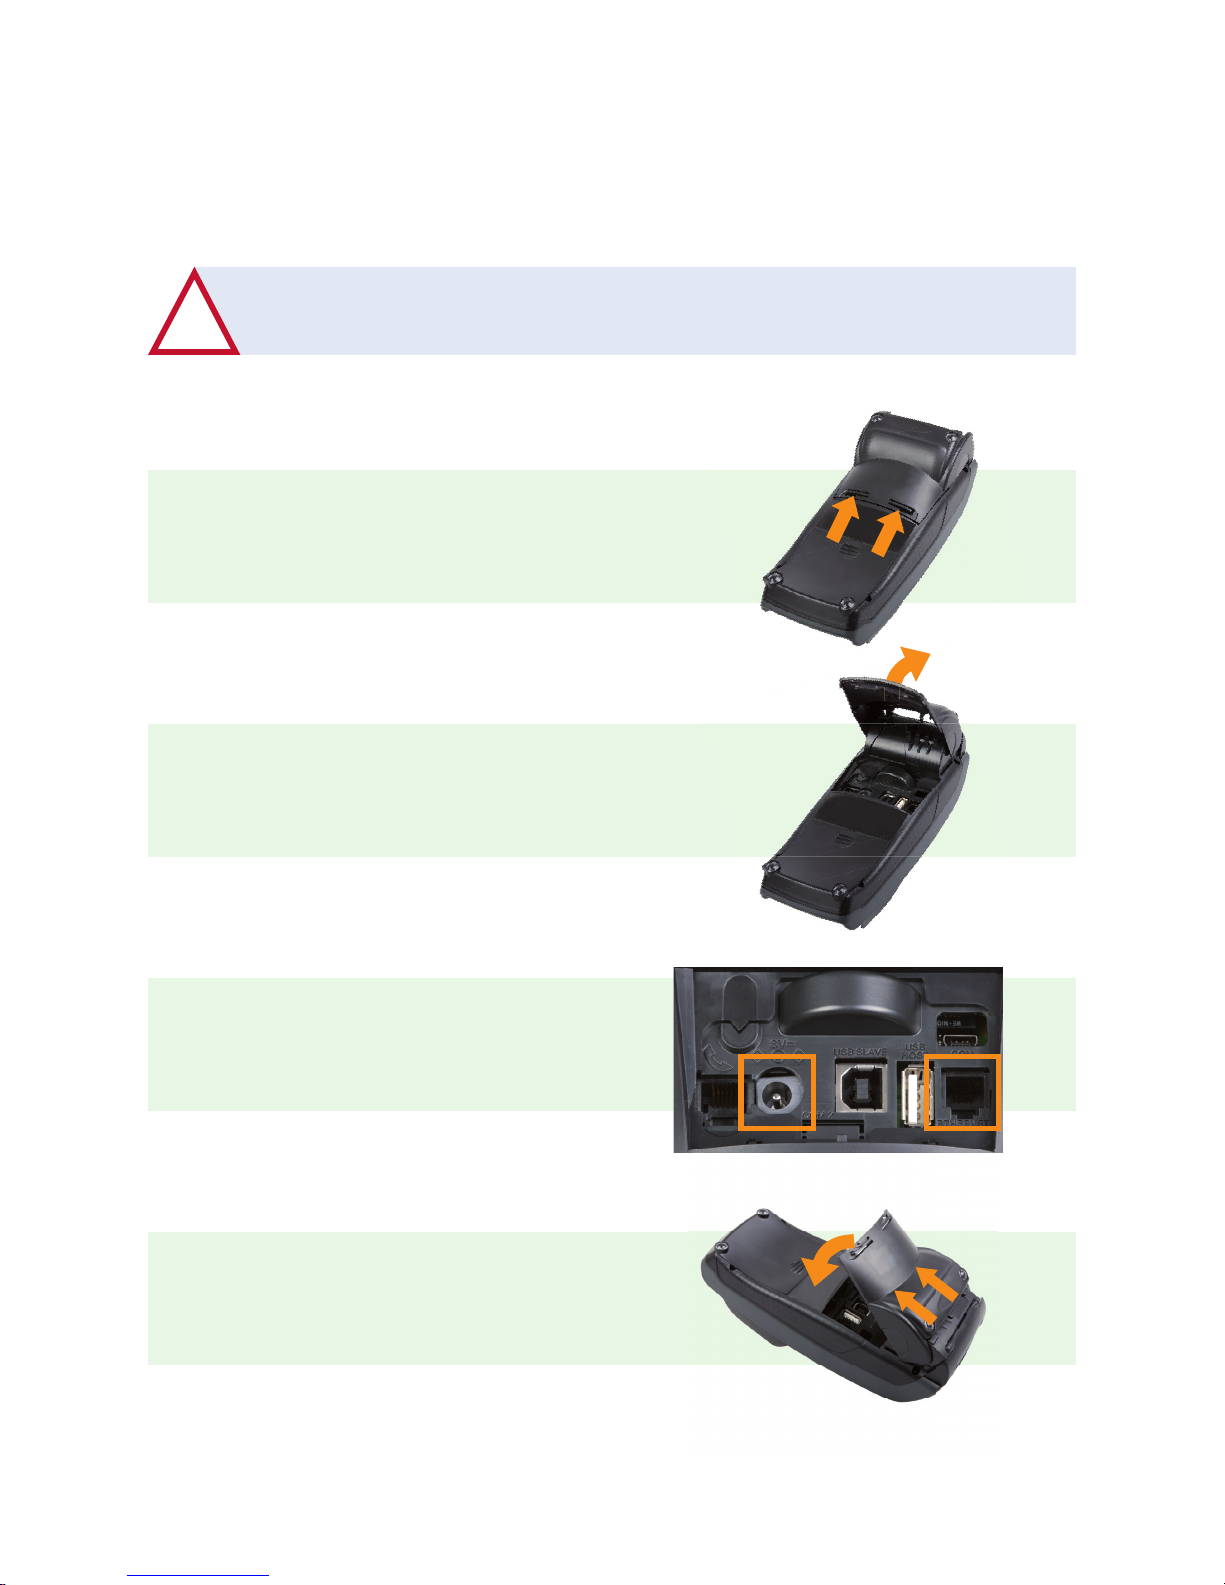
Open the cable cover by pressing the clips upwards.
Lift the cover in the direction of the arrow.
When the cover has been removed, connect the terminal
power cable (1) and Ethernet cable (2).
To close the cover again replace the top part,
fi rst ensuring that the cover clips are in place
on the terminal. Then press the cover down
towards the back of the terminal.
1 2
1.2 Installing iCT250E
Installing iCT250E with broadband communication
In order to connect an iCT250E to the power supply and broadband communication, do as follows:
!
The terminal and modem must be turned off when you connect the network cable.
Page 5
5
Installing iCT250E with “Magic Box”
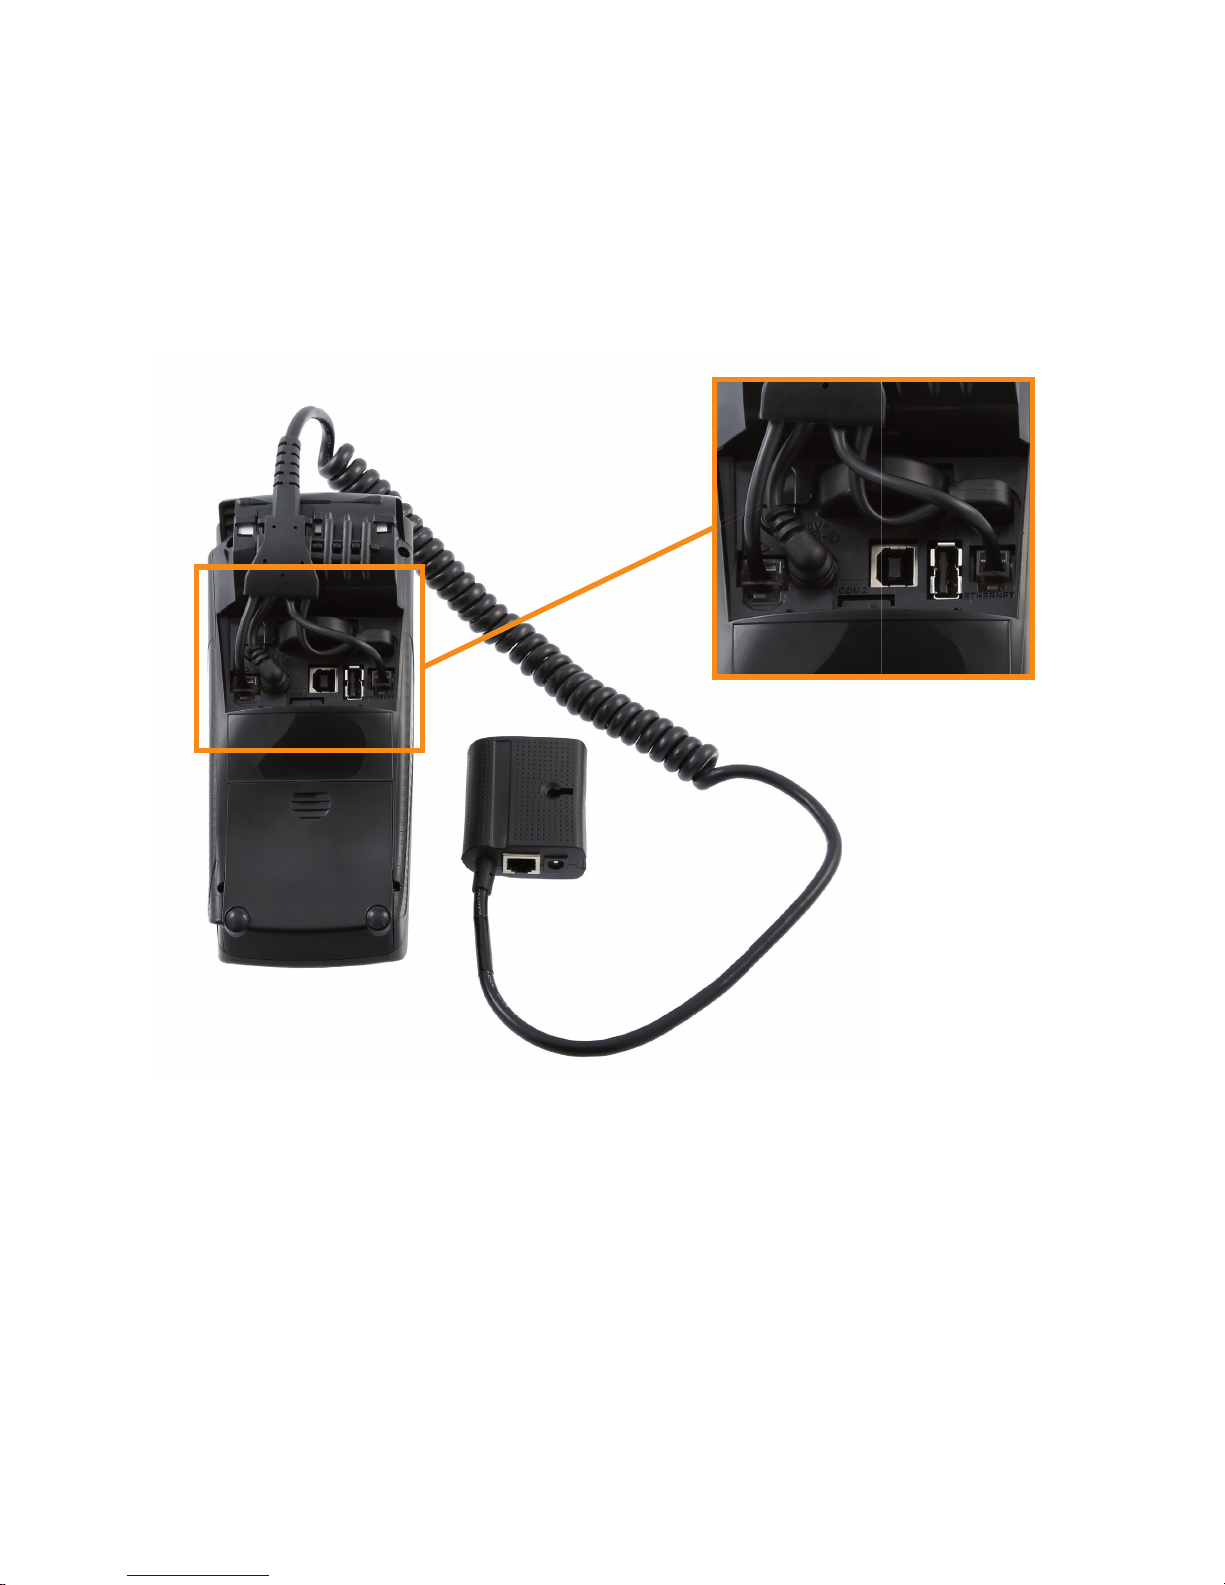
Magic Box can be used when iCT250 E must be integrated with the till system. At one end of the Magic Box
cable there are four different cables which must be connected to the payment terminal:
1. Analogue line
2. Power supply
3. Integration with till system
4. Ethernet connection
1 2 4
3
Page 6
6
1.3 Installing iPP350
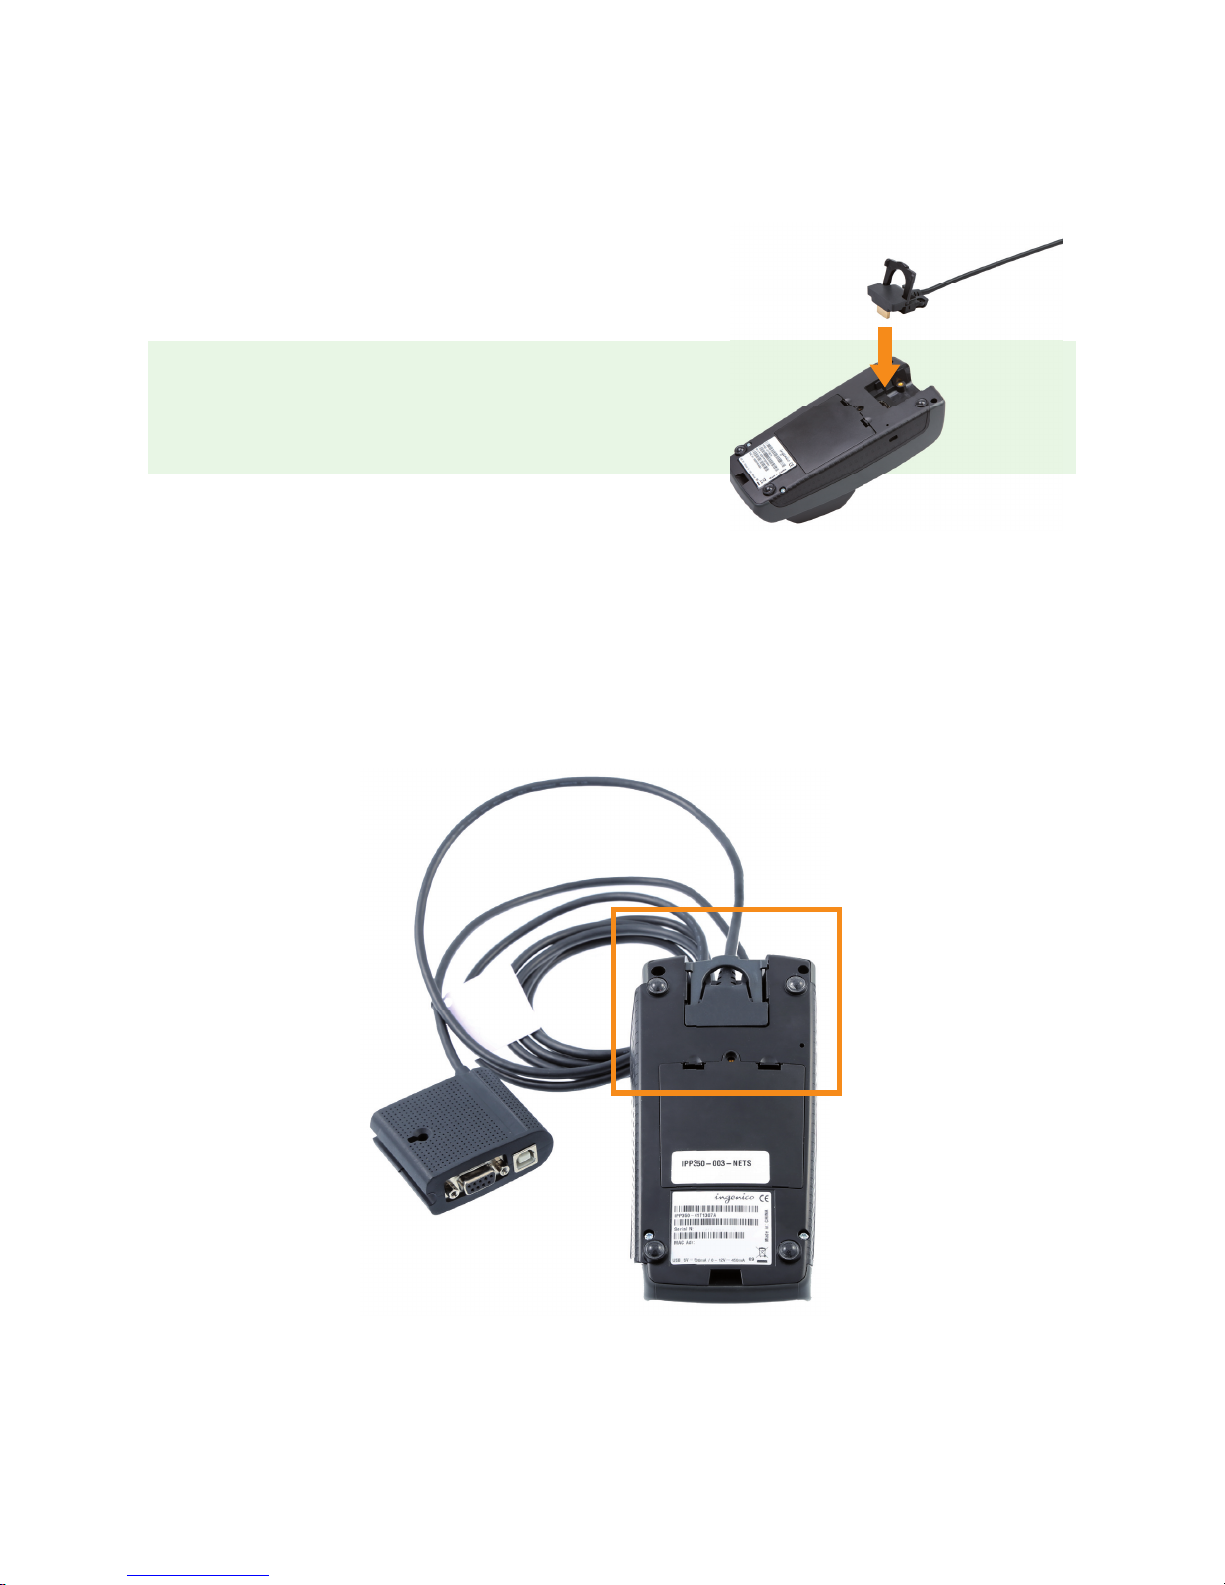
iPP350 is integrated with the till system using an integration cable. This is either a USB cable or an RS232
cable. The USB cable must be connected to the till system’s USB port, the RS232 cable must be connected
to the till system’s COM port. Both variants must be connected to iPP350 as follows:
Download USB drivers
USB drivers for integration with the till system can be downloaded from: http://www.betalingsterminal.no/
Betalingsterminaler-forside/Kommunikasjon/USB-driver-til-iCT220-og-iPP350/
Installing iPP350 with “Magic Box”
Magic Box is used when iPP350 must be connected directly to the Ethernet (broadband). The Magic Box
cable must be connected to the payment terminal as follows:
Insert the integration cable as shown in the image.
Page 7
7
1.4 Installing iWL250B/G
iWL250G = Uses GPRS communication
iWL250B = Uses Bluetooth communication to the base station. The base station is connected to broadband.
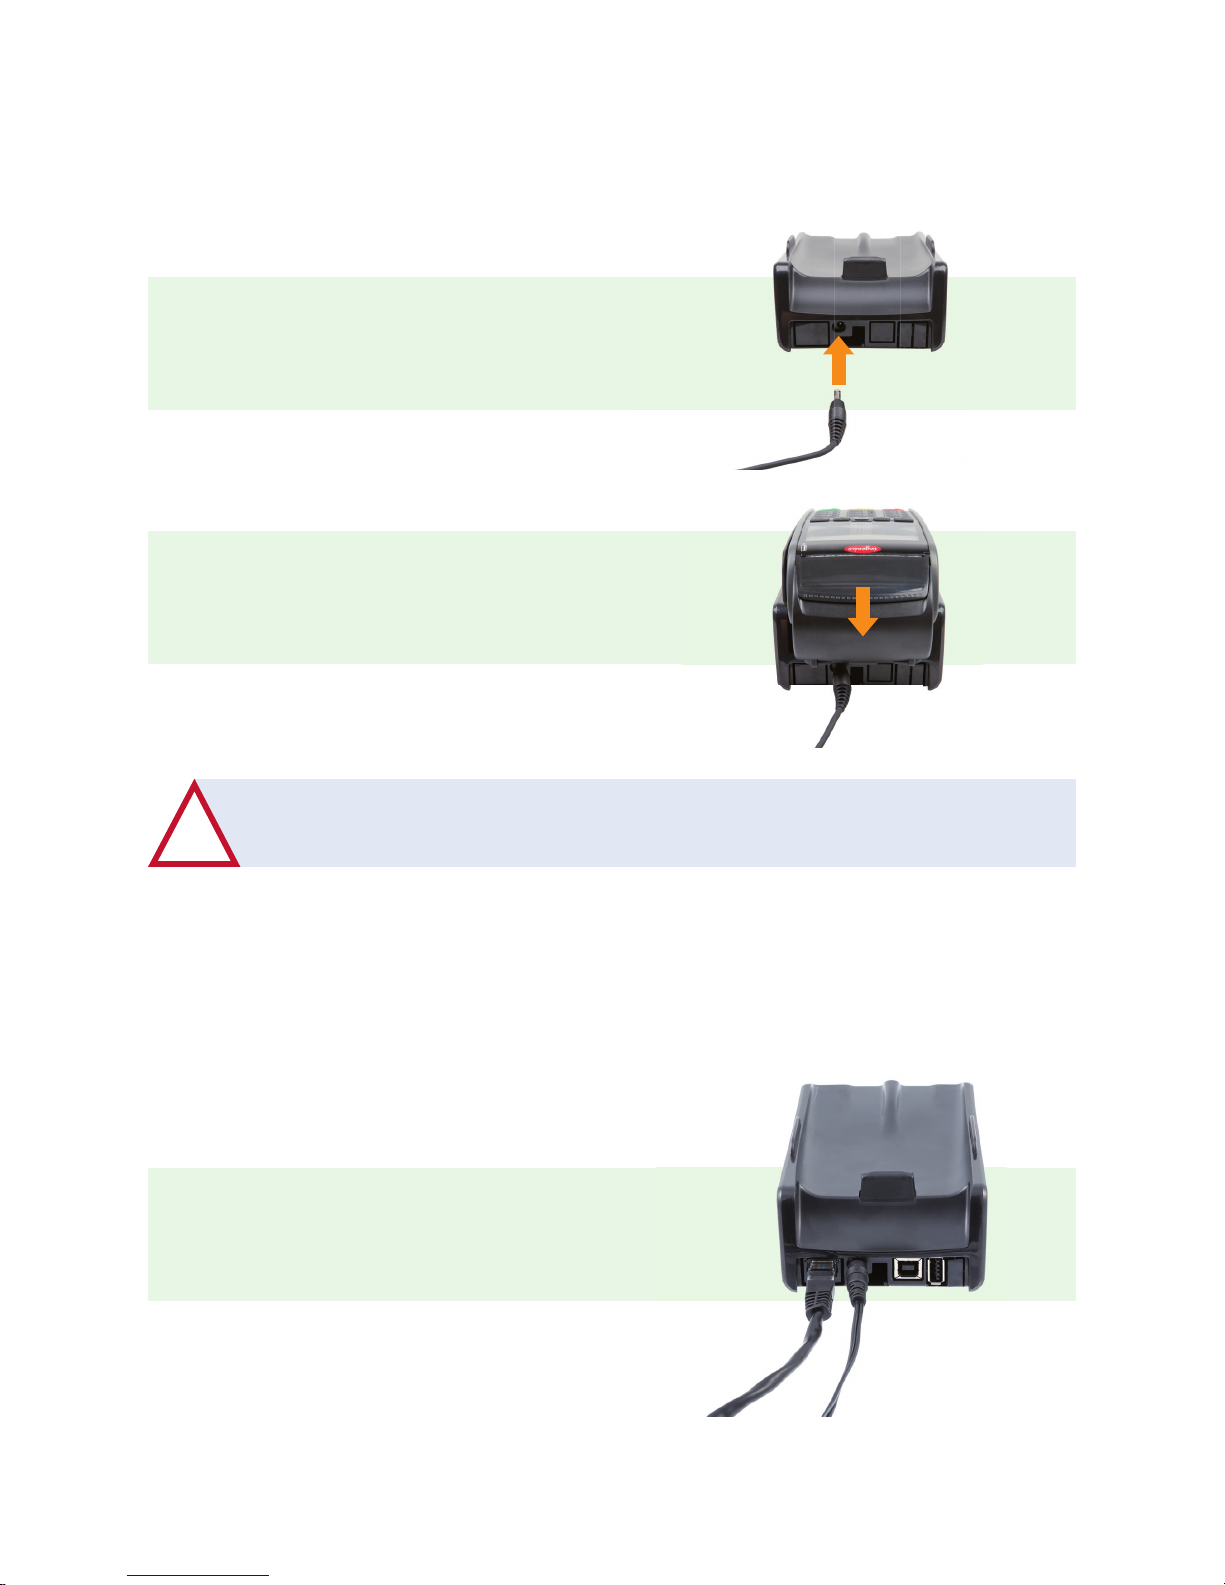
To install and charge an iWL250, do as follows:
Connect the power cable to the base station.
Place the terminal on the base station.
The terminal will connect and is then ready for use.
!
The new terminal comes with a battery that has been minimally charged.
The terminal must be charged to perform to the full.
Connecting the base station to Ethernet (broadband) or wireless router
(only iWL250B)
When using the restaurant solution Pay@Table or a wireless router, an Ethernet cable must be connected
from the till or router to the base station. The base station communicates with the terminal via Bluetooth.
Continued on next page
1 2
Connect the Ethernet cable (1) and power cable (2) as
shown in the image. Place the terminal on the base station;
the terminal will connect and is then ready for use.
Page 8
8
Inserting a SIM card (iWL250G only)
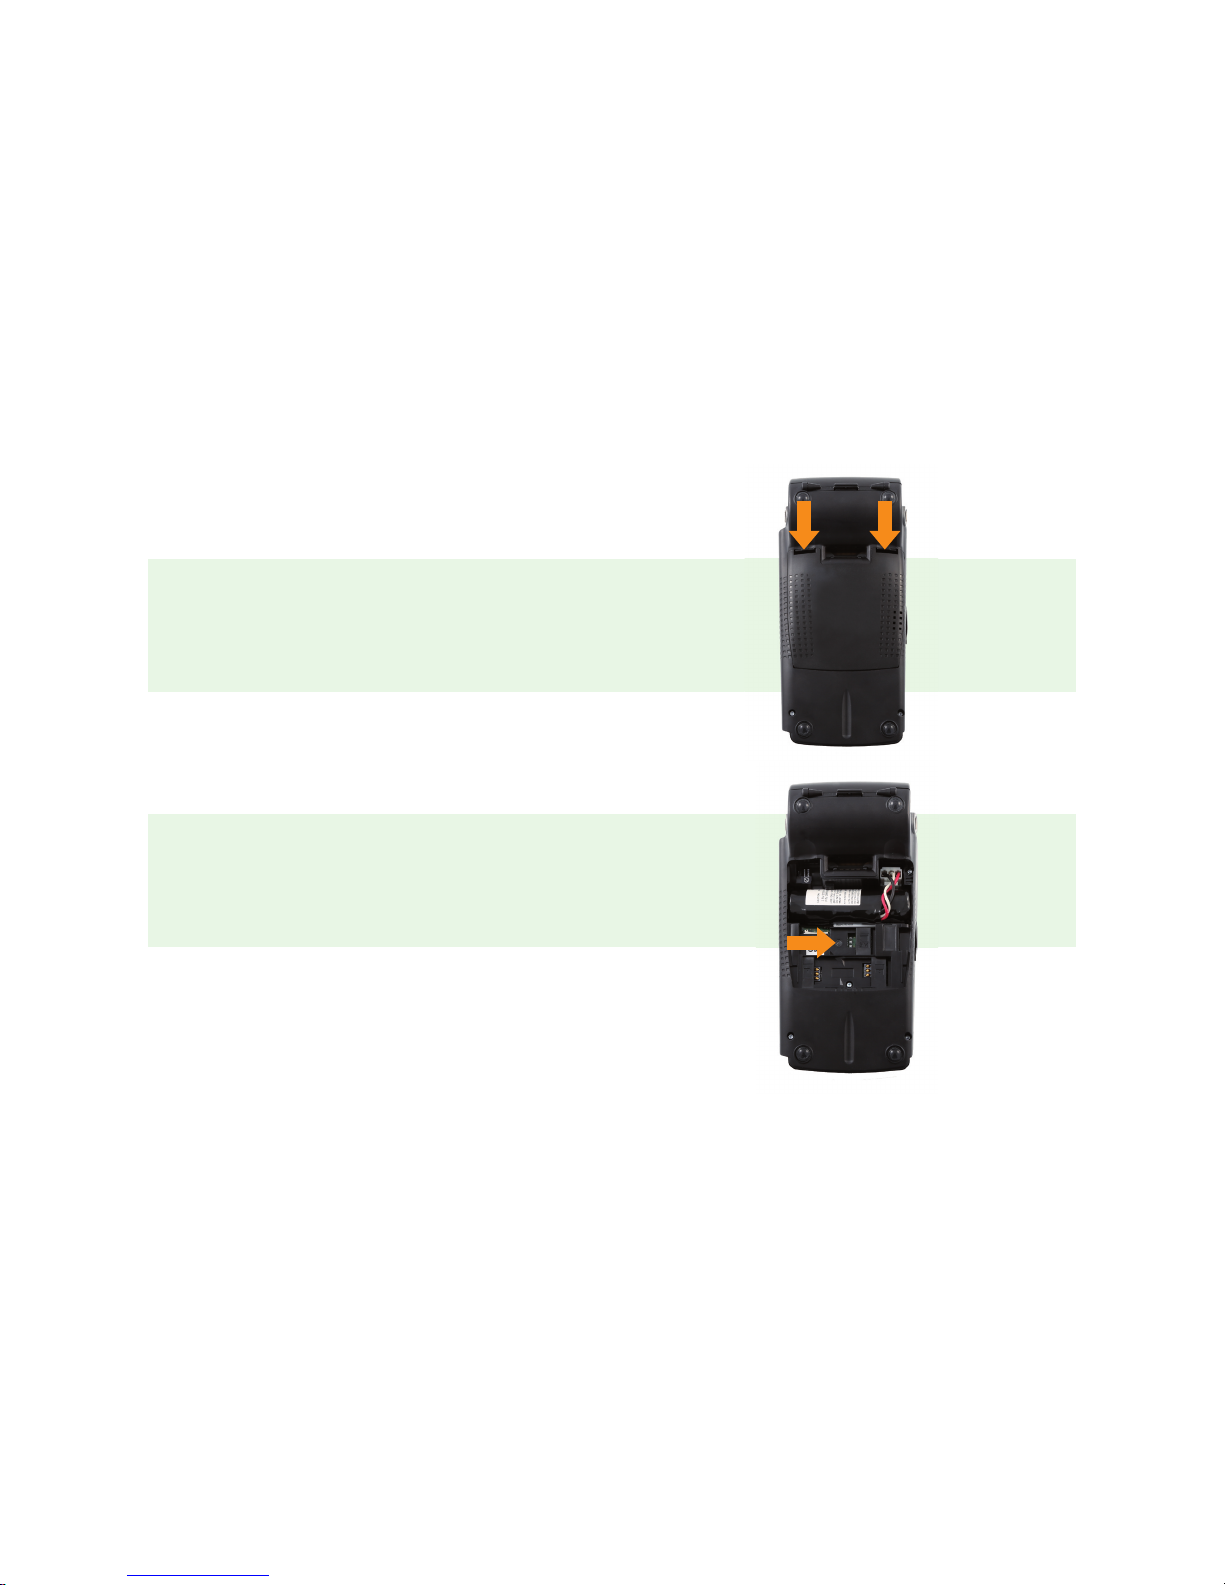
If iWL250G is not supplied with a SIM card already installed, do as follows to insert a SIM card:
Open the cable cover by pressing the clips downwards.
Insert the SIM card under the fl ap labelled “SIM”.
For an iWL250B to work, it must be associated with a base station within range. To change which base station iWL250B is connected to, do as follows:
1. Press the button at the far left under the screen.
2. Select 0 – Telium manager
3. Enter code 4302+OK
4. Select Initialization > Hardware > Cradle setup > Association
5. Now you can choose to add a new base station, select a base station, or delete a base station.
Page 9
9
1.5 Inserting a receipt roll – iCT250E and iWL250B/G only
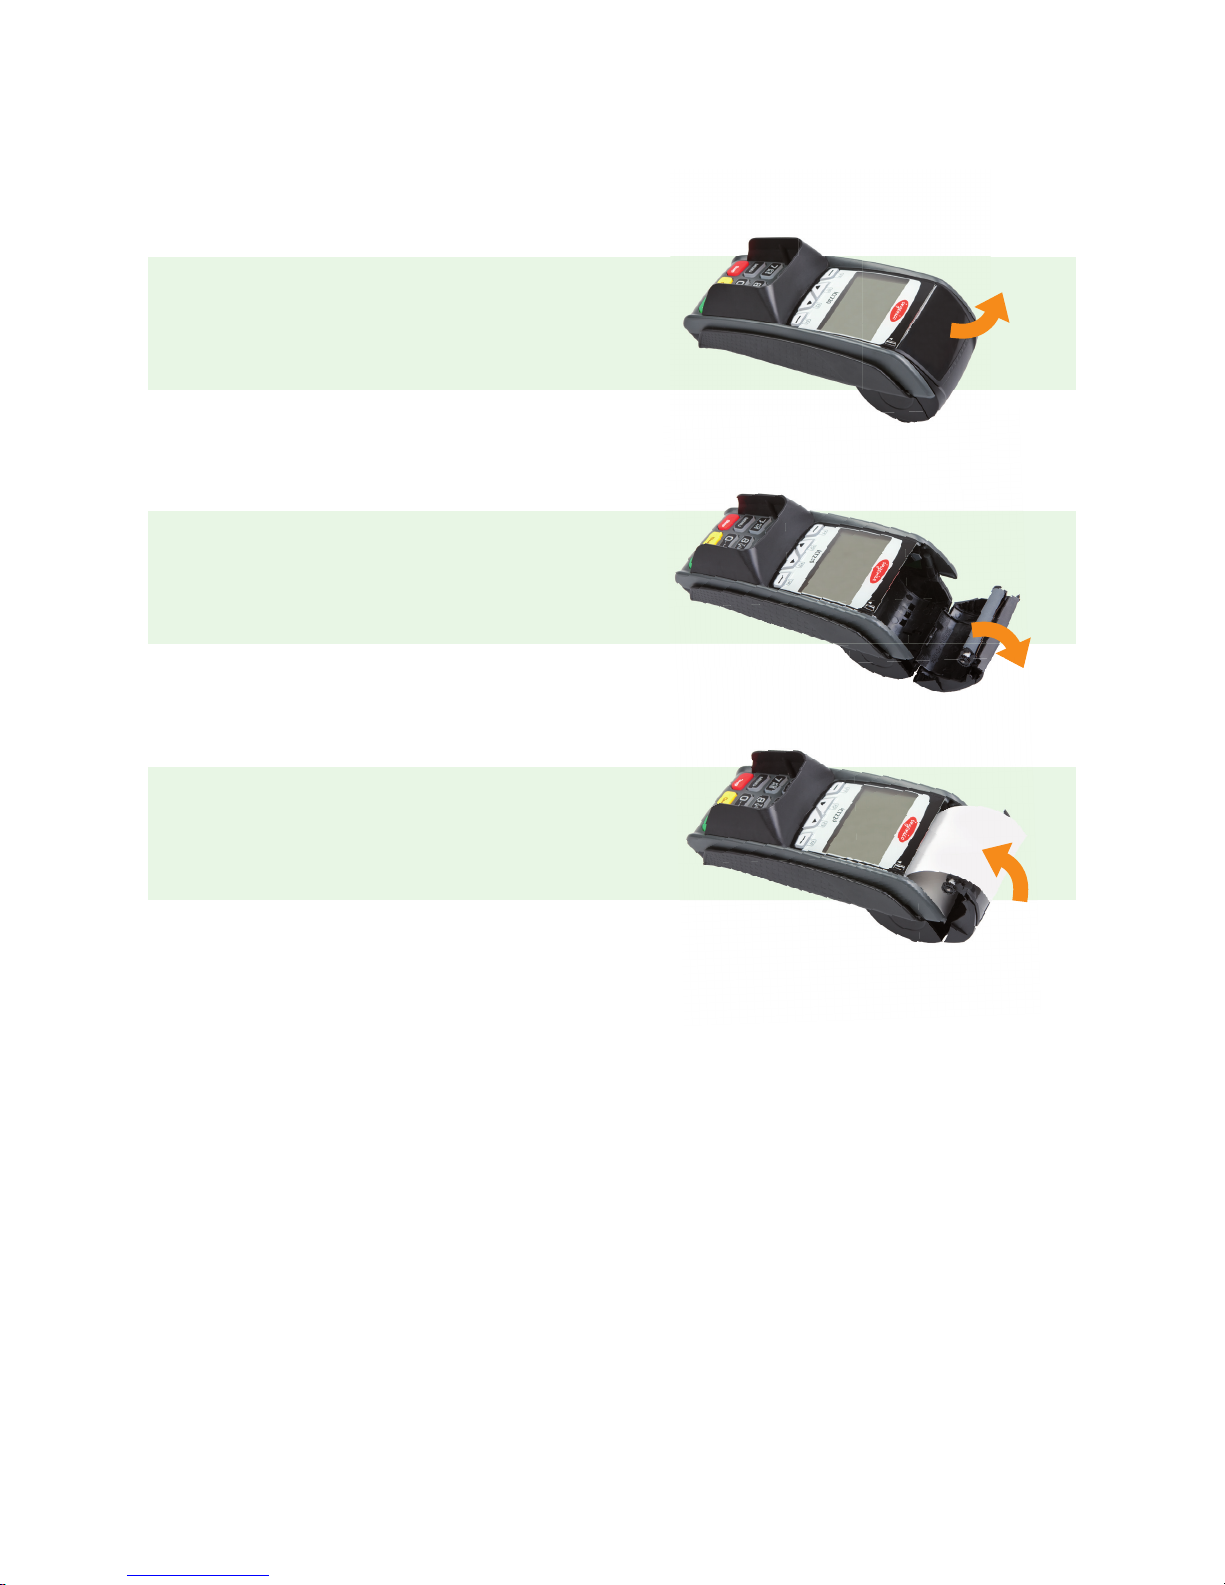
Nets recommends only using receipt rolls suitable for the terminal. How to insert the receipt roll in the terminal:
Lift the fl ap in the direction of the arrow.
Then slide the cover downwards in the direction of the
arrow to open it.
Insert the paper in the terminal as shown.
Then close the cover again in the direction of the arrow.
Approx. 5 cm. of the paper should stick out when the
cover is closed. The receipt printer is now ready for use.
Page 10
10
2 MERCHANT CARD
Along with the payment terminal you will receive a Merchant Card. The Merchant Card is used to activate
individual terminal functions. Merchants with several terminals can use the same Merchant Card for all terminals.
The Merchant Card is used to activate the following functions in the payment terminal:
• Cancel the most recent transaction
• Reconciliation (if protected)
• Terminal status printout
• Offline transactions printout
• Administration of operator ID
• Changes to terminal parameters
• Manual updating of terminal software
If you do not have a Merchant Card or if you have a defective card, you can order a new one from Nets’
customer service.
NB: The Merchant Card makes it possible to cancel transactions performed on the terminal. Make sure the
Merchant Card is kept in a safe place.
KJØPMANNSKORT
KØBMANDSKORT
KAUPPIASKORTTI
LÖSENKORT
MERCHANT CARD
R399-0164
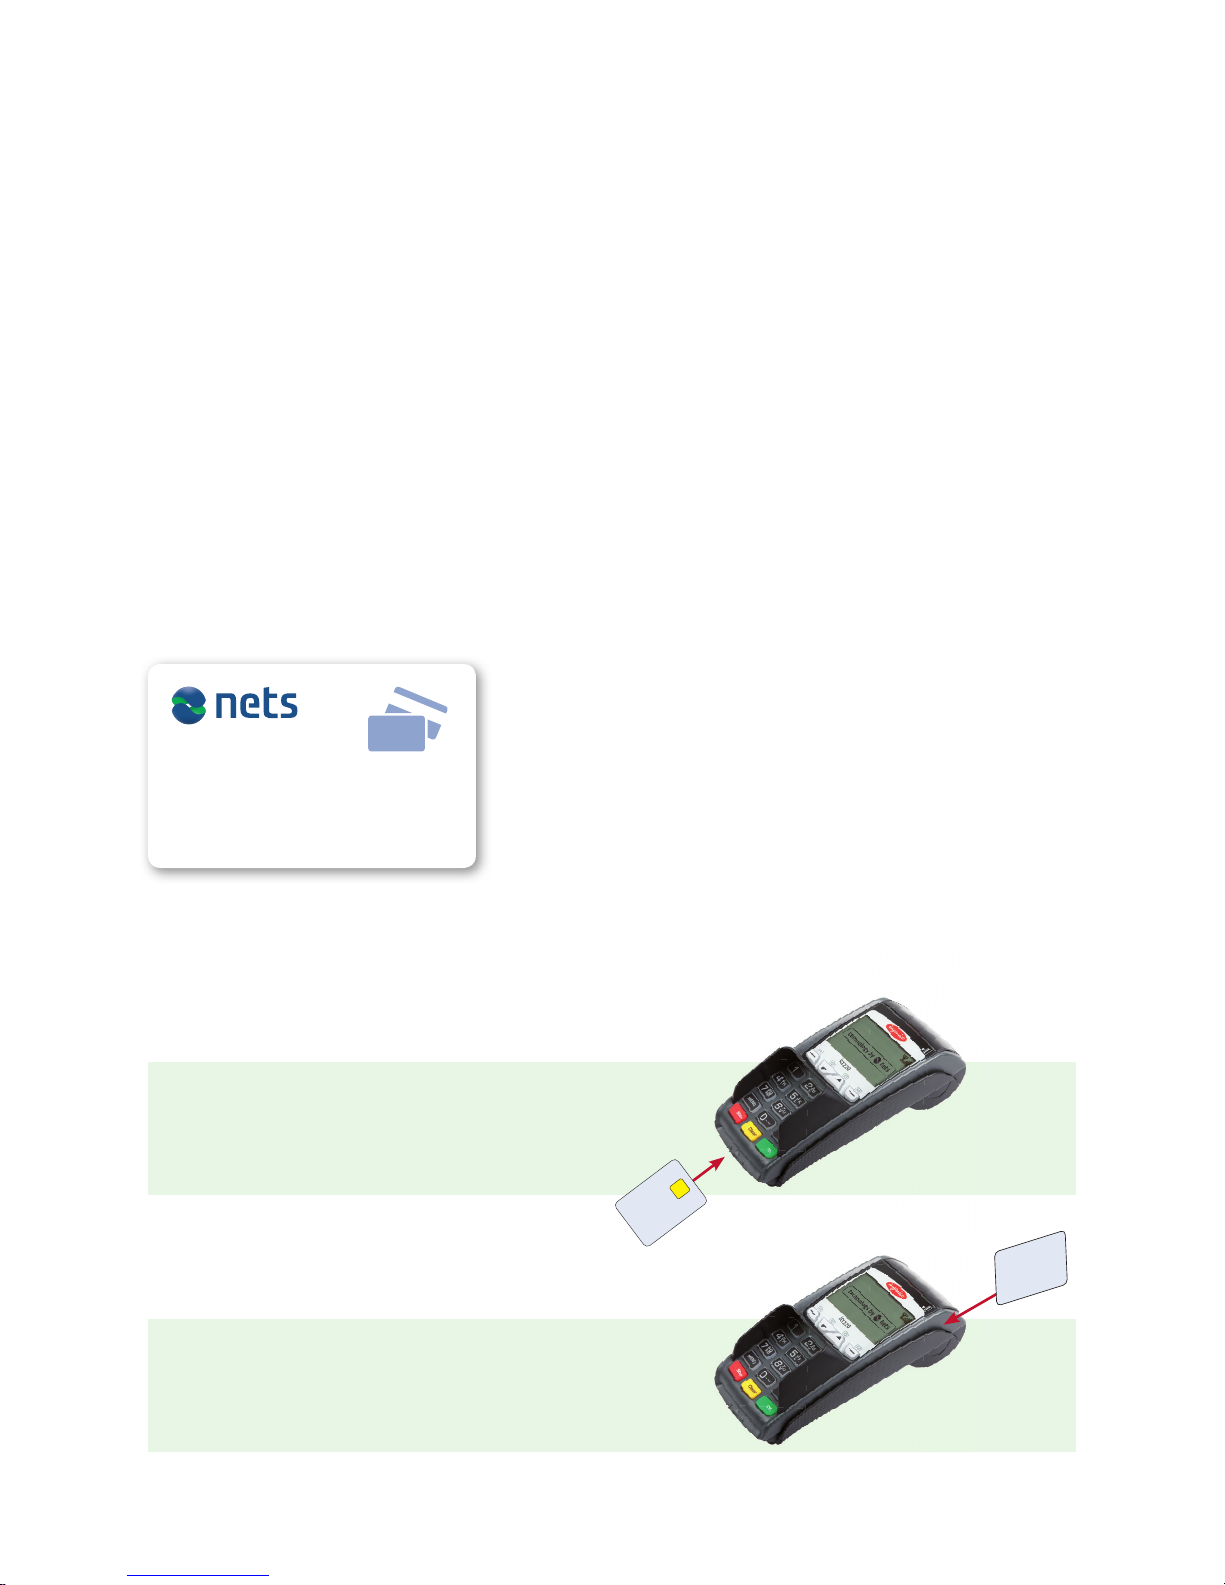
3 USING PAYMENT CARDS
With chip
With magnetic strip
Swipe the card with the magnetic strip facing left:
NB: If contactless is activated, press F2 (down arrow)
to activate the magnetic strip reader.
Insert the card in the front of the terminal with the chip
facing up:
Page 11
11
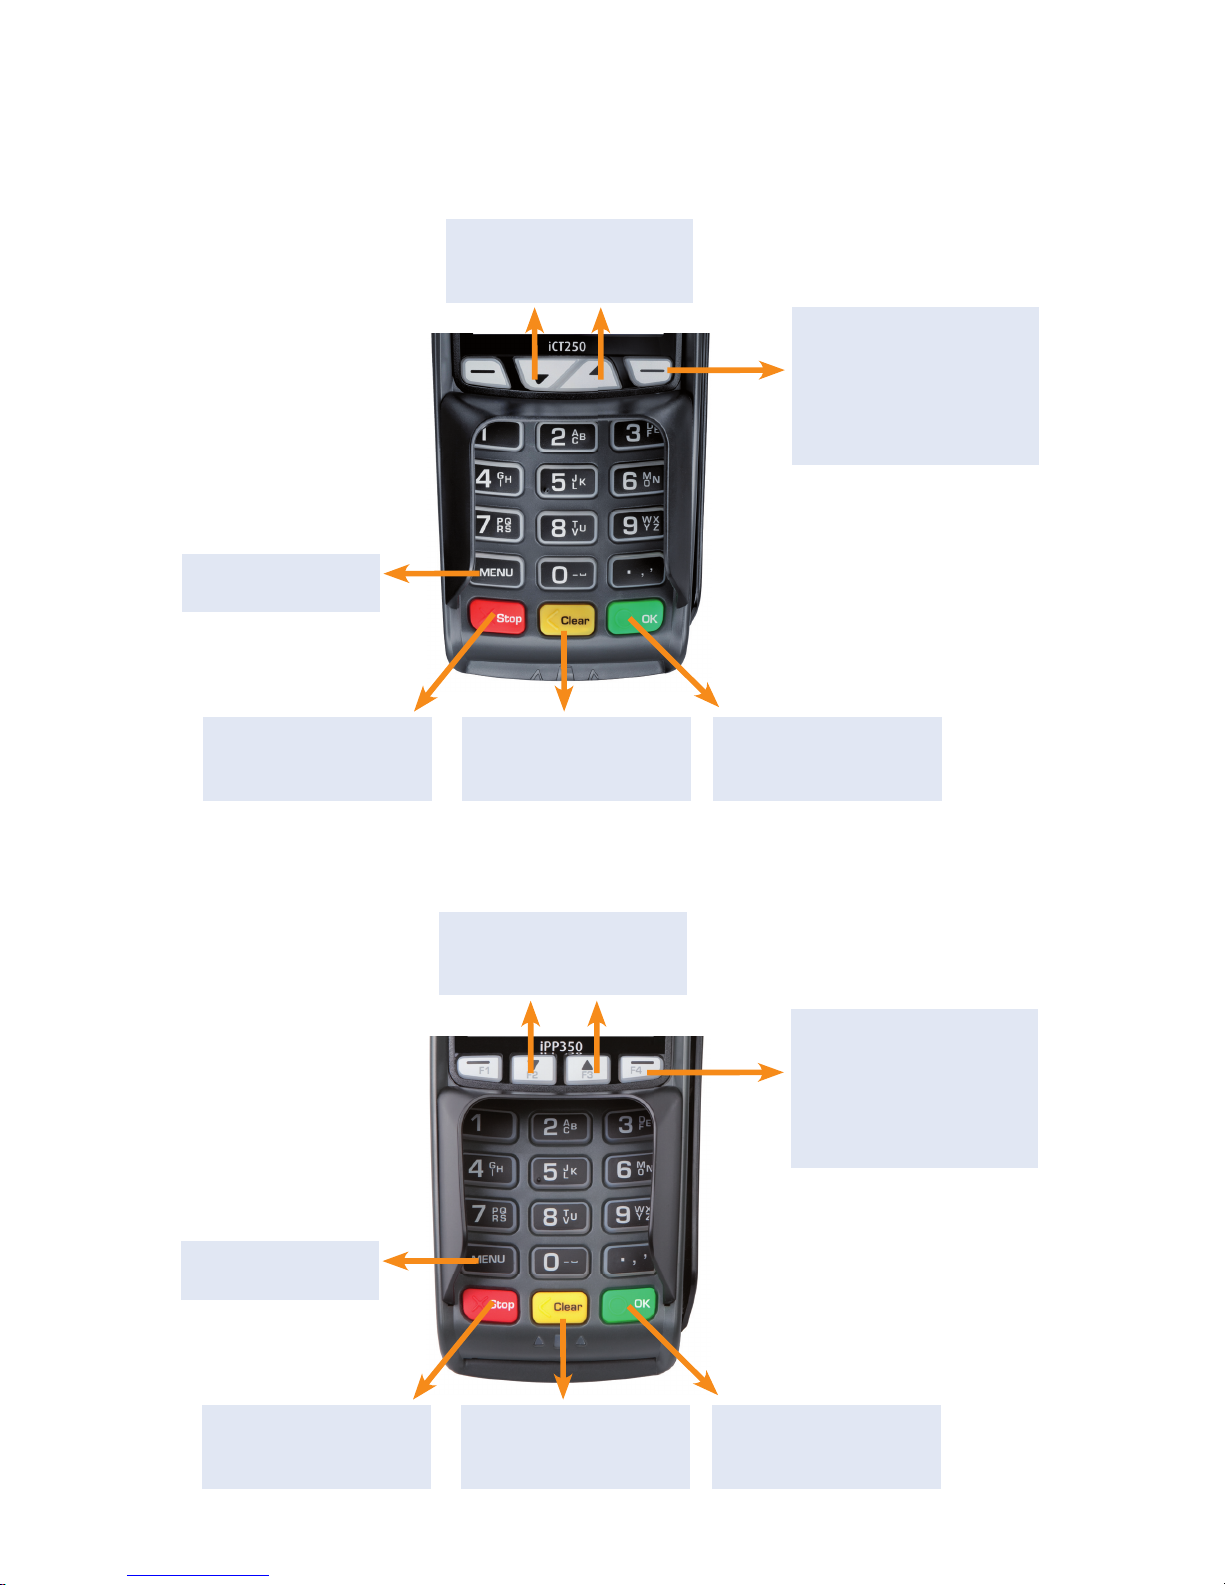
4 THE TERMINALS’ KEYPADS
4.1 iCT250E
Navigation keys to
scroll up and down in
menus
Used to manually enter
card data. Used to toggle
between upper and lower
case letters or from letters
to numbers, and to check
balance
Used to enter
the main menu
Cancels the function and
returns to the main
menu
To corr ect incorr ect key
entry or return to previ-
ous menu
Confirm entry or
menu selection
4.2 iPP350
Cancels the function and
returns to the main
menu
To corr ect incorr ect key
entry or return to previ-
ous menu
Confirm entry or
menu selection
Used to manually enter
card data. Used to toggle
between upper and lower
case letters or from letters
to numbers, and to check
balance
Used to enter
the main menu
Navigation keys to
scroll up and down in
menus
Page 12
12
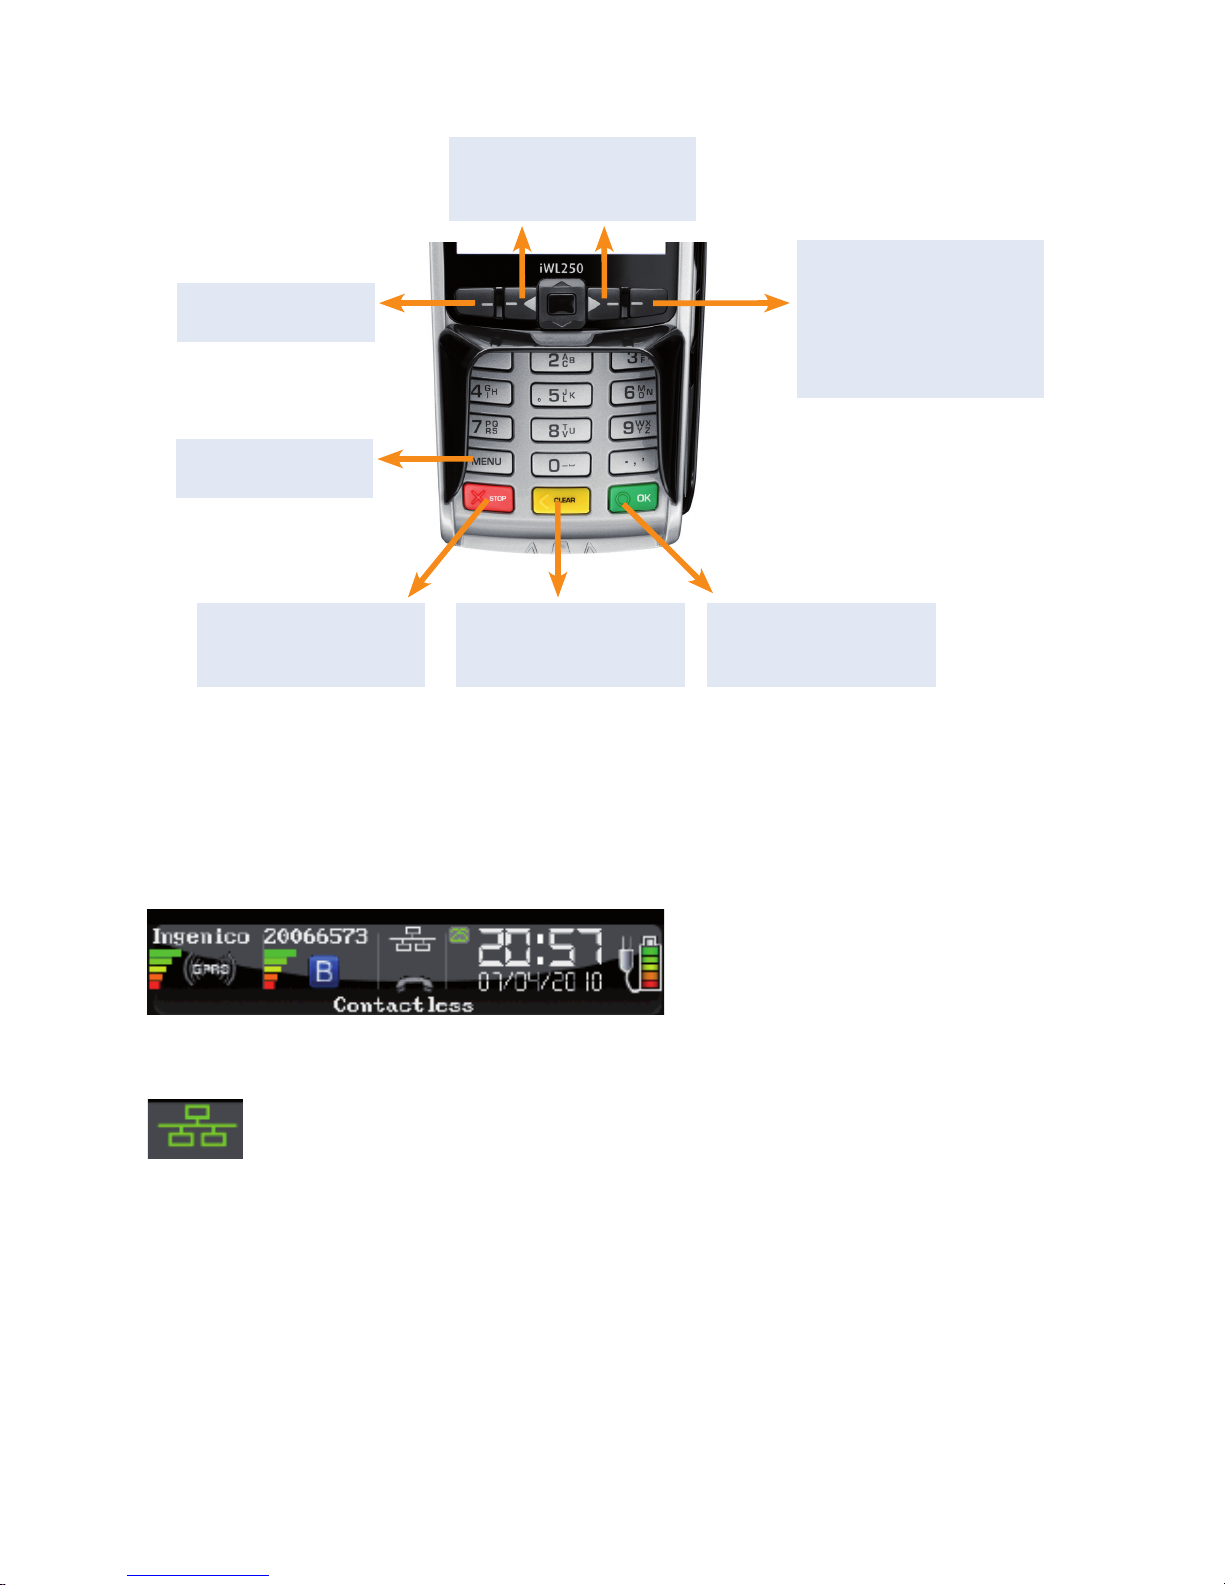
4.3 iWL250B/G
Used to manually enter
card data. Used to toggle
between upper and lower
case letters or from letters
to numbers, and to check
balance
Cancels the function and
returns to the main
menu
To corr ect incorr ect key
entry or return to previ-
ous menu
Confirm entry or
menu selection
Used to enter
the main menu
5 STATUS LINE – DESCRIPTIONS
The status line in the upper part of the terminal’s display provides information on the status of communication and available hardware.
5.1 Ethernet
This symbol indicates whether the terminal has access to Ethernet:
White symbol: The terminal has an Ethernet port
Green symbol: The terminal has an Ethernet port and is connected to a network
Red symbol: The terminal has an Ethernet port but has not been assigned IP over DHCP
Connecting to base
station (iWL250B)
Navigation keys to
scroll up and down in
menus
Page 13
13
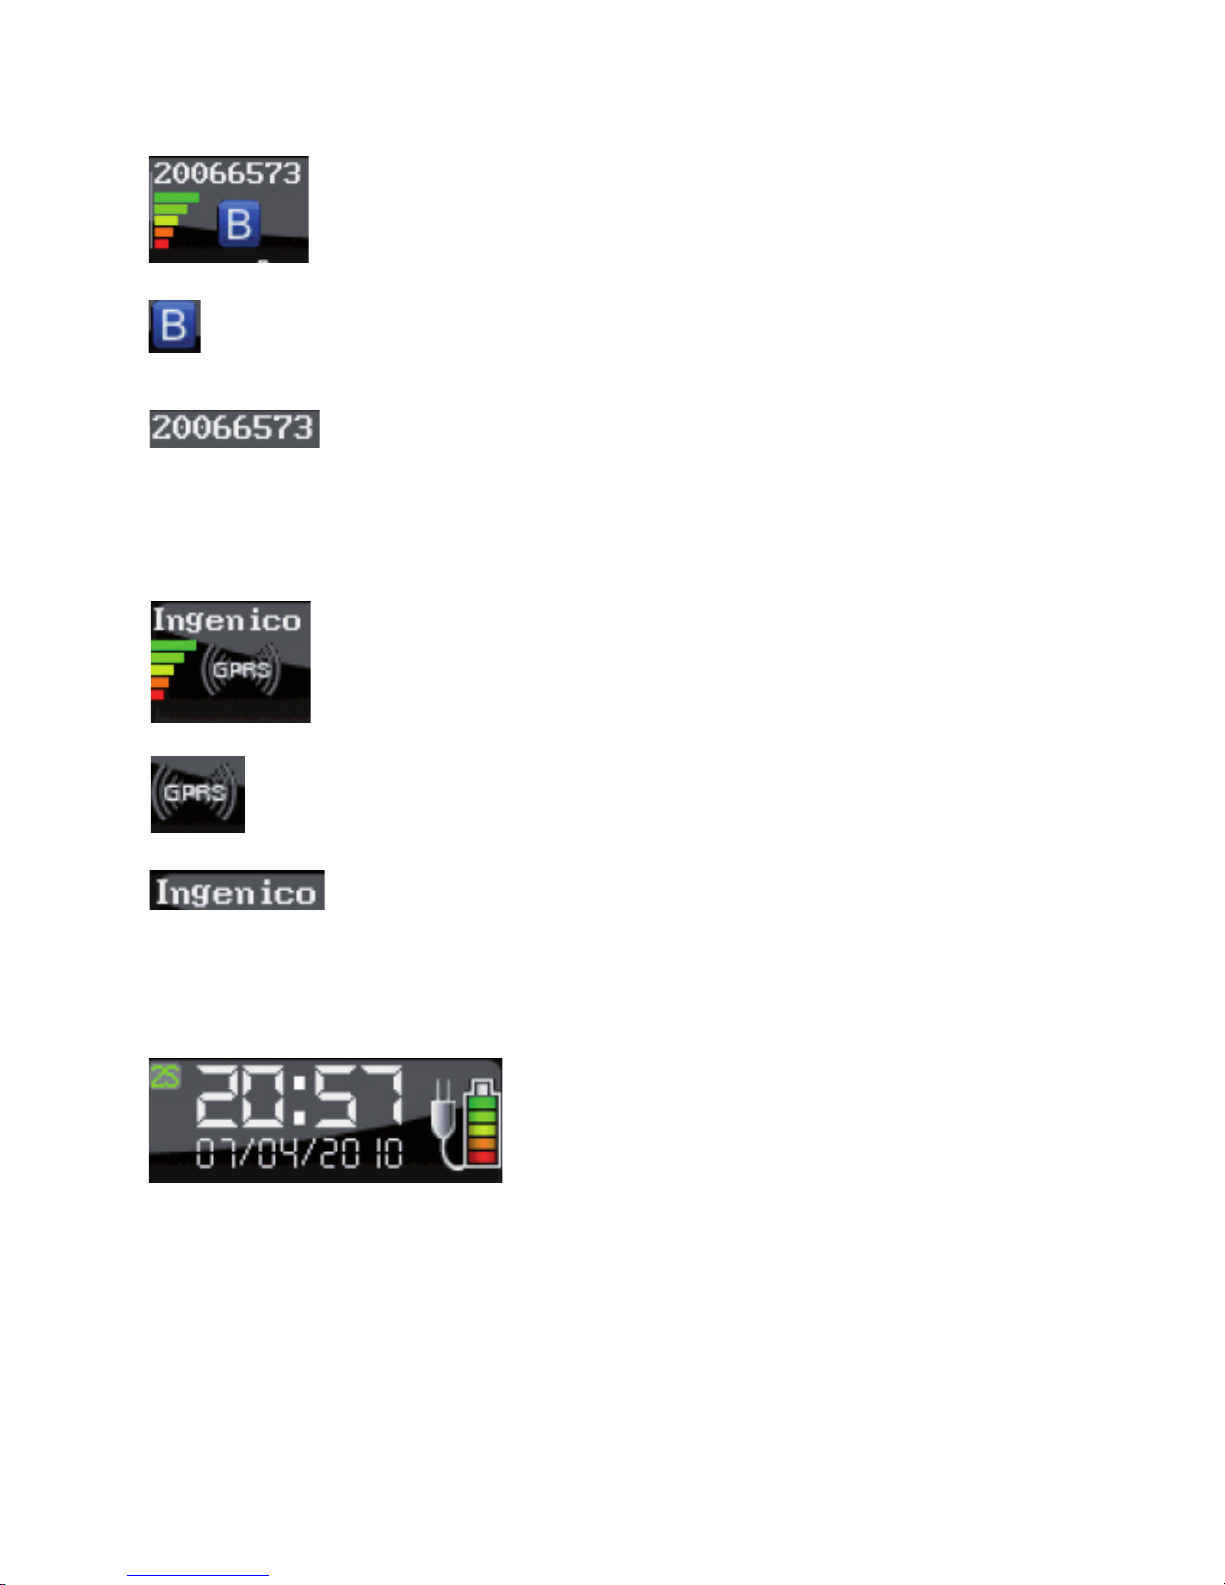
5.2 Bluetooth
indicates whether the terminal has Bluetooth support. If the symbol is not visible, Bluetooth is not
supported. If the Bluetooth symbol is grey or red, the terminal is outside the base station’s coverage
range.
is the serial number of the base station to which the terminal is connected. The signal
strength is indi cated with 5 levels where red is the weakest and green is the strongest
signal.
5.3 GPRS
indicates whether the terminal has GPRS support. If the symbol is not visible, GPRS is not suppor ted. If the GPRS symbol is white, it is not connected to the network. If the GPRS symbol is
green, the terminal is network connected.
shows the name of the telephone line provider to which the terminal is connected.
The signal strength is indicated with 5 levels where red is the weakest and green is
the strongest signal.
5.4 Battery and clock
This field shows the date and time. The clock is updated every time the terminal connects to Nets to submit
transactions. The battery symbol indicates that the battery is installed and how much charge the battery
has. The socket symbol shows that the terminal or the terminal’s charging base is connected to mains
power.
Page 14

14
Function Keys (does not apply to iPP350)
Purchase Enter the amount
Purchase + cash (C/B) Press MENU and 2
Reconciliation Press MENU and 6
Balance Press MENU and 3+3
Deposit Press MENU and 3+4
Cancel the last transaction Press MENU and 3+6
Return of goods Press MENU and 3+7
Copy of the last receipt Press MENU and 5+1
Transaction list Press MENU and 7+1+1
X-To tal Press MENU and 7+1+2
Z-Tot a l Press MENU and 7+1+3
Operat or X-Total Press MENU and 7+1+4
Oper ator Z-Tota l Press MENU and 7+1+5
Printing out EOT Swipe the Merchant Card and press 2+1
This chapter explains the most common terminal functions. By using this guide, you will not have to scroll
through menus and confirm using OK, but can go directly to your selection. When the terminal display says
‘Swipe the Merchant Card’, swipe the Merchant Card with the strip facing left. A detailed description of each
feature is contained in separate chapters.
On integrated terminals: Start all commands with MENU or swipe the Merchant Card. When you are in the
menu, press numbers to go directly to your selection or use the arrow keys.
6 QUICK MENU
Page 15
15
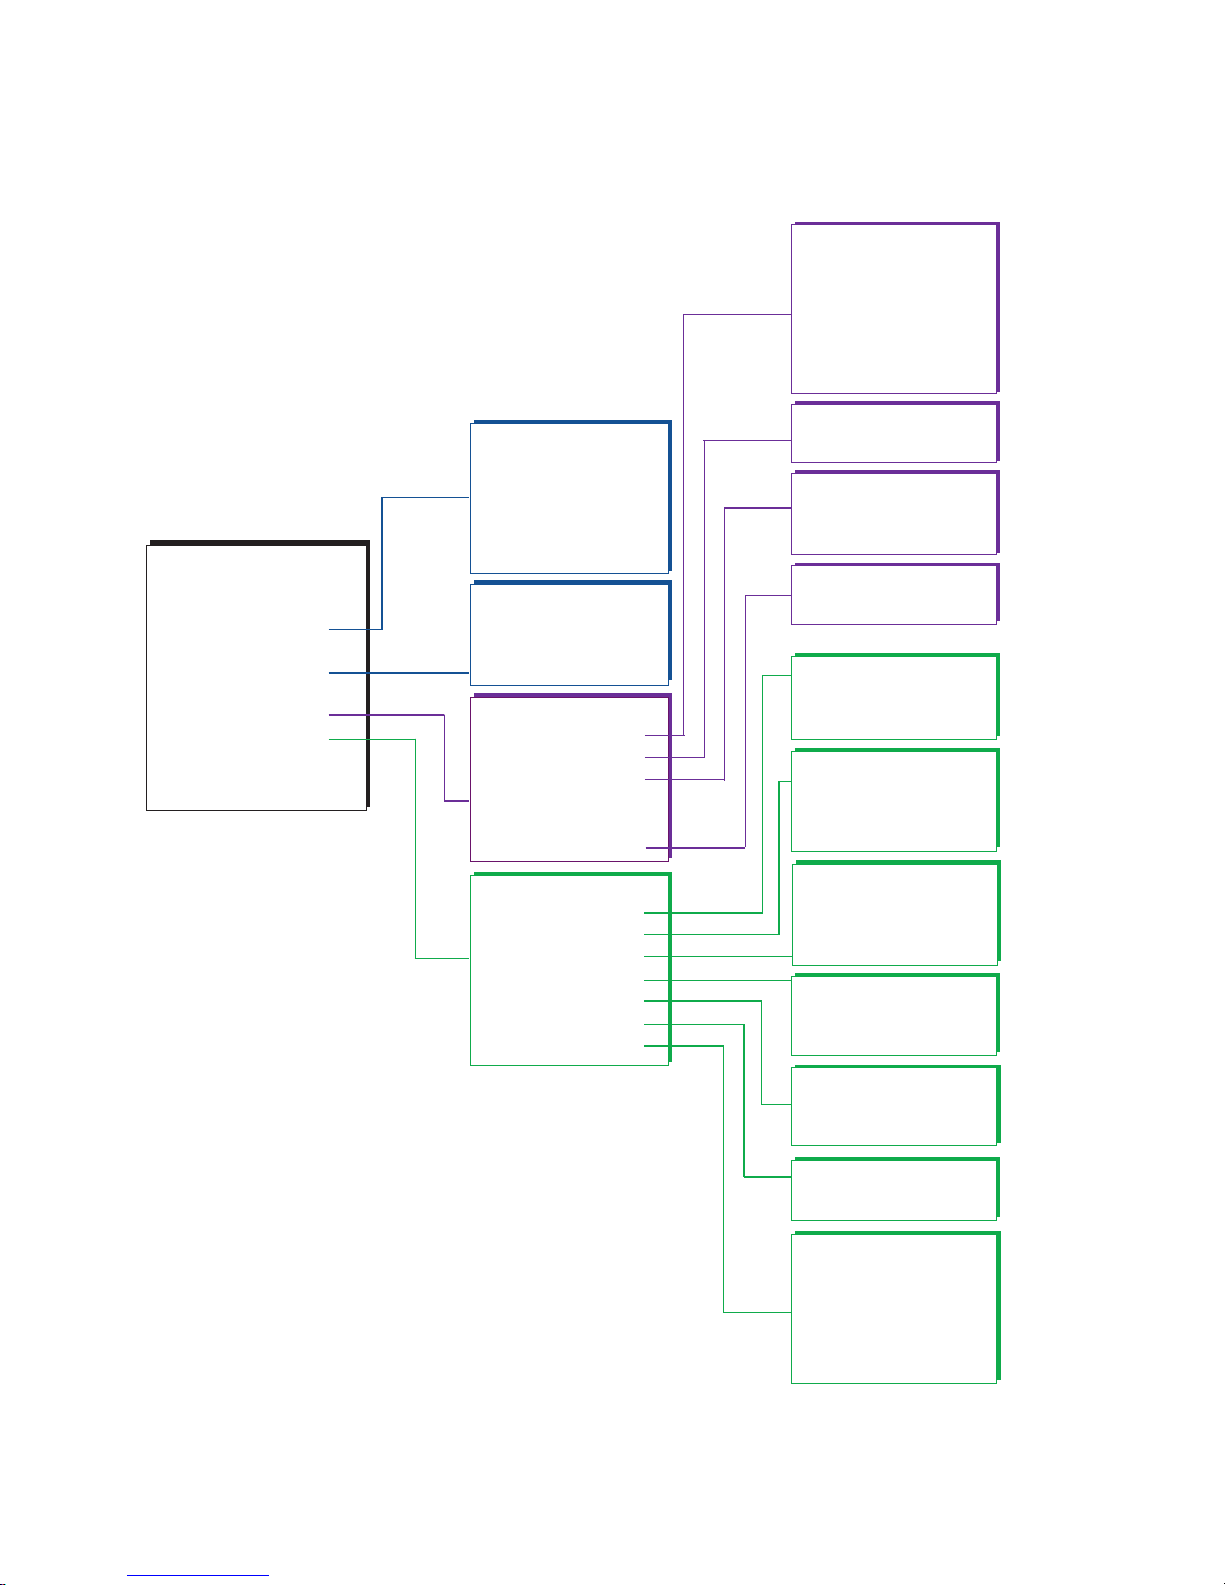
7 TERMINAL MENU STRUCTURE
Operator menu
1 Reports
2 Issuers
3 Term status
4 Send Errorlogs
5 Send Tracelogs
9 Battery+Signal
Reports
1 Trans. list
2 X-Total
3 Z-Total
4 Op X-Total
5 Op Z-Total
7 Reconciliation
Issuers
1 Print
Term status
1 Print
2 Send to host
Battery: 100%
Signal: 5
Issuers
1 Get issuers
2 Print
EOT
1 Print
2 Send to host
3 Delete
Parameters
1 Change
2 Print
Comms
1 Remove obstruc
2 Ping host
Software
1 Get software
Card services
3 Balance
4 Deposit
5 Withdrawal
6 Reversal
7 Rtn of goods
Copy menu
1 Last receipt
2 Last reconc.
3 Last Z-Total
Merchant menu
1 Issuers
2 EOT
3 Operator admin
6 Parameters
7 Comms
8 Software
9 System menu
Main menu
1 Purchase
2 Purchase + cash (C/B)
3 Card services
4 Optional Func
5 Copy menu
6 Reconciliation
7 Operator menu
8 Merchant menu
9 Switch off
Operator admin
1 Add Op.
2 Delete op.
3 Print ops.
System menu
1 Empty printer buffer
2 System Log
6 Test
7 Res merch card
9 Reboot
Page 16
16
8 TERMINAL FEATURES – DAILY OPERATION
This chapter describes the terminal’s features in detail. The software and features are identical in all payment terminals from Nets.
Enter amount.
Press OK.
Ask the customer to enter card.
Ask the customer to enter code and press OK (for credit card with signature,
press only OK to confirm amount).
If authorised, the terminal display will show APPROVED and print a receipt.
Amount + OK
100.00
NOK = 100.00
Code + OK
Hide PIN entry
APPROVED
NOK = 100.00
Awaiting card
8.1 Purchase
Page 17
17
8.2 Purchase with cash withdrawal (cashback)
This function is used to complete purchases that include cash withdrawals. If the tip function is activated,
purchases + cash are shown as Option 2 under Card services.
Press MENU.
Press numeric key 2
or scroll down to Purchase + cash (C/B) and press OK.
Enter amount of purchase and press OK.
Enter amount of cash and press OK.
If the amount is authorised, the terminal display will show APPROVED and
print a receipt.
Ask the customer to verify total amount by entering PIN + OK.
NOK = 100.00
Awaiting card
Chip up
Main menu
1 Purchase
2 Purchase + C/B
3 Card services
Amount + OK
100.00
Cash + OK
200.00
NOK = 300.00
Code + OK
Hide PIN entry
Ask the customer to enter card.
APPROVED
Page 18
18
8.3 Purchase with manual entry of card data
This function can be used to purchase and return goods. Enter card data on the terminal instead of the
customer using his/her card. This feature is only available for credit cards with signature check.
Press MENU.
Press OK for Purchase.
Enter amount of purchase and press OK.
Press the key (the key at the top right of the terminal).
Enter card expiry date mm/yy and press OK.
Enter the card’s CVC number and press OK. CVC is the last three digits of the
number that can be found on the back of the card next to the customer’s signature.
Enter the customer’s card number (from the front of the customer’s card) and
press OK.
The amount is verified by pressing OK.
Cancel the transaction by pressing STOP.
If the amount is authorised, the terminal display will show APPROVED and
print a receipt.
Main menu
1 Purchase
2 Purchase + C/B
3 Card services
Amount + OK
100.00
NOK = 100.00
Awaiting card
Enter card no.:
Expiry date:
/
Enter CVC:
Amount = 100.00
OK or STOP
APPROVED
Page 19
19
8.4 Copy of the last receipt
This function is used to extract a copy of the most recently authorised transaction.
Press MENU.
Press numeric key 5
or scroll down to Copy Menu and press OK.
Press numeric key 1 or OK.
Main menu
3 Card services
4 Optional Func
5 Copy menu
Copy menu
1 Last receipt
2 Last reconc.
3 Last Z-Total
Wait for receipt.
Print Pending
8.5 Cancellation (reversal) of the last transaction
Cancellation can only be carried out for the most recently authorised purchase transaction.
Press MENU.
Press numeric key 3
or scroll down to Card services and press OK.
Press numeric key 6
or scroll down to Reversal and press OK.
Swipe the Merchant Card, magnetic strip facing left.
Wait for receipt.
Press OK to confirm cancellation, or STOP to cancel.
Main menu
1 Purchase
2 Purchase + cash
3 Card services
Card services
4 Deposit
5 Withdrawal
6 Reversal
Swipe
Merchant card
NOK 100.00
OK or Cancel
REVERSED
Page 20
20
8.6 Return of goods
Used when goods that have been paid for by credit card are returned. Product refunds are not available for
purchases made with debit cards (bank cards).
Press MENU.
Press numeric key 3
or scroll down to Card Services and press OK.
Press numeric key 7
or scroll down to Return of goods and press OK.
Swipe the Merchant Card, magnetic strip facing left.
Ask the customer to insert/swipe the card, or press the key (the key at
the top right of the terminal) to enter the card number manually.
If the product refund is authorised, the terminal display will show APPROVED
and print a receipt. Approved receipt corresponds to purchase receipt.
Enter amount on the customer’s receipt and press OK.
Main menu
1 Purchase
2 Purchase + C/B
3 Card services
Card services
5 Withdrawal
6 Reversal
7 Rtn of goods
Swipe
Merchant card
Return amount:
100.00
NOK = 100.00
Awaiting card
APPROVED
Page 21
21
8.7 Tips
Tips is an optional service. Contact your terminal dealer to gain access to the tip function. Tips can be used
in two ways:
• Printoutareceiptwherethecardholderentersthetotalamountincludingtips.
• Thecardholderentersthetotalamountincludingtipsdirectlyontheterminal.
Create a receipt
This function is used to print out receipts with an amount for the customer to pay and a line for tips and
total amount. If tips is activated, Create a Receipt will appear as Option 2 in the main menu.
Create a Receipt is only a print-out and cannot be used for later claims. Purchases must be carried out on
the terminal in the standard way.
Press MENU.
Press numeric key 2
or scroll down using the arrow key to Create a Receipt and press OK.
Enter amount of purchase and press OK.
Wait for receipt.
RECEIPT
05/10/2006 10:14
Amount = 42.00
Cash = .........................
Ex tra = .........................
Total = .........................
Cash can only be paid out
with a BankAxept card
Receipt:
Main menu
1 Purchase
2 Create a receipt
3 Card services
Amount + OK
42.00
Print Pending
Page 22
22
8.8 Purchase with tips
This function is used for purchases that include tips.
Nets
H. Martinsensvei
NO-0978 OSLO
Bax: 10139902-125442
BankAxept *****05040-3
05/10/2006 10:14
Ref.: 829764004472
Amount = 120.00
Extra = 30.00
Total = 150.00
Authorised
Thank you for your visit
We hope to see you again!
Receipt, purchase with tips:
Press MENU.
Press OK for Purchase.
Enter amount and press OK.
Enter total amount including tips. If a receipt is not used, the merchant can
ask the customer to enter the total amount on the terminal.
Ask the customer to enter code and press OK (for credit card with signature,
press only OK to confirm amount).
If authorised, the terminal display will show APPROVED and print a receipt.
Ask the customer to enter card.
Main menu
1 Purchase
2 Purchase + C/B
3 Card services
Amount + OK
120.00
Amount = 120.00
Total = 150.00
NOK = 150.00
Awaiting card
Amount = 150.00
Code + OK
Hide PIN entry
APPROVED
Page 23
23
9 CONTACTLESS PAYMENTS (CONTACTLESS/NFC)
Contactless payments is a common term for all payments using NFC technology (Near Field Communication). NFC can be implemented in a range of payment methods such as chip cards, Micro SD cards
connected to mobile phones, clocks, bracelets etc. or via a mobile phone (called ”Wallet”).
Contactless payments without verification can only be used for purchases under a certain amount; all purchases over this amount will require verification – either with a PIN code or password. The details of the
verification will depend on the payment card provider. However, the instructions to enter the verification
code will be shown on the terminal and/or on the mobile phone.
9.1 Wallet solution
“Wallet” is a solution for confirming a contactless payment using the customer’s mobile phone. The user
must install an app supplied by the card issuer on their mobile phone. When the program is installed the
user can confirm a contactless payment by holding their phone over the terminal when the contactless
symbol is shown. As with card-based contactless payments, purchases above a certain amount will require
verification. Contactless payment via Wallet can be performed even if the mobile phone is switched off,
however, the customer will be unable to confirm payments in such instances. If the customer has registered several payment cards via a Wallet solution, the correct payment card must be selected in the application/program before the phone is switched off.
9.2 Purchase with contactless payment
Amount + OK
100.00
NOK 100.00
Awaiting card
APPROVED
Enter amount.
Press OK.
Ask the customer to hold the NFC device (card, mobile phone, etc.)
close over the payment terminal screen.
If authorised, the terminal display will show APPROVED and print a receipt.
9.3 Product refunds
Continued on next page
Press MENU.
Press numeric key 3
or scroll down to Card Services and press OK.
Main menu
1 Purchase
2 Purchase + C/B
3 Card services
Page 24
24
Card services
5 Withdrawal
6 Reversal
7 Rtn of goods
Swipe
Merchant card
Return amount:
100.00
APPROVED
Press numeric key 7
or scroll down to Return of goods and press OK.
Swipe the Merchant Card, magnetic strip facing left.
Ask the customer to hold the NFC device (card, mobile phone, etc.)
close over the payment terminal screen.
If the product refund is authorised, the terminal display will show APPROVED
and print a receipt. Authorised receipt corresponds to purchase receipt.
Enter amount on the customer’s receipt and press OK.
NOK 100.00
Awaiting card
9.4 Cancellation (reversal) of the last transaction
Press MENU.
Press numeric key 3
or scroll down to Card Services and press OK.
Press numeric key 6
or scroll down to Cancellation and press OK.
Swipe the Merchant Card, magnetic strip facing left.
Wait for receipt.
Press OK to confirm cancellation, or STOP to cancel.
Main menu
1 Purchase
2 Purchase + C/B
3 Card services
Card services
4 Deposit
5 Withdrawal
6 Cancellation
Swipe
Merchant card
NOK 100.00
OK or STOP
REVERSED
Continued from previous page
Page 25

25
10 BACKUP SOLUTION (EOT)
If errors occur in the communication between the terminal and
Nets, an electronic backup solution can be used for BankAxept
cards. The terminal prints out a receipt with a signature line.
Procedure with backup solution (EOT):
• Ask the cardholder to sign the receipt.
• Check the cardholder’s identity.
• Add the security code from the bank card to the receipt – both
letters and numbers (e.g. ABCD 123).
• For purchases with a value of more than NOK 1,500 contact
Nets’ customer service on +47 08989 to authorise the amount.
• Note the authorisation number in the merchant field on the
receipt.
You must keep the receipt with the cardholder’s signature and be
able to produce it, if required.
The amount is transferred to Nets automatically when the terminal
is up and running again. Do not provide cash-back when the backup solution is used.
Backup solution receipt:
******************************
Signature-based payment
MUST BE COMPLETED
******************************
Nets Norway AS
H. Martinsensvei
NO-0978 OSLO
Bax: 1234567-123456
BankAxept 12345678910-3
Expiry: 11/2014
AID: D5780000221010
Service code: 601
05/10/2011 10:14
Sequence no: 901469
Resp.: Y3
Not connected to network
AUTHORISED WITH
SIGNATURE
Amount = 1.00
Bank card
verification code:
-------------------------- Signature:
******************************
CARD CHARGED
******************************
----------- Tear here ------------
Nets Norway AS
H. Martinsensvei
NO-0978 OSLO
Bax: 10139902-125442
BankAxept ******05040-3
AID: D5780000221010
05/10/2011 10:14
Sequence no: 901469
Resp.: Y3
Amount = 1.00
AUTHORISED WITH
SIGNATURE
CUSTOMER COPY
Page 26
26
10.1 Print out backup solution (EOT)
Swipe the Merchant Card, magnetic strip facing left.
Press numeric key 2
or scroll down to EOT and press OK.
Press OK to start printing the terminal’s stored backup solutions.
Merchant menu
1 Issueras
2 EOT
3 Operator admin
EOT
1 Print
2 Send to host
3 Delete
10.2 Submit backup solution (EOT)
Swipe the Merchant Card, magnetic strip facing left.
Press numeric key 2
or scroll down to EOT and press OK.
Press numeric key 2
or scroll down to Send to host and press OK to submit the terminal’s stored
backup solutions.
Merchant menu
1 Issuers
2 EOT
3 Operator admin
EOT
1 Print
2 Send to host
3 Delete
Page 27
27
11 RECONCILLIATION (DAILY STATEMENT)
11.1 Manual reconciliation
Reconciliation transfers transactions to the settlement account on the following business day. The terminal
should be reconciled every day. If seven days have elapsed since the last reconciliation, the terminal must be
reconciled before it can be used.
11.2 Automatic reconciliation
Automatic reconciliation involves the terminal carrying out re conciliation at a fixed time every day. If the
merchant has several terminals, automatic reconciliation will take place from the same terminal every time.
Please contact Nets customer service to activate automatic reconciliation.
11.3 Copy of last reconciliation
This function is used to extract a copy of the most recent reconciliation receipt.
Press MENU.
Press numeric key 5
or scroll down to Copy Menu and press OK.
Press numeric key 2 or scroll down to Last Reconciliation and press OK. Wait
for receipt.
Main menu
3 Card services
4 Optional Func
5 Copy menu
Copy menu
1 Last receipt
2 Last reconc.
3 Last Z-Total
!
If you have several terminals, only one terminal needs to be reconciled. Reconciliation of one
terminal reconciles all the terminals under the same merchant number.
Press MENU.
Press numeric key 6
or scroll down using the arrow key to Reconciliation and press OK.
The terminal prints out a receipt showing the number of transactions per card
type and amount.
Main menu
4 Optional Func
5 Copy menu
6 Reconciliation
Print Pending
Page 28
28
12 NETS PREPAID GIFT CARDS
12.1 Deposits
This function is used to insert a required amount on an electronic gift card.
Press MENU.
Press numeric key 3
or scroll down to Card Services and press OK.
Press numeric key 4
or scroll down to Deposit and press OK.
Swipe the Merchant Card, magnetic strip facing left.
Mandatory use of Merchant Card can be deactivated in the terminal security
menu.
Swipe the gift card through the terminal (magnetic strip facing
left).
Press OK to confirm amount, or STOP to cancel.
If the amount is authorised, the terminal display will show APPROVED and
print a receipt.
Enter amount and press OK.
Main menu
1 Purchase
2 Purchase + C/B
3 Card services
Card services
7 Rtn of goods
3 Balance
4 Deposit
Swipe
Merchant card
Amount + OK
250.00
NOK 50,00
Awaiting card
Chip up
Deposit = 250.00
OK or STOP
APPROVED
Page 29
29
12.2 Creating replacement cards for a defective prepaid gift card
It is possible to create replacement cards for defective Nets prepaid gift cards. There may be various reasons
that a customer requires a new gift card. These may include:
• Demagnetisation
• Defective magnetic strip/card
Available balance
Manual entry of the card number is used to check the outstanding balance on the defective card. The customer must have access to the card number (19 digits) and produce the physical card. Do as follows:
When the balance on the defective card is known, a replacement card can be created. See next page.
Press MENU.
Press numeric key 3
or scroll down using the arrow key to Card Services and press
OK.
Press numeric key 3
or scroll down to Available and press OK.
Press the key (the key at the top right of the terminal).
Enter card expiry date mm/yy and press OK.
Press OK.
Press OK.
Available balance will be shown on the display.
Enter card number (19 digits) and press OK.
Main menu
1 Purchase
2 Purchase + C/B
3 Card services
Card services
6 Reversal
7 Rtn of goods
3 Balance
Awaiting card
Chip up
Enter card no.
Enter expiry date:
/
Enter CVV:
Available
OK or STOP
Available
Available = 500.00
Page 30
30
Creating replacement cards
Press MENU.
Press numeric key 3
or scroll down to Card Services and press OK.
Press numeric key 4
or scroll down to Deposit and press OK.
Swipe the Merchant Card, magnetic strip facing left.
Mandatory use of Merchant Card can be deactivated in the terminal security
menu.
Enter the card number from the defective card (19 digits) and press OK.
Swipe the new gift card through the terminal (magnetic strip facing
left).
Enter the amount, balance from the defective card, and press
MENU.
Confirm amount by pressing OK.
Wait for receipt.
Main menu
1 Purchase
2 Purchase + C/B
3 Card services
Card services
7 Rtn of goods
3 Balance
4 Deposit
Swipe
Merchant card
Amount + OK
250.00
Enter information field:
23
Awaiting card
Chip up
Deposit = 250.00
OK or STOP
APPROVED
Page 31
31
Available – stand-alone terminal
This function is used to view available balance on a gift card on a stand-alone terminal.
Receipts are not printed for balance enquiries.
Press MENU.
Press numeric key 3
or scroll down to Card Services and press OK.
Press numeric key 3
or scroll down to Available and press OK.
Ask the customer to insert/swipe the card.
Available balance will be shown on the display.
Cardholder must press OK to view available balance.
Main menu
1 Purchase
2 Purchase + C/B
3 Card services
Card services
6 Reversal
7 Rtn of goods
3 Balance
Awaiting card
Chip up
Available
OK or STOP
Available
Amount = 500.00
Available – integrated terminal
This function is used to view available balance on a gift card on an integrated terminal.
Swipe the gift card through the terminal card reader.
When the terminal shows ‘PLEASE WAIT’, press the key (the key at
the top right of the terminal).
Cardholder must press OK to view available balance.
PLEASE WAIT
Available
OK or STOP
Available
Amount= 500.00
Available balance will be shown on the display.
12.3 See available balance on prepaid gift card
Page 32
32
13.1 Transaction list
Used to print out a list of all transactions stored in the terminal.
Press MENU.
Press numeric key 7
or scroll down to Operator Menu and press OK.
Press OK or numeric key 1.
Press OK or numeric key 1.
Scroll down using the arrow key to the required reconciliation and press OK.
The option All is shown at the bottom of the list and provides a print-out of
all transactions stored in the terminal.
Press OK or numeric key 1 to print.
Wait for receipt.
Main menu
5 Copy menu
6 Reconciliation
7 Operator menu
Operator menu
1 Reports
2 Issuers
3 Term status
Reports
1 Trans. list
2 X-Tot al
3 Z-Tota l
Trans. list
1 Print
2 Delete
Select session
Session 490: 2
Session 489: 10
Session 488: 1
Print Pending
13 REPORTS
Page 33
33
13.2 X-Total
The report shows sales on the terminal since the previous Z-Total was printed out. Figures are not reset
when a list is printed out.
Press MENU.
Press numeric key 7
or scroll down to Operator Menu and press OK.
Press OK for Reports.
Press numeric key 2
or scroll down to X-Total and press OK.
Wait for receipt.
Main menu
5 Copy menu
6 Reconciliation
7 Operator menu
Operator menu
1 Reports
2 Issuers
3 Term status
Reports
1 Trans. list
2 X-To ta l
3 Z-Tota l
Print Pending
13.3 Z-Total
The report shows sales on the terminal since the previous Z-Total was printed out. Figures are reset when a
list is printed out.
Press MENU.
Press numeric key 7
or scroll down to Operator Menu and press OK.
Press OK for Reports.
Press numeric key 3
or scroll down to Z-Total and press OK.
Wait for receipt.
Main menu
5 Copy menu
6 Reconciliation
7 Operator menu
Operator menu
1 Reports
2 Issuers
3 Term status
Reports
1 Trans.list
2 X-Tot al
3 Z-To tal
Print Pending
Page 34
34
13.5 Operator X-Total
The report shows all transactions carried out on the terminal for one or all operators since the last Operator
Z-Total was printed out. Figures are not reset when a list is printed out.
Press MENU.
Press numeric key 7
or scroll down to Operator menu and press OK.
Press OK for Reports.
Press numeric key 4
or scroll down to Operator X-Total and press OK.
Press OK to print out X-Total for a selected operator.
Press 2 to print out X-Total for all operators.
Main menu
5 Copy menu
6 Reconciliation
7 Operator menu
Operator menu
1 Reports
2 Issuers
3 Term status
Reports
2 X-Total
3 Z-Total
4 Op X-Total
Op X-Total
1 Cur operator
2 All
Print Pending
Wait for receipt.
13.4 Copy of last Z-Total
This function is used to extract a copy of the most recent Z-Total.
Press MENU.
Press numeric key 5
or scroll down to Copy meenu and press OK.
Press numeric key 3
or scroll down to Last Z-Total and press OK.
Wait for receipt.
Main menu
3 Card services
4 Optional Func
5 Copy menu
Copy menu
1 Last receipt
2 Last reconc.
3 Last Z-Total
Print Pending
Page 35
35
13.6 Operator Z-Total
The report shows all transactions carried out on the terminal for one or all operators since the last Operator
Z-Total was printed out. Figures are reset when a list is printed out.
Press MENU.
Press numeric key 7
or scroll down to Operator Menu and press OK.
Press OK for Reports.
Press numeric key 5
or scroll down to Operator Z-Total and press OK.
Press OK to print out Z-Total for a selected operator.
Press 2 to print out Z-Total for all operators. NB: Requires Merchant Card.
Main menu
5 Copy menu
6 Reconciliation
7 Operator menu
Operator menu
1 Reports
2 Issuers
3 Term status
Reports
3 Z-Total
4 Op X-Total
5 Op Z-Total
Oper Z-Total
1 Cur operator
2 All
Print Pending
Wait for receipt.
Page 36
36
This function is used to register and delete operators using the termin al. Operators are registered with a
unique operator ID (up to 10 digits) and name. Each operator must be registered on each terminal that they
use.
It is possible to access-protect operators by activating a four-digit code. The first operator to register with
his/her code becomes the Master. The Master Operator is the only person who can create or delete registered operators. If the Master Operator is not known, a list of registered operators can be printed out. The
Masterismarkedwithan*.
14.1 Creating a new operator
Used for registering a new operator on the terminal.
Swipe the Merchant Card, magnetic strip facing left.
Press numeric key 3
or scroll down to Operator admin.
Press OK to register a new operator.
Enter operator number and press OK.
Enter operator name. Use the key (the key at the top right of the terminal) to toggle to lower case.
Merchant menu
1 Issuers
2 EOT
3 Operator admin
Operator admin
1 Add Op.
2 Delete Op.
3 Print ops.
Operator Id:
Operator Name:
ABC
Operator added
Operator PIN:
Enter the optional four-digit PIN and press OK. If a PIN is not required, the
field may be left empty. Simply press OK.
14 OPERATORS
Page 37
37
14.2 Delete operator
Used to delete a registered operator.
Swipe the Merchant Card, magnetic strip facing left.
Press numeric key 3
or scroll down to Operator admin.
Press numeric key 2 or scroll down to Delete Operator and press OK.
Enter the operator number that is to be deleted and press OK.
Press OK to confirm deletion of operator.
Merchant menu
1 Issuers
2 EOT
3 Operator admin
Operator admin
1 Add Op.
2 Delete Op.
3 Print ops.
Operator ID:
Delete
Operator?
Operator deleted
PIN + OK
Appears only if the registered operator has a PIN. Only the Master Operator
can delete operators.
Page 38
38
14.3 Print operator list
Used to print out a list of all operators registered on the terminal.
Swipe the Merchant Card, magneticstrip facing left.
Press numeric key 3
or scroll down to Operator admin.
Press numeric key3
or scroll down to Print List and press OK to print out
a list of operators.
The terminal will print out a list of all operators registered on the terminal. If
theregisteredoperatorhasaPIN,theMasterismarkedwithan*.
Merchant menu
1 Issuers
2 EOT
3 Operator admin
Operator admin
1 Add Op.
2 Delete Op.
3 Print ops.
Print Pending
14.4 Using Operator ID
The Operator ID can be used in five different ways:
1. Without operator – the terminal never asks for Operator ID.
2. Z-Total – the terminal asks for Operator ID after each Z-Total.
3. O report – the terminal asks for Operator ID after each Operator X and Z-Total.
4. Reconciliation – the terminal asks for Operator ID after each reconciliation.
5. Always – the terminal asks for Operator ID after each transaction.
This is set in the function parameters on the terminal.
Page 39
39
Multiterminal makes it possible for up to ten users to use the same payment terminal. Users have their own
account, own receipt text and own reports on the terminal. This is a solution suitable for companies or the
self-employed sharing premises.
15.1 Purchases with multi-users
On terminals with multiple users, the user (merchant) must first be selected before functions on the terminal can be used. Press the MENU key or swipe a card through the terminal to view a list of merchants (users)
on the display. Use the arrow keys to scroll to the required user and press OK. Then confirm that the correct
user has been selected by pressing OK. How to select user for the Purchase function is described below.
Swipe the card through the terminal or press the MENU key.
Use the arrow keys to scroll to the required user.
Press OK to confirm that the required user has been selected. Press Stop
to go back to the list of users.
Press OK for purchase.
Ask the customer to enter card.
Wait for receipt.
Enter amount and press OK.
Merchants
Multi 1
Multi 2
Multi 3
Multi 2
ID 01
T ID 123 45 67 8
OK or STOP
Main menu
1 Purchase
2 Purchase + cash
3 Card services
Amount + OK
100.00
Awaiting card
Chip up
APPROVED
15 MULTITERMINAL
Page 40
40
16.1 Terminal card agreements (Issuers)
In order to be able to carry out purchases on the terminal, you need card agreements. Card agreements are
entered into between merchants and the bank/card acquirer (issuers). On the terminal, you are able to print
out your card agreements as well as update the terminal if a new card agreement is entered into.
16.2 Downloading card agreements
Swipe the Merchant Card, magnetic strip facing left.
Press numeric key 1 or OK.
Press numeric key 1
or OK to download your card agreements.
Merchant menu
1 Issuers
2 EOT
3 Operator admin
Issuers
1 Get issuers
2 Print
16.3 Printing card agreements
Swipe the Merchant Card, magnetic strip facing left.
Press numeric key 1 or OK.
Press numeric key 2
or scroll down to Print and press OK to print out the registered card agreements.
Merchant menu
1 Issuers
2 EOT
3 Operator admin
Issuers
1 Get issuers
2 Print
16.4 Downloading new software
You are able to start software updates manually from the terminal.
Swipe the Merchant Card, magnetic strip facing left.
Press numeric key 8
or scroll down to Software and press OK.
Press OK to start software update.
Merchant menu
6 Parameters
7 Comms
8 Software
Software
1 Get software
16 ADMINISTRATION
Page 41
41
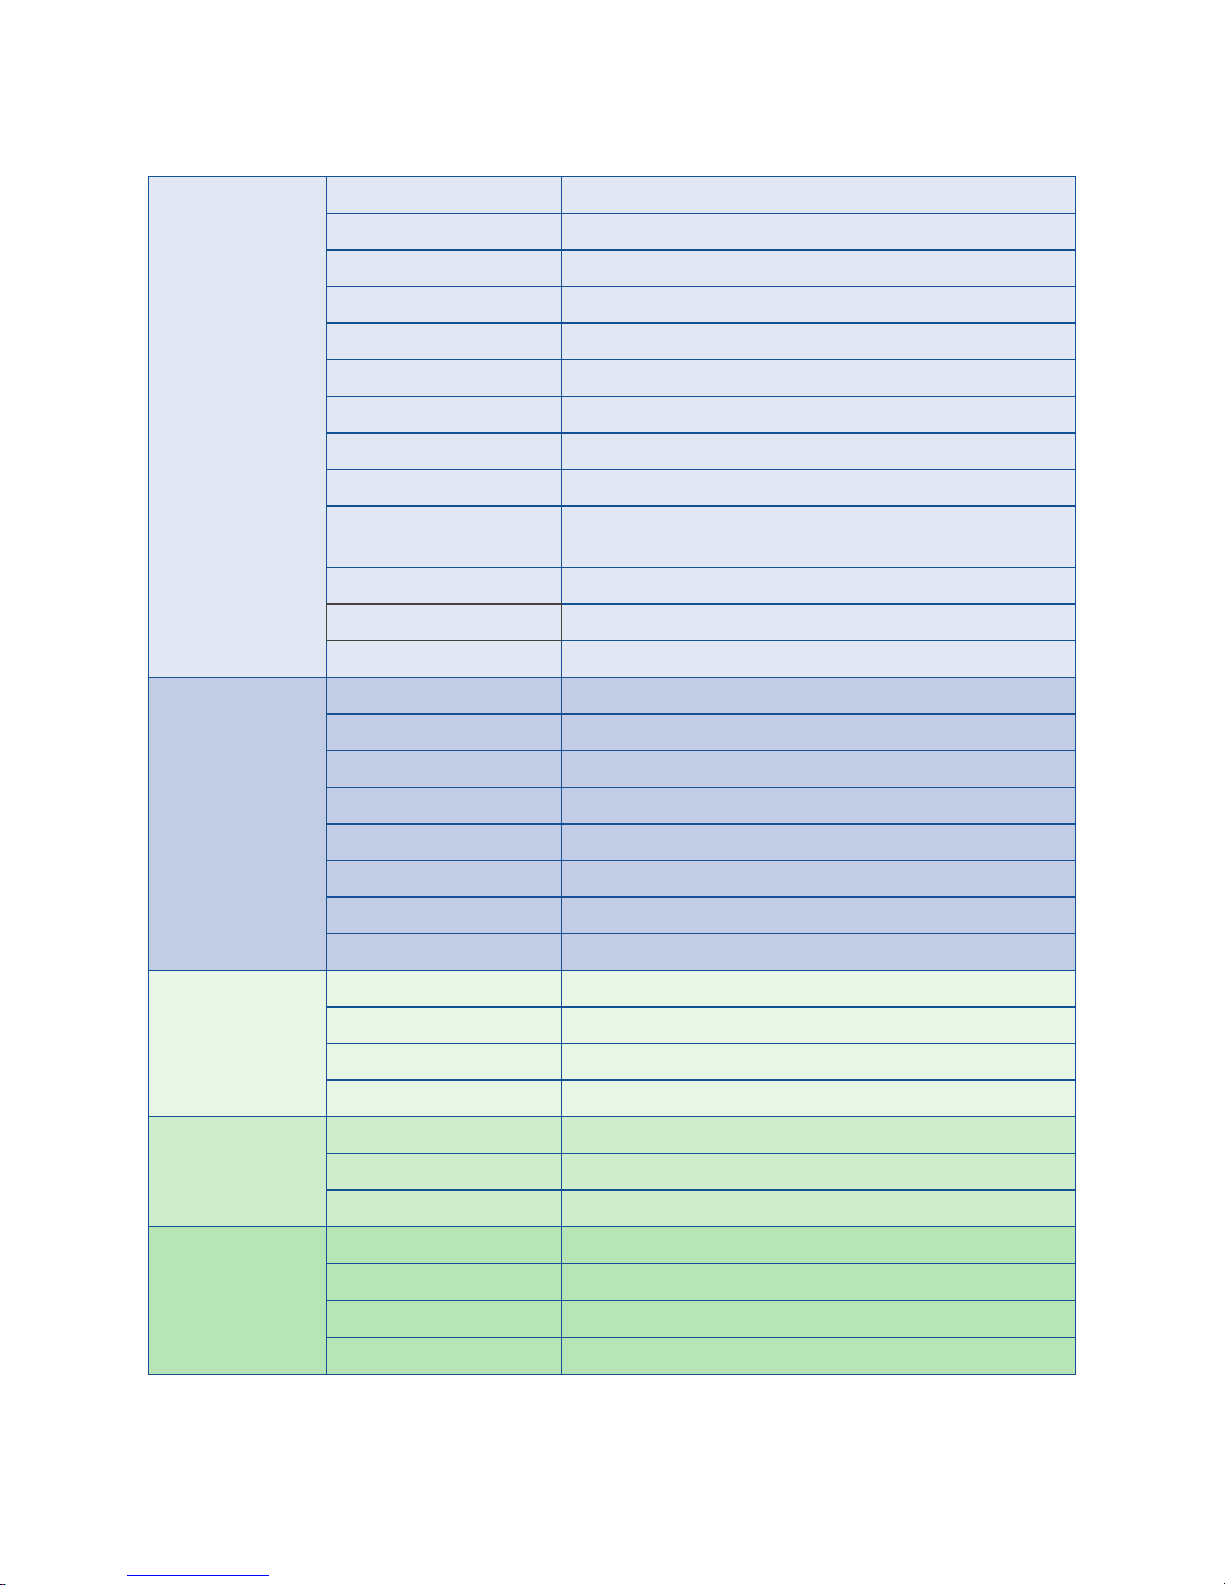
17 TERMINAL PARAMETRES
1 Function Terminal ID
Amount mode Øre/Kroner
Backup solution Yes/No
Information field No information/CID/information text/Oper ID
Key sound None/On error/Always
Always copy No/Yes
Double check Yes/No
Language Norwegian/Swedish/English
Tips Yes/No
Change operator Without operator/Reconciliation/Z-Total/Always/O report
VAT Fixed VAT/Change VAT/No VAT
VAT rate
Automatically off Never/After 1 hour/After 2 hours
2 Communication Comm. type = GPRS/Ethernet/via ECR
Host IP Address 193.214.20.211 / 91.102.24.142
Host IP Port 9670
PPP Password oidd398
PPP User name [email protected]
GPRS APN nets
GSM PIN ****
DHCP Use DHCP/Static
3 Till ECR Yes/No
Comm. type RS232 / USB Slave / IP Ethernet
ECR Speed 1200,2400,4800,9600,19200,38400,57600,115200
Card info Never / After amount / Always
4 Security Protect menu Yes/No
Protect reconciliation Yes/No
Protect deposit Yes/No
6 Change profile 1 .no
2 .se
3 .dk
4 .pl
Page 42

42
Questions Solution
re purchases, reconciliation and backup
solution which are more than 7 days old
Please contact your bank.
re purchases, reconciliation, backup solution
in the past 7 days
Please contact Nets customer service.
re several terminals with the same error Please contact your network provider or shop/chain
manager.
re Telenor broadband from Nets Please contact Nets customer service.
To order credit card agreements Please contact the credit card company.
To order automatic reconciliation Please contact Nets customer service.
Error situations Solution
• Not connected to network
• No contact with centre
• I only get backup solutions
General: The terminal cannot establish contact with
the network. Restart the terminal by holding down the
yellow “Clear” button and the full stop/comma button
simultaneously. Let go and wait until the terminal starts
up (approx. 30 seconds). Try again.
GPRS: In order for the terminal to be online, the signal
strength with antenna signal must first be displayed at
the top of the display. If the signal or antenna do not
show after restarting, contact the network provider to
check coverage and subscriptions/SIM cards or call Nets’
customer service for additional troubleshooting of the
terminal.
Ethernet/Broadband: Check that the network cable is
connected to the terminal and the network socket in
the wall, switch or router/modem. Contact your network
provider to check the network, or contact Nets’ Customer
service for troubleshooting the terminal.
The terminal freezes. None of the keys
work
Restart the terminal by holding down the yellow “Clear”
button and the full stop/comma button simultaneously.
Let go and wait until the terminal starts up (approx. 30
seconds). Try again. If the terminal is still frozen, remove
the power cable or battery and ensure that the display
goes dark. Replace the power cable/battery. If the terminal is still frozen, contact Nets’ customer service.
The terminal stopped working when we were
carrying out a transaction. Did the purchase
go through?
Take a copy of the last transaction (Menu – 5 – 1) to see
if the purchase went through OK. If this is still uncertain,
call Nets customer service.
Problems with the terminal modem Check whether the modem is lit up. Check that all cables
are in the right position on the terminal, in the modem
and in the wall socket. Take out the line and power
cables on the modem. Replace the line in the modem
first (the one with a clip). Then replace the power cable.
Contact Nets customer service if required.
18 ERRORS AND TROUBLESHOOTING
Page 43

43
19 SUBMITTING PAYMENT TERMINAL FOR SERVICE OR
TERMINATION
Check that the terminal has been reconciled before sending it to the Nets repair service. Pack the terminals
securely and separately. Remember to include associated cables. The package must be traceable; keep the
tracking number.
Do not return the ADSL modem to the Nets repair service. When sending terminals for service, please include a return schedule. Please print the BAX number on the outside of the box.
Terminals should not be sent for repair/service until the error has been reported to Nets customer service.
Terminals received by the Nets repair service which have not been reported to Nets customer service will be
stored until a service report has been received from Nets.
When terminating the lease of a terminal, the terminal should not be returned until the merchant has terminated the existing lease agreement. Merchants that buy a new terminal from a different supplier must
terminate their lease agreements with the bank before they return the old terminal. The lease agreement
will run and the merchant will be invoiced until notice of termination has been received by the merchant’s
bank.
Please contact Nets customer service about return enquiries.
Response codes Explanation
Resp 05 and 51 – Rejected The transaction is rejected by the bank or card issuer.
Resp 55 – Incorrect PIN The customer has entered an incorrect PIN code; get
them to try again.
Resp 87 – The terminal must be reconciled More than seven days have passed since the last recon-
ciliation and you must reconcile the terminal (Menu – 6)
before it can be used.
Resp 91 – No contact with card issuer A data centre is down and the terminal cannot establish
contact with the customer’s card issuer. Try again, try
another card or settle in cash. The amount is reserved
on the customer’s account but will be reversed as soon
as the data centre is up again. It is important to explain
that the cardholder will not be charged and the transaction must be performed again.
Page 44

© Nets | Vers ion 1 – 2014
 Loading...