

Page 1

Wireless 802.11bg USB Adapter
User’s Guide
W420B
Page 2

FCC Certifications
Federal Communication Commission Interference Statement
This equipment has been tested and found to comply with the limits for a Class B digital
device, pursuant to Part 15 of the FCC Rules. These limits are designed to provide
reasonable protection against harmful interference in a residential installation. This
equipment generates, uses and can radiate radio frequency energy and, if not installed and
used in accordance with the instructions, may cause harmful interference to radio
communications. However, there is no guarantee that interference will not occur in a
particular installation. If this equipment does cause harmful interference to radio or
television reception, which can be determined by turning the equipment off and on, the user
is encouraged to try to correct the interference by one of the following measures:
- Reorient or relocate the receiving antenna.
- Increase the separation between the equipment and receiver.
- Connect the equipment into an outlet on a circuit different from that
to which the receiver is connected.
- Consult the dealer or an experienced radio/TV technician for help.
This device complies with Part 15 of the FCC Rules. Operation is subject to the following
two conditions: (1) This device may not cause harmful interference, and (2) this device must
accept any interference received, including interference that may cause undesired
operation.
FCC Caution: Any changes or modifications not expressly approved by the party
responsible for compliance could void the user's authority to operate this equipment.
IEEE 802.11b or 802.11g operation of this product in the U.S.A. is firmware-limited to
channels 1 through 11.
IMPORTANT NOTE:
FCC Radiation Exposure Statement:
This equipment complies with FCC radiation exposure limits set forth for an
uncontrolled environment. End users must follow the specific operating instructions for
satisfying RF exposure compliance. To maintain compliance with FCC RF exposure
compliance requirements, please follow operation instruction as documented in this
manual.
This transmitter must not be co-located or operating in conjunction with any other antenna or
transmitter.
The availability of some specific channels and/or operational frequency bands are country
dependent and are firmware programmed at the factory to match the intended destination.
The firmware setting is not accessible by the end user.
1
Page 3

Europe – EU Declaration of Conformity
This device complies with the essential requirements of the R&TTE Directive 1999/5/EC. The
following test methods have been applied in order to prove presumption of conformity with the
essential requirements of the R&TTE Directive 1999/5/EC:
- EN 60950-1: 2001
Safety of Information Technology Equipment
- EN 50392: 2004
Generic standard to demonstrate the compliance of electronic and electrical apparatus with the
basic restrictions related to human exposure to electromagnetic fields (0 Hz - 300 GHz)
- EN 300 328 V1.6.1 (2004-11)
Electromagnetic compatibility and Radio spectrum Matters (ERM); Wideband transmission
systems; Data transmission equipment operating in the 2,4 GHz ISM band and using wide band
modulation techniques; Harmonized EN covering essential requirements under article 3.2 of the
R&TTE Directive
- EN 301 489-17 V1.2.1 (2002-08) and EN 301 489-1 V1.5.1 (2004-11)
Electromagnetic compatibility and Radio spectrum Matters (ERM); ElectroMagnetic
Compatibility (EMC) standard for radio equipment and services; Part 17: Specific conditions for
2,4 GHz wideband transmission systems and 5 GHz high performance RLAN equipment
This device is a 2.4 GHz wideband transmission system (transceiver), intended for use in all EU member states and EFTA countries,
except in France and Italy where restrictive use applies.
In Italy the end-user should apply for a license at the national spectrum authorities in order to obtain
authorization to use the device for setting up outdoor radio links and/or for supplying public access
to telecommunications and/or network services.
This device may not be used for setting up outdoor radio links in France and in some areas the RF
output power may be limited to 10 mW EIRP in the frequency range of 2454 – 2483.5 MHz. For
detailed information the end-user should contact the national spectrum authority in France.
0560
Česky [Czech] [Jméno výrobce] tímto prohlašuje, že tento [typ zařízení] je ve shodě
se základními požadavky a dalšími příslušnými ustanoveními
směrnice 1999/5/ES.
Dansk [Danish] Undertegnede [fabrikantens navn] erklærer herved, at følgende
2
Page 4
udstyr [udstyrets typebetegnelse] overholder de væsentlige krav og
øvrige relevante krav i direktiv 1999/5/EF.
Deutsch [German] Hiermit erklärt [Name des Herstellers], dass sich das Gerät
[Gerätetyp] in Übereinstimmung mit den grundlegenden
Anforderungen und den übrigen einschlägigen Bestimmungen der
Richtlinie 1999/5/EG befindet.
Eesti [Estonian] Käesolevaga kinnitab [tootja nimi = name of manufacturer] seadme
[seadme tüüp = type of equipment] vastavust direktiivi 1999/5/EÜ
põhinõuetele ja nimetatud direktiivist tulenevatele teistele
asjakohastele sätetele.
English Hereby, [name of manufacturer], declares that this [type of
equipment] is in compliance with the essential requirements and
other relevant provisions of Directive 1999/5/EC.
Español [Spanish] Por medio de la presente [nombre del fabricante] declara que el
[clase de equipo] cumple con los requisitos esenciales y cualesquiera
otras disposiciones aplicables o exigibles de la Directiva 1999/5/CE.
Ελληνική [Greek] ΜΕ ΤΗΝ ΠΑΡΟΥΣΑ [name of manufacturer] ∆ΗΛΩΝΕΙ ΟΤΙ [type
of equipment] ΣΥΜΜΟΡΦΩΝΕΤΑΙ ΠΡΟΣ ΤΙΣ ΟΥΣΙΩ∆ΕΙΣ
ΑΠΑΙΤΗΣΕΙΣ ΚΑΙ ΤΙΣ ΛΟΙΠΕΣ ΣΧΕΤΙΚΕΣ ∆ΙΑΤΑΞΕΙΣ ΤΗΣ
Ο∆ΗΓΙΑΣ 1999/5/ΕΚ.
Français [French] Par la présente [nom du fabricant] déclare que l'appareil [type
d'appareil] est conforme aux exigences essentielles et aux autres
dispositions pertinentes de la directive 1999/5/CE.
Italiano [Italian] Con la presente [nome del costruttore] dichiara che questo [tipo di
apparecchio] è conforme ai requisiti essenziali ed alle altre
disposizioni pertinenti stabilite dalla direttiva 1999/5/CE.
Latviski [Latvian] Ar šo [name of manufacturer / izgatavotāja nosaukums] deklarē, ka
[type of equipment / iekārtas tips] atbilst Direktīvas 1999/5/EK
būtiskajām prasībām un citiem ar to saistītajiem noteikumiem.
Lietuvių
[Lithuanian]
Šiuo [manufacturer name] deklaruoja, kad šis [equipment type]
atitinka esminius reikalavimus ir kitas 1999/5/EB Direktyvos
3
Page 5
nuostatas.
Nederlands
[Dutch]
Hierbij verklaart [naam van de fabrikant] dat het toestel [type van
toestel] in overeenstemming is met de essentiële eisen en de andere
relevante bepalingen van richtlijn 1999/5/EG.
Malti [Maltese] Hawnhekk, [isem tal-manifattur], jiddikjara li dan [il-mudel
tal-prodott] jikkonforma mal-ħtiġijiet essenzjali u ma provvedimenti
oħrajn relevanti li hemm fid-Dirrettiva 1999/5/EC.
Magyar
[Hungarian]
Alulírott, [gyártó neve] nyilatkozom, hogy a [... típus] megfelel a
vonatkozó alapvetõ követelményeknek és az 1999/5/EC irányelv
egyéb elõírásainak.
Polski [Polish] Niniejszym [nazwa producenta] oświadcza, że [nazwa wyrobu] jest
zgodny z zasadniczymi wymogami oraz pozostałymi stosownymi
postanowieniami Dyrektywy 1999/5/EC.
Português
[Portuguese]
[Nome do fabricante] declara que este [tipo de equipamento] está
conforme com os requisitos essenciais e outras disposições da
Directiva 1999/5/CE.
Slovensko
[Slovenian]
[Ime proizvajalca] izjavlja, da je ta [tip opreme] v skladu z
bistvenimi zahtevami in ostalimi relevantnimi določili direktive
1999/5/ES.
Slovensky
[Slovak]
[Meno výrobcu] týmto vyhlasuje, že [typ zariadenia] spĺňa základné
požiadavky a všetky príslušné ustanovenia Smernice 1999/5/ES.
Suomi [Finnish] [Valmistaja = manufacturer] vakuuttaa täten että [type of equipment
= laitteen tyyppimerkintä] tyyppinen laite on direktiivin 1999/5/EY
oleellisten vaatimusten ja sitä koskevien direktiivin muiden ehtojen
mukainen.
Svenska [Swedish] Härmed intygar [företag] att denna [utrustningstyp] står I
överensstämmelse med de väsentliga egenskapskrav och övriga
relevanta bestämmelser som framgår av direktiv 1999/5/EG.
4
Page 6

TABLE OF CONTENTS
TABLE OF CONTENTS
TABLE OF CONTENTSTABLE OF CONTENTS
OVERVIEW ................................................... 6
U
NPACKING INFORMATION
I
NTRODUCTION TO THE
Key Features ..................................................................................... 7
........................................................ 6
IEEE 802.11G W
IRELESS
USB A
DAPTER
..... 7
INSTALLATION GUIDE.................................. 8
S
OFTWARE INSTALLATION
........................................................ 8
MANAGEMENT GUIDE ..................................13
M
AKING A BASIC NETWORK CONNECTION
Before You Start ............................................................................. 13
Ad-Hoc Mode...................................................................................13
Infrastructure mode .........................................................................15
I
NTRODUCTION TO THE WIRELESS
Starting the Wireless LAN Utility..................................................... 17
General ........................................................................................... 18
Profile ............................................................................................. 19
LAN U
.................................. 13
TILITY
.......................... 17
Available Network ........................................................................... 20
Advanced ........................................................................................ 21
Status ............................................................................................. 21
Statistics ......................................................................................... 22
APPENDIX ...................................................24
RT-S
AP
ET SETUP WIZARD
Connect to a wireless network in infrastructure mode.................... 24
Connect to a wireless network in ad hoc mode ............................... 27
Use this adapter as an AP ............................................................... 30
MODE MANAGEMENT GUIDE
General ........................................................................................... 33
Advanced ........................................................................................ 34
Statistics ......................................................................................... 34
SoftAP ............................................................................................. 35
......................................................... 24
................................................. 33
PRODUCT SPECIFICATION...........................36
5
Page 7

Overview
Thank you for purchasing this product. Read this chapter to know about your IEEE
802.11g Wireless USB Adapter.
Unpacking information
Before getting started, please verify that your package includes the following items:
1. IEEE 802.11g Wireless USB Adapter
2. One Utility/ Manual CD
6
Page 8
Introduction to the IEEE 802.11g Wireless USB Adapter
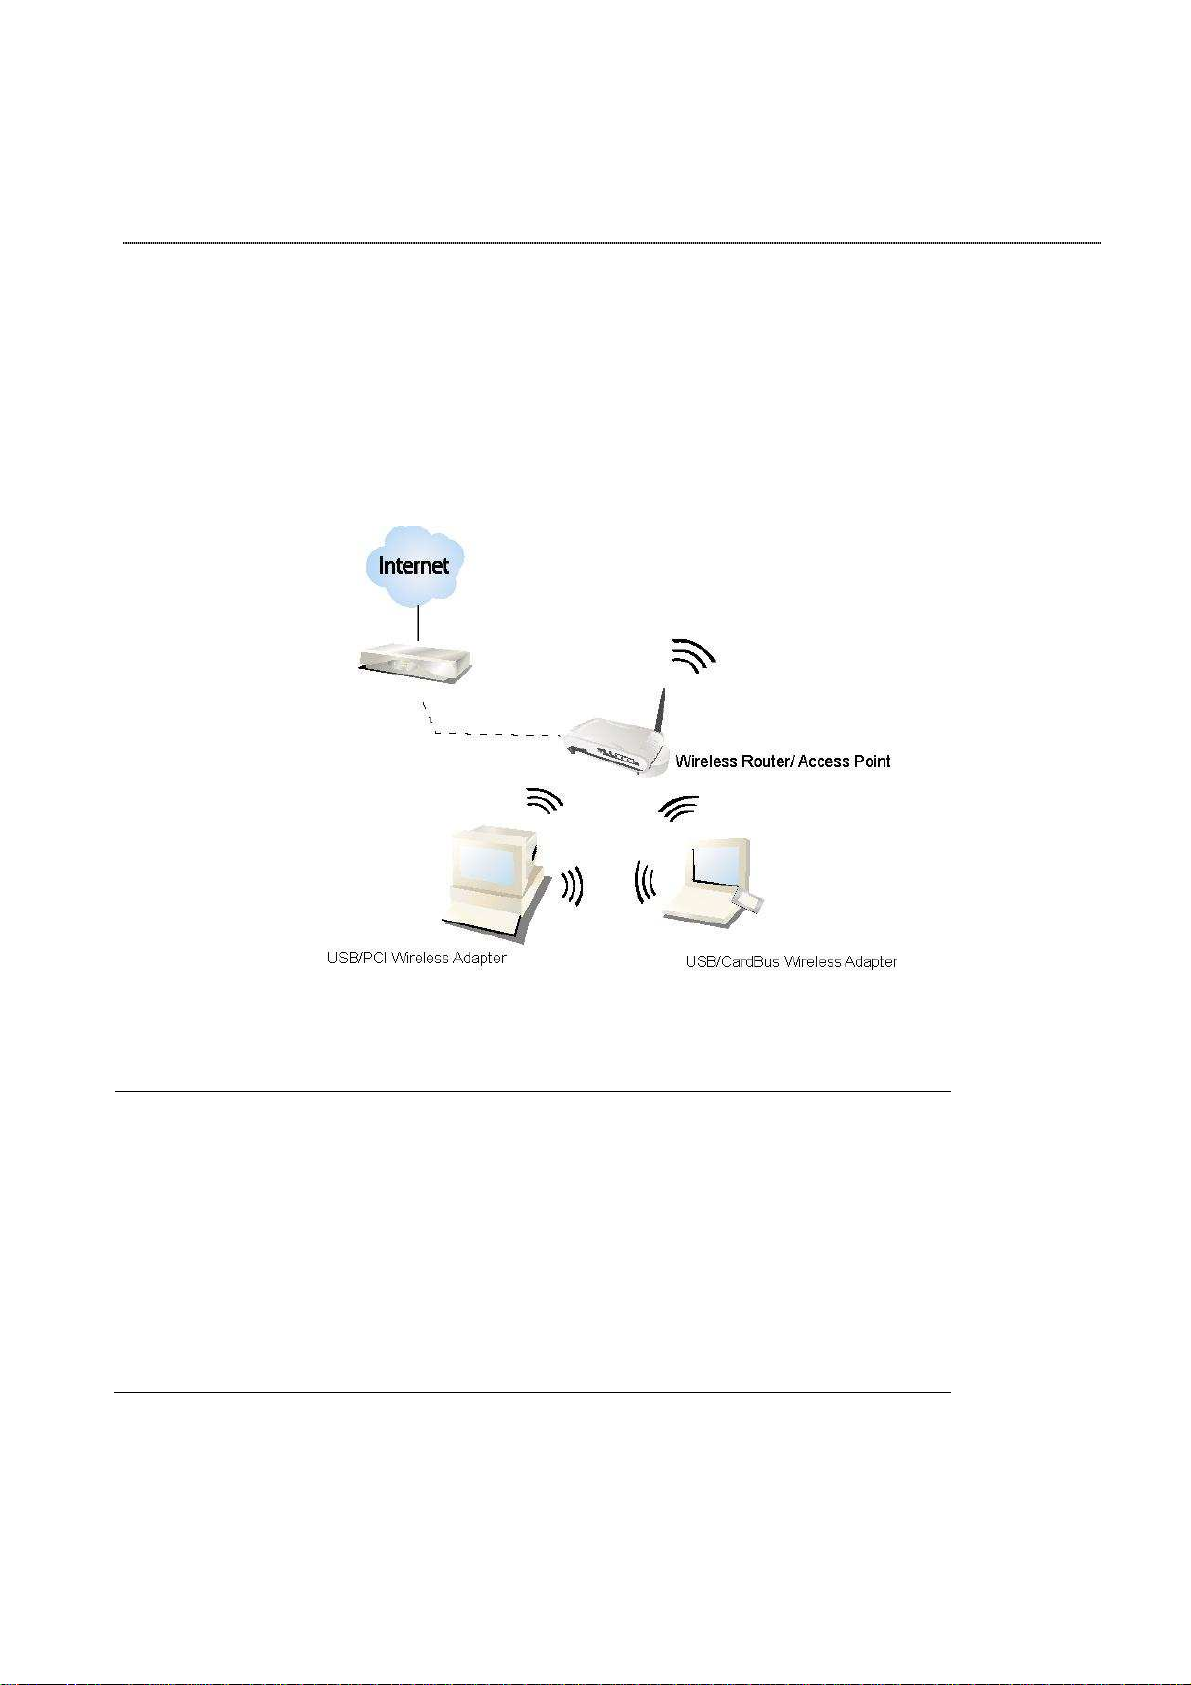
The IEEE 802.11g Wireless USB adapter provides users to launch IEEE 802.11g wireless network
at 54 Mbps in the 2.4GHz frequency, which is also compatible with IEEE 802.11b wireless devices
at 11Mbps. You can configure this adapter with ad-hoc mode to connect to other 2.4GHz wireless
computers or with Infrastructure mode to connect to a wireless AP or router for accessing to
Internet. This adapter includes a convenient Utility for scanning available networks and saving
preferred networks that users usually connected with. Security encryption can also be configured
by this utility.
Key Features
Complies with IEEE 802.11b/g wireless
standard
Complies with Universal Serial Bus Rev.
1.0, 1.1 and 2.0 specifications.
High Speed transfer data rate up to 54
Mbps
Support turbo mode for 72 Mbps data
rate
Support driver for Windows2000, XP
32/64 bit and Vista 32/64 bit
Supports auto-installation and diagnostic
utilities.
Support wireless data encryption with
64/128-bit WEP, WPA (TKIP with IEEE
802.1x) and AES functions.
7
Page 9

Installation Guide
Software Installation
Note: The following driver installation guide uses Windows XP as the presumed operation system.
The procedures and screens in Windows2000 and Vista are familiar with Windows XP.
Insert the CD-Rom that came with this product to your CD-Rom drive. The menu window pops up
automatically. Please click the “Driver” button of this product.
Note: If the CD-Rom fails to auto-run, please click on “My Computer” your CD-Rom Drive
then double-click the “Setup” icon to start the this menu.
8
Page 10
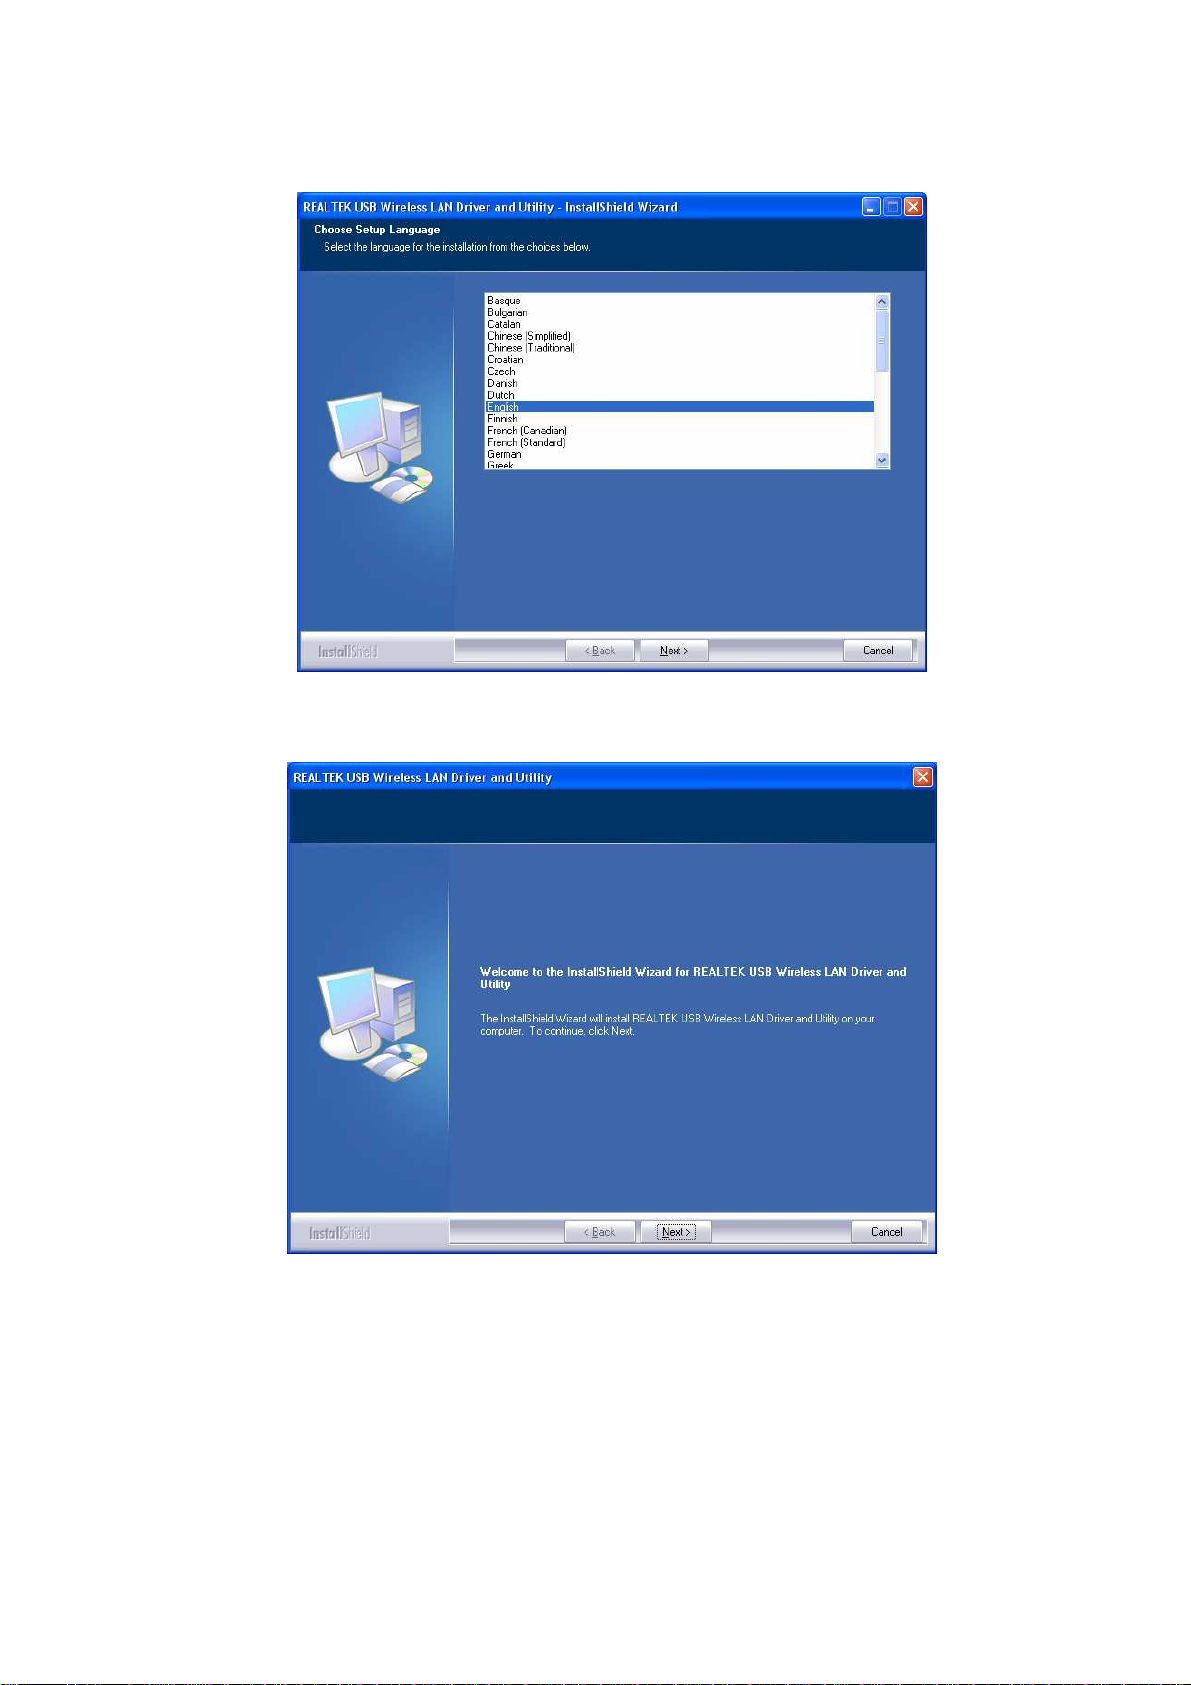
1. The language-selecting window pops up. Please select the language you use and click OK.
2. The welcome window pops up. Click the “Next” button to proceed.
3. Please wait while installation.
9
Page 11
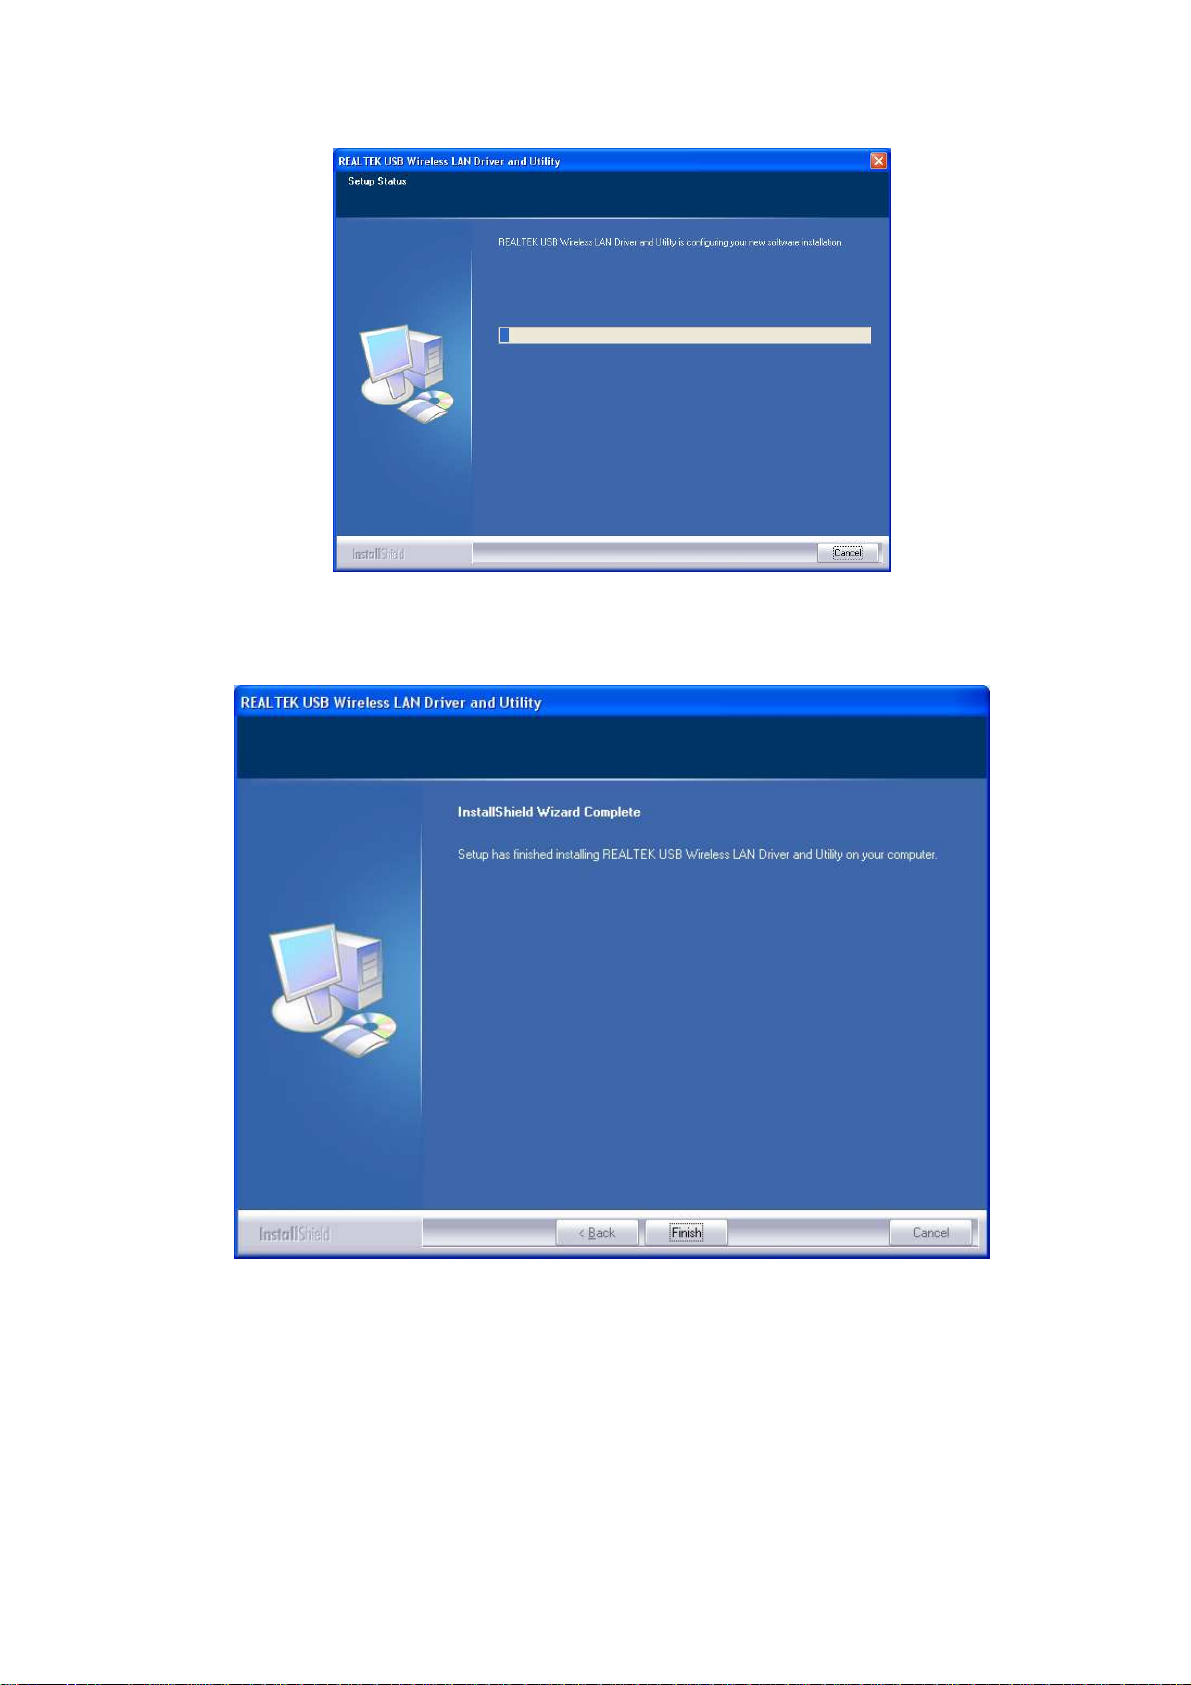
4. Click the “Finish” button to complete driver and utility installation.
5. For Windows XP and 2000 users, please insert this USB wireless adapter to your computer.
6. The “Found New Hardware Wizard“ pops up.
7. Select “No, not this time” and click the “Next” button.
10
Page 12
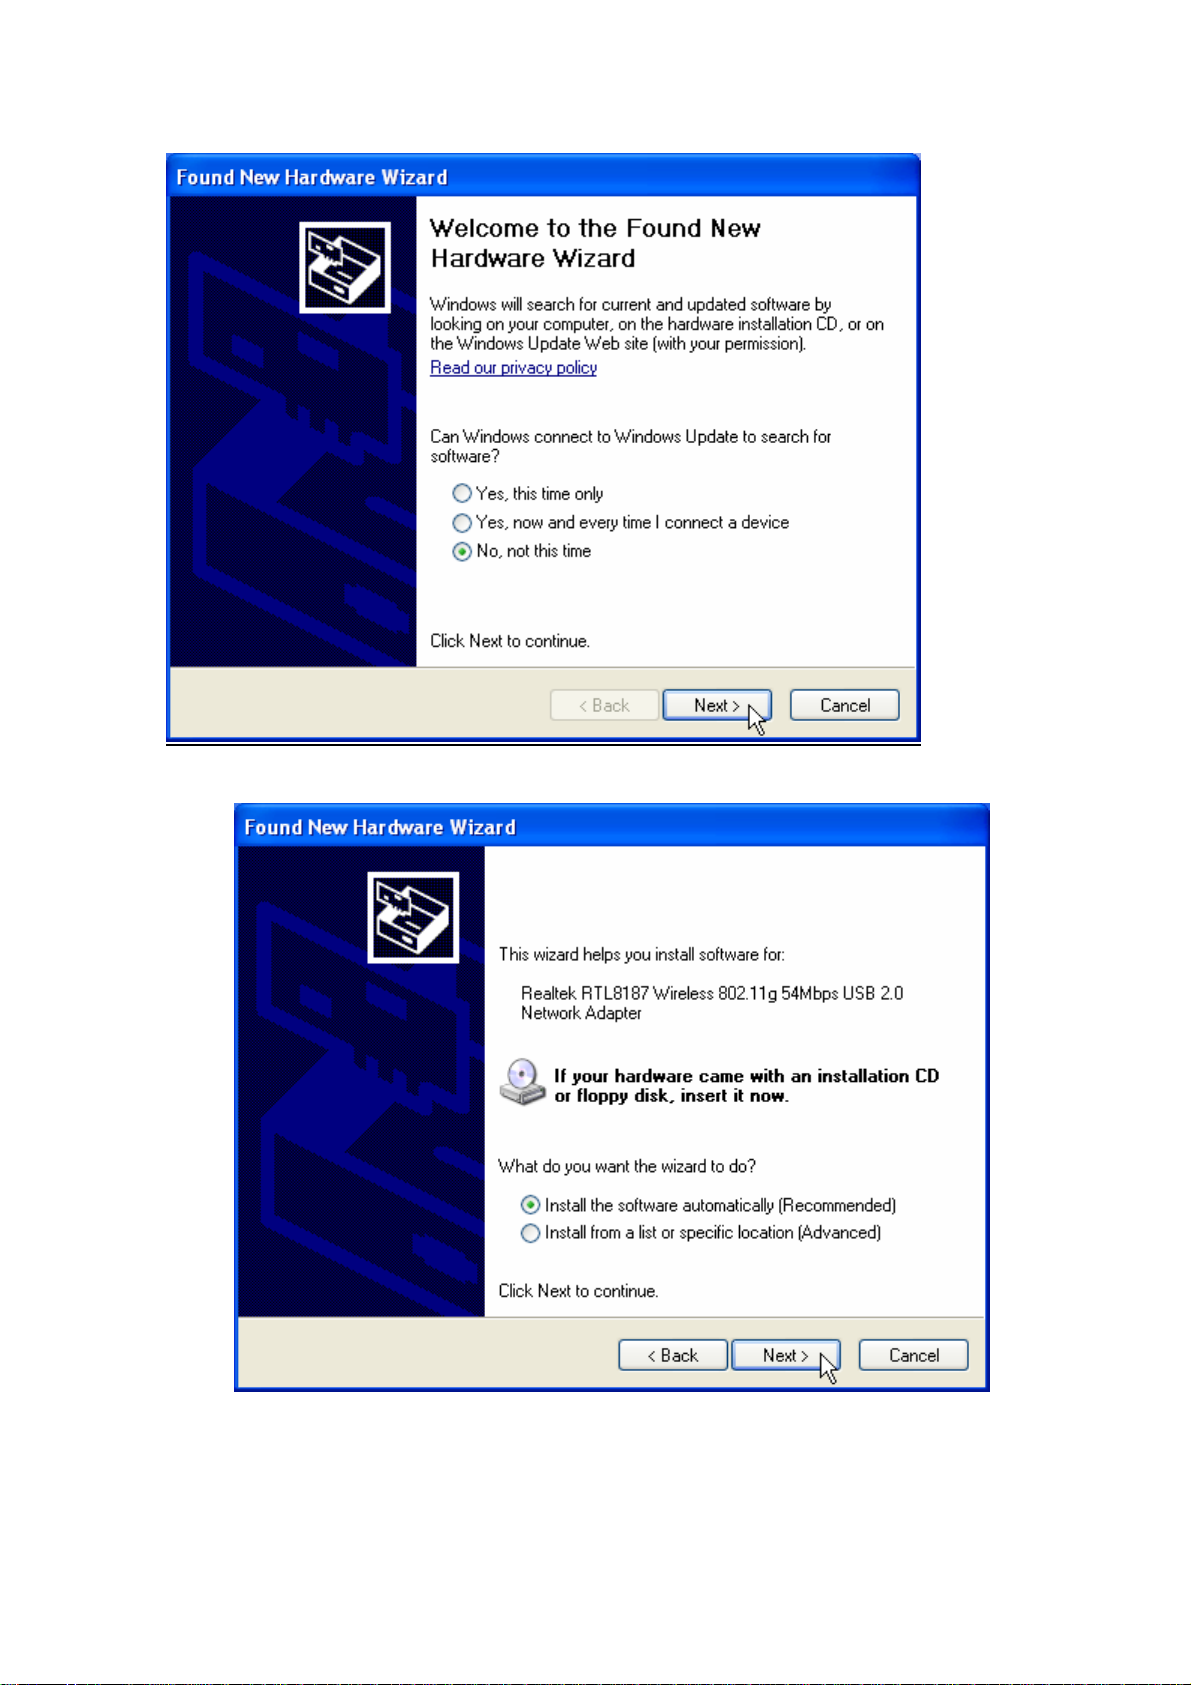
8. Select “Install the software automatically” and then click the “Next” button.
9. Click the “Finish” button to complete installation.
11
Page 13

12
Page 14

Management Guide
Read this chapter to understand the management interface of the device and how
to manage the device.
Making a Basic Network Connection
Before You Start
In the following instruction for making a network connection, we use the utility we provided to
configure your wireless network settings.
Note: For Windows XP users that want to configure your wireless network using this Utility, please
perform the following procedures to disable your native Windows XP wireless support (Wireless
Zero Configuration Service)
1. Double click the icon on your desktop to start the utility.
2. Make sure that the “Windows Zero Config” checkbox is unchecked.
Ad-Hoc Mode
An Ad-Hoc mode wireless network connects two computers directly without the use of a router or
AP. It is also know as a peer-to-peer network. For example, we can install this wireless adapter
to two computers respectively. The communication between the two computers is an Ad-Hoc mode
network.
13
Page 15
To use this adapter in Ad-Hoc Mode
1. Double click the icon on your desktop.
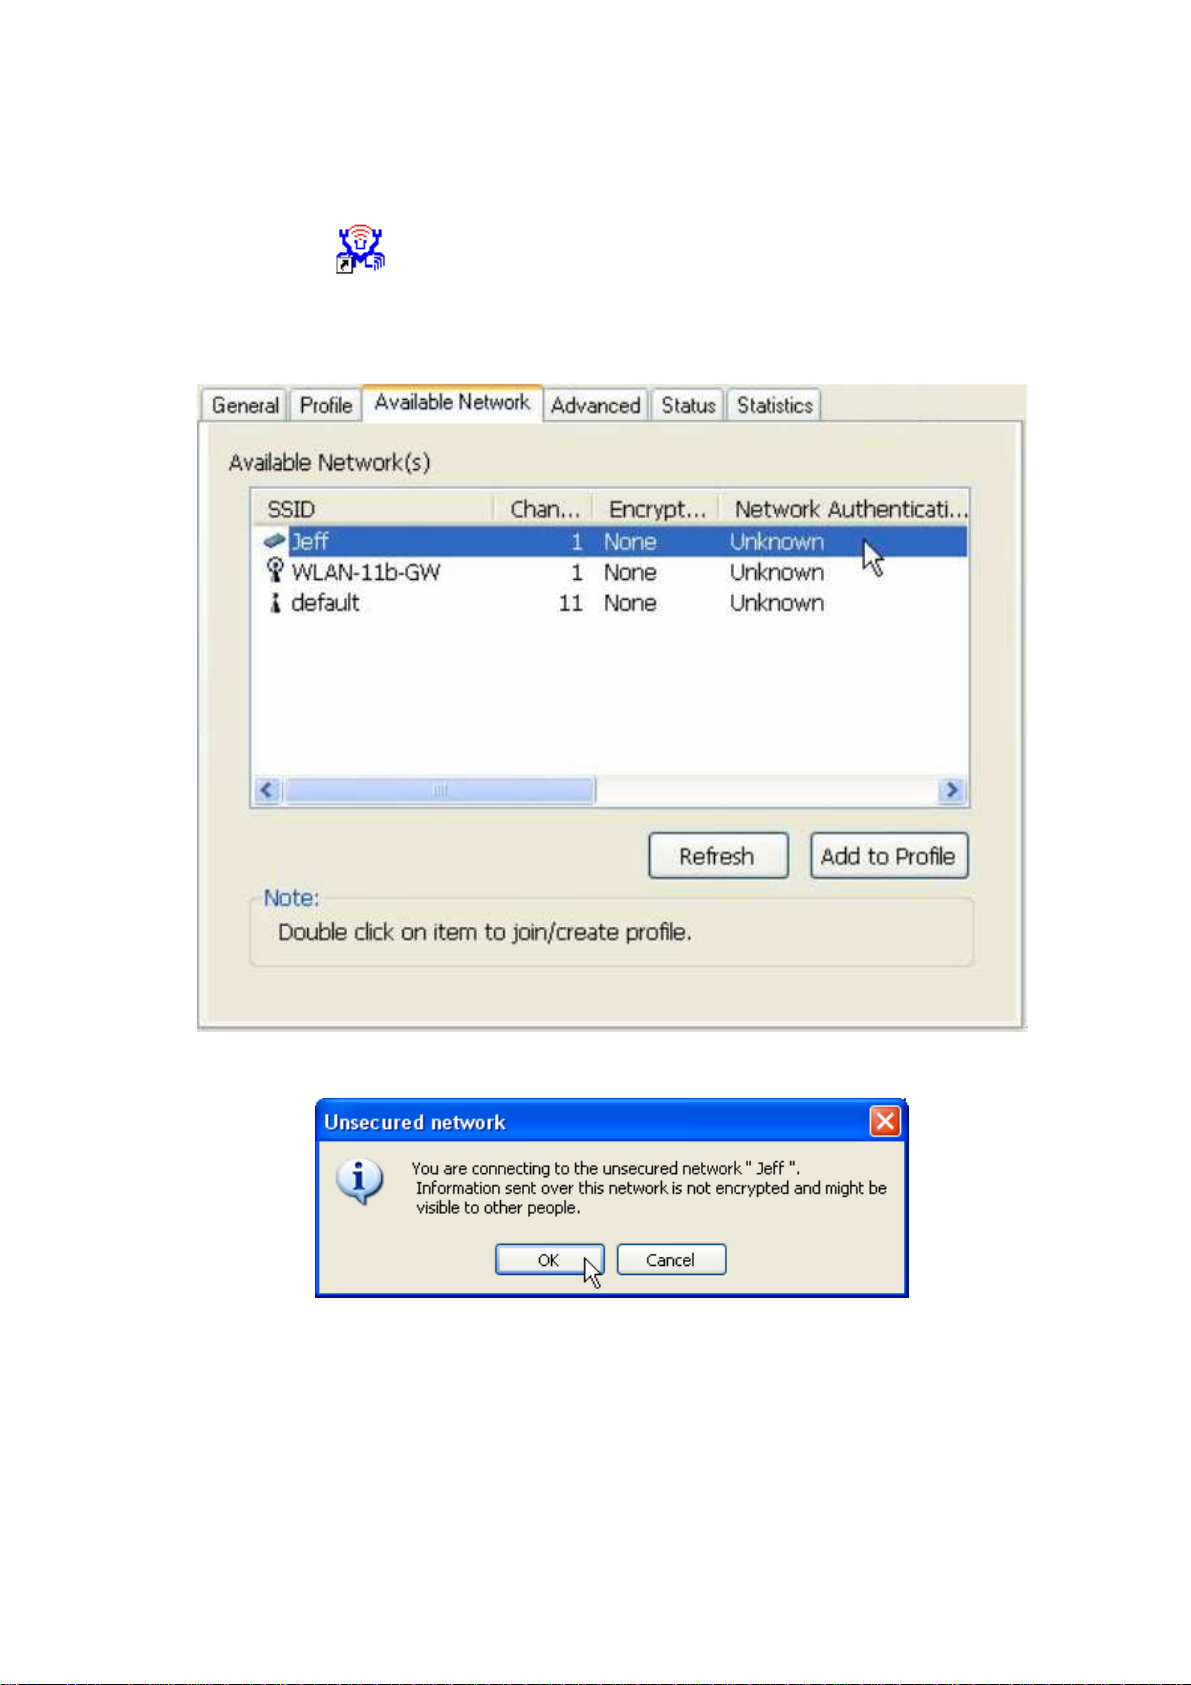
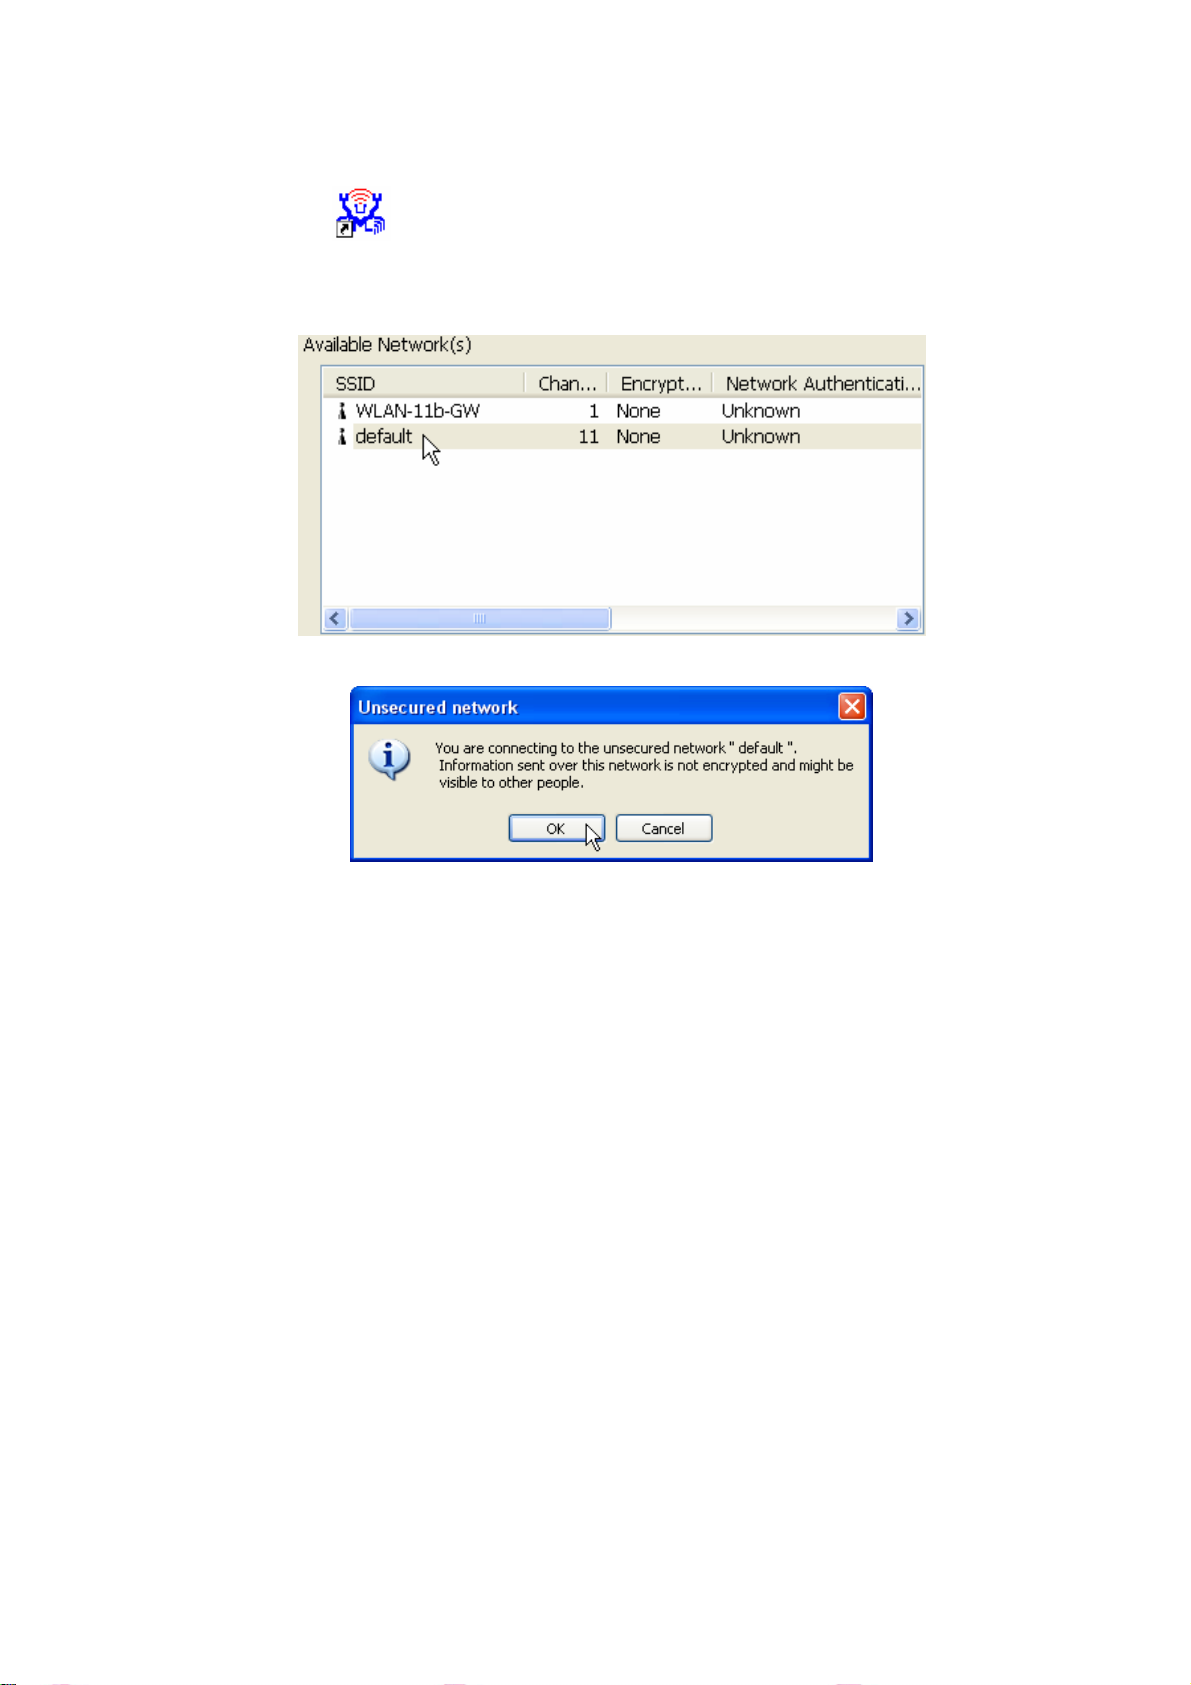
2. Click the “Available Network” button to scan available wireless network adapters. Double
click on the network adapter that you are going to connect to.
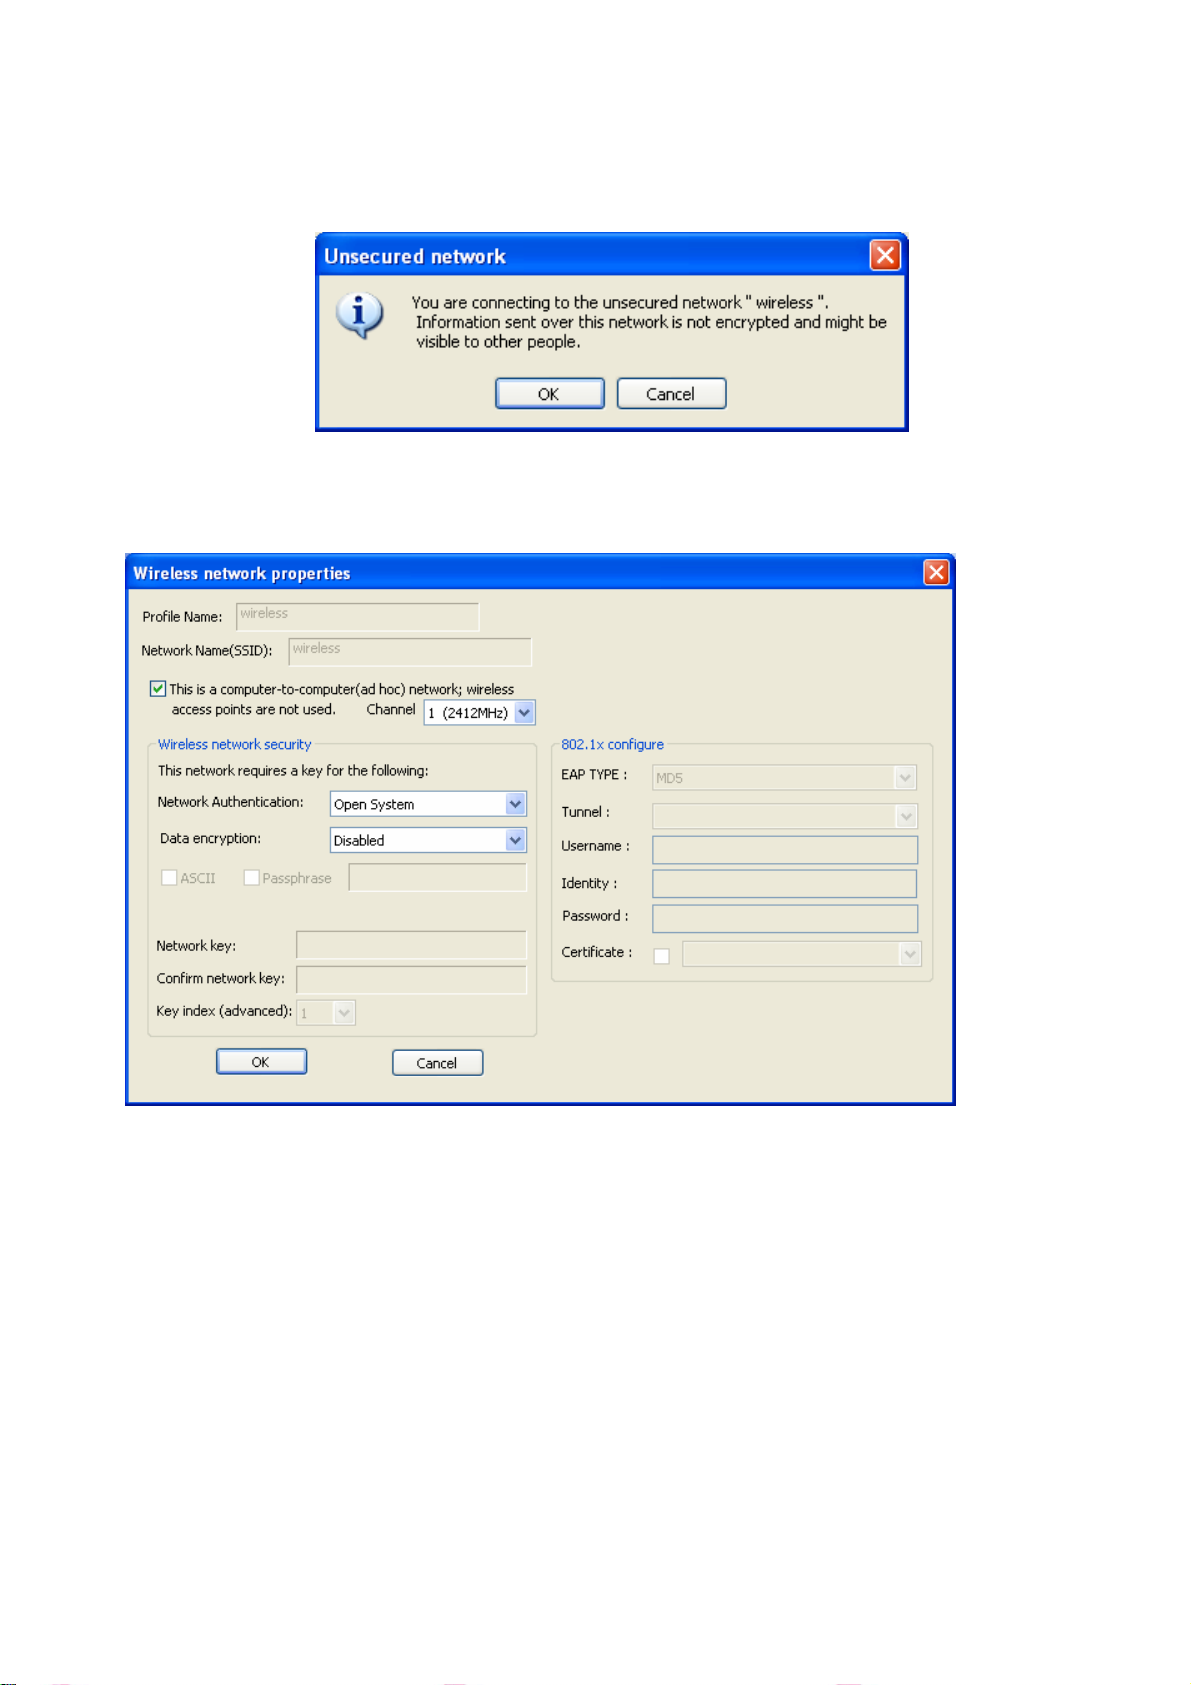
3. Click the OK button to confirm that you are connecting to an open wireless network.
4. Click OK to add this network into the profile list.
Note: This example is an open wireless network. If you are going to connect to a Wireless adapter
with security protection, you will have to configure the encryption settings in this profile to be
corresponding to the other wireless adapter. Please click on the “Network Authentication” drop
list to select an authentication method, and then select a “Data encryption” type. Fill in each
14
Page 16
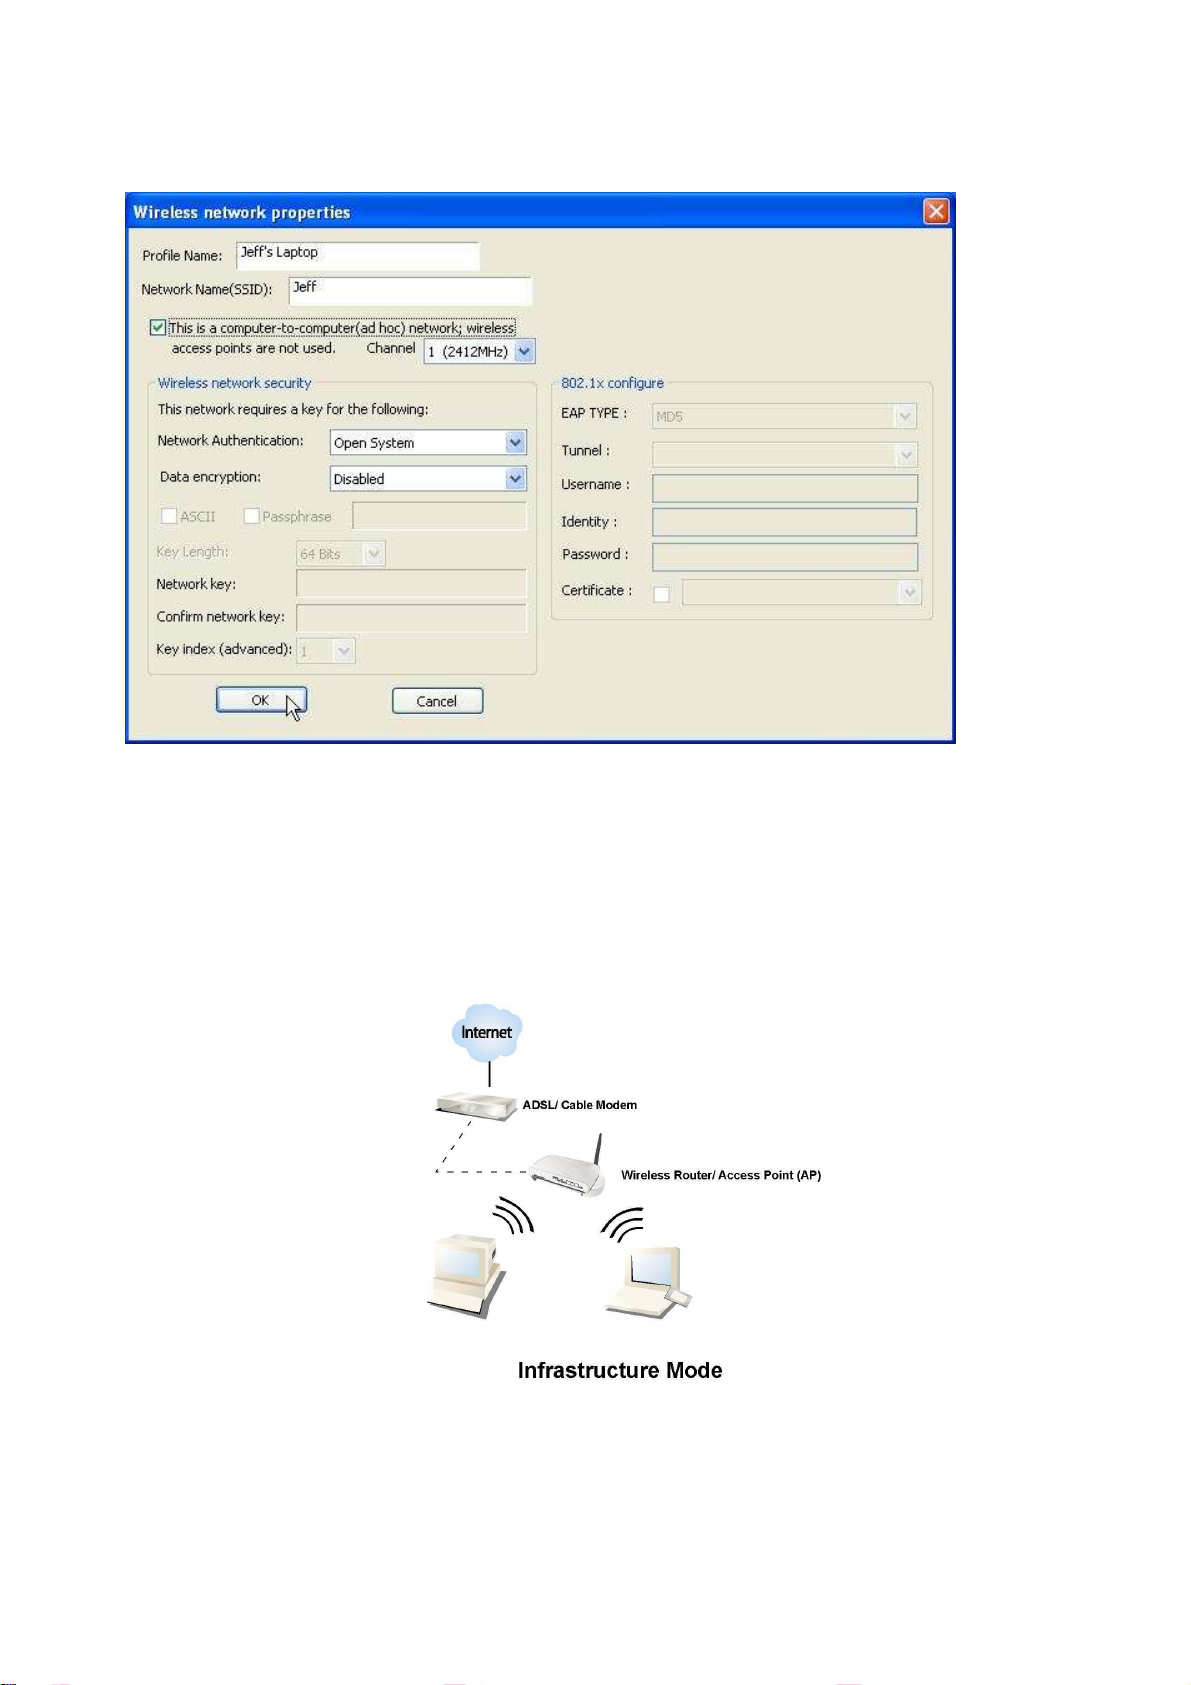
required blanks and click “OK”.
Infrastructure mode
An Infrastructure Mode network contains at least one wireless client and one wireless AP or router.
This client connects to Internet or intranet by communicating with this wireless AP.
15
Page 17
To use this adapter in Infrastructure Mode:
1. Double click the icon on your desktop.
2. Click the “Available Network” button to scan available access points. Double click on the AP
that you are going to connect to.
3. Click the OK button to confirm that you are connecting to an open wireless network.
4. Click OK to add this network into the profile list.
16
Page 18

Note:
Check this checkbox to show the utility icon on your
tray, which is in the notification area at the
right corner of the windows desktop. You may
also uncheck it to remove the utility icon from system
native Windows XP
ero Configuration Service)
instead of using this utility to configure your wireless
Check this checkbox to prevent this adapter form
transmitting or receiving signals. Uncheck it to
disable this wireless adapter.
This example is an open wireless network. If you are going to connect to an AP with security
protection, you will have to configure the encryption settings in this profile to be corresponding to
your AP. Please click on the “Network Authentication” drop list to select an authentication
method, and then select a “Data encryption” type. Fill in each required blanks and click “OK”.
Tip: Windows XP and Windows 2000 users is also allowed to connect to your wireless network with
the “RT-Set” setup wizard. Please refer to “Appendix” for more information.
Introduction to the Wireless LAN Utility
Note: This management instruction uses Windows XP as the presumed operation system.
Starting the Wireless LAN Utility
Double click the shortcut on your desktop. The Wireless LAN Utility pops up.
You may click on the tabs above to configure this adapter. The checkboxes below provide the
following functions:
Show Tray Icon
Windows Zero Config
system
lower-
tray.
Uncheck this checkbox to use
wireless support (Wireless Z
Radio Off
Disable Adapter
network.
communicate.
Check this checkbox to
Uncheck it to enable this adapter again.
17
Page 19

General
The performing encryption mode for connecting to current
After starting the utility, the general page pops up This General tab provides the information of
your current wireless network connection. You may click the Renew button to refresh those listed
information.
Status:
Speed:
Type:
Encryption:
SSID:
Signal Strength:
Network Address:
Check if the device associated to target network.
The current connection speed
Infrastructure mode or Ad-Hoc mode.
network profile.
The SSID (network name) of the connected wireless network.
Indicates the signal strength detected by this adapter.
Shows the current IP addresses settings for this adapter.
18
Page 20
Profile
profile
To modify the configurations for a profile, click this profile on
To make a copy of a profile, click the profile that going to be
To select a profile as your default wireless connection, click this
profile on the list and click this button. You may also double click
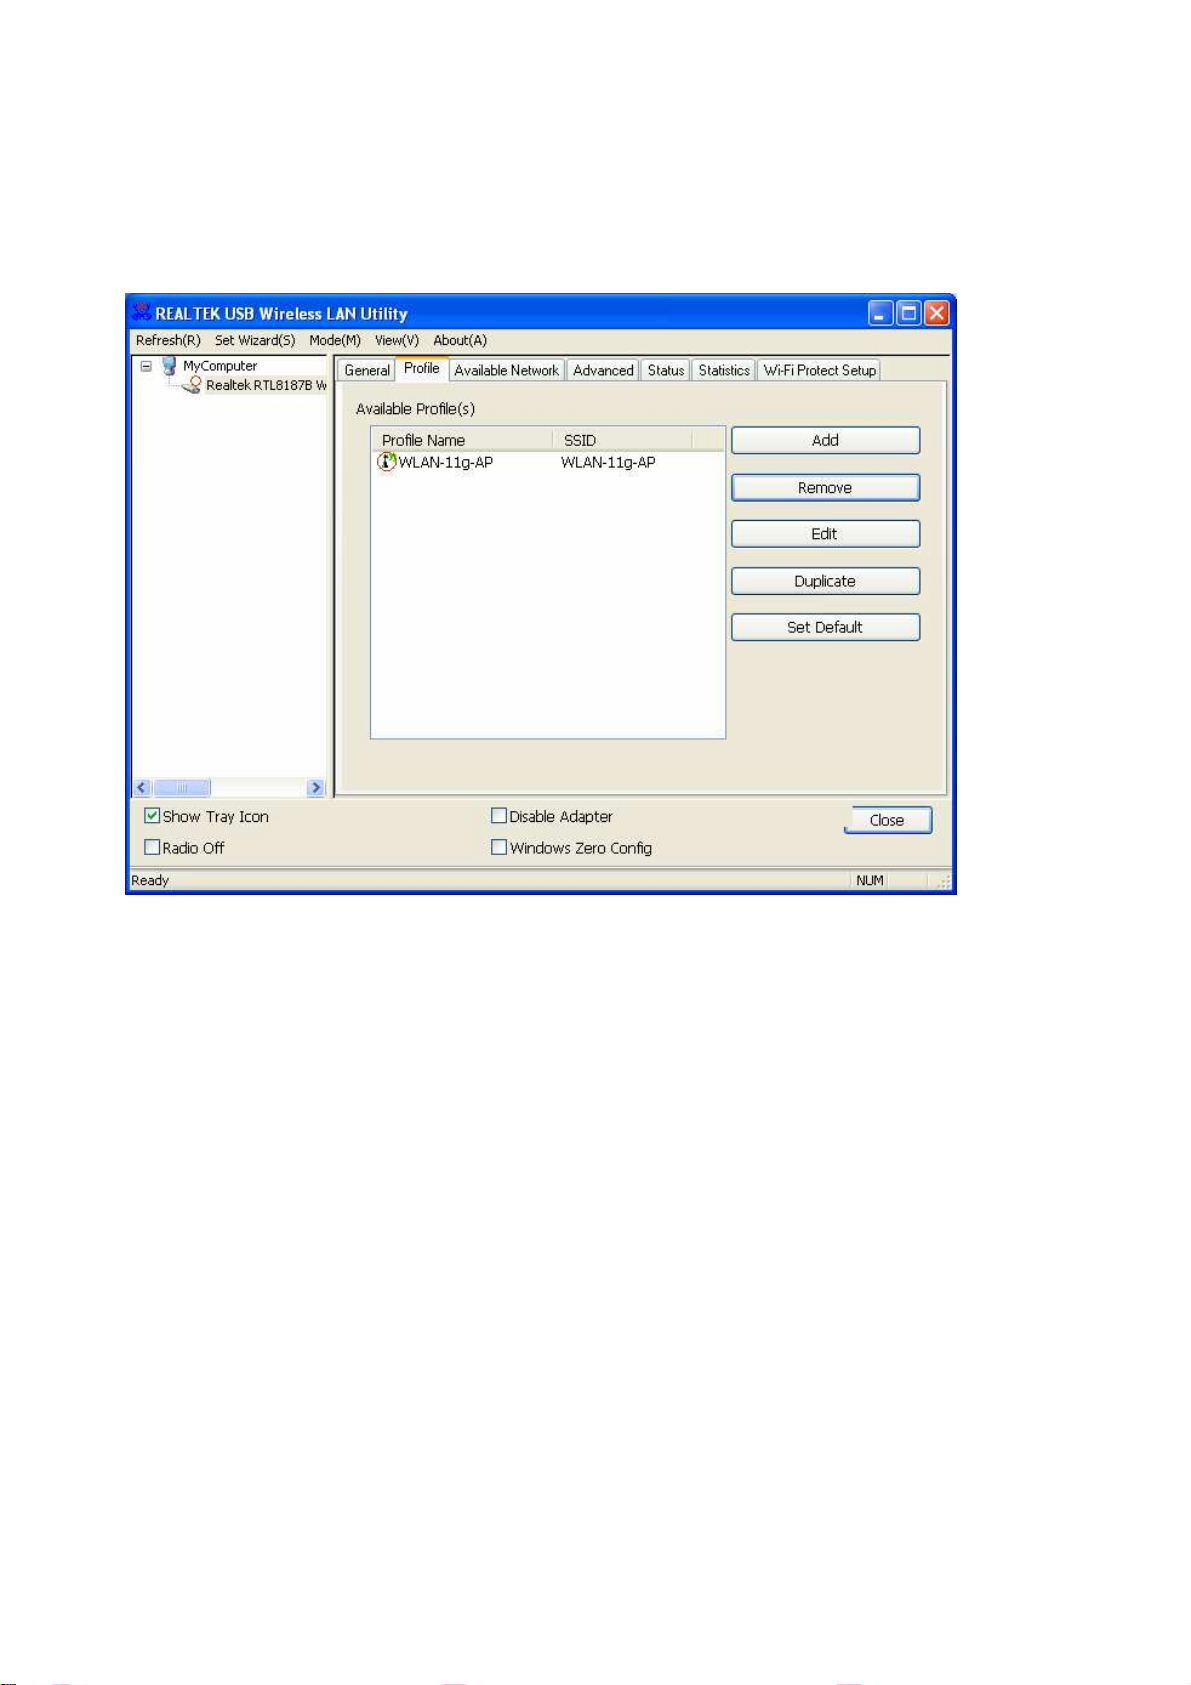
The Profile tab lists the preferred connections. You can click the buttons beside to do configure
each connection.
Add
Remove
Edit
Duplicate
Set Default
Click this button to add a connection profile for this adapter.
To remove a connection profile, click this profile on the
list and click this button to delete it.
the profile list and click this button to edit.
copied, and click this button to copy it.
on each profile to select it as your default wireless connection.
19
Page 21
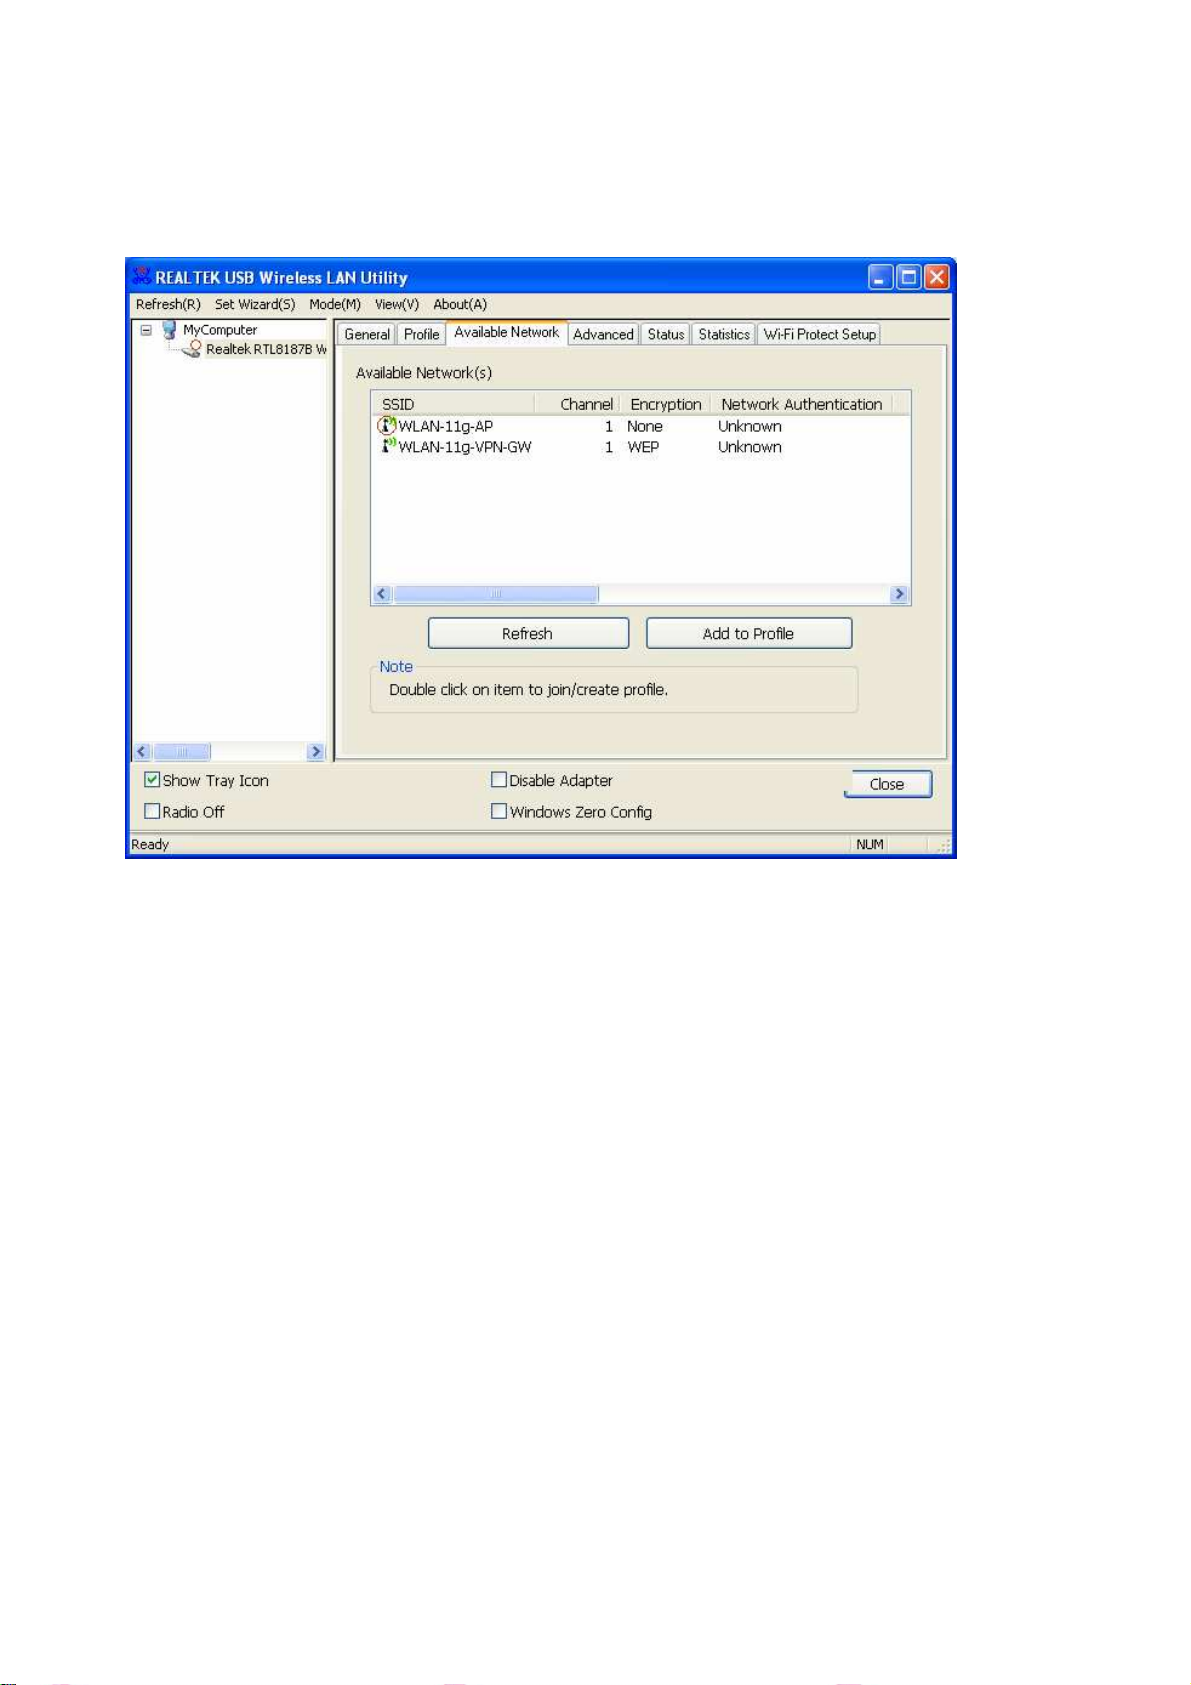
Available Network
Click this button to rescan available networks around the
To add an available Network to your profile list, select an
This available tab lists the reachable wireless network of this adapter.
Refresh
Add to Profile
adapter.
available network and click this button to add.
20
Page 22

Advanced
to the detected
to be segmented and transmitted.
e and click wake up button to
Mark this check box to enable PSP XLink mode. This function allows PSP users to
This Advanced tab provides advanced configurations to this adapter. Every modification in this tab
will be performed after clicking the Apply button.
To restore the default settings of the advanced tab, click the Set defaults button to perform
restoring.
Power Save
None Disable Power saving function.
Min Minimum power consumption
Max Maximum power consumption
Turbo Mode
OFF Disable turbo mode
ON Enable turbo mode
AUTO Enable or disable turbo automatically according
environment
Fragment Threshold
The maximum size of a packet that is going
Select the size from 256 to 2432(default) bytes.
RTS Threshold
Select the RTS Threshold form 0 to 2432(default)
Wireless Mode
802.11g/b Connect to a 802.11g/b network (2.4GHz/54Mbps)
802.11b Connect to a 802.11b network (2.4GHz/11Mbps)
802.11b Preamble Mode
Select the preamble mode to be long, short or auto detection mode.
WOL
Enter the MAC Address of the designated devic
power on the device.
PSP XLink Mode
play games with players around the world.
WMM Parameter
Mark the checkbox to enable QoS or Power save function for WMM.
Status
This tab shows the current connection status of this adapter.
21
Page 23

Statistics
See this tab to show the transmission activity record. Clicking the “Reset” button recounts the
values from zero.
22
Page 24

Wi-Fi Protected Setup
This page provides users to connect this device with routers or AP with PIN number or PBC
mechanism. Click on the PIN or PBC button to start.
Note: Please note that the two connection methods would only work with routers or AP that
support PIN number or PBC. Please make sure that the AP or Router support this function first.
23
Page 25

Appendix
RT-Set Setup Wizard
For Windows 2000 and XP users to connect to a wireless network easily, we also provide the RT-Set
setup wizard to help users set their preferred wireless network step by step. You can configure
your wireless network via this RT-Set setup wizard in the following three modes:
Station mode (infrastructure): Select this mode to connect to the AP (access point) in your
LAN.
Station mode (ad hoc): Select this mode to connect to another wireless network adapter in your
LAN.
AP mode: Select this mode to perform this adapter as an AP (access point).
To start the RT-Set Wizard, please click the “RT-Set” tab on the up-left corner of the window
Connect to a wireless network in infrastructure mode
1. To connect this adapter to an AP, select the “Station (infrastructure)” mode and click the “Next”
button to proceed.
24
Page 26

2. The RT-Set scans the available AP within your LAN. Those AP are listed with their SSID. Click the wireless
AP that you are going to connect with and then click the “Next” button.
You may also click the “Refresh” button to scan wireless AP again.
3. The “unsecured network” window may pop up if the AP you select doesn’t use security encryption settings.
Click the “OK” button after your confirmation.
4. Click “OK” after configuring the profile content to be corresponding to the AP that you are going to
connect with. If you are connecting to an AP without security encryption, please click “OK” button without
configuration.
25
Page 27
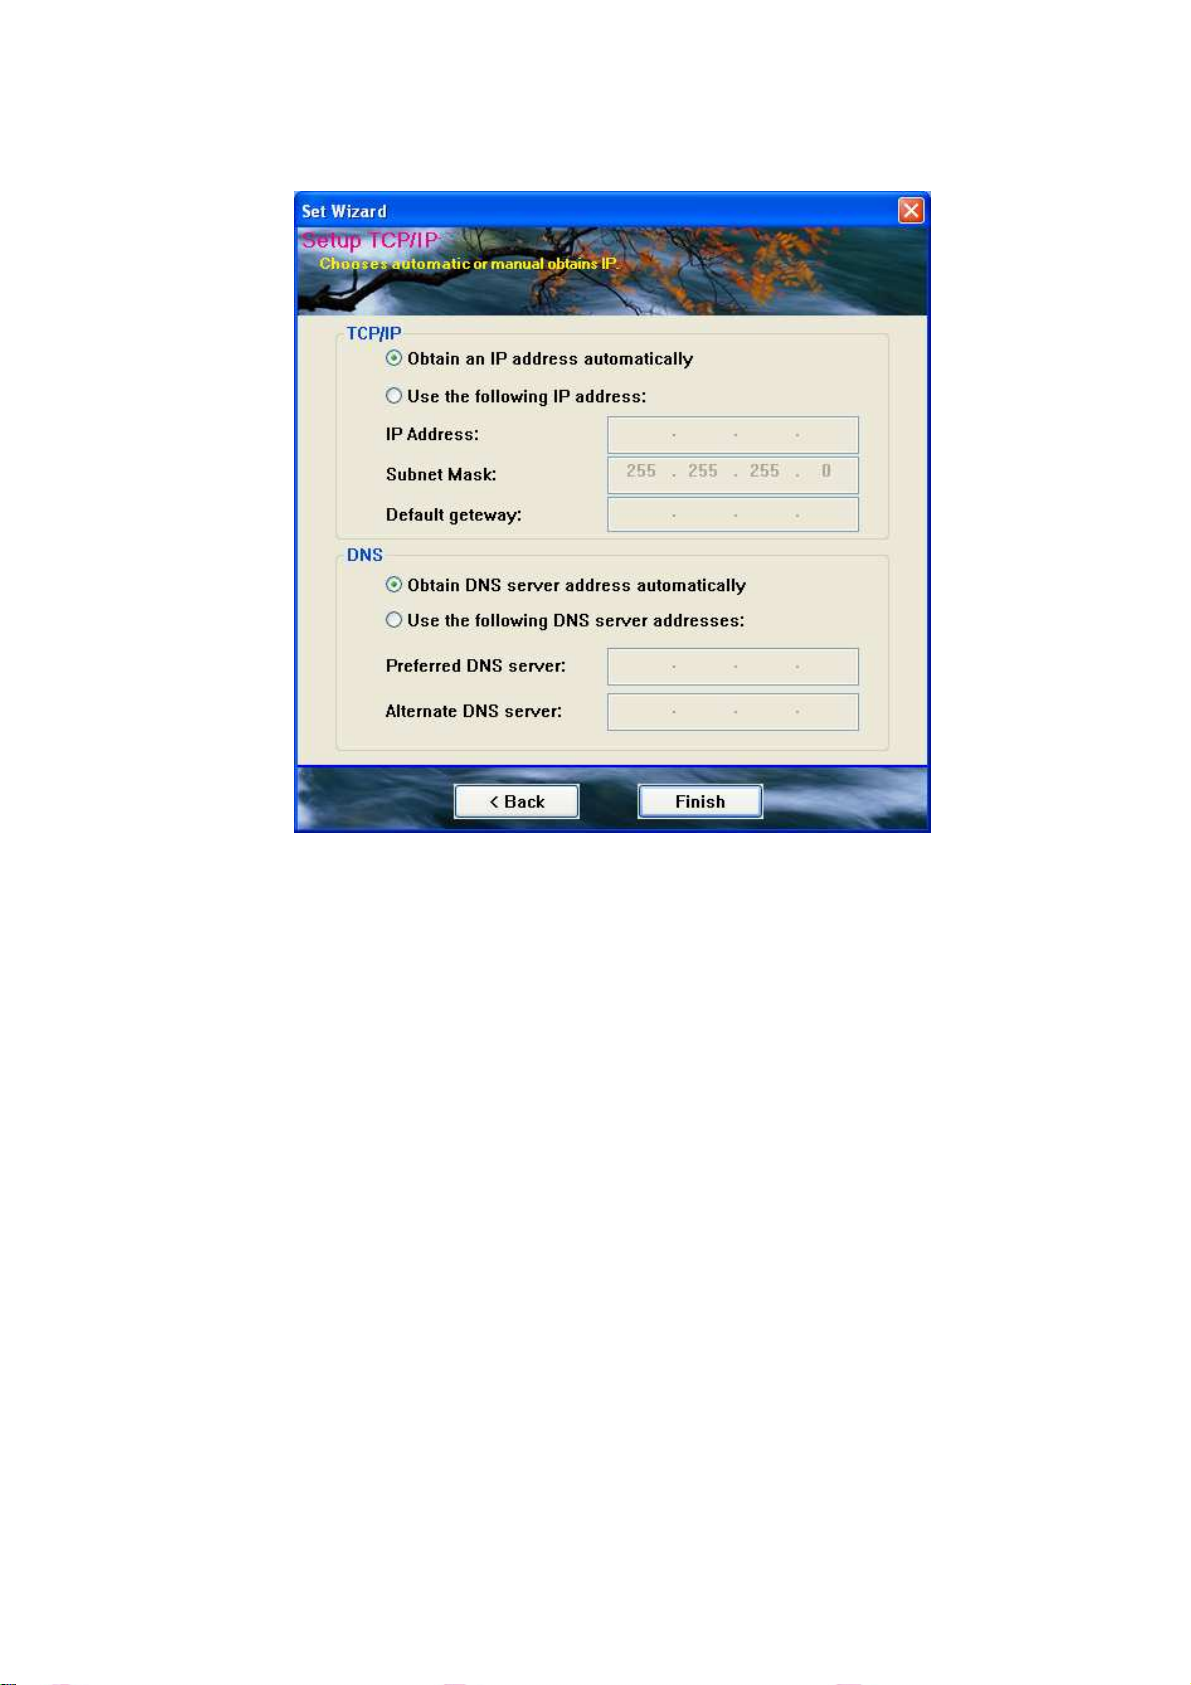
5. Configure the IP address for connecting to the network. You may choose “Use the following IP address”
to fill in IP addresses manually or choose “Obtain an IP address automatically (recommend)”.
6. After configuring IP addresses, click the “Finish” button to complete.
26
Page 28

Connect to a wireless network in ad hoc mode
1. To connect this adapter to another computer, select the “Station (ad hoc)” mode and click the “Next”
button to proceed.
2. The RT-Set scans the available wireless adapters within your LAN. Those adapters are listed with their
SSID. Click the one that you are going to connect with and then click the “Next” button. You may also
click the “Refresh” button to scan wireless adapters again.
27
Page 29
3. The “unsecured network” window may pop up if the adapter you select doesn’t use security encryption
settings. Click the “OK” button after your confirmation.
4. Click “OK” after configuring the profile content to be corresponding to the wireless adapter that you are
going to connect with. If you are connecting to a wireless adapter without security encryption, please
click “OK” button without configuration.
28
Page 30

5. Configure the IP address for connecting to the wireless adapter. You may choose “Use the following IP
address” to fill in IP addresses manually or choose “Obtain an IP address automatically”.
29
Page 31
Use this adapter as an AP
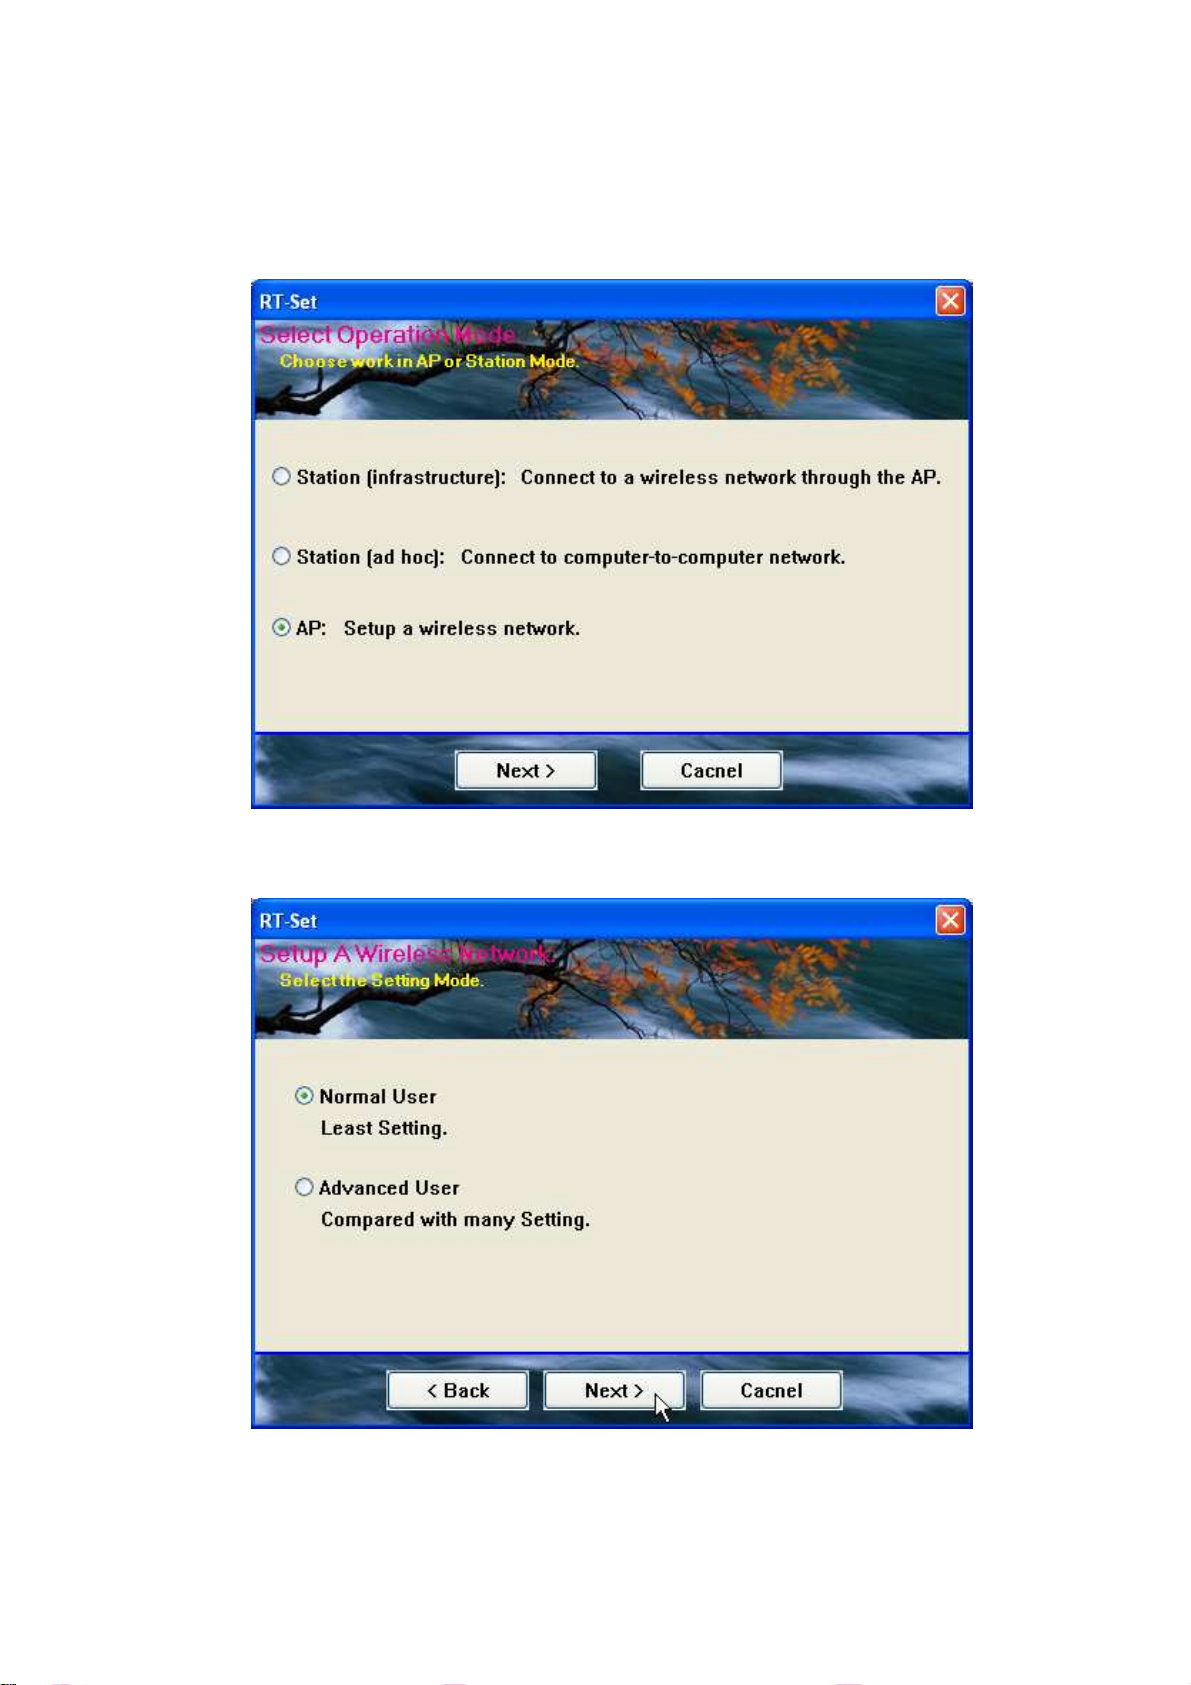
1. To use this adapter as an AP (access point), select the “AP” mode and click the “Next” button to proceed.
2. Select “Normal User” (recommend) to make an step-by-step configuration. You may also select
“Advanced Users” to configure this AP with more detail.
30
Page 32
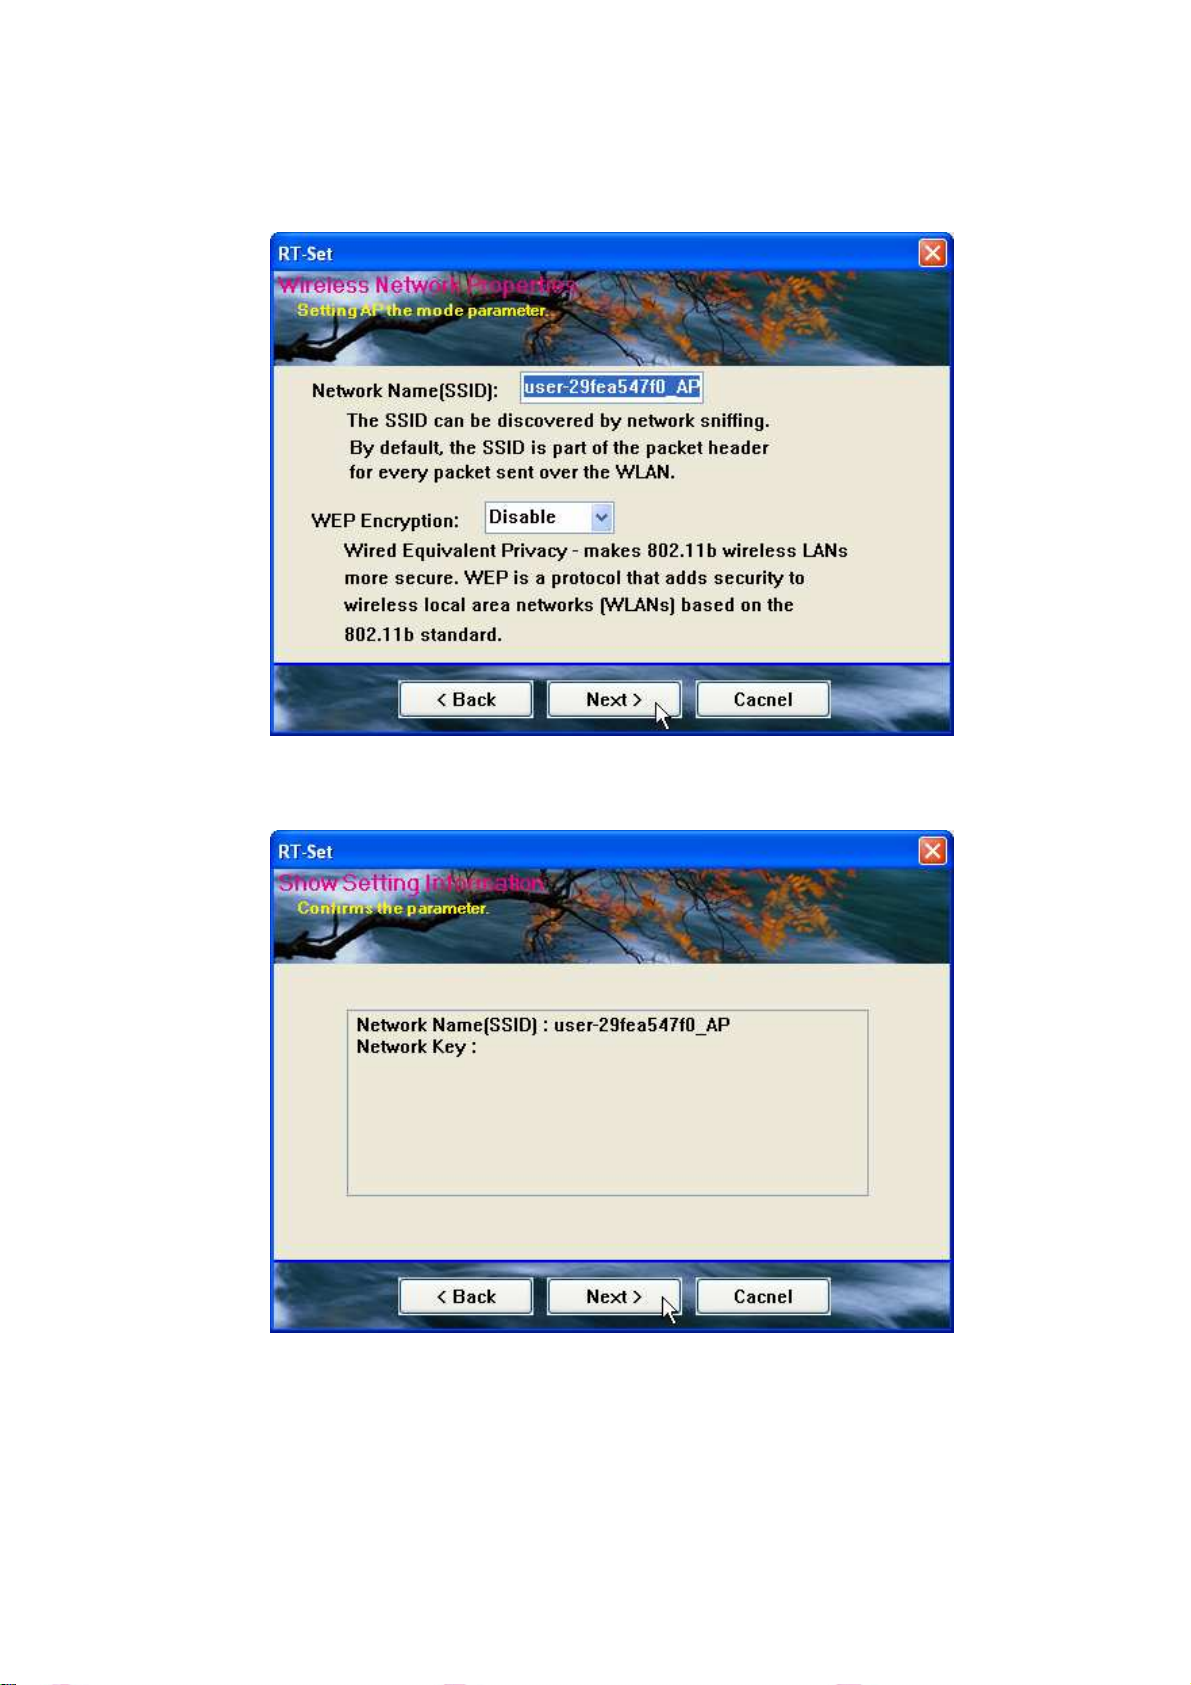
3. Assign an SSID for this AP, which is the name that is going to be identified while other wireless devices
scan for available network. Choose to use WEP encryption or not from the drop list and click “Next” to
proceed.
4. Click the “Next” button after confirming those settings above.
31
Page 33

5. Click “Finish” to complete setup.
32
Page 34

AP mode management guide
General
After configuring the adapter in AP mode, this “General” page shows up, which shows the general
information of this AP.
SSID:
BSSID: The MAC address of this AP
Config: Click this button to change configurations to this AP
Association Table: Shows the information of those devices that associated with
The SSID (network name) of the wireless network
constructed by this AP.
this AP including their MAC addresses and the time that they
connected with this device.
33
Page 35

Advanced
Beacon Interval: Define the interval between beacons from 20~1000
DTIM Period: Set the DTIM period between 1~255
Preamble Mode: Click the drop list to select the preamble to be long, short
or auto
Set Defaults: Click this button to restore the settings above to default
Apply: Click this button to execute changes.
WMM Parameter
Mark the checkbox to enable QoS or Power save
function for WMM.
Statistics
See this tab to show the transmission activity record. Clicking the “Reset” button recounts the
values from zero.
34
Page 36

SoftAP
This page allows users to select the adapter for connect to public network.
Please click on the device that are used for connecting to public network and click the “Select”
button, and then click the “Apply” button to execute.
35
Page 37

Product Specification
Standard
IEEE 802.11b, IEEE 802.11g
Interface
USB rev1.0/1.1/2.0
Antenna
Antenna gain: 2dB
Antenna type: Patch antenna
RF Maximum output power
802.11b:14.962mW
802.11g:15.136mW
Number of channels
802.11b: 11 channels (USA, Canada), 13 channels (Europe)
802.11g: 11 channels (USA, Canada), 13 channels (Europe)
Carrier frequency of each channel
802.11b /g ---
Ch1: 2412 MHz, Ch2: 2417 MHz, Ch3: 2422 MHz, Ch4: 2427 MHz, Ch5: 2432 MHz,
Ch6: 2437 MHz, Ch7: 2442 MHz, Ch8: 2447 MHz, Ch9: 2452 MHz, Ch10: 2457 MHz,
Ch11: 2462 MHz (Ch12: 2467MHz, Ch13: 2472MHz for Europe)
Security
64/128-bit WEP, WPA (TKIP with IEEE 802.1x), AES
Receiver Sensitivity
54Mbps OFDM, 10%PER, -68dBm
11Mbps CCK, 8%PER, -86dBm
1Mbps BPSK, 8%PER, -92dBm
Channel
USA 11, Europe 13
Network Data Rate
802.11b: 11/5.5/2/1 Mbps
802.11g: 54/48/36/24/18/12/9/6 Mbps
Range Coverage
Indoor 35~100 meters
Outdoor 100~300 meters
LED indicator
Link/ACT(Green)
36
Page 38

Operating Temperature
0- 40 0C (32 – 104 0C)
Operating Humidity
10% ~ 90% (non-condensing)
Emission
FCC Class B, CE
FCC Part 15.247 for US (2.412~2.462 MHz)
ETS 300 328 for Europe (2.400~2483.5 MHz)
DGT LP0002 for Taiwan (2.412~2.462MHz)
61NB-W420B+207C
37
 Loading...