

Page 1

IEEE 802.11n Wireless Series
Wireless-11n-1T1R Travel Router
User Manual
Version 2.1
Date: Sep. 8, 2009
Page 2

Wireless 11n 1T1R Travel Router
FCC Certifications
Federal Communication Commission Interference Statement
This equipment has been tested and found to comply with the limits for a Class B digital device,
pursuant to Part 15 of the FCC Rules. These limits are designed to provide reasonable
protection against harmful interference in a residential installation. This equipment generates,
uses and can radiate radio frequency energy and, if not installed and used in accordance with the
instructions, may cause harmful interference to radio communications. However, there is no
guarantee that interference will not occur in a particular installation. If this equipment does cause
harmful interference to radio or television reception, which can be determined by turning the
equipment off and on, the user is encouraged to try to correct the interference by one of the
following measures:
-Reorient or relocate the receiving antenna.
-Increase the separation between the equipment and receiver.
-Connect the equipment into an outlet on a circuit different from that to which the receiver is
connected.
-Consult the dealer or an experienced radio/TV technician for help.
This device complies with Part 15 of the FCC Rules. Operation is subject to the following two
conditions: (1) This device may not cause harmful interference, and (2) this device must accept
any interference received, including interference that may cause undesired operation.
FCC Caution: Any changes or modifications not expressly approved by the party responsible for
compliance could void the user's authority to operate this equipment.
IMPORTANT NOTE:
FCC Radiation Exposure Statement:
This equipment complies with FCC radiation exposure limits set forth for an uncontrolled
environment. This equipment should be installed and operated with minimum distance 20cm
between the radiator & your body.
This transmitter must not be co-located or operating in conjunction with any other antenna or
transmitter.
IEEE 802.11b or 802.11g operation of this product in the U.S.A. is firmware-limited to channels 1
through 11.
ii
Page 3

Wireless 11n 1T1R Travel Router
CE Mark Warning
This equipment complies with the requirements relating to electromagnetic compatibility, EN
55022 class B for ITE, the essential protection requirement of Council Directive 2004/108/EC on
the approximation of the laws of the Member States relating to electromagnetic compatibility.
Company has an on-going policy of upgrading its products and it may be possible that information
in this document is not up-to-date. Please check with your local distributors for the latest
information. No part of this document can be copied or reproduced in any form without written
consent from the company.
Trademarks:
All trade names and trademarks are the properties of their respective companies.
Copyright © 2009, All Rights Reserved.
ᆖীڤᎁᢞٽհ܅פ୴᙮ሽᖲΔᆖױΔֆΕᇆࢨࠌش݁լᖐ۞᧢ޓ᙮Ε
ףՕפࢨ᧢ޓૠհࢤ֗פ౨Ζ
܅פ୴᙮ሽᖲհࠌشլᐙଆڜ٤֗եឫٽຏΙᆖ࿇ڶեឫွழΔᚨمܛೖ
شΔࠀޏ۟ྤեឫழֱᤉᥛࠌشΖছႈٽຏΔࠉሽࡳ܂ᄐհྤᒵሽຏΖ
܅פ୴᙮ሽᖲႊݴ࠹ٽຏࢨՠᄐΕઝᖂ֗᠔᛭شሽᘿ୴ࢤሽᖲໂհեឫΖ
iii
Page 4

Wireless 11n 1T1R Travel Router
Contents
Unpacking Information ······················································································································6
Chapter 1 ·················································································7 Introduction to Wireless Router
1.1 ···································································································7 General Description
1.2 ·············································································································7 Key Features
1.3 ·········································································································8 The Front Panel
1.4 ·········································································································9 The Rear Panel
Chapter 2 ·······································································10 Installing and Using Wireless Router
2.1 ··································································10 Connecting this Router to your network
2.2 ··························································10 Configuring the IP address of your computer
Chapter 3 ···········································································································13 Management
3.1 ·····················································13 Starting the WEB-Based Management Interface
3.2 ·····················································································13 The Graphic User Interface
3.3 ···········································································································14 Setup Wizard
3.4 ·······································································································18 Operation Mode
3.5 ···················································································································19 Wireless
3.5.1 ··································································································19 Basic Settings
3.5.2 ···························································································22 Advanced Settings
3.5.3 ············································································································23 Security
3.5.4 ································································································ 27 Access Control
3.5.5 ··································································································28 WDS Settings
3.5.6 ······································································································29 Site Survey
3.5.7 ··································································································30 WPS Settings
3.5.8 ··········································································································31 Schedule
3.6 ·······································································································32 TCP/IP Settings
3.6.1 ························································································32 LAN Interface Setup
3.6.2 ·······················································································34 WAN Interface Setup
3.7 ······································································································42 Firewall Settings
3.7.1 ·········································································································42 Port Filter
3.7.2 ············································································································43 IP Filter
3.7.3 ········································································································ 44 MAC Filter
3.7.4 ·······························································································45 Port Forwarding
3.7.5 ·········································································································46 URL Filter
3.7.6 ·················································································································47 DMZ
3.8 ·························································································································47 QoS
3.9 ···········································································································48 Management
3.9.1 ···············································································································48 Status
3.9.2 ··········································································································48 Statistics
3.9.3 ································································································ 49 DDNS Settings
iv
Page 5

Wireless 11n 1T1R Travel Router
3.9.4 ···························································································50 Time Zone Setting
3.9.5 ·····························································································51 Denial-of-Service
3.9.6 ···················································································································52 Log
3.9.7 ···························································································53 Upgrade Firmware
3.9.8 ························································································53 Save/Reload Setting
3.9.9 ·········································································································54 Password
Appendix A: Product Specifications ································································································55
Appendix B: Glossary ·····················································································································56
v
Page 6

Wireless 11n 1T1R Travel Router
Unpacking Information
Thank you for purchasing the product. Before you start, please check all the contents of this
package. The product package should include the following:
1. One Wireless 11n 1T1R Travel Router
2. One Power Adapter
3. One antennas
4. One resource CD, including:
User’s Manual
QIG
Note:
Make sure that the package contains the above items. If any of the listed items are damaged or
missing, please contact with your distributor.
Conventions
The Router mentioned in this guide stands for IEEE 802.11n Wireless 1T1R Travel Router without
any explanation.
6
Page 7

Wireless 11n 1T1R Travel Router
Chapter 1 Introduction to Wireless Router
1.1 General Description
Draft 802.11n Wireless Connectivity
The IEEE802.11n Wireless Router provides a better wireless signal for network than existing
wireless 802.11g technology. It complies with IEEE 802.11n draft 2.0 and IEEE802.11b/g
wireless standards.
Greater Range and Coverage
The router allows multiple users to share one broadband connection, as well as secures your
private network. With its built-in switch port and wireless AP, LAN users can share files, printers,
or playing network games all at a blazing speed. This technology maximizes the speed and
range of your wireless signal to significantly outperform 802.11g devices.
Advanced Network Security
As for security, it also supports the latest wireless security features to help prevent
unauthorized access, be it from over a wireless network or from the Internet. Moreover,
supporting for WPA and WPA2 standards ensure that you will be able to use the best possible
encryption, regardless of your client devices. In addition, this Wireless 11n Router utilizes dual
active firewalls (SPI and NAT) to prevent potential attacks from across the Internet.
1.2 Key Features
¾ Supports 2.4 GHz frequency band
¾ Supports wireless data encryption with WPA, WPA2, Open/ shared key, and pair-wise key
authentication services
¾ Supports QoS: WMM, WMM-SA Client mode, Ingress and Egress bandwidth control
¾ Supports authentication for wireless connectivity based on ESSID
¾ Provides MAC access control and hidden SSID function
¾ Support MDI/MDIX auto crossover function
¾ Supports NAT IP Sharing and DHCP server
¾ Supports WAN connection type: Static IP, PPPoE, PPTP, DHCP L2TP client
¾ Supports ACL, DOS, Virtual DMZ, DNS relay, UPnP, VPN-Pass through
¾ Supports DDNS (DynDNS, TZO)
¾ Supports firmware upgrade function via Web
7
Page 8

Wireless 11n 1T1R Travel Router
1.3 The Front Panel
The front panel of the Wireless 11n 1T1R Travel Router:
Name Status Indication
Green Power On
Status
System Resetting
Blink Green One time System reboot
WPS
WLAN
WAN /
LAN
Dark Power Off
default
Blink Green WPS Connecting
Dark System Stability
Off The wireless function is disabled
Flashing The wireless function is enabled
Flashing fast Sending or receiving data over wireless
Off
On
Flashing Sending or receiving data over corresponding port
Blink Green a few times
There is no device linked to the corresponding port or the
connection is dropping off.
There are devices linked to the corresponding ports but no
data transmitted or received.
8
Page 9

Wireless 11n 1T1R Travel Router
᧶
1.4 The Rear Panel
The rear panel of the Wireless Router is shown below.
z LAN: Through these ports, you can connect the Router to your PCs and the other Ethernet
network devices.
z WAN: This WAN port is where you will connect the cable/DSL Modem, or Ethernet
z DC IN
Plug the circle end of the power adapter firmly into the rear panel of the Wireless Router, and
the other end put into an electric service outlet then the system is ready.
z Reset Button
Push the button for more than 5 seconds and then release it, the system will return to factory
default setting. In the meantime, system rewrites flash to default value and Status LED flash
for a while. Approximately 60 seconds later, the Status LED turn dark, now the whole system
parameters have returned to factory default value. If the process has been interrupted by any
reason (power off), the system will fail. Before performing the process, ensure a safe
operating environment please!
z Antenna: Used for enhancing the wireless signal, and expanding the range of signal.
z WPS: Help users to connect this Router to Internet quickly. It uses PIN configuration method
or PBC configuration method, in which users can easy setup WPS connection. Please refer
WPS settings
to
Warning
Incomplete factory setti
malfunctionIf you are unfortunately in this situation, do not try to repair it by
yourself. Consult your local distributor for help!
for more information.
ng recovery procedure will cause the Wireless Router
9
Page 10

Wireless 11n 1T1R Travel Router
Chapter 2 Installing and Using Wireless Router
This chapter provides a step-by-step guide to the installation and configuration of the Wireless
Router. We suggest you go over the whole chapter and then do more advanced operation.
2.1 Connecting this Router to your network
Steps to build up the network:
¾ Connect the phone line from the wall socket to the line-in port on the ADSL modem, or the
coaxial cable to the line-in port on the Cable modem.
¾ Connect the ADSL or Cable modem to the Ethernet WAN port on the back of the Wireless
Router by using the UTP cable.
¾ Plug-in the power adapter to the modem and turn on the power. Install the Ethernet card into
the computer by referring to the User Guide that came with the card.
¾ Connect the computer to the Wireless Router by using standard twisted-pair Ethernet cable
from the computer’s Ethernet card to a 10/100Mbps Ethernet port on the back of the
Wireless Router.
¾ Plug-in the power adapter to the Router and the other side to the wall outlet.
2.2 Configuring the IP address of your computer
In order to communicate with this Wireless Router, you have to configure the IP addresses of
your computer to make it compatible with the device.
Note: The router supports DHCP server and it is enabled as default. Users that configure your
IP address as “Obtain an IP address automatically” may skip the following IP configuration
instruction.
1. The default network setting of the device:
IP address: 192.168.1.1
Subnet Mask: 255.255.255.0
DHCP Server: enable
2. In the following TCP/IP configuration guide, the IP address “192.168.1.2” is assumed to be
your IP address if you want to specify IP addresses manually. Please DO NOT choose
“192.168.1.1” as the IP address. For the IP address “192.168.1.1“has been set as the
default IP for this device.
3. The following TCP/IP configuration guide uses windows XP as the presumed operation
system.
10
Page 11

Wireless 11n 1T1R Travel Router
Procedures to configure IP addresses for your computer
1. If you are in Classic Start menu view, click Start > Settings > Network Connections.
If you are in Start menu view, click Start > Control Panel > Network Connections.
2. Right-click on Local Area Connection item and click on Properties.
11
Page 12

Wireless 11n 1T1R Travel Router
3. Choose Internet Protocol (TCP/IP) and click Properties.
4. You may choose “Obtain an IP address automatically” (recommend) to get IP address
automatically or choose “Use the following IP address” to specify IP addresses manually.
Please click the OK button after your configuration.
12
Page 13

Wireless 11n 1T1R Travel Router
Chapter 3 Management
3.1 Starting the WEB-Based Management Interface
The device uses WEB as the management interface. You can use a browser to access the
management interface easily. Please follow the steps listed below.
1. Open the Internet WEB browser.
2. Type 192.168.1.1 into the URL WEB address location and press Enter.
3. The Login window appears.
- Enter admin in the User Name location (default value).
- Enter admin in the Password location (default value).
- Click OK button.
3.2 The Graphic User Interface
After the password authorization, the information page shows up as the home page of the Graphic
User interface. You may click on each folder on left column of each page to get access to each
configuration page. Please note that you should click the Save Settings button to apply your
configuration to this device. You can also restore the default settings by clicking the Reset
Settings button.
13
Page 14

The Graphic User Interface as follows:
Wireless 11n 1T1R Travel Router
3.3 Setup Wizard
If you are using the router for the first time, please follow the procedures of the setup wizard to do
a step-by-step configuration.
Note: The following instruction does an overall introduction to the Setup Wizard. For detail
information to each item, please refer to instruction of each page.
1. To start the Setup Wizard, click the “Next” button to proceed.
14
Page 15

Wireless 11n 1T1R Travel Router
2. Select your demanding operation mode and click “Next”.
3. Mark the check box to enable synchronizing time by NTP server. Select the religion you live
and a NTP server by clicking the drop list then click “Next”.
15
Page 16

Wireless 11n 1T1R Travel Router
4. Specify an IP address and subnet mask for connecting to the router in LAN.
5. Select a WAN access type for the router to connect to Internet. Fill in the parameters that
required in each blank, and then click the “Next” button. You may get those parameters from
your ISP. WAN Access Type : Static IP, DHCP Client, PPPoE, PPTP, L2TP
16
Page 17

Wireless 11n 1T1R Travel Router
6. Select the wireless parameters that are used for associating with this router and click “Next”.
Items Information
Band
Mode
Network
Type
Channel
Width
ControlS
ideband
7. Click the drop list to select the encryption type for your wireless network. Fill in the parameters
for the encryption type you select and click finish to complete configuration. Encryption type :
None, WEP, WPA(TKIP), WPA2(AES), WPA2 Mixed
2.4GHz(B),2.4GHz(G),2.4GHz(N),2.4GHz(B+
G),2.4GHz(G+N), 2.4GHz(B+G+N)
AP, Client, WDS, AP+WDS
Infrastructure, Ad-hoc
40MHz, 20MHz
Upper, Lower
17
Page 18

Wireless 11n 1T1R Travel Router
3.4 Operation Mode
To select an operation mode for this router, click on the mode that you want to perform and click
the
button to execute.
18
Page 19

Wireless 11n 1T1R Travel Router
3.5 Wireless
3.5.1 Basic Settings
You can set up the configuration of your Wireless basic settings and monitor the Wireless Clients
associate with your router.
Items Information
Disable
Wireless LAN
Interface
Band
Mode
Mark the checkbox to disable interface of Wireless LAN
To select a band for this device to match 802.11b, 802.11g,
802.11n, 802.11b/g, 802.11g/n or 802.11b/g/n. optional
parameters:
2.4GHz(B),2.4GHz(G),2.4GHz(N),2.4GHz(B+G),2.4GHz(G+N),
2.4GHz(B+G+N)
Configure this device as AP, Client, WDS or AP+WDS. If you set
this device as AP or AP+WDS mode, the
available for you to set up four SSID for this wireless network.
button is
19
Page 20

Wireless 11n 1T1R Travel Router
Click on this button to do more configurations.
When you configure this device in Client mode, this drop-down list
allows users to change the network type into infrastructure mode
or ad-hoc mode.
Network Type
SSID
Channel Width
Control
Sideband
Broadcast
SSID
WMM
Ad-Hoc mode: connects two computers directly without the use of
a router or AP. It is also know as a peer-to-peer network.
Infrastructure Mode: the wireless network contains at least one
wireless client and one wireless AP or router. This client connects
to Internet or intranet by communicating with this wireless AP.
Service set identifier (SSID) for the name of the wireless network.
Select to use 20MHz or 40MHz as the wireless channel frequency.
If you have selected the channel width of 40MHz for this router,
you can control this router to use the frequency for a deflection of
“Upper” or “Lower.”
If you enable "Broadcast SSID", every wireless station located
within the coverage of this wireless router can discover this
wireless router easily. If you are building a public wireless network,
enabling this feature is recommended. Disabling "Broadcast SSID"
can provide better security.
This will enhance the data transfer performance of multimedia
contents when they’re being transferred over wireless network.
WMM is not available in 11n mode.
The transmit limitation of data packets of this wireless router. The
Data Rate
Associated
Client
Enable MAC
clone
Enable
Universal
Repeater Mode
SSID of
Extended
Interface
* Please click on the Apply Changes button or the Reset button at the bottom to save/reset the configurations.
wireless router will use the highest possible selected transmission
rate to transmit the data packets.
Click "Show Active Clients" button, then an "Active Wireless Client
Table" pops up. You can see the status of all active wireless
stations that are connecting to the access point.
Mark the checkbox to clone the MAC address of the device. This
function is only available when you set this router as Client mode.
You can also manually set the MAC address in WAN setting.
Mark this checkbox to enable Universal Repeater Mode which acts
this device as an AP and client simultaneously.
While you enable the Universal Repeater Mode, you have to
specify an SSID for the extended interface.
20
Page 21
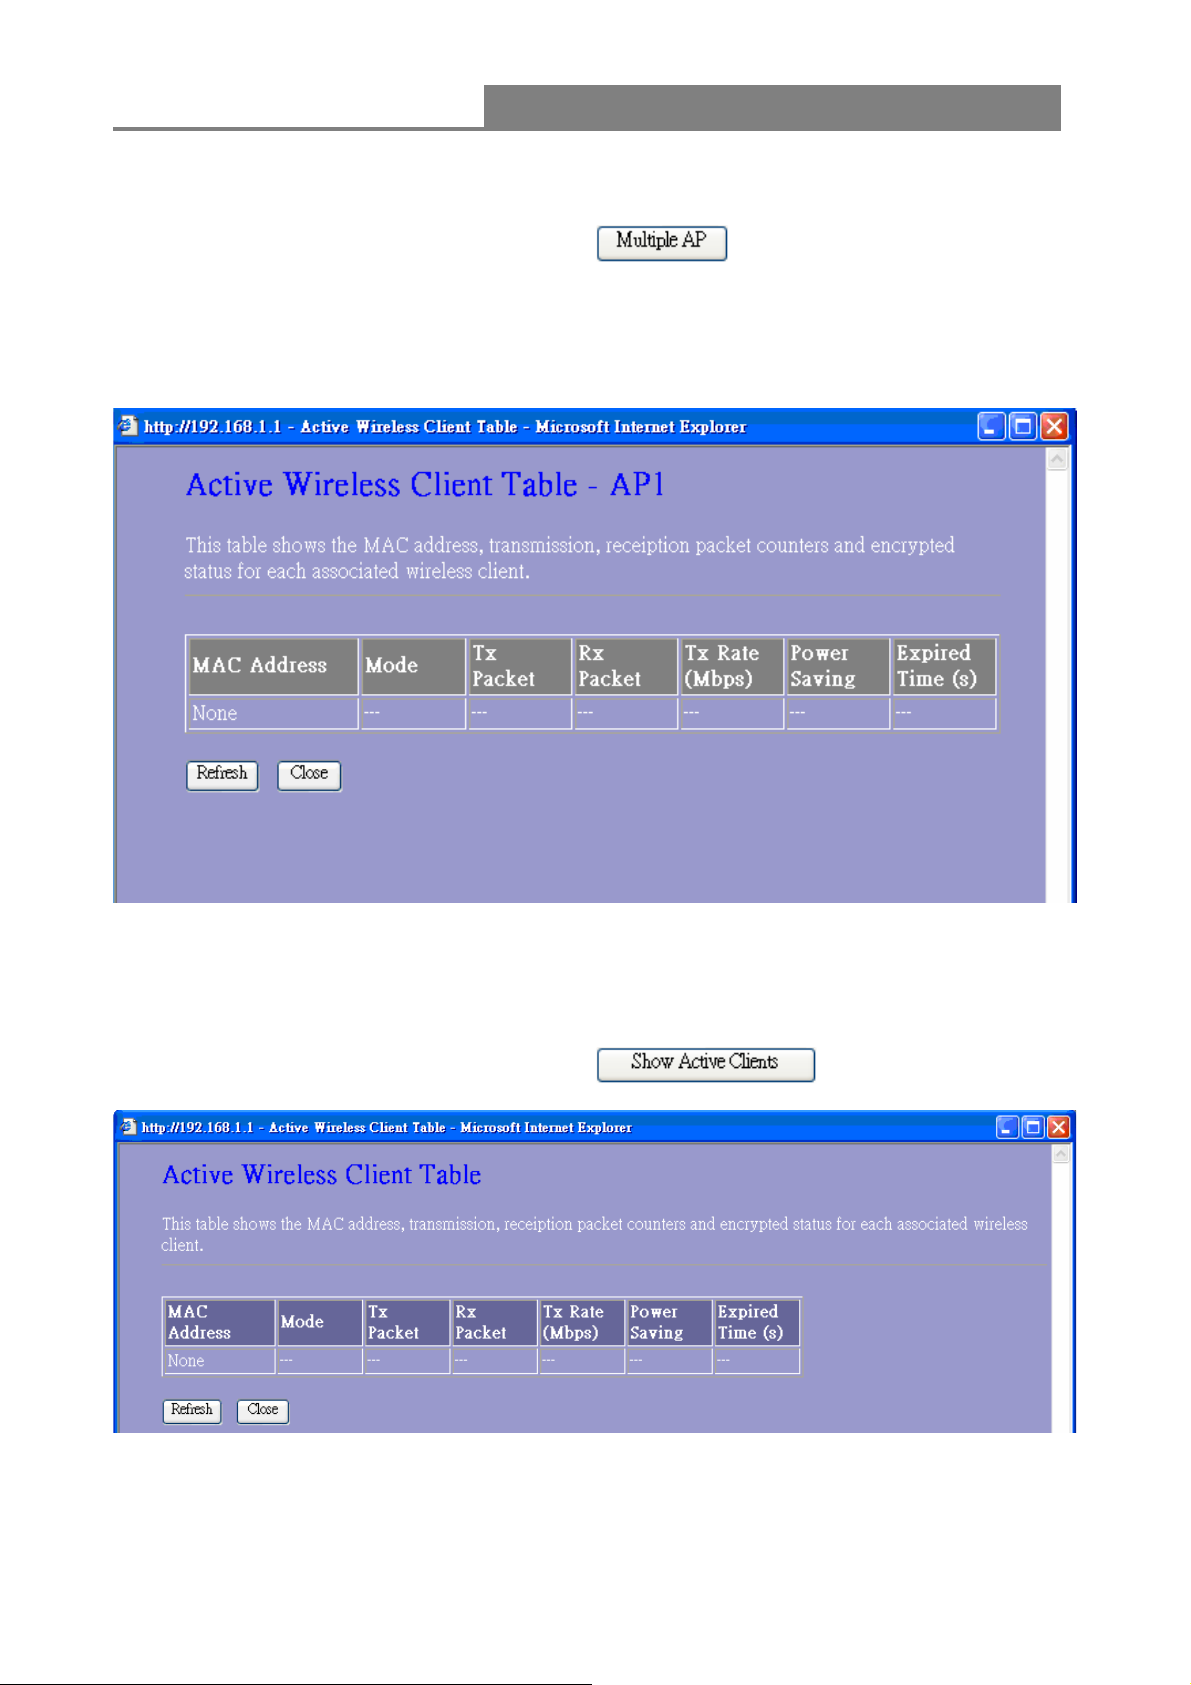
1. Multiple APs
Wireless 11n 1T1R Travel Router
This is the window that pops up after clicking the
Select one of the AP, and then click the button “Show”, “Active Wireless Client Table – AP1”
windows pops up.
button.
2. Active Wireless Client Table
This is the window that pops up after clicking the
button.
21
Page 22

Wireless 11n 1T1R Travel Router
3.5.2 Advanced Settings
You can set advanced wireless LAN parameters of this router. We recommend not changing these
parameters unless you know what changes will be on this router.
Items Information
This value should remain at its default setting of 2346. If you
Fragment
Threshold
RTS Threshold
Beacon Interval
Preamble Type
IAPP
experience a high packet error rate, you may slightly increase your
fragmentation threshold within the value range of 0 to 2346. Setting
the fragmentation threshold too low may result in poor performance.
Request To Send threshold. This value should remain at its default
setting of 2347. If you encounter inconsistent data flow, only minor
modifications to the value range between 1 and 2347 are
recommended.
Beacons are packets sent by an access point to synchronize a
wireless network. Specify a beacon interval value. Default (100ms)
is recommended.
The length of CRC blocks in the frames during the wireless
communication.
To enables multiple AP to communicate and pass information
22
Page 23

Protection
Wireless 11n 1T1R Travel Router
regarding the location of associated Stations.
Some 802.11g wireless adapters support 802.11g protections,
which allows the adapter search for 802.11b/g singles only. Select
“Enabled” to support protection or select “Disabled” to disable this
function.
Aggregation
Short GI
RF Output Power
* Please click on the Apply Changes button or the Reset button at the bottom to save/reset the configurations.
To aggregate lots of packets into a big one before transmitting
packets. This can reduce control packet overhead.
Indicates that the 802.11g network is using a short slot time
because there are no legacy (802.11b) stations present
Select the signal strength for the wireless network.
3.5.3 Security
The Security function protects your wireless network from invasion. We provide WEP and WPA
encryption to secure your wireless network. Please select Disable, WEP, WPA, WPA2, and
WPA-Mixed in the drop list. If you select none, any data will be transmitted without encryption and
any station can access the router.
Items Information
Please choose a SSID you have set for this router in the Wireless
Select SSID
> Basic Settings from the drop-down list. The SSID will be shown
on the wireless network for recognizing.
Encryption
802.1x Authentication
There are 5 modes for you to select: Disable, WEP, WPA, WPA2,
and WPA-Mixed. Please refer to the following description.
Users that do not use this function or connecting to an
open-wireless network please skip this part. Please configure the
settings in accordance with the Certificated Server.
23
Page 24

1. Security Mode -- WEP
Wireless 11n 1T1R Travel Router
Items Information
Encryption
Authentication
Select a security encryption mode for this router.
There provide three options for selecting: Open System,
Shared Key, Auto
Key Length
Key Format
Encryption Key
* Please click on the Apply Changes button or the Reset button to save/reset the configurations.
Select 64-bit or 128-bit as the key encryption length.
Select ASCII
1
or Hex2 to setup the key value.
Enter the key according to the key format you select.
1
ASCII (American Standard Code for Information Interchange) is a code for representing English letters as numbers
from 0-127.
2
Hexadecimal digits consist of the numbers 0-9 and the letters A-F.
24
Page 25

Wireless 11n 1T1R Travel Router
2. Security Mode – WPA / WPA 2
Items Information
Authentication Mode
WPA Cipher Suite
Pre-Shared Key
Format
Pre-Shared Key
There are two items, “Enterprise (RADIUS)” and “Personal
(Pre-Shared Key)”. You can select the mode by clicking the
item.
Select the WPA Cipher Suite to be TKIP or AES.
To decide the format, select Pass phrase or Hex in the drop
list.
Enter the Pre-shared Key according to the pre-shared key
format you select. This is the shared secret between AP and
STA. This field must be filled with character longer than 8 and
less than 64 lengths.
25
Page 26

3. Security Mode – WPA-Mixed
Wireless 11n 1T1R Travel Router
Items Information
Authentication Mode
WPA / WPA2 Cipher
Suite
Pre-Shared Key Format
Pre-Shared Key
* Please click on the Apply Changes button or the Reset button to save/reset the configurations.
There are two items, “Enterprise (WPA-Radius)” and
“Personal (Pre-Shared Key)”. You can select the mode
by clicking the item.
Select the WPA/WPA2 Cipher Suite to be TKIP or AES.
To decide the format, select Passphrase or Hex in the
drop list.
Enter the Pre-shared Key according to the pre-shared
key format you select. This field must be filled with
character longer than 8 and less than 64 lengths.
26
Page 27

Wireless 11n 1T1R Travel Router
3.5.4 Access Control
To restrict the clients of Access authentication of Stations, set up the control list in this page.
Items Information
Click on the drop list to choose the access
Wireless Access
Control Mode
MAC Address &
Comment
Current Access Control
list
* Please click on the Apply Changes button or the Reset button to save/reset the configurations.
control mode. You may select “Allow listed” to
allow those allowed MAC addresses or select
“Deny Listed” to ban those MAC addresses from
accessing to this device or select “Disable”.
Fill in the MAC address that you wish to control,
and give a definition to it.
Lists the MAC Access Control Settings you have
added before. Click on the list to change
configuration. To Delete the station on the list,
mark the check box in the select item and click
the “Delete Selected”. If you want to delete all
stations on the list, click “Delete All” to remove all
of them.
27
Page 28
Wireless 11n 1T1R Travel Router
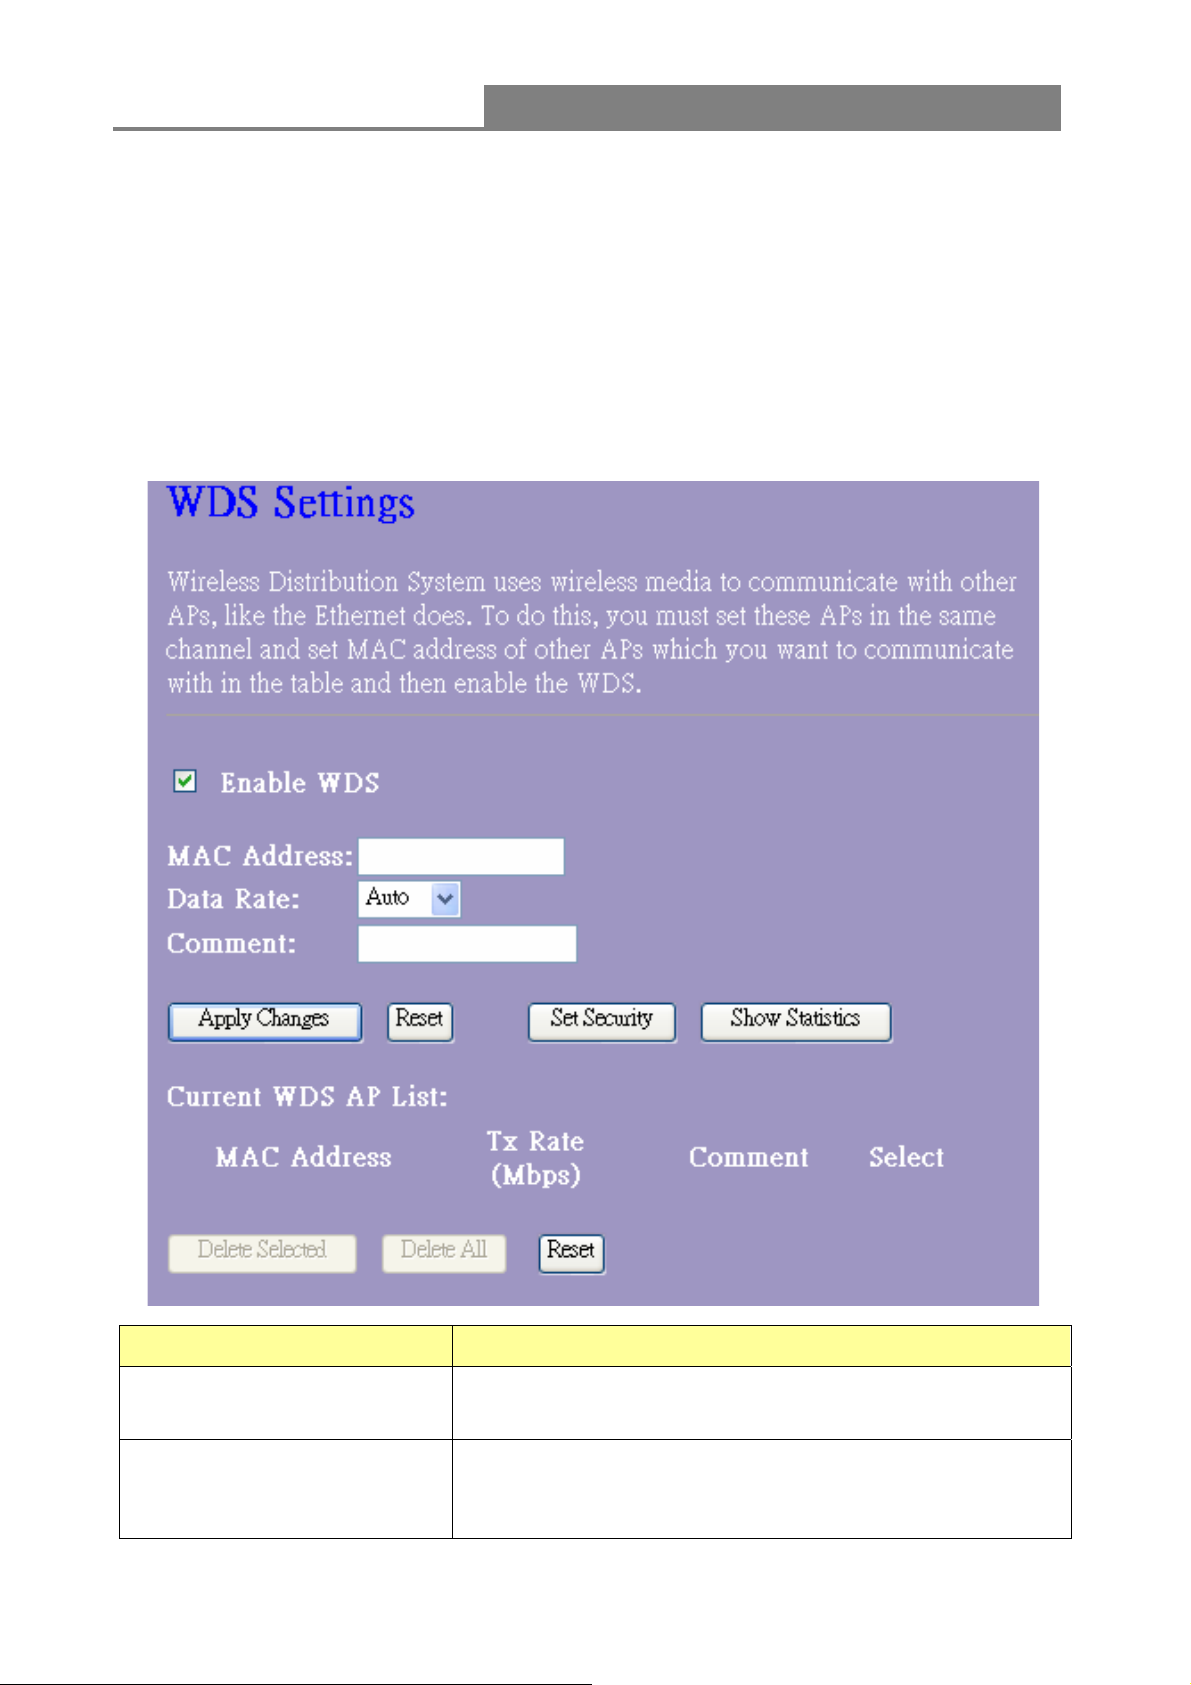
3.5.5 WDS Settings
When you use this device as WDS or AP+WDS mode, “WDS Setting” function can be operated.
Wireless Distribution System allows the router to communicate with other APs wirelessly. To make
it work, you must ensure that these APs and the Router are in the same channel. Please add
these APs MAC address and comment values into the WDS list. Don’t Forget to Enable the WDS
by click the check box of “Enable WDS” and press “Apply Changes” button to save. To Delete the
AP on the list, Click the check box in the select item and click the “Delete Selected”. If you want to
delete all APs on the list, click “Delete All” to remove all of them.
Items Information
MAC Address & Comment
Data Rate
Fill in the MAC address that you wish to control, and give a
definition to it.
The transmit limitation of data packets of this wireless router.
The wireless router will use the highest possible selected
transmission rate to transmit the data packets.
28
Page 29

Wireless 11n 1T1R Travel Router
Current WDS AP List
Lists the WDS Settings you have added before. Click on the
list to change configuration. To Delete the station on the list,
mark the check box in the select item and click the “Delete
Selected”. If you want to delete all stations on the list, click
“Delete All” to remove all of them.
3.5.6 Site Survey
This page shows available wireless network information. When you use this device as a client
station (STA), you may connect to other AP or Router. Select one of the lists in the site survey
table and click on
can be used to scan nearby Router and AP again.
to connect to other wireless network nearby. The button
29
Page 30

Wireless 11n 1T1R Travel Router
3.5.7 WPS Settings
The primary goal of Wi-Fi Protected Setup (Wi-Fi Simple Configuration) is to simplify the security
setup and management of Wi-Fi networks. This Router supports the configuration setup using PIN
configuration method or PBC configuration method through an internal or external Registrar.
Items Information
WPS Status
Self-PIN
Number
Push Button
Configuratio
n
Client PIN
Number
Please click on the Apply Changes button or the Reset button at the bottom to save/reset the configurations.
You cannot manually select the items here. The WPS Status will
change from “UnConfigured” to “Configured” after you enable WPS
function and setup a wireless security key for this device.
If you use this device as a client, you can use this code when trying
to connect this device to other AP by using the PIN method.
Push Button Communication (PBC) method use a simple action of
pushing a button on both the AP and the new STA to reach the
function of easy setup WPS connection. You can simply click the
button in this GUI page. After click on the button,
please run the client’s WPS and push the PBC button within 2
minutes.
Personal Identification Number (PIN) method. Users have to fill in
the PIN code of enrollee device and click on the
button to make communication with other AP. After click on the
button, please run the client’s WPS and push the PIN button within
2 minutes.
30
Page 31

Wireless 11n 1T1R Travel Router
3.5.8 Schedule
You can configure the schedule via this page. Click “Enable Wireless Schedule”, then config days
or time which you want. Wireless will start or stop at your scheduled time. Please do not forget to
configure system time before enabling this feature.
31
Page 32

Wireless 11n 1T1R Travel Router
3.6 TCP/IP Settings
3.6.1 LAN Interface Setup
To set up the configuration of LAN interface, private IP of your router LAN port and subnet mask
for your LAN segment.
Items Information
IP Address
Subnet Mask
Default Gateway
DHCP
The IP of your Router LAN port (default 192.168.1.1).
Subnet Mask of you LAN (default 255.255.255.0). All devices on the
network must have the same subnet mask to communicate on the
network.
Enter the IP Address of the router in your network.
DHCP stands for Dynamic Host Configuration Protocol. It is a
protocol for assigning dynamic IP addresses “automatically.” You can
select to use this router as a DHCP client or DHCP server. To give
your LAN client an IP, you have to enable “DHCP Server”. If not,
manual setting up your client IP is necessary when you want to use
the router as your client’s default gateway.
32
Page 33
DHCP Client Range
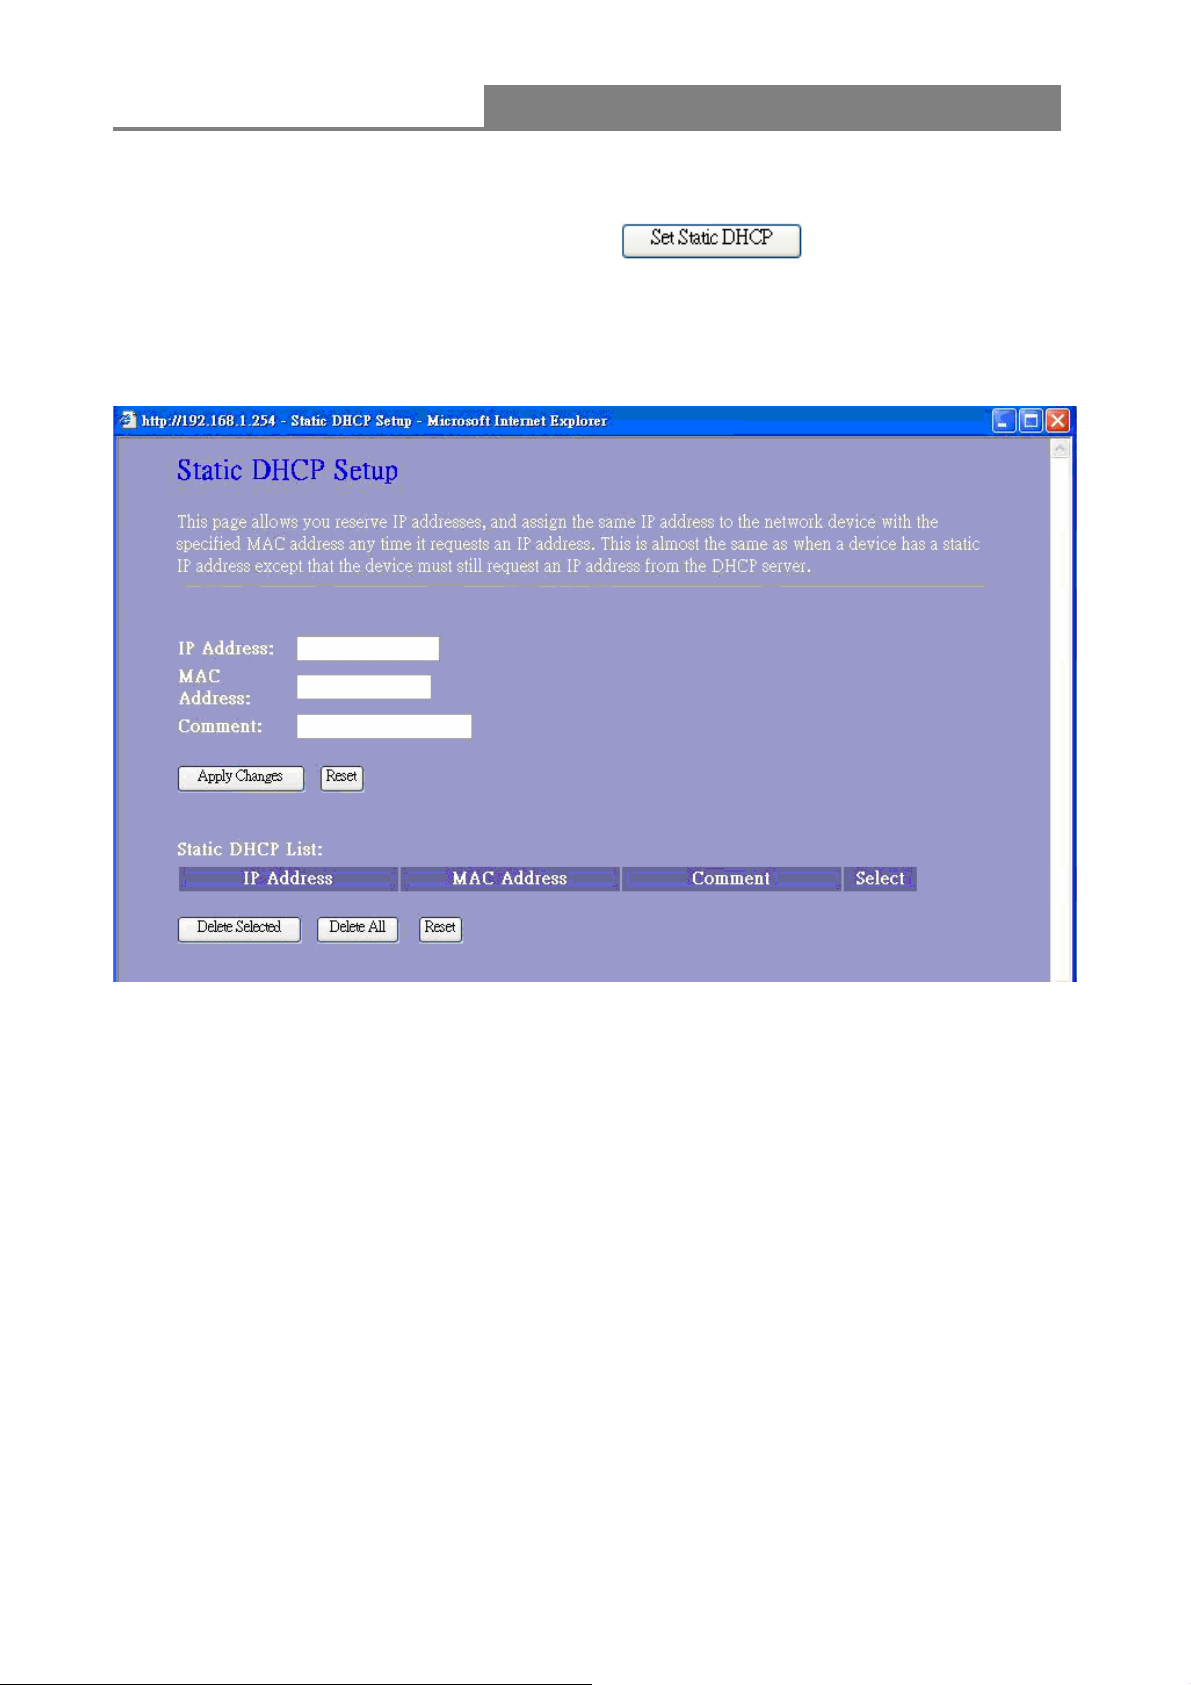
Static DHCP
Wireless 11n 1T1R Travel Router
Specify the DHCP Client IP address range (default start from 150 and
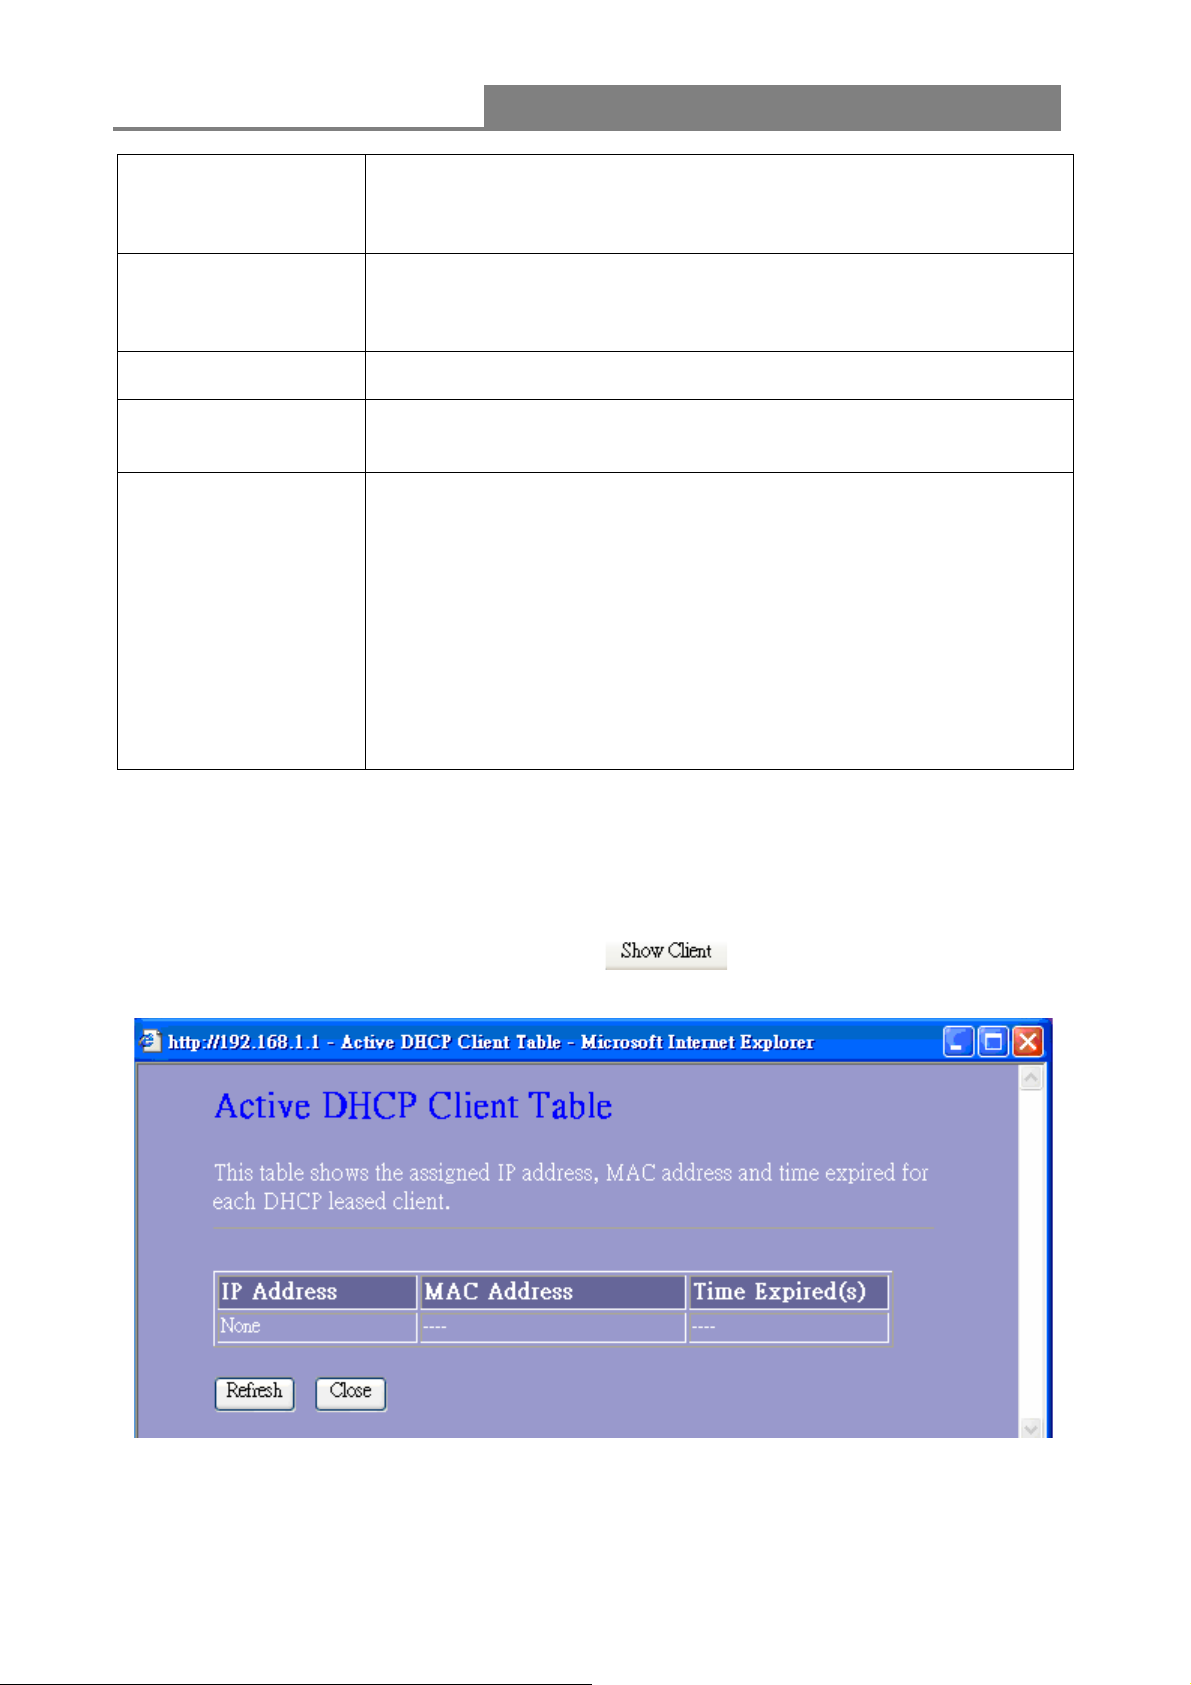
end to 200). You can also click the “Show Client” button to list those
connected DHCP clients.
This function is only available when you use this router as a DHCP
server. This router may automatically assign the static DHCP address
to the specific clients
.
Domain Name
802.1d Spanning
Tree
Clone MAC Address
* Please click on the Apply Changes button or the Reset button at the bottom to save/reset the configurations.
(Optional) The name of your local domain.
To prevent from network loops and preserve the quality of bridged
network
Your ISP may require a particular MAC address in order for you to
connect to the Internet. This MAC address is the PC’s MAC address
that your ISP had originally connected your Internet connection to.
MAC cloning feature allows the MAC address reported by WAN side
network interface card to be set to the MAC address already
registered with the ISP eliminating the need to register the new MAC
address with the ISP. This feature does not change the actual MAC
address on the NIC, but instead changes the MAC address reported
by Wireless Router to client requests. To Change the MAC address,
enter it in the text box.
1. Active DHCP Client List
This is the window that pops up after clicking the button. It shows the information of
IP/MAC address and expire time of the DHCP clients that have connected with this device.
33
Page 34
Wireless 11n 1T1R Travel Router
2. Static DHCP Setup
This is the window that pops up after clicking the button. Click on the list to
change configuration. To delete the station on the list, mark the check box in the select item and
click the “Delete Selected”. If you want to delete all stations on the list, click “Delete All” to remove
all of them.
3.6.2 WAN Interface Setup
This page allows users to configure those parameters for connecting to Internet. You may select
the Internet connection type from the “My Connection type” drop list and configure parameters for
each mode. Five modes for selection: Static, DHCP, PPPoE, L2TP, and PPTP mode.
34
Page 35

Wireless 11n 1T1R Travel Router
1. Static Mode (fixed IP)
Devices that are assigned the same IP address may not be visible on the network. Enter the IP
address of the DNS server. The DNS server translates domain names into IP addresses.
35
Page 36

Wireless 11n 1T1R Travel Router
Items Information
IP Address, Subnet Mask and
Default Gateway
MTU Size
DNS 1~3
* Please click on the Apply Changes button or the Reset button at the bottom to save/reset the configurations.
2. DHCP (Auto Config)
Fill in the IP address, Subnet Mask and Default Gateway
that provided by your Internet Service Provider (ISP).
To Enable the Maximum Transmission Unit of Router
setup. Any packet over this number will be chopped up
into suitable size before sending. Larger number will
enhance the transmission performance.
Enter the MTU number in the blank to set the limitation
(default 1500 bytes).
To specify the Domain Name System (DNS). The DNS
server translates domain names into IP addresses. Enter
the DNS provided by your ISP in 1
st
, 2nd and 3rd server.
Items Information
Host Name
MTU Size
Attain DNS Automatically
The name of this device.
To Enable the Maximum Transmission Unit of Router
setup. Any packet over this number will be chopped up
into suitable size before sending. Larger number will
enhance the transmission performance.
Enter your MTU number in the text-box to set the
limitation (default 1492 bytes).
If your DNS provide by ISP is dynamic, choose “Attain
DNS automatically
36
Page 37

Wireless 11n 1T1R Travel Router
To specify the Domain Name System (DNS). The DNS
Set DNS Manually
* Please click on the Apply Changes button or the Reset button at the bottom to save/reset the configurations.
3. PPPoE (ADSL)
server translates domain names into IP addresses.
Enter the DNS provided by your ISP in 1
st
, 2nd and 3
server.
rd
Items Information
Username, Password and
Service Name
Connection Type
Idle Time
Fill in the User Name, password and service name that
provided by your ISP.
There are three connection types:
“Continuous”: always keep connection.
“Connect on demand”: bill by connection time. You can set
up the idle time for the value. Specifies the number of time that
elapses before the system automatically disconnects the
PPPoE session.
“Manual”: To connect to ISP, click “Connect” manually from
the WEB user interface. The WAN connection will not lose its
connection even the idle time is out. If the WAN line breaks
down and latter links again, the router will not auto-connect to
the ISP.
The value specifies the number of idle time that elapses before
the system automatically disconnects the PPPoE session.
37
Page 38

MTU Size
Wireless 11n 1T1R Travel Router
To Enable the Maximum Transmission Unit of Router setup.
Any packet over this number will be chopped up into suitable
size before sending. Larger number will enhance the
transmission performance.
Enter your MTU number in the text-box to set the limitation
(default 1452 bytes).
Attain DNS Automatically
Set DNS Manually
* Please click on the Apply Changes button or the Reset button at the bottom to save/reset the configurations.
4. PPTP
Point-to-Point Tunneling Protocol (PPTP) is a method for implementing virtual private networks
(VPNs).
If your DNS provide by ISP is dynamic, choose “Attain DNS
automatically
To specify the Domain Name System (DNS). The DNS server
translates domain names into IP addresses. Enter the DNS
provided by your ISP in 1
st
, 2nd and 3rd server.
38
Page 39

Wireless 11n 1T1R Travel Router
Items Information
IP address & Subnet Mask
Username and Password
Idle Time
MTU Size
Request MPPE Encryption
Request MPPC Compression
Fill in IP address & Subnet Mask that match the same
subnet provided by your Internet Service Provider (ISP).
Fill in Username and Password that provided by your
Internet Service Provider (ISP).
The value specifies the number of idle time that elapses
before the system automatically disconnects the PPTP
session.
To Enable the Maximum Transmission Unit of Router
setup. Any packet over this number will be chopped up
into suitable size before sending. Larger number will
enhance the transmission performance.
Enter the MTU number in the blank to set the limitation
(default 1460 bytes).
Mark to enable the Microsoft Point-to-Point Encryption
function. MPPE compresses data across PPP or VPN
links.
Mark to enable the Microsoft Point-to-Point Compression
function. MPPC can only be used in products that
implement the Point to Point Protocol AND for the sole
purpose of interoperating with other MPPC and Point to
Point Protocol implementations.
Attain DNS Automatically
DNS 1~3
* Please click on the Apply Changes button or the Reset button at the bottom to save/reset the configurations.
5. L2TP
The Layer Two Tunneling Protocol (L2TP) provides a standard method for transporting the link
layer of the Point-to-Point Protocol (PPP) between a dial-up server and a Network Access Server,
using a network connection in lieu of a physical point-to-point connection.
If your DNS provide by ISP is dynamic, choose “Attain
DNS automatically
To specify the Domain Name System (DNS). The DNS
server translates domain names into IP addresses. Enter
the DNS provided by your ISP in 1
st
, 2nd and 3rd server.
39
Page 40
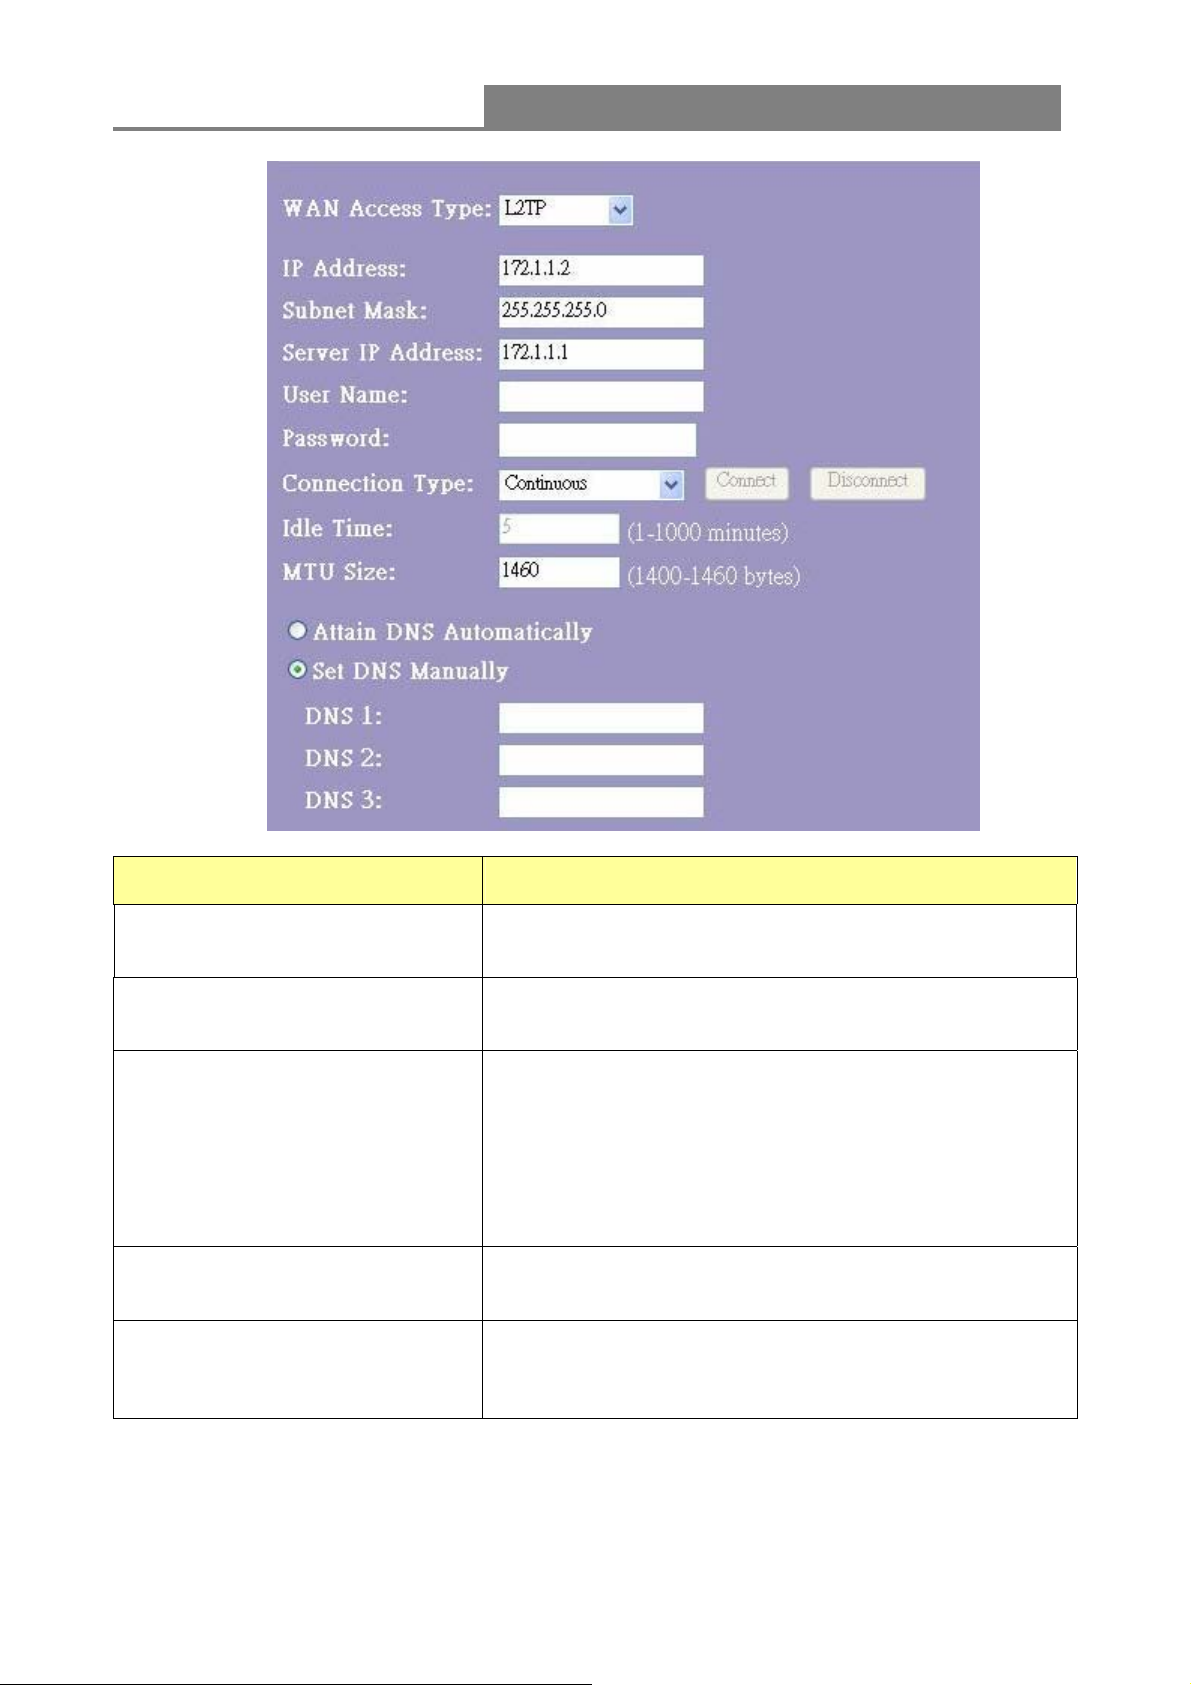
Wireless 11n 1T1R Travel Router
Items Information
IP address & Subnet Mask
Username and Password
MTU Size
Attain DNS Automatically
DNS 1~3
Fill in IP address & Subnet Mask that match the same
subnet provided by your Internet Service Provider (ISP).
Fill in the Username and Password that provided by your
Internet Service Provider (ISP).
To Enable the Maximum Transmission Unit of Router
setup. Any packet over this number will be chopped up
into suitable size before sending. Larger number will
enhance the transmission performance.
Enter the MTU number in the blank to set the limitation
(default 1460bytes).
If your DNS provide by ISP is dynamic, choose “Attain
DNS automatically
To specify the Domain Name System (DNS). The DNS
server translates domain names into IP addresses. Enter
the DNS provided by your ISP in 1
st
, 2nd and 3rd server.
40
Page 41

Wireless 11n 1T1R Travel Router
6. Common configurations for WAN interface
There are some settings are able to be configured on each WAN access types:
Items Information
When ISP use MAC address authentication (with
DHCP), then the MAC address of the Ethernet card
attached to your Cable modem must be registered with
the ISP before connecting to the WAN (Internet). If the
Ethernet card is changed, the new MAC address must
be registered with the ISP.
Clone MAC Address
Enable Web Server Access on
WAN from port
MAC cloning feature allows the MAC address reported
by WAN side network interface card to be set to the
MAC address already registered with the ISP
eliminating the need to register the new MAC address
with the ISP. This feature does not change the actual
MAC address on the NIC, but instead changes the
MAC address reported by Wireless Router to client
requests. To Change the MAC address, enter it in the
text box.
To Enable the user to access this Router with WAN
port IP address from Internet
Enable IPsec pass through on
VPN connection
Enable PPTP pass through on
VPN connection
Enable L2TP pass through on
VPN connection
* Please click on the Apply Changes button or the Reset button at the bottom to save/reset the configurations.
Mark the check box to enable IPsec pass through on
VPN connection and clear the checkbox to disable.
Mark the check box to enable PPTP pass through on
VPN connection and clear the checkbox to disable.
Mark the check box to enable L2TP pass through on
VPN connection and clear the checkbox to disable.
41
Page 42

Wireless 11n 1T1R Travel Router
3.7 Firewall Settings
3.7.1 Port Filter
The firewall could not only obstruct outside intruders from intruding your system, but also
restricting the LAN users. Port filter restricts certain type of data packets from your LAN to Internet
through the router.
Items Information
Enable Port Filtering
Port Range
Protocol
Comment
Current Filter Table
* Please click on the Apply Changes button or the Reset button at the bottom to save/reset the configurations.
Mark to enable the configuration, and clear to disable.
Fill in the port range that you wish to filter. The valid
numbers are 1~65535.
Select the protocol type of TCP, UDP or Both.
Input any text to describe this mapping
Lists the Port Filter Settings you have added before. To
delete the settings on the list, click the check box in the
select item and click the “Delete Selected”. If you want
to delete all entries on the list, click “Delete All” to
remove all of them.
42
Page 43

Wireless 11n 1T1R Travel Router
3.7.2 IP Filter
The Wireless Router could filter the outgoing packets for security or management consideration.
Items Information
Enable IP Filtering
Local IP Address
Protocol
Comment
Current Filter Table
* Please click on the Apply Changes button or the Reset button at the bottom to save/reset the configurations.
Mark to enable the configuration, and clear to disable.
Fill in the IP address that you wish to filter.
Select the protocol type of “TCP”, “UDP” or both.
Input any text to describe this mapping,
Lists the IP Filter Settings you have added before. To delete
the settings on the list, click the check box in the select item
and click the “Delete Selected”. If you want to delete all entries
on the list, click “Delete All” to remove all of them.
43
Page 44
Wireless 11n 1T1R Travel Router
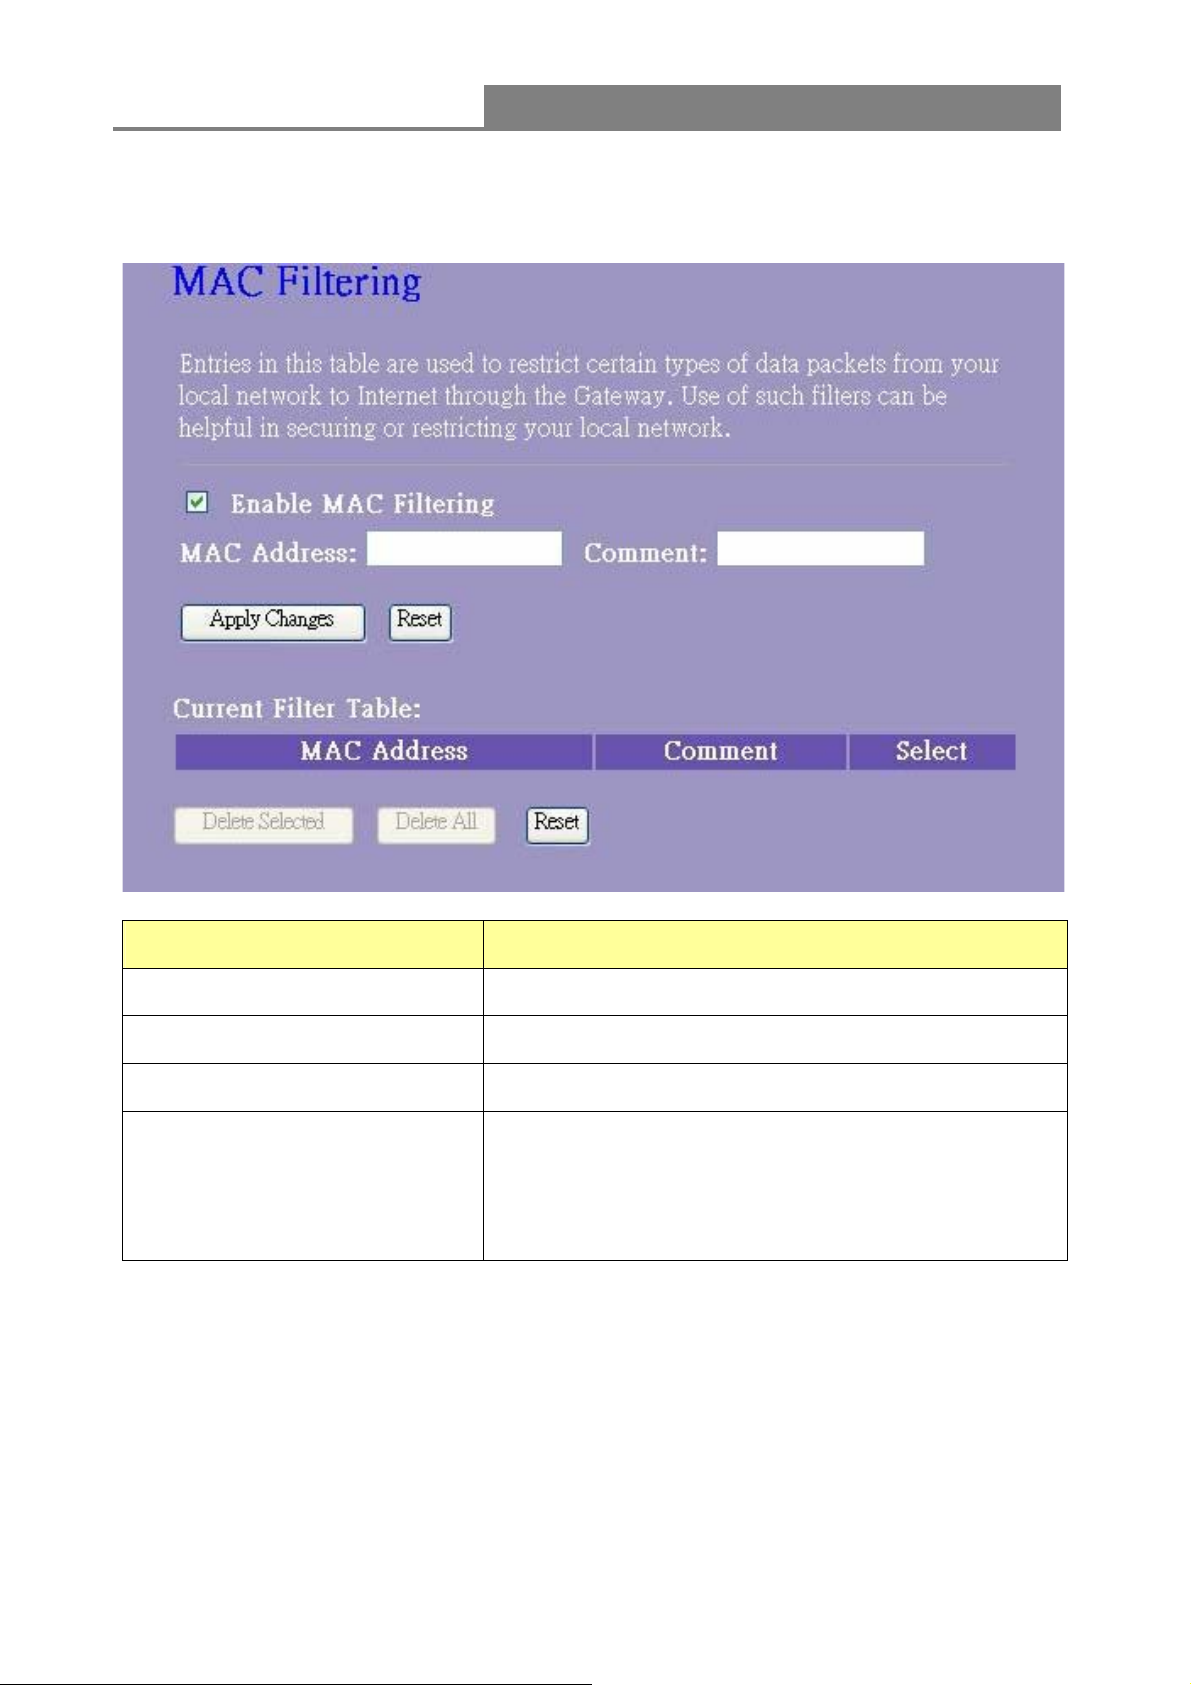
3.7.3 MAC Filter
The Wireless Router could filter the outgoing packets for security or management consideration.
Items Information
Enable MAC Filtering
MAC Address
Comment
Current Filter Table
Please click on the Apply Changes button or the Reset button at the bottom to save/reset the configurations.
Mark to enable the configuration, and clear to disable.
Fill in the MAC address that you wish to filter.
Input any text to describe this mapping.
Lists the MAC Filter Settings you have added before. To
delete the settings on the list, click the check box in the
select item and click the “Delete Selected”. If you want to
delete all entries on the list, click “Delete All” to remove
all of them.
44
Page 45
Wireless 11n 1T1R Travel Router
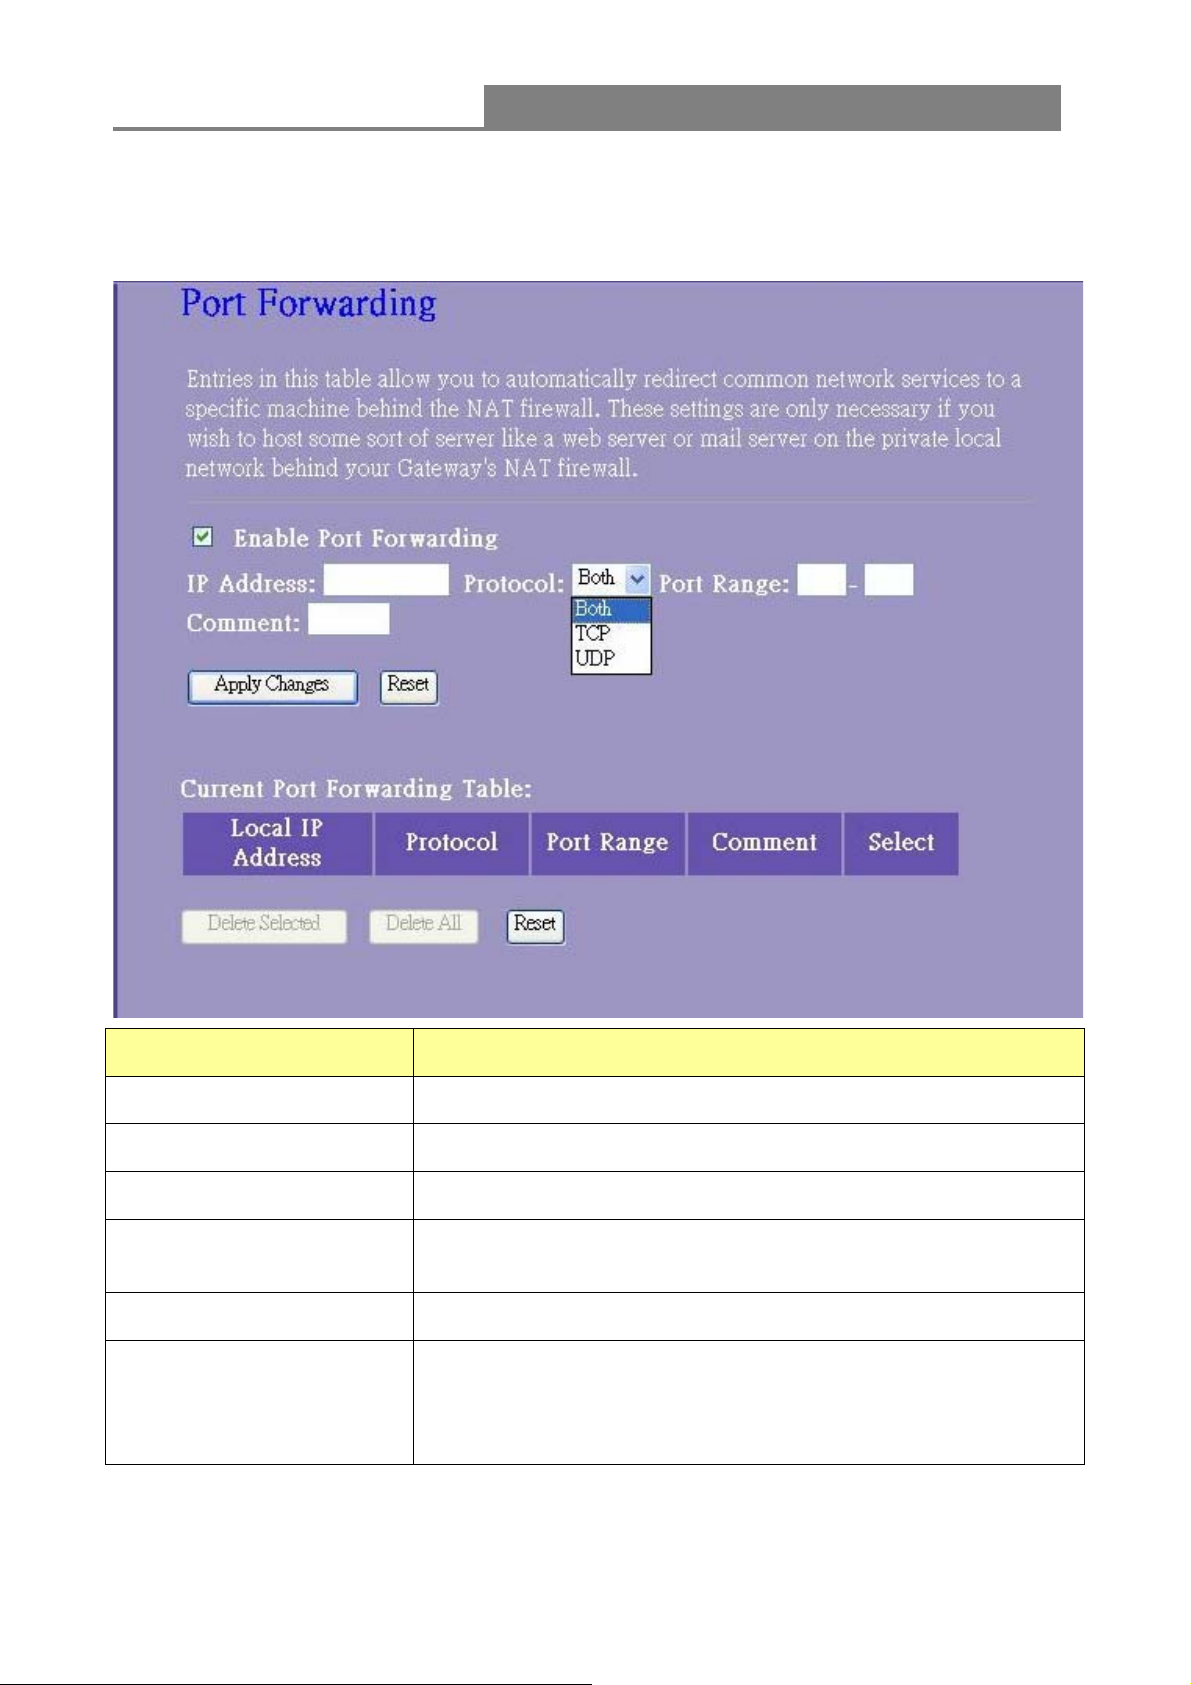
3.7.4 Port Forwarding
The Port Forwarding allows you to re-direct a particular range of service port numbers (from the
Internet/WAN Ports) to a particular LAN IP address.
Items Information
Enable Port Forwarding
IP Address
Protocol
Port Range
Comment
Current Port Forwarding
Table
Please click on the Apply Changes button or the Reset button at the bottom to save/reset the configurations.
Mark to enable the configuration, and clear to disable.
Fill in the IP address that you wish to forward.
Select the protocol type of TCP, UDP or Both.
Fill in the port range that you wish to forward. The valid numbers
are 1~65535.
Input any text to describe this mapping.
Lists the Port Forward Settings you have added before. To delete
the settings on the list, click the check box in the select item and
click the “Delete Selected”. If you want to delete all entries on the
list, click “Delete All” to remove all of them.
45
Page 46
Wireless 11n 1T1R Travel Router
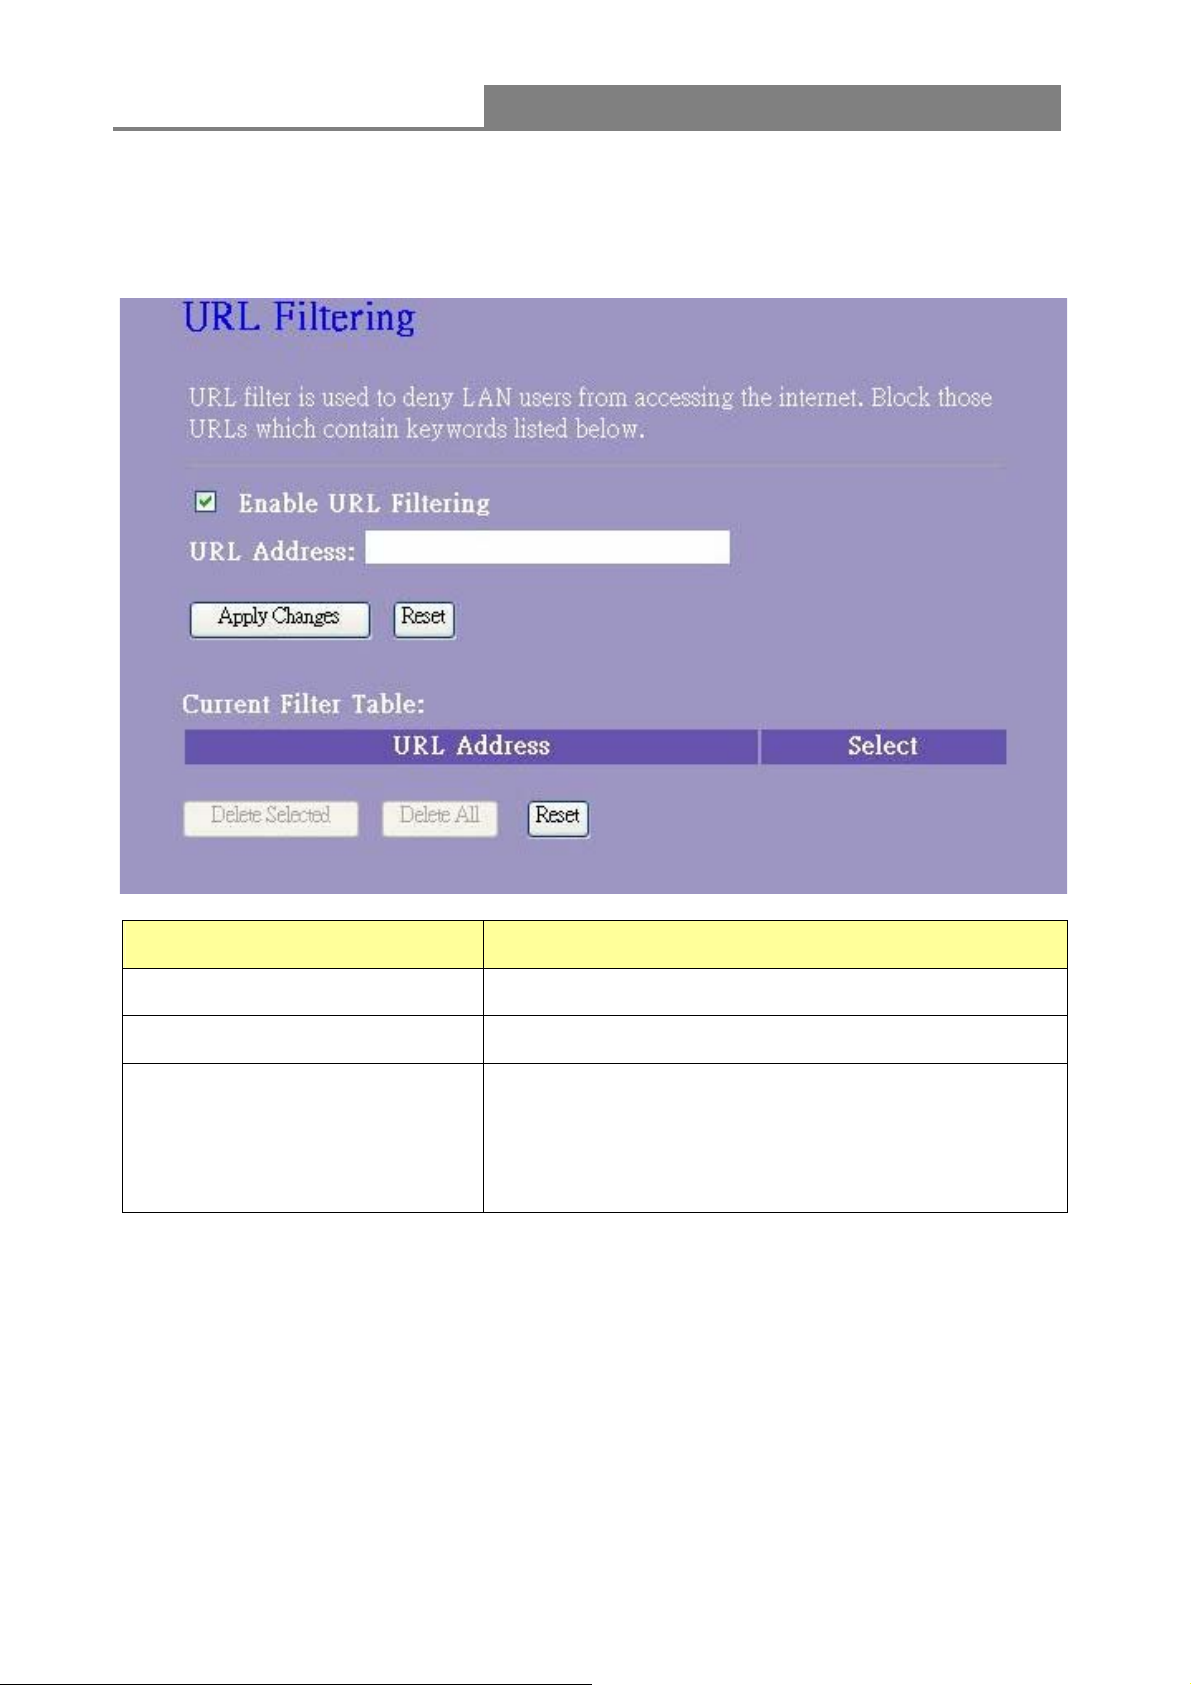
3.7.5 URL Filter
The URL Filter allows users to prevent certain URL from accessing by users in LAN. This filter will
block those URLs that contain certain keywords.
Items Information
Enable URL Filtering
URL Address
Current Filter Table
* Please click on the Apply Changes button or the Reset button at the bottom to save/reset the configurations.
Mark to enable the configuration, and clear to disable.
Fill in the URL address that you wish to filter.
Lists the URL Filter Settings you have added before. To
delete the settings on the list, click the check box in the
select item and click the “Delete Selected”. If you want to
delete all entries on the list, click “Delete All” to remove
all of them.
46
Page 47

Wireless 11n 1T1R Travel Router
3.7.6 DMZ
To configure it, mark to enable virtual DMZ and then enter the Host IP (private IP address) and
click
3.8 QoS
to enact the setting.
The QoS (Quality of Service) Settings page provides different priority to different users.
47
Page 48

Wireless 11n 1T1R Travel Router
3.9 Management
3.9.1 Status
This information page shows the current settings of this device. You could check if the parameters
match your configuration.
3.9.2 Statistics
This page allows users to get information of data transferring condition, and monitor the status
and performance of this router including receiving and sending packets. To see the latest report,
click
button.
48
Page 49

Wireless 11n 1T1R Travel Router
3.9.3 DDNS Settings
DDNS (Dynamic Domain Name Server) service allows users to connect to this device via a fixed
and easy-to–remember hostname. This router supports DDNS service of following service
providers:
DynDNS (
Please go to one of DDNS service provider’s web page listed above, and get a free DDNS
account by the instructions given on their web page.
http://www.dyndns.org
), TZO (http://www.tzo.com)
49
Page 50

Wireless 11n 1T1R Travel Router
Items Information
Service Provider
Domain Name
User Name/Email
Password/Key
* Please click on the Apply Changes button or the Reset button at the bottom to save/reset the configurations.
The website that provides DDNS service. Please select
from the drop-down list.
The hostname that you have applied for the device.
DDNS login account. For DynDNS users, please fill in your
user name; for TZO users, please fill in your email
address.
The password of your DDNS service account.
3.9.4 Time Zone Setting
This page allows users to configure the time of the router. To specify manually, fill in the blanks in
“Current Time” and click the “Apply Change” button. To synchronize time from a timeserver, please
mark the “Enable NTP client update” checkbox, select a NTP server from the drop list or manually
enter a NTP server. Click the “Apply Change” button after your configuration.
50
Page 51

Wireless 11n 1T1R Travel Router
3.9.5 Denial-of-Service
A DoS (Denial of Service) attack attempt to disrupt the network and information system by sending
abnormal packets to overload your Internet connection. DoS protect function helps to detect and
block those malevolent DoS attack. It is strongly recommended that this setting be left enabled.
Please mark to enable the DoS protection function. Manually adjust the value of packet threshold
and click
to enact the setting.
51
Page 52
Wireless 11n 1T1R Travel Router
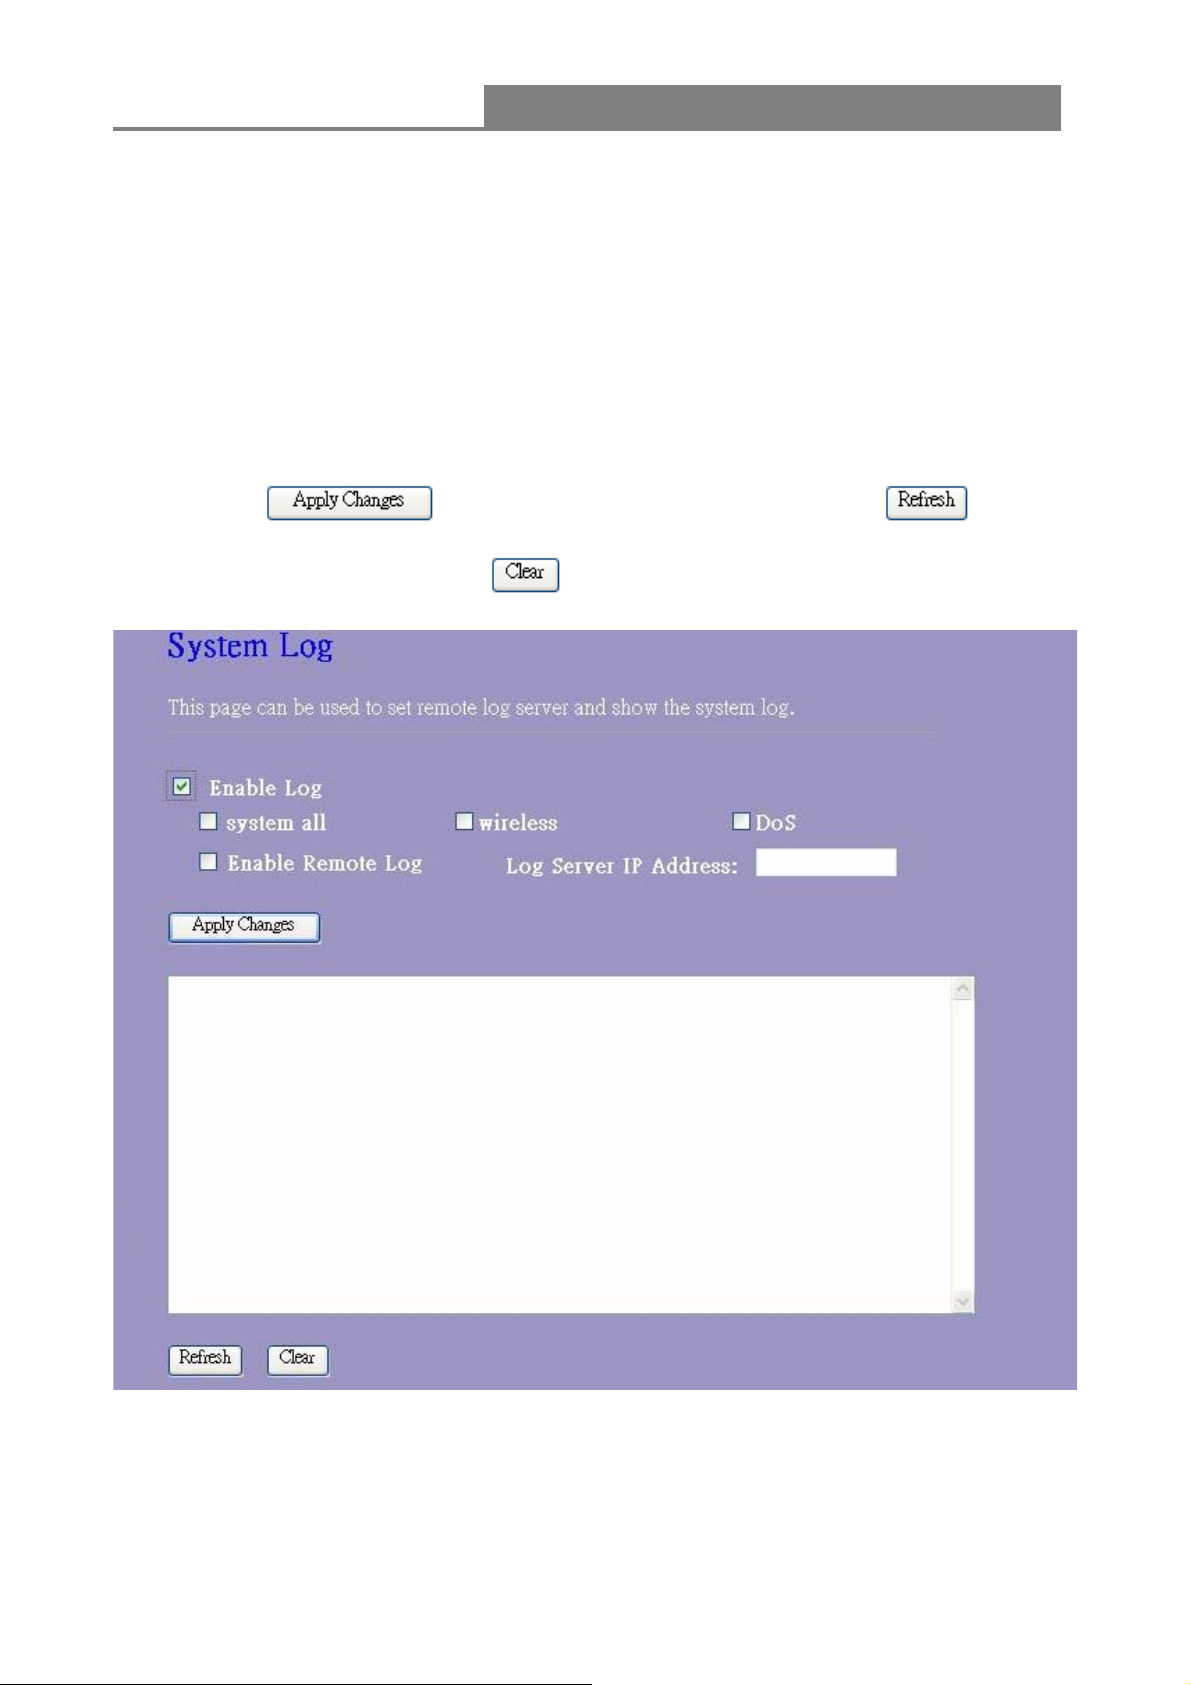
3.9.6 Log
This System Log page shows the information of the current activities on the router. To enable
system log function:
1. Mark the “Enable Log” checkbox.
2. To see all information of the system, select the “system all” checkbox.
To see wireless information only, select the “wireless” checkbox.
To send the log information to a certain note, select the “Enable Remote Log” checkbox and
fill in the IP address in the “Log Server IP Address” box.
3. Click the
refresh the log information or click the
button to activate. You could also click the button to
button to clean the log table.
52
Page 53

Wireless 11n 1T1R Travel Router
3.9.7 Upgrade Firmware
Sometimes a new firmware may be issued to upgrade the system of this device. You could
upgrade the firmware you got in this page. To upgrade the firmware, please click on the
button, locate the firmware in your computer and then click the button to
execute.
3.9.8 Save/Reload Setting
The Save/Reload Setting page allows users to backup and download the configuration status of
the device or restore the factory default configuration.
53
Page 54

Wireless 11n 1T1R Travel Router
Items Information
Save Settings to File
Load Settings from File
Reset Settings to Default
Click on the
settings.
Click
click
complete.
Click
the status LED starts blinking.
to start the process. Please wait for it to
to start the process and it will be completed till
button to save the currently configure
to select the file that you save, and then
3.9.9 Password
To set up the Administrator Account information, enter the Username, New password, and reenter
the password on the text box. Don’t forget to click the
to save the configuration.
54
Page 55

Wireless 11n 1T1R Travel Router
Appendix A: Product Specifications
Standard
Interface
Antenna
WAN Connection
Cable Connections
Transmission Mode
Security
Network Data Rate
Receiver Sensitivity
Transmit Power
LED indications
Range Coverage
IEEE 802.11n draft 2.0, IEEE 802.11g, IEEE 802.11b, IEEE 802.3,
IEEE 802.3u
LAN: 1 port 10/100 Mbps Ethernet, RJ-45
WAN: One RJ-45 port
1* reverse SMA detachable antennas (Standard 1.8 dB)
1* reset to factory default button
1* WPS button
Antenna connector type: one Reverse SMA
Ethernet 10/100 Mbps
RJ-45 (10BASE-T): Category 3,4,5 UTP
RJ-45 (100BASE-TX): Category 5 UTP
Auto-Negotiation (Full-duplex, Half-duplex)
64/128-bit WEP, WPA, WPA2
802.11b: 1,2,5.5, and 11Mbps
802.11g: 6,9,12,18,24,36,48 and 54Mbps
802.11n: up to 150 Mbps
802.11n Typical -68 dBm
802.11g Typical -73 dBm
802.11b Typical -84 dBm
16dBm typically @ 802.11b
14dBm typically @ 802.11g
13dBm typically @ 802.11n
1*PWR, 1*SYS, 1*WAN, 1*LAN, 1*WLAN
Indoor 35~100 meters :
Outdoor 100~300 meters.
Emission
Temperature
Humidity
FCC CE, CLASS B
FCC Part 15.247 for US (2.412~2.462MHz)
ETS 300 328 for Europe (2.400~2483.5MHz)
DGT LP0002 for Taiwan (2.412~2.462MHz)
Operating: 0°C ~ 40°C (32°~104°F)
Storage: -10°C ~ 70°C (14°~158°F)
Operating: 10% ~ 90% RH, non-condensing
Storage: 5%~90% RH, non-condensing
55
Page 56

Wireless 11n 1T1R Travel Router
Appendix B: Glossary
z 802.11b - The 802.11b standard specifies a wireless networking at 11 Mbps using
direct-sequence spread-spectrum (DSSS) technology and operating in the unlicensed radio
spectrum at 2.4GHz, and WEP encryption for security. 802.11b networks are also referred to
as Wi-Fi networks.
z 802.11g - specification for wireless networking at 54 Mbps using direct-sequence
spread-spectrum (DSSS) technology, using OFDM modulation and operating in the
unlicensed radio spectrum at 2.4GHz, and backward compatibility with IEEE 802.11b devices,
and WEP encryption for security.
z 802.11n - 802.11n builds upon previous 802.11 standards by adding MIMO (multiple-input
multiple-output). MIMO uses multiple transmitter and 3receiver antennas to allow for
increased data throughput via spatial multiplexing and increased range by exploiting the
spatial diversity, perhaps through coding schemes like Alamouti coding. The Enhanced
Wireless Consortium (EWC)3 was formed to help accelerate the IEEE 802.11n development
process and promote a technology specification for interoperability of next-generation wireless
local area networking (WLAN) products.
z DDNS (Dynamic Domain Name System) - The capability of assigning a fixed host and domain
name to a dynamic Internet IP Address.
z DHCP (Dynamic Host Configuration Protocol) - A protocol that automatically configure the
TCP/IP parameters for the all the PC(s) that are connected to a DHCP server
z DMZ (Demilitarized Zone) - A Demilitarized Zone allows one local host to be exposed to the
Internet for a special-purpose service such as Internet gaming or videoconferencing.
z DNS (Domain Name System) – An Internet Service that translates the names of websites into
IP addresses.
z Domain Name - A descriptive name for an address or group of addresses on the Internet.
z DoS (Denial of Service) - A hacker attack designed to prevent your computer or network from
operating or communicating.
z
DSL (Digital Subscriber Line) - A technology that allows data to be sent or received over
existing traditional phone lines.
z ISP (Internet S
z MTU (Maximum Transmission Unit) - The size in bytes of the largest packet that can be
ervice Provider) - A company that provides access to the Internet.
transmitted.
z NAT (Network Address Translation) - NAT technology translates IP addresses of a local area
network to a different IP address for the Internet.
z PPPoE (Point to Point Protocol over Ethernet) - PPPoE is a protocol for connecting remote
hosts to the Internet over an always-on connection by simulating a dial-up connection.
z SSID - A Service Set Identification is a thirty-two character (maximum) alphanumeric key
identifying a wireless local area network. For the wireless devices in a network to
56
Page 57

Wireless 11n 1T1R Travel Router
communicate with each other, all devices must be configured with the same SSID. This is
typically the configuration parameter for a wireless PC card. It corresponds to the ESSID in
the wireless Access Point and to the wireless network name.
z WEP (Wired Equivalent Privacy) - A data privacy mechanism based on a 64-bit or 128-bit or
152-bit shared key algorithm, as described in the IEEE 802.11 standard.
z Wi-Fi - A trade name for the 802.11b wireless networking standard, given by the Wireless
Ethernet Compatibility Alliance (WECA, see http://www.wi-fi.net), an industry standards group
promoting interoperability among 802.11b devices.
z WLAN (Wireless Local Area Network) - A group of computers and associated devices
communicate with each other wirelessly, which network serving users are limited in a local
area.
57
61NB-W24100+217
 Loading...