

Page 1
Digital Signage
User Manual
The contents of this manual will be modified without further notice.
The operation temperature for the product is between 10℃~40℃.
Operating or recharging in an environment with a temperature over 40℃ might cause the
system to malfunction. However, this should be considered a normal phenomenon. Please do
not operate under extreme temperatures.
Model: S97407/ S133408
Page 2

Content
Preface.................................................................................................................................................. 2
Safety Precautions ................................................................................................................................ 5
Warranty .............................................................................................................................................. 5
1. Product Introduction ................................................................................................................ 6
1.1 Package Content ................................................................................................................... 6
1.2 Overview .............................................................................................................................. 7
1.2.1 Front View ........................................................................................................................ 7
1.2.2 Rear View ......................................................................................................................... 8
1.2.3 Bottom View ..................................................................................................................... 8
1.2.4 Right View ........................................................................................................................ 9
1.3 Connected information ...................................................................................................... 10
1.4 Charging the battery .......................................................................................................... 10
2. Architecture diagram ............................................................................................................. 11
3. Software Design ..................................................................................................................... 12
3.1 Image format ...................................................................................................................... 12
3.2 Redraw setting ................................................................................................................... 12
4. Pair Setting ............................................................................................................................. 13
4.1 APP Setting by cellphone (BLE WiFiConfig app) ................................................................. 13
4.2 USB Setting Tool (USB WiFiconfig tool) .............................................................................. 20
5. Installation Step ..................................................................................................................... 23
6. OTA Update ............................................................................................................................ 27
7. Specification ........................................................................................................................... 28
1
Digital Signage User Manual
Page 3

Preface
We appreciate your purchase the digital signage of the Sable.
Please read all instructions thoroughly for a full understanding of the products’ features.
Note:
The illustrations and images used in the manual are for reference only and may differ from the
actual product.
2
Digital Signage User Manual
Page 4

Federal Communications Commission (FCC) Statement
This device complies with Part 15 of the FCC Rules. Operation is subject to the following two
conditions: (1) This device may not cause harmful interference, and (2) this device must accept any
interference received, including interference that may cause undesired operation.
This equipment has been tested and found to comply with the limits for a Class B digital device,
pursuant to Part 15 of the FCC Rules. These limits are designed to provide reasonable protection
against harmful interference in a residential installation. This equipment generates uses and can
radiate radio frequency energy and, if not installed and used in accordance with the instructions,
may cause harmful interference to radio communications. However, there is no guarantee that
interference will not occur in a particular installation. If this equipment does cause harmful
interference to radio or television reception, which can be determined by turning the equipment
off and on, the user is encouraged to try to correct the interference by one of the following
measures:
- Reorient or relocate the receiving antenna.
- Increase the separation between the equipment and receiver.
- Connect the equipment into an outlet on a circuit different from that to which the receiver is
connected.
- Consult the dealer or an experienced radio/TV technician for help.
FCC Caution: Any changes or modifications not expressly approved by the party responsible for
compliance could void the user's authority to operate this equipment.
This transmitter must not be co-located or operating in conjunction with any other antenna or
transmitter.
Radiation Exposure Statement:
The product complies with the FCC portable RF exposure limit set forth for an uncontrolled
environment and are safe for intended operation as described in this manual. The further RF
exposure reduction can be achieved if the product can be kept as far as possible from the user
body or set the device to lower output power if such function is available.
Note: The country code selection is for non-US model only and is not available to all US model. Per
FCC regulation, all WiFi product marketed in US must fixed to US operation channels only.
This equipment complies with FCC radiation exposure limits set forth for an uncontrolled
environment. This equipment should be installed and operated with minimum distance 20cm
between the radiator & your body. (S133408 only)
3
Digital Signage User Manual
Page 5

USA- Appliance Efficiency Compliance (S97407 only)
4
Digital Signage User Manual
Page 6

Safety Precautions
• This product is a wall-mounted device; please select the install location cautiously.
Sable will not bear any responsibility if the user does not follow the correct device installing
procedure.
• Do not drop, puncture or disassemble the device; otherwise the warranty will be voided.
• Do not remove or replace the battery. Only well trained service personnel are allowed to
disassemble/install the internal components.
• According to regulations, the device should be at a height less than 2 meters above the floor.
• Do not OTA update the device when the device is in low battery. Do not reset the device in
OTA update process.
Warranty
保固條件
1. 一般保固:保固期限內自行送修到本公司免費維修或換修之服務,更換零件以規格相等或
較高之良品為主。
2. 新品保固:於發票日起 30 日(含)硬體故障者(展示品除外)、包裝及配件完整 憑發票可更
換新品。
3. 維修保固:本公司對於維修後之產品,提供 90 天保固期,在此期間內如果同一故障原因
再發生時,消費者享有免費維修服務。
產品保固維修如有下列情形,西伯有權酌收維修費用
1. 無法證明西伯產品之保固期限或超過西伯產品之保固期限。
2. 未依操作手冊使用或非正常方式使用所致之故障毀壞。
3. 產品之毀損係受不可抗力(天災、水災、火災、地震、雷擊、颱風、蟲害等),外力破壞(液
體滲入、受潮、刮傷、摔傷、卡榫斷裂、敲打、破裂、重擊等)或其他非正常因素所致者。
4. 客戶擅自使用第三人安裝、添附、擴充、修改、修復非本公司授權或認可之零件所致之毀
壞。
5. 非本公司隨機出貨之軟體問題排除或系統重整安裝或軟體安裝等服務。
6. 客戶自行變更作業系統或因電腦病毒所致之系統毀損或解毒等。
7. 耗材例如電缐與相關配件等。
保固注意事項
1. 本公司僅負責硬體維修,不負責客戶資料之救援與保管,客戶於本公司提供維修服務前應
先儲存備用資料或為保護資料免於損壞之措施。
2. 客戶於送修前應先行移除非原廠保固範圍之配件。(如保護膜、飾品、改裝零件等。)如上
非西伯原廠配件未經移除或無法移除,西伯均不負責保管、復原或處理責任。
3. 上述產品保固說明,西伯股份有限公司保有以書面或網站修改、說明及解釋的權利。
4. 本保固說明僅適用於台灣地區(含離島)銷售之產品。
5
Digital Signage User Manual
Page 7
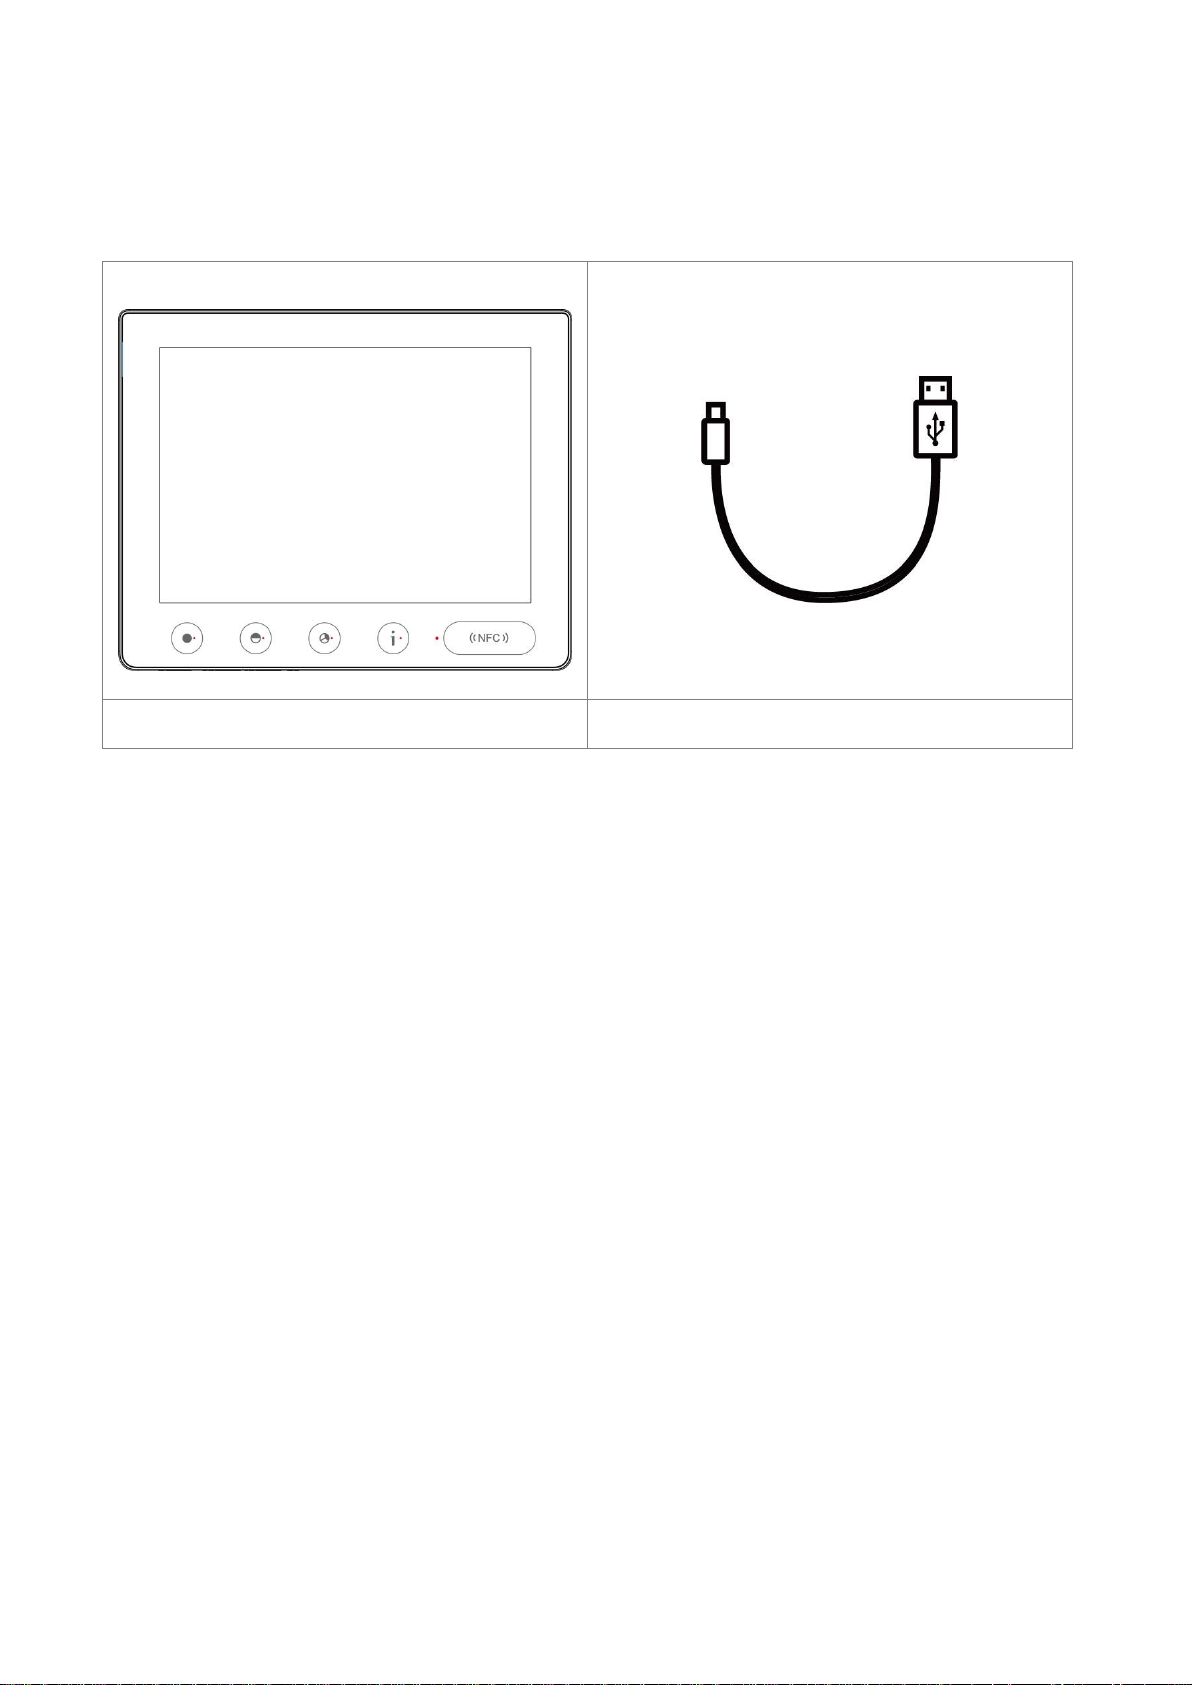
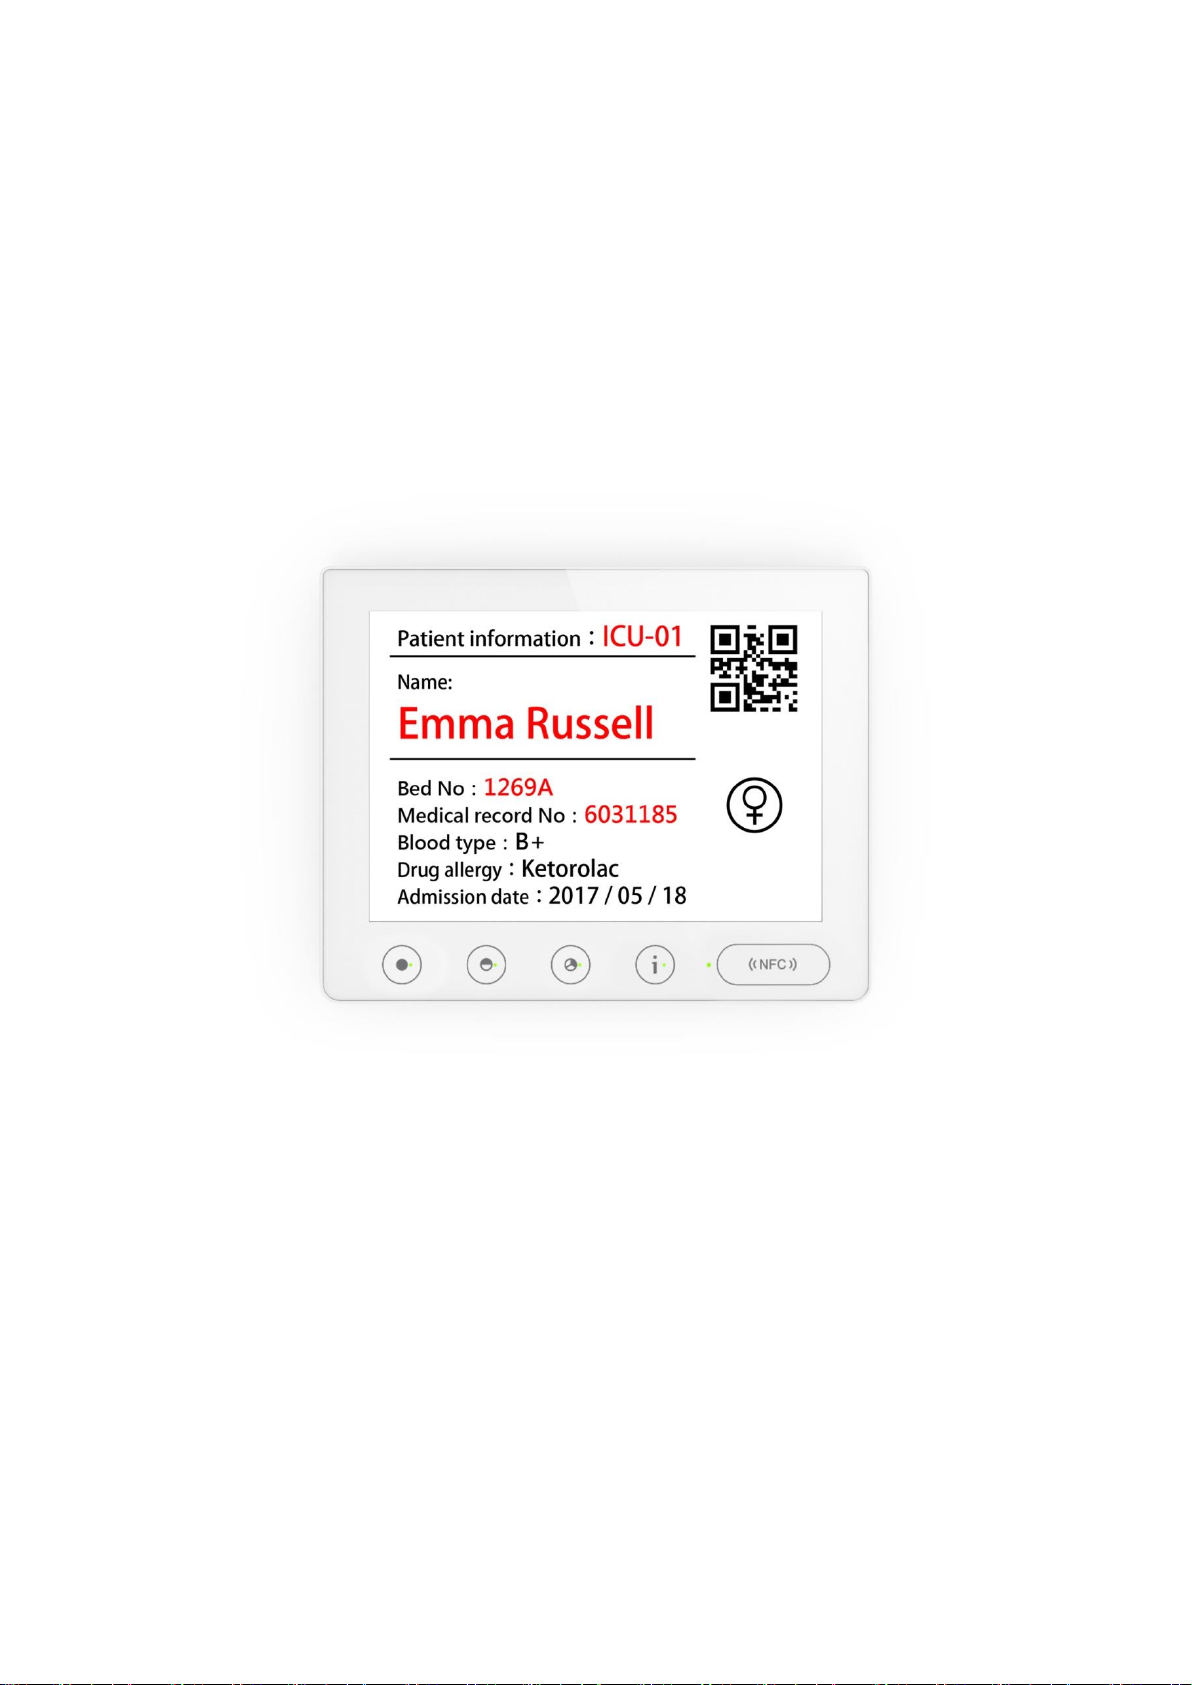
1. Product Introduction
Digital Signage
USB Cable
1.1 Package Content
6
Digital Signage User Manual
Page 8
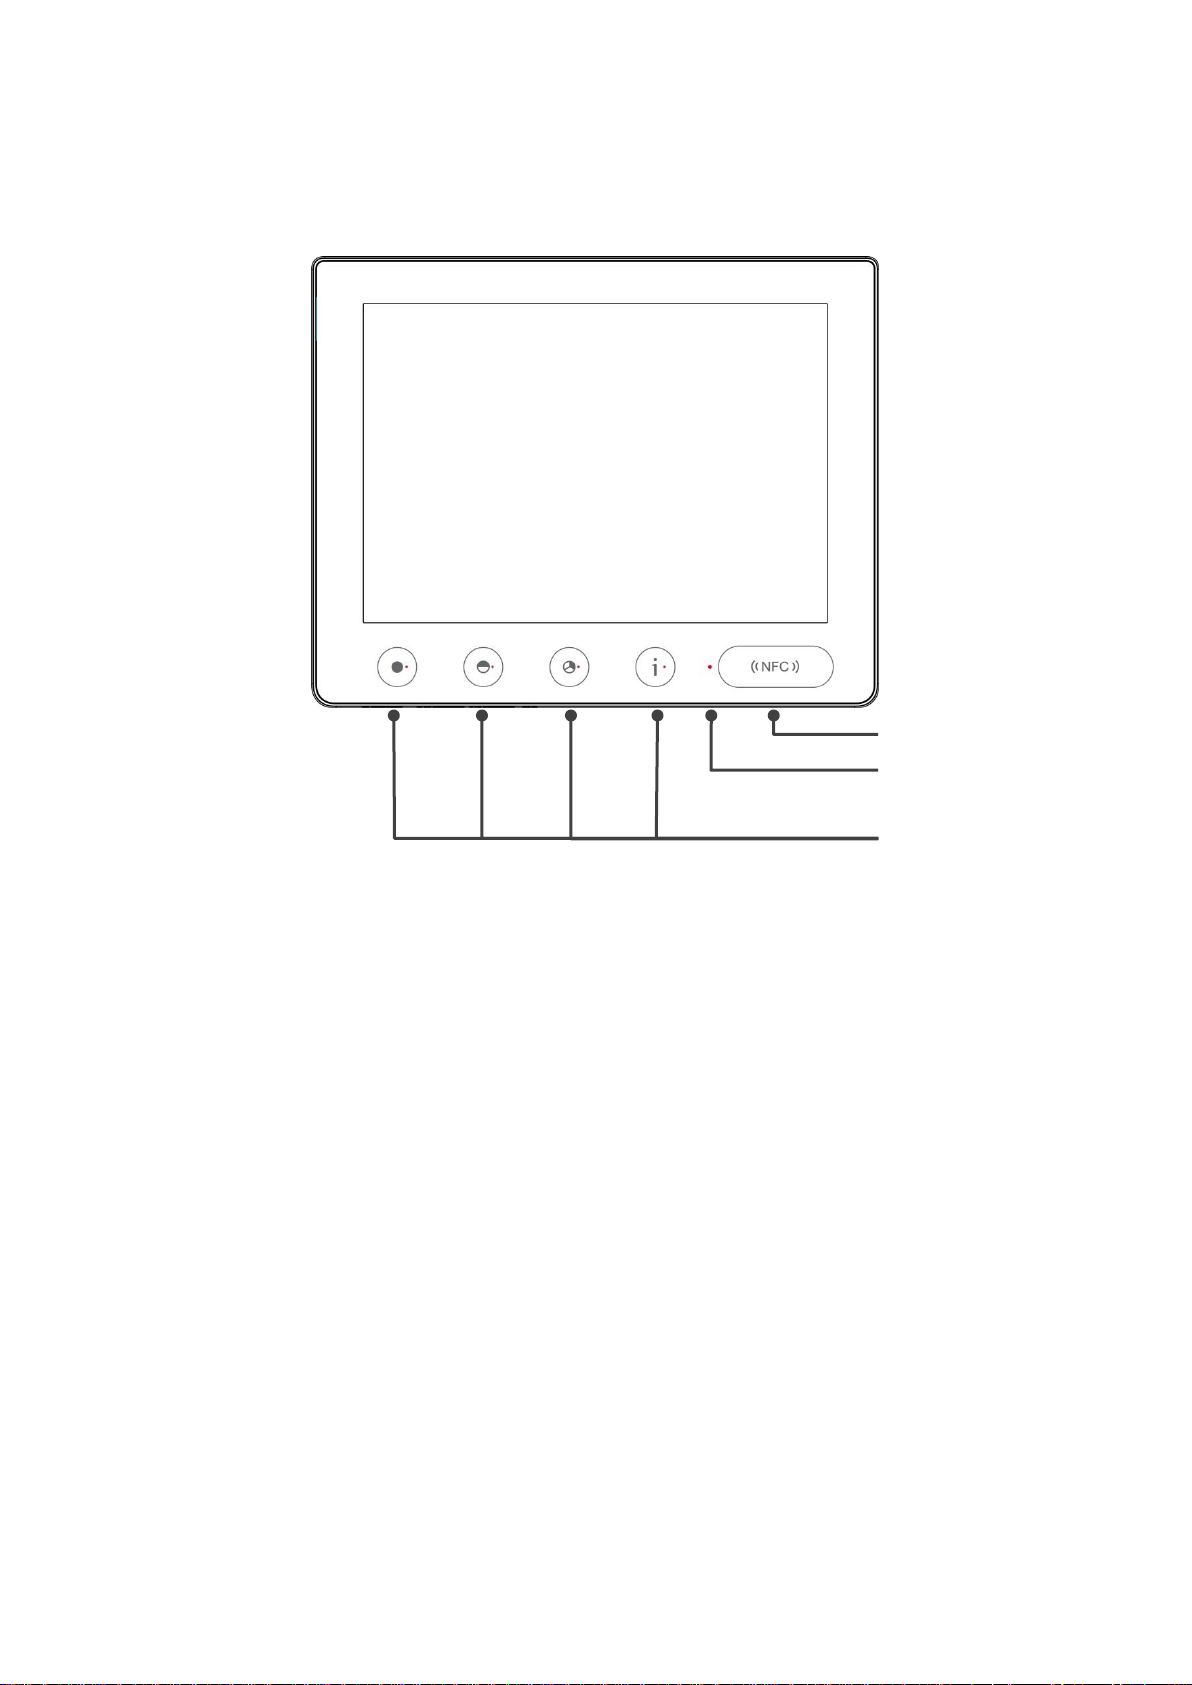
1.2 Overview
NFC Sensing Area
Power (white) LED/
Charging (red) LED
Function button
(Defined by customer)
1.2.1 Front View
※ According to OEM, the function keys are divided into two types.:
• Normal key (Behavior defined by customer)
• NFC Sensing Area
7
Digital Signage User Manual
Page 9
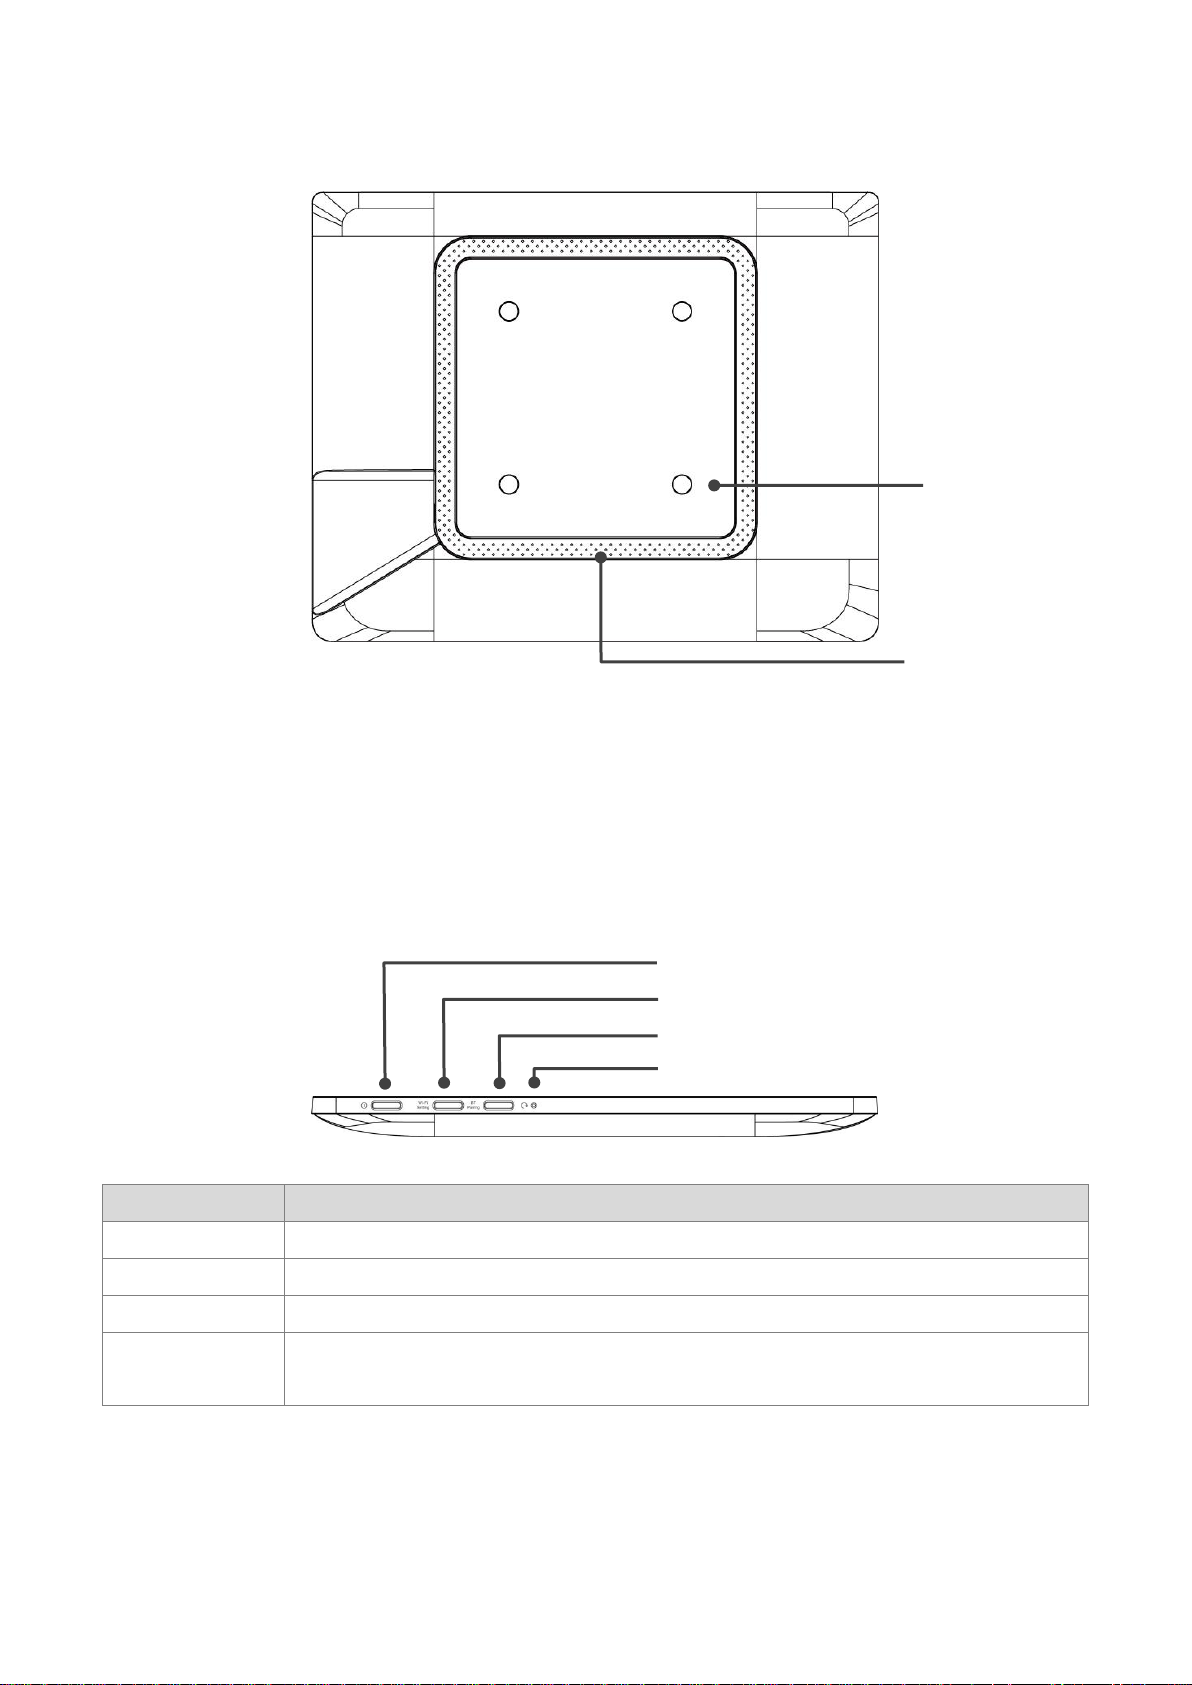
1.2.2 Rear View
Key Type
Description
Power button
Hold the power button for 5 seconds to turn on or turn off the device
Wi-Fi Setting
Press to trigger Bluetooth for Wi-Fi setting
BT Pairing
Bluetooth Pairing key + Reset, device enter USB config mode
Reset
Insert a stretched paperclip or a small pin into the hole and press it for a few
seconds to reset the device
Buzzer
Power button
Wi-Fi Setting
Bluetooth Pairing
Reset
Screw hole
※ The screw size of VESA Mount is used M4*5.5mm (size of screw hole).
If you add a Washer/screw washer, please adjust the screw length.
※ According to regulations, the device should be at a height less than 2 meters above the floor.
1.2.3 Bottom View
8
Digital Signage User Manual
Page 10

1.2.4 Right View
Micro USB Port
9
Digital Signage User Manual
Page 11

1.3 Connected information
Data Name
Description
SSID
Device will connect to Wi-Fi AP’s name
(ex: ntxdemos)
Password
Device will connect to Wi-Fi AP’s password
(ex: 1234567890)
Server link
Device will send request/response to this server for getting/
reporting data
(ex: http://nws.netronixinc.com:9090/ntxcmd)
OEM JSON file
Device setting config in BOOT process
Background image link
It’s an image which be updated to device when boot/polling process
WiFi config setting tool
Offer two way for setting up:
1. APP Setting by cellphone (BLE WiFiconfig app)
2. USB Setting tool (USB WiFiconfig tool)
Below table will list all data which should be prepared in advance.
1.4 Charging the battery
Connect the micro USB cable to the USB adapter (not included), then insert the USB adapter into a
power outlet to charge digital signage device.
10
Digital Signage User Manual
Page 12

2. Architecture diagram
http(s) protocol
/ OTA update
Server
Pair Setting
or
Please executing「Device Pairing setup」to complete product creation.
Please reference 4. Pair Setting
The device performs JSON file and Polling transmission with the server through the http(s) protocol,
or updates through OTA.
11
Digital Signage User Manual
Page 13

3. Software Design
3.1 Image format
The original format required for the image is as follows:
• Full size
• 9.7”: 1200(W)X825(H)
• 13.3”:1600(W) X 1200(H)
3.2 Redraw setting
The screen redraw is defined according to the server and can be adjusted according to different
needs.
• The default is every 60 seconds redraw the screen.
• Within 5 seconds before/ after drawing and in drawing process, the system is busy and does
not accept any command, so pressing the button will not respond.
• The timeout time of the button function is preset to 8 seconds. If the time is exceeded, the
system will cancel the action, please re-operate.
12
Digital Signage User Manual
Page 14

4. Pair Setting
There are two ways to set up Wi-Fi config:
• APP Setting by cellphone (BLE WiFiconfig app)
• USB Setting tool (USB WiFiconfig tool)
4.1 APP Setting by cellphone (BLE WiFiConfig app)
Step 1. Please save the android_BleWifiConfig APK file to your cellphone.
(Suggestion: please store the APK in the download folder)
Clicking the APK file will automatically complete the installation.
13
Digital Signage User Manual
Page 15

Step 2. After completing installation, open the BleWificonfig app and check the app is the latest
version.
Click [About] on upper-right corner, it will show about app information.
Step 3. Click [SSID] field and key in SSID name.
14
Digital Signage User Manual
Page 16
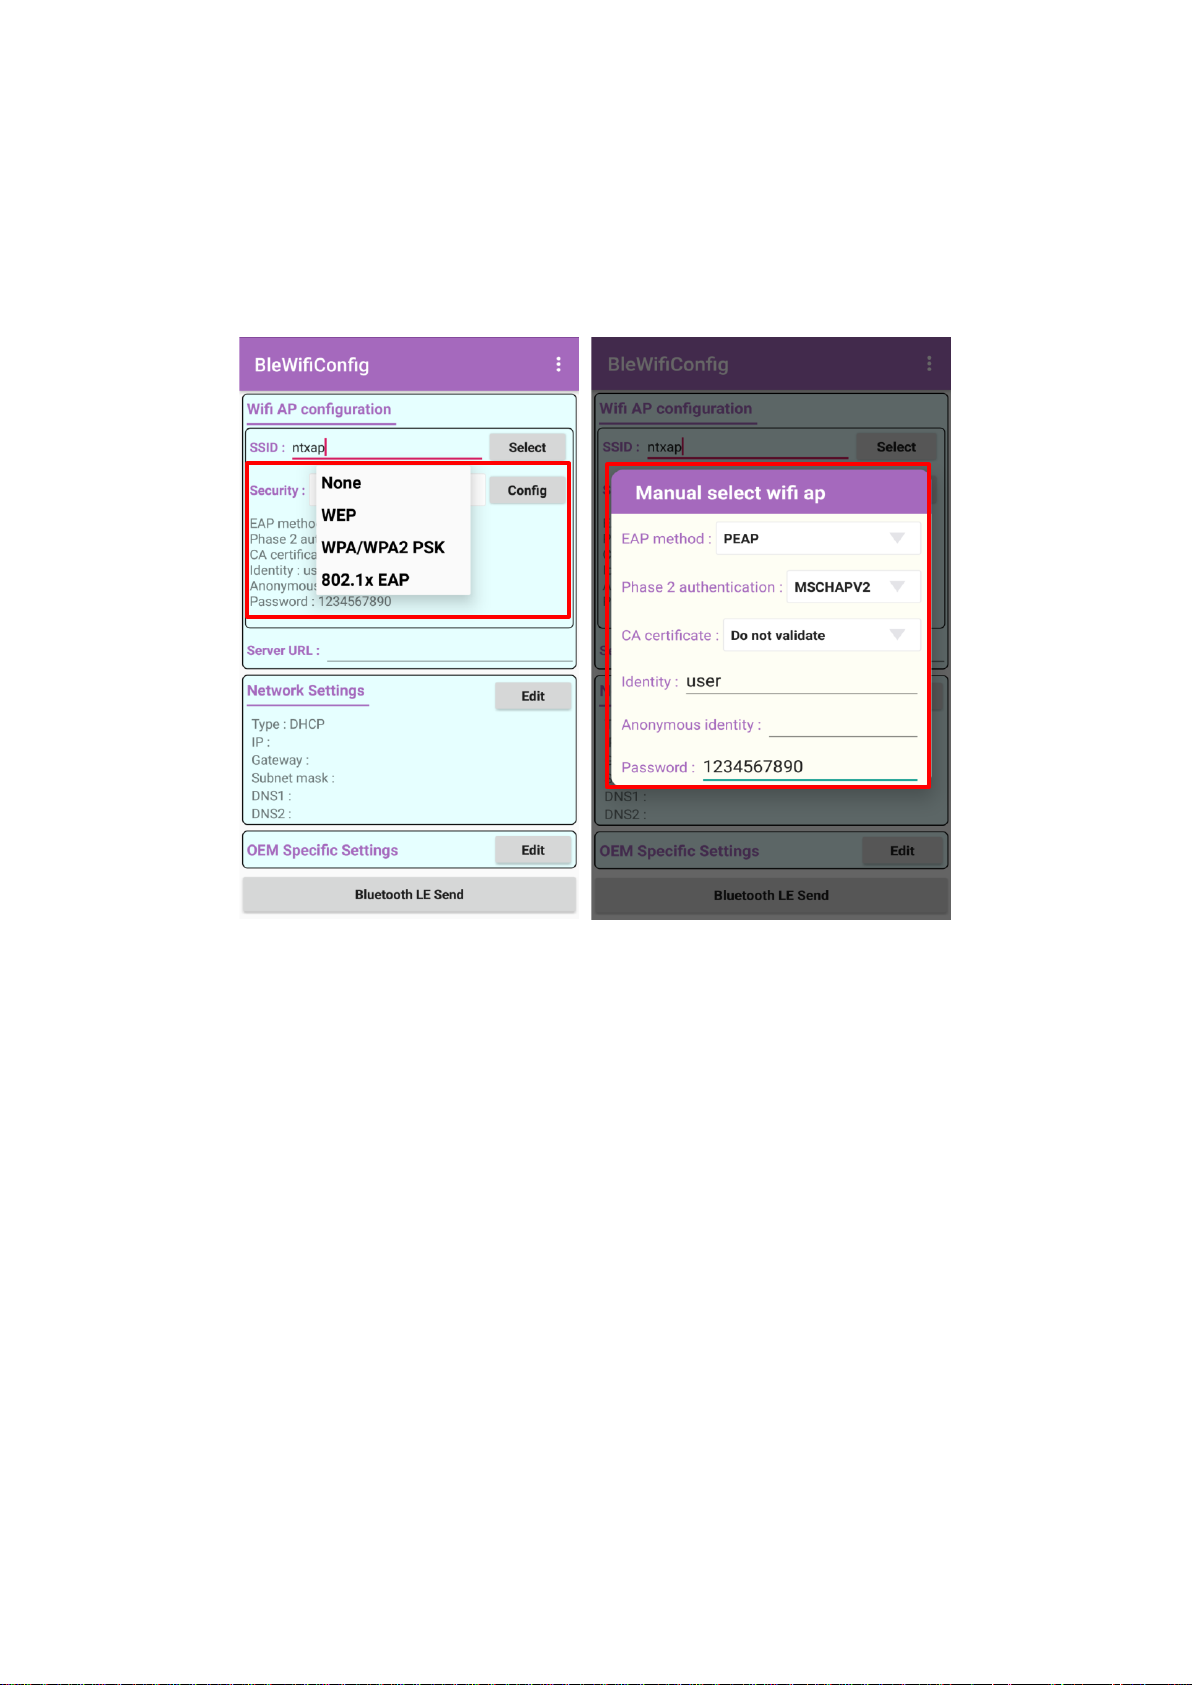
Step 4. Select [Security] type, support 4 security mode
1. None
2. WEP
3. WPA/WPA2 PSK
4. 802.1x EAP
Click [Config], according to the different security type fill up data.
15
Digital Signage User Manual
Page 17

Step 5. Fill up [Server URL]
Step 6. Network Settings
Click [Edit], choose use DHCP or Static IP
16
Digital Signage User Manual
Page 18

Step 7. OEM Specific Setting field
Power
Wi-Fi Setting
Click [Edit], input JSON file URL.
Step 8. Turn on the device
Power on device (press 5 second) and wait for LED (white) turn off.
17
Digital Signage User Manual
Page 19

Step 9. Press [Wi-Fi Setting], will be displayed BLE mac address on the screen.
Step 10. In APP, Click [Bluetooth LE Send], start to scan devices.
After scan timeout, it will show all devices list.
Choose which one you want to connect and do config.
18
Digital Signage User Manual
Page 20

Step 11. Wait for Bluetooth connecting and sending data to device.
Power
It will show result on pop-up window.
Step 12. After successfully connecting Bluetooth, please reset the device.
19
Digital Signage User Manual
Page 21

4.2 USB Setting Tool (USB WiFiconfig tool)
BT Pairing
Reset
Step 1. Please make sure the device connected to PC or NB by USB.
Press [BT Pairing] button then Insert a stretched paperclip or a small pin into the [Reset]
hole in the same time. Four LEDs will blink twice, device enter the Wi-Fi config mode by
USB.
20
Digital Signage User Manual
Page 22

Step 2. Open Wi-Fi config tool execute, the top of window will show the version.
Step 3. Fill up all fields which users want to setting. After finished it, press [Program] to generate
tmp.bin.
21
Digital Signage User Manual
Page 23

Step 4. Executed go.bat to write Wi-Fi config file to device.
Step 5. After completing the above steps, please reset the device.
Note: If the pairing setting failed, maybe USB transfer have a problem. Please re-plug the USB and
repeat the above steps.
22
Digital Signage User Manual
Page 24

5. Installation Step
Power
After executing Wi-Fi Config setting steps, it indicates that the device connection settings have
been completed. The device can be used, and the operation steps are as follows.
Step 1. Press [Power] key 5 seconds to turn on the device.
Step 2. Wait for the LED (white) go out.
Step 3. The screen will display the logo image.
23
Digital Signage User Manual
Page 25

Step 4. Show connection result
(1) The following is AP connection success, please skip to Step 5.
(2) The following is Wi-Fi AP connect fail, please skip to Step 6.
24
Digital Signage User Manual
Page 26

Step 5. Device will download OEM JSON file, if result is successful
(1) Download JSON successfully, it will show background image. Then, installation steps
finished.
(2) Download JSON fail, it will show error in the bottom screen. Please reference to Step
6.
25
Digital Signage User Manual
Page 27

Step 6. Error message list
Error Message Type
Description/ Solution
Wi-Fi AP connect fail
The device can’t connect to Wi-Fi AP, please check:
1. SSID/ Password
2. AP Setting
UI-JSON file download fail
There are 2 reasons:
1. Download JSON file fail, please check the JSON file
format
2. JSON file format isn’t correct, please check the input
value
Mcuver rsp fail
Send device version to server fail, please check the server
Reboot=0&updatelevel=? Rep fail
The device doesn’t receive update level response, please
check the server
Low battery
The device is low battery now and shutdown immediately
In BOOT or POLLING flow, device could has some error situation, below list all of error
message which showed in screen.
26
Digital Signage User Manual
Page 28

6. OTA Update
Device on below status will check whether do OTA:
• Power on
• Polling response
Note:
1. Do not OTA update the device when the device is in low battery.
2. Do not reset the device in OTA update process.
27
Digital Signage User Manual
Page 29

7. Specification
Item
S97407
S133408
Display
9.7 inch Electronic Paper Display
13.3 inch Electronic Paper Display
Resolution: 1200 x 825 pixels
Resolution: 1600 x 1200pixels
Color: Black/White/Red Color
Color: Black/White/Red Color
Case Color
White
White
LED
Status LED
*2 Single LED, Color: Red*1/
White*1
*2 Single LED, Color: Red*1/
White*1
Function LED
*4 LEDs, Color: Red.
*4 LEDs, Color: Red.
Flash
Flash
8MB
16MB
Connection
WiFi
2.4GHz IEEE 802.11 b/g/n
2.4GHz IEEE 802.11 b/g/n
BLE
Bluetooth Low Energy (BLE) 4.0
Bluetooth Low Energy (BLE) 4.0
Zigbee
2.4GHz
N/A
NFC
NFC Reader
Support read the Card ID only
without cryptography key, and No
support NFC security
NFC Reader
Support read the Card ID only
without cryptography key, and No
support NFC security
Buzzer
*1, for NFC reader
*1, for NFC reader
Interface
Micro USB Slot
*1, Charging only, No support
data transferring
*1, Charging only, No support
data transferring
Control
Buttons
Power Key
*1, Press to power on/off
*1, Press to power on/off
WiFi setting Key
*1, Press to trigger Bluetooth for
Wi-Fi setting
*1, Press to trigger Bluetooth for
Wi-Fi setting
BT Pairing Key
*1, To be defined
*1, To be defined
Reset Hole
*1, Reset button
*1, Reset button
Function Buttons
*4 Buttons
*4 Buttons
Battery
Li-ion Polymer Battery 3.8V with
3,035mAh
Li-ion Polymer Battery 3.8V with
3,035mAh
Power Supply
Charging by USB cable
Charging by USB cable
Mounting Interface
Support 75x75mm VESA mount
No including VESA mount package
kit and screws
Support 75x75mm VESA mount
No including VESA mount package
kit and screws
Accessory
USB Cable
*1, 1 meter
*1, 1 meter
Operating temperature
10°C ~ 40°C
10°C ~ 40°C
Dimension (W*H*D)
247.3*196.5*17.7mm
318.74*257.88*19.7mm
Weight
515g
TBD
28
Digital Signage User Manual
 Loading...