

Page 1

NG-188 User Manual
NG-188 User Manual
1 / 46
Page 2

NG-188 User Manual
1 NG-188 Features..................................................................................................4
1.1 Appearance.................................................................................................................4
1.2 Interface.......................................................................................................................4
1.3 Electricity characteristic.............................................................................................4
1.4 Software.......................................................................................................................5
1.5 Standard and Protocols.............................................................................................5
1.6 Compliant Standards..................................................................................................6
1.7 Operating requirement...............................................................................................6
1.8 Package.......................................................................................................................6
1.9 Installation....................................................................................................................7
2 Web Configuration ...............................................................................................8
2.1 Access Web setting page..........................................................................................8
2.2 Current state................................................................................................................9
2.3 Network......................................................................................................................10
2.3.1 Wan Config......................................................................................... 10
2.3.2 LAN Config......................................................................................... 11
2.4 VoIP ............................................................................................................................12
2.4.1 SIP Config................................................................................................ 12
2.4.2 Iax2 Config............................................................................................... 13
2.5 Advance.....................................................................................................................15
2.5.1 DHCP Server...................................................................................... 15
2.5.2 NAT .................................................................................................... 16
2.5.3 Net Service......................................................................................... 17
2.5.4 Firewall settings.................................................................................. 18
2.5.5 QoS settings....................................................................................... 20
2.5.6 Advance SIP settings ......................................................................... 22
2.5.7 Digital Map.......................................................................................... 24
2.5.8 Call Service Settings .......................................................................... 25
2.5.9 MMI Filter ........................................................................................... 27
2.5.10 Audio Settings .................................................................................... 28
2 / 46
Page 3

NG-188 User Manual
2.5.11 VPN .................................................................................................... 28
2.6 Dial-Peer Settings .......................................................................................................30
2.7 Config Manage..........................................................................................................31
2.8 Update........................................................................................................................32
2.9 System Manage........................................................................................................35
2.9.1 Account Manage................................................................................. 35
2.9.2 Phone Book:....................................................................................... 35
2.9.3 Syslog Config:.......................................................................................... 35
2.9.4 Time Set:.................................................................................................. 36
2.9.3 Reboot:............................................................................................... 36
3 Use normal phone to pre-configure NG-188 gateway..................................37
4 Telnet Console....................................................................................................38
4.1 Introduce....................................................................................................................38
4.2 Global Command......................................................................................................39
5 Tree Structure.....................................................................................................40
6 Network Diagnosis.............................................................................................41
7 Restore to factory default..................................................................................41
8 POST Mode(safe mode)...................................................................................42
9 FAQ.......................................................................................................................43
How many SIP servers may NG-188 register simultaneously?.....................................43
How can I know the NG-188’s IP address?......................................................................43
How to use NG-188’s Lifeline function?............................................................................ 43
Why the settings vanish after reboot?...............................................................................43
How to use the dial rule?.....................................................................................................43
How to use speed dial function?........................................................................................45
How to configure digital map?............................................................................................45
How to use Call Forward, Call Transfer and 3-way Conference calls?........................45
3 / 46
Page 4
NG-188 User Manual
1 NG-188 Features
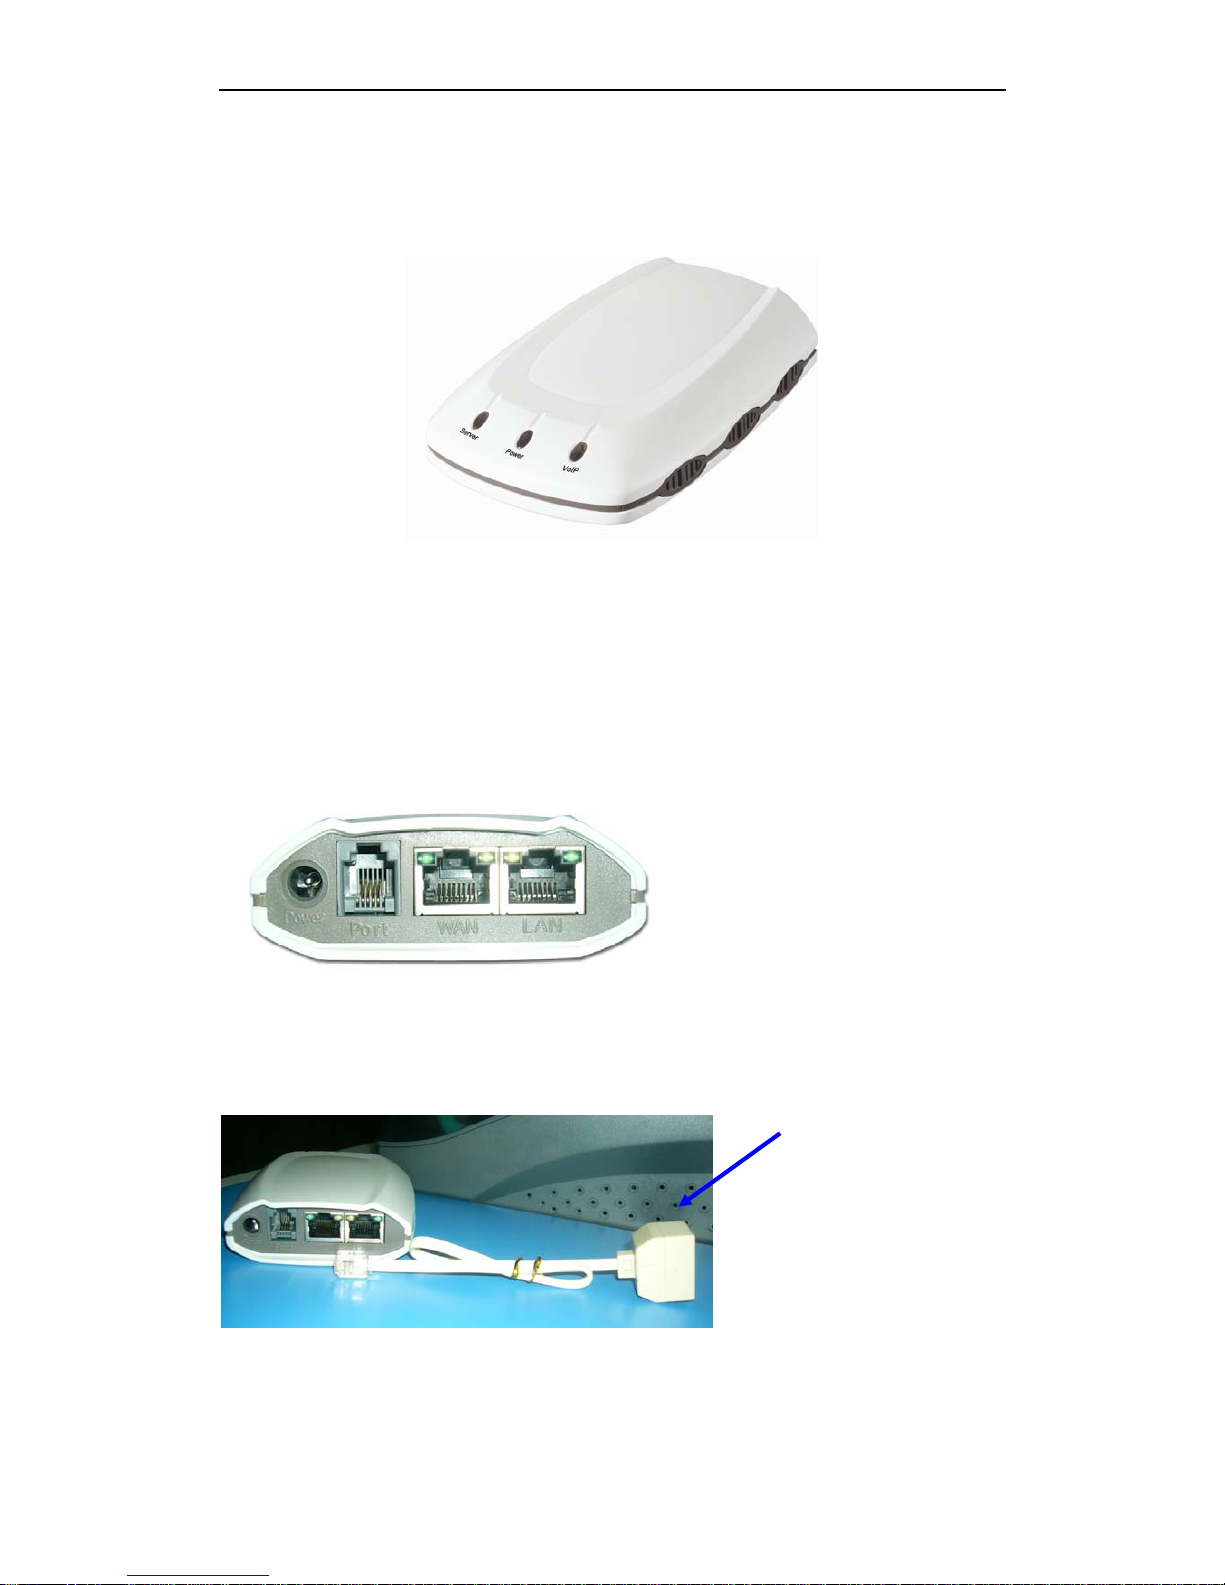
1.1 Appearance
Power: Power indicator.
Server: Server indicator. Registered: ON; Registering: Blinking; Do not register: OFF.
VoIP: Indicate the calling status. Hook-on: OFF; Hook-off and in VoIP state: ON; Hook-off
and in PSTN state: OFF
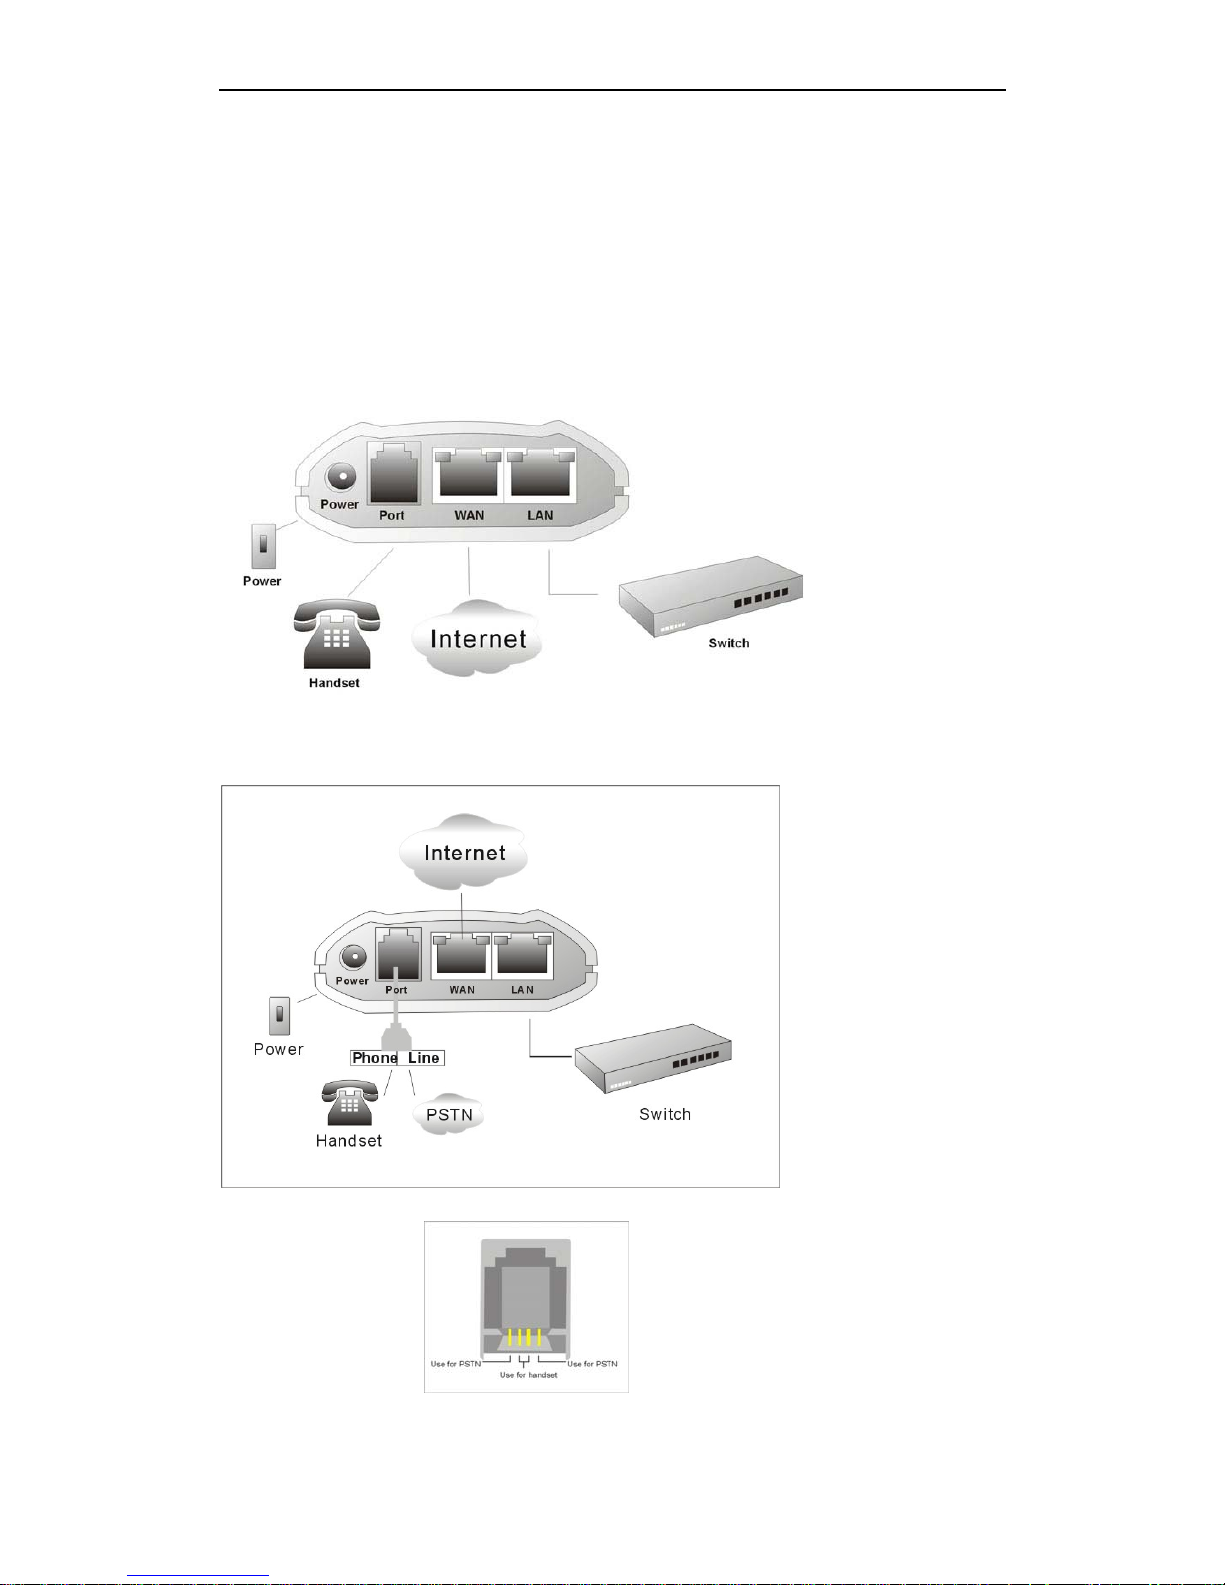
1.2 Interface
Power: Output Power:12VDC,500mA.
Port: RJ11 port. Connect to handset or the Lifeline accessory.
WAN: RJ45 port.
LAN: RJ45 port.
Lifeline accessory
1.3 Electricity characteristic
z Speciality of electric: output the 12V 500mA DC
4 / 46
Page 5

NG-188 User Manual
z The network connects:2 RJ45 connect, a WAN, a LAN
z One Liftline
1.4 Software
z Support two sip servers running at the same time.
z Back-up sip server support.
z NAT, Firewall.
z DHCP client and server.
z Support PPPoE, (used for ADSL, cable modem connecting).
z Support major G7.xxx CODEC.
z VAD,CNG.
z G.168 compliant 32ms echo cancellation
z Tone generation and Local DTMF re-generation according with ITU-T
z E.164 dial plan and customized dial rules
z Support Lifeline.
z Hotline.
z Speed Dial
z Call Forward, Call Transfer, 3-way conference calls
z Caller ID display
z DND(Do Not Disturb),Black List,Limit List
z Upgrade firmware through FTP or HTTP.
z Web management.
z Reverse polarity
z Telnet remote management.
z Voice prompt
z adjustable user password and super password
1.5 Standard and Protocols
z IEEE 802.3 /802.3 u 10 Base T / 100Base TX
z PPPoE: PPP Protocol over Ethernet
z DHCP Client and Server: Dynamic Host Configuration Protocol
z G.711 u/a; G729 audio Codec
z SIP RFC3261, RFC 2543
z IAX2
z TCP/IP: Internet transfer and control protocol
5 / 46
Page 6

NG-188 User Manual
z RTP: Real-time Transport Protocol
z RTCP: Real-time Control Protocol
z VAD/CNG save bandwidth
z Telnet: Internet's remote login protocol
z DNS: Domain Name Server
z TFTP: Trivial File Transfer Protocol
z HTTP: Hyper Text Transfer protocol
z FTP: File Transfer protocol
z RFC 3362:T.38 protocol
1.6 Compliant Standards
● CE: EN55022, EN55044
● FCC part 15
● RoHS
1.7 Operating requirement
● Operation temperature: 0 to 40° C (32° to 104° F)
● Storage temperature: -30° to 65° C (-22° to 149° F)
● Humidity: 10 to 90% no dew
1.8 Package
z Size 128 x 85 x 30 mm
z Packing List
9 NG-188 gateway
9 Power adaptor (12v, 500mA)
9 Manual CD
9 Lifeline accessory (option)
6 / 46
Page 7
NG-188 User Manual
1.9 Installation
Use Ethernet cable to connect NG-188’s LAN port and your computer. Set your
computer’s ip to the network 192.168.10.x or using dynamic obtain IP. Open your web
browser and key in 192.168.10.1. Then you will see the logon page of NG-188, the default
username and password is admin/admin for administrator and guest/guest for guest.
Set up page for VoIP use only:
Set up page for Lifeline support:
Port illustration:
7 / 46
Page 8
NG-188 User Manual
2 Web Configuration
2.1 Access Web setting page
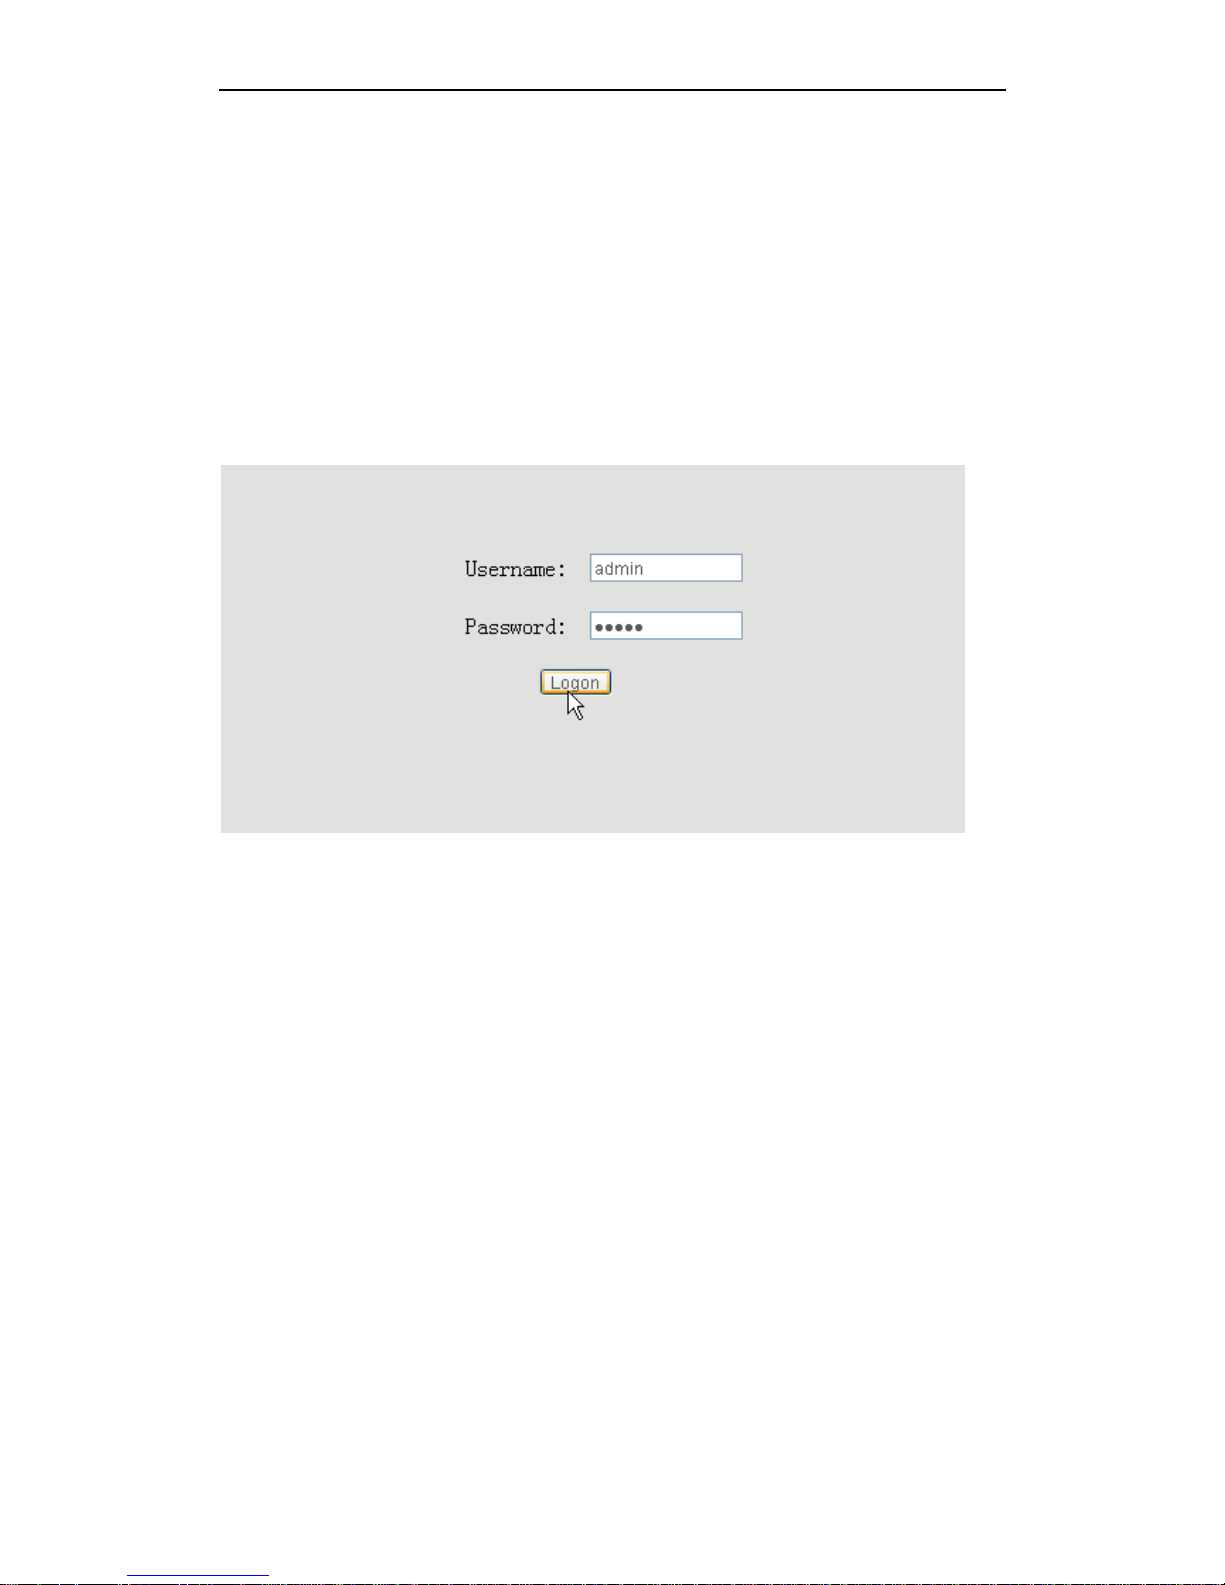
Enter NG-188 IP address in the web browser and press ENTER to go to the log on page,
and key in the username and password to access NG-188 setting page.
Default username and password is:
Administrator: Username: admin password: admin
User: Username: guest Username: guest
8 / 46
Page 9
NG-188 User Manual
2.2 Current state
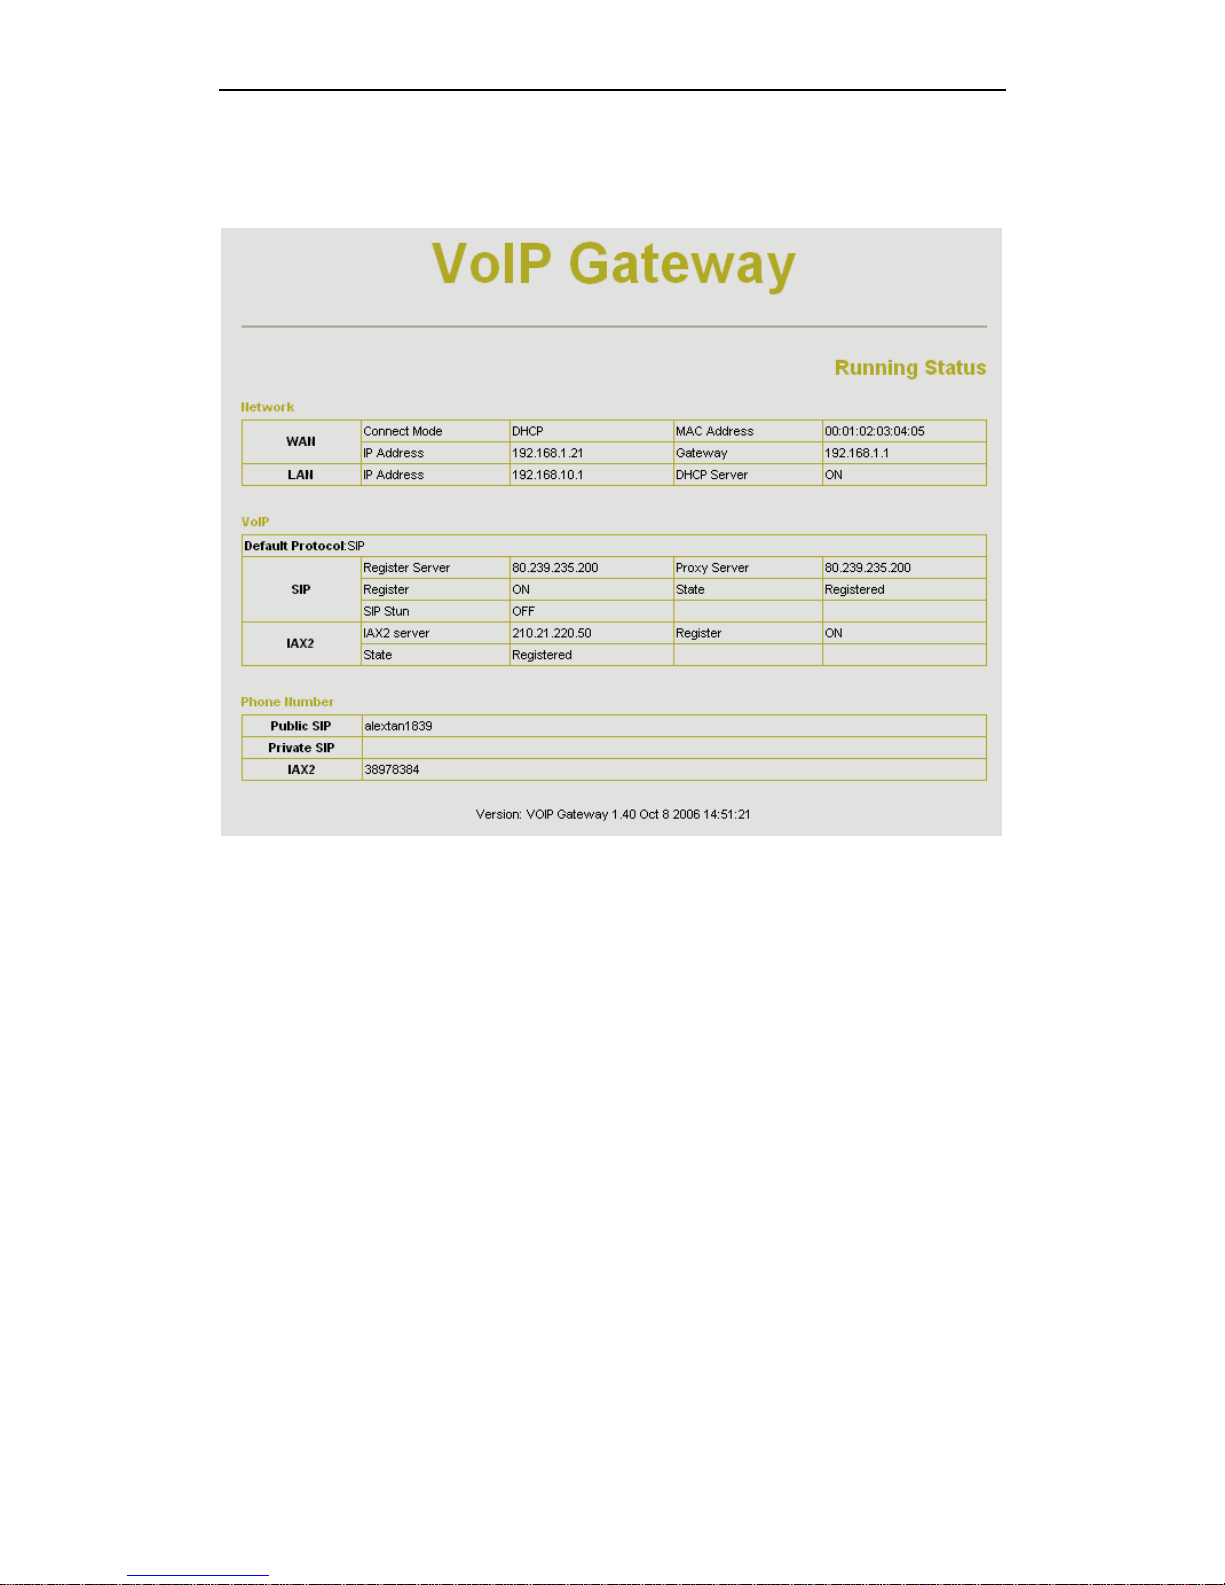
This page shows NG-188’s running state.
Network :shows the WAN and LAN port connecting state and current settings.
VoIP: show the default protocol, the working state of SIP and IAX2, you can see whether
NG-188 has registered the public sip server and IAX2 server.
Phone Number shows the public sip server、 the private sip server and the IAX2 server
phone numbers.
9 / 46
Page 10
NG-188 User Manual
2.3 Network
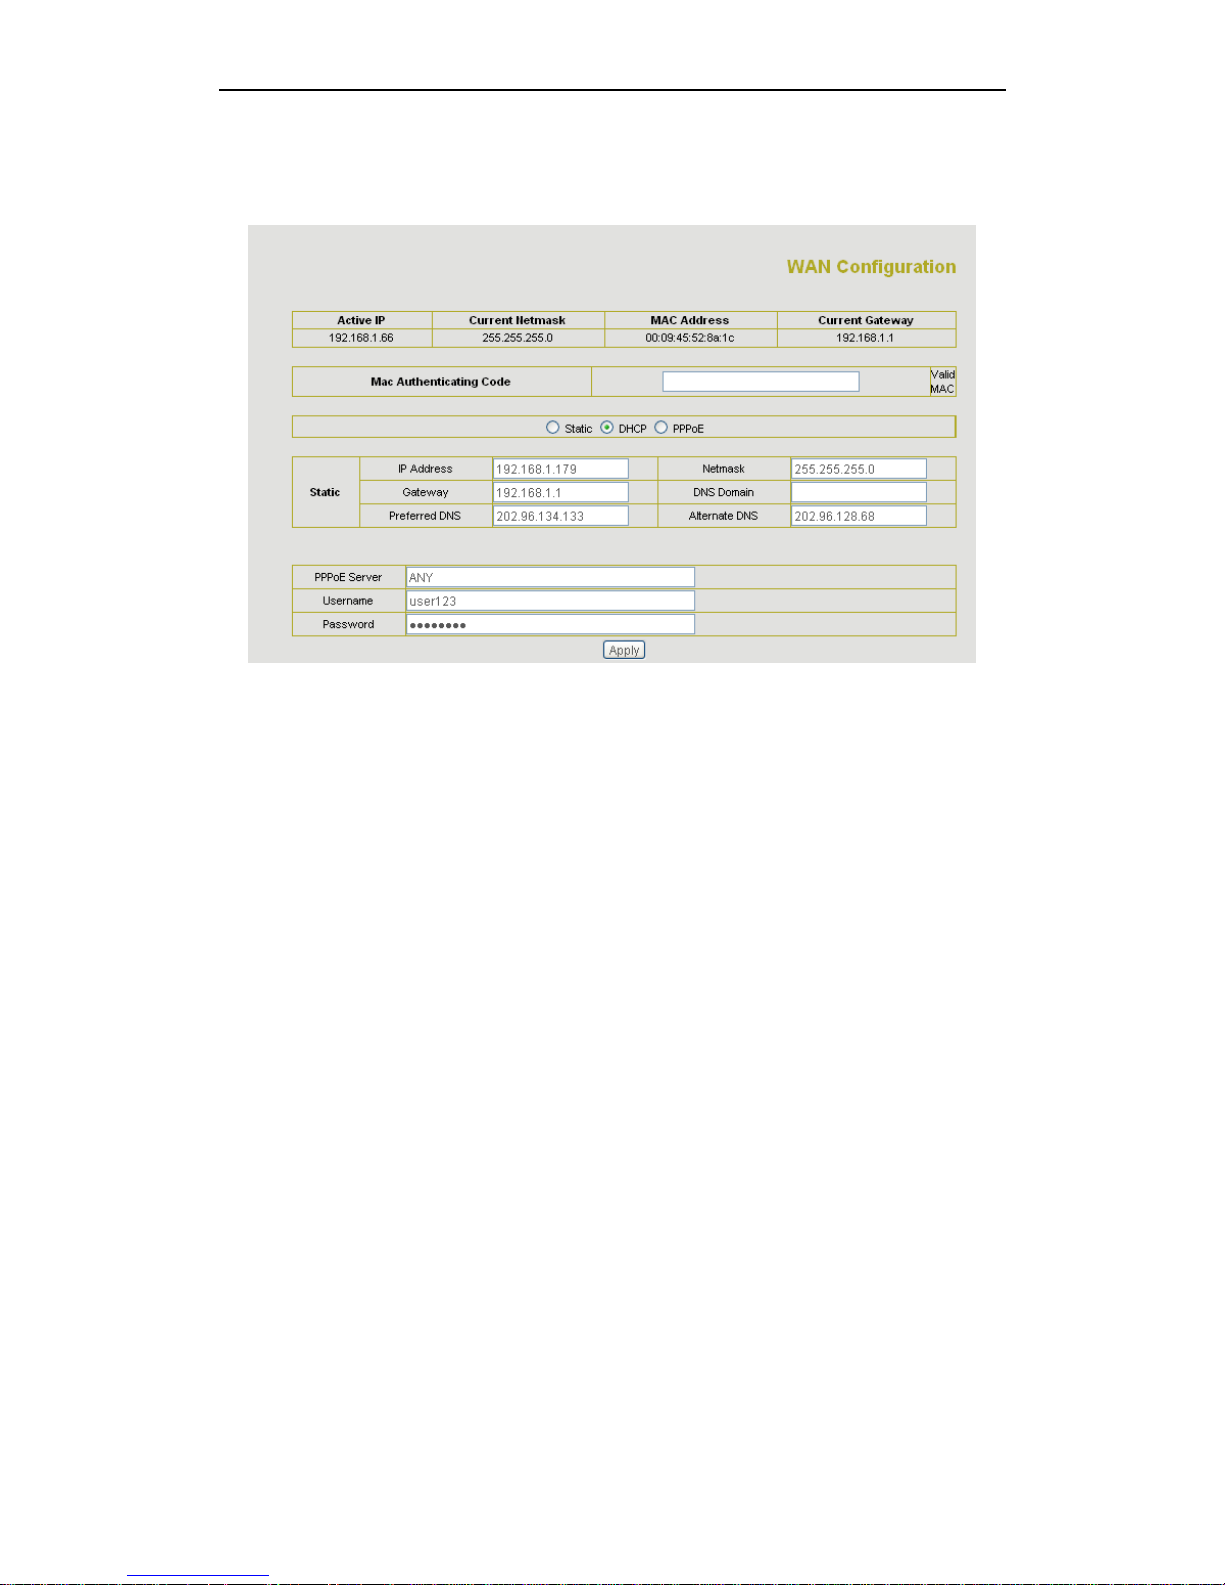
2.3.1 Wan Config
WAN port network setting page.
Support static IP, dynamic obtain IP and PPPoE.
Configure Static IP:
----Enable Static;
----Set NG-188’s IP address in the IP Address;
----Set net mask in the Net mask field;
----Set router IP address in the Gateway;
----DNS Domain:
----Set local DNS server in the Preferred DNS and the Alternate DNS
Configure to dynamic obtain IP
----Enable DHCP;
If there is DHCP server in your local network, NG-188 will automatically obtain WAN
port network information from your DHCP server.
Configure PPPoE:
----Enable PPPoE
----PPPoE server: Enter “ANY” if no specified from your ITSP.
----Enter PPPoE username and pin in the username and password.
NG-188 will automatically obtain WAN port network information from your ITSP if
PPPoE setting and the setup are correct.
Notice: If user accesses the gateway through WAN port. He should use the new IP
address to access the gateway when the WAN port address was changed.
10 / 46
Page 11
NG-188 User Manual
2.3.2 LAN Con f ig
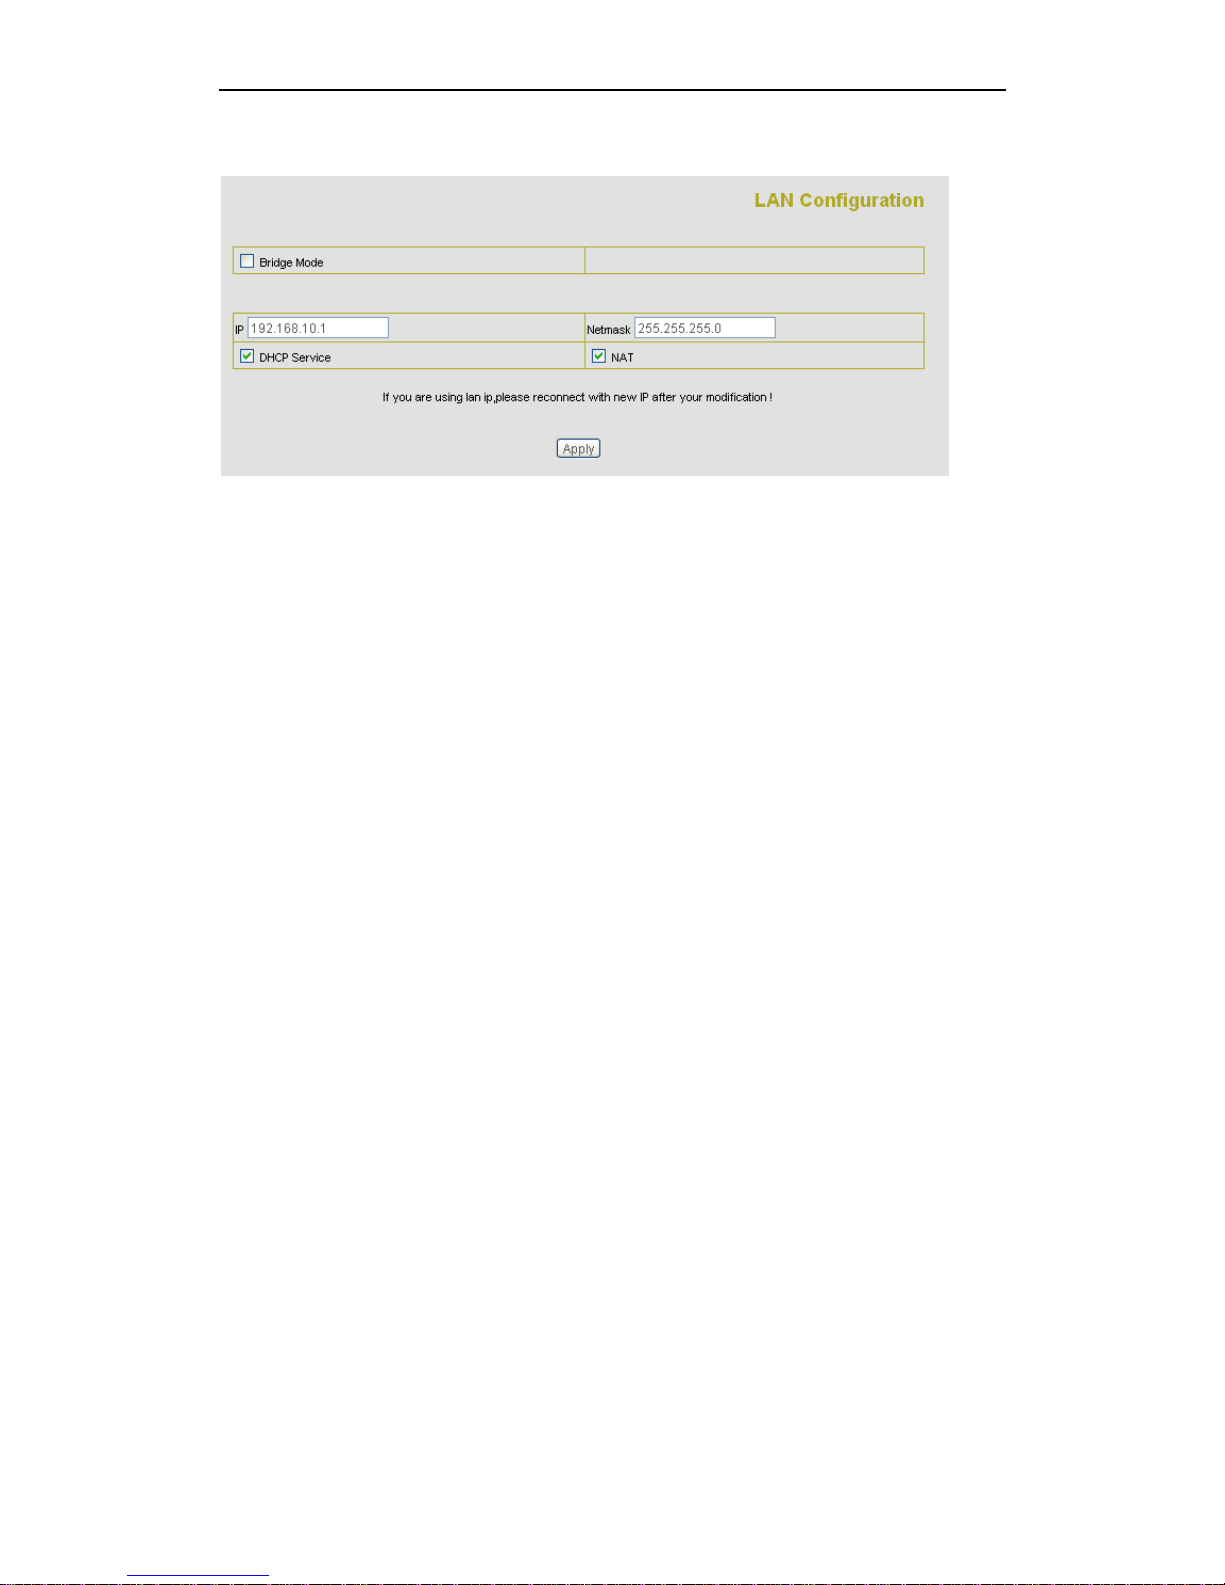
Bridge Mode: Enable this option to switch to bridge mode. Gateway won’t assign IP
for its LAN port in bridge mode and its LAN and WAN port will be in the same network.
(This setting won’t take effect unless you save the config and reboot the device)
IP Netmask: Set the IP and Netmask for the LAN
DHCP Server: Enable DHCP service in LAN port
NAT: Enable NAT.
11 / 46
Page 12
NG-188 User Manual
2.4 VoIP
2.4.1 SIP Config
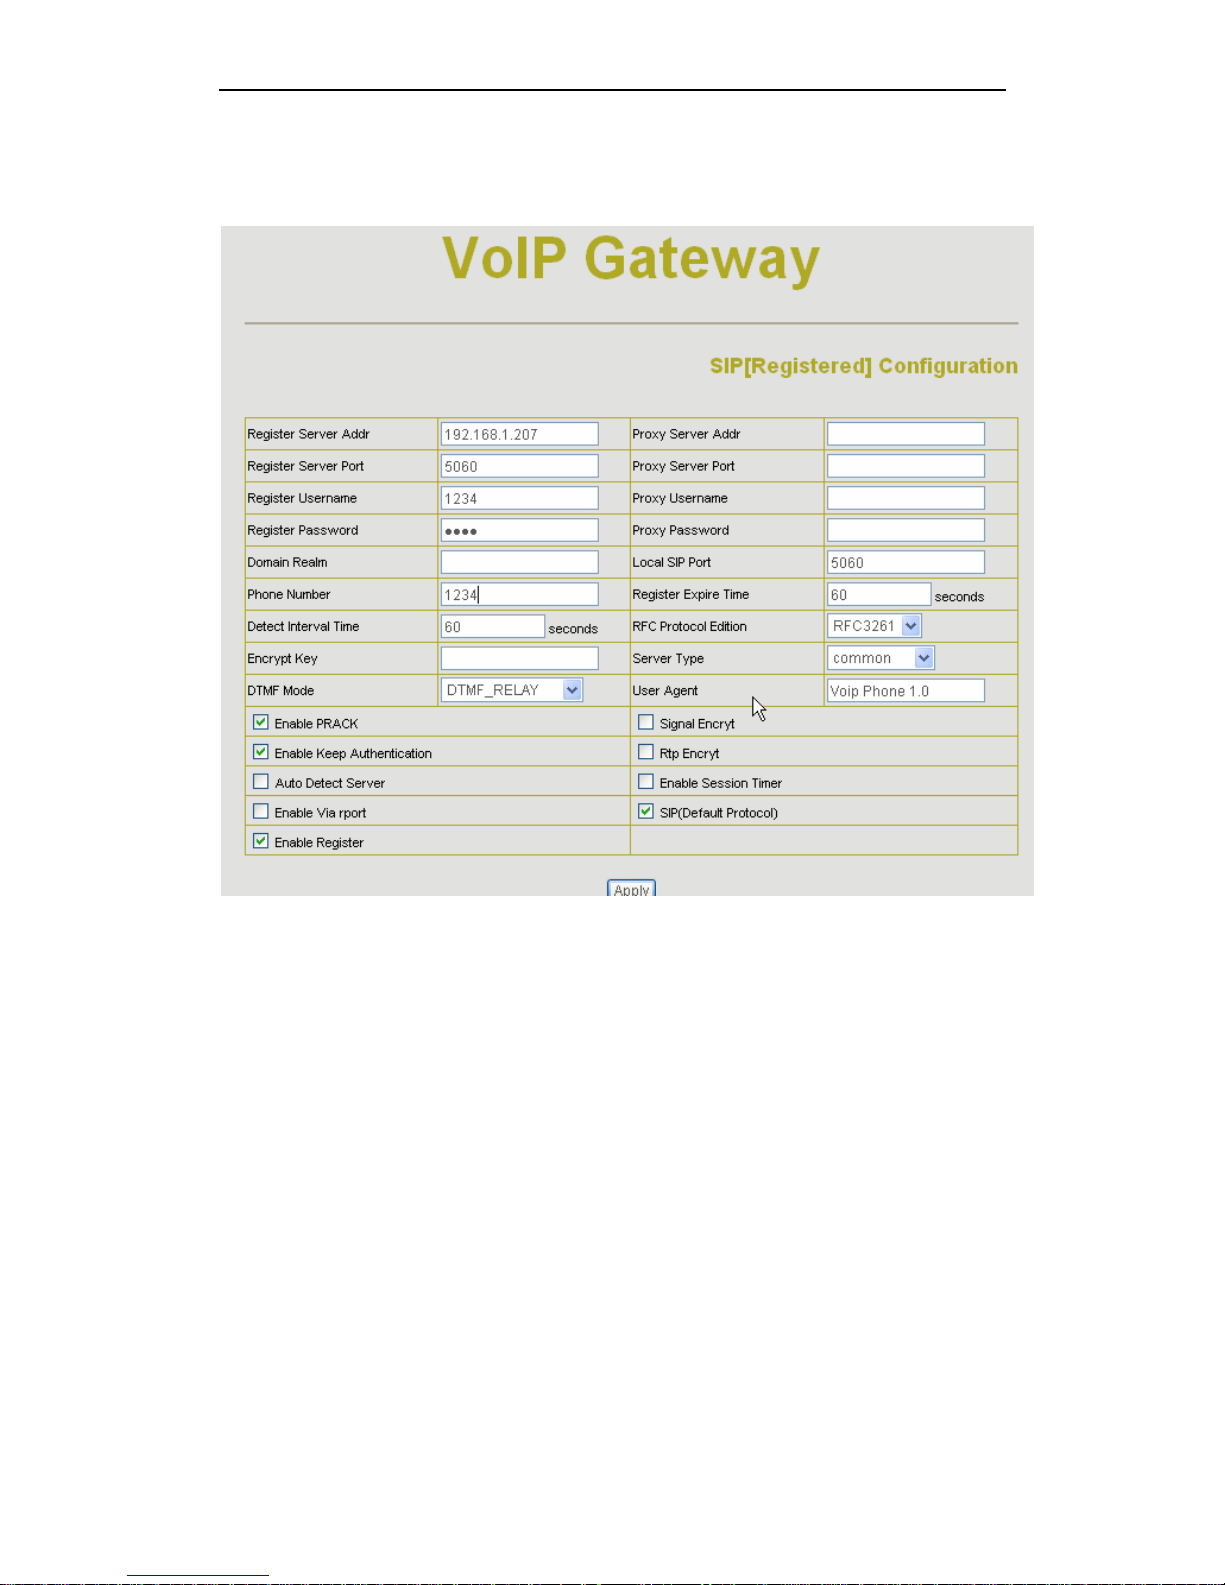
Setting page of public SIP server:
Register Server Addr: Register address of public SIP server
Register Server Port: Register port of public SIP server
Register Username: Username of your SIP account (Always the same as the phone
number)
Register Password: Password of your SIP account.
Proxy Server Addr: IP address of proxy SIP server (SIP provider always use the
same IP for register server and proxy server, in this case you don’t need to configure the
proxy server information. )
Proxy Server Port: Signal port of SIP proxy
Proxy Username: proxy server username
Proxy Password: proxy server password
Domain Realm: SIP domain, enter the sip domain if any , otherwise NG-188 will
use the proxy server address as sip domain.
Local SIP port: Local SIP register port, default 5060
Phone Number: Phone number of your SIP account
Register Expire Time: register expire time, default is 600 seconds. NG-188 will auto
12 / 46
Page 13
NG-188 User Manual
configure this expire time to the server recommended setting if it is different from the SIP
server.
Detect Interval Time: Co-work with the Auto Detect Server, if Auto Detect Server is
enable, NG-188 will periodically detect if the SIP server is available according this setting.
RFC Protocol Edition: Current NG-188 SIP versions. Set to RFC 2543 if the gate
need to communicate to devices (such as CISCO5300) using the SIP 1.0. Default is RFC
3261.
Enable Register: Enable/Disable SIP register. NG-188 won’t sent register info to SIP
server
DTMF Mode: DTMF signal sending mode: support RFC2833, DTMF_RELAY (inband
audio) and SIP info
Auto Detect server: co-work with Server Auto Swap and Detect Interval Time. Enable
this option, NG-188 will periodically detect whether the public SIP server is available, if the
server is unavailable, the NG-188 will switch to the back-up SIP sever, and continue
detecting the public sip server. NG-188 will switch back to the primary SIP server if the
server is available again.
Server Auto Swap:Please refer to Auto Detect server for detail.
Enable Via rport: config the supporting for RFC 3581
SIP(Default Protocol): Setting for the default protocol of SIP
2.4.2 Iax2 Config
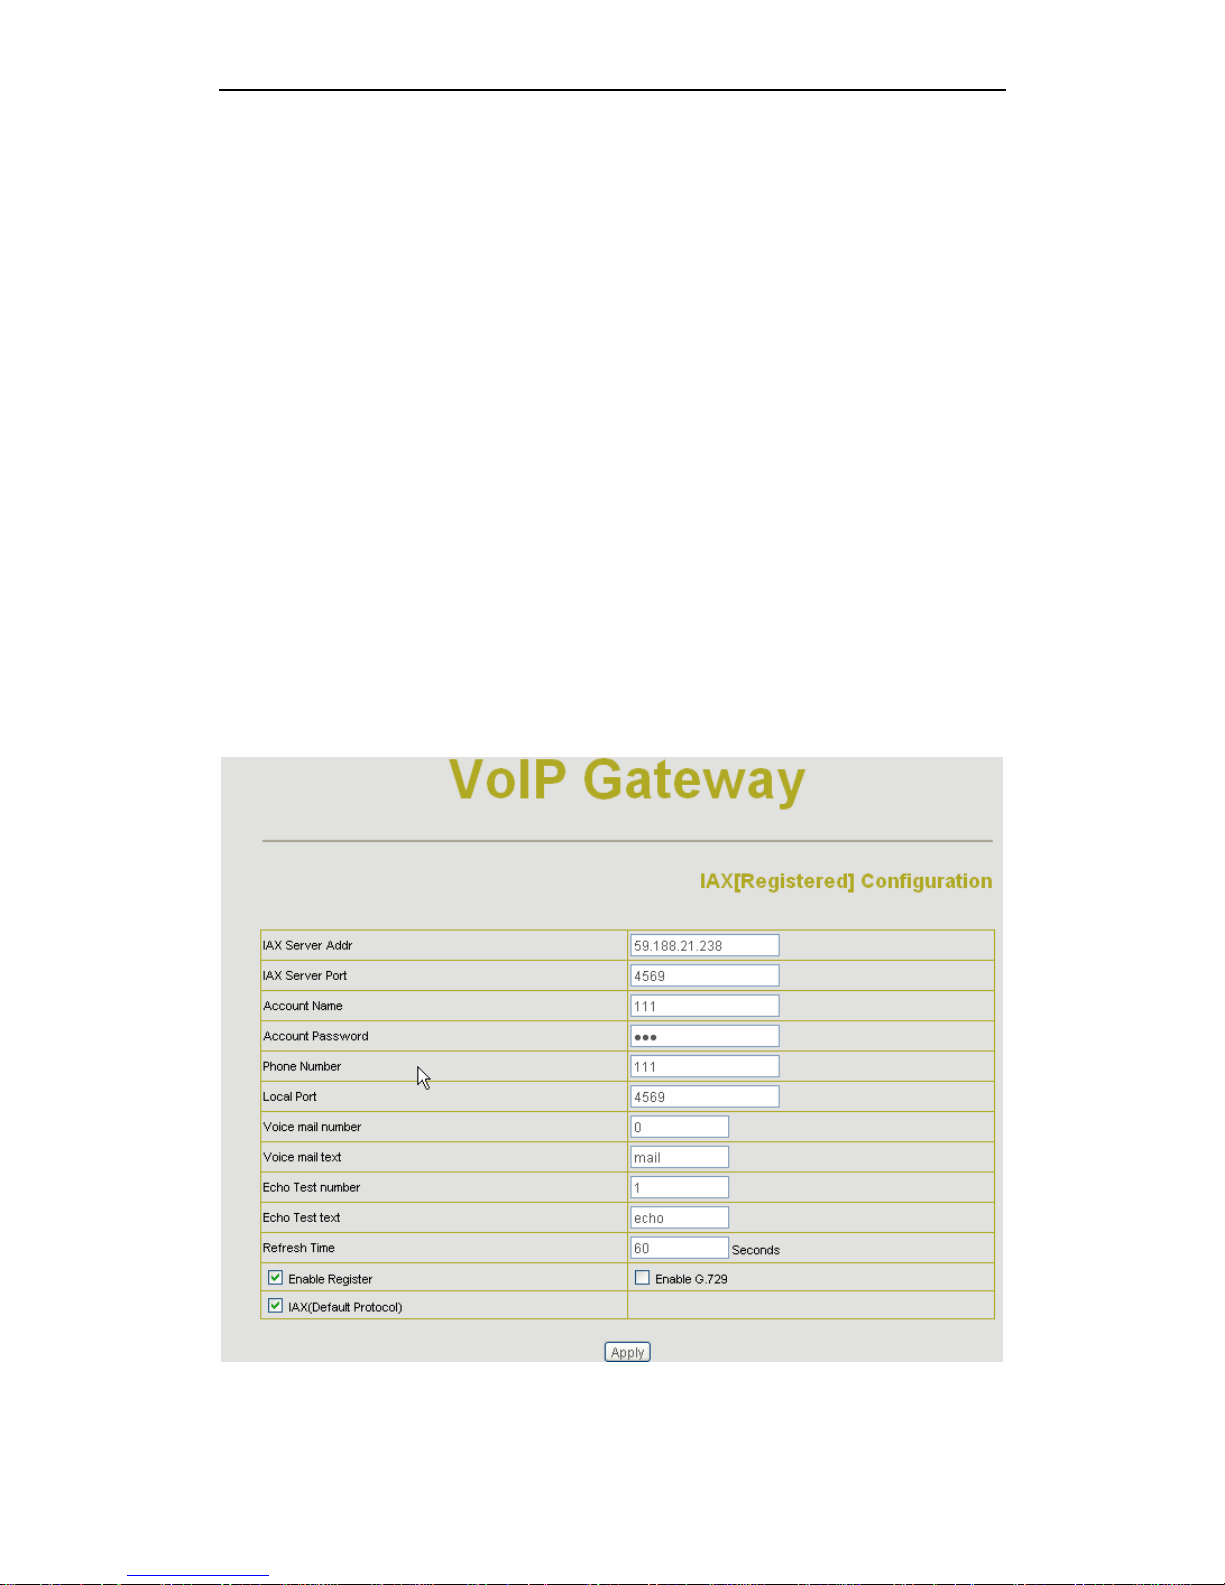
Setting page of public IAX server:
IAX Server Addr: Register address of public IAX server
13 / 46
Page 14

NG-188 User Manual
IAX Server Port: Register port of public IAX server,default port is 4569
Account Name: Username of your SIP account (Always the same as the phone
number)
Account Password: Password of your IAX account.
Local port: Signal port of local, default port is 4569
Phone Number: Phone number of your IAX account
Vo ice mail number: If the IAX support voice mail, but your username of the voice mail is
letters which you can not input with the ATA , then you use the number to stand for your
username
Vo ice mail text: if IAX support voice mail, config the domain name of your mail box here.
Echo test number: If the platform support echo test , and the number is test form , the
config the test number to replace the text format The echo test is to test the woring status
of terminals and platform
Echo test text: echo test number in text format
Refresh time: IAX refresh time
Enable Register: enable or disable register
IAX(Default Protocol): Set IAX 2 as the default protocol , if not the system will choose SIP
as default
Enable G.729:
Using G.729 speech coding mandatory consultations
14 / 46
Page 15
NG-188 User Manual
2.5 Advance
2.5.1 DHCP Server
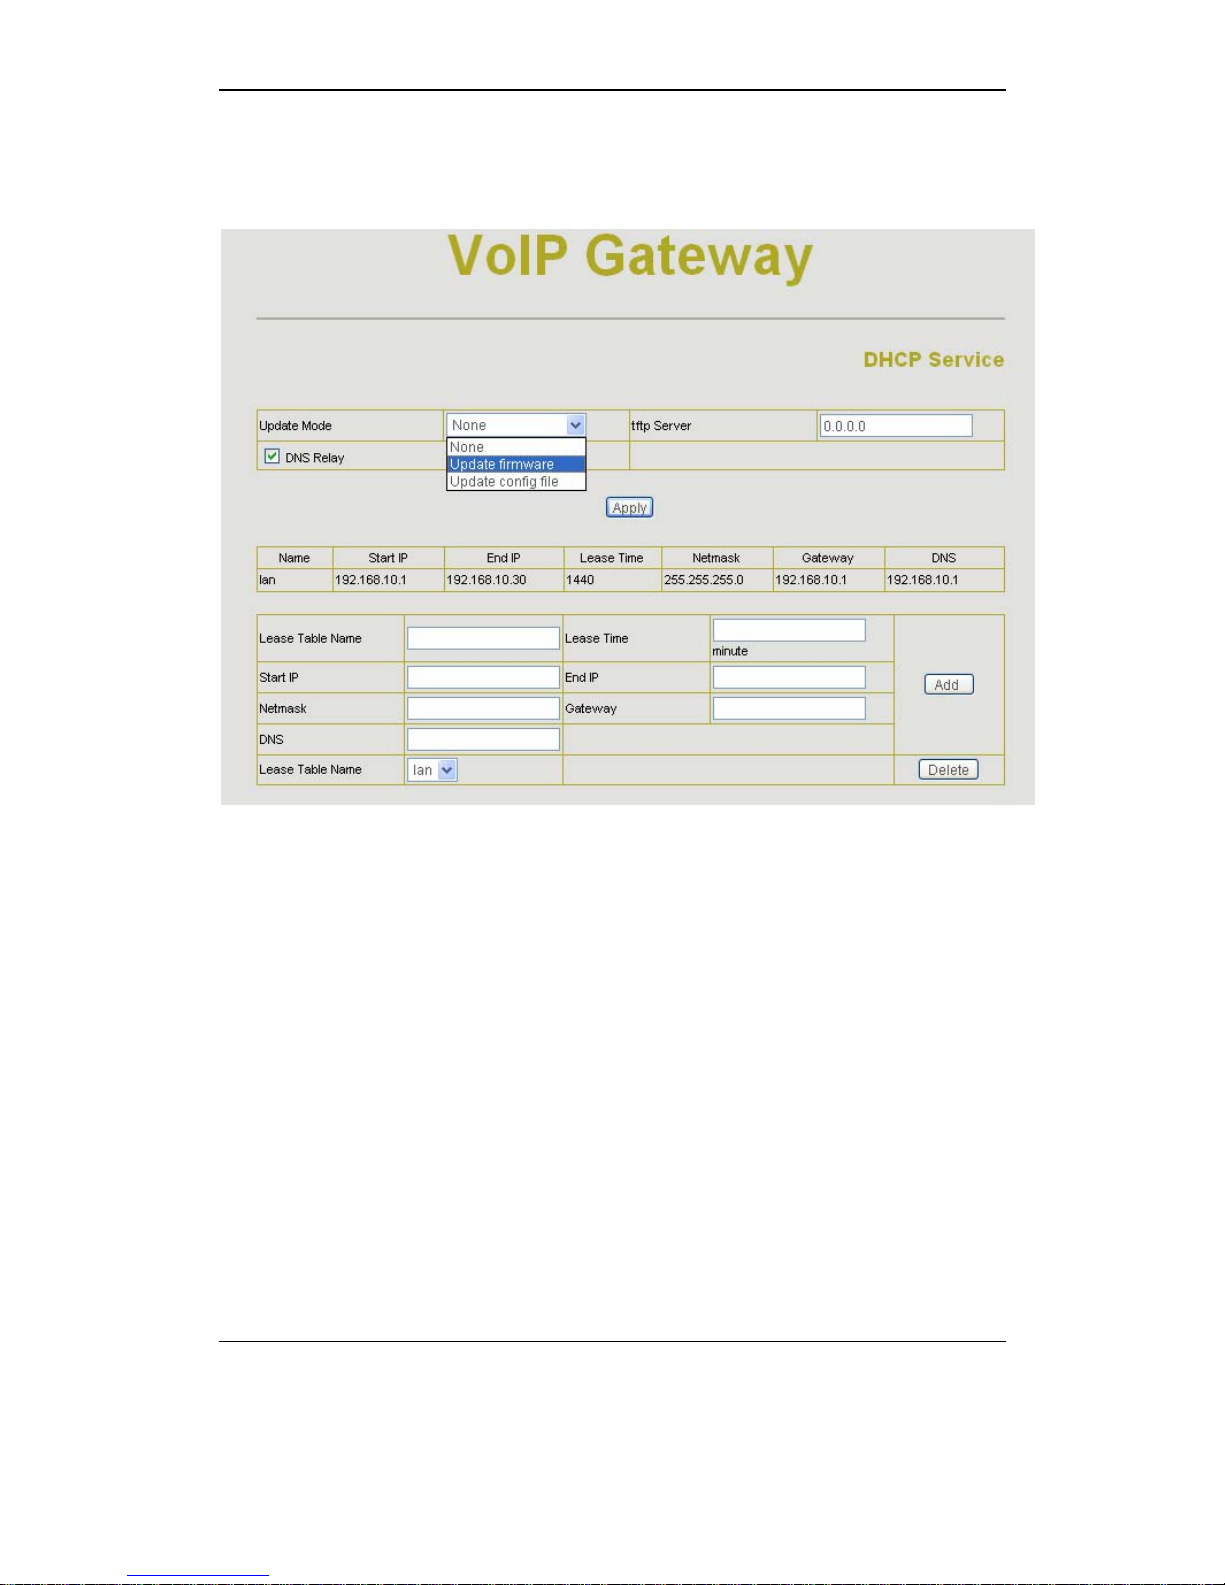
DHCP server manage page.
User may trace and modify DHCP server information in this page.
Update Mode: Using DHCP updated model ,None expressed are not updated,
Update firmware update firmware is used to DHCP. Update file is used to
configure DHCP updated configuration files.
Tftp Server: Addresses using TFTP server upgrade 。
DNS Relay: enable DNS relay function.
User may use below setting to add a new lease table.
Lease Table Name: Lease table name.
Lease Time: DHCP server lease time.
Start IP: Start IP of lease table.
End IP: End IP of lease table. Network device connecting to the NG-188 LAN port can
dynamic obtain the IP in the range between start IP and end IP.
Netmask: Netmask of lease table.
Gateway: Default gateway of lease table
DNS: default DNS server of lease table.
Notice: This setting won’t take effect unless you save the config and reboot the device
15 / 46
Page 16
NG-188 User Manual
2.5.2 NAT
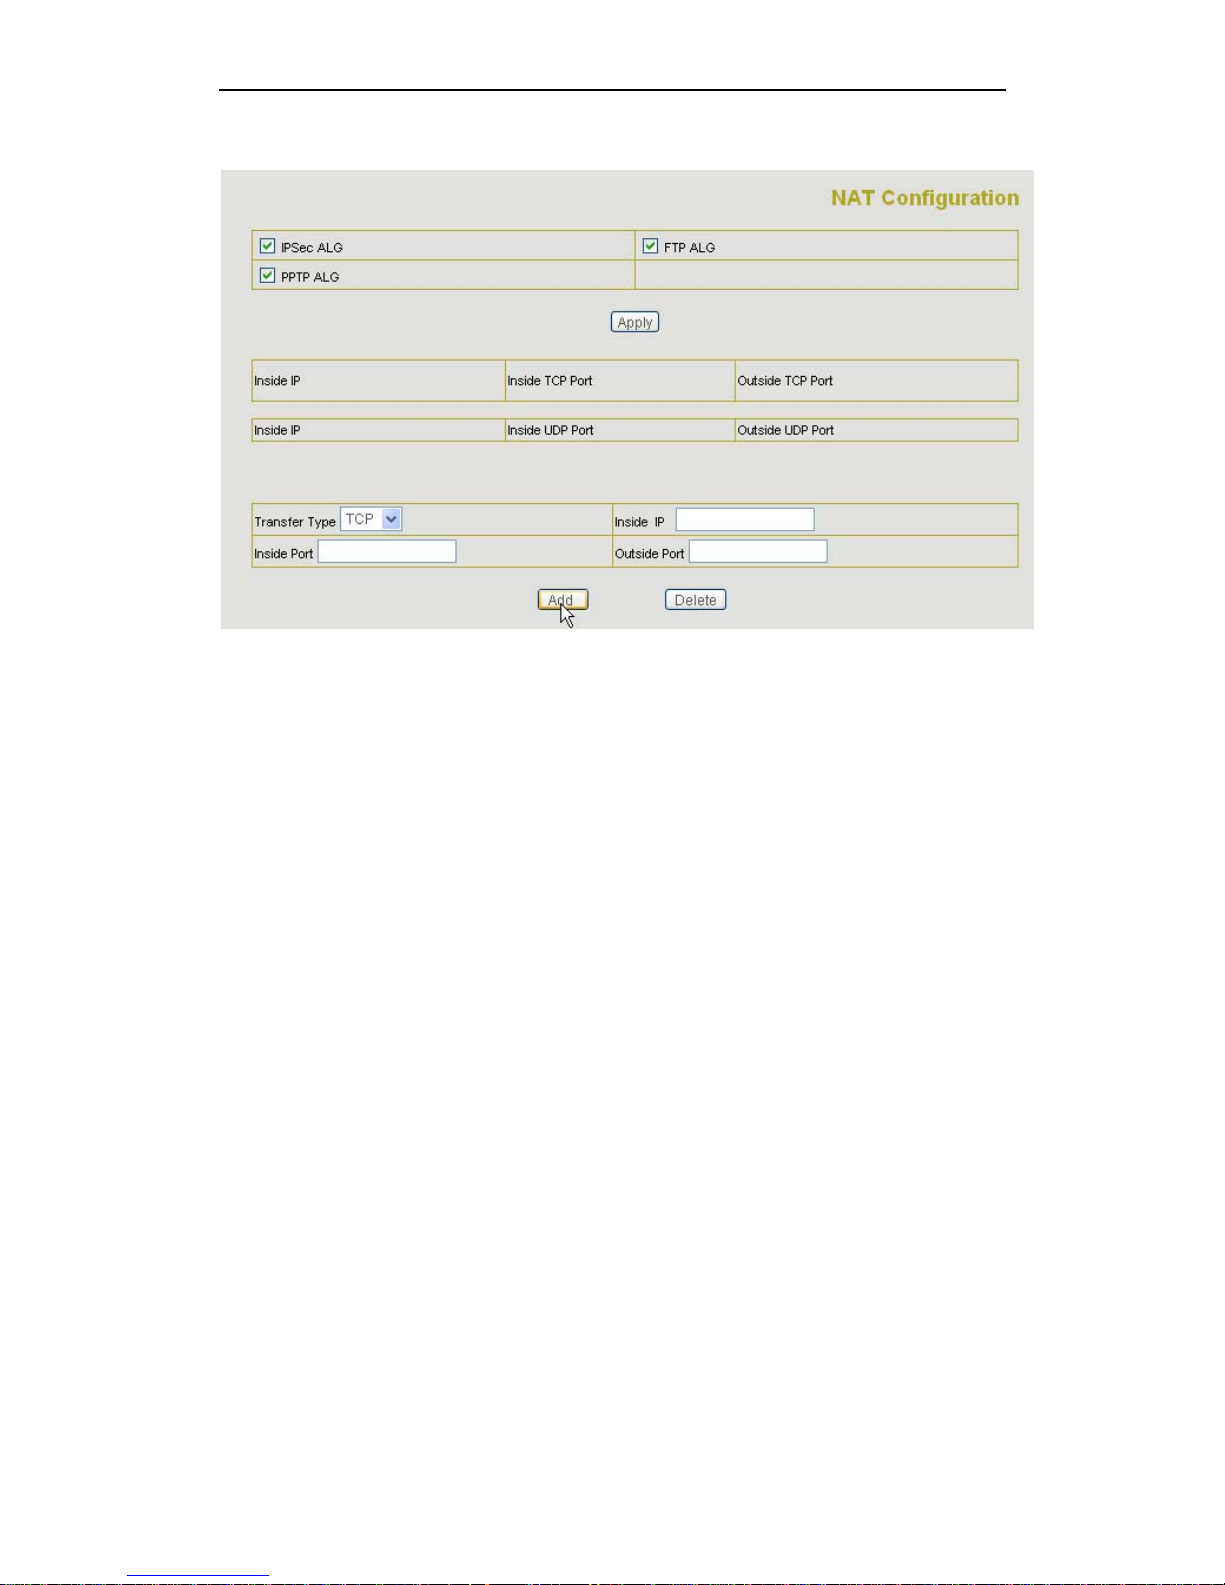
Advance NAT setting. Maximum 10 items for TCP and UDP port mapping.
IPSec ALG: Enable/Disable IPSec ALG;
FTP ALG: Enable/Disable FTP ALG;
PPTP ALG: Enable/Disable PPTP ALG;
Transfer Type: Transfer type using port mapping.
Inside IP: LAN device IP for port mapping.
Inside Port: LAN device port for port mapping.
Outside Port: WAN port for port mapping.
Click Add to add new port mapping item and Delete to delete current port mapping item.
16 / 46
Page 17
NG-188 User Manual
2.5.3 Net Service
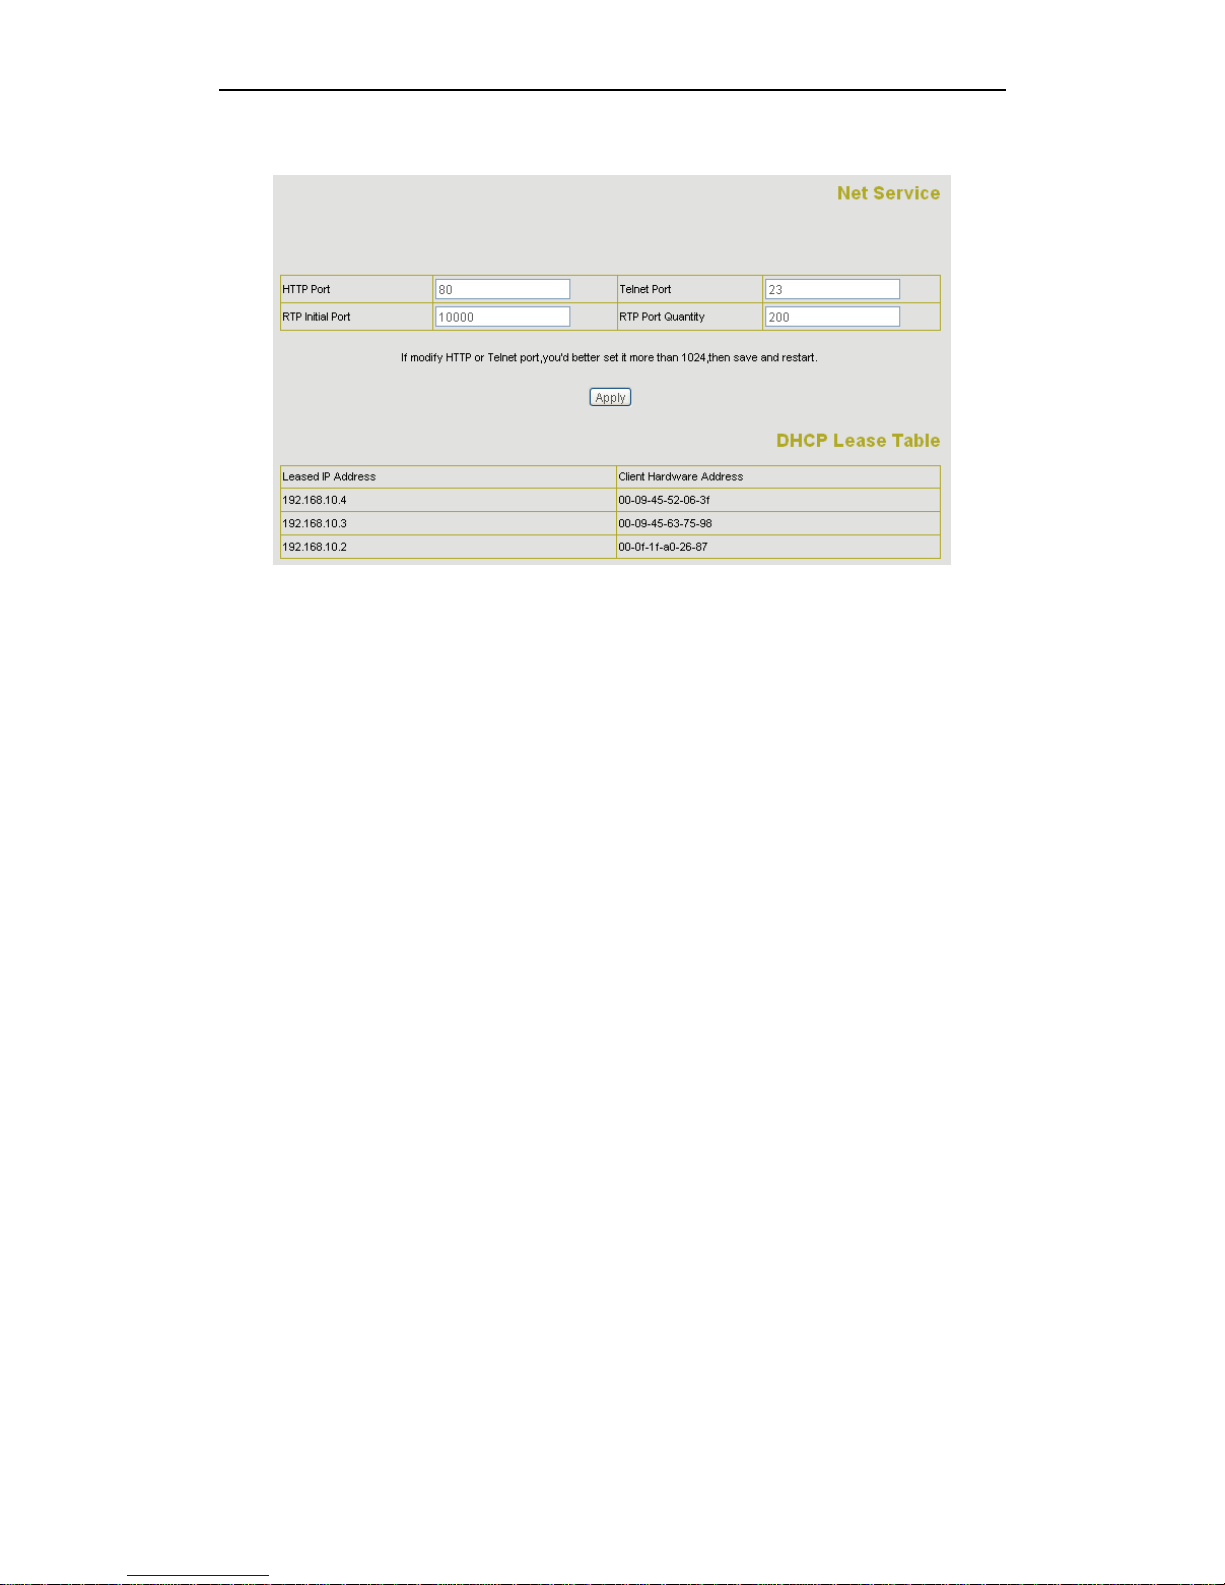
HTTP Port: configure HTTP transfer port, default is 80.User may change this port to enhance
system’s security. When this port is changed, please use http://xxx.xxx.xxx.xxx:xxxx/ to
reconnect.
Telnet Port: configure telnet transfer port, default is 23.
RTP Initial Port: RTP initial port.
RTP Port Quantity: Maximum RTP port quantity, default is 200
Notice:
Settings in this page won’t take effect unless save and reboot the device.
If you need to change telnet port or HTTP port, please use the port greater than 1024,
because ports under 1024 is system remain ports.
HTTP service if HTTP is set to 0.
17 / 46
Page 18
NG-188 User Manual
2.5.4 Firewall settings
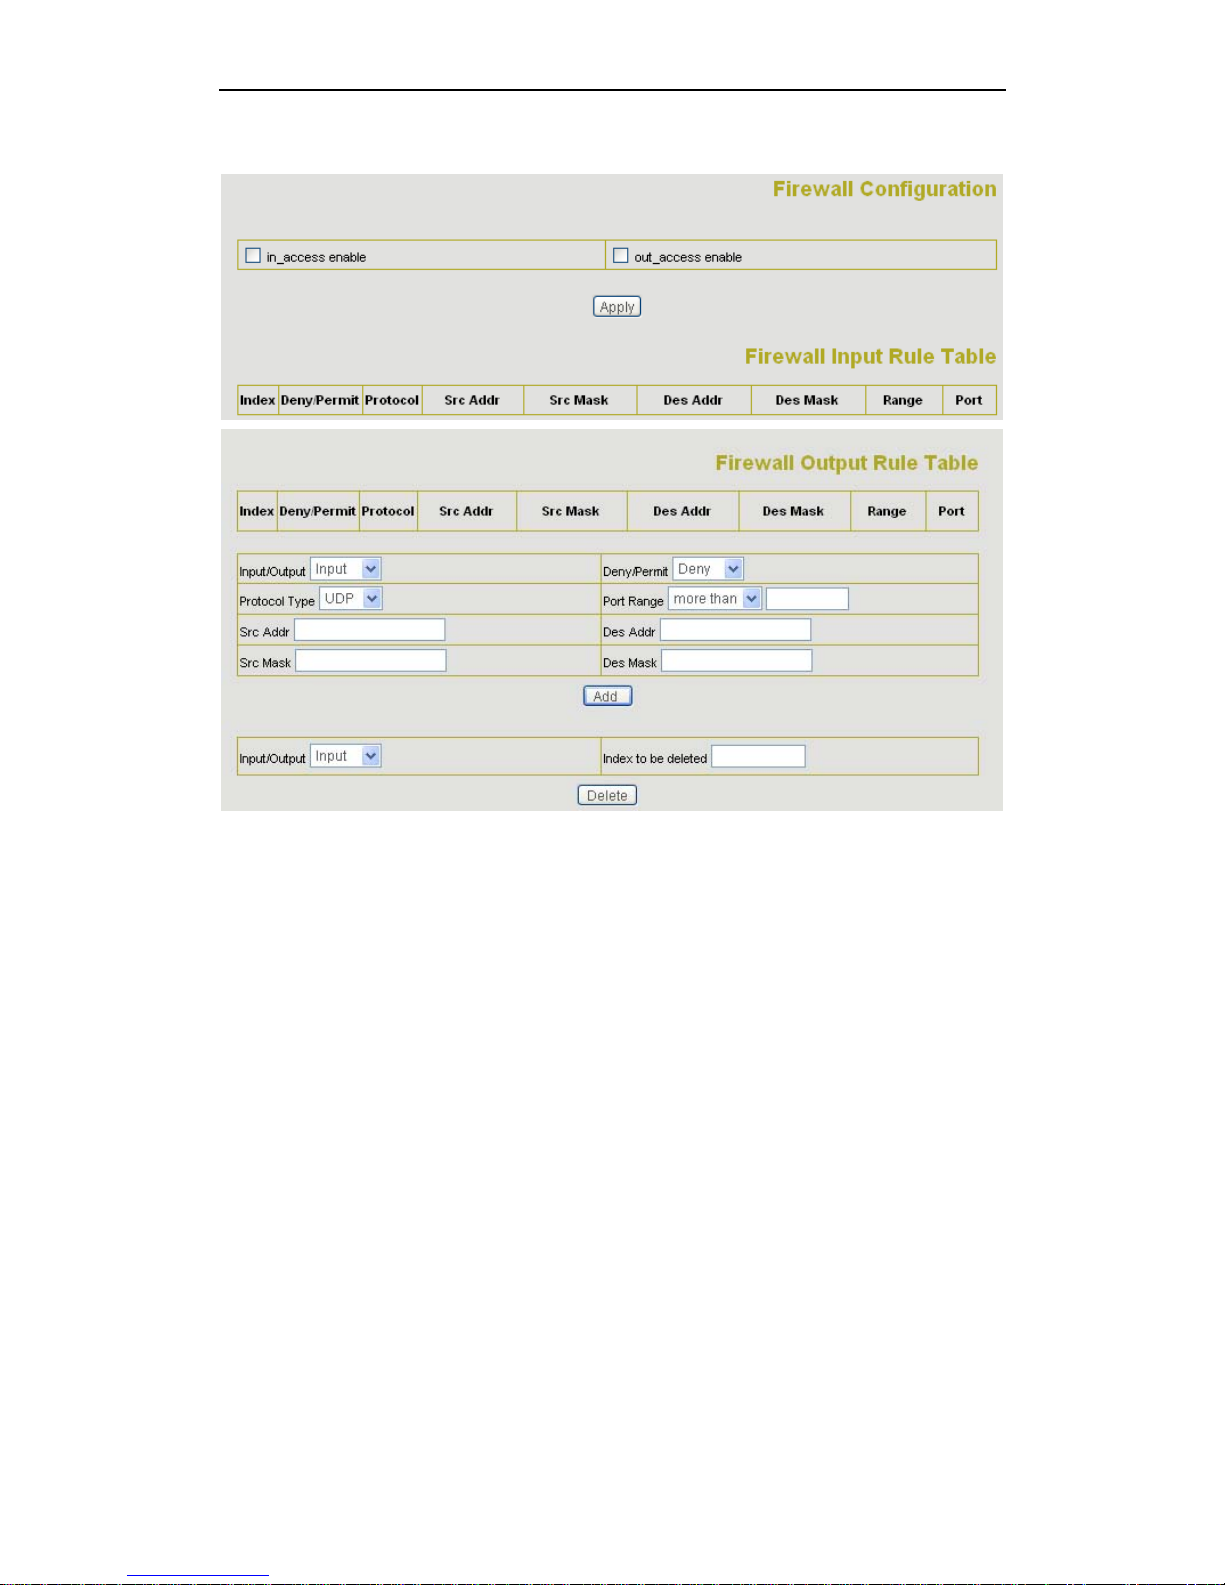
Firewall setting page. User may set up firewall to prevent unauthorized Internet users from
accessing private networks connected to the Internet (input rule), or prevent
unauthorized private network devices to access the internet.
Access list support two type limits: input_access limit or output_access limit. Each type
support 10 items maximum.
NG-188 firewall filter is base WAN port. So the source address or input destination
address should be WAN port IP address.
Configuration:
in_access enable enable in_access rule
out_access enable enable out_access rule
Input/Output: specify current adding rule is input rule or output rule.
Deny/Permit: specify current adding rule is deny rule or permit rule.
Protocol Type: protocol using in this rule: TCP/IP/ICMP/UDP.
Port Range: port range if this rule
Src Addr: source addre ss. can be single IP address or network address.
Dest Addr: destination address.can be IP address or network address.
Src Mask: source address mask. Indicate the source is dedicate IP if set to
255.255.255.255. Otherwise is network ID
18 / 46
Page 19

NG-188 User Manual
Des Mask: Destination address mask. Indicate the source is dedicate IP if set to
255.255.255.255. Otherwise is network ID
19 / 46
Page 20
NG-188 User Manual
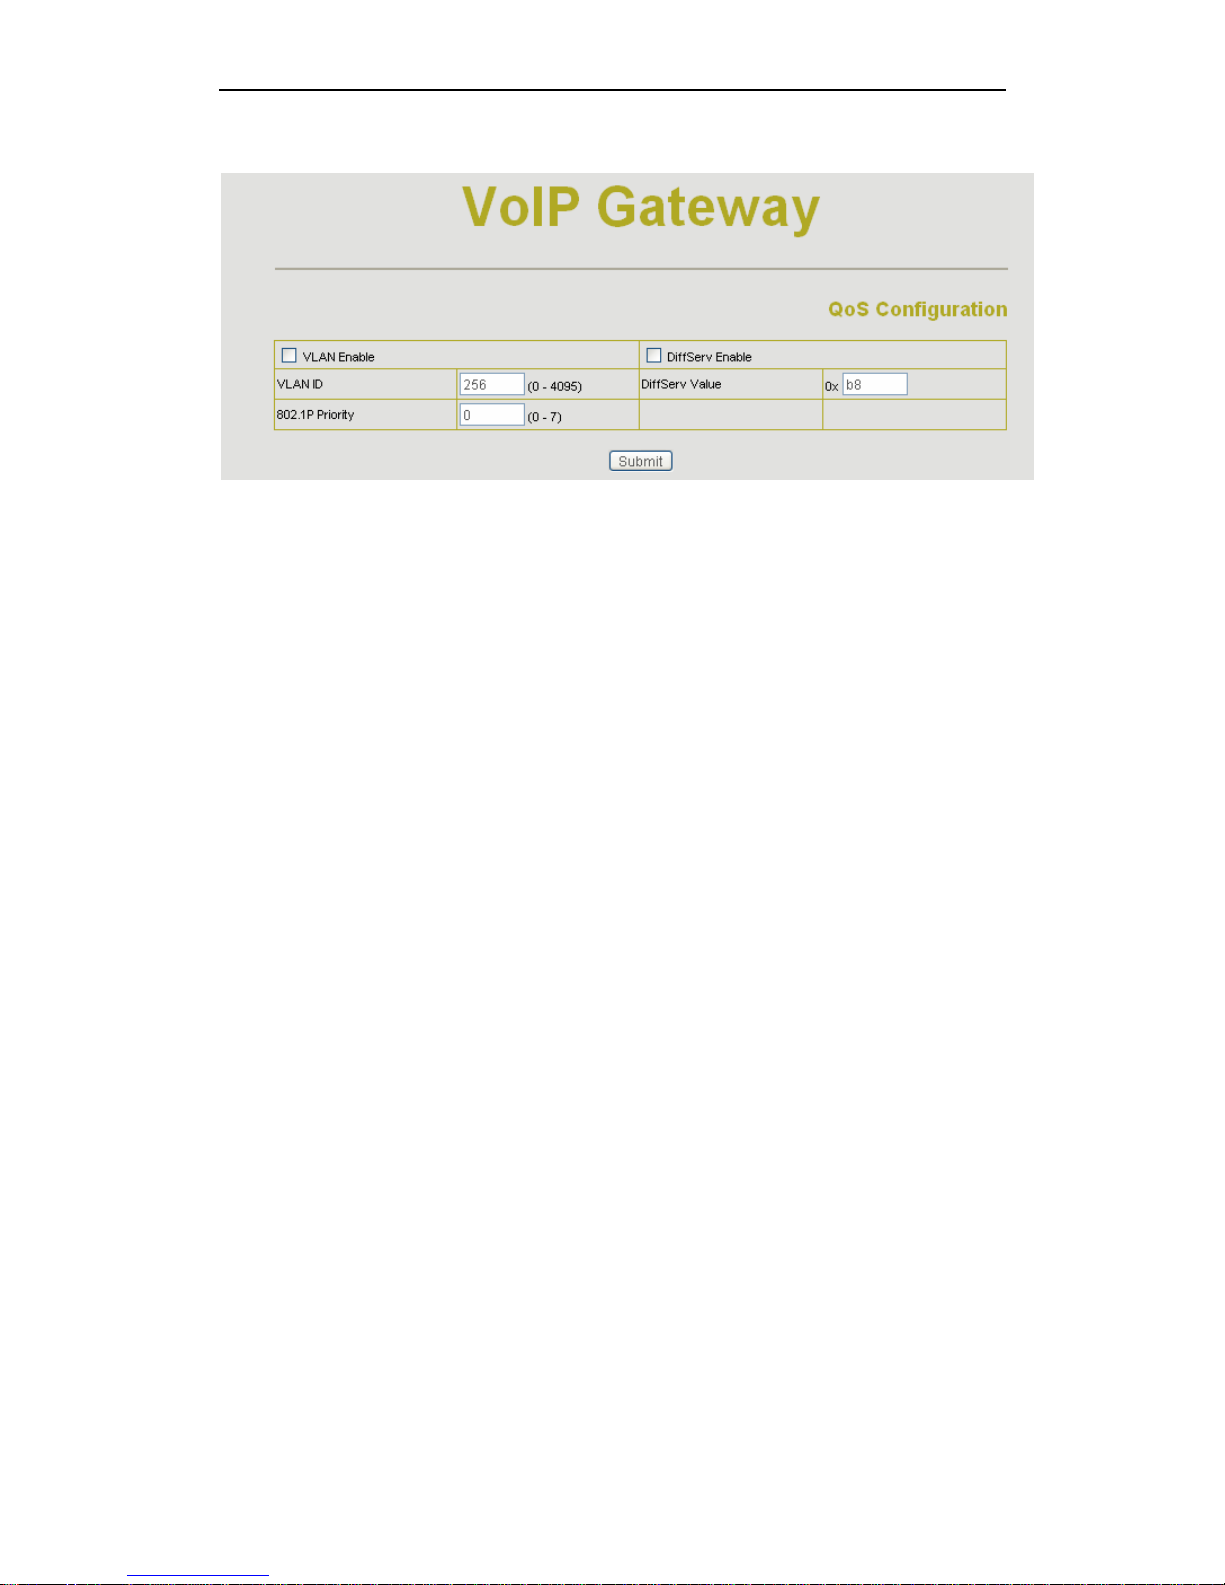
2.5.5 QoS settings
AT-530 IP phone implement QoS based on 802.1p, The QoS is used to mark the network
communication priority in the data link/MAC sub-layer. AT-530 will sorted the packets
using the QoS and sends it to the destination.
VLAN Enable: If enable the VLAN service, the second layer will realize separate voice,
signal and data transmission. To realize separate voice and data transmission by dispose
for IP precedence of ToS area of voice transmission. To reach upper layer switch or router
have priority to transfer voice transmission. (The prerequisite is the upper layer switch or
routers have to identify ToS area.)
VLAN ID: Dispose VLAN ID is add a Tag header after realize enable the VLAN function.
The realized voice packets transfer at the same VLAN. The prerequisite is it must the
same as VLAN of upper switch. The value range are 1~4094.
DiffServ Enable: If enable the VLAN service, it indicates use DSCP mode to realize three
layers QoS. This moment, the DSCP of SIP signals which between IP Phone and MGC. It
will use Class Selector 5 (The value is 0xA0). And the DSCP of mediums information (In
RTP packets) would be used the values of DiffServ Value field.
DiffServ Value:The value range:
0x28,0x30,0x38,0x48,0x50,0x58,0x68,0x70,0x78,0x88,0x90,0x98,0xb8.default is
0xb8 ,oxb8 stands for best fast transmission; 28-30 is guarantee for the transmission
priority for the 1st rank , 48-58 is guarantee for the transmission priority for the 2nd rank,
68-78 is guarantee for the transmission priority for the 3rd rank, 88-98 is guarantee for the
transmission priority for the 4th rank.
802.1P Priority: the priority of 802.ip
20 / 46
Page 21

NG-188 User Manual
NG-188 Gateway implement QoS based on 802.1p, The QoS is used to mark the network
communication priority in the data link/MAC sub-layer. NG-188 will sorted the packets
using the QoS and sends it to the destination.
QoS Enable: Enable QoS service.
QoS Table Include: enable include QoS table, NG-188 will only provide QoS service to
the network address included in the QoS table. Disable the option. NG-188 provides QoS
service to the network address outside the QoS table.
QoS Table Item: user can set the QoS Table using IP and Netmask. the IP can be
network address or dedicate IP address (set netmask to 255.255.255.255)
Delete QoS Table: enter the IP/Netmask configure and select delete to delete
corresponding item.
21 / 46
Page 22
NG-188 User Manual
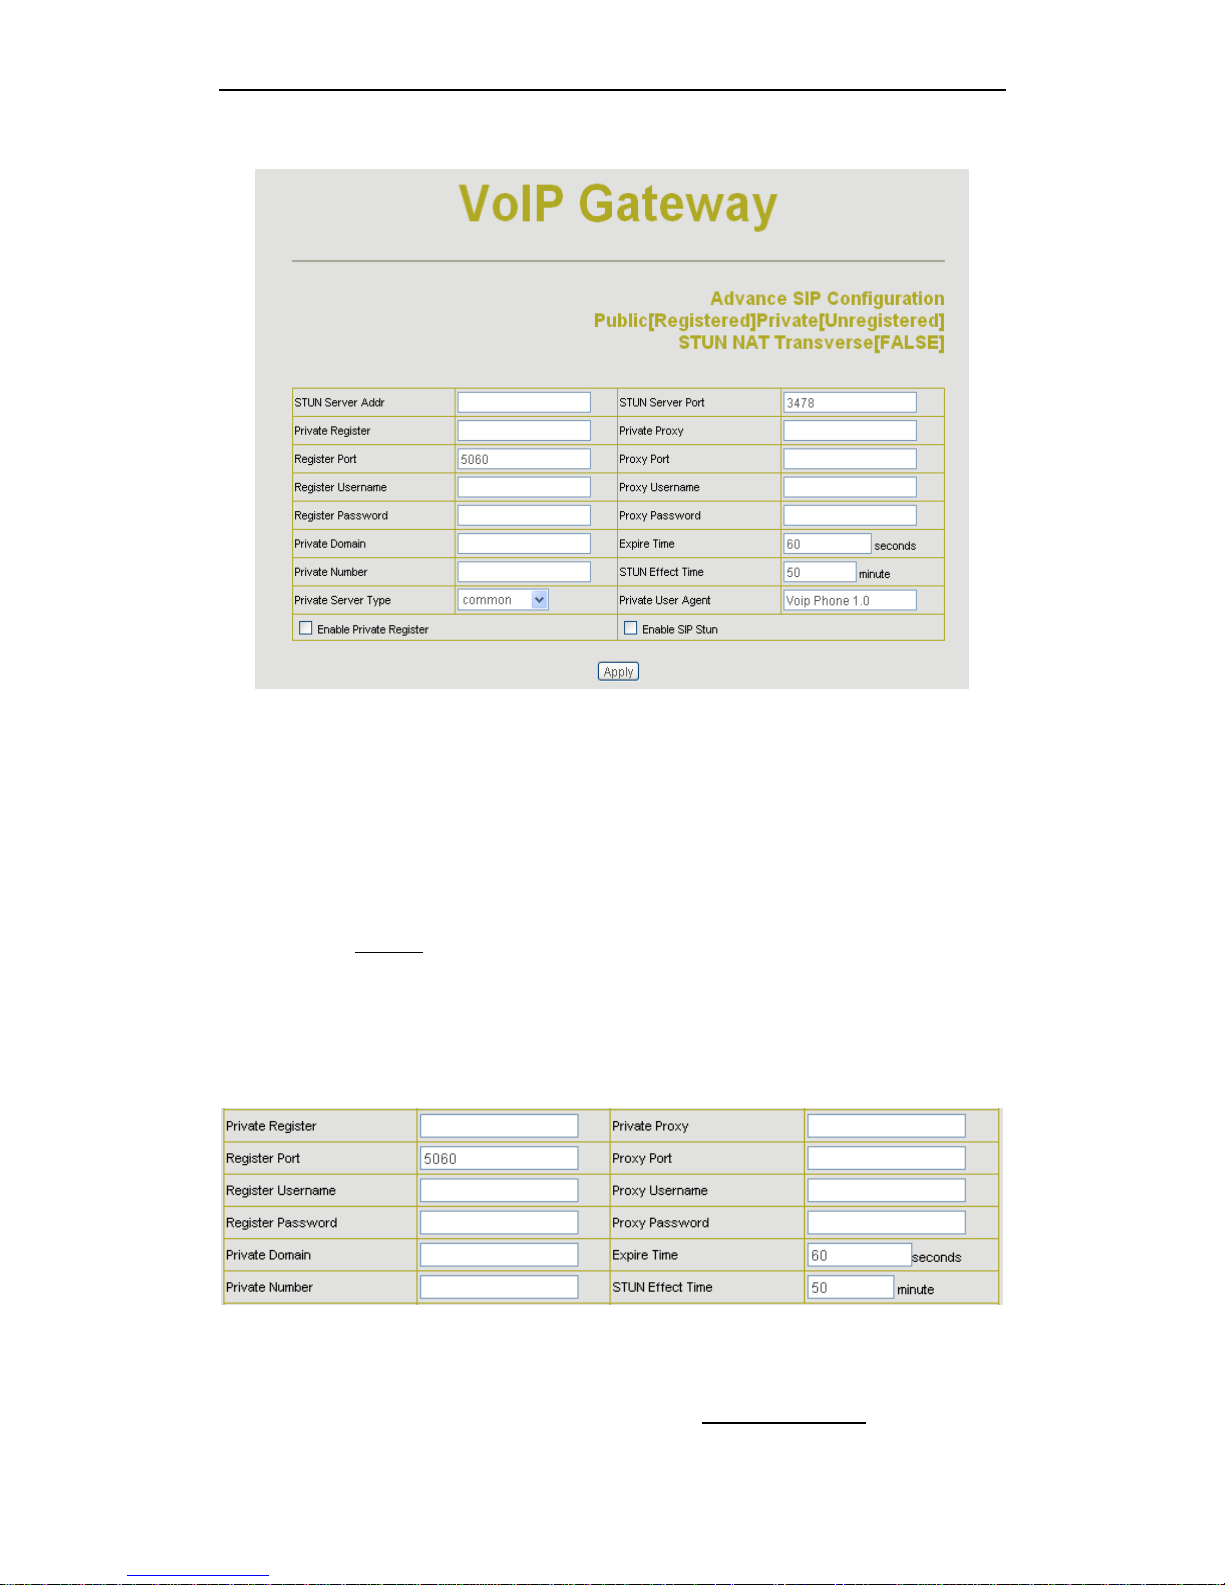
2.5.6 Advance SIP settings
This page is used to set the private sip server, stun server, and back up sip server
information.
STUN Server setting:
STUN Server Addr: configure stun server address;
STUN Server Port: configure stun server port default 3478
STUN Effect Time: stun detect NAT type circle, unit: minute.
Enable SIP STUN: enable/disable stun.
Please refer to
sip conf for the setting for how to set the public alter server.
Private Server Type:The particular Private service system supplier carries out the sign
and speeches to encrypt, default is common
User can register two sip servers: public sip server and private sip server. these two sip
servers are independent from each other and running in the same time.
For how to configure private sip server. Please refer to
sip configuration.
22 / 46
Page 23

NG-188 User Manual
23 / 46
Page 24
NG-188 User Manual
2.5.7 Digital Map
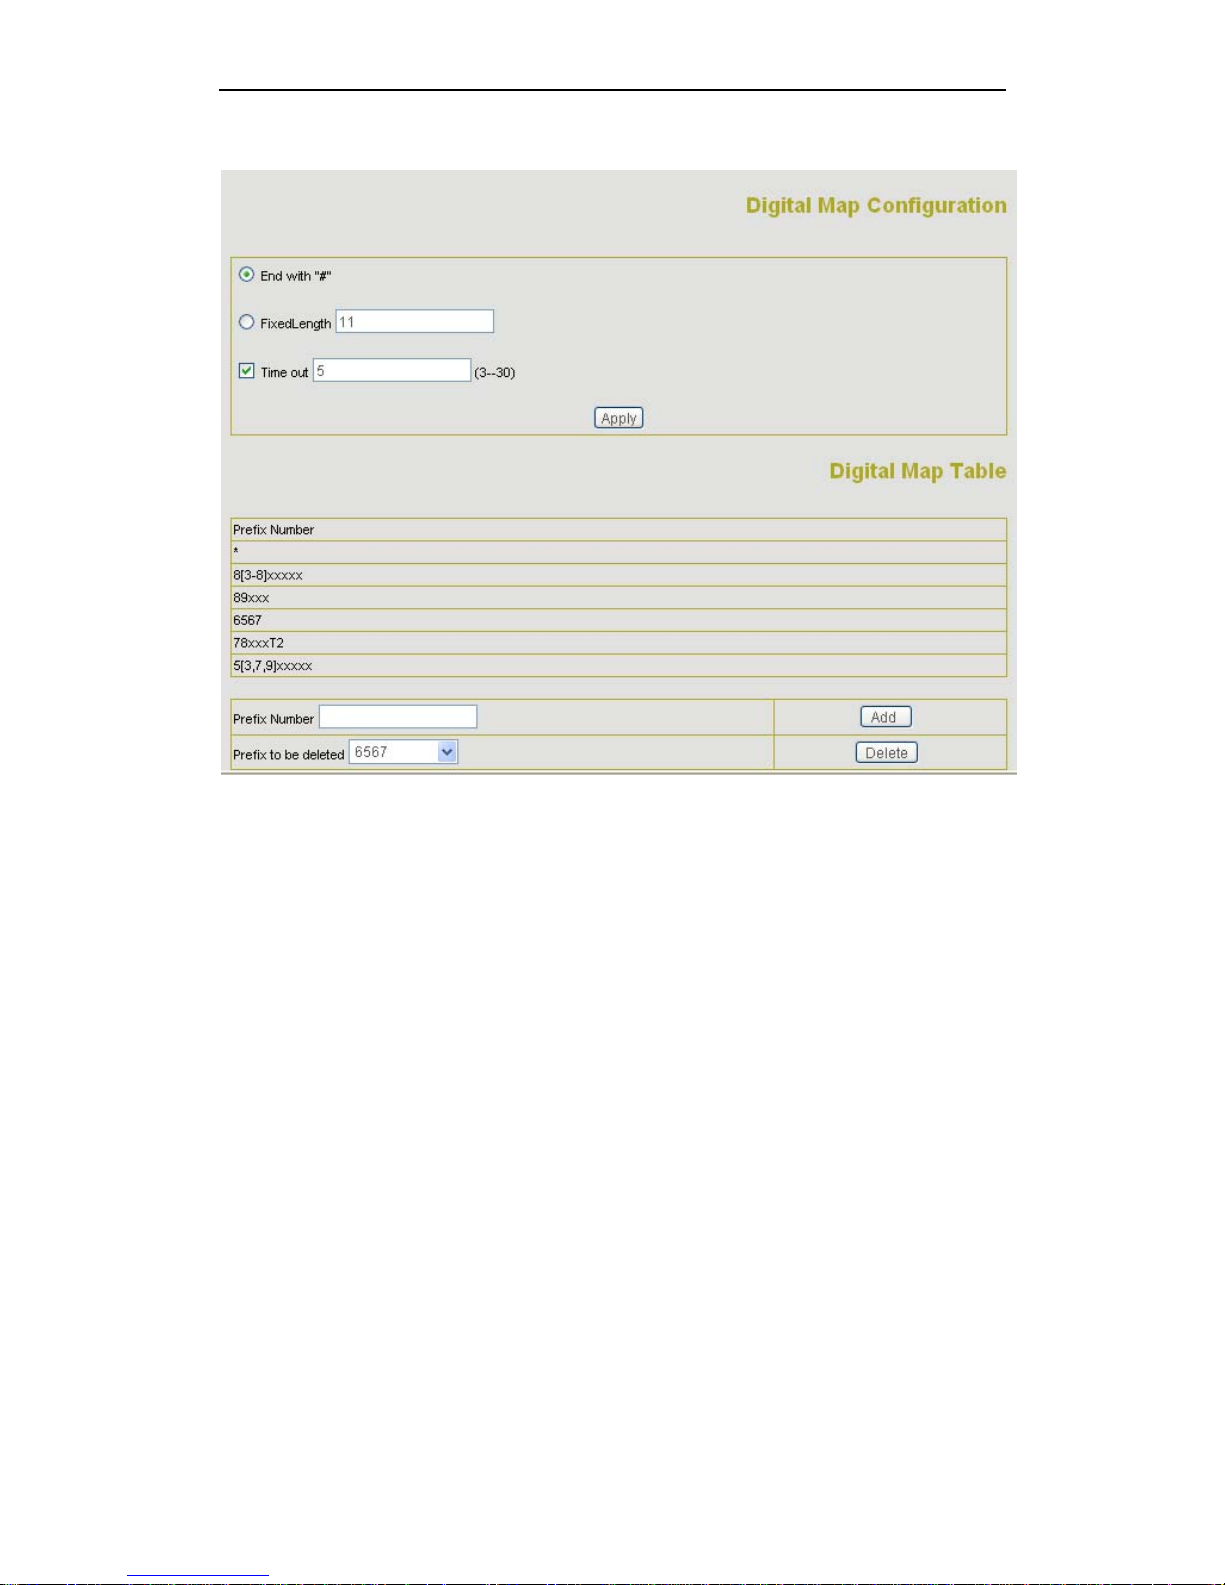
Digit map is a set of rules to determine when the user has finished dialing.
NG-188 support below digital map:
Digital Map is based on some rules to judge when user end their dialing and send the number to
the server. NG-188 support following digital map:
----End With “#”: Use # as the end of dialing.
----Fixed Length: When the length of the dialing match, the call will be sent.
----Timeout: Specify the timeout of the last dial digit. The call will be sent after timeout
----Prefix: User define digital map:
[ ] represents the range of digit, can be a range such as [1-4], or use comma such as [1,3,5],
or use a list such as [234]
x represents any one digit between 0~9
Tn represents the last digit timeout. n represents the time from 0~9 second, it is necessary.
Tn must be the last two digit in the entry. If Tn is not included in the entry, we use T0 as default, it
means system will sent the number immediately if the number matches the entry.
Example:
[1-8]xxx All number from 1000 to 89999 will be sent immediately.
9xxxxxxx 8 digits numbers begin with 9 will be sent immediately.
911 Number 911 will be sent will be immediately
99xT4 3 digits numbers begin with 99 with be sent after four seconds.
24 / 46
Page 25
NG-188 User Manual
2.5.8 Call Service Settings
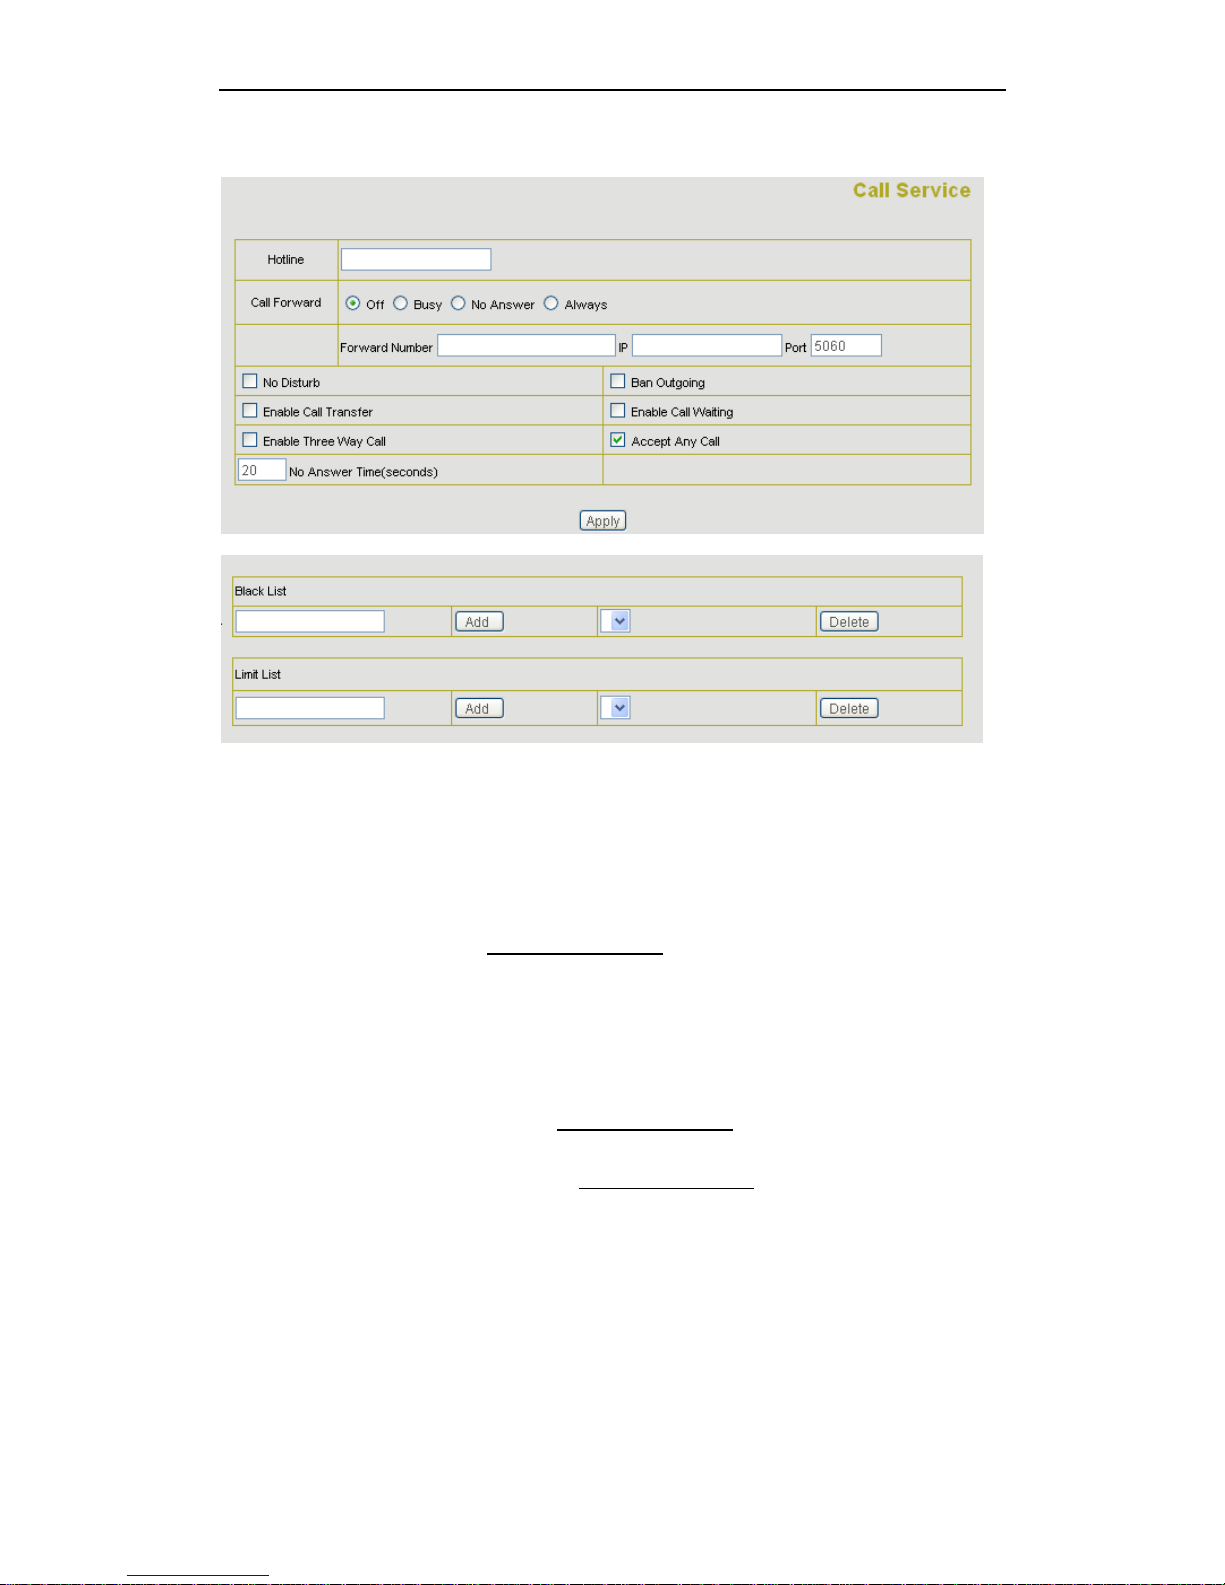
User configure the value add service such as hotline, call forward, call transfer, 3-way
conference call .etc in this page
Hotline: configure hotline number. NG-188 immediately dials this number after hook-off if
it is set.
Call Forward: Please refer to
value add service for detail.
No Disturb: DND, do not disturb, enable this option to refuse any calls.
Ban Outgoing: Enable this to ban outgoing calls.
Enable Call Transfer: Please refer to
value add service for detail.
Enable Three Way Call: Please refer to
value add service for detail.
Enable Call Waiting: Enable/disable Call Waiting
Accept Any Call: If this option is disable, NG-188 refuse the incoming call when the
called number is different from NG-188’s phone number.
No Answer Time: no answer call forward time setting.
25 / 46
Page 26

NG-188 User Manual
Black List: incoming call in these phone numbers will be refused.
Limit List: outgoing calls with these phone numbers will be refused
26 / 46
Page 27
NG-188 User Manual
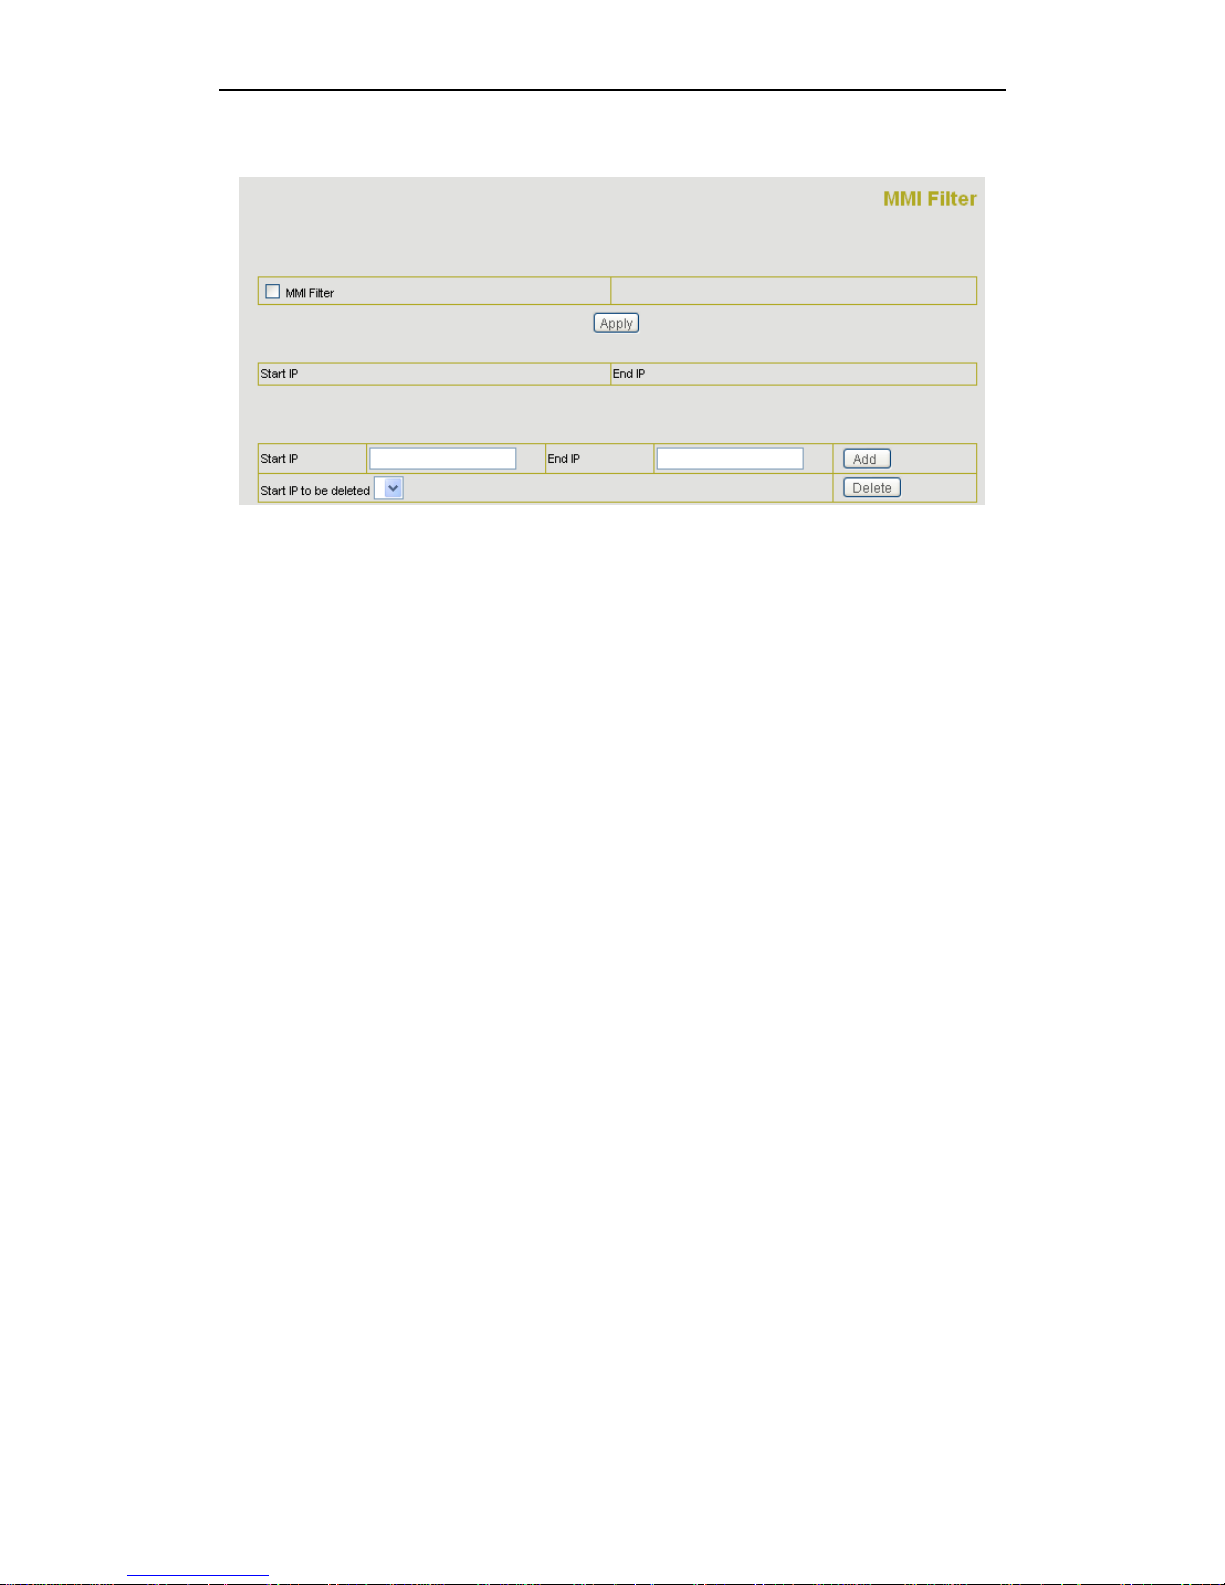
2.5.9 MMI Filter
MMI filter is used to make access limit to NG-188 Gateway.
When MMI filter is enable. Only IP address within the start IP and end IP can access
NG-188 gateway.
27 / 46
Page 28
NG-188 User Manual
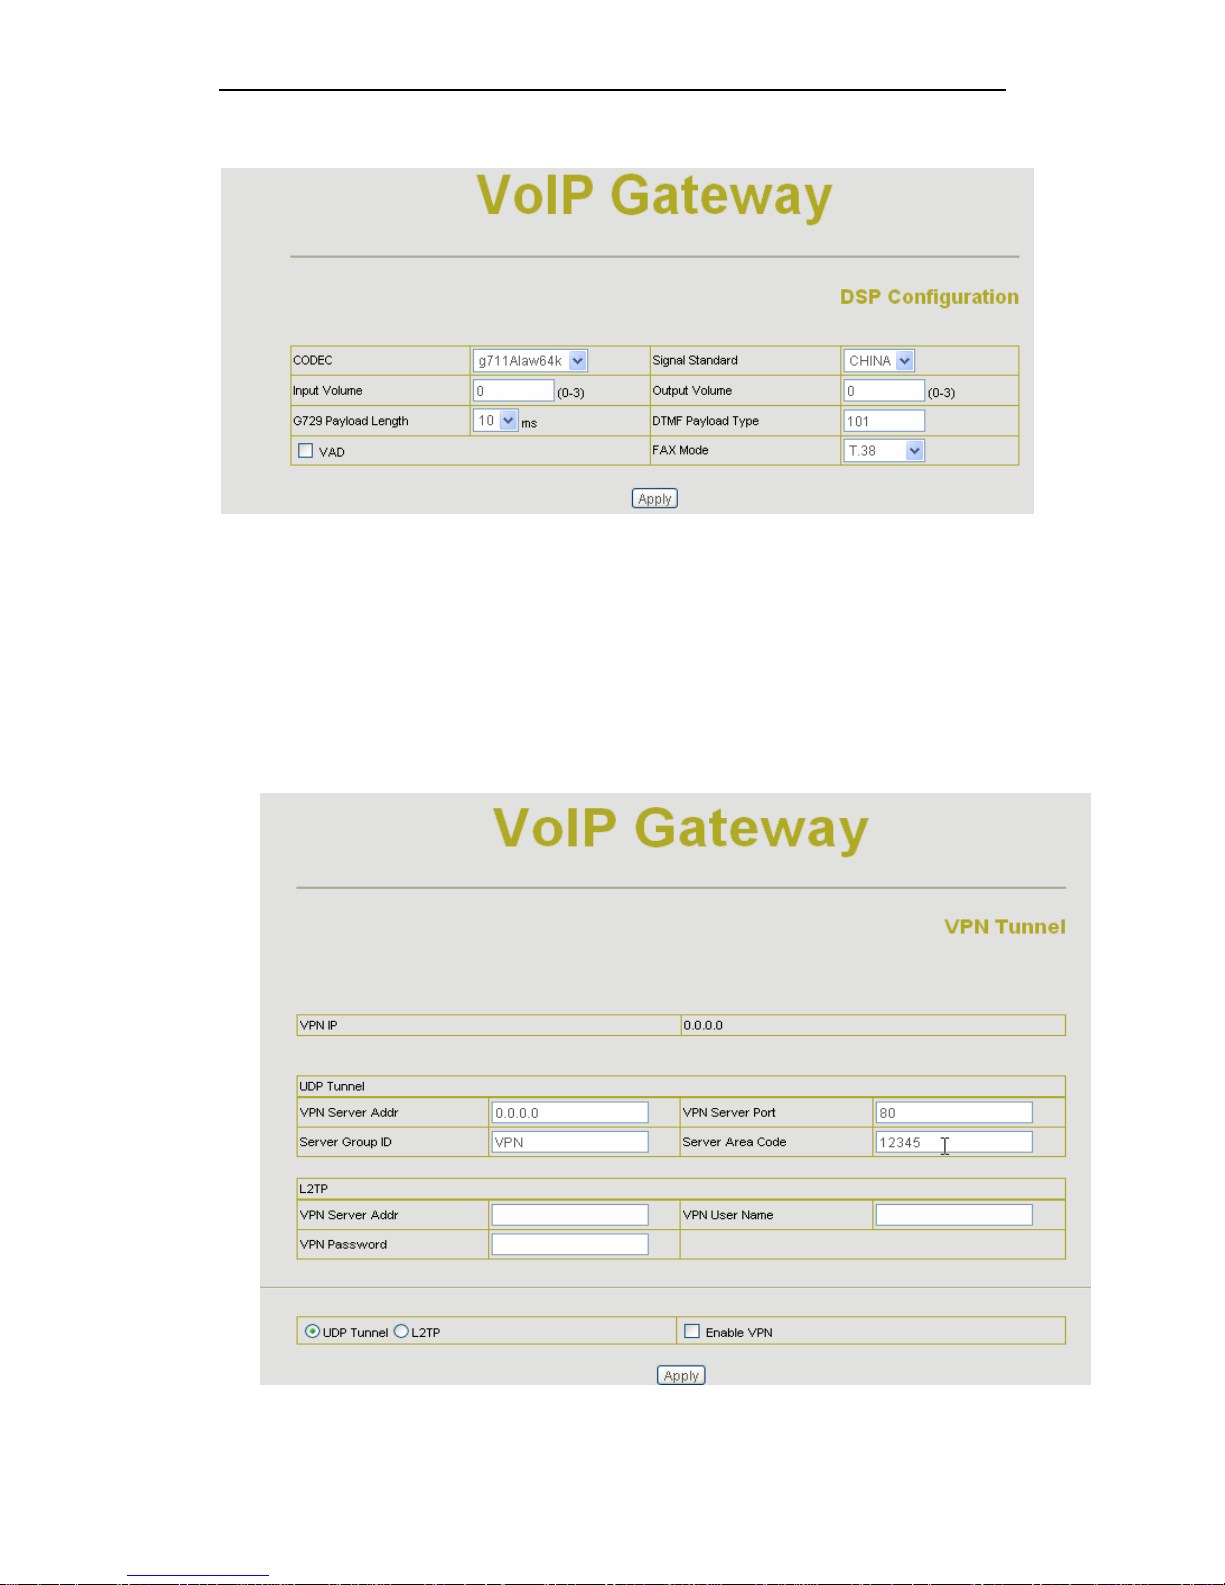
2.5.10 Audio Settings
CODEC: select the prefer CODEC; support ulaw, alaw and G729
Signal Standard: Support CHINA, Japan and USA standard
Input Volume: Handset in volume.
Output Volume: Handset out volume.
G729 Payload Length: G729 payload length
VAD: Enable/disable Voice Activity Detection
FAX Mode: select the FAX Mode
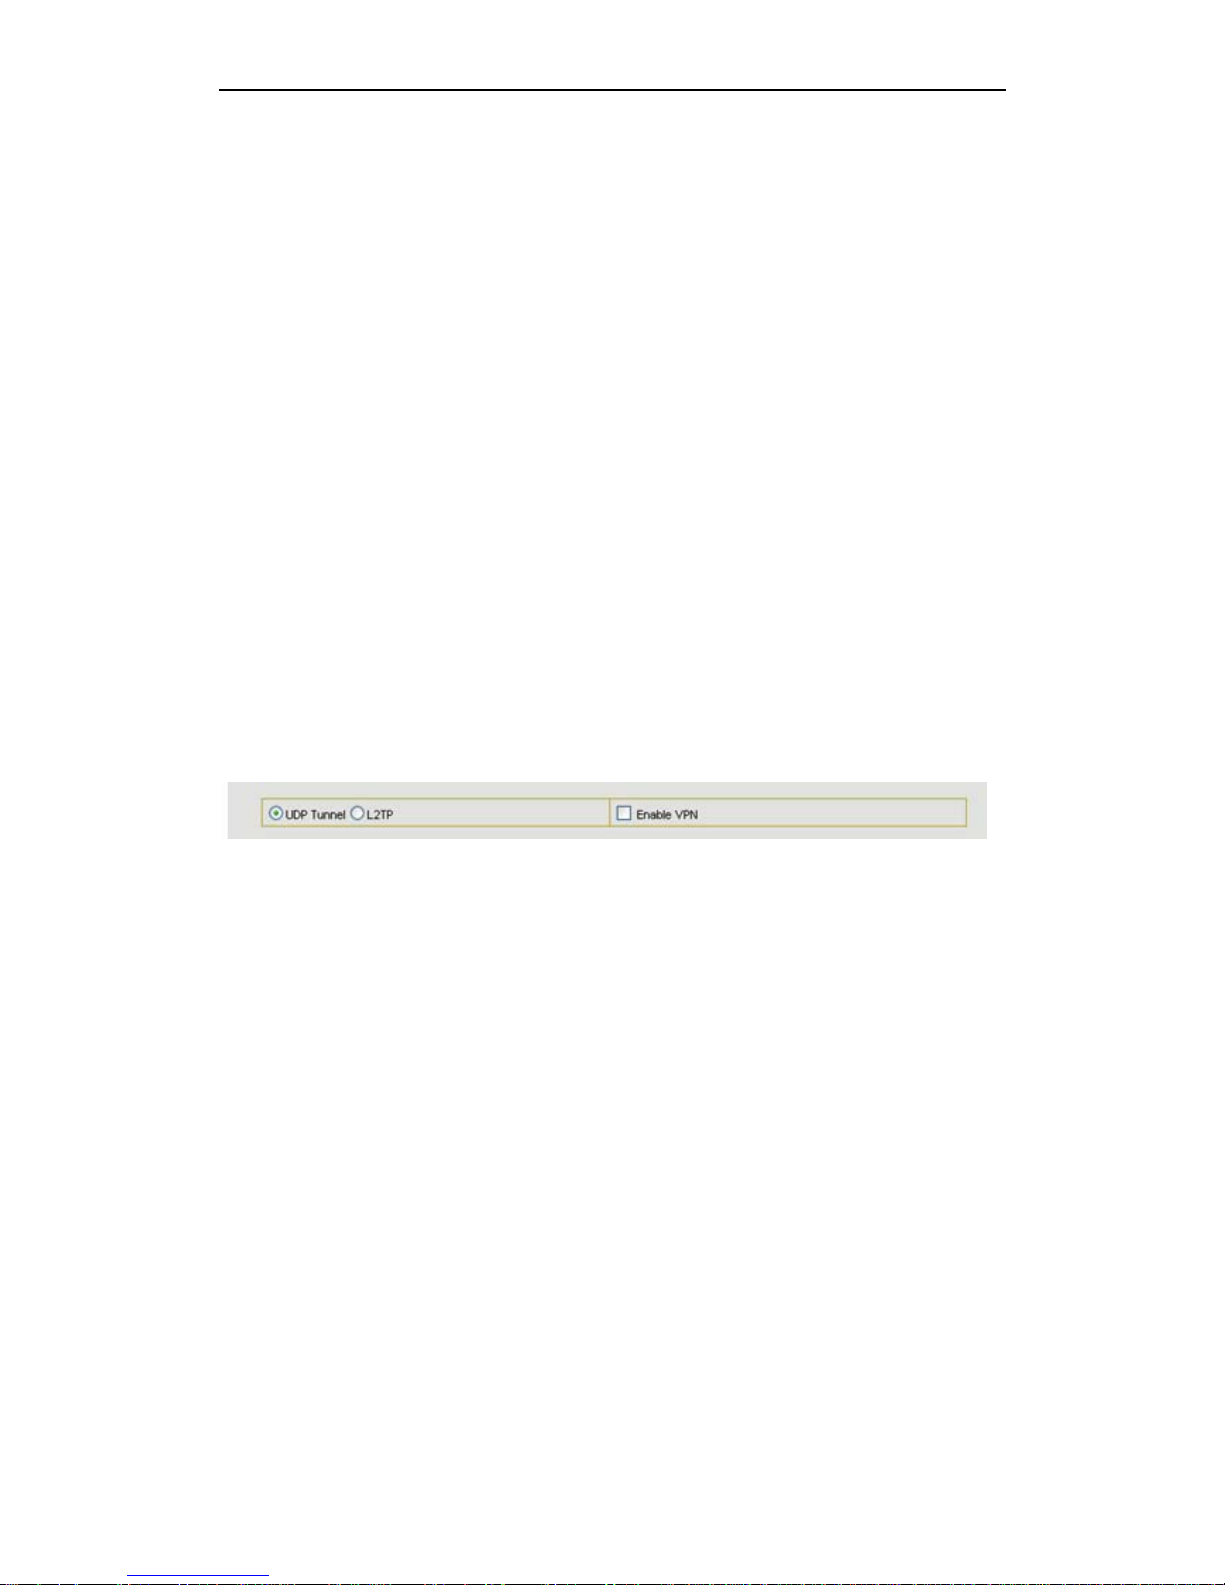
2.5.11 VPN
this page is VPN setting page , the IP phone support the VPN with UDP and L2TP
28 / 46
Page 29
NG-188 User Manual
protocol .The parameters is as below
VPN IP: After VPN registered successfully, VPN server will give an IP aggress to the
terminal . If there is a IP address shown on terminal (except for 0.0.0.0) ,it means your
VPN has registered
UDP Tunnel
VPN Server Addr: register to the address of VPN server 。
VPN Server Port: Register to the port of VPN server
Server Group ID: the group ID of UDP VPN
Server Area Code: the are code of VPN server
L2TP
VPN Server Addr: register to the address of VPN server
VPN User Name: L2TP VPN username
VPN Password: L2TP VPN password
UDPTunnel: use the UDP to visit VPN
L2TP: use the L2TP to visit VPN
Enable VPN: Enable the VPN server, you must choose UDP or L2TP type in advance
29 / 46
Page 30
NG-188 User Manual
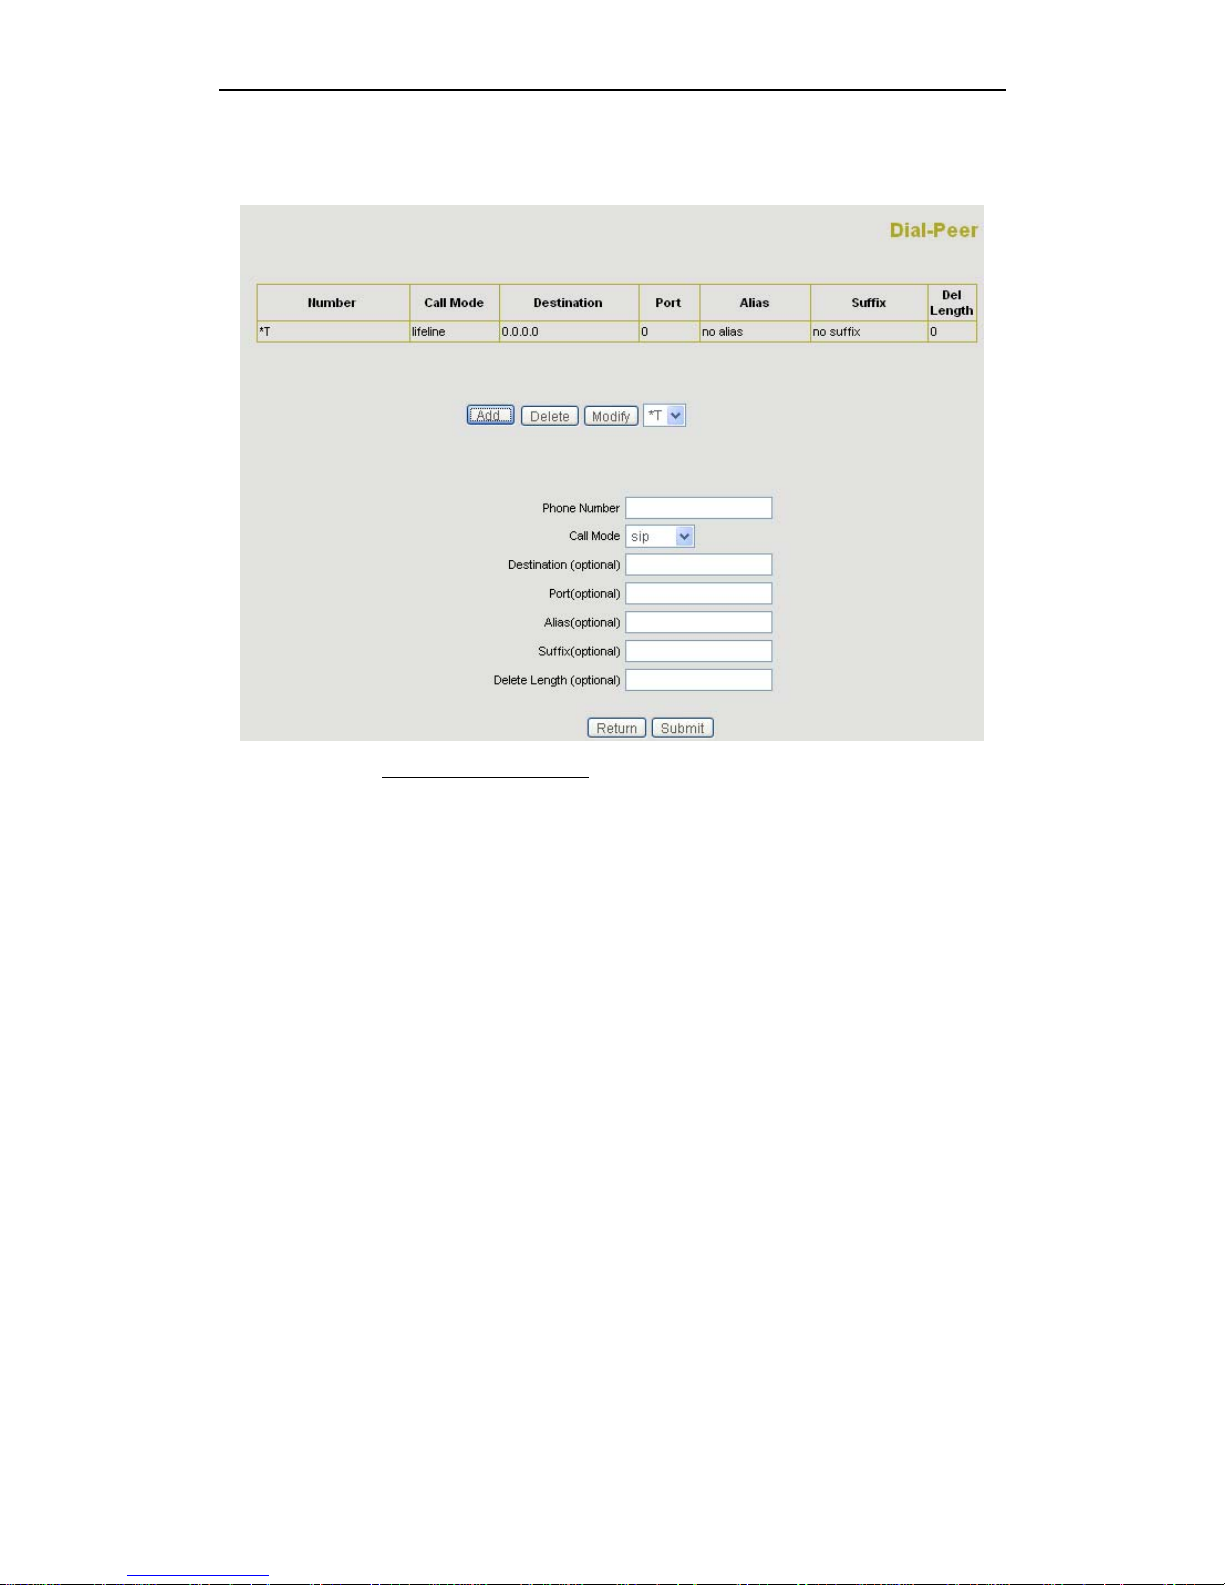
2.6 Dial-Peer Settings
Please refer to “how to use dial rule?” for detail.
30 / 46
Page 31

NG-188 User Manual
2.7 Config Manage
Save Config: save current settings.
Clear Config: restore to default settings.
Notice: clear config in admin mode, all settings restores to factory default; clear config in
guest modem, all settings except sip, advance sip restore to factory default.
31 / 46
Page 32
NG-188 User Manual
2.8 Update
2.8.1 Web Update:
update gateway’s settings or firmware. Firmware file is .dlf extension when configure
file is .cfg extension, NG-188 will auto select configure update or firmware update
according the extension.
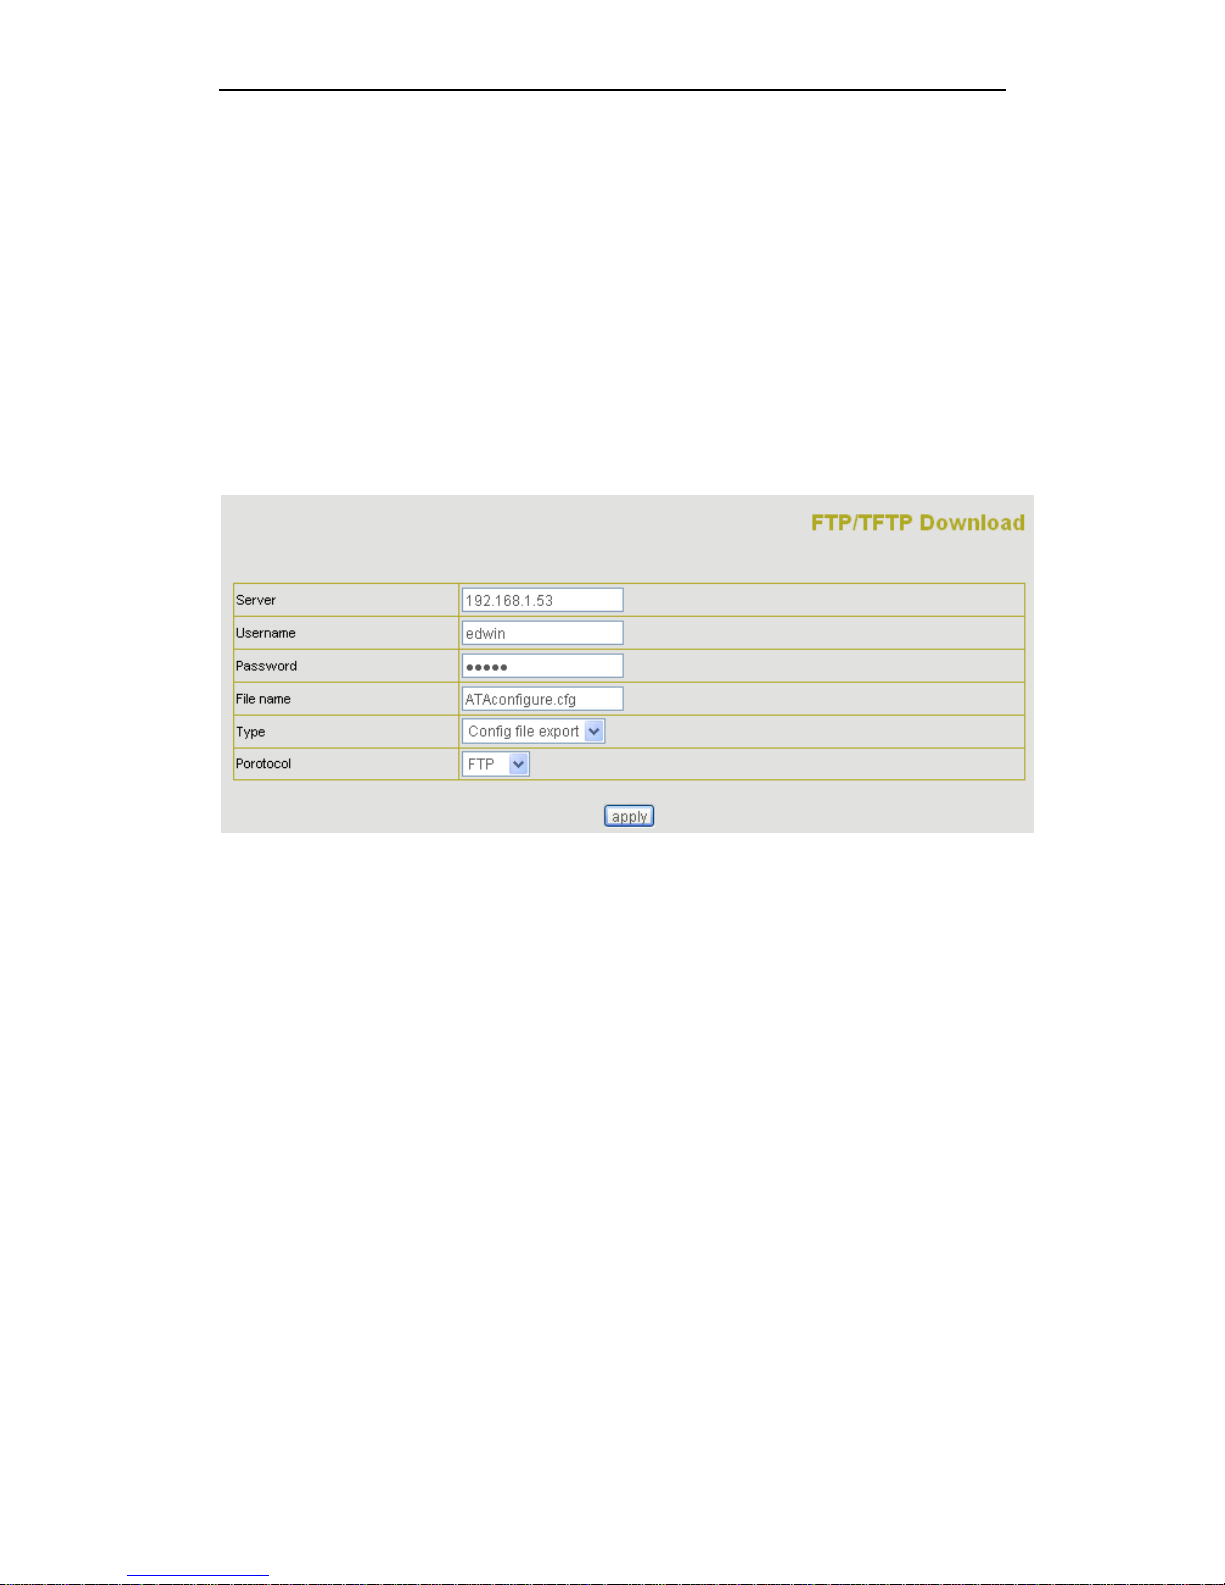
2.8.2 FTP Update:
back up the configure file to FTP or TFTP server. Or auto up date configure file from
your auto update server.
Back up configure file to your FTP/TFTP server.
* configure use .cfg extension.
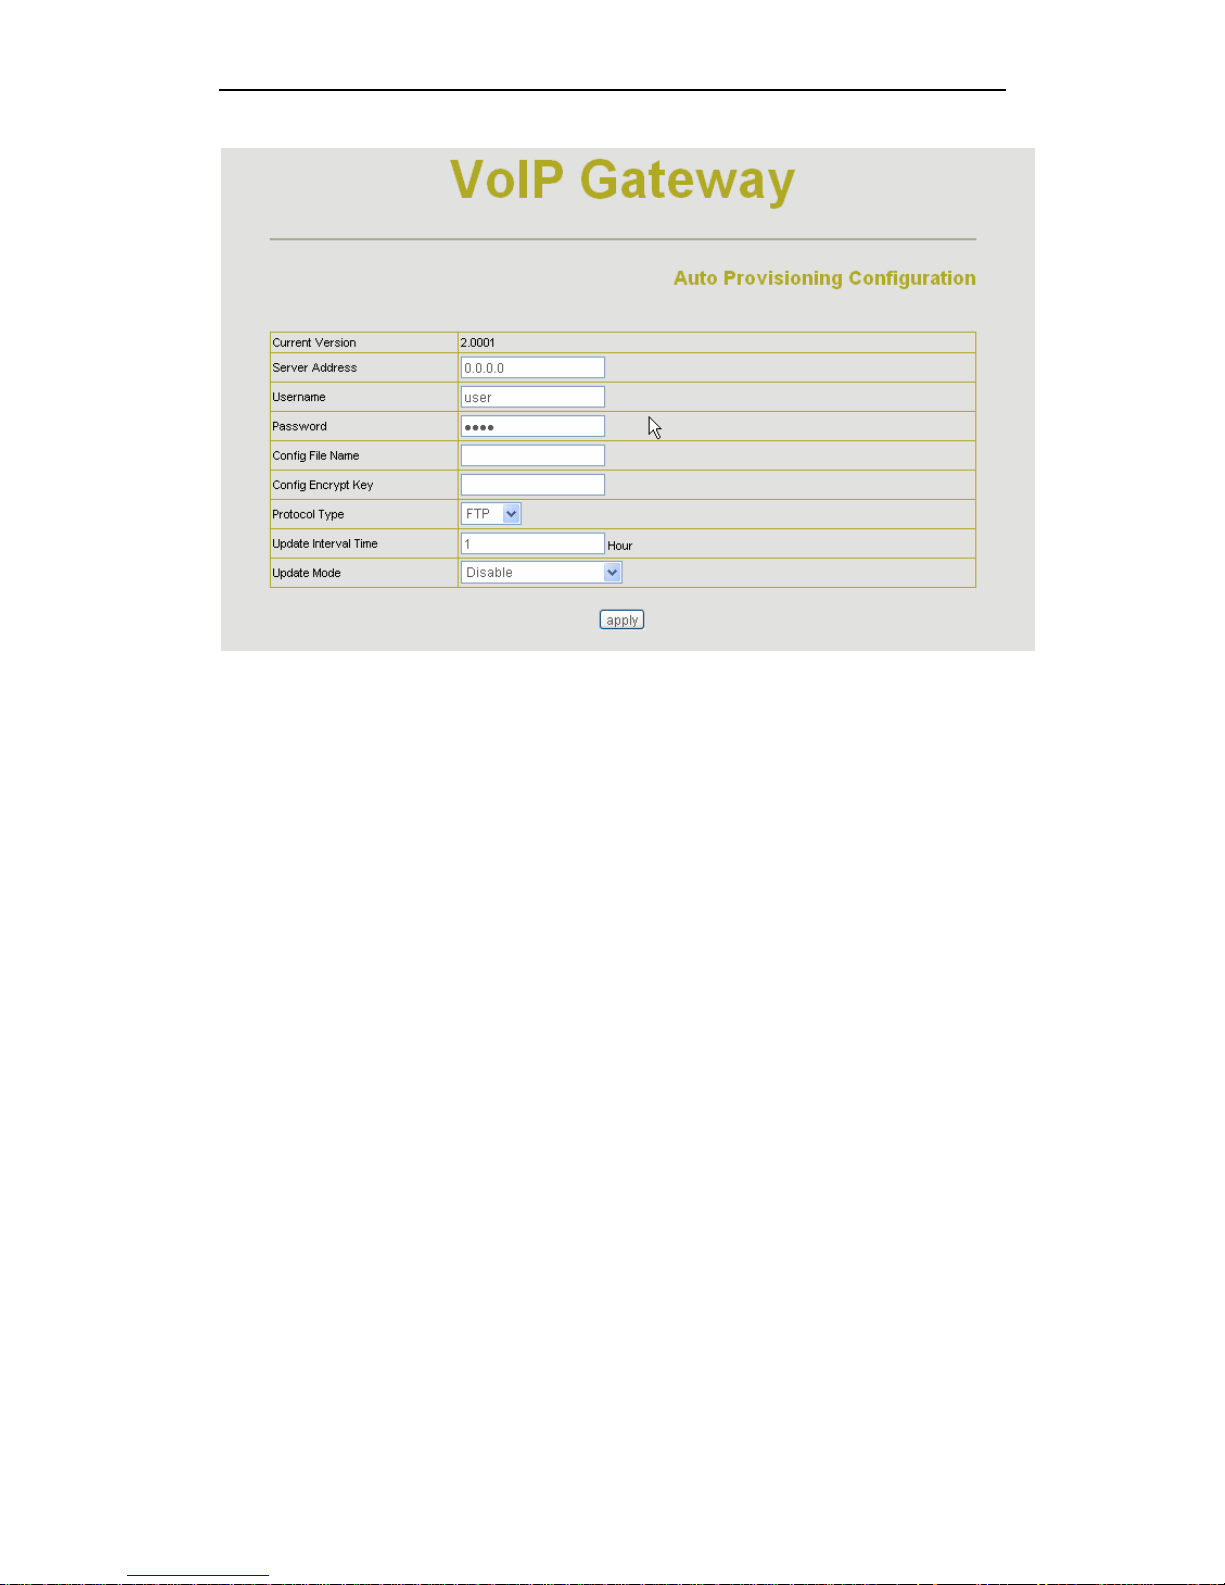
2.8.3 Auto update:
NG-188 gateway support FTP and TFTP auto update. The gateway will auto obtain the
configure file from your update server if configured. To obtain the original configure file,
you can use the FTP/TFTP back up as describe above. Configure file using module
structure, user may remain the concerned modules and remove other modules. Put the
configure file in the root directory of update serve when finish editing.
32 / 46
Page 33
NG-188 User Manual
Current Version: the system will display the current version number 。
Server Address: FTP/TFTP server address
Username: FTP server user name
Password: FTP server password
Config File Name: The name of configuration file
Config Encrypt Key: The encrypt key of confirmation file
Protocol Type: The protocol type that used for upgrading
Update Interval Time: The interval time that the terminals search for new configuration
file.
Update Mode: auto provision mode; Disable: not auto update,Update after reboot:auto
update after reboot,Update at time interval:auto update after a certain time
Configure file version was in the <<VOIP CONFIG FILE>> and <GLOBLE CONFIG
MODULE> ConfFile Version
For instance:
Gateway original version is:
<<VOIP CONFIG FILE>>Version:1.0000
<GLOBLE CONFIG MODULE> ConfFile Version:6
User may edit the configure file version to:
<<VOIP CONFIG FILE>>Version:1.0007
33 / 46
Page 34

NG-188 User Manual
<GLOBLE CONFIG MODULE> ConfFile Version:7
34 / 46
Page 35
NG-188 User Manual
2.9 System Manage
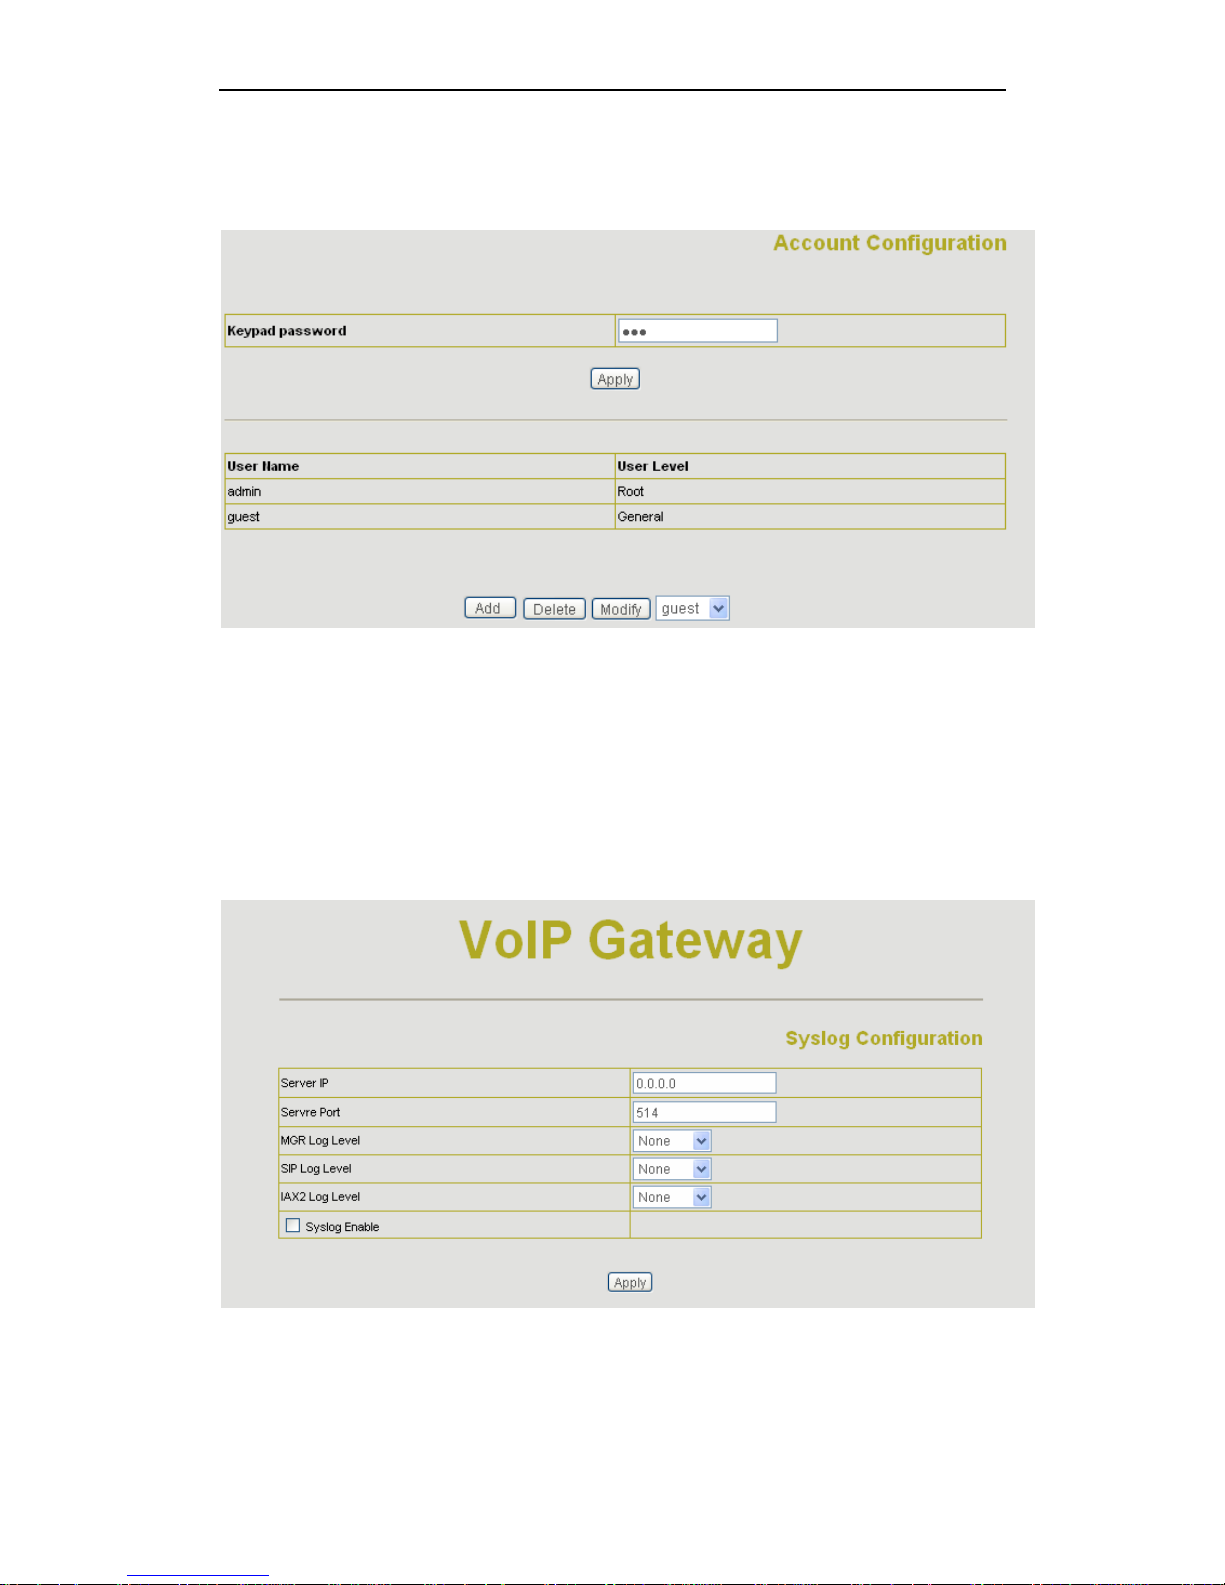
2.9.1 Account Manage
Set web access account or keypad password of AT-530.
2.9.2 Phone Book:
User may set contacts in this page, and the contacts will be saved in the memory. Then
using the Pbook, Vol+,Vol-,Menu/OK and Exit keys to choose your friend in the contacts
and then press # to call out.
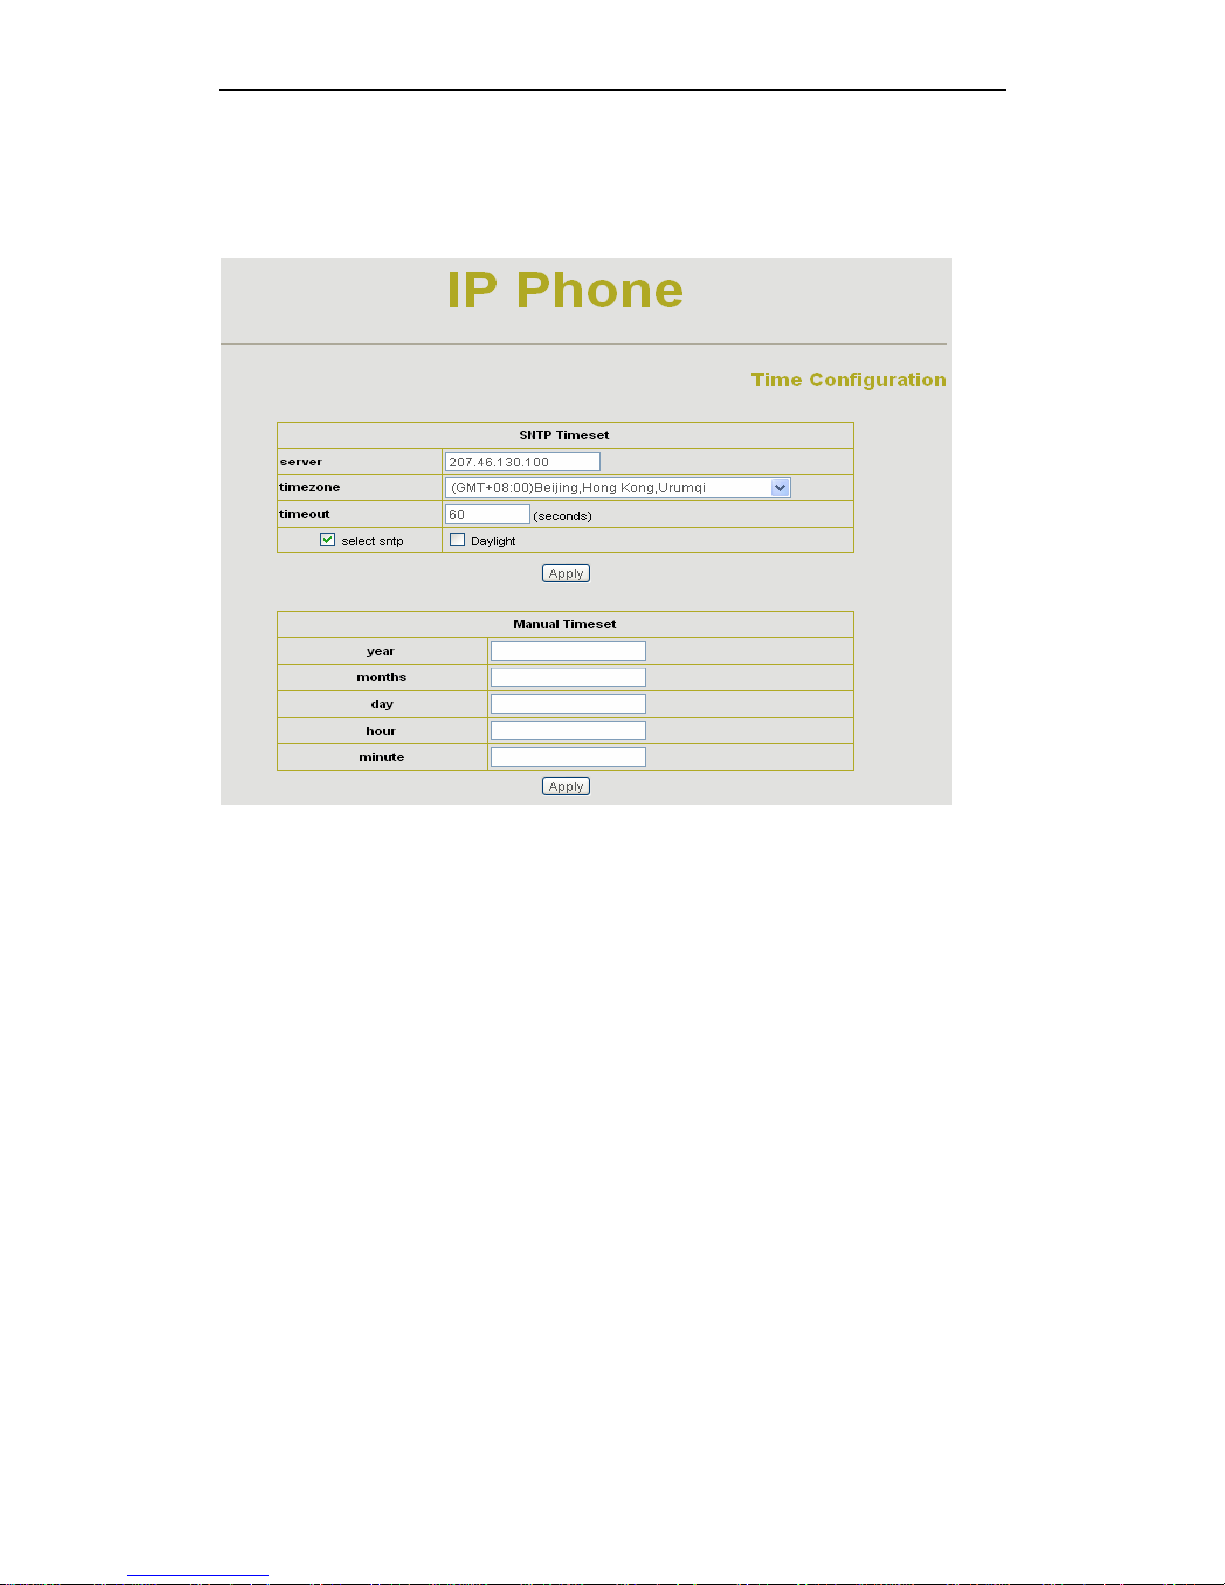
2.9.3 Syslog Config:
Server IP: set the syslog server address
Server Port: set the syslog server port
MGR Log Level: set the MGR log level
SIP Log Level: set the SIP log level
35 / 46
Page 36
NG-188 User Manual
IAX2 Log Level: set the IAX2 log level
Please click “apply” after setting
2.9.4 Time Set:
Server:type the ip address of time server
Timezone:select correct time zone in list box
Timeout: longest response time for SNTP
Manual Timeset:The time setting
Daylight:
Daylight Saving time
2.9.3 Reboot:
Reboot IP phone, some setting needs to reboot to make it works. Please always save
config before reboot, otherwise the setting will return to previous setting.
36 / 46
Page 37

NG-188 User Manual
3 Use normal phone to pre-configure NG-188 gateway
User may pre-config NG-188 gateway using a normal phone connecting to NG-188.
please refer the below command:
Notice: all command below can be end with # to speed response.
"#****" /*reboot gateway*/
"#*000" /*clear settings*/
"#*100" /*set the IP type to static ip */
"#*101" /*set IP type to DHCP */
"#*102" /*set IP type to PPPoE*/
"#*111" /*prompt gateway ip*/
"#*222" /* prompt phone number*/
Below setting need reboot to take effect
"#*103" /*change to bridge mode*/
"#*104" /*change to router mode*/
"#*50192.168.1.117" set WAN port IP address
"#*51192.168.1.1" set default gateway IP
"#*52202.112.10.37" set dns server
"#*53255.255.255.0” set netmask, use 255.255.255.0 if no be set
37 / 46
Page 38

NG-188 User Manual
4 Telnet Console
4.1 Introduce
4.1.1 Basic structure
User may use telnet command to access and manage gateway.
NG-188 adopts tree structure for telnet. Every node contains its sub-nodes or local
command. User can type “help” or “?” whenever to see sub-nodes and all local command
under current node.
Besides local command, there are some global commands can be used in each node.
4.1.2 Basic command
Logout: exit telnet mode.
Write: save current settings.
Type sub-nodes name in current node to switch to sub-node.
Type “!” or “exit” in current node to return to parent-node.
Type “help” or “?” can see all sub-nodes and all local command under current node, every
help item has comments such as <command> or <node> to distinguish sub-nodes and
local command. Type “help” or “?” in command can see all parameters using in this
command.
When typing node name or command, user no need to key the full name, use TAB button
will make it more efficient.
There are two types in command parameters: optional and required. “required” parameter
use “-” as prefix and “optional” use “_” as prefix. User may type “-” or “_” then press TAB
button for complementarily.
38 / 46
Page 39

NG-188 User Manual
4.2 Global Command
Global command is available under all nodes, NG-188 support following
commands:
Command Function Example
exit Return to parent-node #exit
logout Exit #logout
ping Ping command, use to check network, #ping www.google.com
write Save setting to flash #write
39 / 46
Page 40

NG-188 User Manual
5 Tree Structure
5.1.1 Debug (Level 0~7)
path: <debug>#
show debug setting ---show
[disable]enable debug all modules ---[no] all xxx
[disable]enable debug app module ---[no] app xxx
[disable]enable debug cdr module ---[no] cdr xxx
[disable]enable debug sip module ---[no] sip xxx
[disable]enable debug tel module ---[no] tel xxx
[disable]enable debug dsp module ---[no] dsp xxx
5.1.2 reload
usage: #reload
Reboot system
5.1.3 show system running info
¾ basic
path: <show>#
show network status
Example: #<show>#basic
Show ip packets Stat.
Example:#<show>#ip ip
Show RTP packets Stat.
Example:#<show>#ip rtp
Show TCP packets S tat.
Example:#<show>#ip tcp
Show UDP packets Stat.
Example:#<show>#ip udp
¾ memory
path: <show>#
show gateway memory
Example:#<show>#memory
¾ nat
path: <show>#
show NAT information
Example:#<show>#nat
40 / 46
Page 41

NG-188 User Manual
¾ uptime
path: <show>#
show running time
Example:#<show># uptime
¾ version
path: <show>#
show gateway version
Example:#<show># version
5.1.4 telnet and logout
Usage: #telnet –target -port
Login:xxx
Password:xxx
#
#logout
5.1.5 tracert trace network path info
usage: #tracert –host
Example:#tracert
www.google.com
6 Network Diagnosis
There are some telnet commands for checking your network. Now Listing below for your
information
Command Function Example
ping Check if the destination is accessible #ping www.google.com
tracert Show network path info #tracert www.google.com
show basic Show network settings #show basic
show ip route Show route table #show ip route
show ip arp Show arp table #show ip arp
telnet Telnet to another device #telnet 192.168.1.2
7 Restore to factory default
#setdefault clear gateway settings expect network part
#setdefault all clear all settings.
41 / 46
Page 42
NG-188 User Manual
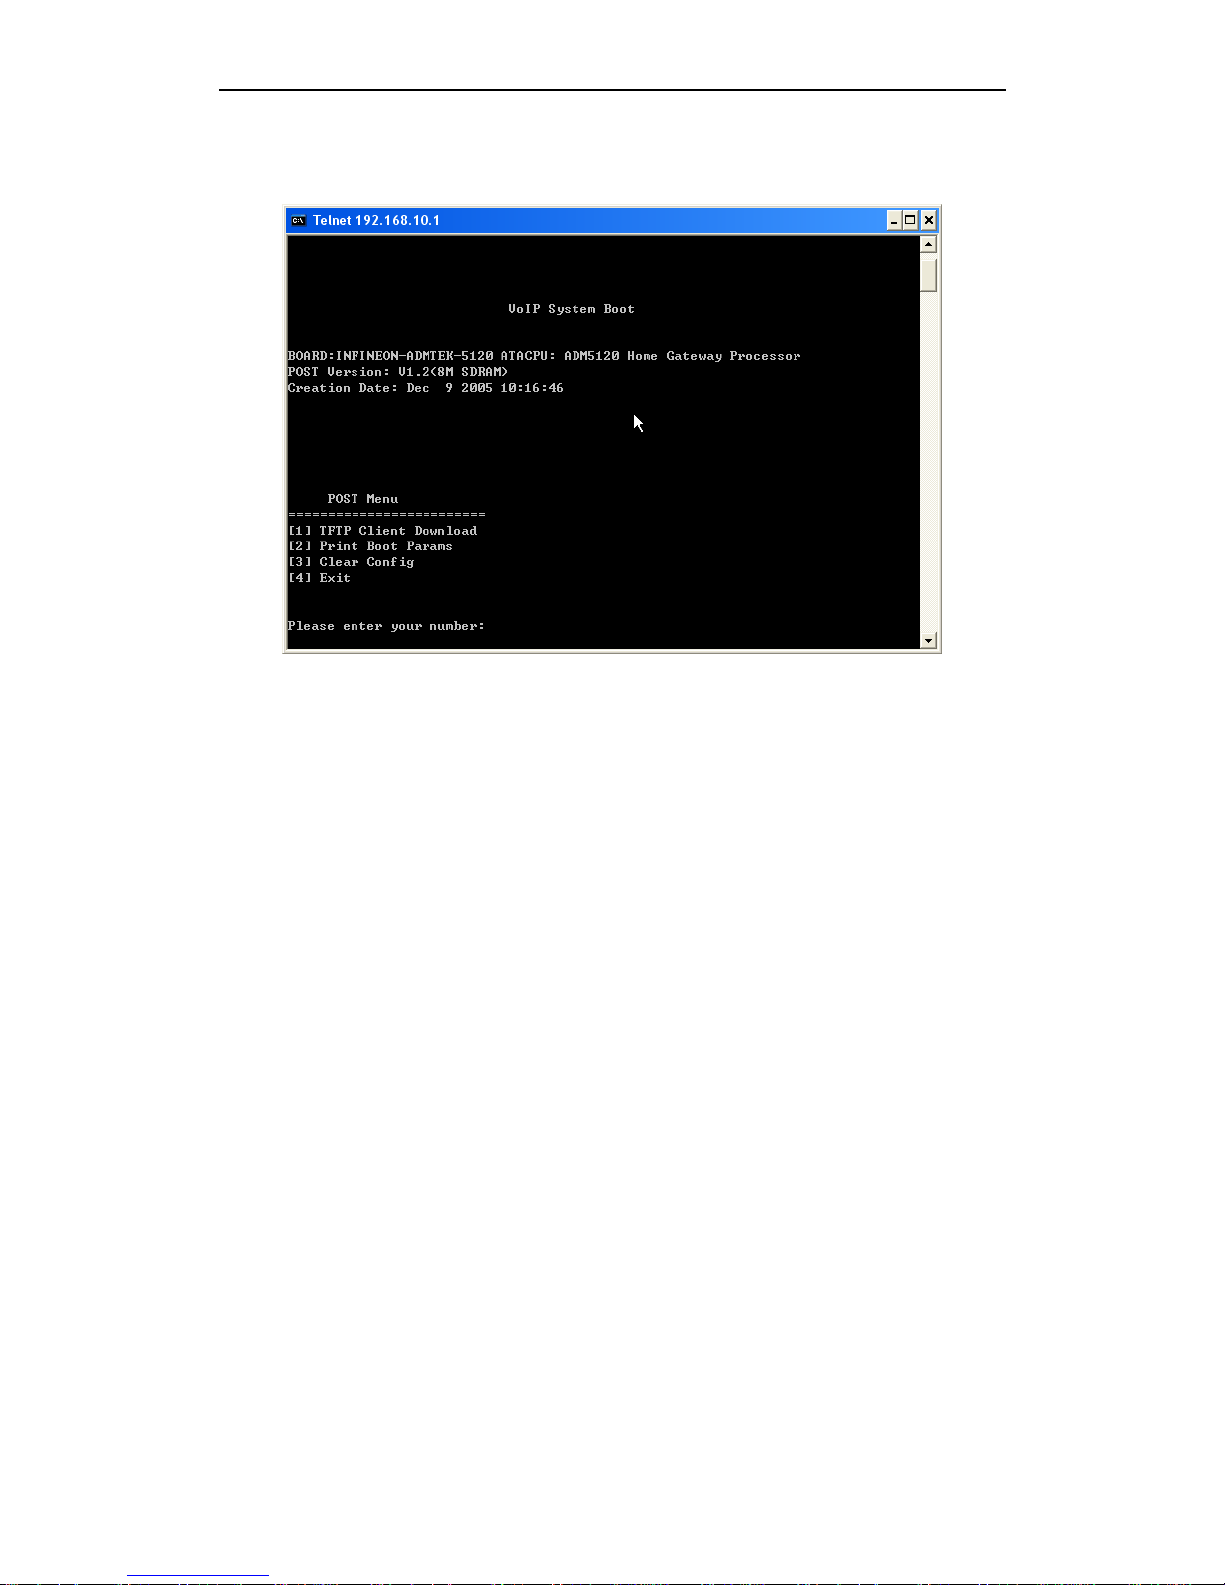
8 POST Mode(safe mode)
NG-188 provide safe mode. When there is booting problem because of setting problem or
firmware problem. User can restore the factory setting or upgrade to a new firmware to
solve this problem.
How to enter safe mode?
In the NG-188 booting procedure, it use the static ip 192.168.1.179 (WAN port IP) for a
short time, user can telnet to this ip address in this occasion to enter the save
mode.(remember to change your PC into the network 192.168.1.xx )
Then user can according the guide in post mode to clear the settings or upgrade the
firmware.
42 / 46
Page 43

NG-188 User Manual
9 FAQ
How many SIP servers may NG-188 register simultaneously?
NG-188 support 2 SIP servers and a IAX server. The Default server is SIP . If you want to use the
IAX server you must set IAX as default protocol in the IAX config page. IAX and SIP can register
simultaneously but not work simultaneously. If you set 2 SIP servers in the SIP setting page , you
can choose the route (server) by dialing plan which is edited by you. Please see
“How to use the
dial rule?” for detail.
How can I know the NG-188’s IP address?
Pick up the handset and then dial “#*111#”, and the NG-188 will promote you its IP address.
How to use NG-188’s Lifeline function?
NG-188 supports Lifeline function, you can use the same handset to place PSTN and VoIP calls.
First, you need to set up the Lifeline with the accessory send with the NG-188, connect this
accessory to NG-188’s FXS port, and then connect the handset to the accessory’s phone port,
connect the landline to the accessory’s line port. You can receive PSNT and VoIP calls simply with
configuration. To place the PSTN call, you need to set up as follow:
----Add a new dial rule in the Dial-Peer setting: set the phone number to *T, and choose the
Lifeline as the Call mode.
----Add new Digital map item in the Advance
Æ
Digital Map: set Prefix Number to and *, and the
length to 1.
Then when you want to place a PSTN calls, you can first press * to switch to the PSTN line and
then place your call as you normal do.
Why the settings vanish after reboot?
Please go to Config ManageÆSave Config to save your setting always.
How to use the dial rule?
NG-188 provide flexible dial rule, with different dial-rule configure, user can easily implement
the following function:
----Replace, delete or add prefix of the dial number.
----Make direct IP to IP call
----Place the call to different SIP server according the prefix.
----Make PSTN calls use Lifeline function (Please refer “
How can use the Lifeline function of
NG-188?”).
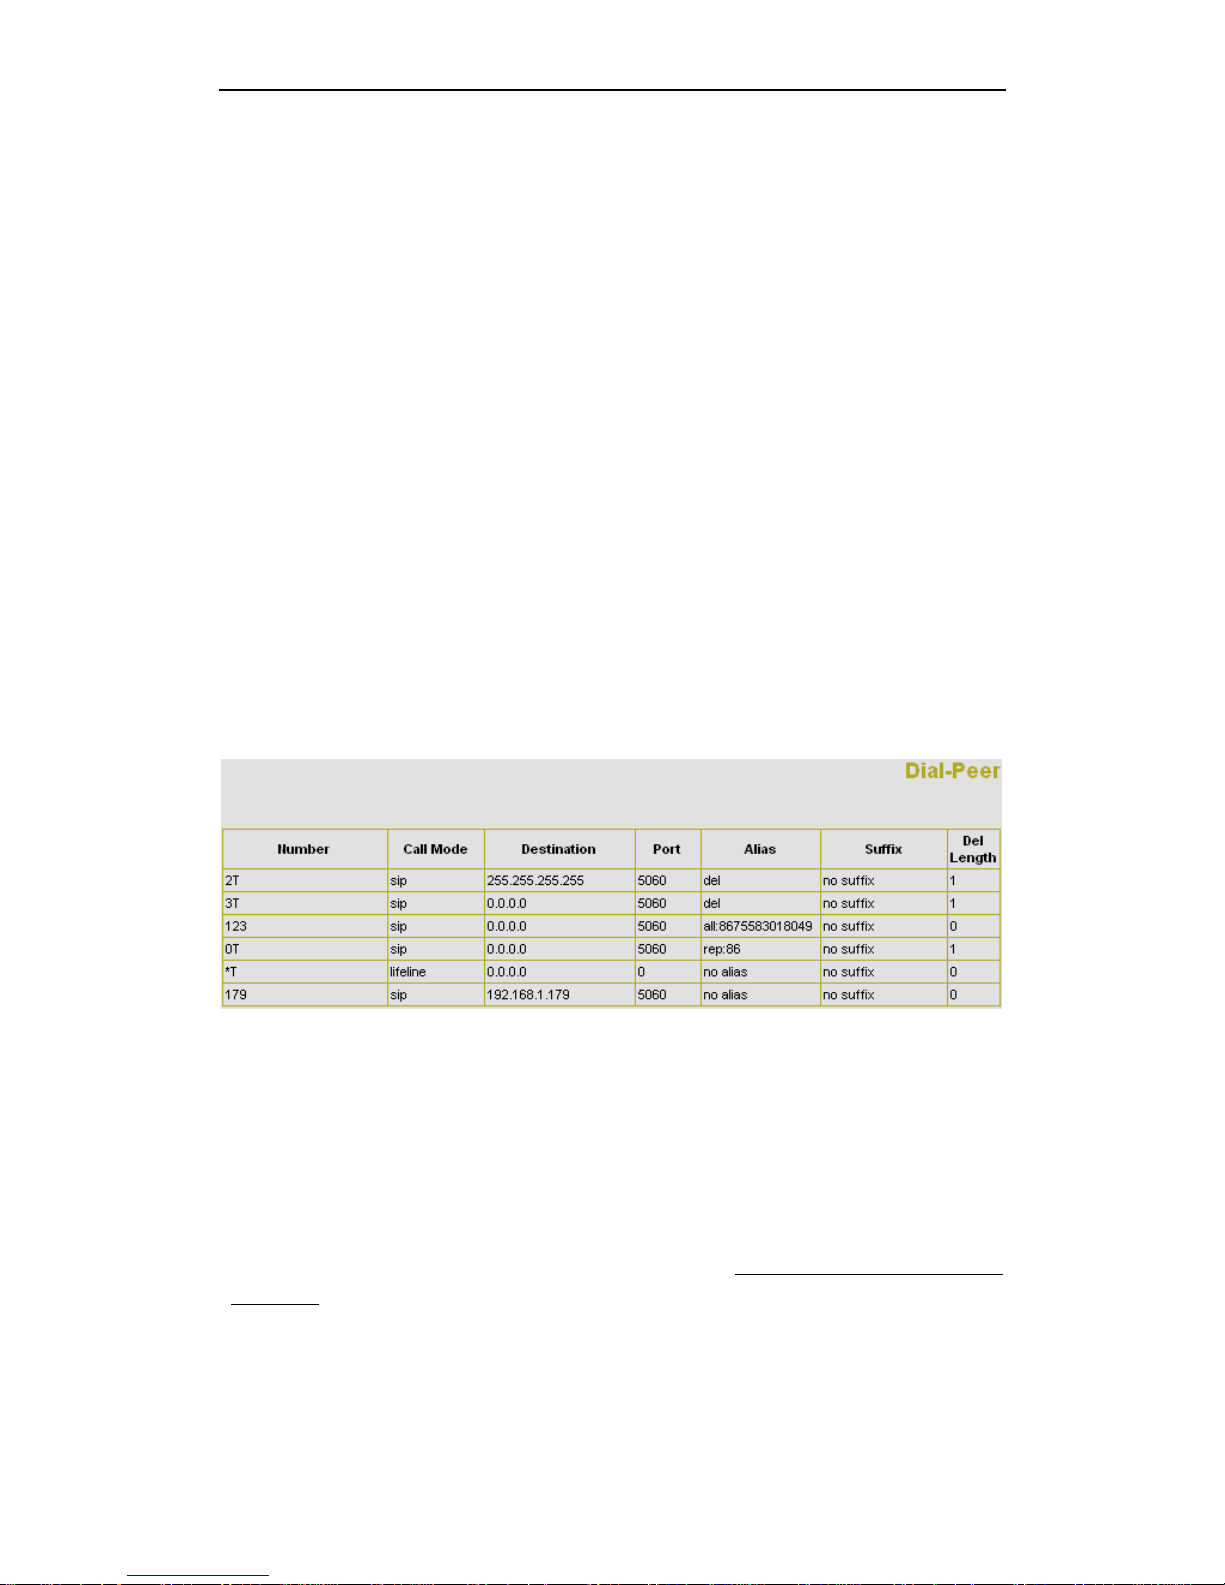
You can click “Add” to add a new dial rule. Below is the detail setting of the dial-rule:
Phone Number: The Number suit for this dial rule, cam be set as full match or prefix match. Full
match means that if the number user dialed is completely the same as this number, the call will use
43 / 46
Page 44
NG-188 User Manual
this dial-rule. Prefix match means that if prefix of the number that the user dials is the same as the
prefix, the call will use this dial-rule, to distinguish from the full match case, you need to add “T”
after the prefix number in the phone number setting.
Call Mode: support SIP and Lifeline,SIP means the call will use sip protocol,Lifeline means the
call will use the PSTN line.
Destination (optional): call destination, can be IP or domain. Default is 0.0.0.0, in this case the
call will be routed to the Public SIP server. If you set the destination to 255.255.255.255, then the
call will be routed to the private SIP server. Also you can key other address here to make direct IP
calls
Port (optional): Configure the port of the destination, default is 5060
Alias (optional):Set up the Alias. We support four Alias as below. Alias need to co-work with the
Del Length:
¾ add:xxx, add prefix to the phone number, can set to reduce the dial length.
¾ all: xxx, replace the phone number with the xxx, can use as speed dial function.
¾ del, delete the first N numbers. N is set in the Del Length
¾ rep:xxx,replace the first N numbers. N is set in the Del Length. For Example: Use wants to
place a call 8610-62281493, then you can set the phone number in the dial rule as 010T, and set
the Alias as rep:8610, and set the Del Length to 3. Then all calls begin with 010 will be changed to
8610 xxxxxxxx.
Suffix (optional):Configure suffix, show no suffix if not set
Instance:
2T rule: If the call starts with 2, the first 2 will be deleted, and the rest number will be sent to
private server.
3T rule: If the call starts with 3, the first 3 will be deleted, and the rest number with be sent to
public server.
123 rule: Dial 123 and will send 8675583018049 to your server. Used as speed dial function.
0T rule: If the calls is begin with 0, the first 0 will be replace by 86. Means that if you dial
075583018049 and NG-188 will send 8675583018049 to your server.
*T rule: Dial the * and the line with switch to PSTN. Note that you need to set another rule
“Prefix Number: *; Length: 1” in the Digital Map. (Refer
“How to use NG-188’s Lifeline
Function?”)
179 rule: when you dial 179 , the call with send to 192.168.1.179, suit for LAN application
without set up a sip server.
44 / 46
Page 45
NG-188 User Manual
How to use speed dial function?
Please refer to “How to use dial rule?”.
How to configure digital map?
Please refer digit map settings.
How to use Call Forward, Call Transfer and 3-way Conference
calls?
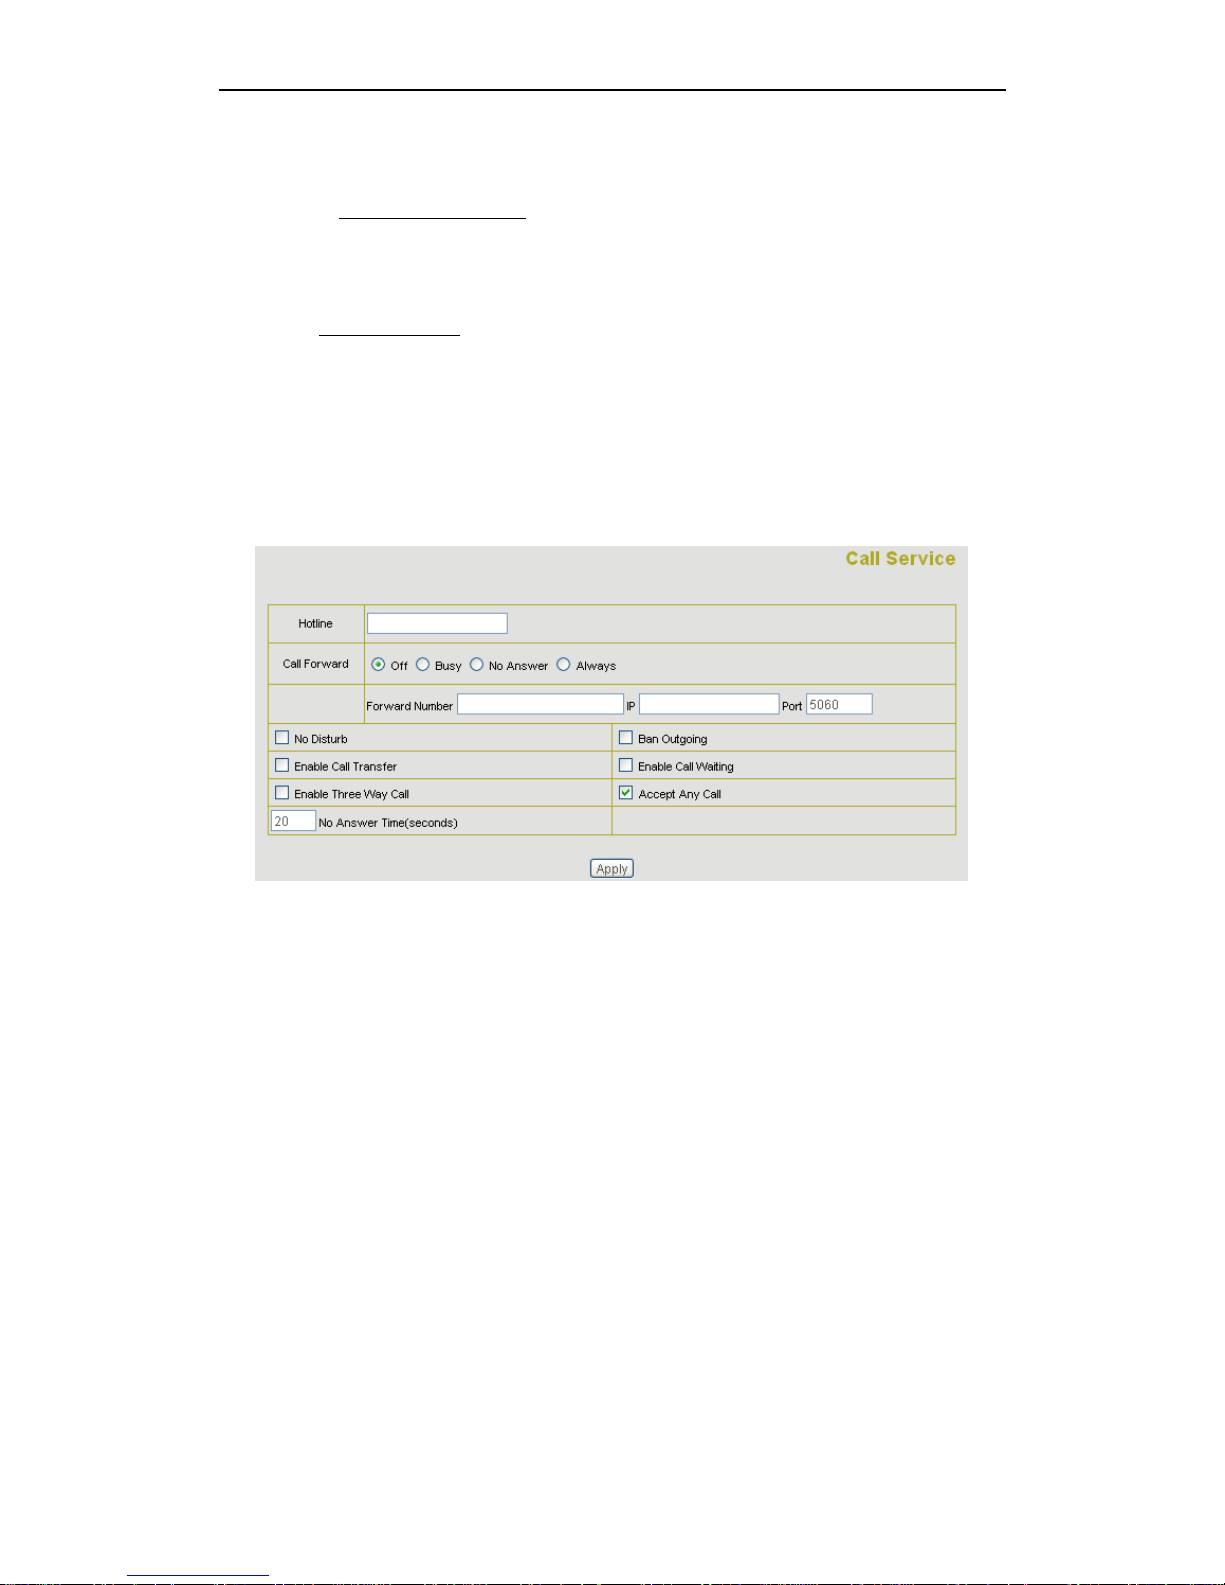
User may set up the configuration in the Call Service page to use these value add service.
Call Forward:
--Forward when busy: select Busy in the Call Forward Field, and Key in the destination phone
--Forward no answer: Select No Answer in the Call Forward Field, and Key in the destination
--Forward Always: Select Always in the Call Forward Field, and Key in the destination phone
¾
--
number in the Forward Number. If some one calls you when you having a call, the caller will be
forwarded to the destination number.
--
phone number in the Forward Number, fill the time in the No Answer Time. If some one calls you
and no one answer the caller during the No Answer Time, the call will be forward to the
destination number.
--
number in the Forward Number, then any one calls this gateway will be forward to the destination
number.
45 / 46
Page 46

NG-188 User Manual
Call Transfer:
c all Transfer.
lls and talking with A through VoIP. A can press the Hook-Flash
3-Way Conference Calls
c
unction .Assume A is the NG-188 user, and B calls and talking
¾
Che k the Enable C
If A is the NG-188 user, and B ca
to hold the call with B, and then press * and then enter C’s number. B will be transferred to C
and can talk with C.
¾
Che k Enable Three Way Call
Only sip protocol support this f
with A through VoIP. A can press Hook-Flash to hold the call with B, then enter C’s number to
talk with C, and then press Hook-Flash again switch back to user B , then A can press * to
make 3-way conference calls.
Notice: A can press Hook-Flash to switch between B and C. or press # to cancel the current call
and switch to the other user.
46 / 46
 Loading...