

Page 1

Netopia VoIP ATA
Quickstart Guide
VoIP ATA Package Contents Checklist
For any missing items, please contact your dealer immediately.
Top View:
Rear Panel:
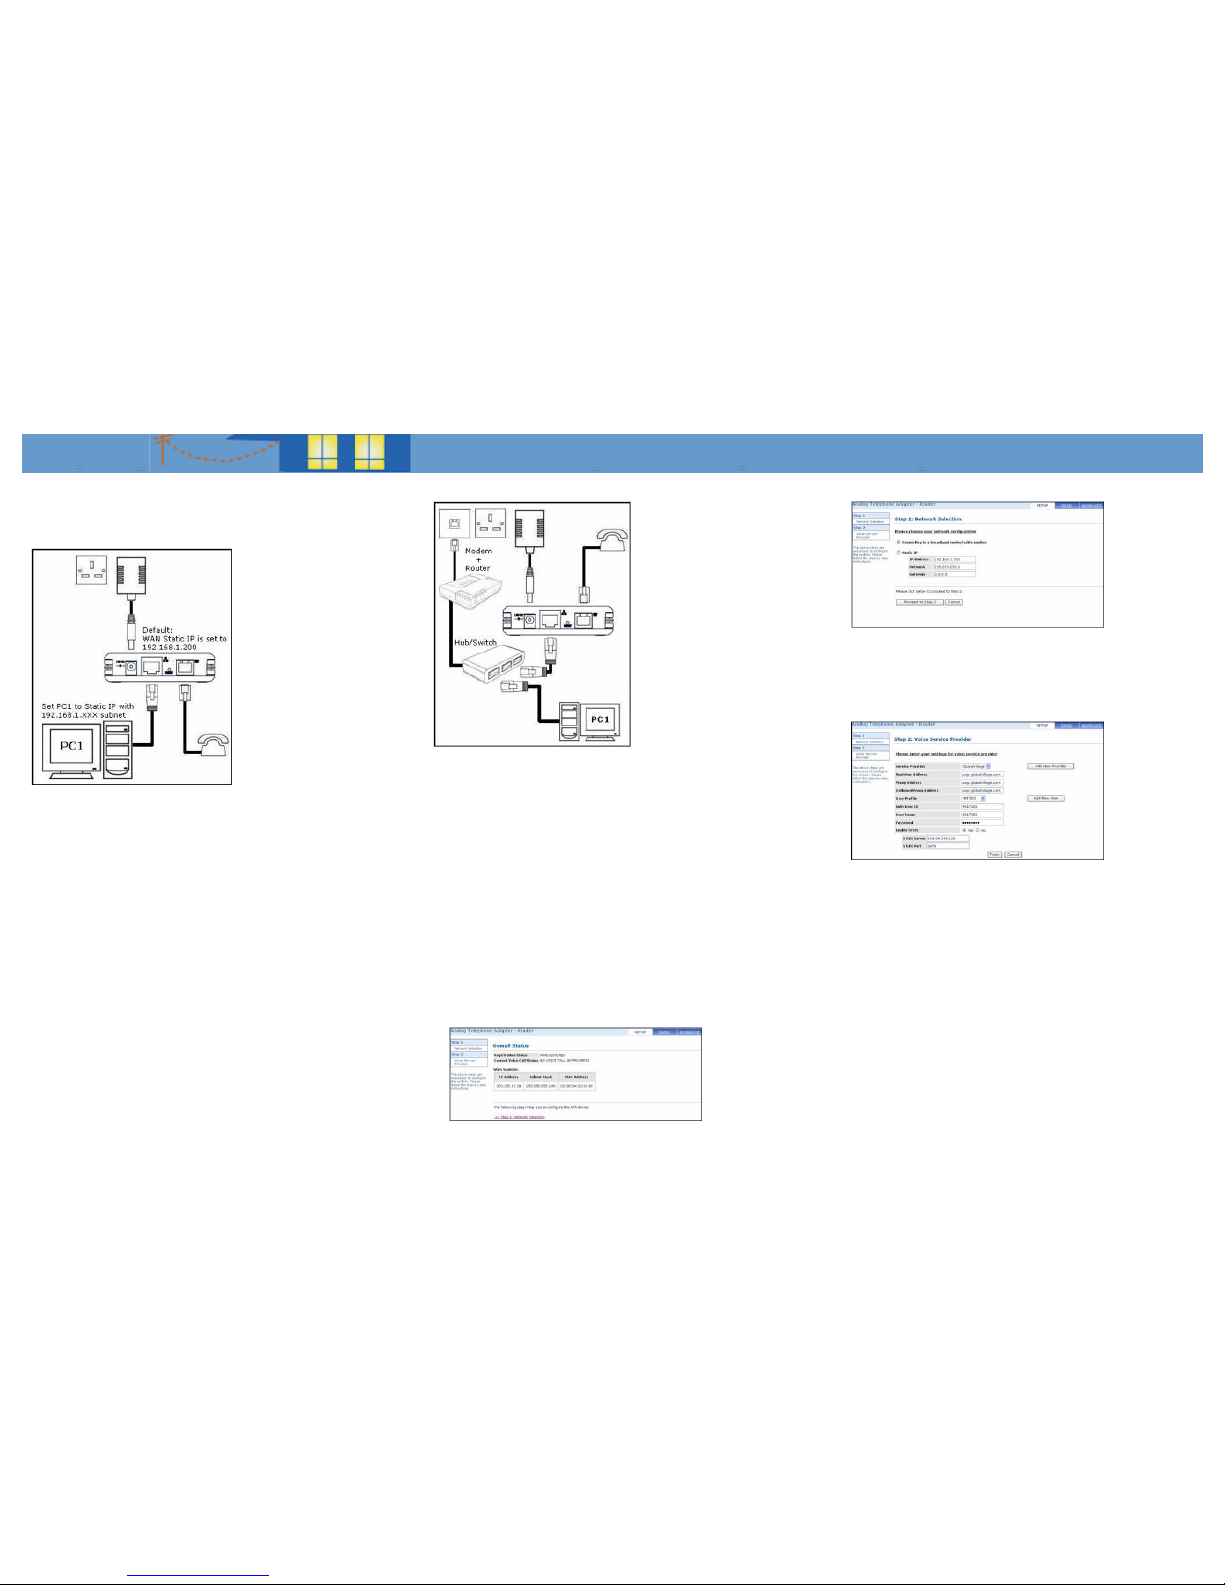
Typical VoIP ATA Connection
ADSL Connection Diagram Cable Connection Diagram
For a Company Network Connection
UDP port 5060 for SIP Signaling and UDP ports 5000-5020 for RTP must be open.
Netopia VoIP ATA
CD & Quickstart
Guide
Power
Supply
Gray RJ-11
Telephone
Cable
Gray RJ-45
Ethernet
Cable
IIIIMMMMPPPPOOOORRRRTTTTAAAANNNNTTTT SSSSAAAAFFFFEEEETTTTYYYY IIIINNNNSSSSTTTTRRRRUUUUCCCCTTTTIIIIOOOONNNNSSSS –––– PPPPOOOOWWWWEEEERRRR SSSSUUUUPPPPPPPPLLLLYYYY IIIINNNNSSSSTTTTAAAALLLLLLLLAAAATTTTIIIIOOOONN
NN
Connect the power supply cord to the power jack on the Netopia ATA. Plug the
power supply into an appropriate electrical outlet.
CAUTION:
Depending on the power supply provided with the product, either the direct plugin power supply blades, power supply cord plug or the appliance coupler serves
as the main power disconnect. It is important that the direct plug-in power supply,
socket-outlet or appliance coupler be located so it is readily accessible.
(Sweden) Apparaten skall anslutas till jordat uttag när den ansluts till ett nätverk
(Norway) Apparatet må kun tilkoples jordet stikkontakt.
TTTTEEEELLLLEEEECCCCOOOOMMMMMMMMUUUUNNNNIIIICCCCAAAATTTTIIIIOOOONNNN IIIINNNNSSSSTTTTAAAALLLLLLLLAAAATTTTIIIIOOOONN
NN
When using your telephone equipment, basic safety precautions should always be
followed to reduce the risk of fire, electric shock and injury to persons, including
the following:
• Do not use this product near water, for example, near a bathtub, wash bowl,
kitchen sink or laundry tub, in a wet basement or near a swimming pool.
• Avoid using a telephone (other than a cordless type) during an electrical storm.
There may be a remote risk of electrical shock from lightning.
• Do not use the telephone to report a gas leak in the vicinity of the leak.
SSSSAAAAVVVVEEEE TTTTHHHHEEEESSSSEEEE IIIINNNNSSSSTTTTRRRRUUUUCCCCTTTTIIIIOOOONNNNSS
SS
LED STATUS DESCRIPTIONS
POWER
On The VoIP ATA is receiving power.
ETHERNET
On The VoIP ATA has an Ethernet connection with a cable
or DSL modem or network.
Blinking The VoIP ATA is sending/receiving data to/from the
cable/DSL modem or network.
Off The VoIP ATA doesn't have an Ethernet connection with
the cable/DSL modem or network.
PHONE
On This port is registered to the Internet Phone Service
Provider.
Blinking The telephone(s) connected to this(these) port(s)
is(are) off-hook.
Off This port is not registered to an Internet Phone Service
Provider.
DESCRIPTIONS
POWER
This is where the included power adapter is connected.
MODEM
This port allows connection of the VoIP ATA to a router, gateway or network using a Category 5 (or better) Ethernet network cable (RJ-45).
ETHERNET SWITCH PHONE LINE
RESET
Press and hold the RESET button for 2 to 4 seconds to restore the VoIP
ATA's WAN Static IP to 192.168.1.200 while keeping all the other settings
intact.
Press and hold the RESET button for more than 5 seconds to restore the
VoIP ATA to default factory settings.
PHONE
The PHONE port allows you to connect your telephone to the VoIP ATA
using an RJ-11 telephone cable.
B
ROADBAND
WITHOUT
B
OUNDARIES
™
Page 2
Setting Up Your Computer
Accessing the Web UI Using Static IP
These instructions are for Windows 98/ME/2000 and XP operating systems.
1.
In Windows XP, click Start-> Control Panel.
In Windows 98/ME/2000, click Start-> Settings-> Control Panel.
2.
In Windows XP, click Network Connections.
In Windows 98/ME/2000, click Network and Dial-up Connections.
3.
Right-click Local Area Connection and then click Properties.
4.
Select Internet Protocol (TCP/IP) (under the General tab in Windows XP) and
click Properties.
5.
Select Use the following IP address and enter information as below:
IP address : 192.168.1.XXX (IP Address set must be unique)
Subnet mask : 255.255.255.0
Default gateway : -Blank-
6.
Click OK to close the Internet Protocol (TCP/IP) Properties window.
7.
Click Close (OK in Window 98/ME/2000) to close the Local Area Connection
Properties window.
8.
Close the Network Connections screen.
9.
Launch a web browser and enter “192.168.1.200” at the address bar and press
Enter.
10.
Log in using User name “admin” and the default Password “epicrouter”
Accessing the Web UI Using a Hub or Switch
If the Router’s LAN is already in the 192.168.1.XXX subnet, launch a web browser and
enter “192.168.1.200” (VoIP ATA’s Static IP) at the address bar and press Enter.
If the Router’s LAN is using a subnet other than 192.168.1.XXX:
1.
Access the VoIP ATA’s Web UI using Static IP as described above and set the
VoIP ATA as a DHCP client.
2.
Access the Router’s Web UI.
3.
Determine what IP Address has been assigned to the VoIP ATA.
4.
Launch a web browser and enter the assigned IP Address at the address bar
and press Enter.
5.
Log in using the User name “admin” and the default Password “epicrouter”
VoIP ATA Setup via the Web UI
An account from a SIP service provider is required to make VoIP calls with the ATA.
Initial Configuration
1.
Upon successfully logging in, the Setup mode screen, shown below, appears.
2.
Click on “Step 1: Network Selection” to start configuring the VoIP ATA.
3.
Depending on your System Setup (see the User’s Guide on the accompanying
CD for details), select Connecting to a broadband router/cable modem and
click “Proceed to Step 2”.
4.
Fill in the fields with information exactly as provided by the Service Provider
or network administrator.
5.
Click Finish to save your configuration and reboot the VoIP ATA.
6.
Wait approximately 30 seconds for the process to complete. A “Saving Configuration” message is displayed during this process.
Making Phone Calls
• PSTN Calls
To call regular phone numbers, use your Service Provider’s dialing plan.
• Internet Calls
To make a VoI P call, dial the SIP number on your phone’s dial pad.
NNNNeeeettttooooppppiiiiaaaa PPPPaaaarrrrtttt NNNNuuuummmmbbbbeeeerrrr::
::
6180166-00-01
Copyright 2006, Netopia, Inc. Netopia and the Netopia logo are registered trademarks
belonging to Netopia, Inc., registered U.S. Patent and Trademark Office. Broadband
Without Boundaries is a trademark belonging to Netopia, Inc. All other trademarks are
the property of their respective owners. All rights reserved.
 Loading...