

Page 1
iViewHD Userʼs Manual
Manual V1.05
Firmware V2.0drn or later
Website V2.0aoa or later
November 11, 2009
Page 2

iViewHD Userʼs Manual
NetMedia, Inc.
10940 N. Stallard Place
Tucson, Arizona 85737
TEL: (520) 544-4567
FAX: (520) 544-0800
http://NetMedia.com
PURCHASE TERMS AND CONDITIONS
The laws of the State of Arizona shall govern PURCHASE TERMS AND CONDITIONS. LIMITED WARRANTY:
NETMEDIA MAKES NO WARRANTIES OTHER THAN THOSE CONTAINED HEREIN AND NETMEDIA EXPRESSLY
DISCLAIMS ANY AND ALL IMPLIED WARRANTIES, INCLUDING ANY WARRANTY OF FITNESS FOR A PARTICU
LAR PURPOSE OR OF MERCHANTABILITY.
The foregoing limited warranty shall not apply unless Buyer has paid for in full the NetMedia products. Elec
tronic updates to the NetMedia iViewHD User’s Manual and NetMedia iViewHD software are available free to
Registered Buyer upon request for a one (1) year period from the invoice date.
NOTICE
NetMedia, Inc. reserves the right to make improvements in the software product described in this manual as
well as the manual itself at any time and without notice.
DISCLAIMER OF ALL WARRANTIES AND LIABILITY
NETMEDIA, INC. MAKES NO WARRANTIES, EITHER EXPRESSED OR IMPLIED, WITH RESPECT TO THIS MANUAL
OR WITH RESPECT TO THE SOFTWARE DESCRIBED IN THIS MANUAL, ITS QUALITY, PERFORMANCE, MERCHANTABILITY, OR FITNESS FOR ANY PARTICULAR PURPOSE. NETMEDIA, INC. SOFTWARE IS SOLD OR LICENSED “AS IS”. IN NO EVENT SHALL NETMEDIA, INC. BE LIABLE FOR INCIDENTAL OR CONSEQUENTIAL DAMAGES RESULTING FROM ANY DEFECT IN THE SOFTWARE.
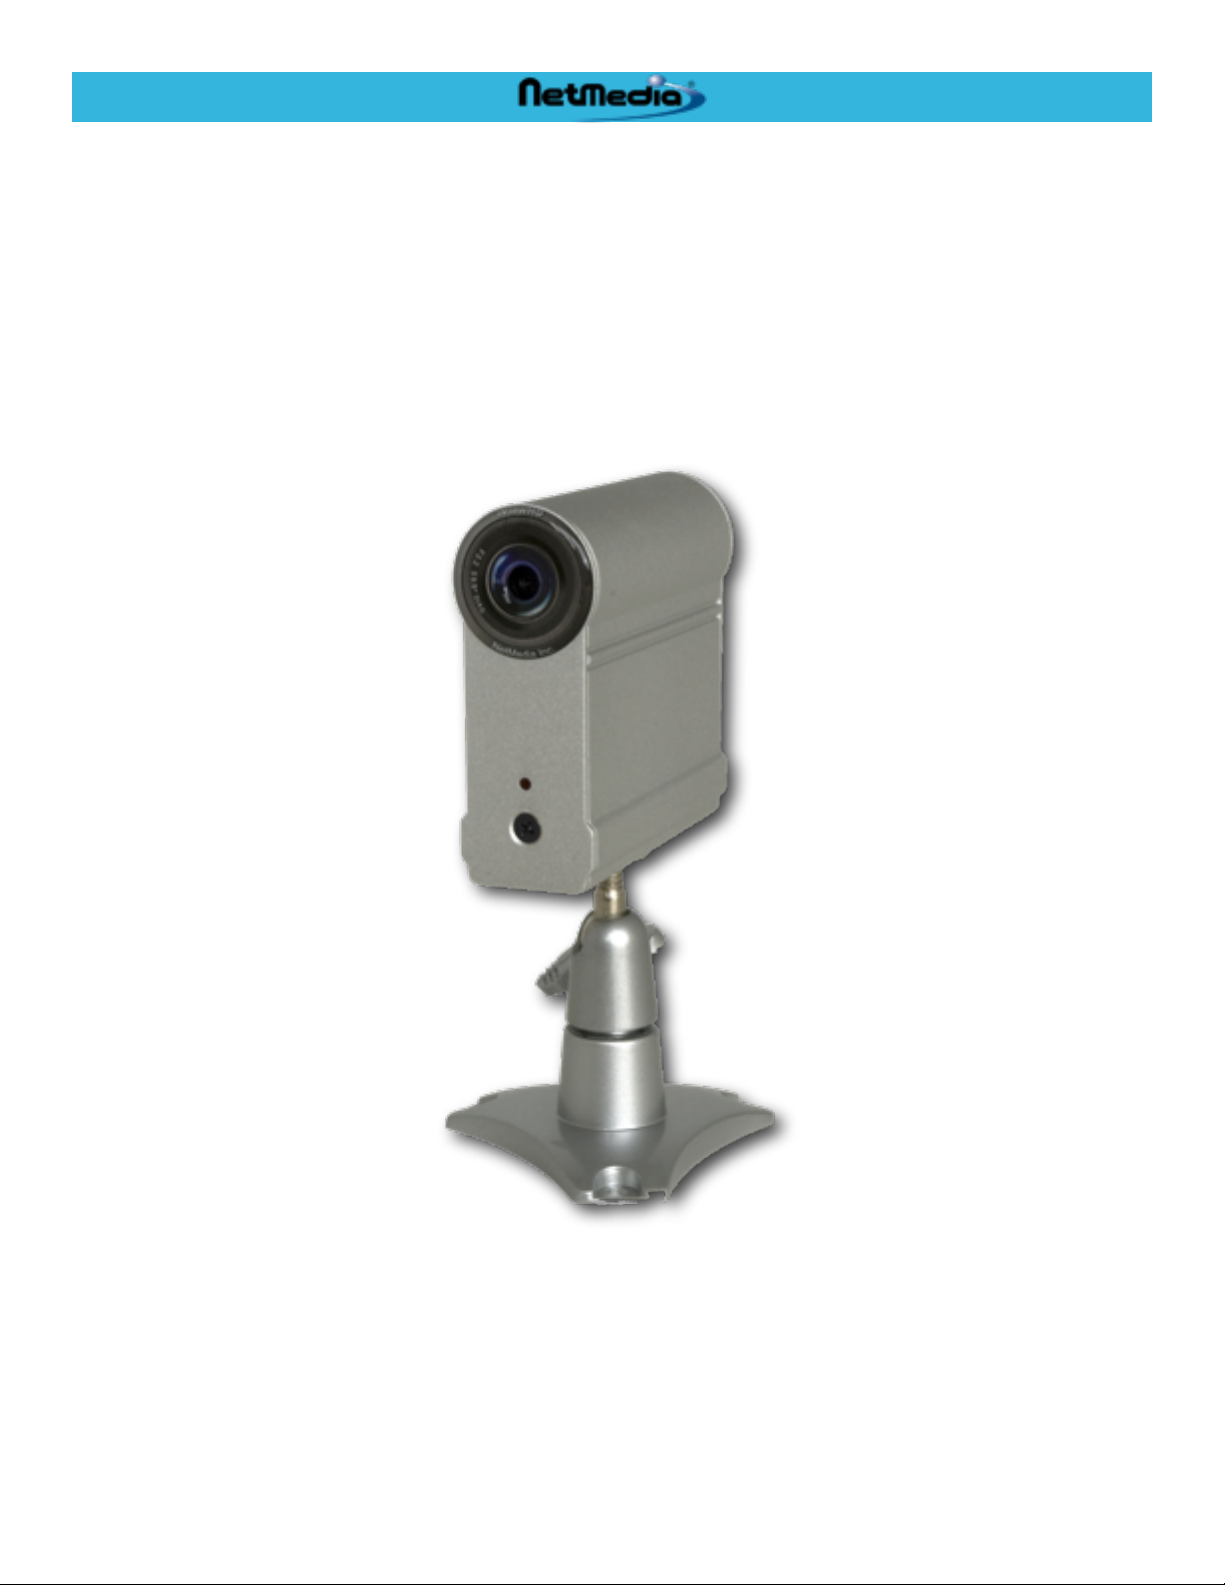
iViewHD Camera 2M / D1
Tested to comply with
For Home or Commercial Use
Copyright © 2009 NetMedia, Inc.
All rights are reserved. This manual may not, in whole or part, be copied, photocopied, reproduced, translated, or reduced to any electronic medium or machine-readable form without the prior agreement and
written permission of NetMedia, Inc.
2 © 2009 NetMedia, Inc.
Page 3

iViewHD Userʼs Manual
Conventions
The term iViewHD is used throughout this manual to denote the family of iViewHD cameras such
•
as the iViewHD-2M or iViewHD-D1.
Web screen shots may not appear exactly the same between various web browsers and operating
•
systems.
© 2009 NetMedia, Inc. 3
Page 4

iViewHD Userʼs Manual
Table of Contents
....................................................................................Introduction! 6
...............................................................................................................iViewHD-2M! 7
...............................................................................................................iViewHD-D1! 7
.................................................................................Specifications! 8
.............................................................................................................FCC Warning! 9
.....................................Distinguishing Various iViewHD Models! 7
..........................................................FCC Compliance Statement! 9
............................................................................CE-Mark Warning! 9
...............................................................Quick Setup Procedure! 10
.............................................................Configuration and Setup! 12
......................................................iViewHD Image Control Page! 15
..............................................................................Info Web Page! 19
......................................................................Services Web Page! 21
.............................................................................................Change Device Name! 21
................................................................................................Change Port Values! 21
.........................................................................................Change TCP Keep-Alive! 22
..........................................................................................................Set Extra Port! 22
...................................................................IP Options Web Page! 23
...............................................................................................DHCP Configuration! 23
................................................................................................Fixed IP Addresses ! 23
.......................................................................Security Web Page! 25
.........................................................................Change Username and Password! 25
.................................................................Authorized Port, IP address and Mask! 26
..........................................................................Admin Web Page! 27
................................................................................................Set LED Brightness! 27
.................................................................................................................Blink LED! 27
......................................................................................................Restart iViewHD! 28
..........................................................................................Set to Factory Defaults! 28
........................................................................................Clear Persistent Storage! 28
.........................................................................Update Web Page! 30
.............................................Informational and Error Messages! 31
4 © 2009 NetMedia, Inc.
Page 5

33
iViewHD Userʼs Manual
.......................................................Factory defaults are being set. Please wait...! 31
..................................................................................................Parameters set OK! 31
........................................................................................Restarting. Please wait...! 31
..........................................................................................................Bad flash file.! 31
........................................................Bad request from browser or file not found.! 31
.......................................................................................Error setting parameters! 31
...............................................Firmware received OK. Reflashing, please wait...! 31
.......................................................................Website feature/version mismatch! 31
.......................................................................Website received OK. Restarting...! 32
....................................................................................Appendix A! 33
...Alternate Ways to Locate an iViewHD Camera on the Network!
................................................................Bonjour Browser for Windows (plugin)! 33
..................................................................................Safari Browser for Windows! 33
............................................................................................................DHCP Server! 33
..........................................................................................ARP Table Modification! 34
Adding Route to Windows so Link Local Devices Can be Ac-
...........................................................................................cessed! 36
.........................................................................HTTP Commands! 37
..................................................................JSON Object Support! 41
..........................................................................................Reading JSON Objects! 41
............................................................................................Writing JSON Objects! 41
.......................................................................................................JSONP Support! 41
..........................................................................................iViewHD JSON Objects! 42
© 2009 NetMedia, Inc. 5
Page 6

iViewHD Userʼs Manual
Introduction
iViewHD is a family of high resolution small form factor internet protocol (IP) cameras. The cameras
provide both still JPEG and Motion-JPEG (MJPEG) images which are either viewable with a standard
web browser or usable with a Network Video Recorder (NVR).
iViewHD cameras are powered using Power Over Ethernet (POE) which means that data and power
are supplied via a single Ethernet cable. Power is provided by standard POE network switches or
power injectors. Because the cameras use standard Ethernet cabling infrastructure (CAT5), they are
ideal in environments where networking cabling is already installed. New installations are also easier
than traditional video cameras, due to the use of a single cable for both power and video.
The cameras are configured using a standard web browser. Various camera parameters can be set
up and saved using a web page. A live camera view is also available via the web interface. iViewHD
has several levels of security available to help protect the camera against unwanted use.
For security applications, iViewHD will generally be used in conjunction with a Network Video Recorder (NVR). Due to its use of JPEG and MJPEG, it will work with most NVR software and hardware.
6 © 2009 NetMedia, Inc.
Page 7
iViewHD Userʼs Manual
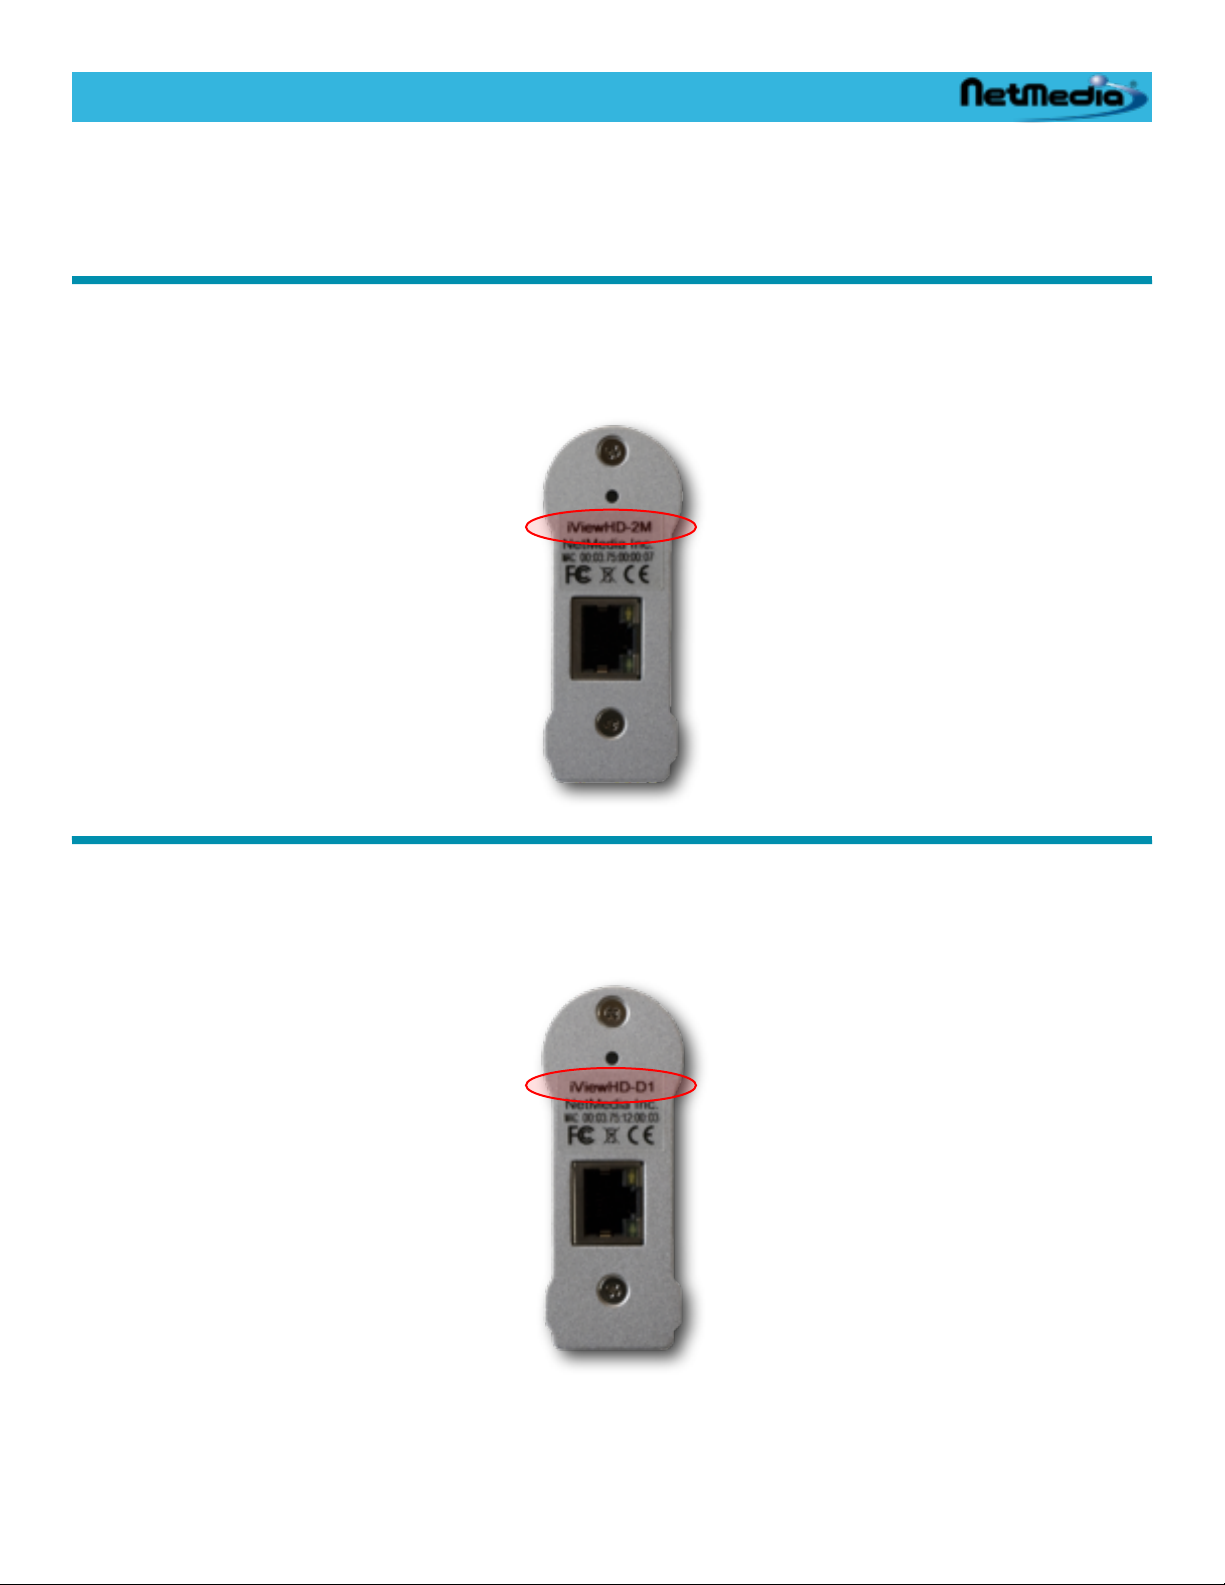
Distinguishing Various iViewHD Models
Below you will nd several iViewHD cameras illustrated so that you can distinguish between them.
iViewHD-2M
2 Megapixel maximum image output (1600x1200)
•
Power Over Ethernet (POE) powered
•
iViewHD-D1
385K maximum pixel output (720x536)
•
Power Over Ethernet (POE) powered
•
© 2009 NetMedia, Inc. 7
Page 8

iViewHD Userʼs Manual
Specifications
Some of the iViewHD features include
Compact size
•
MJPEG streaming output. Can be preconfigured or selectable via HTTP or JSON commands for
•
NVR integration
JPEG output
•
Various standard and user configurable resolutions from 1600x1200(UXGA) to 160x120
•
(QQVGA)
Maximum resolution: 1600x1200 2M Camera; 720x536 D1 Camera
•
Lens: F3.2, 59.9º diagonal
•
Image Sensor Size: 1/4 inch
•
Configurable via a web browser with username/password and IP and mask protection
•
Conforms to various internet standards:
•
ARP
•
TCP/IP
•
UDP
•
DHCP
•
Link Local / Bonjour
•
ICMP Ping
•
HTTP
•
Up to 4 IP addresses configurable:
•
DHCP
•
Link Local
•
2 static IP Addresses
•
OEM custom webpages available
•
Controllable LED status indicator
•
Audio power-on signal
•
Power requirements: Class 1 (less than 3.8W) Power Over Ethernet POE (IEEE 802.3af ) 2.5W
•
actual
FCC Class B certification
•
CE certification
•
RoHS
•
Dimensions 2.75”x1.1”x2.75” (HxWxD)
•
Camera Weight: 4 oz.
•
Base Weight: 2 oz.
•
Housing type: Aluminum
•
8 © 2009 NetMedia, Inc.
Page 9

iViewHD Userʼs Manual
FCC Compliance Statement
This device compiles with Part 15 of the FCC Rules. Operation is subject to the following two conditions:
1. This device may not cause harmful interference
2. This device must accept any interference received, including interference that may cause undesired operation.
FCC Warning
This equipment has been tested and found to comply with the limits for a Class B digital device, pursuant to Part 15 of the FCC Rules. These limits are designed to provide reasonable protection
against harmful interference in a residential installation.
This equipment generates, uses and can radiate radio frequency energy and, if not installed and used
in accordance with the instructions, may cause harmful inerference to radio communications.
However, there is no guarantee that interference will not occur in a particular installation. If this
equipment does cause harmful interference to radio or television reception, which can be determined
by turning the equipment off and on, the user is encouraged to try to correct the interference by one
or more of the following measures:
Reorient or relocate the receiving antenna.
•
Increase the separation between the equipment and the receiver.
•
Connect the equipment into an outlet different from that to which the receiver is connected.
•
Consult the dealer or an experienced radio/TV technician for help.
•
CE-Mark Warning
In a domestic environment this product may cause radio interference in which case the user may be
required to take adequate measures.
© 2009 NetMedia, Inc. 9
Page 10
iViewHD Userʼs Manual
Quick Setup Procedure
This section presents a quick setup guide in configuring the iViewHD camera. For a more detailed
explanation, please consult the following sections of the manual
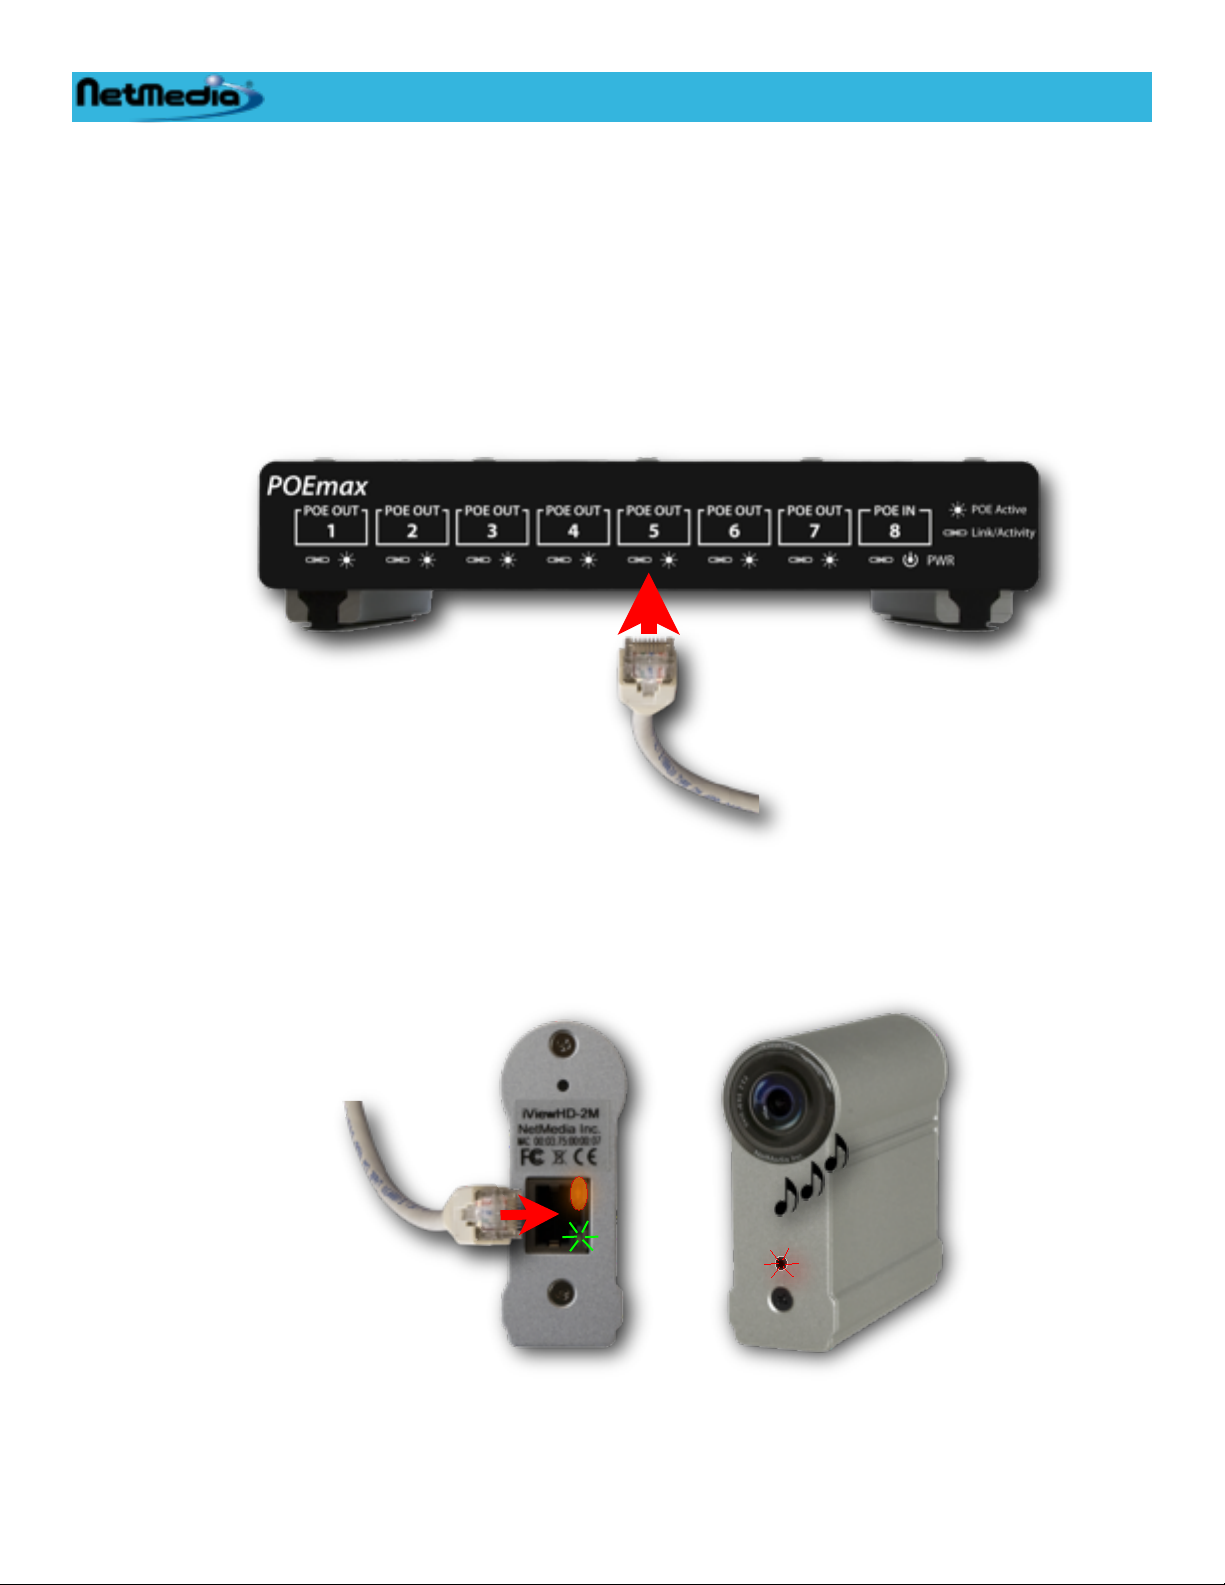
The iViewHD camera connects to a Power Over Ethernet (POE) network switch, such as the Netmedia POEmax or other suitable POE switch. The POE switch provides the network connectivity and
power for the camera.
To configure the iViewHD camera:
1. Plug in an Ethernet cable to the POE switch:
2. Plug the the other end of the Ethernet cable into the iViewHD Camera. The orange LED next to
the RJ45 connector should illuminate. The red LED in front of the camera will light up and the
camera should emit a series of beeps and you will probably see the green link activity light
blinking:
3. Connect a computer to the same network as the camera.
10 © 2009 NetMedia, Inc.
Page 11
iViewHD Userʼs Manual
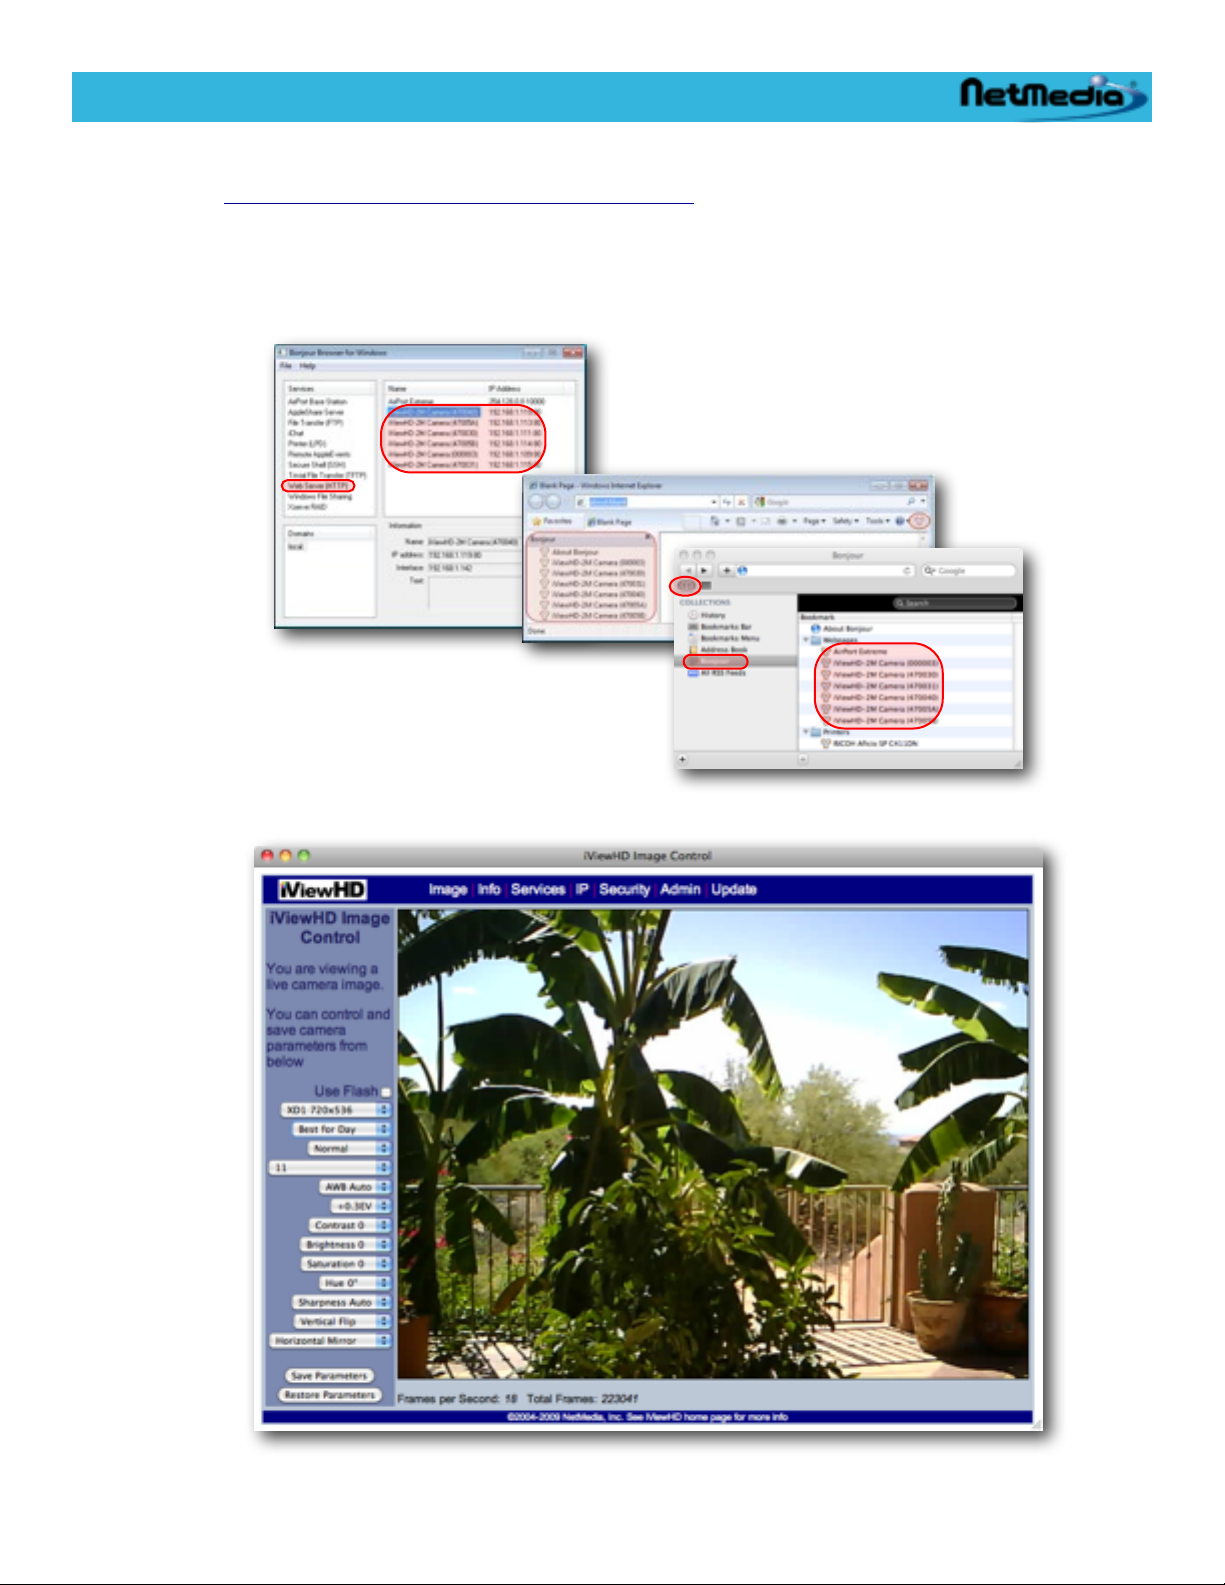
4. Run a web browser on the computer which has Bonjour support enabled. Or for Windows
download and install the Standalone Bonjour Browser for Windows
http://netmedia.com/iviewhd/downloads.html
On the the Mac run the Safari browser which has Bonjour already built in. See appendix A (Al-
ternate Ways to Locate an iViewHD Camera on the Network) which provides several options for locating an iViewHD camera.
5. Locate the camera using Bonjour. And double click on the camera name:
You can make adjustments to the default camera image on the main web page:
© 2009 NetMedia, Inc. 11
Page 12
iViewHD Userʼs Manual
Configuration and Setup
iViewHD uses Link Local and multicast DNS (also known as Bonjour) to advertise its presence on the
network. You can use a Bonjour enabled web browser to locate an iViewHD camera and configure it.
Some web browsers, such as Appleʼs Safari, have a built in Bonjour browser. Other web browsers,
such as Internet Explorer, can have a Bonjour plug-in installed for them.
For Windows users, the easiest thing to do is download the Standalone Bonjour Browser at
http://netmedia.com/iviewhd/downloads.html
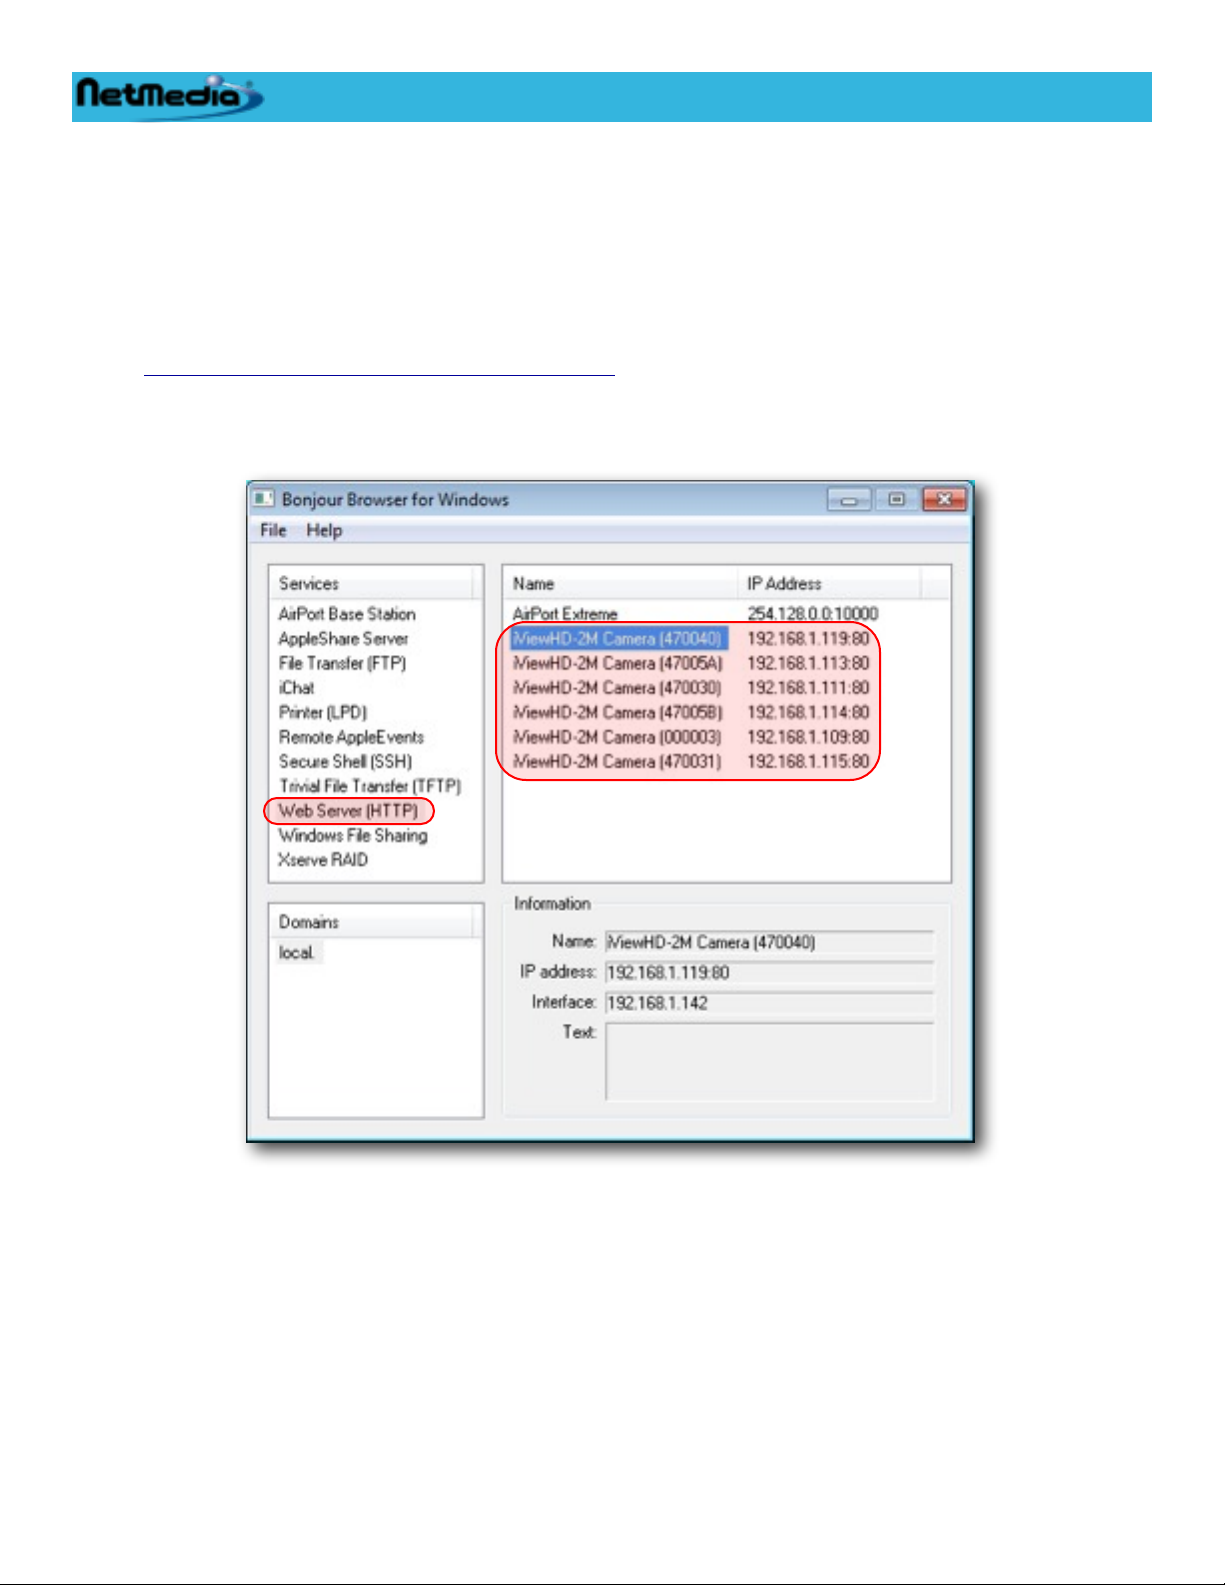
Once you run the Bonjour Browser, you will see a window similar to the following
You will need to select Web Server (HTTP) under Services because iViewHD acts as a Web Server.
The iViewHD cameras are then displayed in the right most window and you can double click the
camera to launch your web browser.
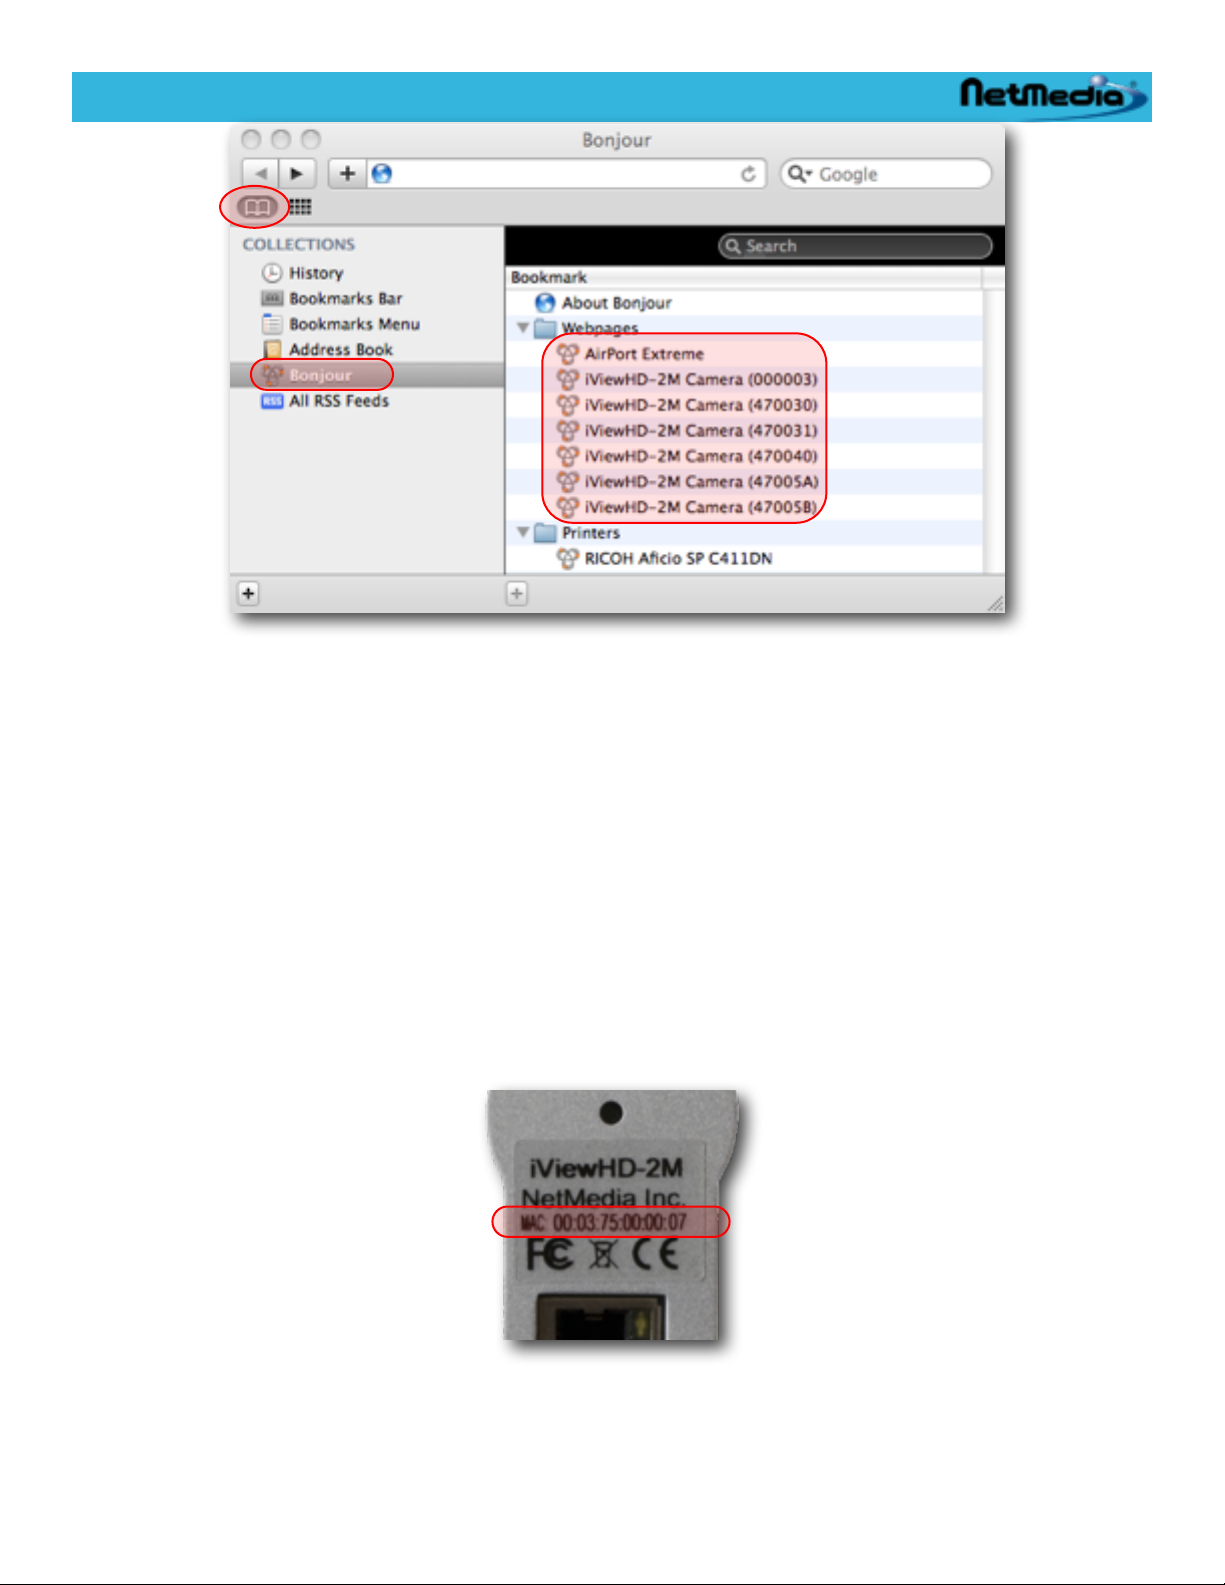
In Safari the Bonjour browser can be selected by selecting the Collections icon on the Bookmarks
bar:
12 © 2009 NetMedia, Inc.
Page 13
iViewHD Userʼs Manual
There are other options also available for locating an iViewHD camera. See appendix A (Alternate
Ways to Locate an iViewHD Camera on the Network) which provides several options for locating
an iViewHD camera, such as
Bonjour Browser for Windows (plugin)
•
Safari Browser for Windows
•
DHCP Server
•
ARP table modification
•
In this section we will assume that you already have Bonjour installed and are running a Bonjour enabled browser or are running the standalone Bonjour Browser for Windows.
Each iViewHD has a unique name associated with it which you can change later on. The factory default name is in the form iViewHD-TT Camera (XXXXXX), where TT is either 2M for a 2 megapixel
camera or D1 for a D1 camera. XXXXXX are the last 3 digits of the iViewHDʼs MAC address in hex.
You can find the MAC address on a label on the back of the camera:
Double clicking on the name will attempt to connect to the iViewHD main image control web page.
When your browser connects to iViewHD, you may be greeted with an authentication window requesting your username and password. iViewHD ships with this feature disabled, but if you see the
© 2009 NetMedia, Inc. 13
Page 14

iViewHD Userʼs Manual
following window, you should enter your username and password. If enabled, the factory default user-
name is user and the factory default password is password. Usernames and passwords are case sensitive.
You will have an opportunity later on to change these if you wish.
The following sections describe the main iViewHD image control web page and the other web pages which
are used to congure your camera.
Once you know the address of your camera on the network, you can use a number of other browsers to
connect to the camera:
Safari Internet Explorer Firefox OperaGoogle Chrome
14 © 2009 NetMedia, Inc.
Page 15

Resolution
White Balance
Contrast Level
Save Parameters
Help and Information Area
Use Flash Plugin Option
iViewHD Userʼs Manual
iViewHD Image Control Page
Navigation Bar
Frame Rate
Special Image Effects
JPEG Compression Level
Exposure Value
Brightness Level
Color Saturation
Color Hue
Sharpness
Vertical Flip
Horzontal Mirror
Restore Parameters
Footer
This is the first page you will see when connecting to the iViewHD camera. The navigation bar at the
top of the web page allows you to change various iViewHD non-image settings. You will find this
navigation bar on all the iViewHD pages. The various pages available are
Image - returns you to the iViewHD Image control page.
•
Services - allows you to change the iViewHD device name and the network ports that various
•
iViewHD services use.
IP - allows you to enable / disable DHCP and specify additional static IP addresses.
•
Security - allows you to change the web page username and password and limit access to
•
iViewHDʼs network ports to certain IP addresses.
Admin - allows you to perform administration functions on iViewHD such as Link LED con-
•
trol,restarting (rebooting) iViewHD or setting it back to factory defaults.
Update - allows you to load new Firmware or Web pages into iViewHD.
•
© 2009 NetMedia, Inc. 15
Page 16

iViewHD Userʼs Manual
Each iViewHD web page contains a footer which can be clicked to access the iViewHD home page
where you will find out more information about iViewHD and also access support forums, documentation and firmware updates.
You can change various camera parameters and then save them in the cameraʼs persistent storage.
You can also retrieve your saved parameters. The parameters that you can modify are
Use Flash - Enables use of an optional Flash plugin. This option is only visible in non-Internet
•
Explorer browsers. For Internet Explorer this Flash plugin is used exclusively. In non-Internet
Explorer browsers such as FireFox, Safari or Chrome, the browser is able to handle the MJPEG
data stream directly. If you would rather have the camera image displayed by the Flash plugin,
you can select this option. This is only a browser option, and is retained by your browser and not
saved when parameters are saved.
Resolution - Selects from a variety of fixed camera capture resolutions. The resolutions cur-
•
rently supported are
UXGA 1600x1200
•
SXGA 1280x960
•
XGA 1024x768
•
SVGA 800x600
•
XD1 720x536
•
VGA 640x480
•
QVGA 320x240
•
QQVGA 160x120
•
CIF 400x296
•
Frame Rate - Selects from three frame rates which allow better displaying of lighting conditions.
•
The camera may automatically adjust the frame rate based on the resolution selected:
Best for Day - This is the fastest frame rate and is better suited for brighter lighting condi-
•
tions. Based on lighting conditions, resolution and compression, this frame rate can deliver
more than 30fps, but in low light conditions, the frame rate will be much lower.
Better for Night - This frame rate is better suited for night. Itʼs a medium frame rate that al-
•
lows longer exposure for darker environments. Based on lighting conditions, resolution and
compression, this frame rate can deliver more than 15fps, but in low light conditions, the
frame rate will be much lower.
Best for Night - This frame rate is intended for night viewing, although it functions at a re-
•
duced frame rate in daylight. Based on lighting conditions, resolution and compression, this
frame rate can deliver more than 10fps, but in low light conditions, the frame rate will be
much lower.
Special Image Effects - Selects from a variety of special effects which alter the appearance of
•
the image:
Normal - The image is not altered.
•
Negative - The image is a color negative.
•
Gray - The image is grayish in appearance.
•
Bluish - The image has a blueish cast.
•
Greenish - The image has a greenish cast.
•
Reddish - The image has a reddish cast.
•
Sepia - The image appears as sepia
•
BW - The image appears a black and white
•
16 © 2009 NetMedia, Inc.
Page 17

iViewHD Userʼs Manual
BW Negative - The image appears as a black and white negative
•
JPEG Compression Level - You can select a number from 0 to 45 which specifies the JPEG
•
compression level. A lower number represents less compression and hence a better appearing
image (at the expense of a larger image size). A higher number represents more compression
and hence a lower quality image (but at a reduced file size). The compression may be automatically adjusted by the camera based on the resolution selection
White Balance - Allows adjustment of the white balance:
•
AWB Off - Turns off any white balance compensation. This may be useful as a base com-
•
parison to the other white balance settings.
AWB Auto - Automatically adjusts white balance based on a gray average image. This works
•
most of the time since average images are gray, but may be fooled when the image is
skewed towards a particular color.
Sunny - This is suitable for lighting that is predominately from a sunny cloudless day.
•
Cloudy - This is suitable when the lighting is from a cloudy sky.
•
Office - This is suitable in environments with florescent lighting.
•
Home - This is suitable in environments with incandescent lighting.
•
Exposure Value - Sets the exposure value. Values range from -2.0EV to +2.0EV in 0.3EV
•
steps. The default value is 0, which means that no exposure compensation is used. Lower EV
values set a lower exposure resulting in a darker image. Higher EV values increase the exposure resulting in a brighter image. You will generally adjust the EV to compensate for uneven
brightness. The camera will attempt to automatically adjust its exposure based on average lighting. If there are very bright or dark areas in an image, one of them will not be as visible. You can
use the EV setting to make these area more visible.
For example, a bright sky may cause the foreground to appear too dark. You can set the EV
value a bit higher and make the foreground less dark. This will have the effect of possibly washing out the sky.
Contrast Level - Allows the adjustment of the image contrast level in a range of -4 to +4. Lower
•
contrast values allow more dynamic range, but the picture does not appear as sharp. Higher
contrast values make the picture appear sharper at the loss of dynamic range.
Brightness Level - Adjusts how bright the picture appears. This does not alter exposure, but
•
rather the final image brightness. You can select a value from -8 to +8 which ranges from low to
high brightness.
Color Saturation - Adjust how saturated the colors appear. You can specify a number from -4
•
(low) to +4 (high). Low color saturation, results in very muted colors; high saturation results in
very bright colors.
Color Hue - Sets the color hue from -60º (greenish) to +60º(reddish). This allows fine adjust-
•
ment of the output image color.
Sharpness - Adjust the sharpness of an image. You can select Auto sharpness or a number
•
from 0 (low) to 31 (high). Sharpness is adjusted based on edge detection of the image.
Vertical Flip - Selects if the image is to be flipped vertically. If you are mounting the camera up-
•
side down, you will need to select both Vertical Flip and Horizontal Mirror.
Horizontal Mirror - Selects if the image is to be mirrored horizontally. If you are mounting the
•
camera upside down, you will need to select both Vertical Flip and Horizontal Mirror.
© 2009 NetMedia, Inc. 17
Page 18

iViewHD Userʼs Manual
The following camera orientation illustrates Vertical Flip and Horizontal Mirror values:
Vertical Flip
Horizontal Mirror
After the above parameters are selected, they can be saved in the cameraʼs persistent storage. They
can later be retrieved. This is useful if the parameters are altered and you wish to restore them to
their saved state:
Save Parameters - When you click this, the current parameters are saved in the cameraʼs per-
•
sistent storage. These parameters are retained if there is a power failure. You will get a confirmation dialog after the parameters are saved successfully:
No Vertical Flip
No Horizontal Mirror
Restore Parameters - When you click this, the current saved parameters are restored. You will
•
get a confirmation dialog after the parameters are successfully restored:
Please see the NVR Commands section in Appendix A for a list of commands that may be issued
by NVR software to control the camera outside of the web interface.
18 © 2009 NetMedia, Inc.
Page 19

iViewHD Userʼs Manual
Info Web Page
The Info web page gives a quick overview of some of iViewHDʼs settings:
Device Name - shows the name of the iViewHD camera. This name is directly translatable to a
•
Bonjour name which allows the camera to be located on the network.
Website Version - shows the current version of the website that is loaded into the iViewHD
•
camera. You can load new website firmware using the Update page.
Firmware Version - shows the current Firmware version number. You can load new Firmware
•
using the Update page.
Hardware Version - shows the hardware version of the iViewHD camera. iViewHD-2M repre-
•
sents a 2 megapixel camera; iViewHD-D1 represents a D1 camera.
Ethernet MAC Address - shows iViewHDʼs Ethernet MAC address. Each iViewHD has a unique
•
MAC address.
Free Space Remaining - shows how much free space is remaining in iViewHDs persistent
•
(flash)storage. iViewHD stores configuration parameters in persistent storage. If persistent storage space is exhausted, you will need to reset iViewHD back to factory defaults to reclaim the
space.
DHCP Address - shows your current DHCP address. A value of 0.0.0.0 means that a DHCP ad-
•
dress has not been obtained either because iViewHD was recently rebooted and has not requested a DHCP address yet, the DHCP server may not have allocated one or DHCP was disabled.
Link Local IP Address - shows your current link local (LL) address. Each iViewHD automati-
•
cally generates its own LL address which is unique on the local network. LL addresses are not
routable and thus cannot be accessed outside of the local network. If you need a routable address, you should use a DHCP or Static IP address.
© 2009 NetMedia, Inc. 19
Page 20

iViewHD Userʼs Manual
Static IP 1 & 2 - shows each static IP address that iViewHD will respond to. A value of 0.0.0.0
•
means that no Static IP address has been configured.
System Events - These are internal events that iViewHD logs. If you are experiencing prob-
•
lems, technical support may ask you for these values to assist in isolating the problem.
Any changes that are made to iViewHD parameters are saved in persistent storage. Most changes to
iViewHD parameters force iViewHD to restart, so you should be careful not to change these parameters while there are other network connections to iViewHD or else these connections will be lost. You
should also be careful when changing things such as IP addresses and or the device name, because
you may need to locate the camera on the network again using Bonjour.
20 © 2009 NetMedia, Inc.
Page 21

iViewHD Userʼs Manual
Services Web Page
The Services web page allows you to change the iViewHD device name, the HTTP port that various
iViewHD services use (such as the web page and the MJPEG streaming), various TCP keep-alive parameters and an extra port offset.
Change Device Name
The device name is the name that iViewHD uses to advertise its services and is seen by the Bonjour
browser. The factory default name is in the form iViewHD-TT (XXXXXX), where TT is either 2M for a
2 megapixel camera or D1 for a D1 camera. XXXXXX are the last 3 digits of the iViewHDʼs MAC address in hex You can change the name to anything up to 32 characters. You should try to keep names
unique on your network if you are using multiple iViewHDs to more easily distinguish among them.
This web page also displays the Link Local name. The link local name is a DNS safe name that is derived from the device name. Operating systems which support the mDNS (Bonjour) protocol allow you
to address iViewHD using the Link Local name.
Change Port Values
You can also change the HTTP port number that iViewHD supports. Normally you will leave this port
number at its default value. The HTTP protocol is used to communicate with iViewHDʼs web server
and also provides access to the JPEG and MJPEG camera images
© 2009 NetMedia, Inc. 21
Page 22

iViewHD Userʼs Manual
See iViewHD Services and Protocols section for more details about the protocols and how to use
them.
Change TCP Keep-Alive
You can enable and change various parameters which control iViewHDʼs keep-alive mechanism. The
keep-alive mechanism will terminate network connections if a computer is not reachable for a period
of time. The parameters which can be changed here are global and effect all iViewHD TCP/IP
protocols/services (i.e. HTTP).
Normally TCP/IP connections are maintained indefinitely. This means that intermediate computers
and routers can go down and come back up and TCP/IP will not care. This can cause problems in
certain cases when a computer connected to iViewHD goes down. iViewHD will maintain the connection to its service for the computer because it has no way of knowing the computer has been shut
down. Because a connection is still maintained for a particular service, iViewHD will not allow other
computers to connect to that service.
To remedy this problem you can enable TCP Keep-Alive. You can fine tune the keep-alive mechanism
by altering various parameters:
Idle Time - specifies the amount of time in seconds to wait before sending a probe packet to de-
•
termine if the other end is still active. The default value of 7200 is 2 hours.
Retry Interval - specifies the amount of time in seconds between successive probe packets.
•
The default is 9 seconds.
Retry Count - specifies the number of times probe packets will be retried before the connection
•
is terminated. The default value is 75 times.
Set Extra Port
All iViewHD services can be accessed at their default port numbers. The extra port value is a number
which is added to the default port number which allows iViewHD to also be accessed at a different
port number. For example, by default iViewHDʼs web pages can be accessed at port 80. The default
extra port value of 47000 allows iViewHD to also be accessed at port 47080. If you need to disable
this feature, just set the extra port value to 0.
The extra port value can be used, for example, in a NAT router to forward TCP/IP data in a certain
port range to a iViewHD. You could set port 47080 to be forwarded to a iViewHD on the local network
while the NAT routerʼs web page was externally accessible as port 80. This is also useful in cases
where some ISPs block port 80. In this case, iViewHD would be externally accessed on port 47080
while still being internally accessed on port 80.
22 © 2009 NetMedia, Inc.
Page 23

Static IP Address #1
Static IP Gateway #1
Static IP Mask #1
192.168.1.50
192.168.1.254
255.255.255.0
iViewHD Userʼs Manual
IP Options Web Page
The IP Web page allows you to specify how iViewHD acquires an IP address. You can enable or disable DHCP address acquisition or you can assign fixed IP addresses to iViewHD.
DHCP Configuration
The current DHCP status is displayed along with the DHCP address, gateway, mask and DNS server
that has been acquired. The only option you have is to enable or disable DHCP address acquisition.
Fixed IP Addresses
You can specify up to 2 static IP addresses. Static IP addresses can be used to give iViewHD a
known unchanging IP address. You will need to specify the IP address, gateway, and mask to properly set the static IP address. The gateway and mask values are used to initiate communications from
iViewHD to other computers. Some example values are
© 2009 NetMedia, Inc. 23
Page 24

iViewHD Userʼs Manual
If you disable DHCP address acquisition and you donʼt specify any static IP addresses, the only IP
address that iViewHD will have is the automatically generated Link Local address. This may make
iViewHD more difficult to locate on a network if your computer does not support link local addressing/
Bonjour. See Appendix A - Adding Route to Windows so Link Local Devices Can be Accessed if
you have Windows and need to only use a link local address.
In order to have changes to the DHCP configuration or static IP addresses made, iViewHD will automatically restart.
24 © 2009 NetMedia, Inc.
Page 25

iViewHD Userʼs Manual
Security Web Page
The Security Web page allows you to specify the level of protection you need for iViewHD.
Change Username and Password
You can enable or disable username and password protection for iViewHDʼs web pages. If you disable username/password security anyone can access iViewHDʼs web setup pages. With security enabled all of iViewHDʼs web pages will be protected with a username and password, although you will
only need to enter this information once when you access the first web page.
You can change the username and password for web access. Both the username and password are
case sensitive. Only the username is displayed. The default username and password are
© 2009 NetMedia, Inc. 25
Page 26

Default Username
Default Password
user
password
Port Number
IP Address
IP Mask
80
192.168.2.0
255.255.255.0
Port Number
IP Address
IP Mask
47080
192.168.2.153
255.255.255.255
iViewHD Userʼs Manual
Authorized Port, IP address and Mask
You can specify up to 4 TCP ports that need protection. Ports may be protected so that only computers with certain IP addresses can have access to iViewHD. For each protected port you can set three
parameters:
Port Number - the number of the port you wish to have protected. These port numbers should
•
correspond to the port numbers in the Services web page. For example, the factory default port
of 80 is used for HTTP. Access is only restricted for port numbers which are listed here. If a port
number is not listed then it has no access restriction.
IP Address - the complete or partial IP address that will have access to the port. •
•
IP Mask - a mask value which allows you to specify a range of IP addresses. The mask is
•
ANDed with the IP address which is accessing iViewHD and compared to the IP Address
above. Here is an example,
This will grant access to port 80 (the HTTP port) for anyone from the 192.168.2.0 subnet. That is IP
ad dresses 192.168.2.0 to 192.168.2.255.
This will grant access to port 47080 (the extra HTTP port) for anyone from IP address 192.168.2.153.
Notice by setting the mask to 255.255.255.255 and specifying a full IP address, you can restrict access to just a single IP address.
If you forget the username/password you will need to perform a hardware reset to set iViewHD to its
default username and password.
26 © 2009 NetMedia, Inc.
Page 27

iViewHD Userʼs Manual
Admin Web Page
The Admin Web page provides several options which help you manage iViewHD. You can control the
Link LED and force iViewHD to restart (reboot) or to have iViewHD set itself into a factory default
configuration.
Set LED Brightness
You can control the brightness level of the Link LED.
LED Brightness - specifies the LED brightness level. You can set a level from 0 to 255. A level
•
of 0 turns off the LED and a level of 255 sets the LED brightness to its maximum. The default
value is 255.
Press “Set LED Brightness” to change the brightness level. The brightness level will change immediately without iViewHD restarting.
Blink LED
You can force the Link LED to blink for a period of time and at a certain rate. This is useful if you have
several iViewHDs and you wish to know which iViewHD you are controlling via the web interface.
Once the LED finishes blinking it will revert to its original functionality.
Blink time - specifies the amount of time the LED will blink in seconds. You can specify a value
•
of 0 to 255.
Blink rate - specifies how fast the LED will blink. You can enter a value of 0 to 7. 0 is the slowest
•
blink rate and 7 is the fastest.
© 2009 NetMedia, Inc. 27
Page 28

iViewHD Userʼs Manual
Press “Blink LED” to start the LED blinking immediately without iViewHD restarting.
Restart iViewHD
Press the “Restart iViewHD” button to force iViewHD to restart itself. Any active network connections
will be lost when iViewHD restarts.
Set to Factory Defaults
Press “Set to Factory Defaults” to cause iViewHD to erase its persistent storage. iViewHD will revert
to a factory default configuration. The current Website will be erased, but the current Firmware will not
be altered. This operation will take less than 1 minute. During this time, iViewHDʼs LED will be blinking to indicate that the persistent storage is being erased. Do not remove power while this is happening. After the persistent storage is erased, iViewHD will restart and revert to a minimal web page:
You should reload the Website ROM file so that you can reconfigure iViewHD. See the Update Web
Page section on how to reload the Website ROM file. When setting the iViewHD to its factory defaults, you should be aware that any network configuration (IP address or DHCP) that you may have
set, will revert back to the factory defaults. You may not be able to access the camera at those network settings.
Clear Persistent Storage
Press the “Clear Persistent Storage” button to have iViewHD erase its Persistent Storage. The current
Website will be erased, but the current Firmware will not be altered. Before erasing the persistent
storage iViewHD will attempt to save the current configuration parameters so they may be restored
28 © 2009 NetMedia, Inc.
Page 29

iViewHD Userʼs Manual
after persistent storage is erased. This is useful when persistent storage is getting full and you want
to reinitialize it, but donʼt want to lose your configuration parameters. If power is lost during this operation, then it is likely that the current configuration parameters were not saved and restored.
© 2009 NetMedia, Inc. 29
Page 30

iViewHD Userʼs Manual
Update Web Page
The Update web page allows you to load new Firmware or Website ROM software. You will do this
when new software becomes available. You can also do this to reload the current software. iViewHD
determines from the contents of the file you select which kind of software is being loaded. The currently loaded Firmware or Website version is displayed for reference purposes.
The Update web page will appear slightly different depending on which browser you use. For example, if you are using Internet Explorer, the web page will look like this
In either case you will need to press the “Browse...” or “Choose File” button to select the appropriate
file. ROM files are named as follows
iViewHD_Firmware_Vn_naaa.rom
iViewHD_Website_Vn_naaa.rom
where n_naaa is the version number which corresponds to version n.naaa of the ROM file. iViewHD
will attempt to save and restore the current configuration parameters after an update.
30 © 2009 NetMedia, Inc.
Page 31

iViewHD Userʼs Manual
Informational and Error Messages
You will encounter several informational and error messages as you use iViewHDʼs setup web pages.
These messages will appear after you have clicked on a form button on a web page. The message
are
Factory defaults are being set. Please wait...
You have requested that the iViewHD is set back to its factory default state. Persistent storage is being cleared. This operation will take about a minute.
Parameters set OK
You have requested changing some parameters that did not require restarting iViewHD. For example,
changing serial port parameters or controlling the Link LED will give this message.
Restarting. Please wait...
You have requested to change some iViewHD parameters that have resulted in iViewHD restarting.
Most parameters that are changed in iViewHD require a restart. You will also get this message if you
clicked on “Restart iViewHD” in the Admin web page.
Bad flash file.
The flash file you attempted to update iViewHD with was either corrupt or some kind of network error
caused the file to be received incorrectly. Make sure you are sending a valid flash file to iViewHD. If
you have verified that the flash file sent to iViewHD is valid, then try updating iViewHD again with the
same file. You may also get this message if your web browser does not correctly upload files. You
could try switching to a different browser.
Bad request from browser or file not found.
You have requested a page on the iViewHD that does not exist or your browser has sent a command
that iViewHD does not recognize.
Error setting parameters
There was an error in setting the parameters. Try the command again. You may also get this error if
iViewHDʼs persistent storage is full.
Firmware received OK. Reflashing, please wait...
iViewHD has determined that you are attempting to upload a firmware file and that it was received
with no errors. iViewHD will now re-flash its persistent storage with a copy of the newly received firmware. This operation will take several minutes.
Website feature/version mismatch
The website you uploaded to iViewHD is not compatible with the firmware currently running in
iViewHD. This error is usually caused by attempting to load a website version into iViewHD that is either too old or too new. iViewHDʼs firmware is feature locked with certain website versions. If you attempt to load a website which does not have a compatible feature set, then you will get this error
message.
© 2009 NetMedia, Inc. 31
Page 32

iViewHD Userʼs Manual
Website received OK. Restarting...
iViewHD has determined that you are attempting to upload a website file and that it was received with
no errors. iViewHD will now reflash its persistent storage with a copy of the newly received firmware.
This operation will take several minutes.
32 © 2009 NetMedia, Inc.
Page 33

iViewHD Userʼs Manual
Appendix A
Alternate Ways to Locate an iViewHD
Camera on the Network
The iViewHD camera supports Bonjour which allows it to be easily located on a network.
Bonjour Browser for Windows (plugin)
For Windows, you can install Bonjour support for Windows which can be downloaded at
http://support.apple.com/downloads/Bonjour_for_Windows
This will enable Bonjour for your computer and also place a Bonjour item into Internet Explorerʼs task
bar. Once you start Internet Explorer, you should see a window similar to the following after selecting the
Bonjour logo on the Tools Bar. You can then click on the camera that you want to manage.
Safari Browser for Windows
You can also install the Safari web browser which will enable Bonjour on your computer and also give you a
Bonjour browser. It’s available at
http://www.apple.com/safari/download/
For cases where Bonjour is not appropriate there are several other ways to locate an iViewHD camera.
DHCP Server
iViewHD has DHCP enabled by default. If you have a DHCP server, then you can query your DHCP
server about its DHCP leases. The iViewHD camera will be listed there:
© 2009 NetMedia, Inc. 33
Page 34

iViewHD Userʼs Manual
You will then be able to associate the camera with an IP address that you can use in a browser.
ARP Table Modification
The Address Resolution Protocol (ARP) table in your computer translates an IP address to an Ethernet MAC address. This allows your computer to use an IP address to access devices on the network.
The ARP table is normally filled in automatically by the operating system, but you can also modify it
and assign your iViewHD camera an IP address. You need to be careful in doing so as not to use an
IP address that is already in use. Once you assign an IP address to a camera, you can use the IP address in a web browser to setup the camera.
You will need to issue commands on a terminal or command shell. In Linux or Mac OS X, you can use
the terminal. In Windows you will use CMD.EXE. The command to modify the ARP table is similar in
all operating systems.
You will need to obtain the MAC address of the camera which you want to locate. The MAC address
is on a sticker on the back of the camera:
The MAC address for the above image is 00:03:75:00:00:07. The command for mapping an IP address to a MAC address is
arp -s IP-Address MAC-Address
In Windows the MAC address is specified as 00-03-75-00-00-07. In Linux or Mac OS X the MAC address is specified as 00:03:75:00:00:07.
34 © 2009 NetMedia, Inc.
Page 35

iViewHD Userʼs Manual
Letʼs say we wanted to address the iViewHD camera at IP address 192.1681.200. The command in
Windows would be
arp -s 192.168.1.200 00-03-75-00-00-07
In Linux or Mac OS X the command would be
arp -s 192.168.1.200 00:03:75:00:00:07
Here is an example CMD.EXE session for windows mapping the IP address 192.168.1.200 to the
MAC address of 00-03-75-47-00-07:
The arp -a command lists all the entries in the ARP table. After the new IP to MAC association is
made, we do a ping to make sure that the iViewHD camera is accessible.
© 2009 NetMedia, Inc. 35
Page 36

iViewHD Userʼs Manual
Adding Route to Windows so Link Local
Devices Can be Accessed
You only need to be concerned about this if you have not installed Bonjour for Windows.
Windows supports Link Local (LL) addressing. If you are connected to a network and an IP address
cannot be obtained manually or automatically (via DHCP), Windows will choose a LL address. These
addresses are in the form 169.254.x.y, where x.y are randomly chosen numbers such that they are
unique on the network. While Windows is using the LL address it maintains a route to the LL address
subnet. This means that it can communicate with LL devices such as iViewHD.
In most cases once Windows obtains an IP address via DHCP, iViewHD will also obtain a DHCP address and accessing the device is not an issue. There may be cases, however, where the DHCP
server does not assign an IP address to iViewHD. This can occur when DHCP has been disabled in
iViewHD or the DHCP serverʼs IP address allocation rules prevent an address from being assigned.
In these cases, iViewHD can only be accessed via its LL address.
Unfortunately, once Windows obtains a non LL address (either manually or through DHCP), it removes its route to the LL address subnet. This has the effect of not being able to communicate with
devices which are addressed only through 169.254.x.y. The easiest way around this is to add a route
to the LL subnet so that Windows knows where to send packets that are addressed to LL devices.
This may be accomplished by running CMD.EXE and typing ROUTE PRINT
You will need the interface IP address under the “Interface” column - the one with a “Destination” of
0.0.0.0. In this example it is 192.168.1.142.
Type the following command substituting your interface IP address for 192.168.1.142:
ROUTE ADD 169.254.0.0 MASK 255.255.0.0 192.168.1.142
This will add a route so that link local devices can be accessed. You will need to do this every time
the computer is rebooted, unless you make the route permanent by typing
ROUTE -p ADD 169.254.0.0 MASK 255.255.0.0 192.168.1.142
36 © 2009 NetMedia, Inc.
Page 37

iViewHD Userʼs Manual
HTTP Commands
iViewHD accepts HTTP commands that may be used with NVR software to control the operation of
the camera. These commands are case sensitive and must be issued in the proper case or else they
will not be understood. The general form of the HTTP commands is
http://IP-Address/image.cgi?CAPTURE=YES/NO&STREAM=0/1&COMMAND=commands
Where
IP-Address is the IP-Address of the camera. If you have Bonjour installed on your NVR or the
•
computer issuing the commands, you can use the cameraʼs Bonjour name here.
YES/NO is either the word YES or NO and is used to indicate if an image is to be CAPTURED
•
after the commands that follow are processed. Usually you set this to YES to begin capturing
video or still pictures. You would set this to NO if you just want to change some camera parameter without receiving an image. This is useful if you are changing parameters while another computer is capturing images.
0/1 is either the number 0 or 1 and indicates if images are to be streamed or not. A 0 means that
•
only a single JPEG image is to be returned, while a 1 means that multiple JPEG (MJPEG) images are to be returned/streamed.
commands is a list of commands separated by commas described below. The COMMAND= pa-
•
rameter should always be present even if there are no commands included afterwards.
Some example HTTP commands are
http://iViewHD-Camera-2M-470040/image.cgi?CAPTURE=YES&STREAM=1&COMMAND=
Returns a stream of MJPEG images using the camera parameters that are currently set in the camera at IP address iViewHD-Camera-2M-470040.
http://192.168.1.140/image.cgi?CAPTURE=YES&STREAM=1&COMMAND=
Same as previous example, but camera images come from IP address 192.168.1.140.
http://192.168.1.140/image.cgi?CAPTURE=YES&STREAM=0&COMMAND=
A single JPEG image is returned from IP address 192.168.1.140 using the cameras current parameters.
As a convention we will be omitting the http://IP-Address/ portion in some of the examples below
Commands that can follow the COMMAND= option are also case sensitive and are separated by
commas. The commands are
COMP: 0..45 Compression level (Default 11)
•
0 is lowest compression (best image quality) - large file size
•
45 is highest compression (worst image quality) - small file size
•
EFFECT: 0..8 Special effect (Default 0)
•
0 - Normal
•
1 - Negative
•
2 - Gray
•
3 - Bluish
•
4 - Greenish
•
5 - Reddish
•
6 - Sepia
•
© 2009 NetMedia, Inc. 37
Page 38

iViewHD Userʼs Manual
7 - Black & White
•
8 - Black & White Negative
•
MODE: UXGA, SXGA, XGA, SVGA, VGA, QVGA, QQVGA or CIF - or numeric corresponding
•
value 0..8 (Default XD1)
UXGA 0 - 1600x1200
•
SXGA 1 - 1280x960
•
XGA 2 - 1024x768
•
SVGA 3 - 800x600
•
XD1 4 - 720x536
•
VGA 5 - 640x480
•
QVGA 6 - 320x240
•
QQVGA 7 - 160x120
•
CIF 8 - 400x298
•
RATE: 0..2 (default varies based on resolution and compression)
•
0 - Best for Night
•
1 - Better for Night
•
2 - Best for Day
•
BRIGHT: 0..16 Brightness (default 8)
•
0 - Low
•
8 - Normal
•
16 - High
•
EXPO: 0..12 Exposure (default 6)
•
0 - -2.0EV
•
1 - -1.7EV
•
2 - -1.3EV
•
3 - -1.0EV
•
4 - -0.7EV
•
5 - -0.3EV
•
6 - "0.0EV
•
7 - +0.3EV
•
8 - +0.7EV
•
9 - +1.0EV
•
10 - +1.3EV
•
11 - +1.7EV
•
12 - +2.0EV
•
SAT: 0..8 Saturation (default 4)
•
0 - Low
•
4 - Normal
•
8 - High
•
HUE: 0..4 Hue (default 2)
•
0 - -60º
•
1 - -30º
•
2 - 0º
•
3 - +30º
•
4 - +60º
•
CONTRAST: 0..8 Contrast (default 4)
•
38 © 2009 NetMedia, Inc.
Page 39

iViewHD Userʼs Manual
0 - Low
•
4 - Normal
•
8 - High
•
SHARP: 0..7 Sharpness (default 0)
•
0 is Automatic sharpness
•
1..7 Progressively sharper images. Sharpness is based on edge detection and enhancement
•
WB: 0..5 White balance (default 1)
•
0 - AWB Off
•
1 - AWB Automatic
•
2 - Sunny
•
3 - Cloudy
•
4 - Office
•
5 - Home
•
DCW: Digital Crop Window. Defaults to size of current base resolution. This specifies an area of
•
the current image that is cropped before being displayed. You should begin by setting a base
resolution mode of either UXGA (1600x1200) or SVGA (800x600). The DCW operates on one of
these base resolutions and is relative to the Pan offset (see below).
HxV - The horizontal and vertical size in pixels (separated by ʻxʼ) of the window within the
•
base resolution. This value should be in increments of 4 pixels - if not, it will be rounded
down to the nearest 4 pixels.
PAN: Pan. Defaults to 0x0. This specifies a location to begin the DCW within the current base
•
resolution image.
HxV - The horizontal and vertical location in pixels (separated by ʻxʼ). The coordinates are
•
relative to the upper left corner of the base resolution image. This value can be in increments
of 1 pixel.
SIZE: Output image size. Defaults to size of current output resolution. This value should be no
•
larger than the DCW and the same image aspect ratio - if not, it will be adjusted automatically.
HxV - The horizontal and vertical size in pixels (separated by ʻxʼ). This value should be in in-
•
crements of 4 pixels - if not, it will be rounded down to the nearest 4 pixels.
VFLIP: Vertical flip (default 1)
•
0 - Do not flip image vertically
•
1 - Flip image vertically
•
HMIRROR: Horizontal mirror (default 1)
•
0 - Do not mirror image horizontally
•
1 - Mirror image horizontally
•
†
†
Some examples of HTTP commands using the COMMAND= option are
/image.cgi?CAPTURE=YES&STREAM=1&COMMAND=MODE:UXGA,COMP:25
Starts receive MJPEG images at UXGA resolution with compression level 25
/image.cgi?CAPTURE=YES&STREAM=1&COMMAND=MODE:UXGA,COMP:25,VFLIP:0,HMIRROR:0
Receives UXGA MJPEG images at compression level 25 and images are inverted. This is useful if
the camera is mounted upside down.
†
The sensor is mounted upside down in the camera and thus the image is normally vertically flipped and horizontally mir-
rored to appear correct
© 2009 NetMedia, Inc. 39
Page 40

iViewHD Userʼs Manual
A special form of the HTTP command is available to retrieve a single JPEG image using the current
camera parameters. Itʼs equivalent to the
/image.cgi?CAPTURE=YES&STREAM=0&COMMAND=
The command is simply
/Image.jpg
For example,
http://192.168.1.140/Image.jpg
40 © 2009 NetMedia, Inc.
Page 41

iViewHD Userʼs Manual
JSON Object Support
The iViewHD camera supports a variety of JSON (JavaScript Object Notation) objects to manipulate
camera parameters. JSON is of primary interest to those that want to make custom web applications
that communicate to the iViewHD camera without having to issue HTTP commands. For a general
outline on what JSON is and various JSON links, please see
http://www.json.org/
iViewHD supports both reading and writing JSON objects. JSON objects are read/written using GET
or PUT JavaScript XMLHttpRequest calls. Because JSON objects may contain special characters, it
is always best to URL encode the JSON request using something like JavaScriptʼs escape function.
Reading JSON Objects
To read a JSON object issue a GET or PUT request in the form
/JSON.cgi?GETSET=0&COMMAND=<JSON-Partial-Objects>
where <JSON-Partial-Objects> denotes JSON objects to be retrieved formatted as JSON objects
without their corresponding values. For example,
{“JSONVersion”:}
{“CameraParameters”:}
{“CameraStats”:}
{“”:}
The object name may also be an empty string, in which case all JSON objects will be retrieved.
Writing JSON Objects
To write a JSON object issue a GET or PUT request in the form
/JSON.cgi?GETSET=1&COMMAND=<JSON-Object>
where <JSON-Objects> denotes a single JSON object and its corresponding values. For example,
{“CameraParameters”:{"OutputSize":[1600,1200]}}
Some JSON parameters are Read-Only and attempting to change them has no effect. Other JSON
parameters are used internally and are not documented here.
JSONP Support
iViewHD also supports JSONP (JSON with Padding). This allows the JSON object to be returned surrounded by parenthesis and an object name such as a function. If youʼre not familiar with JSONP,
here are some links
http://bob.pythonmac.org/archives/2005/12/05/remote-json-jsonp/
http://ajaxian.com/archives/jsonp-json-with-padding
To use JSONP use the following syntax:
/JSON.cgi?GETSET=0&JSONP=<JSONP-Name>&COMMAND=<JSON-Partial-Objects>
where <JSONP-Name> is the JSONP prefix that will be returned with the response. The JSONP= designator needs to come before the COMMAND= designator. For example,
/JSON.cgi?GETSET=0&JSONP=showVersion&COMMAND={“JSONVersion”:}
would return something like
showVersion({“JSONVersion”:4096})
© 2009 NetMedia, Inc. 41
Page 42

iViewHD Userʼs Manual
iViewHD JSON Objects
Below is a list of iViewHDʼs supported JSON objects.
{
"JSONVersion": number,
"CameraParameters": {
"Resolution": number,
"Crop": [number, number],
"PanOrigin": [number, number],
"OutputSize": [number, number],
"Effect": number,
"Compression": number,
"Brightness": number,
"Contrast": number,
"Hue": number,
"Saturation": number,
"Sharpness": number,
"Exposure": number,
"WB": number,
"VFlip": boolean,
"HMirror": boolean,
"FrameRate": number,
"Save": boolean,
"Restore": boolean
},
"CameraStats": {
"FramesPerSecond": number,
"TotalFrames": number,
"BadFrames": number,
"BadJPEG": number
}
}
42 © 2009 NetMedia, Inc.
 Loading...