

Page 1

R
netis Wireless High Power Ceiling/Wall Mounted Outdoor AP Router
Quick Installation Guide
Model No. WF2520P
WF2520
Page 2
net is Wire less Hi gh Powe r Ceili ng/Wal l mount ed AP Rout er Quic k Insta llati on Guid e
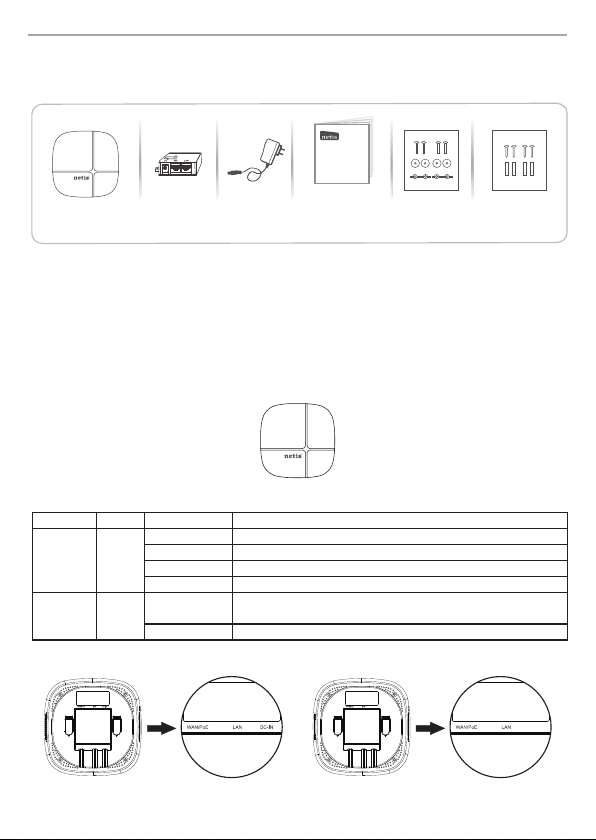
1.Package Contents
The f ol lo wing items s ho ul d be f ou nd i n yo ur p ac ka ge :
netis Wireless High Power Outdoor AP Router
Quick Installation Guide
Ceil ing/w all Moun ted
AP Rou ter
Please ma ke s ur e th at t he p ac ka ge c on ta in s ab ov e it em s, i f an y of t he l is te d it em s ar e da ma ge d
or mi ss in g, p le as e co nt ac t yo ur d is tr ib ut or.
* Thi s QI G is f or a ll n et is W ir el es s Hi gh P ow er AP Rou te r, in cl ud in g mo de lsCeiling/Wal l mo un te d
as be lo w
WF2 52 0P: Th is d ev ic e su pp or ts b ot h Pa ss iv e Po E an d re gu la r Po we r ad ap te r( DC 24 V/ 0. 5A ).
You may u se e it he r on e as p ow er s ou rc e.
WF2 52 0:Th is device only supports IEEE802.3af/at PoE.
PoE I nject or
(for W F2520 P only)
for WF 2520P o nly
Pow er Adapt er Quick Installation Guide Ce iling M ounti ng Kit Wal l mount ing Kit
2.H a r dwa r e Co n n e c t i o n
* Top Cover of Pr od uc t
* LED Ind icator
Col or
LED
SYS TEM
WLA N
Red
Blu e
* I/O o f Bo tt om C ov er
1
Mod e
Sol id Red
Off
Fas t Blink ing
Slo w Blink ing
Sol id Blue
Bli nking
The re is no '' DC-IN ' on WF25 20
Pow er ON and s ystem i s booti ng
Aft er syst em boot f inish ed
Whe n firmw are is up gradi ng
WiF i disab led
Aft er syst em boot f inish ed and no w irele ss date i s
bei ng tran smitt ed
The re is wir eless d ate bei ng tran smitt ed
Sta tus
Page 3

net is Wire less Hi gh Powe r Ceili ng/Wal l mount ed AP Rout er Quic k Insta llati on Guid e
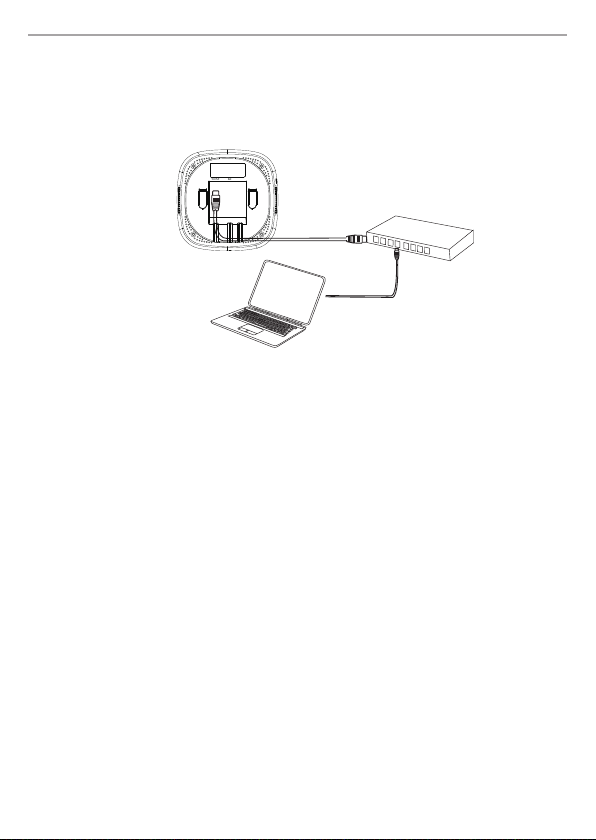
1)WF2 520P (Power sou rce: PoE)
A) Conne ct one end of th e Ether net cab le into the WAN/PoE po rt of the dev ice and th e
other end to th e PoE port of th e PoE inje ctor.
B) Conne ct the Pow er Adapte r to DC-in po rt of the PoE injector and plug th e other en d to wall out let.
C) Conne ct the Eth erne t cable in to LAN/ WAN port of PoE in ject or and the ot her end to the Ethernet
port of the PC.
LAN/WAN
LAN/WAN
Com puter
2) WF252 0P(P ower so urce :DC- IN)
A) Conne ct the pow er adap ter to DC- IN port of the device and plug the ot her end to wa ll outl et;
B) Conne ct the Eth erne t cable in to WAN/Po E port of the de vice an d the othe r end to the Ethernet
port of PC.
WF2 52 0P
PC
2
Page 4
net is Wire less Hi gh Powe r Ceili ng/Wal l mount ed AP Rout er Quic k Insta llati on Guid e
3) WF252 0 (Powe r sourc e:Po E switc h)
A) Conne ct one end of th e Ether net cab le into the WAN/PoE po rt of the dev ice and th e other end to
the Ether net por t of PoE swit ch.
B) Conne ct one end of th e Ether net cab le into an Ethernet port of the Po E switc h and the oth er end
to the Ether net por t of PC.
WF2 52 0
PoE switch
3. Configure the AP Router via Web Management Page
Thi s device works in AP mo de b y de fa ul t, s o if y ou a re i nt en d to c ha ng e th e wo rk in g mo de o r
any setti ng s, p le ase connect your computer to WAN /P oE o r LA N Po rt o f AP and set a sta ti c
IP fo r yo u co mp ut er a s be lo w st ep s:
3.1 Set a Sta ti c IP f or P C
Manually set the IP add re ss o f th e wi re d ne tw or k ad ap te r on y ou r co mp ut er a s be lo w.
IP Add re ss/ IP v4 A dd re ss : 19 2. 16 8. 1. x (1 <x <2 55 )
Sub ne t Ma sk : 25 5.25 5.255.0
Default Gat eway / Ro ut er : 19 2. 16 8. 1. 1
For W in do ws 8 / 7/ Vi st a
1) Go t o “S et ti ng s” ( fo r Wi nd ow s 8) /“ St ar t” ( fo r Wi nd ow s 7/ Vi st a) > “ Co nt ro l Pa ne l” .
2) Left-c li ck on “Network and Int er ne t” > “ Ne tw or k an d Sh ar in g Ce nt er ” > “C ha ng e
ada pte r set tin gs ” (for W ind ows 8 / 7)/” Ma nag e net wor k con nec tio ns ” (for W ind ows Vi st a).
3) Right-click on “Local Ar ea C on ne ct io n” a nd l ef t- cl ic k on “ Pr op er ti es ”.
4) Double-click on “Internet Protocol Version 4 (TCP/I Pv 4) ”.
5) Select “Use the foll ow in g IP a dd re ss ” th en l ef t- cl ic k on “ OK ”.
For W in do ws X P/ 20 00
1) Go t o “S ta rt ” > “C on tr ol P an el ”.
2) Left-c li ck on “Network and Int er ne t Co nn ec ti on s” > “ Ne tw or k Co nn ec ti on s” .
3) Right-click on “Local Ar ea C on ne ct io n” a nd l ef t- cl ic k on “ Pr op er ti es ”.
4) Double-click on “Internet Protocol (TC P/IP )” .
5) Select “Use the foll ow in g IP a dd re ss ” th en l ef t- cl ic k on “ OK ”.
For M AC O S
1) Click on the “Apple” menu > “System Preferences”.
2) Click on the “Network” icon.
3) Click on “Ethernet” in the left side box and click on “Advanced” in the lower right corner.
4) In t he t op o pt io ns , se le ct “ TC P/ IP ”.
5) In t he p ul l-down menu next to “Configure I Pv 4” s el ect “M an ua ll y” .
6) Fi ll in the “IPv 4 Ad dr es s/ Su bn et M as k/ Ro ut er ” pa ra me te rs , an d cl ic k “O K” t he n “A pp ly ”.
3
Page 5
net is Wire less Hi gh Powe r Ceili ng/Wal l mount ed AP Rout er Quic k Insta llati on Guid e
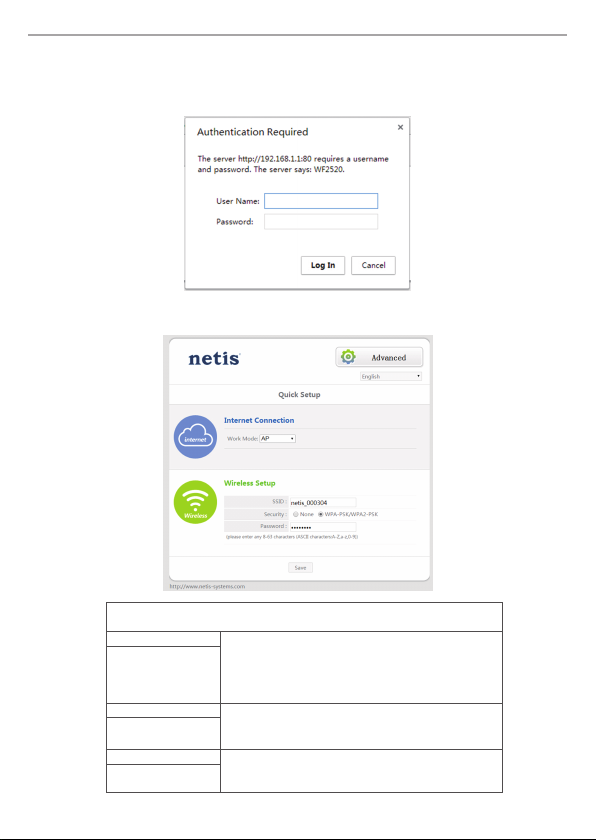
3.2 O pe n yo ur browser and type http:/ /1 92 .1 68 .1 .1 i n th e ad dress fi eld to visit router's web
management page.
3.3 A dial og box wil l prompt as below, plea se ente r User Nam e and Pass word , both default values
are gues t and clic k OK.
Note: The configuration inc lude s “Inte rnet Co nnec tion ” and “Wire less Se tup” , if you choo se “AP” ,
pleas e go to Wirel ess Set up.
AP Ro uter Mo de:
Sel ect the c orrec t Conne ction Ty pe.
PPP oE Sel ect “PP PoE” wh en:
Type in the U sername &
Password provided by the
ISP.
DHC P Sel ect “DH CP” whe n:
(Dy namic I P)
Sta tic IP Sel ect “St atic IP
Type in all the IP Info.
1. Th e devic e is conn ected t o a DSL or Cab le pure m odem.
2. Go t usern ame &pa sswor d from IS P
3. Br oadba nd conn ectio n is need ed on PC wh en bypa ssing
Thi s devic e.
1. Th e devic e is conn ected t o a Cable /DSL mod em rout er.
2. In terne t works d irect ly on PC wh en bypa ssing t his Dev ice.
1. Go t IP Addre ss, Sub net Mas k, Defa ult Gat eway, DN S
Ser ver fro m ISP.
” whe n:
.
4
Page 6

net is Wire less Hi gh Powe r Ceili ng/Wal l mount ed AP Rout er Quic k Insta llati on Guid e
WIS P Mode :
Sel ect tar get net work an d Conne ction Typ e.
1. Cl ick “AP Sc an” but ton to se lect yo ur targ et netw ork and c lick “C onnec t” butt on.
2. Type i n the wir eless s ecuri ty info o f the tar get net work.
3. Se lect co nnect ion typ e. (Ple ase ref er to “In terne t Setti ngs” →“A P Router M ode”)
Wirel ess Set up
Setup a wir eles s netwo rk name in “S SID” bo x, it is recommend ed to use WPA-PSK/WPA2-PSK for
“Secu rity ” and set a wire less ne twor k key in the “Password” box, th en clic k “Save ” butto n.
Note: Th e DHCP Serv er will be disabled after sw itch ing to “AP ” mode suc cess full y, so you will have
to set a static IP address for your PC first if you need to login to the web-based management page again.
3.4 The web management pag e will dis play af ter log in succ essf ully. Sele ct the lan guag e as you need
on the top box , defau lt is in Engl ish.
3.5 When you completed the configurati on,plea se remember to change the settings on your computer
back to 'obtain an IP address automat ically' in the the same window as step 3.1.
5
Page 7
net is Wire less Hi gh Powe r Ceili ng/Wal l mount ed AP Rout er Quic k Insta llati on Guid e
4.M o u n t i n g t h e d evice
Thi s de vi ce c an b e ce il in g mo un te d or w al l mo un te d ac co rd in g to y ou r se tu p.
1. Ce iling Mounted
Att en ti on : Fo r ce il in g mo un te d, w e wo ul d su gg es t,
(1) The t hi ck ne ss o f ce il in g mu st b e ov er 1 7m m
(2) The W ei gh t- be ar in g of c ei li ng m us t be o ve r 5k g.
If th e ce il in g do n ot m ee t th e re qu ir em en t as a bo ve , pl ea se a dd a p la te o n th e ba ck o f th e
ceiling to st re ng th en t he t hi ck ne ss a nd w ei gh t- be ar in g.
1) Re mo ve t he s el ec te d ce il in g an d pl ac e th e mo un ti ng b ra ck et o n th e su it ab le l oc at io n of t he
cei li ng . Ma rk in g fo ur h ol es o f th e br ac ke t on t he c ei li ng a nd o ne h ol e fo r Et he rn et c ab le
whi ch i s 5c m in f ro nt o f th e U- sh ap ed n ot ch .
Marking four holes of the
bracket on th e ce iling
2) Dr ill fo ur s cr ew h ol es f or f ix in g mo un ti ng b ra ck et a nd o ne h ol e fo r Et he rn et c ab le .
3) Att ac h th e mo un ti ng b ra ck et t o th e ce il in g by u si ng t he p ro vi de d mo un ti ng k it .
Eth ernet cable hole
Scr ew nut
Scr ew
6
Page 8
net is Wire less Hi gh Powe r Ceili ng/Wal l mount ed AP Rout er Quic k Insta llati on Guid e
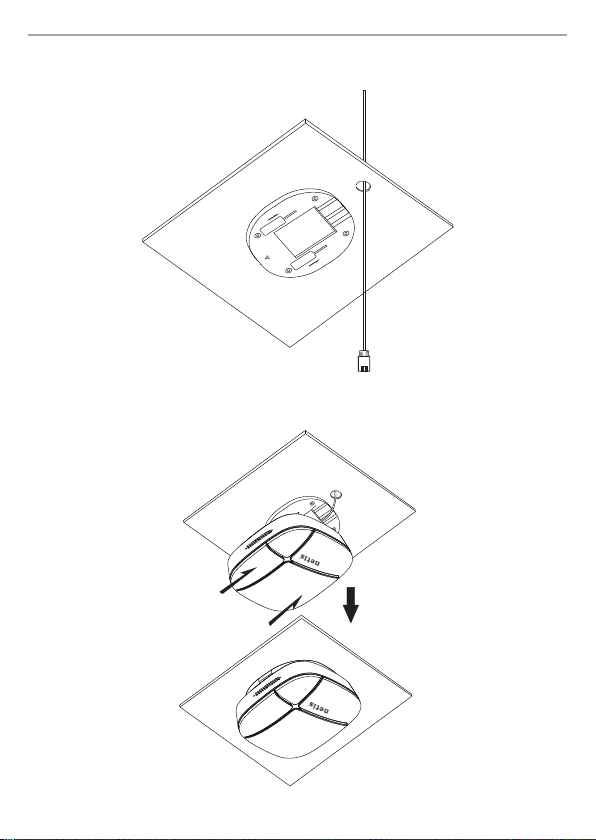
4) Connect the Ethernet cable to the WA N/ Po E po rt o f th e de vi ce
5) Re install th e ce il ing and mo unt th e de vi ce b y fi xi ng t he d ev ic e to t he s lo t of m ou nt in g br ac ke t.
7
Page 9

net is Wire less Hi gh Powe r Ceili ng/Wal l mount ed AP Rout er Quic k Insta llati on Guid e
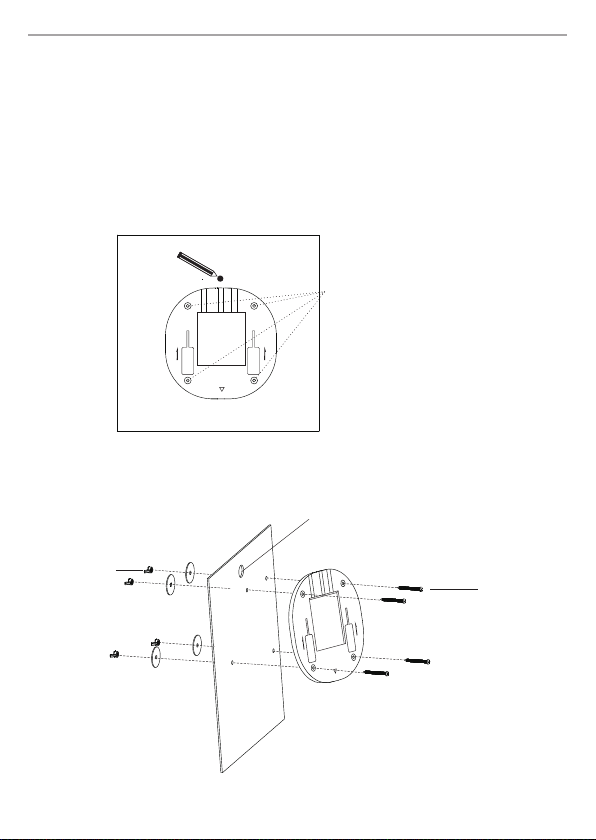
2 Wall Mout
1) Place th e mount ing kit on th e wall and ma rk four holes of the bra cket on th e wall, and the n drill
four hole s on the wall . Pleas e note tha t the U-shaped notch must be co nsis tent wi th the act ual
direct ion of the ne twor k.
Marki ng four holes of the
bracket on th e wa ll.
2) Attach the mount ing bra cket to th e wall by usi ng the provided mounting kit.
3) Connect the Ethe rnet ca ble to the WAN/PoE port of the devi ce
Setsc re w
Scr ew
Blue Port
Yell ow P or t
8
Page 10

net is Wire less Hi gh Powe r Ceili ng/Wal l mount ed AP Rout er Quic k Insta llati on Guid e
4) Mount ing the de vice by fi xing th e devic e to the slot of mou ntin g brack ets.
9
Page 11

5.Troubleshooting
Q How do I restore my netis WF2520/WF2520P to default settings?
A With the router powered on, holding “RESET” button on the PoE injector or the device for 8s~10s with
a pin to restore it to factory defaults.
Q What can I do if my Internet cannot be accessed?
A 1) Check to verify the hardware connections are correct. Please refer to the “Hardware Connection” step.
2) Refer to 3.1) to set a Static IP address for your PC and connect the WF2520/WF252 0P to your PC.
3) Open a web browser and login to http://192.168.1.1
4) Re-check your setting
5) Reboot the modem first and then netis device. Wait for one minute before you check the Internet again.
6) If Internet access is not available, please connect your computer directly to your modem and try
the Internet again.
If the Internet is still not working, please contact your ISP for further help.
Fed er al Com muni ca ti on C om mi ss io n In te rf er en ce S ta te me nt
Thi s equip ment ha s been te sted an d found t o compl y with th e limit s for a Cla ss B digi tal dev ice, pu rsuan t
to Pa rt 15 of th e FCC Rul es. The se limi ts are de signe d to prov ide rea sonab le prot ectio n again st harm ful
int erfer ence in a r eside ntial i nstal latio n. This e quipm ent gen erate s, uses a nd can ra diate r adio
fre quenc y energ y and, if n ot inst alled a nd used i n accor dance w ith the i nstru ction s, may ca use har mful
int erfer ence to r adio co mmuni catio ns. How ever, th ere is no g uaran tee tha t inter feren ce will n ot occu r in
a par ticul ar inst allat ion. If t his equ ipmen t does ca use har mful in terfe rence t o radio o r telev ision
rec eptio n, whic h can be de termi ned by tu rning t he equi pment o ff and on , the use r is enco urage d to try to
cor rect th e inter feren ce by one o f the fol lowin g measu res:
·Reo rient o r reloc ate the r eceiv ing ant enna.
·Inc rease t he sepa ratio n betwe en the eq uipme nt and re ceive r.
·Conn ect the equip ment into an outlet on a circuit differ ent from that to which the receive r is connect ed.
·Con sult th e deale r or an exp erien ced rad io/TV t echni cian fo r help.
FCC RF Radi at io n Ex po su re S ta te me nt :
1. The equ ipment complie s with RF exposu re limits set for th for an uncontr olled environm ent. The antenna(s)
use d for thi s trans mitte r must no t be co-l ocate d or oper ating i n conju nctio n with an y other a ntenn a or
tra nsmit ter.
2. Thi s equipme nt compl ies with FCC RF radiation expo sure limits set forth for an uncon trolled enviro nment.
3. Th is equi pment s hould b e insta lled an d opera ted wit h a minim um dist ance of 2 0 centi meter s betwe en
the r adiat or and yo ur body.
FCC C autio n: Any cha nges or m odifi catio ns not ex press ly appr oved by t he part y respo nsibl e for
com plian ce coul d void th e user' s autho rity to o perat e this eq uipme nt.
Thi s devic e compl ies wit h Part 15 o f the FCC R ules. O perat ion is su bject t o the fol lowin g two con ditio ns:
(1) t his dev ice may n ot caus e harmf ul inte rfere nce and
(2) t his dev ice mus t accep t any int erfer ence re ceive d, incl uding i nterf erenc e that ma y cause u ndesi red
ope ratio n
Technical Support:
USA/ Canada
Toll Free: +1 866 71 network (+1 866 716 3896)
E-mail: usa_support@n etis-systems.co m
Other Regions:
E-mail: support@netis-syste ms.com
NET IS SYST EMS CO. , LTD.
www. netis -syst ems.c om
MAD E IN CHIN A
 Loading...