

Page 1

R
netis Wireless N VDSL2 VoIP IAD
Quick Installation Guide
Page 2

net is Wire less N VD SL2 Mod em Rout er Quic k Insta llati on Guid e
1.Packa ge Contents
MODEM
V
PHONE
netis Wirele ss N ADSL2 + Modem R outer
Quick Instal latio n Guide
Wire less N V DSL2
VoIP IA D
Pow er Adapt er
VDSL S plitt er
Ethe rnet Ca ble Telephone Cable *2
QIG
2.Hard ware Connecti on
3G don gle
(or US B stora ge devi ce)
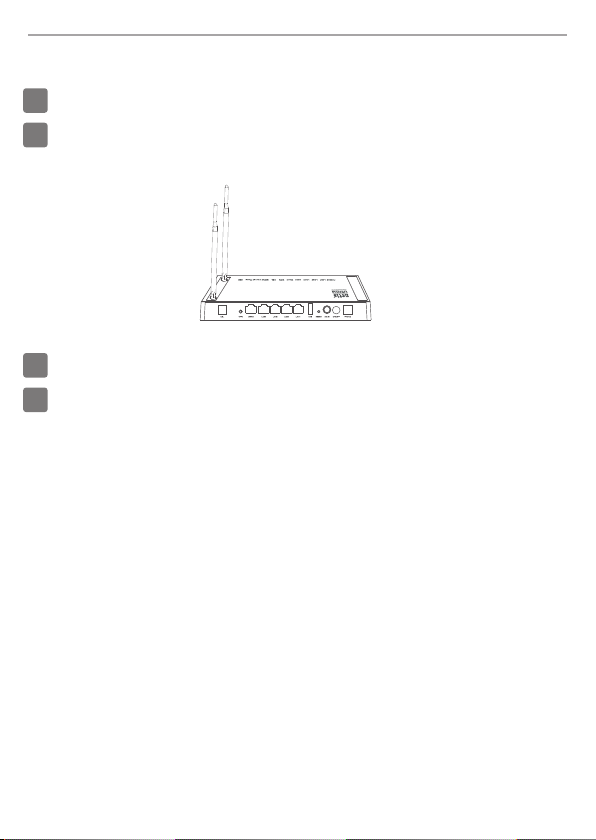
2.1. Con nect the DSL line wit h the atta ched teleph one cable.
Connec t the LIN E port of VD SL Split ter to the wall jack w ith a telephon e cable .
Connec t the MOD EM port of VDSL Split ter to the DSL port on net is Modem Route r with th e other teleph one cable.
Connec t your te lephone to the PH ONE port of VDSL Spli tter.
Tip: If no tel ephone is need ed, please con nect the DSL port on net is Modem Route r to the wal l jack wi th the
phone ca ble directl y.
2.2. Con nect your comp uter to one of the LAN po rt on netis Modem Ro uter with an Ethe rnet cable.
2.3. Plu g the pro vided Power Adap ter into the DC-I N jack of ne tis Modem Rout er and the other end to a st andard
electr ical socket .
2.4 If you ne ed VoIP service, pl ease connect yo ur telephon e to the PHO NE port on the modem wi th a telep hone cable
2.5 Conn ect your 3G dongl e or USB sto rage to the USB port on t he modem
Tip: If the LE D indic ators displa y abno rmally, please ch eck if all the cable s are wel l conne cted. If the DSL LED is
off or flas hing, please co ntact your ISP (In ternet Serv ice Provide r) to check the Inte rnet connec tion.
1
Page 3

net is Wire less N VD SL2 Mod em Rout er Quic k Insta llati on Guid e
3. Configure the Modem Router via Web
Management Page
3.1. Necessary Information before the configuration.
For a suc cessful setup, you're re commended to con tact your ISP first an d ask for the
following network pa rameters which will be required dur ing the configur ation pr ocedures.
a. VPI /VCI;
b. Con nectio n Type;
c. Enc apsula tion Type (Optiona l);
d. Use rname & Pas sword (O ptional, according to yo ur Connection Type).
3.2. Set the IP address of the wired network adapter on your computer
as “Automatic” or “DHCP”.
For Windows 8/ 7/ Vista
1) Go to “Settings ” (Win 8)/“ Start” (Win 7/Vista)> “Control Pa nel”.
2) Left-click on “Network and Internet” > “Netwo rk and Sharing Cent er”> “Ch ange
adap ter settings” (Win 8/7)/“Manag e networ k connec tions” (Win Vista ).
3) Right-clic k on “Local A rea Conn ection” and left-click on “Properti es”.
4) Double-cli ck on “Internet Protocol Version 4 (TCP /IPv4)”.
5) Select “Obtain an IP address automatical ly” and “Obtain DNS server
addr ess automatica lly” the n left-c lick on “OK ”.
For Windows XP/2000
1) Go to “Start”> “Control Pa nel”.
2) Left-click on “Network and Internet Connecti ons”> “N etwork Connectio ns”.
3) Right-clic k on “Local A rea Conn ection” and left-click on “Properti es”.
4) Double-cli ck on “Internet Protocol (T CP/IP)”.
5) Select “Obtain an IP address automatical ly” and “Obtain DNS server
addr ess automatica lly” the n left-c lick on “OK ”.
For MA C OS
1) Click on the “Apple” menu> “System Prefere nces”.
2) Click on the “Network” ico n.
3) Click on “Ether net” in the left side bo x and click on “Ad vanced” in the lowe r
righ t corner.
4) In the top options, select “TCP/IP”.
5) In the pull-dow n menu next to “Configure IPv4” select “Using DHCP”.
6) Click “OK” then “Apply” .
3.3. Op en yo ur br owser and type 19 2.1 68. 1.1 in the addres s fie ld.
Then type in the us ern ame g uest and passwo rd gu est t o login
the web m ana gem ent page.
192.168.1.1
2
Page 4

net is Wire less N VD SL2 Mod em Rout er Quic k Insta llati on Guid e
3.4. After you login the web management page, you can go to "Wizard" to
do basic configurations step by step
1) Step 1: I SP Con nec tion Ty pe. Selec t the ISP Connect ion Typ e tha t give n by yo ur
ISP. Af ter selec tion, ple ase click N EXT to cont inue.
2) Step 2, PPPoE/PPPoA. When PPPoE/PPPoA is selected, Enter the PPPoE/PPPoA information
provided to you by your ISP. Click NEXT to continue
3
Page 5

net is Wire less N VD SL2 Mod em Rout er Quic k Insta llati on Guid e
3)Step 3, Wireless Settings, You may enable/disable Wireless, change the Wireless SSID and
Authentication type in this page. Click NEXT to continue.
4)Step 4, the Setup Wizard has completed. Click on BACK to modify changes or mistakes.
Click NEXT to save the current settings.
Tip 1 :
Defaul t IP add ress : 192 .168 .1.1 Defa ult lo gin u sern ame: gues t
Defaul t SSID : net is Def ault l ogi n pass word: gue st
Defaul t wire les s pass word: pas swor d
Tip 2 :
After th e basi c Int erne t setting s, you m ay open som e popu lar w ebsi tes to
check yo ur Int ern et con nection . If you c annot acc ess th e Int erne t, please
refer to t he ins tru ctio ns in “Troub lesh ooting” .
4
Page 6
net is Wire less N VD SL2 Mod em Rout er Quic k Insta llati on Guid e
4.Troubleshooting
How do I resto re my netis Modem Router's configuration to its default settings?
Q
With the router powered on, use a pin to press and hold the Default button on
A
the rear panel for 8 to 10 seconds before releasing it. The router will reboot and
all configurations are back to factory default.
What can I do if my Internet cannot be accessed?
Q
1) Check to verify the hardware connections are correct.
A
Please refer to the “Hardware Connection” step.
2) Login to netis Modem Router's web management page and ensure that
you input the correct network parameters.
You'd better contact your ISP to make sure that the VPI/VCI, Connection Type,
Username & Password are correct.
3) If you still cannot access the Internet, please restore your Modem Router
to its factory default settings and try the “Wizard” again.
4) Please feel free to contact netis Technical Support if possible.
Tech nic al Su pport:
USA/ Can ada:
Toll F ree: + 1 866 71 netw ork (+ 1 866 71 6 3896 )
E-mail : usa_ supp ort@ netis-s yste ms.c om
Oth er Re gion s:
E-mail : supp ort@ neti s-syste ms.c om
5
Page 7

Federal Com mun ication Comm iss ion Interfer enc e Statement
Thi s equ ipme nt ha s bee n tes ted and fou nd to comp ly wi th the limi ts fo r a Cla ss B digit al
device , purs uant to Par t 15 of the FCC Ru les. The se limi ts are desi gned t o prov ide
reason able pr otec tion agai nst har mfu l inte rfer enc e in a res iden tial in stal lat ion. Th is
equipm ent g ener ates , use s and can r adia te ra dio f requ ency ener gy an d, if not i nsta lled
and use d in acco rdan ce w ith t he i nstr uct ions , ma y cau se h armf ul i nter fer ence to r adio
commun icat ions . H owev er, there i s n o g uarante e t hat inte rfer ence wil l n ot occu r i n a
partic ular in stal lati on. If thi s equipme nt does ca use har mful in terf eren ce to radi o or
tel evi sion rece ptio n, w hich can b e de term ined by tu rni ng th e equ ipment o ff an d on, the
user is en cour aged t o try to c orrect th e inte rfer ence b y one o f the fo llow ing me asures:
— Reorie nt or re loca te the r eceivin g ante nna.
— Inc rea se the s epar atio n between t he equ ipme nt and r ece iver.
— Conn ect the equ ipme nt into an outl et on a c ircu it diffe rent fr om that to whi ch the
receiv er is co nnec ted.
— Consul t the de aler o r an exp erience d radi o/TV t echn ici an for h elp.
FCC RF Radiat ion E xposure Stat eme nt:
1. T he e quip ment compli es wi th R F exp osur e li mits set for th f or an unc ont roll ed
enviro nmen t. Th e an tenn a(s) use d fo r th is t rans mitt er m ust not be co-l oca ted o r
operat ing in c onju ncti on wi th any o ther a nten na or tr ans mitt er.
2. Th is equipme nt comp lie s wit h FCC RF r adia tion e xpos ure li mits set fort h for an
uncont roll ed env iron men t.
3. Thi s equ ipme nt shou ld be inst alled and ope rate d with a min imu m dist ance of 20
centim eter s betw een th e radiato r and yo ur bod y.
FCC Cau tion : Any changes or m odif icat ion s not exp ress ly a ppro ved b y th e par ty
respon sibl e for co mpli anc e coul d void t he use r's au tho rity t o oper ate th is equipm ent.
Thi s dev ice c omp lies with Part 15 of the FCC R ule s. Op erat ion i s sub ject to th e
fol low ing tw o cond itio ns:
(1) this d evic e may no t caus e harmful i nter fere nce an d
(2) this d evic e mu st a ccep t an y inter fere nce rece ived, i nclu ding inte rfer ence that may
cause un desi red op erat ion
6
Page 8

NETIS SYSTEMS CO., LTD.
www.netis-systems.com
MADE IN CHINA
PKU M0575 5
 Loading...