

Page 1
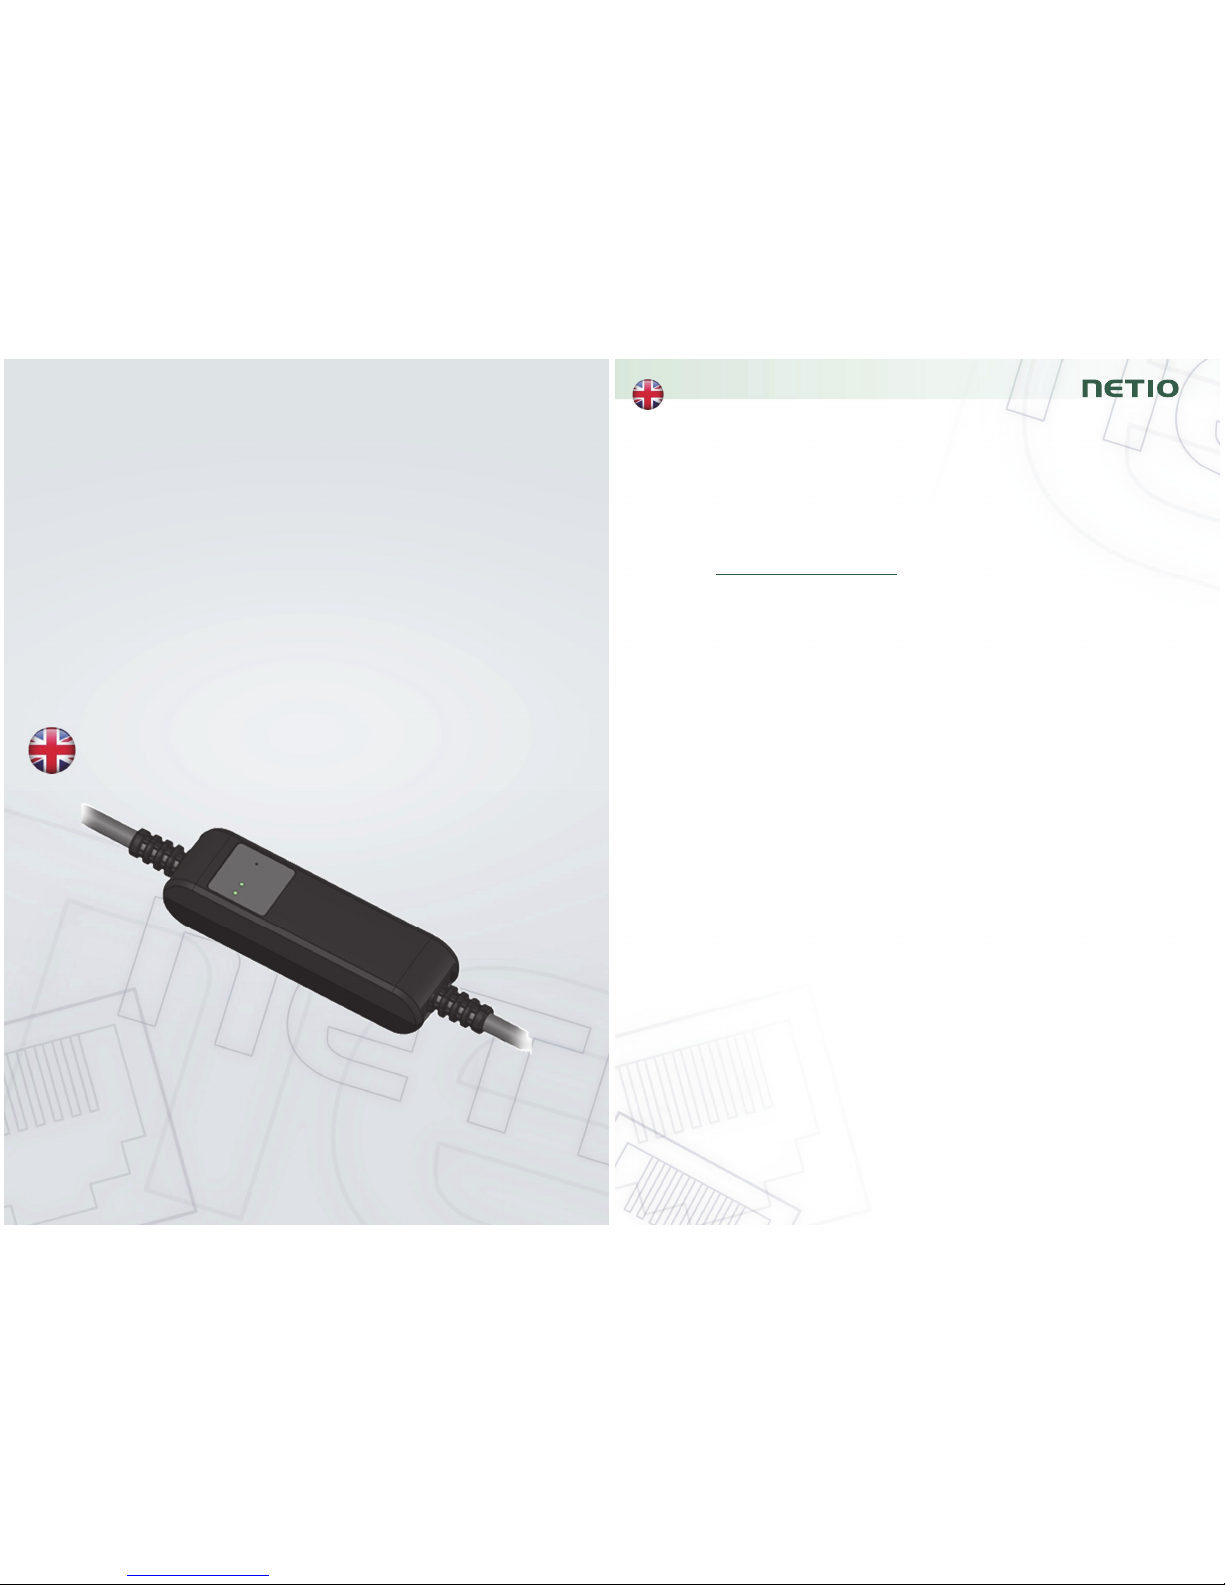
QIG
(Quick Installation Guide)
PowerCable QIG
1
NETIO PowerCable
Quick Installation Guide (QIG)
Thank you for purchasing a product of NETIO products a.s. Before using your
product for the first time, please read this short guide to avoid problems with
incorrect installation or use. For more information, please see the User's Manual
available at
http://netio-products.com
.
Please read carefully the following notice.
The NETIO PowerCable is an electrical device. Mishandling may damage the device,
void your warranty, or result in injury or death.
Safety Notices
1) The manufacturer is not liable for any damage caused by incorrect use of the
device or by operating it in an unsuitable environment.
2) The device is not rated for outdoor use.
3) Do not expose the device to strong vibrations.
4) Unauthorized modifications may damage the device or cause a fire. Do not open
the device – risk of electric shock!
5) Protect the device from liquids and excessive temperatures.
6) Make sure the device does not fall.
7) Only electrical appliances approved for use with the electrical network may be
connected to the device.
8) Do not connect multiple devices in series.
9) The cable plug must be easily accessible.
10) The device is completely switched off only when unplugged.
11) If the device malfunctions, disconnect it from the electrical outlet and contact
your vendor.
12) If the power cable is damaged, do not use the device. Send the device to an
authorized service center for a repair.
Page 2
2
Minimum system requirements (for configuration)
A device with an Internet browser (Firefox, Chrome, Safari, Microsoft Internet
Explorer, Opera, Mozilla etc.) that has JavaScript and Cookies support enabled.
Package contents
NETIO PowerCable device
Quick Installation Guide (QIG)
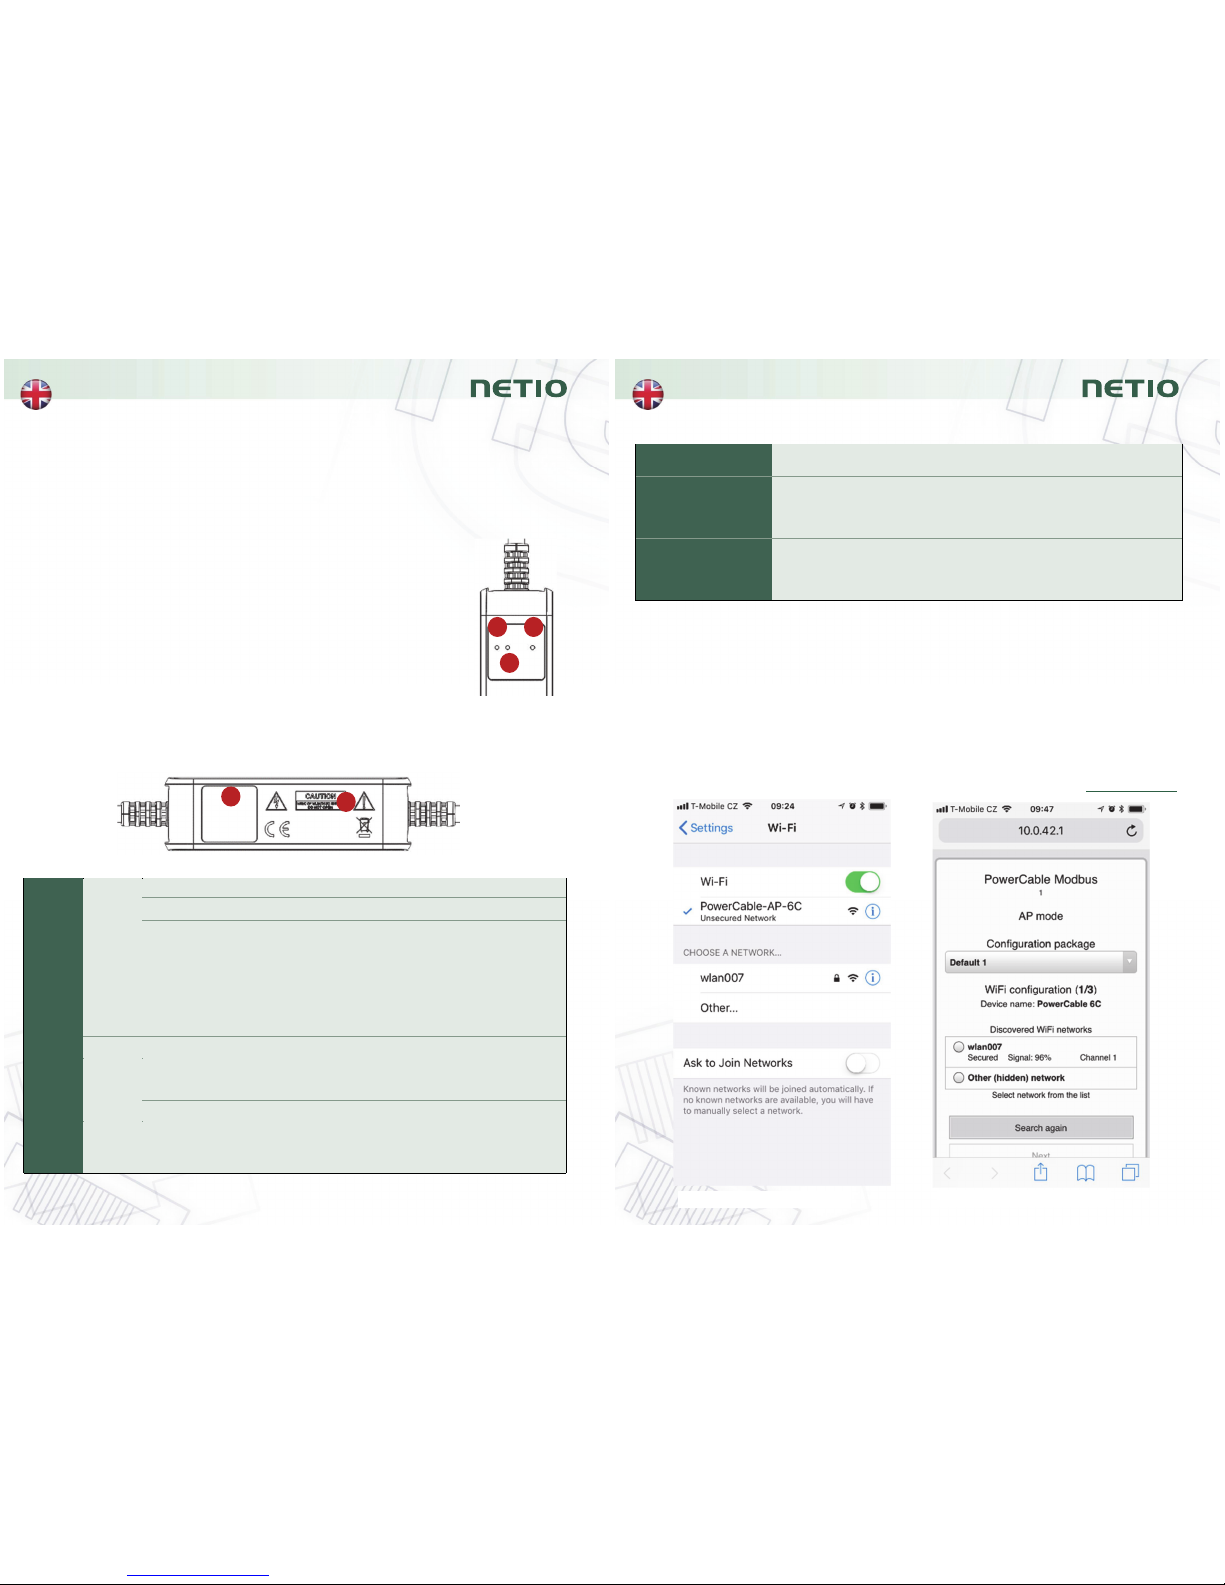
Device description
1) Status LED (Y+R)
2) Output state LED (G)
3) Button – to press, a thin object is needed (may be conductive)
4) Type plate – indicates the device model, electrical rating, maximum
switching power and serial number
5) Caution: Do not open the device – risk of electric shock!
Rear view
Status
LED (1)
Yellow
Off No WiFi connection
On WiFi connected
Quickly flashing
& red is off
AP mode
Slowly flashing
& red is off
Waiting for DHCP
3 fast flashes every
second & red is off
Locate function – for one minute after being
enabled in the web administration
Red Flash Activity (command received over M2M)
Output
LED (2)
Green
Off Output relay open
On Output relay closed
Quickly flashing for 1sec “Load to defaults & AP mode” activated
All
LEDs
Yellow
+ red,
green
Shortly on
During system boot (e.g. after powering up
or rebooting the device)
Front view
123
5
4
3
Button functions
Output control
To change the output state, press the button three times within 1 to 5
seconds.
AP mode activation
Press and hold the button for at least 10 seconds while the device is
on. This activates the AP mode. You can now connect to the device
and change the WiFi network to which it should connect.
(Yellow LED blinks guickly)
Restoring factory
defaults
Switch Off the device. Press and hold the button for at least 10
seconds
while powering up
the device. The device reverts to factory
settings and the AP mode is activated. (Green quickly flashing for
1sec, than Yellow blinks quickly)
First connection, starting up and basic configuration
1) Connect the NETIO PowerCable plug into an electrical socket. When the device
is powered up for the first time, it enters the “
AP mode
” (Yellow flashing quickly).
2) On a computer, tablet or smartphone, display available WiFi networks and
connect to the unsecured “
PowerCable-AP-xx
” network. (Figure 1)
3) Open a web browser and enter
10.0.42.1
– you will see NETIO PowerCable WiFi
configuration page. (Figure 2)
Alternatively, enter any URL, you will be redirected, for example www.netio.eu.
Figure 1
Figure 2
Page 3
4
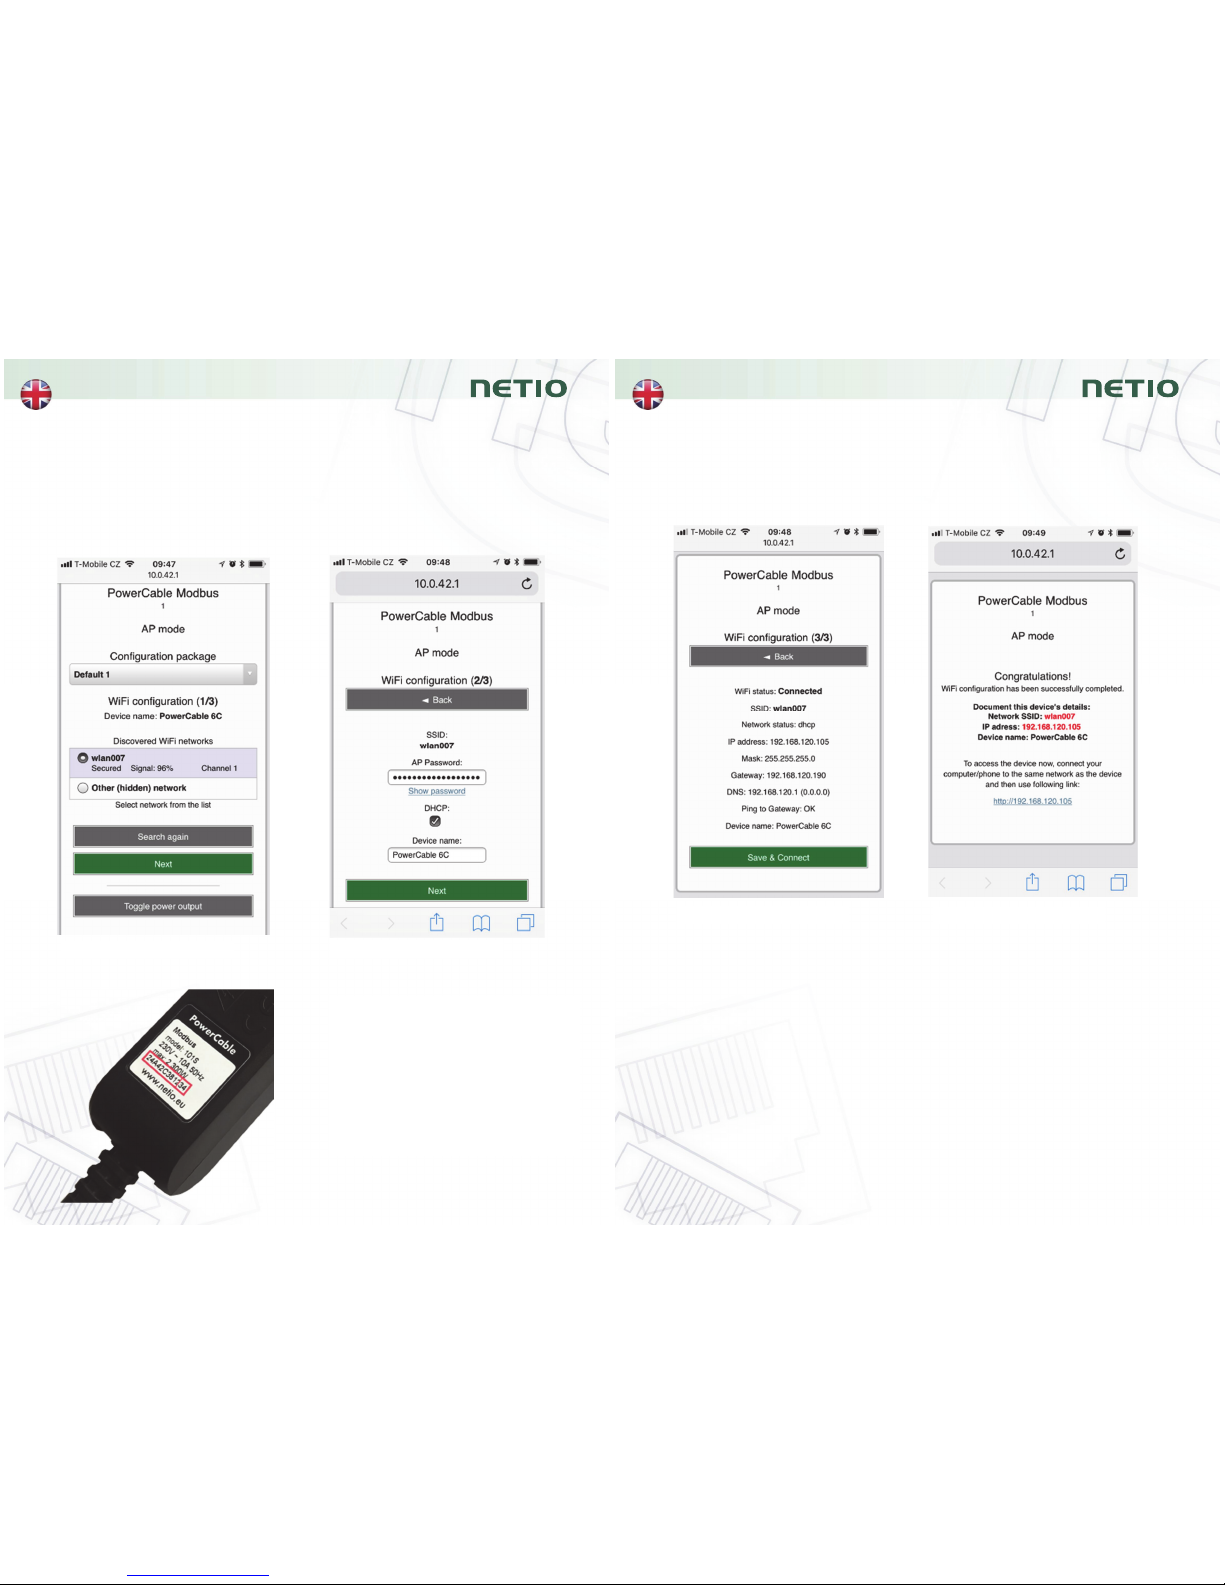
4) Select your network in the list of detected networks and press “Next”. (Figure 3)
5) Enter the password for the selected WiFi network. You may also change the
device name. If your network does not use the DHCP, unselect this option and
manually enter the IP address and other network parameters (for experts only).
Confirm by pressing “Next”. (Figure 4)
Figure 3
Figure 4
SN (serial number) on the label
----------xx
24A42C381234
WiFi network:
PowerCable-AP-xx
PowerCable-AP-34
5
6) A page with the connection result is displayed. If it shows “WiFi status:
Connected“, check the network parameters and then click “Save&Connect” to
save the configuration. (Figure 5) The device then exits the AP mode, connects
to the selected WiFi network, and displays a network configuration summary
page. (Figure 6) WiFi connection is indicated with the yellow LED.
7) Connect your computer, tablet or smartphone to the same network where the
NETIO PowerCable is now connected and enter the device’s IP address (or use
the link at the summary page, see the previous step). If you haven’t noted the IP
address, you can use the
NETIO Discover
to find it, as described below.
8) After entering the address in a browser, the web administration login dialog
appears. The default username / password combination is
admin
/
admin
. After
a successful login, the web administration of the device appears. We recommend
changing the default username and password using the Users tab in the left-hand
menu.
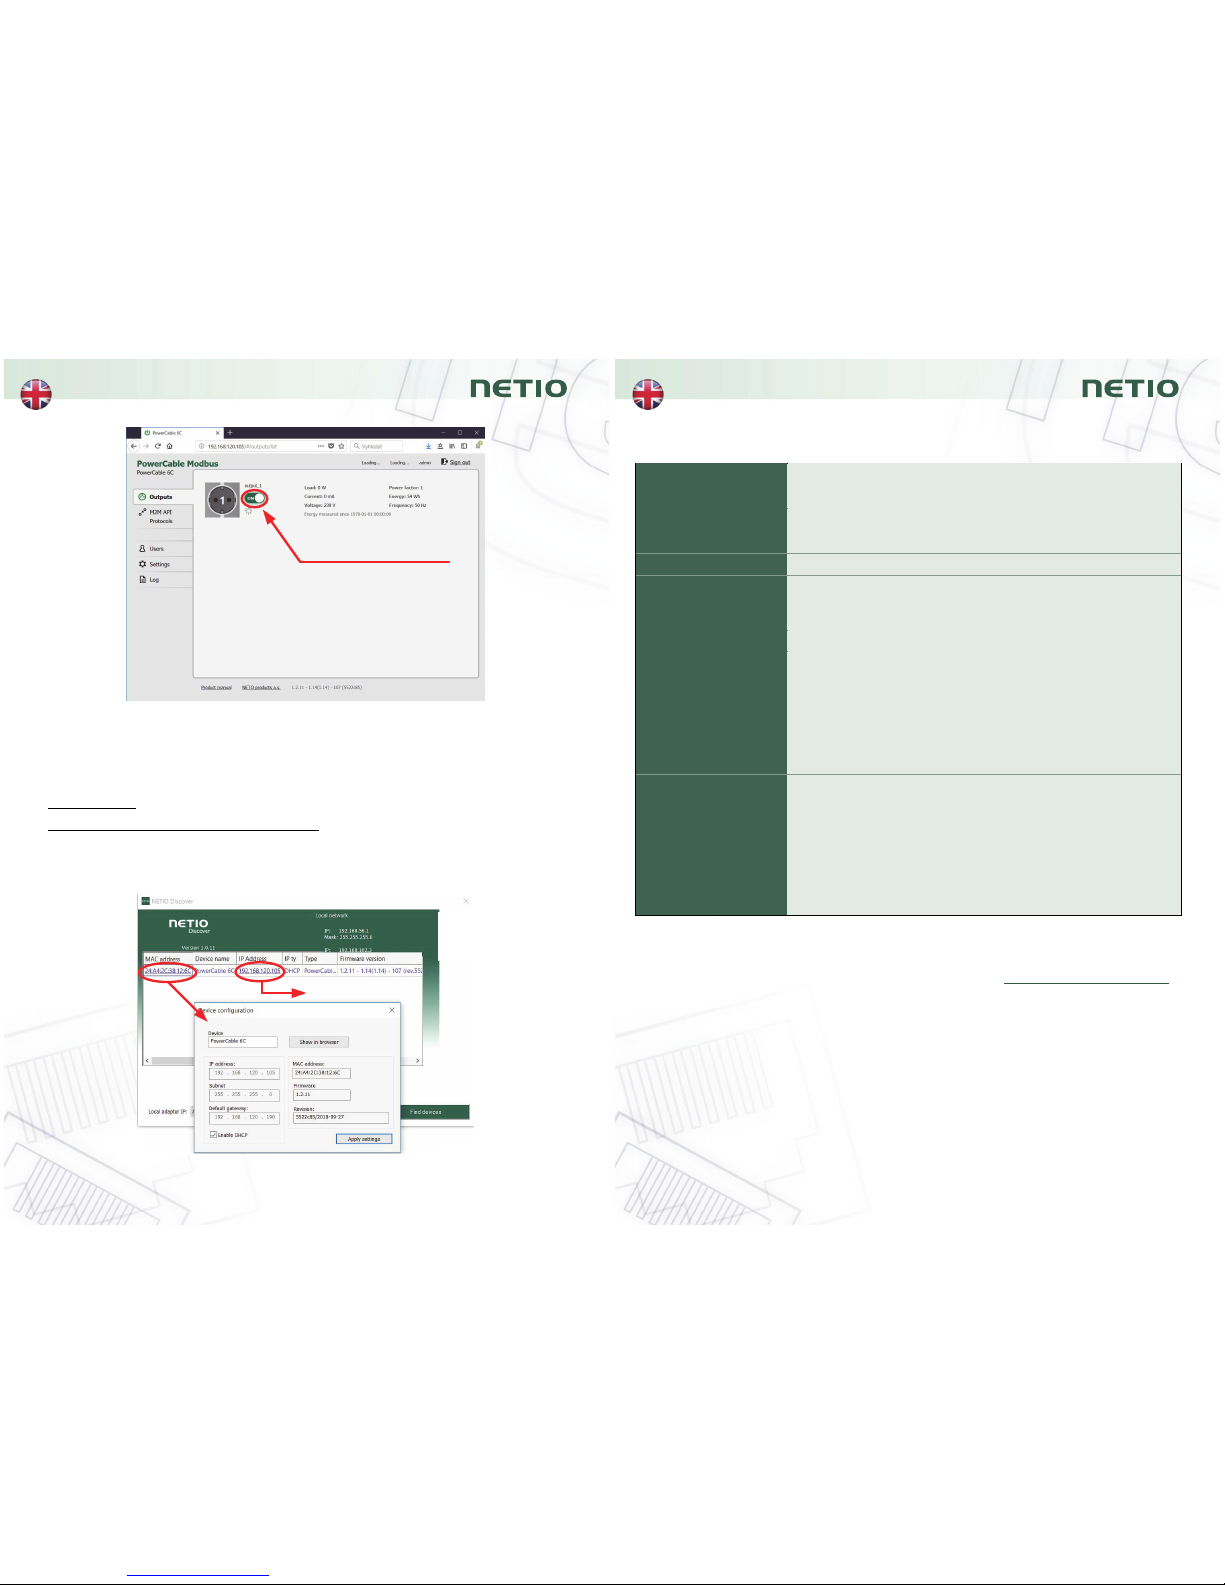
9) Device web administration allows you to control the socket (Outputs tab), set up
M2M communication protocols (M2M API Protocols tab) and configure more
parameters (Settings tab). (Figure 7)
For details, see the user manual.
Figure 5
Figure 6
Page 4
6
Installation = NETIO Discover
To find NETIO PowerCable device on the LAN, use the
NETIO Discover
utility.
1) MS Windows: Find the
NETIO Discover
utility at our website, install it.
2) Other operating systems (Mac, Linux, ...): Use
NETIO Discover multiplatform
version written in JAVA. An up-to-date JAVA version is required.
3) It will show you devices on the LAN. If your network uses a DHCP server, simply
click the IP address
in NETIO Discover and open the web interface. (Figure 8)
Figure 7
Click here to
switch the output
Web browser
Figure 8
7
Specifications
Power
101E, 101F
: 230V~; 50Hz; 16A
101J, 101S
: 230V~; 50Hz; 10A
Switched output
101E, 101F
: 230V~; 50Hz; 16[8]A; max. 3600W
101J, 101S
: 230V~; 50Hz; 10[8]A; max. 2300W
Internal consumption Max 1 W
Output relay
Micro-disconnection (µ) (resistive load)
1E5 switching cycles, max. 1.5kV pulse voltage
Switch heat and fire resistance 1
Interfaces 1x Wi-Fi IEEE 802.11 b/g; 2.4GHz
Environment
IP30, protection rating = class 1
Operating temperature -10 .. 65°C (6A load = max. 63°C,
10A = max. 50°C, 16A = max. 30°C)
Device rated for pollution degree 2.
Designed for continuous operation in altitudes up to
2000m.
No additional cooling required.
Caution
The device is not designed to power appliances with a
high inrush current.
Do not connect several devices in series.
The device is safe only when completely disconnected
from the electrical network. The cable plug serves as the
disconnection means and must be easily accessible.
The electrical socket must be protected with a circuit
breaker rated at 16A or less and earthed.
The manufacturer assumes no responsibility for any technical or printing errors and
reserves the right to modify the product or this document without prior notice. Such
changes are announced at the manufacturer's website, http://netio-products.com.
The manufacturer disclaims all warranties of any kind with respect to the contents of
this document, as well as all implied warranties of merchantability or fitness for a
particular purpose. In particular, the manufacturer disclaims all responsibility for any
damages caused by incorrect use of the product, failure to comply with instructions
and recommendations in the user manual, and/or unprofessional actions of third
parties not authorized by the manufacturer to perform warranty service.
February 2018
© 2018 NETIO products a.s. All rights reserved.
Page 5
8
DECLARATION OF CONFORMITY (RED CE)
Manufacturer:
NETIO products a.s.
Address:
U Pily 3/103
143 00 Praha 4, Czech Republic
Product / type:
101x
- where “x” define a socket/plug variant:
E
FR
F
DE
J
Swiss
S
IEC320 C13/C14
L
Italy
G
UK
H
Israel
T
IEC320 C19/C20
This declaration of conformity is issued under the sole responsibility of the
manufacturer.
Object of the declaration: “Extension socket NETIO COBRA
controlled and monitored over the WiFi / LAN network”.
The object of the declaration described above is in conformity with the
relevant Union harmonization legislation:
NV 426/2016 Sb. including amendments
RED CE
(Radio Equipment Directive) - 2014/53/EU – including amendments
o
ETSI EN 300 328 V2.1.1, EN 62311:2008, ETSI EN 301 489-1 V2.2.0
o
EN 60950-1:2006+A11:2009+A1:2010+A12:2011+A2:2013
References to the relevant harmonized standards used or references to the
other technical specifications in relation to which conformity is declared:
Article 3.1 a) Health and safety
Article 3.1 b) Electromagnetic compatibility
Article 3.2 Effective use of radio spectrum
Additional information:
Test Report No.: EZÚ 700026-01/06 of 31.1.2018
Test Report No.: EZÚ 700026-01/09 of 31.1.2018
RoHS:
The product mentioned above to which this declaration relates is in conformity with
the essential requirements and other relevant requirements of the Directive
2011/65/EU (restriction of the use of certain hazardous substances in electrical and
electronic equipment).
The product mentioned above is in conformity with the following standards and/or
other normative documents:
EN 50581: 2012
Czech Republic, Prague, 11.6.2018 Jan Řehák, Chief of the board
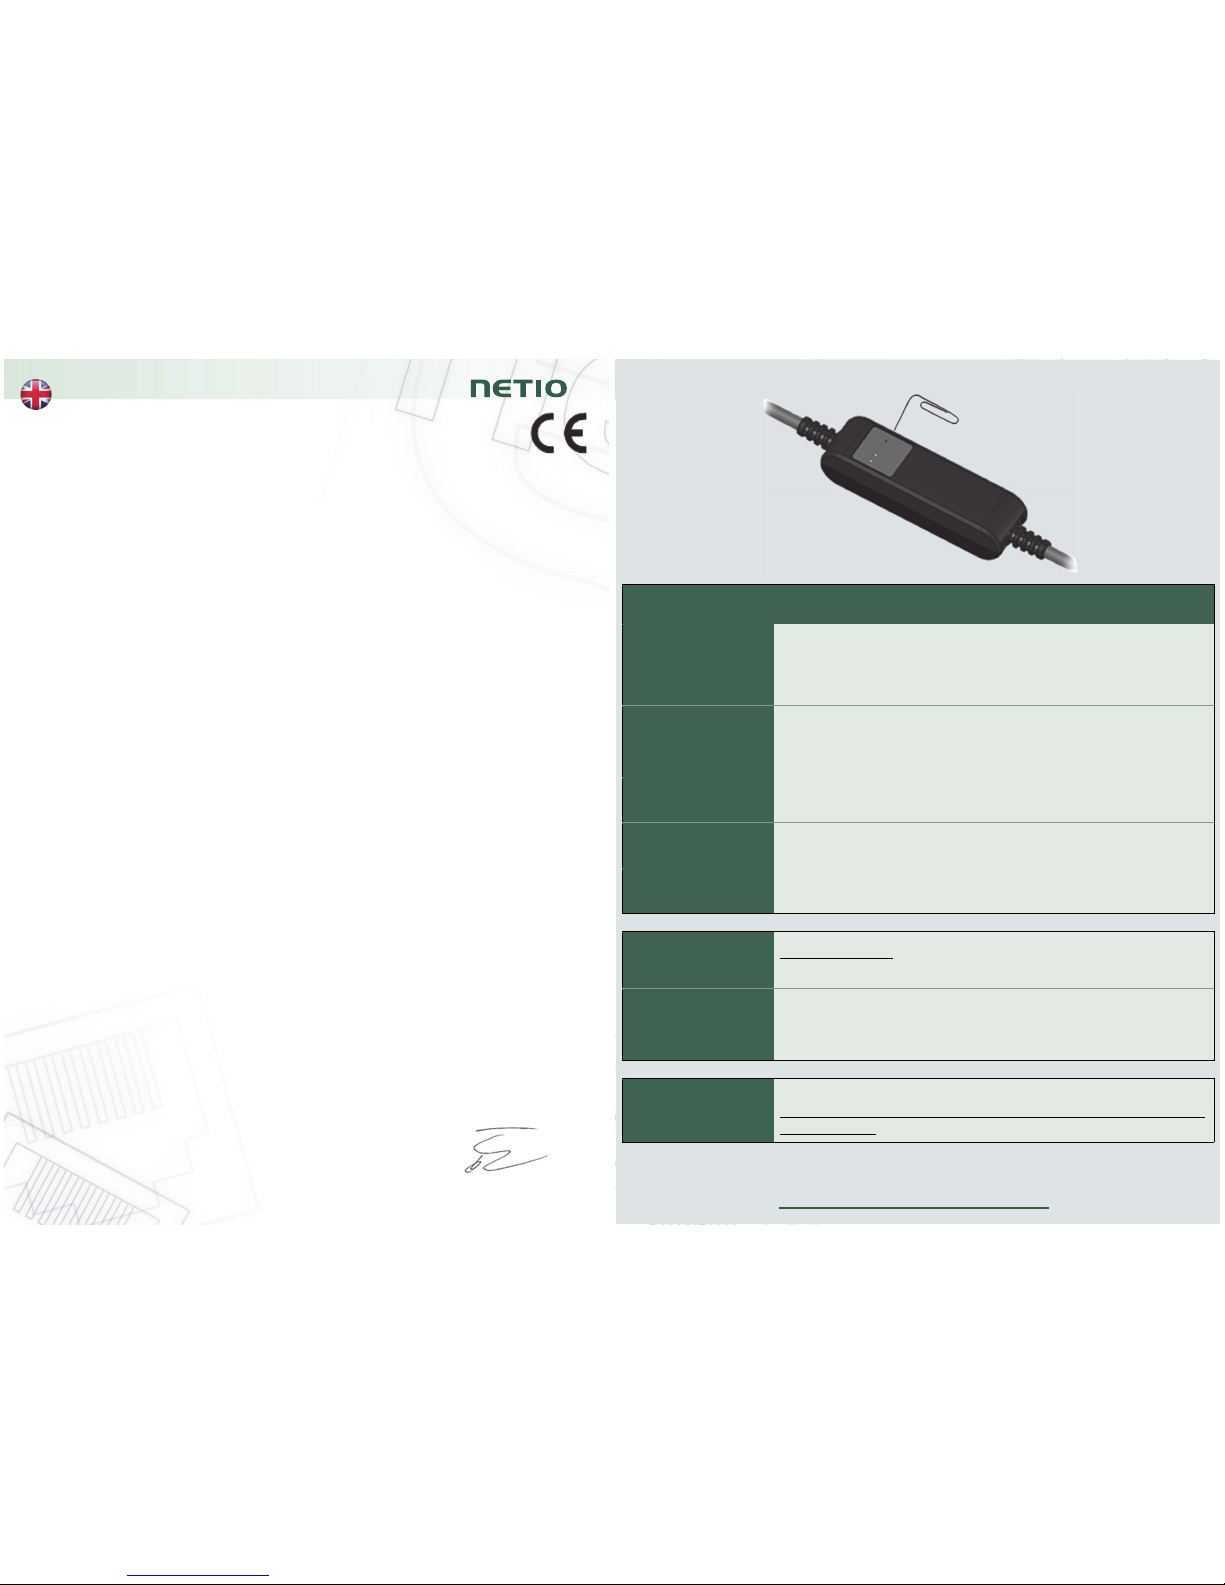
First configuration
(1)
AP mode
activation
Switch ON the device.
Press and hold the button for at least
10 seconds
while the device is on. You can use paper clip or
any metal sharp tool.
This activates the
AP mode
. (Yellow LED blinks guickly)
(2)
Connect to the
device
In AP mode the PowerCable works as a WiFi Access Point and
DHCP server.
Connect to the “
PowerCable-AP-xx
” where xx are last two
digits from serial number on the device label.
(3)
Connect device
do the WLAN
Open in your browser any IP address or “
10.0.42.1
”.
Select your local WiFi network and configure wifi password.
(4)
Note assigned IP
address
On the last page it will show you in red color assigned final IP
address.
(5)
Device web
configuration
Click to this address or open it in the computer.
Default username: “
admin
”, password: “
admin
”.
Download software
NETIO Discover
(for MS Windows or JAVA version)
https://www.netio-products.com/en/download
Factory defaults
Switch OFF the device. Press and hold the button for at least 10
seconds
while powering up the device
. The device reverts to
factory settings and the AP mode is activated.
(Green quickly flashing for 1sec, than Yellow blinks quickly)
Modbus/TCP
first steps
Search on the NETIO website the
AN27:
Modbus/TCP with NETIO 4x – Control and measure LAN
power sockets
www.netio-products.com
 Loading...