

Page 1

NET INTEGRATION TECHNOLOGIES INC.
NET INTEGRATOR MICRO
Quick Start Guide
602-0002-02
Page 2

NET INTEGRATION TECHNOLOGIES INC.
Meet Your Net Integrator Micro
Front View
USB Port
Ethernet LED
Hard Drive LED
Power LED
Power button
2 Quick Start Guide
Page 3

Back View
NET INTEGRATION TECHNOLOGIES INC.
DC 12V input connector
PS/2 mouse connector
PS/2 keyboard connector
LAN 2
USB ports
Serial port (COM1)
Parallel port
VGA connector
Serial port (COM2)
LAN 1
LAN 3
Quick Start Guide 3
Page 4

NET INTEGRATION TECHNOLOGIES INC.
CHECKING YOUR
Step 1
Your Net Integrator Micro package should contain the following:
1. Net Integrator Micro
2. Power cord and external power supply
3. Category 5 Ethernet cables (3)
4. Net Integrator User Manual CD
5. Quick Start Guide
NET INTEGRATOR COMPONENTS
4 Quick Start Guide
Page 5

NET INTEGRATION TECHNOLOGIES INC.
CONNECTING YOUR
Step 2
Ensure that the Net Integrator has adequate ventilation.
A
Place the back of the unit at least one to two feet (12”-24”) away from the wall.
B
To plug in the Net Integrator:
i. Connect one end of the power cord into the DC 12V input socket (located on the back of the
Net Integrator).
ii. Connect the other end of the power cord into a standard 115 Volt AC (North America) or 220/
240 Volt AC (Europe) power outlet.
C
To connect to your Local Area Network (LAN):
i. Connect one end of a category 5 or higher Ethernet cable into LAN 1 (located on the back of the
Net Integrator).
NET INTEGRATOR
Skip (D) if your office is already connected to the Internet.
ii. Connect the other end of the cable into your Ethernet hub.
If you are using a high-speed cable modem or a DSL modem:
D
i. Connect one end of a category 5 or higher Ethernet cable into LAN 2 (located on the back of the
Net Integrator).
ii. Connect the other end of the cable into your cable modem or DSL modem.
Connect a VGA monitor and PS/2 style keyboard to the appropriate connectors at the
E
rear of the Micro.
Quick Start Guide 5
Page 6

NET INTEGRATION TECHNOLOGIES INC.
Step 3
Turn on the main power switch.
A
When the system boots, the Nitix boot screen will load
B
When it has loaded, the following prompt will appear on your monitor: Press ENTER to begin.
Press <Enter>. A Configuration screen similar to the following will appear:
C
CONFIGURING YOUR SYSTEM
Please Note: A red warning box may appear advising you to set up your server using Nitix’s web-based
configuration screen. Press <Enter> to continue.
Ta ke note of the display’s Settings and Status boxes. These display various information about the server.
D
Ta ke note of the IP address shown in the Status box. This is the LAN IP address of the server.
E
The Default IP address for the Micro is 192.168.168.1. You will need this IP address to connect to finish the configuration
of your server.
Please Note: In the event that the server is unable to detect an appropriate IP address for your LAN, or to change the IP
address, see Step 3b: Manually Setting the IP Address.
Yo u are ready to proceed with Step 4: Configuring Your Desktop when an IP address appears in the
F
console’s Status box.
Note: The rest of the configuration steps should be done through Nitix’s WebConfig menu. See Step 5:
Connecting to WebConfig for more information.
6 Quick Start Guide
Page 7

NET INTEGRATION TECHNOLOGIES INC.
Step 3b
Follow these steps if your Net Integrator is unable to automatically select an IP address (the console’s
Status box continues to read Choosing Address) or if you want to change the chosen address:
Select IP Address from the Main Menu box on the Configuration Screen
A
(see screen shot in Step 3).
Yo u will be prompted to enter a new IP address. Enter the new IP address and press <Enter>.
B
MANUALLY SETTING THE IP ADDRESS
Note: Skip this step if Nitix automatically selected an IP address for you, and the address is
acceptable.
Confirm the new IP address by pressing <Y>.
C
You can turn on or off the DHCP server (which automatically assigns IP addresses to the
D
workstations connected to your local network). Unless you have some other server providing
DHCP services, it is recommended that you turn DHCP on. To turn DHCP on, select DHCP
server from the Main Menu on the Configuration Screen - if it says, “The DHCP server is
currently DISABLED”, then press <Y> to enable the DHCP server. The DHCP server is now on.
Quick Start Guide 7
Page 8
NET INTEGRATION TECHNOLOGIES INC.
Step 4
In Windows (on your workstation), select
A
Start > Settings > Control Panel.
CONFIGURING YOUR DESKTOP
Note: Desktop displays may vary according to Windows version and operating system.
B
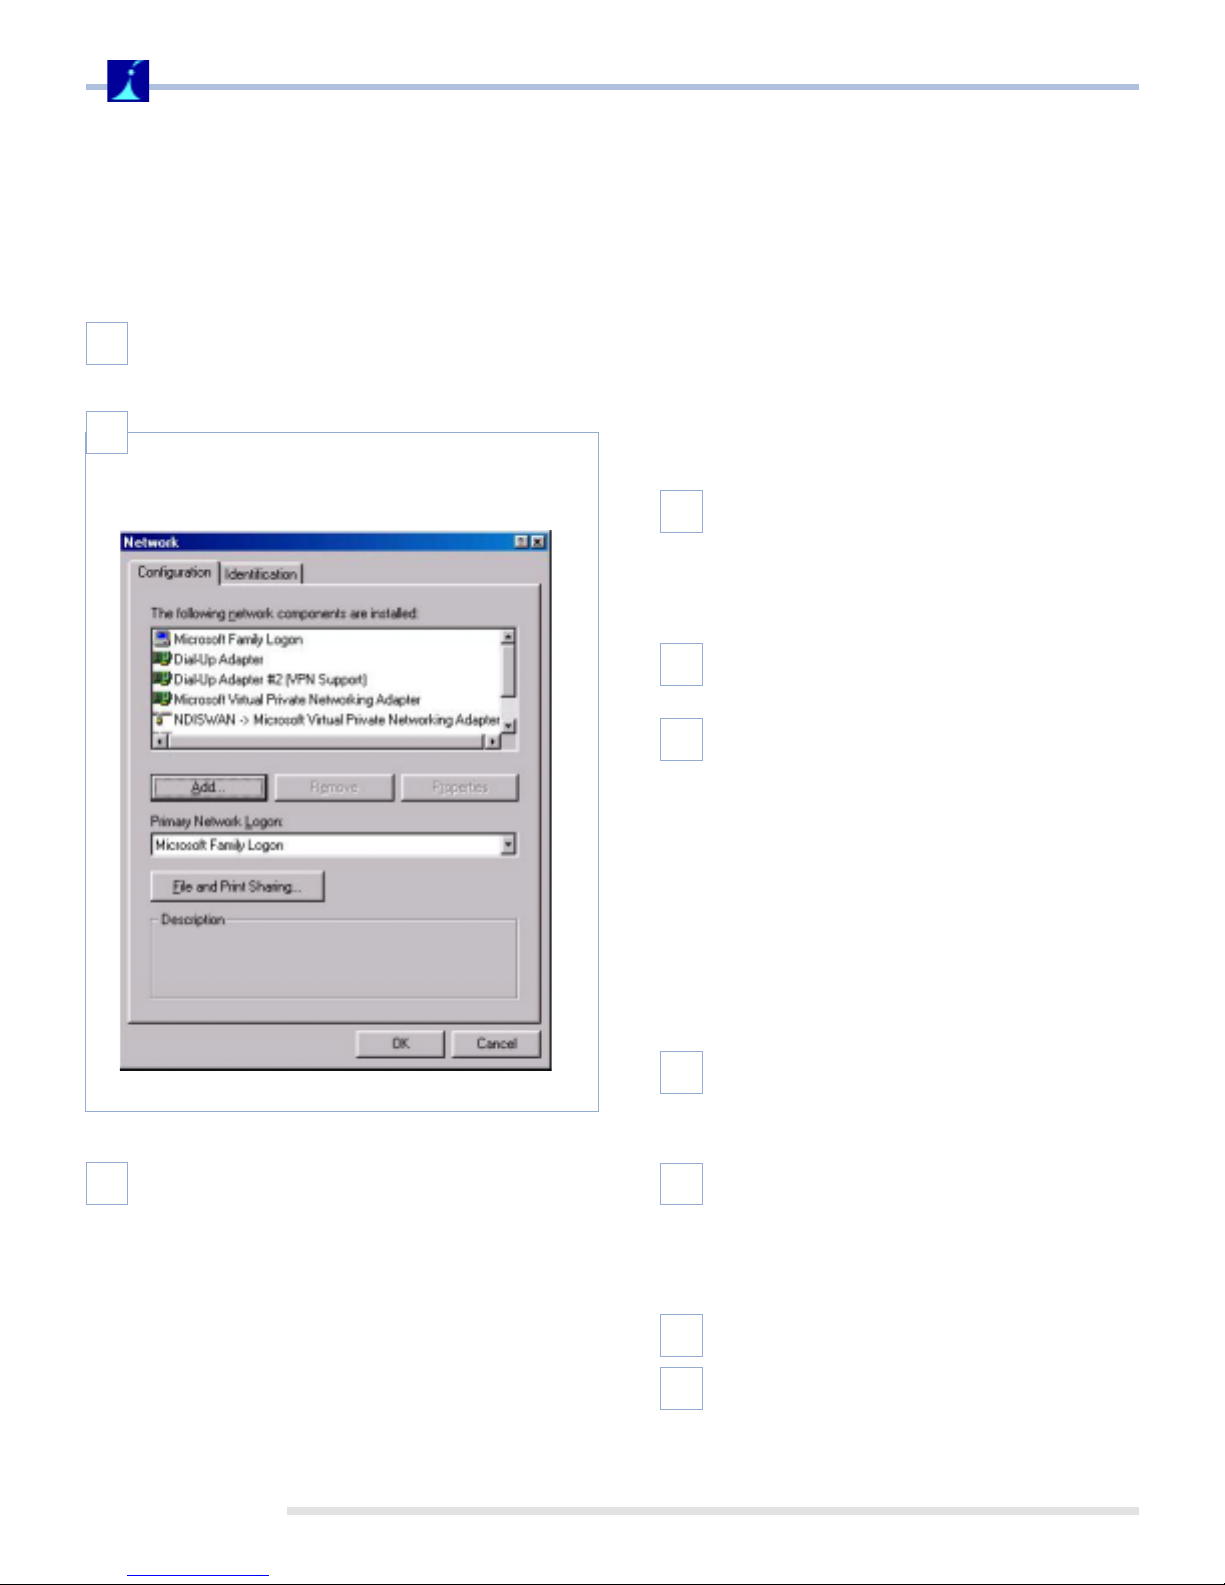
Select Network from the list.
The Network screen displays:
iii. Select Microsoft in the Manufacturers
section of the screen. Select TCP/IP in the
Network Protocols section of the screen.
Click on the OK button. TCP/IP should
now display on the Network screen.
Select TCP/IP from the installed
D
components list on the Network screen.
Click on the Properties button. The TCP/IP
Properties screen displays.
Click on the IP Address tab. Select Obtain
E
an IP address automatically.
To configure DNS settings:
F
i. Click on the DNS tab. Select Enable DNS.
If TCP/IP does not display in the installed
C
components list:
i. Click on the Add button. The Select Network
Component Type screen displays.
ii. Select Protocol from the list. Click on the Add
button. The Select Network Protocol screen
displays.
ii. Select all entries in the DNS Server Search
Order section of the screen and click on
the Remove button.
iii. Select all entries in the Domain Suffix
Search Order section of the screen and
click on the Remove button.
iv. Select Disable DNS.
Click on the Gateway tab. Select any
G
entries in the Installed gateways section of
the screen and click on the Remove button.
Click on the WINS Configuration tab. Select
H
all entries in the WINS Server Search Order
section of the screen and click on the
Remove button. Select Use DHCP for WINS
Resolution.
Click on the OK button.
I
Reboot your computer.
J
8 Quick Start Guide
Page 9
NET INTEGRATION TECHNOLOGIES INC.
Step 5
Open an Internet browser on your workstation.
A
Newer versions of Netscape or Microsoft browsers
are recommended.
Read the IP address from the Status box on the
B
Configuration screen on the console. For
demonstration purposes, we will use the following
IP address: 192.168.0.1
CONNECTING TO WEBCONFIG
C
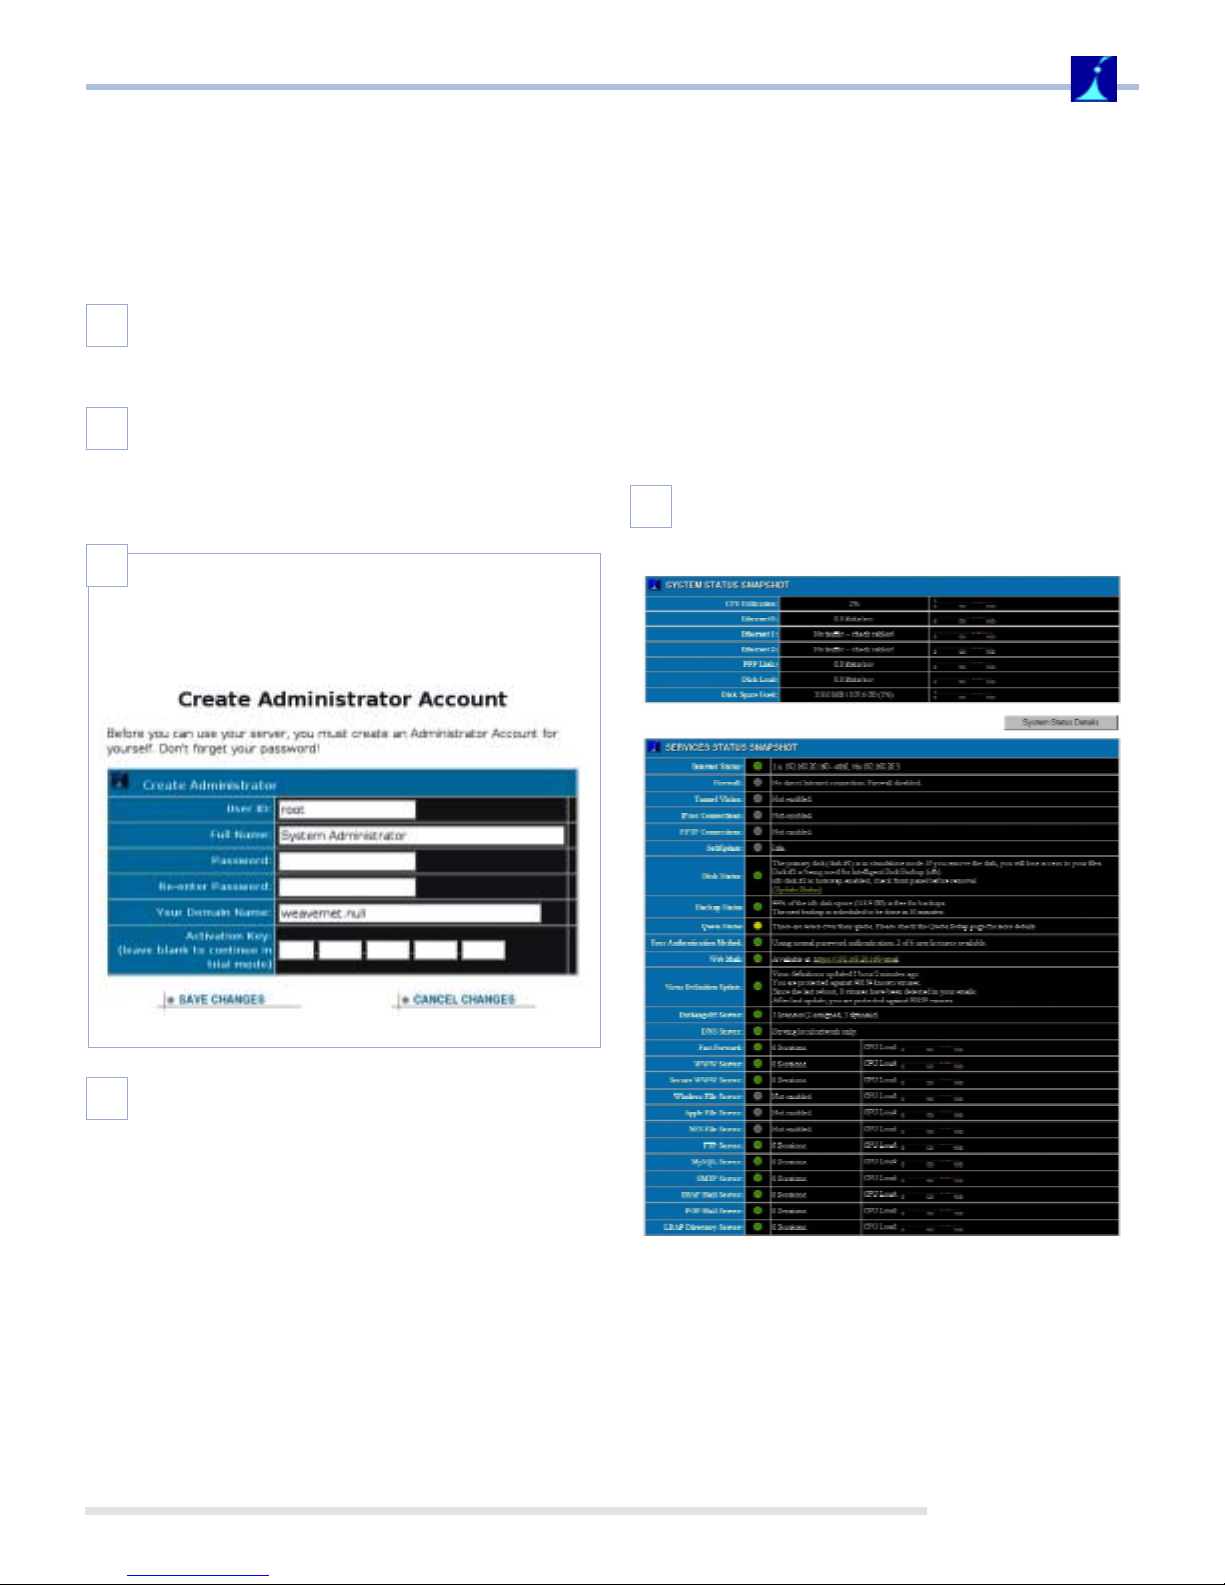
Type https://192.168.0.1:8043 into the browser's
address bar. Press Enter on your keyboard. The
Create Administrator Account page displays:
iv. your organization's registered Internet domain
name (e.g. example.com). If you do not have a
registered domain name, leave the default domain
name.
v. your Software Activation Key.
Click on the Save Changes button. This will
E
take you directly to Nitix’s main WebConfig
screen:
Ty pe in the following information:
D
i. a User ID. The default User ID is root - you can use
this name or you can create a new User ID by
typing over the existing text.
ii. the administrator's full name.
iii. a password. Retype the password to ensure it was
typed properly.
Important: Some Nitix services will not be enabled
unless hard disks are configured through the
WebConfig menu. For first time disk configuration,
do not use the ‘’Disk Install”option on the console
menu . For more information on configuring your
hard disks, see the chapter on Disk Management
in the Nitix user manual.
Quick Start Guide 9
Page 10

NET INTEGRATION TECHNOLOGIES INC.
Step 6
I. CABLE MODEM or DSL MODEM (not requiring PPPoE protocol)
If your cable modem or DSL modem does not configure automatically (i.e. the Internet Status option does
not have a green light), refer to Advanced Network Settings in Chapter 4 of the Nitix User Manual for
information on how to set up an IP address and default gateway using data provided by your Internet
Service Provider (ISP).
II. LEASED LINE CONNECTION
Please refer to Configuring a Leased Line Connection in Chapter 4 of the Nitix User Manual for full instructions.
CONFIGURING YOUR INTERNET CONNECTION
If the Internet Status option on the
System Status page has a green light,
you do not have to perform these
steps.
III. DSL MODEM (requiring PPPoE protocol)
From the Network Setup menu on the System Status page, select Dial-up.
A
The Dial-up Networking Setup page displays. Click on the appropriate ADSL Action button.
B
On the screen that displays:
C
i. type in your account user name (provided by your ISP).
ii. type in your account password. Retype this password to ensure it was typed properly.
iii. select Yes to enable the DSL connection.
Click the Save Changes button.
D
For further details, please consult your User Manual.
10 Quick Start Guide
Page 11

NET INTEGRATION TECHNOLOGIES INC.
Net Integration Technical Support
If you need technical support, please contact your Net Integration reseller.
Authorized resellers may contact the toll-free Reseller Technical Support Line:
1-86-NET-ITECH (1-866-384-8324)
Outside of North America call: 1-905-946-1777
Email support questions to: support@nitix.com
Hours of operation: Live technical support staff are available (24/5) from 12 a.m.
EST Monday (midnight Sunday) to 4 a.m. ET Saturday, and a Call
Coordinator is available from 8:30 a.m. to 5:30 p.m.EST, Monday to Friday.
Quick Start Guide 11
Page 12

NET INTEGRATION TECHNOLOGIES INC.
12 Quick Start Guide
 Loading...