

Netgear orporated WG602V3 User Manual

User’s Guide for the WG602
54 Mbp s Wireless Access
Point
NETGEAR, Inc.
4500 Great America Parkway
Santa Clara, CA 95054 USA
Phone 1-888-NETGEAR
WG602 v3
September 2004

NETGEAR, INC.
Technical Support
Please register to obtain technical support. Please retain your proof of purchase and warranty
information.
To register your product, get product support or obtain product information and product
documentation, go to www.netgear.com. If you do not have access to the W orld W ide Web, you can
register your product by filling out the registration card and mailing it to NETGEAR customer
service.
You will find technical support information at:
www.netgear.com/support/main.asp through the customer service area. If you want to contact
technical support by telephone, see the support information card for the correct telephone number
for your country.
© 2003 by NETGEAR, Inc. All rights reserved.
Trademarks
NETGEAR is a registered trademark of NETGEAR, INC. Windows is a registered trademark of Microsoft
Corporation. Other brand and product names are trademarks or registered trademarks of their respective
holders. Information is subject to change without notice. All rights reserved.
Statement of Conditions
In the interest of improving internal design, operational function, and/or reliability, NETGEAR reserves the
right to make changes to the products described in this document without notice. NETGEAR does not
assume any liability that may occur due to the use or application of the product(s) or circuit layout(s)
described herein.
2
Federal Communications Commission (FCC) Compliance Notice: Radio Frequency Notice
NETGEAR 54 Mbps Wireless Access Point WG602 v3
Tested to Comply
with FCC Standards
FOR HOME OR OFFICE USE
This device complies with part 15 of the FCC Rules. Operation is subject to the following two conditions:
1. This device may not cause harmful interference.
2. This device must accept any interference received, including interference that may cause undesired
operation.
Note: This equipment has been tested and found to comply with the limits for a Class B digital device,
pursuant to part 15 of the FCC Rules. These limits are desig ned to provi de reasonable protection
against harmful interference in a residential installation. This equipment generates, uses, and can
radiate radio frequency energy and, if not installed and used in accordance with the instructions,
may cause harmful interference to radio communications. However, there is no guarantee that
interference will not occur in a particular installation. If this equipment does cause harmful
interference to radio or television reception, which can be determined by turning the equipment off
and on, the user is encouraged to try to correct the interference by one or more of the following
measures:
• Reorient or relocate the receiving antenna
• Increase the separation between the equipment and receiver
• Connect the equipment into an outlet on a circuit different from that to which the receiver is
connected
• Consult the dealer or an experienced radio/TV technician for help.
Warning!
T o comply with the FCC’s
exposure requirements you must
maintain a distance of at least 1
cm from the antenna of this
device while it is in use. This
device should not be co-located
with other transmitters.
FCC Caution: Any changes or modifications not expressly approved by the party responsible
for compliance could void the user's authority to operate this equipment.
RF Exposure Requirements
WARNING! To ensure compliance with FCC RF exposure requirements, the antenna used for this device
must be installed to provide a separation distance of at least 20 cm (8 in) from all persons and must not be
co-located or operating in conjunction with any other antenna or radio transmitter. Installers and end-users
must follow the installation instructions provided in this user guide.
3

Radio Frequency Interference Requirements
To prevent radio interference to the licensed service, this device is intended to be operated
indoors and away from windows to provide maximum shielding.
This device is restricted to indoor use due to its operation in the 2.4 GHz frequency range. FCC requi res this
product to be used indoors in 2.4 GHz the frequency range to reduce the potential for harmful interference to
co-channel Mobile Satellite systems.
Regulatory Compliance Information
This device is restricted to indoor use due to reduce the potential for harmful interference to co-channel
Mobile Satellite and Radar Systems.
Canadian Department of Communications Compliance Statement
This Class B Digital apparatus (54 Mbps Wireless Access Point WG602 v3) meets all the
requirements of the Canadian Interference Causing Equipment Regulations.
Cet appareil numerique del la classe B respect les exigences du Regalement sur le material broilleur du
Canada.
This device comples with Class B limits of Industry of Canada. Operation is subject to the following two
conditions:
1. This device may not cause harmful interference.
2. This device must accept any interference received, including interference that may cause undesired
operation.
The device is certified to the requirements of RSS-210 for 2.4 GHz spread spectrum devices.
The use of this device in a system operating either partially or completely outdoors may require the user to
obtain a license for the system according to the Canadian regulations. For further information, contact your
local Industry Canada office.
EN 55 022 Declaration of Conformance
This is to certify that the 54 Mbps Wireless Access Point WG602 v3 is shielded against the generation of
radio interference in accordance with the application of Council Directive 89/336/EEC, Article 4a.
Conformity is declared by the application of EN 55 022 Class B (CISPR 22).
4

CE Declaration of Conformity
For the following equipment: 54 Mbps Wireless Access Point WG602 v3
0984 !
is herewith confirmed to comply with the requirements set out in the Council Directive on the
Approximation of the Laws of the Member States relating to Electromagnetic Compatibility (89/336/EEC ),
Low-voltage Directive (73/23/EEC) and the Amendment Directive (93/68/EEC), the procedures given in
European Council Directive 99/5/EC and 89/3360EEC. The equipment was passed. The test was performed
according to the following European standards:
• EN 301489-1 V1.2.1 (2000-08)
• EN 301 489-17 V1.1.1 (2000-09)
• EN 55022: 1988 Class B
• EN 61000-3-2: 2000
• EN 6100-3-3: 1995
• EN 55024: 1998 (IEC 61000-4-5:1995, IEC 61000-4-3:1995, IEC 61000-4-4;1995, IEC 61000-4-5:1995, IEC
61000-4-6:1996, IEC 61000-4-8:1993, IEC 61000-4-11:1994)
The test was carried out on February 19, 2003 at Sporton International Inc. Lab.
5

6

Contents
Chapter 1
About This Manual
Audience, Scope, Conventions ......................................................................................1-1
How to Use the PDF and HTML Versions of this Manual ...............................................1-2
How to Print this Manual .................................................................................................1-3
Chapter 2
Introduction
About the 54 Mbps Wireless Access Point WG602 v3 ...................................................2-1
Key Features ..................................................................................................................2-2
802.11g Standards-based Wireless Networking ......................................................2-3
Autosensing Ethernet Connections with Auto Uplink ...............................................2-4
Compatible and Related NETGEAR Products .........................................................2-4
System Requirements ....................................................................................................2-4
What’s In the Box? .........................................................................................................2-5
Hardware Description .....................................................................................................2-6
WG602 v3 Wireless Access Point Front Panel ........................................................2-6
WG602 v3 Wireless Access Point Rear Panel .........................................................2-7
Power Socket ....................................................................................................2-7
Reset and Restore to Factory Defaults Button ..................................................2-7
RJ-45 Ethernet Port ...........................................................................................2-7
Detachable Antenna ..........................................................................................2-7
Chapter 3
Basic Installation and Configuration
Observing Placement and Range Guidelines ..................... ................ ................ ............3-2
Default Factory Settings .................................................................................................3-3
Understanding WG602 v3 Wireless Security Options ....................................................3-4
Installing the 54 Mbps Wireless Access Point WG602 v3 ..............................................3-5
Two Ways to Log In to the WG602 v3 ............................................................................3-8
How to Log in Using the Default IP Address of the WG602 v3 ................................3-8
How to Log In to the WG602 v3 Using Its Default NetBIOS Name ........................3-10
Using the Basic IP Settings Options .............................................................................3-11
Contents iii

Understanding the Basic Wireless Settings ..................................................................3-12
Understanding Wireless Security Options ....................................................................3-14
Information to Gather Before Changing Basic Wireless Settings ...........................3-15
How to Configure WEP Wireless Security ....................................................................3-16
How to Configure WPA-PSK Wireless Security ............................................................3-17
How to Restrict Wireless Access by MAC Address ...... ................................................ 3-18
Chapter 4
Management
Viewing General Information ..........................................................................................4-1
Viewing a List of Attached Devices .................................................................................4-3
Upgrading the Wireless Access Point Software .............................................................4-3
Rebooting and Resetting Factory Default Options .........................................................4-4
Restoring the WG602 v3 to the Factory Default Settings ........................................4-5
Using the Reset Button to Reboot or Restore Factory Defaults .......................... .....4-5
Changing the Administrator Password ...........................................................................4-5
Chapter 5
Advanced Configuration
Understanding Advanced Wireless Settings ..................................................................5-1
Configuring Wireless Distribution System Links .............................................................5-2
How to Configure WDS Links ...................................................................................5-2
How to Configure a WG602 v3 as a Repeater .........................................................5-3
How to Configure Wireless Bridging ........................................................................5-4
Chapter 6
Troubleshooting
Troubleshooting ............................................... ............................................................... 6-1
No lights are lit on the access point. ........................................................................6-1
The Ethernet LAN light is not lit. ..............................................................................6-1
The Wireless LAN activity light is not lit. .................................................................6-2
I cannot configure the wireless access point from a browser. ......... ... ... ... ... .... ... ... ..6-2
I cannot access the Internet or the LAN with a wireless capable computer. ...........6-2
When I enter a URL or IP address I get a timeout error. .............. .... ... ... ... ... ............6-3
Using the Reset Button to Restore Factory Default Settings ..... ... ... ... .... ... ... ... ... .... ... .....6-3
Appendix A
Specifications
Specifications for the WG602 v3 ................................................................................... A-1
iv Contents

Appendix B
Wireless Networking Basics
Wireless Networking Overview ........................................ ... ... .... ... ... ... .... ... ... ... ... .... ... ... . B-1
Infrastructure Mode ................................................................................................. B-1
Ad Hoc Mode (Peer-to-Peer Workgroup) ......................................... ... ... ... ... .... ... ... . B-2
Network Name: Extended Service Set Identification (ESSID) ................................ B-2
Wireless Channels .................................................................................................. B-2
WEP Wireless Security .................... ... ... ... .................................................... ... ... ........... B-4
WEP Authentication ............................................... ... ... ... .... ... ... .............................. B-4
WEP Open System Authentication ......................................................................... B-5
WEP Shared Key Authentication ............................................................................ B-6
Key Size and Configuration .............................................................................. B-7
How to Use WEP Parameters ................................................................................. B-8
WPA Wireless Security .................................................................................................. B-8
How Does WPA Compare to WEP? ........................................................................ B-9
How Does WPA Compare to IEEE 802.11i? ........................................................ B-10
What are the Key Features of WPA Security? ...................................................... B-10
WPA Authentication: Enterprise-level User
Authentication via 802.1x/EAP and RADIUS .................................................. B-12
WPA DAta Encryption Key Management ........................................................ B-14
Is WPA Perfect? .... ................................................................................................ B-16
Product Support for WPA ...................................................................................... B-16
Supporting a Mixture of WPA and WEP Wireless Clients ............................... B-16
Changes to Wireless Access Points ............................................................... B-16
Changes to Wireless Network Adapters ......................................................... B-17
Changes to Wireless Client Programs .......................... ......................... ......... B-18
Appendix C
Network, Routing, Firewall, and Cabling Basics
Basic Router Concepts .................................................................................................. B-1
What is a Router? ................................................................................................... B-2
IP Addresses and the Internet ............ ... ... .... ................................................................. B-2
Netmask .................................... ................................................................ ..............B-4
Subnet Addressing .................................................................................................. B-4
Private IP Addresses ................................. ... ... ... ..................................................... B-7
Single IP Address Operation Using NAT ................................................................. B-7
IP Configuration by DHCP ..................... ... ... ... .................................................... ... . B-8
Contents v

Domain Name Server .............................................................................................. B-9
Routing Protocols .................................................................................................... B-9
RIP ............................... .................... ................... ................... .................... ....... B-9
MAC Addresses and ARP .............................................................................. B-10
Internet Security and Firewalls .................................................................................... B-10
What is a Firewall? .................................................................................................B-11
Stateful Packet Inspection ............................... ... .... ... ... ... .... ... ................................ B-11
Denial of Service Attack .........................................................................................B-11
Ethernet Cabling ........................................... ... ... .................................................... ... ...B-11
Category 5 Cable Quality ...................................................................................... B-12
Inside Twisted Pair Cables .................................................................................... B-13
Uplink Switches, Crossover Cables, and MDI/MDIX Switching ............................ B-14
Appendix D
Preparing Your PCs for Network Access
Preparing Your Computers for TCP/IP Networking ............................ .... ... ... ... ... .... ... ... . C-1
Configuring Windows 98 and Me for TCP/IP Networking ................... ...........................C-2
Installing or Verifying Windows Networking Components ......... ... .... ... ...... ... .... ... ... . C-2
Enabling DHCP to Automatically Configure TCP/IP Settings ........................................C-3
DHCP Configuration of TCP/IP in Windows 98 and Me ..........................................C-4
Selecting the Windows Internet Access Method .......................... ........................... C-5
Verifying TCP/IP Properties for Windows 98 or Me ................................................C-5
Configuring Windows 2000 or XP for TCP/IP Networking .............................................C-6
Installing or Verifying Windows Networking Components ......... ... .... ... ...... ... .... ... ... . C-6
DHCP Configuration of TCP/IP in Windows XP ......................................................C-7
DHCP Configuration of TCP/IP in Windows 2000 .................................................. C-9
Verifying TCP/IP Properties for Windows XP or 2000 ........................................... C-11
Glossary
Numeric .........................................................................................................................D-1
A .................................................................................................................................... D-2
B .................................................................................................................................... D-2
C ..................................... ........................................................................... ....................D-3
D ..................................... ........................................................................... ....................D-3
E .................................................................................................................................... D-4
G ..................................... .............................................. ................................................. D-4
I .................................... ............. .......... ............. ............. ............. ............. ............ ........... D-4
vi Contents

L ...................................... ................. ............. ................ ................ ................ ................. D-6
M ..................................... ............. ............. ............. ............. ............. ............. ................. D-6
N ..................................... ........................................................................... ....................D-7
P .................................................................................................................................... D-8
Q ..................................... .............................................. ................................................. D-9
R ..................................... ........................................................................... ....................D-9
S .................................................................................................................................... D-9
T .................................................................................................................................. D-10
U ..................................... ........................................................................... ..................D-10
W ................................................................................................................................. D-10
Index
Contents vii

viii Contents
User’s Guide for the WG602 54 Mbps Wireless Access Point
Chapter 1
About This Manual
This chapter introduces the conventions and features of this document.
Audience, Scope, Conventions
This manual assumes that the reader has basic to intermediate computer and Internet skills.
However, tutorial information is provided in the Appendices, on the Resource CD for the 54 Mbps
Wireless Access Point WG602 v3, and on the NETGEAR Web site.
This manual uses the following typographical conventions:
Table 1. Typographical conventions
italics Emphasis.
bold times roman User input.
[Enter] Named keys in text are shown enclosed in square brackets.
SMALL CAPS
DOS file and directory names.
This manual uses the following formats to highlight special messages:
Note: This format is used to highlight information of importance or special interest.
This manual is written according to these specifications:
Table 1-1. Manual Specifications
Product Version 54 Mbps Wireless Access Point WG602 v3
Manual Part Number WG602 v3
Manual Publication Date September 2004
Note: Product updates are available on the NETGEAR Web site at
www.netgear.com/support/main.asp. Documentation updates are available on the
NETGEAR, Inc. Web site at www.netgear.com/docs.
About This Manual 1-1

User’s Guide for the WG602 54 Mbps Wireless Access Point
How to Use the PDF and HTML Versions of this Manual
The HTML version of this manual includes these features.
1
Figure 1-1: HTML version of this manual
1. Left pane. Use the left pane to view the Contents, Index, Search, and Favorites tabs.
To view the HTML version of the manual, you must have a version 4 or later browser with
Java or JavaScript enabled. To use the Favorites feature, your browser must be set to accept
cookies. You can record a list of favorite pages in the manual for easy later retrieval.
2
3
2. Toolbar buttons. Use the toolbar buttons across the top to navigate, print pages, and more.
–The Show in Contents button locates the currently displayed topic in the Contents tab.
– Previous/Next buttons display the topic that precedes or follows the current topic.
–The PDF button links to a PDF version of the full manual.
–The E-mail button enables you to send feedback by e-mail to NETGEAR support.
–The Print button prints the currently displayed topic. Using this button when a
step-by-step procedure is displayed will send the entire procedure to your printer—you do
not have to worry about specifying the correct range of pages.
–The Bookmark button bookmarks the currently displayed page in your browser.
3. Right pane. Use the right pane to view the contents of the manual. Also, each page of the
manual includes a “PDF of This Chapter” link at the top right which links to a PDF file
containing just the currently selected chapter of the manual.
1-2 About This Manual

User’s Guide for the WG602 54 Mbps Wireless Access Point
How to Print this Manual
To print this manual you man choose one of the following several options, according to your
needs.
• A “How To” Sequence of Steps in the HTML View. Use the Print button on the upper right
of the toolbar to print the currently displayed topic. Using this button when a step-by-step
procedure is displayed will send the entire procedure to your printer—you do not have to
worry about specifying the correct range of pages.
• A Chapter. Use the “PDF of This Chapter” link at the top right of any page.
– Click “PDF of This Chapter” link at the top right of any page in the chapter you want to
print. A new browser window opens showing the PDF version of the chapter you were
viewing.
– Click the print icon in the upper left of the window.
– Tip: If your printer supports printing two pages on a single sheet of paper, you can save
paper and printer ink by selecting this feature.
• The Full Manual. Use the PDF button in the toolbar at the top right of the browser window.
– Click the PDF button. A new browser window opens showing the PDF version of the
chapter you were viewing.
– Click the print icon in the upper left of the window.
– Tip: If your printer supports printing two pages on a single sheet of paper, you can save
paper and printer ink by selecting this feature.
About This Manual 1-3

User’s Guide for the WG602 54 Mbps Wireless Access Point
1-4 About This Manual

Chapter 2
Introduction
This chapter introduces the NETGEAR 54 Mbps Wireless Access Point WG602 v3. Minimal
prerequisites for installation are presented in “System Requirements” on page 2-4.
About the 54 Mbps Wireless Access Point WG602 v3
The 54 Mbps Wireless Access Point WG602 v3 is the basic building block of a wireless LAN
infrastructure. It provides connectivity between wired Ethernet networks and radio-equipped
wireless notebook systems, desktop systems, print servers, and other devices.
The WG602 v3 provides wireless connectivity to multiple wireless network devices within a fixed
range or area of coverage, interacting with a wireless network interface card (NIC) via an antenna.
T ypically, an individual in-building access point provides a maximum connectivity area with about
a 300 foot radius. The 54 Mbps Wireless Access Point WG602 v3 can support a small group of
users in a range of several hundred feet. Most access points are rated between 32 users
simultaneously.
The 54 Mbps Wireless Access Point WG602 v3 acts as a bridge between the wired LAN and
wireless clients. Connecting multiple WG602 v3 Access Points via a wired Ethernet backbone can
further lengthen the wireless network coverage. As a mobile computing device moves out of the
range of one access point, it moves into the range of another. As a result, wireless clients can freely
roam from one access point to another and still maintain seamless connection to the network.
The auto-sensing capability of the 54 Mbps Wireless Access Point WG602 v3 allows packet
transmission at up to 54 Mbps, or at reduced speeds to compensate for distance or electromagnetic
noise interference.
Introduction 2-1

User’s Guide for the WG602 54 Mbps Wireless Access Point
Key Features
The WG602 v3 Access Point is easy-to-use and provides solid wireless and networking support.
Support
The following standards and conventions are supported:
• Standards Compliant. The WG602 v3 Access Point complies with the IEEE 802.11g
(DSSS).
• Radius Client Support. The WG602 v3 Access Point can log in to your existing Radius
server (as a Radius client).
• WEP support. Support for WEP is included. Both 64-bit and 128-bit keys are supported.
• Dynamic WEP key Support. Fixed or Dynamic WEP (Wired Equivalent Privacy) keys can
be used.
• DHCP Client Support. DHCP provides a dynamic IP address to PCs and other devices upon
request. The WG602 v3 can act as a client and obtain information from your DHPC server.
• NetBIOS & WINS Support. Support for both NetBIOS broadcast and WINS (Windows
Internet Naming Service) allows the WG602 v3 to easily fit into your existing Windows
network.
• SNMP Support. Support for Simple Network Management Protocol (SNMP) Management
Information Base (MIB) management.
Features
The WG602 v3 provides solid functionality, including these features:
• Multiple Operating Modes
– Wireless Access Point. Operates as a standard 802.11g or 802.11x access point.
– Point-to-Point Bridge. In this mode, the ME103 only communicates with another
bridge-mode wireless station. You must enter the MAC address (physical address) of the
other bridge-mode wireless station in the field provided. WEP should be used to protect
this communication.
– Point-to-Multi-Point Bridge. Select this only if this ME103 is the “Master” for a group
of bridge-mode wireless stations. The other bridge-mode wireless stations must be set to
Point-to-Point Bridge mode, using this ME103's MAC address. They then send all traffic
to this “Master”, rather than communicate directly with each other . WEP should be used to
protect this traffic.
2-2 Introduction

User’s Guide for the WG602 54 Mbps Wireless Access Point
– Client Access Point. The WG602 v3 acts as a client access point (CAP) for a remote
GAP. If selected, you must enter the MAC address (physical address) of the remote GAP.
– Repeater Access Point. The WG602 v3 acts as a repeater only, and sends all traffic to the
remote AP. If selected, you must enter the MAC address (physical address) of the remote
AP.
• Upgradeable Firmware. Firmware is stored in a flash memory and can be upgraded easily,
using only your Web browser, and can be upgraded remotely.
• Access Control. The Access Control MAC Address filtering feature can ensure that only
trusted wireless stations can use the WG602 v3 to gain access to your LAN.
• Simple Configuration. If the default settings are unsuitable, they are easy to change.
• Hidden Mode. The SSID is not broadcast, assuring only clients configured with the correct
SSID can connect.
• Configuration Backup. Configuration settings can be backed up to a file and restored.
• Supports Diversity. Dual removable external antennas support diversity.
• Secure and Economical Operation. Adjustable power output allows more secure or
economical operation.
• Automatic Date and Time Updates. Date and time can be automatically updated from
Internet time servers.
• Autosensing Ethernet Connection with
IEEE 802.3 Ethernet networks.
• LED Indicators. Power and wireless activity are easily identified.
Auto Uplink Interface. Connects to 10/100 Mbps
802.11g Standards-based Wireless Networking
The 54 Mbps Wireless Access Point WG602 v3 provides a bridge between Ethernet wired LANs
and 802.11g compatible wireless LAN networks. It provides connectivity between Ethernet wired
networks and radio-equipped wireless notebook systems, desktop systems, print servers, and other
devices. Additionally, the WG602 v3 supports the following wireless features:
• Distributed coordinated function (CSMA/CA, Back off procedure, ACK procedure,
retransmission of unacknowledged frames)
• RTS/CTS handshake
• Beacon generation
• Packet fragmentation and reassembly
• Authentication Algorithms (Open System, Shared Key)
Introduction 2-3

User’s Guide for the WG602 54 Mbps Wireless Access Point
• Short or long preamble
• Roaming among access points on the same subnet
Autosensing Ethernet Connections with Auto Uplink
The WG602 v3 can connect to a standard Ethernet network. The LAN interface is autosensing and
capable of full-duplex or half-duplex operation.
TM
The wireless access point incorporates Auto Uplink
automatically sense whether the Ethernet cable plugged into the port should have a ‘normal’
connection such as to a PC or an ‘uplink’ connection such as to a switch or hub. That port will then
configure itself to the correct configuration. This feature also eliminates any concerns about
crossover cables, as Auto Uplink will accommodate either type of cable to make the right
connection.
technology. The Ethernet port will
Compatible and Related NETGEAR Products
For a list of compatible products from other manufacturers, see the Wireless Ethernet
Compatibility Alliance Web site (WECA, see http://www.wi-fi.net).
The following NETGEAR products work with the WG602 v3 Access Point:
• POE101 Power Over Ethernet Adapter
• WAB501 a/b Dual Band Wireless PC Card Adapter
• MA401 802.11b Wireless PC Card
• WG511 802.11g Wireless CardBus Adapter
• MA111 801.11b Wireless Bridge
• MA101 802.11b Wireless USB Adapter
• ME102 802.11b Wireless Access Point
• MA311 802.11b Wireless PCI Adapter
• MA701 802.11b Wireless Compact Flash Card
System Requirements
Before installing the WG602 v3, make sure your system meets these requirements:
• A Cable/DSL Router with multiple 10/100 Mbps Ethernet Ports or a 10/100 Mbps Local Area
Network device such as a hub or switch
2-4 Introduction

User’s Guide for the WG602 54 Mbps Wireless Access Point
• A Category 5 UTP straight through Ethernet cable with RJ-45 connector included in the
package, or one like it
• A 100-240 V, 50-60 HZ AC power source
• A Web browser for configuration such as Microsoft Internet Explorer 5.0 or above, or
Netscape Navigator 4.78 or above
• At least one Pentium class computer (or equivalent) with the TCP/IP protocol installed
• Other 802.11b or 802.11g-compliant devices, such as the NETGEAR WAB501 Dual Band
Wireless PC Card or the WG511 54 Mbps Wireless PC Card
• Windows 98, Me, 2000, or XP
What’s In the Box?
The product package should contain the following items:
• 54 Mbps Wireless Access Point WG602 v3
• Power adapter and cord (7.5Vdc, 1A)
• Straight through Category 5 Ethernet cable—5 feet (1.52 m)
• Printed 54 Mbps Wireless Access Point WG602 v3 Quick Installation Guide
• Resource CD for the 54 Mbps Wireless Access Point WG602 v3
– User’s Guide for the WG602 54 Mbps Wireless Access Point (WG602 v3) -- this manual
– Windows TCP/IP and Networking Tutorials
– Animated Install Assistant
– Soft copy of the 54 Mbps Wireless Access Point WG602 v3 Quick Installation Guide
• Support Information card
• Warranty and Registration card
Contact your reseller or customer support in your area if there are any wrong, missing, or damaged
parts. You can refer to the Support Information Card for the telephone number of customer support
in your area. You should keep the Support Information card, along with the original packing
materials, and use the packing materials to repack the WG602 v3 if you need to return it for repair.
T o qualify for product updates and product warranty registrations, we encourage you to register on
the NETGEAR Web site at: http://www.netgear.com.
Introduction 2-5
User’s Guide for the WG602 54 Mbps Wireless Access Point
Hardware Description
The 54 Mbps Wireless Access Point WG602 v3 front and rear hardware functions are described
below.
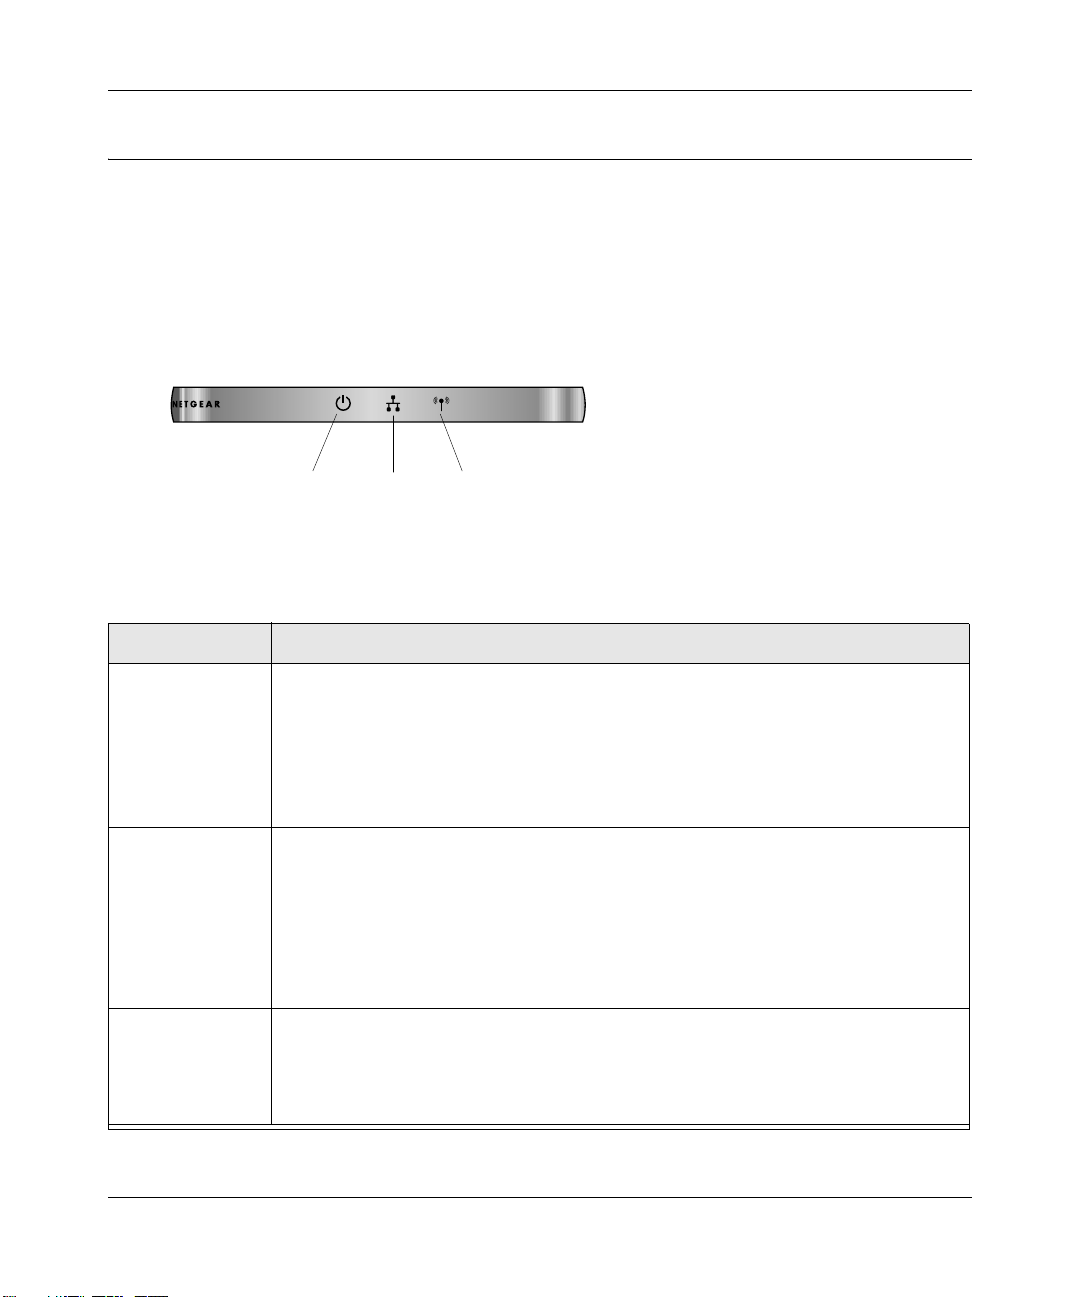
WG602 v3 Wireless Access Point Front Panel
The WG602 v3 Access Point provides three status LEDs.
Power
Ethernet Wireless
Figure 2-1: WG602 v3 front panel
The following table explains the LED indicators:
LED DESCRIPTION
Power
Blink Indicates self test, loading software, or system fault (if continues).
Ethernet Ethernet LAN Link Activity Indicator
Green On
Green Blink Indicates data traffic on the 100Mbps Ethernet LAN.
Amber 0n 10 Mbps Ethernet link detected, no activity.
Amber Blink Indicates data traffic on the 10Mbps Ethernet LAN.
Wireless Wireless LAN Link Activity Indicator
Green On
Green Blink Wireless link activity.
Power Indicator
No power. If this LED does not come on with the power adapter and cord correctly
Off
installed, see Chapter 4, Troubleshooting.
Power is on.
On
Note: This LED may blink for a minute before going on steady.
Off
Indicates no Ethernet link detected.
100 Mbps Fast Ethernet link detected, no activity.
Off
Indicates no Ethernet link detected.
Wireless link enabled, no activity.
2-6 Introduction
User’s Guide for the WG602 54 Mbps Wireless Access Point
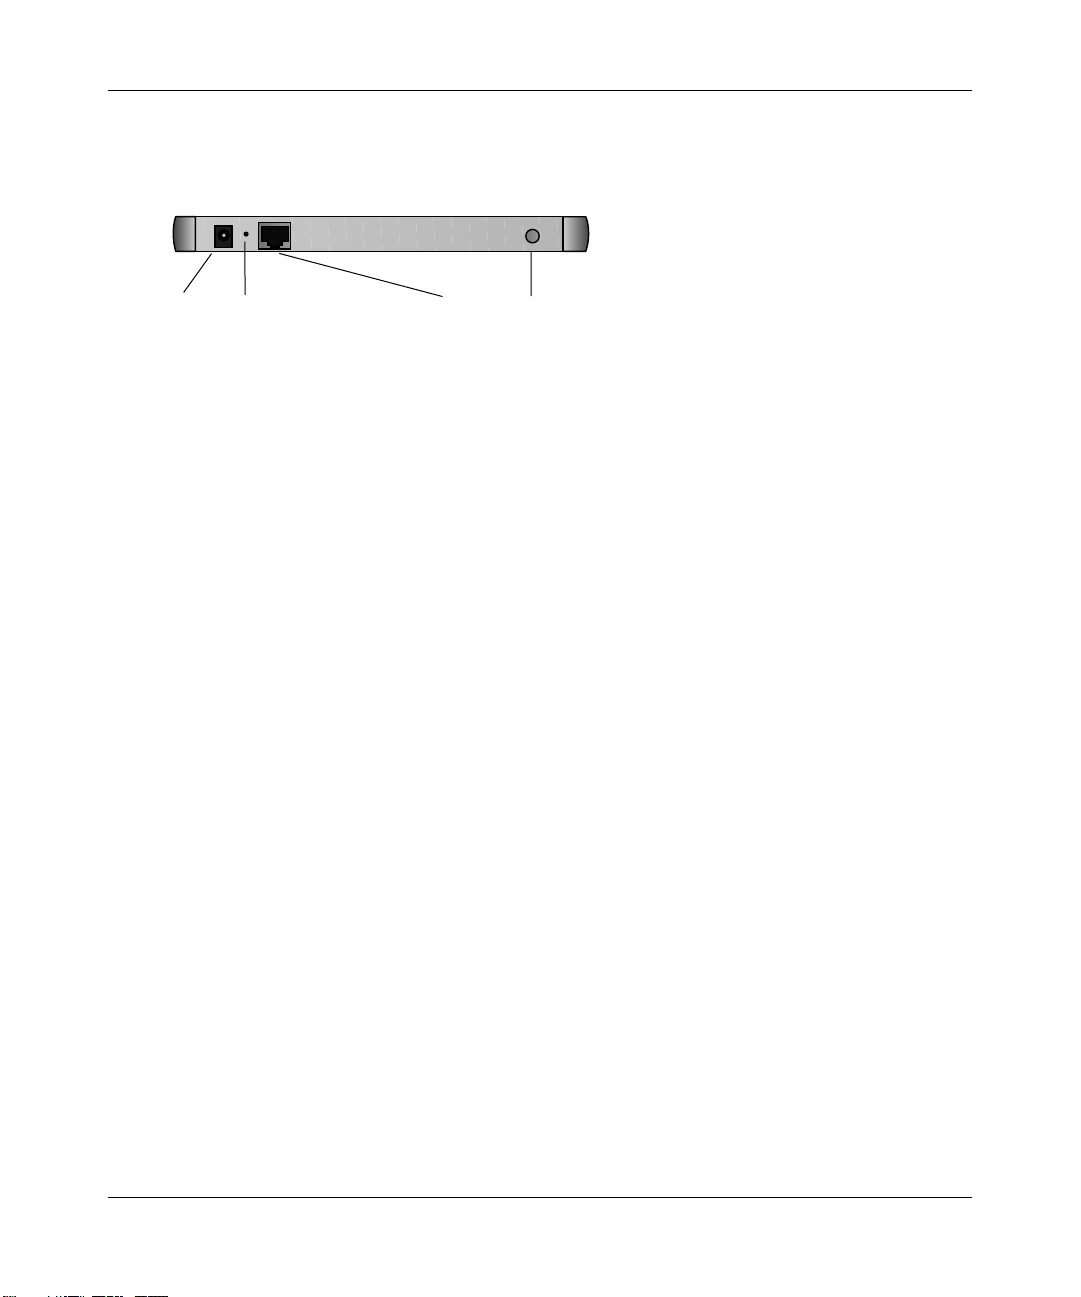
WG602 v3 Wireless Access Point Rear Panel
Power Socket
Figure 2-2: WG602 v3 rear panel
Reset & Restore
Button
RJ-45 Ethernet Port
Detachable Antenna
Power Socket
This socket connects to the WG602 v3 power adapter.
Reset and Restore to Factory Defaults Button
The reset and restore to defaults button located between the Ethernet RJ-45 connector and the
power socket resets the WG602 v3 when pushed once or restores to the factory default settings
when pushed and held for 20 seconds.
RJ-45 Ethernet Port
Use the WG602 v3 Ethernet RJ-45 port to connect to an Ethernet LAN through a device such as
a hub, switch, or router.
Detachable Antenna
The WG602 v3 provides a detachable antenna. Be sure the antenna is securely fastened.
Introduction 2-7

Chapter 3
Basic Installation and Configuration
This chapter describes how to set up your 54 Mbps Wireless Access Point WG602 v3 for wireless
connectivity to your LAN. This basic configuration will enable computers with 802.11b or
802.11g wireless adapters to do such things as connect to the Internet, or access printers and files
on your LAN.
You need to prepare these three things before you can establish a connection through your wireless
access point:
• A location for the WG602 v3 that conforms to the guidelines below.
• The wireless access point connected to your LAN through a device such as a hub, switch,
router, or Cable/DSL gateway.
The WG602 v3 Access Point connects to your LAN via twisted-pair Category 5 Ethernet cable
with RJ-45 connectors.
Note: The power adapter and cord shipped with the WG602 v3 limits the distance from
an AC outlet. To overcome this, consider using NETGEAR’s POE101 Power Over
Ethernet Adapter with a Cat 5 Ethernet cable. This adapter sends DC power through an
Ethernet cable to enable you to power an access point in a remote location up to 328 feet
away.
• One or more computers with properly configured 802.11b or 802.11g wireless adapters.
Basic Installation and Configuration 3-1
User’s Guide for the WG602 54 Mbps Wireless Access Point
Observing Placement and Range Guidelines
Note: Indoors, computers can connect over wireless networks at ranges of several
hundred feet or more. This distance can allow for others outside your area to access your
network. It is important to take appropriate steps to secure your network from
unauthorized access. The WG602 v3 Access Point provides highly effective security
features which are covered in detail in Chapter 4, “Management” . Deploy the security
features appropriate to your needs.
The operating distance or range of your wireless connection can vary significantly based on the
physical placement of the wireless access point. The latency, data throughput performance, and
notebook power consumption of wireless adapters also vary depending on your configuration
choices.
Note: Failure to follow these guidelines can result in significant performance
degradation or inability to wirelessly connect to the WG602 v3. For complete
performance specifications, see Appendix A, “Specifications”.
For best results, place your wireless access point:
• Near the center of the area in which your PCs will operate.
• In an elevated location such as a high shelf where the wirelessly connected PCs have
line-of-sight access (even if through walls).
• Away from sources of interference, such as PCs, microwaves, and 2.4 GHz cordless phones.
• Away from large metal surfaces.
• If using multiple access points, it is better if adjacent access points use different
radio frequency
Channels to reduce interference. The recommended Channel spacing between adjacent access
points is 5 Channels (for example, use Channels 1 and 6, or 6 and 11).
The time it takes to establish a wireless connection can vary depending on both your security
settings and placement. Wired Equivalent Privacy (WEP) connections can take slightly longer to
establish. Also, WEP encryption can consume more battery power on a notebook PC.
Basic Installation and Configuration 3-2

User’s Guide for the WG602 54 Mbps Wireless Access Point
Default Factory Settings
When you first receive your WG602 v3, the default factory settings will be set as shown below.
You can restore these defaults with the Factory Default Restore switch on the rear panel — see
“WG602 v3 Wireless Access Point Rear Panel” on page 2-7.
FEATURE FACTORY DEFAULT SETTINGS
User Name (case sensitive) admin
Password (case sensitive) password
Access Point Name NETGEARxxxxxx where xxxxxx are the last six digits of the
wireless access point's MAC address
DHCP DHCP client
IP Configuration
if DHCP server is unavailable
Wireless Network Name (SSID) NETGEAR
Broadcast Network Name Enabled
802.11g/b
Radio Frequency Channel
WEP Disabled
Authentication Type Open System
IP Address: 192.168.0.227
Subnet Mask: 255.255.255.0
Gateway: 0.0.0.0
Primary DNS Server: blank
Secondary DNS Server: blank
6
3-3 Basic Installation and Configuration
User’s Guide for the WG602 54 Mbps Wireless Access Point
Understanding WG602 v3 Wireless Security Options
Unlike wired network data, your wireless data transmissions can be received well beyond your
walls by anyone with a compatible adapter. For this reason, use the security features of your
wireless equipment. The WG602 v3 Access Point provides highly effective security features
which are covered in detail in this chapter. Deploy the security features appropriate to your needs.
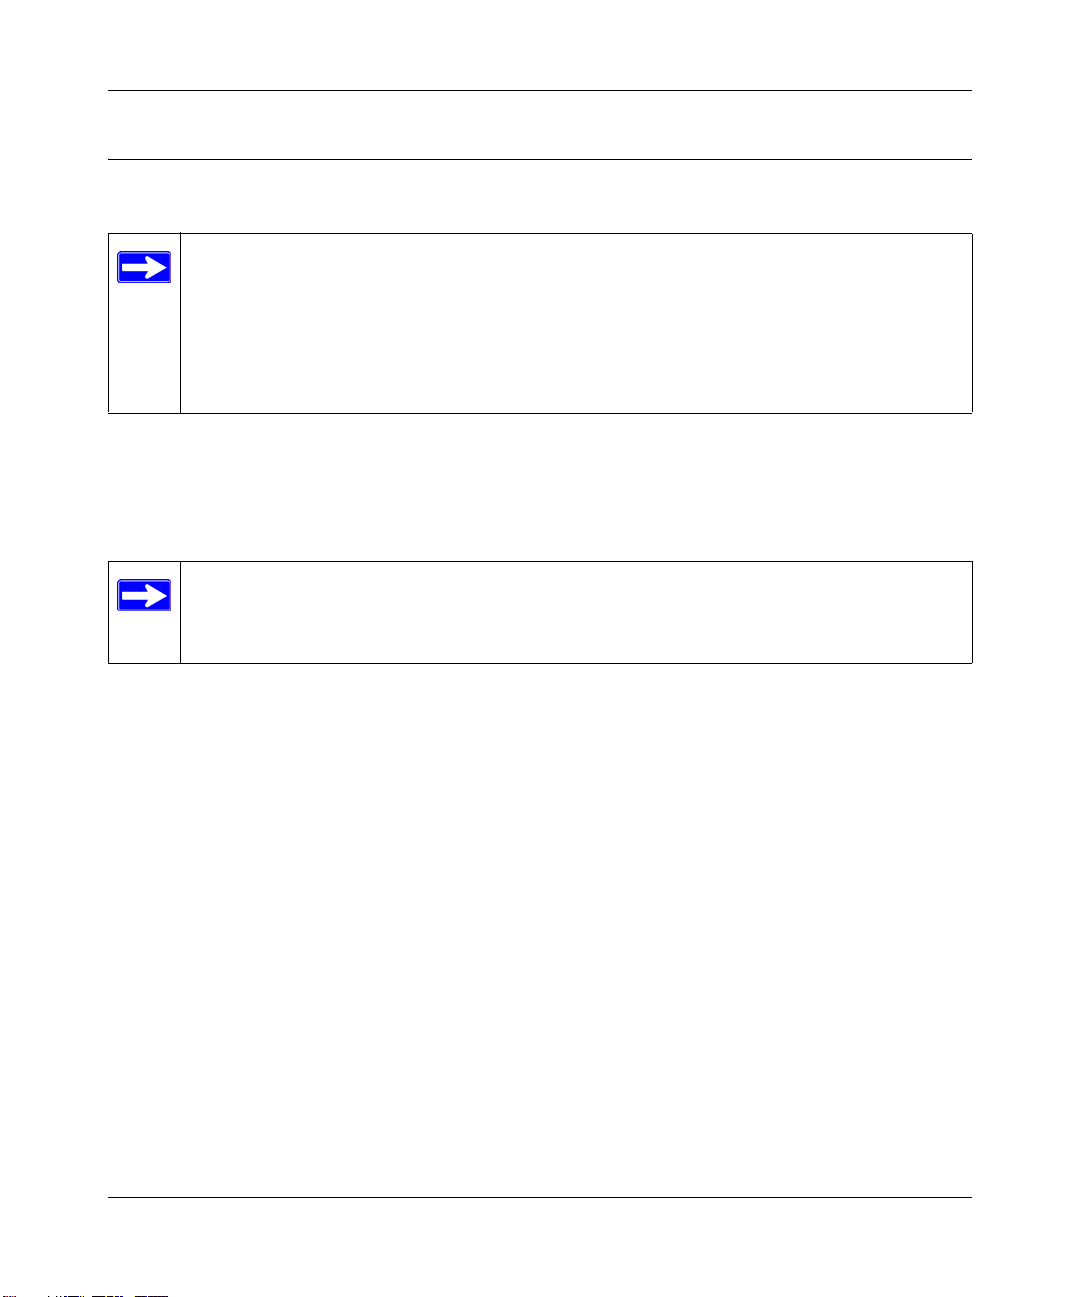
Wireless Data
Security Options
Range: Up to 300 Foot Radius
WG602 v3
2) MAC Access List: No data security
3) WEP: Secure but some vulnerabilities
4) WPA: Very strong security
Figure 3-1: WG602 v3 wireless data security options
There are several ways you can enhance the security of your wireless network:
• Restrict Access Based on MAC Address. Yo u can restrict access to only trusted PCs so that
unknown PCs cannot wirelessly connect to the WG602 v3. MAC address filtering adds an
obstacle against unwanted access to your network, but the data broadcast over the wireless link
is fully exposed.
• Turn Off the Broadcast of the Wireless Network Name (SSID). If you disable broadcast of
the SSID, only devices that have the correct SSID can connect. This nullifies the wireless
network ‘discovery’ feature of some products such as Windows XP, but the data is still fully
exposed to a determined snoop using specialized test equipment like wireless sniffers.
• Use WEP. Wired Equivalent Privacy (WEP) data encryption provides data security. WEP
Shared Key authentication and WEP data encryption will block an eavesdropper but because
the keys are static, a determined snoop can learn the keys in less than a day of eavesdropping.
• Use WPA-PSK. Wi-Fi Protected Access (WPA) data encryption provides data security. WEP
Shared Key authentication and WEP data encryption will block all but the most determined
eavesdropper. Because this is a new standard, wireless device driver and software availability
may be limited.
1) Open System: Easy but no security
Basic Installation and Configuration 3-4
User’s Guide for the WG602 54 Mbps Wireless Access Point
Installing the 54 Mbps Wireless Access Point WG602 v3
Follow the instructions below to set up and test basic wireless connectivity. Once you have
established basic wireless connectivity, you can enable security settings and configure the
advanced wireless functions.
Before installing the 54 Mbps Wireless Access Point WG602 v3, you should make sure that your
Ethernet network is up and working. You will be connecting the access point to the Ethernet
network so that computers with 802.11b or 802.11g wireless adapters will be able to communicate
with computers on the Ethernet network. In order for this to work correctly, verify that you have
met all of the system requirements, shown on page 2-4.
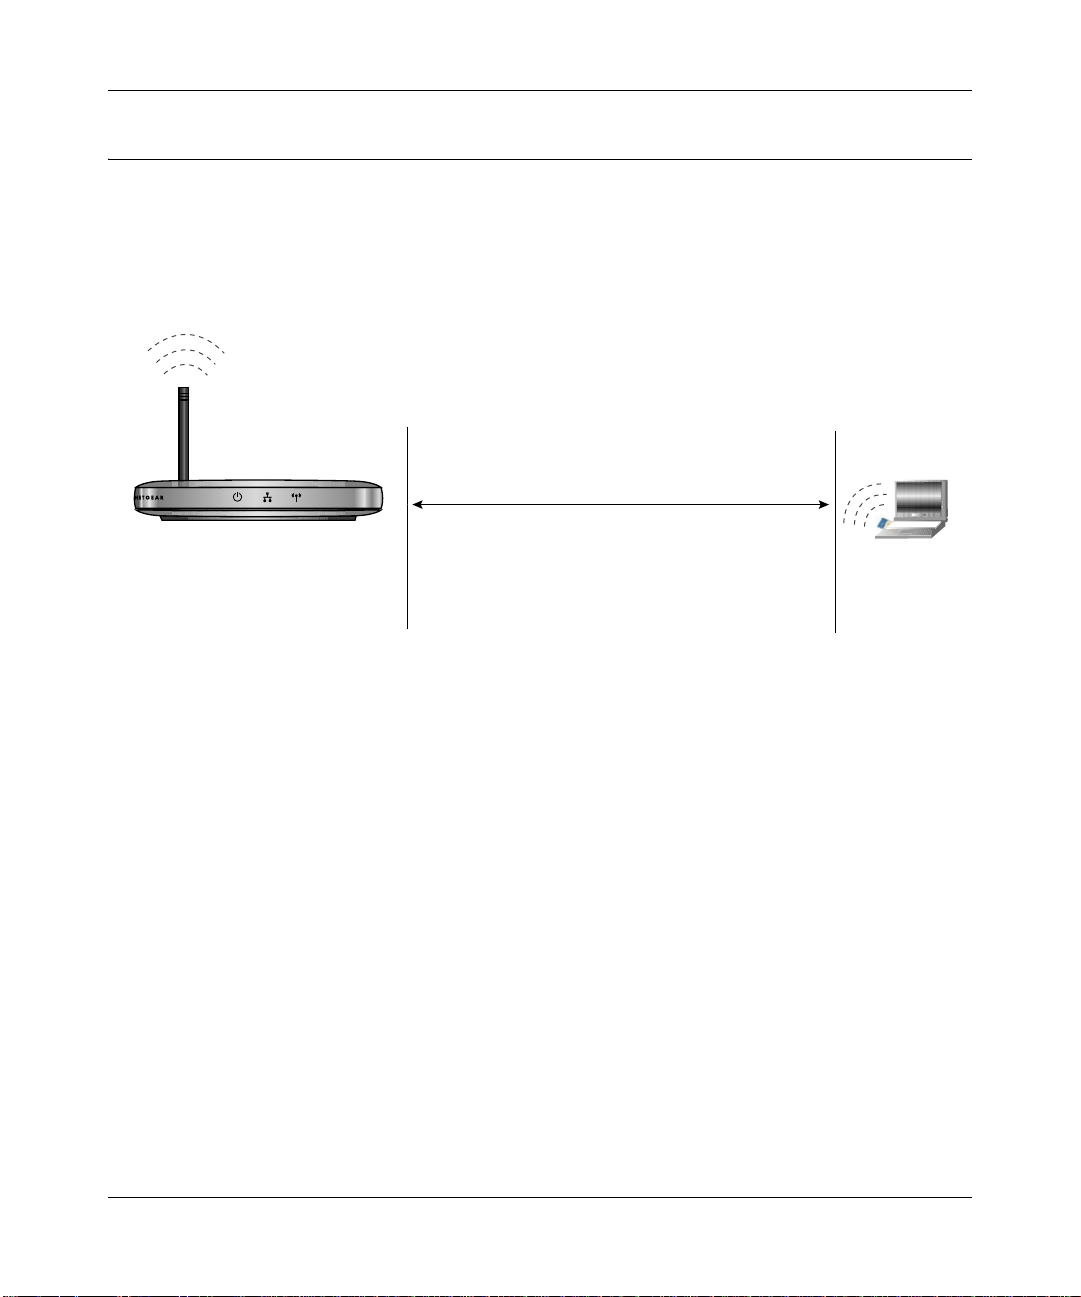
1SET UP THE WG602 V3 ACCESS POINT
Tip: Before mounting the WG602 v3 in a high location, first set up and test the WG602 v3 to
verify wireless network connectivity.
a. Prepare a PC with an Ethernet adapter. If this PC is already part of your network, record its
TCP/IP configuration settings.
b. Configure the PC with a static IP address of 192.168.0.210 and 255.255.255.0 for the
Subnet Mask.
c. Connect an Ethernet cable from the WG602 v3 to the PC (A).
A
ETHERNET
WG602 54 Mbps
Wireless Access Point
Figure 3-2: Set up the WG602 v3
Turn on your computer, connect the power adapter to the WG602 v3 and verify the
d.
following:
The power light goes on.
The LAN light of the wireless access point is lit when connected to a powered on PC.
3-5 Basic Installation and Configuration
User’s Guide for the WG602 54 Mbps Wireless Access Point
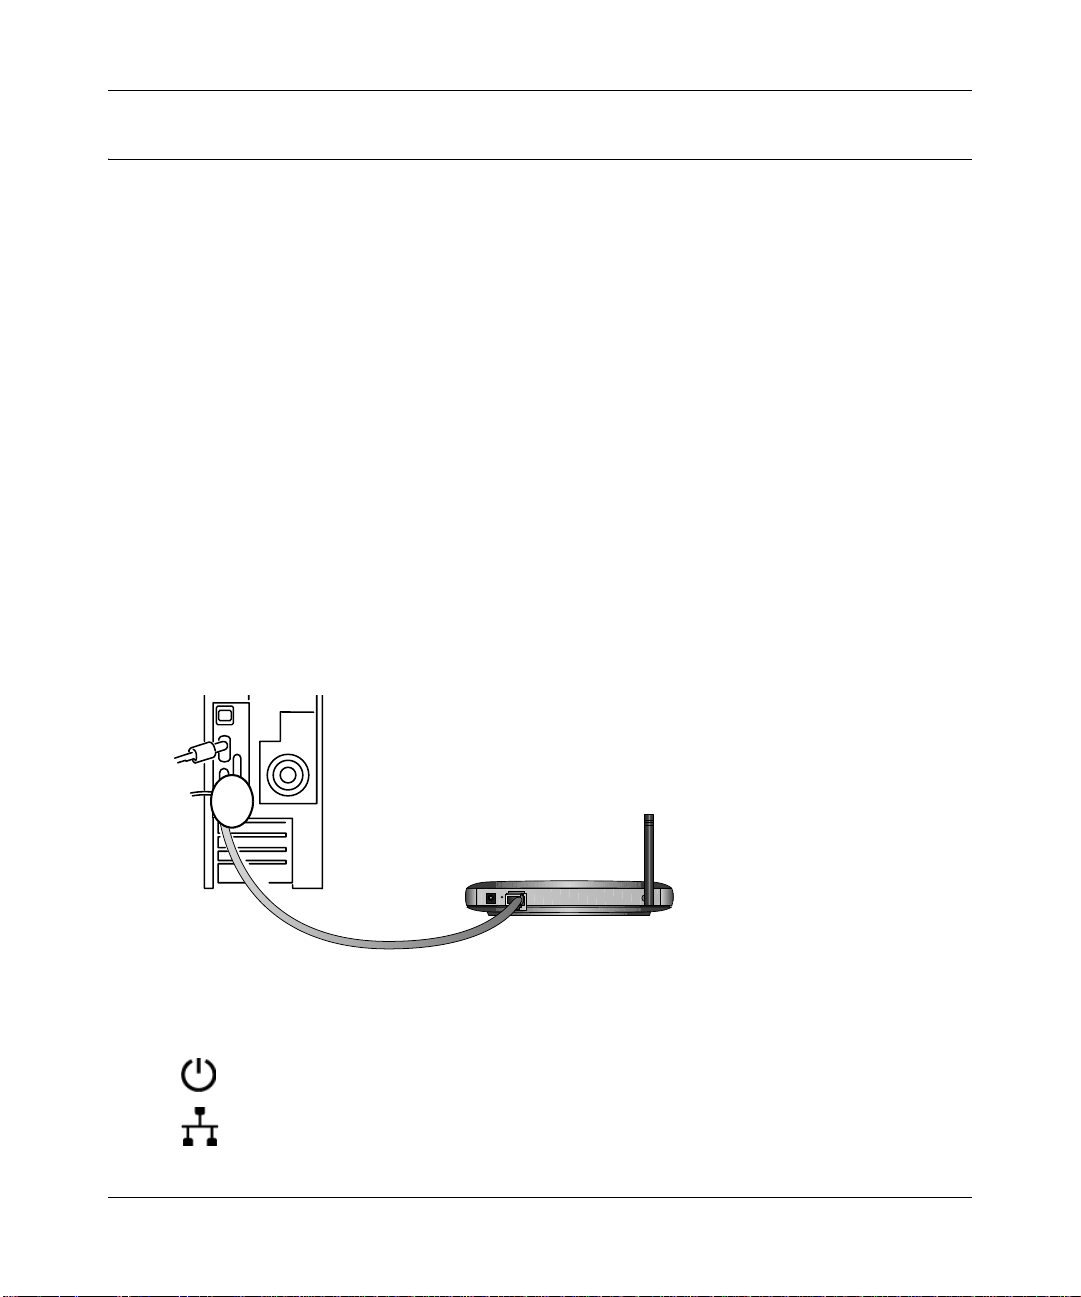
2CONFIGURE LAN AND WIRELESS ACCESS
a. Configure the WG602 v3 Ethernet port for LAN access.
– Connect to the WG602 v3 by entering its default address of http://192.168.0.227 into your
browser.
– A login window like the one shown below opens:
Figure 3-3: Login window
– When prompted, enter admin for the user name and password for the password, both
in lower case letters.
– Click IP Settings and configure the IP Settings according to your network setup.
b. Configure the wireless interface for wireless access. See the online help or the
“Understanding Basic Wireless Settings” on page 3-11 for full instructions.
Note: You must set the Regulatory Domain. It may not be legal to operate the wireless
access point in a region other than one of those identified in this field.
Now that you have finished the setup steps, you are ready to deploy the WG602 v3 in your
network. If needed, you can now reconfigure the PC you used in step 1 back to its original
TCP/IP settings.
3DEPLOY THE WG602 V3 ACCESS POINT
a. Disconnect the WG602 v3 and position it where you will deploy it. The best location is
elevated at the center of your wireless coverage area.
Tip: If you plan to locate the WG602 v3 in a location where it is difficult to connect the
electrical power supply , consider using the NETGEAR, Inc. POE101 Power Over Ethernet
Adapter which provides power to the WG602 v3 through the Ethernet cable.
Basic Installation and Configuration 3-6

User’s Guide for the WG602 54 Mbps Wireless Access Point
Lift the antenna side so that it is vertical.
b.
c. Connect an Ethernet cable from your WG602 v3 Access Point to a LAN port on your
router, switch, or hub.
Note: By default, WG602 v3 is set to be a DHCP client. If your network uses static IP
addresses, you will need to change this setting.
d. Connect the power adapter to the wireless access point and plug the power adapter in to a
power outlet. The power, LAN, and wireless lights and should light up.
4VERIFY WIRELESS CONNECTIVITY
Using a computer with an 802.11b or 802.11g wireless adapter with the correct wireless
settings needed to connect to the WG602 v3 (SSID, MAC ACL, WEP, WPA, etc.), verify
connectivity by using a browser such as Netscape or Internet Explorer to browse the Internet,
or check for file and printer access on your network. If you cannot connect, see
“Troubleshooting” on page 6-1.
3-7 Basic Installation and Configuration
 Loading...