

Page 1

Installation Guide for the Model WG511 802.11g Wireless PC Card
NETGEAR, Inc.
4401 Great America Parkway
Santa Clara, CA 95054 USA
Page 2

Technical Support
Please refe r to the support information card that shipped wi th your product.
By registering your product at www.NETGEAR.com/register
, we can
provide you with faster expert technical support and timely notices of product and
software upgrades.
NETGEAR, INC.
Support Information
Phone: 1-888-NETGEAR (For US & Canada only)
For other countries see your Support information card.
E-mail: Support@NETGEAR.com
Web site: www.NETGEAR.com
Statem ent of Condit ions
In the interest of improving internal design, operational function, and/or
reliability, NETGEAR reserves the right to make changes to the products
described in this document without notice.
NETGEAR does not assume any liability that may occur due to the use or
application of the product(s) or circuit layout(s) described herein.
©2002 NETGEAR, Inc. NETGEAR, the Netgear logo, The Gear Guy and Everybody's
Connecting are trademarks or registered trademarks of Netgear, Inc. in the United States
and/or other countries. Microsoft and Windows are registered trademarks of Microsoft
Corporation in the United States and/or other countries. Other brand and product names
are trademarks or registered trademarks of their respective holders. Information is subject
to change without notice. All rights reserved
December 2002
.
Page 3

Contents
Chapter 1 - Introduction
About the WG511 802.11g Wireless PC Card .........................................1
Key Features and Related NETGEAR Products ......................................1
What’s in the Box? ...................................................................................2
Chapter 2 - Installing the WG511 802.11g Wireless PC Card
What You Will Need Before You Begin ....................................................4
Verify System Requirements .............................................................5
Observe Location and Range Guidelines ..........................................5
Two Basic Operating Modes ....................................................................5
WG511 Default Wireless Configuration Settings ......................................6
Using the WG511 to Connect to a Wireless Access Point Network in
Infrastructure Mode ..... ....................................... ...... ....... ...... ....... ...... ......7
Setup Instructions ............. ....... ...... ....... ...... ....... ...... ....... ...... ....... ............8
For Windows XP Users Installing a WG511 ......................................8
For Windows 98/Me Users Installing a WG511 ...............................11
For Windows 2000 Users Installing a WG511 .................................14
Using the WG511 to Connect in Ad-Hoc Mode ......................................17
WG511 Wireless Connection Indicators .................................................18
Interpreting the LED on the WG511 ................................................18
Interpreting System Tray Icon Colors ..............................................19
Troubleshooting Tips ..............................................................................20
Chapter 3 Protecting Your Wireless Connection
Enabling Basic Wireless Security Features ...........................................21
Identifying the Wireless Network Name (SSID) and WEP Security
Settings ....................... ............. ....... ............. ............. ............. .......... 22
Setting the Wireless Network Name (SSID) ....................................23
Configuring WEP Encryption Security .............................................23
i
Page 4

Chapter 1
Introduction
This chapter introduces the features, package contents, and appearance of the
NETGEAR
About the WG511 802.11g Wireless PC Card
The WG511 802.11g W ire less PC Card gi ves you ultima te mobili ty in your of fice
or while you are traveling. It frees you from traditional Ethernet wiring and helps
you create a wireless network for sharing your broadband cable or DSL Internet
access among multiple PCs in and around your home. It is designed for notebook
computers running Microsoft
CardBus compatible and works in any available PCMCIA or CardBus slot. Its
auto-sensing capabi li ty all ows the highes t pack et tr ansfer or dynamic range
shifting to the lower speeds due to distance or operating limitations in an
environment with a lot o f electromagnetic interference.
®
WG511 802.11g Wireless PC Card.
®
Windows®. It is both 16-bit PCMCIA and 32-bit
It provides reliable, standards-based 802.11g LAN connectivity that is protected
with industry-standard security. It works with Windows 95B, 98, Me, NT4, 2000,
and XP operating systems.
Key Features and Related NETGEAR Products
The WG511 PC Card provides the following features:
• Reliable IEEE 802.11g standard-based wireless technology.
• Supports roaming between access points when configured in Infrastructure
mode.
1
Page 5

• 11 Mbps high rate speed. Wireless nodes negotiate to operate in the optimal
data transfer rate. In a noisy environment or when the distance between the
wireless nodes is far, the wireless nodes automatically fall back to operate at
the lower transfer rate of two or one Megabit per second.
• Highest level of data encryption using128-bit Shared Key WEP data
encryption method. Lower level of data encryption or no data encryption is
available to simplify your network setup or to improve data transfer rate.
The following Netgear products can be configured to communicate with the
WG511 PC Card.
• WAB102 Dual Band Access Point
• WAB501 Dual Band PC Card
• MA101 802.11b Wireless USB Adapter
• ME102 802.11b Wireless Access Point
• MA311 802.11b Wireless PCI Adapter
• MR314 802.11b Wireless Cable/DSL Router
• MA701 802.11b Wireless Compact Flash Card
What’s in the Box?
The product package should contain the following items:
• WG511 802.11g Wireless PC Card
• Installation Guide for the Model WG511 802.11g Wireless PC Card
• Model WG511 Resource CD, including:
— Driver and Configuration Utility Software
— Reference Guide for the Model WG511 802.11g Wireless PC Card in
Adobe Acrobat PDF file format
— Reference Guide for the Model WG511 802.11g Wireless PC Card in
HTML format
• Warranty card
• Support information card
2
Page 6

If any of the parts are incorrect, missing, or damaged, contact your NETGEAR
dealer. Keep the cart on, incl uding the ori ginal packi ng mater ials, in cas e you nee d
to return the product for repair.
The WG511 80 2.1 1 g Wireless PC Card has two inte rface s. The PCMCIA Type II
connector connects to any notebook PC with an available PCMCIA or CardBus
slot. The wireless interface of the WG511 802.11g Wireless PC Card remains
outside of t he notebook PC chassis when the wireless PC card is inserted in to a
notebook. The green LED indicates the wireless link condition of the WG511
802.11g Wireless PC Card with another wireless node or the associated access
point.
3
Page 7

Chapter 2
Installing the
WG511 802.11g Wireless PC Card
This section describes how to set up your WG511 802.11g Wireless PC Card for
wireless connectivity on your Wireless Local Area Network
Note: Indoors, computers can c onnect over 802.11 wir eless n etwo rks at
a maximum range of up to 500 feet. With this distance, and because
walls do not always block wireless signals, others outside your
immediate area could access your network. It is important to take
appropriate steps to se cure your network f rom unauthor ized acc ess. The
WG511 802.11g Wireless PC Card provides highly effective security
features which are co vered in Secti on 3 of this man ual. Netgear s trongly
recommends you deploy th e secur ity fea tures appropr iate t o your need s.
(WLAN).
What You Will Need Before You Begin
You need to verify your computer meets the minimum system requirements and
identify the wire le ss n etwork configuration s ettings of the WLAN where you wi l l
connect before you can configure your wireless pc card and connect.
4
Page 8

Verify System Requirements
Before installing the WG511 802.11g Wireless PC Card, please make sure that
these minimum requirements have been met:
• You must have a Pentium® Class notebook computer with an available
PCMCIA or Cardbus slot.
• A CD-ROM drive.
• 5 Mbytes of free hard disk space.
• Some versions of Windows may ask for the original Windows operating
system insta llation files to complete t he installatio n of the WG511 driver
software.
Observe Location and Range Guidelines
Computers can connect over 802.11g wireless networks indoors at a maximum
range of approximatel y 500 feet . However , the operat ing dist ance or range of your
wireless connection can vary significantly based on the physical location of the
computer with the WG511 802.11g Wireless PC Card. For best results, avoid
potential s ources of interference, such as:
• Large metal surfaces
• Microwaves
• 2.4 GHz Cordless phones
In general, 802.11g wireless device s can co mmunica te thr ough wal ls. Howeve r, if
the walls are cons truct ed wit h conc rete, or have metal, or met al mes h, the 802.11g
effective range will decrease if such materials are between the devices.
Two Basic Operating Modes
The WG511 PC Card, like all 802.11b adapters, can operate in the following two
basic modes:
5
Page 9

• Infrastructure Mode: An 802.11 networking framework in which devices
and computers communicate with each other by first going through an
point (AP).
For example, this mode is used when computers in a house connect to an
Access Point that is at tached to a r outer which l ets mul tiple co mputers share a
single Cable or DSL broadband Internet connection.
• Ad-Hoc Mode: An 802.11 networking framework in which devices or
computers communicate directly with each other, without the use of an AP.
For example, Ad-Hoc Mode is used when two Windows computers are
configured with fi le and pr int sharing enable d and y ou wan t t o exc h ang e fi le s
directly between them.
Both of these configuration options are available with the WG511 PC Card.
access
WG511 Default Wireless Configuration Settings
If this is a ne w wi re less network inst al la ti on, use the factory default setti ngs to set
up the network and verify wireless connectivity. If this is an addition to an
existing wireless ne twork, you wil l need to id entify th e wireles s configurat ion and
security parameters already defined.
Note: All NETGEAR, Inc. 802.11 wireless access products use the same factory
settings as the WG511 and will work without any configuration changes.
Your WG511 802.11g Wireless PC Card factory default basic settings are:
• Wireless network name Service Set Identification (SSID): Wireless
Note: In order for t he WG511 PC Card t o communic ate with a wirele ss acc ess
point or wireless adapter, all devices must be configured with the same SSID.
• Mode (Infrastructure or Ad-Hoc): Infrastructure
6
Page 10

Using the WG511 to Connect to a Wireless Access Point Network in Infrastructure Mode
Wireless Access Point
Cable/DSL Router
WG511 Wireless PC Card
in a Notebook Computer
Cable or DSL modem
Figure 2-1: NETGEAR WG511 Wireless PC Card in Infrastructure Mode
This section provides inst ructions for setting up the WG511 802.11g Wirele ss PC
Card. The procedures below provide step-by-step installation instructions for
Windows PCs . Use the procedu re th at correspo nds to th e vers ion of Windows you
are using.
7
Page 11

Setup Instructions
Use the procedure below that corresponds to the version of Windows you are
using.
For Windows XP Users Installing a WG511
Insert the WG511 PC Card into your computer.
a. Power on your notebook and let the operating system boot up
completely.
b. Insert the Model WG511 Resource CD into your CD-ROM drive.
c. Locate an available PCMCIA or CardBus slot on the side of your
notebook. If your notebook computer has two PCMCIA or CardBus
slots, the WG511 802.11g Wireless PC Card can be inserted into
either slot.
d. Hold the PC Card with the Netgear logo facing up and insert it into
the PC card slot.
8
Page 12
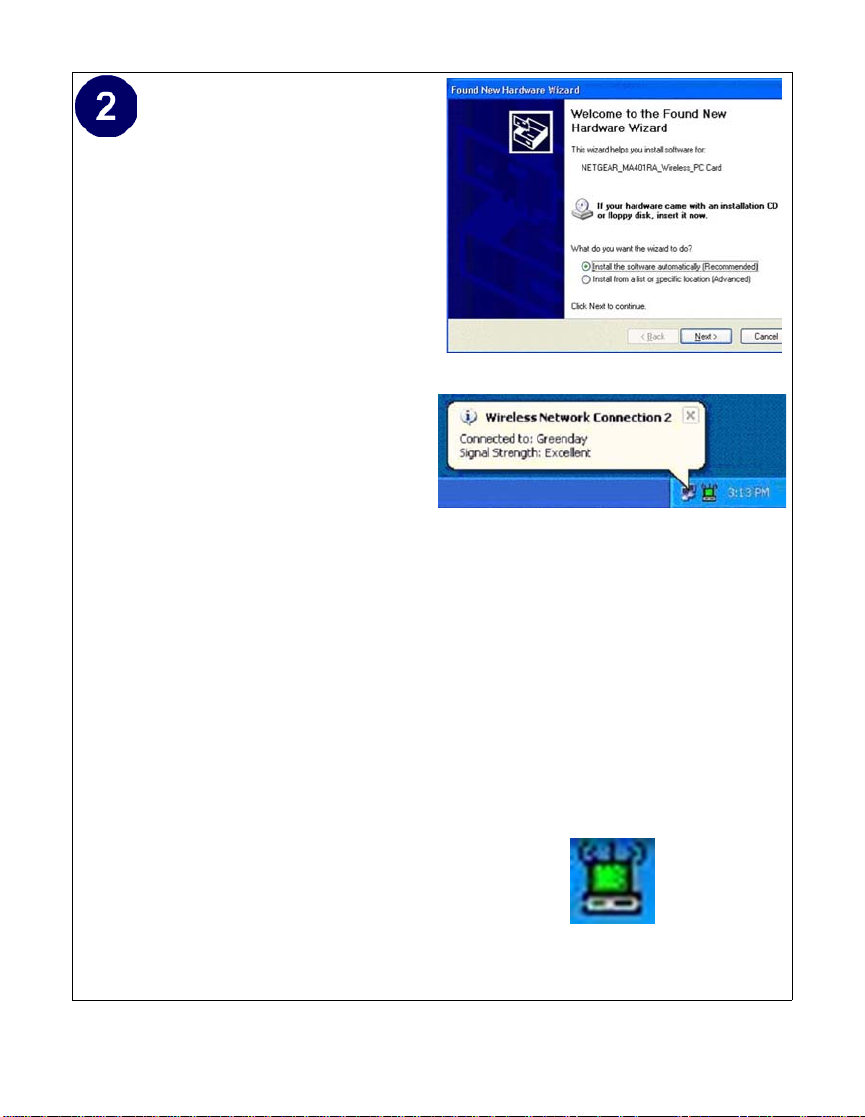
Install the WG511 driver
and configuration utility
software.
a. A Found New Hardware
Wizard is dis played. Select
Install the software
automatically
(Recommended) and then
click Next.
b. Windows XP looks into the
CD-ROM for the necessa ry
software to be installed.
The wizard w ill
automatically install both
the driver and the
configuration utility onto
the hard dri ve.
c. After the installation
completes, click Finish to
close the wizard.
d. After installing the WG51 1,
Windows XP will displ ay a
“Wireless Network
Connection #” message.
e. Click on the X to close this
message.
f. You should see the WG511
system tray icon on the
right in the lower right
portion of the Windows
task bar.
Windows XP Add New Hardware Wizard
Windows XP Wireless Network
Connection Alert
Note: The Netgear and Windows XP
utilities let you set up your WG511.
The Netgear installation utility
defaults to turning off the Windows
XP utilities. You cannot use both at
the same time. The Netgear screens
are presented in step 3 below.
WG511 LAN Configuration Utility
System Tray Icon
9
Page 13

Configure your wireless
adapter.
a. The WG511 d efault settings
are as follows:
• SSID: Wireless
• Mode (Infrastruct ure or
Ad-Hoc):
Infrastructure
• WEP encryption not
enabled.
b. Click on the System Tray
icon to run the wireless
LAN configuration utility
to verify your settings
WG511 Configuratio n Utility
Note: If your WLAN
settings are different fr om
the Netgear default settings,
you will not connect . Set up
your WG511 accordingly.
Verify wireless connectivity to your network.
The WG511 has an LED labeled LINK that indicates the wireless link
condition of the station. Solid green indicates a good connection.
Blinking i ndicates attempting to c onnect. Off ind icates the card is
turned off or not fully plugged in.
Verify connectivity by accessing the Internet or network resources.
Note: If you are unabl e to conne ct, see “Troubleshoo ting Tips” on p age
20. Also, for problems wi th accessing network re sour ce s, t he Windows
Client and File and Print Sharing software might not be installed and
configured properly on your computers. Pl ease refer to “Pr eparing Your
PCs for Network Access” on page 39 of the Reference Manual on the
Model WG511 Resource CD.
10
Page 14

For Windows 98/Me Users Installing a WG511
Insert the WG511 PC Card into your computer.
a. Power on your notebook and let the operating system boot up
completely.
b. Have the Windows 98 or Me operating system installation files
handy . W i ndows 98/Me needs these files to complet e the creat ing and
installation of new network adapter hardware drivers.
Note: The MA401 driver supports Windows 95/B and above.
Windows 95 and Windows 95A are not supported.
c. Insert the Model WG511 Resource CD into your CD-ROM drive.
d. Locate an available PCMCIA or CardBus slot on the side of your
notebook. If your notebook computer has two PCMCIA or CardBus
slots, the WG511 802.11g Wireless PC Card can be inserted into
either slot.
e. Hold the PC Card with the Netgear logo facing up and insert it into
the PC card slot.
11
Page 15

Install the WG511 driver
and configuration utility
software.
a. After inserting the WG511
802.11g Wireless PC Card,
the Windows 98/Me Add
New Hardware Wizard is
displayed. Click Next, select
Search for the best driver
for your device
(Recommended) and click
Next again.
b. Windows 98/Me prompts
for the location of the dri ver .
Click the CD-ROM drive
box and click Next to
proceed. The wizard will
install both the driver and
the configuration utility. If
Windows requests the
Windows operating system
files, insert the Windows 98/
Me CD and follow the
prompts to proceed.
Windows 98/Me Add Hardware Wizard
c. After the installation
completes, click Finish.
d. Click Yes when asked if you
want to reboot the system.
e. You should now see the
Windows system tray icon
on the right in the lower
right portion of the
Windows task bar.
WG511 LAN Configuration Utility
System Tray Icon
12
Page 16

Configure your wireless
adapter.
a. The WG511 default settings
are as follows:
• SSID: Wireless
• Mode (Infrastructure or
Ad-Hoc):
Infrastructure
• WEP encryption not
enabled.
b. Click on the System Tray
icon to run the wireless
LAN configuration uti lity to
verify your settings
WG511 Configuratio n Utility
Note: If your WLAN
settings are different fr om
the Netgear default settings,
you will not connect. Set up
your WG511 accordingly.
Verify wireless connectivity to your network.
13
The WG511 has an LED labeled LINK that indicates the wireless link
condition of the station. Solid green indicates a good connection.
Blinking indicates attempting to connect. Off indicates the card is turned
off or not fully plugged in.
Verify connectivity by accessing the Internet or network resources.
Note: If you are unable to connect, see “Troubleshooting Tips” on page
20. Also, for problems with accessing network resources, the Windows
Client and File and Print Sharing software might not be installed and
configured prope rl y on your computers. Please r efer to “Prepari ng Your
PCs for Network Access” on page 39 of the Refere nce Manual on the
Model WG511 Resource CD.
Page 17

For Windows 2000 Users Inst alling a WG511
Insert the WG511 PC Card into your computer.
a. Power on your notebook and let the operating system boot up
completely.
b. Have the Windows 2000 operating system installation files handy.
Windows 2000 needs these files to complete the creating and
installation of new network adapter hardware drivers.
c. Insert the Model WG511 Resource CD into your CD-ROM drive.
Note: You may need to be logged on to Windows 2000 with
administrator rights to complete the installation of new hardware to
your PC.
d. Locate an available PCMCIA or CardBus slot on the side of your
notebook. If your notebook computer has two PCMCIA or CardBus
slots, the WG511 802.11g Wireless PC Card can be inserted into
either slot.
e. Hold the PC Card with the Netgear logo facing up and insert it into
the PC card slot.
14
Page 18

Install the WG511 driver
and configuration utility
software.
a. After inserting the WG511,
the Windows Found New
Hardware Wizard is
displayed. Click Next, select
Search for the best driver
for your device
(Recommended) and the
click Next again.
b. When Windows 2000
prompts for the location of
the driver software, select
the CD-ROM drive.
Clicking Next to proceed.
c. If Windows 2000 warns
about a Digital Signature
Not Found, click Yes to
continue. Netgear has tested
the WG511 to assure tha t it
is compatible with W indows
2000. If requeste d, insert th e
Windows 2000 CD and
follow the prompts to
proceed.
Windows 2000 Found New Hardware
Wizard
Digital Signature Not Found
15
d. Click Finish to close the
wizard. Click Yes to reboot
the system.
e. You should now see the
Windows system tray icon
in the Windows task bar.
WG511 LAN Configuration Utility
System Tray Icon
Page 19

Configure your wireless
adapter.
a. The WG511 default settings
are as follows:
• SSID: Wireless
• Mode (Infrastructure or
Ad-Hoc):
Infrastructure
• WEP encryption not
enabled.
b. Click on the System Tray
icon to run the wireless
LAN configuration uti lity to
verify your settings
WG511 Configuratio n Utility
Note: If your WLAN
settings are different fr om
the Netgear default settings,
you will not connect. Set up
your WG511 accordingly.
Verify wireless connectivity to your network.
The WG511 has an LED labeled LINK that indicates the wireless link
condition of the station. Solid green indicates a good connection.
Blinking indicates attempting to connect. Off indicates the card is turned
off or not fully plugged in.
Verify connectivity by accessing the Internet or network resources.
Note: If you are unable to connect, see “Troubleshooting Tips” on page
20. Also, for problems with accessing network resources, the Windows
Client and File and Print Sharing software might not be installed and
configured prope rl y on your computers. Please r efer to “Prepari ng Your
PCs for Network Access” on page 39 of the Refere nce Manual on the
Model WG511 Resource CD.
16
Page 20

Using the WG511 to Connect in Ad-Hoc Mode
WG511 Wireless PC Card
in a Notebook Computer
WG511 Wireless PC Card
in a Notebook Computer
Figure 2-2: NETGEAR WG511 Wireless PC Card in Ad-Hoc Mode
Ad-Hoc Mode is an 802.11 networkin g framewo rk in wh ich dev ices o r comput ers
communicate directly with each other, without the use of an access point. For
example, Ad-Hoc Mode is used when two Windows computers are configured
with file and print sharing enabled and you want to exchange files directly
between them. To use the Ad-Hoc mode, install the WG511 following the
instructions above for your version of the Windows operating system. However,
select Ad-Hoc mode instead of Infr astructure mode. Otherwise all the other
settings would be the same. Again, unless both computers are configured to
operate in Ad-Hoc mode, you will not be able to connect.
17
Page 21

WG511 Wirele ss Conne ct io n Ind ic at or s
The WG511 802.11g Wireless PC Card provides the following two indicators
which give you feedback on the status of your wireless connection:
• The green LED on the WG511 802.11g Wireless PC Card indicates the
wireless link conditi on of the MA401 Wireless PC Card with another wireless
node or associated access point.
• The SysTray icon is on the System Tray portion of the taskbar in the
Microsoft Windows desktop. The color of this icon indicates the status of the
wireless connection.
Interpreting the LED on the WG511
Figure 2-3: WG511 LED
• If the LED is on, the card is plugged in to the notebook PC.
• If the LED is on and is a steady green, the WG511 has a connection with an
access point or another 802.11 device.
• If the LED is blinking, the WG511 is trying to establish a connection but is
unable to do so. If the LED is blinking, check your configuration, or try
moving to a different location where the wireless signal quality is better.
18
Page 22

Interpreting System Tray Icon Colors
The System Tray (SysTray) resides on one end of the taskbar in the Microsoft
Windows desktop. The wireless LAN configuration utility installation for the
MA401 Wirel es s PC Ca rd adds a configurati on and status report ing utility icon i n
the SysTray.
Color Condition Description
Red The wireless PC Card has
no connection to any
other wireless node.
Yellow The wireless PC Card has
a connection with a nother
wireless node.
Green The wireless PC Card has
a connection with a nother
wireless node.
The wireless PC Card is not able to
link to any access point or the link
between the wireless PC Card and the
access point is lost. Check your
configuration or try moving to a
location where the wireless signal
quality is better.
The link condition between the
wireless PC Card and the associated
access point is weak. Try moving to
another location where the wireless
signal quality is better, such as closer
to the wireless access point. Also,
look for any possible sources of
interference such as a 2 .4 GHz
cordless phone or a large metal
surface.
The wireless PC Card has establishe d
good communication with an access
point and the signal quality is strong.
19
Page 23

Troubleshooting Tips
If you have problems connected to your wireless network, try the tips below.
Symptom Cause Solution
The PC Card
LED is not lit.
The LED is
blinking
repeatedly.
I can connect
to an access
point, but I do
not see the
other
computers on
the networ k.
The wireless PC
card is not
inserted into the
slot properly or
the proper
wireless WG511
802.11g Wireless
PC Card software
is not loaded .
The wireless PC
Card is
attempting to
connect to access
point but cannot
connect.
This could be a
physical layer
problem or a
network
configuration
problem.
Remove and reinsert the wireless P C
Card.
Check the device manager in
Windows to see if the PC Card is
recognized in the W i ndows oper at in g
system. Reload the dr iver if ne cessar y.
Try to in stall the W G511 in a dif ferent
PCMCIA slot on your system if one is
available.
The access point may not be powered
on.
The access point and the PC card are
not configured wi th t he same wirel ess
parameters. Check the SSID and WEP
settings.
Check to make sure that the access
point is physically connected to the
Ethernet network.
Make sure that the IP addresses and
the Windows networking parameters
are all configured correctly.
20
Page 24

Chapter 3
Protecting Your Wireless Connection
The absence of a physical connection between nodes makes wireless links
vulnerable to information theft. This chapter describes how to use the basic
security features of the WG511 802.11g Wireless PC Card to protect your
connection.
Enabling Basi c Wireless Securit y Fe atures
There are several ways you can strengthen the security of your wireless
connection.
• Enable Wired Equivalent Privacy (WEP) encryption of the wireless data
communications.
• Change the factory default SSID setting of the WG511 802.11g Wireless PC
Card.
In addition to the WG511 wireless security features, you should also configure
appropriate LAN network security features such as requiring a user name and
password to access the shared resources in your network.
Netgear strongly recommends that, at a minimum, you configure your wireless
network to use an SSID other than the default setting.The procedures below
identify how to change the SSID and WEP encryption settings of your WG511
802.11g Wireless PC Card.
21
Page 25

Identifying the Wireless Network Name (SSID) and WEP Security Settings
Print this form, fill in the configuration parameters and put it in a safe place for
possible future re fer en ce. For an existing wi re les s network, the person who set up
the network will be able to provide this information.
• Wireless Network Name (SSID): The Service Set Identification (SSID)
identifies the wireless local area network. Wireless is the default WG511
SSID. You may customize it by using up to 32 alphanumeric characters.
Netgear recommends that you wri te y our cust omi zed SS ID on t he l in e bel ow.
Note: The SSID in t he wireless access point is the SSID you configure in the
wireless pc card. For the access point a nd wireless nodes to communicate with
each other, all must be configured with the same SSID.
Wireless network name (SSID): ______________________________
• WEP Security Encryption key : The defau lt WEP enc ryption key nu mber is 1,
and the default key size is 64 bits.
Note: The key number as well as the key value used by both the Wireless
Access Point and wireless nodes must be the same. If they are different, you
will not be able to connect.
WEP Encryption Key Size, circle one: 64 or 128 bits
WEP Encryption Passphrase, if used: ____________________________
A Passphrase is used to automatically generate the WEP hexadecimal
numbers for the key. If the wireless network Access Point uses a Passphrase,
you can also use that here. Otherwise, you will have to manually enter the
hexadecimal numbers.
WEP Hexadecimal Numbers: ______________________________
The WEP Hexadecimal Numbers are nee ded if a Pass phrase is not use d in the
wireless network access point but rather if the key is manually entered.
Use the procedures below to configure basic security settings in the WG511.
22
Page 26

Setting the Wireless Network Name (SSID)
These settings must match the settings of the wire less Access P oint. Follow the
steps below to perform this procedure.
1. Run the Config Utility and select the Configuration tab page.
2. To change the SSID, enter a new SSID.
Note: The characters are case sensitive.
3. Click Apply or OK for the changes to take effect.
Configuring WEP Encryption Security
Following the steps below to perform this procedure.
1. Run the Config Utility and select the Encryption tab page.
2. Select the WEP encryption strength you will use. The choices are:
• 64-bit WEP data encryption
• 128-bit WEP data encryption
Note: Larger encryption keys require more processing and may slow the
communications response times.
3. Check the Create with Passphras e radio button and enter the passphrase. Cli ck
Apply and the configuration utility automatically generates the WEP keys.
Note: The characters are case sensitive. Be sure to use the same passphrase
for all the wireless devices in the network.
If the passphrase method is not available in the other devices, you must
manually enter the keys to match exa ctly what is in the acc ess point and other
802.11b wireless devices.
4. The Default Key setting must match what is set in the access point and the
other 802.11 wireless devices.
5. Click Apply then OK for the changes to take effect.
23
Page 27

Certificate of the Manufacturer/Importer
It is hereby certified that the Model MA401 Wireless PC Card has been suppressed in accordance w ith the
conditions set out in the BMPT- AmtsblVfg 243/1991 and Vfg 46/1992. The operatio n of some equipment (for
example, test transmitters) in accordance with the regulations may, however, be subject to certain restrictions.
Please refer to the notes in the operating in stru ct io ns.
Federal Office for Telecommunications Approvals has been notified of the placing of this equipment on the
market and has been granted the right to test the series for compliance wit h the regulations.
VCCI Statement
This equipment is in the Class B category (information equipment to be used in a re side nt ia l a rea or an adjacent
area thereto) and conforms to the sta ndards set by the Voluntary Control Council for Interference by Data
Processing Equipment and Electronic Office Machines aimed at preventing radio interference in such residential
areas. When used near a radi o or TV receiver, it may become the cause of rad io in terference. Read instructi ons
for correct handling.
Federal Communications Commission (FCC) Compliance Notice: Radio Frequency Notice
This device complies wit h pa rt 15 of the FCC Rules. Operatio n is subject to the following two conditions:
1. This device may not cause harmful interference.
2. This device must accept an y interference received, inc luding interference that ma y ca use undesired
operation.
Note: This equipm ent has been tested and found to compl y wit h th e li m it s for a Cl ass B digital device, pursuant
to part 15 of the FCC Rules. These li mi ts a re designed to provide reasona bl e protection against harmfu l
interference in a residential installation. This equipment gene rates, uses, and can radiate radio fre que ncy energy
and, if not installed and used in acc ordance with the instructions , may cause harmful interferen ce to radio
communications. However, there is no guarantee that interfere nce will not occur in a particular installation. If
this equipment does cause harmful interference to radio or te le vi sio n reception, which can be determ i ned by
turning the equipmen t off and on , th e use r is encouraged to try to corr ec t th e interference by one or more of the
following measures: (1) Reorient or relocate the receiving antenna, (2) Increase t he separation between the
equipment and receiver, (3) Connect the equipment into an ou tlet on a circuit differ ent from that to which the
receiver is connecte d, (4) Consult the dealer or an experienced radio/T V te chnician for help.
Federal Communications Commission (FCC) Radiation Exposure Statement
This equipment complies with FCC radiation exposure limits set forth for an uncontrolled environment. In order
to avoid the possibility of ex ce eding the FCC radio frequenc y exposure limits, human pr oximity to the antenna
shall not be less than 1 inch (2.5 cm) during normal operation.
Canadian Department of Communications Radio Interference Regulations
This digital apparatus (Model MA401 Wireless PC Card) does not exceed the Class B limits for radio-noise
emissions from digital apparatus as set out in the Radio Interference Regulations of the Canadian Department of
Communications.
Page 28

NETGEAR, Inc.
4500 Great America Parkway
Santa Clara, CA 95054 USA
E-mail: support@NETGEAR.com
www.NETGEAR.com
R
 Loading...