

Page 1
Getting StartedGetting Started Operation Status
yyyyyy Overview
Device Display
Get to Know
Your Device
Para la version en español, visite
xxxxxwireless.com/support.
4G LTE Mobile Hotspot
- AC791L
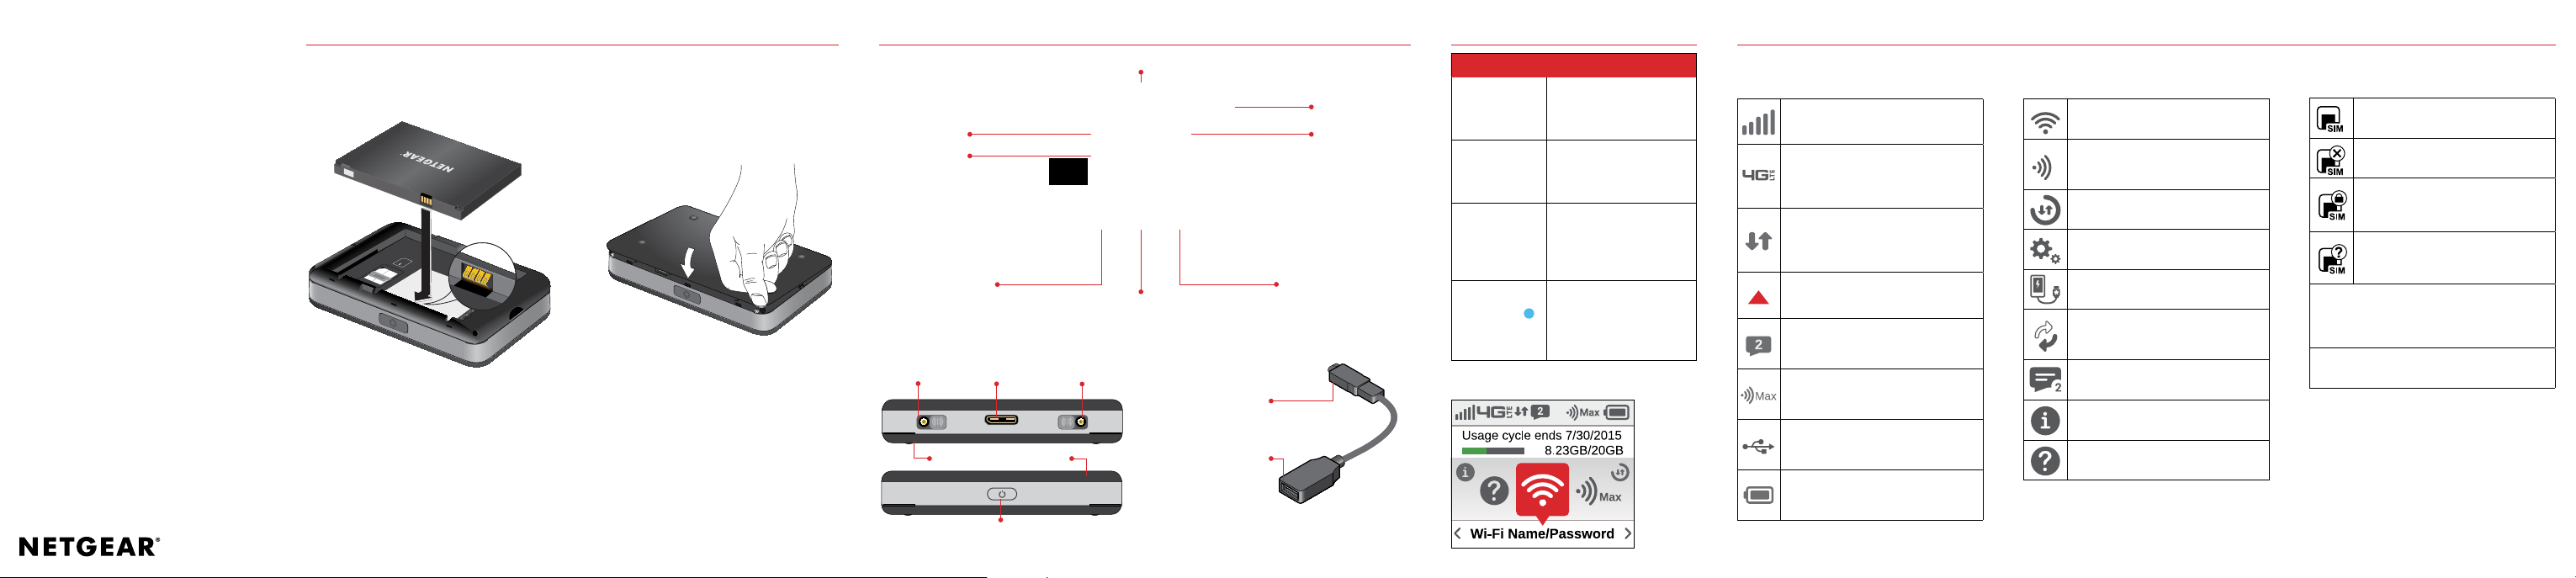
Step 1. Insert the Battery
Align the gold contacts. Press down gently
to secure the battery.
Step 2. Replace the Back Cover
Line up the 2 tabs on the back cover with
the slots at the bottom of the yyyyyyy, and
then press down along the edges to secure
the cover.
Step 3. Power On Your yyyyyyy
Press and hold the Power button for
2 seconds. The display will illuminate.
Home Screen
Display
Data Usage &
Alert Panel
Navigate Left/Up
Selec t Left Option
Accessory
Universal Charging
Port & yyyyyyy
Port
Charge/Tether
Bottom View/Top view
Power Button
Power Button
Selec t Center Option
Accessory
Port
Power
Indicator
Status Bar
Navigate Right/Down
Selec t Right Option
Universal Charging Cable
Connect This End
To yyyyyyy
Connect This
End To Device
USB Cable
WARNING! Use only an approved charger to charge your
yyyyyyy. Improper handling of the charging port, as well as
the use of an incompatible charger, may cause damage to
your device and void the warranty.NOTE: Appearance of device might vary.
Operations Actions
Power On To turn ON, p ress and
hold th e Power but ton
for 2 seconds.
Power Off To turn OFF, press and
hold the Power button
for 3 seconds.
Display
Wake-Up
Power
Indicator
When the display is on,
the first quick press of
the Power button puts
the display to sleep.
When the yyyyyyy is
powered on, the Power
indicator light will
blink.
Home Screen
Display Indicators
STATUS ICONS
Network Signal Strength
Indicator
Network Technology
Indicator displays when you
are con nected to t he 4G LTE
network.
Activity Indicator appears
when d ata is being transferred
between the Xxxxx network
and your yyyyyyy.
Roaming indicator appears
when y ou are roaming.
Messages Indicator appears
when y ou have unrea d Xxxxx
system messages.
Connected Device Indicator
displays the number of devices
connected to your yyyyyyy.
Tethered Mode Indicator
displays when your yyyyyyy has
a tethered connection.
Battery Indicator displays the
remaining battery charge and
battery charging status.
CAROUSEL ICONS
Wi-F i — View Wi-Fi Na me/
Password.
Connected Devices — View
currently connected/blocked
5
device details.
Data Usage — View data usage
and billing cycle de tails.
Settings — View/change basic
yyyyyyy and Wi-Fi settings.
Universal Charging — Displays
universal charging status.
Software Update — Vie w
current software version and
check for updates.
Messages — View/delete
system messages.
About yyyyyyy — Displays
device details/Internet status.
Help — Displays Help , Tips, and
Advanced features.
SIM ICONS
Ready — A SIM card is in stalled
and your device is ready to use.
No SIM — Th e device does not
detec t a SIM.
SIM Locked — Yo u must enter
a PIN to unlock th e SIM and use
the device.
SIM Erro r — The device canno t
read the SIM th at is installe d.
SIM Blocked — The wrong PI N was
entered too m any times. C ontact
custo mer serv ice to get the code to
unblo ck the SIM.
SIM Rejected — The device can read
the SIM , but the network reje cts it.
Page 2
Using Your yyyyyyy
System Requirements
Your compu ter, tablet, or ot her wireless
devices need Wi-Fi capa bility and In ternet
browser software only.
Your yyyy yyy is co mpatible with all m ajor
operating systems an d the latest ve rsions
of browsers.
Wi-Fi Name/Password Menu
You can view your yyyyyyy’s Wi-Fi name
(SSID) and password using the following
steps.
1. Power on your yyyyyyy by pressing
and holding t he Power but ton for 2
seconds.
2. Open the Wi-Fi Name/Password
menu .
Connecting to the Internet
1. Power on the yyyyyyy.
2. Open t he Wi-Fi application or co ntrols
on the computer or Wi-Fi–capable
device you wan t to connec t to the
yyyyyyy and find the Wi-Fi network
(SSID) named “Xxxxxx-791L-XXXX.”
3. Selec t Connect and ente r the Wi-Fi
password . Your Wi-Fi–capable device
is now co nnected t o the Inter net.
Resetting Your yyyyyyy
To restore your yyyyyyy to its factory
settings, follow the steps below:
1. Verify the yyyyyyy is powered on.
2. Open t he Settin gs menu and s elect
the Fac tory Rese t option. Follow the
prompts.
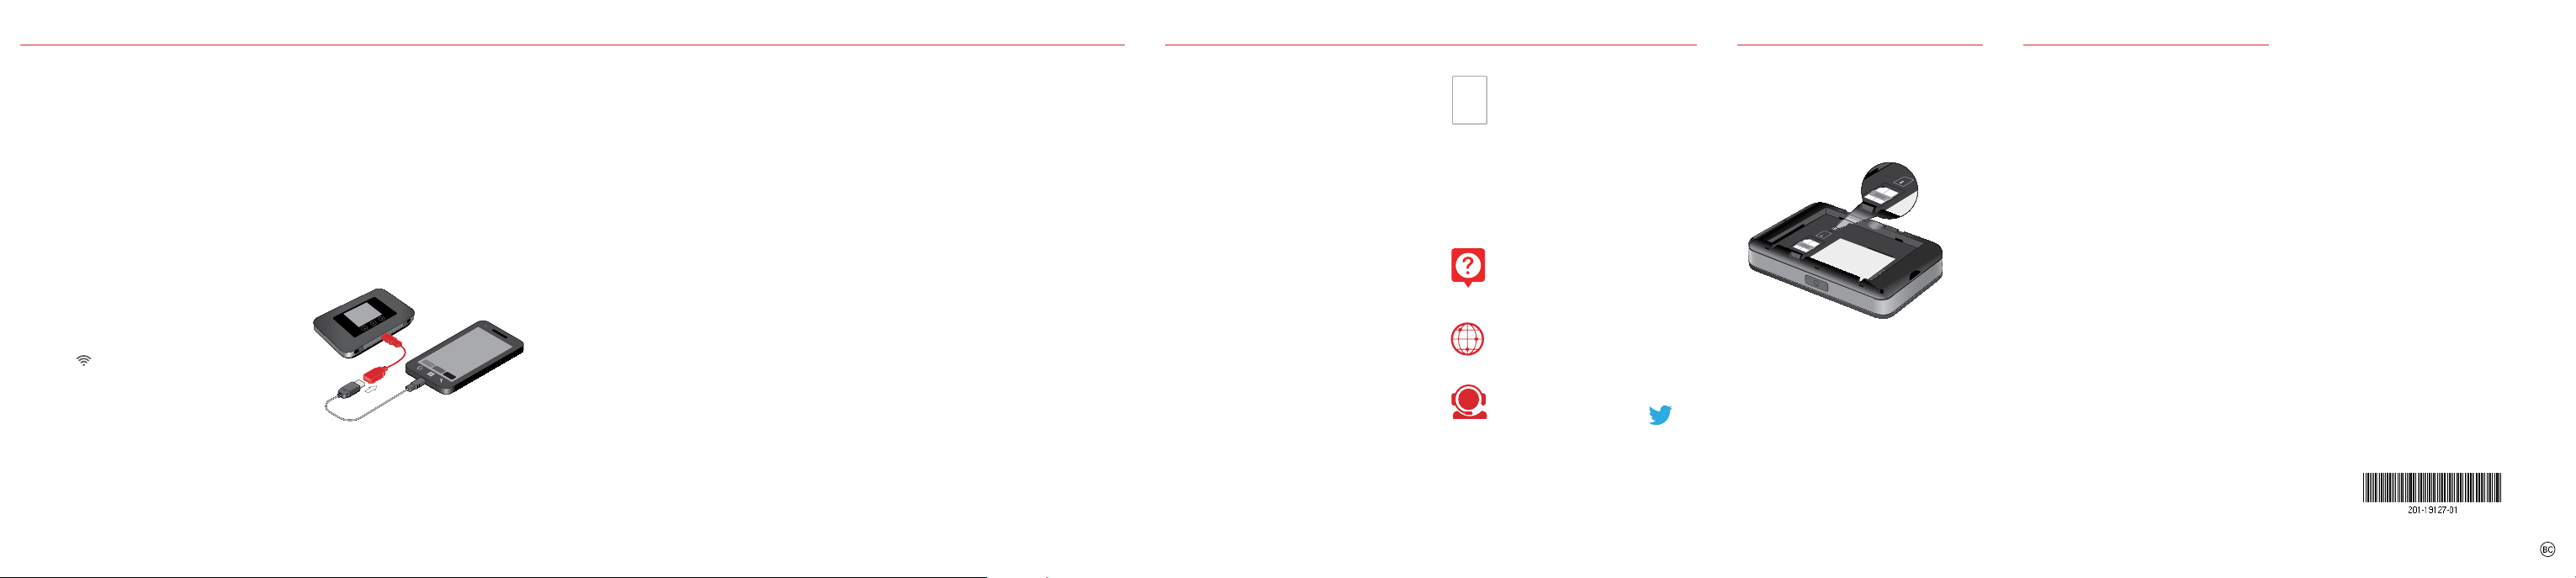
Universal Charging
The universal charging cable allows you to
charge other devices with your yyyyyyy
such as smartphones, to keep them
powered and connected longer.
1
2
To charge an external device using the
Universal Charging feature:
1. Verify the yyyyyyy is powered on.
Connect t he universal chargin g cable
to the yyyyyyy.
2. Connect t he other end o f the charg ing
cable to a USB cable, th en connec t
the ot her end of the USB cable to th e
device you wish to cha rge.
3. Selec t your charging p reference :
Continuo us or Timed Ch arge.
Accessing Advanced Settings
To access advanced settings and manage
the yyyyyyy, sign in to the yyyyyyy Admin
website using the following steps:
1. Connect your Wi-Fi–capable device to
the yyyyyyy using the steps outlined
in the Co nnectin g to the Inter net
section.
2. Open a Web browser on yo ur
connecte d device and en ter
http://my.yyyyyyy or
http://192.168.1.1.
Some compu ters will only accept the
IP addr ess to connect to the yy yyy yy
Admin website.
3. Sign in with the yyyyyyy Admin
password.
1. Verify the yyyyyyy is powered on.
2. Open t he yyyyyyy Admin website
optio n in the Help menu to vie w
the Admin password.
Important: The default Admin password
is the same as the default Wi-Fi password.
To change either password, sign in to the
yyyyyyy Admin website (see Accessing
Advanced Settings).
Managing Wi-Fi Networks
and Connections
When connected to the 4G LTE network,
the default settings allow 15 Wi-Fi–capable
devices to connect wirelessly to the
primary network, one Wi-Fi–capable device
to connect wirelessly to the guest network,
and one additional tethered device via USB.
The guest network is turned off on initial
start-up. To use the guest network, you
must turn it on in the Wi-Fi option of the
Settings menu.
To change the number of devices that can
connect to either network, follow the steps
below:
1. Sign in to the yyyyyyy Admin website
and select yyyyyyy Settings > Wi-Fi .
2. Choos e a Wi-Fi prof ile and then
expand the Options.
Monitoring Data Usage
You can monitor your yyyyyyy data usage
and set up usage alerts through your My
Xxxxx account. You can also see current
usage details on your yyyyyyy Home screen
or by scrolling to the Data Usage icon and
opening the menu item.
Support & More
User Guide
To download a User Guide go to
xxxxxxwireless.com/support and
find your device. To access the User
Guide from the yyyyyyy Admin
website, select My yyyyyyy Home
and select the Device Support
Page & User Guide link under Help
& Support.
Get Help Using Your yyyyyyy
View Help content right from your
yyyyyyy.
Customer Service
Web
http://xxxxxxwireless.com/
Support.
Call (800) 922-0204.
Follow us @xxxSupport.
SIM Card Access
A SIM card is preinstalled in your yyyyyyy.
If you need to replace your SIM card,
remove the back cover and battery then
gently push the SIM card out of SIM slot.
Customer Information
Your Wireless Device
and Third Party Services
Xxxxxx Wireless is the mobile carrier
associated with this wireless device,
but many services and features offered
through this wireless device are provided
by or in conjunction with third parties.
Xxxxxx Wireless is not responsible for
your use of this wireless device or any
non–Xxxxx Wireless applications, services
and products including any personal
information you choose to use, submit or
share with others. It is recommended that
you use the available encryption options
for added security when provisioning
your device for use as a Wi-Fi gateway.
See your user manual for details. Specific
third party terms and conditions, terms
of use, and privacy policies shall apply.
Please review carefully all applicable terms
and conditions and policies prior to using
this wireless device and any associated
application, product or service.
Quality One part no. wwwwwww
 Loading...