

Support
Thank you for purchasing this NETGEAR product.
Aer installing your device, locate the serial number on the label of your product and use it to
register your product at https://my.netgear.com.
You must register your product before you can use NETGEAR telephone support. NETGEAR
recommends registering your product through the NETGEAR website.
For product updates and web support, visit http://support.netgear.com.
NETGEAR recommends that you use only the ocial NETGEAR support resources.
You can get the user manual online at http://downloadcenter.netgear.com or through a link in
the product’s user interface.
Quick Start
Nighthawk X4
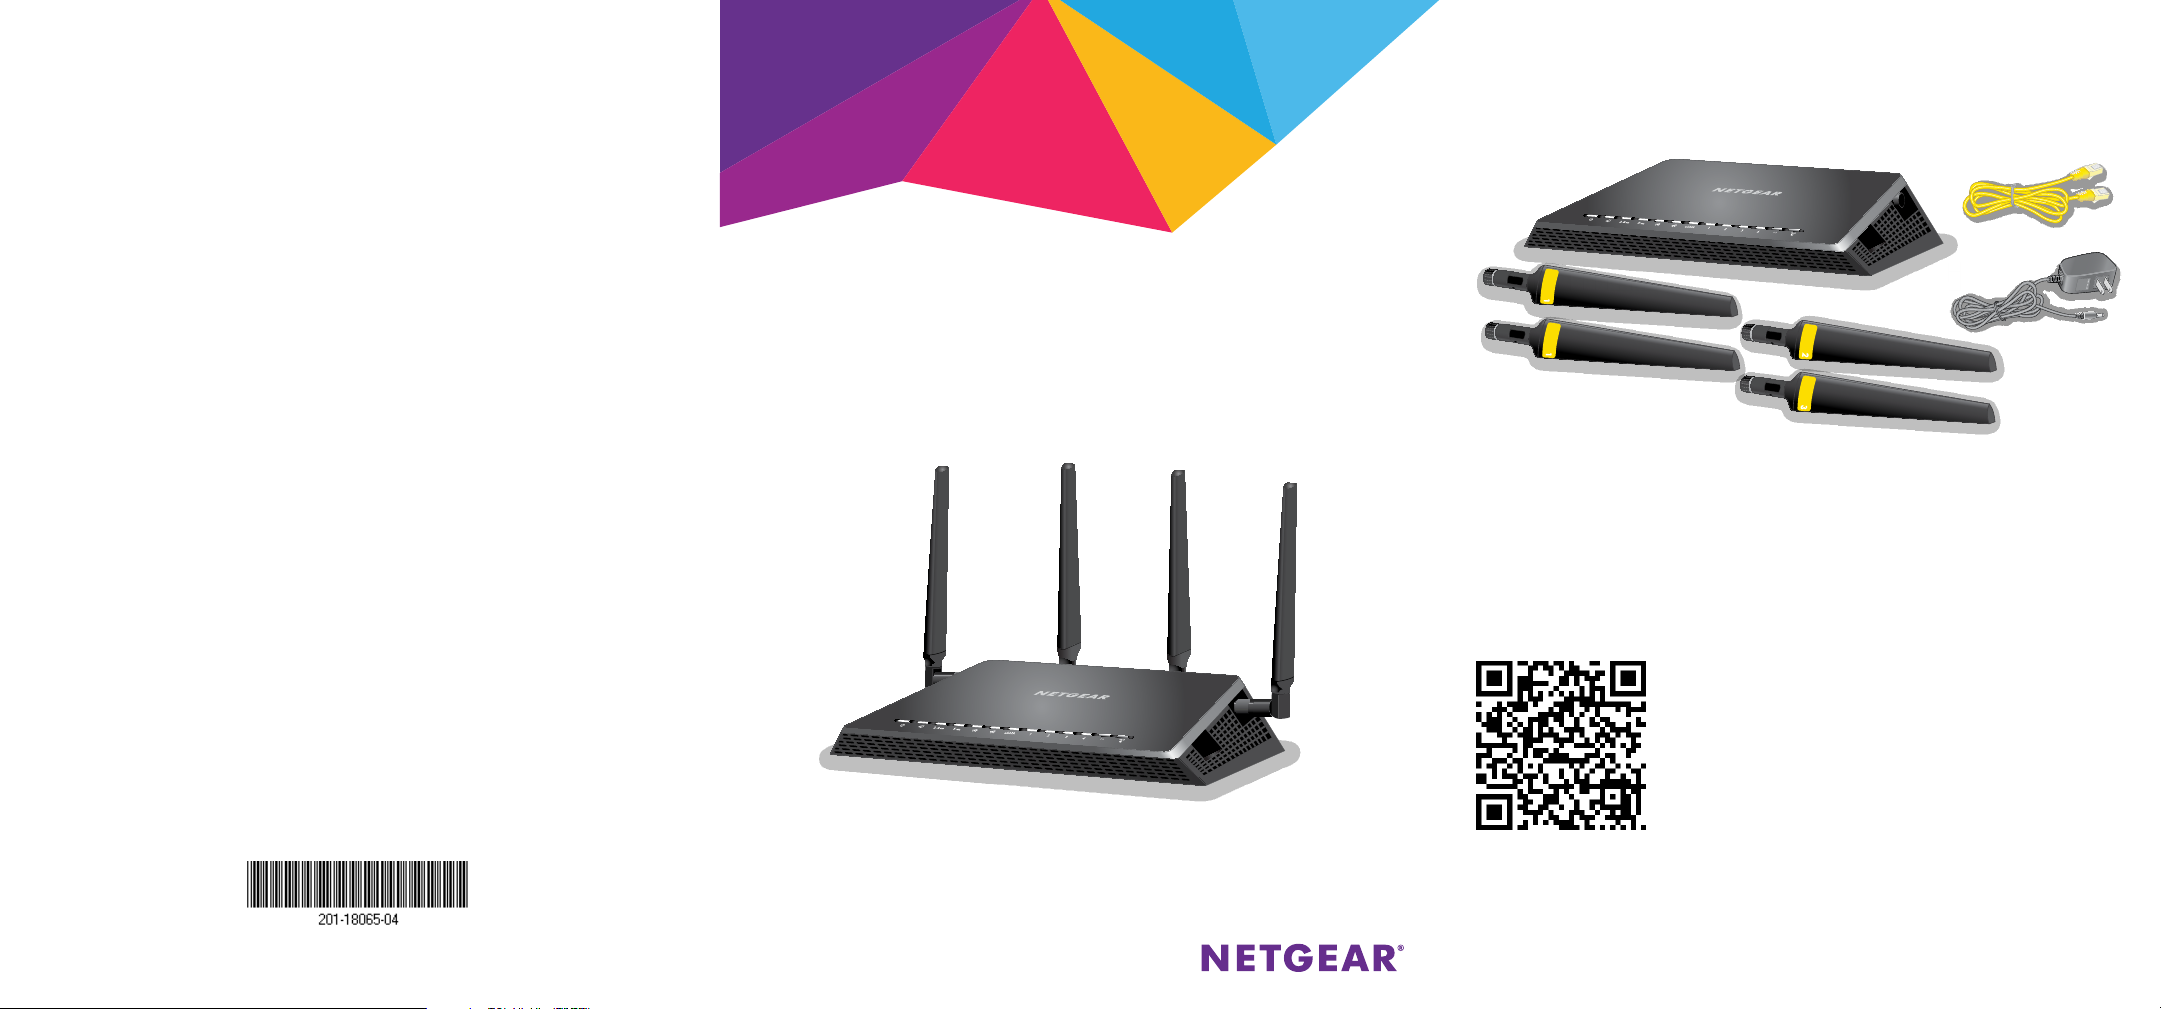
Package Contents
The box contains the following items.
AC2350 Smart WiFi Router
Ethernet cable
Trademarks
NETGEAR, the NETGEAR logo, and Connect with Innovation are trademarks and/or registered
trademarks of NETGEAR, Inc. and/or its subsidiaries in the United States and/or other
countries. Information is subject to change without notice. © NETGEAR, Inc. All rights
reserved.
Compliance
For the current EU Declaration of Conformity, visit:
http://support.netgear.com/app/answers/detail/a_id/11621/.
For regulatory compliance information, visit:
http://www.netgear.com/about/regulatory/.
See the regulatory compliance document before connecting the power supply.
NETGEAR, Inc.
350 East Plumeria Drive
San Jose, CA 95134 USA
AC2350 Smart WiFi Router
Model R7500
Power adapter
Antennas (4)
In some regions, a resource CD is included in the package.
Installation Video
To view the Nighthawk installation video, visit
http://www.netgear.com/R7500_vid1
or use this QR code:
October 2014
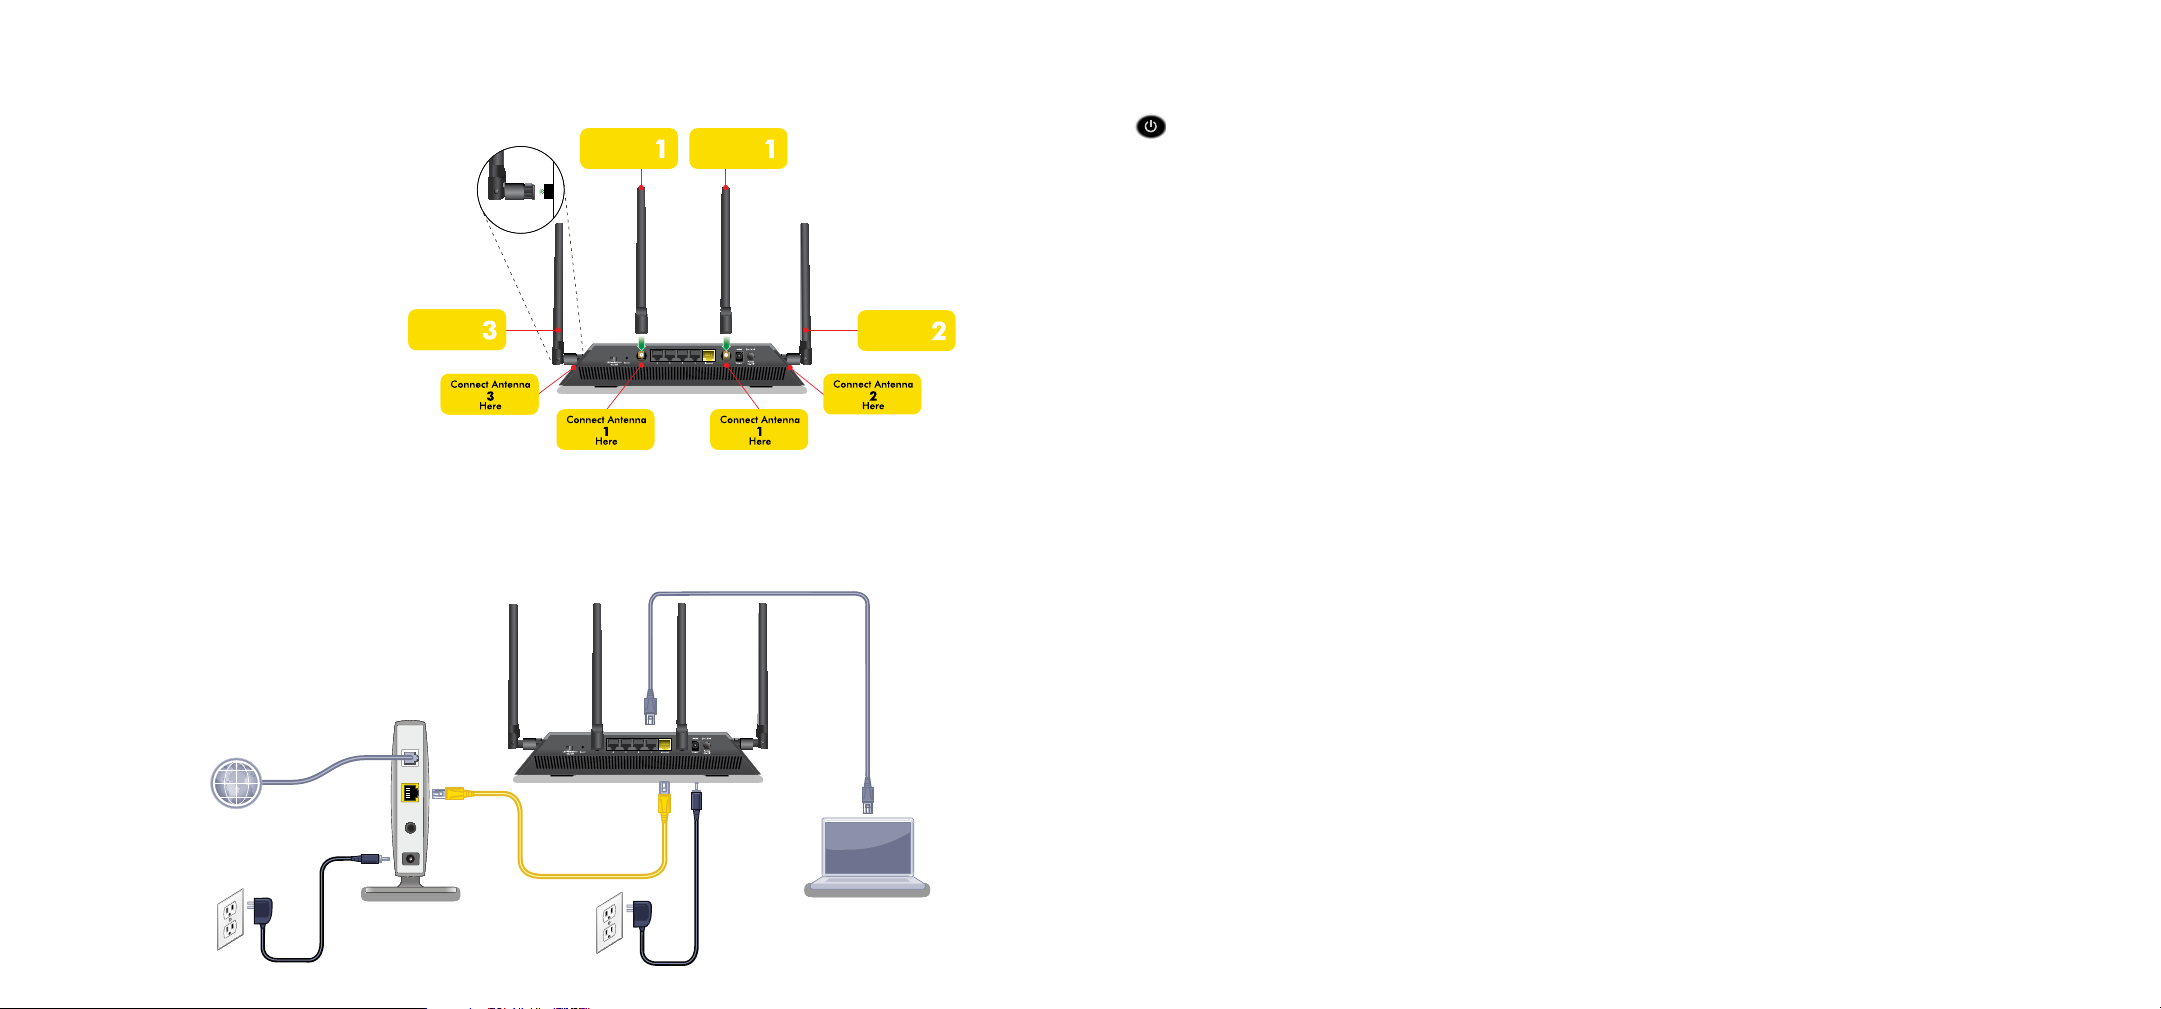
You can use this diagram to connect your router or follow the detailed instructions in this booklet.
1. Attach the antennas.
To determine where to attach the
antennas, match the labels on the
antennas with the labels on the
router.
Attach the antennas on the threaded
antenna posts.
Position the antennas for the best
WiFi performance.
NETGEAR recommends that you
position all of the antennas vertically,
as shown.
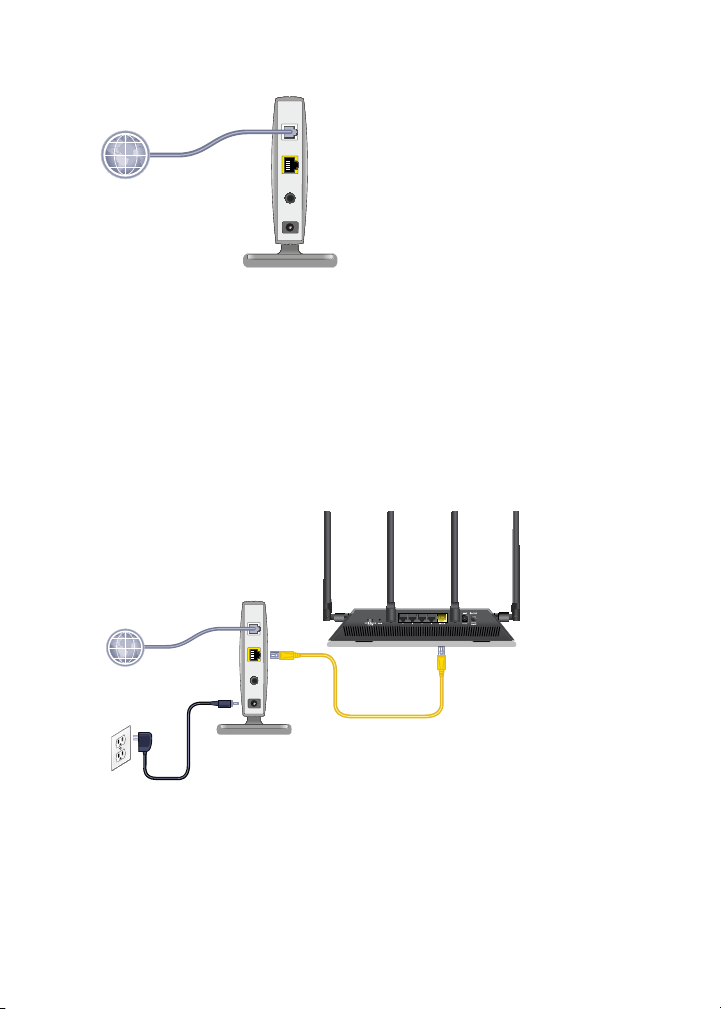
2. Prepare your modem.
Unplug your modem’s power. If it has a battery
backup, remove the battery.
3. Connect your modem.
Plug in your modem. Put the battery back
in. Then cable the modem to the yellow
Internet port on the router.
Internet
DSL or cable
Modem
Router
Ethernet cable
Ethernet cable
Power
adapter
4. Power on the router.
The Power LED
lights amber and then
turns white when the router is ready.
5. Connect a computer.
You can use an Ethernet cable or connect
with WiFi.
To connect with WiFi, use the WiFi network
name and password on the product label.
6. Log in to the router.
Launch a web browser.
NETGEAR genie displays.
If you do not see genie, enter
www.routerlogin.net in the address field
of the web browser. When prompted, enter
admin for the user name and password for
the password.
Follow the genie steps to connect to the
Internet.
7. Get the genie app.
Download the free genie app from
www.NETGEAR.com/genie.
Easily share media, files, and printers on the
network from your smartphone, tablet, or
laptop.
8. Get the user manual.
You can get the user manual online at
http://downloadcenter.netgear.com or
through a link in the product’s user interface.
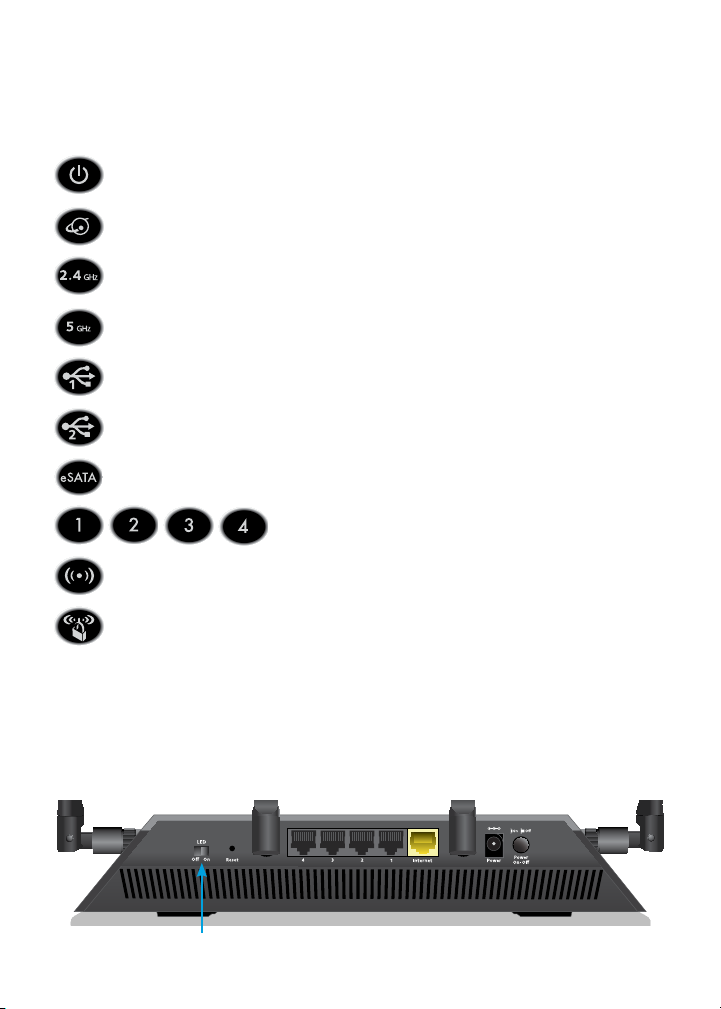
LEDs
The LEDs on the top of the router light to indicate router activity:
Power
Internet
2.4 GHz WiFi
5 GHz WiFi
USB 3.0 port 1
USB 3.0 port 2
eSATA port
Ethernet ports 1–4
WiFi On/O button with LED
WPS button with LED
You can use the LED O/On switch on the rear panel of the router
to turn the LEDs on the top of the router on or o.
Note: The Power LED stays lit even if the LED O/On switch is in the o
position.
LED O/On switch
1
Install Your Router
Make sure that your Internet service is active before you install
your router.
¾ To install your router:
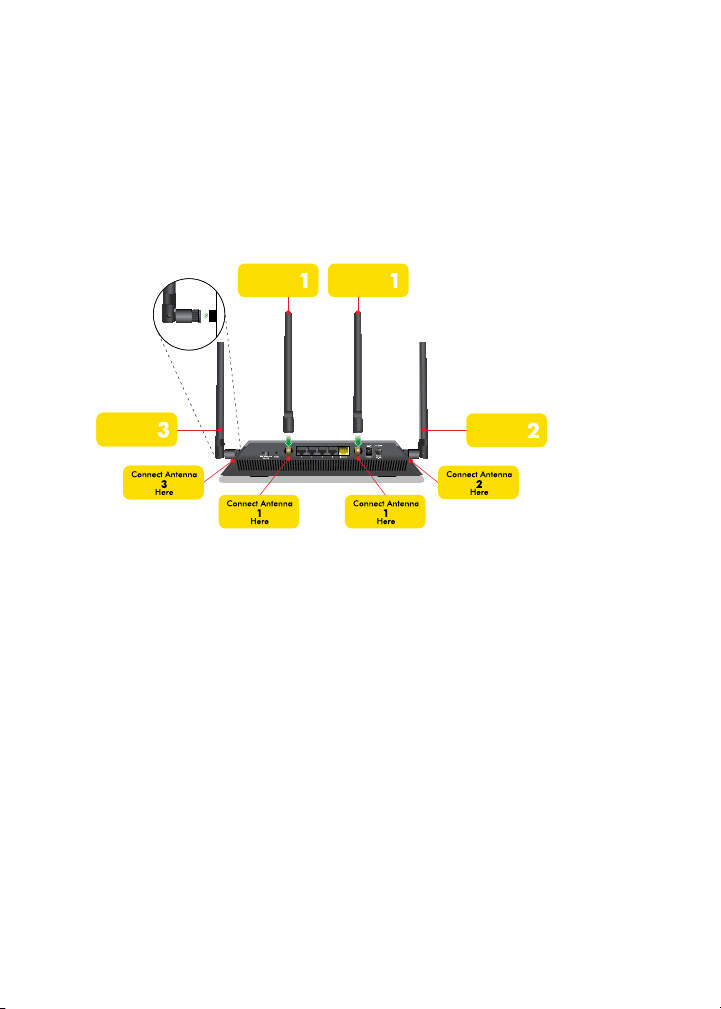
1. Attach the antennas.
a. To determine where to attach the antennas, match the
labels on the antennas with the labels on the router.
b. Align the antennas with the antenna posts on the router.
c. Attach the antennas on the threaded antenna posts.
d. Position the antennas for the best WiFi performance.
NETGEAR recommends that you position all of the antennas
vertically, as shown.
2
2. Prepare your modem.
Internet
DSL or cable
Modem
a. Unplug your modem’s power.
b. If the modem has a battery backup, remove its batteries.
c. If your modem was already connected to another router,
disconnect the cable between your modem and that router.
Make sure that your modem is turned o and is cabled only to
the wall jack for your Internet service.
3. Connect your modem.
Internet
DSL or
cable
Modem
Router
Ethernet cable
a. Plug in, then turn on your modem.
b. If you removed the batteries, replace them.
c. With the yellow Ethernet cable that came with the router,
connect your modem to the yellow Internet port on your
router.
3
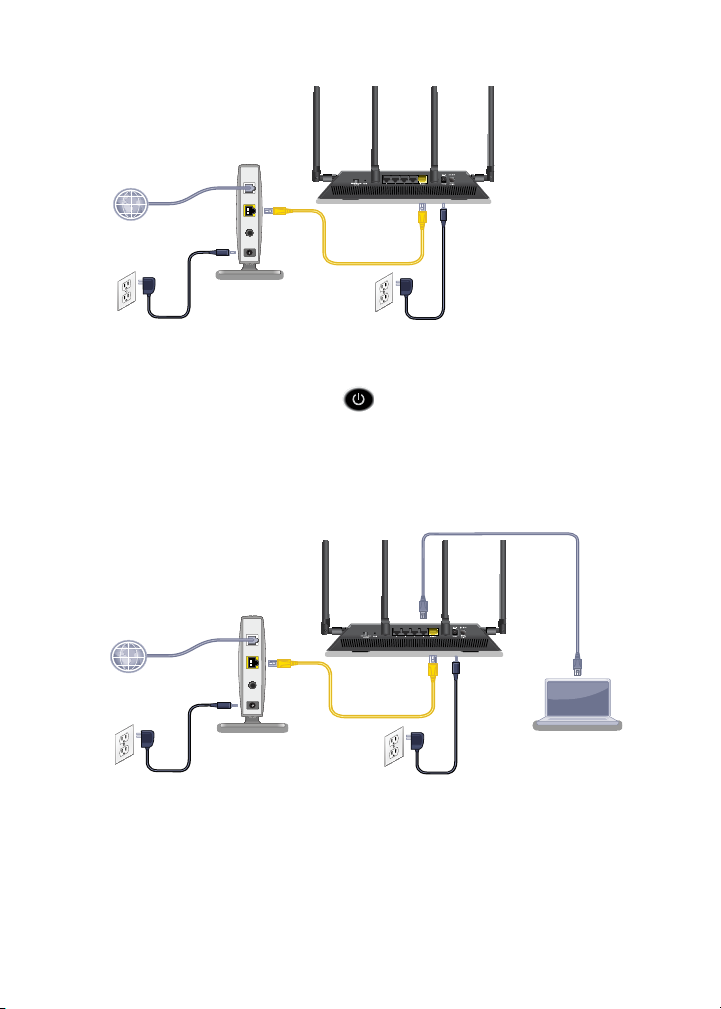
4. Add power to the router.
Internet
DSL or
cable
Ethernet
cable
Modem
Router
Power adapter
a. Connect the power adapter to the router and plug the
power adapter into an outlet.
b. Wait for the Power LED
on the front panel to light
amber and turn white.
If no LEDs are lit, press the Power On/O button on the
rear panel of the router.
5. Connect a computer.
Internet
DSL or
cable
Ethernet
cable
Modem
Router
Power adapter
You can use an Ethernet cable or connect with WiFi:
Ethernet
cable
• For a wired connection, use an Ethernet cable (not included)
to connect your computer to a black Ethernet port on your
router.
• To connect with WiFi, use the WiFi settings on the product
label.
4

6. Launch a web browser.
The first time that you connect to the router, the genie screen
displays. Follow the genie steps to connect to the Internet.
If the genie screen does not display, try the following:
• Close and reopen the browser.
• Make sure that your computer is connected to one of the
four black LAN Ethernet ports on the router, or that you are
connected to your WiFi network.
• Make sure that the router has full power, and that its Power
LED
is lit.
• If your computer is set to a static or fixed IP address (this is
uncommon), change it to obtain an IP address automatically
from the router.
If you still do not see the genie screen, log in to the router so
that genie can detect your Internet connection.
¾ To log in to the router:
1. Launch a web browser.
2. Enter www.routerlogin.net in the address field of the
browser.
A login screen displays.
3. Enter admin for the user name and password for the
password.
The BASIC Home screen displays. If your Internet connection
is not set up yet, genie automatically detects your Internet
connection.
5
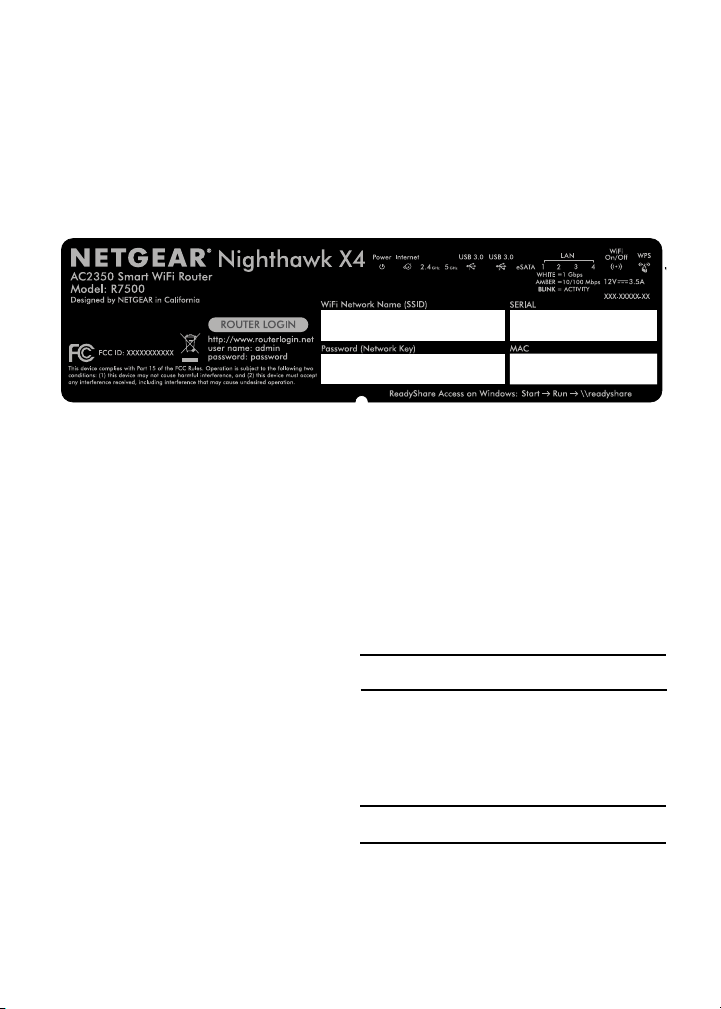
WiFi Network Name and Password
The preset WiFi network name (SSID) and password (network key)
are unique to your router, like a serial number. Because the router
automatically uses WiFi security, you don’t need to set it up. The
WiFi settings are on the product label.
NETGEAR recommends that you use the preset WiFi settings
because you can check the product label if you forget them.
NETGEAR genie lets you change these settings. If you do so, write
down the new WiFi settings and store them in a safe place.
You can write the WiFi settings from your product label in this space
for easy reference.
WiFi network name (SSID):
Network key (password):
If you change the WiFi settings, write the new settings here for
easy reference and store this booklet in a safe place.
WiFi network name (SSID):
Network key (password):
6
 Loading...