

Page 1

ADSL2+ Gateway
DRAFT
Model D2200D-1FRNAS
User Manual
May 2015
202-11541-01
350 East Plumeria Drive
San Jose, CA 95134
USA
Page 2

ADSL2+ Gateway
DRAFT
Support
Thank you for selecting NETGEAR products.
Contact your Internet service provider for technical support.
Trademarks
© NETGEAR, Inc., NETGEAR and the NETGEAR logo are trademarks of NETGEAR, Inc. Any non-NETGEAR trademarks are
used for reference purposes only.
Compliance
For regulatory compliance information, visit http://www.netgear.com/about/regulatory/.
See the regulatory compliance document before connecting the power supply.
2
Page 3

Contents
DRAFT
Chapter 1 Hardware Setup
Chapter 2 Connect to the Network and Access the Gateway
Chapter 3 Specify Your Internet Settings
Unpack Your Gateway. . . . . . . . . . . . . . . . . . . . . . . . . . . . . . . . . . . . . . . . . . . . . . . . . 7
Front and Top Panel. . . . . . . . . . . . . . . . . . . . . . . . . . . . . . . . . . . . . . . . . . . . . . . . . . . 7
Rear Panel. . . . . . . . . . . . . . . . . . . . . . . . . . . . . . . . . . . . . . . . . . . . . . . . . . . . . . . . . . . 8
Position Your Gateway . . . . . . . . . . . . . . . . . . . . . . . . . . . . . . . . . . . . . . . . . . . . . . . . 9
Cable Your Gateway . . . . . . . . . . . . . . . . . . . . . . . . . . . . . . . . . . . . . . . . . . . . . . . . . 10
Connect to the Network. . . . . . . . . . . . . . . . . . . . . . . . . . . . . . . . . . . . . . . . . . . . . . 12
Wired Connection . . . . . . . . . . . . . . . . . . . . . . . . . . . . . . . . . . . . . . . . . . . . . . . . . 12
WiFi Connection . . . . . . . . . . . . . . . . . . . . . . . . . . . . . . . . . . . . . . . . . . . . . . . . . . 12
Label . . . . . . . . . . . . . . . . . . . . . . . . . . . . . . . . . . . . . . . . . . . . . . . . . . . . . . . . . . . . 13
Types of Logins . . . . . . . . . . . . . . . . . . . . . . . . . . . . . . . . . . . . . . . . . . . . . . . . . . . . . 13
Log In to the Gateway . . . . . . . . . . . . . . . . . . . . . . . . . . . . . . . . . . . . . . . . . . . . . . . 13
Use Auto Configuration to Set Up Your Internet Connection . . . . . . . . . . . . . . . 16
Rerun the Setup Wizard . . . . . . . . . . . . . . . . . . . . . . . . . . . . . . . . . . . . . . . . . . . . . . 16
Chapter 4 Control Access to the Internet
Set General Firewall Settings . . . . . . . . . . . . . . . . . . . . . . . . . . . . . . . . . . . . . . . . . . 19
Set Up Custom Firewall Rules . . . . . . . . . . . . . . . . . . . . . . . . . . . . . . . . . . . . . . . . . 20
View the Security Log. . . . . . . . . . . . . . . . . . . . . . . . . . . . . . . . . . . . . . . . . . . . . . . . 21
Port Forwarding Overview . . . . . . . . . . . . . . . . . . . . . . . . . . . . . . . . . . . . . . . . . . . 22
Port Forwarding to Permit External Host Communications . . . . . . . . . . . . . . 23
Set Up Port Forwarding to Local Servers . . . . . . . . . . . . . . . . . . . . . . . . . . . . . 24
Add a Port Forwarding Rule . . . . . . . . . . . . . . . . . . . . . . . . . . . . . . . . . . . . . . . . . . . 24
Add or Edit a Port Forwarding Profile . . . . . . . . . . . . . . . . . . . . . . . . . . . . . . . . . . 25
Set Up a Default DMZ Host . . . . . . . . . . . . . . . . . . . . . . . . . . . . . . . . . . . . . . . . . . . 26
Set Up Static NAT . . . . . . . . . . . . . . . . . . . . . . . . . . . . . . . . . . . . . . . . . . . . . . . . . . . 28
Set Up Remote Management. . . . . . . . . . . . . . . . . . . . . . . . . . . . . . . . . . . . . . . . . . 29
Specify ALG Settings . . . . . . . . . . . . . . . . . . . . . . . . . . . . . . . . . . . . . . . . . . . . . . . . 30
Chapter 5 Specify Network Settings
View Network Computers and Devices . . . . . . . . . . . . . . . . . . . . . . . . . . . . . . . . . 32
Specify the IP Addresses that the Gateway Assigns . . . . . . . . . . . . . . . . . . . . . . 32
Disable the DHCP Server Feature in the Gateway . . . . . . . . . . . . . . . . . . . . . . . . 33
3
Page 4

ADSL2+ Gateway
DRAFT
Specify Private LAN Settings . . . . . . . . . . . . . . . . . . . . . . . . . . . . . . . . . . . . . . . 35
Specify Public LAN Settings . . . . . . . . . . . . . . . . . . . . . . . . . . . . . . . . . . . . . . . . 36
Reserve LAN IP Addresses. . . . . . . . . . . . . . . . . . . . . . . . . . . . . . . . . . . . . . . . . . 37
RIP Configuration . . . . . . . . . . . . . . . . . . . . . . . . . . . . . . . . . . . . . . . . . . . . . . . . . 38
Enable or Disable Multicast IGMP Proxy . . . . . . . . . . . . . . . . . . . . . . . . . . . . . . 39
View the Routing Table. . . . . . . . . . . . . . . . . . . . . . . . . . . . . . . . . . . . . . . . . . . . . 40
Improve Network Connections with Universal Plug and Play . . . . . . . . . . . . . . . 41
Specify Basic WiFi Settings . . . . . . . . . . . . . . . . . . . . . . . . . . . . . . . . . . . . . . . . . . . 41
Change the WiFi Security Settings . . . . . . . . . . . . . . . . . . . . . . . . . . . . . . . . . . . . . 44
Create a Hidden Wireless Network . . . . . . . . . . . . . . . . . . . . . . . . . . . . . . . . . . . . . 45
Restrict Wireless Access by MAC Address. . . . . . . . . . . . . . . . . . . . . . . . . . . . . . . 46
Set Up a Guest Network. . . . . . . . . . . . . . . . . . . . . . . . . . . . . . . . . . . . . . . . . . . . . . 47
WPS Overview. . . . . . . . . . . . . . . . . . . . . . . . . . . . . . . . . . . . . . . . . . . . . . . . . . . . . . 49
Enable WPS Simple Config . . . . . . . . . . . . . . . . . . . . . . . . . . . . . . . . . . . . . . . . . 49
Connect Using WPS . . . . . . . . . . . . . . . . . . . . . . . . . . . . . . . . . . . . . . . . . . . . . . . 49
Control the Wireless Radios . . . . . . . . . . . . . . . . . . . . . . . . . . . . . . . . . . . . . . . . . . . 50
Quality of Service . . . . . . . . . . . . . . . . . . . . . . . . . . . . . . . . . . . . . . . . . . . . . . . . . . . 51
Enable QoS. . . . . . . . . . . . . . . . . . . . . . . . . . . . . . . . . . . . . . . . . . . . . . . . . . . . . . . 51
Manage QoS Rules and Filters. . . . . . . . . . . . . . . . . . . . . . . . . . . . . . . . . . . . . . . 52
Add a Queue . . . . . . . . . . . . . . . . . . . . . . . . . . . . . . . . . . . . . . . . . . . . . . . . . . . . . 53
Change the Wireless Mode . . . . . . . . . . . . . . . . . . . . . . . . . . . . . . . . . . . . . . . . . . . 54
Chapter 6 Manage Your Network
Change the admin Password . . . . . . . . . . . . . . . . . . . . . . . . . . . . . . . . . . . . . . . . . . 57
View Gateway Status . . . . . . . . . . . . . . . . . . . . . . . . . . . . . . . . . . . . . . . . . . . . . . . . 57
View Advanced Status . . . . . . . . . . . . . . . . . . . . . . . . . . . . . . . . . . . . . . . . . . . . . . . 58
View the Ethernet Status. . . . . . . . . . . . . . . . . . . . . . . . . . . . . . . . . . . . . . . . . . . 59
View the ATM Status . . . . . . . . . . . . . . . . . . . . . . . . . . . . . . . . . . . . . . . . . . . . . . 60
View the DSL Status. . . . . . . . . . . . . . . . . . . . . . . . . . . . . . . . . . . . . . . . . . . . . . . 61
View the ADSL Status. . . . . . . . . . . . . . . . . . . . . . . . . . . . . . . . . . . . . . . . . . . . . . 62
View the Wireless Status . . . . . . . . . . . . . . . . . . . . . . . . . . . . . . . . . . . . . . . . . . . 63
Upgrade the Firmware . . . . . . . . . . . . . . . . . . . . . . . . . . . . . . . . . . . . . . . . . . . . . . . 63
Upgrade Firmware from the Internet. . . . . . . . . . . . . . . . . . . . . . . . . . . . . . . . . 64
Upgrade Firmware from a Computer. . . . . . . . . . . . . . . . . . . . . . . . . . . . . . . . . 65
Run the Ping Utility . . . . . . . . . . . . . . . . . . . . . . . . . . . . . . . . . . . . . . . . . . . . . . . . . . 67
Run the Traceroute Utility . . . . . . . . . . . . . . . . . . . . . . . . . . . . . . . . . . . . . . . . . . . . 68
View Devices Currently on the Network . . . . . . . . . . . . . . . . . . . . . . . . . . . . . . . . 69
Manage the Gateway Configuration File . . . . . . . . . . . . . . . . . . . . . . . . . . . . . . . . 69
Save the Configuration Settings. . . . . . . . . . . . . . . . . . . . . . . . . . . . . . . . . . . . . 69
Load Configuration Settings . . . . . . . . . . . . . . . . . . . . . . . . . . . . . . . . . . . . . . . . 70
Restore the Factory Settings . . . . . . . . . . . . . . . . . . . . . . . . . . . . . . . . . . . . . . . . . . 71
Dynamic DNS . . . . . . . . . . . . . . . . . . . . . . . . . . . . . . . . . . . . . . . . . . . . . . . . . . . . . . . 72
Specify a DNS Account . . . . . . . . . . . . . . . . . . . . . . . . . . . . . . . . . . . . . . . . . . . . 72
Specify a DNS Server . . . . . . . . . . . . . . . . . . . . . . . . . . . . . . . . . . . . . . . . . . . . . . 73
Specify the Date and Time Settings . . . . . . . . . . . . . . . . . . . . . . . . . . . . . . . . . . . . 74
Reboot the Gateway . . . . . . . . . . . . . . . . . . . . . . . . . . . . . . . . . . . . . . . . . . . . . . . . . 75
Specify the VPN Pass-Through Method . . . . . . . . . . . . . . . . . . . . . . . . . . . . . . . . 76
4
Page 5

ADSL2+ Gateway
DRAFT
Appendix A Supplemental Information
Factory Settings. . . . . . . . . . . . . . . . . . . . . . . . . . . . . . . . . . . . . . . . . . . . . . . . . . . . . 78
Technical Specifications . . . . . . . . . . . . . . . . . . . . . . . . . . . . . . . . . . . . . . . . . . . . . . 79
Appendix B Wall-Mount the Gateway
5
Page 6

1. Hardware Setup
DRAFT
This chapter covers the following topics:
• Unpack Your Gateway
• Front and Top Panel
• Rear Panel
• Position Your Gateway
• Cable Your Gateway
1
6
Page 7

Unpack Your Gateway
DRAFT
Your package contains the following items.
ADSL2+ Gateway
Gateway
Phone cable
Figure 1. Package contents
Front and Top Panel
The gateway has status LEDs.
Power adapter
Ethernet cable
POWER
E1, E2, E3, E4
INTERNET
DSL
WIRELESS
Figure 2. Gateway front and side view
Hardware Setup
7
Page 8

ADSL2+ Gateway
DRAFT
You can use the LEDs to verify status and connections. The following table lists and
describes each LED and button on the front panel of the gateway.
LED Description
POWER
• Green. Power is supplied to the gateway.
• Off. No power is supplied to the gateway.
E1, E2, E3, E4
WIRELESS
DSL
INTERNET
• Green. A powered-on device is connected to this Ethernet port.
• Off. No device is connected to this Ethernet port.
• Green. The wireless radio is on.
• Off. The wireless
• Green. The gateway has a DSL connection.
• Slow blinking green. The gateway
• Fast blinking green. The gateway found the signal and is performing negotiation and
handshaking.
• Off
.
The gateway does not have a DSL connection.
• Solid blue. The gateway is online.
• Blinking blue. The gateway
• Off. The gateway
radio is off.
is looking for a signal.
is sending or receiving Internet traffic.
is offline.
Rear Panel
The rear panel has the connections and button shown the following figure.
Figure 3. Gateway rear panel
button
Hardware Setup
8
On/Off
button
PowerEthernet LAN ports PowerResetDSL port
adapter
input
Page 9

ADSL2+ Gateway
DRAFT
Position Your Gateway
The gateway lets you access your network anywhere within the operating range of your
wireless network. However, the operating distance or range of your wireless connection can
vary significantly depending on the physical placement of your gateway. For example, the
thickness and number of walls the wireless signal passes through can limit the range.
Additionally, other wireless access points in and around your home might affect your
gateway’
any other device that emits a wireless signal for network access.
Position your gateway according to the following guidelines:
• Place your gateway near the center of the area where your computers and other devices
• Make sure that the gateway is within reach of an
• Place the gateway in an elevated location, minimizing the number walls and ceilings
• Place the gateway away from electrical devices such as these:
• Place the gateway away from large metal surfaces, large glass surfaces, and insulated
s signal. Wireless access points are gateways, repeaters, WiFi range extenders, or
operate, and within line of sight to your wireless devices.
AC power outlet and near Ethernet
cables for wired computers.
between the gateway and your other devices.
- Ceiling fans
- Home security systems
- Microwaves
- Computers
- Base of a cordless phone
- 2.4 GHz cordless phone
walls such as these:
- Solid metal doors
- Aluminum studs
- Fish tanks
- Mirrors
- Brick
- Concrete
Hardware Setup
9
Page 10

ADSL2+ Gateway
DRAFT
Cable Your Gateway
The gateway comes configured to work as both a modem and a router. You can share your
Internet connection without connecting the gateway to a router or gateway.
To cable your gateway:
1. Connect the phone line cable that came in the package to the DSL port.
PowerPowerDSL port
On/Of
button
2. Connect the other end of the phone line cable to your DSL line wall jack.
3. Connect the power adapter provided in the package to the gateway and plug the power
adapter in to an electrical outlet.
4. Press the Power On/Off button.
The Power LED lights green.
To set up your Internet connection, you must connect a computer or wireless device to the
gateway’
Chapter 3, Specify Your Internet Settings.
s network and use a web browser
. See Connect to the Network on page 12 and
adapter
input
Hardware Setup
10
Page 11

2. Connect to the Network and
DRAFT
Access the Gateway
This chapter contains the following sections:
• Connect to the Network
• Types of Logins
• Log In to the Gateway
2
11
Page 12

ADSL2+ Gateway
DRAFT
Connect to the Network
You can connect to the gateway’s network through a wired or WiFi connection. If you set up
your computer to use a static IP address, change the settings so that it uses Dynamic Host
Configuration Protocol (DHCP).
Wired Connection
You can connect your computer to the gateway using an Ethernet cable and join the
gateway’s local area network (LAN).
To connect your computer to the gateway with an Ethernet cable:
1. Make sure that the gateway has power (its Power LED is lit).
2. Connect an Ethernet cable to an Ethernet port on your computer
3. Connect the other end of the Ethernet cable to Ethernet port E2, E3, or E4 on the gateway.
.
Note: Do not use port E1 during setup.
Your computer connects to the local area network (LAN). A message might display on
your computer page to notify you that an Ethernet cable is connected.
WiFi Connection
Y ou can connect to the gateway’ s WiFi network with Wi-Fi Protected Setup (WPS) or you can
find and select the WiFi network. For information about using WPS, see WPS Overview on
page 49.
To find and select the WiFi network:
1. Make sure that the gateway has power (its Power LED is lit).
2. On your computer or wireless device, find and select the WiFi network.
The WiFi network name is on the gateway’s label.
3. Join the WiFi network and enter the WiFi password.
The password is on the gateway’s label.
Your wireless device connects to the WiFi network.
Connect to the Network and Access the Gateway
12
Page 13

ADSL2+ Gateway
DRAFT
Label
The label on the gateway shows the login information, MAC address, and serial number.
Serial number
WiFi password
MAC address
FOR POSITION ONLY
SSID
(WiFi network)
Figure 4. Gateway label
Login information
(default access)
Types of Logins
Separate types of logins have different purposes. It is important that you understand the
difference so that you know which login to use when.
Types of logins:
• WiFi network key or password. Your gateway is preset with a unique wireless network
name (SSID) and password for wireless access.
Note: Your gateway broadcasts dual-band 2.4 GHz and 5 GHz WiFi signals.
The label shows the SSID for the 2.4 GHz signal. For information about
5 GHz WiFi settings, see Specify Basic WiFi Settings on page 41.
This information is on the gateway label.
• Gateway login.This logs you in to the gateway interface as admin from an Internet
browser
Log In to the Gateway
When you first set up your gateway, NETGEAR genie automatically starts when you launch
an Internet browser on a computer that is connected to the gateway. If you want to view or
change settings for the gateway, you can use genie again.
To log in to the gateway:
1. Launch an Internet browser from a computer or wireless device that is connected to the
network.
2. T
ype http:/192.168.254.254.
.
Connect to the Network and Access the Gateway
13
Page 14

ADSL2+ Gateway
DRAFT
If you are accessing the gateway for the first time, the Auto Configuration page displays.
To bypass Auto Configuration, click the Cancel button.
The login window opens.
3. Enter the gateway user name and password.
The user name is admin. The
are case-sensitive.
The Main page displays.
default password is admin. The user name and password
Connect to the Network and Access the Gateway
14
Page 15

3. Specify Your Internet Settings
DRAFT
Usually, the quickest way to set up the gateway to use your Internet connection is to allow the
genie to detect the Internet connection when you first access the gateway with an Internet
browser. You can also customize or specify your Internet settings.
This chapter contains the following sections:
• Use Auto Configuration to Set Up Your Internet Connection
• Rerun the Setup Wizard
3
15
Page 16

ADSL2+ Gateway
DRAFT
Use Auto Configuration to Set Up Your Internet Connection
The first time that you use a web browser to access the gateway, the Auto Configuration
page displays. You can use Auto Configuration to detect the Internet connection, or you can
click the Cancel button to exit, and then log in to the gateway.
To use Auto Configuration:
1. Launch an Internet browser from a computer or wireless device that is connected to the
network.
2. T
ype http:/192.168.254.254.
The Auto Configuration page displays. The gateway detects your Internet connection.
3. Follow the onscreen instructions to complete your Internet setup.
Rerun the Setup Wizard
After you install the gateway, you can rerun the Setup Wizard to detect your Internet
connection.
To rerun the Setup Wizard:
1. Launch an Internet browser from a computer or wireless device that is connected to the
network.
2. T
ype http:/192.168.254.254.
A login window opens.
3. Enter the gateway user name and password.
The user name is admin. The
are case-sensitive.
The Main page displays.
4. Select Advanced.
5. When prompted, click the Y
The Advanced page displays.
6. Select Re-Run Setup W
izard.
default password is admin. The user name and password
es button to proceed.
The Re-Run Setup Wizard page displays.
7. Click the Detect Configuration button.
The gateway restarts and the Auto Configuration page displays.
8. Follow the Setup Wizard onscreen instructions.
Specify Your Internet Settings
16
Page 17

ADSL2+ Gateway
DRAFT
If you are prompted to enter PPP account settings, enter your Frontier email address and
password.
The gateway detects your Internet connection and the Main page displays.
Specify Your Internet Settings
17
Page 18

4. Control Access to the Internet
DRAFT
4
The gateway comes with a built-in firewall that helps protect your home network from unwanted
intrusions from the Internet.
This chapter includes the following sections:
• Set General Firewall Settings
• Set Up Custom Firewall Rules
• View the Security Log
• Port Forwarding Overview
• Set Up a Default DMZ Host
• Set Up Static NAT
• Set Up Remote Management
• Specify ALG Settings
18
Page 19

ADSL2+ Gateway
DRAFT
Set General Firewall Settings
To set general firewall settings:
1. Launch an Internet browser from a computer or wireless device that is connected to the
network.
2. Type http:/192.168.254.254.
A login window opens.
3. Enter the user name and password.
The user name is
are case-sensitive.
The Main page displays.
4. Select Firewall Settings > General.
admin. The
default
password is admin. The user name and password
5. Select a radio button.
6. Click the Apply button.
Your settings are saved.
Control Access to the Internet
19
Page 20

ADSL2+ Gateway
DRAFT
Set Up Custom Firewall Rules
To add a custom firewall rule:
1. Launch an Internet browser from a computer or wireless device that is connected to the
network.
2. Type http:/192.168.254.254
A login window opens.
3. Enter the user name and password.
.
The user name is admin. The
are case-sensitive.
The Main page displays.
4. Select Firewall Settings > General.
The General page displays.
5. Select the Custom Security (None) radio button.
6. When prompted, click the OK button to confirm.
The Edit button is activated.
7. Click the Edit button.
default
password is admin. The user name and password
Control Access to the Internet
20
Page 21

ADSL2+ Gateway
DRAFT
8. Select a Security Default radio button:
- Allow.
- Deny. Block the packet if no rule matches it.
This specifies the default action to be taken if no rule is found to match the given packet.
Allow the packet if no rule matches it.
9. In the
10. Click the Apply button.
Add Rules section, complete the following fields:
• Rule Name. Name of the new rule.
• Type. Allow or deny the packet matching this rule.
• Protocol. Protocol to match for the new rule.
• Source Address.
subnet mask is also to be provided.
• Destination Address.
against.The subnet mask is also to be provided.
• Source Port.
end ports should be mentioned.
• Destination Port.
start and end ports should be mentioned.
• Mode. Specify if packets needs to be logged.
• Direction.
whether inbound or outbound or both can be specified.
Your settings are saved.
The traffic direction for which the rule is to be applied. The direction
The source address of the packet to check the rule against.The
The destination address of the packet to check the rule
The source port of the packet to check the rule against.The start and
The destination port of the packet to check the rule against.The
View the Security Log
The log is a detailed record of the websites you have accessed or attempted to access and
other gateway actions.
To view the security log:
1. Launch an Internet browser from a computer or wireless device that is connected to the
network.
2. T
ype http:/192.168.254.254.
A login window opens.
3. Enter the user name and password.
The user name is admin. The
are case-sensitive.
The Main page displays.
4. Select Firewall Settings > Security Log.
default password is admin. The user name and password
Control Access to the Internet
21
Page 22

ADSL2+ Gateway
DRAFT
5. When prompted, click the Yes button to proceed.
6. To customize the log, do the following:
a. Click the Settings button.
The Security Log Settings page displays.
b. Select Enabled or Disabled for each of these settings:
• Log Allowed T
• Log Blocked Traffic
• Log Traffic Specified in Rules.
• Log Administrative Access.
raffic.
.
c. Select or clear the Remote Logging Enable
d. If you enabled remote logging, complete the Remote IP
e. Click the Apply button.
7. T
o refresh the log page, click the Refresh button.
8. To clear the log entries, click the Clear Log button.
9. To save the log in a printable format, click the Printable Format button.
check box
Address
field.
Port Forwarding Overview
Port forwarding allows you to forward incoming traffic from the outside network, to a range of
WAN ports on an IP address on the LAN. You can also enable traffic from local network to a
specified port range to be allowed to go outside of the network in medium firewall settings.
All the settings on this page are associated with a Service Profile in the Current Profile
drop-down list. If no profile has been created, the default profile is used.
To configure port forwarding, you need to know which inbound ports the application needs.
You usually can determine this information by contacting the publisher of the application or
the relevant user groups or news groups.
A typical application of port forwarding occurs when a remote computer
access a web server running on a computer in your local network. Using port forwarding, you
can tell the gateway, “When you receive incoming traffic on port 80 (the standard port number
for a web server process), forward it to the local computer at 192.168.1.123.”
sequence shows the effects of the port forwarding rule you have defined:
’s browser needs to
The following
Control Access to the Internet
22
Page 23

ADSL2+ Gateway
DRAFT
1. The user of a remote computer opens a browser and requests a web page from
www.example.com, which resolves to the public IP address of your gateway. The
remote computer composes a web page request message with the following destination
information:
Destination address. The IP address www.example.com, which is the gateway’s address.
Destination port number. 80, which is the standard port number for a web server process.
The remote computer then sends this request message through the Internet to your
gateway.
2. Y
our gateway receives the request message and looks in its rules table for any rules
covering the disposition of incoming port 80 traffic. Your port forwarding rule specifies that
incoming port 80 traffic should be forwarded to local IP address 192.168.1.123. Therefore,
your gateway modifies the destination information in the request message:
The destination address is replaced with 192.168.1.123.
Your gateway then sends this request message to your local network.
3. Y
our web server at 192.168.1.123 receives the request and composes a return message
with the requested web page data. Your web server then sends the gateway a reply
message.
4. Y
our gateway performs Network Address Translation (NAT) on the source IP address, and
sends this request message through the Internet to the remote computer, which displays the
web page from www.example.com.
Port Forwarding to Permit External Host Communications
In both the preceding examples, your computer initiates an application session with a server
computer on the Internet. However, you might need to allow a client computer on the Internet
to initiate a connection to a server computer on your network. Normally , your gateway ignores
any inbound traffic that is not a response to your own outbound traffic. You can configure
exceptions to this default rule by using the port forwarding feature.
A typical application of port forwarding can be shown by reversing the client-server
relationship from the previous web server example. In this case, a remote computer
browser needs to access a web server running on a computer in your local network. Using
port forwarding, you can tell the gateway, “When you receive incoming traffic on port 80 (the
standard port number for a web server process), forward it to the local computer at
192.168.1.123.” The following sequence shows the effects of the port forwarding rule you
have defined:
1. The user of a remote computer opens a browser and requests a web page from
.example.com, which resolves to the public IP address of your gateway. The
www
remote computer composes a web page request message with the following destination
information:
Destination address. The IP address of www.example.com, which is the address of your
gateway.
Destination port number. 80, which is the standard port number for a web server process.
’s
Control Access to the Internet
23
Page 24

ADSL2+ Gateway
DRAFT
The remote computer sends this request message through the Internet to your gateway.
2. Y
our gateway receives the request message and looks in its rules table for any rules
covering the disposition of incoming port 80 traffic. Your port forwarding rule specifies that
incoming port 80 traffic should be forwarded to local IP address 192.168.1.123. Therefore,
your gateway modifies the destination information in the request message:
The destination address is replaced with 192.168.1.123.
Your gateway then sends this request message to your local network.
3. Y
our web server at 192.168.1.123 receives the request and composes a return message
with the requested web page data. Your web server then sends this reply message to your
gateway.
4. Y
our gateway performs Network Address Translation (NAT) on the source IP address, and
sends this request message through the Internet to the remote computer, which displays the
web page from www.example.com.
To configure port forwarding, you need to know which inbound ports the application needs. T o
find out, contact the publisher of the application or the relevant user groups or news groups.
Set Up Port Forwarding to Local Servers
Using the port forwarding feature, you can allow certain types of incoming traffic to reach
servers on your local network. For example, you might want to make a local web server, FTP
server, or game server visible and available to the Internet.
Use the Port Forwarding/Port Triggering page to configure the gateway to forward specific
incoming protocols to computers on your local network. In addition to servers for specific
applications, you can also specify a default DMZ server to which all other incoming protocols
are forwarded.
Before starting, you need to determine which type of service, application, or game you want
to provide, and the local IP address of the computer that will provide the service.
computer has to always have the same IP address.
Tip: T
o ensure that your server computer always has the same IP address,
use the reserved IP address feature of your product.
The server
Add a Port Forwarding Rule
You can select an existing service or rule, or you can create a new custom rule.
To add a port forwarding service or rule:
1. Launch an Internet browser from a computer or wireless device that is connected to the
network.
2. T
ype http:/192.168.254.254.
A login window opens.
Control Access to the Internet
24
Page 25

ADSL2+ Gateway
DRAFT
3. Enter the user name and password.
The user name is admin. The default
are case-sensitive.
The Main page displays.
4. Select Firewall Settings > Port Forwarding.
5. When prompted, click the Ye
6. Click the Add button.
s button to proceed.
password is admin. The user name and password
7. To create a new rule, click the Create button and specify the settings.
The new rule displays in the list below Custom Defined Service.
8. To edit a rule, select it in the list and click the Edit button.
9. In the Port Forwarding page, click the Add button to add the rule that you created.
10. Click the Apply
Your settings are saved.
Add or Edit a Port Forwarding Profile
The service profile associates a service profile with one or more of your Connection Profiles.
This means different connections can allow different services to be associated with them.
button.
Control Access to the Internet
25
Page 26

ADSL2+ Gateway
DRAFT
To add or edit a port forwarding profile:
1. Launch an Internet browser from a computer or wireless device that is connected to the
network.
2. Type http:/192.168.254.254
A login window opens.
3. Enter the user name and password.
.
The user name is admin. The
are case-sensitive.
The Main page displays.
4. Select Firewall Settings > Port Forwarding.
5. When prompted, click the Ye
The Current Profile list shows the selected profile.
6. To add a profile, click the New button and follow the steps to create a custom service entry.
default
s button to proceed.
password is admin. The user name and password
The new profile is added to the
7. To edit the selected profile, click the Edit
profile.
8. Click the Apply button.
Your settings are saved.
Set Up a Default DMZ Host
The default DMZ Host feature is helpful when you are using some online games and
videoconferencing applications that are incompatible with Network Address Translation
(NAT). The gateway is programmed to recognize some of these applications and to work
correctly with them, but other applications might not function well. In some cases, one local
computer can run the application correctly if the IP address for that computer is entered as
the default DMZ server.
Current Profile list.
button and follow the steps to change a service
Control Access to the Internet
26
Page 27

ADSL2+ Gateway
DRAFT
WARNING:
DMZ servers pose a security risk. A computer designated as the
default DMZ server loses much of the protection of the firewall and
is exposed to exploits from the Internet. If compromised, the DMZ
server computer can be used to attack other computers on your
network.
The gateway usually detects and discards incoming traffic from the Internet that is not a
response to one of your local computers or a service that you have configured in the Port
T
Forwarding/Port
forward the traffic to one computer on your network. This computer is called the default DMZ
server.
To set up a DMZ host:
1. Launch an Internet browser from a computer or wireless device that is connected to the
network.
2. T
ype http:/192.168.254.254.
riggering page. Instead of discarding this traffic, you can have the gateway
A login window opens.
3. Enter the user name and password.
The user name is
are case-sensitive.
The Main page displays.
4. Select Firewall Settings > DMZ Host.
5. When prompted, click the Ye
6. In the list, select the LAN device to share your public IP address.
7. Click the Enable button.
admin. The
s button to proceed.
default
password is admin. The user name and password
A message displays notifying you that the gateway must restart.
8. Click the OK button.
The gateway restarts and DMZ hosting is enabled.
Control Access to the Internet
27
Page 28

ADSL2+ Gateway
DRAFT
Set Up Static NAT
Static NAT provides a one-to-one private to public static IP address mapping. This can be
useful when you want to access a local computer from outside the network.
To set up static NAT:
1. Launch an Internet browser from a computer or wireless device that is connected to the
network.
2. T
ype http:/192.168.254.254
A login window opens.
3. Enter the user name and password.
.
The user name is admin. The
are case-sensitive.
The Main page displays.
4. Select Firewall Settings > Static NAT.
5. When prompted, click the Yes button to proceed.
6. In the Static NAT Device list, select the DNS acquired name of the device that will function
as the default NAT destination.
7. In the IP Address field, type the IP address of the device that will function as the default
NAT destination.
8. To enable static NAT, click the Enable button.
9. To disable static NAT, click the Disable button.
10. Click the Apply
button.
default
password is admin. The user name and password
Your settings are saved.
Control Access to the Internet
28
Page 29

ADSL2+ Gateway
DRAFT
Set Up Remote Management
You can use remote management to access your gateway over the Internet to view or
change its settings. You need to know the gateway’s WAN IP address to use this feature. For
information about remote access using Dynamic DNS, see Dynamic DNS on page 72.
Note: Be sure to change the password for the user name admin to a secure
password. The ideal password contains no dictionary words from any
language and contains uppercase and lowercase letters, numbers,
and symbols. It can be up to 30 characters. See Change the admin
Password on page 57.
To set up remote management:
1. Launch an Internet browser from a computer or wireless device that is connected to the
network.
2. T
ype http:/192.168.254.254.
A login window opens.
3. Enter the user name and password.
The user name is
are case-sensitive.
The Main page displays.
4. Select Advanced.
5. When prompted, click the Y
Advanced page displays.
The
6. Select Remote Administration.
admin. The
es button to proceed.
default
password is admin. The user name and password
Control Access to the Internet
29
Page 30

ADSL2+ Gateway
DRAFT
7. Select the Enable Remote Access check box.
8. Click the Apply button.
Your changes take effect.
Specify ALG Settings
You can configure the ALG services. When the firewall is set to High, some services are not
configurable.
To specify ALG settings:
1. Launch an Internet browser from a computer or wireless device that is connected to the
network.
2. T
ype http:/192.168.254.254
A login window opens.
3. Enter the user name and password.
.
The user name is admin. The
are case-sensitive.
The Main page displays.
4. Select Advanced.
5. When prompted, click the Y
Advanced page displays.
The
6. Select ALG.
7. Select or clear the check boxes.
8. Click the Apply button.
es button to proceed.
default
password is admin. The user name and password
Your settings are saved.
Control Access to the Internet
30
Page 31

5. Specify Network Settings
DRAFT
This chapter includes the following sections:
• View Network Computers and Devices
• Specify the IP Addresses that the Gateway Assigns
• Disable the DHCP Server Feature in the Gateway
• Improve Network Connections with Universal Plug and Play
• Specify Basic WiFi Settings
• Change the WiFi Security Settings
• Create a Hidden Wireless Network
• Restrict Wireless Access by MAC Address
• Set Up a Guest Network
• Control the Wireless Radios
• Quality of Service
• Change the Wireless Mode
5
31
Page 32

ADSL2+ Gateway
DRAFT
View Network Computers and Devices
To view network computers and devices:
1. Launch an Internet browser from a computer or wireless device that is connected to the
network.
2. Type http:/192.168.254.254
A login window opens.
3. Enter the user name and password.
.
The user name is admin. The
are case-sensitive.
The Main page displays.
4. Select My Connected Home > Network Connections..
default
password is admin. The user name and password
Specify the IP Addresses that the Gateway Assigns
By default, the gateway acts as a Dynamic Host Configuration Protocol (DHCP) server. The
gateway assigns IP, DNS server, and default gateway addresses to all computers connected
to the LAN. The assigned default gateway address is the LAN address of the gateway.
These addresses must be part of the same IP address subnet as the gateway’s LAN IP
address. Using the default addressing scheme, define a range between 192.168.0.2 and
192.168.0.254, although you can save part of the range for devices with fixed addresses.
To specify the pool of IP addresses that the gateway assigns:
1. Launch an Internet browser from a computer or wireless device that is connected to the
network.
2. T
ype http:/192.168.254.254
A login window opens.
3. Enter the user name and password.
The user name is admin. The
are case-sensitive.
.
default
Specify Network Settings
password is admin. The user name and password
32
Page 33

The Main page displays.
DRAFT
4. Select Advanced.
5. When prompted, click the Y
Advanced page displays.
The
ADSL2+ Gateway
es button to proceed.
6. Select IP Address Distribution
7. In the DHCP Start Address field, enter the lowest IP address in the range.
8. In the DHCP End Address
9. Click the Apply button.
.
field, enter the highest IP address in the range.
Your settings are saved.
The gateway delivers the following parameters to any LAN device that requests DHCP:
• An IP address from the range that you have defined
• Subnet mask
• Gateway IP address (the gateway’
• DNS server IP address (the gateway’s LAN IP address)
Disable the DHCP Server Feature in the Gateway
By default, the gateway acts as a DHCP server. The gateway assigns IP, DNS server, and
default gateway addresses to all computers connected to the LAN. The assigned default
gateway address is the LAN address of the gateway.
s LAN IP address)
Specify Network Settings
33
Page 34

ADSL2+ Gateway
DRAFT
You can use another device on your network as the DHCP server, or specify the network
settings of all your computers.
To disable the DHCP server feature in the gateway:
1. Launch an Internet browser from a computer or wireless device that is connected to the
network.
2. T
ype http:/192.168.254.254
A login window opens.
3. Enter the user name and password.
.
The user name is admin. The
are case-sensitive.
The Main page displays.
4. Select Advanced.
5. When prompted, click the Y
Advanced page displays.
The
6. Select IP Address Distribution
es button to proceed.
default
.
password is admin. The user name and password
7. In the IP Address Distribution list, select Off.
8. Click the Apply button.
Your settings are saved.
9. (Optional) If this service is disabled and no other DHCP server is on your network, set your
computer IP addresses manually so that they can access the gateway.
Specify Network Settings
34
Page 35

ADSL2+ Gateway
DRAFT
Specify Private LAN Settings
Y ou can specify how the gateway interacts with computers and devices that are connected to
its network.
To specify private LAN settings:
1. Launch an Internet browser from a computer or wireless device that is connected to the
network.
2. T
ype http:/192.168.254.254.
A login window opens.
3. Enter the user name and password.
The user name is
are case-sensitive.
The Main page displays.
4. Select Advanced.
5. When prompted, click the Y
Advanced page displays.
The
6. Select Private LAN.
7. Select the Private LAN Server Enable check box.
admin. The
es button to proceed.
default
password is admin. The user name and password
Enabling DHCP server allows the gateway to automatically assign IP addresses to
devices that connect to its network.
8. Select the Public LAN Enable check box.
Enabling Public LAN allows a global subnet to exist behind your gateway.
9. In the Modem’
local communication.
10. In the Subnet Mask field, enter the subnet mask used to determine if an IP address belongs
to your local network.
11. T
o specify the IP address pool that the gateway uses, complete the DHCP Start
and DHCP End Address fields.
s Public IP
Address field, enter the IP address that the gateway uses for
Address
Specify Network Settings
35
Page 36

ADSL2+ Gateway
DRAFT
12. Click the Apply button.
Your settings are saved.
Specify Public LAN Settings
You can specify how the gateway interacts with computers and devices that are connected to
its network.
To specify public LAN settings:
1. Launch an Internet browser from a computer or wireless device that is connected to the
network.
2. T
ype http:/192.168.254.254
A login window opens.
3. Enter the user name and password.
.
The user name is admin. The
are case-sensitive.
The Main page displays.
4. Select Advanced.
5. When prompted, click the Y
Advanced page displays.
The
6. Select Public LAN.
7. To enable Public LAN, select the Enable DHCP Server check box.
Enabling DHCP server allows the gateway to automatically assign IP addresses to
devices that connect to its network.
default
es button to proceed.
password is admin. The user name and password
8. Select the Public LAN Enable check box.
Enabling Public LAN allows a global subnet to exist behind your gateway.
9. In the Modem’
local communication.
10. In the Subnet Mask field, enter the subnet mask used to determine if an IP address belongs
to your local network.
11. Click the Apply button.
s Public IP
Address field, enter the IP address that the gateway uses for
Specify Network Settings
36
Page 37

ADSL2+ Gateway
DRAFT
Your settings are saved.
Reserve LAN IP Addresses
When you specify a reserved IP address for a computer on the LAN, that computer always
receives the same IP address each time it accesses the gateway’s DHCP server. Assign
reserved IP addresses to computers or servers that require permanent IP settings.
To reserve an IP address:
1. Launch an Internet browser from a computer or wireless device that is connected to the
network.
2. T
ype http:/192.168.254.254.
A login window opens.
3. Enter the user name and password.
The user name is
are case-sensitive.
The Main page displays.
4. Select Advanced.
5. When prompted, click the Y
Advanced page displays.
The
6. Select IP Address Distribution
admin. The
es button to proceed.
default
.
password is admin. The user name and password
Specify Network Settings
37
Page 38

ADSL2+ Gateway
DRAFT
The IP Address Reservation table displays a list of IP addresses from the DHCP pool
range that are reserved for specific LAN devices.
7. To add an entry into the Address Reservation table, complete the fields in the Add/Edit Host
Information section:
• Host Name.
• IP Address.
• MAC Address.
8. Click the Add button.
The device is added to the Address Reservation table.
The reserved address is not assigned until the next time the computer or device contacts the
gateway’
force a DHCP release and renew.
s DHCP server. You can reboot the computer, or access its IP configuration and
The name of the LAN device to be added.
The IP address to be reserved for this LAN device by the DHCP server.
The MAC address of the device.
RIP Configuration
You can specify RIP settings for the LAN and WAN.
To specify RIP configuration:
1. Launch an Internet browser from a computer or wireless device that is connected to the
network.
2. T
ype http:/192.168.254.254.
A login window opens.
3. Enter the user name and password.
The user name is admin. The
are case-sensitive.
The Main page displays.
4. Select Advanced.
5. When prompted, click the Y
The Advanced page displays.
default password is admin. The user name and password
es button to proceed.
Specify Network Settings
38
Page 39

ADSL2+ Gateway
DRAFT
6. Select RIP Configuration.
7. To enable RIP, select the RIP LAN Enable check box.
8. In the Interface T
ype list, select LAN or WAN.
The WAN side is receive-only.
9. Complete the fields to specify the RIP version and the authentication mode.
10. T
o specify a default gateway, select the Default Gateway
This setting controls whether the gateway advertises itself as a gateway.
11. Click the Apply button.
Your settings are saved.
Note: You can click the Reset button to return the gateway RIP
configuration settings to their default values.
check box.
Enable or Disable Multicast IGMP Proxy
By default, IGMP proxy is enabled.
To enable multicast IGMP proxy:
1. Launch an Internet browser from a computer or wireless device that is connected to the
network.
2. T
ype http:/192.168.254.254.
A login window opens.
3. Enter the user name and password.
The user name is
are case-sensitive.
admin. The
default
Specify Network Settings
password is admin. The user name and password
39
Page 40

ADSL2+ Gateway
DRAFT
The Main page displays.
4. Select Advanced.
5. When prompted, click the Y
Advanced page displays.
The
6. Select Multicast..
The Multicast page displays.
7. Select or clear the IGMP Proxy Enable check box.
8. Click the Apply button.
Your settings are saved.
es button to proceed.
View the Routing Table
To view the routing table:
1. Launch an Internet browser from a computer or wireless device that is connected to the
network.
2. T
ype http:/192.168.254.254
A login window opens.
3. Enter the user name and password.
The user name is admin. The
are case-sensitive.
The Main page displays.
4. Select Advanced.
5. When prompted, click the Y
Advanced page displays.
The
6. Select Routing.
.
default
es button to proceed.
password is admin. The user name and password
Specify Network Settings
40
Page 41

ADSL2+ Gateway
DRAFT
Improve Network Connections with Universal Plug and Play
Universal Plug and Play (UPnP) helps devices, such as Internet appliances and computers,
access the network and connect to other devices as needed. UPnP devices can
automatically discover the services from other registered UPnP devices on the network.
If you use applications such as multiplayer gaming, peer-to-peer connections, or real-time
communications such as instant messaging or remote assistance (a feature in Windows XP),
enable UPnP
To enable Universal Plug and Play:
1. Launch an Internet browser from a computer or wireless device that is connected to the
network.
2. T
ype http:/192.168.254.254.
A login window opens.
.
3. Enter the user name and password.
The user name is admin. The
are case-sensitive.
The Main page displays.
4. Select Advanced.
5. When prompted, click the Y
The Advanced page displays.
6. Select Universal Plug and Play.
The UPnP page displays.
7. Select the UPnP Enable check box.
By default, this check box is selected. UPnP for automatic device configuration can be
enabled or disabled. If the
allow any device to automatically control gateway resources, such as port forwarding.
8. Click the Apply button.
default password is admin. The user name and password
es button to proceed.
Turn UPnP On check box is cleared, the gateway does not
Specify Basic WiFi Settings
The gateway comes with preset security. This means that the WiFi network name (SSID),
network key (password), and security option (encryption protocol) are preset in the factory.
You can find the preset SSID and password on the product label.
Specify Network Settings
41
Page 42

ADSL2+ Gateway
DRAFT
Note: The preset SSID and password are uniquely generated for every
device to protect and maximize your wireless security.
It is recommended that you do not change your preset security settings. If you change your
preset security settings, make a note of the new settings and store it in a safe place where
you can easily find it.
If you use a wireless computer to change the wireless network name (SSID) or other wireless
security settings, you are disconnected when you click the Apply button.
problem, use a computer with a wired connection to access the gateway.
To specify basic wireless settings:
1. Launch an Internet browser from a computer or wireless device that is connected to the
network.
2. T
ype http:/192.168.254.254.
To avoid this
A login window opens.
3. Enter the user name and password.
The user name is admin. The
are case-sensitive.
The Main page displays.
default password is admin. The user name and password
Specify Network Settings
42
Page 43

4. Select Wireless.
DRAFT
ADSL2+ Gateway
5. To change the network name (SSID), type a new name in the SSID field.
The name can be up to 32 characters long and it is case-sensitive. The default SSID is
randomly generated and is on the product label. If you change the name, make sure to
write down the new name and keep it in a safe place.
6. To change the wireless channel, select a number in the Channel list.
In some regions, not all channels are available. Do not change the channel unless you
experience interference (shown by lost connections or slow data transfers). If this
happens, experiment with different channels to see which is the best.
When you use multiple access points, it is better if adjacent access points use dif
channels to reduce interference. The recommended channel spacing between adjacent
access points is four channels (for example, use Channels 1 and 5, or 6 and 10).
7. Click the Apply
Your settings are saved.
If you connected wirelessly to the network and you changed the SSID, you are
disconnected from the network.
8. Make sure that you can connect wirelessly to the network with its new settings.
If you cannot connect wirelessly, check the following:
button.
ferent
Specify Network Settings
43
Page 44

ADSL2+ Gateway
DRAFT
• Is your computer or wireless device connected to another wireless network in your
area? Some wireless devices automatically connect to the first open network without
wireless security that they discover.
• Is your computer or wireless device trying to connect to your network with its old
settings (before you changed the settings)? If so, update the wireless network
selection in your computer or wireless device to match the current settings for your
network.
Change the WiFi Security Settings
Your gateway comes with preset WPA2 or WPA security. The password that you enter to
connect to your network is unique to your gateway and is on the product label. NETGEAR
recommends that you use the preset security, but you can change them. NETGEAR
recommends that you do not disable security.
To change the wireless security settings:
1. Launch an Internet browser from a computer or wireless device that is connected to the
network.
2. T
ype http:/192.168.254.254
A login window opens.
3. Enter the user name and password.
The user name is admin. The
are case-sensitive.
The Main page displays.
4. Select Security Settings.
.
default
password is admin. The user name and password
Specify Network Settings
44
Page 45

ADSL2+ Gateway
DRAFT
5. In the Wireless Security list, select WPA, WEP, or Disable.
The WPA is recommended because it uses the newest standard for the strongest
security
Wireless Security List.
o specify WPA, do the following:
6. T
• In the WP
• In the Data Encryption field, select AES or TKIP +
• In the WP
7. T
o specify WEP, do the following:
• In the Network Authentication field, select Open System
• Complete the fields to enter the encryption keys, the entry method, and the key
8. W
9. Click the Apply button.
. The fields displayed in this page depend on what is currently selected in the
A Type list, select WP A Any , WPA2, or WPA.
AES.
A Shared Key field, enter the WiFi network key (password).
The shared key is a text string from 8 to 63 characters.
Authentication or
Shared Key Authentication.
length,
rite down the new password and keep it in a secure place for future reference.
Your settings are saved.
Create a Hidden Wireless Network
A hidden wireless network does not broadcast its wireless name (SSID). To connect to a
hidden wireless network, you must know the wireless name and password and type them.
To create a hidden network:
1. Launch an Internet browser from a computer or wireless device that is connected to the
network.
2. T
ype http:/192.168.254.254.
A login window opens.
3. Enter the user name and password.
The user name is admin. The
are case-sensitive.
The Main page displays.
4. Select W
The Wireless Security page displays.
ireless Security.
default password is admin. The user name and password
Specify Network Settings
45
Page 46

ADSL2+ Gateway
DRAFT
5. Scroll down to the Level 2 section.
6. Select the SSID Broadcast Disable radio button.
7. Click the Apply button.
Your settings are saved.
Restrict Wireless Access by MAC Address
You can restrict wireless access to certain computers and wireless devices based on their
MAC addresses. This is called MAC filtering.
To restrict wireless access by MAC address:
1. Launch an Internet browser from a computer or wireless device that is connected to the
network.
2. T
ype http:/192.168.254.254
A login window opens.
3. Enter the user name and password.
The user name is admin. The
are case-sensitive.
The Main page displays.
4. Select Wireless Security.
The Wireless Security page displays.
.
default
password is admin. The user name and password
Specify Network Settings
46
Page 47

5. Scroll down to the Level 3 section.
DRAFT
6.
7. Click the Add button.
8. Click the Apply button.
ADSL2+ Gateway
Your settings are saved.
Set Up a Guest Network
A guest network allows visitors at your home to use the Internet without using your wireless
security key. You can add a guest network to each wireless network: 2.4 GHz b/g/n and
5.0 GHz a/n.
To set up a guest network:
1. Launch an Internet browser from a computer or wireless device that is connected to the
network.
2. T
ype http:/192.168.254.254.
A login window opens.
3. Enter the user name and password.
The user name is
are case-sensitive.
The Main page displays.
admin. The
default
password is admin. The user name and password
Specify Network Settings
47
Page 48

4. Select Guest Network.
DRAFT
ADSL2+ Gateway
5. Select any of the following wireless settings:
• Enable Guest Network. When this check box is selected, the guest network is
enabled, and guests can connect to your network using the SSID of this profile.
• Enable SSID Broadcast. If this check box is selected, the wireless access point
broadcasts its name (SSID) to all wireless stations. Stations with no SSID can adopt
the correct SSID for connections to this access point.
• Allow guest to see each other and access my local network. If this check box is
selected, anyone who connects to this SSID has access to your local network, not just
Internet access.
6. Give the guest network a name.
The guest network name is case-sensitive and can be up to 32 characters. You then
manually configure the wireless devices in your network to use the guest network name in
addition to the main SSID.
7. Select a radio button for a security option.
The WPA2 options use the newest standard for the strongest security, but some older
computers and wireless devices cannot use it. NETGEAR recommends that you select
the WPA-PSK [TKIP] + WP
network and lets computers and wireless devices can connect to the WiFi network by
using either WPA2 or WPA security.
8. Click the Apply button.
A2-PSK [AES] radio button. This setting protects your WiFi
Your settings are saved.
Specify Network Settings
48
Page 49

ADSL2+ Gateway
DRAFT
WPS Overview
Wi-Fi Protected Setup (WPS) lets you add a wireless computer or device to your WiFi
network without typing the WiFi password.
Enable WPS Simple Config
To use WPS, you must enable WPS simple config first.
To enable WPS connections (simple config):
1. Launch an Internet browser from a computer or wireless device that is connected to the
network.
2. T
ype http:/192.168.254.254.
A login window opens.
3. Enter the user name and password.
The user name is admin. The
are case-sensitive.
The Main page displays.
4. Select W
5. Select the Enable Simple Config button.
The radio buttons are activated.
ireless Settings > Simple Config.
default password is admin. The user name and password
Connect Using WPS
To connect using a WPS button:
1. Launch an Internet browser from a computer or wireless device that is connected to the
network.
2. T
ype http:/192.168.254.254.
A login window opens.
3. Enter the user name and password.
The user name is admin. The
are case-sensitive.
default password is admin. The user name and password
The Main page displays.
4. Select W
The Simple Config page displays.
5. Select the radio button for the setup method that you want to use:
ireless Settings > Simple Config.
Specify Network Settings
49
Page 50

ADSL2+ Gateway
DRAFT
• Use Push Button method. Click the Begin Simple Config button.
• Use PIN entry method. In the Device PIN field, type the client security PIN and click
the Begin Simple Config button.
6. Within two minutes, go to the client device and use its WPS software to connect to the WiFi
network.
The WPS process automatically sets up your wireless computer with the network
password when it connects. The gateway WPS page displays a confirmation message.
Control the Wireless Radios
The gateway has internal wireless radios that broadcast signals in the 2.4 GHz. By default,
they are on so that you can connect wirelessly to the gateway. You can turn the wireless
radios off and on. When the wireless radios are off, you can still use an Ethernet cable for a
LAN connection to the gateway.
To turn the wireless radios off and on:
1. Launch an Internet browser from a computer or wireless device that is connected to the
network.
2. T
ype http:/192.168.254.254
A login window opens.
3. Enter the user name and password.
.
Specify Network Settings
50
Page 51

ADSL2+ Gateway
DRAFT
The user name is admin. The default password is admin. The user name and password
are case-sensitive.
The Main page displays.
4. Select Wireless Settings > Basic Settings
5. Select The Wireless On or Off radio button.
6. Click the Apply button.
If you turned off the wireless radios, the WiFi On/Off LED turns off. If you turned on the
wireless radios, the WiFi On/Of
f LED lights.
.
Quality of Service
Quality of Service (QoS) provides differentiated levels of service for network traffic. Disabling
QoS also disables fragmentation.
Enable QoS
To enable QoS:
1. Launch an Internet browser from a computer or wireless device that is connected to the
network.
2. T
ype http:/192.168.254.254.
A login window opens.
3. Enter the user name and password.
The user name is
are case-sensitive.
admin. The
default
Specify Network Settings
password is admin. The user name and password
51
Page 52

The Main page displays.
DRAFT
4. Select Advanced.
5. When prompted, click the Y
Advanced page displays.
The
6. Select Quality of Service (QoS).
es button to proceed.
ADSL2+ Gateway
7. To enable QoS, select the Enable QoS Services check box.
Manage QoS Rules and Filters
You can add, edit, or delete QoS filters and you can control the priority of the rules in relation
to each other.
To manage QoS rules and filters:
1. Launch an Internet browser from a computer or wireless device that is connected to the
network.
2. T
ype http:/192.168.254.254
A login window opens.
3. Enter the user name and password.
The user name is admin. The
are case-sensitive.
The Main page displays.
4. Select Advanced.
5. When prompted, click the Y
Advanced page displays.
The
.
default
es button to proceed.
password is admin. The user name and password
6. Select Quality of Service (QoS).
Specify Network Settings
52
Page 53

ADSL2+ Gateway
DRAFT
The Queue and Summary page displays.
7. Click the View/Add Filter Rules
8. To add a filter, click the New Filter button.
9. To modify a filter, click the Edit
10. To delete a filter, click the Delete
11. To change the priority of a rule, click the Down
12. Click the Apply button.
link.
button for a rule.
button.
button or the Up button.
Your settings are saved.
Add a Queue
To add a queue:
1. Launch an Internet browser from a computer or wireless device that is connected to the
network.
2. T
ype http:/192.168.254.254.
A login window opens.
3. Enter the user name and password.
The user name is
are case-sensitive.
The Main page displays.
4. Select Advanced.
admin. The
default
Specify Network Settings
password is admin. The user name and password
53
Page 54

ADSL2+ Gateway
DRAFT
5. When prompted, click the Yes button to proceed.
The Advanced page displays.
6. Select Quality of Service (QoS).
The Queue and Summary page displays.
7. Click the Add Queue link.
8. Specify the following:
• Precedence. The range is 1 to 15. Lower values have higher priority
• Type. SP or WFQ.
• Traffic Class. The range is 1 to 15. Lower values have higher priority.
• Buffer Size
• Weight.
• Maximum Rate. The range is 1 to 100.
9. Click the Apply
The queue is added.
. The range is 1 to 10000.
The range is 1 to 65535.
button.
.
Change the Wireless Mode
To turn the wireless radios off and on:
1. Launch an Internet browser from a computer or wireless device that is connected to the
network.
2. T
ype http:/192.168.254.254
A login window opens.
.
3. Enter the user name and password.
The user name is admin. The
are case-sensitive.
The Main page displays.
default
Specify Network Settings
password is admin. The user name and password
54
Page 55

ADSL2+ Gateway
DRAFT
4. Select Wireless Settings > Advanced Settings.
5. In the 802.11b/ Mode list, select an option.
6. In the High Performance list, select an option.
7. Click the Apply button.
Your settings are saved.
Specify Network Settings
55
Page 56

6. Manage Your Network
DRAFT
6
This chapter describes the gateway settings for administering and maintaining your gateway and
home network.
This chapter includes the following sections:
• Change the admin Password
• View Gateway Status
• Run the Ping Utility
• Run the Traceroute Utility
• View Devices Currently on the Network
• Manage the Gateway Configuration File
• Dynamic DNS
• Specify the Date and Time Settings
• Reboot the Gateway
56
Page 57

ADSL2+ Gateway
DRAFT
Change the admin Password
This feature let you change the default password that is used to log in to the gateway with the
user name admin. This password is not the one that you use for WiFi access. The label on
your gateway shows your unique wireless network name (SSID) and password for wireless
access.
To set the password for the user name admin:
1. Launch an Internet browser from a computer or wireless device that is connected to the
network.
2. T
ype http:/192.168.254.254.
A login window opens.
3. Enter the user name and password.
The user name is admin. The
are case-sensitive.
The Main page displays.
4. Select Advanced.
5. When prompted, click the Y
The Advanced page displays.
Select Users.
6. T
ype the old password, and type the new password twice.
7. Click the Apply button.
Your changes take effect.
default password is admin. The user name and password
es button to proceed.
View Gateway Status
To view gateway status:
1. Launch an Internet browser from a computer or wireless device that is connected to the
network.
2. T
ype http:/192.168.254.254.
A login window opens.
3. Enter the user name and password.
The user name is admin. The
are case-sensitive.
The Main page displays.
default password is admin. The user name and password
Manage Your Network
57
Page 58

ADSL2+ Gateway
DRAFT
4. Select System Monitoring.
5. For information about the displayed settings, click the Help icon in the upper right corner of
the page.
View Advanced Status
To view gateway status and usage information:
1. Launch an Internet browser from a computer or wireless device that is connected to the
network.
2. T
ype http:/192.168.254.254
A login window opens.
3. Enter the user name and password.
The user name is admin. The
are case-sensitive.
The Main page displays.
.
default
password is admin. The user name and password
Manage Your Network
58
Page 59

ADSL2+ Gateway
DRAFT
4. Select System Monitoring > Advanced Status.
For information about the content of this page, click the Help icon.
View the Ethernet Status
To view the gateway Ethernet status:
1. Launch an Internet browser from a computer or wireless device that is connected to the
network.
2. T
ype http:/192.168.254.254.
A login window opens.
3. Enter the user name and password.
The user name is
are case-sensitive.
The Main page displays.
admin. The
default
password is admin. The user name and password
Manage Your Network
59
Page 60

ADSL2+ Gateway
DRAFT
4. Select System Monitoring > Advanced Status > Ethernet.
View the ATM Status
To view gateway status and usage information:
1. Launch an Internet browser from a computer or wireless device that is connected to the
network.
2. T
ype http:/192.168.254.254
A login window opens.
3. Enter the user name and password.
The user name is admin. The
are case-sensitive.
The Main page displays.
.
default
password is admin. The user name and password
Manage Your Network
60
Page 61

ADSL2+ Gateway
DRAFT
4. Select System Monitoring > Advanced Status > ATM.
View the DSL Status
To view the gateway DSL status:
1. Launch an Internet browser from a computer or wireless device that is connected to the
network.
2. T
ype http:/192.168.254.254.
A login window opens.
3. Enter the user name and password.
The user name is
are case-sensitive.
The Main page displays.
admin. The
default
password is admin. The user name and password
Manage Your Network
61
Page 62

ADSL2+ Gateway
DRAFT
4. Select System Monitoring > Advanced Status > DSL.
View the ADSL Status
To view the gateway ADSL status:
1. Launch an Internet browser from a computer or wireless device that is connected to the
network.
2. T
ype http:/192.168.254.254
A login window opens.
3. Enter the user name and password.
The user name is admin. The
are case-sensitive.
The Main page displays.
4. Select System Monitoring
.
default
> Advanced Status > ADSL.
password is admin. The user name and password
Manage Your Network
62
Page 63

ADSL2+ Gateway
DRAFT
View the Wireless Status
To view the gateway wireless status:
1. Launch an Internet browser from a computer or wireless device that is connected to the
network.
2. T
ype http:/192.168.254.254.
A login window opens.
3. Enter the user name and password.
The user name is
are case-sensitive.
The Main page displays.
4. Select System Monitoring > Advanced Status > W
admin. The
default
password is admin. The user name and password
ireless.
Upgrade the Firmware
The gateway firmware (routing software) is stored in flash memory . You might see a message
at the top of the genie screens when new firmware is available. You can respond to that
message to update the firmware, or you can check to see if new firmware is available, and to
update your product. You can upgrade firmware from the Internet or from a computer.
Manage Your Network
63
Page 64

ADSL2+ Gateway
DRAFT
Upgrade Firmware from the Internet
To upgrade the firmware from the Internet::
1. Launch an Internet browser from a computer or wireless device that is connected to the
network.
2. T
ype http:/192.168.254.254
A login window opens.
3. Enter the gateway user name and password.
.
The user name is admin. The
are case-sensitive.
The Main page displays.
4. Select Advanced.
5. When prompted, click the Y
Advanced page displays.
The
6. Select Firmware Upgrade.
default
es button to proceed.
password is admin. The user name and password
7. To check to see if new firmware is available over the Internet, in the Check at URL field,
type the URL where your Internet service provider provides new firmware and do one of the
following:
• Click the Check for web updates button.
• Click the Update from web now button.
Manage Your Network
64
Page 65

ADSL2+ Gateway
DRAFT
The gateway checks for new firmware. If new firmware is available, the modem
downloads it. If you clicked the Update from web now button, the gateway loads the new
firmware and reboots.
WARNING:
To avoid the risk of corrupting the firmware, do not interrupt the
upgrade. For example, do not close the browser, click a link, or load
a new page. Do not turn off the router.
When the upload is complete, your gateway restarts. The upgrade process typically takes
about one minute. Read the new firmware release notes to find out if you need to
reconfigure the gateway after upgrading.
Upgrade Firmware from a Computer
To upgrade the firmware from the Internet::
1. Launch an Internet browser from a computer or wireless device that is connected to the
network.
2. T
ype http:/192.168.254.254.
A login window opens.
3. Enter the gateway user name and password.
The user name is admin. The
are case-sensitive.
The Main page displays.
4. Select Advanced.
5. When prompted, click the Y
The Advanced page displays.
default password is admin. The user name and password
es button to proceed.
Manage Your Network
65
Page 66

6. Select Firmware Upgrade.
DRAFT
ADSL2+ Gateway
7. Scroll down and click Upgrade From a Computer in the Network Update Now button.
The Software Upgrade page displays.
8. Click the Browse button and select the upgrade file.
9. Click the Upload File button.
If you clicked the Update from web now button, the gateway loads the new firmware and
reboots.
WARNING:
To avoid the risk of corrupting the firmware, do not interrupt the
upgrade. For example, do not close the browser, click a link, or load
a new page. Do not turn off the router.
When the upload is complete, your gateway restarts. The upgrade process typically takes
about one minute. Read the new firmware release notes to find out if you need to
reconfigure the gateway after upgrading.
Manage Your Network
66
Page 67

ADSL2+ Gateway
DRAFT
Run the Ping Utility
Ping is an administration utility that tests whether a computer on the network is reachable
and measures the time it takes messages sent from the originating device to reach a
destination computer and return.
To run a ping test:
1. Launch an Internet browser from a computer or wireless device that is connected to the
network.
2. T
ype http:/192.168.254.254.
A login window opens.
3. Enter the gateway user name and password.
The user name is
are case-sensitive.
The Main page displays.
4. Select Advanced.
5. When prompted, click the Y
Advanced page displays.
The
6. Select Diagnostics.
admin. The
default
es button to proceed.
password is admin. The user name and password
7. Do one of the following:
• To ping the ISP’s router, click the T
• To ping a host name, complete the Host Name field and click the Host Name Test
button.
est button.
Manage Your Network
67
Page 68
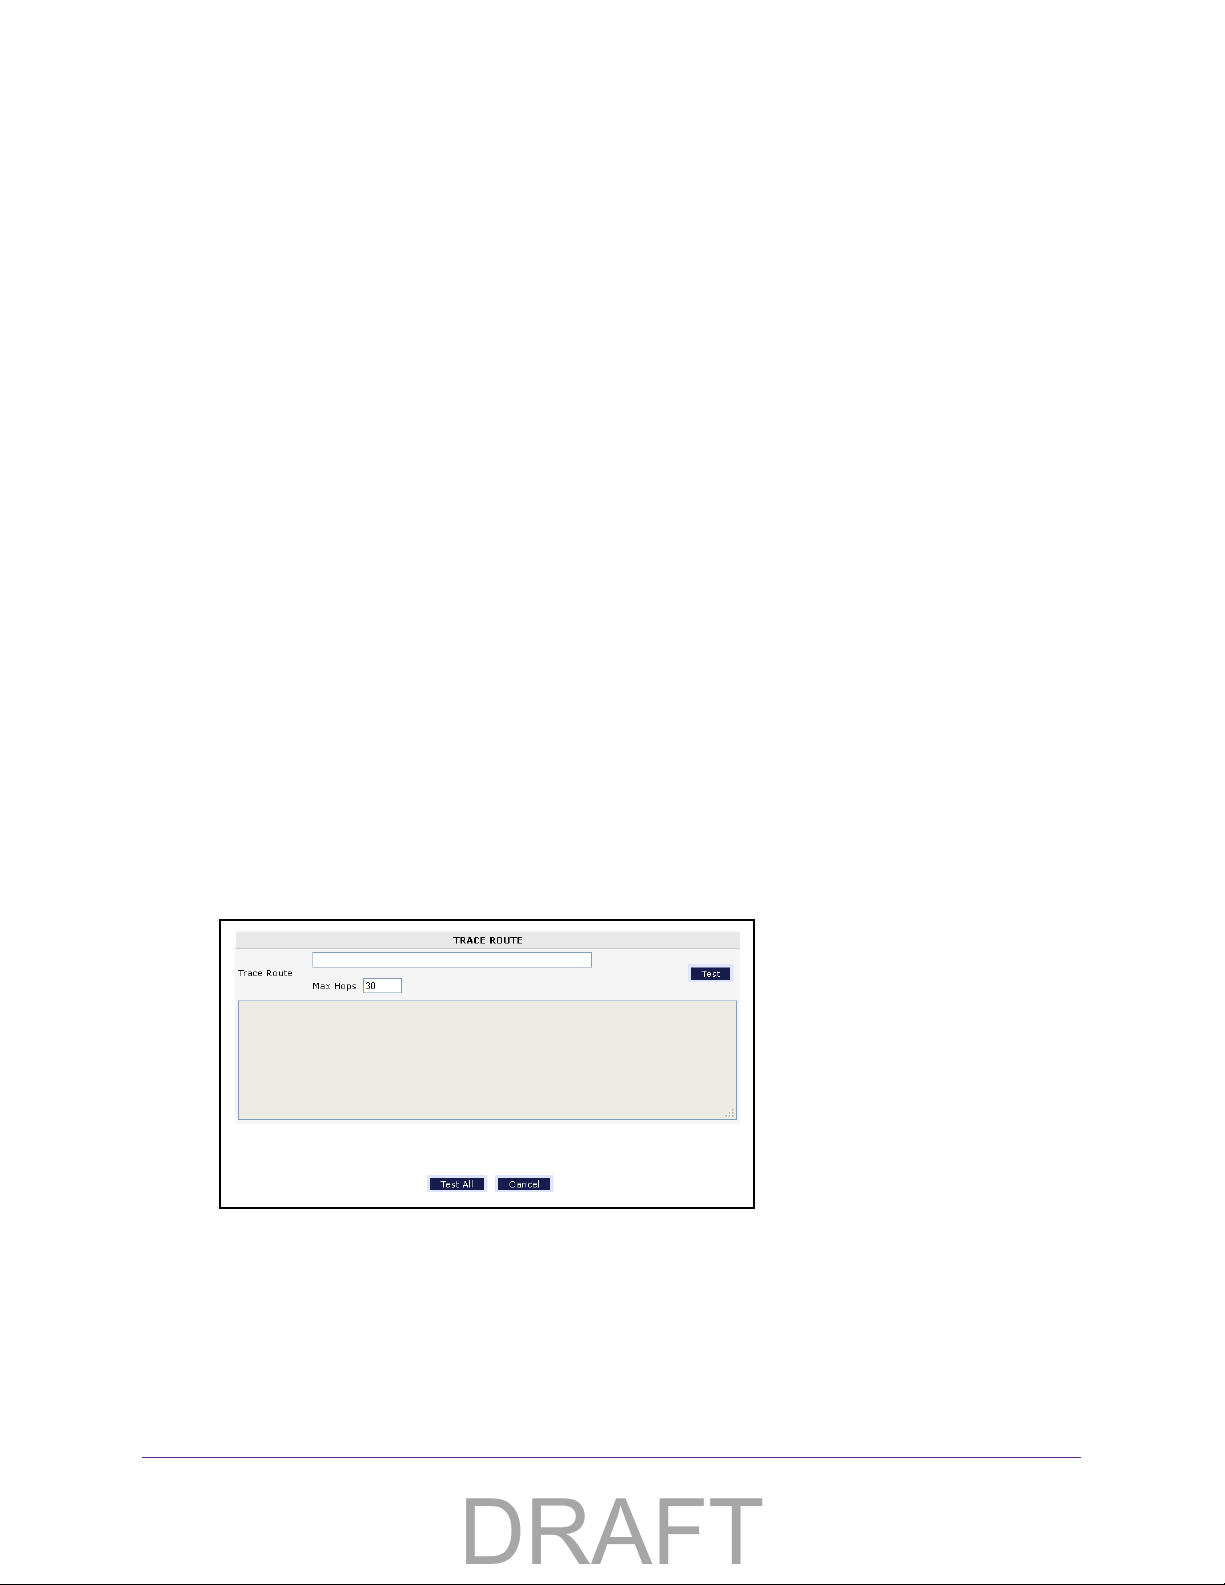
ADSL2+ Gateway
DRAFT
• To ping an IP address, complete the IP Address/Host Name field, and click the IP
Address Host Name Test button.
The ping results display.
Run the Traceroute Utility
To display the route and measure transit delays of packets across an IP, run the traceroute
utility.
To run a traceroute test:
1. Launch an Internet browser from a computer or wireless device that is connected to the
network.
2. T
ype http:/192.168.254.254
A login window opens.
3. Enter the gateway user name and password.
.
The user name is admin. The
are case-sensitive.
The Main page displays.
4. Select Advanced.
5. When prompted, click the Y
Advanced page displays.
The
6. Select Diagnostics and scroll down to the TRACE ROUTE section.
7. Specify the following parameters for the traceroute utility:
• Trace Route.
• Max Hops. The maximum number of hops to allow when tracing the route.
The IP address or host name of the computer you are tracing.
default
es button to proceed.
password is admin. The user name and password
8. Click the Test button.
The traceroute results display
.
Manage Your Network
68
Page 69

ADSL2+ Gateway
DRAFT
View Devices Currently on the Network
You can view all computers or devices that are currently connected to your network.
To view devices on the network:
1. Launch an Internet browser from a computer or wireless device that is connected to the
network.
2. T
ype http:/192.168.254.254.
A login window opens.
3. Enter the gateway user name and password.
The user name is
are case-sensitive.
The Main page displays.
4. Select My Connected Home > Network Connections.
admin. The
default
password is admin. The user name and password
Manage the Gateway Configuration File
The configuration settings of the gateway are stored within the gateway in a configuration file.
You can save this file on the gateway or on your computer. You can load a saved
configuration file onto the gateway.
Save the Configuration Settings
To back up the gateway’s configuration settings:
1. Launch an Internet browser from a computer or wireless device that is connected to the
network.
2. T
ype http:/192.168.254.254.
A login window opens.
3. Enter the user name and password.
The user name is
are case-sensitive.
admin. The
default
Manage Your Network
password is admin. The user name and password
69
Page 70

The Main page displays.
DRAFT
4. Select Advanced.
5. When prompted, click the Y
Advanced page displays.
The
6. Select Configuration File.
ADSL2+ Gateway
es button to proceed.
7. To save the configuration settings onto the gateway, click the Save Configuration File
button.
8. To save the configuration settings onto a computer, click the Save Configuration File to
LAN PC
9. Specify a location on your network.
A confirmation message displays.
10. Click the OK
A copy of the current settings is saved in the location you specified.
button.
button.
Load Configuration Settings
To load configuration settings from a file that you saved:
1. Launch an Internet browser from a computer or wireless device that is connected to the
network.
2. T
ype http:/192.168.254.254
A login window opens.
3. Enter the user name and password.
The user name is admin. The
are case-sensitive.
.
default
password is admin. The user name and password
Manage Your Network
70
Page 71

The Main page displays.
DRAFT
4. Select Advanced.
5. When prompted, click the Y
Advanced page displays.
The
6. Select Configuration File.
ADSL2+ Gateway
es button to proceed.
7. To load configuration settings that you saved on the gateway, click the Load Configuration
File button.
8. To load configuration files that you saved on a computer, click the Load Configuration File
from LAN PC
The file is uploaded to the gateway and the gateway reboots.
WARNING:
Do not interrupt the reboot process.
button.
Restore the Factory Settings
You can restore the gateway to its factory default settings except the PPP user name and
password, which are retained. This process erases the other gateway configuration settings
that you have set up.
To restore the gateway to its factory default settings:
1. Launch an Internet browser from a computer or wireless device that is connected to the
network.
2. T
ype http:/192.168.254.254.
A login window opens.
Manage Your Network
71
Page 72

ADSL2+ Gateway
DRAFT
3. Enter the user name and password.
The user name is admin. The
are case-sensitive.
The Main page displays.
4. Select Advanced.
5. When prompted, click the Y
The Advanced page displays.
6. Select Restore Defaults.
The Restore Defaults page displays.
7. Click the Restore Defaults button.
The gateway is restored to its factory default settings. The gateway reboots.
default password is admin. The user name and password
es button to proceed.
Dynamic DNS
Internet service providers (ISPs) assign numbers called IP addresses to identify each
Internet account. Most ISPs use dynamically assigned IP addresses. This means that the IP
address can change at any time. You can use the IP address to access your network
remotely, but most people don’t know what their IP addresses are or when this number
changes.
To make it easier to connect, you can get a free account with a Dynamic DNS service that lets
you use a domain name to access your home network.
the gateway to use Dynamic DNS. Then the gateway notifies the Dynamic DNS service
provider whenever its IP address changes. When you access your Dynamic DNS account,
the service finds the current IP address of your home network and automatically connects
you.
If your ISP assigns a private WAN IP address (such as 192.168.x.x or 10.x.x.x), the Dynamic
DNS service does not work because private addresses are not routed on the Internet.
To use this account, you must set up
Specify a DNS Account
To set up Dynamic DNS in the gateway:
1. Launch an Internet browser from a computer or wireless device that is connected to the
network.
2. T
ype http:/192.168.254.254.
A login window opens.
3. Enter the user name and password.
The user name is admin. The
are case-sensitive.
default password is admin. The user name and password
Manage Your Network
72
Page 73

The Main page displays.
DRAFT
4. Select Advanced.
5. When prompted, click the Y
Advanced page displays.
The
6. Select Dynamic DNS.
ADSL2+ Gateway
es button to proceed.
7. Select the DNS Client Enable radio button.
8. In the Service Provider list, select your service provider.
9. In the Host .Domain Name field, type the host name (sometimes called the domain name)
for your account.
10. In the
11. In the User Password field, type the password for your DDNS account.
12. Check Interval
13. Log Level
14. Click the Apply button.
User Name field, enter the user name for your account.
Your changes are saved.
Specify a DNS Server
1. Launch an Internet browser from a computer or wireless device that is connected to the
network.
2. Type http:/192.168.254.254.
A login window opens.
3. Enter the user name and password.
The user name is
are case-sensitive.
The Main page displays.
4. Select Advanced.
5. When prompted, click the Y
admin. The
es button to proceed.
default
Manage Your Network
password is admin. The user name and password
73
Page 74

The Advanced page displays.
DRAFT
6. Select DNS Server.
ADSL2+ Gateway
7. To add a DNS entry, click the Add DNS Entry link and complete the fields.
8. To specify the DNS server, click the Set button.
9. Click the Apply
Your changes are saved.
button.
Specify the Date and Time Settings
By default, the gateway is set to Eastern time with Daylight Saving Time enabled. The
gateway uses the Internet to access a time server to automatically set the time. You can view
and change these settings.
To set the date and time:
1. Launch an Internet browser from a computer or wireless device that is connected to the
network.
2. T
ype http:/192.168.254.254
A login window opens.
3. Enter the user name and password.
The user name is admin. The
are case-sensitive.
.
default
password is admin. The user name and password
The Main page displays.
4. Select Advanced.
5. When prompted, click the Y
es button to proceed.
Manage Your Network
74
Page 75

The Advanced page displays.
DRAFT
ADSL2+ Gateway
6. Select Date and Time
7. Complete the fields to specify the date and time settings.
8. Click the Apply button.
.
Your settings are saved.
Reboot the Gateway
To reboot the gateway:
1. Launch an Internet browser from a computer or wireless device that is connected to the
network.
2. T
ype http:/192.168.254.254.
A login window opens.
3. Enter the user name and password.
The user name is
are case-sensitive.
The Main page displays.
4. Select Advanced.
5. When prompted, click the Y
Advanced page displays.
The
6. Select Reboot Modem.
admin. The
es button to proceed.
default
password is admin. The user name and password
Manage Your Network
75
Page 76

ADSL2+ Gateway
DRAFT
7. When prompted, click the OK button to confirm that you want to reboot the gateway.
The gateway reboots.
Specify the VPN Pass-Through Method
You can specify which kind of VPN pass-through the gateway uses. By default, the gateway
is set up to use PPTP, L2TP, and IPSec.
To specify VPN passthrough:
1. Launch an Internet browser from a computer or wireless device that is connected to the
network.
2. T
ype http:/192.168.254.254.
A login window opens.
3. Enter the user name and password.
The user name is admin. The
are case-sensitive.
The Main page displays.
4. Select Advanced.
5. When prompted, click the Y
The Advanced page displays.
6. Select VPN.
The VPN page displays.
7. Select or clear the following check boxes:
• PPTP PassThru
• L2TP PassThru
• IPSec PassThru
8. Click the Apply button.
Your settings are saved.
default password is admin. The user name and password
es button to proceed.
Manage Your Network
76
Page 77

A. Supplemental Information
DRAFT
This appendix covers the following topics:
• Factory Settings
• Technical Specifications
A
77
Page 78

ADSL2+ Gateway
DRAFT
Factory Settings
You can return the gateway to its factory settings.
To reset the gateway:
Use the end of a paper clip or a similar object to press and hold the Reset button on the
back of the gateway for 10 seconds.
Reset
button
The gateway resets, and returns to the factory configuration settings shown in the
following table.
Table 1. Factory default settings
Feature Default behavior
Gateway login User login URL www.routerlogin.com or www.routerlogin.net
User name (case-sensitive) admin
Login password (case-sensitive) admin
Local network
(LAN)
LAN IP 192.168.254.254
Subnet mask 255.255.255.0
DHCP server Enabled
DHCP range
Time zone Pacific time
DHCP starting IP address Configured by the Internet provider
DHCP ending IP address
DMZ Disabled
Time zone As per the ISP/MSO ToD (Time of Day) Configuration
Time zone adjusted for daylight
savings time
As per ISP/MSO ToD (time of Day) server configuration
SNMP Enabled
Supplemental Information
78
Page 79

ADSL2+ Gateway
DRAFT
Table 1. Factory default settings (continued)
Feature Default behavior
Firewall Inbound (communications coming
in from the Internet)
Outbound (communications going
out to the Internet)
Wireless Wireless communication Enabled
SSID name See the product label
Security WPA2-PSK (AES)
Broadcast SSID Enabled
Country/region United States
Wireless
(continued)
1. Maximum wireless signal rate derived from IEEE Standard 802.11 specifications. Actual throughput can vary. Network
conditions and environmental factors, including volume of network traffic, building materials and construction, and network
overhead, lower actual data throughput rate.
RF channel (2.4 GHz) Auto
Operating mode Up to 300 Mbps at 2.4 GHz
Technical Specifications
Disabled (except traffic on port 80, the HTTP port)
Enabled (all)
1
Table 2. Gateway specifications
Feature Description
Data and routing protocols TCP/IP, DHCP, Dynamic DNS, UPnP, and SMB
Power adapter
(North America)
Dimensions Dimensions: mm x mm x mm ( in. x in. x in.)
Weight Weight: g (0. lb)
Operating temperature 0° to 40° C (32º to 104º F)
Operating humidity 90% maximum relative humidity, noncondensing
Electromagnetic emissions FCC Part 15 Class B
LAN 10BASE-T or 100BASE-TX or 1000BASE-T, RJ-45
WAN 24 x 8 DOCSIS 3.0 WAN Interface
Wireless Maximum wireless signal rate complies with the IEEE 802.11 standard. See the
Radio data rates Auto Rate Sensing
120V, 60 Hz, input
12V/3.5A DC output
footnote for the previous table.
Supplemental Information
79
Page 80

ADSL2+ Gateway
DRAFT
Table 2. Gateway specifications (continued)
Feature Description
Data encoding standards IEEE 802.11n version 2.0
IEEE 802.11g
IEEE 802.11b 2.4 GHz
Maximum computers per
wireless network
Operating frequency range 2.4 GHz: 2.412–2.462 GHz
802.11 security WPA-PSK, WPA2-PSK, and WPA/WPA2
Limited by the amount of wireless network traffic generated by each node
(typically 50–70 nodes).
Supplemental Information
80
Page 81

B. Wall-Mount the Gateway
DRAFT
This appendix describes how to wall-mount the gateway.
The gateway lets you access your network from anywhere within the operating range of your
WiFi network. However
significantly depending on the physical placement of your gateway. For example, the thickness
and number of walls the WiFi signal passes through can limit the range.
For best results, place your gateway according to the following guidelines:
, the operating distance or range of your WiFi connection can vary
B
• Place your gateway on an upper floor of a multifloor home or of
• Place your gateway close to a window but avoiding direct sunlight.
gives the best conditions for receiving a strong 4G LTE signal.
• Place your gateway near the center of the area where your computers and other devices
operate, and within line of sight to your wireless devices.
• Make sure that the gateway is within reach of an
cables for wired computers.
• Place the gateway in an elevated location, minimizing the number of walls and ceilings
between the gateway and your other devices.
• Place the gateway away from electrical devices such as these:
- Ceiling fans
- Home security systems
- Microwaves
- Computers
- Base of a cordless phone
- 2.4 GHz cordless phone
• Place the gateway away from large metal surfaces, large glass surfaces, and insulated
walls such as these:
- Solid metal doors
- Aluminum studs
- Fish tanks
- Mirrors
- Brick
AC power outlet and near Ethernet
fice.
A window location
81
Page 82

ADSL2+ Gateway
DRAFT
- Concrete
To wall-mount the gateway:
1. Drill holes in the wall where you want to wall-mount the gateway.
Holes must be 6-9/16 in.
(167 cm) center to center.
2. Install wall anchors in the holes.
3. Use pan head Phillips wood screws, 3.5 x 20 mm (diameter x length, European) or No. 6
type screws, 1" inch long (U.S.).
4. Insert screws into the wall anchors, leaving 1/8 inch (3 mm) of each screw exposed.
Wall-Mount the Gateway
82
Page 83

ADSL2+ Gateway
DRAFT
1/16 inch
(1.6 mm)
5. Attach the gateway to the screws and secure it into place.
Wall-Mount the Gateway
83
Page 84

FCC statement
Warning: Changes or modifications to this unit not expressly approved by the party
responsible for compliance could void the user’ s au thori ty to oper ate the equipme nt.
NOTE: This equipment has been tested and found to comply with the limits for a Class B
digital device, pu rsuant to Part 15 of the FCC Rules. These limits are designed to provide
reasonable protection against harmful interference in a residential installation. This
equipment generates, uses and can radiate radio frequency energy and, if not installed and
used in accordance with the instructions, may cause harmful interference to radio
communications.
This device complies with Part 15 of the FCC Rules. Operation is subject to the following
two conditions: (1) this device may not cause harmful interference, and (2) this device must
accept any interference received, including interference that may cause undesired
operation.
However, there is no guarantee that interference will not occur in a particular installation.
If this equipment does cause harmful interference to radio or television reception, which
can be determined by turning the equipment off and on, the user is encouraged to try to
correct the interference by one or mor e of the following measures:
z Reorient or relocate the receiving antenna.
z Increase the separation between the equipment and receiver .
z Connect the equipment into an outlet on a circuit different from that to which
the receiver is connected.
z Consult the dealer or an experienced radio/TV technician for help.
“FCC RF Radiation Exposure Statement Caution: To maintain
compliance with the FCC’s RF exposure guidelines, place the product
at least 20cm from nearby persons.”
 Loading...