

Page 1
Quick Start
AC1200 WiFi Range Extender
Model EX6150
Page 2
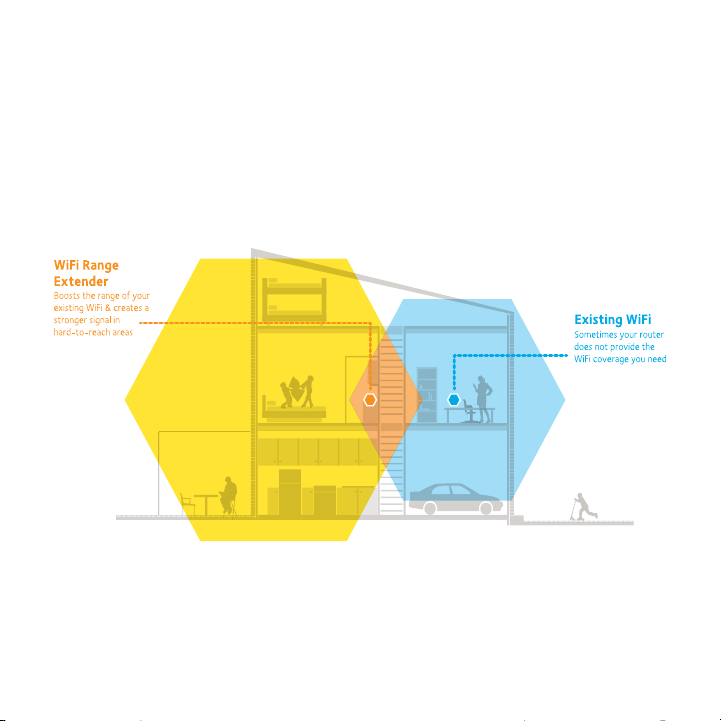
Getting Started
The NETGEAR WiFi Range Extender increases the distance of a WiFi
network by boosting the existing WiFi signal and enhancing the overall
signal quality over long distances. An extender repeats the signals from an
existing WiFi router or access point.
2
Page 3
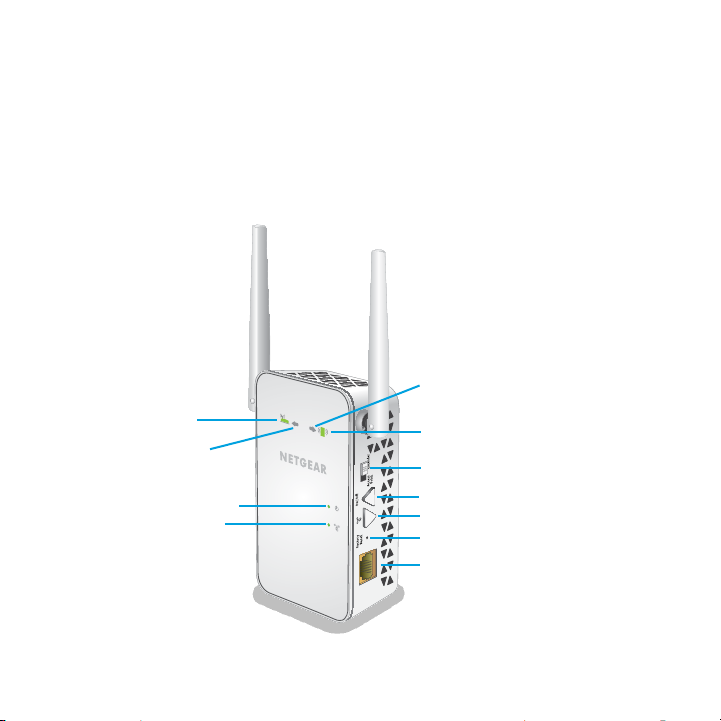
Meet Your Extender
Before you install your extender, familiarize yourself with its LEDs,
buttons, and port.
Front Panel and Side Panel
Client Arrow LED
Router Link LED
Router Arrow LED
Power LED
WPS LED
Client Link LED
Access Point/Extender switch
Power On/O button
WPS button
Factory Reset button
Ethernet port
3
Page 4
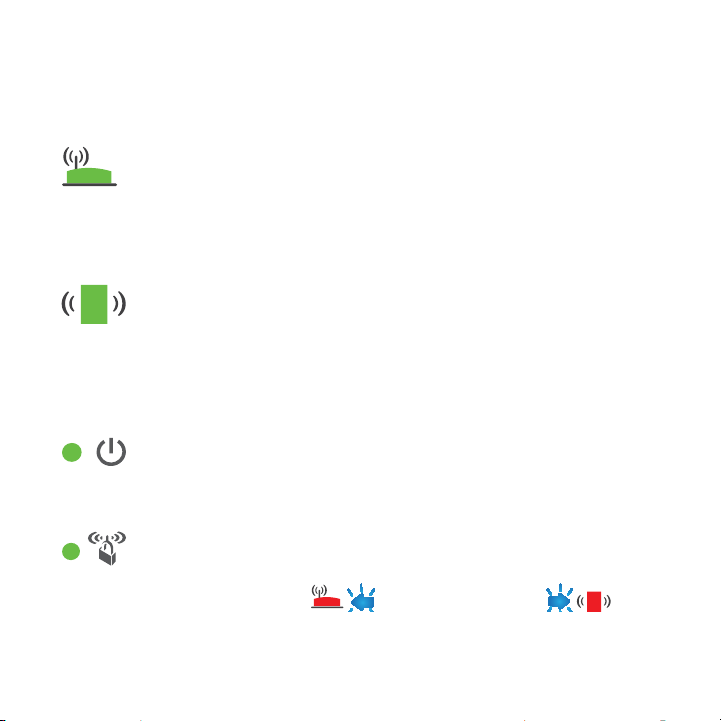
LED Descriptions
Router Link
LED
Client Link LED This LED indicates the connection between the extender and
Power LED
WPS LED Solid green. WiFi security is enabled (WPA or WPA2).
Note: If the Router Arrow LED or Client Arrow LED
blinks, see Find the Best Location on page 11. If no arrow LEDs light, the
extender is in a good location.
This LED indicates the connection between the extender and
the router or access point.
Solid green. Best connection.
Solid amber. Good connection.
Solid red. Poor connection.
O. No connection.
a computer or WiFi device.
Solid green. Best connection.
Solid amber. Good connection.
Solid red. Poor connection.
O. No connection.
Solid amber. The extender is booting.
Solid green. The extender is powered on.
O. The extender is powered o.
Blinking green. A WPS connection is in progress.
O. WiFi security is not enabled.
4
Page 5
Use the Extender in Extender Mode
Set the Access Point/Extender switch, place the extender, apply power,
and connect it to your WiFi network.
Set the Access Point/Extender Switch
To use the extender in extender mode, set the Access Point/Extender
switch to Extender .
Place the Extender and Apply Power
1. Place your extender in the same room as your WiFi router.
Proximity to the WiFi router is required only during the initial setup
process.
2. Plug the extender into an electrical outlet.
The Power LED lights green. If the Power LED does not light,
press the Power On/Off button on the side of the extender.
5
Page 6

Connect to an Existing WiFi Network
To extend the range of your WiFi network, you must connect the extender
to your existing WiFi network. You can do this in one of two ways:
• Connect with WPS. For more information, see Connect with WPS on
page 6
.
• Connect with web browser setup. For more information, see
Connect with Web Browser Setup on page 8.
Connect with WPS
Wi-Fi Protected Setup (WPS) lets you join a secure WiFi network without
typing the network name and password.
Note: WPS does not support WEP network security. If you are using WEP
security, follow the instructions in Connect with Web Browser Setup on
page 8
.
1. Press the WPS button on the side panel of the extender.
The WPS LED blinks.
2. Within two minutes, press the WPS button on your router or access
point.
The WPS LED on the extender lights solid green, the Router Link LED
lights, and the extender connects to your existing WiFi network.
6
Page 7

If the Router LED does not light, try again. If it still does not light, see
Connect with Web Browser Setup on page 8.
3. If your WiFi router supports the 5 GHz band, repeat steps 1 and 2 to
connect the extender to the 5 GHz band.
4. Find the new extended WiFi network name on your computer or WiFi
device.
The extender’s wireless network name (SSID) changes to your
existing network name, with _2GEXT or _5GEXT at the end of the
name, depending on whether the extender is connecting to your WiFi
network in 2.4 GHz or 5 GHz.
For example:
• Existing WiFi network name. MyNetworkName
• New extended network name. MyNetworkName_2GEXT
or
MyNetworkName_5GEXT
5. Connect your computer or WiFi devices to the new extended WiFi
network.
Use the same WiFi password that you use for your WiFi router.
6. Unplug the extender and move it to a new location closer to the area
with a poor WiFi signal.
7
Page 8

The location that you choose must be within the range of your
existing WiFi router network.
7. Plug the extender into an electrical outlet.
The Power LED lights green. If the Power LED does not light,
press the Power On/Off button.
8. Use the Router Link LED on the front panel to help you choose a spot
where the extender-to-router connection is optimal.
Connect with Web Browser Setup
1. Use a WiFi network manager on a computer or WiFi device to find and
connect to the NETGEAR_EXT (SSID) WiFi network.
After the connection with the computer or WiFi device is established,
the Client Link LED lights.
2. Open a web browser window from the same computer or WiFi device.
The browser takes you directly to the NETGEAR genie Smart Setup.
If you are not automatically directed to NETGEAR genie, launch a web
browser and enter www.mywifiext.net in the address field.
The login screen displays.
3. Click the NEW EXTENDER SETUP button.
The Extender Setup screen displays.
4. Complete the Extender Setup screen and click the NEXT button.
8
Page 9

NETGEAR genie displays.
5. Verify that the Access Point/Extender switch is set to Extender and
click the CONTINUE button.
6. Select a WiFi network to extend and click the NEXT button.
If you do not want to extend both WiFi bands, clear the 2.4GHz WiFi
Networks or the 5GHz WiFi Networks checkbox.
7. Type the existing WiFi network password (also called passphrase or
security key) in the Password (network key) field and click the
NEXT button.
8. Set the network name (SSID) and password for your new extender
WiFi network and click the NEXT button.
9. Use a WiFi network manager on the computer or WiFi device to
connect to the new extended WiFi network.
Repeat this step for all of your computers and WiFi devices.
10. Select the check box at the bottom of the screen and click the NEXT
button.
A message displays confirming that the extender has connected to
the WiFi network.
11. Click the Next button.
The reregistration screen displays.
9
Page 10

12. Complete the registration fields and click the Finish button to
complete the setup.
If you do not want to register your extender, click the Skip
Registration link. Note that you must register your extender before
you can use NETGEAR telephone support.
The Status screen displays.
13. Unplug the extender and move it to a new location closer to the area
with a poor WiFi signal.
The location that you choose must be within the range of your
existing WiFi router network.
14. Plug the extender into an electrical outlet.
The Power LED lights green. If the Power LED does not light,
press the Power On/Off button.
Use the Router Link LED to help you choose a spot where the
extender-to-router connection is optimal.
10
Page 11

Find the Best Location
If the WiFi signal is weak, the first time you join the extender network, an
arrow LED blinks for two minutes. If this happens, adjust the position of
the extender.
• If the Router arrow blinks, move the extender closer to the
router.
• If the Client arrow blinks, move the computer or mobile
device closer to the extender.
If no arrow LEDs are lit, the extender is in a good location.
11
Page 12

Connect an Ethernet-Enabled Device
After the extender is connected to your existing WiFi network, you can
connect a wired device to the extender using an Ethernet cable. That
device can then access your existing network through the WiFi connection.
Extender Blu-ray player
WiFi router
1. Set up the extender.
For more information, see Place the Extender and Apply Power on page
5
.
2. Connect the extender to an existing WiFi network.
For more information, see Connect to an Existing WiFi Network on
page 6
.
3. Plug the Ethernet cable from an Ethernet-enabled device in to the
Ethernet port on the extender.
12
Page 13

Use the Extender in Access Point Mode
You can use the extender as a WiFi access point, which creates a new WiFi
hotspot by using a wired Ethernet connection.
1. Set the Access Point/Extender switch to Access Point .
2. Plug the extender into an electrical outlet.
The Power LED lights green within one minute. If the Power
LED does not light, press the Power On/Off button.
3. Use an Ethernet cable to connect the extender to the router Ethernet
LAN port or the remote Ethernet LAN jack with LAN access.
The extender joins the LAN and creates a WiFi hotspot.
13
Page 14

4. Use a WiFi network manager on a computer or WiFi device to find and
join a WiFi extender network.
When the extender is in access point mode, you can join one of the
following WiFi extender networks:
• 2.4 GHz network. NETGEAR_EXT
• 5 GHz network. NETGEAR_5GEXT
When you join the network, the extender Client Link LED lights
to show that you are connected.
5. Launch a web browser and enter www.mywifiext.net in the address
field.
A login screen displays.
6. Click the NEW EXTENDER SETUP button.
The Extender Setup screen displays.
7. Complete the Extender Setup screen and click the NEXT button.
8. Verify that the Access Point/Extender switch is set to Access Point
and click the CONTINUE button.
The extender checks for an Internet connection.
9. Click the HOME NETWORK or PUBLIC NETWORK button.
10. Set the network name (SSID), security option, and password for each
access point network, and click the Next button.
14
Page 15

Your settings are applied and the extender is ready to be used as an
access point.
11. Use a WiFi network manager on the computer or WiFi device to
connect to the new extended WiFi network.
Log In to Access Extender Settings
After installation, you can log in to the extender to view or change the
extender’s settings.
1. Use a WiFi network manager on a computer or WiFi device to find and
connect to the new extended WiFi network.
After the connection with the computer or WiFi device is established,
the Client Link LED lights.
2. Launch a web browser.
3. Enter www.mywifiext.net in the address field of the browser.
A login screen displays.
4. Type your email and password and click the LOG IN button.
The Status screen displays.
5. Make any needed changes.
15
Page 16

Frequently Asked Questions
You can find more information about your product in the user manual,
which is available at http://support.netgear.com.
The web browser setup guide keeps asking me for my network
password (passphrase) or security key, and I am sure I have entered
the correct password. What can I do?
The extender is probably placed at the borderline of the range covered by
the router or access point. For more information, see Place the Extender
and Apply Power on page 5.
If you are using WEP security, make sure that you are typing the network
password in the correct field.
Can I set up the extender in extender mode if I connect it to the
router or access point with an Ethernet cable?
No. The extender is designed to connect wirelessly to the router or access
point if it is in extender mode. If the extender is in access point mode, you
can connect it to the router or access point with an Ethernet connection.
For more information about access point mode, see Use the Extender in
Access Point Mode on page 13.
16
Page 17

I forgot my login email and password. What can I do?
On the login screen, click the Username & Password Help link to answer
the security questions you set up during the initial setup.
If you forgot the answers to your security questions, do the following to
set up your login credentials again:
1. Restore the extender to its factory default settings.
2. Launch a web browser.
3. Enter www.mywifiext.net in the address field of the browser.
The login screen displays.
4. Click the NEW EXTENDER SETUP button.
The login setup screen dispalys.
How do I restore the extender to its factory default settings?
1. Use a sharp object such as a pen or paper clip to press and hold the
Factory Reset button on the bottom of the extender for at least five
seconds until the Power LED blinks amber.
2. Release the Factory Reset button and wait for the extender to
reboot.
The extender resets and returns to the factory default settings.
17
Page 18

I enabled a wireless MAC filter, wireless access control, or access
control list (ACL) on my router. What should I do when installing
the extender?
When the WiFi device connects through the extender to your router,
the MAC address of the WiFi device shown on the router is translated to
another MAC address. If your router’s MAC filter, wireless access control,
or ACL is enabled, the WiFi device connects to the extender but cannot
get an IP address from the extender and cannot access the Internet.
To allow the WiFi device to receive an IP address from the extender and
access the Internet, you must provide the translated MAC address to the
router.
1. Log in to your router and disable the MAC filter, wireless access
control, or ACL.
For more information on how to disable your router’s MAC filter,
wireless access control, or ACL, see your router’s documentation.
2. Power on the extender and connect all of your WiFi devices to the
extender network.
3. Make sure that the Router Link LED remains lit.
4. Log in to your extender.
a. Launch a web browser and in the address field, enter
www.mywifiext.net.
18
Page 19

A login screen displays.
b. Type your email and password and click the LOG IN button.
The Status screen displays.
5. Select Settings > WiFi Settings > Connected Devices.
The Connected Devices screen displays the MAC addresses and virtual
MAC addresses for computers and WiFi devices that are connected to
the extender network.
6. On the router, add all of the virtual MAC addresses from your
extender to your router’s MAC filter table.
7. Enable the router’s MAC filter, wireless access control, or ACL.
I am connected to NETGEAR_EXT and launched a browser. Why
can’t I see the web browser setup guide?
Try these troubleshooting steps:
• Make sure that your computer is set up to use DHCP (most are).
• Make sure that the Client Link LED is green and that you have a valid
IP address.
• Relaunch the web browser and type www.mywifiext.net in the
address field. Type your email and password and click the LOG IN
button.
19
Page 20

Technical Support
Thank you for purchasing this NETGEAR product. After installing your device, locate
the serial number on the label of your product and use it to register your product at
https://my.netgear.com. You must register your product before you can use NETGEAR
telephone support. NETGEAR recommends registering your product through the
NETGEAR website.
For product updates and web support, visit http://support.netgear.com.
NETGEAR recommends that you use only the official NETGEAR support resources. You
can get the user manual online at http://downloadcenter.netgear.com or through a link
in the product’s user interface.
Trademarks
NETGEAR, the NETGEAR logo, and Connect with Innovation are trademarks and/or registered
trademarks of NETGEAR, Inc. and/or its subsidiaries in the United States and/or other
countries. Information is subject to change without notice. © NETGEAR, Inc. All rights
reserved.
Compliance
For the current EU Declaration of Conformity, visit
http://support.netgear.com/app/answers/detail/a_id/11621/.
For regulatory compliance information, visit:
http://www.netgear.com/about/regulatory/.
See the regulatory compliance document before connecting the power supply.
NETGEAR, Inc.
BETA DOCUMENT
August 2014
350 East Plumeria Drive
San Jose, CA 95134, USA
Page 21

Federal Communication Commission Interference Statement
The product is for indoor use only for all bands
This device complies with Part 15 of the FCC Rules. Operation is subject to
the following two conditions: (1) This device may not cause harmful
interference, and (2) this device must accept any interference received,
including interference that may cause undesired operation.
This equipment has been tested and found to comply with the limits for a
Class B digital device, pursuant to Part 15 of the FCC Rules. These limits
are designed to provide reasonable protection against harmful interference in a
residential installation. This equipment generates, uses and can radiate radio
frequency energy and, if not installed and used in accordance with the
instructions, may cause harmful interference to radio communications.
However, there is no guarantee that interference will not occur in a particular
installation. If this equipment does cause harmful interference to radio or
television reception, which can be determined by turning the equipment off
and on, the user is encouraged to try to correct the interference by one of the
following measures:
- Reorient or relocate the receiving antenna.
- Increase the separation between the equipment and receiver.
- Connect the equipment into an outlet on a circuit different from that
to which the receiver is connected.
- Consult the dealer or an experienced radio/TV technician for help.
FCC Caution: Any changes or modifications not expressly approved by the
party responsible for compliance could void the user's authority to operate this
equipment.
This transmitter must not be co-located or operating in conjunction with any
other antenna or transmitter.
For operation within 5.15 ~ 5.25GHz frequency range, it is restricted to indoor
environment.
Page 22

Radiation Exposure Statement:
This equipment complies with FCC radiation exposure limits set forth for an
uncontrolled environment. This equipment should be installed and operated
with minimum distance 20cm between the radiator & your body.
Industry Canada statement:
This device complies with RSS-247 of the Industry Canada Rules. Operation is
subject to the following two conditions: (1) This device may not cause harmful
interference, and (2) this device must accept any interference received, including
interference that may cause undesired operation.
Ce dispositif est conforme à la norme CNR-247d'Industrie Canada applicable aux
appareils radio exempts de licence. Son fonctionnement est sujet aux deux conditions
suivantes: (1) le dispositif ne doit pas produire de brouillage préjudiciable, et (2) ce
dispositif doit accepter tout brouillage reçu, y compris un brouillage susceptible de
provoquer un fonctionnement indésirable.
Caution :
(i) the device for operation in the band 5150-5250 MHz is only for indoor use to
reduce the potential for harmful interference to co-channel mobile satellite systems;
(ii) high-power radars are allocated as primary users (i.e. priority users) of the bands
5250-5350 MHz and 5650-5850 MHz and that these radars could cause interference
and/or damage to LE-LAN devices.
Avertissement:
(i) les dispositifs fonctionnant dans la bande 5 150-5 250 MHz sont réservés
uniquement pour une utilisation à l’intérieur afin de réduire les risques de
brouillage préjudiciable aux systèmes de satellites mobiles utilisant les mêmes
canaux;
(ii) De plus, les utilisateurs devraient aussi être avisés que les utilisateurs de radars de
haute puissance sont désignés utilisateurs principaux (c.-à-d., qu’ils ont la priorité)
pour les bandes 5 250-5 350 MHz et 5 650-5 850 MHz et que ces radars pourraient
causer du brouillage et/ou des dommages aux dispositifs LAN-EL.
Page 23

Radiation Exposure Statement:
This equipment complies with IC radiation exposure limits set forth for an
uncontrolled environment. This equipment should be installed and operated with
minimum distance 23cm between the radiator & your body.
Déclaration d'exposition aux radiations:
Cet équipement est conforme aux limites d'exposition aux rayonnements IC établies
pour un environnement non contrôlé. Cet équipement doit être installé et utilisé avec
un minimum de 23 cm de distance entre la source de rayonnement et votre corps.
 Loading...