

Page 1
R6300v2 S m a r t WiFi
Router
350 East Plumeria Drive
San Jose, CA 95134
USA
U s e r M an u al
Page 2

R6300
WiFi Router
802.11ac Dual
Band
Gigabit
2
©2012 NETGEAR, Inc. All rights reserved.
No part of this publication may be reproduced, transmitted, transcribed, stored in a retrieval system, or translated
into any language in any form or by any means without the written permission of NETGEAR, Inc.
T
echnical Support
Thank you for choosing NETGEAR. To register your product, get the latest product updates, or get support online,
visit us at http://support.netgear.com.
Phone (US & Canada only): 1-888-NETGEAR
Phone (Other Countries): See support information card.
T
rademarks
NETGEAR, the NETGEAR logo, and Connect with Innovation are trademarks and/or registered trademarks of
NETGEAR, Inc. and/or its subsidiaries in the United States and/or other countries. Information is subject to change
without notice. Other brand and product names are registered trademarks or trademarks of their respective
holders. © 2012 NETGEAR, Inc. All rights reserved.
Statement
To improve internal design, operational function, and/or reliability, NETGEAR reserves the right to make changes
to the products described in this document without notice. NETGEAR does not assume any liability that may occur
due to the use, or application of, the product(s) or circuit layout(s) described herein.
of
Conditions
Page 3

R6300
WiFi Router
802.11ac Dual
Band
Gigabit
3
Page 4

7
1
1.
Hardware
Setup
Ge t
t i n
g t o
The NETGEAR R6300 WiFi Router delivers next-generation WiFi at gigabit speeds. It offers the
ultimate mobility for WiFi devices with speeds up to three times faster than 802.11n.
Compatible with next-generation WiFi devices, and backward compatible with 802.11 a/b/g and n
devices, it enables HD streaming throughout your home. The R6300 with simultaneous
dual-band WiFi technology offers speeds up to 450
ensuring top WiFi speeds and reliable connections. This makes it ideal for larger homes with
multiple devices. In addition, four Gigabit Ethernet ports offer ultra-fast wired connections.
Wirelessly access and share a USB hard drive and USB printer using the two USB 2.0 ports.
If you already set up your router, you can skip this chapter. If you have not done that yet, this
chapter covers the hardware setup. Chapter 3, genie Basic Settings, explains how to set up your
Internet connection.
This chapter contains the following sections:
• Unpack Your Router
• Position Your Router
• Hardware Features
For information about ReadySHARE features in your product, see Chapter 5, USB Storage, and
www.netgear.com/readyshare.
The NETGEAR genie® app provides easy installation from an iPad, tablet, computer, or
smartphone. It includes a personal dashboard, allowing you to manage, monitor, and repair your
home network. NETGEAR customers can download the app at www.netgear.com/genie or from
the Google Play or App Store.
For more information about the topics covered in this manual, visit the Support website at
http://support.netgear.com.
k n o
w y o ur r o u t e
1. Maximum wireless signal rate derived from IEEE standard 802.11 specifications. Actual data throughput and wireless coverage will vary. Network
conditions and environmental factors, includin g volume of network traffic, building materials and construction, and network overhead, lower actual
data throughput rate and wireless coverage. NETGEAR makes no express or implied representations or warranties about this product’s compatibility
with any future standards. 802.11ac 1300 Mbps is approximately 3x faster than 802.11n 450 Mbps.
2. Up to 1300 Mbps wireless speeds achieved wh en connecting to other 802.11ac 1300 Mbps devices.
r
1
to 13002 Mbps and avoids interference,
Page 5

Hardware
Setup
Unpack Your R
Open the box and remove the router, cables, and installation guide.
outer
Ethernet cable
Power adapter
Dual Band WiFi Router
Figure 1. Check the package contents
Your box contains the following items:
• R6300 smart WiFi Router
• AC power adapter and power cord (plug varies by region)
• Category 5 (Cat 5) Ethernet cable
• Installation guide with cabling and router setup instructions
If any parts are incorrect, missing, or damaged, contact your NETGEAR dealer. Keep the
carton and original packing materials, in case you need to return the product for repair.
Power cord
Position Your R
outer
The router lets you access your network from virtually anywhere within the operating range of
your wireless network. However, the operating distance or range of your wireless connection
can vary significantly depending on the physical placement of your router. For example, the
thickness and number of walls the wireless signal passes through can limit the range. For
best results, place your router:
• Near the center of the area where your computers and other devices operate, and
preferably within line of sight to your wireless devices.
• So it is accessible to an AC power outlet and near Ethernet cables for wired computers.
8
Page 6
Hardware
Setup
• In an elevated location such as a high shelf, keeping the number of walls and ceilings
between the router and your other devices to a minimum.
• Away from electrical devices that are potential sources of interference. Equipment that
might cause interference includes ceiling fans, home security systems, microwaves,
computers, the base of a cordless phone, or 2.4 GHz cordless phone.
• Away from any large metal surfaces, such as a solid metal door or aluminum studs. Large
expanses of other materials such as glass, insulated walls, fish tanks, mirrors, brick, and
concrete can also affect your wireless signal.
When you use multiple access points, it is better if adjacent access points use different radio
frequency channels to reduce interference. The recommended channel spacing between
adjacent access points is five channels (for example, use Channels 1 and 6, or 6 and 11).
Hardware Features
Before you cable your router, take a moment to become familiar with the front, side, and back
panels and the label. Pay particular attention to the LEDs on the front panel.
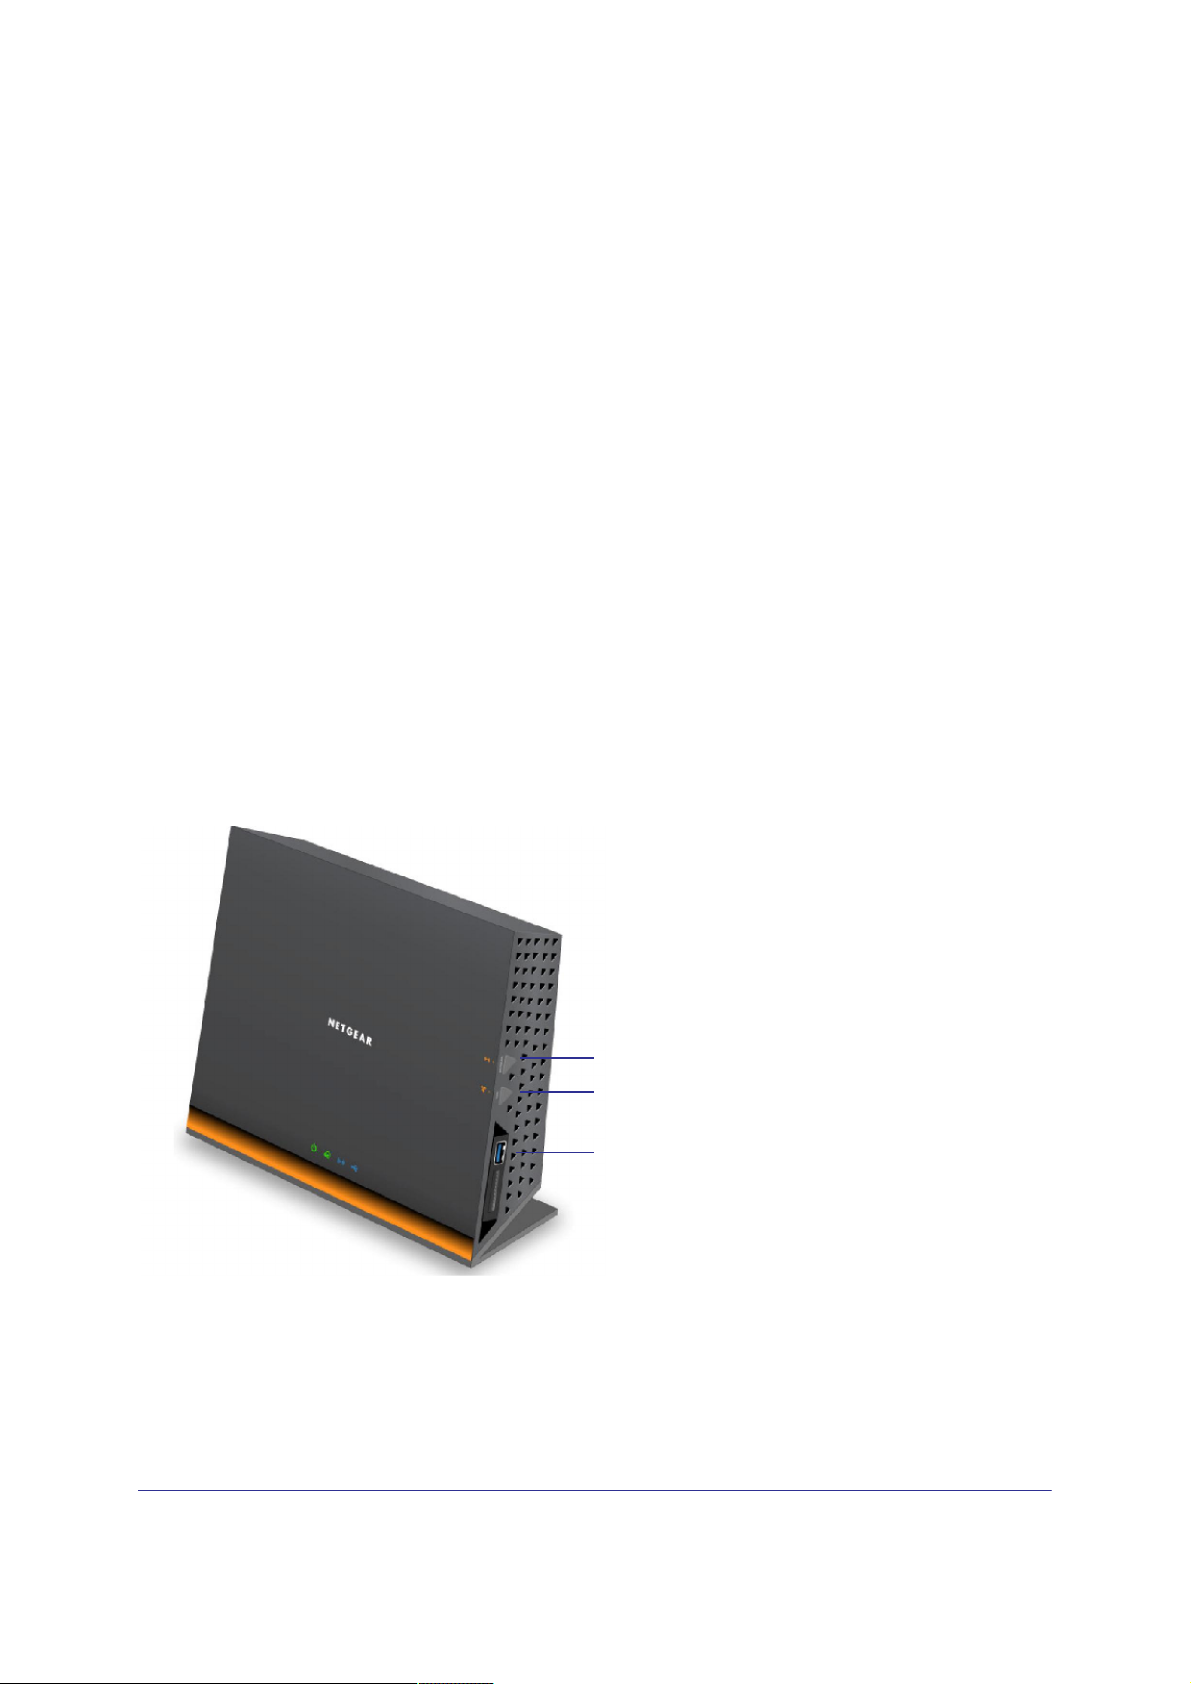
Front
The router front panel has the status LEDs and icons shown in the following figure.
LEDs
and
Side Panel
WiFi On/Off button
WPS button
USB port
Figure 2. Router, front and side view
9
Page 7
Hardware
Setup
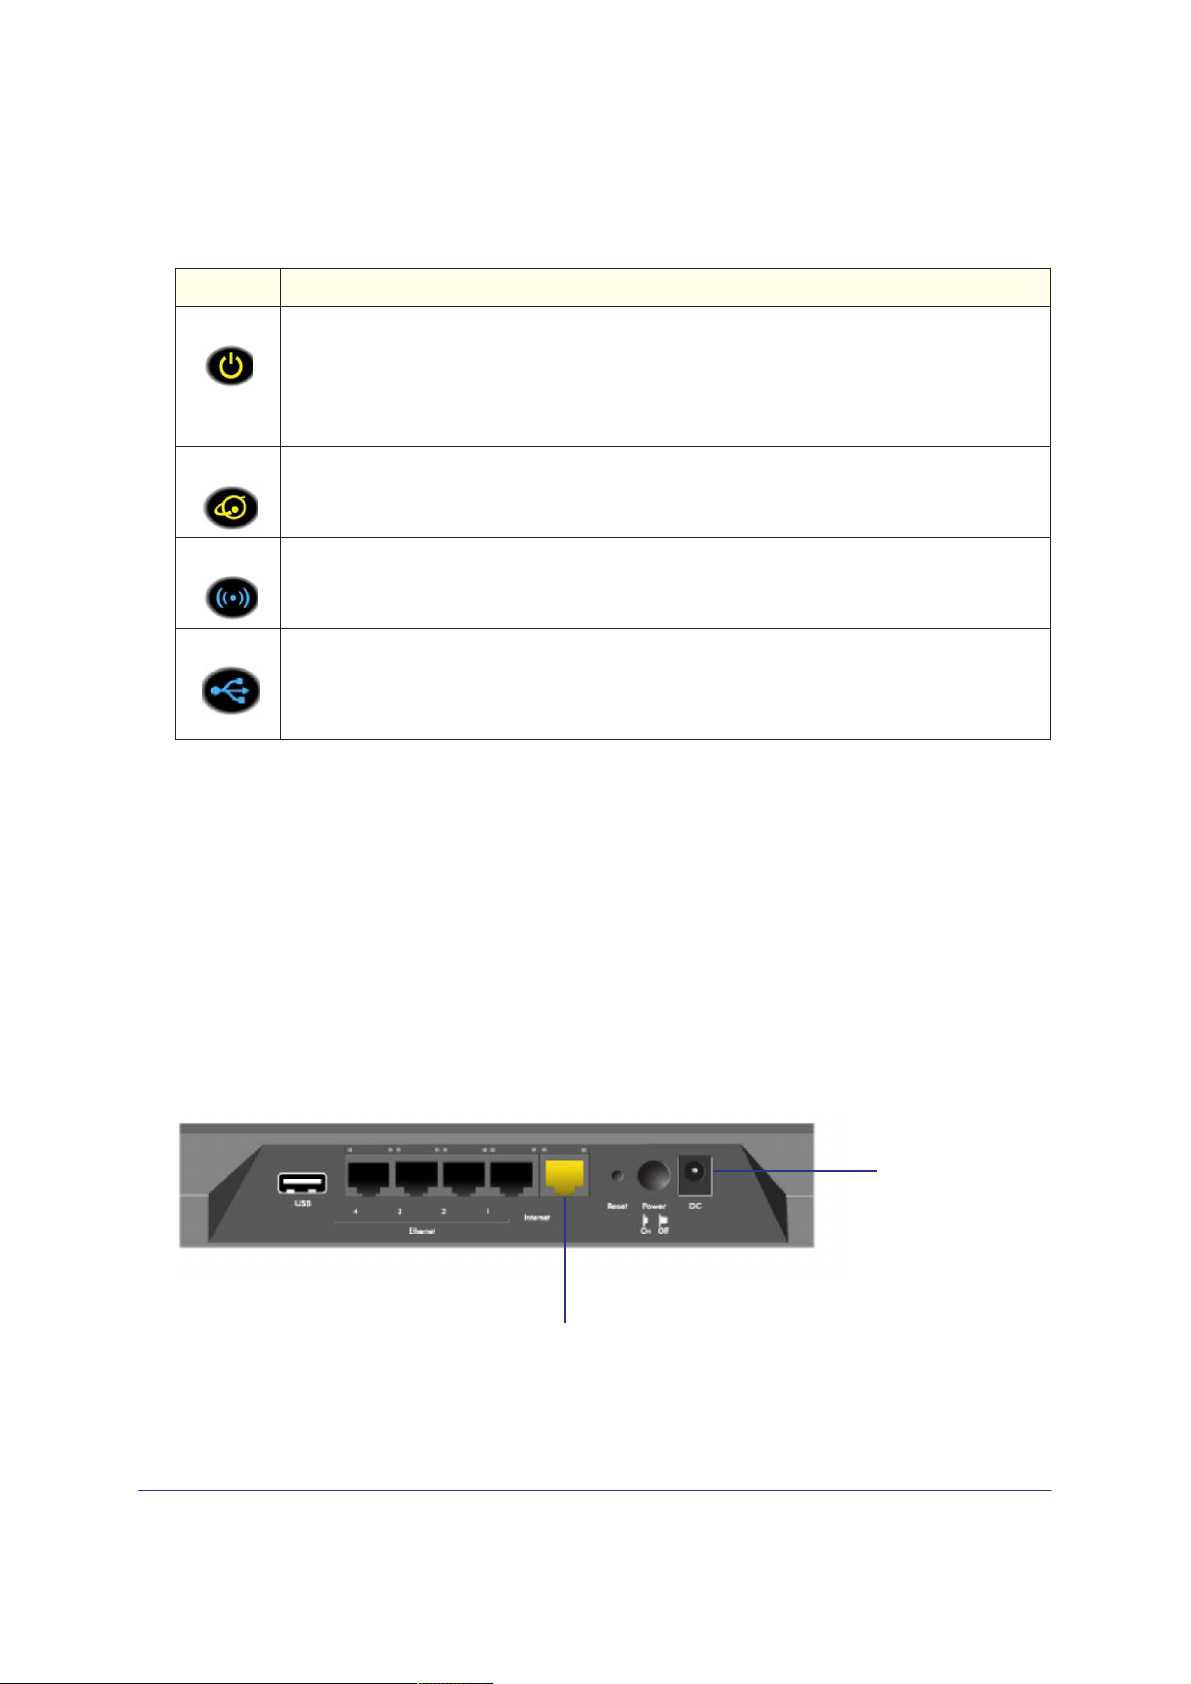
Table 1. Front panel LED descriptions
LED
Power
Internet
Description
• Solid amber. The router is starting up.
• Blinking amber. The firmware is upgrading, or the Reset button was pressed.
• Solid green. The router is ready.
• Blinking green. The firmware is corrupted. See www.netgear.com/support.
• Off. Power is not supplied to the router.
• Solid green. The Internet connection is ready.
• Solid amber. The Ethernet cable connection to the modem has been detected.
• Off. No Ethernet cable is connected to the modem.
USB
• Solid blue. The wireless radio is operating in either 2.4 GHz or 5 GHz mode.
• Blinking: The router is in WPS mode.
• Off. The wireless radios are off for both 2.4 GHz and 5 GHz.
• Solid blue: The USB device has been accepted by the router and is ready to be used.
• Blinking blue: A second USB HDD is plugged in and is trying to connect.
• Off: No USB device is connected, someone clicked the Safely Remove Hardware button, and
it is now safe to remove the attached USB device.
Wireless
The WiFi On/Off and WPS buttons toggle the WiFi and WPS functions on and off.
• WiFi On/Off button. Pressing and holding the WiFi On/Off button for 2 seconds turns the
2.4 GHz and 5 GHz wireless radios on and off. If the 2.4 GHz and 5 GHz LEDs are lit,
then the wireless radio is on. If these LEDs are off, then the wireless radios are turned off
and you cannot connect wirelessly to the router.
• WPS button. You can use this button to use WPS to add a wireless device or computer
to your wireless network. The LED below the WPS button blinks green when the router is
trying to add the wireless device or computer. The LED stays solid green when wireless
security is enabled in the router.
Back Panel
The back panel has the connections shown in the following figure.
Power connector
USB Ethernet Internet
port
LAN ports 1–4
Reset
port button
Power On/Off
10
Page 8

12
2
Figure 3. Router, rear view
See Factory Settings on page 115 for information about restoring factory settings.
2.
Getting Started with
NETGEAR genie
C o nn ec t in
This chapter explains how to use NETGEAR genie to set up your router after you complete
cabling as described in the installation guide and in the previous chapter.
This chapter contains the following sections:
• Router Setup Preparation
• Types of Logins and Access
• NETGEAR genie Setup
• Use NETGEAR genie after Installation
• Upgrade Router Firmware
• Router Dashboard (Basic Home Screen)
• Add Wireless Devices or Computers to Your Network
• NETGEAR genie App and Mobile genie App
g t o t h e r o u t e
r
Page 9

R6300
WiFi Router
802.11ac Dual
Band
Gigabit
Getting
Started
with NETGEAR
genie
Router Setup Preparation
You can set up your router with the NETGEAR genie automatically, or you can use the genie
menus and screens to set up your router manually. Before you start the setup process, get
your ISP information, and make sure the computers and devices in the network have the
settings described here.
Use
If you set up your computer to use a static IP address, you need to change the settings so
that it uses Dynamic Host Configuration Protocol (DHCP).
Gather
If you have DSL broadband service, you might need the following information to set up your
router and to check that your Internet configuration is correct. Your Internet service provider
(ISP) should have provided you with all of the information needed to connect to the Internet.
If you cannot locate this information, ask your ISP to provide it. When your Internet
connection is working, you no longer need to launch the ISP’s login program on your
computer to access the Internet. When you start an Internet application, your router
automatically logs you in.
• The ISP configuration information for your DSL account
• ISP login name and password
• Fixed or static IP address settings (special deployment by ISP; this is rare)
Wireless Devices
Make sure that the wireless device or computer that you are using supports WPA or WPA2
wireless security, which is the wireless security supported by the router.
Standard
ISP
Information
TCP/IP
and
Properties
Security
for
DHCP
Settings
T
ypes
of Logins
There are separate types of logins that have different purposes. It is important that you
understand the difference so that you know which login to use when.
• Router login logs you in to the router interface from NETGEAR genie. See Use
NETGEAR genie after Installation on page 15 for details about this login.
• ISP login logs you in to your Internet service. Your service provider has provided you with
this login information in a letter or some other way. If you cannot find this login
information, contact your service provider.
• Wireless network key or password. Your router is preset with a unique wireless
network name (SSID) and password for wireless access. This information is on the label
on the bottom of your router.
and Access
13
Page 10

R6300
WiFi Router
802.11ac Dual
Band
Gigabit
Getting
Started
with NETGEAR
genie
NETGEAR
genie Setup
NETGEAR genie runs on any device with a web browser. It is the easiest way to set up the
router because it automates many of the steps and verifies that those steps have been
successfully completed. It takes about 15 minutes to complete.
To use NETGEAR genie to set up your router:
1. Turn the router on by pressing the On/Off button, if not done yet.
2. Make sure that your device is connected with an Ethernet cable (wired) or wirelessly (with
the preset security settings listed on the bottom label) to your router.
3. Launch your Internet browser.
• The first time you are set up the Internet connection for your router, the browser goes
to http://www.routerlogin.net, and the NETGEAR genie screen displays.
• If you already used the NETGEAR genie, type http://www.routerlogin.net in the
address field of your browser to display the NETGEAR genie screen. See Use
NETGEAR genie after Installation on page 15.
4. Follow the onscreen instructions to complete NETGEAR genie setup. NETGEAR genie
guides you through connecting the router to the Internet.
If the browser cannot display the web page:
• Make sure that the computer is connected to one of the four LAN Ethernet ports, or
wirelessly to the router.
• Make sure that the router has full power, and that its wireless LED is lit.
• Close and re-open the browser to make sure the browser does not cache the previous
page.
• Browse to http://www.routerlogin.net.
• If the computer is set to a static or fixed IP address (this is uncommon), change it to
obtain an IP address automatically from the router.
If the router does not connect to the Internet:
1. Review your settings to be sure that you have selected the correct options and typed
everything correctly.
2. Contact your ISP to verify that you have the correct configuration information.
3. Read Chapter 10, Troubleshooting. If problems persist, register your NETGEAR product and
contact NETGEAR technical support.
14
Page 11
R6300
WiFi Router
802.11ac Dual
Band
Gigabit
Getting
Started
with NETGEAR
genie
Use
NETGEAR
genie
after
Installation
When you first set up your router, NETGEAR genie automatically starts when you launch an
Internet browser on a computer that is connected to the router. You can use NETGEAR genie
again if you want to view or change settings for the router.
1. Launch your browser from a computer or wireless device that is connected to the router.
2. Type http://www.routerlogin.net or http://www.routerlogin.com.
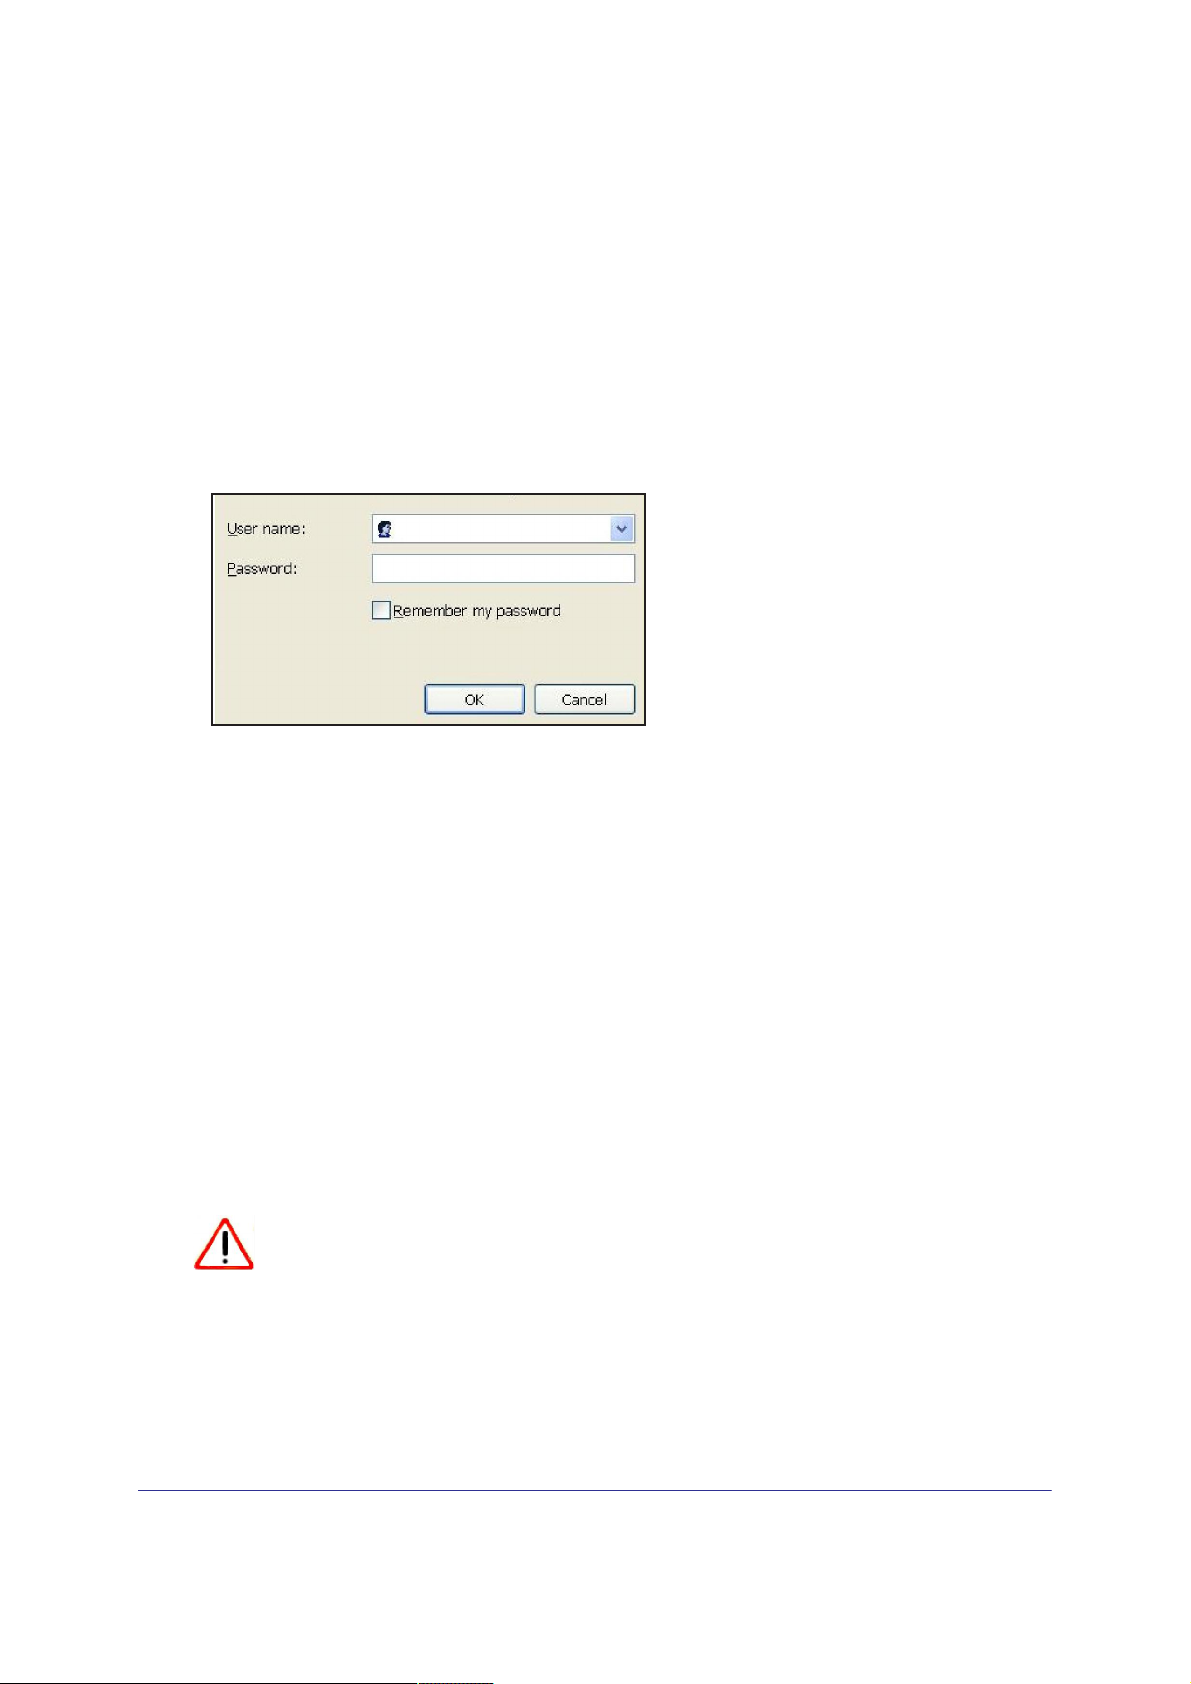
dmin
The login window displays:
a
3. Enter admin for the router user name and password for the router password, both in
lowercase letters.
********
Note: The router user name and password are different from the user name
and password for logging in to your Internet connection. See Types of Logins
and Access on page 13 for more information.
Upgrade
Router
Firmware
When you set up your router and are connected to the Internet, the router automatically
checks for you to see if newer firmware is available. If it is, a message is displayed on the top
of the screen. See Upgrade the Router Firmware on page 71 for more information about
upgrading firmware.
Click the message when it shows up, and click Yes to upgrade the router with the latest
firmware. After the upgrade, the router restarts.
CAUTION:
Do not try to go online, turn off the router, shut down the computer, or do
anything else to the router until the router finishes restarting and the
Power LED has stopped blinking for several seconds.
15
Page 12

R6300
WiFi Router
802.11ac Dual
Band
Gigabit
Getting
Started
with NETGEAR
genie
Router
Dashboard
(Basic
Home Screen)
The router Basic Home screen has a dashboard that lets you see the status of your Internet
connection and network at a glance. You can click any of the six sections of the dashboard to
view more detailed information. The left column has the menus, and at the top there is an
Advanced tab that is used to access additional menus and screens.
Menus
(Click the
Advanced
tab to view
more)
Language
Dashboard
(Click to
view details)
Help
Figure 5. Router Basic Home screen with dashboard, language, and online help
• Home. This dashboard screen displays when you log in to the router.
• Internet. Set, update, and check the ISP settings of your router.
• Wireless. View or change the wireless settings for your router.
• Attached Devices. View the devices connected to your network.
• Parental Controls. Download and set up parental controls to prevent objectionable
content from reaching your computers.
• ReadySHARE. If you connected a USB storage device to the router, then it is displayed
here.
• Guest Network. Set up a guest network to allow visitors to use your router’s Internet
connection.
• Advanced tab. Set the router up for unique situations such as when remote access by IP
or by domain name from the Internet is needed. See Chapter 9, Advanced Settings.
Using this tab requires a solid understanding of networking concepts.
• Help & Support. Go to the NETGEAR support site to get information, help, and product
documentation. These links work once you have an Internet connection.
16
Page 13

R6300
WiFi Router
802.11ac Dual
Band
Gigabit
Getting
Started
with NETGEAR
genie
Add Wireless Devices or
Computers
to Your Network
Choose either the manual or the WPS method to add wireless devices and other equipment
to your wireless network. See Guest Networks on page 28 for instructions on how to set up a
guest network.
Manual Method
To connect manually:
1. Open the software that manages your wireless connections on the wireless device
(laptop computer, gaming device, iPhone) that you want to connect to your router. This
software scans for all wireless networks in your area.
2. Look for your network and select it. If you did not change the name of your network during
the setup process, look for the default Wi-Fi network name (SSID) and select it. The default
SSID is printed on the label on the bottom of the router.
3. Enter the router password and click Connect. The default router passphrase is printed on
the product label on the bottom of the router.
4. Repeat steps 1–3 to add other wireless devices.
Wi-Fi
Protected
Setup (WPS)
Method
Wi-Fi Protected Setup (WPS) is a standard for easily adding computers and other devices to
a home network while maintaining security. To use WPS, make sure that all wireless devices
to be connected to the network are Wi-Fi certified and support WPS. During the connection
process, the client gets the security settings from the router so that every device in the
network has the same security settings.
To use WPS to join the wireless network:
If your wireless device supports WPS (Push 'N' Connect), follow these steps:
1. Press the WPS button on the router front panel .
2. Within 2 minutes, press the WPS button on your wireless device, or follow the WPS
instructions that came with the device. The device is now connected to your router.
3. Repeat steps 1–2 to add other WPS wireless devices.
17
Page 14

R6300
WiFi Router
802.11ac Dual
Band
Gigabit
Getting
Started
with NETGEAR
genie
NETGEAR
genie
App
and
Mobile
genie App
The genie app is the easy dashboard for managing, monitoring, and repairing your home
network. See the NETGEAR genie App User Manual for details about these products.
Retrieve wireless password
About genie
Language
Menu
Dashboard
(Click to
view
details)
Support
• Automatically repair common wireless network problems.
• Have easy access to router features like Live Parental Controls, guest access, broadband
usage meter, speed test, and more.
Use the genie mobile app on your iPhone, iPad, or Android phone:
Phone status
Log in to the router
Search NETGEAR
support
Information about
genie mobile app
and the connected
router
18
Page 15

R6300
WiFi Router
802.11ac Dual
Band
Gigabit
Advanced
Settings
19
Page 16

105
10.
Trouble
sh
oo
ting
This chapter provides information to help you diagnose and solve problems you might have with
your router. If you do not find the solution here, check the NETGEAR support site at
http://support.netgear.com for product and contact information.
This chapter contains the following sections:
• Quick Tips
• Troubleshooting with the LEDs
• Cannot Log In to the Router
• Cannot Access the Internet
• Changes Not Saved
• Wireless Connectivity
• Restore the Factory Settings and Password
• Troubleshoot Your Network Using the Ping Utility
Page 17

R6300
WiFi Router
802.11ac Dual
Band
Gigabit
T
roubleshooting
Quick Tips
This section describes tips for troubleshooting some common problems
Sequence
Be sure to restart your network in this sequence:
1. Turn off and unplug the modem.
2. Turn off the router and computers.
3. Plug in the modem and turn it on. Wait 2 minutes.
4. Turn on the router and wait 2 minutes.
5. Turn on the computers.
Check
Make sure that the Ethernet cables are securely plugged in.
• The Internet LED on the router is on if the Ethernet cable connecting the router and the
modem is plugged in securely and the modem and router are turned on.
• For each powered-on computer connected to the router by an Ethernet cable, the
corresponding numbered router LAN port LED is on.
Wireless
Make sure that the wireless settings in the computer and router match exactly.
• For a wirelessly connected computer, the wireless network name (SSID) and wireless
security settings of the router and wireless computer need to match exactly.
• If you set up an access list in the Advanced Wireless Settings screen, you have to add
each wireless computer’s MAC address to the router’s access list.
Network Settings
Make sure that the network settings of the computer are correct.
• Wired and wirelessly connected computers need to have network (IP) addresses on the
same network as the router. The simplest way to do this is to configure each computer to
obtain an IP address automatically using DHCP.
• Some cable modem service providers require you to use the MAC address of the
computer initially registered on the account. You can view the MAC address in the
Attached Devices screen.
to Restart Your Network
Ethernet Cable Connections
Settings
106
Page 18

R6300
WiFi Router
802.11ac Dual
Band
Gigabit
T
roubleshooting
T
roubleshooting
After you turn on power to the router, the following sequence of events should occur:
1. When power is first applied, verify that the Power LED is on.
2. Verify that the Power LED turns amber within a few seconds, indicating that the self-test is
running.
3. After approximately 30 seconds, verify the following:
• The Power LED is solid green.
• The Internet LED is on.
• A numbered Ethernet port LED is on for any local port that is connected to a
The LEDs on the front panel of the router can be used for troubleshooting.
Power
• Make sure that the power cord is securely connected to your router and that the power
• Check that you are using the 12V DC, 5A power adapter that NETGEAR supplied for this
• If the Power LED blinks slowly and continuously, the router firmware is corrupted. This
Power
When the router is turned on, the Power LED turns amber for about 20 seconds and then
turns green. If the LED does not turn green, the router has a problem.
If the Power LED is still amber 1 minute after you turn on power to the router:
1. Turn the power off and back on to see if the router recovers.
2. Press and hold the Reset button to return the router to its factory settings. as explained
If the error persists, you might have a hardware problem and should contact technical
support at www.netgear.com/support.
computer. This indicates that a link has been established to the connected device.
LED
adapter is securely connected to a functioning power outlet.
product.
can happen if a firmware upgrade is interrupted, or if the router detects a problem with the
firmware. If the error persists, you have a hardware problem. For recovery instructions, or
help with a hardware problem, contact technical support at www.netgear.com/support.
LED
in Restore the Factory Settings and Password on page 113.
Is Off or
Stays
with the
Blinking
Amber
LEDs
107
Page 19

R6300
WiFi Router
802.11ac Dual
Band
Gigabit
T
roubleshooting
LEDs
When the router is turned on, the LEDs turn on for about 10 seconds and then turn off. If all
the LEDs stay on, there is a fault within the router.
If all LEDs are still on 1 minute after power-up:
• Cycle the power to see if the router recovers.
• Press and hold the Reset button to return the router to its factory settings as explained in
If the error persists, you might have a hardware problem and should contact technical support
at www.netgear.com/support.
Internet
If either the Ethernet port LEDs or the Internet LED does not light when the Ethernet
connection is made, check the following:
• Make sure that the Ethernet cable connections are secure at the router and at the modem
• Make sure that power is turned on to the connected modem or computer.
• Be sure that you are using the correct cable:
Wireless
If the Wireless LEDs stay off, check to see if the Wi-Fi On/Off button on the router has been
pressed. This button turns the wireless radios in the router on and off. The Wireless LEDs are
lit when the wireless radio is turned on.
The Push 'N'
If after using the WPS function the button blinks amber, check the following:
• Make sure that you are using the button and not the router’s built-in registrar.
• Check that PIN verification has succeeded for the wireless device you are adding to the
• Make sure that you have not pressed the WPS button on the side of the router after
• Check that the router is not in the temporary AP setup locked state (if you are using the
Never Turn Off
Restore the Factory Settings and Password on page 113.
or
Ethernet
or computer.
When connecting the router’s Internet port to a cable or DSL modem, use the cable that
was supplied with the cable or DSL modem. This cable could be a standard
straight-through Ethernet cable or an Ethernet crossover cable.
LEDs
Are
Connect
wireless network.
disabling the WPS feature (you logged in to the router and disabled this previously).
wireless repeater function).
Port
Off
LEDs
Are
(WPS) Button Blinks
Off
Amber
108
Page 20

R6300
WiFi Router
802.11ac Dual
Band
Gigabit
T
roubleshooting
Cannot
Log In to the Router
If you are unable to log in to the router from a computer on your local network, check the
following:
• If you are using an Ethernet-connected computer, check the Ethernet connection
between the computer and the router as described in the previous section.
• Make sure that your computer’s IP address is on the same subnet as the router. If you are
using the recommended addressing scheme, your computer’s address should be in the
range of 192.168.1.2 to 192.168.1.254.
• If your computer’s IP address is shown as 169.254.x.x, recent versions of Windows and
Mac OS generate and assign an IP address if the computer cannot reach a DHCP server.
These auto-generated addresses are in the range of 169.254.x.x. If your IP address is in
this range, check the connection from the computer to the router, and reboot your
computer.
• If your router’s IP address was changed and you do not know the current IP address,
clear the router’s configuration to factory defaults. This sets the router’s IP address to
192.168.1.1. This procedure is explained in Factory Settings on page 115.
• Make sure that your browser has Java, JavaScript, or ActiveX enabled. If you are using
Internet Explorer, click Refresh to be sure that the Java applet is loaded.
• Try quitting the browser and launching it again.
• Make sure that you are using the correct login information. The factory default login name
is admin, and the password is password. Make sure that Caps Lock is off when you
enter this information.
• If you are attempting to set up your NETGEAR router as an additional router behind an
existing router in your network, consider replacing the existing router. NETGEAR does
not support such a configuration.
• If you are attempting to set up your NETGEAR router as a replacement for an ADSL
gateway in your network, the router cannot perform many gateway services. For
example, the router cannot convert ADSL or cable data into Ethernet networking
information. NETGEAR does not support such a configuration.
Cannot
Access the
Internet
If you can access your router but not the Internet, check to see if the router can obtain an IP
address from your Internet service provider (ISP). Unless your ISP provides a fixed IP
address, your router requests an IP address from the ISP. You can determine whether the
request was successful using the Router Status screen.
To check the WAN IP address:
1. Start your browser, and select an external site such as www.netgear.com.
2. Access the router interface at www.routerlogin.net.
3. Select Administration > Router Status.
109
Page 21

R6300
WiFi Router
802.11ac Dual
Band
Gigabit
T
roubleshooting
4. Check that an IP address is shown for the Internet port. If 0.0.0.0 is shown, your router has
not obtained an IP address from your ISP.
If your router cannot obtain an IP address from the ISP, you might need to force your cable or
DSL modem to recognize your new router by restarting your network, as described in
Sequence to Restart Your Network on page 106.
If your router is still unable to obtain an IP address from the ISP, the problem might be one of
the following:
• Your Internet service provider (ISP) might require a login program.
Ask your ISP whether they require PPP over Ethernet (PPPoE) or some other type of
login.
• If your ISP requires a login, the login name and password might be set incorrectly.
• Your ISP might check for your computer’s host name.
Assign the computer host name of your ISP account as the account name in the Internet
Setup screen.
• Your ISP allows only one Ethernet MAC address to connect to Internet and might check
for your computer’s MAC address. In this case, do one of the following:
- Inform your ISP that you have bought a new network device, and ask them to use the
router’s MAC address.
- Configure your router to clone your computer’s MAC address.
If your router can obtain an IP address, but your computer is unable to load any web pages
from the Internet:
• Your computer might not recognize any DNS server addresses.
A DNS server is a host on the Internet that translates Internet names (such as www
addresses) to numeric IP addresses. Typically, your ISP provides the addresses of one or
two DNS servers for your use. If you entered a DNS address during the router’s
configuration, reboot your computer, and verify the DNS address.You can configure your
computer manually with DNS addresses, as explained in your operating system
documentation.
• Your computer might not have the router configured as its TCP/IP gateway.
If your computer obtains its information from the router by DHCP, reboot the computer,
and verify the gateway address.
• You might be running login software that is no longer needed.
If your ISP provided a program to log you in to the Internet (such as WinPoET), you no
longer need to run that software after installing your router. You might need to go to
Internet Explorer and select Tools > Internet Options, click the Connections tab, and
select Never dial a connection.
110
Page 22

R6300
WiFi Router
802.11ac Dual
Band
Gigabit
T
roubleshooting
T
roubleshoot
PPPoE
If you are using PPPoE, try troubleshooting your Internet connection.
To troubleshoot a PPPoE connection:
1. Log in to the router.
2. Select Administration > Router Status.
3. Click Connection Status. If all of the steps indicate OK, then your PPPoE connection is
up and working.
If any of the steps indicate Failed, you can attempt to reconnect by clicking Connect. The
router continues to attempt to connect indefinitely.
If you cannot connect after several minutes, you might be using an incorrect service name,
user name, or password. There also might be a provisioning problem with your ISP.
Note: Unless you connect manually, the router does not authenticate
using PPPoE until data is transmitted to the network.
T
roubleshooting Internet Browsing
If your router can obtain an IP address but your computer is unable to load any web pages
from the Internet, check the following:
• Your computer might not recognize any DNS server addresses. A DNS server is a host
on the Internet that translates Internet names (such as www addresses) to numeric IP
addresses.
Typically, your ISP provides the addresses of one or two DNS servers for your use. If you
entered a DNS address during the router’s configuration, restart your computer.
Alternatively, you can configure your computer manually with a DNS address, as
explained in the documentation for your computer.
• Your computer might not have the router configured as its default gateway.
Reboot the computer and verify that the router address (www.routerlogin.net) is listed by
your computer as the default gateway address.
• You might be running log in software that is no longer needed. If your ISP provided a
program to log you in to the Internet (such as WinPoET), you no longer need to run that
software after installing your router. You might need to go to Internet Explorer and select
Tools > Internet Options, click the Connections tab, and select Never dial a
connection.
111
Page 23

R6300
WiFi Router
802.11ac Dual
Band
Gigabit
T
roubleshooting
Changes
Not
Saved
If the router does not save the changes you make in the router interface, check the following:
• When entering configuration settings, always click the Apply button before moving to
another screen or tab, or your changes are lost.
• Click the Refresh or Reload button in the web browser. The changes might have
Wireless
occurred, but the old settings might be in the web browser’s cache.
Connectivity
If you are having trouble connecting wirelessly to the router, try to isolate the problem.
• Does the wireless device or computer that you are using find your wireless network?
If not, check the Wireless LEDs on the front of the router. It should be lit. If it is not, you
can press the WiFi On/Off button on the back of the router to turn the router’s wireless
radio back on.
If you disabled the router’s SSID broadcast, then your wireless network is hidden and
does not show up in your wireless client’s scanning list. (By default, SSID broadcast is
enabled.)
• Does your wireless device support the security that you are using for your wireless
network (WPA or WPA2)?
• If you want to view the wireless settings for the router, use an Ethernet cable to connect a
computer to a LAN port on the router. Then log in to the router, and select Wireless (see
(Basic Wireless Settings on page 26).
Note: Be sure to click Apply if you make changes.
Wireless Signal
Strength
If your wireless device finds your network, but the signal strength is weak, check these
conditions:
• Is your router too far from your computer, or too close? Place your computer near the
router, but at least 6 feet away, and see whether the signal strength improves.
• Is your wireless signal blocked by objects between the router and your computer?
112
Page 24

R6300
WiFi Router
802.11ac Dual
Band
Gigabit
T
roubleshooting
Restore the Factory
Settings and Password
This section explains how to restore the factory settings, changing the router’s administration
password back to password. You can erase the current configuration and restore factory
defaults in two ways:
• Use the Erase function of the router (see Erase on page 78).
• Use the Reset button on the back of the router. See Factory Settings on page 115. If you
restore the factory settings and the router fails to restart, or the green Power LED
continues to blink, the unit might be defective. If the error persists, you might have a
hardware problem and should contact technical support at
T
http://www.netgear.com/support.
roubleshoot Y
our Network
Using the Ping Utility
Most network devices and routers contain a ping utility that sends an echo request packet to
the designated device. The device then responds with an echo reply. You can easily
troubleshooting a network by using the ping utility in your computer or workstation.
T
est
the LAN Path to Your R
outer
You can ping the router from your computer to verify that the LAN path to your router is set up
correctly.
To ping the router from a running Windows PC:
1. From the Windows toolbar, click Start, and then select Run.
2. In the field provided, type ping followed by the IP address of the router, as in this example:
ping www.routerlogin.net
3. Click OK.
You should see a message like this one:
Pinging <IP address > with 32 bytes of data
If the path is working, you see this message:
Reply from < IP address >: bytes=32 time=NN ms TTL=xxx
If the path is not working, you see this message:
Request timed out
If the path is not functioning correctly, you could have one of the following problems:
• Wrong physical connections
For a wired connection, make sure that the numbered LAN port LED is on for the port to
which you are connected.
113
Page 25

R6300
WiFi Router
802.11ac Dual
Band
Gigabit
T
roubleshooting
Check that the appropriate LEDs are on for your network devices. If your router and
computer are connected to a separate Ethernet switch, make sure that the link LEDs are
on for the switch ports that are connected to your computer and router.
• Wrong network configuration
Verify that the Ethernet card driver software and TCP/IP software are both installed and
configured on your computer.
Verify that the IP address for your router and your computer are correct and that the
addresses are on the same subnet.
T
est
the Path from Your Computer
to a R
emote Device
After verifying that the LAN path works correctly, test the path from your computer to a remote
device.
1. From the Windows toolbar, click the Start button, and then select Run.
2. In the Windows Run window, type:
ping -n 10 <IP address>
where <IP address> is the IP address of a remote device such as your ISP’s DNS server.
If the path is functioning correctly, replies like those shown in the previous section are
displayed.
If you do not receive replies:
• Check that your computer has the IP address of your router listed as the default gateway.
If the IP configuration of your computer is assigned by DHCP, this information is not
visible in your computer’s Network Control Panel. Verify that the IP address of the router
is listed as the default gateway.
• Check to see that the network address of your computer (the portion of the IP address
specified by the subnet mask) is different from the network address of the remote device.
• Check that your cable or DSL modem is connected and functioning.
• If your ISP assigned a host name to your computer, enter that host name as the account
name in the Internet Setup screen.
• Your ISP could be rejecting the Ethernet MAC addresses of all but one of your computers.
Many broadband ISPs restrict access by allowing traffic only from the MAC address of your
broadband modem. Some ISPs additionally restrict access to the MAC address of a single
computer connected to that modem. If this is the case, configure your router to “clone” or
“spoof” the MAC address from the authorized computer.
114
Page 26

115
A.
Su
pplemental Information
This appendix provides factory default settings and technical specifications for the R6300 WiFi
Router 802.11ac Dual Band Gigabit.
Factory
Settings
You can return the router to its factory settings. Use the end of a paper clip or a similar object
to press and hold the Reset button on the back of the router for at least 7 seconds. The
router resets, and returns to the factory configuration settings shown in the following table.
Table 4. Factory default settings
Feature
Router login
Internet
connection
User login URL
User name (case-sensitive)
Login password (case-sensitive)
WAN MAC address
WAN MTU size
Port speed
Default behavior
www.routerlogin.com or www.routerlogin.net
admin
password
Use default hardware address
1500
Autosensing
A
Local network
(LAN)
LAN IP address
Subnet mask
DHCP server
DHCP range
Time zone
Time zone daylight savings time
Allow a registrar to configure this
router
192.168.1.1
255.255.255.0
Enabled
192.168.1.2 to 192.168.1.254
Pacific time
Disabled
Enabled
Page 27

R6300
WiFi Router
802.11ac Dual
Band
Gigabit
Supplemental
Information
Table 4. Factory default settings (Continued)
Feature
Default behavior
Local network
(LAN) continued
Firewall
Wireless
DHCP starting IP address
DHCP ending IP address
DMZ
Time zone
Time zone adjusted for daylight
savings time
SNMP
Inbound (communications coming
in from the Internet)
Outbound (communications going
out to the Internet)
Source MAC filtering
Wireless communication
SSID name
Security
Broadcast SSID
Transmission speed
192.168.1.2
192.168.1.254
Disabled
GMT for WW except NA and GR, GMT+1 for GR, GMT-8
for NA
Disabled
Disabled
Disabled (except traffic on port 80, the HTTP port)
Enabled (all)
Disabled
Enabled
See router label
WPA2-PSK (AES)
Enabled
Auto
*
Firewall
Country/region
RF channel
Operating mode
Inbound (communications coming
in from the Internet)
Outbound (communications going
out to the Internet)
*. Maximum wireless signal rate derived from IEEE Standard 802.11 specifications. Actual throughput can .
Network conditions and environmental factors, including volume of netw ork traffic, building materials and
construction, and network overhead, lower actual data throughput rate.
United States in the US; otherwise varies by region
6 until region selected
Up to 217 Mbps
Disabled (bars all unsolicited requests)
Enabled (all)
116
Page 28

R6300
WiFi Router
802.11ac Dual
Band
Gigabit
Supplemental
Information
T
echnical Specifications
Table 5. R6300 Router specifications
Feature
Description
Data and routing protocols
Power adapter
Dimensions
Weight
Operating temperature
Operating humidity
Electromagnetic Emissions
LAN
WAN
Wireless
Radio data rates
TCP/IP, RIP-1, RIP-2, DHCP, PPPoE, PPTP, Bigpond, Dynamic DNS, UPnP,
and SMB
• North America: 120V, 60 Hz, input
• UK, Australia: 240V, 50 Hz, input
• Europe: 230V, 50 Hz, input
• All regions (output): 12V DC @ 5A, output
Dimensions: 205 x 255 x 77 mm (8.07 x 10.04 x 3.03 in)
Weight: 654 g (1.44 lb)
0° to 40° C (32º to 104º F)
90% maximum relative humidity, noncondensing
FCC Part 15 Class B
VCCI Class B
EN 55 022 (CISPR 22), Class B C-Tick N10947
10BASE-T or 100BASE-Tx or 1000BASE-T, RJ-45
10BASE-T or 100BASE-Tx or 1000BASE-T, RJ-45
Maximum wireless signal rate complies with the IEEE 802.11 standard. See the
footnote for the previous table.
Auto Rate Sensing
Data encoding standards
Maximum computers per
wireless network
IEEE 802.11ac draft 2.0
IEEE 802.11n version 2.0
IEEE 802.11n, IEEE 802.11g, IEEE 802.11b 2.4 GHz
IEEE 802.11n, IEEE 802.11a 5.0 GHz
Limited by the amount of wireless network traffic generated by each node
(typically 50–70 nodes).
117
Page 29

R6300
WiFi Router
802.11ac Dual
Band
Gigabit
Supplemental
Information
Table 5. R6300 Router specifications (Continued)
Feature
Operating frequency range
Description
2.4 GHz
5 GHz
2.412–2.462 GHz (US)
2.412–2.472 GHz (Japan)
2.412–2.472 GHz (Europe ETSI)
5.18–5.24 + 5.745–5.825 GHz (US)
5.18–5.24 GHz (Europe ETSI)
802.11 security
WPA-PSK, WPA2-PSK, and WPA/WPA2
118
Page 30

119
B
B.
Notification
of Complian
ce
NE T
R
This section includes user requirements for operating this product in accordance with National laws for usage of radio
spectrum and operation of radio devices. Failure of the end-user to comply with the applicable requirements may
result in unlawful operation and adverse action against the end-user by the applicable National regulatory authority.
G EAR D u al
egulatory Compliance Information
Note: Note: This product's firmware limits operation to only the channels allowed in a particular Region or Country.
Therefore, all options described in this user's guide may not be available in your version of the product.
Ba n d - W ir e l e ss
Europe -
EU
Declaration
of
Conformity
Marking by the above symbol indicates compliance with the Essential Requirements of the R&TTE Directive of the
European Union (1999/5/EC). This equipment meets the following conformance standards:
EN300 328 (2.4Ghz), EN301 489-17, EN301 893 (5Ghz), EN60950-1
For complete DoC please visit the NETGEAR EU Declarations of Conformity website at:
http://support.netgear.com/app/answers/detail/a_id/11621/
EDOC in
Language
Cesky [Czech]
Dansk [Danish]
Deutsch
[German]
Eesti [Estonian]
Languages
of the
Statement
NETGEAR Inc. tímto prohlašuje, že tento Radiolan je ve shode se základními
požadavky a dalšími príslušnými ustanoveními smernice 1999/5/ES.
Undertegnede NETGEAR Inc. erklærer herved, at følgende udstyr Radiolan overholder
de væsentlige krav og øvrige relevante krav i direktiv 1999/5/EF.
Hiermit erklärt NETGEAR Inc., dass sich das Gerät Radiolan in Übereinstimmung mit
den grundlegenden Anforderungen und den übrigen einschlägigen Bestimmungen der
Richtlinie 1999/5/EG befindet.
Käesolevaga kinnitab NETGEAR Inc. seadme Radiolan vastavust direktiivi 1999/5/EÜ
põhinõuetele ja nimetatud direktiivist tulenevatele teistele asjakohastele sätetele.
European Community
English
Hereby, NETGEAR Inc., declares that this Radiolan is in compliance with the essential
requirements and other relevant provisions of Directive 1999/5/EC.
Page 31

R6300
WiFi Router
802.11ac Dual
Band
Gigabit
Notification
of
Compliance
Español
[Spanish]
Ελληνική
[Greek]
Français
[French]
Italiano [Italian]
Latviski
[Latvian]
Lietuvių
[Lithuanian]
Nederlands
[Dutch]
Por medio de la presente NETGEAR Inc. declara que el Radiolan cumple con los
requisitos esenciales y cualesquiera otras disposiciones aplicables o exigibles de la
Directiva 1999/5/CE.
ΜΕ ΤΗΝ ΠΑΡΟΥΣΑ NETGEAR Inc. ΔΗΛΩΝΕΙ ΟΤΙ Radiolan ΣΥΜΜΟΡΦΩΝΕΤΑΙ ΠΡΟΣ
ΤΙΣ ΟΥΣΙΩΔΕΙΣ ΑΠΑΙΤΗΣΕΙΣ ΚΑΙ ΤΙΣ ΛΟΙΠΕΣ ΣΧΕΤΙΚΕΣ ΔΙΑΤΑΞΕΙΣ ΤΗΣ ΟΔΗΓΙΑΣ
1999/5/ΕΚ.
Par la présente NETGEAR Inc. déclare que l'appareil Radiolan est conforme aux
exigences essentielles et aux autres dispositions pertinentes de la directive 1999/5/CE.
Con la presente NETGEAR Inc. dichiara che questo Radiolan è conforme ai requisiti
essenziali ed alle altre disposizioni pertinenti stabilite dalla direttiva 1999/5/CE.
Ar šo NETGEAR Inc. deklarē, ka Radiolan atbilst Direktīvas 1999/5/EK būtiskajām
prasībām un citiem ar to saistītajiem noteikumiem.
Šiuo NETGEAR Inc. deklaruoja, kad šis Radiolan atitinka esminius reikalavimus ir kitas
1999/5/EB Direktyvos nuostatas.
Hierbij verklaart NETGEAR Inc. dat het toestel Radiolan in overeenstemming is met de
essentiële eisen en de andere relevante bepalingen van richtlijn 1999/5/EG.
Malti [Maltese]
Magyar
[Hungarian]
Polski [Polish]
Português
[Portuguese]
Slovensko
[Slovenian]
Slovensky
[Slovak]
Suomi [Finnish]
Svenska
[Swedish]
Hawnhekk, NETGEAR Inc., jiddikjara li dan Radiolan jikkonforma mal-htigijiet essenzjali
u ma provvedimenti ohrajn relevanti li hemm fid-Dirrettiva 1999/5/EC.
Alulírott, NETGEAR Inc. nyilatkozom, hogy a Radiolan megfelel a vonatkozó alapvetõ
követelményeknek és az 1999/5/EC irányelv egyéb elõírásainak.
Niniejszym NETGEAR Inc. oświadcza, że Radiolan jest zgodny z zasadniczymi
wymogami oraz pozostałymi stosownymi postanowieniami Dyrektywy 1999/5/EC.
NETGEAR Inc. declara que este Radiolan está conforme com os requisitos essenciais e
outras disposições da Directiva 1999/5/CE.
NETGEAR Inc. izjavlja, da je ta Radiolan v skladu z bistvenimi zahtevami in ostalimi
relevantnimi določili direktive 1999/5/ES.
NETGEAR Inc. týmto vyhlasuje, že Radiolan spĺňa základné požiadavky a všetky
príslušné ustanovenia Smernice 1999/5/ES.
NETGEAR Inc. vakuuttaa täten että Radiolan tyyppinen laite on direktiivin 1999/5/EY
oleellisten vaatimusten ja sitä koskevien direktiivin muiden ehtojen mukainen.
Härmed intygar NETGEAR Inc. att denna Radiolan står I överensstämmelse med de
väsentliga egenskapskrav och övriga relevanta bestämmelser som framgår av direktiv
1999/5/EG.
120
Page 32

R6300
WiFi Router
802.11ac Dual
Band
Gigabit
Notification
of
Compliance
Íslenska
[Icelandic]
Norsk
[Norwegian]
This device is a 2.4 GHz wideband transmission system (transceiver), intended for use in all EU member states and
EFTA countries, except in France and Italy where restrictive use applies.
In Italy the end-user should apply for a license at the national spectrum authorities in order to obtain authorization to
use the device for setting up outdoor radio links and/or for supplying public access to telecommunications and/or
network services.
This device may not be used for setting up outdoor radio links in France and in some areas the RF output power may
be limited to 10 mW EIRP in the frequency range of 2454 - 2483.5 MHz. For detailed information the end-user should
contact the national spectrum authority in France.
Hér með lýsir NETGEAR Inc. yfir því að Radiolan er í samræmi við grunnkröfur og aðrar
kröfur, sem gerðar eru í tilskipun 1999/5/EC.
NETGEAR Inc. erklærer herved at utstyret Radiolan er i samsvar med de grunnleggende
krav og øvrige relevante krav i direktiv 1999/5/EF.
FCC R
equirements
for
Operation
in the
United States
FCC
Information
This product does not contain any user serviceable components and is to be used with approved antennas only.
Any product changes or modifications will invalidate all applicable regulatory certifications and approvals.
FCC
Guidelines
This equipment complies with FCC radiation exposure limits set forth for an uncontrolled environment. This
equipment should be installed and operated with minimum distance of 20 cm between the radiator and your body.
This transmitter must not be co-located or operating in conjunction with any other antenna or transmitter.
FCC
Declaration
We, NETGEAR, Inc., 350 East Plumeria Drive, San Jose, CA 95134, declare under our sole responsibility that the
R6300 WiFi Router 802.11ac Dual Band Gigabit complies with Part 15 Subpart B of FCC CFR47 Rules. Operation
is subject to the following two conditions:
• This device may not cause harmful interference, and
• This device must accept any interference received, including interference that may cause undesired operation.
FCC
Radio Frequency Interference Warnings & Instructions
This equipment has been tested and found to comply with the limits for a Class B digital device, pursuant to Part 15
of the FCC Rules. These limits are designed to provide reasonable protection against harmful interference in a
residential installation. This equipment uses and can radiate radio frequency energy and, if not installed and used in
accordance with the instructions, may cause harmful interference to radio communications. However, there is no
guarantee that interference will not occur in a particular installation. If this equipment does cause harmful
interference to radio or television reception, which can be determined by turning the equipment off and on, the user
is encouraged to try to correct the interference by one or more of the following methods:
• Reorient or relocate the receiving antenna.
• Increase the separation between the equipment and the receiver.
• Connect the equipment into an electrical outlet on a circuit different from that which the radio receiver is
connected.
• Consult the dealer or an experienced radio/TV technician for help.
to
User
for
Human Exposure
of
Conformity
FCC
Caution
• Any changes or modifications not expressly approved by the party responsible for compliance could void the
user's authority to operate this equipment.
• This device complies with Part 15 of the FCC Rules. Operation is subject to the following two conditions: (1) This
device may not cause harmful interference, and (2) this device must accept any interference received, including
interference that may cause undesired operation.
121
Page 33

R6300
WiFi Router
802.11ac Dual
Band
Gigabit
Notification
of
Compliance
• For product available in the US/Canada market, only channel 1~11 can be operated. Selection of other
channels is not possible.
• This device and its antenna(s) must not be co-located or operation in conjunction with any other antenna or
transmitter.
Canadian Department
This digital apparatus (R6300 WiFi Router 802.11ac Dual Band Gigabit) does not exceed the Class B limits for
radio-noise emissions from digital apparatus as set out in the Radio Interference Regulations of the Canadian
Department of Communications.
This Class [B] digital apparatus complies with Canadian ICES-003.
Cet appareil numérique de la classe [B] est conforme à la norme NMB-003 du Canada
of
Communications Radio Interference Regulations
Industry
This device complies with RSS-210 of the Industry Canada Rules. Operation is subject to the following two conditions:
(1) This device may not cause harmful interference, and (2) this device must accept any interference received,
including interference that may cause undesired operation.
Canada
IMPORTANT
This equipment complies with IC radiation exposure limits set forth for an uncontrolled environment. This equipment
should be installed and operated with minimum distance 20cm between the radiator & your body.
NOTE:
Radiation Exposure
Statement:
Caution:
The device for the band 5150-5250 MHz is only for indoor usage to reduce po-tential for harmful interference to
co-channel mobile satellite systems.
Ce dispositif est conforme à la norme CNR-210 d'Industrie Canada applicable aux appareils radio exempts de licence.
Son fonctionnement est sujet aux deux conditions suivantes: (1) le dispositif ne doit pas produire de brouillage
préjudiciable, et (2) ce dispositif doit accepter tout brouillage reçu, y compris un brouillage susceptible de provoquer un
fonctionnement indésirable.
NOTE
Cet équipement est conforme aux limites d'exposition aux rayonnements IC établies pour un environnement non
contrôlé. Cet équipement doit être installé et utilisé avec un minimum de 20 cm de distance entre la source de
rayonnement et votre corps.
IMPORTANTE:
Déclaration d'exposition
aux
radiations:
Avertissement:
Le dispositif fonctionnant dans la bande 5150-5250 MHz est réservé uniquement pour une utili-sation à l'intérieur afin
de réduire les risques de brouillage préjudiciable aux systèmes de satellites mobiles utilisant les mêmes canaux.
All cables used to connect peripherals must be shielded and grounded. Operation with cables connected to peripherals
that are not shielded and grounded may result in interference to radio and television reception.
GPL
License
GPL may be included in this product; to view the GPL license agreement go to
ftp://downloads.netgear.com/files/GPLnotice.pdf.
For GNU General Public License (GPL) related information, please visit
http://support.netgear.com/app/answers/detail/a_id/2649 .
Agreement
122
Page 34

R6300
WiFi Router
802.11ac Dual
Band
Gigabit
Notification
of
Compliance
Interference Reduction T
The table below shows the Recommended Minimum Distance between NETGEAR equipment and household
appliances to reduce interference (in feet and meters).
Household Appliance
Microwave ovens
Baby Monitor - Analog
able
Recommended Minimum Distance
(in feet and meters)
30 feet / 9 meters
20 feet / 6 meters
Baby Monitor - Digital
Cordless phone - Analog
Cordless phone - Digital
Bluetooth devices
ZigBee
40 feet / 12 meters
20 feet / 6 meters
30 feet / 9 meters
20 feet / 6 meters
20 feet / 6 meters
123
Page 35

R6300
WiFi Router
802.11ac Dual
Band
Gigabit
124
 Loading...