

Netgear orporated 12300207 User Manual
N900 Wireless Dual Band
Gigabit Router
WNDR4500v2
User Manual
350 East Plumeria Drive
San Jose, CA 95134
USA
October 2012
202-11130-01
v1.0

N900 Wireless Dual Band Gigabit Router WNDR4500v2
Support
Thank you for choosing NETGEAR.
After installing your device, locate the serial number on the label of your product and use it to register your product
at https://my.netgear.com. You must register your product before you can use NETGEAR telephone support.
NETGEAR recommends registering your product through the NETGEAR web site. For product updates and web
support, visit http://support.netgear.com.
Phone (US & Canada only): 1-888-NETGEAR.
Phone (Other Countries): Check the list of phone numbers at
http://support.netgear.com/general/contact/default.aspx.
NETGEAR recommends that you use only the official NETGEAR support resources.
Trademarks
NETGEAR, the NETGEAR logo, and Connect with Innovation are trademarks and/or registered trademarks of
NETGEAR, Inc. and/or its subsidiaries in the United States and/or other countries. Information is subject to change
without notice. © NETGEAR, Inc. All rights reserved.
Revision History
Publication Part Number Version Publish Date Comments
202-11130-01 v1.0 October 2012 First publication
2

Contents
Chapter 1 Hardware Setup
Chapter 2 Getting Started with NETGEAR genie
Unpack Your Router. . . . . . . . . . . . . . . . . . . . . . . . . . . . . . . . . . . . . . . . . . .8
Position Your Router . . . . . . . . . . . . . . . . . . . . . . . . . . . . . . . . . . . . . . . . . .8
Hardware Features. . . . . . . . . . . . . . . . . . . . . . . . . . . . . . . . . . . . . . . . . . . . 9
Front Panel . . . . . . . . . . . . . . . . . . . . . . . . . . . . . . . . . . . . . . . . . . . . . . . . 9
Back Panel . . . . . . . . . . . . . . . . . . . . . . . . . . . . . . . . . . . . . . . . . . . . . . .11
Label. . . . . . . . . . . . . . . . . . . . . . . . . . . . . . . . . . . . . . . . . . . . . . . . . . . .11
Router Setup Preparation. . . . . . . . . . . . . . . . . . . . . . . . . . . . . . . . . . . . . . 13
Use Standard TCP/IP Properties for DHCP . . . . . . . . . . . . . . . . . . . . . .13
Gather ISP Information. . . . . . . . . . . . . . . . . . . . . . . . . . . . . . . . . . . . . .13
Wireless Devices and Security Settings . . . . . . . . . . . . . . . . . . . . . . . . . 13
Types of Logins and Access. . . . . . . . . . . . . . . . . . . . . . . . . . . . . . . . . . . .13
NETGEAR genie Setup . . . . . . . . . . . . . . . . . . . . . . . . . . . . . . . . . . . . . . .14
Use NETGEAR genie after Installation. . . . . . . . . . . . . . . . . . . . . . . . . . . .15
Upgrade Router Firmware . . . . . . . . . . . . . . . . . . . . . . . . . . . . . . . . . . . . .15
Router Dashboard (Basic Home Screen). . . . . . . . . . . . . . . . . . . . . . . . . .16
Add Wireless Devices or Computers to Your Network. . . . . . . . . . . . . . . .17
Manual Method. . . . . . . . . . . . . . . . . . . . . . . . . . . . . . . . . . . . . . . . . . . .17
Wi-Fi Protected Setup (WPS) Method . . . . . . . . . . . . . . . . . . . . . . . . . .17
Chapter 3 NETGEAR genie Basic Settings
Internet Setup. . . . . . . . . . . . . . . . . . . . . . . . . . . . . . . . . . . . . . . . . . . . . . .19
Internet Setup Screen Fields . . . . . . . . . . . . . . . . . . . . . . . . . . . . . . . . . 19
Attached Devices . . . . . . . . . . . . . . . . . . . . . . . . . . . . . . . . . . . . . . . . . . . .21
Parental Controls . . . . . . . . . . . . . . . . . . . . . . . . . . . . . . . . . . . . . . . . . . . . 22
ReadySHARE USB Storage. . . . . . . . . . . . . . . . . . . . . . . . . . . . . . . . . . . . 22
Basic Wireless Settings . . . . . . . . . . . . . . . . . . . . . . . . . . . . . . . . . . . . . . .23
Wireless Settings Screen Fields. . . . . . . . . . . . . . . . . . . . . . . . . . . . . . .24
Change WPA Security Option and Passphrase . . . . . . . . . . . . . . . . . . .25
Guest Networks . . . . . . . . . . . . . . . . . . . . . . . . . . . . . . . . . . . . . . . . . . . . .26
Guest Network Wireless Security Options . . . . . . . . . . . . . . . . . . . . . . . 27
3

N900 Wireless Dual Band Gigabit Router WNDR4500v2
Chapter 4 NETGEAR genie Advanced Home
Setup Wizard . . . . . . . . . . . . . . . . . . . . . . . . . . . . . . . . . . . . . . . . . . . . . . .29
WPS Wizard . . . . . . . . . . . . . . . . . . . . . . . . . . . . . . . . . . . . . . . . . . . . . . . . 30
Setup Menu . . . . . . . . . . . . . . . . . . . . . . . . . . . . . . . . . . . . . . . . . . . . . . . . 31
WAN Setup. . . . . . . . . . . . . . . . . . . . . . . . . . . . . . . . . . . . . . . . . . . . . . . . . 32
Default DMZ Server . . . . . . . . . . . . . . . . . . . . . . . . . . . . . . . . . . . . . . . .33
Change the MTU Size . . . . . . . . . . . . . . . . . . . . . . . . . . . . . . . . . . . . . . 33
LAN Setup . . . . . . . . . . . . . . . . . . . . . . . . . . . . . . . . . . . . . . . . . . . . . . . . . 35
LAN Setup Screen Settings . . . . . . . . . . . . . . . . . . . . . . . . . . . . . . . . . .36
Use the Router as a DHCP Server. . . . . . . . . . . . . . . . . . . . . . . . . . . . .36
Address Reservation . . . . . . . . . . . . . . . . . . . . . . . . . . . . . . . . . . . . . . . 37
Quality of Service (QoS) Setup . . . . . . . . . . . . . . . . . . . . . . . . . . . . . . . . . 38
Chapter 5 USB Storage
USB Drive Requirements . . . . . . . . . . . . . . . . . . . . . . . . . . . . . . . . . . . . . . 44
ReadySHARE Access . . . . . . . . . . . . . . . . . . . . . . . . . . . . . . . . . . . . . . . . 44
File-Sharing Scenarios . . . . . . . . . . . . . . . . . . . . . . . . . . . . . . . . . . . . . . . . 44
Basic Settings. . . . . . . . . . . . . . . . . . . . . . . . . . . . . . . . . . . . . . . . . . . . . . . 46
Add or Edit a Network Folder . . . . . . . . . . . . . . . . . . . . . . . . . . . . . . . . .47
USB Storage Advanced Settings . . . . . . . . . . . . . . . . . . . . . . . . . . . . . . . .48
Safely Remove a USB Drive . . . . . . . . . . . . . . . . . . . . . . . . . . . . . . . . . . . 49
Media Server Settings . . . . . . . . . . . . . . . . . . . . . . . . . . . . . . . . . . . . . . . . 50
Specify Approved USB Devices . . . . . . . . . . . . . . . . . . . . . . . . . . . . . . . . . 50
Connect to the USB Drive from a Remote Computer. . . . . . . . . . . . . . . . . 52
Access the Router’s USB Drive Remotely Using FTP . . . . . . . . . . . . . . 52
Chapter 6 ReadySHARE Printer
ReadySHARE Printer . . . . . . . . . . . . . . . . . . . . . . . . . . . . . . . . . . . . . . . . . 54
USB Control Center Utility . . . . . . . . . . . . . . . . . . . . . . . . . . . . . . . . . . . . .59
Control Center Configuration . . . . . . . . . . . . . . . . . . . . . . . . . . . . . . . . .60
USB Printer. . . . . . . . . . . . . . . . . . . . . . . . . . . . . . . . . . . . . . . . . . . . . . . 60
Scan with a Multi-Function Printer . . . . . . . . . . . . . . . . . . . . . . . . . . . . .61
USB Speaker . . . . . . . . . . . . . . . . . . . . . . . . . . . . . . . . . . . . . . . . . . . . .61
Desktop NETGEAR genie . . . . . . . . . . . . . . . . . . . . . . . . . . . . . . . . . . . . . 62
Chapter 7 Security
Keyword Blocking of HTTP Traffic . . . . . . . . . . . . . . . . . . . . . . . . . . . . . . .64
Block Services (Port Filtering) . . . . . . . . . . . . . . . . . . . . . . . . . . . . . . . . . . 65
Schedule Blocking . . . . . . . . . . . . . . . . . . . . . . . . . . . . . . . . . . . . . . . . . . .67
Security Event Email Notifications . . . . . . . . . . . . . . . . . . . . . . . . . . . . . . . 68
4

N900 Wireless Dual Band Gigabit Router WNDR4500v2
Chapter 8 Administration
Upgrade the Router Firmware . . . . . . . . . . . . . . . . . . . . . . . . . . . . . . . . . .70
View Router Status. . . . . . . . . . . . . . . . . . . . . . . . . . . . . . . . . . . . . . . . . . .71
Router Information . . . . . . . . . . . . . . . . . . . . . . . . . . . . . . . . . . . . . . . . .71
Internet Provider (WAN) Setup. . . . . . . . . . . . . . . . . . . . . . . . . . . . . . . .71
Wireless Settings (2.4 GHz and 5 GHz) . . . . . . . . . . . . . . . . . . . . . . . . . 74
Guest Network (2.4 GHz and 5 GHz) . . . . . . . . . . . . . . . . . . . . . . . . . . . 75
View Logs of Web Access or Attempted Web Access . . . . . . . . . . . . . . . .75
Manage the Configuration File . . . . . . . . . . . . . . . . . . . . . . . . . . . . . . . . . .77
Back Up Settings . . . . . . . . . . . . . . . . . . . . . . . . . . . . . . . . . . . . . . . . . . 77
Restore Configuration Settings. . . . . . . . . . . . . . . . . . . . . . . . . . . . . . . .77
Erase . . . . . . . . . . . . . . . . . . . . . . . . . . . . . . . . . . . . . . . . . . . . . . . . . . .78
Set Password . . . . . . . . . . . . . . . . . . . . . . . . . . . . . . . . . . . . . . . . . . . . . . .79
Password Recovery . . . . . . . . . . . . . . . . . . . . . . . . . . . . . . . . . . . . . . . .79
Time Machine . . . . . . . . . . . . . . . . . . . . . . . . . . . . . . . . . . . . . . . . . . . . . . .80
Set Up Time Machine . . . . . . . . . . . . . . . . . . . . . . . . . . . . . . . . . . . . . . . 80
Access the Connected USB Hard Drive . . . . . . . . . . . . . . . . . . . . . . . . . 81
Before You Back up a Large Amount of Data. . . . . . . . . . . . . . . . . . . . .83
Change the Partition Scheme. . . . . . . . . . . . . . . . . . . . . . . . . . . . . . . . .85
Chapter 9 Advanced Settings
Advanced Wireless Settings. . . . . . . . . . . . . . . . . . . . . . . . . . . . . . . . . . . .87
Wireless Repeating Function (WDS) . . . . . . . . . . . . . . . . . . . . . . . . . . . . .88
Wireless Repeating Function . . . . . . . . . . . . . . . . . . . . . . . . . . . . . . . . .89
Set Up the Base Station . . . . . . . . . . . . . . . . . . . . . . . . . . . . . . . . . . . . .90
Set Up a Repeater Unit. . . . . . . . . . . . . . . . . . . . . . . . . . . . . . . . . . . . . .91
Port Forwarding and Triggering . . . . . . . . . . . . . . . . . . . . . . . . . . . . . . . . .92
Remote Computer Access Basics . . . . . . . . . . . . . . . . . . . . . . . . . . . . . 92
Port Triggering to Open Incoming Ports . . . . . . . . . . . . . . . . . . . . . . . . . 93
Port Forwarding to Permit External Host Communications . . . . . . . . . .94
How Port Forwarding Differs from Port Triggering . . . . . . . . . . . . . . . . .95
Set Up Port Forwarding to Local Servers . . . . . . . . . . . . . . . . . . . . . . . . . .96
Add a Custom Service . . . . . . . . . . . . . . . . . . . . . . . . . . . . . . . . . . . . . .97
Editing or Deleting a Port Forwarding Entry . . . . . . . . . . . . . . . . . . . . . .98
Set Up Port Triggering . . . . . . . . . . . . . . . . . . . . . . . . . . . . . . . . . . . . . . . .99
Dynamic DNS . . . . . . . . . . . . . . . . . . . . . . . . . . . . . . . . . . . . . . . . . . . . . .101
Static Routes . . . . . . . . . . . . . . . . . . . . . . . . . . . . . . . . . . . . . . . . . . . . . .103
Remote Management . . . . . . . . . . . . . . . . . . . . . . . . . . . . . . . . . . . . . . . .105
USB Settings . . . . . . . . . . . . . . . . . . . . . . . . . . . . . . . . . . . . . . . . . . . . . .106
Universal Plug and Play . . . . . . . . . . . . . . . . . . . . . . . . . . . . . . . . . . . . . .106
IPv6 . . . . . . . . . . . . . . . . . . . . . . . . . . . . . . . . . . . . . . . . . . . . . . . . . . . . .108
Traffic Meter . . . . . . . . . . . . . . . . . . . . . . . . . . . . . . . . . . . . . . . . . . . . . . .109
5

N900 Wireless Dual Band Gigabit Router WNDR4500v2
Chapter 10 Troubleshooting
Quick Tips . . . . . . . . . . . . . . . . . . . . . . . . . . . . . . . . . . . . . . . . . . . . . . . . 111
Sequence to Restart Your Network . . . . . . . . . . . . . . . . . . . . . . . . . . . 111
Check Ethernet Cable Connections . . . . . . . . . . . . . . . . . . . . . . . . . . .111
Wireless Settings . . . . . . . . . . . . . . . . . . . . . . . . . . . . . . . . . . . . . . . . .111
Network Settings . . . . . . . . . . . . . . . . . . . . . . . . . . . . . . . . . . . . . . . . .111
Troubleshooting with the LEDs . . . . . . . . . . . . . . . . . . . . . . . . . . . . . . . .112
Power/Test LED Is Off or Blinking . . . . . . . . . . . . . . . . . . . . . . . . . . . . 112
Power/Test LED Stays Amber . . . . . . . . . . . . . . . . . . . . . . . . . . . . . . .112
LEDs Never Turn Off . . . . . . . . . . . . . . . . . . . . . . . . . . . . . . . . . . . . . . 113
Internet or Ethernet Port LEDs Are Off. . . . . . . . . . . . . . . . . . . . . . . . .113
Wireless LEDs Are Off . . . . . . . . . . . . . . . . . . . . . . . . . . . . . . . . . . . . . 113
The Push 'N' Connect (WPS) Button Blinks Amber . . . . . . . . . . . . . . . 113
Cannot Log In to the Router . . . . . . . . . . . . . . . . . . . . . . . . . . . . . . . . . . . 114
Cannot Access the Internet . . . . . . . . . . . . . . . . . . . . . . . . . . . . . . . . . . . 114
Troubleshooting PPPoE . . . . . . . . . . . . . . . . . . . . . . . . . . . . . . . . . . . . 116
Troubleshooting Internet Browsing. . . . . . . . . . . . . . . . . . . . . . . . . . . .116
Changes Not Saved . . . . . . . . . . . . . . . . . . . . . . . . . . . . . . . . . . . . . . . . . 117
Wireless Connectivity . . . . . . . . . . . . . . . . . . . . . . . . . . . . . . . . . . . . . . . . 117
Wireless Signal Strength . . . . . . . . . . . . . . . . . . . . . . . . . . . . . . . . . . . 117
Restore the Factory Settings and Password . . . . . . . . . . . . . . . . . . . . . . 117
Troubleshoot Your Network Using the Ping Utility . . . . . . . . . . . . . . . . . .118
Test the LAN Path to Your Router . . . . . . . . . . . . . . . . . . . . . . . . . . . .118
Test the Path from Your Computer to a Remote Device . . . . . . . . . . . 119
Appendix A Supplemental Information
Factory Settings . . . . . . . . . . . . . . . . . . . . . . . . . . . . . . . . . . . . . . . . . . . .120
Technical Specifications. . . . . . . . . . . . . . . . . . . . . . . . . . . . . . . . . . . . . .122
Appendix B Notification of Compliance
Index
6

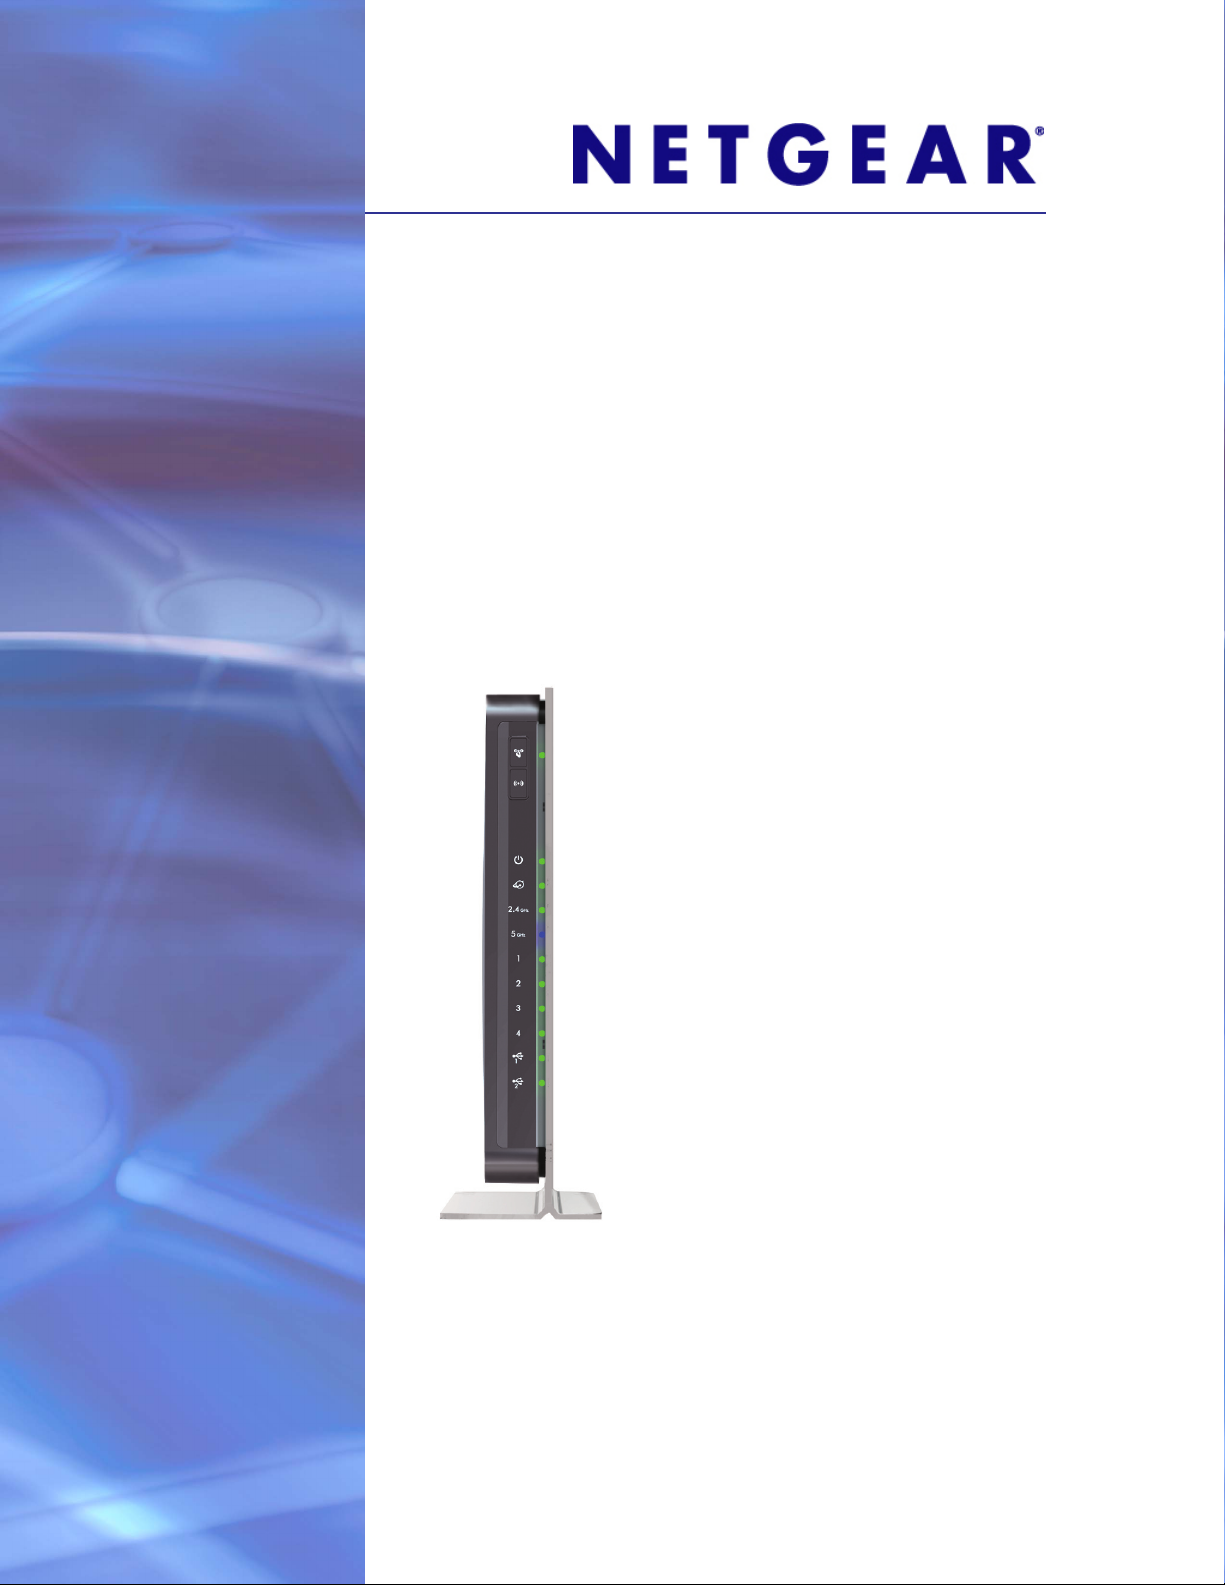
1. Hardware Setup
Getting to know your router
1
The N900 Wireless Dual Band Gigabit Router WNDR4500v2 provides you with an easy and
secure way to set up a wireless home network with fast access to the Internet over a high-speed
digital subscriber line (DSL). It is compatible with all major DSL Internet service providers, lets
you block unsafe Internet content and applications, and protects the devices (PCs, gaming
consoles, and so on) that you connect to your home network.
If you have not already set up your new router using the installation guide that comes in the box,
this chapter walks you through the hardware setup.
explains how to set up your Internet connection.
This chapter contains the following sections:
• Unpack Your Router
• Position Your Router
• Hardware Features
For information about ReadySHARE features in your product, see Chapter 5, USB Storage, and
www.netgear.com/readyshare.
For more information about the topics covered in this manual, visit the Support website at
http://support.netgear.com.
Chapter 3, NETGEAR genie Basic Settings,
7
N900 Wireless Dual Band Gigabit Router WNDR4500v2
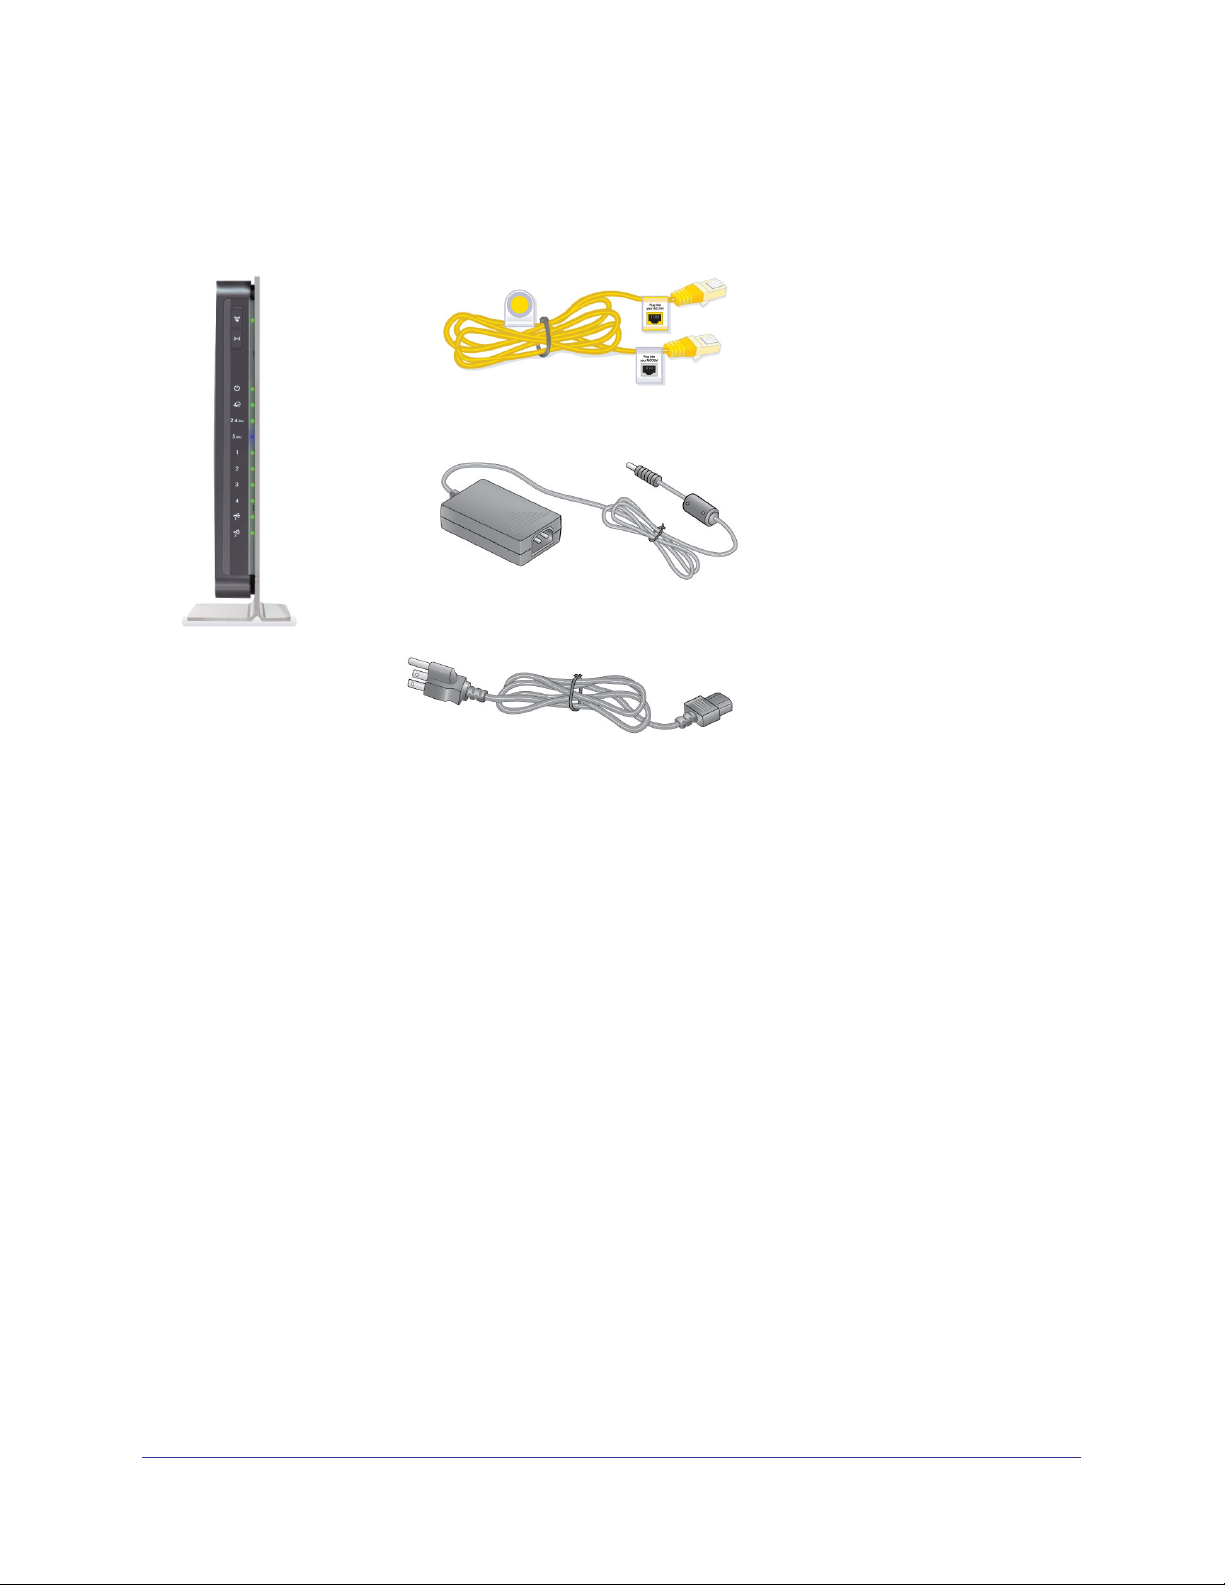
Unpack Your Router
Open the box and remove the router, cables, and installation guide.
Figure 1. Check the package contents
Your box should contain the following items:
• N900 Wireless Dual Band Gigabit Router WNDR4500v2
• AC power adapter (plug varies by region)
• Category 5 (Cat 5) Ethernet cable
• Installation guide with cabling and router setup instructions
If any parts are incorrect, missing, or damaged, contact your NETGEAR dealer. Keep the
carton and original packing materials, in case you need to return the product for repair.
Position Your Router
The router lets you access your network from virtually anywhere within the operating range of
your wireless network. However, the operating distance or range of your wireless connection
can vary significantly depending on the physical placement of your router. For example, the
thickness and number of walls the wireless signal passes through can limit the range. For
best results, place your router:
• Near the center of the area where your computers and other devices operate, and
preferably within line of sight to your wireless devices.
• So it is accessible to an AC power outlet and near Ethernet cables for wired computers.
Hardware Setup
8

N900 Wireless Dual Band Gigabit Router WNDR4500v2
• In an elevated location such as a high shelf, keeping the number of walls and ceilings
between the router and your other devices to a minimum.
• Away from electrical devices that are potential sources of interference, such as ceiling
fans, home security systems, microwaves, PCs, or the base of a cordless phone or 2.4
GHz cordless phone.
• Away from any large metal surfaces, such as a solid metal door or aluminum studs. Large
expanses of other materials such as glass, insulated walls, fish tanks, mirrors, brick, and
concrete can also affect your wireless signal.
When you use multiple access points, it is better if adjacent access points use different radio
frequency channels to reduce interference. The recommended channel spacing between
adjacent access points is 5 channels (for example, use Channels 1 and 6, or 6 and 11).
Hardware Features
Before you cable your router, take a moment to become familiar with the label and the front
and back panels. Pay particular attention to the LEDs on the front panel.
Front Panel
The router front panel has the status LEDs and icons shown in the following figure.
WPS button and LED
Wireless On/Off button
Power
Internet
2.4 wireless network
5 GHz wireless network
Etherent LAN ports 1–4
USB port 1
USB port 2
Figure 2. Router, front view
Router stand (attached)
Hardware Setup
9
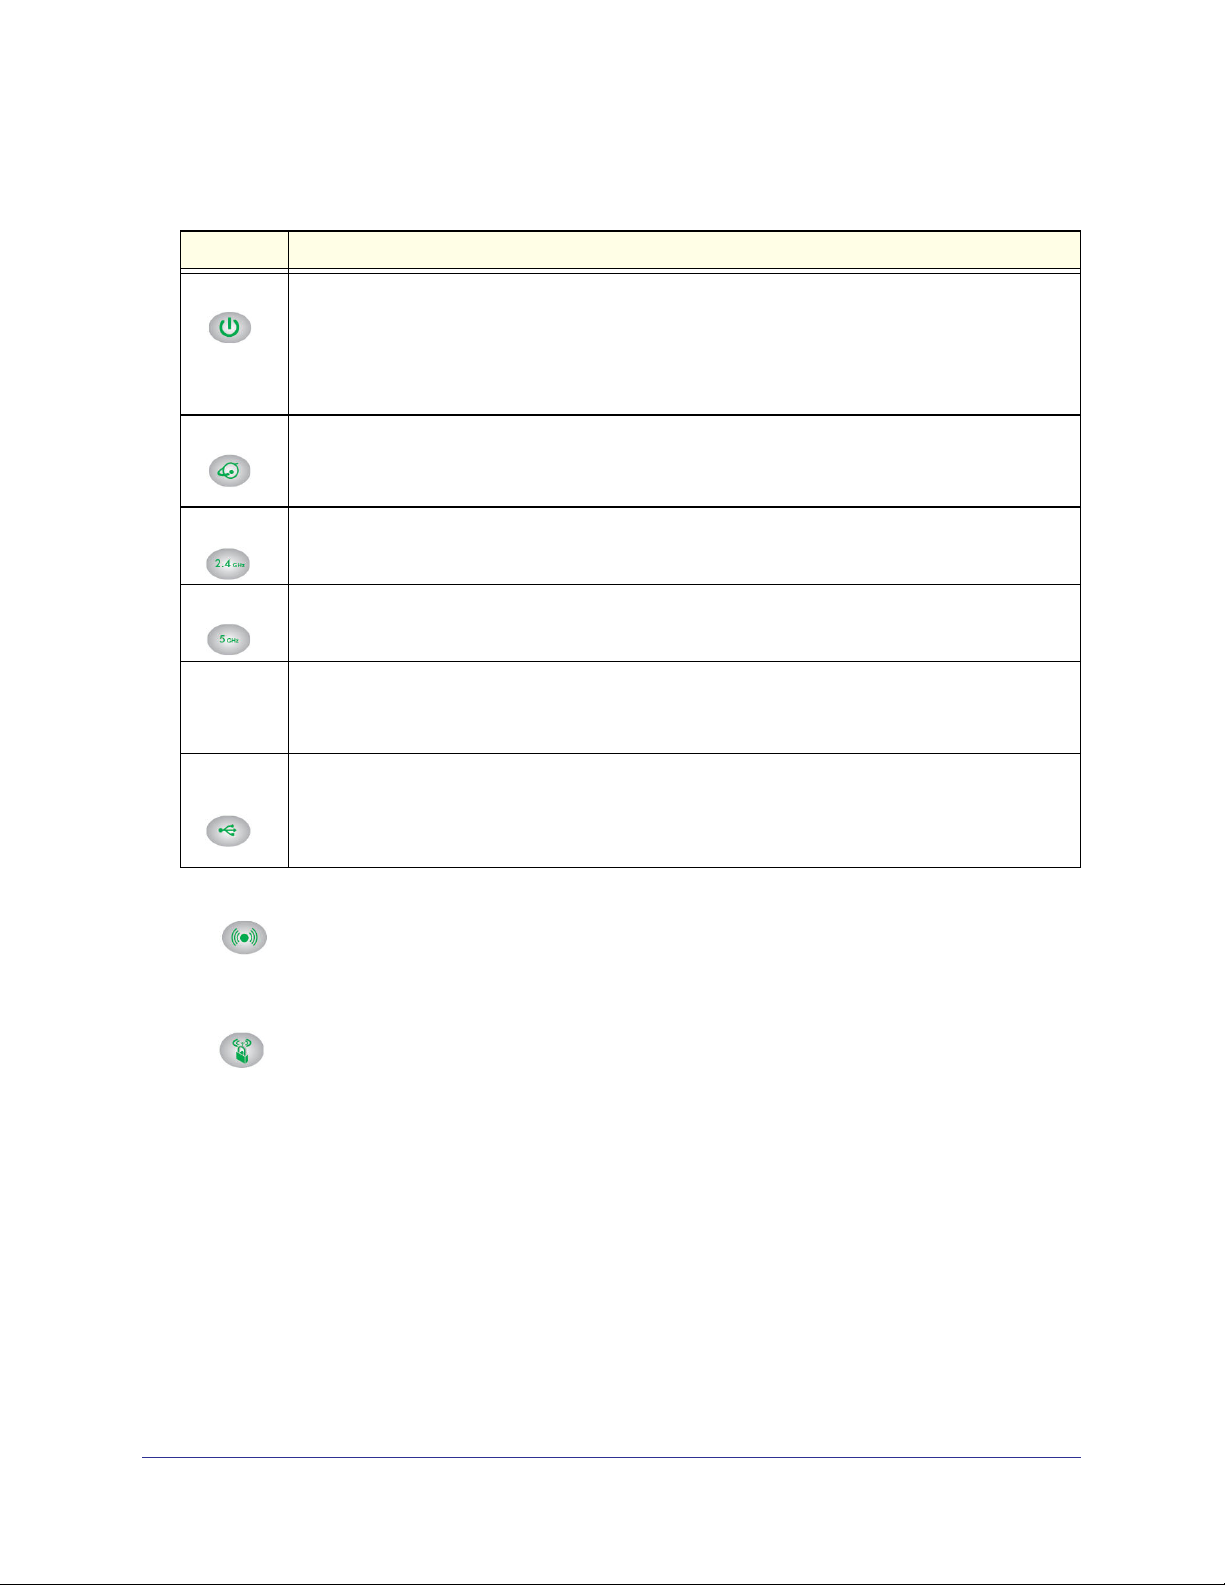
Table 1. Front panel LED descriptions
LED Description
N900 Wireless Dual Band Gigabit Router WNDR4500v2
Power/Test
Internet
2.4 GHz
5 GHz
LAN ports
1–4
USB
(2 LEDs)
• Solid amber. The unit is starting up after being powered on.
• Solid green. The power is on, and the router is ready.
• Blinking amber. A firmware update is in progress.
• Blinking green. The firmware is corrupt.
• Off. Power is not supplied to the router.
• Solid amber. The IP address has not been acquired.
• Solid green. An IP address has been received; ready to transmit data.
• Off. No Ethernet cable is connected between the router and the modem.
• Solid blue. The wireless radio is operating.
• Off. The wireless radio is off.
• Solid blue. The wireless radio is operating.
• Off. The wireless radio is off.
• Solid green. The LAN port has detected a 1,000 Mpbs link with an attached device.
• Solid amber. The LAN port has detected a 10/100 Mbps link with an attached device.
• Off. No link is detected on this port.
• Solid. The USB device had been accepted by the router and is ready to be used.
• Blinking. The USB device is in use.
• Off. No USB device is connected, or the Safely Remove Hardware button has been clicked
and it is now safe to remove the attached USB device.
The WLAN and WPS buttons toggle the WLAN and WPS functions on and off.
•
WLAN On/Off button. Pressing and holding the wireless LAN button for 2 seconds
turns the 2.4 GHz and 5 GHz wireless radios on and off. If the 2.4 GHz and 5 GHz LEDs
are lit, then the wireless radio is on. If these LEDs are off, then the wireless radios are
turned off and you cannot connect wirelessly to the router.
•
WPS button. You can use this button to use WPS to add a wireless device or
computer to your wireless network. The LED below the WPS button blinks green when
the router is trying to add the wireless device or computer. The LED stays solid green
when wireless security is enabled in the router.
Hardware Setup
10

N900 Wireless Dual Band Gigabit Router WNDR4500v2
Back Panel
The back panel has the connections shown in the following figure.
USB ports
LAN Ethernet ports 1–4
Internet port
Reset button
Power
Power On/Off button
Figure 3. Router, rear view
See Factory Settings on page 120 for information about restoring factory settings.
Label
The label on the bottom of the router shows the WPS PIN, login information, MAC address,
and serial number.
Default Access Information
Serial number
MAC address
Preset WiFi Password
Preset SSID
Figure 4. The label shows unique information about your router
Hardware Setup
11

2. Getting Started with NETGEAR genie
Connecting to the router
2
This chapter explains how to use NETGEAR genie to set up your router after you complete
cabling as described in the installation guide and in the previous chapter in this book.
This chapter contains the following sections:
• Router Setup Preparation
• Types of Logins and Access
• NETGEAR genie Setup
• Use NETGEAR genie after Installation
• Upgrade Router Firmware
• Router Dashboard (Basic Home Screen)
• Add Wireless Devices or Computers to Your Network
12

N900 Wireless Dual Band Gigabit Router WNDR4500v2
Router Setup Preparation
You can set up your router with the NETGEAR genie automatically, or you can use the
NETGEAR genie menus and screens to set up your router manually. However, before you
start the setup process, you need to have your ISP information on hand and make sure the
laptops, PCs, and other devices in the network have the settings described here.
Use Standard TCP/IP Properties for DHCP
If you set up your computer to use a static IP address, you need to change the settings so
that it uses Dynamic Host Configuration Protocol (DHCP).
Gather ISP Information
If you have DSL broadband service, you might need the following information to set up your
router and to check that your Internet configuration is correct. Your Internet service provider
(ISP) should have provided you with all of the information needed to connect to the Internet.
If you cannot locate this information, ask your ISP to provide it. When your Internet
connection is working, you no longer need to launch the ISP’s login program on your
computer to access the Internet. When you start an Internet application, your router
automatically logs you in.
• The ISP configuration information for your DSL account
• ISP login name and password
• Fixed or static IP address settings (special deployment by ISP; this is rare)
Wireless Devices and Security Settings
Make sure that the wireless device or computer that you are using supports WPA or WPA2
wireless security, which is the wireless security supported by the router.
Types of Logins and Access
There are separate types of logins that have different purposes. It is important that you
understand the difference so that you know which login to use when.
• Router login logs you in to the router interface from NETGEAR genie. See Use
NETGEAR genie after Installation on page 15 for details about this login.
• ISP login logs you in to your Internet service. Your service provider has provided you
with this login information in a letter or some other way. If you cannot find this login
information, contact your service provider.
• Wireless network key or password. Your router is preset with a unique wireless
network name (SSID) and password for wireless access. This information is on the label
located on the bottom of your router.
Getting Started with NETGEAR genie
13

N900 Wireless Dual Band Gigabit Router WNDR4500v2
NETGEAR genie Setup
NETGEAR genie runs on any device with a web browser. It is the easiest way to set up the
router because it automates many of the steps and verifies that those steps have been
successfully completed. It takes about 15
minutes to complete.
To use NETGEAR genie to set up your router:
1. Turn the router on by pressing the On/Off button, if not done yet.
2. Make sure that your device is connected with an Ethernet cable (wired) or wirelessly (with
the preset security settings listed on the bottom label) to your router.
3. Launch your Internet browser.
• If this is the first time you are setting up the Internet connection for your router, the
browser automatically goes to http://www.routerlogin.net, and the NETGEAR genie
screen displays.
• If you already used the NETGEAR genie, type http://www.routerlogin.net in the
address field for your browser to display the NETGEAR genie screen. See
NETGEAR genie after Installation on page 15.
Use
4. Follow the onscreen instructions to complete NETGEAR genie setup. NETGEAR genie
guides you through connecting the router to the Internet.
If the browser cannot display the web page:
• Make sure that the computer is connected to one of the four LAN Ethernet ports, or
wirelessly to the router.
• Make sure that the router is fully up and running. Its wireless LED should turn on.
• Close and re-open the browser to make sure the browser does not cache the previous
page.
• Browse to http://routerlogin.net.
• If the computer is set to a static or fixed IP address (this is uncommon), change it to
obtain an IP address automatically from the router.
If the router does not connect to the Internet:
1. Review your settings to be sure that you have selected the correct options and typed
everything correctly.
2. Contact your ISP to verify that you have the correct configuration information.
3. Read Chapter 10, Troubleshooting. If problems persist, register your NETGEAR product and
contact NETGEAR technical support.
Getting Started with NETGEAR genie
14
N900 Wireless Dual Band Gigabit Router WNDR4500v2
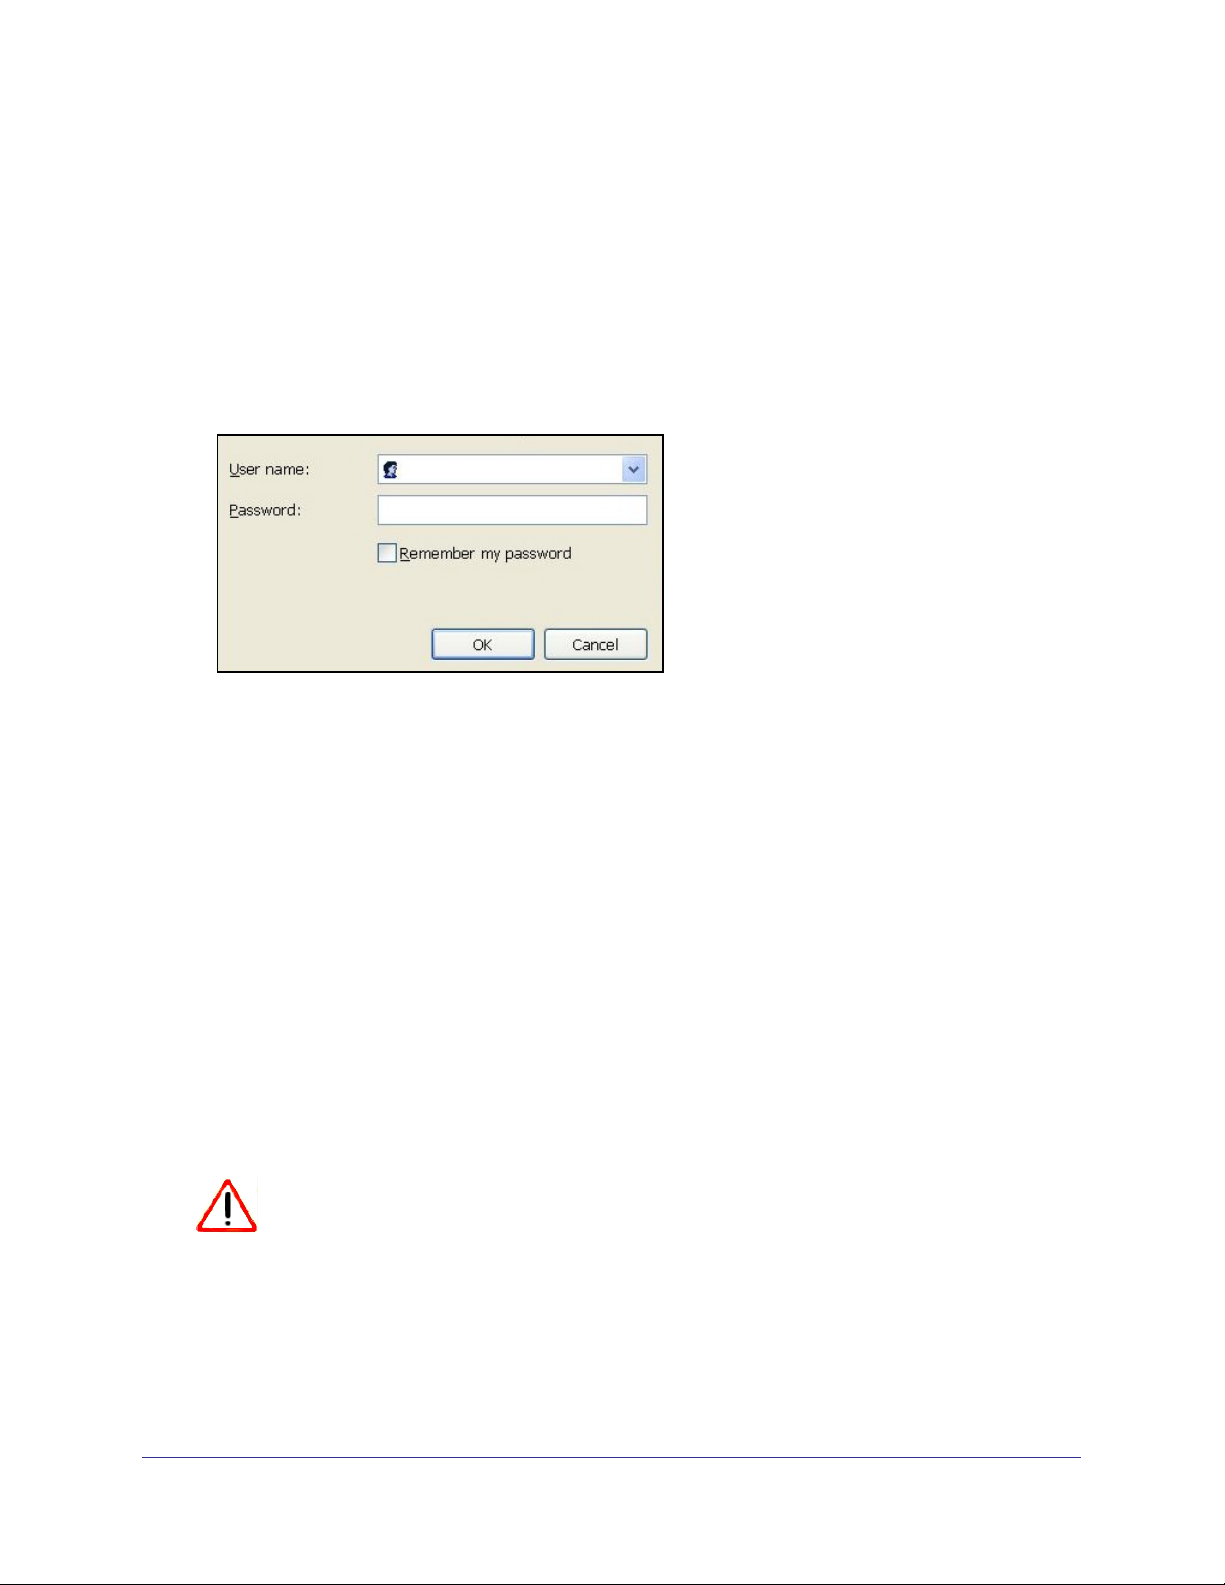
Use NETGEAR genie after Installation
When you first set up your router, NETGEAR genie starts automatically when you launch an
Internet browser on a computer that is connected to the router. You can use NETGEAR
genie again if you want to view or change settings for the router.
1. Launch your browser from a computer or wireless device that is connected to the router.
2. Type http://www.routerlogin.net or http://www.routerlogin.com.
A login window displays.
admin
********
3. Enter admin for the router user name and password for the router password, both in
lowercase letters.
Note: The router user name and password are different from the user name
and password for logging in to your Internet connection. See Types of Logins
and Access on page 13 for more information.
Upgrade Router Firmware
When you set up your router and are connected to the Internet, the router automatically
checks for you to see if newer firmware is available. If it is, a message is displayed on the top
of the screen. See Upgrade the Router Firmware on page 70 for more information about
upgrading firmware.
Click the message when it shows up, and click Yes to upgrade the router with the latest
firmware. After the upgrade, the router restarts.
CAUTION:
Do not try to go online, turn off the router, shut down the computer, or do
anything else to the router until the router finishes restarting and the
Power LED has stopped blinking for several seconds.
Getting Started with NETGEAR genie
15

N900 Wireless Dual Band Gigabit Router WNDR4500v2
e
d
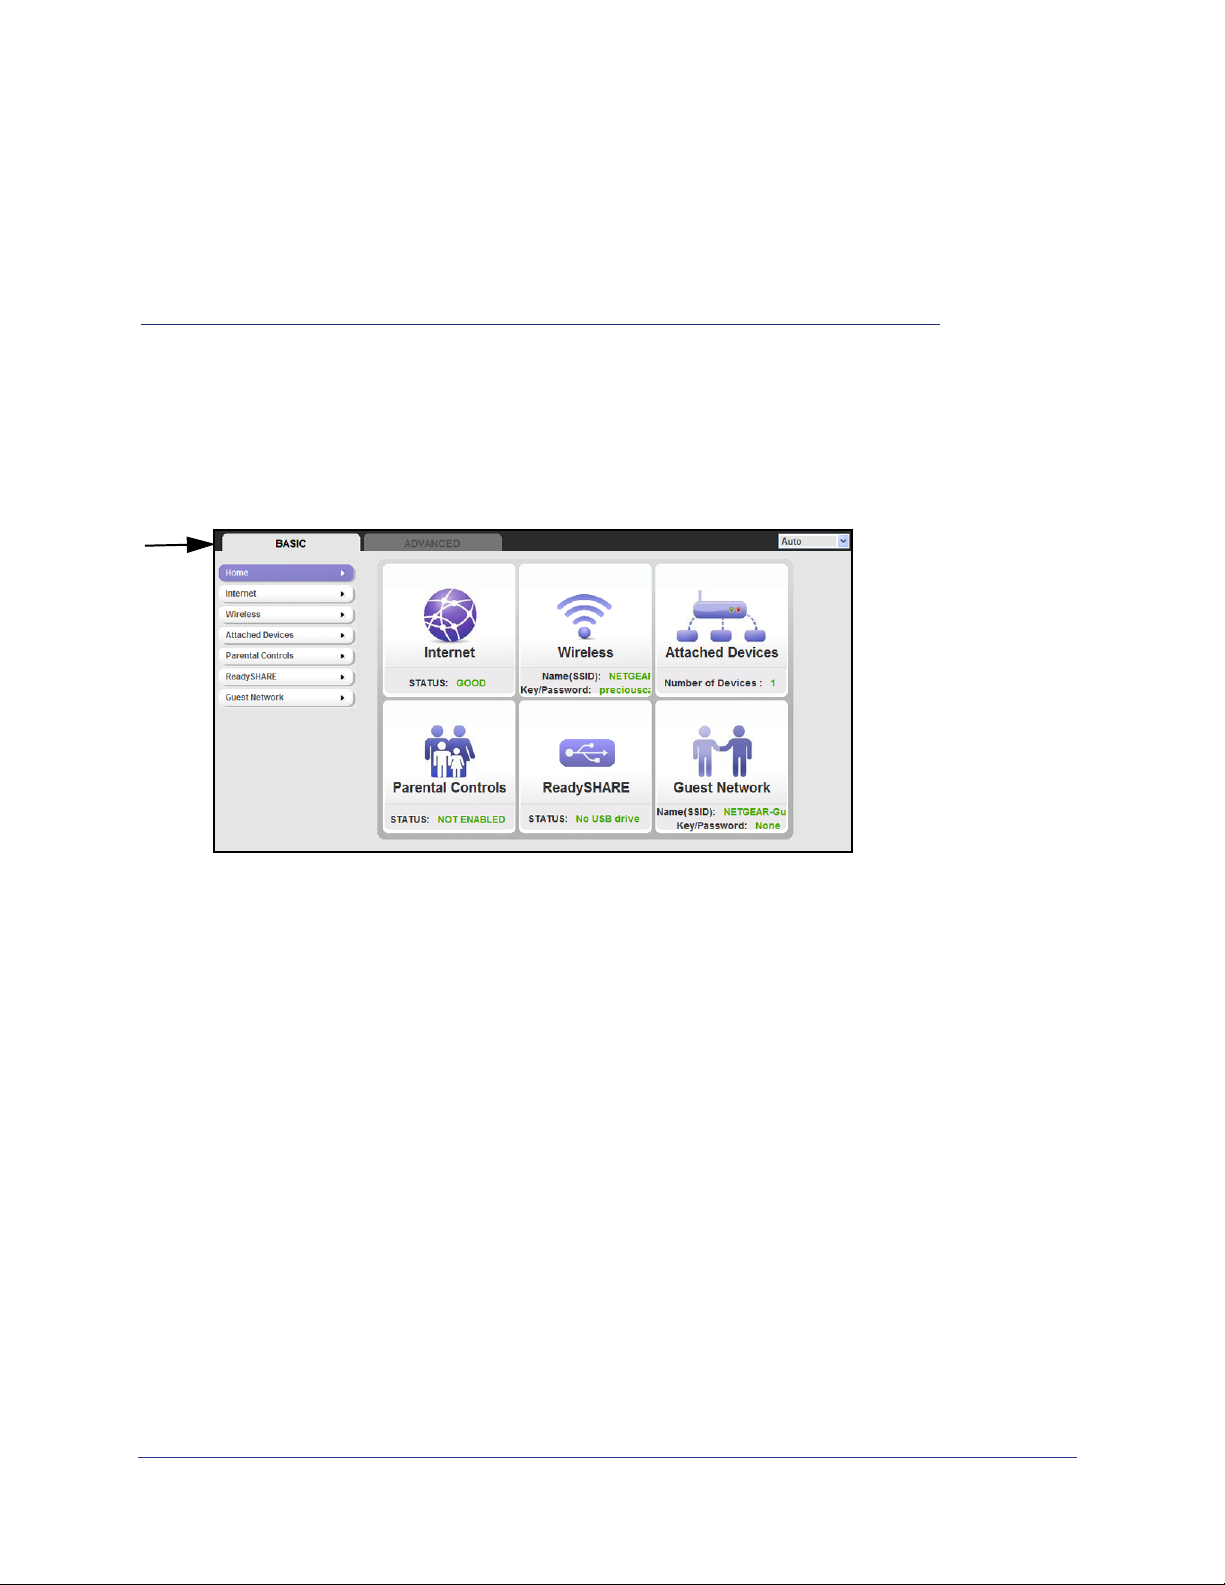
Router Dashboard (Basic Home Screen)
The router Basic Home screen has a dashboard that lets you see the status of your Internet
connection and network at a glance. You can click any of the six sections of the dashboard to
view more detailed information. The left column has the menus, and at the top there is an
Advanced tab that is used to access additional menus and screens.
Languag
Menus
(Click the
Advanced
tab to view
more)
Dashboar
(Click to
view
details)
Help
Figure 5. Router Basic Home screen with dashboard, language, and online help
• Home. This dashboard screen displays when you log in to the router.
• Internet. Set, update, and check the ISP settings of your router.
• Wireless. View or change the wireless settings for your router.
• Attached Devices. View the devices connected to your network.
• Parental Controls. Download and set up parental controls to prevent objectionable
content from reaching your computers.
• ReadySHARE. If you connected a USB storage device to the router, then it is displayed
here.
• Guest Network. Set up a guest network to allow visitors to use your router’s Internet
connection.
• Advanced tab. Set the router up for unique situations such as when remote access by IP
or by domain name from the Internet is needed. See Chapter 9, Advanced Settings.
Using this tab requires a solid understanding of networking concepts.
• Help & Support. Go to the NETGEAR support site to get information, help, and product
documentation. These links work once you have an Internet connection.
Getting Started with NETGEAR genie
16

N900 Wireless Dual Band Gigabit Router WNDR4500v2
Add Wireless Devices or Computers to Your Network
Choose either the manual or the WPS method to add wireless devices and other equipment
to your wireless network. See Guest Networks on page 26 for instructions on how to set up a
guest network.
Manual Method
To connect manually:
1. Open the software that manages your wireless connections on the wireless device
(laptop computer, gaming device, iPhone) that you want to connect to your router. This
software scans for all wireless networks in your area.
2. Look for your network and select it. If you did not change the name of your network during
the setup process, look for the default Wi-Fi network name (SSID) and select it. The default
SSID is located on the product label on the bottom of the router.
3. Enter the router password and click Connect. The default router passphrase is located on
the product label on the bottom of the router.
4. Repeat steps 1–3 to add other wireless devices.
Wi-Fi Protected Setup (WPS) Method
Wi-Fi Protected Setup (WPS) is a standard for easily adding computers and other devices to
a home network while maintaining security. To use WPS, make sure that all wireless devices
to be connected to the network are Wi-Fi certified and support WPS. During the connection
process, the client gets the security settings from the router so that every device in the
network has the same security settings.
To use WPS to join the wireless network:
If your wireless device supports WPS (Push 'N' Connect), follow these steps:
1. Press the WPS button on the router front panel
2. Within 2 minutes, press the WPS button on your wireless device, or follow the WPS
instructions that came with the device. The device is now connected to your router.
3. Repeat steps 1–2 to add other WPS wireless devices.
.
Getting Started with NETGEAR genie
17
3. NETGEAR genie Basic Settings
Your Internet connection and network
3
This chapter explains the features available from the NETGEAR genie Basic Home screen,
shown in the following figure:
This chapter contains the following sections:
• Internet Setup
• Attached Devices
• Parental Controls
• ReadySHARE USB Storage
• Basic Wireless Settings
• Guest Networks
18
 Loading...