

N750 Wireless Dual Band
Gigabit ADSL Modem
Router DGND4000
User Manual
350 East Plumeria Drive
San Jose, CA 95134
USA
September 2012
202-11047-01
v1.0
Note: This draft is a certification document and
there might be some differences between
this user manual and the actual unit.

N750 Wireless Dual Band Gigabit ADSL Modem Router DGND4000
© 2012 NETGEAR, Inc. All rights reserved
No part of this publication may be reproduced, transmitted, transcribed, stored in a retrieval system, or translated
into any language in any form or by any means without the written permission of NETGEAR, Inc.
Technical Support
Thank you for choosing NETGEAR. To register your product, get the latest product updates, get support online, or
for more information about the topics covered in this manual, visit the Support website at
http://support.netgear.com/general/contact/default.aspx
Phone (US & Canada only): 1-888-NETGEAR
Phone (Other Countries): Check the list of phone numbers at
http://support.netgear.com/app/answers/detail/a_id/984.
Trademarks
NETGEAR, the NETGEAR logo, and Connect with Innovation are trademarks and/or registered trademarks of
NETGEAR, Inc. and/or its subsidiaries in the United States and/or other countries. Information is subject to change
without notice. Other brand and product names are registered trademarks or trademarks of their respective
holders. © 2012 NETGEAR, Inc. All rights reserved.
Statement of Conditions
To improve internal design, operational function, and/or reliability, NETGEAR reserves the right to make changes
to the products described in this document without notice. NETGEAR does not assume any liability that may occur
due to the use, or application of, the product(s) or circuit layout(s) described herein.
2

Contents
Chapter 1 Hardware Setup
Chapter 2 Get Started with NETGEAR Genie
Unpack Your New Router. . . . . . . . . . . . . . . . . . . . . . . . . . . . . . . . . . . . . .10
Hardware Features. . . . . . . . . . . . . . . . . . . . . . . . . . . . . . . . . . . . . . . . . . .11
Label. . . . . . . . . . . . . . . . . . . . . . . . . . . . . . . . . . . . . . . . . . . . . . . . . . . .11
Back Panel . . . . . . . . . . . . . . . . . . . . . . . . . . . . . . . . . . . . . . . . . . . . . . .12
Front Panel. . . . . . . . . . . . . . . . . . . . . . . . . . . . . . . . . . . . . . . . . . . . . . .13
Position Your Wireless Router . . . . . . . . . .
ADSL Microfilters . . . . . . . . . . . . . . . . . . . . . . . . . . . . . . . . . . . . . . . . . . . . 17
One-Line ADSL Microfilter (Not Included) . . . . . . . . . . . . . . . . . . . . . . .17
Two-Line ADSL Microfilter (Included). . . . . . . . . . . . . . . . . . . . . . . . . . .18
Summary . . . . . . . . . . . . . . . . . . . . . . . . . . . . . . . . . . . . . . . . . . . . . . . .18
Cable Your N750 Wireless Modem Router . . .
Verify the Cabling. . . . . . . . . . . . . . . . . . . . . . . . . . . . . . . . . . . . . . . . . . . .19
Prepare to Set Up the Wireless Modem Router. . . . . . . . . . . . . . . . . . . . .21
Use Standard TCP/IP Properties for DHCP . . . . . . . . . . . . . . . . . . . . . .21
Gather ISP Information. . . . . . . . . . . . . . . . . . . . . . . . . . . . . . . . . . . . . .21
Wireless Devices and Security Settings. . . . . .
Types of Logins and Access. . . . . . . . . . . . . . . . . . . . . . . . . . . . . . . . . . . .21
NETGEAR Genie Setup. . . . . . . . . . . . . . . . . . . . . . . . . . . . . . . . . . . . . . .22
Use NETGEAR Genie after Installation . . . . . .
Upgrade Wireless Modem Router Firmware . . . . . . . . . . . . . . . . . . . . . . .23
Wireless Modem Router Dashboard (BASIC Home Screen). . . . . . . . . . .24
Add Wireless Devices or Computers to Your Network. . . . . . . . . . . . . . . .25
Manual Method. . . . . . . . . . . . . . . . . . . . . . . . . . . . . . . . . . . . . . . . . . . .25
Wi-Fi Protected Setup (WPS) Method . . . . . . . . . . . . . . . . . . . . . . . . . .25
. . . . . . . . . . . . . . . . . . . . . . . .16
. . . . . . . . . . . . . . . . . . . . .18
. . . . . . . . . . . . . . . . . . .21
. . . . . . . . . . . . . . . . . . . . .23
Chapter 3 NETGEAR genie BASIC Settings
Internet Basic Settings . . . . . . . . . . . . . . . . . . . . . . . . . . . . . . . . . . . . . . . .28
Internet Basic Settings Screen Fields. . . . . . . . . . . . . . . . . . . . . . . . . . .28
Attached Devices . . . . . . . . . . . . . . . . . . . . . . . . . . . . . . . . . . . . . . . . . . . .30
Parental Controls . . . . . . . . . . . . . . . . . . . . . . . . . . . . . . . . . . . . . . . . . . . .31
ReadySHARE USB Storage and Printer . . . . . . . . . . . . . . . . . . . . . . . . . .32
USB Storage (Basic Settings) . . . . . . . . . . . . . . . . . . . . . . . . . . . . . . . .32
ReadySHARE Printer . . . . . . . . . . . . . . . . . . . . . . . . . . . . . . . . . . . . . . .33
Basic Wireless Settings . . . . . . . . . . . . . . . . . . . . . . . . . . . . . . . . . . . . . . .33
Wireless Settings Screen Fields. . . . . . . . . . . . . . . . . . . . . . . . . . . . . . .35
Change WPA Security Option and Passphrase . . . . . . . . . . . . . . . . . . .36
3

N750 Wireless Dual Band Gigabit ADSL Modem Router DGND4000
Guest Networks . . . . . . . . . . . . . . . . . . . . . . . . . . . . . . . . . . . . . . . . . . . . .37
Guest Network Wireless Security Options . . . . . . . . . . . . . . . . . . . . . . . 38
NETGEAR genie App. . . . . . . . . . . . . . . . . . . . . . . . . . . . . . . . . . . . . . . . .39
NETGEAR genie Mobile App . . . . . . . . . . . . . . . . . . . . . . . . . . . . . . . . .40
Chapter 4 NETGEAR genie ADVANCED Home
Setup Wizard . . . . . . . . . . . . . . . . . . . . . . . . . . . . . . . . . . . . . . . . . . . . . . .42
WPS Wizard. . . . . . . . . . . . . . . . . . . . . . . . . . . . . . . . . . . . . . . . . . . . . . . . 44
VPN Wizard . . . . . . . . . . . . . . . . . . . . . . . . . . . . . . . . . . . . . . . . . . . . . . . .45
Setup Menu . . . . . . . . . . . . . . . . . . . . . . . . . . . . . . . . . . . . . . . . . . . . . . . . 47
ADSL Setup . . . . . . . . . . . . . . . . . . . . . . . . . . . . . . . . . . . . . . . . . . . . . . . .48
WAN Setup. . . . . . . . . . . . . . . . . . . . . . . . . . . . . . . . . . . . . . . . . . . . . . . . . 49
Default DMZ Server . . . . . . . . . . . . . . . . . . . . . . . . . . . . . . . . . . . . . . . . 50
Change the MTU Size . . . . . . . . . . . . . . . . . . . . . . . . . . . . . . . . . . . . . . 50
LAN Setup . . . . . . . . . . . . . . . . . . . . . . . . . . . . . . . . . . . . . . . . . . . . . . . . . 52
LAN Setup Screen Settings . . . . . . . . . . . . . . . . . . . . . . . . . . . . . . . . . . 53
Use the Wireless Modem Router as a DHCP Server. . . . . . . . . . . . . . .53
Address Reservation . . . . . . . . . . . . . . . . . . . . . . . . . . . . . . . . . . . . . . . 54
Quality of Service Setup. . . . . . . . . . . . . . . . . . . . . . . . . . . . . . . . . . . . . . .55
Chapter 5 USB Storage
USB Drive Requirements. . . . . . . . . . . . . . . . . . . . . . . . . . . . . . . . . . . . . .61
ReadySHARE Access . . . . . . . . . . . . . . . . . . . . . . . . . . . . . . . . . . . . . . . .61
File-Sharing Scenarios. . . . . . . . . . . . . . . . . . . . . . . . . . . . . . . . . . . . . . . . 62
USB Storage Basic Settings. . . . . . . . . . . . . . . . . . . . . . . . . . . . . . . . . . . .63
Add or Edit a Network Folder . . . . . . . . . . . . . . . . . . . . . . . . . . . . . . . . .64
USB Storage Advanced Settings . . . . . . . . . . .
Safely Remove a USB Drive . . . . . . . . . . . . . . . . . . . . . . . . . . . . . . . . . . .66
Media Server Settings . . . . . . . . . . . . . . . . . . . . . . . . . . . . . . . . . . . . . . . . 67
Specify Approved USB Devices. . . . . . . . . . . . . . . . . . . . . . . . . . . . . . . . .68
Connect to the USB Drive from a Remote Computer
Access the Wireless Modem Router’s USB Drive Remotely Using FTP 69
. . . . . . . . . . . . . . . . . . . . .65
. . . . . . . . . . . . . . . . .69
Chapter 6 USB Printer Control
Control Center Configuration . . . . . . . . . . . . . . . . . . . . . . . . . . . . . . . . . . .72
USB Printer . . . . . . . . . . . . . . . . . . . . . . . . . . . . . . . . . . . . . . . . . . . . . . . . 72
Scan with a Multifunction Printer . . . . . . . . . . . . . . . . . . . . . . . . . . . . . . . . 73
USB Speaker . . . . . . . . . . . . . . . . . . . . . . . . . . . . . . . . . . . . . . . . . . . . . . .73
Chapter 7 Security
Keyword Blocking of HTTP Traffic . . . . . . . . . . . . . . . . . . . . . . . . . . . . . . .75
Firewall Rules. . . . . . . . . . . . . . . . . . . . . . . . . . . . . . . . . . . . . . . . . . . . . . .76
Add Custom Services to Allow or Block . . . . . . . . . . . . . . . . . . . . . . . . . . . 78
Schedule for Firewall Rules . . . . . . . . . . . . .
Security Event Email Notifications . . . . . . . . . . . . . . . . . . . . . . . . . . . . . . .81
. . . . . . . . . . . . . . . . . . . . . . .80
4

N750 Wireless Dual Band Gigabit ADSL Modem Router DGND4000
Chapter 8 Administration
Upgrade the Wireless Modem Router Firmware . . . . . . . . . . . . . . . . . . . .83
View Wireless Modem Router Status. . . . . . . . . . . . . . . . . . . . . . . . . . . . .84
Wireless Modem Router Information . . . . . . . . . . . . . . . . . . . . . . . . . . .84
Internet Provider (WAN) Setup. . . . . . . . . . . . . . . . . . . . . . . . . . . . . . . .84
Wireless Settings (2.4 GHz and 5 GHz). . . . . . . . . . . . . . . . . . . . . . . . .86
Guest Network (2.4 GHz and 5 GHz). . . . . . . . . . . . . . . . . . . . . . . . . . .87
View VPN Status . . . . . . . . . . . . . . . . . . . . . . . . . . . . . . . . . . . . . . . . . . . .88
View Logs of Web Access or Attempted Web Access . . . . . . . . . . . . . . . .88
Attached Devices . . . . . . . . . . . . . . . . . . . . . . . . . . . . . . . . . . . . . . . . . . . .89
Manage the Configuration File . . . . . . . . . . . . . . . . . . . . . . . . . . . . . . . . . .89
Back Up Settings . . . . . . . . . . . . . . . . . . . . . . . . . . . . . . . . . . . . . . . . . .90
Restore Configuration Settings. . . . . . . . . . . . . . . . . . . . . . . . . . . . . . . .90
Erase . . . . . . . . . . . . . . . . . . . . . . . . . . . . . . . . . . . . . . . . . . . . . . . . . . .90
Set Password . . . . . . . . . . . . . . . . . . . . . . . . . . . . . . . . . . . . . . . . . . . . . . .91
Password Recovery . . . . . . . .
Diagnostics. . . . . . . . . . . . . . . . . . . . . . . . . . . . . . . . . . . . . . . . . . . . . . . . .92
Time Machine. . . . . . . . . . . . . . . . . . . . . . . . . . . . . . . . . . . . . . . . . . . . . . .94
Set Up Time Machine. . . . . . . . . . . . . . . . . . . . . . . . . . . . . . . . . . . . . . .94
Access the Connected USB Hard Driv
Before You Back up a Large Amount of Data. . . . . . . . . . . . . . . . . . . . .97
Change the Partition Scheme. . . . . . . . . . . . . . . . . . . . . . . . . . . . . . . . .99
. . . . . . . . . . . . . . . . . . . . . . . . . . . . . . . .91
e. . . . . . . . . . . . . . . . . . . . . . . . .95
Chapter 9 Advanced Settings
Advanced Wireless Settings. . . . . . . . . . . . . . . . . . . . . . . . . . . . . . . . . . .101
Wireless Repeating Function (WDS) . . . . . . . . . . . . . . . . . . . . . . . . . . . .104
Wireless Repeating Function . . . . . . . . . . . . . . . . . . . . . . . . . . . . . . . .105
Set Up the Base Station . . . . . . . . . . . . . . . . . . . . . . . . . . . . . . . . . . . .106
Set Up a Repeater Unit. . . . . . . . . . . . . . . . . . . . . . . . . . . . . . . . . . . . .107
Port Forwarding and Triggering . . . . . . . . . . . . . . . . . . . . . . . . . . . . . . . .108
Remote Computer Access Basics . . . . . . . .
Port Triggering to Open Incoming Ports. . . . . . . . . . . . . . . . . . . . . . . .109
Port Forwarding to Permit External Host
How Port Forwarding Differs from Port Triggering . . . . . . . . . . . . . . . .112
Set Up Port Forwarding to Local Servers. . . . . . . . . . . . . . . . . . . . . . . . .112
Add a Custom Service . . . . . . . . . . . . . . . . . . . . . . . . . . . . . . . . . . . . .114
Edit or Delete a Port Forwarding Entry. . . . . . . . . . . . . . . . . . . . . . . . .114
Set Up Port Triggering . . . . . . . . . . . . . . . . . . . . . . . . . . . . . . . . . . . . . . .115
Dynamic DNS. . . . . . . . . . . . . . . . . . . . . . . . . . . . . . . . . . . . . . . . . . . . . .117
Static Routes . . . . . . . . . . . . . . . . . . . . . . . . . . . . . . . . . . . . . . . . . . . . . .118
Remote Management. . . . . . . . . . . . . . . . . . . . . . . . . . . . . . . . . . . . . . . .121
USB Settings . . . . . . . . . . . . . . . . . . . . . . . . . . . . . . . . . . . . . . . . . . . . . .122
Universal Plug and Play . . . . . . . . . . . . . . . . . . . . . . . . . . . . . . . . . . . . . .122
IPv6 . . . . . . . . . . . . . . . . . . . . . . . . . . . . . . . . . . . . . . . . . . . . . . . . . . . . .124
Traffic Meter . . . . . . . . . . . . . . . . . . . . . . . . . . . . . . . . . . . . . . . . . . . . . . .124
ReadySHARE Cloud . . . . . . . . . . . . . . . . . . . . . . . . . . . . . . . . . . . . . . . .126
Device Mode. . . . . . . . . . . . . . . . . . . . . . . . . . . . . . . . . . . . . . . . . . . . . . .128
. . . . . . . . . . . . . . . . . . . .108
Communications . . . . . . . . .111
5

N750 Wireless Dual Band Gigabit ADSL Modem Router DGND4000
VPN Policies. . . . . . . . . . . . . . . . . . . . . . . . . . . . . . . . . . . . . . . . . . . . . . .128
Add or Edit an Auto VPN Policy . . . . . . . . . . . . . . . . . . . . . . . . . . . . . .130
Add or Edit a Manual VPN Policy. . . . . . . . . . . . . . . . . . . . . . . . . . . . .133
Chapter 10 Troubleshooting
Quick Tips . . . . . . . . . . . . . . . . . . . . . . . . . . . . . . . . . . . . . . . . . . . . . . . . 136
Sequence to Restart Your Network . . . . . . . . . . . . . . . . . . . . . . . . . . .136
Check Ethernet Cable Connections . . . . . . . . . . . . . . . . . . . . . . . . . . .136
Wireless Settings . . . . . . . . . . . . . . . . . . . . . . . . . . . . . . . . . . . . . . . . . 136
Network Settings . . . . . . . . . . . . . . . . . . . . . . . . . . . . . . . . . . . . . . . . .136
Troubleshoot with the LEDs . . . . . . . . . . . . . . . . . . . . . . . . . . . . . . . . . . .137
Power LED Is Off or Blinking . . . . . . . . . . . . . . . . . . . . . . . . . . . . . . . .137
Power LED Stays Red . . . . . . . . . . . . . . . . . . . . . . . . . . . . . . . . . . . . . 137
LEDs Never Turn Off . . . . . . . . . . . . . . . . . . . . . . . . . . . . . . . . . . . . . .138
Internet or Ethernet Port LEDs Are Off. . . . . . . . . . . . . . . . . . . . . . . . .138
Wireless LEDs Are Off . . . . . . . . . . . . . . . . . . . . . . . . . . . . . . . . . . . . .138
The Push 'N' Connect (WPS) Button Blinks Red
Cannot Log In to the Router. . . . . . . . . . . . . . . . . . . . . . . . . . . . . . . . . . .139
Cannot Access the Internet . . . . . . . . . . . . . . . . . . . . . . . . . . . . . . . . . . .139
Troubleshoot PPPoE . . . . . . . . . . . . . . . . . . . . . . . . . . . . . . . . . . . . . .141
Troubleshoot Internet Browsing . . . . . . . . . .
Changes Not Saved. . . . . . . . . . . . . . . . . . . . . . . . . . . . . . . . . . . . . . . . .142
Incorrect Date or Time . . . . . . . . . . . . . . . . . . . . . . . . . . . . . . . . . . . . . . .142
Wireless Connectivity. . . . . . . . . . . . . . . . . . . . . . . . . . . . . . . . . . . . . . . .142
Wireless Signal Strength . . . . . . . . . . . . . . . . . . . . . . . . . . . . . . . . . . .143
Restore the Factory Settings and Password . . . . . . . . . . . . . . . . . . . . . .143
Troubleshoot Your Netw
Test the LAN Path to Your Router . . . . . . . . . . . . . . . . . . . . . . . . . . . .143
Test the Path from Your Computer to a Remote Device . . . . . . . . . . .144
ork Using the Ping Utility . . . . . . . . . . . . . . . . . .143
. . . . . . . . . . . . . . . . . 138
. . . . . . . . . . . . . . . . . . . .141
Appendix A Supplemental Information
Factory Settings . . . . . . . . . . . . . . . . . . . . . . . . . . . . . . . . . . . . . . . . . . . . 146
Technical Specifications. . . . . . . . . . . . . . . . . . . . . . . . . . . . . . . . . . . . . .148
Appendix B Notification of Compliance
Index
6

1. Hardware Setup
Get to know your wireless router
1
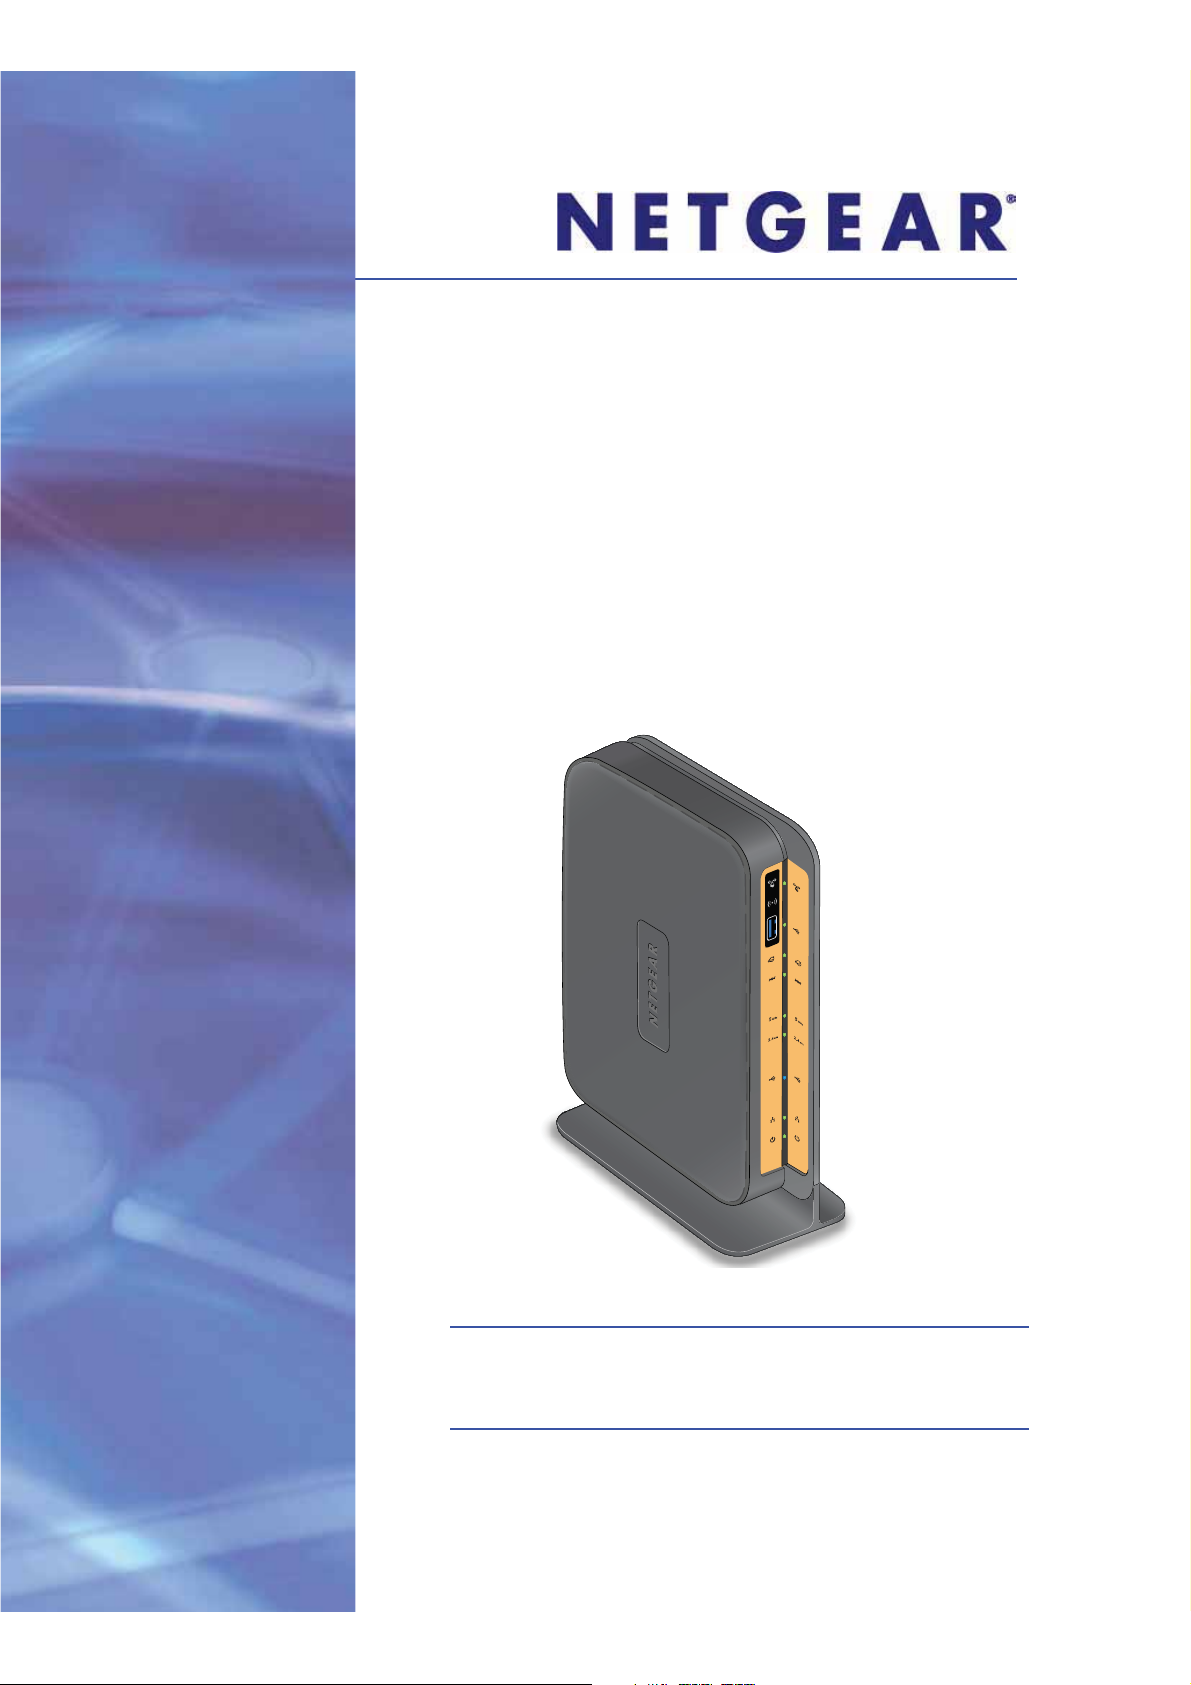
The NETGEAR N750 Wireless Dual Band Gigabit ADSL Modem Router DGND4000 is the
ultimate integrated ADSL networking gateway. It offers concurrent dual-band technology that
allows devices to avoid interference and also ensures top speeds and the greatest range for
demanding applications, such as streaming HD video and multiplayer gaming. Complete with a
built-in ADSL modem, it is compatible with all major ADSL Internet service providers. The
Gigabit port on the WAN side can also connect to a fiber or cable modem.
• All
• Concurrent dual band. Ensures top speeds and the greatest range while minimizing
• Faster multimedia streaming. Provides Wireless-N speed for streaming HD videos,
• Shared storage. T wo (2) ports for ReadySHARE® USB storage access provide fast and
• Live Parental Controls. Keep your Internet experience safe.
• Guest network access. Provides separate security and access restrictions for guests
• Secured connection. Push 'N' Connect ensures a quick and secure network connection.
• Broad
• Easy installation. Connect to computer and open your browser to install.
• Comp
• Broadband usage meter. Monitors Intern et traf fic and sends customized report s to help
-in-one. Built-in ADSL2+ modem and WAN Gigabit-Ethernet port for cable or fiber
combined with a wireless router create the ultimate integrated home gateway.
interference.
simultaneous downloads, and online gaming in addition to basic Internet applications.
easy shared access to an external USB storage device.
using the network.
band usage meter. Monitors Internet traffic and sends customized reports to help
keep costs under control.
atibility. Compatible with all major ADSL Internet service providers (ISPs).
keep costs under control.
Product Specifications
Package Contents
• N7
• Ethernet cable
• Ph
• Po
50 Wireless Dual Band Gigabit ADSL Modem Router DGND4000
one cable and filter
wer adapter, localized to country of sale
7

N750 Wireless Dual Band Gigabit ADSL Modem Router DGND4000
Warranty
• NETGEAR 1-year warranty
System Requirements
• Broadband Internet service
- ADSL
broadband Internet service
- Cable or fiber: Connects to cable modem or fiber termination node through the
Gigabit-Ethernet WAN port
• 802.11 a/b/g/n 2.4 GHz or 5.0 GHz specification wireless adapter or an Ethernet adapter
and cable for each computer
• Microsoft Windows 7, Vista, XP, 2000, Me, Mac OS, UNIX, or Linux
• Microsof
• Use wit
t Internet Explorer 5.0, Firefox 2.0, Safari 1.4, or later
h an N600 Wireless Dual Band USB Adapter (WNDA3100 for maximum
performance)
Standards
• IEEE 802.11 b/g/n 2.4 GHz
• IEEE 802.1
1 a/n 5.0 GHz
• Five (5) 10/100/1000 (1 WAN and 4 LAN) Gigabit Ethernet ports
• T
wo (2) USB 2.0 ports
• On
e (1) ADSL2+ port
Performance
• All-in-one. High-speed ADSL2+ modem (built-in) and WAN Gigabit-Ethernet port for
cable or fiber
• Powerful dual-core (400 MHz each) processor
• High-speed
access to external USB storage using two USB 2.0 ports
• Memory: 128 MB flash and 128 MB RAM
• Five (5) (1
• Adva
WAN, 4 LAN) Gigabit-Ethernet ports
nced Quality of Service (QoS)
Security
• Wi-Fi Protected Access® (WPA/WPA2-PSK) and WEP
• Double firewall pro
tection (SPI and NAT firewall)
• Denial-of-service (DoS) attack prevention
Ease of Use
• Easy inst
allation. Connect to computer and open your browser to install
• Push 'N' Connect using Wi-Fi Protected Setup® (WPS)
Physical Specifications
Hardware Setup
8
N750 Wireless Dual Band Gigabit ADSL Modem Router DGND4000
Power On/Off button
80% recycled packaging
CEC (California Efficiency)
RoHS
WEEE
• Dimensions: 223 x 153 x 31 mm (8.8 x 6.0 x 1.2 inches)
• Weight: 0.5 kg (1.2 lb)
Advanced Features
ive Parental Controls with flexible and customizable filter settings.
• L
• Simultaneous dual band. 2.4 GHz and 5 GHz operation.
• Two (2) ports for ReadySHARE® USB storage access. Supports FAT16/32, NTFS
Rea
d/Write.
• DLNA®. Stream media to DLNA media players.
• Multiple SSID guest networks (separate security and access restrictions).
• Broadband usage meter measures Internet usage.
• Power and Wi-Fi On/Off buttons.
NETGEAR Green
Features
If you have not already set up your new router using the installation guide that comes in the box,
this chapter walks you through the hardware setup. Chapter 3, NETGEAR genie BASIC Settings,
explains how to set up your Internet connection.
For more information about the topics covered in this manual, visit the support
website at
http://support.netgear.com/general/contact/default.aspx.
This chapter contains the fo
llo
wing sections:
• Unpack Your New Router
• Hardware Features
• Position Your Wireless Router
• ADSL Microfilters
• Cable Your N750 Wireless Modem Router
• Verify the Cabling
Hardware Setup
9
N750 Wireless Dual Band Gigabit ADSL Modem Router DGND4000
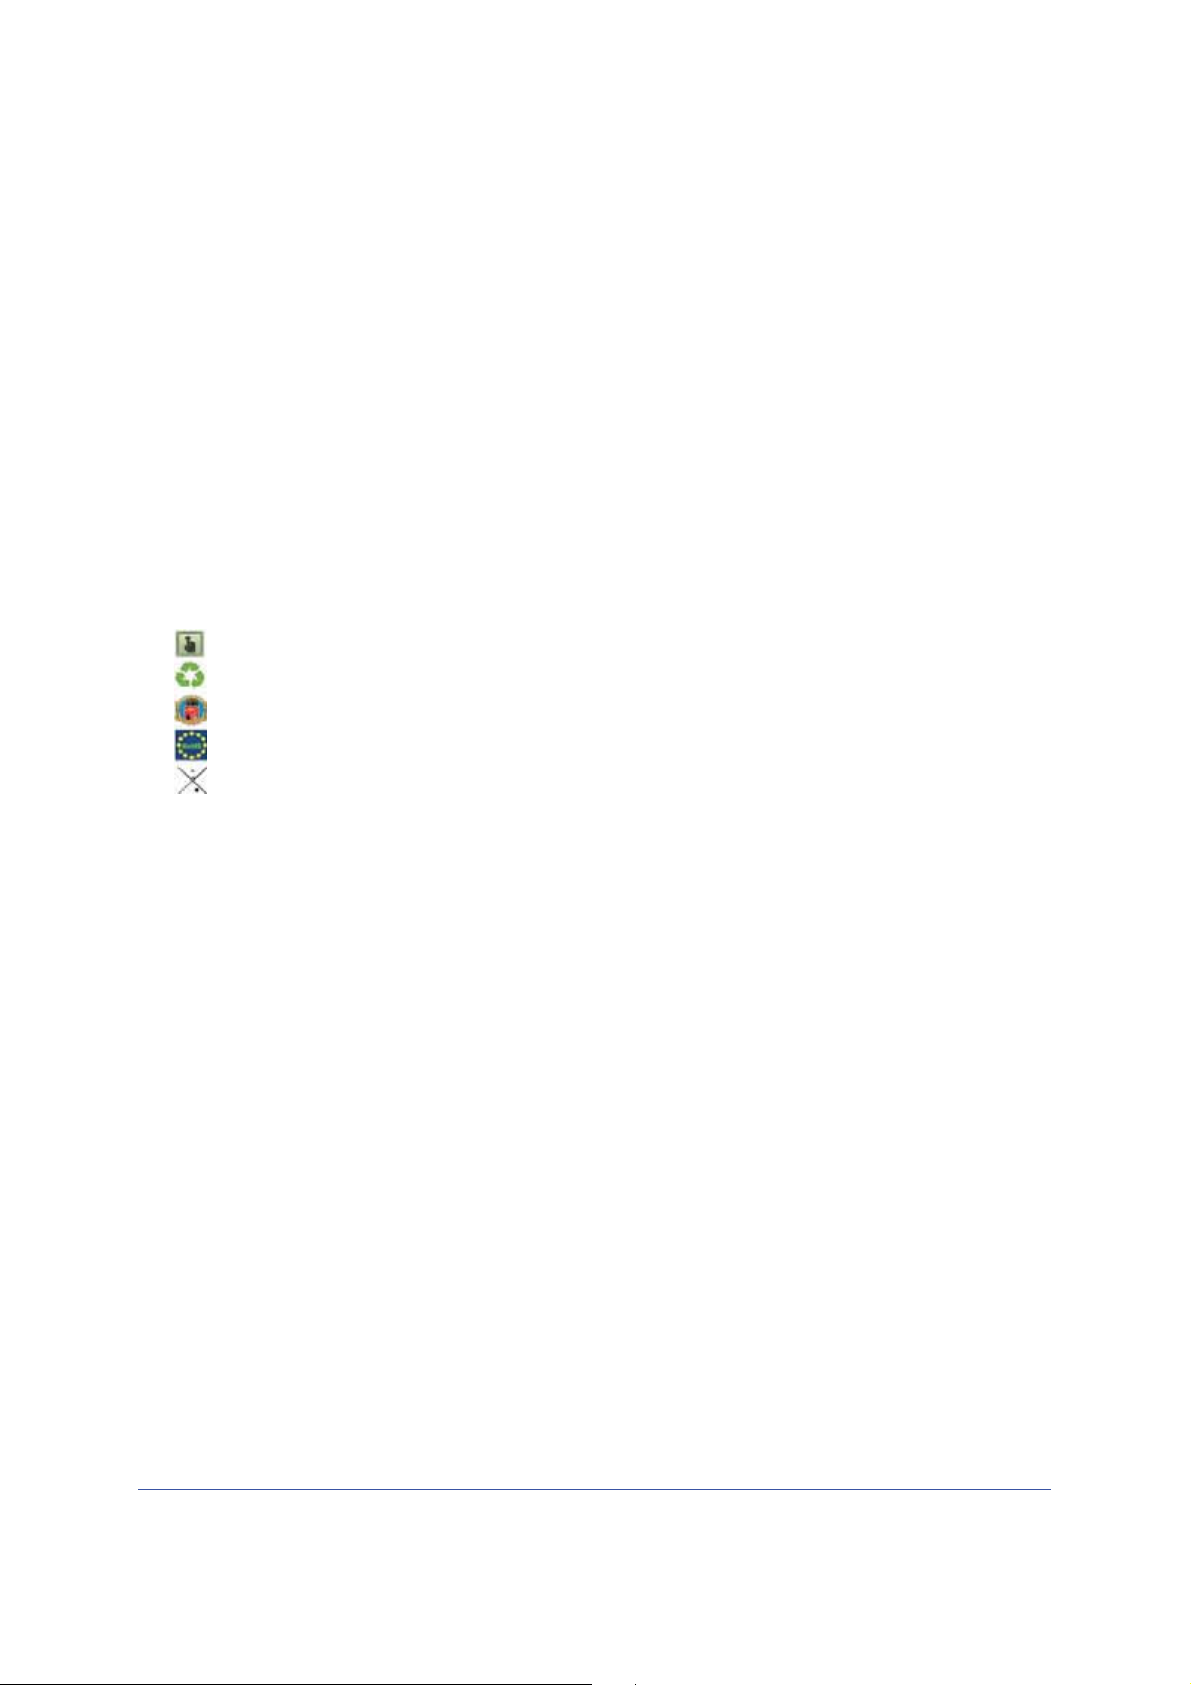
Unpack Your New Router
Your box should contain the following items:
• N750 Wireless Dual Band Gigabit ADSL Modem Router DGND4000
• AC power adapter (plug varies by region)
• Category 5 (Cat 5) Ethernet cable
• Telephone cable with RJ-11 connector
• Microfilters and splitters (quantity and type vary by region)
• Installation guide with cabling and router setup instructions
If any of the parts are incorrect, missing, or damaged, contact your NETGEAR dealer. Keep
the carton, including the original packing materials, in case you need to return the product for
repair. See Position Your Wireless Router on page 16 for information
and how to position your router.
about where to place
DGND4000
Modem Router
Telephone cable
Filter/splitter
Ethernet cable
Power adapter (2 parts)
Figure 1. Box contents
Hardware Setup
10
N750 Wireless Dual Band Gigabit ADSL Modem Router DGND4000
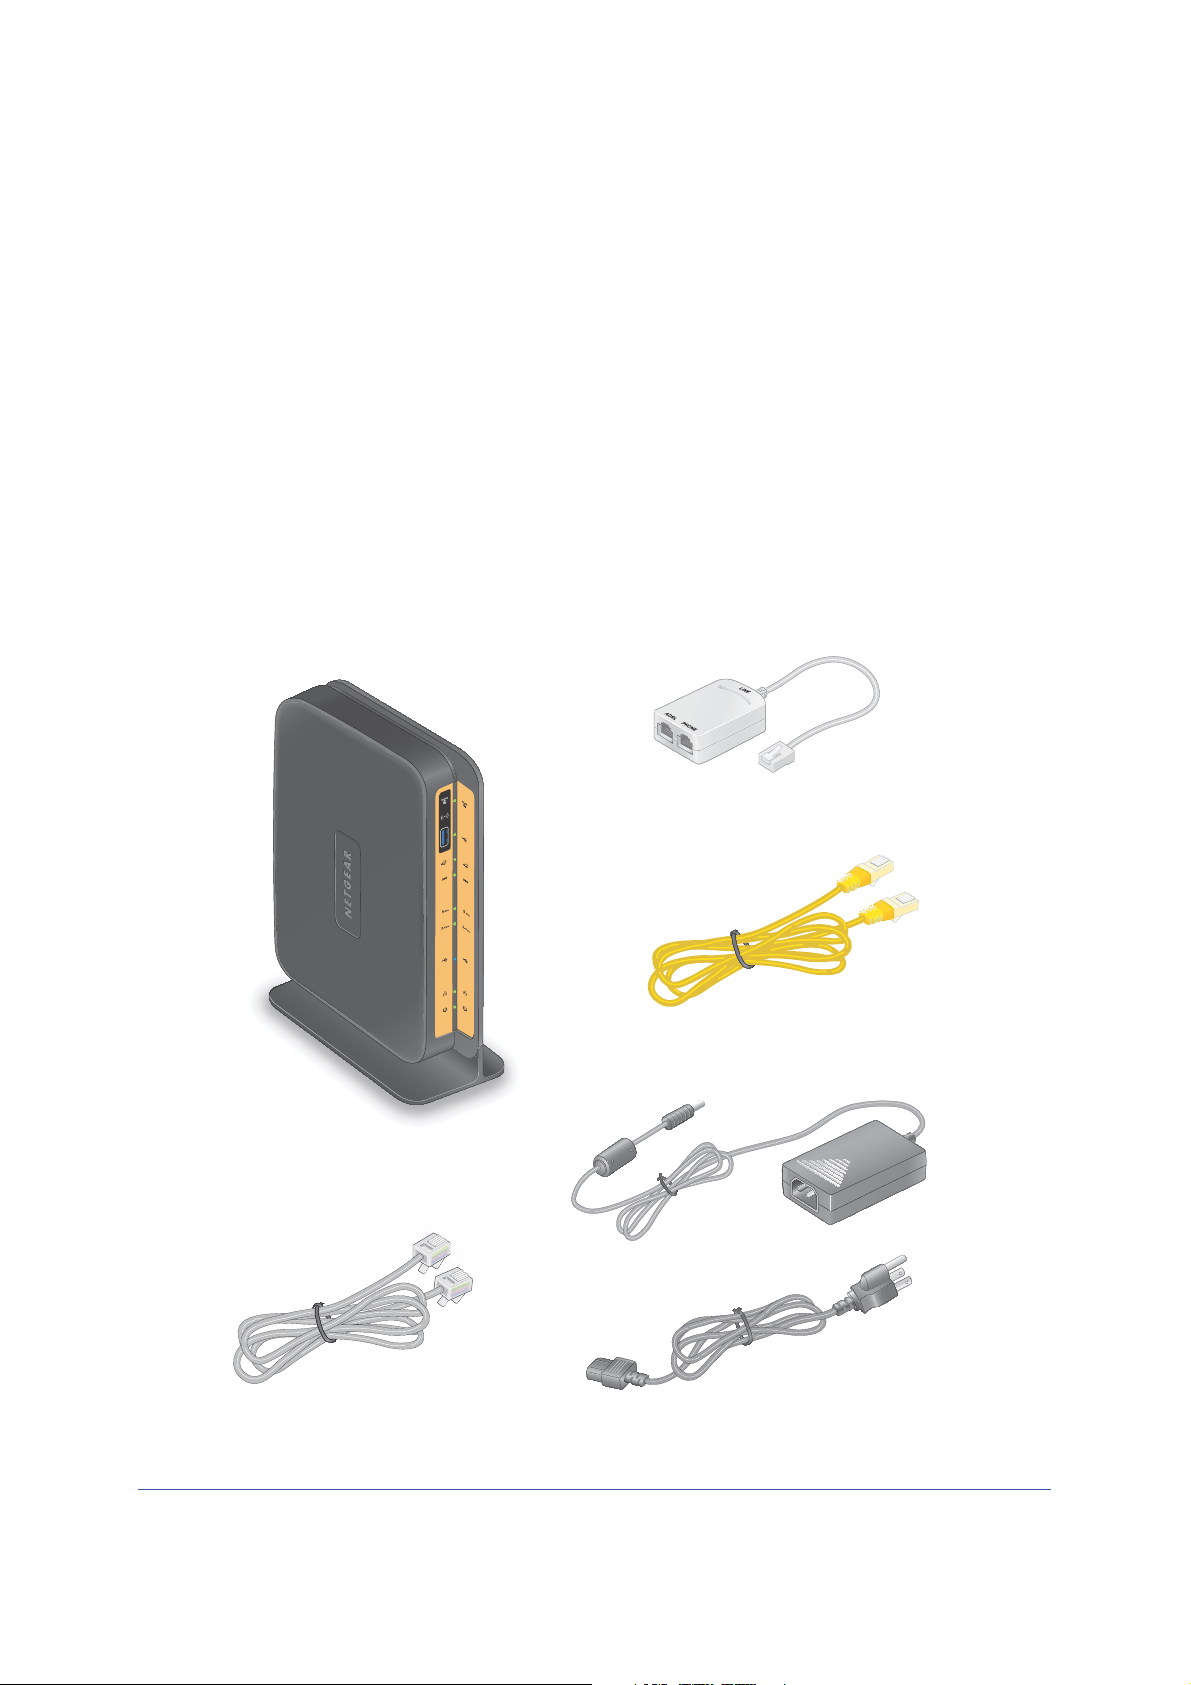
MAC Address
Network Key (Password)
Restore Factory Settings
WiFi Network Name (SSID)
Hardware Features
Before you cable your router, take a moment to become familiar with the label and the front
and back panels. Pay particular attention to the LEDs on the front panel.
Label
The label on the bottom of the wireless modem router shows the router’s Restore Factory
Settings button, WiFi network name (SSID), network key (password), and MAC address.
Figure 2. Label on router bottom
See Factory Settings on page 146 for information about the Restore Factory Settings button
and the factory setting values.
Hardware Setup
11

N750 Wireless Dual Band Gigabit ADSL Modem Router DGND4000
Back Panel
The back panel has the Power On/Off button and port connections shown in the figure:
1. ADSL line
2. USB port
3. Gigabit-Ethernet LAN ports
4. Gigabit-Ethernet WAN port for connecting to external
cable or fiber modem
5. AC power adapter input
6. Power On/Off button
Figure 3. Back panel port connections
Viewed from top to bottom, the back panel contains the following elements:
1. RJ-11 asynchronous DSL (ADSL) port for connecting the wireless modem router to an
ADSL line
Note: An ADSL port can send data over an ADSL line at one speed and
receiving it at another speed.
2. USB port for connecting USB storage devices like flash drives or hard drives
3. Four Gigabit-Ethernet RJ-45 LAN ports for cabling the wireless modem router to the local
computers
4. One Gigabit-Ethernet WAN port for connecting the wirele ss m ode m r out er t o a f ibe r o r
cable modem
Hardware Setup
12

N750 Wireless Dual Band Gigabit ADSL Modem Router DGND4000
Note: You can use either the ADSL or Gigabit-Ethernet port for WAN
connectivity.
5. AC power adapter input
6. Power On/Off button
Front Panel
The wireless modem router front panel has the ten status LEDs, icons, and ports shown in
the figure. The Wireless and WPS icons are buttons.
WPS On/Off button
Wireless On/Off button
USB port
Internet
DSL
5 GHZ wireless
2.4 GHz wireless
USB
LAN ports
Power
Figure 4. Front panel LEDs
The following tables describe the LEDs, icons, and buttons on the front panel from top to
bottom.
Hardware Setup
13
N750 Wireless Dual Band Gigabit ADSL Modem Router DGND4000
Table 1. WPS button and LED
Icon LED Activity Description
Solid green Indicates that wireless security has been enabled.
Blinking green WPS-capable device is connecting to the device.
Off WPS is not enabled. For information about the use of this button, see Wi-Fi
Protected Setup (WPS) Method on page 25.
Table 2. Wireless button
Icon Description
For information about the use of this button, see Wireless Connectivity on page 142.
Table 3. USB port
Icon Description
USB port for connecting USB storage devices like flash drives or hard drives.
Table 4. Internet LED
Icon LED Activity Description
Solid green You have an Internet connection. If this connection is dropped due to an
idle time-out but the connection is still present, the light stays green. If the
Internet connection is dropped for any other reason, the light turns off.
Solid red The Internet (IP) connection failed. See Cannot Access the Internet on
page 139 for troubleshooti ng information.
Blinking green Data is being transmitted over the Internet connection.
Off No Internet connection is detected or
external device handles the ISP connection).
the device is in bridge mode (an
Hardware Setup
14
N750 Wireless Dual Band Gigabit ADSL Modem Router DGND4000
Table 5. DSL LED
Icon LED Activity Description
Solid green You have an ADSL connection. In technical terms, the ADSL port is
synchronized with an ISP’s network-access device.
Blinking green Indicates that the wireless modem router is negotiating the best possible
speed on the ADSL line.
Off The unit is off or there is no IP connection.
Table 6. 5 GHz Wireless LED
Icon LED Activity Description
Solid blue There is wireless connectivity.
Blinking blue Data is being transmitted or received over the 5 GHz wireless link.
Off There is no wireless connectivity. You can still plug an Ethernet cable into
one of the LAN ports to get wired connectivity.
Table 7. 2.4 GHz Wireless LED
Icon LED Activity Description
Solid green There is wireless connectivity.
Blinking green Data is being transmitted or received over the 2.4 GHz wireless link.
Off There is no wireless connectivity. You can still plug an Ethernet cable into
one of the LAN ports to get wired connectivity.
Table 8. USB LED
Icon LED Activity Description
Solid green A USB port has detected a USB device.
Blinking green Data is being transmitted or received.
Off No link is detected on these ports.
Hardware Setup
15
N750 Wireless Dual Band Gigabit ADSL Modem Router DGND4000
Table 9. LAN LED
Icon LED Activity Description
Solid green A LAN port has detected an Ethernet link with a device.
Blinking green Data is being transmitted or received.
Off No link is detected on these ports.
Table 10. Power On/Off LED
Icon LED Activity Description
Solid green Power is supplied to the router.
Solid red POST (power-on self-test) failure or a device malfunction has occurred.
Off Power is not supplied to the router.
Restore Factory
Settings
Light blinks momentarily when the Restore Factory Settings button on the
bottom of the unit is pressed for six seconds. The Power LED then blinks
red three times when the Restore Factory Settings button is released and
then turns green as the gateway resets to the factory defaults.
Position Your Wireless Router
The wireless modem router lets you access your network from anywhere within the operating
range of your wireless network. However, the operating distance or range of your wireless
connection can vary significantly depending on the physical placement of your router. For
example, the thickness and number of walls the wireless signal passes through can limit the
range. For best results, place your router:
• Near the
preferably within line of sight to your wireless devices.
• So it is accessible to an AC power outlet and near Ethernet cables for wired computers.
• In an elevated location such as a high shelf, keeping the number of walls and ceilings
between the wireless modem router and your other devices to a minimum.
• Away from electrical devices that are potential sources of interference, such as ceiling
fans, home security systems, microwaves, computers, or the base of a cordless phone or
2.4 GHz cordless phone.
• A
way from any large metal surfaces, such as a solid met
expanses of other materials such as glass, insulated walls, fish tanks, mirrors, brick, and
concrete can also affect your wireless signal.
center of the area where your computers and other devices operate, and
al door or aluminum studs. Large
Note: The DGND4000 should be put in a vertical position only.
Hardware Setup
16

N750 Wireless Dual Band Gigabit ADSL Modem Router DGND4000
Also be aware that when you use multiple access points, it is better if adjacent access points
use different radio frequency channels to reduce interference. The recommended channel
spacing between adjacent access points is five channels (for example, use Channels 1 and
6, or 6 and 11).
ADSL Microfilters
If this is the first time you have cabled a wireless router between an ADSL phone line and
your computer or laptop, you might not be familiar with ADSL microfilters. If you are, you can
skip this section and proceed to Cable Your N750 Wireless Modem Router on page 18.
An ADSL microfilter is a small inline device that filters ADSL interference out of standard
phone equipment that shares line with your ADSL service. Every telephone device that
connects to a telephone line that provides ADSL service needs an ADSL microfilter to filter
out the ADSL interference. Example devices are telephones, fax machines, answering
machines, and caller ID displays. Not every phone line in your home necessarily carries
ADSL service. That depends on the ADSL service setup in your home.
Note: Often the ADSL microfilter is included in the box with the wireless
modem router. If you purchased the wireless modem router in a
country where a microfilter is not included, you have to acquire the
ADSL microfilter separately.
One-Line ADSL Microfilter (Not Included)
Plug the ADSL microfilter into the wall outlet and plug your phone equipment into the jack
labeled Phone. The wireless modem router plugs directly into a separate ADSL line. Plugging
the wireless modem router into the phone jack blocks the Internet connection. If you do not
have a separate ADSL line for the router, the best thing to do is to use an ADSL microfilter
with a built-in splitter.
Plugs into ADSL line
Figure 5. One-line ADSL microfilter
Second best when you do not have a separate ADSL line for the router is to get a separate
splitter. To use a one-line filter with a sep arate splitter, insert the splitter into the phone outlet,
connect the one-line filter to the splitter, and connect the phone to the filter.
Hardware Setup
17
N750 Wireless Dual Band Gigabit ADSL Modem Router DGND4000
Two-Line ADSL Microfilter (Included)
Use an ADSL microfilter with a built-in splitter when there is a single wall outlet that provides
connectivity for both the wireless modem router and your telephone equipment. Plug the
ADSL microfilter into the wall outlet, plug your phone equipment into the jack labeled Phone,
and plug the wireless modem router into the jack labeled ADSL.
Plugs into the ADSL line
Figure 6. Two-line ADSL microfilter with built-in splitter
Summary
• One-line ADSL microfilter (not included). Use with a phone or fax machine.
• Splitter (not included). Use with a one-line ADSL microfilter to share an outlet with a
phone and the wireless modem router.
• Two-line ADSL microfilter with built-in splitter (included). Use to share an outlet with a
phone and the wireless modem router.
Cable Your N750 Wireless Modem Router
WARNING:
DO not stack equipment, or place equipment in tight spaces, or in
drawers. Be sure that your equipment is surrounded by at least
2 inches of air space. The unit should not be wall mounted.
Hardware Setup
18
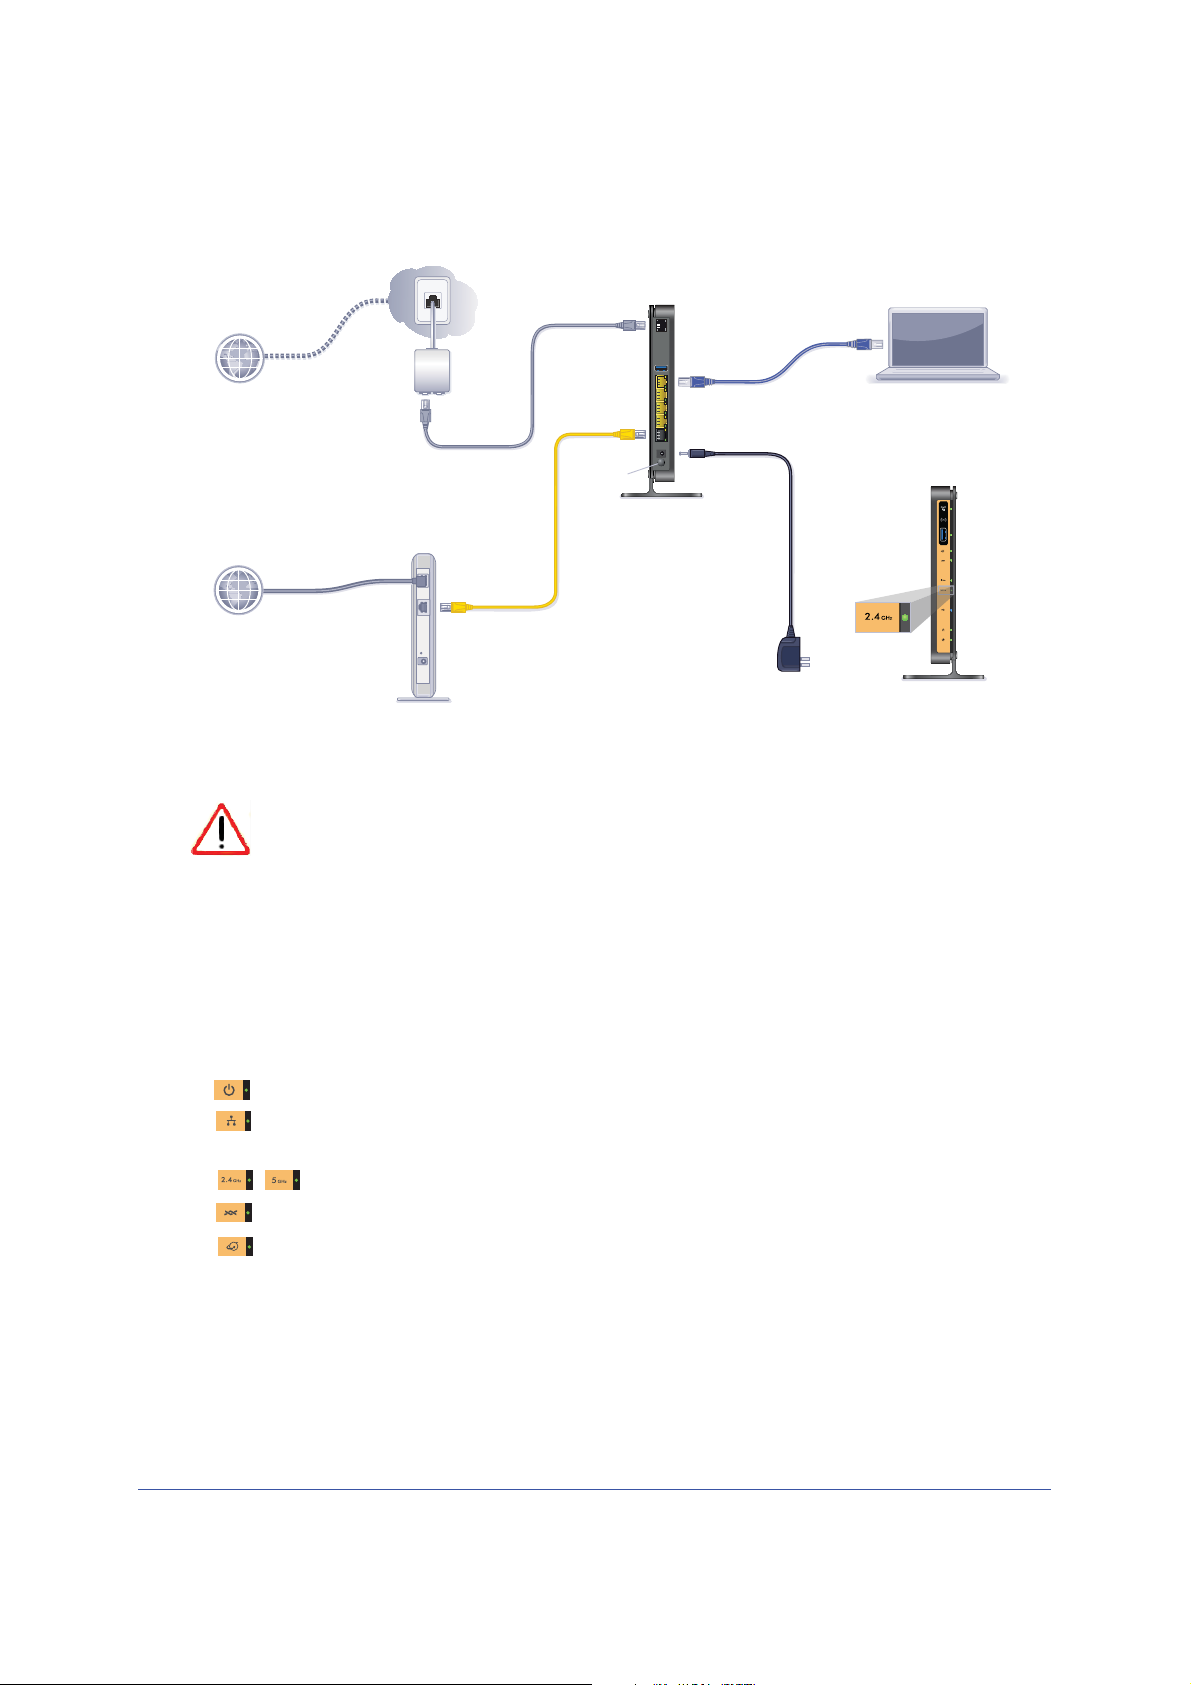
N750 Wireless Dual Band Gigabit ADSL Modem Router DGND4000
Step 1:
Connect to ADSL
if connecting directly
to a DSL line.
Connect to Ethernet WAN
if connecting to a
fiber/cable modem.
Step 2:
Cable your computer.
Step 3:
Power on your router.
Wait until the 2.4 GHz
Wireless LED turns solid
green.
Note: Add an ADSL filter for every
telephone on the same phone line
as your wireless modem router.
Internet
Internet
Power On/Off
N600 Wireless Modem Router
Note: Keep the DGND3700v2
N600 Wireless Modem Router
in a vertical position.
Connect to Internet with ADSL or Ethernet WAN.
Phone cable
Ethernet cable
Ethernet cable
(not included)
Power adapter
N600 Wireless Modem Router
The installation guide that came in the box has a cabling diagram on the second page.
Line
Phone
ADSL
2.4 GHz
Wireless LED
Laptop or desktop
computer
Fiber/Cable modem
Figure 7. Cabling diagram
CAUTION:
Incorrectly connecting a filter to your wireless modem router blocks your
ADSL connection.
Verify the Cabling
Verify that your router is cab led correctly by checking the wireless modem router LEDs. Turn
on the wireless router by pressing the Power On/Off button on the back.
•
•
•
•
•
Turn on your computer. If software usually logs you in to your Internet connection, do not run
that software. Cancel it if it starts automatically.
The Power LED is green when the modem router is turned on.
The LAN port LED is green when a computer is cabled to the router by an Ethernet
cable.
The Wireless LEDs are lit when the modem router is turned on.
The DSL LED is green when you have an ADSL connection.
The Internet LED is green when there is an Internet connection.
Hardware Setup
19

2. Get Started with NETGEAR Genie
Connect to the wireless modem router
2
This chapter explains how to use NETGEAR Genie to set up your wireless modem router after
you complete cabling as described in the installation guide and in the previous chapter in this
book.
This chapter contains the following sections:
• Prepare to Set Up the Wireless Modem Router
• Types of Logins and Access
• NETGEAR Genie Setup
• Use NETGEAR Genie after Installation
• Upgrade Wireless Modem Router Firmware
• Wireless Modem Router Dashboard (BASIC Home Screen)
• Add Wireless Devices or Computers to Your Network
20

N750 Wireless Dual Band Gigabit ADSL Modem Router DGND4000
Prepare to Set Up the Wireless Modem Router
You can set up your wireless modem router with the NETGEAR Genie automatically, or you
can use the Genie menus and screens to set up your wireless modem router manually.
However, before you start the setup process, you need to have your ISP information about
hand and make sure the laptops, computers, and other devices in the network have the
settings described here.
Use Standard TCP/IP Properties for DHCP
If you set up your computer to use a static IP address, you need to change the settings so
that it uses Dynamic Host Configuration Protocol (DHCP).
Gather ISP Information
If you have DSL broadband service, you might need the following information to set up your
wireless modem router and to check that your Internet configuration is correct. Your Internet
service provider (ISP) should have provided you with all of the information needed to connect
to the Internet. If you cannot locate this information, ask your ISP to provide it. When your
Internet connection is working, you no longer need to launch the ISP’s login program on your
computer to access the Internet. When you start an Internet application, your wireless
modem router automatically logs you in.
• The ISP configuration information for your DSL account
• I
SP login name and password
• Fixed or static IP address settings (special deployment by ISP; this situation is rare)
Wireless Devices and Security Settings
Make sure that the wireless device or computer that you are using supports WPA or WPA2
wireless security , which is the wireless security supported by the wireless modem router. See
Basic Wireless Settings on page 33 for information about the wireless modem router’s
preconfigured security settings.
Types of Logins and Access
There are two separate types of logins that have different purposes. It is important that you
understand the difference so that you know which login to use when.
• W
ireless modem router login logs you in to the wireless modem router interface from
NETGEAR Genie. See Use NETGEAR Genie after Installation on page 23 for details
about this login.
Get Started with NETGEAR Genie
21

N750 Wireless Dual Band Gigabit ADSL Modem Router DGND4000
¾
¾
¾
Wireless network key or password. Your wireless modem router is preset with a unique
wireless network name (SSID) and password for wireless access. This information is on
the label located on the bottom of your wireless modem router.
• ISP login logs you in to your Internet service. Y our service provider has provided you with
this login information in a letter or some other way. If you cannot find this login
information, contact your service provider.
NETGEAR Genie Setup
NETGEAR Genie runs on any device with a web browser. It is the easiest way to set up the
wireless modem router because it automates many of the steps and verifies that those steps
have been successfully completed. It takes about 15 minutes to complete.
To use NETGEAR Genie to set up your wireless modem router:
1. Turn the wireless modem router on by pressing the On/Off button, if not done yet.
2. Make sure tha
router.
3. Launch your Internet browser.
• If this is the
modem router, the browser automatically goes to http://www.routerlogin.net, and the
NETGEAR Genie screen displays.
• If you already used the NETGEAR Genie, type http://www.routerlogin.net in the
address field for your browser to display the NETGEAR Genie screen. See Use
NETGEAR Genie after Installation on page 23.
t your device is connected with an Ethernet cable to your wir el e ss mo d em
first time you are setting up the Internet connection for your wireless
4. Follow the onscreen instructions to complete NETGEAR Genie setup. NETGEAR Genie
guides you through connecting the wir el es s m o de m r o ut er to the Internet.
If the browser cannot display the web page:
• Make sure that the computer is connected to one of the four Gigabit-Ethernet LAN ports,
or wirelessly to the wireless modem router.
• Make sure that the wireless modem router is fully up and running. Its Wireless LEDs
should turn on.
• Close and reopen the browser to make sure the browser does not cache the previous
page.
• Browse to http://routerlogin.net.
• If your computer is set to a static or fixed IP address (this is uncommon), change the
setting to obtain an IP address automatically from the wireless modem router.
If the wireless modem router does not connect to the Internet:
1. Review your settings to be sure that you have selected the correct options and typed
everything correctly.
2. Contact your ISP to verify that you have the correct configuration information.
Get Started with NETGEAR Genie
22
N750 Wireless Dual Band Gigabit ADSL Modem Router DGND4000
3. Read Chapter 10, Troubleshooting. If problems persist, register your NETGEAR product and
contact NETGEAR technical support.
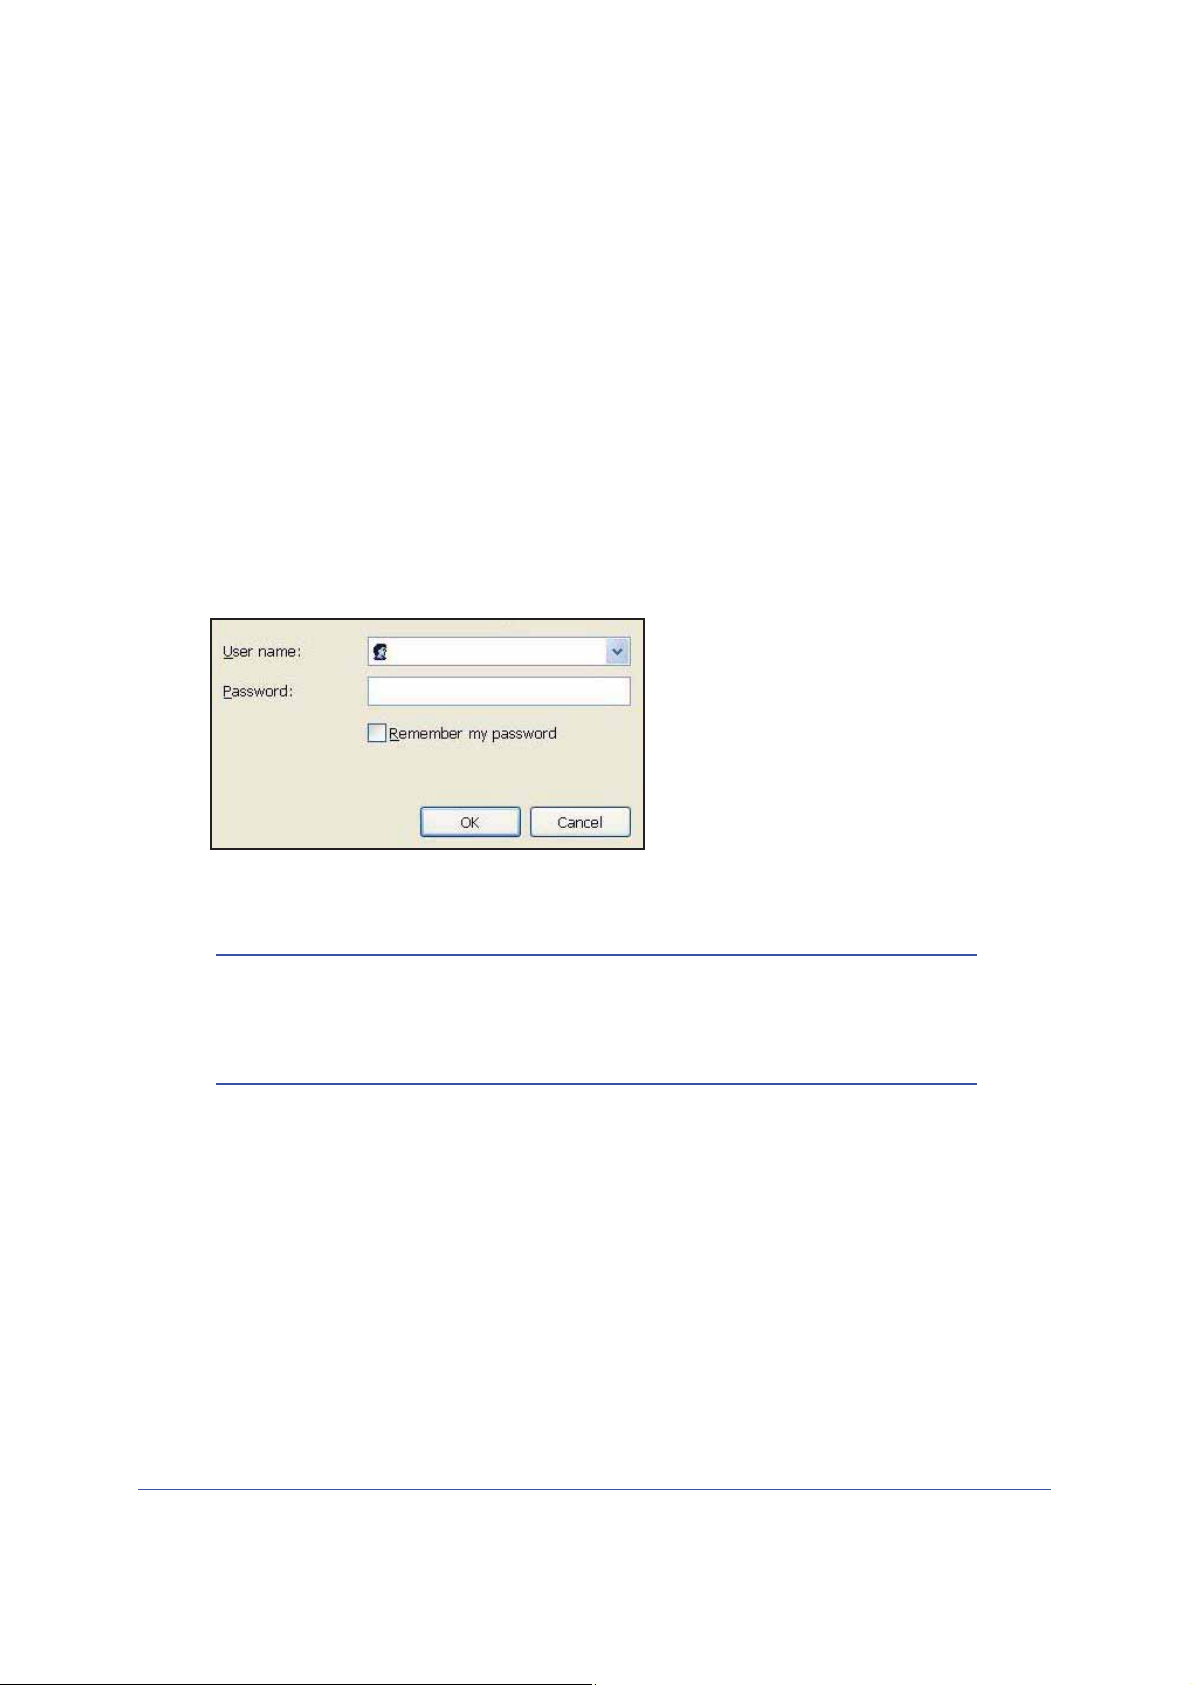
Use NETGEAR Genie after Installation
When you first set up your wireless modem router, NETGEAR Genie automatically starts
when you launch an Internet browser on a computer that is connected to the wireless modem
router. You can use NETGEAR Genie again if you want to view or change settings for the
wireless modem router.
1. Launch your browser from a computer or wireless device that is connected to the
wireless modem router.
2. Type http://www.routerlogin.net or http://www.routerlogin.com.
The login window displays:
admin
********
3. Enter admin for the wireless modem router user name and password for the wireless
modem router password, both in lowercase letters.
Note: The wireless modem router user name and password are different
from the user name and password for logging in to your Internet
connection. See
information.
Types of Logins and Access on page 21 for more
Upgrade Wireless Modem Router Firmware
When you set up your wireless modem router and are connected to the Internet, the wireless
modem router automatically checks for you to see if newer firmware is available. If it is, a
message is displayed on the top of the screen. See Upgrade the Wireless Modem Router
Firmware on page 83 for more information about upgrading firmware.
Click the message when it shows up, and click Yes to upgrade the wireless modem router
with the latest firmware. After the upgrade, the wireless modem router restarts.
Get Started with NETGEAR Genie
23
N750 Wireless Dual Band Gigabit ADSL Modem Router DGND4000
Language
Help
Dashboard (Click to view details)
Menus (Click the Advanced tab to view more)
CAUTION:
Do not try to go online, turn off the wireless modem router, shut down the
computer, or do anything else to the wireless modem router until the
wireless modem router finishes restarting and the Power LED has stopped
blinking for several seconds.
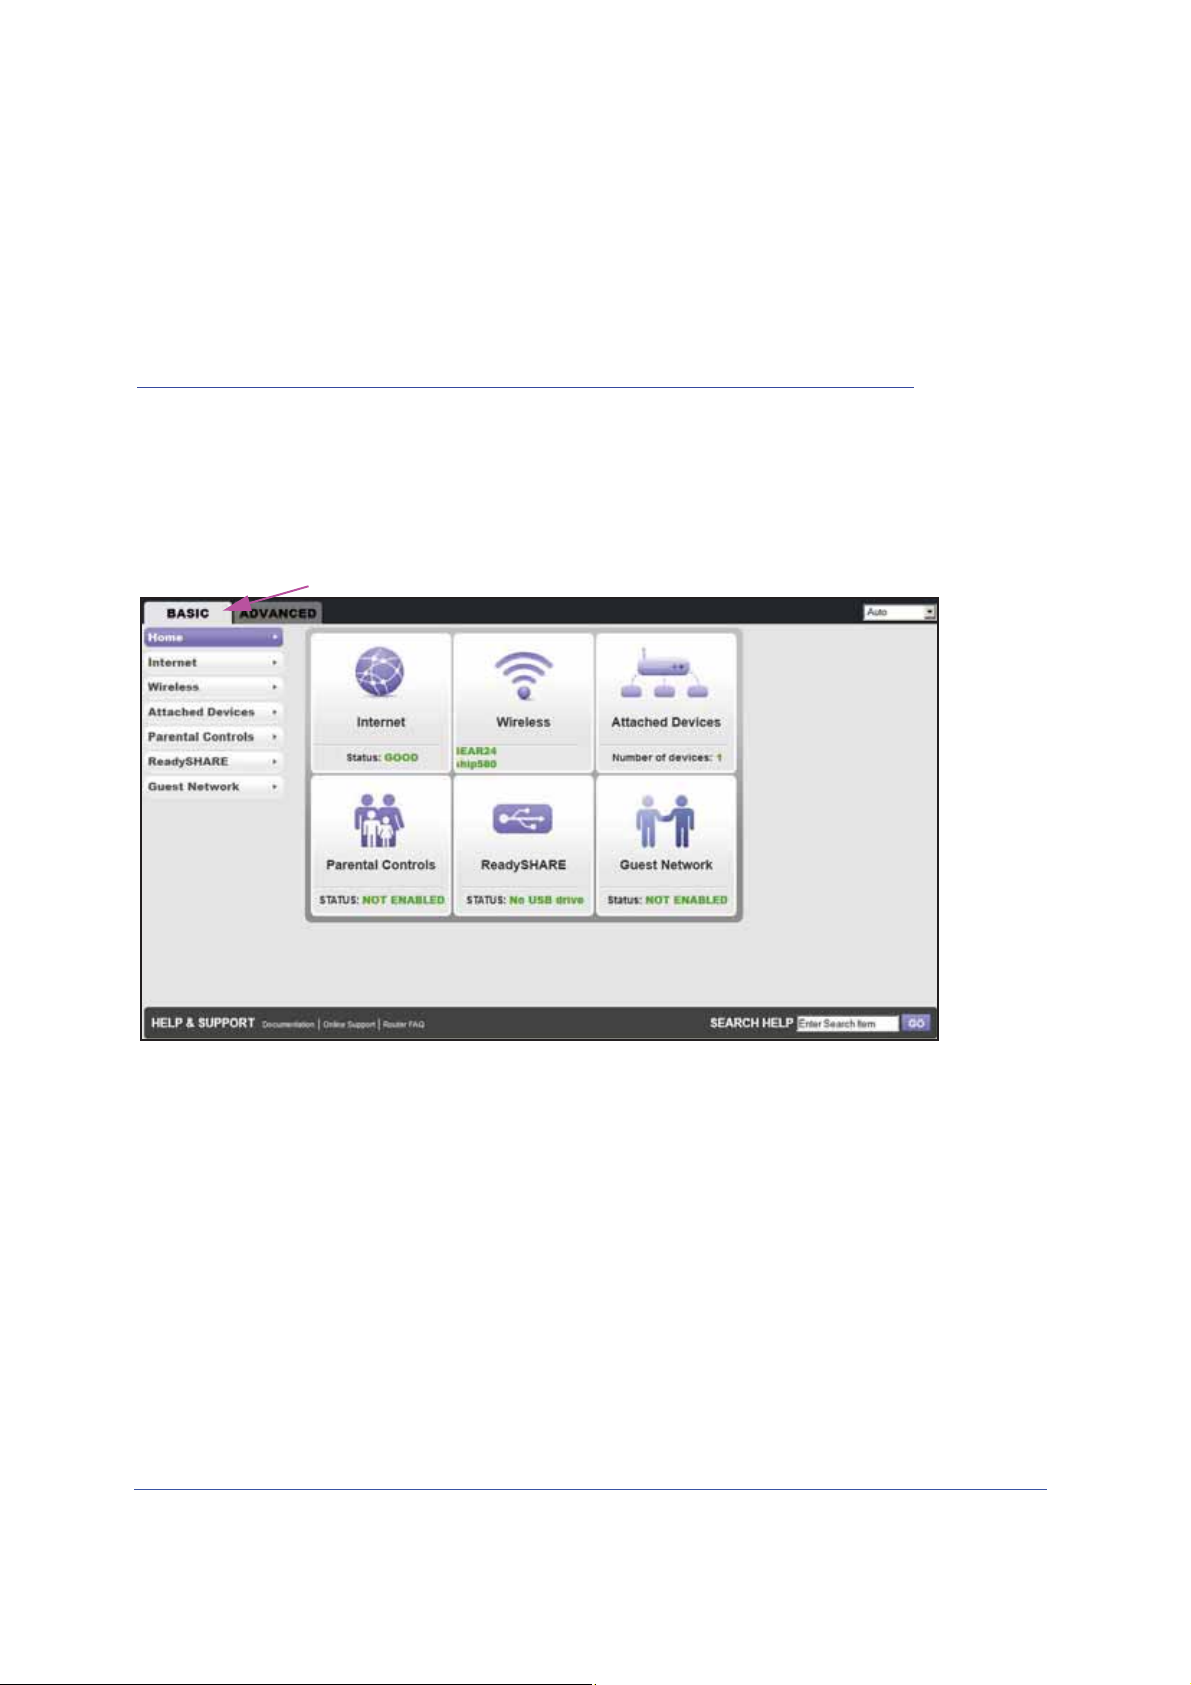
Wireless Modem Router Dashboard (BASIC Home Screen)
The wireless modem router BASIC Home screen has a dashboard that lets you see the
status of your Internet connection and network at a glance. You can click any of the six
sections of the dashboard to view more detailed information. The left column has the menus,
and at the top there is an Advanced tab that is used to access additional menus and screens.
Figure 8. Wireless modem router BASIC Home screen with dashboard, language, and online
help
• Home. This dashboard screen displays when you log in to the wireless modem
router.
• Internet.Set, update, and check the ISP settings of your wireless modem router.
• Wireless. View or change the wireless settings for your wireless modem router.
• Attached Devices. V
iew the devices connected to your network.
Get Started with NETGEAR Genie
24

N750 Wireless Dual Band Gigabit ADSL Modem Router DGND4000
¾
¾
• Parental Controls. Download and set up parental controls to prevent objectionable
content from reaching your computers.
• ReadySHARE. If you connected a USB storage device to the wireless modem router,
then it is displayed here.
• Guest Network. Set up a guest network to allow visitors to use your wireless modem
router’s Internet connection.
• Advanced tab. Set the wireless modem router up for unique situations such as when
remote access by IP or by domain name from the Internet is needed. See Chapter 9,
Advanced Settings. Using this tab requires a solid understanding of networking concepts.
• Help & Support. Go to the NETGEAR support site to get information, help, and product
documentation. These links work once you have an Internet connection.
Add Wireless Devices or Computers to Your Network
Choose either the manual or the WPS method to add wireless devices and other equipment
to your wireless network. See Guest Networks on page 37 for instructions for how to set up a
guest network.
Manual Method
To connect manually:
1. Open the software that manages your wireless connections on the wireless device
(laptop computer, gaming device, iPhone) that you want to connect to your wireless
modem router. This software scans for all wireless networks in your area.
2. Look for your net
the setup process, look for the default WiFi network name (SSID) and select it. The default
SSID is located on the product label on the bottom of the wir el es s m o de m r ou te r .
3. Enter the wireless modem router password and click Connect. The default wireless modem
router passphrase is located on the product label on the bottom of the wireless modem
router.
4. Repeat steps 1–3 to add other wireless devices.
work and select it. If you did not change the name of your network during
Wi-Fi Protected Setup (WPS) Method
Wi-Fi Protected Setup (WPS) is a standard for easily adding computers and other devices to
a home network while maintaining security. To use WPS, make sure that all wireless devices
to be connected to the network are Wi-Fi certified and support WPS. During the connection
process, the client gets the security settings from the wireless modem router so that every
device in the network has the same security settings.
To use WPS to join the wireless network:
If your wireless device supports WPS (Push 'N' Connect), follow these steps:
1. Press the WPS button on the wireless modem router top panel.
Get Started with NETGEAR Genie
25

N750 Wireless Dual Band Gigabit ADSL Modem Router DGND4000
2. Within two minutes, press the WPS button on your wireless device, or follow the WPS
instructions that came with the device. The device is now connected to your wir el es s
modem router.
3. Repeat steps 1–2 to add other WPS wireless devices.
Get Started with NETGEAR Genie
26
3. NETGEAR genie BASIC Settings
Your Internet connection and network
3
This chapter explains the features available from the NETGEAR genie BASIC Home screen,
shown in the following figure:
This chapter contains the following sections:
• Internet Basic Settings
• Attached Devices
• Parental Controls
• ReadySHARE USB Storage and Printer
• Basic Wireless Settings
• Guest Networks
• NETGEAR genie App
27
N750 Wireless Dual Band Gigabit ADSL Modem Router DGND4000
Internet Basic Settings
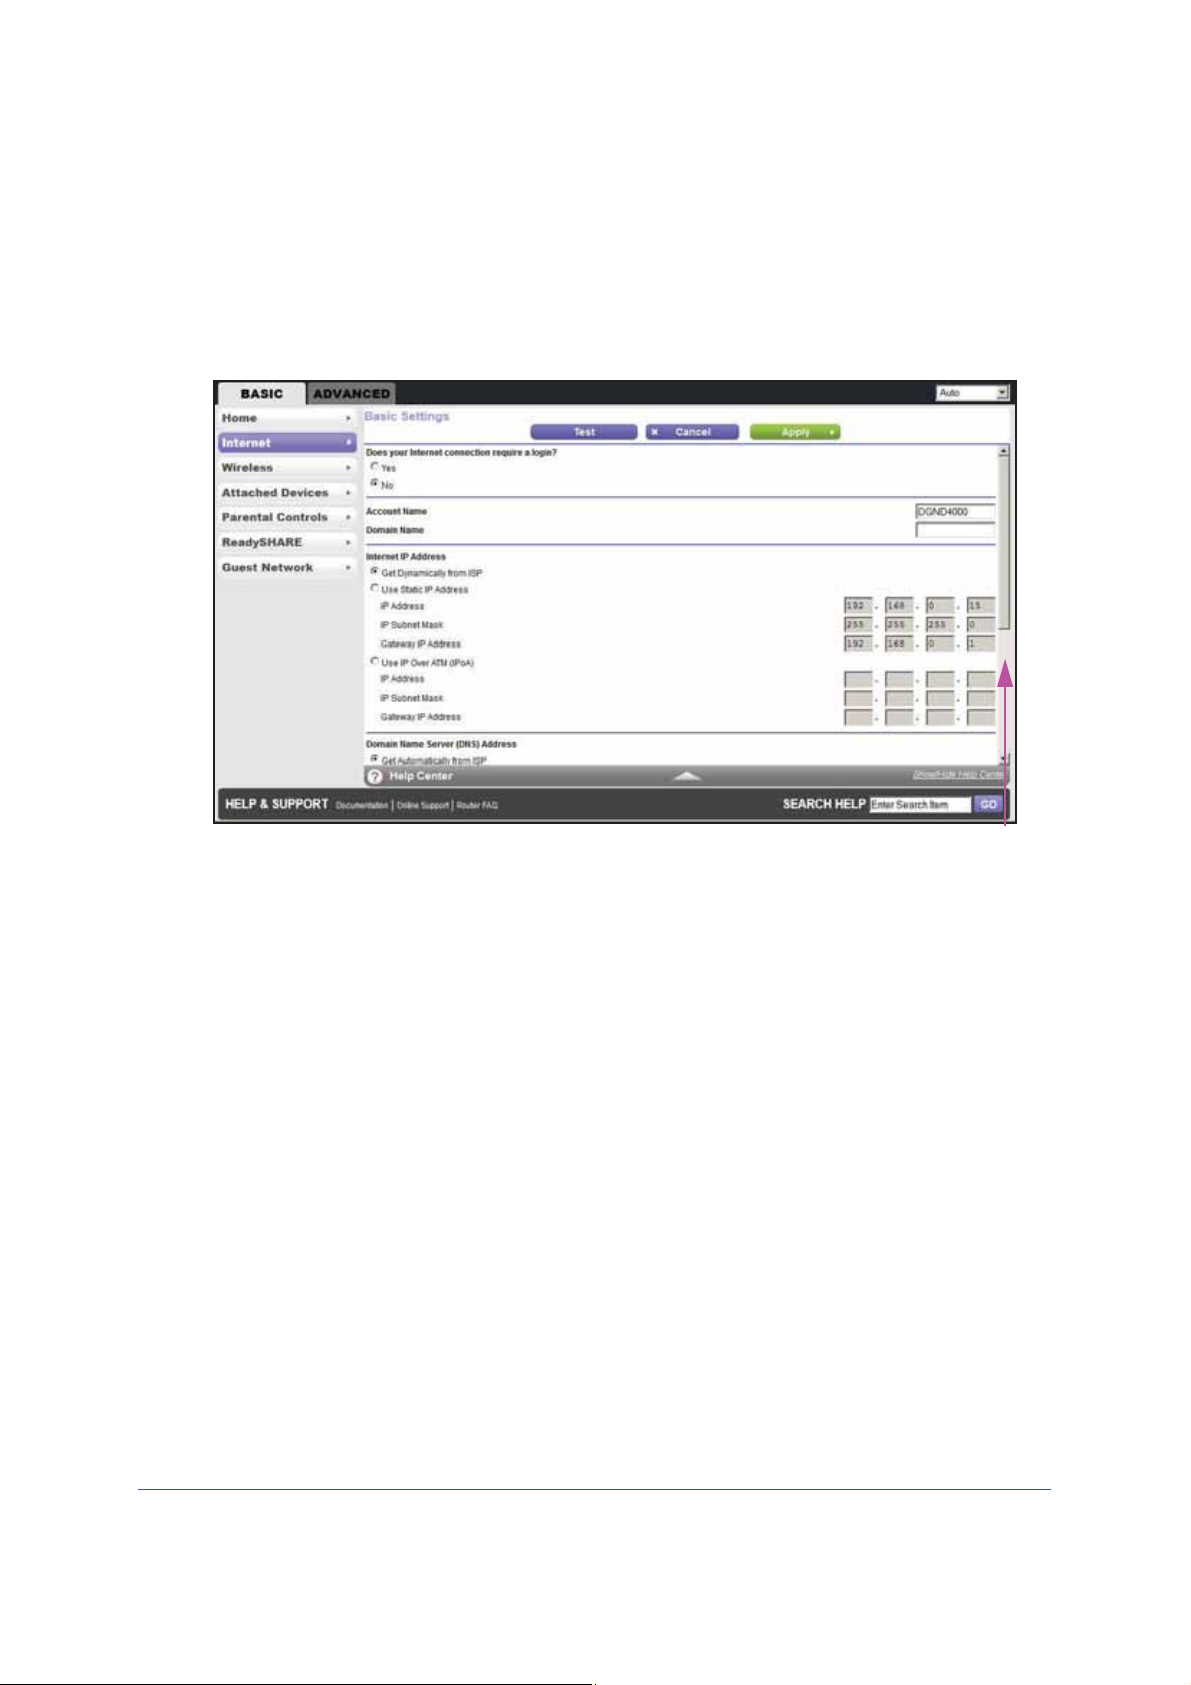
The Internet Basic Settings screen is where you view or change ISP information.
1. From the BASIC Home screen, select Internet. The following screen displays:
Scroll to view more settings
The fields that display in the Internet Basic Settings screen depend on whether your
Internet connection requires a login.
s. Select
• Ye
change the login time-out, enter a new value in minutes.
• No. Enter the account and domain names, only if needed.
2. Enter the settings for the IP address and DNS server. The default settings usually work fine.
If you have problems with your connection, check the ISP settings.
3. Click Apply to save your settings.
4. Click Test to test your Internet connection. If the NETGEAR website does not display within
1 minute, see Chapter 10, Troubleshooting.
the encapsulation method and enter the login name. If you want to
Internet Basic Settings Screen Fields
The following descriptions explain all of the possible fields in the Internet Basic Settings
screen. Which fields display in this screen depends on whether an ISP login is required.
Does Your ISP Require a Login? Answer eithe
These fields display when no login is required:
• Account Nam
might also be called the host name.
e (If required). Enter the account name provided by your ISP. This name
r yes or no.
NETGEAR genie BASIC Settings
28

N750 Wireless Dual Band Gigabit ADSL Modem Router DGND4000
• Domain Name (If required). Enter the domain name provided by your ISP.
These fields display when your ISP requires a login:
• Internet Service Provider Encapsulation . ISP types. The choices are PPPoE, PPTP, or
L2TP.
• Login. The login name provided by your ISP. This name is often an email address.
• Password.
The password that you use to log in to your ISP.
• Idle Timeout (In minutes). If you want to change the login time-out, enter a new value in
minutes. This setting determines how long the wireless modem router keeps the Internet
connection active after there is no Internet activity from the LAN. Entering a value of 0
(zero) means never log out.
Internet IP Address.
• Get Dynamic
ally from ISP. Your ISP uses DHCP to assign your IP address. Your ISP
automatically assigns these addresses.
• Use Static IP Address. Enter the IP address, IP subnet mask, and the gateway IP
address that your ISP assigned. The gateway is the ISP’s wireless modem router to
which your wireless modem router connects.
Domain Name Server (DNS) Address. The DNS se
rver is used to look up site addresses
based on their names.
• Get Automati
cally from ISP. Y our ISP uses DHCP to assign your DNS servers. Your ISP
automatically assigns this address.
• Use These DNS Servers. If you know that your ISP does not automatically transmit DNS
addresses to the wireless modem router during login, select this option, and enter the IP
address of your ISP’s primary DNS server. If a secondary DNS server address is
available, enter it also.
Wireless Modem Router MAC Address. The Ethernet MAC address used by the wireless
modem router on the Internet port. Some ISPs register the MAC address of the network
interface card in your computer when your account is first opened. They then accept traffic
only from the MAC address of that computer. This feature allows your wireless modem router
to use your computer’s MAC address (this procedure is also called cloning).
• Use Default Address. Use the default MAC address.
• Use
Computer MAC Address. The wireless modem router captures and use the MAC
address of the computer that you are now using. You have to use the one computer that
is allowed by the ISP.
• Use This MAC Address. Enter the MAC address that you want to use.
NETGEAR genie BASIC Settings
29
N750 Wireless Dual Band Gigabit ADSL Modem Router DGND4000
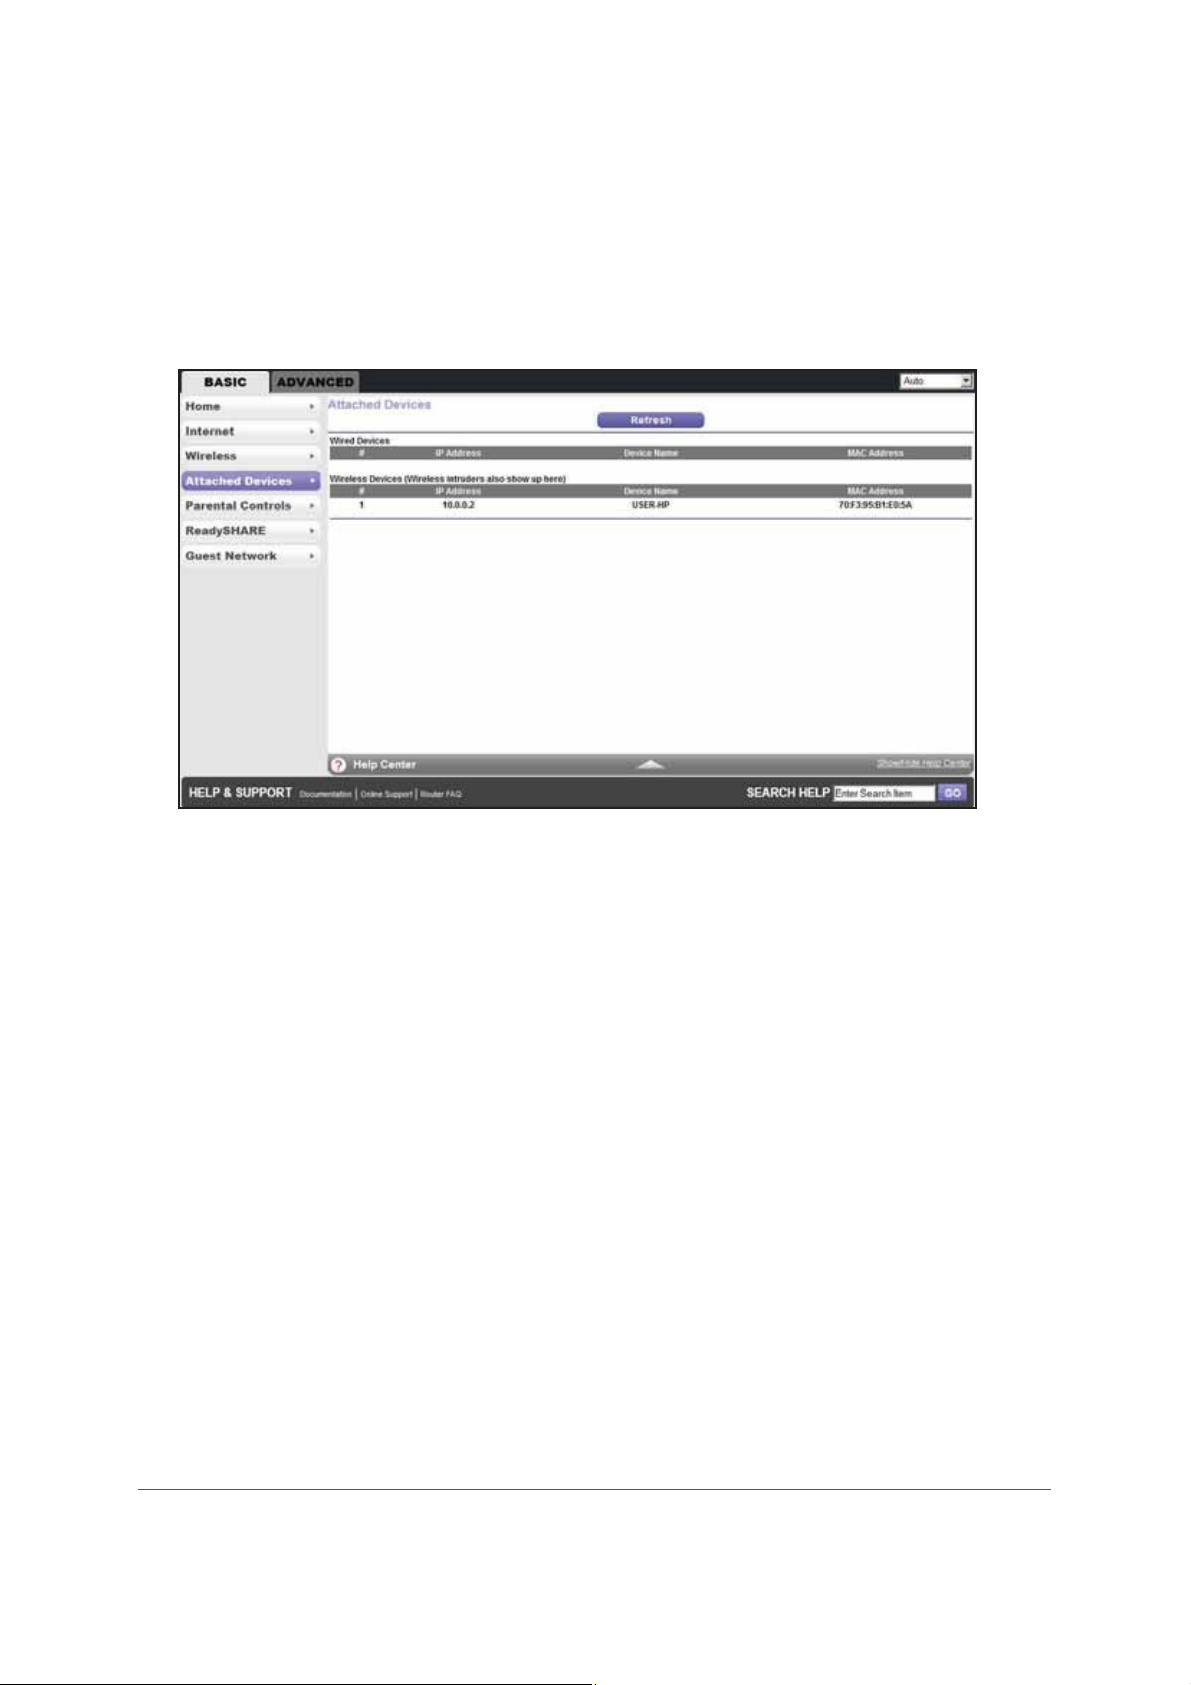
Attached Devices
You can view all computers or devices that are currently connected to your network here.
From the BASIC Home screen, select Attached Devices to display the following screen:
Wired devices are connected to the wireless modem router with Ethernet cables. Wireless
devices have joined the wireless network.
• # (nu
• IP Address
• Device Na
• MAC Address. The unique MAC address for each device does not change. The MAC
You can click Refresh to upda
mber). The order in which the device joined the network.
. The IP address that the wireless modem router assigned to this device when
it joined the network. This number can change when a device is disconnected and rejoins
the network.
me. If t
address is typically shown on the product label.
he device name is known, it is shown here.
te this screen.
NETGEAR genie BASIC Settings
30
 Loading...