

Page 1
NeoTV Streaming Player (NTV200)
Installation Guide
Page 2

© 2011 NETGEAR, Inc. All rights reserved.
No part of this publication may be rep
stored in a retrieval system, or translated into any language in any form or by
any means without the written permission of NETGEAR, Inc.
DO NOT stack equipment, or place equipment in tight spaces or in drawers.
Be sure your equipment is surrounded by at least 2 in. of air space.
roduced, transmitted, transcribed,
Technical Support
Thank you for choosing NETGEAR. To register your product, get the latest
product updates, or get support online, visit us at http://support.netgear.com.
Phone (US only): 1-888-NETGEAR
Phone (Other Countries):
See http://support.netgear.com/app/answers/detail/a_id/984.
Trademarks
NETGEAR, the NETGEAR logo, ReadyNAS, ProSafe, Smart Wizard, Auto
Uplink, X-RAID2, and NeoTV are trademarks or registered trademarks of
NETGEAR, Inc. Microsoft, Windows, Windows NT, and Vista are registered
trademarks of Microsoft Corporation. Other brand and product names are
registered trademarks or trademarks of their respective holders.
Statement of Conditions
In the interest of improving internal design, operational function, and/or
reliability, NETGEAR reserves the right to make changes to the products
described in this document without notice. NETGEAR does not assume any
liability that may occur due to the use or application of the product(s) or circuit
layout(s) described herein.
Page 3
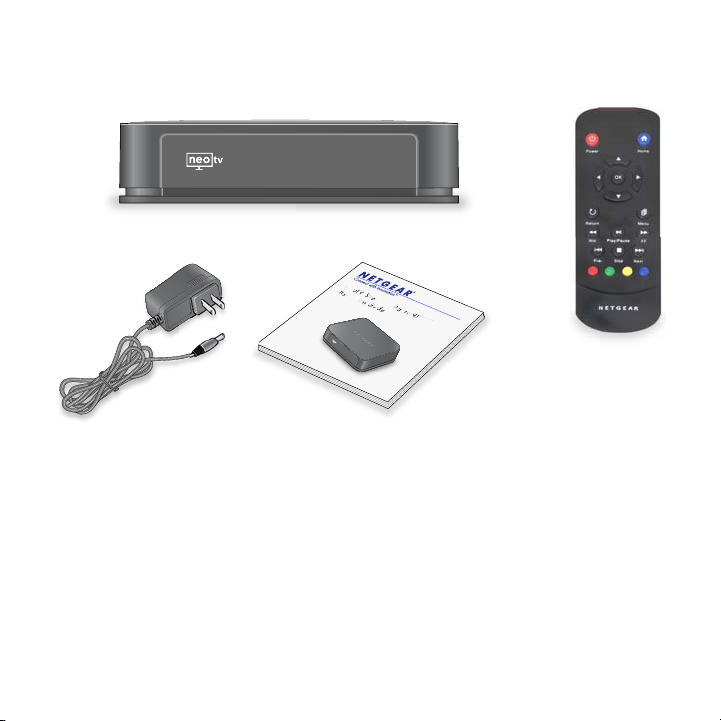
What’s Included in the Box
NeoTV Streaming Player NTV200
Installation Guide
Ne
o
T
V
S
t
r
e
aming
P
l
a
y
e
r
N
T
V200
In
s
t
allat
i
on
G
u
i
d
e
Power adapter
Remote
NeoTV Streaming Player
control
Installation guide
with
batteries
3
Page 4
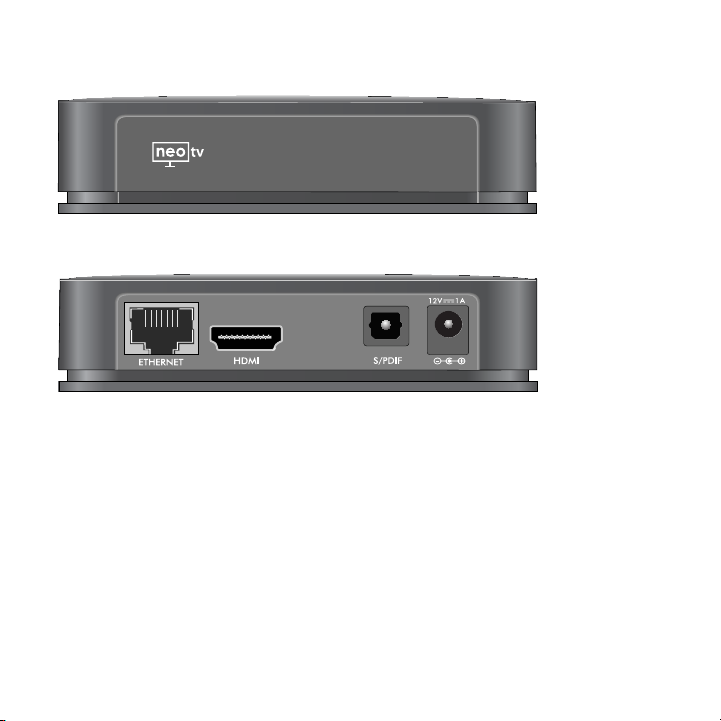
Front and Rear Views
What You Need to Use Your NeoTV Player
• TV with HDMI port
• HDMI cable
• Broadband Internet connection
•
A wireless or wired network
•
Device with I
nternet browser for service activation
4
Page 5
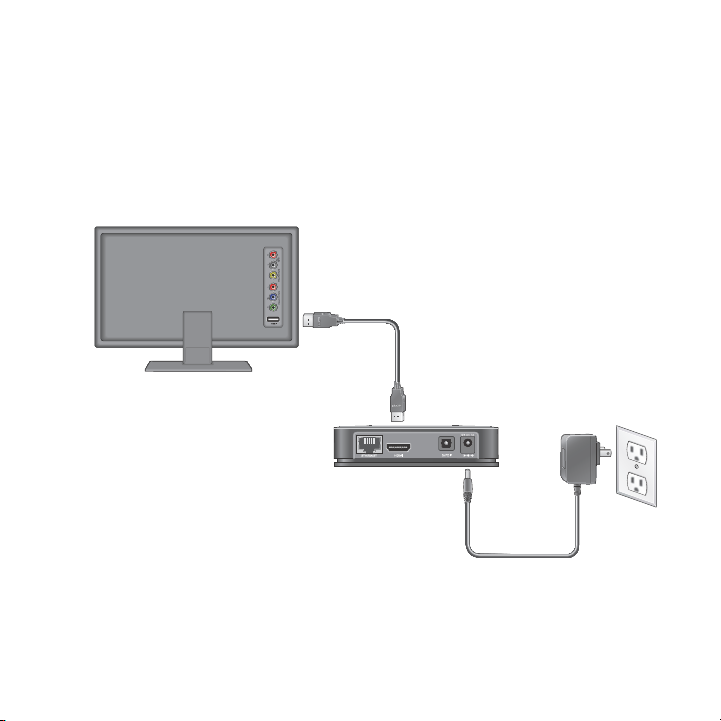
Connect to the TV
HDMI supports 5.1 surround sound
(if available). You do not need a
separate audio cable.
1. Make sure that your TV is on and set to display the correct video
input.
2. Connect an HDMI cable (sold separately) to the HDMI port on your
player
and to the HDMI IN port on your TV.
3. Connect the power adapter to your player, and plug it into an
e
lectrical outlet.
5
Page 6

Remote Control Batteries
To use the remote control, remove the plastic strip beneath the
batteries as shown.
Connect to Your Home Network
To use your player, you need to connect it to your home network with
either a wireless or a wired connection. After you get your network
ready, the onscreen guided setup helps you connect your player to
your network.
Do no
IMPORTANT:
Placing objects on top of your player can interfere with the wireless
signal or cause the player to overheat.
t place anything on top of your NeoTV player.
6
Page 7

Wired Connection
NeoTV
Router
Use an Ethernet cable (sold separately) to connect your player to a
LAN port on your router.
7
Page 8

Wireless Connection
To connect wirelessly, you
can use Wi-Fi Protected
Setup (WPS), or you can
select your network and
enter its password using the
onscreen setup guide.
NeoTV
Wireless
router
If you are using a wireless connection, place your player within range
of your wireless network. For best wireless recep tion, avoid enclosing
your player in a cabinet.
If you do not receive a strong signal during the onscreen setup, rotate
your player or move it closer to your router.
8
Page 9

Onscreen Guided Setup
On your TV:
• Use the re
instructions, which include setting the output resolution to the TV,
and the standby timing, connecting to a network, and checking for
the latest NeoTV software update.
our player might download software updates or restart during
• Y
setup.
•
Once you complete setup, se
or Pandora) to enjoy the content.
mote control to follow the NeoTV onscreen setup
lect a channel icon (such as Netflix
9
Page 10

Remote Control
Power
Select
Left
Up
Right
Down
Stop
Fast forward
Rewind
Next
Home
Return
Menu
Play/Pause
Previous
10
Page 11

Remote Control App
NeoTV Remote app turns your iPhone or
Android phone into a NeoTV Streaming
Player remote control.
1. Using your iPhone or Android
smartphone, navigate to the Apple
AppStore or Android Market, and
search for NeoTV Remote.
2. Install the app on your phone.
3. Make sure that the phone is con nected
to the sam
NeoTV Streaming Player.
4. Launch the app, and it searches for your
device and
e WiFi network (SSID) as your
connects.
11
Page 12

Federal Communication Commission Interference
Statement
This equipment has been tested and found to comply
with the limits for a Class B digital device, pursuant to
Part 15 of the FCC Rules. These limits are designed
to provide reasonable protection against harmful
interference in a residential installation.
This equipment generates, uses and can radiate radio
frequency energy and, if not installed and used in
accordance with the instructions, may cause harmful
interference to radio communications.However, there
is no guarantee that interference will not occur in a
particular installation.If this equipment does cause
harmful interference to radio or television reception,
which can be determined by turning the equipment off
12
Page 13

and on, the user is encouraged to try to correct the
interference by one of the following measures:
- Reorient or relocate the receiving antenna.
- Increase the separation between the equipment
and receiver.
- Connect the equipment into an outlet on a circuit
different from that to which the receiver is connected.
- Consult the dealer or an experienced radio/TV
technician for help.
FCC Caution: Any changes or modifications not
expressly approved by the party responsible for
compliance could void the user's authority to operate
this equipment.
13
Page 14

This device complies with Part 15 of the FCC Rules.
Operation is subject to the following two conditions:
(1) This device may not cause harmful interference,
and (2) this device must accept any interference
received, including interference that may cause
undesired operation.
IMPORTANT NOTE:
Radiation Exposure Statement:
This equipment complies with FCC radiation exposure
limits set forth for an uncontrolled environment. This
equipment should be installed and operated with
minimum distance 20cm between the radiator & your
body.
14
Page 15

This transmitter must not be co-located or operating in
conjunction with any other antenna or transmitter.
15
Page 16

Technical Support
Thank you for selecting NETGEAR products.
After installing your device, locate the
your product and use it to register your product at
www.NETGEAR.com/register. Registration is required before you can
use our telephone support service. Registration through our website
ngly recommended.
is stro
Go to http://support.netgear.com for
support.
GPL might be included in this product; to view the GPL license
reement, go to ftp://downloads.netgear.com/files/GPLnotic
ag
NETGEAR, Inc.
350 East Plumeria Drive
San Jose, CA 95134, USA
serial number on the label of
product updates and web
e.pdf.
July 2011
 Loading...