


Universal WiFi Range Extender WN3000RP
User Manual
350 East Plumeria Drive
San Jose, CA 95134
USA
February 2011
202-10752-01
v1.0

Universal WiFi Range Extender WN3000RP
©2011 NETGEAR, Inc. All rights reserved.
No part of this publication may be reproduced, transmitted, transcribed, stored in a retrieval system, or translated
into any language in any form or by any means without the written permission of NETGEAR, Inc.
Technical Support
Thank you for choosing NETGEAR. To register your product, get the latest product updates, or get support online,
visit us at http://support.netgear.com.
Phone (US & Canada only): 1-888-NETGEAR
Phone (Other Countries): See Support information card.
Trademarks
NETGEAR, the NETGEAR logo, ReadyNAS, ProSafe, Smart Wizard, Auto Uplink, X-RAID2, and NeoTV are
trademarks or registered trademarks of NETGEAR, Inc. Microsoft, Windows, Windows NT, and Vista are
registered trademarks of Microsoft Corporation. Other brand and product names are registered trademarks or
trademarks of their respective holders.
Statement of Conditions
To improve internal design, operational function, and/or reliability, NETGEAR reserves the right to make changes
to the products described in this document without notice. NETGEAR does not assume any liability that may occur
due to the use, or application of, the product(s) or circuit layout(s) described herein.
2 |

Table of Contents
Chapter 1 Getting Started
Front Panel. . . . . . . . . . . . . . . . . . . . . . . . . . . . . . . . . . . . . . . . . . . . . . . . . .4
Side View . . . . . . . . . . . . . . . . . . . . . . . . . . . . . . . . . . . . . . . . . . . . . . . . . . .5
How the Range Extender Works . . . . . . . . . . . . . . . . . . . . . . . . . . . . . . . . .5
When to Use Your Range Extender. . . . . . . . . . . . . . . . . . . . . . . . . . . . .6
Positioning Your Range Extender . . . . . . . . . . . . . . . . . . . . . . . . . . . . . .7
Connect a PC to the Extender with an Ethernet Cable . . . . . . . . . . . . . . . .7
Log In to the Range Extender. . . . . . . . . . . . . . . . . . . . . . . . . . . . . . . . . . . .9
Use the Smart Wizard to Set Up the Range Extender . . . . . . . . . . . . . . . .10
Chapter 2 Range Extender Network Settings
Connect the Range Extender to an Existing Network . . . . . . . . . . . . . . . .12
Use WPS to Add a PC to the Range Extender’s Wireless Network. . . . . .13
Range Extender Wireless Settings. . . . . . . . . . . . . . . . . . . . . . . . . . . . . . .14
Setting Up WEP . . . . . . . . . . . . . . . . . . . . . . . . . . . . . . . . . . . . . . . . . . .15
Setting Up WPA, WPA2, or WPA + WPA2. . . . . . . . . . . . . . . . . . . . . . .16
Range Extender IP Address Setup. . . . . . . . . . . . . . . . . . . . . . . . . . . . . . .16
Status Screen. . . . . . . . . . . . . . . . . . . . . . . . . . . . . . . . . . . . . . . . . . . . . . .17
Show Statistics. . . . . . . . . . . . . . . . . . . . . . . . . . . . . . . . . . . . . . . . . . . .19
Network Devices. . . . . . . . . . . . . . . . . . . . . . . . . . . . . . . . . . . . . . . . . . . . .20
Back Up and Manage Range Extender Settings . . . . . . . . . . . . . . . . . . . .20
Backing Up Settings. . . . . . . . . . . . . . . . . . . . . . . . . . . . . . . . . . . . . . . .20
Restoring Settings . . . . . . . . . . . . . . . . . . . . . . . . . . . . . . . . . . . . . . . . .20
Erasing the Settings . . . . . . . . . . . . . . . . . . . . . . . . . . . . . . . . . . . . . . . .21
Set the Password . . . . . . . . . . . . . . . . . . . . . . . . . . . . . . . . . . . . . . . . . . . .21
Upgrade the Firmware . . . . . . . . . . . . . . . . . . . . . . . . . . . . . . . . . . . . . . . .22
Advanced Wireless Settings. . . . . . . . . . . . . . . . . . . . . . . . . . . . . . . . . . . .22
Chapter 3 Troubleshooting
Smart Wizard FAQs . . . . . . . . . . . . . . . . . . . . . . . . . . . . . . . . . . . . . . . . . .24
Connecting to http://www.mywifiext.net . . . . . . . . . . . . . . . . . . . . . . . . . . .24
Joining Wireless Networks . . . . . . . . . . . . . . . . . . . . . . . . . . . . . . . . . . . . .25
Appendix A Supplemental Information
Factory Settings . . . . . . . . . . . . . . . . . . . . . . . . . . . . . . . . . . . . . . . . . . . . .26
Technical Specifications. . . . . . . . . . . . . . . . . . . . . . . . . . . . . . . . . . . . . . .27
Appendix B Compliance Notification
Contents | 3
1. Getting Started
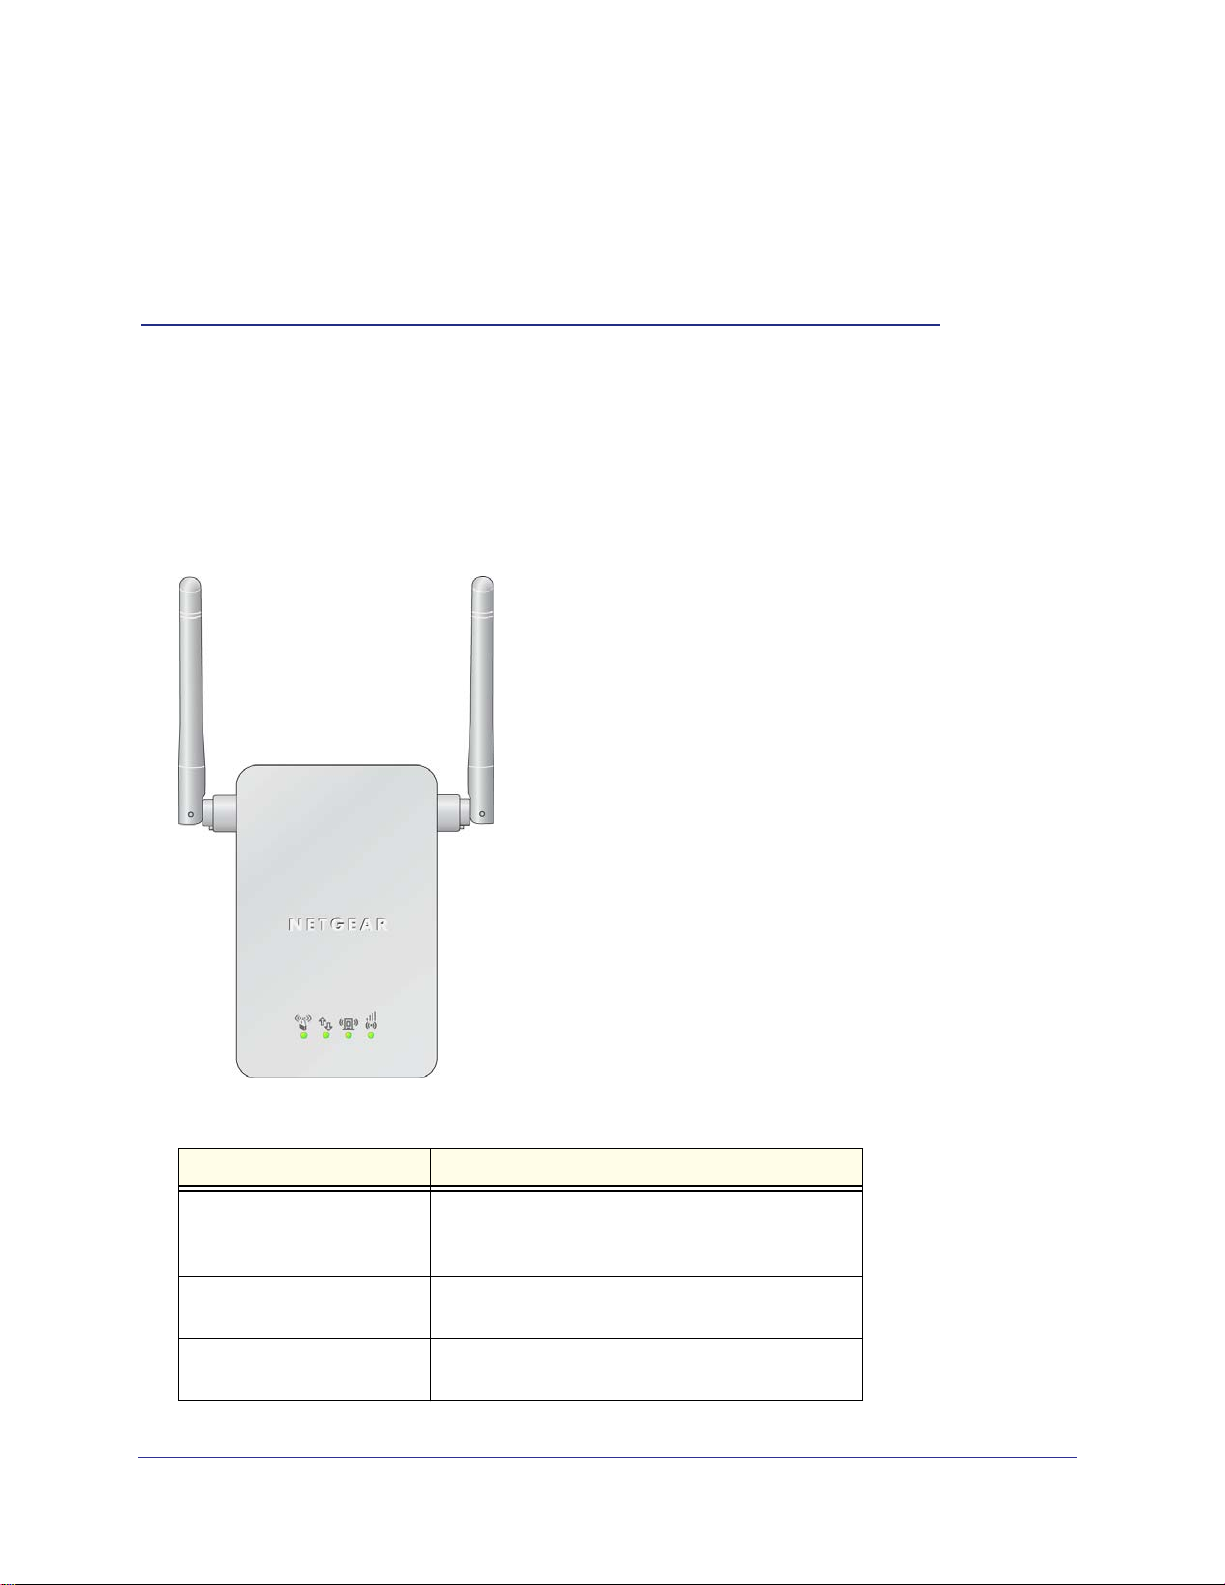
Front Panel
Text
1
Figure 1. Front view
LEDs and Button Description
Link Rate
The wireless connection between the range extender
and the router is optimum.
The wireless connection between the range extender
and the router is good.
The wireless connection between the range extender
and the router is poor.
WPS
PC to Extender
Extender Status
Link Rate
Chapter 1. Getting Started | 4
Universal WiFi Range Extender WN3000RP
LEDs and Button Description
Extender Status The range extender is powered on.
PC to Extender Connection The range extender is connected to a PC.
WPS button
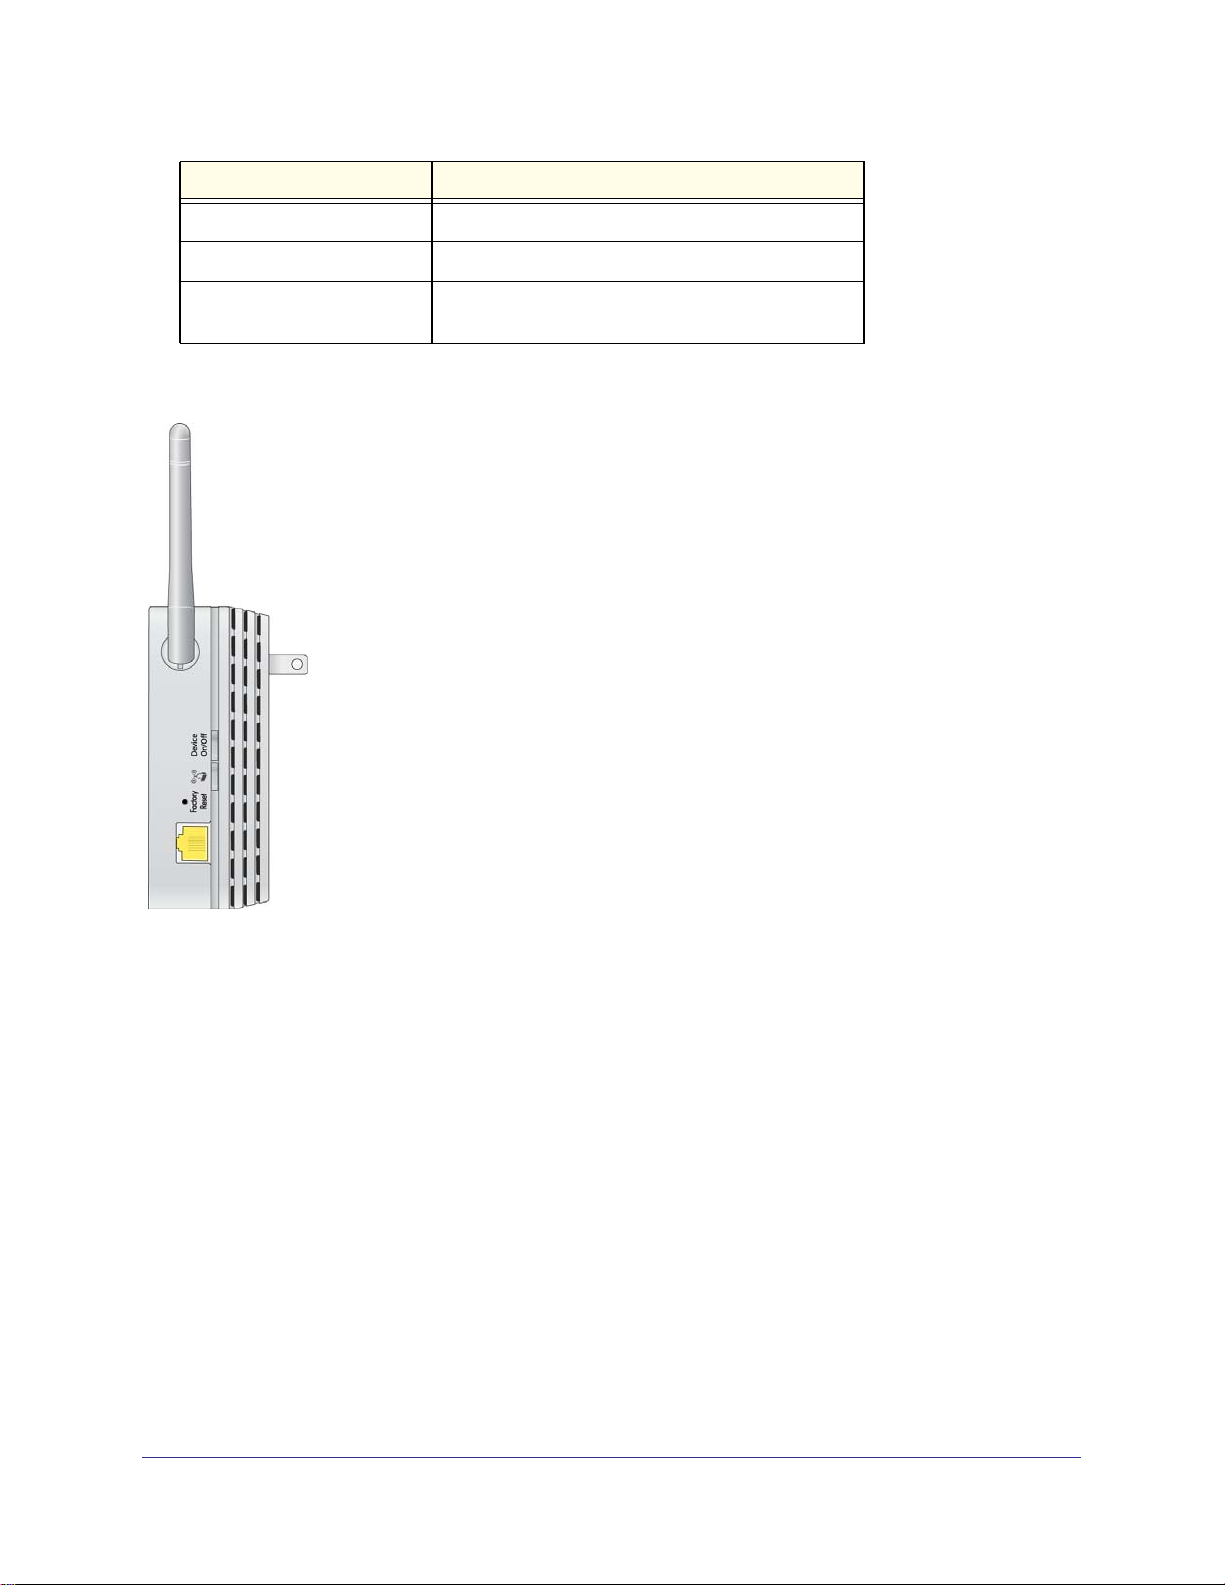
Side View
The WPS button allows you to connect your
computer to the extender using Push 'N' Connect.
Device On/Off
button
WPS button
Factory Reset
button
Ethernet
port
Figure 2. Side view
How the Range Extender Works
The range extender works like a bridge between a wireless router and a computer or wireless
device outside the wireless router’s range. To do this, the range extender has two main jobs:
1. The range extender connects to a wireless network that is up and running.
When the range extender connects wirelessly to a network, it acts as a network client.
This is similar to how a computer connects to a network.
2. The range extender acts a
The range extender has its own wireless network called NETGEAR_EXT that wireless
computers can join. In its role as an access point, the range extender performs tasks that
wireless routers do, such as broadcasting its network name (SSID).
s an access point for computers.
Chapter 1. Getting Started | 5
Universal WiFi Range Extender WN3000RP
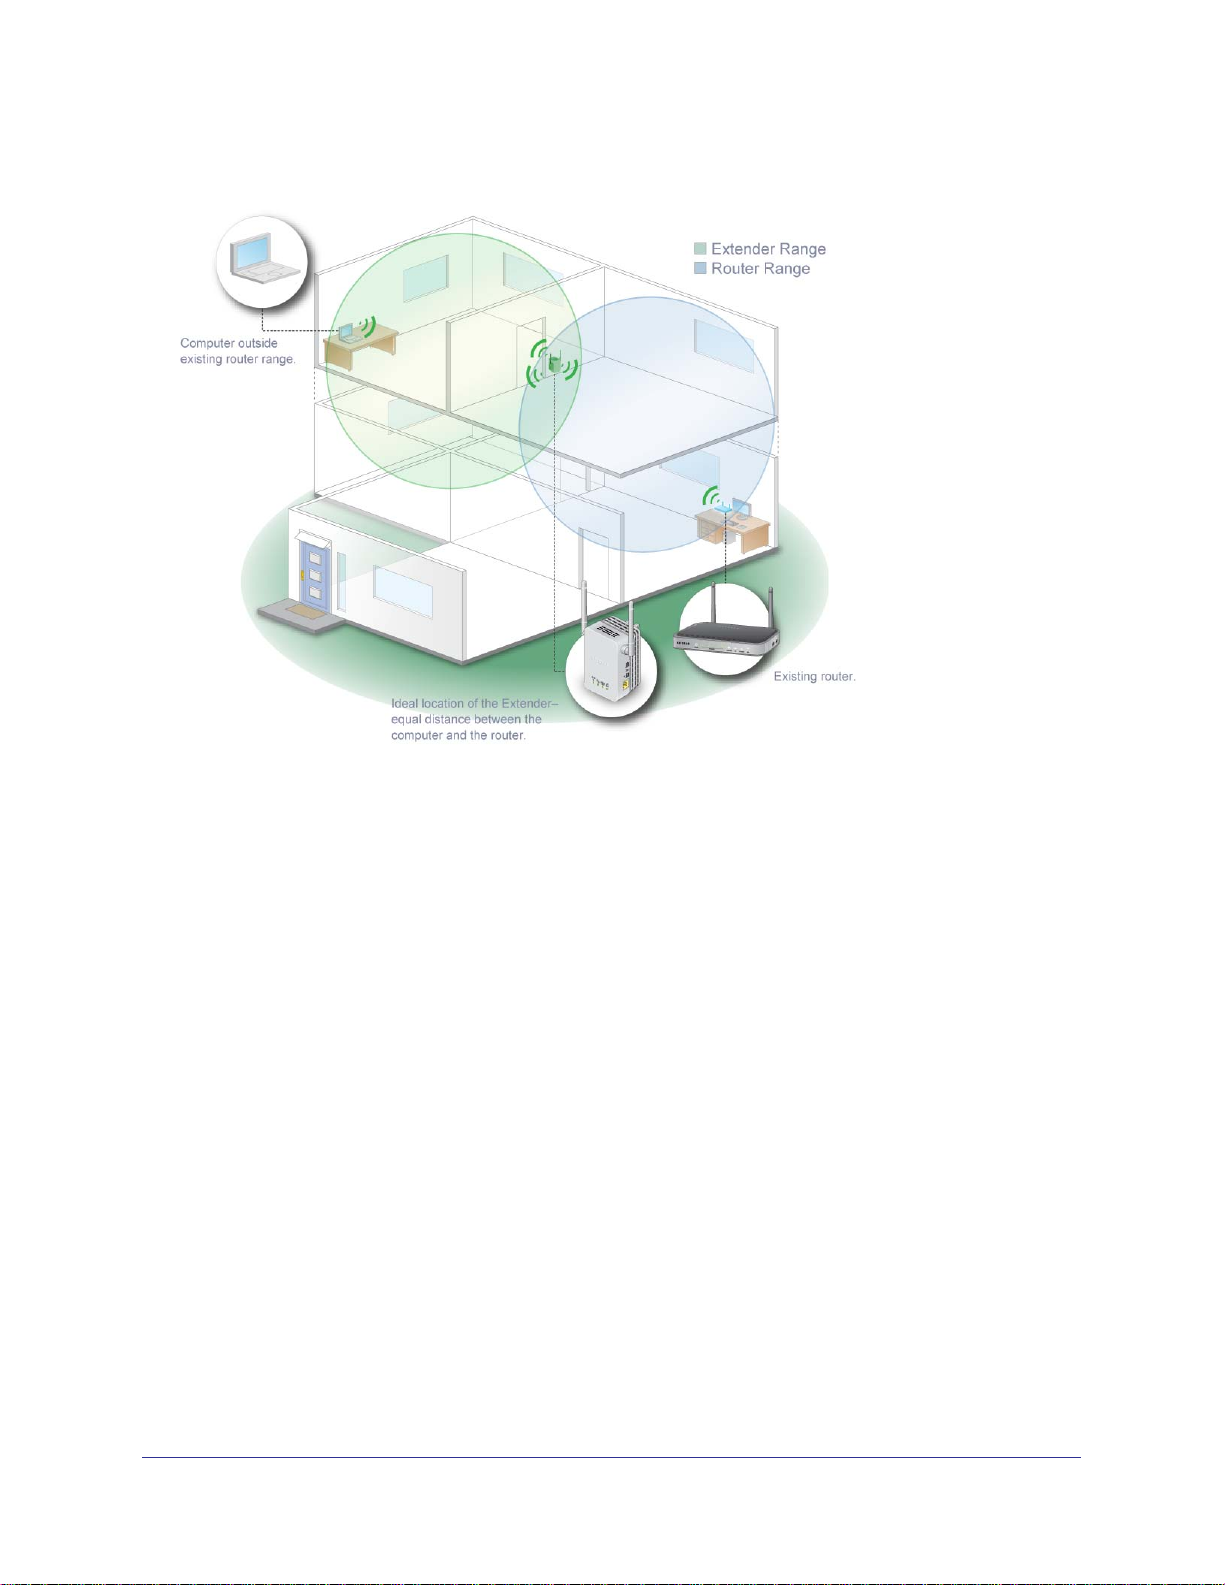
The range extender must do each of these jobs so that both ends of the bridge are in place.
Figure 3. Range Extender in a home
When to Use Your Range Extender
NETGEAR recommends that you connect to the range extender only when your home
network connection is poor. Because data traffic routed through the range extender is
inherently slower than traffic routed directly from the network, the computer should stay on
the network if the connection is good enough. NETGEAR recommends that you connect
through the range extender network only when the computer is in a “dead zone” where
connection from the network is very poor or non-existent.
The range extender LEDs can help you tell if the extender is correctly set up and working as
it should.
• The best performance is delivered when both the Link Rate LED
Connection LED
are green.
• A workable performance is delivered when the Link Rate LED is amber
Extender Connection LED
is green.
and the PC to Extender
and the PC to
6 | Chapter 1. Getting Started
Universal WiFi Range Extender WN3000RP
Positioning Your Range Extender
The ideal location to place the range extender is half-way between your wireless router and
your computer.
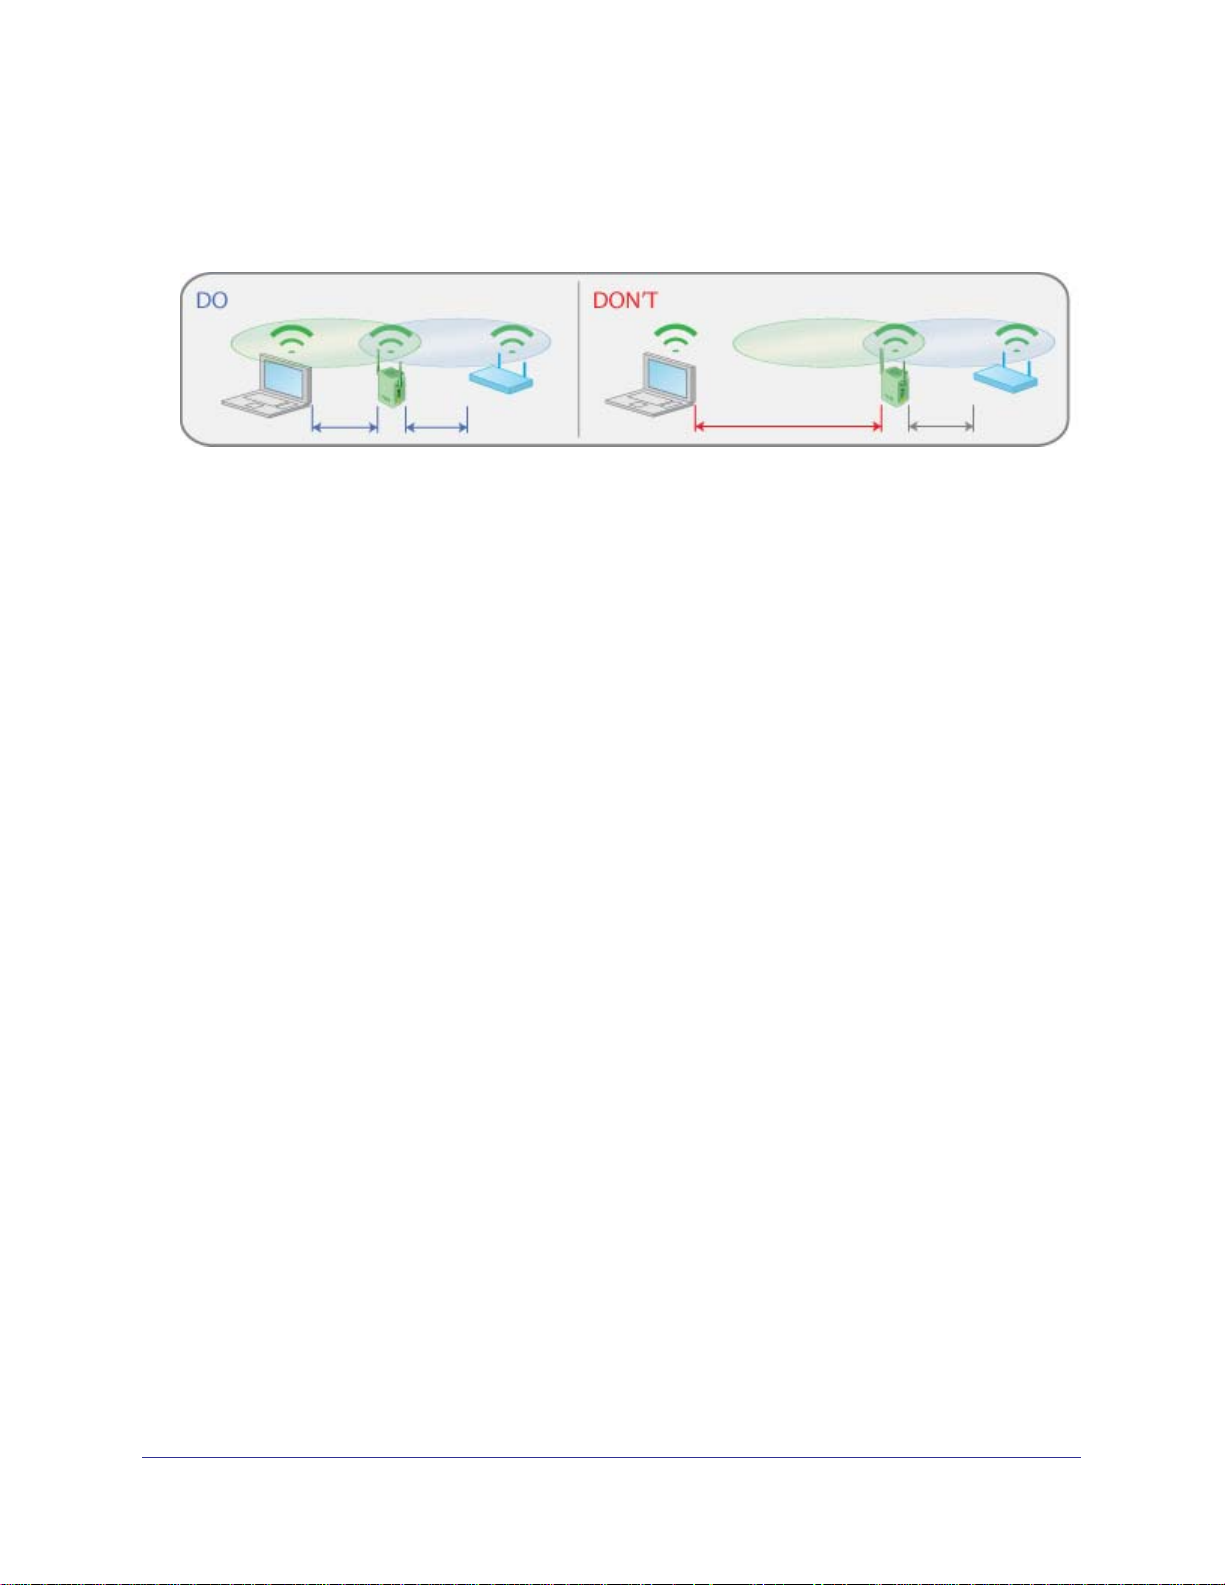
Figure 4. Range extender location
The best connection is established when there is a clear line of sight between the range
extender and the wireless router and also a clear line of sight between the range extender
and the computer you are using. If this straight path is blocked by a thick wall or other
materials, move the range extender to a different location half-way between the computer
and the router.
If there is no power outlet nearby, or you prefer to place the range extender elsewhere, move
the range extender closer to the computer. If the Link Rate LED is green or amber and the
PC to Extender Connection LED is green, the range extender is working as expected.
To improve the Link Rate LED from red or amber to green:
• Once you successfully connect to the range extender from a computer that is outside the
range of your router and log in to www.mywifiext.net, the Smart Wizard guides you
through the process to connect the range extender to a router.
• If the Link Rate LED is red or the Smart Wizard cannot connect the range extender to a
router, move the range extender closer to the router or to a different spot where it
provides a better line of sight. As you move the range extender, continue to check the
Link Rate and the PC to Extender Connection LEDs on the front panel until you find a
location where the Link Rate LED is green or amber, and the PC to Extender Connection
LED is green. Note that you might have to unplug the range extender as you move it to a
different location. If you do, from the new location, power up the range extender and
continue to check the LEDs.
Once the LEDs show that the range extender is in a good location, open a browser and
go to http://www.mywifiext.net to continue the setup process.
Connect a PC to the Extender with an Ethernet Cable
Usually, you connect to the range extender wirelessly, but you can use its LAN ports to
connect wired devices such as Ethernet-enabled gaming consoles, printers, or PCs.
Chapter 1. Getting Started | 7

Universal WiFi Range Extender WN3000RP
Note: Before you connect wired devices or computers, first install and set
up your range extender as described in the Universal WiFi Extender
WN3000RP Installation Guide that came in the package.
1. Connect your computer to the range extender with an Ethernet cable.
2. Connect the range extender power adapter, and plug it into an electrical outlet.
CAUTION:
Do not use Ethernet cable to connect the range extender to a router. If you
do so, the range extender does not work because it is designed to use
only a wireless connection to the router.
3. Log in as described in the following section.
If you have trouble connecting:
• If you start your computer, connect the Ethernet cable to the range extender, and launch
your browser quickly, the computer might still need a couple of minutes to recognize the
Ethernet LAN connection before you can connect.
• Make sure that your Ethernet cable is securely connected to the range extender and the
computer, and that the range extender LAN LED is on. If the LED is not lit reconnect the
Ethernet cable, and relaunch your Internet browser.
8 | Chapter 1. Getting Started
Universal WiFi Range Extender WN3000RP
Log In to the Range Extender
You can log in to the range extender to use the Smart Wizard or to use the menu selections
to view or change the extender’s settings.
1. On your computer, launch an Internet browser such as Mozilla Firefox or Microsoft
Internet Explorer.
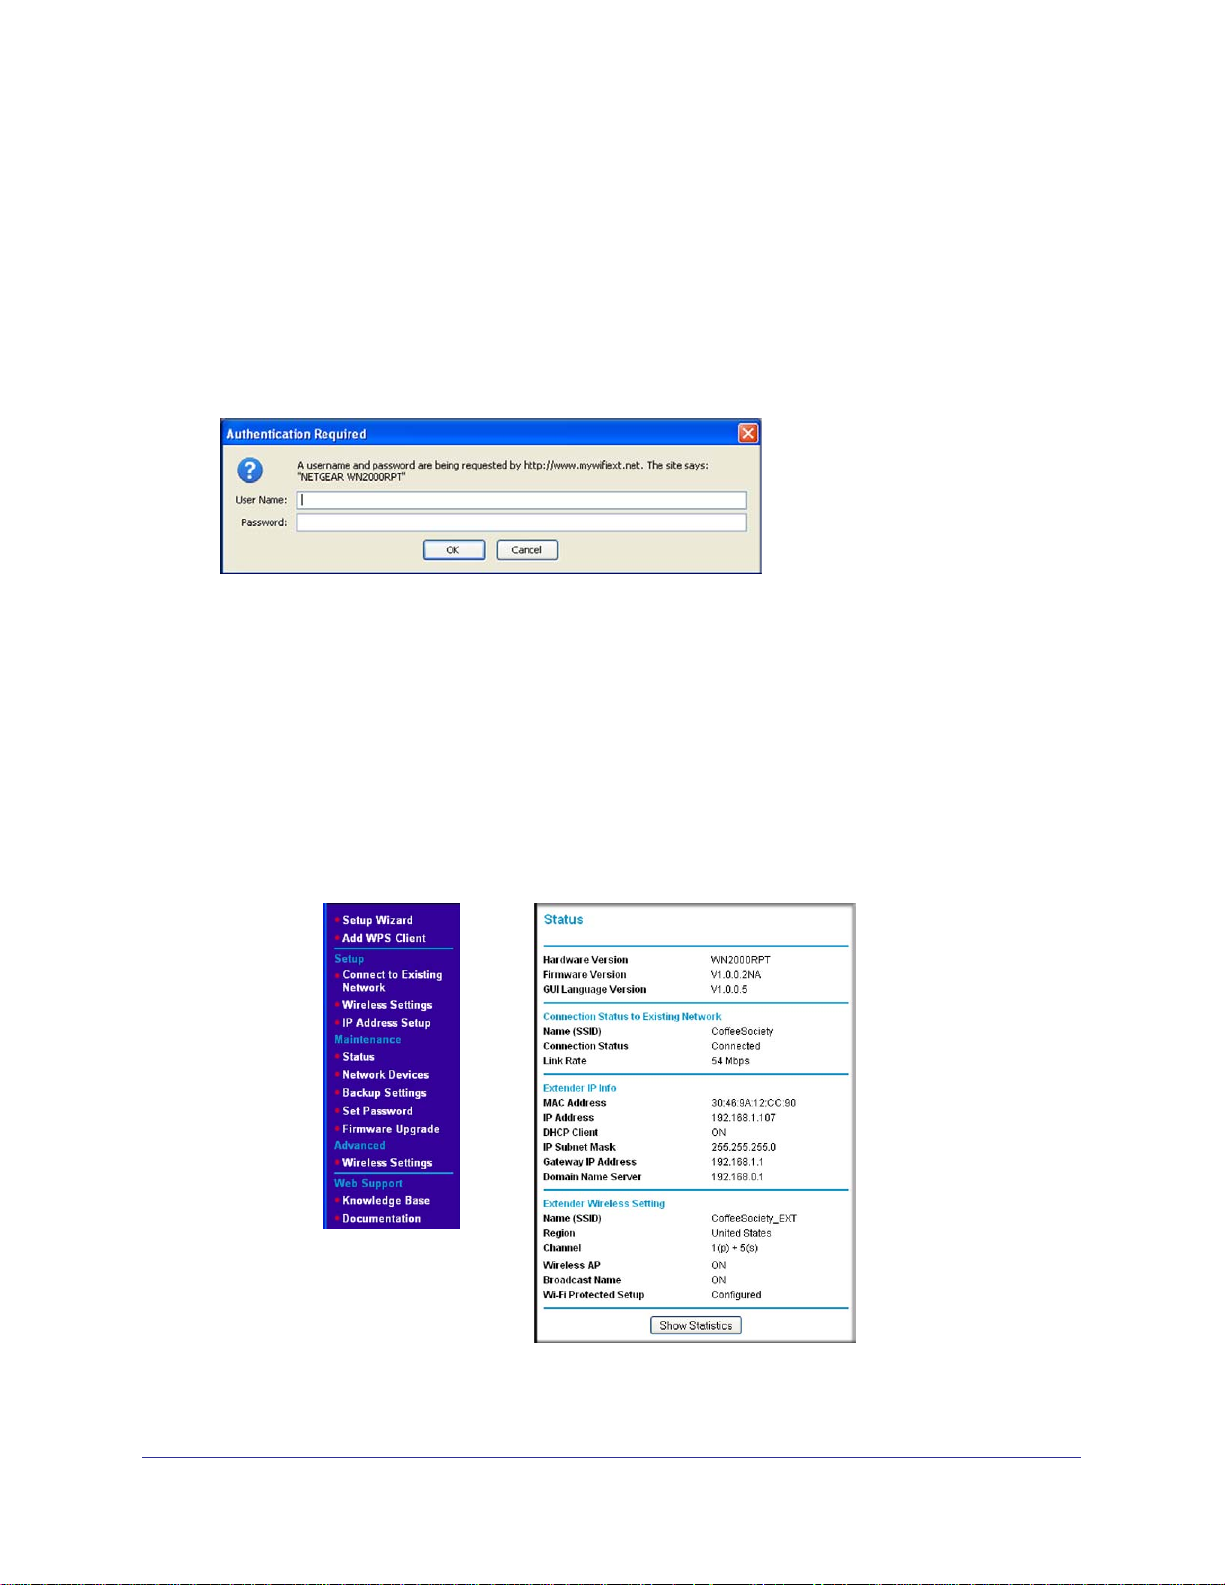
2. In the address field of your browser, enter http://www.mywifiext.net. You are prompted to
enter a user name and password:
FPO
If you do not see the log in prompt, make sure to include http:// when you type
http://www.mywifiext.net in your browser.
3. Type admin for the user name. The default password is password. NETGEAR
recommends that you set a more secure password after you log in (see Set the Password
on page 21).
• If your range extender has an Internet connection, the Firmware Upgrade screen
displays (see Upgrade the Firmware on page 22), and the software automatically
checks for new firmware at the NETGEAR website.
• The Status screen displays with the menu on the left. This screen shows what the
current settings are for the range extender:
Menu
Status screen
FPO
Chapter 1. Getting Started | 9
Universal WiFi Range Extender WN3000RP
Use the Smart Wizard to Set Up the Range Extender
The Smart Wizard can help you set up your range extender to connect to a wireless network.
For information about more configuration options, see Chapter 2, Range Extender Network
Settings.
The Universal WiFi Extender WN3000RP Installation Guide (included in the package)
explains how to install your range extender. During installation, when you launch your
Internet browser, the Smart Wizard automatically displays.
After installation, to use the Smart Wizard again:
1. Log in to the range extender.
Note: Once you begin using the Smart Wizard, you must complete all of its
steps before you can exit.
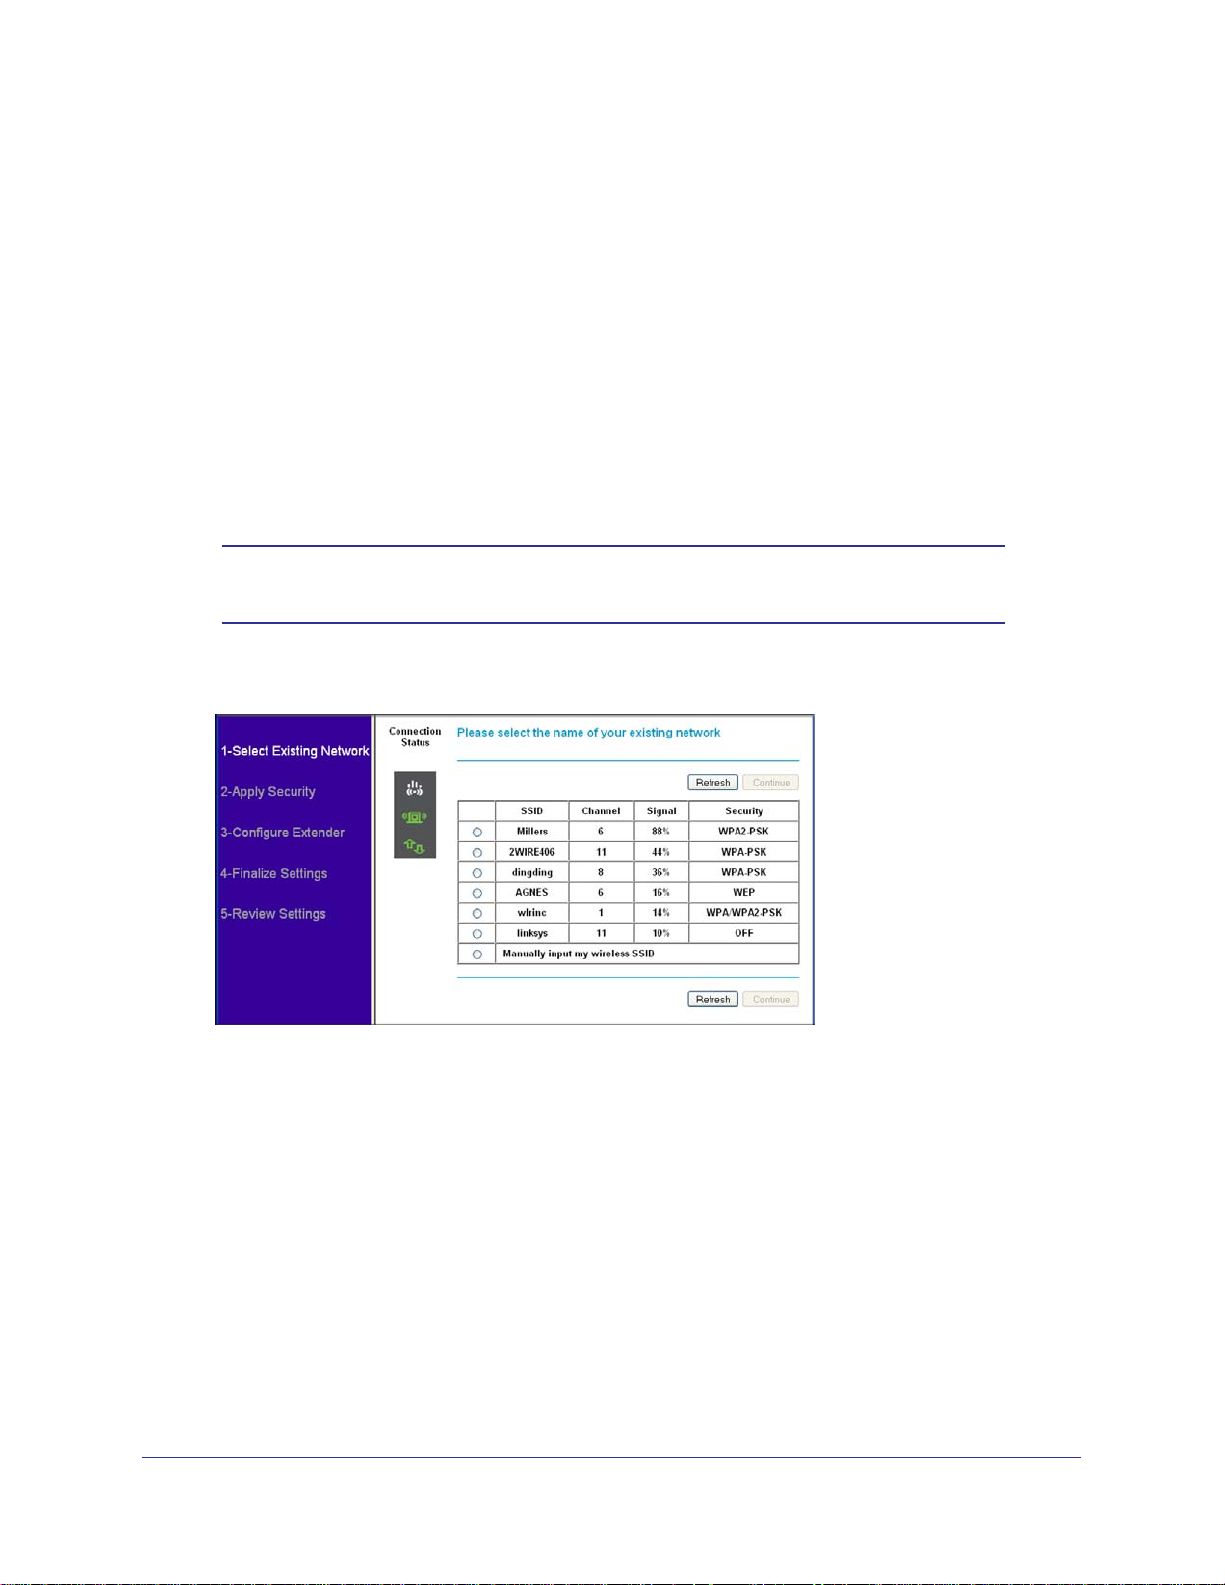
2. From the menu, select Setup Wizard. The following screen displays:
FPO
This is the same Smart Wizard that displays during installation as described in the
installation guide.
3. Either select a network from the list, or select the Manually input my wireless SSID radio
button and type the SSID.
10 | Chapter 1. Getting Started
 Loading...