

Page 1

9. Troubleshooting
Diagnosing and solving problems
This chapter provides information to help you diagnose and solve problems you might have with
your wireless modem router. If you do not find the solution here, check the NETGEAR support
site at http://support.netgear.com for product and contact information.
This chapter contains the following sections:
• Router Not On
• No ISP Connection
• TCP/IP Network Not Responding
• Cannot Log in
• Changes Not Saved
• Firmware Needs to Be Reloaded
• Incorrect Date or Time
9
Chapter 9. Troubleshooting | 143
Page 2
N600 Wireless Dual Band Gigabit ADSL2+ Modem Router DGND3700 User Manual
Router Not On
When you turn the power on, the power, LAN, wireless, DSL, and Internet LEDs should light
as described here. If they do not, refer to the sections that follow for help.
1. When power is first applied, the Power LED lights.
2. After approximately 10 seconds, other LEDs light as follows:
a. The LAN ports LED lights when any local port is connected.
b. The 2.4 GHz and 5 GHz Wireless LEDs light.
c. The DSL LED lights when there is a link via the ADSL phone lines.
d. The Internet LED lights to indicate a connection to the ISP.
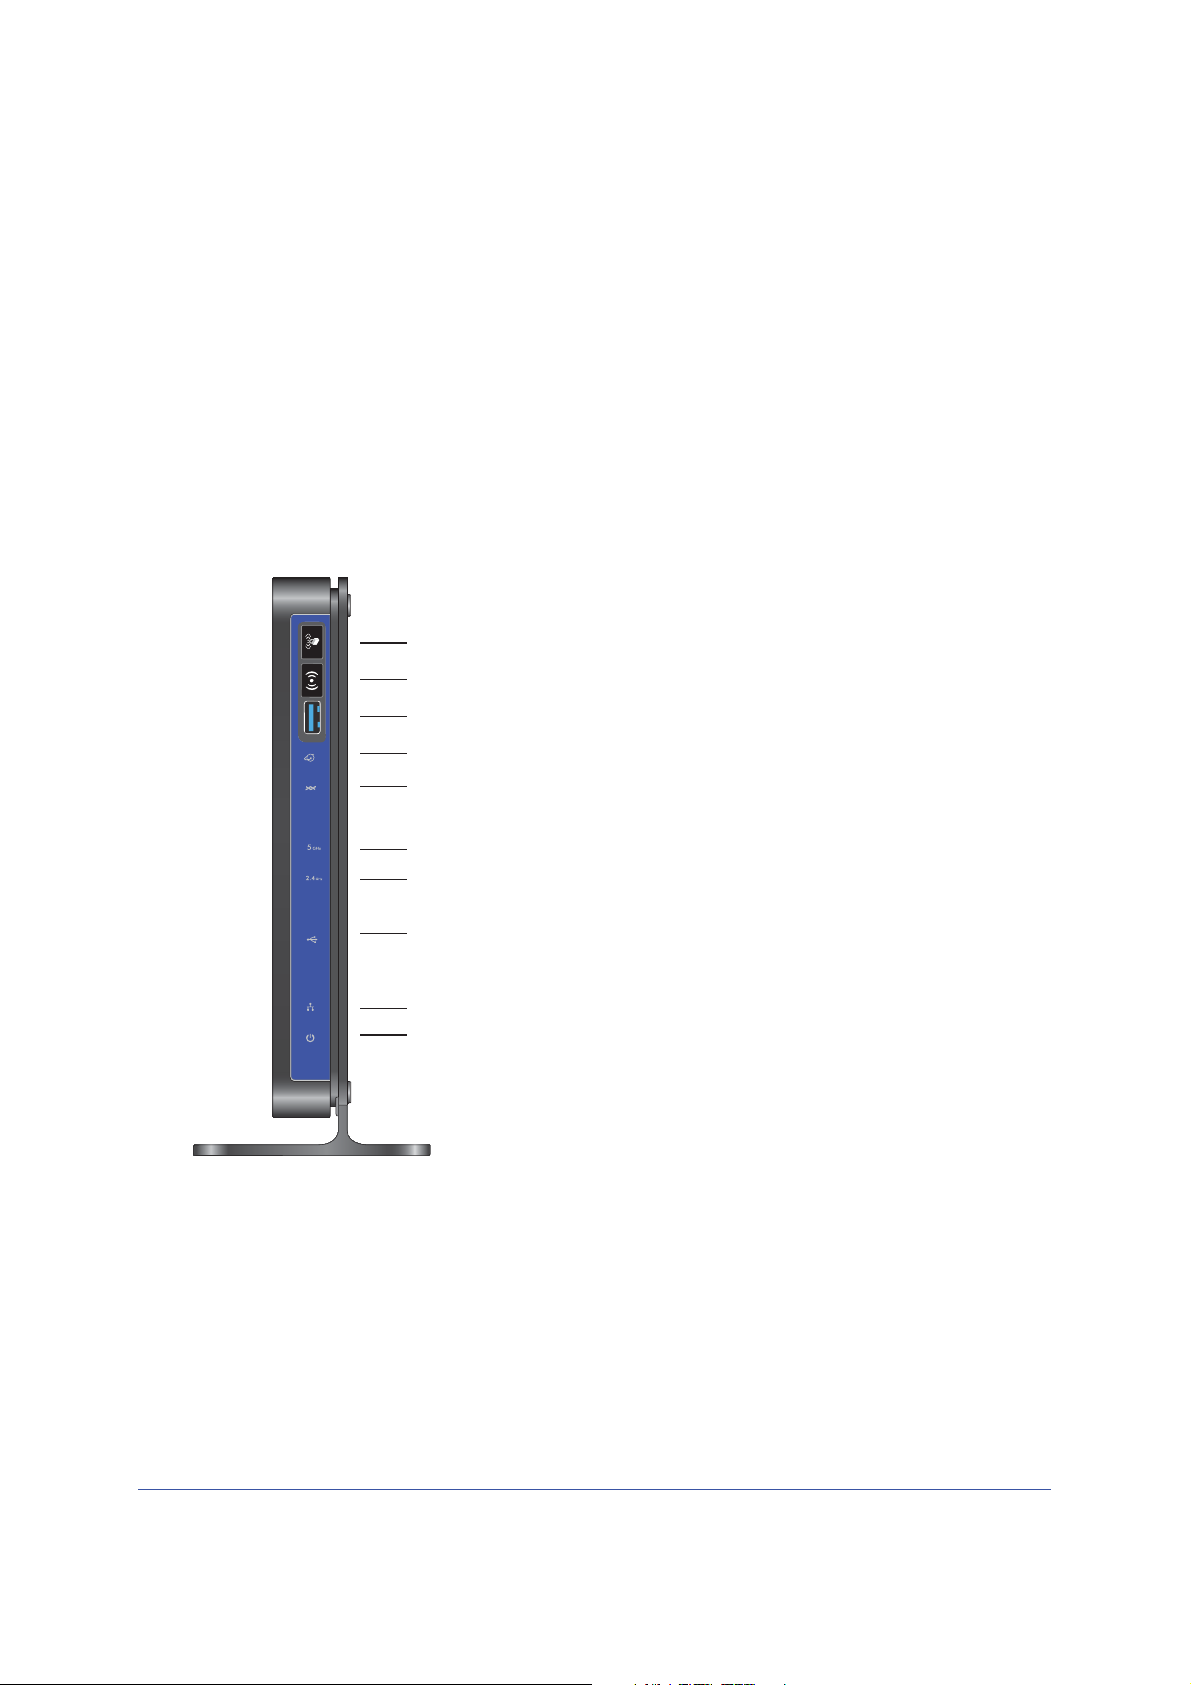
WPS On/Off button
Wireless On/Off button
USB port
Internet
DSL
5 GHZ Wireless
2.4 GHz Wireless
USB
LAN ports
Power
Figure 60. Front panel LEDs
Power LED Is Off
If the Power and other LEDs are off when your router is turned on:
• Check that the power cord is correctly connected to your router and the power supply
adapter is correctly connected to a functioning power outlet.
• Check that you are using the 12-V DC power adapter supplied by NETGEAR for this
product.
144 | Chapter 9. Troubleshooting
Page 3

N600 Wireless Dual Band Gigabit ADSL2+ Modem Router DGND3700 User Manual
If the error persists, you could have a hardware problem and should contact NETGEAR
Technical Support.
Power LED Is Red
When the router is turned on, it performs a power-on self-test. If the Power LED turns red
after a few seconds or at any other time during normal operation, there is a fault within the
router.
If the Power LED turns red to indicate a router fault, turn the power off and on to see if the
wireless modem router recovers. If the power LED is still red 1 minute after power-up:
• Turn the power off and on one more time to see if the wireless modem router recovers.
• Clear the router’s configuration to factory defaults as explained in Factory Settings on
page 154. This sets the router’s IP address to 192.168.0.1.
If the error persists, you could have a hardware problem and should contact NETGEAR
Technical Support.
LAN LED Is Off
If the LAN LED does not light when the Ethernet connection is made, check the following:
• The Ethernet cable connections are secure at the wireless modem router and at the hub
or workstation.
• The power is turned on to the connected hub or workstation.
Wireless LEDs Are Off
If the 2.4 GHz and 5 GHz Wireless LEDs do not light, the radios may be turned off. Press the
Wireless On/Off button on its front panel
to turn the radios back on.
DSL or Internet LED Is Off
If the DSL or Internet LED does not light, check to make sure you are using the correct cable.
When connecting the ADSL or Ethernet WAN port, use the cables that were supplied with the
wireless modem router. If the DSL or Internet LED is still off, this could mean that there is no
ADSL or Fiber/Cable modem service or the cable connected to the ADSL or Ethernet WAN
port is bad.
See also DSL LED Is Off on page 146.
Chapter 9. Troubleshooting | 145
Page 4

N600 Wireless Dual Band Gigabit ADSL2+ Modem Router DGND3700 User Manual
No ISP Connection
If your router cannot access the Internet, first check the ADSL connection, and then check
the WAN TCP/IP connections. See Figure 4, Front panel LEDs on page 14 for the location of
the LEDs.
ADSL Link
First determine whether you have a ADSL link with the service provider. The state of this
connection is indicated by the DSL LED.
DSL LED Is Green or Blinking Green
You have a good ADSL connection. The service provider has connected your line correctly,
and your wiring is correct.
DSL LED Is Blinking Amber
Your wireless modem router is attempting to make a ADSL connection with the service
provider. The LED should turn green within several minutes.
If the DSL LED does not turn green, disconnect all telephones on the line. If this solves the
problem, reconnect the telephones one at a time and use a microfilter on each telephone as
described in ADSL Microfilters on page 18. If you connect the microfilters correctly, you
should be able to connect all your telephones.
If disconnecting telephones does not result in a green DSL LED, there might be a problem
with your wiring. If the telephone company has tested the ADSL signal at your network
interface device (NID), you might have poor-quality wiring in your house.
DSL LED Is Off
First disconnect all telephones on the line. If this solves the problem, reconnect the
telephones one at a time and use a microfilter on each telephone. If the microfilters are
connected correctly, you should be able to connect all your telephones.
If disconnecting telephones does not result in a green DSL LED, check for the following:
• Check that the telephone company has made the connection to your line and tested it.
• Verify that you are connected to the correct telephone line. If you have more than one
phone line, be sure that you are connected to the line with the ADSL service. It could be
necessary to use a swapper if your ADSL signal is on pins 1 and 4 or the RJ-11 jack. The
wireless modem router uses pins 2 and 3.
146 | Chapter 9. Troubleshooting
Page 5

N600 Wireless Dual Band Gigabit ADSL2+ Modem Router DGND3700 User Manual
Internet LED Is Red
If the Internet LED is red, the device could not connect to the Internet. Verify the following:
• Check that your log-in credentials are correct. See Log In to the N600 Modem Router on
page 24 for more information.
• Check that the information you entered on the Basic Settings screen is correct. See
Manual Setup (Basic Settings) on page 28.
• Check with your ISP to verify that the multiplexing method, VPI, and VCI settings on the
ADSL settings screen are correct.
• Find out if the ISP is having a problem. If it is, wait until that problem is cleared up and try
again.
Cannot Obtain an Internet IP Address
If your wireless modem router cannot access the Internet, and your Internet LED is green or
blinking green, check whether the wireless modem router can obtain an Internet IP address
from the ISP. Unless you have been assigned a static IP address, your wireless modem
router must request an IP address from the ISP. You can determine whether the request was
successful as follows:
1. Access the router menus at http://192.168.0.1 and log in.
2. Under Maintenance, select Router Status and check that an IP address shows for the WAN
port. If 0.0.0.0 shows, your wireless modem router has not obtained an IP address from your
ISP.
If your router cannot obtain an IP address from the ISP, the problem might be one of the
following:
• If you have selected a login program, the service name, user name, or password might be
incorrect. See Debug PPPoE or PPPoA on page 148.
• Your ISP might check for your computer’s host name. Assign the computer host name of
your ISP account to the wireless modem router in the browser-based Setup Wizard. See
Setup Wizard on page 27 for more information.
• Your ISP allows only one Ethernet MAC address to connect to the Internet, and might
check for your computer’s MAC address. In this case, do one of the following:
- Inform your ISP that you have bought a new network device and ask them to use the
router’s MAC address.
- Configure your router to spoof your computer’s MAC address through the Basic
Settings screen. See Manual Setup (Basic Settings) on page 28.
Chapter 9. Troubleshooting | 147
Page 6

N600 Wireless Dual Band Gigabit ADSL2+ Modem Router DGND3700 User Manual
Debug PPPoE or PPPoA
Debug the PPPoE or PPPoA connection as follows:
1. Access the router menus at http://192.168.0.1 and log in.
2. Under Maintenance, select Router Status.
3. Click the Connection Status button.
4. If all of the steps indicate OK, your PPPoE or PPPoA connection is working.
5. If any of the steps indicate Failed, you can attempt to reconnect by clicking Connect.
The wireless modem router continues to attempt to connect indefinitely. If you do not
connect after several minutes, check that the service name, user name, and password
you are using are correct. Also check with your ISP to be sure that there is no problem
with their service.
Note: Unless you connect manually, the wireless modem router does not
authenticate with PPPoE or PPPoA until data is transmitted to the
network.
Cannot Load an Internet Web Page
If your wireless modem router can obtain an IP address, but your browser cannot load any
Internet Web pages:
• Your computer might not recognize any DNS server addresses.
A DNS server is a host on the Internet that translates Internet names (such as www
addresses) to numeric IP addresses. Typically your ISP provides the addresses of one or
two DNS servers for your use. If you entered a DNS address during the wireless modem
router’s configuration, reboot your computer, and verify the DNS address. Alternately, you
can configure your computer manually with DNS addresses, as explained in your
operating system documentation.
• Your computer might not have the wireless modem router configured as its TCP/IP
wireless modem router.
If your computer obtains its information from the wireless modem router by DHCP, reboot
the computer, and verify the wireless modem router address.
TCP/IP Network Not Responding
Most TCP/IP terminal devices and routers have a ping utility for sending an echo request
packet to the designated device. The device responds with an echo reply to tell whether a
TCP/IP network is responding to requests.
148 | Chapter 9. Troubleshooting
Page 7

N600 Wireless Dual Band Gigabit ADSL2+ Modem Router DGND3700 User Manual
Test the LAN Path to Your Wireless Modem Router
You can ping the router from your computer to verify that the LAN path to your router is set up
correctly.
To ping the router from a PC running Windows 95 or later:
1. From the Windows task bar, click the Start button, and select Run.
2. In the field provided, type ping followed by the IP address of the router, as in this example:
ping 192.168.0.1
3. Click OK.
You should see a message like this one:
“Pinging <IP address> with 32 bytes of data”
If the path is working, you see this message:
“Reply from < IP address >: bytes=32 time=NN ms TTL=xxx”
If the path is not working, you see this message:
“Request timed out”
If the path is not functioning correctly, you could have one of the following problems:
• Wrong physical connections
- Make sure that the LAN port LED is on. If the LED is off, follow the instructions in LAN
LED Is Off on page 145.
- Check that the corresponding link LEDs are on for your network interface card and for
the hub ports (if any) that are connected to your workstation and router.
• Wrong network configuration
- Verify that the Ethernet card driver software and TCP/IP software are both installed
and configured on your PC or workstation.
- Verify that the IP address for your router and your workstation are correct and that the
addresses are on the same subnet.
Chapter 9. Troubleshooting | 149
Page 8

N600 Wireless Dual Band Gigabit ADSL2+ Modem Router DGND3700 User Manual
Test the Path from Your Computer to a Remote Device
After you verify that the LAN path works correctly, test the path from your PC to a remote
device. In the Windows Run screen, type:
ping -n 10 IP address
where IP address is the IP address of a remote device such as your ISP’s DNS server.
If the path is functioning correctly, replies as described in Test the LAN Path to Your Wireless
Modem Router on page 149 display. If you do not receive replies:
• Check that your PC has the IP address of your router listed as the default wireless
modem router. If the IP configuration of your PC is assigned by DHCP, this information is
not visible in your PC’s Network Control Panel. Verify that the IP address of the router is
listed as the default wireless modem router.
• Check that the network address of your PC (the portion of the IP address specified by the
netmask) is different from the network address of the remote device.
• Check that your cable or ADSL modem is connected and functioning.
• If your ISP assigned a host name to your PC, enter that host name as the account name
in the Basic Settings screen.
• Your ISP could be rejecting the Ethernet MAC addresses of all but one of your PCs. Many
broadband ISPs restrict access by allowing traffic only from the MAC address of your
modem, but some additionally restrict access to the MAC address of a single PC
connected to that modem. In this case, configure your router to clone or spoof the MAC
address from the authorized PC.
Cannot Log in
If you cannot log in to the wireless modem router from a computer on your local network,
check the following:
• The router is plugged in and it is on.
• You are using the correct login information. The login name is admin, and the password
is password. Make sure that Caps Lock is off when you enter this information.
• If you cannot connect wirelessly, try an Ethernet connection and view the router wireless
settings and set up your wireless computer with corresponding wireless settings.
• If you are using an Ethernet-connected computer, check the Ethernet connection
between the computer and the router. The LAN LED for the port you are using on the
router should light up to show your connection.
• Your computer’s IP address is on the same subnet as the router. If you are using the
recommended addressing scheme, your computer’s address should be in the range
192.168.0.2 to 192.168.0.254.
• If the computer IP address is 169.254.x.x, recent versions of Windows and Mac OS
generate and assign an IP address when the computer cannot reach a DHCP server. The
150 | Chapter 9. Troubleshooting
Page 9
N600 Wireless Dual Band Gigabit ADSL2+ Modem Router DGND3700 User Manual
auto-generated addresses are in the range 169.254.x.x. If your IP address is in this
range, check the connection from the computer to the router and reboot your computer.
• If your router’s IP address was changed and you do not know the current IP address,
clear the router’s configuration to factory defaults as explained in Factory Settings on
page 154. This sets the router’s IP address to 192.168.0.1.
• Make sure that your browser has Java, JavaScript, or ActiveX enabled. If you are using
Internet Explorer, click Refresh to be sure that the Java applet is loaded.
• Try closing the browser and relaunching it.
Changes Not Saved
If the router does not save the changes you make in the router interface, check the following:
• When entering configuration settings, always click the Apply button before moving to
another screen or tab, or your changes are lost.
• Click the Refresh or Reload button in the Web browser. The changes might have
occurred, but the old settings might be in the Web browser’s cache.
Firmware Needs to Be Reloaded
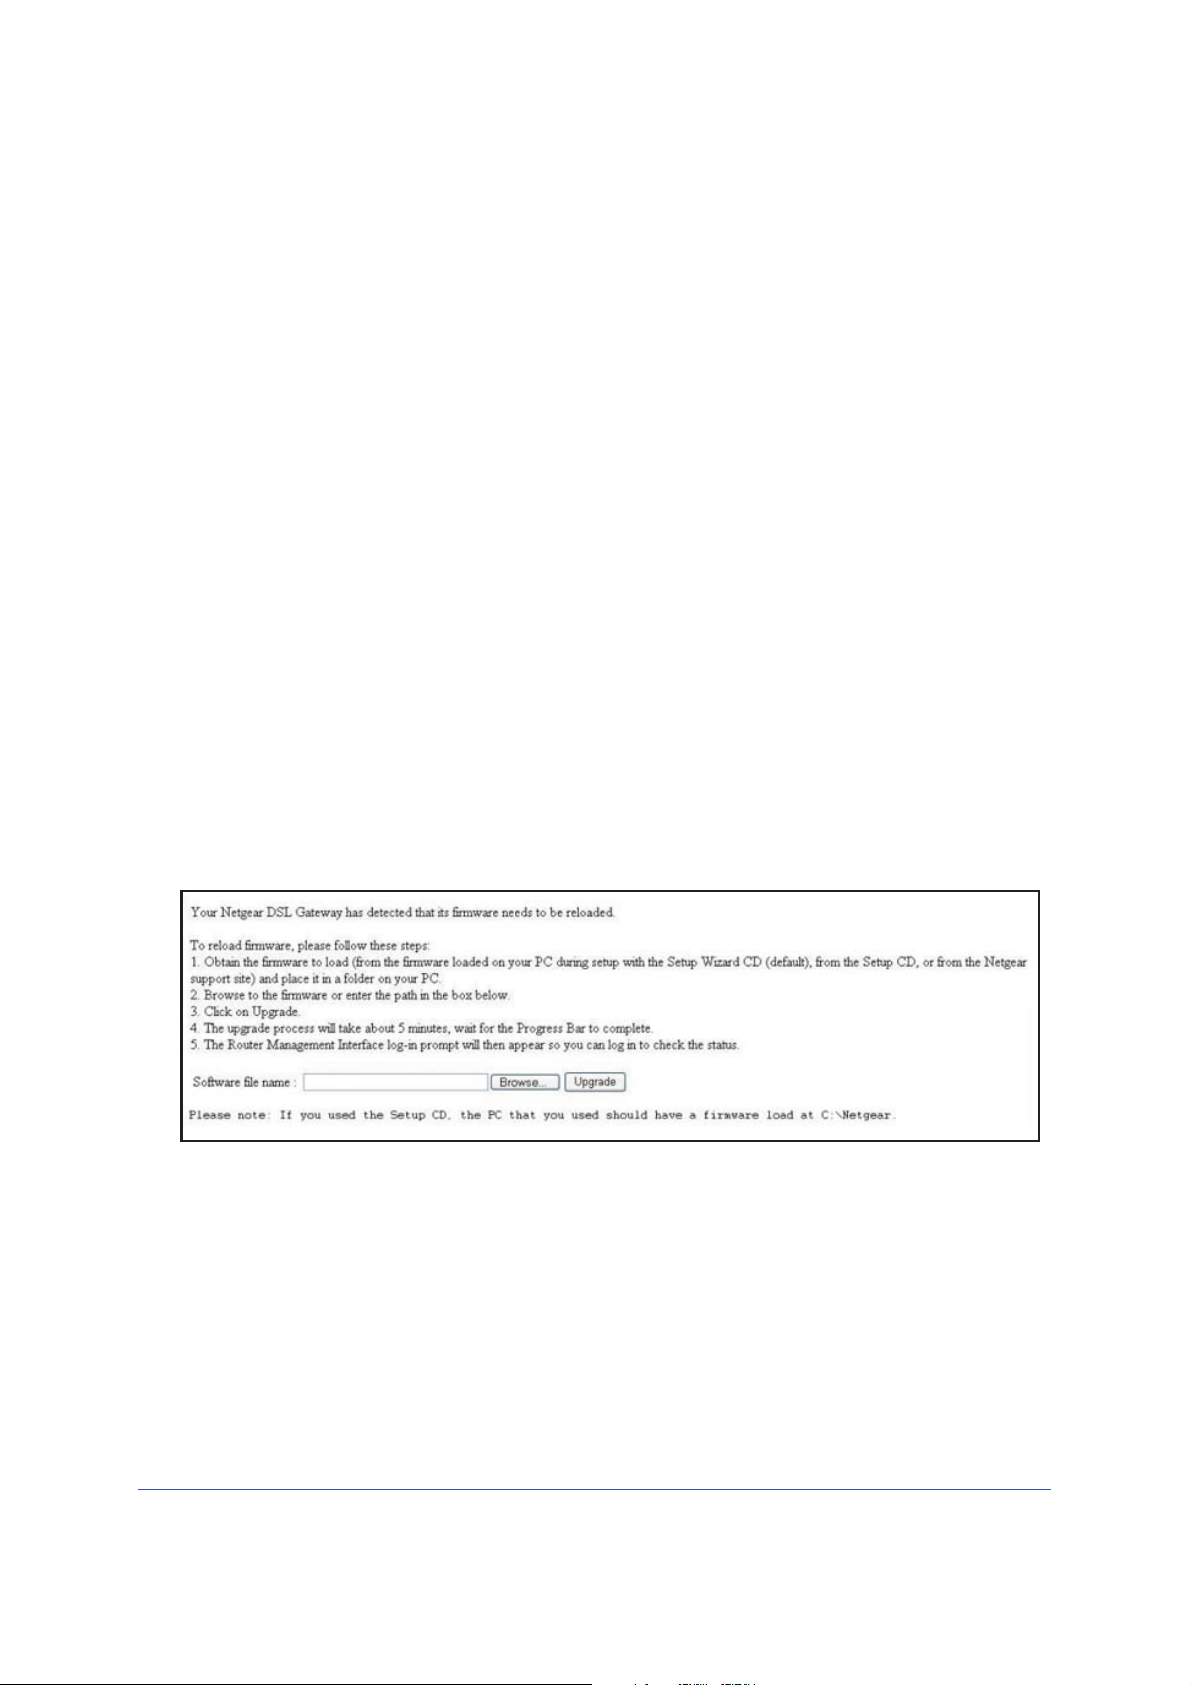
When you attempt to connect to the Internet, the browser might display a message similar to
the one below telling you that you need to reload the router’s firmware. This means a
problem has been detected with the router’s firmware.
Figure 61. Reload firmware
1. If you already have the firmware file on your PC, go directly to step 2. If you do not have
the firmware file on your PC, obtain the firmware from the NETGEAR support site at
http://www.netgear.com/support through another working Internet connection.
2. Click Browse.
3. Navigate to the firmware file.
4. Click Upgrade. A progress bar displays. The reload takes about 5 minutes to complete.
When the firmware recovery is completed, the login screen displays so you can log in.
Chapter 9. Troubleshooting | 151
Page 10

N600 Wireless Dual Band Gigabit ADSL2+ Modem Router DGND3700 User Manual
Incorrect Date or Time
Select Security > Schedule to display the current date and time. The wireless modem router
uses the Network Time Protocol (NTP) to obtain the current time from one of several network
time servers on the Internet. Each entry in the log is stamped with the date and time of day.
Problems with the date and time function can include the following:
• Date shown is January 1, 2000. This means the router has not yet successfully reached a
network time server. Check that your Internet access is configured correctly. If you have
just completed configuring the router, wait at least 5 minutes, and check the date and time
again.
• Time is off by one hour. The router does not automatically sense daylight savings time. In
the Schedule screen, select the Adjust for Daylight Savings Time check box.
152 | Chapter 9. Troubleshooting
Page 11

A. Supplemental Information
This appendix includes the factory default settings and technical specifications for the
N600 Wireless Dual Band Gigabit ADSL2+ Modem Router DGND3700, and
instructions for wall-mounting the unit.
This appendix contains the following sections:
• Factory Settings
• Technical Specifications
A
Appendix A. Supplemental Information | 153
Page 12
N600 Wireless Dual Band Gigabit ADSL2+ Modem Router DGND3700 User Manual
Factory Settings
You can return the wireless modem router to its factory settings. On the bottom of the
wireless modem router, use the end of a paper clip or some other similar object to press and
hold the Restore Factory Settings button
router resets, and returns to the factory settings.
configuration settings shown in the following table.
Table 22. Factory Settings Description
Feature Default Behavior
Router Login
User Login URL http://www.routerlogin.net or http://www.routerlogin.com
User Name (case-sensitive) admin
Login Password (case-sensitive) password
Internet Connection
for at least 7 seconds. The wireless modem
Your device will return to the factory
WAN MAC Address Use default address
WAN MTU Size 1492
Port Speed AutoSense
Local Network (LAN)
Lan IP 192.168.0.1
Subnet Mask 255.255.255.0
RIP Direction None
RIP Version Disabled
RIP Authentication None
DHCP Server Enabled
DHCP Starting IP Address 192.168.0.2
DHCP Ending IP Address 192.168.0.254
DMZ Disabled
Time Zone GMT
Time Zone Adjusted for Daylight Saving
Time
Disabled
SNMP Disabled
154 | Appendix A. Supplemental Information
Page 13

N600 Wireless Dual Band Gigabit ADSL2+ Modem Router DGND3700 User Manual
Table 22. Factory Settings Description
Feature Default Behavior
Firewall
Inbound (communications coming in from
Disabled (except traffic on port 80, the HTTP port)
the Internet)
Outbound (communications going out to
Enabled (all)
the Internet)
Source MAC filtering Disabled
Wireless
Wireless Communication Enabled
Wi-Fi Network Name (SSID) 2.4 GHz Wireless Network: NETGEAR
5 GHz Wireless Network: NETGEAR-5G
Wireless security Disabled
Broadcast SSID Enabled
Transmission Speed Auto
1
Country/Region United States (in North America; otherwise, varies by
region)
RF Channel Auto
Operating Mode Up to 145 Mbps
Data Rate Best
Output Power Full
Access Point Enabled
Authentication Type Pre-Shared Key
Wireless Card Access List All wireless stations allowed
1. Maximum wireless signal rate derived from IEEE Standard 802.11 specifications. Actual throughput will
vary. Network conditions and environmental factors, including volume of network traffic, building materials
and construction, and network overhead, lower actual data throughput rate.
Appendix A. Supplemental Information | 155
Page 14

N600 Wireless Dual Band Gigabit ADSL2+ Modem Router DGND3700 User Manual
Technical Specifications
Table 23. Technical Specifications Description
Network Protocol and Standards Compatibility
Data and routing protocols: TCP/IP, RIP-1, RIP-2, DHCP, PPPoE or PPPoA, RFC 1483 Bridged
or Routed Ethernet, and RFC 1577 Classical IP over ATM
Power Adapter
North America 120V, 60 Hz, input
UK, Australia 240V, 50 Hz, input
Europe: 230V, 50 Hz, input
All regions (output) 12 V AC @ 2.5A output
Physical
Dimensions 6.80 in. x 5.03 in. x 1.28 in.
172.7 mm x 127.7 mm x 32.5 mm
Weight 0.61 lbs.
0.275 kg
Environmental
Operating temperature 0° to 40° C (32º to 104º F)
Operating humidity 10% to 90% relative humidity, noncondensing
Storage temperature -20° to 70° C (-4º to 158º F)
Storage humidity 5 to 95% relative humidity, noncondensing
Regulatory Compliance
Meets requirements of FCC Part 15 Class B; VCCI Class B; EN 55 022 (CISPR 22), Class B
Interface Specifications
LAN 10BASE-T or 100BASE-Tx, RJ-45
WAN ADSL, Dual RJ-11, pins 2 and 3
T1.413, G.DMT
156 | Appendix A. Supplemental Information
Page 15

B. NETGEAR VPN Configuration
Case study on how to set up a VPN
This appendix is a case study on how to configure a secure IPSec VPN tunnel from a NETGEAR
DGND3700 to a FVL328. This case study follows the VPN Consortium interoperability profile
guidelines (found at http://www.vpnc.org/InteropProfiles/Interop-01.html).
B
Configuration Profile
The configuration in this appendix follows the addressing and configuration mechanics
defined by the VPN Consortium. Gather necessary information before you begin
configuration. Verify that the firmware is up to date, and that you have all the addresses and
parameters to be set on both sides. Check that there are no firewall restrictions.
Table 24. Wireless Modem Router to Gateway B Profile Summary
VPN Consortium Scenario Scenario 1 (Identity Using Preshared Secrets)
Type of VPN LAN-to-LAN or gateway-to-gateway (not PC/client-to-gateway)
Security scheme: IKE with pre-shared secret/key (not certificate based)
IP addressing:
NETGEAR-Gateway A Static IP address
NETGEAR-Gateway B Static IP address
10.506.0/24
Gateway A
(DGND3700)
LAN IP
10.5.6.1
Figure 62. VPNC Example, Network Interface Addressing
WAN IP
14.15.16.17
Internet
WAN IP
22.23.24.25
Appendix B. NETGEAR VPN Configuration | 157
172.23.9.0/24
Gateway B
LAN IP
172.23.9.1
Page 16

N600 Wireless Dual Band Gigabit ADSL2+ Modem Router DGND3700 User Manual
Step-by-Step Configuration
1. Use the VPN Wizard to configure Gateway A (DGND3700) for a gateway-to-gateway
tunnel (see Setting Up a Gateway-to-Gateway VPN Configuration on page 99), being
certain to use appropriate network addresses for the environment.
The LAN addresses used in this example are as follows:
Unit WAN IP LAN IP LAN Subnet Mask
DGND3700 14.15.16.17 10.5.6.1 255.255.255.0
FVL328 22.13.24.25 172.23.9.1 255.255.255.0
a. For the connection name, enter toGW_B.
b. For the remote WAN’s IP address, enter 22.23.24.25.
c. Enter the following:
• IP Address. 172.23.9.1
• Subnet Mask. 255.255.255.0
d. In the Summary screen, click Done.
2. Use the VPN Wizard to configure the Gateway B for a gateway-to-gateway tunnel (see
Setting Up a Gateway-to-Gateway VPN Configuration on page 99), being certain to use
appropriate network addresses for the environment.
a. For the connection name, enter toGW_A.
b. For the remote WAN’s IP address, enter 14.15.16.17.
c. Enter the following:
• IP Address. 10.5.6.1
• Subnet Mask. 255.255.255.0
d. In the Summary screen, click Done.
158 | Appendix B. NETGEAR VPN Configuration
Page 17

N600 Wireless Dual Band Gigabit ADSL2+ Modem Router DGND3700 User Manual
3. On the Gateway B router menu, under VPN, select IKE Policies, and click the Edit button
to display the IKE Policy Configuration screen:
toGW_A
22.23.24.25
14.15.16.17
4. On Gateway B router menu, under VPN, select VPN Policies, and click the Edit button to
display the VPN - Auto Policy screen:
toGW_A
toGW_A
toGW_A
toGW_A
14.15.16.17
172 23 9
10 5 6
1
5. Test the VPN tunnel by pinging the remote network from a PC attached to Gateway A
(wireless modem router).
a. Open the command prompt (select Start > Run > cmd).
Appendix B. NETGEAR VPN Configuration | 159
Page 18

N600 Wireless Dual Band Gigabit ADSL2+ Modem Router DGND3700 User Manual
b. Type ping 172.23.9.
If the pings fail the first time, try the pings a second time.
Wireless Modem Router with FQDN to Gateway B
This section is a case study on how to configure a VPN tunnel from a NETGEAR wireless
modem router to a gateway using a fully qualified domain name (FQDN) to resolve the public
address of one or both routers. This case study follows the VPN Consortium interoperability
profile guidelines (found at http://www.vpnc.org/InteropProfiles/Interop-01.html).
Configuration Profile
The configuration in this section follows the addressing and configuration mechanics defined
by the VPN Consortium. Gather the necessary information before you begin configuration.
Verify that the firmware is up to date, and that you have all the addresses and parameters to
be set on both sides. Check that there are no firewall restrictions.
10.506.0/24
Gateway A
(DGND3700)
Gateway B
LAN IP
10.5.6.1
Figure 63. VPNC Example, Network Interface Addressing
Table 25. Wireless Modem Router with FQDN to Gateway B Profile Summary
VPN Consortium Scenario Scenario 1
Type of VPN LAN-to-LAN or gateway-to-gateway (not PC/client-to-gateway)
WAN IP
example.org
(FQDN)
Internet
WAN IP
example2.org
(FQDN)
172.23.9.0/24
LAN IP
172.23.9.1
Security scheme: IKE with pre-shared secret/key (not certificate based)
IP addressing:
160 | Appendix B. NETGEAR VPN Configuration
Page 19

N600 Wireless Dual Band Gigabit ADSL2+ Modem Router DGND3700 User Manual
Table 25. Wireless Modem Router with FQDN to Gateway B Profile Summary
VPN Consortium Scenario Scenario 1
NETGEAR-Gateway A Fully qualified domain name (FQDN)
NETGEAR-Gateway B FQDN
Using a Fully Qualified Domain Name (FQDN)
Many ISPs provide connectivity to their customers using dynamic instead of static IP
addressing. This means that a user’s IP address does not remain constant over time, which
presents a challenge for gateways attempting to establish VPN connectivity.
A Dynamic DNS (DDNS) service allows a user whose public IP address is dynamically
assigned to be located by a host or domain name. It provides a central public database
where information (such as email addresses, host names, and IP addresses) can be stored
and retrieved. Now, a gateway can be configured to use a third-party service instead of a
permanent and unchanging IP address to establish bidirectional VPN connectivity
To use DDNS, you must register with a DDNS service provider. Some DDNS service
providers include:
.
• DynDNS: www.dyndns.org
• TZO.com: netgear.tzo.com
• ngDDNS: ngddns.iego.net
In this example, Gateway A is configured using a sample FQDN provided by a DDNS service
provider. In this case we established the hostname dgnd3300v2.dyndns.org for Gateway A
using the DynDNS service. Gateway B uses the DDNS service provider when establishing a
VPN tunnel.
To establish VPN connectivity, Gateway A must be configured to use Dynamic DNS, and
Gateway B must be configured to use a DNS host name provided by a DDNS service
provider to find Gateway A. Again, the following step-by-step procedures assume that you
have already registered with a DDNS service provider and have the configuration information
necessary to set up the gateways.
Step-by-Step Configuration
1. Log in to Gateway A (your wireless modem router) as described in Log In to the N600
Modem Router on page 24.
This example assumes that you have set the local LAN address as 10.5.6.1 for Gateway
A and have set your own password.
2. On Gateway A, configure the Dynamic DNS settings.
Appendix B. NETGEAR VPN Configuration | 161
Page 20

N600 Wireless Dual Band Gigabit ADSL2+ Modem Router DGND3700 User Manual
a. Under Advanced, select Dynamic DNS.
b. Fill in the fields with account and host name settings.
• Select the Use a Dynamic DNS Service check box.
• In the Host Name field, type dgnd3300v2.dyndns.org.
• In the User Name field, enter the account user name.
• In the Password field, enter the account password.
c. Click Apply.
d. Click Show Status. The resulting screen should show Update OK: good:
3. On NETGEAR Gateway B, configure the Dynamic DNS settings. Assume a correctly
configured DynDNS account.
a. From the main menu, select Dynamic DNS.
b. Select the DynDNS.org radio button.
162 | Appendix B. NETGEAR VPN Configuration
Page 21

N600 Wireless Dual Band Gigabit ADSL2+ Modem Router DGND3700 User Manual
The Dynamic DNS screen displays:
c. Fill in the fields with the account and host name settings.
• In the Host and Domain Name field, enter fvl328.dyndns.org.
• In the User Name field, enter the account user name.
• In the Password field, enter the account password.
d. Click Apply.
e. Click Show Status.
The resulting screen should show Update OK: good:
4. Configure the N600 Wireless Dual Band Gigabit ADSL2+ Modem Router DGND3700 as in
the gateway-to-gateway procedures using the VPN Wizard (see Setting Up a
Gateway-to-Gateway VPN Configuration on page 99), being certain to use appropriate
network addresses for the environment.
The LAN addresses used in this example are as follows:
Device LAN IP Address LAN Subnet Mask
DGND3700 10.5.6.1 255.255.255.0
FVL328 172.23.6.1 255.255.255.0
Appendix B. NETGEAR VPN Configuration | 163
Page 22

N600 Wireless Dual Band Gigabit ADSL2+ Modem Router DGND3700 User Manual
a. For the connection name, enter toFVL328.
b. For the remote WAN's IP address, enter fvl328.dyndns.org.
c. Enter the following:
• IP Address. 172.23.9.1
• Subnet Mask. 255.255.255.0
5. Configure the FVL328 as in the gateway-to-gateway procedures for the VPN Wizard (see
Setting Up a Gateway-to-Gateway VPN Configuration on page 99), being certain to use
appropriate network addresses for the environment.
a. For the connection name, enter toDGND3300v2.
b. For the remote WAN's IP address, enter dgnd3300v2.dyndns.org.
c. Enter the following:
• IP Address. 10.5.6.1
• Subnet Mask. 255.255.255.0
6. Test the VPN tunnel by pinging the remote network from a PC attached to the N600
Wireless Dual Band Gigabit ADSL2+ Modem Router DGND3700.
a. Open the command prompt (select Start > Run > cmd)
b. Type ping 172.23.9.1.
If the pings fail the first time, try the pings a second time.
Configuration Summary (Telecommuter Example)
The configuration in this section follows the addressing and configuration mechanics defined
by the VPN Consortium. Gather the necessary information before you begin configuration.
Verify that the firmware is up to date, and make sure you have all the addresses and
parameters to be set on both sides. Assure that there are no firewall restrictions.
Table 26. Configuration Summary (Telecommuter Example)
VPN Consortium Scenario Scenario 1
Type of VPN: PC/client-to-gateway, with client behind NAT router
Security scheme: IKE with pre-shared secret/key (not certificate based)
IP addressing:
164 | Appendix B. NETGEAR VPN Configuration
Page 23

N600 Wireless Dual Band Gigabit ADSL2+ Modem Router DGND3700 User Manual
Table 26. Configuration Summary (Telecommuter Example)
VPN Consortium Scenario Scenario 1
Gateway Fully qualified domain name (FQDN)
Client Dynamic
192.168.0.1/24
Gateway A
LAN IP
192.168.0.1
(main office)
WAN IP
FQDN
ntgr.dyndns.org
“from_GW_A”
Internet
WAN IP
0.0.0.0
“toGW_A”
Gateway B
(regional office)
IP: 192.168.2.3
Figure 64. Telecommuter Example
Client PC
(running NETGEAR
ProSafe VPN client)
Setting Up Client-to-Gateway VPN (Telecommuter
Example)
Setting up a VPN between a remote PC running the NETGEAR ProSafe VPN client and a
network gateway involves two steps, described in the following sections:
• Step 1: Configure Gateway A (VPN Router at Main Office) on page 166.
• Step 2: Configure Gateway B (VPN Router at Regional Office) on page 167 describes
configuring the NETGEAR ProSafe VPN client endpoint.
Appendix B. NETGEAR VPN Configuration | 165
Page 24

N600 Wireless Dual Band Gigabit ADSL2+ Modem Router DGND3700 User Manual
Step 1: Configure Gateway A (VPN Router at Main Office)
1. Log in to the VPN router. Select VPN Policies to display the VPN Policies screen. Click
Add Auto Policy to proceed and enter the information.
fromGW_A (in the example)
IKE Keep Alive is optional; must match
Remote LAN IP Address when enabled
(remote PC must respond to pings)
192.168.2.3 (in this example)
(Remote NAT router must have
Address Reservation set and
VPN Passthrough enabled)
fromGW_A.com (in this example)
toGW_A.com (in this example)
2. Click Apply when you are finished to display the VPN Policies screen.
To view or modify the tunnel settings, select the radio button next to the tunnel entry, and then
click Edit.
166 | Appendix B. NETGEAR VPN Configuration
Page 25

N600 Wireless Dual Band Gigabit ADSL2+ Modem Router DGND3700 User Manual
Step 2: Configure Gateway B (VPN Router at Regional Office)
This procedure assumes that the PC running the client has a dynamically assigned IP
address.
The PC must have a VPN client program installed that supports IPSec (in this case study, the
NETGEAR VPN ProSafe Client is used). Go to the NETGEAR website (www.netgear.com)
for information about how to purchase the NETGEAR ProSafe VPN Client.
Note: Before installing the software, be sure to turn off any virus protection
or firewall software you might be running on your PC.
1. Install the NETGEAR ProSafe VPN Client on the remote PC, and then reboot.
a. You might need to insert your Windows CD to complete the installation.
b. If you do not have a modem or dial-up adapter installed in your PC, you might see
the warning message stating “The NETGEAR ProSafe VPN Component requires at
least one dial-up adapter be installed.” You can disregard this message.
c. Install the IPSec component. You might have the option to install either the VPN
adapter or the IPSec component or both. The VPN adapter is not necessary.
d. The system should show the ProSafe icon (
e. Double-click the system tray icon to open the Security Policy Editor.
2. Add a new connection.
a. Run the NETGEAR ProSafe Security Policy Editor program, and create a VPN
connection.
b. From the Edit menu of the Security Policy Editor, select Add > Connection. A New
Connection listing appears in the list of policies.
c. Rename the new connection to match the connection name you entered in the VPN
settings of Gateway A. Choose connection names that make sense to the people
using and administrating the VPN.
) in the system tray after you reboot.
Appendix B. NETGEAR VPN Configuration | 167
Page 26

N600 Wireless Dual Band Gigabit ADSL2+ Modem Router DGND3700 User Manual
Note: In this example, the connection name on the client side of the VPN
tunnel is toGW_A. It does not have to match the VPN_client connection name
used on the gateway side of the VPN tunnel because connection names do not
affect how the VPN tunnel functions.
d. In the Connection Security section, select Secure.
toGW_A
e. In the ID Type drop-down list, select IP Subnet.
f. In this example, in the Subnet field, type 192.168.0.1 as the network address of the
wireless modem router.
g. In the Mask field, enter 255.255.255.0 as the LAN subnet mask of the wireless
modem router.
h. In the Protocol drop-down list, select All to allow all traffic through the VPN tunnel.
i. Select the Connect using Secure Gateway Tunnel check box.
j. In the ID Type drop-down list, select Domain Name, and enter fromGW_A.com (in
this example).
k. Select Gateway Hostname and enter ntgr.dyndns.org (in this example).
3. Configure the security policy in the wireless modem router software.
a. In the Network Security Policy list, expand the new connection by double-clicking its
name or clicking the + symbol. My Identity and Security Policy appear below the
connection name.
168 | Appendix B. NETGEAR VPN Configuration
Page 27

N600 Wireless Dual Band Gigabit ADSL2+ Modem Router DGND3700 User Manual
b. Click Security Policy to show the Security Policy screen.
c. In the Select Phase 1 Negotiation Mode group, select the Main Mode radio button.
4. Configure the VPN client identity.
In this step, you provide information about the remote VPN client PC. You must provide
the pre-shared key that you configured in the wireless modem router and either a fixed IP
address or a fixed virtual IP address of the VPN client PC.
a. In the Network Security Policy list on the left side of the Security Policy Editor window,
click My Identity.
b. In the Select Certificate list, select None.
c. In the ID Type list, select Domain Name, and enter toGW_A.com (in this example).
d. In the Virtual Adapter list, select Disabled.
Appendix B. NETGEAR VPN Configuration | 169
Page 28

N600 Wireless Dual Band Gigabit ADSL2+ Modem Router DGND3700 User Manual
e. In the Internet Interface section, select Intel PRO/100VE Network Connection (in
this example; your Ethernet adapter might be different) in the Name list, and then in
the IP Addr list, enter 192.168.2.3 (in this example).
f. Click the Pre-Shared Key button.
g. In the Pre-Shared Key screen, click Enter Key. Enter the N600 Wireless Dual Band
Gigabit ADSL2+ Modem Router DGND3700’s pre-shared key and click OK. In this
example, 12345678 is entered, though the screen shows asterisks. This field is
case-sensitive.
5. Configure the VPN Client Authentication Proposal.
In this step, you provide the type of encryption (DES or 3DES) to be used for this
connection. This selection must match your selection in the VPN router configuration.
a. In the Network Security Policy list on the left side of the Security Policy Editor window,
expand the Security Policy heading by double-clicking its name or clicking the +
symbol.
b. Expand the Authentication subheading by double-clicking its name or clicking the +
symbol. Then select Proposal 1 below Authentication.
c. In the Authentication Method drop-down list, select Pre-Shared Key.
d. In the Encrypt Alg drop-down list, select the type of encryption. In this example, use
Triple DES.
e. In the Hash Alg drop-down list, select SHA-1.
f. In the SA Life drop-down list, select Unspecified.
g. In the Key Group drop-down list, select Diffie-Hellman Group 2.
6. Configure the VPN Client Key Exchange Proposal.
170 | Appendix B. NETGEAR VPN Configuration
Page 29

N600 Wireless Dual Band Gigabit ADSL2+ Modem Router DGND3700 User Manual
In this step, you provide the type of encryption (DES or 3DES) to be used for this
connection. This selection must match your selection in the VPN router configuration.
a. Expand the Key Exchange subheading by double-clicking its name or clicking the +
symbol. Then select Proposal 1 below Key Exchange.
b. In the SA Life drop-down list, select Unspecified.
c. In the Compression drop-down list, select None.
d. Select the Encapsulation Protocol (ESP) check box.
e. In the Encrypt Alg drop-down list, select the type of encryption. In this example, use
Triple DES.
f. In the Hash Alg drop-down list, select SHA-1.
g. In the Encapsulation drop-down list, select Tunnel.
h. Leave the Authentication Protocol (AH) check box cleared.
7. Save the VPN client settings.
From the File menu at the top of the Security Policy Editor window, select Save.
After you have configured and saved the VPN client information, your PC automatically
opens the VPN connection when you attempt to access any IP addresses in the range of
the remote VPN router’s LAN.
8. Check the VPN connection.
Appendix B. NETGEAR VPN Configuration | 171
Page 30

N600 Wireless Dual Band Gigabit ADSL2+ Modem Router DGND3700 User Manual
To check the VPN connection, you can initiate a request from the remote PC to the VPN
router’s network by using the Connect option in the wireless modem router screen:
Right-click the system
tray icon to open the
My Connections\DGD3300v2
pop-up menu.
Since the remote PC has a dynamically assigned WAN IP address, it must initiate the
request.
a. Right-click the system tray icon to open the pop-up menu.
b. Select Connect to open the My Connections list.
c. Select toDGND3300v2.
The wireless modem router reports the results of the attempt to connect. Once the
connection is established, you can access resources of the network connected to the
VPN router.
Right-click the system
tray icon to open the
My Connections\DGD3300v2
pop-up menu.
To perform a ping test using this example, start from the remote PC:
a. Establish an Internet connection from the PC.
b. On the Windows taskbar, click the Start button, and then select Run.
c. Type ping -t 192.168.0.1, and then click OK.
172 | Appendix B. NETGEAR VPN Configuration
Page 31

N600 Wireless Dual Band Gigabit ADSL2+ Modem Router DGND3700 User Manual
This causes a continuous ping to be sent to the VPN router. Within 2 minutes, the ping
response should change from timed out to reply.
Once the connection is established, you can open the browser on the PC and enter the LAN
IP address of the VPN router. After a short wait, you should see the login screen of the VPN
router (unless another PC already has the VPN router management interface open).
Note: You can use the VPN router diagnostics to test the VPN connection
from the VPN router to the client PC. To do this, select Diagnostics
on the wireless modem router main menu.
Monitoring the VPN Tunnel (Telecommuter Example)
To view information about the progress and status of the VPN client connection, open the Log
Viewer. In Windows, click Start, and select Programs > N600 Wireless Dual Band Gigabit
ADSL2+ Modem Router DGND3700 > Log Viewer.
Note: Use the active VPN tunnel information and pings to determine
whether a failed connection is due to the VPN tunnel or some
reason outside the VPN tunnel.
The Connection Monitor screen displays:
While the connection is being established, the connection name listed in this screen shows
SA before the name of the connection. When the connection is successful, the SA changes
to the yellow key symbol.
Appendix B. NETGEAR VPN Configuration | 173
Page 32

N600 Wireless Dual Band Gigabit ADSL2+ Modem Router DGND3700 User Manual
Note: While your PC is connected to a remote LAN through a VPN, you
might not have normal Internet access. If this is the case, you need
to close the VPN connection to have normal Internet access.
Viewing the VPN Router’s VPN Status and Log Information
To view information about the status of the VPN client connection, open the VPN router’s
VPN Status screen:
1. On the wireless modem router main menu, select Router Status, and then click the
VPN Status button. The VPN Status/Log screen displays:
2. To view the VPN tunnels status, click VPN Status.
174 | Appendix B. NETGEAR VPN Configuration
Page 33

C. Notification of Compliance
NETGEAR Wireless Routers, Gateways, APs
Regulatory Compliance Information
Placeholder for dual-band compliance appendix.
Interference Reduction Table
The table below shows the Recommended Minimum Distance between NETGEAR equipment and household
appliances to reduce interference (in feet and meters).
Table 27. Interference Reduction Table
Household Appliance Recommended Minimum Distance
(in feet and meters)
Microwave ovens 30 feet / 9 meters
Baby Monitor - Analog 20 feet / 6 meters
Baby Monitor - Digital 40 feet / 12 meters
Cordless phone - Analog 20 feet / 6 meters
Cordless phone - Digital 30 feet / 9 meters
C
Bluetooth devices 20 feet / 6 meters
ZigBee 20 feet / 6 meters
Appendix C. Notification of Compliance | 175
Page 34

Index
A
AC power adapter input 14
access lists
accessing remote computer
adapter, wireless
adding
custom service
addresses, DNS
ADSL
see also DSL
statistics, viewing
ADSL microfilter
filter, described
ADSL microfilters
ADSL settings
ADSLport
Advanced Wireless Settings screen
alerts, emailing
Application Level Gateway (ALG), disabling
approved USB devices
attached devices, viewing
authentication proposal
Auto Policy to configure VPN tunnels
automatic firmware checking
automatic Internet connection
13
43
32
59
30
23
18
53
18
69
80
95
49
128
71
, 96
110
64
28
B
back panel 13
backing up configuration
Basic Settings screen
described
manual setup
blocking content and services
blocking keywords, examples
blocking settings examples
box contents
bridged networks
29
11
66
28
47
48
48
130
C
changes not saved, router 151
123
client-to-gateway VPN tunnels
compliance
configuration file
backing up
erase
managing
restoring
configuration, wireless network
configuring
port forwarding
port triggering
security policy
VPN tunnels
connecting USB drive
connecting wirelessly
content filtering
custom service (port forwarding)
66
175
66
66
66
86
47
53
55
94
, 88, 99, 160
81
17
85
41
53
D
date and time 152
daylight savings time
deactivating VPN tunnels
default demilitarized zone (DMZ) server
default factory settings, see factory settings
deleting
VPN tunnels
denial of service (DoS)
port scans
protection
devices, adding
diagnostic utilities
disable SSID
disabling
firewalls
SIP ALG
SSID broadcast
disconnecting USB drive
DNS servers
Domain Name Server (DNS) addresses
Domain Name Server (DNS), secondary
DSL port LED
DSL settings
37
31
49
31
121
47
123
15
39
109
71
37
58
, 152
107
80
, 108
122
30
30
, 123
Index | 176
Page 35

N600 Wireless Dual Band Gigabit ADSL2+ Modem Router DGND3700 User Manual
Dynamic DNS 123
Dynamic Host Configuration Protocol (DHCP) server
125
E
email notices 59
encryption algorithm
encryption keys
erasing configuration file
96
38
66
F
factory settings
list of
154
resetting
file and printer sharing
file sharing
filtering content
firmware
automatic check
reload firmware message
upgrade
upgrade at log in
upgrade manually
front panel
front panel LEDs
FTP, sharing files using
fully qualified domain name (FQDN), configuring VPN
tunnels using
73
14
12
64
160
82
47
64
151
, 136
25
65
14
75
G
gateway IP address 30
gateway-to-gateway VPN tunnels
guest devices, adding
39
86
, 99
H
host name 29
host trusted
48
I
IKE protocol 110
installing
manual setup
Internet port
Internet port LEDs
Internet port, no connection
Internet Relay Chat (IRC)
Internet Service Provider (ISP), see ISP
28
28
15
32
50
Internet traffic statistics
IP address
IP setup, LAN
ISP
ISP login 24
81
DHCP
23
LAN service
reserved
account information
Basic Settings screen
DSL settings
DSL synchronization
125
124
142
124
23
29
31
15
K
keep-alive, IKE 111
keywords
blocking
deleting
48
48
L
LAN
setup
124
LAN port LEDs
LAN ports
LAN setup
large files, sharing
LEDs
troubleshooting
verifying cabling
local servers, port forwarding to
Log Viewer
logging in
cannot
changing password
ISP
router
time-out
types
upgrade firmware
login time-out
logs, emailing
24
13
124
24
33
98
150
33
32
59
16
, 63
75
144
20
25
32
, 63
M
MAC addresses
configuring
described
filtering by
rejected
restricting access by
spoofing
150
147
37
44
31
43
, 45
53
Index | 177
Page 36

N600 Wireless Dual Band Gigabit ADSL2+ Modem Router DGND3700 User Manual
maintenance settings 63
manual logout 33
manual setup
manual setup, Basic Settings screen
manually configuring VPN policies
Maximum Transmit Unit (MTU)
MD5 authentication
menus, described
metric, number of routers
mixed mode security options
multi-point bridge mode
28
28
117
122
112
26
138
38
132
N
NAT (Network Address Translation) 49
NETGEAR ProSafe VPN Client
Network Address Translation (NAT)
network folder
creating
editing
Network Time Protocol (NTP)
network troubleshooting
no Internet connection
79
77
32
148
58
92
31
, 152
O
On/Off button 14
On/Off LED
one-line ADSL microfilter
online help, router
17
18
26
P
passphrases 46
changing
WPA-802.1x
passwords, see passphrases
ping
98
pinging WAN port
Plug and Play, Universal (UPnP)
plug and play, universal (UPnP)
point-to-point bridge mode
Point-to-Point Tunneling Protocol (PPTP)
port forwarding
configuring
example
port numbers
port scanning, disabling
port triggering
configuring
example
, 172
45
51
53
51
57
50
55
50
45
122
139
139
131
, 52, 53
121
, 52, 55
28
ports
listed, back panel
positioning the router
power adapter, AC
preset security
passphrase
security option
SSID
36
pre-shared key
primary DNS addresses
Push ’N’ Connect, see WPS
38
36
13
17
14
, 45
36
30
Q
Quality of Service (QoS) 126, 127
R
RADIUS server 38
range of wireless connections
remote management
removing USB drive
repeater mode with wireless client association
replace existing router
reserved IP address
restore
configuration file
factory settings button
restricting wireless access by MAC addresses
router interface, described
router, status
Routing Information Protocol (RIP}
81
80
125
66
67
17
, 135
23
154
26
124
S
secondary DNS 30
Secure Sockets Layer (SSL)
security
security association (SA)
security features
security options
security PIN
security policy, configuring
security settings
sending logs by email
services
Session Initiation Protocol (SIP), disabling
setting time zone
37
see also security options
36
described
settings
57
37
12
37
, 40
47
58
35
87
94
59
123
134
45
178 | Index
Page 37

N600 Wireless Dual Band Gigabit ADSL2+ Modem Router DGND3700 User Manual
Setup Wizard 28
SHA-1 authentication 112
sharing files
Simple Mail Transfer Protocol (SMTP)
sites, blocking
SSID
described
disable
static routes
statistics, viewing
status
Internet connection
router
storage drive. See USB storage
67
73
37
137
48
43
, 138
69
70
T
TCP/IP
network troubleshooting
no Internet connection
technical specifications
technical support
Temporal Key Integrity Protocol (TKIP)
time of day
time zone, setting
time-out
port triggering
time-stamping
trademarks
traffic metering
troubleshooting
cannot log in
date or time incorrect
firmware reload
LEDs
network
router changes not saved
router not on
trusted host
Trusted IP Address field
trusted wireless stations
turn off wireless connectivity
two-line ADSL microfilter
152
2
144
148
48
58
141
143
, 145
2
58
56
, 142
150
151
144
156
48
44
19
32
152
148
37
151
, 145
U
Universal Plug and Play (UPnP) 139
unmounting USB drive
upgrading firmware
USB devices, approved
USB drive requirements
64
80
, 136
80
73
60
38
USB drive, unmounting 80
USB port
USB port LED
USB storage
15
16
72
advanced
basic settings
connecting
creating a network folder
editing a network folder
file sharing scenarios
78
, 140
75
81
73
79
77
V
Virtual Channel Identifier (VCI) 24, 31
Virtual Path Identifier (VPI)
VPN Auto Policy
VPN client
VPN Log Viewer
VPN Manual Policy
VPN network connections
VPN tunnels
activating
client-to-gateway
configuring
control
deactivating
deleting
gateway-to-gateway
monitoring
special setup
status
VPN Wizard
VPNs
85
, 86
overview
pinging
planning
status
92
103
106
172
103
103
109
101
85
86
110
98
160
107
173
, 102
, 174
, 114, 115
, 173
117
, 105
, 108
109
85
86
24
110
, 99
, 31
W
WAN 121
advanced setup
ping response
settings
WAN port
scanning
Wi-Fi Protected Setup (WPS)
adding devices
keep existing settings
settings
Wi-Fi-certified products
Wired Equivalent Privacy (WEP) encryption
passphrase
when to use
121
128
121
122
, 122
46
38
121
39
39
129
39
, 40
46
Index | 179
Page 38

N600 Wireless Dual Band Gigabit ADSL2+ Modem Router DGND3700 User Manual
wireless access points 43
wireless adapter 23
wireless advanced settings
wireless bridging and repeating
wireless channel
wireless connections
wireless connectivity
wireless distribution system (WDS)
wireless isolation
Wireless LAN (WLAN)
wireless LED
wireless mode
wireless network configuration
wireless network settings
wireless region
wireless security
wireless security options
Wireless Settings screen
wireless settings, SSID broadcast
Wireless Stations Access List
WPA encryption
WPA2 encryption
WPA2-PSK encryption
WPA-802.1x encryption
passphrases
RADIUS servers
WPA-PSK encryption
WPA-PSK/WPA2-PSK mixed mode
WPS button
WPS LED
WPS, see Wi-Fi Protected Setup (WPS)
WPS-capable devices
WPS-PSK encryption
WPS-PSK+ WPA2-PSK encryption
wrong date or time
14
40
15
43
43
, 16
43
43
36
38
38
45
152
17
37
38
38
38
128
130
, 145
130
69
41
43
37
41
43
43
38
38
38
39
38
, 131, 132, 134
180 | Index
 Loading...