

N150 Wireless Modem Router DGN1000 Setup Manual
NETGEAR, Inc.
350 East Plumeria Drive
San Jose, CA 95134
Santa Clara, CA 95054 USA
June 2009
208-10462-01
v1.0

©2009 by NETGEAR, Inc. All rights reserved.
Trademarks
NETGEAR and the NETGEAR logo are trademarks of NETGEAR, Inc. Microsoft, Windows, and Windows NT are
registered trademarks of Microsoft Corporation. Other brand and product names are registered trademarks or trademarks
of their respective holders.
Statement of Conditions
In the interest of improving internal design, operational function, and/or reliability, NETGEAR reserves the right to
make changes to the products described in this document without notice.
NETGEAR does not assume any liability that may occur due to the use or application of the product(s) or circuit
layout(s) described herein.
ii

Contents
N150 Wireless Modem Router DGN1000 Setup Manual
Getting to Know Your Wireless Router
Unpacking Your New Router .................................... .... ... ... ... .... ... ... ... .... ...........................1
Hardware Features ............................................................................................................2
Router Front Panel ......................................................................................................2
Router Back Panel ......................................................................................................4
Router Label ................................................................................................................5
Positioning Your Wireless Router ......................................................................................5
Installing Your Wireless Modem Router .............................................................................6
Installing Your Router Using the
Smart Wizard
Using the Smart Wizard .....................................................................................................8
Accessing Your Router After Installation ...........................................................................9
Installing Your Router Manually
(Advanced, Mac, and Linux Users)
Understanding ADSL Microfilters ....................................................................................11
ADSL Microfilter ........................................................................................................11
ADSL Microfilter with Built-In Splitter ......................................................................... 11
Connecting Your Wireless Modem Router .......................................................................12
Verifying Your Connection ...............................................................................................15
Setting Up Your Router for Internet Access ........ ... ... .... ... ... ... .... ... ... ................................16
Configuring Your Wireless Network
Specifying Wireless Settings .................................... .... ... ... ... .... ......................................18
Setting Your SSID and Wireless Security Manually .................................................. 19
Using Push 'N' Connect (WPS) to Configure Your Wireless Network .......................20
Testing Basic Wireless Connectivity ................................................................................23
Troubleshooting
Basic Functioning ............................................................................................................25
iii

Power LED Not On ....................................................................................................26
Power LED is Red .....................................................................................................26
LAN or Internet Port LEDs Not On ......... ... ... ... ... .... ... ... ... .... ... ... ... .... ... ... ... ... .............26
Troubleshooting the Web Configuration Interface ...........................................................27
Troubleshooting the ISP Connection ...............................................................................27
ADSL link ..................................................................................................................28
Obtaining an Internet IP Address ..............................................................................28
Troubleshooting PPPoE or PPPoA ...........................................................................29
Troubleshooting Internet Browsing ...........................................................................30
Troubleshooting a TCP/IP Network Using the Ping Utility ...............................................30
Testing the LAN Path to Your Router ........................................................................30
Testing the Path from Your Computer to a Remote Device ................ ... ... ... .... ... ... ...31
Restoring the Default Configuration and Password ............ ... .... ... ... ... .... ... ... ... ... .... ... ... ...32
Using the Reset Button to Reset the Router .......................................... ... ... .............32
Technical Specifications
General Specifications ................. .... .......................................... ... ... ... .... ... ......................33
Default Configuration .......................................................................................................34
Related Documents
Registration and Certifications
iv

Getting to Know Your Wireless Router
Congratulations on your purchase of a NETGEAR® high-speed wireless router, the N150
Wireless Modem Router.
Before you begin installing your router, check the package contents (see “Unpacking Your New
Router” on page 1). Become familiar with the front and back panels of your router—especially the
LEDs—and the important information on the router label (see “Hardware Features” on page 2).
Then, read the section on “Positioning Your Wireless Router” on page 5 to ensure that you have
selected the best location to install your router.
This chapter describes how to set up the wireless modem router on your Local Area Network
(LAN) and connect to the Internet. It describes how to set up your wireless modem router for
Internet access and configure basic wireless connectivity.
Unpacking Your New Router
Your router should contain the following items:
• Wireless Modem Router
• AC power adapter (varies by region)
• Category 5 (Cat 5) Ethernet cable
• Telephone cable with RJ-11 connector
• Microfilters (quantity and type vary by region)
• Resource CD, including:
– The Smart Wizard Installation Assistant
– This manual
• Warranty and Support Information cards
If any of the parts are incorrect, missing, or damaged, contact your NETGEAR dealer. Keep the
carton, including the original packing materials, in case you need to return the product for repair.
Place your router in a suitable area for installation (near an AC power outlet and accessible to the
Ethernet cables for your wired computers).
Getting to Know Your Wireless Router 1

Hardware Features
Power
LAN Ports (1-4)
DSL
Internet
Wireless
WPS
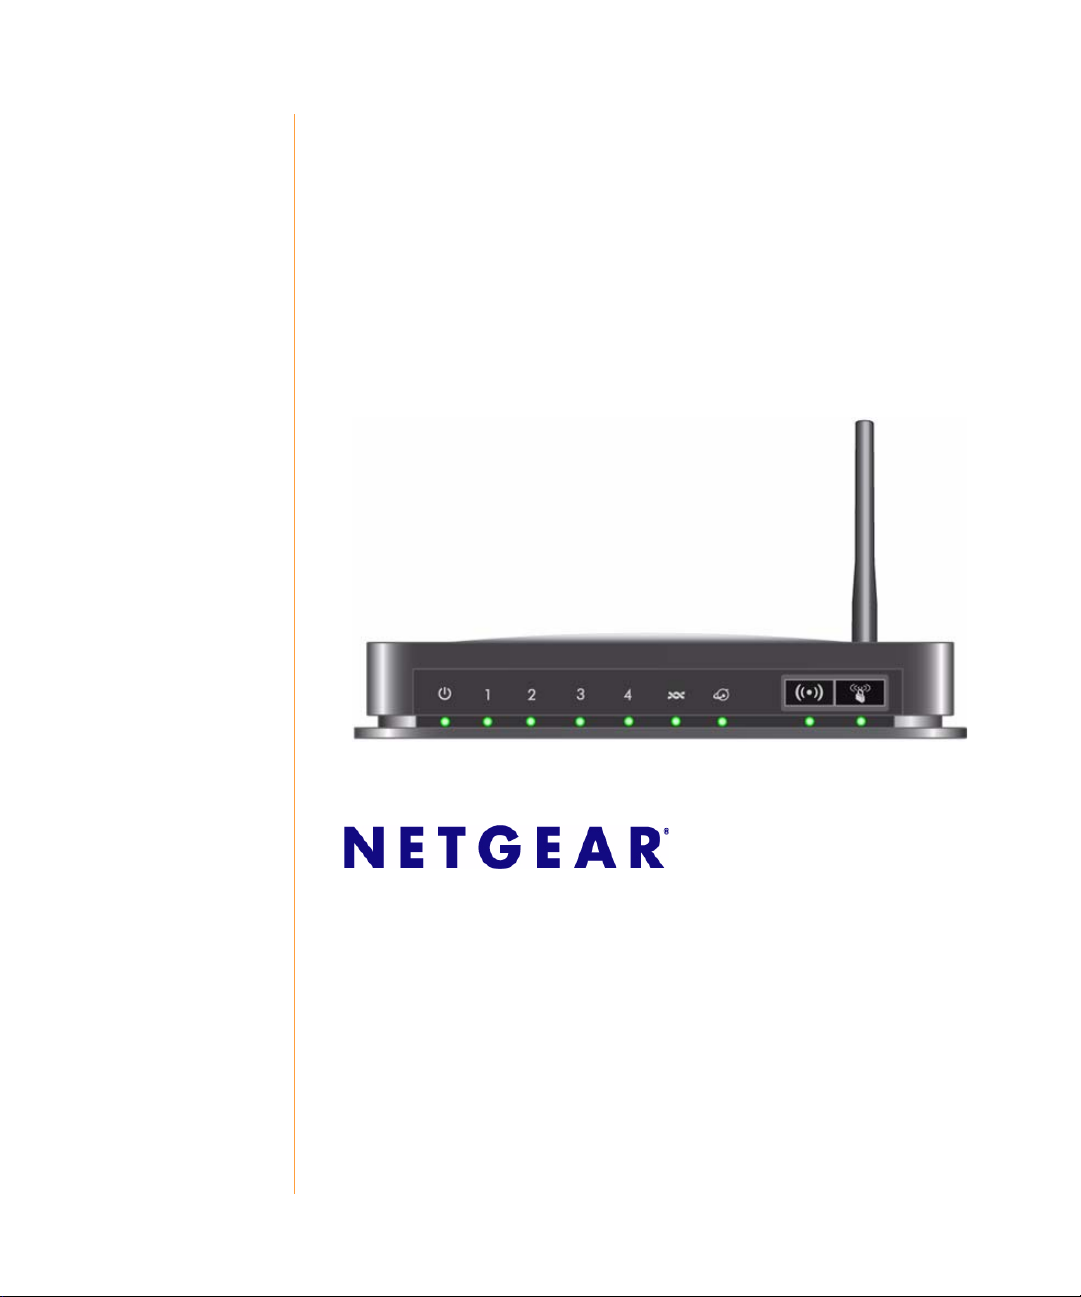
Before you install and connect your router, take a moment to become familiar with the front and
back panels of the router—especially the LEDs on the front panel.
Router Front Panel
The wireless modem router front panel shown below contains status LEDs.
Figure 1
Getting to Know Your Wireless Router 2
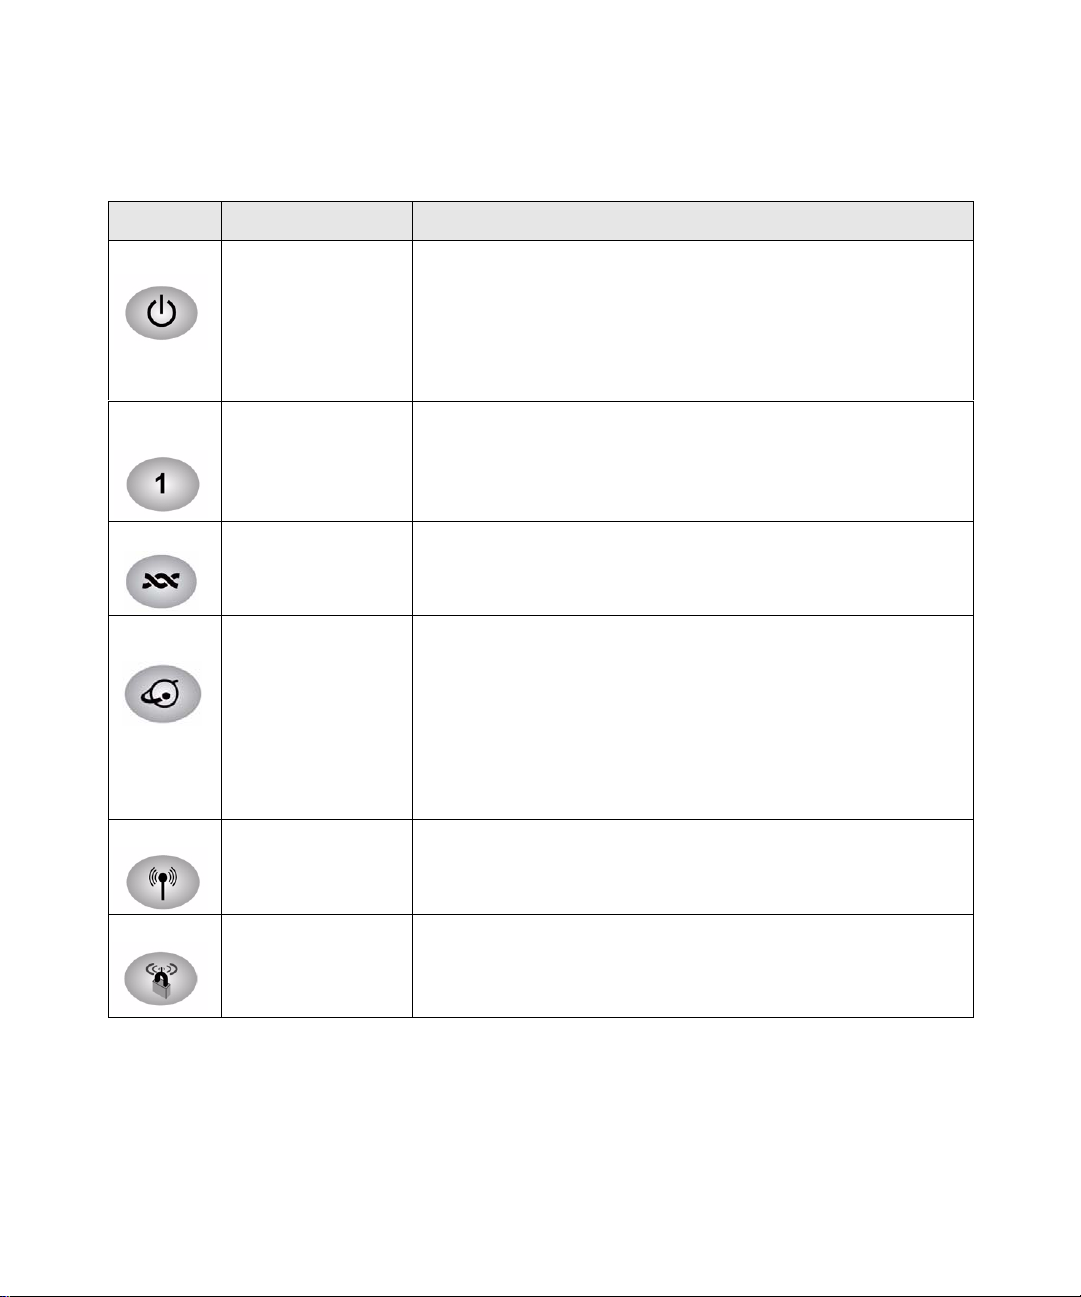
You can use the LEDs to verify various conditions.Table 1 describes each LED.
Ta ble 1. LED Descriptions
Label LED Activity Description
Power Solid Green
Solid Red
Off
Factory reset
LAN Ports
1 - 4
DSL Solid Green
Internet Port Solid Green
Wireless Solid Green
Solid Green
Blinking Green
Off
Blinking Green
Off
Solid Red
Blinking Green
Off
Blinking Green
Off
Power is supplied to the router.
POST (Power-On Self-Test) failure or device malfunction
Power is not supplied to the router
Lights momentarily when the reset button is pressed for 6 seconds,
then blinks red three times when released. It then turns green as the
gateway resets to the factory defaults.
The Local port has detected an Ethernet link with a device.
Data is being transmitted or received.
No link is detected on this port.
The ADSL port is synchronized with an ISP’s network-access device.
Indicates ADSL training—ADSL is synchronizing with the DSLAM.
The unit is off or there is no IP connection.
There is an Internet session. If the session is dropped due to an idle
timeout, and an ADSL connection is still present, the light will remain
green. If the session is dropped for any other reason, the light will
turn off.
IP connection failed (no DHCP or PPoE response, PPPoE
authentication failed, etc.)
Data is being transmitted over the ADSL port.
No Internet connection detected or device in bridged mode.
Indicates that the Wireless port is initialized.
Data is being transmitted or received over the wireless link.
The Wireless Access Point is turned off.
WPS Solid Green
Blinking Green
Off
Getting to Know Your Wireless Router 3
WPS wireless security is being enabled.
The device is in the 2-minute interval to synchronize security.
WPS is not being set or enabled.
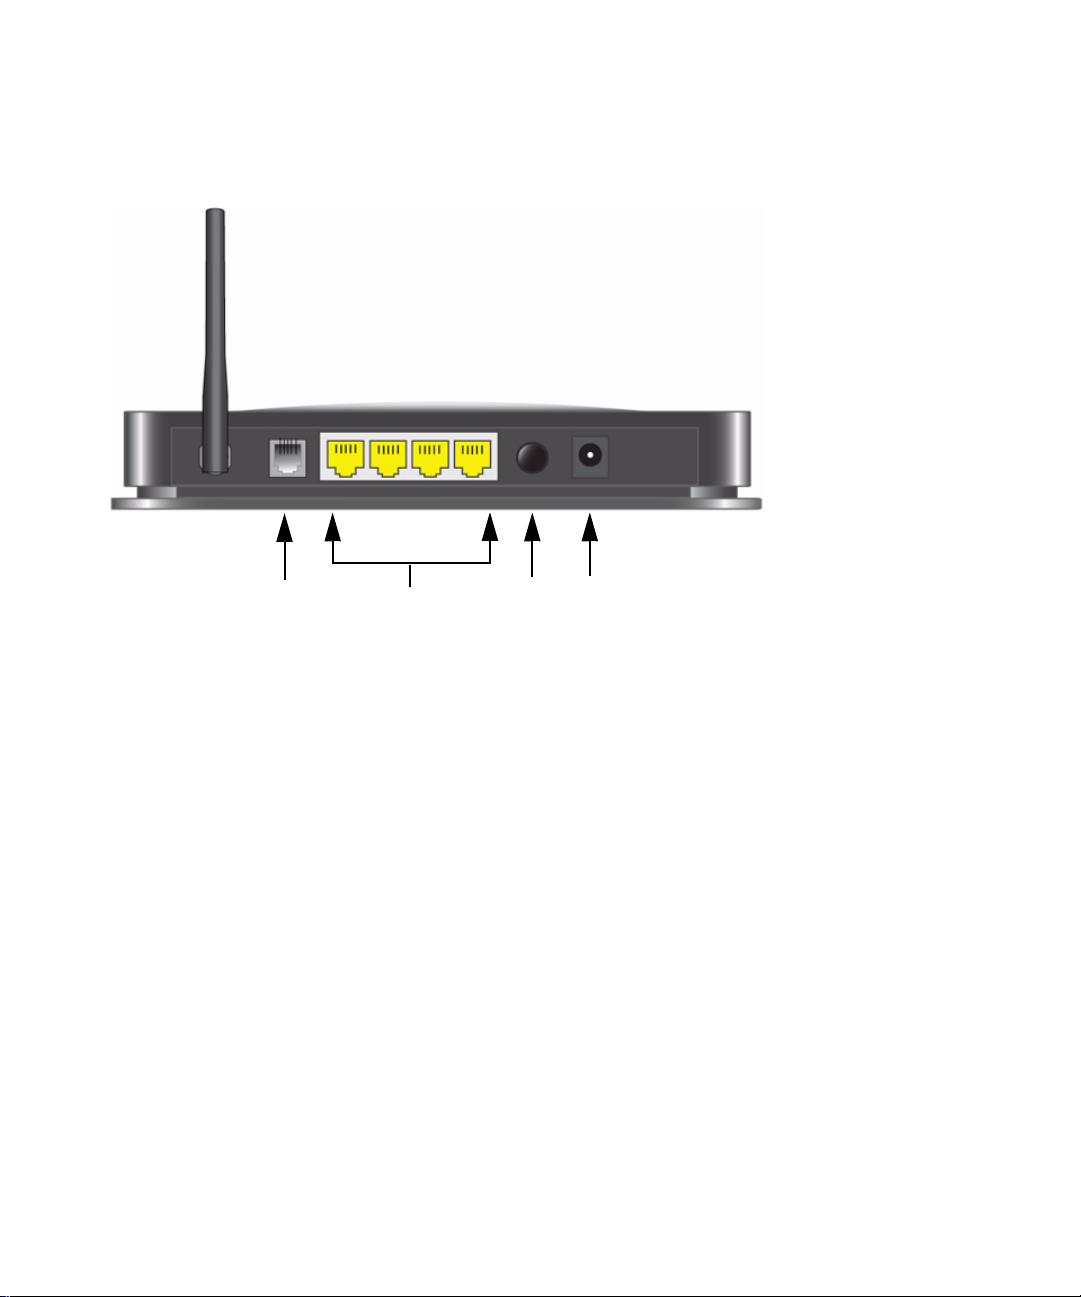
Router Back Panel
1
2
4
3
The back panel of the wireless modem router contains port connections.
Figure 2
Viewed from left to right, the rear panel contains the following elements:
1. RJ-11 ADSL port for connecting the wireless modem router to an ADSL line
2. Four Local Ethernet RJ-45 LAN ports for connecting the wireless modem router to the local
computers
3. Power On/Off button
4. AC power adapter input
Getting to Know Your Wireless Router 4
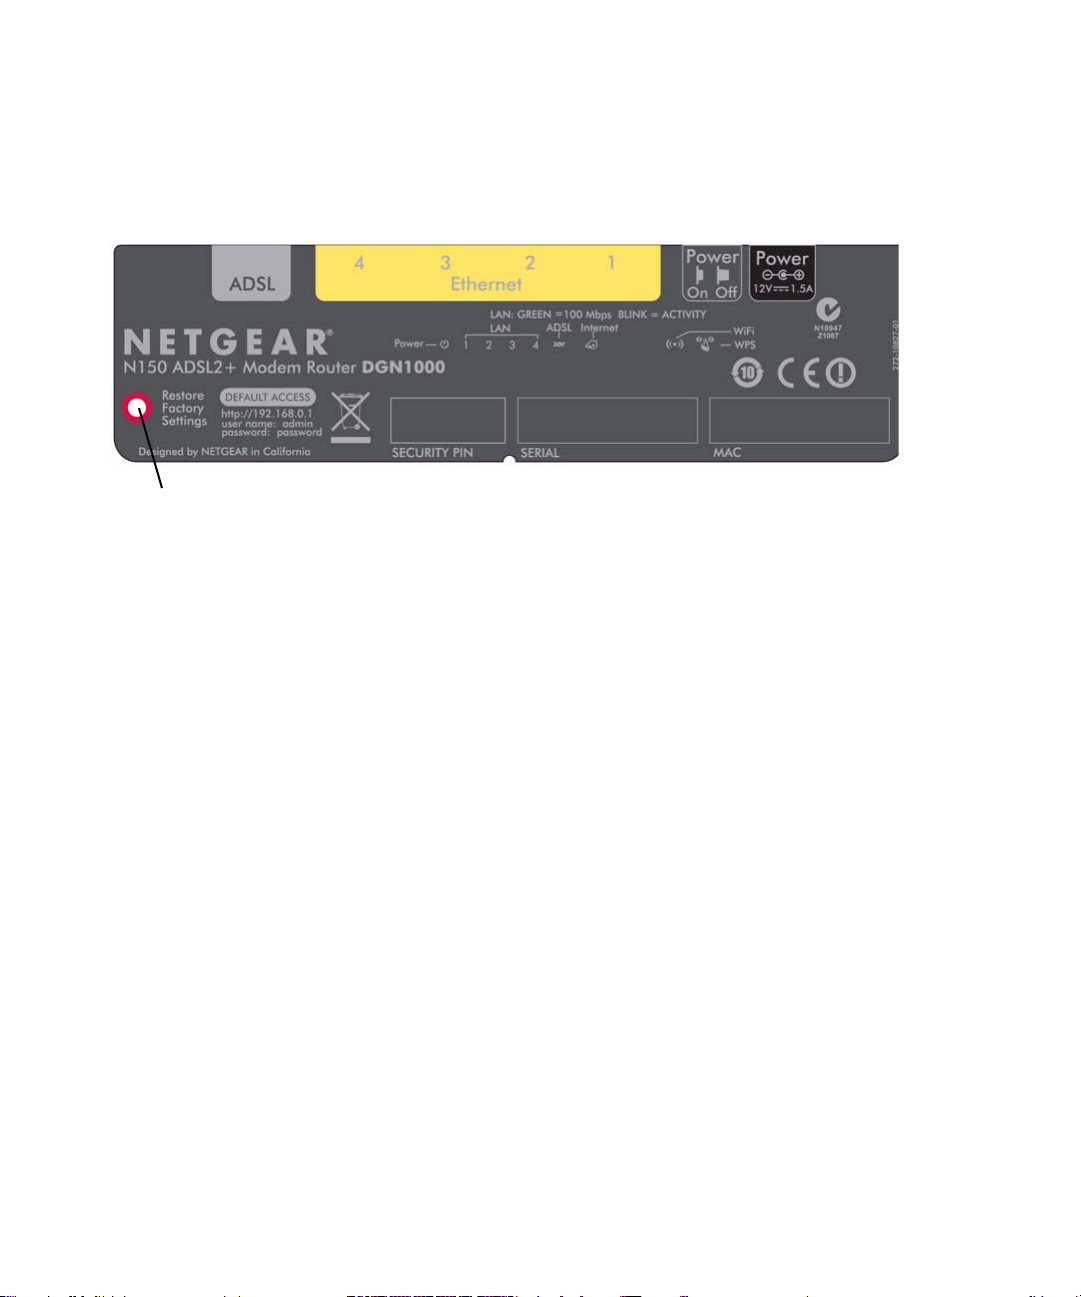
Router Label
Factory Default Reset. Press for 6 seconds to reset the router
to its factory default settings.
FCC ID: PY309300114
The label on the bottom of the wireless modem router shows the router’s MAC address, serial
number, security PIN, and factory default login information.
Figure 3
Positioning Your Wireless Router
The wireless modem router lets you access your network from virtually anywhere within the
operating range of your wireless network. However, the operating distance or range of your
wireless connection can vary significantly depending on the physical placement of your router . For
example, the thickness and number of walls the wireless signal must pass through may limit the
range. For best results, place your router:
• Near the center of the area where your computers and other devices will operate, preferably
• Accessible to an AC power outlet and near Ethernet cables for wired computers.
• In an elevated location such as a high shelf, keeping the number of walls and ceilings between
• Away from electrical devices which are potential sources of interference, such as ceiling fans,
Getting to Know Your Wireless Router 5
within line of sight to your wireless devices.
the wireless modem router and your other devices to a minimum.
home security systems, microwaves, or the base for a cordless phone.
• Away from any large metal surfaces, such as a solid metal door or aluminum studs. Large
expanses of other materials such as glass, insulated walls, fish tanks, mirrors, brick, and
concrete can also affect your wireless signal.
Failure to follow these guidelines can result in significant performance degradation
or an inability to wirelessly connect to the Internet.
Installing Your Wireless Modem Router
To help you set up your router and get on the Internet quickly, the Resource CD contains a Smart
Wizard™. The Smart Wizard walks you through the steps required to connect your router,
microfilters, and PC(s); configure your wireless settings; and enable wireless security for your
network. When you have finished, you will be Internet ready!
If you have a Macintosh or Linux system, you need to use the manual installation
method (see “Installing Your Router Manually (Advanced, Mac, and Linux Users)”
on page 10).
You can set up your wireless modem router using one of two methods:
• Smart Wizard Setup: The Smart Wizard setup is available on your Resource CD. See
“Installing Your Router Using the Smart Wizard” on page 8 to use the Smart Wizard.
– This is the easiest option. The wizard guides you through the setup process. It automates
many of the steps and verifies that the steps have been successfully completed.
– Smart Wizard requires a PC running Microsoft Windows..
Before running the Smart Wizard on a corporate PC to set up your home
router, check with your company’s network support staff. Corporate
network settings or Virtual Private Network (VPN) client software may
conflict with the default settings of a home router. If you are unsure about
whether there might be a conflict, use a different computer.
• Manual Setup: If you cannot or prefer not to use the Smart Wizard, see “Installing Your
Router Manually (Advanced, Mac, and Linux Users)” on page 10. For example, if you are
connecting to a Mac, are using a Linux operating system, or are technically knowledgeable,
select this option.
Getting to Know Your Wireless Router 6

If you choose to use the manual setup option, for best results, install and set up your router in
this order:
1. Install and connect your wireless router to your network (see “Connecting Your Wireless
Modem Router” on page 12).
2. Set up your wireless router for Internet access (see “Setting Up Your Router for Internet
Access” on page 16).
3. Configure your wireless network and select wireless security settings to protect your
wireless network (see “Configuring Your Wireless Network” on page 18).
Getting to Know Your Wireless Router 7
Installing Your Router Using the
Smart Wizard
To use the Smart Wizard, you must be using a PC with Windows Vista, or Windows XP, or
Windows 2000 with Service Pack 2. The Smart Wizard setup procedure should take about
15 minutes to complete. Before using the Smart Wizard to set up your wireless modem router,
ensure that:
• You have an ADSL Internet service connection through an Internet Service Provider (ISP).
• You have the configuration information provided by your ISP.
Using the Smart Wizard
The NETGEAR Smart Wizard takes you through the procedure to connect your router, ADSL
microfilters, and PC(s). It then helps you to configure your wireless settings and enable wireless
security for your network. The Smart Wizard guides you through the setup process by automating
many of the steps. At each step in the setup process, the Smart Wizard checks to ensure that the
steps you perform are successfully completed.
To install your router using the Smart Wizard:
1.
Locate the ADSL settings information provided by your Internet Service Provider.
2. Insert the Resource CD into your Windows PC. The CD will automatically start and detect the
language you are using on your PC. Select a different language option, if you prefer.
If the CD does not automatically start, browse the CD and double-click on .
3. When the Welcome screen appears, click Setup to start the Smart Wizard. Follow the
instructions and prompts to complete the installation.
8
The Smart Wizard guides you through installing your router, connecting your router to the
Internet, configuring your wireless network settings, and selecting the optimum security
protection for your network. If you choose not to select a security option during installation,
you can always access the router’s user interface later to select a security option (see
“Accessing Your Router After Installation” on page 9).
To ensure optimum performance of your high-speed wireless router, the
wireless adapter card for each computer in your network should support the
same technology as your router (see the online Reference Manual for more
information).
You are now connected to the Internet!
To set up additional wireless computers in your network for router access and to connect to the
Internet, see “Configuring Your Wireless Network” on page 18.
Accessing Your Router After Installation
The Smart Wizard only appears when you first install the router or when the router is in its factory
default state (for example, if you have reset the router to its factory default settings). If you want to
change the settings after installing and configuring your router, you can click the desktop
shortcut—a preconfigured shortcut placed on your desktop at installation—to open the
router management interface.
router. After logging in, you can:
1
Optionally, you can also open a browser window and log in to the
• Set up other wireless computers on your network, see “Configuring Your Wireless Network”
on page 18.
• Change settings and configure wireless security, see “Specifying Wireless Settings” on
page 18.
For advanced features that are not covered in this manual, see the Reference Manual on your
Resource CD. A link to the on-line Reference Manual also is available from the router interface.
1. The shortcut icon is installed on your desktop only when using the Smart Wizard installation method.
Installing Your Router Using the Smart Wizard 9

Installing Your Router Manually
(Advanced, Mac, and Linux Users)
Before installing and connecting your router manually, review the list below and make sure that
you have all of the necessary information.
• Internet ADSL service connection through an Internet Service Provider (ISP).
• The configuration information your ISP gave you. Depending on how your Internet account
was set up, you may need the following information to set up your wireless modem router and
access the Internet:
– Host and Domain Name
– Internet Login Name and Password (frequently an email address and password)
– Domain Name Server (DNS) Addresses
– Fixed or Static IP Address
Your ISP should have provided you with all the information needed to connect to the Internet.
If you cannot locate this information, ask your ISP.
• ADSL Microfilters (see “Understanding ADSL Microfilters” on page -11).
• Your computers set to DHCP enabled.
If you have not already done so:
• Check the package contents of your router to ensure that it is complete (see “Unpacking Your
New Router” on page 1”).
• Select an optimum location for your wireless modem router after reviewing the guidelines
presented in “Positioning Your Wireless Router” on page 5.”
Installing Your Router Manually (Advanced, Mac, and Linux Users) 10

Understanding ADSL Microfilters
ADSL technology uses the same wires as your telephone service. However, ADSL adds signals to
the telephone lines which create noise in the telephone service. You must use ADSL microfilters
to filter out these signals before they reach your telephone.
If you purchased the wireless modem router in a country where a microfilter is not
included, you must acquire one.
ADSL Microfilter
Figure 4
Each device such as a telephone, fax machine, answering machine, or caller ID display will require
an ADSL microfilter.
Do not connect the wireless modem router to the ADSL line through a microfilter
unless the microfilter is a combination microfilter/splitter specifically designed for
this purpose. Doing so will prevent block your connection to the Internet. If you
have any doubts about this, connect the wireless modem router directly to the
ADSL line.
ADSL Microfilter with Built-In Splitter
Use an ADSL microfilter with built-in splitter when there is a single wall outlet which must
provide connectivity for both the wireless modem router and telephone equipment.
Figure 5
Installing Your Router Manually (Advanced, Mac, and Linux Users) 11

Connecting Your Wireless Modem Router
1
2
3
Before you install your wireless modem router, make sure that the Internet Protocol (TCP/IP)
Property settings on your computer are set to “automatically obtain an IP address” using DHCP
and “Obtain DNS server address automatically.” You can check these settings by looking at the
TCP/IP Properties of your Internal Network Connections, which are accessible through the
Control Panel of your computer. If you are unsure about this, refer to the documentation for your
computer or see the link to TCP/IP Addressing in “Related Documents” on page 36.
If you are replacing an existing router, disconnect it completely from your network
and set it aside before starting to install your new router.
To connect the wireless modem router, the ADSL filter and the computer:
Connect an ADSL filter as shown below.
1.
If you purchased the DGN1000 in a country where an ADSL filter is not
included, you must acquire one.
• Install an ADSL filter for every telephone that uses the same phone line as your wireless
modem router. Select the appropriate filter(s) for your wireless setup.
1. One-Line Filter: Use with a phone or fax machine.
2. Splitter: Use with a one-line filter to share an outlet with a phone and the
wireless modem
router.
3. Two-Line Filter with Splitter: Use to share an outlet with a phone and the wireless modem
router.
Figure 6
Installing Your Router Manually (Advanced, Mac, and Linux Users) 12

• Two-Line Filter Example . Insert the two-line filter into the phone outlet and connect the
A
phone to the phone line connector (A), as shown in Figure 7.
Figure 7
To use a one-line filter with a separate splitter, insert the splitter into the phone
outlet, connect the one-line filter to the splitter, and connect the phone to the
filter.
2. Connect the wireless modem router to the ADSL filter. Using the included phone cable with
RJ-11 jacks, connect the ADSL port (B) of the wireless modem router to the ADSL port (C) of
the two-line filter, as shown in Figure 8.
Installing Your Router Manually (Advanced, Mac, and Linux Users) 13

.
C
B
Figure 8
Improperly connecting a filter to your wireless modem router will block
your ADSL connection.
3. Connect the Ethernet cable (D) from a wireless modem router LAN port to the Ethernet
adapter in your computer, as shown in Figure 9.
4. Connect the power adapter to the wireless modem router and plug it in to a power outlet.
Installing Your Router Manually (Advanced, Mac, and Linux Users) 14

Figure 9
D
D
D
5. Connect any additional wired PCs to your router by inserting an Ethernet cable from a PC into
one of the three remaining LAN ports.
Verifying Your Connection
Verify that your router is connected correctly by checking the wireless modem router status lights.
• The power light is lit after turning on the wireless modem router.
• The DSL light is lit, indicating an ADSL connection.
• The wireless light is lit after turning on the wireless modem router.
• The Internet light is green, indicating you are connected to the ADSL network.
Now , turn on your computer. If software usually logs you in to your Internet connection, do not run
that software. Cancel it if it starts automatically. Verify the following:
• The local lights (1 through 4) are lit for any connected computers.
Installing Your Router Manually (Advanced, Mac, and Linux Users) 15

Setting Up Your Router for Internet Access
When configuring your wireless router manually, you must log in to your wireless modem router
to set it up initially and to make any changes to your wireless router’s settings later.
To access the router:
1.
Type http://192.168.0.1 in the address field of your browser, and then click Enter.
You can also enter either of these addresses to connect to your wireless router:
http://www.routerlogin.net or http://www.routerlogin.com.
.
Figure 10
A login window similar to the one shown in Figure 11 will display.
Figure 11
2. When prompted, enter admin for the router User Name and password for the router
Password, both in lowercase letters. (For security reasons, the router has its own user name
and password.)
The router user name and password are not the same as any user name or
password you may use to log in to your Internet connection.
The Main menu will display.
Installing Your Router Manually (Advanced, Mac, and Linux Users) 16

3. From the menu options in the left navigation pane, click Setup Wizard. The Setup Wizard
screen will display.
Figure 12
4. Select one of the following options:
• Select Yes to allow the Setup Wizard to detect your Internet connection. When prompted,
click Next. The wizard will assist you with configuring your wireless router to access the
Internet.
If you cannot connect to the wireless router, check the Internet Protocol
(TCP/IP) properties in the Network Connections section of your Control
Panel. It should be set to obtain both IP and DNS server addresses
automatically. For assistance, see your computer documentation or see the
links in “Related Documents” on page 36.
• Select No to set up the connection yourself. Click Next and the Basic Settings screen will
display . Enter the required information for your ISP connection in the appropriate fields. If
you need assistance, follow the Basic Settings Help screens on the router interface or see
the online User’s Manual for this wireless modem router.
5. Click Apply to save your settings and complete your connection.
You should now be connected to the Internet!
If you do not connect successfully:
• Review your settings and make sure that you have selected the correct options and typed
everything correctly.
• Contact your ISP to verify that you have the correct configuration information.
•Read “Troubleshooting” on page 25.
If problems persist, register your NETGEAR product and contact NETGEAR Technical Support.
Installing Your Router Manually (Advanced, Mac, and Linux Users) 17

Configuring Your Wireless Network
After installing your router, you must log into the router to complete your wireless setup. The
wireless network settings of the router must match the wireless network settings of any wireless
devices that connect wirelessly to the router (such as wireless adapter cards and wireless
computers).
For a wireless connection, the router and each wireless computer must use the same SSID,
also called the wireless network name, and the same wireless security. NETGEAR strongly
recommends that you use wireless security.
Indoors, computers can connect over wireless networks at a range of several hundred
feet. This can allow others outside of your immediate area to access your network.
Specifying Wireless Settings
The Wireless Settings screen lets you set your wireless network connections and the wireless
security option for your network and router. To configure the wireless network, you can either
manually specify your network name (SSID) and your wireless security settings (see “Setting
Your SSID and Wireless Security Manually” on page 19) or, if the clients in your network are
WPS capable, you can use Wi-Fi Protected Setup (WPS) to automatically set the SSID and
implement WPA/WPA2 security on both the router and the client device (see “Using Push 'N'
Connect (WPS) to Configure Your Wireless Network” on page 20).
If you configure the router from a wireless computer and you change the router’s
SSID, channel, or security settings, you will lose your wireless connection when
you click Apply. You must then change your computer’s wireless settings to match
the router’s new settings. To avoid this situation, you can use a computer that is
connected to the router with an Ethernet cable.
For a complete overview of all the security configurations that can be implemented on this router,
see the on-line Reference Manual. A link to the Reference Manual is on the Resource CD.
Configuring Your Wireless Network 18

Setting Your SSID and Wireless Security Manually
To specify the wireless settings, you must know the following:
• SSID. The default SSID for the router is NETGEAR.
• The wireless mode (802.11g/b, or 802.11n) that each wireless adapter supports.
• Wireless security option. NETGEAR strongly recommends that you use wireless security. To
successfully implement wireless security, check each wireless adapter to determine which
wireless security option it supports.
To set up basic wireless connectivity:
1.
Log in to the wireless modem router at its default LAN address of http://Default IP Address
Variable with its default user name of admin and default password of password, or using
whatever LAN address and password you have set up.
You can also enter either of these addresses to connect to your wireless router:
http://www.routerlogin.net or http://www.routerlogin.com.
2. On the main menu, select Wireless Settings to display the Wireless Settings screen.
Note that the default SSID is NETGEAR.
The SSID of any wireless adapters must match the SSID you configure in the
wireless modem router. If they do not match, you will not get a wireless
connection.
3. Set the Region. Select the region where the router is located.
4. Leave the wireless mode at the default setting of 802.11n.This mode is backward compatible
with 802.11b and 802.11g wireless adapters.
5. Click Apply to save your changes.
To set up your computers for wireless connectivity:
Program the wireless settings of each computer or wireless adapter to have the same SSID
1.
(wireless network name) as the router.
Configuring Your Wireless Network 19

2. Check that the wireless adapter on each computer can support the mode and security option
that you selected. (If you have a question, see the online Reference Manual or review the
settings you selected in “Specifying Wireless Settings” on page 18).
3. Check that the security settings on each wireless device match the security settings of the
router. For example, if you selected a security option requiring a passphrase, then the same
passphrase must be used for each wireless computer.
4. Check that each wireless computer has a wireless link and is able to obtain an IP address by
DHCP from the router.
For a Windows PC, go to the Control Panel and select Network Connections.
Check the Wireless Connections Properties and ensure that TCP/IP Properties
are set to Obtain an IP address automatically.
To ac cess the Internet from any computer connected to your wireless modem router, launch a
browser such as Microsoft Internet Explorer or Firefox. You should see the wireless modem
router’s Internet LED blink, indicating communication to the ISP.
Using Push 'N' Connect (WPS) to Configure Your Wireless Network
If your wireless clients support Wi-Fi Protected Setup (WP S), you can use this feature to configure
the router’s SSID and security settings and, at the same time, connect the wireless client securely
and easily to the router. Look for the symbol on your client device.
configures the SSID and wireless security settings for the router (if the router is in its default state)
and broadcasts these settings to the wireless client.
1
WPS automatically
NETGEAR’s Push 'N' Connect feature is based on the Wi-Fi Protected Setup
(WPS) standard. All other Wi-Fi-certified and WPS-capable products should be
compatible with NETGEAR products that implement Push 'N' Connect.
If the router has already been configured manually, and either WPS-PSK or WPA2-PSK security
has been enabled, a wireless client can be connected quickly and simply by using the WPS method
of connecting to the wireless network. In this case, the existing wireless settings are broadcast to
1. For a list of other Wi-Fi-certified products available from NETGEAR, go to http://www.wi-fi.org.
Configuring Your Wireless Network 20

the WPS-capable client. (For more information on setting up a mixed network, see the on-line
Reference Manual. A link to the Reference Manual is on the Resource CD.).
If you choose to use WPS, the only security methods supported are WPA-PSK and
WPA2-PSK. WEP security is not supported by WPS.
These instructions assume that you are configuring WPS on the router for the first time and
connecting a WPS-capable device.
To set up basic wireless connectivity:
1.
Log in to the wireless modem router at its default LAN address of http://Default IP Address
Variable with its default user name of admin and default password of password, or using
whatever LAN address and password you have set up.
You can also enter either of these addresses to connect to your wireless router:
http://www.routerlogin.net or http://www.routerlogin.com.
2. On the router main menu, select Add a WPS Client (computers that will connect wirelessly to
the router are clients). The Add WPS Client wizard screen displays. Click Next.
Figure 13
3. Select the method for adding the WPS client. A WPS client can be added using the Push
Button method or the PIN method.
• Using the Push Button. This is the preferred method.
Configuring Your Wireless Network 21

– Select the Push Button radio box and either press the WPS push button on the side
panel of the router or click the soft WPS Push Button on the screen (as shown below).
– The router will attempt to communicate with the client; you have 2 minutes to enable
WPS from the client device using the client’s WPS networking utility.
:
Figure 14
• Entering a PIN. If you want to use the PIN method, select the PIN radio box. A screen
similar to the one shown below displays.
– Go to your wireless client and, from the client’s WPS utility, obtain the wireless
client’s security PIN, or follow the client’s WPS utility instructions to generate a
security PIN.
– Then, enter this PIN in the Enter Client’s PIN field provided on the router and click
Next. You have 2 minutes to enable WPS on the router using this method.
Figure 15
Using either method, the client wireless device will attempt to detect the WPS signal from the
router and establish a wireless connection in the time allotted.
• If no connection is detected, then no SSID or security settings are configured on the router.
Configuring Your Wireless Network 22

• If a connection is established, the router WPS screen displays a message confirming that
the wireless client was successfully added to the wireless network. (The router has
generated an SSID, implemented WPA/WPA2 wireless security (including a PSK security
password) on the router and has sent this configuration to the wireless client.)
4. Note the new SSID and WPA/WPA2 password for the wireless network.
To ac cess the Internet from any computer connected to your wireless modem router, launch a
browser such as Microsoft Internet Explorer or Firefox. You should see the wireless modem
router’s Internet LED blink, indicating communication to the ISP.
If you are planning a mixed network of WPS capable devices and non-WPS capable
devices, NETGEAR suggests that you set up your wireless network and security
settings manually first, and use WPS only for adding additional WPS capable
devices.
For more information on setting up your wireless network and configuring your wireless security
settings, see the Reference Manual. A link to the on-line Reference Manual is on your
Resource CD.
Testing Basic Wireless Connectivity
Once you have established basic wireless connectivity, you can enable security settings
appropriate to your needs.
To set up and test basic wireless connectivity:
1.
Log in to the wireless modem router at its default LAN address of http://Default IP Address
Variable with its default user name of admin and default password of password, or using
whatever LAN address and password you have set up.
2. Click the Wireless Settings link in the main menu of the wireless modem router.
3. Note that the default SSID is NETGEAR.
The SSID of any wireless adapters must match the SSID you configure in the
wireless modem router. If they do not match, you will not get a wireless
connection.
4. Set the Region. Select the region in which the wireless interface will operate.
Configuring Your Wireless Network 23

5. Leave the Wireless mode at the default setting of 802.11n. This mode is backward compatible
with 802.11b and 802.11g wireless adapters.
6. Click Apply to save your changes.
If you are configuring the Product Family from a wireless computer and you
change the Product Family’s SSID, channel, or security settings, you will lose
your wireless connection when you click Apply. You must then change the
wireless settings of your computer to match the Product Family’s new settings.
7. Configure and test your computers for wireless connectivity.
Program the wireless adapter of your computers to have the same wireless network name
(SSID) as the wireless modem router. Check that they have a wireless link and are able to
obtain an IP address by DHCP from the Product Family.
Your wireless modem router is now configured to provide Internet access for your network. Your
wireless modem router automatically connects to the Internet when one of your computers requires
access. It is not necessary to run a dialer or login application such as Dial-Up Networking or
Enternet to connect, log in, or disconnect. These functions are performed automatically by the
wireless modem router as needed.
To ac cess the Internet from any computer connected to your wireless modem router, launch a
browser such as Microsoft Internet Explorer or Firefox. You should see the wireless modem
router’s Internet LED blink, indicating communication to the ISP. The browser should begin to
display a Web page.
Configuring Your Wireless Network 24

Troubleshooting
This chapter gives information about troubleshooting your wireless modem router. After each
problem description, instructions are provided to help you diagnose and solve the problem. For the
common problems listed, go to the section indicated.
• Is the router on?
Go to “Basic Functioning” on page 25.
• Have I connected the router correctly?
Go to “Troubleshooting the Web Configuration Interface” on page 27.
• I cannot access the router’s configuration with my browser.
Go to “Troubleshooting Internet Browsing” on page 30.
• I have configured the router but I can’t access the Internet.
Go to “Troubleshooting the ISP Connection” on page 27.
• I cannot remember the router’s configuration password.
Go to “Using the Reset Button to Reset the Router” on page 32.
• I want to clear the configuration and start over again.
Go to “Restoring the Default Configuration and Password” on page 32.
Basic Functioning
After you turn on power to the router, the following sequence of events should occur:
1. When power is first applied, verify that the Power LED is on (see “Hardware Features” on
page 2 for an illustration and explanation of the LEDs).
2. After approximately 10 seconds, verify that:
a. The LAN port LEDs are lit for any local ports that are connected.
b. The ADSL Internet port LED is lit.
If a port’s LED is lit, a link has been established to the connected device. If any of these
conditions does not occur, refer to the appropriate following section.
Troubleshooting 25

Power LED Not On
If the Power and other LEDs are off when your router is turned on:
• Make sure that the power cord is properly connected to your router and that the power supply
adapter is properly connected to a functioning power outlet.
• Check that you are using the power adapter supplied by NETGEAR for this product.
If the error persists, you have a hardware problem and should contact technical support.
Power LED is Red
When the router is turned on, it performs a power-on self test. If the Power LED turns red after a
few seconds or at any other time during normal operation, there is a fault within the router. The
power LED also turns red when you depress the factory default reset push button, and blinks red 3
times when that button is released. However, in this case, the wireless modem router is working
normally.
If the power LED turns red to indicate a router fault:
• Cycle the power to see if the router recovers.
If the power LED is still red one minute after power up:
• Cycle the power to see if the router recovers.
• Clear the router’s configuration to factory defaults. This will set the router’s IP address to
192.168.0.1. This procedure is explained in “Using the Reset Button to Reset the Router” on
page 32.
If the error persists, you might have a hardware problem and should contact technical support.
LAN or Internet Port LEDs Not On
If either the LAN LEDs or ADSL Internet LED do not light when the Ethernet connection is made,
check the following:
• Make sure that the Ethernet cable connections are secure at the router and at the hub or
workstation.
• Make sure that power is turned on to the connected hub or workstation.
• Be sure you are using the correct cable: when connecting the ADSL port, use the cable that
was supplied with the wireless modem router. If the Internet LED is still off, this may mean
that there is no ADSL service or the cable connected to the ADSL port is bad.
Troubleshooting 26

Troubleshooting the Web Configuration Interface
If you are unable to access the router’s Web Configuration interface from a computer on your local
network, check the following:
• If you are using an Ethernet-connected computer, check the Ethernet connection between the
computer and the router as described in the previous section.
• Make sure your computer’s IP address is on the same subnet as the router. If you are using the
recommended addressing scheme, your computer’s address should be in the range of
192.168.0.2 to 192.168.0.254. Refer to “Preparing Your Network” on page 36 to find your
computer’s IP address.
• If your computer’s IP address is shown as 169.254.x.x:, it might because recent versions of
Windows and MacOS generate and assign an IP address if the computer cannot reach a DHCP
server. These auto-generated addresses are in the range of 169.254.x.x. If your IP address is in
this range, check the connection from the computer to the router and reboot your computer.
• If your router’s IP address was changed and you do not know the current IP address, clear the
router’s configuration to factory defaults. This will set the router’s IP address to 192.168.0.1.
This procedure is explained in “Using the Reset Button to Reset the Router” on page 32.
• Make sure your browser has Java, JavaScript, or ActiveX enabled. If you are using Internet
Explorer, click Refresh to be sure the Java applet is loaded.
• Try quitting the browser and launching it again.
• Make sure you are using the correct login information. The factory default login name is
admin and the password is password. Make sure that CAPS LOCK is off when entering this
information.
If the router does not save changes you have made in the Web Configuration Interface, check the
following:
• When entering configuration settings, be sure to click the Apply button before moving to
another menu or tab, or your changes are lost.
• Click the Refresh or Reload button in the Web browser. The changes may have occurred, but
the Web browser ma y be caching the old configuration.
Troubleshooting the ISP Connection
If your router is unable to access the Internet, you should check the ADSL connection, then the
Internet TCP/IP connection.
Troubleshooting 27

ADSL link
If your router is unable to access the Internet, you should first determine whether you have an
ADSL link with the service provider. The state of this connection is indicated with the Internet
LED.
Internet LED Green or Blinking Green
If your Internet LED is green or blinking green, then you have a good ADSL connection. You can
be confident that the service provider has connected your line correctly and that your wiring is
correct.
Internet LED Red
If the Internet LED is red, disconnect all telephones on the line. If this solves the problem,
reconnect the telephones one at a time, being careful to use a microfilter on each telephone. If the
microfilters are connected correctly, you should be able to connect all your telephones.
If disconnecting telephones does not result in a green Internet LED, there may be a problem with
your wiring. If the telephone company has tested the ADSL signal at your Network Interface
Device (NID), then you may have poor quality wiring in your house.
Internet LED Off
If the Internet LED is off, disconnect all telephones on the line. If this solves the problem,
reconnect the telephones one at a time, being careful to use a microfilter on each telephone. If the
microfilters are connected correctly, you should be able to connect all your telephones.
If disconnecting telephones does not result in a green Internet LED the problem may be one of the
following:
• Check that the telephone company has made the connection to your line and tested it.
• Verify that you are connected to the correct telephone line. If you have more than one phone
line, be sure that you are connected to the line with the ADSL service. It may be necessary to
use a swapper if you ADSL signal is on pins 1 and 4 of the RJ-11 jack. The Wireless Modem
Router uses pins 2 and 3.
Obtaining an Internet IP Address
If your wireless modem router is unable to access the internet, and your Internet LED is red, you
should determine whether the wireless modem router is able to obtain a Internet IP address from
the ISP. Unless you have been assigned a static IP address, your wireless modem router must
Troubleshooting 28

request an IP address from the ISP. You can determine whether the request was successful using
the browser interface.
To chec k the Internet IP address from the browser interface:
1. Launch your browser and select an external site such as http://www.netgear.com.
2. Access the Main Menu of the wireless modem router’s configuration at
http://192.168.0.1.
3. Under Maintenance, select Router Status and check that an IP address is shown for the
Internet port. If 0.0.0.0 is shown, your wireless modem router has not obtained an IP address
from your ISP.
If your router is unable to obtain an IP address from the ISP, the problem may be one of the
following:
• If you have selected a login program, you may have incorrectly set the Serv ice Name, User
Name and Password. See “Troubleshooting PPPoE or PPPoA” on page 29.
• Your ISP may check for your computer's host name.
Assign the computer Host Name of your ISP account to the wireless modem router in the
browser-based Setup Wizard.
• Your ISP only allows one Ethernet MAC address to connect to Internet, and may check for
your computer’s MAC address. In this case:
– Inform your ISP that you have bought a new network device, and ask them to use the
router’s MAC address; or
– Configure your router to spoof your computer’s MAC address. This can be done in the
Basic Settings menu. Refer to the online help in the wireless modem router main menu.
Troubleshooting PPPoE or PPPoA
The PPPoE or PPPoA connection can be debugged as follows:
1. Access the main menu of the router at http://192.168.0.1.
2. Under Maintenance, select Router Status.
3. Click Connection S tatus .
If all of the steps indicate “OK” then your PPPoE or PPPoA connection is up and working.
If any of the steps indicates “Failed”, you can attempt to reconnect by clicking Connect. The
wireless modem router will continue to attempt to connect indefinitely.
Troubleshooting 29

If you cannot connect after several minutes, you may be using an incorrect service name, user
name, or password. There also may be a provisioning problem with your ISP.
Unless you connect manually, the wireless modem router will not authenticate using
PPPoE or PPPoA until data is transmitted to the network.
Troubleshooting Internet Browsing
If your wireless modem router can obtain an IP address but your computer is unable to load any
Web pages from the Internet:
• Your computer may not recognize any DNS server addresses.
A DNS server is a host on the Internet that translates Internet names (such as www addresses)
to numeric IP addresses. Typically your ISP will provide the addresses of one or two DNS
servers for your use. If you entered a DNS address during the wireless modem router’s
configuration, reboot your computer and verify the DNS address as described in “Preparing
Your Network” on page 36. Alternatively, you can configure your computer manually with
DNS addresses, as explained in your operating system documentation.
• Your computer may not have the wireless ADSL modem router configured as its TCP/IP
default gateway.
If your computer obtains its information from the wireless modem router by DHCP, reboot the
computer and verify the wireless modem router address as described in “Preparing Your
Network” on page 36.
Troubleshooting a TCP/IP Network Using the Ping Utility
Most TCP/IP terminal devices and routers contain a ping utility that sends an echo request packet
to the designated device. The device then responds with an echo reply. Troubleshooting a TCP/IP
network is made easy by using the ping utility in your computer.
Testing the LAN Path to Your Router
You can ping the router from your computer to verify that the LAN path to your router is set up
correctly.
To ping the router from a PC running Windows 95 or later:
Troubleshooting 30

1. From the Windows toolbar, click the Start button and select Run.
2. In the field provided, type Ping followed by the IP address of the router, as in this example:
ping 192.168.0.1
3. Click OK.
You should see a message like this one:
Pinging <IP address> with 32 bytes of data
If the path is working, you see this message:
Reply from < IP address >: bytes=32 time=NN ms TTL=xxx
If the path is not working, you see this message:
Request timed out
If the path is not functioning correctly, you could have one of the following problems:
• Wrong physical connections
– Make sure the LAN port LED is on. If the LED is off, follow the instructions in “LAN
or Internet Port LEDs Not On” on page 26.
– Check that the corresponding Link LEDs are on for your network interface card and
for the hub ports (if any) that are connected to your workstation and router.
• Wrong network configuration
– Verify that the Ethernet card driver software and TCP/IP software are both installed
and configured on your PC or workstation.
– Verify that the IP address for your router and your workstation are correct and that the
addresses are on the same subnet.
Testing the Path from Your Computer to a Remote Device
After verifying that the LAN path works correctly, test the path from your PC to a remote device.
From the Windows run menu, type:
PING -n 10 <IP address>
where <IP address> is the IP address of a remote device such as your ISP’s DNS server.
If the path is functioning correctly, replies as in the previous section are displayed. If you do not
receive replies:
Troubleshooting 31

• Check that your PC has the IP address of your router listed as the default gateway. If the IP
configuration of your PC is assigned by DHCP, this information will not be visible in your
PC’s Network Control Panel. Verify that the IP address of the router is listed as the TCP/IP
default gateway as described in “Preparing Your Network” on page 36.
• Check to see that the network address of your PC (the portion of the IP address specified by
the netmask) is different from the network address of the remote device.
• If your ISP assigned a host name to your PC, enter that host name as the Account Name in the
Basic Settings menu.
Restoring the Default Configuration and Password
This section explains how to restore the factory default configuration settings, changing the
router’s administration password to password and the IP address to 192.168.0.1. You can erase
the current configuration and restore factory defaults in two ways:
• Use the Erase function of the Web Configuration Manager.
• Press the reset button on the bottom of the router. Use this method for cases when the
administration password or IP address is not known.
Using the Reset Button to Reset the Router
To restore the factory default configuration settings without knowing the administration password
or IP address, you must press the reset button on the bottom of the router following the steps
below.
1. Press and hold the reset button until the Power LED blinks red (about 6 seconds).
2. Release the reset button and wait for the router to reboot.The Power LED will blink red three
times and then will turn green when the default configuration settings have been restored.
Troubleshooting 32

Technical Specifications
This appendix provides technical specifications for the wireless modem router.
General Specifications
Network Protocol and Standards Compatibility
Data and Routing Protocols: TCP/IP, RIP-1, RIP-2, DHCP, PPPoE or PPPoA, RFC 1483 Bridged
or Routed Ethernet, and RFC 1577 Classical IP over ATM
Power Adapter
North America: 120V, 60 Hz, input
UK, Australia: 240V, 50 Hz, input
Europe: 230V, 50 Hz, input
All regions (output): 12 V AC @ 1.0A output
Physical
Dimensions: 6.80" x 5.03" x 1.28"
172.7 mm x 127.7 mm x 32.5 mm
Weight: 0.61 lbs.
0.275 kg
Environmental
Operating temperature: 0 to 40 C (32º to 104º F)
Operating humidity: 10% to 90% relative humidity, noncondensing
Storage temperature: -20 to 70 C (-4º to 158º F)
Storage humidity: 5 to 95% relative humidity, noncondensing
Regulatory Compliance
Meets requirements of: FCC Part 15 Class B; VCCI Class B; EN 55 022 (CISPR 22), Class B
Technical Specifications 33

Interface Specifications
LAN: 10BASE-T or 100BASE-Tx, RJ-45
WAN: ADSL, Dual RJ-11, pins 2 and 3
T1.413, G.DMT, G.Lite
Default Configuration
You can use the Wireless On/Off and WPS buttons that are located on the side of your router to
reset all settings to their factory defaults. This is called a hard reset. To perform a hard reset, push
and hold the Wireless On/Off and WPS buttons simultaneously for 6 seconds. Your router will
return to the factory configuration settings that are shown in the table below.
Feature Default Behavior
Router Login
User Login URL http://www.routerlogin.net or http://www.routerlogin.com
User Name (case sensitive) admin
Login Password (case sensitive) password
Internet Connection
WAN MAC Address Use Default address
WAN MTU Size 1492
Port Speed AutoSense
Local Network (LAN)
Lan IP 192.168.0.1
Subnet Mask 255.255.255.0
RIP Direction None
RIP Version Disabled
RIP Authentication None
DHCP Server Enabled
DHCP Starting IP Address 192.168.0.2
DHCP Ending IP Address 192.168.0.254
DMZ Disabled
Time Zone GMT
Technical Specifications 34

Feature Default Behavior
Time Zone Adjusted for Daylight Saving
Disabled
Time
SNMP Disabled
Firewall
Inbound (communications coming in from
Disabled (except traffic on port 80, the http port)
the Internet)
Outbound (communications going out to
Enabled (all)
the Internet)
Source MAC filtering Disabled
Wireless
Wireless Communication Enabled
SSID Name NETGEAR
Security Disabled
Broadcast SSID Enabled
Transmission Speed Auto
a
Country/Region United States (in North America; otherwise, varies by
region)
RF Channel 11 until the region is selected
Operating Mode Up to 60 Mbps
Data Rate
Output Power
Best
Full
Access Point Enabled
Authentication Type Open System
Wireless Card Access List All w ireless stations allowed
a. Maximum Wireless signal rate derived from IEEE Standard 802.11 specifications. Actual throughput will vary.
Network conditions and environmental factors, including volume of network traffic, building materials and
construction, and network overhead, lower actual data throughput rate.
Technical Specifications 35

Related Documents
This appendix provides links to reference documents you can use to gain a more complete
understanding of the technologies used in your NETGEAR product.
Document Link
ITCP/IP Networking Basics http://documentation.netgear.com/reference/enu/tcpip/index.htm
Wireless Networking Basics http://documentation.netgear.com/reference/enu/wireless/index.htm
Preparing Your Network http://documentation.netgear.com/reference/enu/wsdhcp/index.htm
Virtual Private Networking Basics http://documentation.netgear.com/reference/enu/vpn/index.htm
Glossary http://documentation.netgear.com/reference/enu/glossary/index.htm
Related Documents 36

Registration and Certifications
FCC Radiation Exposure Statement
This equipment complies with FCC RF radiation exposure limits set forth for an uncontrolled
environment. This equipment should be installed and operated with a minimum distance of 20
centimeters between the radiator and your body.
This device complies with Part 15 of the FCC Rules. Operation is subject to the following two
conditions:
(1) This device may not cause harmful interference, and
(2) This device must accept any interference received, including interference that may cause
undesired operation.
This transmitter must not be co-located or operating in conjunction with any other antenna or
transmitter.
The antennas used for this transmitter must be installed to provide a separation distance of at
least 20 cm from all persons and must not be co-located or operating in conjunction with any
other antenna or transmitter.
Product Registration, Support, and Documentation
Register your product at http://www.NETGEAR.com/register. You must register before you can use our telephone
support service. Product updates and Web support are always available by going to:
Setup documentation is available on the CD, on the support website, and on the documentation website. When the
wireless modem router is connected to the Internet, click the KnowledgeBase link to view support information or click
the Documentation link to view the online Reference Manual for this wireless modem router.
Maximum Wireless Signal Rate Derived from IEEE Standard 802.11 Specifications
Actual data throughput will vary. Network conditions and environmental factors, including volume of network traffic,
building materials and construction, and network overhead, lower actual data throughput rate.
Federal Communications Commission (FCC) Compliance Notice: Radio Frequency Notice
This equipment has been tested and found to comply with the limits for a Class B digital device, pursuant to part 15 of
the FCC Rules. These limits are designed to provide rea sonable protection against harmful interference in a residential
installation. This equipment generates, uses, and can radiate radio frequency energy and, if not installed and used in
accordance with the instructions, may cause harmful interference to radio communications. However, there is no
guarantee that interference will not occur in a particular installation. If this equipment does cause harmful interference to
radio or television reception, which can be determined by turning the equipment off and on, the user is encouraged to try
to correct the interference by one or more of the following measures:
• Reorient or relocate the receiving antenna.
• Increase the separation between the equipment and receiver.
• Connect the equipment into an outlet on a circuit different from that to which the receiver is connected.
• Consult the dealer or an experienced radio/TV technician for help.
http://kbserver.netgear.com/.
37
 Loading...