

Page 1

Digital Entertainer Elite
Model EVA9000 User
Manual
NETGEAR, Inc.
350 E. Plumeria Drive
San Jose, CA 95134 USA
v1.0
September 2008
202-10374-01
Page 2

© 2008 by NETGEAR, Inc. All rights reserved.
Trademarks
NETGEAR, the NETGEAR logo and the NETGEAR Digital Entertainer logo are registered
trademarks of NETGEAR, Inc., in the United Sates and/or other countries. Other brand names
mentioned here are for identification purposes only and may be trademarks of their respective
holder(s).
September 2008
Statement of Conditions
In the interest of improving internal design, operational function, and/or reliability, NETGEAR
reserves the right to make changes to the products described in this document without notice.
NETGEAR does not assume any liability that may occur due to the use or application of the
product(s) or circuit layout(s) described herein.
Customer Support
Refer to the Support Information card that shipped with your Digital Entertainer Elite Model
EVA9000.
World Wide Web
NETGEAR maintains a World Wide Web home page that you can access at:
http://www.netgear.com.
A direct connection to the Internet and a Web browser such as Internet Explorer or Netscape are
required.
ii
Page 3

Product and Publication Details
Model Number: EVA9000
Publication Date: September 2008
Product Family: Digital Media Player
Product Name: Digital Entertainer Elite Model EVA9000
Home or Business
Product:
Language: English
Publication Part
Number:
Publication Version
Number
Home
202-10374-01
1.0
iii
Page 4

iv
Page 5

Contents
Digital Entertainer Elite Model EVA9000 User Manual
About This Manual
Audience, Conventions, Formats, and Scope xi
Version History xii
Welcome to the
Digital Entertainer Elite
Important Safeguards and Notices 1
What Is in the Box 1
Overview of the Digital Entertainer HD 2
Digital Entertainer Elite Front View 5
Digital Entertainer Elite Rear View 6
NETGEAR Universal Remote Control 8
Basic Setup
Connecting the Digital Entertainer Elite 13
Completing the Basic Setup Steps 16
Enabling Access to Your Media Library 19
Installing the Digital Entertainer for Windows Software 20
Giving the Digital Entertainer Elite Access to Your
Media Library 22
v
Page 6

Getting Acquainted
Navigating with the Remote Control or from a Computer 25
Navigating with the Remote Control 25
Navigating from a Web Browser 28
Using Protected Media Files 31
Using Windows Media Player 11 32
Using iTunes for Windows 32
Using Multiple Digital Entertainer Elites 33
Listening, Viewing, and Recording
Listening to Music 35
Using the Remote Control When Music Is Playing 37
Listening to Protected Music 38
Viewing Photos 39
Using the Remote Control While Viewing Photos 40
Viewing Recorded Video 42
Watching Recorded Video 42
Using the Remote Control When Recorded Video Is Playing 43
Using the USB Connection for Pictures, Music, or Video 45
Installing and Using an Internal Disk Drive for Pictures, Music, or
Video 46
Installing an Internal Disk Drive 46
Setting Up the Internal Disk Drive 50
Drag and Drop Media Files to the Internal Disk Drive 51
Playing Internet Media 52
Viewing YouTube Content 53
Using the Remote Control When Viewing YouTube Content 54
vi Contents
Page 7

Playing Internet Radio 56
Using the Remote Control When Playing Internet Radio 57
Viewing News and Weather 57
Combining Different Media Sources 58
Viewing the Status of Multiple Digital Entertainer Elites 59
Viewing Status 60
Fine-Tuning Your Experience
Improving Media Library Search Results 63
Using the Tag Tool Application 63
Adding Cover Art 66
Using the Script Wizard to Automate Tasks 68
Understanding Home Networking 70
Assessing Your Speed Requirements 71
Optimizing the Performance of Your Home Network 72
Optimizing Wireless Performance 72
Optimizing Your Network Bandwidth 74
Optimizing Media File Performance 76
Tips for Streaming Video 77
Taking Precautions 78
Access and Network Security 78
Exercising Parental Control 79
Custom Setup and Supervisor Functions
Custom Setup 83
Supervisor Functions Menu Screen 84
Advanced Settings 86
Setting Up Network Shares 91
Contents vii
Page 8

Media Library Management 92
More... Settings 94
System Information 94
Setting Up Hot Keys 95
Using PC Access 95
Maintenance and Troubleshooting
Resetting to Factory Defaults 99
Updating the Firmware 100
Playing Media 100
Firewall Port Settings 101
Accessing Your Digital Media 102
Windows System Passwords 102
Macintosh OSX 102
Linux 103
Error Messages 103
Troubleshooting Tips 106
Network Connections 108
Ethernet LAN Connection 108
Troubleshooting a Wireless Network Connection 109
Wireless Range and Interference 110
Wireless Networking Tips 110
IP Address 111
Connecting to a Server 112
Unlocking the Disk Drive Tray 114
Default Settings and Technical Specifications
Default Settings 115
viii
Page 9

Supported Media File Formats 116
Technical Specifications 117
Related Documents
Index
Compliance
ix
Page 10

x
Page 11

About This Manual
This chapter describes the intended audience, scope, conventions, and
formats of the Digital Entertainer Elite Model EVA9000 User Manual.
Audience, Conventions, Formats, and Scope
This manual assumes that you have basic to intermediate computer and
Internet skills. However, tutorial information about basic computer
network, Internet, firewall, and VPN technologies is provided on the
NETGEAR website. See “Related Documents.”
This guide uses the following typographical conventions:
Table 1. Typographical Conventions
italics Emphasis, books, CDs, URLs
bold User input, command buttons, physical buttons
This guide uses the following formats to highlight special messages:
This format is used to highlight information of importance
or special interest.
xi
Page 12

This format is used to highlight a procedure that will save
time or resources.
Ignoring this type of note might result in a malfunction or
damage to the equipment.
This is a safety warning. Failure to take heed of this notice
might result in personal injury or death.
Version History
Table 2. Digital Entertainer Elite Model EVA9000 User Manual
Version History
Versi on Publication Date Description
1.0
September 2008 Original document
xii
This manual is written for the Digital Entertainer Elite according to
features supported in the initial product release:
Product updates are available on the NETGEAR, Inc. website
at
http://www.netgear.com/support.
Page 13

xiii
Page 14

xiv
Page 15
Welcome to the
Digital Entertainer Elite
Important Safeguards and Notices
Please observe these precautions, especially those regarding the risk of
electric shock or injury to persons.
To reduce the risk of electric shock, do not remove the
cover. There are no user-serviceable parts inside. This
device should be used only indoors in well-ventilated areas.
To reduce the risk of fire, electric shock, or interference, do
not expose this appliance to moisture or rain, and use only
the recommended accessories.
Displaying static images can cause burn-in on certain
displays. Do not display static images (such as menus,
photos, or paused videos) onscreen for long periods of time.
What Is in the Box
The Digital Entertainer Elite comes with the following components:
• Digital Entertainer Elite Model EVA9000
• NETGEAR Universal Remote Control
1
Page 16

• Category 5 (Cat 5) network cable
• Composite RCA-type A/V cable
• HDMI cable
• IEC power cable
• Two AA batteries
• NETGEAR Resource CD for use with Windows-based PCs and
Macintosh computers
• Installation Guide
Contact your dealer to get a replacement for any missing component.
Overview of the Digital Entertainer HD
You can play media on the Digital Entertainer Elite without running
media server software on your computer. The Digital Entertainer Elite
can work with Windows, Macintosh, and Linux operating systems and
various handheld computers. You can work with a wide variety of
digital storage formats and systems. The Digital Entertainer Elite
enables you to view them as a single media library that you can browse
through on your television screen.
• NETGEAR Digital Entertainer for Windows software
This software provides a variety of media management tools that
make it easy to access media files stored on a Windows PC. You
can perform many of the same tasks on non-Windows computers
using the native utilities of those systems. The NETGEAR Digital
Entertainer for Windows includes the following applications:
– Configuration Wizard. This application helps configure PCs
to share media, automatically set firewall settings, and verify
communications between PCs and the Digital Entertainer Elite.
2 Welcome to the Digital Entertainer Elite
Page 17

– Check for Updates. This application uses your Internet
connection to check for software updates. If an update is
available, you can choose to download and install it.
– Digital Entertainer. This application lets you play Internet
video on your Digital Entertainer Elite.
– Documentation. Use the NETGEAR Resource CD to view the
Installation Guide, the Universal Remote User Manual, the
software Readme file, or the BitTorrent installation guide.
– Tag To ol . This application applies tags and cover art to media
files to make using your media library easier. Also used to add
an MPPA or TV rating to video files for parental control
restrictions.
– Script Wizard. This application lets you automate tasks. You
can create virtual playlists to play any combination of media.
You could create a playlist or command to play a sequence of
videos, or to view photos while playing music.
• NETGEAR Digital Entertainer for Macintosh software
This software provides a variety of media management tools that
make it easy to access media files stored on a Macintosh computer.
– Configuration Assistant. This application helps configure
Macintosh computers to share media, automatically set firewall
settings, and verify communications between your computer
and the Digital Entertainer Elite.
– Status Check. This application displays the status of your
NETGEAR Digital Entertainer Elite. (Not yet available.)
– Remote Control. This application allows you to control your
NETGEAR Digital Entertainer Elite from your computer.
Welcome to the Digital Entertainer Elite 3
Page 18

– Tag To ol . This application applies tags and cover art to media
files to make using your media library easier. Also used to add
an MPPA or TV rating to video files for parental control
restrictions
– NETGEAR documentation. This is a link to the website
where you can download the latest versions of the Installation
Guide, the Universal Remote User Manual, and this User
Manual.
– Updater. This application checks for updates to the Digital
Entertainer Elite software.
• Multi room playback
Digital Entertainer Elites within the same home can intelligently
share resources. You can have all the Digital Entertainer Elites and
Digital Entertainer HDs play the same music simultaneously.
• Parental controls and monitoring
The Digital Entertainer Elite can block access to media files based
on a rating you assign to the files or based on their location in your
network.
4 Welcome to the Digital Entertainer Elite
Page 19

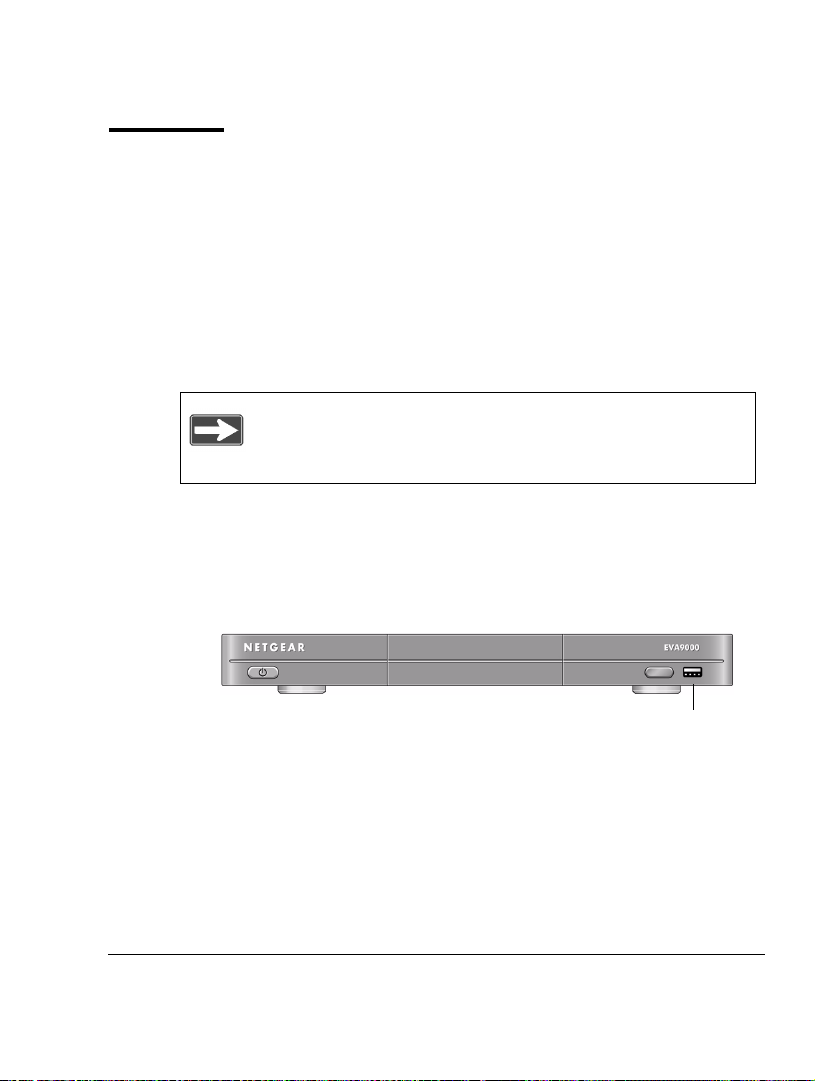
Digital Entertainer Elite Front View
The front view of the of the Digital Entertainer Elite is shown in the
following figure:
USB port
Power button
Figure 1
Welcome to the Digital Entertainer Elite 5
Internal Disk Drive
(Optional)
Sensor
window
Page 20

Digital Entertainer Elite Rear View
The rear view of the Digital Entertainer Elite is shown in the following
figure:
Wireless
antenna
(internal)
Component
video
S/PDIF
coaxial
(audio)
Optical
audio port
USB
port
Reset
Fan
connector
Wireless
antenna
(internal)
Power
Stereo
S-Video
SCART
HDMI
audio
Composite
video
On/Off
Ethernet port
with LEDs
Figure 2
The Digital Entertainer Elite is compatible with all cables described in
the following table, though some cables are not included in the package.
Table 3. Rear Panel Description
Item Compatible Equipment and Cables
SCART port SCART television cable (not included) that is widely used
HDMI port High-Definition Multimedia Interface (HDMI) cable (not
in Europe and Australia.
included). If your television has an HDMI connector, you
can connect only this cable.
6 Welcome to the Digital Entertainer Elite
Page 21

Table 3. Rear Panel Description (continued)
Item Compatible Equipment and Cables
S/PDIF coaxial
(audio) port
S-Video port S-Video cable (included) that works with most televisions
Component video
ports
Composite video
and stereo audio
port
S/PDIF optical
audio port
USB v2.0 port USB mass storage devices such as hard drives, media
10/100 Mbps
Ethernet port with
LEDs
Reset button Reset the Digital Entertainer Elite to its default factory
Fan Fan for cooling the optional internal hard drive. The fan
Power connector IEC Digital Entertainer Elite power cord (included).
On/Off switch Turns the Digital Entertainer Elite on or off.
Wireless antennas
(internal)
Sony/Phillips Digital Interface (S/PDIF) cable, also called
standard RCA type coaxial cable (not included).
in the United States.
Component video cable (not included).
Composite video and stereo audio cables (included),
which can be used with most televisions in the United
States.
Sony/Phillips Digital Interface (S/PDIF) for optical cable
(not included).
players (including Windows- or Mac-formatted Apple
iPods), and flash memory devices.
Cat 5 network cable (included in the package) that you
can use with this port to connect the Digital Entertainer
Elite to a wired local area network (LAN).
settings. To reset, press and hold the button down while
the unit is powering up. The Power LED blinks to
acknowledge the reset request.
operates only when a hard drive is installed.
The internal wireless antennas support IEEE 802.11n,
IEEE 802.11g, and IEEE 802.11b. Keep the internal
wireless antennas clear of metallic obstructions.
Welcome to the Digital Entertainer Elite 7
Page 22

The only inputs on the Digital Entertainer Elite are the USB
ports and the Ethernet port.
NETGEAR Universal Remote Control
Use the NETGEAR Universal Remote to operate the Digital Entertainer
Elite and up to three additional home entertainment devices.
This guide describes how to use the remote with your Digital
Entertainer Elite Model EVA9000. For information about programming
your remote to control other devices, see the Universal Remote User
Manual.
If the Digital Entertainer Elite does not respond when you are
using your remote, press the DE button on the device
and try again.
Table 4. Remote Control Buttons
Button Description
Power. Turn the device on and off.
Back. Go back to the previous screen.
Navigation. Navigate the menu selections.
8 Welcome to the Digital Entertainer Elite
Page 23

Table 4. Remote Control Buttons (continued)
Button Description
Home. Display the main menu.
DE. Set the device mode to control the Digital Entertainer Elite.
TV. Set the device mode to control another home entertainment
device, such as a TV, that has been programmed on the remote.
DVD. Set the device mode to control another home entertainment
device, such as a DVD player, that has been programmed on the
remote.
AUX. Set the device mode to control another home entertainment
device, such as cable or satellite receivers, amplifiers, tuners, or
other auxiliary devices, that has been programmed on the remote.
Eject. Ejects media when you are using the remote with other
devices, such as a DVD player.
Play. Play or resume playing the media. This button also resumes
normal play from fast wind mode.
In the media menus, Play plays the selected item and queues up the
rest of the items in the order shown on the screen.
Pause. Pause the media.
Stop. Stop the media that is currently playing.
Record. Records the media that is playing.
Rewind. Rewind to the beginning of the media that is playing.
Previous. Skip back to previous item playing.
When you are navigating the menus, this button takes you directly to
the first item in the list.
Welcome to the Digital Entertainer Elite 9
Page 24

Table 4. Remote Control Buttons (continued)
Button Description
Fast-forward. Fast-forward the media that is playing.
Next. Skip forward to next item on the playlist.
When you are navigating the menus, this button takes you directly to
the last item in the list.
Select and Play. Press OK to select a menu item or to play a single
song or video.
Information. Display media information.
Vol ume. Increase or decrease volume.
Page up and Page down. This button is also used for the following:
• Scroll up or down.
• Zoom videos and photos.
• Change channels when the remote is programmed for another
device, such as a TV (see the Universal Remote User Manual for
more information).
Mute. Mute or unmute the sound.
Music. Display the Music menu.
If you are currently navigating music, the Music button jumps directly
to top level music menu.
Video. Display the Video menu.
If you are currently navigating video, the Video button jumps directly
to top level video menu.
10 Welcome to the Digital Entertainer Elite
Page 25

Table 4. Remote Control Buttons (continued)
Button Description
Pics. Display the Picture menu.
If you are currently navigating pics, the Pics button jumps directly to
top level pics menu.
Web. Display the Internet media menu.
Menu. Toggles to and from full screen mode during video or photo
playback. During video playback, press Menu to display the DVD
main menu or the audio and subtitle options.
Caps. Toggle Caps Lock or numbers on or off.
TV Mode. Cycle between TV output modes.
Repeat. Repeat a track or media selection.
Zoom. Change the aspect ratio of videos or photos.
Enter. Enters or selects a setting or option.
Rotate. Rotate a photo or video image.
Set. Enters settings when you are configuring the NETGEAR
Universal Remote.
0–9 Use for alpha-numeric entry, choosing presets, and searching.
A–D Use to assign macros that can perform multi-step operations by
CLR Clear. Clears all text from a text entry field (for example, a YouTube
pressing a single button.
search box).
For information about using these buttons with specific types of media,
see “Getting Acquainted” on page 25.
Welcome to the Digital Entertainer Elite 11
Page 26

12 Welcome to the Digital Entertainer Elite
Page 27

Basic Setup
In the order listed, complete these three steps to set up your Digital
Entertainer Elite:
1. Connect the Digital Entertainer Elite.
2. Connect to your network using the Digital Entertainer Elite Basic
Setup option.
3. Use the NETGEAR Digital Entertainer for Windows software to
enable the Digital Entertainer Elite to access your media library.
For custom installations, such as using more than one Digital
Entertainer Elite or working with Macintosh or Linux computers, see
“Advanced Settings” on page 86.
Connecting the Digital Entertainer Elite
To connect the Digital Entertainer Elite:
1. Connect the Digital Entertainer Elite according to the options
available in your entertainment system.
13
Page 28

Component
video
Optical
S-Video
Composite
audio port
USB
port
Stereo
audio
video
Ethernet port
with LEDs
S/PDIF
coaxial
(audio)
SCART
HDMI
Figure 3
For example, connect the composite video cables between your
entertainment system and the Digital Entertainer Elite.
If you use a digital audio/visual (A/V) receiver, NETGEAR
recommends that you use an S/PDIF coaxial or an optical cable to
connect it.
The quality of the picture display is related to the video format you
use. If your television supports multiple formats, choose the format
that provides the best picture quality. HDMI offers the best picture
quality video. Component video provides the next best quality,
followed by SCART, S-Video, and composite video.
2. Connect the Digital Entertainer Elite to your network.
• If you are connecting to an Ethernet LAN, connect the Digital
Entertainer Elite to the LAN with an Ethernet cable.
• If you are connecting to your wireless network, configure the
wireless settings of the Digital Entertainer Elite using the Basic
14 Basic Setup
Page 29

Setup steps described in the following section. Be prepared to
provide the wireless network name (also called SSID) and the
wireless security settings for your network.
3. Turn on the television.
Turn on the television before you turn on the Digital
Entertainer Elite.
4. Set the video source selector on your television to match the
connection from your Digital Entertainer Elite. For example, if you
used an HDMI connector, set the television to use Digital HD or
HDMI input.
5. Connect the power cord to your Digital Entertainer Elite, and plug it
into an outlet.
The LED on the front of the Digital Entertainer Elite lights up to
show that it is powered on.
6. Install the two AA batteries into the remote control that came with
the product.
7. Optimize the television display as necessary.
• If the display is not sharp, or you do not see a picture, aim the
NETGEAR remote control at the Digital Entertainer Elite, and
press the TV Mode button.
Basic Setup 15
Page 30

• You can cycle through the TV modes to get the best display.
It can take 5 to 10 seconds for each TV mode change. In
some modes you might not see a picture on the TV. If
you do not see a picture after four mode changes, check
the cable connections, and verify that the TV is on and
set to the correct input.
• You might be able to enhance the picture quality by selecting
from additional high-definition video modes in the advanced
settings.
8. When prompted, select a language, and press OK.
9. When you hear the audio welcome tune, press OK.
If you do not hear the audio welcome message, check your volume
settings and the connections to the Digital Entertainer Elite.
You will now use the Basic Setup option to finish setting up your Digital
Entertainer HD.
Completing the Basic Setup Steps
The Basic Setup option enables the Digital Entertainer Elite to use
media files that are on Windows PCs or Macintosh computers. If you
use Linux or have a complex home network, use the functions described
in “Custom Setup and Supervisor Functions” on page 83.
Follow these steps for the Basic Setup option:
1. After the audio welcome message, select Basic Setup, and then
press OK.
16 Basic Setup
Page 31

The Digital Entertainer Elite checks for a network connection. If
connected to an Ethernet network that is running DHCP (the usual
case for home networks), the Digital Entertainer Elite automatically
joins the network. Skip to step 3, “Connect to the Internet.”
2. Connect wirelessly (optional). If an Ethernet LAN connection is not
found, you can wirelessly connect your Digital Entertainer Elite to
the network.
Select Connect Wirelessly, and then select one of the following
options:
– Connect using Push 'N' Connect
If your router supports Wi-Fi Protected Setup (WPS) push
button automatic configuration, you can add the network
name (SSID) and security settings automatically using the
Push 'N' Connect feature. Select your network from the
list, select OK, and then push the WPS button on your
router. Select OK to continue. See your router
documentation for more information on WPS support.
– Connect using WPS pin
If your router supports WPS pin configuration, you can
use this option to manually enter a WPS pin number on
your router. Select your network from the list, to generate a
WPS pin number, and then enter that WPS pin number into
your router's setup screen from a computer on your
network. Select OK to continue. See your router
documentation for more information on WPS support.
– Connect Manually
The available networks are displayed in a list sorted
alphabetically. You might have to scroll to see your
network. Select your network from the list, or enter the
required network name (SSID) and security settings as
Basic Setup 17
Page 32

needed. Select the network that provides 5 Ghz connection
for maximum bandwidth, if available.
Wait for the Digital Entertainer Elite to connect to the wireless
network. If the connection is successful, information about the
network settings is displayed. Press OK to accept the settings.
If the Digital Entertainer Elite does not connect to your
wireless network, the options screen is displayed. Check
to make sure that the wireless settings for the Digital
Entertainer Elite match the wireless network exactly, and
then try again. See “Troubleshooting Tips” on page 106.
For more information about wireless networks and
wireless security, see “Wireless Networking Basics:” on
page 119.
3. Connect to the Internet.
After the Digital Entertainer Elite connects to your network, it tries
to connect to the Internet. A message confirms that the Internet
connection is available.
• Depending on where you bought your Digital Entertainer Elite,
you might be prompted to enter your zip code.
To receive local news and weather, enter your zip code,
navigate to the OK button, and then press OK.
• If the Digital Entertainer Elite does not connect to the Internet,
use your computer to see if your Internet connection is
working. The following options display on the Digital
Entertainer Elite:
– Set up network configuration. Lets you view and change
network settings.
– Skip and use stand alone. Lets you use the Digital
Entertainer Elite without a network. You can play media if
18 Basic Setup
Page 33

you connect a USB drive with media on it. You will not be
able to use these features: Internet radio, YouTube Video,
weather, or Electronic Program Guide listings.
– Try again. Test your network connection. For example,
you can use this option to check a LAN connection. First,
check your cables to make sure that they are securely
attached, and that the network is up and running. Then
select Try again.
Upon completion of the Basic Setup steps, you are prompted to install
software. Go to the computer where your media files are located, and
install the software from the NETGEAR Resource CD, according to the
instruction in the following section.
Enabling Access to Your Media Library
For the Digital Entertainer Elite to access your media files, you must
share the media folders on your computers. Although you can manually
use the Windows Sharing and Security option to share media folders, it
is much easier to use the Digital Entertainer for Windows software on
the NETGEAR Resource CD to do so.
Basic Setup 19
Page 34

Installing the Digital Entertainer for Windows Software
Use the NETGEAR Resource CD to install the Digital Entertainer for
Windows software on your Windows-based computer.
The software on the CD is designed to make installation
easier. Only the Digital Entertainer Control center is added to
your startup configuration, and you can close this application
at any time.
To install the Digital Entertainer for Windows software:
1. Power on your computer, and log in as necessary.
2. Insert the NETGEAR Resource CD into the CD drive on the
computer.
3. The Welcome screen opens. If you do not see the Welcome screen,
browse the files on your CD, and then click Setup.
4. Select Install the NETGEAR Digital Entertainer for Windows
Software.
20 Basic Setup
Page 35

.
Figure 4
5. Follow the Setup Wizard steps to accept the license and install the
software.
6. When the Setup Wizard finishes, click Configure to use the
Configuration Wizard.
Figure 5
Basic Setup 21
Page 36

Giving the Digital Entertainer Elite Access to Your Media Library
Use the Configuration Wizard to share media files with the Digital
Entertainer Elite. The Digital Entertainer Elite can access media files in
more than one location at the same time. Use the Configuration Wizard
to configure shared access to media files on the PC where you have
them stored. The Digital Entertainer Elite performs a full scan of your
network to combine the data into a media library.
To use the Configuration Wizard:
1. Click Next to begin. The Configuration Wizard displays.
The wizard prompts you to select media folders to be shared. This
allows the Digital Entertainer Elite to access these files.
Figure 6
2. Browse and select the folders that you want to use, and then click
Next.
22 Basic Setup
Page 37

The wizard displays the following screen when it is ready to
configure your Digital Entertainer Elite.
Figure 7
If the wizard is unable to connect to your Digital
Entertainer Elite, disable any third-party firewall or
security software such as those from Symantec or
McAfee. For more information, see “Firewall Port
Settings” on page 101.
3. Select whether or not you want to create photo thumbnails, and then
click Next.
4. When you see a message confirming that the configuration is done,
go to your television.
Depending on the media files you have, the initial full
scan might take some time to complete.
Basic Setup 23
Page 38

You are finished with the installation and can play media on your
Digital Entertainer Elite.
24 Basic Setup
Page 39

Getting Acquainted
Now that the basic setup is complete, use the topics in this chapter to
guide you through getting acquainted with your Digital Entertainer
Elite.
Navigating with the Remote Control or from a Computer
The Digital Entertainer Elite lets you use either the remote control or a
Web browser on a computer to navigate to your shared media files and
select the ones that you want to play.
Navigating with the Remote Control
To go to the main menu, press Home on the remote control.
While you are viewing a slideshow or video, you can use the
Home key to show and hide the main menu.
If the Digital Entertainer Elite does not respond when using
your remote, press the DE button on the device and try
again.
25
Page 40

The main menu offers these selections:
• Video. Watch Internet or recorded video.
• Photos. View photos.
• Music. Listen to music files or Internet radio.
• Internet Media. Watch YouTube, browse Internet radio stations, or
remove or add a station. See “Playing Internet Media” on page 52.
• PC Access. Access your PC remotely to check e-mail or browse the
web from your TV.
Do not use the PC Access feature to stream Internet
video while browsing the Internet. This feature is
intended for lower bandwidth tasks such as Web
browsing and email.
• News/Weather. View news and weather. Weather is available only
in the United States. To receive local weather you must enter your
zip code. You can enter your zip code during installation or through
local settings. See “Viewing News and Weather” on page 57.
• More. View or work with system functions. See “Custom Setup
and Supervisor Functions” on page 83.”
Using the Remote Control
The following table describes how to use the remote control to navigate,
depending on what task the Digital Entertainer Elite is performing. For a
complete list of all remote control buttons, see “NETGEAR Universal
Remote Control” on page 8.
26 Getting Acquainted
Page 41

Table 5. Using the Remote Control
Button
0–9 If you set up hot
From the Main
Menu
Go back to the
previous screen.
Move the selector
up or down.
Select the
highlighted item.
Hide menus if video
or photos are
playing.
Move the selector
one screen up or
down.
keys, you can use
them to play media.
See “More...
Settings” on
page 94.
When Browsing
Music, Videos, or
Photos
Go back to the
previous screen.
Move the selector up
or down.
Select the highlighted
item.
Go to Home / main
menu.
Move the selector one
screen up or down.
Find entries that
contain the letters or
numbers entered.
In an Edit FIeld
• Go to the previous
or next field.
• Left arrow erases 1
character.
• Right arrow goes to
the next field or
button on a screen.
Edit the selected item.
Cancel the edit and
jump to the main
menu.
Enter characters into
the edit field.
Getting Acquainted 27
Page 42

Tips When Using the Remote Control
Here are some tips to help you quickly locate media files.
• You can combine categories to narrow your search. For example,
you can browse by genre and then by rating to get to R-rated action
movies.
• Some audio or video files might be stored without information in
some fields, such as album or genre. If this is the case, these tracks
are listed in a category called Unknown. You can use the Tag Tool
to fix these. See “Using the Tag Tool Application” on page 63.
• You can enter letters contained in a title to quickly find a media file
by name when browsing. For example, enter EYE to find both
Goldeneye and For your Eyes Only.
To enter letters, tap the number button to get the letters
that you want. For example, tap 6 twice to change from
M to N.
Navigating from a Web Browser
You can access the Digital Entertainer Elite with any browser that
supports HTML 3.2, including browsers on PCs and on most PDAs.
Cookies must be enabled for the browser menus to work
properly.
From a browser, you can use the same menus displayed on the
television. The browser interface works like the television menus in
most instances. A few functions are available only through the browser
interface.
28 Getting Acquainted
Page 43

The browser interface makes it easy to set up your favorite Internet radio
stations that are not on the Digital Entertainer’s top 500 list, to add RSS
news feeds, and to configure complex network settings.
Using the Browser Interface
The browser interface screen is shown in the following figure:
Shuttle control
buttons
Open remote
control screen
Navigation
links
Shortcut
buttons
Select a room to control
Figure 8
To access the browser interface, do one of the following:
• Right-click the Digital Entertainer for Windows task bar icon, and
select the room name of the Digital Entertainer Elite that you want
to access.
Getting Acquainted 29
Page 44

• Set your browser to the IP address of the Digital Entertainer Elite
that you want to configure. To view the IP address, press Home
and select More > Supervisor > System Information.
To change which room you are controlling, click the room name. A list
of available rooms displays.
Playing Media from the Browser Interface
To start playing something, click a menu entry. For example, click
Music to browse to the music you want to play, and then select a song.
When media playback starts, the browser opens the remote control
screen shown in the following figure.
Figure 9
You can also click the Remote Control icon in the PC
Browser Interface to open the remote control screen.
30 Getting Acquainted
Page 45

The buttons on this screen correspond to the Digital Entertainer Elite
remote control. Click them to send commands to the Digital Entertainer
Elite. For example, click Volu m e U p to increase the volume in the
selected room.
See “Supported Media File Formats” on page 116 for a Web
address for the list of supported formats.
Using Protected Media Files
You can play most media files that are protected by Digital Rights
Management (DRM) on a Digital Entertainer Elite by selecting the
Enable UPnP Media Sharing in the Configuration Wizard.
Figure 10
Getting Acquainted 31
Page 46

Alternatively, you can use:
• Windows Media Player Version 11
• iTunes for Windows
Using Windows Media Player 11
Media files bought or downloaded from online services such as Napster,
MSN Music, MovieLink, and others are usually protected by Windows
Media Digital Rights Management (DRM). They can be played only
from a PC using Windows Media Player Media Sharing. Other thirdparty media servers do not work with these files.
The Configuration Wizard makes setting up Windows Media Sharing
easy. Once you’ve installed Windows Media Player 11, use the
Configuration Wizard to share your protected media with the Digital
Entertainer HD. Windows Media Player Version 11 can be downloaded
from http://www.microsoft.com/windows/windowsmedia/player/11/
default.aspx
.
If you use Windows Player Media Sharing to access
downloads with DRM, NETGEAR recommends that you
place all your protected media files in one folder, and use
Windows Media Sharing to share only that folder. Then use
the Configuration Wizard to share all other folders. See
“Connecting to a Server” on page 112.
Using iTunes for Windows
You can play protected iTunes audio files by running the Digital
Entertainer for Windows software on the PC on which iTunes is
installed. You cannot play protected iTunes directly from a Mac. You
must authorize a PC and install iTunes on the PC so that it plays songs.
32 Getting Acquainted
Page 47

See “Listening to Protected Music Stored on a Mac” on page 39 for
more information.
Using Multiple Digital Entertainer Elites
You can have multiple Digital Entertainer Elites on your home network.
Features available for this type of installation are:
• Room name. You can use local settings to select a room name such
as Living Room for each Digital Entertainer Elite. Otherwise, they
are named Digital Entertainer #1, Digital Entertainer #2, and so on,
in the order in which they are installed. See “Custom Setup” on
page 83.
• Follow me. Move the programming from one room to another
(press Home, and select More > Follow me).
• Send message. Send messages from one Digital Entertainer Elite to
another.
• Monitor another Digital Entertainer Elite. To monitor what is
playing in another room, select More > Now playing, and use the
left and right remote buttons to scroll between rooms.
• Whole house audio. You can have all the Digital Entertainer Elites
play the same music simultaneously. Use Follow me, and select
Everywhere; or use Follow me, and add rooms one at a time.
Getting Acquainted 33
Page 48

34 Getting Acquainted
Page 49

Listening, Viewing, and Recording
Your Digital Entertainer Elite can play a wide variety of digital media.
Also, with the addition of optional equipment and services, you can
schedule and record a variety of video or audio programming.
Listening to Music
The Digital Entertainer Elite provides easy access to the music files on
an optional internal hard disk, on your computer hard disks, on external
hard drives connected to a computer or to the Digital Entertainer Elite,
or on other storage devices on the network.
To access music files, you need the following:
• The Digital Entertainer Elite.
• Music files available on your network or on an attached USB
device.
See “Listening to Protected Music” on page 38.
To listen to music:
1. Press Music on the remote, or press Home, and then select
Music.
35
Page 50

This menu offers these selections:
• Play something. Play a random selection of shared music.
To play an entire album or list of songs, highlight
the first song, and press Play. The rest of the songs
will be played in the order shown.
• Browse. Browse digital music such as MP3. See “Tips When
Using the Remote Control” on page 28 for tips.
• Playlists. Select and play a playlist.
Playlists should include only songs on the same
server as the playlist itself, or the songs might not be
identified correctly.
• Internet Radio. Browse Internet radio stations, or remove or
add a station. See “Playing Internet Media” on page 52.
2. Select the music that you want to play.
The Repeat button on the remote lets you repeat a
selection.
When you browse and select a song, it is added to the list of playing
songs. You can select the next song while you are listening to a song. To
go to a song you selected, either press Sto p before you select the song,
or press Next repeatedly until you reach the song you want to hear.
To save the list of playing songs, press i on the remote, select
View Playlist, and then select Save.
36 Listening, Viewing, and Recording
Page 51

There might be a difference between the time displayed when
you are browsing a song and the time displayed when you are
listening to the song. The time embedded in the song file is
shown in the browser, while the actual length of the audio file
(calculated by the Digital Entertainer Elite) is shown in the
Now Playing screen.
Using the Remote Control When Music Is Playing
The following table describes how the remote control works when
music is playing or paused. For a complete list of all remote control
buttons, see “NETGEAR Universal Remote Control” on page 8.
Table 6. Remote Control When Music Is Playing
Button When Music Is Playing When Music Is Paused
Fast-forward. Not available.
Go to the next track.
or 9
Listening, Viewing, and Recording 37
Press 9 to skip to the next item playing
in a second session.
For example, if you start music first
and then photos, skips to the next
song, while 9 skips to the next picture.
Go to the next track and
start playing.
Page 52

Table 6. Remote Control When Music Is Playing (continued)
Button When Music Is Playing When Music Is Paused
Go back to the start of the current
track. If already at the start of the
current track, go to the previous track.
or 7
Press 7 to skip to the previous item
playing in a second session.
For example, if you start music first
and then photos, skips to the
previous song, while 7 skips to the
previous picture.
Show the Now Playing screen. Show the Now Playing
Mute. Not available.
Pauses the music. Not available.
Listening to Protected Music
You can listen to music stored on a mac or PC.
Listening to Protected Music Stored on a PC
Go back to the start of the
current track. If already at
the start of the current track,
go to the previous track and
start playing.
screen.
To play protected music stored on a PC, you need the following:
• A media player
• Windows Media Player 11
• iTunes for Windows
• The Digital Entertainer for Windows software on the same PC.
• Music files that are protected through Digital Rights Management.
It is best if these protected files are stored in a single location on
your network.
38 Listening, Viewing, and Recording
Page 53

The protected music files must be in a shared folder to play on the
Digital Entertainer Elite. For information about how to add folders
containing shared music, see “Enabling Access to Your Media Library”
on page 19.
Listening to Protected Music Stored on a Mac
To listen to protected iTunes music stored on a Macintosh:
1. Use the Configuration Assistant to share your music with the
Digital Entertainer Elite.
2. Install iTunes on the PC that contains the Digital Entertainer for
Windows software.
3. The first time you try to play an iTunes song, you will be asked to
enter your iTunes password on the PC that contains the Digital
Entertainer for Windows software.
Viewing Photos
The Digital Entertainer Elite finds the media files on an optional internal
hard disk, on your computer’s hard disk, on other computers, on external
hard drives, or on other storage devices on the network.
To view photos, you need the following:
• The Digital Entertainer Elite.
• Photo files available on your network or on an attached USB
device.
To view photos:
1. Press Pics on the remote control, or press Home, and then
select Photos.
Listening, Viewing, and Recording 39
Page 54

2. Browse by title, by folder, or by year. See “Navigating with the
Remote Control” on page 25 for tips.
3. Press Play to view the selected photo and the rest of the listed photo
as a slide show.
You can view photos in full screen or thumbnail mode.
• Press OK to toggle between thumbnail or full screen mode.
• Full screen mode. Cycle through the photos. These are displayed
in the same size and zoom level as they were last viewed.
• Thumbnail mode. View thumbnails of several photos at a time, so
you can scroll easily. In thumbnail mode, you can use Page Up and
Down to change the number of thumbnails displayed.
To play music while watching a photo slideshow, press
Music, and start playing a song or playlist. While the
music is playing, press Home, and then select the
photos that you want to view with the music in the
background.
Using the Remote Control While Viewing Photos
The following table describes how to use the remote control while
viewing photos. For a complete list of all remote control buttons, see
“NETGEAR Universal Remote Control” on page 8.
Table 7. Using the Remote Control to View Photos
Button Action When Viewing Photos
Speed up the slide show. The maximum speed depends on the
size of the photos
Slow down the slide show.
40 Listening, Viewing, and Recording
.
Page 55

Table 7. Using the Remote Control to View Photos (continued)
Button Action When Viewing Photos
Go to the next photo.
Press 9 to skip to the next item playing in a second session.
or 9
or 7
For example, if you start photos first and then music, skips
to the next picture, while 9 skips to the next song.
Go back to the previous photo.
Press 7 to skip to the previous item playing in a second session.
For example, if you start photos first and then music, skips
to the previous picture, while 7 skips to the previous song.
Toggle to and from thumbnail view.
Zoom in and zoom out in full screen mode. When viewing
thumbnails, increase or decrease the size of thumbnails.
Zoom in or out to change the aspect ratio. The aspect ratio
settings adjust the display of the photo for different types of
television sets.
Select another thumbnail in thumbnail view.
Pan photo in full screen view.
The Rotate button rotates a photo. For faster results, switch to
thumbnail view by pressing OK; rotate the thumbnail; switch
back to full photo view.
Go back to the last browser menu.
Jump to the music browser.
Listening, Viewing, and Recording 41
Page 56

Table 7. Using the Remote Control to View Photos (continued)
Button Action When Viewing Photos
Jump to the video browser.
Jump to the photo browser.
Viewing Recorded Video
The Digital Entertainer Elite finds the video files on an optional internal
hard disk, on your computer’s hard disk, on other computers, on
external hard drives, or on other storage devices on the network.
Downloaded content from noncommercial sources might be
of varying quality, and might not play back correctly.
To view recorded video files, you need the following:
• Digital Entertainer Elite.
• Video files available on your network or on an attached USB
device.
Watching Recorded Video
To watch a video:
1. Turn on the television and the Digital Entertainer Elite.
2. Aim the remote control at the digital media player, and do one of
the following:
• Press Video.
42 Listening, Viewing, and Recording
Page 57

• Press Home, and select Video > Recorded Video.
3. Use the Recorded Video screen to browse videos. See “Tips When
Using the Remote Control” on page 28 for more information.
4. Select the video that you want to watch.
• To change the aspect ratio of the video to match your television
screen, press the Zoom button on the remote control.
• To display information about the video, press the i button on
the remote control. This option is available only when a video
is playing.
Play plays the selected item, and then plays the rest of
the items in the order shown on the screen.
Using the Remote Control When Recorded Video Is Playing
The following table describes how to use the remote control when video
is playing. For a complete list of all remote control buttons, see
“NETGEAR Universal Remote Control” on page 8.
Table 8. Using the Remote Control When Video Is Playing
Button When Playing When Paused
Fast-forward. Slow motion. Fast-forward faster.
Rewind. Not available. Rewind faster.
Go forward 30
seconds.
Listening, Viewing, and Recording 43
Single frame. Go forward 15 minutes.
During Fast Forward
or Rewind
Page 58

Table 8. Using the Remote Control When Video Is Playing
Button When Playing When Paused
Go back 30
seconds.
0–9 Jump in the file to
0%, 10%, 20%, …
90% of the file.
Toggle the aspect
ratio.
Zoom the video in
or out.
Press Home twice
to restore the
original size.
Go back to t he las t
video browser
screen.
Not available. Go back 15 minutes.
Jump in the file to
0%, 10%, 20%, …
90% of the file.
Toggle the aspect
ratio.
Zoom the video in or
out.
Press Home twice to
restore the original
size.
Go back to the last
video browser
screen.
You can also use the onscreen DVD menu to turn subtitles on
or off, change subtitle text, color and background, or to
change the active audio setting. To access the DVD screen,
press Menu on the remote control, and then press the
down arrow to select a topic. Press OK to open the
screen, and then press the down arrow to select a
setting. Press OK to accept the setting.
During Fast Forward
or Rewind
Jump in the file to 0%,
10%, 20%, … 90% of
the file.
Toggle the aspect ratio
Not available.
Go back to the last video
browser screen.
44 Listening, Viewing, and Recording
Page 59
Using the USB Connection for Pictures, Music, or Video
You can connect up to two USB flash drives or a media player such as
an iPod to a USB port on the front or rear panel of the Digital
Entertainer Elite.
The Digital Entertainer Elite plays files stored in Windows (FAT,
FAT32, NTFS), Macintosh, or Linux disk formats. It does not matter if
you set up the music player on a PC or a Mac.
Be sure to use USBv2 devices with your Digital Entertainer
Elite. The limited bandwidth of the older USBv1 devices
might interfere with the performance of your playback.
To play media with a USB connection:
1. Use the USB cable that came with your product to connect it to the
USB port on the front or rear of the Digital Entertainer Elite.
USB port
Figure 11
The Digital Entertainer Elite scans the media, and then the media
files are available for you to play on the Digital Entertainer Elite.
Listening, Viewing, and Recording 45
Page 60

2. If you want to play the media on your USB device, press Music,
Video, or Pics on the remote control, and then select the media
files.
When browsing media files on an iPod, note that iTunes
uses an unusual file-naming convention to store music
files on the iPod. The Digital Entertainer Elite can
display only the folder names as they are saved on the
iPod. You can find the files by using other criteria such
as artist or genre.
Installing and Using an Internal Disk Drive for Pictures, Music, or Video
Install an optional internal disk drive to store your media files.
An internal cooling fan operates when an internal disk drive
is installed.
Installing an Internal Disk Drive
To install an optional disk drive for storing media files, carefully follow
these instructions.
The installation process formats the hard drive and erases all
existing data. Before you begin, back up any existing data, if
necessary.
46 Listening, Viewing, and Recording
Page 61

Always power off the Digital Entertainer Elite using the
on/off switch on the back of the unit before installing or
removing the internal disk drive.
1. Power off the Digital Entertainer Elite using the on/off switch on
the back of the unit.
2. Remove the disk tray as shown in the following figure.
Figure 12
a. Swing open the front cover.
b. Press to release the latch.
c. Pull out the tray.
Listening, Viewing, and Recording 47
Page 62

3. Set the lock inside the tray before installing the hard disk into the
tray for greater security (optional).
Figure 13
4. Insert a hard drive into the tray. Position the drive with the bottom
facing out from the tray, and the connectors facing away.
If you set the tray lock, insert a push-pin or a paper clip
into the round button to release the latch and open the
tray (see “Unlocking the Disk Drive Tray” on page 114).
48 Listening, Viewing, and Recording
Page 63

5. Use the four screws provided with the unit to secure the drive to the
tray.
Figure 14
6. With the latch in the open position, slide the disk tray into the
Digital Entertainer Elite completely, securing the latch and closing
the door.
Figure 15
Listening, Viewing, and Recording 49
Page 64

7. If the hard disk is not in EVA9000 format, you are prompted to
format the drive. This process erases all data on the drive. See the
following section for more information.
Setting Up the Internal Disk Drive
This step is necessary only when a hard disk is first
inserted into the Digital Entertainer Elite. Formatting a
disk erases all existing data. Back up any existing data
before you begin, if necessary.
1. If you install a drive that is not in EVA9000 format, you are
prompted to format the drive. Select Yes to format the disk, and
continue to step 2.
If the disk is already in the required EVA9000 format, you can
manually start the formatting process.
a. Press Home, and select More > Supervisor functions >
Hard Drive Tools > Format disk.
b. Select Ye s to format the disk. Wait for the format process to
complete.
2. When the formatting process is complete, select Yes to copy your
persistent data to the internal hard disk. The persistent data includes
your media library and favorites, but does not include your media
files, such as videos and music.
The data source, such as a PC or USB drive, must be
available over the network or through a direct
connection.
50 Listening, Viewing, and Recording
Page 65

3. Copy your media files to the internal disk drive as described in the
following section.
Drag and Drop Media Files to the Internal Disk Drive
To copy your media files onto the internal disk drive, do the following:
1. Press Home, and select More > Supervisor functions >
Advanced Settings > Power and Hard Drive.
2. Scroll down to File Sharing, and select Enabled.
3. Enter a password (optional).
a. Select the password field and enter the new password using the
drop-down keyboard.
b. Select Done/OK from the on-screen keyboard to save the
changes.
To disable the password, press the CLR button to clear
all text.
4. On your PC, the EVA9000 hard drive is listed with the networked
devices:
• On a Windows PC, go to Windows Network Neighborhood
(Vista) or My Network Places (XP), and open “media on
EVA9000”.
• On a Mac, go to Go > Network > EVA9000 name > Media.
It might take a few minutes for the EVA9000 drive to
appear on your network.
Listening, Viewing, and Recording 51
Page 66

The Data folder for the EVA9000 drive contains playlists
and other system files. Do not modify the contents of this
folder.
5. Use your mouse to drag media files to the media folder on the hard
drive. NETGEAR suggests organizing the files into folders, such as
music and videos.
6. To play the media on your internal hard drive, press Music, Video,
or Pics on the remote and select the media files.
For improved video playback over a wireless connection,
activate video buffering, select More > Supervisor
functions > Advanced Settings > Power and Hard Drive.
Scroll down to Video buffering and select All videos. See
“Power and Hard Drive Tools” on page 89 for more
information.
To copy media files directly from a USB drive to the
internal hard disk, select More > Supervisor functions >
Hard Drive Tools > Manage data on disk. See “Hard
Drive Tools” on page 85 for more information.
Playing Internet Media
To go to the Internet Media screen, press Home, and then select
Internet Media. The Internet Media menu offers these selections:
• YouTube Video. You must have a PC running the Digital
Entertainer for Windows software to use this feature.
52 Listening, Viewing, and Recording
Page 67

• Internet Radio Player. Browse and edit the list of Internet radio
stations.
To add Internet radio stations more easily, use the Digital
Entertainer Elite Web browser interface. Find your
favorite station on your PC, copy its URL, and paste that
into the browser.
Viewing YouTube Content
You can use your Digital Entertainer Elite to view YouTube content and
add items or publishers to your favorites lists.
To do so, you need the following:
• The Digital Entertainer Elite set up with access to the Internet
through your network.
• A PC running the Digital Entertainer for Windows software.
To view YouTube content:
1. Press Home, and select Video > YouTube, or select Internet
Media > YouTube.
2. Select the option you want to use to retrieve YouTube content, and
press OK.
– Recent searches. Displays your most recent YouTube keyword
searches.
– Favorite videos. Displays a list of your favorite videos.
– Favorite users. Displays a list of your favorite YouTube users.
– Search tags. Press Caps Lock to display the onscreen
keyboard, and then use the arrow buttons on your remote
control to enter a search term (tag). Your last search tag is
displayed by default. Select OK on the onscreen keyboard to
close the keyboard.
Listening, Viewing, and Recording 53
Page 68

– Search user’s videos. Press Caps Lock to display the
onscreen keyboard, and then use the arrow buttons on your
remote control to enter a search term (tag). Your last search tag
is displayed by default. Select OK on the onscreen keyboard to
close the keyboard.
– Tag s. Browse categories of videos, such as action or animals.
– Top videos. Browse a list of top YouTube videos.
The results of your search are displayed, with a preview of each
item shown on the right when an item in the list is selected.
3. Select the item you want to view, and press OK.
The Digital Entertainer Elite begins playing the YouTube item.
Use the Zoom button to improve the picture quality
when viewing YouTube content.
When you have finished viewing the item, you can save this
publisher or this item in your favorites list for easy access in the
future.
Using the Remote Control When Viewing YouTube Content
The following table describes how to use the remote control when
YouTube content is playing. For a complete list of all remote control
buttons, see “NETGEAR Universal Remote Control” on page 8.
54 Listening, Viewing, and Recording
Page 69

Table 9. Using the Remote Control When YouTube Is Playing
Button When Playing When Paused
Pauses the current
video.
Pauses the current
video.
Fast-forward.
Press twice to skip
to the next video.
Not available. Not available. Not available.
Not available. Not available. Not available.
Stop the media that
is currently playing.
If multiple videos are
queued, the Skip
back button skips to
the previous video;
the Skip forward
button skips to the
next video
Toggle the aspect
ratio.
Play plays the
selected item.
Play plays the
selected item and
queues up the rest of
the items in the order
shown on the screen.
Slow motion. Not available.
Not available. Not available.
Toggle the aspect
ratio.
During Fast
Forward or Rewind
Pauses the current
video.
Returns to play
mode.
Toggle the aspect
ratio.
Listening, Viewing, and Recording 55
Page 70

Table 9. Using the Remote Control When YouTube Is Playing
Button When Playing When Paused
Zoom the video in or
out. Press Home
twice to restore the
original size.
Go back to the last
YouTube browser
screen.
Toggles to and from
full screen mode.
Playing Internet Radio
You can use your Digital Entertainer Elite to access and play Internet
radio programming and add items or publishers to your favorites lists.
To do so, you need the Digital Entertainer Elite set up with access to the
Internet through your network.
Some Internet radio stations provide a low bit rate audio
stream that your amplifier or receiver might not support. Try
connecting the analog audio outputs of the Digital Entertainer
Elite to the analog inputs of your home audio amplifier or
receiver, and switch the device to that input when listening to
a low bit rate Internet radio station.
Zoom the video in or
out. Press Home
twice to restore the
original size.
Go back to the last
YouTube browser
screen.
Toggles to and from
full screen mode.
During Fast
Forward or Rewind
Zoom the video in or
out. Press Home
twice to restore the
original size.
Go back to the last
YouTube browser
screen.
Not available.
To access and play Internet radio programming:
1. Press Home, and select Music or select Internet Media.
2. Select Internet Radio, and press OK.
56 Listening, Viewing, and Recording
Page 71

– Browse station. You can browse by title, genre, or quality. Use
the up or down arrows and Page up or down to scroll through
the list. A preview of each item is shown on the right when an
item in the list is selected.
– Remove station. Remove an Internet radio station from the
list.
– Add station. Add an Internet radio station to the list. You need
to know the station’s URL (Web address).
3. Select the item you want to play, and press OK.
The Digital Entertainer Elite begins playing that item.
When you have finished playing the item, you can save this station
in your favorites list for easy access in the future.
You can use the browser interface from the PC to add
stations to the favorites list.
Using the Remote Control When Playing Internet Radio
Only the Stop button is available when Internet radio is playing. Press
the Stop button to stop playing the Internet radio.
Viewing News and Weather
You can use the Digital Entertainer Elite to view news and weather.
To view news and weather, you need the Digital Entertainer Elite set up
with access to the Internet through your network.
Listening, Viewing, and Recording 57
Page 72

Viewing Weather
Weather is available only in the United States. To receive local weather,
you must enter your zip code. You can enter your zip code during
installation or using Digital Entertainer Elite settings. (Press Home,
and select News/Weather.)
Internet Channels
Internet Channels uses Really Simple Syndication (RSS) for accessing
regularly updated information such as news, podcasts, and blogs.
Common sources are the major television networks and wire services,
as well as many Internet websites and portals.
To use the Digital Entertainer Elite to browse RSS news feeds on your
television, press Home, and select News/Weather > Internet
channels. The Digital Entertainer Elite includes several common news
feeds, and you can add your own. To add your own list, select Add new
RSS feed, and enter the URL (Web address) of the RSS news feed as
well as a descriptive title.
You can locate the RSS feeds on your computer and use the Digital
Entertainer Elite browser interface to save the RSS feeds to view on
your television.
Combining Different Media Sources
You can play both photos and audio media at the same time. For
example, you can view a slideshow and play music.
• Start viewing photos, and then start the audio.
• You can start the audio first if you prefer.
58 Listening, Viewing, and Recording
Page 73

Navigation commands from the remote control go to the media that you
started last. The other buttons control the first media. For example, if
you are watching television, and then you start playing music, pressing
Pause pauses the music. Pressing the number buttons or Channel up
changes the channel.
Viewing the Status of Multiple Digital Entertainer Elites
Use the Digital Entertainer application to view the status of any Digital
Entertainer Elite operating in your network.
To do so, run the Digital Entertainer application:
1. From the Windows Start menu, select All Programs > NETGEAR
Digital Entertainer for Windows > Digital Entertainer.
This icon appears in the system tray when the Digital
Entertainer for Windows software is running.
2. Click to open the Digital Entertainer for Windows screen.
• To access the Web browser interface, use one of these methods:
– Select Open.
– Double-click .
– Select Rooms > name of Digital Entertainer Elite to open
a specific Digital Entertainer Elite.
You can also monitor what is playing on another Digital
Entertainer Elite using the Now Playing screen on your
TV. Use the right and left arrows to scroll between rooms
and see what is s playing in each.
Listening, Viewing, and Recording 59
Page 74

Viewing Status
You can view the status of what is playing in each room. Click and
select Status. The Status screen opens.
Figure 16
The Status screen includes these buttons:
• Power Off. Stop media. This does not turn off the Digital
Entertainer Elite.
• Message. Send a message for the Digital Entertainer Elite to
display on the television screen.
• Follow To. Have media that is playing follow you to another
Digital Entertainer Elite.
• Lock. For future use.
You can also right-click the Digital Entertainer Elite name to select the
following additional options:
60 Listening, Viewing, and Recording
Page 75

• Play. Play media in the selected room.
• Control. Opens a screen with buttons that control playback of the
selected session, such as play, pause and skip.
• Power off. Stops the selected session.
Listening, Viewing, and Recording 61
Page 76

62 Listening, Viewing, and Recording
Page 77

Fine-Tuning Your Experience
The topics in this chapter will help you fine-tune your experience with
the Digital Entertainer Elite the following areas:
• Improving media library search results using tags and media art.
• Optimizing network performance to ensure that you get the best
entertainment experience possible with your equipment.
• Taking precautions so that information such as personal photos
sent over a wireless connection are not subject to snooping.
• Assuring that adequate parental controls are in place for using the
digital media in your network.
Improving Media Library Search Results
To make browsing easier or to add media cover art, you can tag your
media files with the Tag Tool.
Using the Tag Tool Application
Use the Tag Tool to enhance your file management on third-party
devices, such as your mobile phone or MP3 player, as well as on the
Digital Entertainer Elite. The Tag Tool works with these file formats:
AVI, WMV, MPG, MP1, MP2, MP3, MKV, FLAC, ISO, and IFO. The
63
Page 78

Digital Entertainer Elite can read the existing tag information associated
with your media files.
You can use the Tag Tool to remove a tag for a file. Select
Remove Tag or select Edit > Remove Tag.
You can use the Tag Tool to add or change the identification information
stored in media files. For example, you can enter the artist name or
rating.
If you set the rating for a file, you can also control access to
that file from the Digital Entertainer Elite Security screen.
To use the Tag Tool:
1. From the Windows Start menu, select All Programs > NETGEAR
Digital Entertainer for Windows > Tag Tool.
64 Fine-Tuning Your Experience
Page 79

The Tag Tool screen opens, as shown in the following figure.
Search
pane
Hide or view
the search
pane
Preview
window
Figure 17
2. Locate the file that you want.
• File menu. You can select File > Open to open a file.
• Browse. Select Browse to view the files within a folder, and
then select the file that you want.
• Preview window. You can select Play to watch a preview.
• Search pane. Enter the name of video in the Name, and then
use the Search pane buttons: Search IMDB, Search Amazon,
or Search Google. After you select a movie, you can select
Form Fill to copy the information from the Web page into the
Tag Tool screen.
3. Make the changes that you want, and then click Apply to save the
tag.
Fine-Tuning Your Experience 65
Page 80

Adding Cover Art
You can use the Tag Tool application to add cover art to files
individually or in groups.
Capturing a Video Frame for Cover Art
You can use the Tag Tool to capture a single frame from the video to use
as cover art for your video.
To capture a video frame:
1. Click Play in the Preview window.
Figure 18
2. When you find a frame that you like, click Capture.
The frame is captured into the Preview image.
Adding High-Resolution Album or Cover Art
You can add high-resolution album or cover art to a media file.
66 Fine-Tuning Your Experience
Page 81

To add high-resolution art:
1. In the Tag Tool screen, click Search Amazon to locate the art. For
even higher-resolution images, click See larger image.
2. Right-click the image of the album or cover art.
3. Select Copy, and then right-click to copy and paste the image into
the Tag Tools Picture area.
Figure 19
You can also copy and paste any other image into the Picture area.
Adding Album Art to All the Songs in an Album
If you want to tag all the songs in an album with the same cover art, the
songs must be in the same folder.
To add album art to all songs on an album:
1. Place all the songs from the album in a single folder.
2. Select any one of the songs from the album in the Tag Tool list box.
3. Click Search Amazon, and copy and paste the album art into the
Tag Tool Picture area.
4. Select the Use folder.jpg check box. This saves your cover art
picture into a file named folder.jpg in the album’s folder. Both
Fine-Tuning Your Experience 67
Page 82

Windows Media Player and the Digital Entertainer Elite will
recognize this as the album art for all the songs in the folder.
Using the Script Wizard to Automate Tasks
Use the Digital Entertainer Script Wizard to automate a variety of tasks.
You can create three types of scripts:
• Command script.Creates a new script to automate the ways you
use your Digital Entertainer Elite.
• Video script.Creates a new script that appears in the video browser
of your Digital Entertainer Elite.
• Audio script.Creates a new script that appears in the audio browser
of your Digital Entertainer Elite.
To create a script:
1. From the Windows Start menu, select All Programs > NETGEAR
Digital Entertainer for Windows > Script Wizard.
Figure 20
68 Fine-Tuning Your Experience
Page 83

2. Select the script type (command, video, or audio).
Figure 21
3. Click New to add an action from the list.
Figure 22
4. Select the options for the script action, if prompted, and then click
Next.
5. Add additional actions, if necessary.
Fine-Tuning Your Experience 69
Page 84

Understanding Home Networking
In recent years, home networks have become common. More and more,
they include a variety of technologies that work together in ways that
are not always obvious. The following topics identify common
connection types, their speed, and security considerations.
• Broadband Internet
Your Internet connection speed is determined by your Internet
Service Provider, as well as the connection speed of the sites to
which you connect, and general Internet traffic. ADSL and cable
modem connections are asymmetrical, meaning they have a lower
data rate to the Internet (upstream) than from the Internet
(downstream). A typical residential ADSL or cable modem
connection provides a downstream throughput of about 1 to 3
megabits per second (Mbps). Newer technologies such as ADSL2+
and Fiber to the Home (FTTH) increase the connection speed to
tens of Mbps.
•Wireless
Current-generation 802.11n wireless routers such as the NETGEAR
WNR854T RangeMax NEXT Wireless-N Router provide wireless
data throughput of up to 300 Mbps using technology called
multiple input, multiple output (MIMO). MIMO uses multiple
antennas to transmit multiple streams of data. The use of multiple
(internal) antennas also provides excellent range and coverage.
With the introduction of the newer WPA and WPA2 encryption and
authentication protocols, wireless security is extremely strong.
• Powerline
For connecting rooms or floors that are blocked by obstructions or
are distant, consider networking over your building’s AC wiring.
NETGEAR’s Powerline HD family of products delivers up to 200
70 Fine-Tuning Your Experience
Page 85

Mbps to any power outlet and connects to your devices and network
using standard Ethernet cables.
You need at least two Powerline HD adapters to make
this type of connection in your network.
Data transmissions are encrypted for security, and you can
configure an individual network password to prevent neighbors
from connecting.
The Powerline HD family of products can coexist on the same
network with older-generation XE family products or HomePlug
1.0 products, but they are not interoperable with these older
products.
• Wired Ethernet
As Gigabit Ethernet ports become common on newer computers,
wired Ethernet remains a good choice for speed, economy, and
security. Gigabit Ethernet can extend up to 100 meters with twistedpair wiring of Cat 5e or better. A wired connection is not
susceptible to interference, and eavesdropping would require a
physical connection to your network.
Assessing Your Speed Requirements
Because your Internet connection is likely to operate at a much lower
speed than your local network, faster local networking technologies
might not improve your Internet experience. However, many emerging
home applications require high data rates. For example:
• Streaming HD video requires 10 to 30 Mbps per stream. Because
latency and packet loss can disrupt your video, plan to provide at
least twice the capacity you need, or add an internal hard drive to
provide “buffering” for your connection.
Fine-Tuning Your Experience 71
Page 86

• Streaming MP3 audio requires less than 1 Mbps per stream and
does not strain most modern networks. Like video, however,
streaming audio is also sensitive to latency and packet loss, so a
congested network or a noisy link can cause problems.
Actual data throughput varies. Network conditions and
environmental factors, including volume of network traffic,
building materials and construction, and network overhead,
can lower actual data throughput rate.
Optimizing the Performance of Your Home Network
To get the best performance from your home network, you should
optimize each portion of the network, as well and place files in the
network where they will get the bandwidth their use will demand.
Optimizing Wireless Performance
The speed and operating distance or range of your wireless connection
can vary significantly based on the physical placement of the wireless
router. You should choose a location for your router that will maximize
the network speed.
To find the best location, start the Network test (from the
Supervisor Functions screen) running on the Digital
Entertainer Elite, and then move the Digital Entertainer Elite
and the wireless router. Monitor the Network test results to
determine which location maximizes network speed.
72 Fine-Tuning Your Experience
Page 87

Failure to follow these guidelines can result in significant
performance degradation or inability to wirelessly connect to
the router. For complete range and performance
specifications, see “Technical Specifications” on page 117.
The following list describes how to optimize wireless router
performance.
• Identify critical wireless links.
If your network has several wireless devices, decide which wireless
devices need the highest data rate, and locate the router near them.
Many wireless products have automatic data-rate fallback, which
allows increased distances without a loss of connectivity. This also
means that devices that are farther away might be slower.
Therefore, the most critical links in your network are those where
the traffic is high and the distances are great. Optimize those first.
• Choose placement carefully.
For best results, place your router:
– Near the center of the area in which your computers will
operate.
– In an elevated location such as a high shelf where the
wirelessly connected computers have line-of-sight access (even
if through walls).
• Avoid obstacles to wireless signals.
– Keep wireless devices at least 2 feet from large metal fixtures
such as file cabinets, refrigerators, pipes, metal ceilings,
reinforced concrete, and metal partitions.
– Keep the device away from large amounts of water such as fish
tanks and water coolers.
Fine-Tuning Your Experience 73
Page 88

• Reduce interference.
Avoid windows unless communicating between buildings.
Place wireless devices away from various electromagnetic noise
sources, especially those in the 2400–2500 MHz frequency band.
Common noise-creating sources are:
– Computers and fax machines (no closer than 1 foot)
– Copy machines and cell phones (no closer than 6 feet)
– Microwave ovens (no closer than 10 feet)
• Choose your settings.
– Use a scanning utility including those provided with the
NETGEAR wireless adapters to determine what other wireless
networks are operating nearby, and then select an unused
channel.
– Turn off SSID broadcast, and change the default SSID. Other
nearby devices might automatically try to connect to your
network several times a second, which can cause significant
performance reduction.
Optimizing Your Network Bandwidth
As your network grows, it might consist of several segments of different
networking technologies, each providing different throughput. In
planning your network, you should first consider which devices will
have the heaviest traffic flow between them. Here are some examples:
• A Digital Entertainer Elite in one room streaming high-definition
video from a server in another room
• A storage device that is used for backing up your computers
Next, consider the throughput of your network devices. Where possible,
use higher-speed technologies to make the heaviest-traffic connections
with no lower-speed bottlenecks in the path.
74 Fine-Tuning Your Experience
Page 89

Figure 23
This illustration shows a sample network using multiple networking
technologies. The two PCs with Gigabit (1000 Mbps) Ethernet adapters
have a gigabit connection through the gigabit switch to the ReadyNAS
Duo network storage unit with a gigabit connection. This connection
should allow for extremely fast access to large files on the ReadyNAS
TM
Duo unit. The EVA9000 connected through a pair of Powerline HD
adapters has access at the 200 Mbps speed of the Powerline HD
connection. This is fine for any of the media files it will use over this
connection and might be more suitable than running Ethernet cables to
Fine-Tuning Your Experience 75
Page 90

where the entertainment system is located. Although any of the links in
this example would be sufficient for high-traffic applications such as
streaming HD video, the use of older devices such as 10 Mbps Ethernet
or 802.11b wireless would create a significant bottleneck.
Optimizing Media File Performance
Video playback can be resource intensive. To avoid pauses in video
viewing, select hard disk drives and network equipment designed to
handle large files quickly. If you want to send video over a wireless
network connection, new wireless technologies like those found in the
NETGEAR RangeMax
operate at higher speeds, but they also sustain those speeds over greater
distances.
File transfer speed depends on the following:
• Hard disk drive speed
SATA hard drives can be any of the following speeds: 4,500 RPM,
5,400 RPM, 7,200 RPM, 10,000 RPM.
For best performance separate your media into their
own set of folders. This will maximize performance of
your PC and reduce time needed to find media files.
TM
products are good choices. Not only do they
• LAN connection speed
A Gigabit Ethernet connection through a gigabit switch provides
the fastest LAN file transfer speed and gives the best performance.
NETGEAR HD Powerline adapters provide adequate bandwidth
without the inconvenience of running Ethernet cables.
• Wireless communication speed
– 802.11b (11 Mbps,) is not recommended for video.
76 Fine-Tuning Your Experience
Page 91

– 802.11g (54 Mbps) is not recommended for HD video.
– 802.11n is not recommended for high bandwidth HD video.
However, when using 802.11n, the 5GHz band is usually less
crowded and will likely provide better performance.
– If many wireless networks in your area are sharing the same
channel, this can slow the speed of your wireless network. (The
scanning utility built in to NETGEAR wireless adapters lists all
wireless networks operating at your location along with the
channel each is using.)
– If any 802.11b devices are powered on in an 802.11g network,
they can cause the entire network to slow to 802.11b speeds.
Tips for Streaming Video
Use these tips for the best performance with streaming video or during
file transfers to the Digital Entertainer Elite.
• Use a wired LAN connection to stream HD video.
• For streaming video, use no more than one wireless link. For
example, do not wirelessly connect both the Digital Entertainer
Elite and your computer with media to your router. Replace one of
these wireless links with a wired connection.
• For playing music and viewing photos, wirelessly connecting both
the Digital Entertainer Elite and the computer with media files
should work fine.
• With a wireless 802.11g connection, you can stream standard-
definition video, music, and standard-resolution photos reliably,
although high network traffic and interference might cause some
audio/video interruptions.
• You can use NETGEAR’s Powerline HD product with a wired
connection; it supports all but the most demanding HD streaming.
Fine-Tuning Your Experience 77
Page 92

• Upgrade to a Dual Band 802.11n router such as the NETGEAR
WNDR3300. Use the less crowded 5GHz band for video and keep
your computers and other internet devices on 2.4GHz bands.
• Add a hard drive (see “Installing and Using an Internal Disk Drive
for Pictures, Music, or Video” on page 46) to improve playback
results over wireless by using the hard drive to buffer playback.
Taking Precautions
Take precautions to secure personal data sent over wireless connections
to your Digital Entertainer HD. Also take precautions for monitoring
content, if you wish to exercise parental control.
See the following sections for information about doing this.
Access and Network Security
Use care when sharing media, and set up security in your home network
to protect your privacy and prevent unauthorized access to your photos
and media files.
When sharing media use the following precautions:
• Share only the folders containing media files. Do not share your
main hard drive or any folder containing programs or personal
data.
• Share media folders on a read-only basis (do not allow others to
write to the folders.) unless recording to the folders.
• For maximum security, consider a storage device, attached to a
network, dedicated to entertainment and media.
78 Fine-Tuning Your Experience
Page 93

When using a wireless network:
• Use wireless security such as WEP, WPA, or WPA2. For more
about wireless security, see “Wireless Networking Basics:” on
page 119.
• Use a firewall or home router with Network Address Translation
(NAT), which hides your in-home systems from the Internet.
Exercising Parental Control
You can block video files by rating, or block any files based on their
location.
Block Video Files By Rating
To block video files using an MPPA or TV rating, mark the files with a
rating and then select a rating level on your Digital Entertainer Elite:
1. Use the NETGEAR Tag Tool application to tag video files with an
MPAA or TV rating. From the Windows Start menu, select All
Programs > NETGEAR Digital Entertainer for Windows > Tag
Tool.
Files without tags are considered “NR” or Not Rated, the
most sensitive and highest rating.
Files restricted by rating do not have to be in the same
folder.
2. Change the supervisor password on your Digital Entertainer Elite:
Fine-Tuning Your Experience 79
Page 94

a. Press Home and select More > Supervisor functions >
Advanced Settings > Parental controls and security >
Supervisor password.
b. Enter the new password, and press OK.
Be sure you pick a password that is easy to remember, or
store it in a safe place.
3. Select More > Supervisor functions > Advanced Settings > Parental
controls and security > Parental control.
4. Select the standard entertainment industry ratings such as G, PG,
NR, and so on.
Users can access files with the selected rating or a lower rating
(higher up on the menu), but cannot access files tagged with a
higher rating. For example, if you select PG-13, all files with a PG13, PG, TVPG or G rating are accessible at all times. However, files
with TV-14, R, NC17, TVMA or NR (no rating set) are accessible
only if you enter the supervisor password.
Select the NR rating to allow access to all shared media files.
To temporarily suspend parental controls for 20 minutes
and display blocked files, select More > Supervisor
functions and enter the supervisor password. To reestablish parental controls, press the power button to
turn the device off and back on.
80 Fine-Tuning Your Experience
Page 95

Block Files By Location
To block files by location, choose the shared folders that require a
supervisor password:
1. Place the files in a shared folder.
2. Press Home on the remote and select More > Supervisor
functions > Advanced Settings > Parental controls and security >
Share Restrictions.
3. Check the boxes next to the shared folders that require a supervisor
password. Folders with a checked box can be accessed only with
the supervisor password.
4. (Optional) Enter an additional password for each protected folder:
a. Press Home, and select More > Supervisor functions >
Advanced Settings > Servers and shared folders > Select which
servers to scan
b. Highlight the shared folder that is password protected with
parental controls.
c. Press Menu and enter a username and password.
d. Select OK.
Fine-Tuning Your Experience 81
Page 96

82 Fine-Tuning Your Experience
Page 97

Custom Setup and Supervisor
Use the custom setup options to manually set up your Digital
Entertainer Elite. Use the screens you access by selecting More >
Supervisor functions to perform housekeeping tasks, run media library
scans, and view system information. You can also use your Digital
Entertainer Elite to access the desktop of a PC on your network.
Custom Setup
The Custom setup screen lets you manually connect the Digital
Entertainer Elite to your network, and to share media files on your
network so that the Digital Entertainer Elite can access them.
Use this screen to set up access to media files on your network that are
on Linux systems or storage servers attached to the network.
To use Custom setup, press Home, and select More > Supervisor
functions > Setup Wizard. After you select a language and hear the
audio welcome tune, you are offered a choice of Basic or Custom setup.
The Custom Setup screen offers these options:
• Select video mode. Set the appropriate resolution for your TV.
• Change room name. If you have more than one Digital
Entertainer Elite, you can select room names, such as living room,
from the list of options to identify them. Or, you can enter a room
name, using the onscreen keyboard.
Functions
83
Page 98

• Enter your ZIP code. You can enter your zip code to receive news,
weather, and TV programming information for your local area.
• Install Computer Software. Next, you are prompted to use the
installation CD (included with your Digital Entertainer Elite) on the
computer where you store your media files. Follow the prompts in
to complete the setup of your Digital Entertainer Elite.
• Scan for shared content. Your Digital Entertainer Elite will scan
your network for shared folders. Alternately, you can enter the
name of a network workgroup to be scanned.
• Data location. Specify a writeable server location where your
media library and other persistent data files can be stored.
Supervisor Functions Menu Screen
To go to the Supervisor Functions screen, press Home, and select
More > Supervisor functions. The Supervisor Functions menu screen
offers these options:
• Setup wizard. Enter or change the settings for the Digital
Entertainer Elite.
• Advanced settings. See “Advanced Settings” on page 86.
• Full scan for media files. Rebuild the media library. This replaces
current media files and adds newfound media files. A full scan
takes significant time, depending on the number of files you have
designated for sharing.
• Scan for USB attached media. Check for media devices such as
an iPod or MP3 player that are connected to the Digital Entertainer
Elite.
84 Custom Setup and Supervisor Functions
Page 99

• Scan for hard drive media. Check for an internal hard drive
device installed in the Digital Entertainer Elite.
• Hard Drive Tools. Formats the drive or verify the health of the
drive. See “Hard Drive Tools” on page 85.
• Network test. Measure the data transfer between devices on your
network and your Digital Entertainer Elite.
• Update. Check for firmware updates for the Digital Entertainer
Elite on the NETGEAR website, or update the firmware from a file
on a USB storage device. See “Updating the Firmware” on
page 100 for more information.
Be sure that power to your Digital Entertainer Elite unit
is not interrupted during the firmware update process.
Failure to observe this precaution can permanently
damage the unit.
Following a firmware update, you need to reload your
media library into the Digital Entertainer Elite from the
backup location.
• System Information. See “System Information” on page 94.
• Restart. Restart the Digital Entertainer Elite.
Hard Drive Tools
If an internal disk drive is installed, use the Hard Drive Tools screen to
format the drive or verify the health of the drive. You can also manually
copy individual files to the drive.
To access these options, press Home, and select More > Supervisor
functions > Hard Drive Tools.
Custom Setup and Supervisor Functions 85
Page 100

• Manage data on disk. Copies a single media file from another
source drive, such as a PC or USB drive, to the internal hard drive.
• Format disk. Formats the disk for use with your Digital Entertainer
Elite. The format process erases all existing data. Before you begin,
back up any existing data, if necessary.
• Standard disk check. Checks the consistency of the disk file
system. Use this option if you have trouble copying or reading a
file. The standard disk check can take up to 30 minutes. The Digital
Entertainer Elite cannot be used until the process is complete.
• Extensive disk check. Checks the entire disk surface for bad
blocks. Use this option if you have trouble copying or reading a
file. The extensive disk check can take up to several hours. The
Digital Entertainer Elite cannot be used until the process is
complete.
• Unmount drive. Unmounts and disables the drive from the Digital
Entertainer Elite. This option is used to replace a disk. After the
disk is unmounted, replace the hard disk following the instructions
in “Installing and Using an Internal Disk Drive for Pictures,
Music, or Video” on page 4-46.
• Drive information. Displays information about the drive including
capacity and percentage of storage space used.
For more information, refer to “Installing and Using an
Internal Disk Drive for Pictures, Music, or Video” on
page 4-46.
Advanced Settings
The following options are available to customize your Digital
Entertainer Elite.
86 Custom Setup and Supervisor Functions
 Loading...