

Digital Entertainer HD
Model EVA8000 User
Manual
NETGEAR, Inc.
4500 Great America Parkway
Santa Clara, CA 95054 USA
202-10219-01
October 2006

© 2006 by NETGEAR, Inc. All rights reserved.
Trademarks
NETGEAR and Auto Uplink are trademarks or registered trademarks of NETGEAR, Inc.. Microsoft, Windows, and
Windows NT are registered trademarks of Microsoft Corporation.Other brand and product names are registered
trademarks or trademarks of their respective holders. Portions of this document are copyright Intoto, Inc.
October 2006
Statement of Conditions
In the interest of improving internal design, operational function, and/or reliability, NETGEAR reserves the right to
make changes to the products described in this document without notice. NETGEAR does not assume any liability that
may occur due to the use or application of the product(s) or circuit layout(s) described herein.
Customer Support
Refer to the Support Information Card that shipped with your Digital Entertainer HD Model
EVA8000.
World Wide Web
NETGEAR maintains a W o rld Wide Web home page that you can access at the universal resource
locator (URL) http://www.netgear.com.
A direct connection to the Internet and a Web browser such as Internet Explorer or Netscape are
required.
Product and Publication Details
Model Number: EVA8000
Publication Date: October 2006
Product Family: Digital Media Player
Product Name: Digital Entertainer HD Model EVA8000
Home or Business Product: Home
Language: English
Publication Part Number: 202-10219-01
Publication Version Number 1.0
ii
Publication Version 1.0, October 2006

Contents
Digital Entertainer HD Model EVA8000 User Manual
About This Manual
Audience, Conventions, Formats and Scope .................................................................1-v
How to Print this Manual ................................................................................................1-vi
Chapter 1 Getting Started
Important Safeguards and Notices .................................................................................1-1
What is in the Box ...........................................................................................................1-2
Digital Entertainer HD Front View ...................................................................................1-2
Digital Entertainer HD Rear View ...................................................................................1-3
Remote Control ..............................................................................................................1-4
Chapter 2 Installation
Connecting the Digital Entertainer HD ............................. ... ... .... ...... ... .... ... ... ... ... .... ... ... ..2-1
Setting up the Digital Entertainer HD ..............................................................................2-2
Basic Setup ..............................................................................................................2-3
Custom Setup ..........................................................................................................2-3
Installing the Digital Entertainer for Windows Software .................................................. 2-4
Configuring Your Media Library ................................................................. ... ... ... .... ... ..... 2-5
Custom Setup and Wireless Networks ................................................................... ... ... ..2-6
Custom Setup ..........................................................................................................2-6
Wireless Networks .......................... ... .... ... ... ... ... .... ...................................... .... ... ... ..2-6
Chapter 3 Playing Media
Media File Formats ................................ ... .... ... ... ... ... ....................................... ... .... ... ... ..3-1
Main Menu ......................................................................................................................3-2
Watching TV or Recorded Video ....................................................................................3-2
Watching Recorded Video ............................................................ .... ... ... ... ... ............3-2
Listening to Music ............................ ... ....................................... ... ... ... .... ... .....................3-3
Internet Radio Player ...............................................................................................3-4
Playing Music from an iPod ......................................................................................3-5
Publication Version 1.0, October 2006
iii

Viewing Photos ...............................................................................................................3-5
Combining Different Media Sources ...................................... ......................................... 3-6
Recording Video Content ...............................................................................................3-7
Digital Video Recording (DVR) .................................................................................3-7
Continuous Loop Recording ............................... .... ... ... ... ....................................... ..3-8
Recording Settings ...................................................................................................3-8
Scheduling Recordings ............................................................................................3-9
Chapter 4 Supervisor Functions
Supervisor Function Menu ............................ ............ ................. ................ ................ .....4-1
Advanced Setup .............................................................................................................4-1
Local Settings ...........................................................................................................4-2
Setup Network Connection ......................................................................................4-2
Setup Network Shares .............................................................................................4-2
Library Management ................................................................................................4-3
System Information .........................................................................................................4-3
Chapter 5 Maintenance and Troubleshooting
Resetting to Factory Defaults .........................................................................................5-1
Error Messages ..............................................................................................................5-1
Firewall Port Settings ......................................................................................................5-2
Accessing Your Digital Media ...................................................................................5-2
Connecting to Wireless Networks ...................................................................................5-3
Appendix A
Technical Specifications and Default Settings
Technical S p ecifications ................................................................................................. A-2
Default Settings ............................................................................................................. A-3
Appendix B
Related Documents
iv
Publication Version 1.0, October 2006
About This Manual
This chapter describes the intended audience, scope, conventions, and formats of
this manual.
Audience, Conventions, Formats and Scope
This manual assumes that the reader has basic to intermediate computer and
Internet skills. However, basic computer network, Internet, firewall, and VPN
technologies tutorial information is provided in the Appendices and on the
NETGEAR website.
This guide uses the following typographical conventions:
Table 1-1. Typographical Conventions
italics Emphasis, books, CDs, URL names
bold User input
fixed Screen text, file and server names, extensions, commands, IP
addresses
This guide uses the following formats to highlight special messages:
Note: This format is used to highlight information of importance or
special interest.
Tip: This format is used to highlight a procedure that will save time or
resources.
Warning: Ignoring this type of note may result in a malfunction or
damage to the equipment.
v1.0, October 2006
v
Digital Entertainer HD Model EVA8000 User Manual
Danger: This is a safety warning. Failure to take heed of this notice may
result in personal injury or death.
This manual is written for the Digital Entertainer HD according to these
specifications:
Table 1-2. Manual Scope
Product Version Digital Entertainer HD Model EVA8000
Manual Publication Date October 2006
Note: Product updates are available on the NETGEAR, Inc. website at
http://kbserver.netgear.com/products/EVA8000.asp.
How to Print this Manual
To print this manual you can choose one of the following several options,
according to your needs.
• Printing a Chapter.
Use the PDF of This Chapter link at the top left of any page.
— Click the PDF of This Chapter link at the top left of any page in the
chapter you want to print. The PDF version of the chapter you were
viewing opens in a browser window.
— Y our computer must have the free Adobe Acrobat reader installed in order
to view and print PDF files. The Acrobat reader is available on the Adobe
Web site at
http://www.adobe.com.
— Click the print icon in the upper left of the window.
Tip: If your printer supports printing two pages on a single sheet of
paper, you can save paper and printer ink by selecting this
feature.
vi About This Manual
v1.0, October 2006
Digital Entertainer HD Model EVA8000 User Manual
• Printing the Full Manual.
Use the Complete PDF Manual link at the top left of any page.
— Click the Complete PDF Manual link at the top left of any page in the
manual. The PDF version of the complete manual opens in a browser
window.
— Click the print icon in the upper left of the window.
Tip: If your printer supports printing two pages on a single sheet of
paper, you can save paper and printer ink by selecting this
feature.
About This Manual vii
v1.0, October 2006

Digital Entertainer HD Model EVA8000 User Manual
viii About This Manual
v1.0, October 2006
Chapter 1 Getting Started
Important Safeguards and Notices
Please read and follow this important information, especially those instructions
related to the risk of electric shock or injury to persons.
Warning: To reduce the risk of electric shock do not remove the cover.
There are no user serviceable parts inside.
Warning: This device can display static images, which can cause “burn
in” of certain displays. Avoid leaving static images (such as
photos or paused videos) onscreen for long periods of time.
Warning: There are no user serviceable fuses To avoid fire hazard, use
only the specified fuse(s) with the correct type
number,voltage and current ratings as referenced in the
service instructions or on the equipment. Fuses should be
replaced only by qualified service personnel.
Warning: This device should be used only indoors in well ventilated
areas. To reduce the risk of fire, electric shock, or
interference, do not expose this appliance to moisture or rain
and use only the recommended accessori es .
v1.0, October 2006
1-1
Digital Entertainer HD Model EVA8000 User Manual
What is in the Box
The Digital Entertainer HD comes with the following components:
• Digital Entertainer HD
• RF Remote control
• Rechargeable NiMH batteries for the RF remote control
• 9V 250 mA charger for the RF remote control
• 12V AC/DC power supply
• CAT5 network cable
• Composite RCA-type A/V cable
•S-Video cable
• IEC power cable
• 2 AA batteries
• NETGEAR Resource CD
• Quick Install Guide
• This User Manual
Contact your dealer to get a replacement of any missing component.
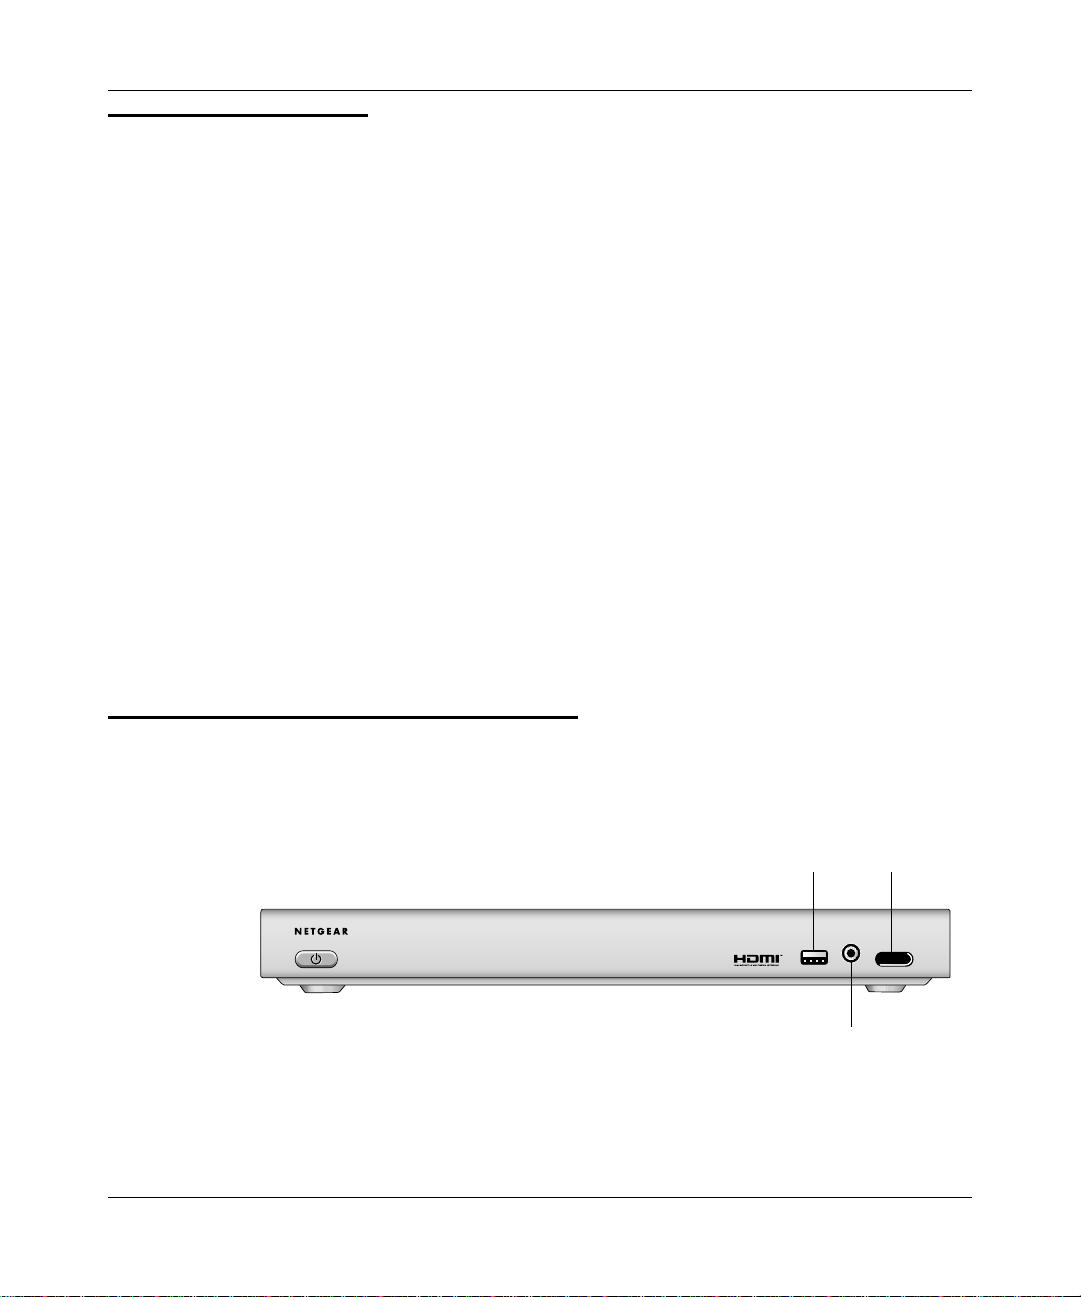
Digital Entertainer HD Front View
The front view of the of the Digital Entertainer HD is shown below:
power
USB port
headphones
Figure 1-1
1-2 Getting Started
v1.0, October 2006
LED
~Í?ËÍjÁÍ?jÁËË7oååå
Digital Entertainer HD Model EVA8000 User Manual
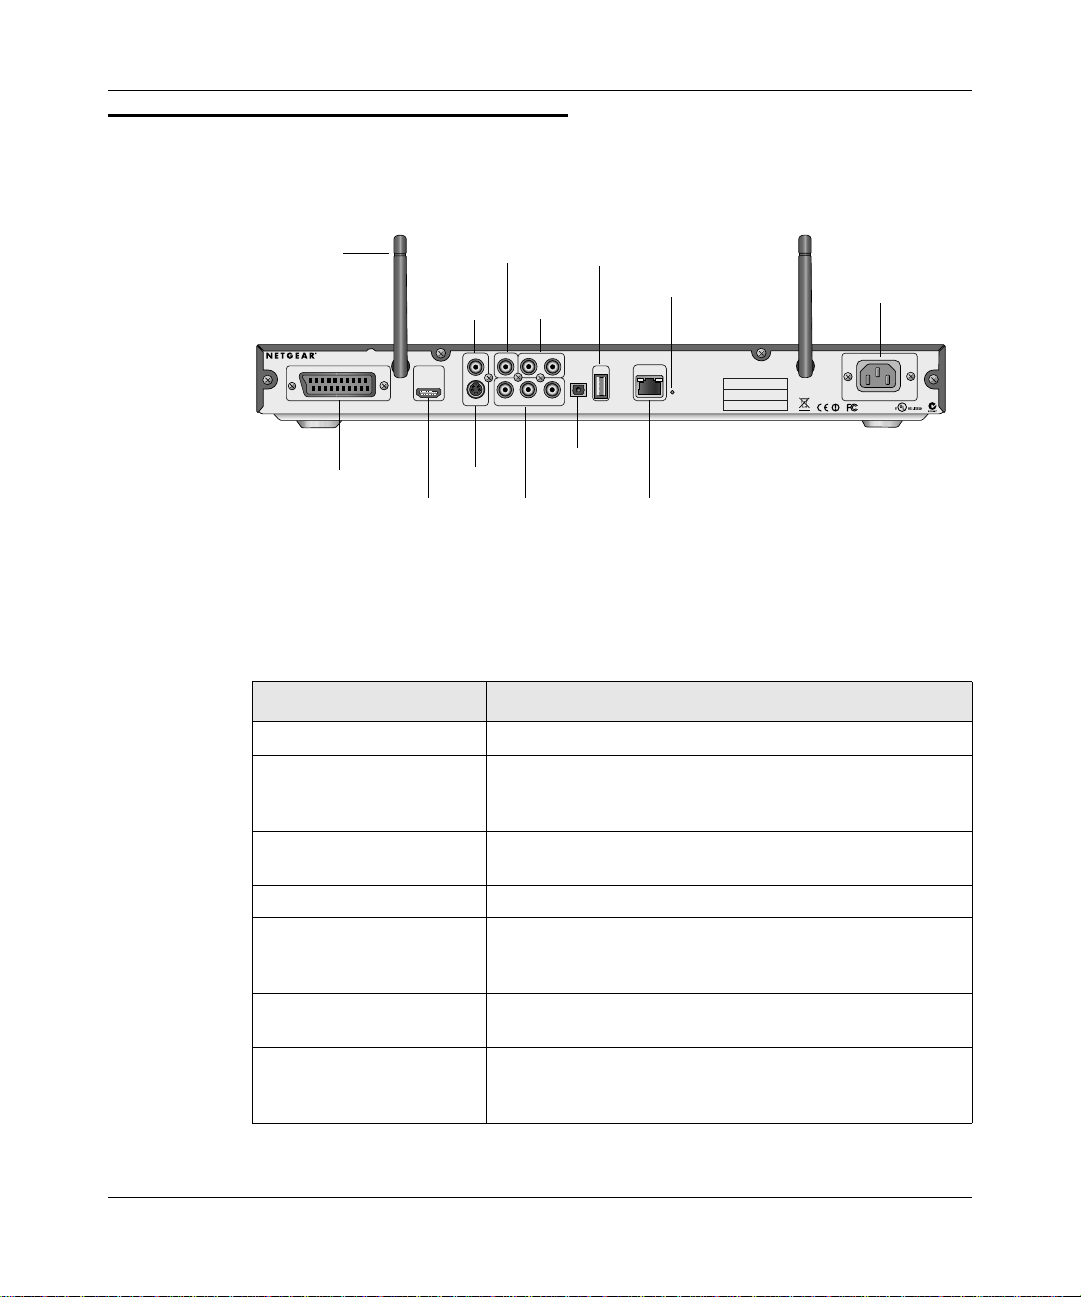
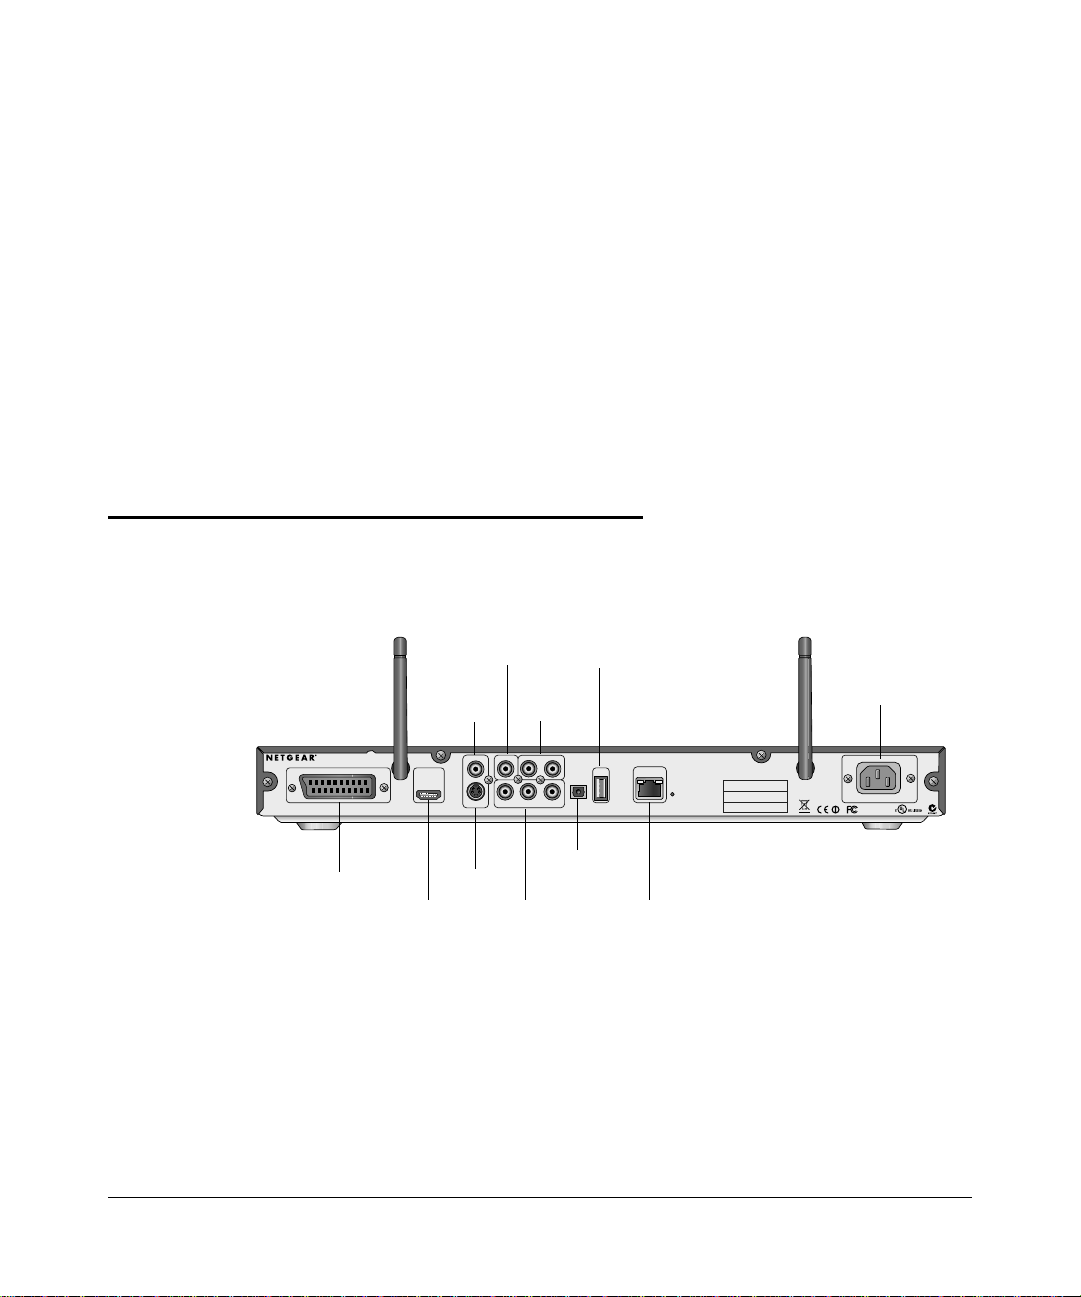
Digital Entertainer HD Rear View
The rear view of the Digital Entertainer HD is shown below.
wireless
antenna
~Í?ËÍjÁÍ?jÁËË7oååå
composite
video
S/PDIF
coaxial
(audio)
.W?ÁÍ
.Ê+Ë?Þ?
.7aj
¬ÄÍjË7aj
:
stereo
audio
¬jÍË7aj
USB
port
reset
Öa
-
ÖÍ
2.
.¬jja
Ê0
¬M
¬Á
.Ê+Ë#¬ÍW?
.-
-jÄjÍ
®ÝÁja¯
®ÝÁjjÄį
power
+ÝjÁ
¤ååÔ|å7IyåÉåã±Ë¤±ÔË?Þ±
Ë]ËË+:ÏåyÏååå¤
Ë]Ë|åy|åyÏååå¤Ë
±0±±ËÔ¤ÔÈÈo
optical
SCART
HDMI
S-Video
component
audio port
Ethernet port
video with LEDs
Figure 1-2
The table below describes the connections on the rear panel.
Table 1-1. Rear Panel Connectors
Connector Description
Wireless antennas
S/PDIF coaxial (audio)
(Sony/Philips Digital
Interface) port
Composite video and
stereo audio
USB port
Reset button This button can reboot or reset the Digital Entertainer HD to
Power The Digital Entertainer HD includes an internal power
SCART This cable is widely used in Europe and Australia. Though
The Digital Entertainer HD includes two wireless antennas.
If you use S/PDIF cable, you can connect it here. This cable
does not ship with the product, and you will need to change
the Digital Entertainer HD settings in order to use it.
The composite video is included, and is compatible with
most televisions in the United States.
its default factory settings. To reset, press and hold the
button down.
supply and universal power adapter.
this cable is not included in the package, the Digital
Entertainer HD is compatible with this cable.
Getting Started 1-3
v1.0, October 2006
Digital Entertainer HD Model EVA8000 User Manual
Table 1-1. Rear Panel Connectors (continued)
Connector Description
HDMI If you use HDMI cable, you can connect it here. This cable
is not included, but the Digital Entertainer HD is compatible
with it.
S-Video The audio cable is included, and is compatible with most
televisions in the United States.
Component video ports This cable is not included, but the Digital Entertainer HD is
compatible with it.
optical audio port This cable is not included, but the Digital Entertainer HD is
compatible with it.
Ethernet port with LEDs 10/100 Mbps Ethernet port for connecting the Digital
Entertainer HD to a wired local area network (LAN).
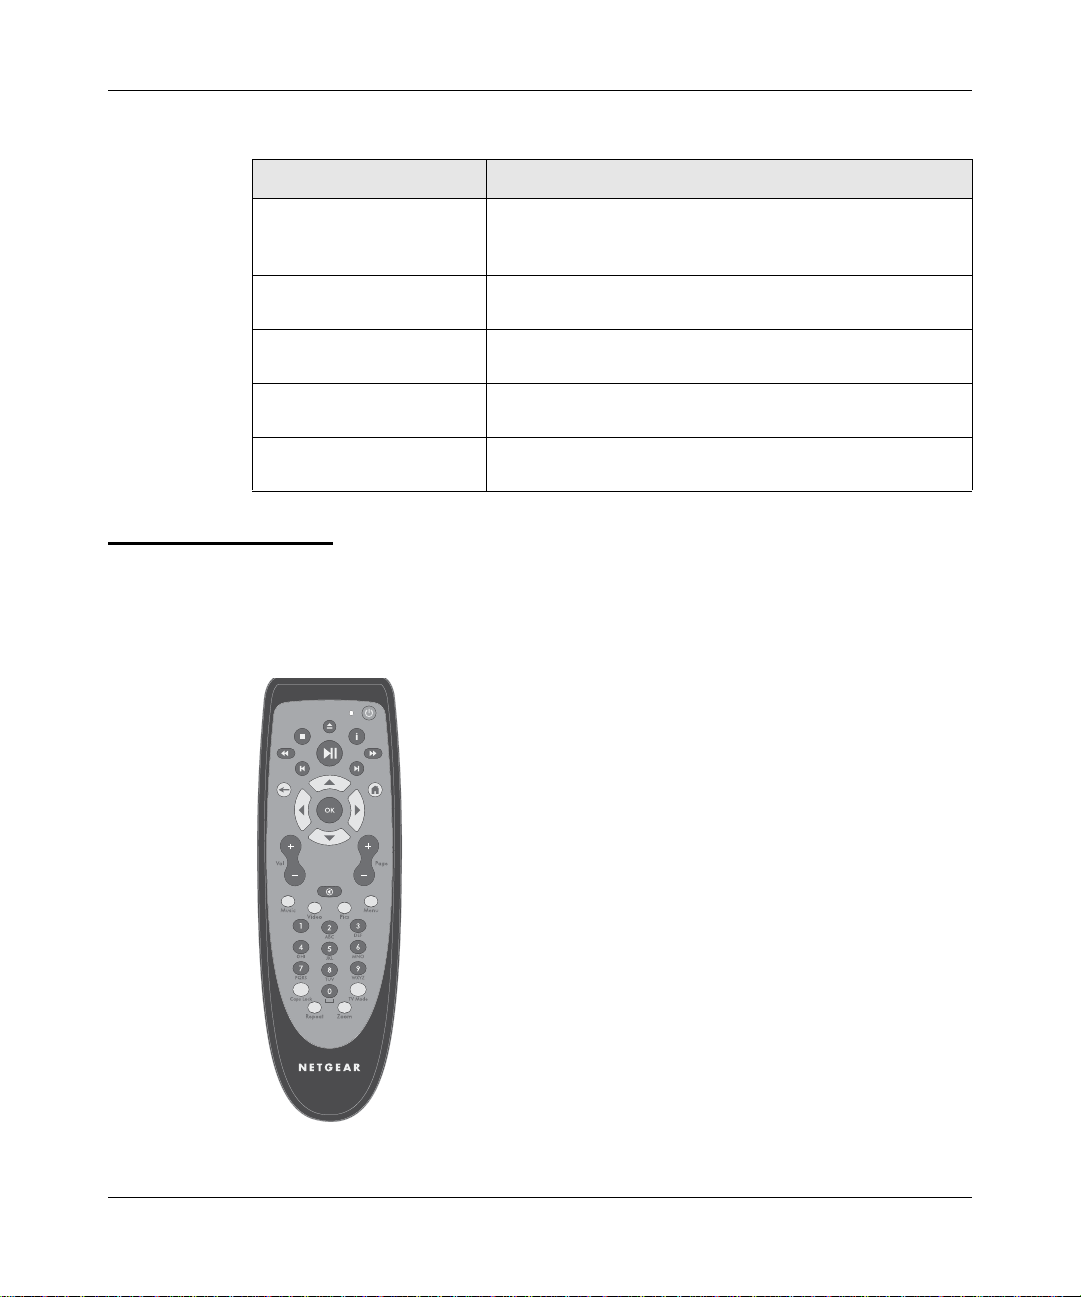
Remote Control
Use the remote control to navigate menus, and to select and to watch videos, listen
to music, or view photos on your television.
Figure 1-3
1-4 Getting Started
v1.0, October 2006
Digital Entertainer HD Model EVA8000 User Manual
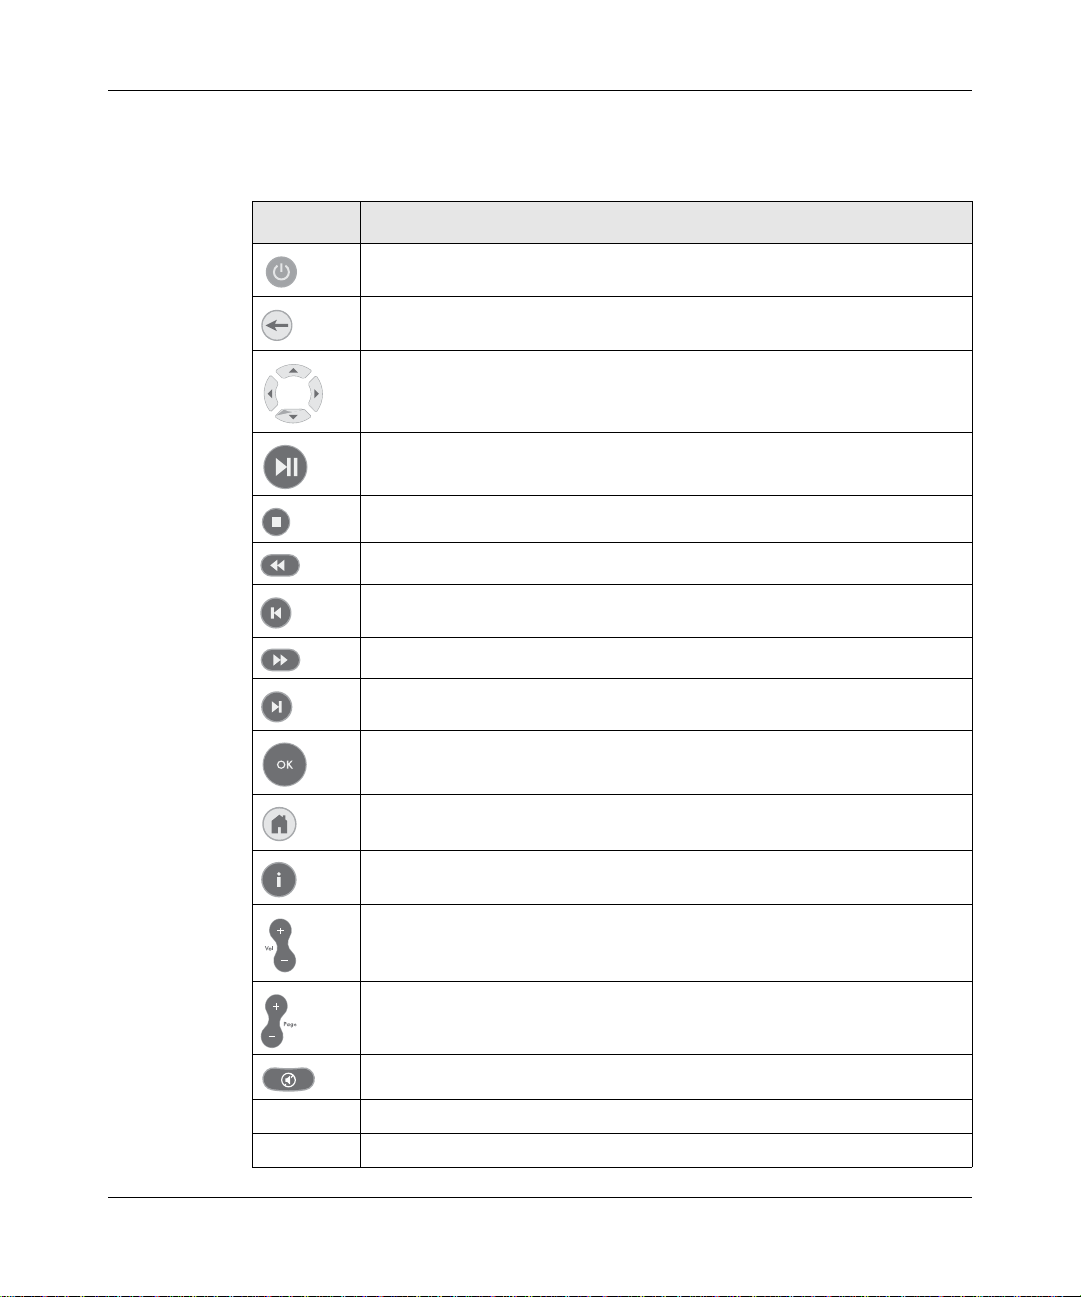
The table below describes the remote control buttons.
Table 1-1. Remote control buttons
Button Description
Power. Turn the Digital Entertainer HD off and on.
Back. Go back to the previous screen.
Navigation. Use these buttons to navigate the menu selections. When
playing a video, you can use the left and right buttons to seek by single
percentage points.
Play/Pause. Press Play to play each file in sequence in a list of songs or
videos.
Stop. Stop the media that is currently playing.
Rewind. Rewind to the beginning of the media that is currently playing.
Previous. Go to the previous item on a list.
Fast forward. Advance the media that is currently playing.
Next. Go to the next item on a list.
Select and Play. Press OK to play an individual song or video, and then
stop.
Home. Display the Main menu.
Information. Display media information.
Volume. Increase or decrease volume
Page up and Page down. Scroll up or down.
Mute. Mute or unmute the sound.
Music Music menu. Display the Music menu .
Video Video menu. Display the Video menu to select movies and video clips.
Getting Started 1-5
v1.0, October 2006
Digital Entertainer HD Model EVA8000 User Manual
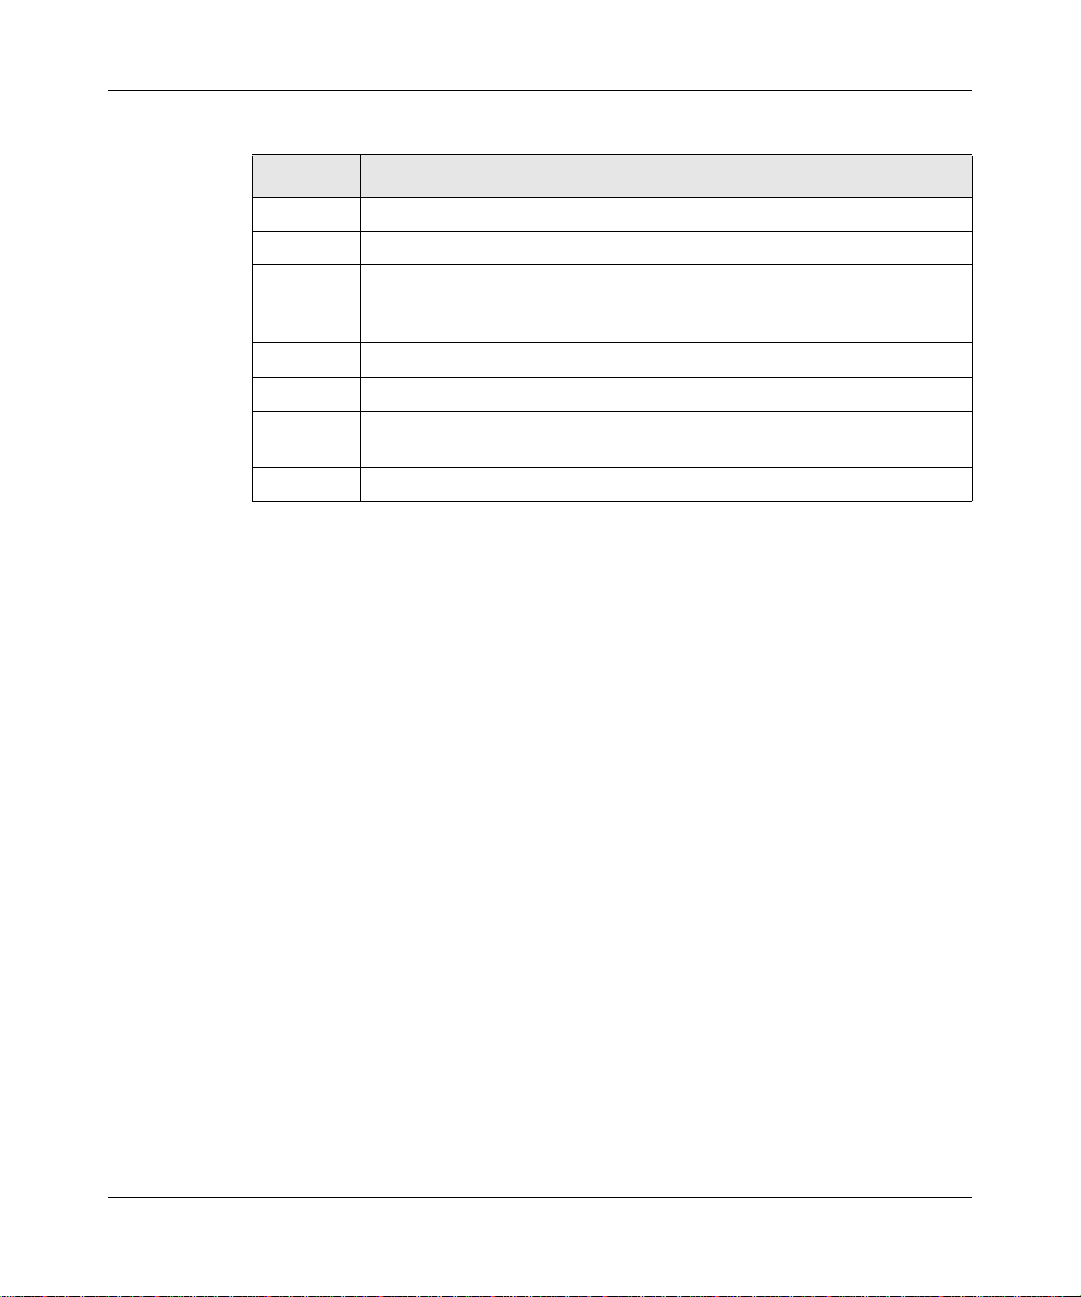
Table 1-1. Remote control buttons (continued)
Button Description
Pics Picture menu. Display the Picture menu to select photographs to view.
Menu Settings menu. Display the Settings menu.
0-9 Numbers. Use this for numeric entry, choosing presets, and searching.
When you are playing audio or video media, you can seek in 10%
increments (such as 10% or 20%) in the currently playing stream.
Caps Lock Caps Lock. Toggle Caps Lock on or off.
TV Mode TV Output Mode. Change the output mode (such as NTSC or PAL).
Repeat Repeat. Repeat a track or media selection. For slide shows, rotate the
photo by 90 degrees.
Zoom Zoom. Change the zoom setting for video.
1-6 Getting Started
v1.0, October 2006
Chapter 2 Installation
Install your Digital Entertainer HD in this order:
1. Connect the Digital Entertainer HD.
2. Set up the Digital Entertainer HD.
3. Inst all softwa re on your computer with the NETGEAR Resource CD.
4. Configure your media library to work with the Digital Entertainer HD.
5. For Custom Setup or wireless networks, enter the settings.
Connecting the Digital Entertainer HD
The figure below shows the rear view of the Digital Entertainer HD.
~Í?ËÍjÁÍ?jÁËË7oååå
composite
video
S/PDIF
coaxial
(audio)
.W?ÁÍ
.Ê+Ë?Þ?
.7aj
¬ÄÍjË7aj
:
stereo
audio
¬jÍË7aj
USB
port
power
Öa
-
ÖÍ
2.
.¬jja
Ê0
¬M
¬Á
.Ê+Ë#¬ÍW?
.-
-jÄjÍ
®ÝÁja¯
®ÝÁjjÄį
+ÝjÁ
¤ååÔ|å7IyåÉåã±Ë¤±ÔË?Þ±
Ë]ËË+:ÏåyÏååå¤
Ë]Ë|åy|åyÏååå¤Ë
±0±±ËÔ¤ÔÈÈo
optical
SCART
HDMI
S-Video
component
audio port
Ethernet port
video with LEDs
Figure 2-1
Follow these steps to connect the Digital Entertainer HD:
1. Connect the Digital Entertainer HD to your TV and audio equipment. If you
use a digital audio/visual (a/v) receiver, use a S/PDIF coaxial or optical cable
to connect it.
2-1
v1.0, October 2006

Digital Entertainer HD Model EVA8000 User Manual
2. The Digital Entertainer HD can use an Ethernet local area network (LAN)
connection, or it can connect wirelessly to an 802.11g or 802.11b wireless
network.
• Ethernet LAN: Connect the Digital Entertainer HD to the router with an
Ethernet cable.
• Wireless: You will need to know the network name, also called the SSID,
and the wireless security settings for your network.
3. Connect the Digital Entertainer HD power cord and plug it into an outlet.
The LED on the front of the Digital Entertainer HD lights up to show that it is
powered on.
4. Install the two AA batteries into the remote control that was packaged with
the product.
Setting up the Digital Entertainer HD
Follow these steps to set up the Digital Entertainer HD:
1. Turn on the TV.
2. Set the video source selector on your TV to match the connection from your
Digital Entertainer HD. For example, if you used HDMI, set the TV to use
“Digital HD” or “HDMI” input.
3. Check the TV display. If it is not clear, aim the remote control at the Digital
Entertainer HD, and push TV Mode. You can cycle through the TV modes to
get the best display. It can take 3 or 4 seconds for each TV mode change.
4. When prompted, select a language and then press OK.
5. When you hear the audio welcome message, press OK.
If you do not hear the audio welcome message, check the connections to the
Digital Entertainer HD.
6. You can use Basic Setup or Custom Setup. Basic Setup works in most cases.
2-2 Installation
v1.0, October 2006

Basic Setup
Follow these steps for basic setup.
1. After the audio welcome message, choose Basic setup.
2. Depending on where you bought your Digital Entertainer HD, you may be
3. When prompted to install software, go to the computer where you will install
Custom Setup
Use Custom Setup if you want to manually enter one or more of these items: room
name, scan for media, select media servers, or TV provider.
Follow these steps for custom setup.
Digital Entertainer HD Model EVA8000 User Manual
You can use TV Mode to try out different TV resolution settings.
prompted to enter your zip code.
If you want to receive news and weather, or to schedule TV recordings with
the electronic program guide, enter your zip code. Press the down arrow when
you are finished, and then press OK.
the software.
1. After you hear the audio welcome message, choose Custom Setup.
You can use TV Mode to try out different TV resolution settings.
2. You can change the room name. Select from the list, or create a new one.
3. Depending on where you bought your Digital Entertainer HD, you may be
prompted to enter your zip code.
If you want to receive news and weather, or to schedule TV recordings with
the electronic program guide, enter your zip code. Press the down arrow when
you are finished, and then press OK.
4. When prompted to install software, go to the computer where you will install
the software.
Installation 2-3
v1.0, October 2006

Digital Entertainer HD Model EVA8000 User Manual
Installing the Digital Entertainer for Windows Software
After connecting the Digital Entertainer HD and completing setup, follow these
steps to install the software.
1. Power on your computer and log in as needed.
2. Insert the NETGEAR Resource CD
into the CD drive on the computer.
The W elcome page opens. If you do
not see the Welcome page, browse
the files on your CD, and then click
Setup.
3. Select Install the NETGEAR
Digital Entertainer for Windows
Software.
4. Follow the Setup Wizard steps to
accept the licence and install the
software.
Figure 2-2
5. After the Se tup Wizard steps are finished, click Configure to use the
Configuration Wizard.
Figure 2-3
2-4 Installation
v1.0, October 2006

Digital Entertainer HD Model EVA8000 User Manual
Configuring Your Media Library
Use the Configuration Wizard to set up your media library to work with the
Digital Entertainer HD. Follow these steps:
1. Click Next to begin.
The Configuration Wizard prompts
you to select media folders to be
shared. This will allow the Digital
Entertainer HD to access these files.
2. Browse and select the folders that
you want, and then click Next.
3. Choo se whether or not you want to
create Photo Thumbnails, and then
click Next.
The Configuration Wizard is ready
to configure your Digital
Entertainer HD and displays this
screen to the right.
Figure 2-4
4. For some firewalls, specific ports
must be opened so that the Digital
Entertainer HD can access media
files on your computer. If
prompted, select Allow or Unblock
to allow the access. For information
about manually opening firewall
ports, see “Firewall Port Settings”
Figure 2-5
in Chapter 5.
5. Click Next and go to your TV.
• If you used Basic Setup with a LAN connection, you are finished with the
installation and can play media on your Digital Entertainer HD.
• If you selected Custom Setup or have a wireless network, enter the
settings now as described in the following sections in this chapter.
Installation 2-5
v1.0, October 2006

Digital Entertainer HD Model EVA8000 User Manual
Custom Setup and Wireless Networks
If you selected Custom Setup, enter the Custom Settings. If you have a wireless
802.11g or 802.11b network, then select the wireless network and enter the
settings.
Custom Setup
If you selected Custom Setup, return to your TV to enter them.
1. Press OK on the remote control. You can choose to scan for shared content
(shared media).
If you do not want to scan automatically, select No to go to the Setup Network
Shares menu. (See “Setup Network Shares” in Chapter 4) where you can do
this manually.
2. Select the media servers from the drop-down list, and then choose the
writeable server location. The electronic program guide uses the writeable
server location.
3. Select your TV provider from the list.
The Digital Entertainer HD goes to the Supervisor Functions menu.
Wireless Networks
Note: You need to know the wireless network name, also called the
SSID, and the wireless security settings for your network.
Use the Network Connection menu to enter the wireless settings.
1. Push Home, and select More>Supervisor Functions>Advanced Setup>
Setup network connection.
2. Select Wireless.
The Digital Entertainer HD scans for wireless networks in your area and
displays a list. The list may contain open, secure, or hidden wireless network s.
• Open Network: This network does not use wireless security.
2-6 Installation
v1.0, October 2006

Digital Entertainer HD Model EVA8000 User Manual
• Secure Network: This network uses wireless security such as WEP,
WPA, or WPA2. To connect to it you must enter any passphrase or
security keys required for access.
• Hidden Network: A hidden network does not broadcast its SSID, so the
SSID is blank on this display. To connect to this wireless network you
must enter the SSID, and then enter any passphrase or security keys
required for access.
3. Select your network from the list and the Digital Entertainer HD tries to
connect to it.
• Successful connection: The screen shows information about the network
settings. For more information about network settings, see “Setup
Network Connection” in Chapter 4.
• Unsuccesful connection: View the list of wireless networks in your area.
Make sure that the signal strength is good and that you selected the
correct network. See “Connecting to Wireless Networks” in Chapter 5.
Installation 2-7
v1.0, October 2006

Digital Entertainer HD Model EVA8000 User Manual
2-8 Installation
v1.0, October 2006

Your Digital Entertainer HD can play a variety of digital files, and can combine
the playback of digital and analog sources at the same time.
Media File Formats
See the NETGEAR website for the latest list of supported formats. As of this
printing the Digital Entertainer HD supports at least:
Table 3-1. Media File Formats
Media Format
Audio Formats • MPEG-1 Layer 1 (MP1)
Audio Playlists • WPL, ASX, WAX, WVX, PLS, M3U, RMP
Video Formats • MPEG-1 VCD format (1.15 Mbps CBR)
Photos JPG, BMP, TIFF
Chapter 3 Playing Media
• MPEG-1 Layer 2 (MP2)
• MPEG-1 Layer 3 (MP3)
• Ogg Vorbis (OGG)
• AC3 5.1 (AC3)
• Microsoft PCM Wave (WAV)
• Advanced Audio Coding (AAC, ADIF, ADTS)
• Apple MPEG4 AAC Audio (M4A)
• Microsoft Windows Media Audio version 1 and version 2
(WMA)
• Microsoft Windows Media Audio Professional (WMA Pro)
• These are for Windows Media Player, WinAmp, RealPlayer,
MusicMatch, iTunes
• SD and HD MPEG-2 up to 15 Mbps (using MPEG Audio, AC3,
DTS audio formats)
• SD and HD MPEG-4 (OpenDivX3, 4, 5.11, XviD)
• SD and HD WMV9 (using WMA audio codec)
• AVI audio codec: MP3, AC3, PCM, WMA, Ogg
• MOV: 3ivX + MP3, 3ivX + PCM (3ivX converted from
supported MPEG-4 video codec using Dr. DivX II for MAC OS)
• MP4: MP4V + MP4A (AAC) (only support non-hinted MP4)
• Subtitle (MicroDVD, SubRip, Sub Station Alpha, Sami)
v1.0, October 2006
3-1

Digital Entertainer HD Model EVA8000 User Manual
Main Menu
Push Home on the remote control to go to the Main menu. The Main menu
offers these selections:
• TV/Video. Watch the TV tunor, or recorded videos.
• Photos. View photos.
• Schedule recordings. Schedule TV recordings with the electronic program
guide.
• Access PC. Connect to the computer where you installed the Digital
Entertainer Windows software.
• News/Weather. View news and weather.
• More. View or work with System Functions. See Chapter 4, “Supervisor
Functions”.
Watching TV or Recorded Video
You can watch the TV tuner or recorded video.
• TV Tuner. Press Video on the remote control and then select TV Tuner.
• Recorded V ideo. Press Video on the remote control and then select Recorded
Video
Watching Recorded Video
The Digital Entertainer HD finds the media files on your computer’s hard disk, on
other computers, external hard drives, or other storage devices on the network.
To watch a video, follow the steps below.
1. Turn on the television and the Digital Entertainer HD.
2. Aim the remote control at the digital media player push Home.
3. Select TV/Video>Recorded Video.
4. Use the Rec orded Video menu to browse videos.
5. Select the video that you want to watch.
3-2 Playing Media
v1.0, October 2006

Digital Entertainer HD Model EVA8000 User Manual
• To zoom in or out when watching a video, push Zoom.
• To display information about the video, push i. This option is only
available when a video is listed or playing.
The following table describes how to use the remote control navigation buttons
with recorded videos.
Table 3-2. Remote Control Navigation with Recorded Videos
Button When Playing While Paulsed
Play/Pause
Stop
Fast Forward
Rewind
Next
Previous
Listening to Music
The Digital Entertainer HD finds the media files on your computer’s hard disk, on
other computers, external hard drives, or other storage devices on the network.
Some audio files may be stored without information in some fields, such as album
or genre. If this is the case, these tracks are listed in a category called “Unknown”.
To play music, follow the steps below:
Fast Forward or
Rewind
Pause Play Resume play
Stop playback Stop playback Stop playback
Fast forward Slow motion Faster
Rewind Rewind faster
Go forward 30’s Single frame Go 15 minutes
forward
Go back 10’s Go 15 minutes back
Tip: The Repeat button on the remote control lets you repeat a
selection.
Playing Media 3-3
v1.0, October 2006

Digital Entertainer HD Model EVA8000 User Manual
1. Push the Music button on the remote control, or push Home, and then
select Music.
This menu offers the following selections:
• Play something. Play shared music.
• Browse. Browse digital music such as MP3.
• Playlists. Select and play a playlist.
• Internet Radio. Browse Internet radio stations, remove, or add a station.
See “Internet Radio Player” on page 3-4.
2. Select the music that you want to play.
The following table shows how to use the remote control navigation buttons while
playing music.
Table 3-3. Remote Control Navigation While Playing Music
Button When Playing
Play/Pause
Stop
Fast Forward
Next
Previous
Internet Radio Player
The Internet Radio Player menu offers these selections:
• Browse station. You can browse by Title, Genre, or Quality. Use the up or
down arrows and Page Up or Page Down to scroll through the list.
• Remove station. Remove an Internet radio station from the list.
• Add station. Add an Internet radio station to the list.
Pause, or resume play if paused
Stop play b ack
Fast forward
Go to the next track.
Go to the previous track.
3-4 Playing Media
v1.0, October 2006

Playing Music from an iPod
~Í?ËÍjÁÍ?jÁËË7oååå
You can connect an iPod to a USB port on the front or rear panel of the Digital
Entertainer HD. It does not matter if you set up the iPod on a PC or a Mac. Follow
these steps:
1. Use the USB cable that came with your iPod to connect it to the USB port on
the front of the Digital Entertainer HD.
Figure 3-1
2.
Viewing Photos
Digital Entertainer HD Model EVA8000 User Manual
USB port
The Digital Entertainer HD finds the media files on your computer’s hard disk, on
other computers, external hard drives, or other storage devices on the network.
1. Use the Pics button on the remote control, or push
Home, and then select
Photos.
2. Browse by Title, by Folder, or Year.
3. Select the photos that you want to view.
You can view photos in Full screen or Thumbnail mode.
• Full screen mode. Cycle through the photos, that are displayed in the same
size and zoom level they were last viewed.
• Thumbnail mode. View thumbnails of 12 photos at a time, allowing you to
scroll between them (if you said yes to Thumbnails during installation).
Playing Media 3-5
v1.0, October 2006

Digital Entertainer HD Model EVA8000 User Manual
The following table shows how to use the remote control navigation buttons while
viewing photos.
Table 3-4. Remote Control While Viewing Photos
Button When Playing
Next
Previous
Next
Previous
Next
Previous
Select
Ch Up
Ch Down
1
2
3
Pause, or resume play if paused
Stop playb ack.
Speed up the slide show.
Slow down the slide show.
Go to the next photo.
Go to the previous photo.
Toggle to and from thumbnail view.
Zoom in.
Zoom out.
Set 4 x 3 aspect ratio.
Set 16 x 9 aspect ratio.
Set 16 x 9 letterbox aspect ratio
The aspect ratio settings adjust the display of the photo to for different types of
TV sets.
Combining Different Media Sources
You can play both video and audio media at the same time. For example, you can
watch a DVD, and play music.
• For videos, start the video first, and then start the audio.
• For photos you can start the audio first if you prefer.
3-6 Playing Media
v1.0, October 2006

Navigation commands from the remote control go to the media that you started
last. The other buttons control the first media. For example, if you are watching a
DVD, and then you play music, pressing Pause pauses the music. Pressing the
number buttons or Channel Up changes the channel.
Recording Video Content
Note: To record a media source onto a computer hard disk you must first
set up the network recording destination using the Recording
Setup menu. Push Home, and then select Supervisor>
Functions>Setup>Recording Settings.
You can use the Digital Entertainer HD for digital video recording (DVR) and for
continuous loop recording.
Digital Video Recording (DVR)
A standard movie .mpg file is created, which which you can play on most PCs.
Digital Entertainer HD Model EVA8000 User Manual
Follow these steps to use the DVR feature:
1. Press Record to rec ord what you are currently watching as a hard disk file.
2. Specify how long to record, or press Stop to stop recording.
Example
T o record a vid eo source such as a VHS tape of your family wedding to hard d isk:
1. Place the tape in your VCR. Push Home, and then select TV-Video>
VCR.
2. Press
pause the tape playback.
3. Press Record. Whe n the “recording” message appears on screen, press
start the tape playing again. Press to stop when the recording is complete.
You can also set the length of time for your recording, and watch something else
while the recording is ongoing. After you have started recording, push Home
and select what you want to watch.
Playing Media 3-7
until you skip past the tape’s header, and then press again to
to
v1.0, October 2006

Digital Entertainer HD Model EVA8000 User Manual
Continuous Loop Recording
Continuous loop recording creates a loop file (you set how large it is) to record
video for an hour or two. As new video comes into the loop, it replaces the oldest
video content in the loop.
Loop files are only created for live-TV sources, which are cable (either with the
built-in tuner in the Digital Entertainer HD or through an external cable tuner) or
satellite.
To start recording to a loop file, follow these steps:
1. Select a live-TV source and press to play.
This creates the loop file.
2. You can press again to pause and rewind through your TV viewing.
3. Press again to restart playback.
Recording Settings
Note: To record a media source onto a computer hard disk you must first
set up the network recording destination from the Recording
Setup menu. Push Home, and select Supervisor
Functions>Setup>Recording Settings.
Use Recording settings to set the recording destination, default duration and bit
rate at which all recordings are made. You can also control the default bit rate at
which Digital Entertainer HD streams video to other devices, and the size of the
loop file recordings.
When watching any video source, press Record to record what you are currently
watching.
• Use settings automatically. The recording starts immediately, using the
settings in the “Recording Settings” menu.
• Manually enter settings. Enter the settings, press OK, and then the recording
begins.
3-8 Playing Media
v1.0, October 2006

Scheduling Recordings
You can use the program guide to schedule automatic recording of broadcast TV,
and to manage the recording schedule. Follow these steps:
1. Push Home, and select Schedule recordings.
• Browse shows. Browse through shows on the electronic program guide.
See “Browse and Record” on page 3-10.
• Browse channels. Browse channels on the electronic program guide.
• Manually add entry.
• Manage Recording Rules. See “Managing Recording Rules” on
page 3-9.
• View upcoming recordings.
• Recording Schedule Wish List. Make or work with a wish list. See
“Wish List” on page 3-9.
2. Select the the show that you want to record and schedule it.
Managing Recording Rules
Digital Entertainer HD Model EVA8000 User Manual
You can set up and manage Recording Rules.
1. Push Home, and select Schedule recordings>Manage Recording Rules.
The following options are displayed:
• Change rule priority.
• Edit rules.
• Edit one time rules.
2.
Wish List
You can set up a Wish List of shows that you would like to record if they are
shown on the electronic program guide..
1. Push Home, and select Schedule recordings>Recording Schedule Wish
List.
The following options are displayed:
Playing Media 3-9
v1.0, October 2006

Digital Entertainer HD Model EVA8000 User Manual
• Make a wish list. Create a wish list. Enter the text for the description.
• Edit a wish list. Change the settings for your wish list.
• Perform wish list search. Search for shows that match the criteria on
your wish list.
• Browse shows found. View a list of upcoming shows that are on your
wish list.
2. Make the selections that you want
Browse and Record
You can browse the program guide to find programs that you wan t to record. You
can search for text, or you can browse by categories and meta categories in the
program guide tree.
For example, you can select “Broadcast Network /Prime Time / Reality Show” as
a category. You can browse shows that match those criteria, and then browse the
episodes that will air within the next week.
When you find a show, you can record episodes individually, or to set up rules to
record episodes automatically.
Note: The Digital Entertainer HD NEVER deletes data from your
network shares (shared media files). So you will need to manage
your disk space, and to be careful to clean up once you no longer
want to keep a recording.
3-10 Playing Media
v1.0, October 2006

Chapter 4 Supervisor Functions
Use the Supervisor Functions to manage the Digital Entertainer HD.
Supervisor Function Menu
To go to the Supervisor Function menu, push Home, and select
More>Supervisor Functions. The Supervisor Function menu offers these options:
• Setup Wizard. Enter or change the settings for the Digital Entertainer HD.
• Advanced Setup. See “Advanced Setup” on page 4-1.
• Full scan for media files. Replace current media files and add new media
files found.
• Quick scan for media files. Look for new media files and add them.
• Look for removable media. Check for media devices such as an iPod or
MP3 player that is connected to the Digital Entertainer HD.
• Update. Check for firmware updates for the Digital Entertainer HD on the
NETGEAR website.
• System Information. See “System Information” on page 4-3.
Advanced Setup
Push Home, and select More>Supervisor Functions>Advanced Setup. The
Advanced Setup menu offers these options:
• Change screen resolution.
• Local settings. See “Local Settings” on page 4-2.
• Setup network connection. See “Setup Network Connection” on page 4-2.
• Setup network shares. Set up shared media files available for the Digital
Entertainer HD. See “Setup Network Shares” on page 4-2.
4-1
v1.0, October 2006

Digital Entertainer HD Model EVA8000 User Manual
• Library management. Manage your media libaray. See “Library
Management” on page 4-3.
• Setup program guide download.
• Data save location. Specify where the electronic program guide data will be
saved.
Local Settings
Push Home, and select More>Supervisor Functions>Advanced Setup>Local
Settings. The Local Settings menu offers these options:
• Change room name.
• Set clock.
• Display settings.
• Enter your ZIP code.
• Photo settings.
• Security.
• Select language. Select the language displayed on the Digital Entertainer HD
in menus and messages.
Setup Network Connection
Push Home, and select More>Supervisor Functions>Advanced Setup>Setup
network connection. The Setup Network Connection menu offers these options:
• Wired. Ethernet local area network (LAN) connection.
• Wireless. Wireless 802.11b or 802.11g connection.
Setup Network Shares
Push Home, and select More>Supervisor Functions>Advanced
Setup>Network shares. The Network Shares menu offers these options:
• Re-build server list automatically.
• Select which servers to scan.
• Manually add file server.
4-2 Supervisor Functions
v1.0, October 2006

• Manually add UPnP server.
• Configure daily scan.
Library Management
Push Home, and select More>Supervisor Functions>Advanced
Setup>Library Management. The Library Management menu offers these options:
• Load library.
• Save library.
• Set library options.
System Information
Push Home, and select More>Supervisor Functions>System Information. The
System Information menu offers these options:
Digital Entertainer HD Model EVA8000 User Manual
•
•
Supervisor Functions 4-3
v1.0, October 2006

Digital Entertainer HD Model EVA8000 User Manual
4-4 Supervisor Functions
v1.0, October 2006

Chapter 5 Maintenance and Troubleshooting
Resetting to Factory Defaults
You can use the Reset button on the rear panel of the Digital Entertainer HD to
reset to factory defaults.
Error Messages
Table 5-1. Error Messages
Message Action
Please configure the program guide
location
No source device available
v1.0, October 2006
5-1

Digital Entertainer HD Model EVA8000 User Manual
Firewall Port Settings
The built-in Windows firewall opens ports to communicate with the Digital
Entertainer HD. For other firewalls, you might need to open these ports:
• TCP: 49156, 49157, 49158, 49159
• UDP: 49152, 49153, 49154, 49155
Accessing Your Digital Media
Windows System Passwords
If your system requires a password on startup you will need to use one of the
following access methods:
• Recommended: Enable Guest Access on PCs which have a startup password.
To do this go to Settings/Control Panel/User Accounts, and select “Enable
Guest Access”
• Manually enter passwords on each iMedia Device connected to the system.
• Remove the password from the main “administrator account”.
Macintosh OSX
Turn off the Macintosh Firewall: Select the sharing icon from system preferences.
Click Firewall, select Stop, and verify that “Firewall off” is displayed.
Select the sharing icon from system preferences and sekect the Windows Sharing
check box, Make sure that “Windows Sharing On” is displayed.
Once the system is up and running, for better security you can configure your
OSX firewall to allow file access while blocking other network ports. For file
sharing you must allow access through TCP ports 139 and 445, and UDP ports
137 and 138.
5-2 Maintenance and Troubleshooting
v1.0, October 2006

Digital Entertainer HD Model EVA8000 User Manual
Linux
You will need to load and install a Samba server. On Redhat 9 systems, click the
Red Hat button and select “System Settings / Server Settings / Samba Server.”
Click “Add” from the dialog that pops up. On other systems, you may need to
install the Samba server (smbd) manually and modify the samba configuration file
(/etc/smb.conf on most systems – check “man smbd”). If you do not have Samba
installed, please see www.samba.org.
Connecting to Wireless Networks
Put basic wireless troubleshooting here.
Wireless range and guidelines
SSID, must be exact (uppercase/lowercase)
Maintenance and Troubleshooting 5-3
v1.0, October 2006

Digital Entertainer HD Model EVA8000 User Manual
5-4 Maintenance and Troubleshooting
v1.0, October 2006

Appendix A
Technical Specifications and Default Settings
This appendix describes the technical specifications and factory default settings
for the Digital Entertainer HD.
Technical Specifications and Default Settings A-1
v1.0, October 2006

Digital Entertainer HD Model EVA8000 User Manual
Technical Sp ecifications
Network Protocol and Standards Compatibility
Data and Routing Protocols: TCP/IP, DHCP
Power Adapter North America: 120V, 60 Hz, input
United Kingdom, Australia: 240V, 50 Hz, input
Europe: 230V, 50 Hz, input
Japan: 100V, 50/60 Hz, input
Maximum input current
NA: 0.4A, UK, AU: 0.2A, EU: 0.2A, JP: 0.4A
Physical Specifications Dimensions (H x W x D): 1.5 x 17 x 10 in.
(38.1 x 431.8 x 254 mm)
Weight: 4.4 lbs (2.0 kg)
Environmental Specifications
Operating temperature: 32º to 104º F (0° to 40° C)
Operating humidity: 90% maximum relative humidity, noncondensing
Electromagnetic Emissions
Meets requirements of: FCC Part 15 Class B, VCCI Class B, EN 55 022
(CISPR 22), Class B C-Tick N10947
Interface Specifications
LAN: 10BASE-T or 100BASE-Tx, RJ-45
WLAN: 802.11/b/g
Wireless
Radio Data Rates 1, 2, 5.5, 6, 9, 12, 18, 24, 36, 48, and 54 Mbps
Auto Rate Sensing
A-2 Technical Specifications and Default Settings
v1.0, October 2006

Frequency 2.4-2.5Ghz
Data Encoding: 802.11b: Direct Sequence Spread S pectrum (DSSS)
Maximum Computers Per
Wireless Network:
Operating Frequency Ranges: 2.412~2.462 GHz (US) 2.457~2.462 GHz (Spain)
802.11 Security: 40-bit (also called 64-bit) and 128-bit WEP and
Default Settings
Smart Wizard: Enabled
language: English
Digital Entertainer HD Model EVA8000 User Manual
802.11g: Orthogonal Frequency Division Multiplexing
(OFDM)
Limited by the amount of wireless network traffic
generated by each node. Typically 30-70 nodes.
2.412~2.484 GHz (Japan)2.457~2.472 GHz (France)
2.412~2.472 GHz (Europe ETSI)
WPA-PSK
video mode: Standard Definition NTFC
wireless connection: any
wireless security: disabled
ZIP code (prompts depending on location)
room name: Digital Entertainer
Technical Specifications and Default Settings A-3
v1.0, October 2006

Digital Entertainer HD Model EVA8000 User Manual
A-4 Technical Specifications and Default Settings
v1.0, October 2006

Appendix B
Related Documents
This appendix provides links to reference documents you can use to gain a more complete
understanding of the technologies used in your NETGEAR product.
Document Link
Internet Networking and
TCP/IP Addressing:
Wireless
Communications:
Preparing a Computer for
Network Access:
Virtual Private
Networking (VPN):
Glossary:
http://documentation.netgear.com/reference/enu/tcpip/index.htm
http://documentation.netgear.com/reference/enu/wireless/index.htm
http://documentation.netgear.com/reference/enu/wsdhcp/index.htm
http://documentation.netgear.com/reference/enu/vpn/index.htm
http://documentation.netgear.com/reference/enu/glossary/index.htm
v1.0, October 2006
B-1

Digital Entertainer HD Model EVA8000 User Manual
B-2 Related Documents
v1.0, October 2006

EN 55 022 Declaration of Conformance
This is to certify that the Digital Entertainer HD Model EVA8000 is shielded against the generation of radio interference
in accordance with the application of Council Directive 89/336/EEC, Article 4a. Conformity is declared by the
application of EN 55 022 Class B (CISPR 22).
Certificate of the Manufacturer/Importer
It is hereby certified that the Digital Entertainer HD Model EVA8000 has been suppressed in accordance with the
conditions set out in the BMPT-AmtsblVfg 243/1991 and Vfg 46/1992. The operation of some equipment (for example,
test transmitters) in accordance with the regulations may, however, be subject to certain restrictions. Please refer to the
notes in the operating instructions.
The Federal Office for Telecommunications Approvals has been notified of the placing of this equipment on the market
and has been granted the right to test the series for compliance with the regulations.
Bestätigung des Herstellers/Importeurs
Es wird hiermit bestätigt, daß dasDigital Entertainer HD Model EVA8000 gemäß der im BMPT-AmtsblVfg 243/1991
und Vfg 46/1992 aufgeführten Bestimmungen entstört ist. Das vorschriftsmäßige Betreiben einiger Geräte (z.B.
Testsender) kann jedoch gewissen Beschränkungen unterliegen. Lesen Sie dazu bitte die Anmerkungen in der
Betriebsanleitung.
Das Bundesamt für Zulassungen in der Telekommunikation wurde davon unterrichtet, daß dieses Gerät auf den Markt
gebracht wurde und es ist berechtigt, die Serie auf die Erfüllung der Vorschriften hin zu überprüfen.
Voluntary Control Council for Interference (VCCI) Statement
This equipment is in the Class B category (information equipment to be used in a residential area or an adjacent area
thereto) and conforms to the standards set by the Voluntary Control Council for Interference by Data Processing
Equipment and Electronic Office Machines aimed at preventing radio interference in such residential areas. Wh en us ed
near a radio or TV receiver, it may become the cause of radio interference. Read instructions for correct handling.
FCC Information to User
This product does not contain any user serviceable components and is to be used with approved antenn as only. Any
product changes or modifications will invalidate all applicable regulatory certifications and approvals
FCC Guidelines for Human Exposure
This equipment complies with FCC radiation exposure limits set forth for an uncontrolled environment. This equipment
should be installed and operated with minimum distance of 20 cm between the radiator and your body.
This transmitter must not be co-located or operating in conjunction with any other antenna or transmitter."
Declaration Of Conformity
We NETGEAR, Inc., 4500 Great America Parkway, Santa Clara, CA 95054, declare under our sole responsibility that
the model EVA8000 Digital Entertainer_HD complies with Part 15 of FCC Rules. Operation is subject to the
following two conditions:
• This device may not cause harmful interference, and
• This device must accept any interference received, including interference that may cause undesired operation.

Regulatory Compliance Information
This section includes user requirements for operating this product in accordance with National laws for usage of radio
spectrum and operation of radio devices. Failure of the end-user to comply with the applicable requirements may result
in unlawful operation and adverse action against the end-user by the applicable National regulatory authority.
NOTE: This product's firmware limits operation to only the channels allowed in a particular Region or Country.
Therefore, all options described in this user's guide may not be available in your version of the product.
FCC Requirements for Operation in the United States
Radio Frequency Interference Warnings & Instructions
This equipment has been tested and found to comply with the limits for a Class B digital device, pursuant to Part 15 of
the FCC Rules. These limits are designed to provide reasonable protection against harmful interference in a residential
installation. This equipment uses and can radiate radio frequency energy and, if not installed and used in accordance
with the instructions, may cause harmful interference to radio communications. However, there is no guarantee that
interference will not occur in a particular installation. If this equipment does cause harmful interference to radio or
television reception, which can be determined by turning the equipment off and on, the user is encouraged to try to
correct the interference by one or more of the following methods:
• Reorient or relocate the receiving antenna
• Increase the separation between the equipment and the receiver
• Connect the equipment into an electrical outlet on a circuit different from that which the radio receiver is connected
• Consult the dealer or an experienced radio/TV technician for help.
Digital Entertainer HD Model EVA8000
Tested to Comply
with FCC Standards
FOR HOME OR OFFICE USE
FCC ID:PY306400058
Modifications made to the product, unless expressly approved byNETGEAR, Inc., could void the user's right to operate
the equipment.
Export Restrictions
This product or software contains encryption code which may not be exported or transferred from the US or Canada
without an approved US Department of Commerce export license.
Europe - EU Declaration of Conformity
This device is a 2.4 GHz low power RF device intended for
home and office use in EU and EFTA member states. In
some EU / EFTA member states some restrictions may
apply. Please contact local spectrum management
authorities for further details before putting this device into
operation.

This product is certified for Switzerland and all EU countries. Marking by the above symbol indicates compliance with
the Essential Requirements of the R&TTE Directive of the European Union (1999/5/EC). This equipment meets the
following conformance standards: EN300 328, EN301 489-17, EN60950
Requirements For Operation in the European Community
Countries of Operation and Conditions of Use in the European Community
The user should run the client utility program provided with this product to check the current channel of operation and
confirm that the device is operating in conformance with the spectrum usage rules for European Community countries as
described in this section.
This device is intended to be operated in all countries of the European Community.
Operation Using 2.4 GHz Channels in France
The following radio channel usage limitations apply in France.
The radio spectrum regulator in France, Autorité de regulation des telecommunications (ART), enforces the following
rules with respect to use of 2.4GHz spectrum in various locations in France. Please check ART's web site for latest
requirements for use of the 2.4GHz band in France: http://www.art-telecom.fr/eng/index.htm. When operating in the
following metropolitan regions (départements) in France, this device may be operated under the following conditions:
• Indoors using any channel in the 2.4-2.4835 GHz band (Channels 1-13)
• Outdoors using channels in the 2.4-2.454 GHz band (Channels 1-7)
When operating outside of the following regions (départements) in France (see table below), this product must be
operated under the following conditions:
• Indoors using channels in the 2.4465-2.4835 GHz band (Channels 10-13).
• Outdoor operation not permitted.
Refer to the ART web site for further details.
Metropolitan Regions with Eased Restrictions in 2.4GHz Band

Declaration of Conformity in Languages of the European Community
Finnish: Valmistaja NETGEAR, Inc. vakuuttaa täten että Radio LAN device tyyppinen laite on direktiivin 1999/5/EY
oleellisten vaatimusten ja sitä koskevien direktiivin muiden ehtojen mukainen.
Dutch: Hierbij verklaart NETGEAR, Inc. dat het toestel Radio LAN device in overeenstemming is met de essentiële
eisen en de andere relevante bepalingen van richtlijn 1999/5/EG.
French: Par la présente NETGEAR, Inc. déclare que l'appareil Radio LAN device est conforme aux exigences
essentielles et aux autres dispositions pertinentes de la directive 1999/5/CE.
Swedish: Härmed intygar NETGEAR, Inc. att denna Radio LAN device står I överensstämmelse med de väsentliga
egenskapskrav och övriga relevanta bestämmelser som framgår av direktiv 1999/5/EG.
Danish: Undertegnede NETGEAR, Inc. erklærer herved, at følgende udstyr Radio LAN device overholder de væsentlige
krav og øvrige relevante krav i direktiv 1999/5/EF.
German: Hiermit erklärt NETGEAR, Inc., dass sich dieser/diese/dieses Radio LAN device in Übereinstimmung mit den
grundlegenden Anforderungen und den anderen relevanten Vorschriften der Richtlinie 1999/5/EG befindet.
Italian: Con la presente NETGEAR, Inc. dichiara che questo Radio LAN device è conforme ai requisiti essenziali ed alle
altre disposizioni pertinenti stabilite dalla direttiva 1999/5/CE.
Spanish: Por medio de la presente NETGEAR, Inc. declara que el Radio LAN device cumple con los requisitos
esenciales y cualesquiera otras disposiciones aplicables o exigibles de la Directiva 1999/5/CE.
Portugese: NETGEAR, Inc. declara que este Radio LAN device está conforme com os requisitos essenciais e outras
disposições da Directiva 1999/5/CE.

Canadian Department of Communications Radio Interference Regulations
This digital apparatus (Digital Entertainer HD Model EVA8000) does not exceed the Class B limits for radio-noise
emissions from digital apparatus as set out in the Radio Interference Regulations of the Canadian Department of
Communications.
Canada ID: 4054A-06400058
Software License Agreement
1. This Software License Agreement (the “Agreement
entity) (“You
Digital Entertainer HD Model EVA8000 (inside the Digital Entertainer HD Model EVA8000, any accompanying
CDs, and any accompanying documentation; together , the “Software
CAREFULLY READ THE TERMS AND CONDITIONS OF THIS AGREEMENT. IF YOU ARE NOT
AUTHORIZED TO SIGN, THEN DO NOT DOWNLOAD, INSTALL OR USE THE SOFTWARE, BECAUSE
BY DOING SO, YOU ARE AGREEING TO BE BOUND BY THIS AGREEMENT. IF YOU DO NOT AGREE
TO ALL OF THE TERMS OF THIS AGREEMENT, DO NOT DOWNLOAD, INSTALL OR USE THIS
SOFTWARE, AND DESTROY OR RETURN ALL COPIES IN YOUR POSSESSION.
2. Subject to the restrictions set forth below, NETGEAR grants You a nonexclusive, personal, nontransferable,
perpetual (subject to Section 5) license to install and use 1 copy of the provided version of the Software in object
code format, for internal and personal purposes only, on 1 computer. The Software is “in use” on a computer when
it is loaded into the temporary memory or installed into the permanent memory of a computer. The license granted
hereunder shall not be effective until You have paid all fees in full. Except for the license rights granted above,
NETGEAR and NETGEAR’s licensors retain all right, title and interest in and to the Software, including all
intellectual property rights therein. YOU MA Y NOT (AND MAY NOT ALLOW A THIRD PARTY TO) (a) RENT ,
LEASE, SUBLICENSE, SELL, ASSIGN, LOAN, USE FOR TIMESHARING OR SERVICE BUREAU
PURPOSES OR OTHERWISE TRANSFER THE SOFTWARE OR ANY OF YOUR RIGHTS AND
OBLIGATIONS UNDER THIS AGREEMENT; (b) reverse engineer, decompile, disassemble or attempt to
reconstruct, identify or discover any source code, underlying ideas, underlying user interface techniques or
algorithms of the Software by any means whatsoever, except to the extent the foregoing restrictions are expressly
prohibited by applicable law; (c) remove or destroy any copyright notices or other proprietary markings; (d) attempt
to circumvent any use restrictions; (e) modify or adapt the Software, merge the Software into another program or
create derivative works based on the Software; (f) use, copy or distribute the Software without NETGEAR’s written
authorization, excepting 1 copy for archival or backup purposes only; or (g) use the Software or the Digital
Entertainer HD Model EVA 8 000 for commercial use. YOU MAY NOT (AND MAY NOT ALLOW A THIRD
P ARTY TO) COPY, REPRODUCE, CAPTURE, STORE, RETRANSMIT, DISTRIBUTE, OR BURN T O CD (OR
ANY OTHER FORMAT) ANY COPYRIGHTED CONTENT (INCLUDING BUT NOT LIMITED TO
MUSICAL AND MUSIC-RELATED) THAT YOU ACCESS OR RECEIVE THROUGH USE OF THE
SOFTWARE. YOU ASSUME ALL RISK AND LIABILITY, CIVIL AND CRIMINAL, FOR ANY SUCH
PROHIBITED USE OF COPYRIGHTED CONTENT.
3. THIS AGREEMENT SHALL BE EFFECTIVE UPON INSTALLATION OF THE SOFTWARE AND SHALL
TERMINATE UPON THE EARLIER OF: (A) YOUR FAILURE TO COMPLY WITH ANY TERM OF THIS
AGREEMENT OR (B) RETURN, DESTRUCTION OR DELETION OF ALL COPIES OF THE SOFTWARE IN
YOUR POSSESSION. NETGEAR’s rights and your obligations shall survive any termination of this Agreement.
Upon termination of this Agreement, Y ou shall certify in writing to NETGEAR or such NETGEAR licensor that all
copies of the Software have been destroyed or deleted from any of your computer libraries or storage devices.
4. NETGEAR warrants that the Software will perform substantially in accordance with the documentation
accompanying the Software for a period of 90 days after your initial receipt of the Software. NETGEAR’s entire
liability and your exclusive remedy for breach of this warranty shall be repair or replacement of the Software. This
limited warranty shall be void if failure of the Software has resulted from any ac cident, abuse, misuse or
misapplication by You. EXCEPT AS SET FORTH ABOVE, THE SOFTWARE IS PROVIDED ON AN “AS IS”
”) and NETGEAR, Inc. (“NETGEAR”) regarding the use of NETGEAR’s software provided with th e
”) is a legal agreement between you (either an individual or an
”). BEFORE YOU USE THIS SOFTWARE,

BASIS. YOU ASSUME ALL RESPONSIBILITY FOR SELECTION OF THE SOFTWARE TO ACHIEVE
YOUR INTENDED RESULTS AND FOR THE INSTALLATION OF, USE OF AND RESULTS OBTAINED
FROM THE SOFTWARE. TO THE MAXIMUM EXTE NT PERMITTED BY APPLICABLE LAW, NETGEAR
DISCLAIMS ALL WARRANTIES, EITHER EXPRESS, IMPLIED OR STATUTOR Y, INCLUDING, BUT NOT
LIMITED TO, IMPLIED WARRANTIES OF MERCHANTABILITY, NONINFRINGEMENT, QUALITY,
ACCURACY, FITNESS FOR A PARTICULAR PURPOSE, AND FITNESS FOR YOUR PURPOSE WITH
RESPECT TO THE SOFTWARE AND THE ACCOMPANYING WRITTEN MATERIALS. THERE IS NO
WARRANTY AGAINST INTERFERENCE WITH THE ENJOYMENT OF THE SOFTWARE OR AGAINST
INFRINGEMENT. NETGEAR DOES NOT WARRANT THAT THE FUNCTIONS CONTAINED IN THE
SOFTWARE WILL MEET YOUR REQUIREMENTS, BE UNINTERRUPTED OR ERROR-FREE, OR THAT
ALL DEFECTS IN THE SOFTWARE WILL OR CAN BE CORRECTED.
5. In the event that a claim alleging infringement or misappropriation of an intellectual property right arises
concerning the Software, NETGEAR in its sole discretion may elect to defend or settle such claim. NETGEAR, in
the event of such claim, may also in its sole discretion, elect to terminate this Agreement and all rights to use the
Software and require the return and/or destruction of the Software, with a refund of the fees paid for use of the
Software less a reasonable allowance for use and shipping. THE FOREGOING ARE NETGEAR’S SOLE
EXCLUSIVE OBLIGATIONS, AND YOUR SOLE AND EXCLUSIVE REMEDIES, WITH RESPECT TO
INFRINGEMENT AND/OR MISAPPROPRIATION OF ANY INTELLECTUAL PROPERTY RIGHT.
6. UNDER NO CIRCUMSTANCES WILL NETGEAR OR ITS LICENSORS BE LIABLE FOR ANY
CONSEQUENTIAL, SPECIAL, INDIRECT, INCIDENTAL OR PUNITIVE DAMAGES WHATSOEVER
(INCLUDING, WITHOUT LIMITATION, DAMAGES FOR LOSS OF PROFITS, INTERRUPTION, LOSS OF
BUSINESS INFORMATION, LOSS OF DATA OR OTHER SUCH PECUNIARY LOSS), WHETHER BASED
ON BREACH OF CONTRACT, TORT (INCLUDING NEGLIGENCE), STRICT LIABILITY, PRODUCT
LIABILITY OR OTHERWISE, ARISING OUT OF THE USE OR INABILITY TO USE THE SOFTWARE,
EVEN IF NETGEAR AND/OR ITS LICENSORS HAVE BEEN ADVISED OF THE POSSIBILITY OF SUCH
DAMAGES. IN NO EVENT SHALL NETGEAR’S AND ITS LICENSORS’ AGGREGATE LIABILITY FOR
DAMAGES ARISING OUT OF THIS AGREEMENT EXCEED THE FEES PAID BY YOU FOR THE
SOFTWARE. THE FOREGOING LIMITATIONS ARE INDEPENDENT OF THE EXCLUSIVE REMEDY
PROVIDED IN SECTION 6 ABOVE AND SHALL APPLY NOTWITHSTANDING ANY FAILURE OF SUCH
EXCLUSIVE REMEDY OR OF ITS ESSENTIAL PURPOSE. THE FOREGOING EXCLUSIONS AND
LIMITATIONS OF LIABILITY AND DAMAGES SHALL NOT APPLY TO CONSEQUENTIAL DAMAGES
FOR PERSONAL INJURY.
7. You may not export or re-export the Software without: (a) the prior written consent of NETGEAR, (b) complying
with applicable export control laws, including, but not limited to, restrictions and regulations of the Department of
Commerce or other United States agency or authority, and (c) obtaining any necessary permits and licenses. In any
event, You may not transfer or authorize the transfer of the Software to a prohibited territory or country or
otherwise in violation of any applicable restrictions or regulations.
8. The Software and documentation are considered “commercial computer software” and “commercial computer
software documentation,” respectively, pursuant to DFAR Section 227.7202 and FAR Section 12.212, as
applicable. Use, duplication or disclosure of the Software and documentation by the U.S. Government is subject to
the restrictions set forth in DFAR Section 227.7202 for military agencies and FAR Section 12.212 for civilian
agencies. THIS AGREEMENT IS GOVERNED BY THE LAWS OF THE STATE OF CALIFORNIA, U.S.A.,
WITHOUT REFERENCE TO ITS CONFLICT OF LAWS PRINCIPLES. THIS AGREEMENT WILL NOT BE
GOVERNED BY THE U.N. CONVENTION ON CONTRACTS FOR THE INTERNATIONAL SALES OF
GOODS. ANY DISPUTE BETWEEN YOU AND NETGEAR ARISING UNDER THIS AGREEMENT SHALL
BE SUBJECT TO THE EXCLUSIVE JURISDICTION OF THE COURTS OF THE STATE OF CALIFORNIA.
This Agreement is the entire agreement between You and NETGEAR regarding the subject matter herein and
supersedes any other communications with respect to the Software. If any provision of this Agreement is held
invalid or unenforceable, the remainder of this Agreement will continue in full force and effect. Failure to prosecute
a party’s rights with respect to a default hereunder will not constitute a waiver of the right to enforce rights with
respect to the same or any other breach.

9. Should you have any questions relating to this Agreement, or if you desire to contact NETGEAR for any reason,
please call 1-888-NETGEAR.

NETGEAR, Inc.
4500 Great America Parkway
Santa Clara, CA 95054 USA
October 2006
 Loading...