

Page 1

Setup Manual for the
DG834GVSP Integrated
ADSL Modem and
Wireless Router with
Voice
NETGEAR, Inc.
4500 Great America Parkway
Santa Clara, CA 95054 USA
February 2006
Page 2

© 2006 by NETGEAR, Inc. All rights reserved.
Trademarks
NETGEAR is a trademark of Netgear, Inc. Microsoft, Windows, and Windows NT are registered trademarks of
Microsoft Corporation. Other brand and product names are registered trademarks or trademarks of their respective
holders.
Statement of Conditions
In the interest of improving internal design, operational function, and/or reliability, NETGEAR reserves the right to
make changes to the products described in this document without notice.
NETGEAR does not assume any liability that may occur due to the use or application of the product(s) or circuit
layout(s) described herein.
ii
v1.0, February 2006
Page 3

Regulatory Approvals
FCC Statement
This equipment has been tested and found to comply with the limits for a Class B digital
device, pursuant to Part 15 of the FCC Rules. These limits are designed to provide reasonable
protection against harmful interference in a residential installation.
This equipment generates, uses and can radiate radio frequency energy and, if not installed and
used in accordance with the instructions, may cause harmful interference to radio communications. However, there is no guarantee that interference will not occur in a particular installation.
If this equipment does cause harmful interference to radio or television reception, which can be
determined by turning the equipment off and on, the user is encouraged to try to correct the
interference by one of the following measures:
Reorient or relocate the receiving antenna.
Increase the separation between the equipment and receiver.
Connect the equipment into an outlet on a circuit different from that to which the receiver
is connected.
Consult the dealer or an experienced radio/TV technician for help.
To assure continued compliance, any changes or modifications not expressly approved by the
party responsible for compliance could void the user's authority to operate this equipment.
(Example - use only shielded interface cables when connecting to computer or peripheral
devices).
FCC Radiation Exposure Statement
This equipment complies with FCC RF radiation exposure limits set forth for an uncontrolled
environment. This equipment should be installed and operated with a minimum distance of 20
centimeters between the radiator and your body.
This device complies with Part 15 of the FCC Rules. Operation is subject to the following two
conditions:
(1) This device may not cause harmful interference, and
(2) This device must accept any interference received, including interference that may cause
undesired operation.
This transmitter must not be co-located or operating in conjunction with any other antenna or
transmitter.
The antennas used for this transmitter must be installed to provide a separation distance of at
least 20 cm from all persons and must not be co-located or operating in conjunction with any
other antenna or transmitter.
Channel
The Wireless Channel sets the radio frequency used for communication.
•Access Points use a fixed Channel. You can select the Channel used. This allows you to
choose a Channel which provides the least interference and best performance. In the USA
and Canada, 11 channel are available. If using multiple Access Points, it is better if adjacent
Access Points use different Channels to reduce interference.
• In "Infrastructure" mode, Wireless Stations normally scan all Channels, looking for an
Access Point. If more than one Access Point can be used, the one with the strongest
signal is used. (This can only happen within an ESS.)
• If using "Ad-hoc" mode (no Access Point), all Wireless stations should be set to use the
same Channel. However, most Wireless stations will still scan all Channels to see if there
is an existing "Ad-hoc" group they can join.
Note:This equipment marketed in USA is restricted by firmware to only operate on 2.4G channel 1-11
.
Page 4

Contents
Setup Manual for the DG834GVSP Integrated ADSL Modem and Wireless
Router with Voice
Chapter 1
Connecting the Router to the Internet
What’s in the Box? ..........................................................................................................1-1
The Router’s Front Panel .........................................................................................1-2
The Router’s Rear Panel .........................................................................................1-3
What You Need Before You Begin ..................................................................................1-4
Internet Configuration Requirements ....................................................................... 1-4
Two Setup Methods: 1) Smart Wizard Setup 2) Manual Setup ......................................1-4
Smart Wizard Setup .......................................................................................................1-5
Manual Setup .................................................................................................................1-6
Understanding ADSL Microfilters .............................................................................1-6
Computers Set to DHCP ..........................................................................................1-7
Manually Setting Up Your ADSL Modem Wireless Router .............................................1-7
How to Manually Set Up and Test Basic Wireless Connectivity ...................................1-13
Implement Appropriate Wireless Security ....................................................................1-14
Chapter 2
Troubleshooting
Basic Functioning ...........................................................................................................2-1
Power LED Not On ...................................................................................................2-2
Test LED Never Turns On or Test LED Stays On .....................................................2-2
LAN or ADSL Internet Port LEDs Not On .................................................................2-3
Troubleshooting the Web Configuration Interface ..........................................................2-3
Troubleshooting the ISP Connection ..............................................................................2-4
ADSL link .................................................................................................................2-4
Obtaining an Internet IP Address .............................................................................2-5
Troubleshooting PPPoE or PPPoA .......................................................................... 2-6
v1.0, February 2006
1
Page 5

Troubleshooting Internet Browsing ..........................................................................2-7
Troubleshooting a TCP/IP Network Using the Ping Utility ..............................................2-7
Testing the LAN Path to Your Router .......................................................................2-7
Testing the Path from Your Computer to a Remote Device .....................................2-8
Restoring the Default Configuration and Password ............... .........................................2-9
Using the Reset Button ............................................................................................2-9
Appendix A
Technical Specifications
Appendix B
Related Documents
2
v1.0, February 2006
Page 6

Chapter 1
Connecting the Router to the Internet
This chapter describes how to set up the router on your Local Area Network (LAN) and connect to
the Internet. It describes how to set up your ADSL modem wireless router for Internet access and
configure basic wireless connectivity.
What’s in the Box?
The product package should contain the following items:
• ADSL Modem Wireless Router
• AC power adapter (varies by region)
• Category 5 (Cat 5) Ethernet cable
• Telephone cable with RJ-11 connector
• Microfilters (quantity and type vary by region)
• Resource CD, including:
— The Smart Wizard Installation Assistant
— This manual
• Warranty and Support Information cards
If any of the parts are incorrect, missing, or damaged, contact your NETGEAR dealer. Keep the
carton, including the original packing materials, in case you need to return the product for repair.
Connecting the Router to the Internet 1-1
v1.0, February 2006
Page 7
Setup Manual for the DG834GVSP Integrated ADSL Modem and Wireless Router with Voice
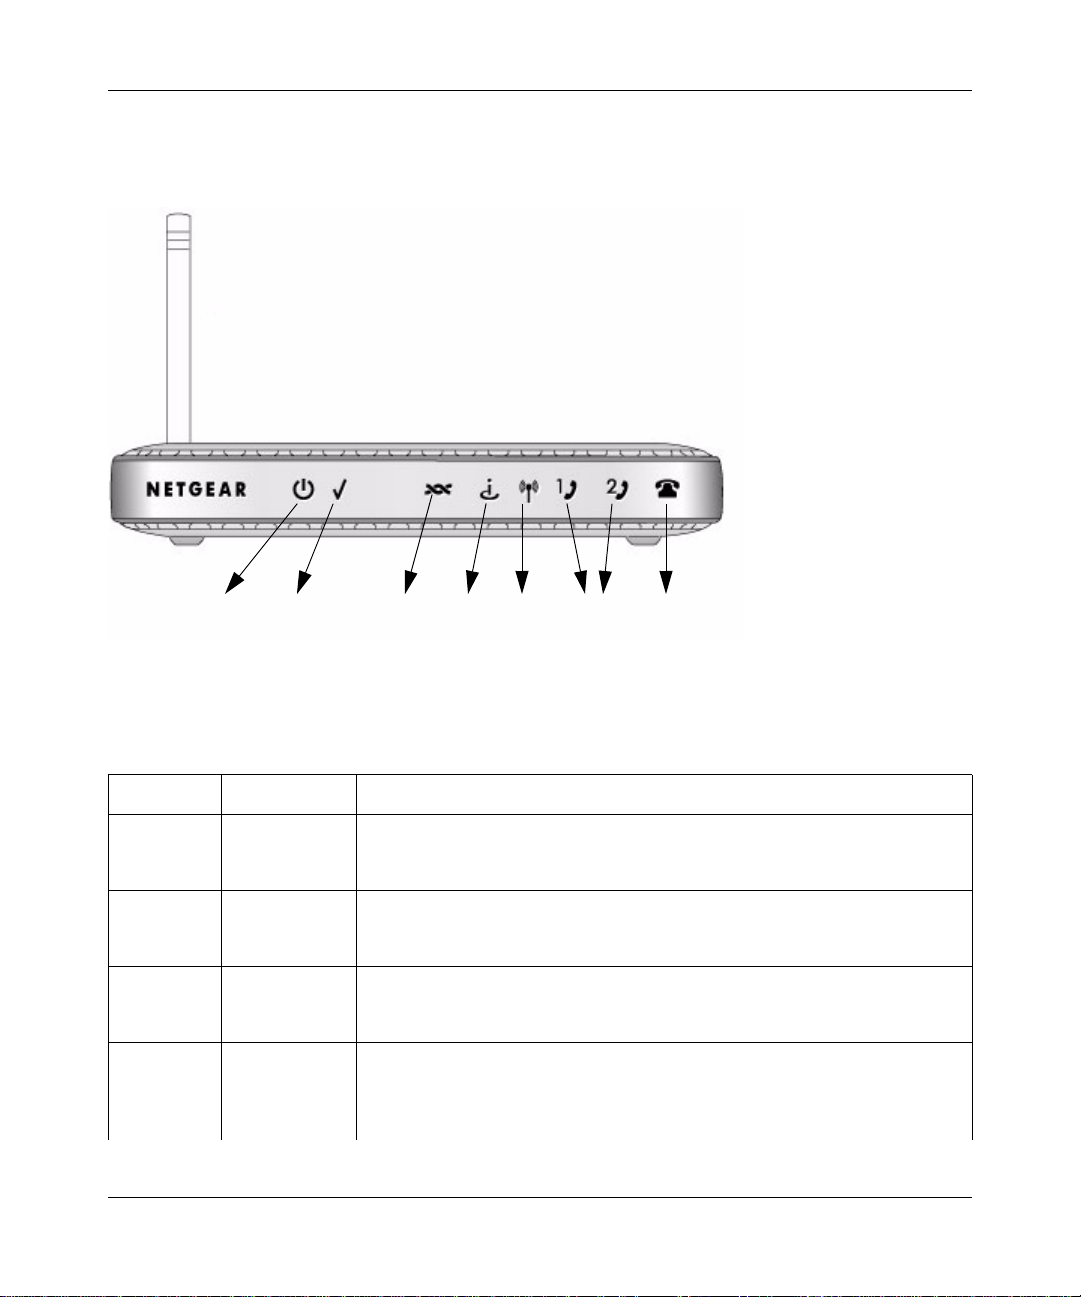
The ADSL Modem Wireless Router’s Front Panel
The ADSL modem wireless router front panel shown below contains status LEDs.
12 345 6 7
Figure 1-1
You can use the LEDs to verify various conditions. Table 1-1 describes each LED.
Table 1-1. LED Descriptions
Label Activity Description
On (Green)
1. Power
2. Test
3. ADSL
4. Internet
On (Red)
Off
On (Amber)
Blink (Amber)
Off
On (Green)
Blink (Green)
Off
On (Green)
Flicker (Green)
Red
Off
1-2 Connecting the Router to the Internet
Power is supplied to the router.
Power-on Self-test failure or device malfunction.
Power is not supplied to the router.
System is not ready or failed to start up.
The system is initializing.
The system is ready and running.
ADSL is synchronized.
DSL is attempting to synchronize.
No link is detected on this port or modem is not powered on.
Internet port is connected, has an IP address, DSL is up, no traffic detected.
Traffic is passing through the connected internet port in either direction.
Device attempted to connect, but failed.
Modem powered off or in bridged mode, or ADSL connection not present.
v1.0, February 2006
Page 8
Setup Manual for the DG834GVSP Integrated ADSL Modem and Wireless Router with Voice
Table 1-1. LED Descriptions (continued)
5. Wireless
6. Phone1
Phone2
7. FXO/
PSTN
fallback
On (Green)
Blink (Green)
Off
On (Green)
Fast blink
Slow blink
Off
On (Green)
Blink
Off
Wireless port is linked.
Data is being transmitted or received.
No wireless link.
Registered to SIP server.
Talking.
Off hook.
Phone not ready.
PSTN line detected.
Talking.
No PSTN line detected.
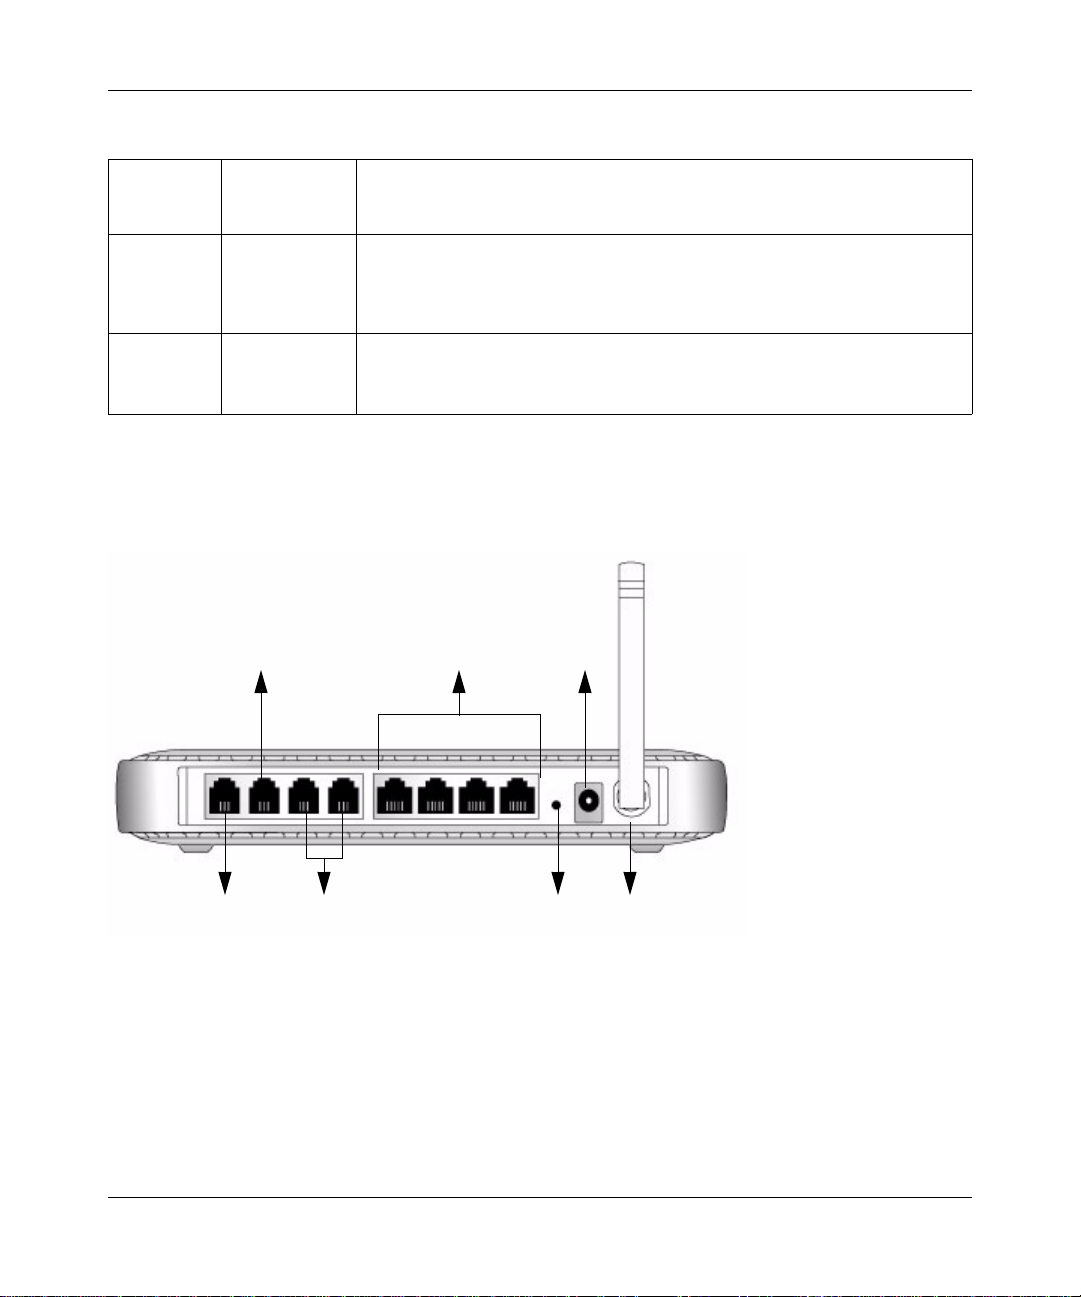
The ADSL Modem Wireless Router’s Rear Panel
The rear panel of the ADSL modem wireless router contains port connections.
2
4
6
1
3
5
7
Figure 1-2
Viewed from left to right, the rear panel contains the following elements:
1. RJ-11 ADSL port for connecting the router to a telephone wall jack via the ADSL port of a
phone splitter
2. RJ-11 PSTN port for connecting the router to the telephone wall jack via the phone port of a
phone splitter
Connecting the Router to the Internet 1-3
v1.0, February 2006
Page 9

Setup Manual for the DG834GVSP Integrated ADSL Modem and Wireless Router with Voice
3. Two phone ports for connecting to telephones
4. Four Local Ethernet RJ-45 LAN ports for connecting the router to the local computers
5. Factory Default Reset push button
6. AC power adapter outlet
7. Wireless antenna
Each LAN port has two LEDs, one green and one amber. They indicate the port status as follows:
• On (Green) LAN port is linked to a 100Mbps device
• Blink (Green) Data is being transmitted or received at 100 Mbps
• On (Amber) LAN port is linked to a 10Mbps device
• Blink (Amber) Data is being transmitted or received at 10 Mbps
• Off No link is detected on this port
1-4 Connecting the Router to the Internet
v1.0, February 2006
Page 10

Setup Manual for the DG834GVSP Integrated ADSL Modem and Wireless Router with Voice
What You Need Before You Begin
You need to prepare the following before you can set up your router:
• Active Internet service provided by an ADSL account.
• The Internet Service Provider (ISP) configuration information for your ADSL account.
• ASDL microfilters as explained below.
• Your computers set to DHCP.
Internet Configuration Requirements
Depending on how your ISP set up your Internet account, you need one or more of these
configuration parameters to connect your router to the Internet:
• Virtual Path Identifier (VPI)/Virtual Channel Indentifier (VCI) parameters
• Multiplexing Method
• Host and Domain Names
• ISP Login Name and Password
• ISP Domain Name Server (DNS) Addresses
• Fixed or Static IP Address
Your ISP should have provided you with all the information needed to connect to the Internet. If
you cannot locate this information, you can ask your ISP to provide it.
Two Setup Methods: 1) Smart Wizard Setup 2) Manual Setup
You have two methods available for setting up your ADSL modem wireless router:
• Smart Wizard Setup: Use the Smart Wizard on the CD to assist you with setting up your
ADSL modem wireless router.
— This option is the easiest. The Smart Wizard on the CD guides you through the setup
process, automating many of the steps, and verifying that necessary conditions exist and
that steps you perform have been successfully completed.
— This option requires a PC running Microsoft Windows 98SE or higher.
Connecting the Router to the Internet 1-5
v1.0, February 2006
Page 11
Setup Manual for the DG834GVSP Integrated ADSL Modem and Wireless Router with Voice
• Manual Setup: Manually set up your ADSL modem wireless router.
— This option is best if you are replacing an existing ADSL modem wireless router or are
technically knowledgeable.
— Use this option if you are using a computer that does not run Microsoft Windows.
— The manual setup procedures are documented in this manual.
Use the setup option that best suites you.
Smart Wizard Setup
The Smart Wizard setup process should take about 20 minutes to complete.
1. Locate the ADSL settings information your Internet service provider gave you.
2. Insert the NETGEAR CD into a Windows PC.
The CD will automatically start and detect the language you are using on your PC.
Note: If the CD does not automatically start, browse the CD and double-click on
Autorun.
3. Accept the language option or change to a different language.
4. Click Next to proceed.
5. Click Setup to start the Smart Wizard installation assistant. Follow the instructions on the
screen.
1-6 Connecting the Router to the Internet
v1.0, February 2006
Page 12

Setup Manual for the DG834GVSP Integrated ADSL Modem and Wireless Router with Voice
Manual Setup
Use the topics and procedures below to manually set up your ADSL modem wireless router.
Understanding ADSL Microfilters
ADSL technology uses the same wires as your telephone service. However, ADSL adds signals to
the telephone lines which create noise in the telephone service. You must use ADSL microfilters to
filter out these signals before they reach your telephone.
Note: If you purchased the ADSL modem wireless router in a country where a microfilter
is not included, you must acquire one.
ADSL Microfilter with Built-In Splitter
ADSL
Phone
Figure 1-3
Line
Use the ADSL microfilter with built-in splitter to provide connectivity to the ADSL modem
wireless router and telephone equipment connected to that router.
ADSL Microfilter
Phone
Figure 1-4
Each device directly connected to the phone line, such as a fax machine, answering machine, or
caller ID display will require an ADSL microfilter.
Connecting the Router to the Internet 1-7
v1.0, February 2006
Page 13

Setup Manual for the DG834GVSP Integrated ADSL Modem and Wireless Router with Voice
Computers Set to DHCP
For the initial connection to your router, your computer has to be set to automatically get its
TCP/IP configuration from the router via DHCP. This is usually the case. The NETGEAR Smart
Wizard CD automatically takes care of this requirement. For manual setup, refer to the
documentation that came with your computer.
Manually Setting Up Your ADSL Modem Wireless Router
There are four steps to setting up your ADSL modem wireless router:
6. Connect the router to the ADSL line via the ADSL microfilter with built-in splitter.
1. Install ADSL filters on other phone lines that use the same telephone number.
2. Log in to the router.
3. Connect to the Internet.
Follow the steps below to connect your router to your network. Before you begin, locate the ADSL
configuration information from your Internet Service Provider (ISP).
1. Connect the ADSL filter with built-in splitter, as follows:
Note: If you purchased the DG834GVSP in a country where an ADSL filter is not
included, you must acquire one.
a. Connect the Line port of the ADSL filter/splitter to the telephone wall socket.
b. Using telephone cable with RJ11 jacks, connect the ADSL port of the filter/splitter to the
ADSL port on the left rear of the ADSL modem wireless router
1-8 Connecting the Router to the Internet
v1.0, February 2006
Page 14

Setup Manual for the DG834GVSP Integrated ADSL Modem and Wireless Router with Voice
c. Connect the Phone port of the filter/splitter to the green PSTN connector on the ADSL
modem wireless router.:
Figure 1-5
d. You need to install a separate ADSL filter (see Figure 1-4 on page 1-6) for every telephone
connected to other wall sockets that use the same telephone number as your ADSL modem
wireless router.
Connecting the Router to the Internet 1-9
v1.0, February 2006
Page 15

Setup Manual for the DG834GVSP Integrated ADSL Modem and Wireless Router with Voice
e. If you have voice service or plan to order it, connect a telephone to Phone Port 1 on the
ADSL modem wireless router.
Phone Port 1
Figure 1-6
Note: In the event of a power outage or loss of internet connectivity, the router
will automatically connect to the standard phone port until VoIP service is
restored. This feature is not available on Phone Port 2.
1-10 Connecting the Router to the Internet
v1.0, February 2006
Page 16

Setup Manual for the DG834GVSP Integrated ADSL Modem and Wireless Router with Voice
f. Connect the Ethernet cable from an ADSL modem wireless router LAN port to the
Ethernet adapter in your computer.
Figure 1-7
g. If you have more than one computer, repeat step f using a different LAN port on the ADSL
modem wireless router.
h. Connect the power adapter to the router and plug it in to a power outlet.
Figure 1-8
i. Verify the following:
The power light is lit after turning on the router.
The test light comes on briefly, then goes off.
The wireless light is lit after turning on the router.
Connecting the Router to the Internet 1-11
v1.0, February 2006
Page 17

Setup Manual for the DG834GVSP Integrated ADSL Modem and Wireless Router with Voice
The ADSL internet light is green, indicating you are connected to the ADSL
network.
j. Now, turn on your computer. If software usually logs you in to your Internet connection,
do not run that software. Cancel it if it starts automatically. Verify the following:
The appropriate LAN port LEDs are lit for any connected computers.
2. Log in to the ADSL modem wireless router as described below.
Note: Your computer needs to be configured for DHCP. For instructions on
configuring for DHCP, please see the documentation that came with your
computer or the online document, “Preparing a Computer for Network
Access”.
a. Type http://192.168.0.1 in the address field of a browser such as Internet Explorer or
®
Netscape
Figure 1-9
Navigator.
This login window opens:
Figure 1-10
Enter admin for the user name and password for the password, both in lower case letters.
1-12 Connecting the Router to the Internet
v1.0, February 2006
Page 18

Setup Manual for the DG834GVSP Integrated ADSL Modem and Wireless Router with Voice
b. After logging in, you will see the menu below.
Figure 1-11
3. Connect to the Internet:
You are now ready to configure your ADSL modem wireless router to connect to the Internet.
There are two ways you can configure your ADSL modem wireless router to connect to the
Internet:
a. Let the ADSL modem wireless router Setup Wizard auto-detect the type of Internet
connection you have and configure it.
b. Manually choose which type of Internet connection you have and configure it.
In either case, use to the configuration parameters your ISP provided to assure that the
configuration settings for your Internet connection are correct.
4. Test your Internet connection.
From the bottom of the Setup menu, click Test. If the NETGEAR Web site does not appear
within one minute, refer to Chapter 2, “Troubleshooting”.
Your ADSL modem wireless router is now configured to provide Internet access for your network.
Your ADSL modem wireless router automatically connects to the Internet when one of your
computers requires access. It is not necessary to run a dialer or login application such as Dial-Up
Networking or Enternet to connect, log in, or disconnect. These functions are performed
automatically by the ADSL modem wireless router as needed.
Connecting the Router to the Internet 1-13
v1.0, February 2006
Page 19

Setup Manual for the DG834GVSP Integrated ADSL Modem and Wireless Router with Voice
T o access the Internet from any computer connected to your ADSL modem wireless router, launch
a browser such as Microsoft Internet Explorer or Netscape Navigator. You should see the ADSL
modem wireless router’s Internet LED blink, indicating communication to the ISP. The browser
should begin to display a Web page.
How to Manually Set Up and Test Basic Wireless Connectivity
Follow the instructions below to set up and test basic wireless connectivity. Once you have
established basic wireless connectivity , you can enable security settings appropriate to your needs.
1. Log in to the ADSL modem wireless router at its default LAN address of http://192.168.0.1
with its default user name of admin and default password of password, or using whatever
LAN address and password you have set up.
2. Click the Wireless Settings link in the main menu of the ADSL modem wireless router.
Figure 1-12
1-14 Connecting the Router to the Internet
v1.0, February 2006
Page 20

Setup Manual for the DG834GVSP Integrated ADSL Modem and Wireless Router with Voice
3. Note that the default SSID is NETGEAR.
Note: The SSID of any wireless adapters must match the SSID you configure in the
ADSL modem wireless router. If they do not match, you will not get a wireless
connection.
4. Set the Region. Select the region in which the wireless interface will operate.
5. Click Apply to save your changes.
Note: If you are configuring the router from a wireless computer and you change the
router’s SSID, channel, or security settings, you will lose your wireless
connection when you click Apply. You must then change the wireless settings
of your computer to match the router’s new settings.
6. Configure and test your computers for wireless connectivity:
Program the wireless adapter of your computers to have the same wireless network name
(SSID) as the ADSL modem wireless router. Check that they have a wireless link and are able
to obtain an IP address by DHCP from the router.
Implement Appropriate Wireless Security
Warning: Indoors, computers can connect over 802.11g wireless networks at a
maximum range of up to 300 feet. Such distances can allow for others outside
of your immediate area to access your network.
Unlike wired network data, your wireless data transmissions can extend beyond your walls and
can be received by anyone with a compatible adapter. For this reason, use the security features of
your wireless equipment. The ADSL modem wireless router provides highly effective security
features which are covered in detail in the full reference manual that is av ailable from a link on t he
CD as well as a link in the main menu of your router. Follow the instructions in the full manual and
in the router help screens to deploy the security features appropriate to your needs.
Connecting the Router to the Internet 1-15
v1.0, February 2006
Page 21

Setup Manual for the DG834GVSP Integrated ADSL Modem and Wireless Router with Voice
1-16 Connecting the Router to the Internet
v1.0, February 2006
Page 22

Chapter 2
Troubleshooting
This chapter gives information about troubleshooting your ADSL modem wireless router. After
each problem description, instructions are provided to help you diagnose and solve the problem.
For the common problems listed, go to the section indicated.
• Is the router on?
Go to “Basic Functioning” on page 2- 1.
• Have I connected the router correctly?
Go to “Basic Functioning” on page 2- 1.
• I cannot access the router’s configuration with my browser.
Go to “Troubleshooting the Web Configuration Interface” on page 2-3.
• I have configured the router but I can’t access the Internet.
Go to “Troubleshooting the ISP Connection” on page 2-4.
• I cannot remember the router’s configuration password.
Go to “Using the Reset Button” on page 2-9.
• I want to clear the configuration and start over again.
Go to “Restoring the Default Configuration and Password” on page 2-9.
Basic Functioning
After you turn on power to the router, the following sequence of events should occur:
1. When power is first applied, verify that the Power LED is on (see “The Router’s Front Panel”
on page 1-2 for an illustration and explanation of the LEDs).
2. Verify that the Test LED lights within a few seconds, indicating that the self-test procedure is
running.
3. After approximately 10 seconds, verify that:
a. The Test LED is not lit.
Troubleshooting 2-1
v1.0, February 2006
Page 23

Setup Manual for the DG834GVSP Integrated ADSL Modem and Wireless Router with Voice
b. The LAN port LEDs are lit for any local ports that are connected.
c. The ADSL Internet port LED is lit.
If a port’s LED is lit, a link has been established to the connected device. If a LAN port is
connected to a 100 Mbps device, verify that the port’ s LED is green. If the port is 10 Mbps, the
LED will be amber.
If any of these conditions does not occur, refer to the appropriate following section.
Power LED Not On
If the Power and other LEDs are off when your router is turned on:
• Make sure that the power cord is properly connected to your router and that the power supply
adapter is properly connected to a functioning power outlet.
• Check that you are using the power adapter supplied by NETGEAR for this product.
If the error persists, you have a hardware problem and should conta ct technical support.
Test LED Never Turns On or Test LED Stays On
When the router is turned on, the Test LED turns on for about 10 seconds and then turns off. If the
Test LED does not turn on, or if it stays on, there is a fault within the router.
If you experience problems with the Test LED:
• Cycle the power to see if the router recovers and the LED blinks for the correct amount of
time.
If all LEDs including the Test LED are still on one minute after power up:
• Cycle the power to see if the router recovers.
• Clear the router’s configuration to factory defaults. This will set the router’s IP address to
192.168.0.1. This procedure is explained in “Using the Reset Button” on page 2-9.
If the error persists, you might have a hardware problem and should contact technical support.
2-2 Troubleshooting
v1.0, February 2006
Page 24

Setup Manual for the DG834GVSP Integrated ADSL Modem and Wireless Router with Voice
LAN or ADSL Internet Port LEDs Not On
If either the LAN LEDs or ADSL Internet LED do not light when the Ethernet connection is made,
check the following:
• Make sure that the Ethernet cable connections are secure at the router and at the hub or
workstation.
• Make sure that power is turned on to the connected hub or workstation.
• Be sure you are using the correct cable: when connecting the ADSL port, use the cable that
was supplied with the ADSL modem wireless router.
Troubleshooting the Web Configuration Interface
If you are unable to access the router’s Web Configuration interface from a computer on your local
network, check the following:
• If you are using an Ethernet-connected computer, check the Ethernet connection between the
computer and the router as described in the previous section.
• Make sure your computer’s IP address is on the same subnet as the router. If you are using the
recommended addressing scheme, your computer’s address should be in the range of
192.168.0.2 to 192.168.0.254. Refer to “Preparing a Computer for Network Access” to find
your computer’s IP address.
Note: If your computer’s IP address is shown as 169.254.x.x:
Recent versions of Windows and MacOS will generate and assign an IP address if the
computer cannot reach a DHCP server. These auto-generated addresses are in the range of
169.254.x.x. If your IP address is in this range, check the connection from the computer to the
router and reboot your computer.
• If your router’s IP address was changed and you do not know the current IP address, clear the
router’s configuration to factory defaults. This will set the router’s IP address to 192.168.0.1.
This procedure is explained in “Using the Reset Button” on page 2-9.
• Make sure your browser has Java, JavaScript, or ActiveX enabled. If you are using Internet
Explorer, click Refresh to be sure the Java applet is loaded.
• Try quitting the browser and launching it again.
• Make sure you are using the correct login information. The factory default login name is
admin and the password is password. Make sure that CAPS LOCK is off when entering this
information.
Troubleshooting 2-3
v1.0, February 2006
Page 25

Setup Manual for the DG834GVSP Integrated ADSL Modem and Wireless Router with Voice
If the router does not save changes you have made in the Web Configuration Interface, check the
following:
• When entering configuration settings, be sure to click the Apply button before moving to
another menu or tab, or your changes are lost.
• Click the Refresh or Reload button in the Web browser. The changes may have occurred, but
the Web browser may be caching the old configuration.
Troubleshooting the ISP Connection
If your router is unable to access the Internet, you should check the ADSL connection, then the
Internet TCP/IP connection.
ADSL link
If your router is unable to access the Internet, you should first determine whether you have an
ADSL link with the service provider. The state of this connection is indicated with the Internet
LED.
ADSL Internet LED Green or Blinking Green
If your ADSL Internet LED is green or blinking green, then you have a good ADSL connection.
You can be confident that the service provider has connected your line correctly and that your
wiring is correct.
ADSL Internet LED Blinking Yellow
If your ADSL Internet LED is blinking yellow, then your ADSL modem wireless router is
attempting to make an ADSL connection with the service provider. The LED should turn green
within several minutes.
If the Internet LED does not turn green, disconnect all telephones on the line. If this solves the
problem, reconnect the telephones one at a time, being careful to use a microfilter on each
telephone. If the microfilters are connected correctly, you should be able to connect all your
telephones.
If disconnecting telephones does not result in a green ADSL Internet LED, there may be a problem
with your wiring. If the telephone company has tested the ADSL signal at your Network Interface
Device (NID), then you may have poor quality wiring in your house.
2-4 Troubleshooting
v1.0, February 2006
Page 26

Setup Manual for the DG834GVSP Integrated ADSL Modem and Wireless Router with Voice
ADSL Internet LED Off
If the ADSL Internet LED is off, disconnect all telephones on the line. If this solves the problem,
reconnect the telephones one at a time, being careful to use a microfilter on each telephone. If the
microfilters are connected correctly, you should be able to connect all your telephones.
If disconnecting telephones does not result in a green ADSL Internet LED the problem may be one
of the following:
• Check that the telephone company has made the connection to your line and tested it.
• Verify that you are connected to the correct telephone line. If you have more than one phone
line, be sure that you are connected to the line with the ADSL service. It may be necessary to
use a swapper if you ADSL signal is on pins 1 and 4 of the RJ-11 jack. The ADSL Modem
Wireless Router uses pins 2 and 3.
Obtaining an Internet IP Address
If your ADSL modem wireless router is unable to access the internet, and your Internet LED is
green or blinking green, you should determine whether the ADSL modem wireless router is able to
obtain a Internet IP address from the ISP. Unless you have been assigned a static IP address, your
ADSL modem wireless router must request an IP address from the ISP . You can determine whether
the request was successful using the browser interface.
To check the Internet IP address from the browser interface :
1. Launch your browser and select an external site such as http://www.netgear.com.
2. Access the Main Menu of the ADSL modem wireless router’s configuration at
http://192.168.0.1.
3. Under the Maintenance heading check that an IP address is shown for the Internet Port.
If 0.0.0.0 is shown, your ADSL modem wireless router has not obtained an IP addre ss from
your ISP.
If your router is unable to obtain an IP address from the ISP, the problem may be one of the
following:
• Your ISP may require a Multiplexing Method or Virtual Path Identifier/Virtual Channel
Identifier parameter.
Verify with your ISP the Multiplexing Method and parameter value, and update the router’s
ADSL Settings accordingly.
Troubleshooting 2-5
v1.0, February 2006
Page 27

Setup Manual for the DG834GVSP Integrated ADSL Modem and Wireless Router with Voice
• Your ISP may require a login program.
Ask your ISP whether they require PPP over Ethernet (PPPoE) or PPP over ATM (PPPOA)
login.
• If you have selected a login program, you may have incorrectly set the Service Name, User
Name and Password. See “Troubleshooting PPPoE or PPPoA”, below.
• Your ISP may check for your computer's host name.
Assign the computer Host Name of your ISP account to the ADSL modem wireless router in
the browser-based Setup Wizard.
• Your ISP only allows one Ethernet MAC address to connect to Internet, and may check for
your computer’s MAC address. In this case:
Inform your ISP that you have bought a new network device, and ask them to use the router’s
MAC address.
OR
Configure your router to spoof your computer’s MAC address. This can be done in the Basic
Settings menu. Refer to the online help in the ADSL modem wireless router main menu.
Troubleshooting PPPoE or PPPoA
The PPPoA or PPPoA connection can be debugged as follows:
1. Access the Main Menu of the router at http://192.168.0.1.
2. Under the Maintenance heading, select the Router Status link.
3. Click the Connection Status button.
4. If all of the steps indicate “OK” then your PPPoE or PPPoA connection is up and working.
5. If any of the steps indicates “Failed”, you can attempt to reconnect by clicking “Connect”. The
ADSL modem wireless router will continue to attempt to connect indefinitely.
If you cannot connect after several minutes, you may be using an incorrect Service Name, User
Name or Password. There also may be a provisioning problem with your ISP.
Note: Unless you connect manually, the ADSL modem wireless router will not
authenticate using PPPoE or PPPoA until data is transmitted to the network.
2-6 Troubleshooting
v1.0, February 2006
Page 28

Setup Manual for the DG834GVSP Integrated ADSL Modem and Wireless Router with Voice
Troubleshooting Internet Browsing
If your ADSL modem wireless router can obtain an IP address but your computer is unable to load
any Web pages from the Internet:
• Your computer may not recognize any DNS server addresses.
A DNS server is a host on the Internet that translates Internet names (such as www addresses)
to numeric IP addresses. Typically your ISP will provide the addresses of one or two DNS
servers for your use. If you entered a DNS address during the ADSL modem wireless router’s
configuration, reboot your computer and verify the DNS address as described in “Preparing a
Computer for Network Access”. Alternatively, you can configure your computer manually
with DNS addresses, as explained in your operating system documentation.
• Your computer may not have the wireless ADSL modem router configured as its TCP/IP
default gateway.
If your computer obtains its information from the ADSL modem wireless router by DHCP,
reboot the computer and verify the ADSL modem wireless router address as described in
“Preparing a Computer for Network Access”.
Troubleshooting a TCP/IP Network Using the Ping Utility
Most TCP/IP terminal devices and routers contain a ping utility that sends an echo request packet
to the designated device. The device then responds with an echo reply. Troubleshooting a TCP/IP
network is made very easy by using the ping utility in your computer.
Testing the LAN Path to Your Router
You can ping the router from your computer to verify that the LAN path to your router is set up
correctly.
To ping the router from a PC running Windows 95 or later:
1. From the Windows toolbar, click the Start button and select Run.
2. In the field provided, type Ping followed by the IP address of the router, as in this example:
ping 192.168.0.1
3. Click OK.
You should see a message like this one:
Troubleshooting 2-7
v1.0, February 2006
Page 29

Setup Manual for the DG834GVSP Integrated ADSL Modem and Wireless Router with Voice
Pinging <IP address> with 32 bytes of data
If the path is working, you see this message:
Reply from < IP address >: bytes=32 time=NN ms TTL=xxx
If the path is not working, you see this message:
Request timed out
If the path is not functioning correctly, you could have one of the following problems:
• Wrong physical connections
— Make sure the LAN port LED is on. If the LED is off, follow the instructions in “LAN
or ADSL Internet Port LEDs Not On” on page 2-3.
— Check that the corresponding Link LEDs are on for your network interface card and
for the hub ports (if any) that are connected to your workstation and router.
• Wrong network configuration
— Verify that the Ethernet card driver software and TCP/IP software are both installed
and configured on your PC or workstation.
— Verify that the IP address for your router and your workstation are correct and that the
addresses are on the same subnet.
Testing the Path from Your Computer to a Remote Device
After verifying that the LAN path works correctly, test the path from your PC to a remote device.
From the Windows run menu, type:
PING -n 10 <IP address>
where <IP address> is the IP address of a remote device such as your ISP’s DNS server.
If the path is functioning correctly, replies as in the previous section are displayed. If you do not
receive replies:
— Check that your PC has the IP address of your router listed as the default gateway. If the IP
configuration of your PC is assigned by DHCP, this information will not be visible in your
PC’s Network Control Panel. Verify that the IP address of the router is listed as the TCP/IP
default gateway as described in “Preparing a Computer for Network Access”.
— Check to see that the network address of your PC (the portion of the IP address specified
by the netmask) is different from the network address of the remote device.
— If your ISP assigned a host name to your PC, enter that host name as the Account Name in
the Basic Settings menu.
2-8 Troubleshooting
v1.0, February 2006
Page 30

Setup Manual for the DG834GVSP Integrated ADSL Modem and Wireless Router with Voice
Restoring the Default Configuration and Password
This section explains how to restore the factory default configuration settings, changing the
router’s administration password to password and the IP address to 192.168.0.1. You can erase the
current configuration and restore factory defaults in two ways:
• Use the Erase function of the Web Configuration Manager.
• Use the Reset button on the rear panel of the router. Use this method for cases when the
administration password or IP address is not known.
Using the Reset Button
To restore the factory default configuration settings without knowing the administration password
or IP address, you must use the Default Reset button on the rear panel of the router.
1. Press and hold the Reset button until the Test LED turns on (about 10 seconds).
2. Release the Default Reset button and wait for the router to reboot.
Troubleshooting 2-9
v1.0, February 2006
Page 31

Setup Manual for the DG834GVSP Integrated ADSL Modem and Wireless Router with Voice
2-10 Troubleshooting
v1.0, February 2006
Page 32

Appendix A
Technical Specifications
This appendix provides technical specifications for the ADSL modem wireless router.
Network Protocol and Standards Compatibility
Data and Routing Protocols: TCP/IP, RIP-1, RIP-2, DHCP, PPPoE or PPPoA, RFC 1483 Bridged or
Routed Ethernet, and RFC 1577 Classical IP over ATM
Power Adapter
North America: 120V, 60 Hz, input
UK, Australia: 240V, 50 Hz, input
Europe: 230V, 50 Hz, input
Japan: 100V, 50/60 Hz, input
All regions (output): 12 V AC @ 1.0A output, 30W maximum
Physical
Dimensions: 10" x 6.7" x 1.3"
255 mm x 169 mm x 34 mm
Weight: 1.4 lbs.
0.62 kg
Environmental
Operating temperature: 0° to 40° C (32º to 104º F)
Operating humidity: 90% maximum relative humidity, noncondensing
Electromagnetic Emissions
Meets requirements of: FCC Part 15 Class B; VCCI Class B; EN 55 022 (CISPR 22), Class B
Interface Specifications
LAN: 10BASE-T or 100BASE-Tx, RJ-45
WAN: ADSL, ADSL2+, Dual RJ-11, pins 2 and 3
T1.413, G.DMT, G.Lite
ITU Annex A or B
Technical Specifications A-1
v1.0, February 2006
Page 33

Setup Manual for the DG834GVSP Integrated ADSL Modem and Wireless Router with Voice
A-2 Technical Specifications
v1.0, February 2006
Page 34

Appendix B
Related Documents
This appendix provides links to reference documents you can use to gain a more complete
understanding of the technologies used in your NETGEAR product.
Document Link
Internet Networking and
TCP/IP Addressing
Wireless
Communications
Preparing a Computer for
Network Access
Virtual Private
Networking (VPN)
Glossary
http://documentation.netgear.com/reference/enu/tcpip/index.htm
http://documentation.netgear.com/reference/enu/wireless/index.htm
http://documentation.netgear.com/reference/enu/wsdhcp/index.htm
http://documentation.netgear.com/reference/enu/vpn/index.htm
http://documentation.netgear.com/reference/enu/glossary/index.htm
Related Documents B-1
v1.0, February 2006
Page 35

Setup Manual for the DG834GVSP Integrated ADSL Modem and Wireless Router with Voice
B-2 Related Documents
v1.0, February 2006
 Loading...