

Page 1

Reference Manual for the NETGEAR ProSafe VPN Client
NETGEAR, Inc.
4500 Great America Parkway
Santa Clara, CA 95054 USA
202-10015-01
November 2003
202-10015-01
Page 2

Regulatory Approvals
FCC Statement
This equipment has been tested and found to comply with the limits for a Class B digital
device, pursuant to Part 15 of the FCC Rules. These limits are designed to provide reasonable
protection against harmful interference in a residential installation.
This equipment generates, uses and can radiate radio frequency energy and, if not installed and
used in accordance with the instructions, may cause harmful interference to radio communications. However, there is no guarantee that interference will not occur in a particular installation.
If this equipment does cause harmful interference to radio or television reception, which can be
determined by turning the equipment off and on, the user is encouraged to try to correct the
interference by one of the following measures:
Reorient or relocate the receiving antenna.
Increase the separation between the equipment and receiver.
Connect the equipment into an outlet on a circuit different from that to which the receiver
is connected.
Consult the dealer or an experienced radio/TV technician for help.
To assure continued compliance, any changes or modifications not expressly approved by the
party responsible for compliance could void the user's authority to operate this equipment.
(Example - use only shielded interface cables when connecting to computer or peripheral
devices).
FCC Radiation Exposure Statement
This equipment complies with FCC RF radiation exposure limits set forth for an uncontrolled
environment. This equipment should be installed and operated with a minimum distance of 20
centimeters between the radiator and your body.
This device complies with Part 15 of the FCC Rules. Operation is subject to the following two
conditions:
(1) This device may not cause harmful interference, and
(2) This device must accept any interference received, including interference that may cause
undesired operation.
This transmitter must not be co-located or operating in conjunction with any other antenna or
transmitter.
The antennas used for this transmitter must be installed to provide a separation distance of at
least 20 cm from all persons and must not be co-located or operating in conjunction with any
other antenna or transmitter.
Channel
The Wireless Channel sets the radio frequency used for communication.
•Access Points use a fixed Channel. You can select the Channel used. This allows you to
choose a Channel which provides the least interference and best performance. In the USA
and Canada, 11 channel are available. If using multiple Access Points, it is better if adjacent
Access Points use different Channels to reduce interference.
• In "Infrastructure" mode, Wireless Stations normally scan all Channels, looking for an
Access Point. If more than one Access Point can be used, the one with the strongest
signal is used. (This can only happen within an ESS.)
• If using "Ad-hoc" mode (no Access Point), all Wireless stations should be set to use the
same Channel. However, most Wireless stations will still scan all Channels to see if there
is an existing "Ad-hoc" group they can join.
CAUTION:
1) To comply with FCC RF exposure compliance requirements, a separation
distance of at least 20 cm must be maintained between the antenna of this
device and all persons.
2) This transmitter must not be co-located or operating in conjunction with
any other antenna or transmitter.
Page 3

© 2003 by NETGEAR, Inc. All rights reserved.
Trademarks
NETGEAR and Auto Uplink are trademarks or registered trademarks of Netgear, Inc.
Microsoft, Windows, and Wi ndow s NT are registered trademar ks of Microsoft Corporation.
Other brand and product names are registered trademarks or trademarks of their respective holders.
Statement of Conditions
In the interest of improving internal design, operational function, and/or reliability, NETGEAR reserves the right to
make changes to the products described in this document without notice.
NETGEAR
layout(s) described herein.
™
does not assume any liability that may occur due to the use or application of the product(s) or circuit
Technical Support
Refer to the Support Information Card that shipped with your NETGEAR ProSafe VPN Client.
World Wide Web
NETGEAR maintains a World Wide W eb home page that you can access at the universal resource locator (URL)
http://www.netgear.com. A direct connection to the Internet and a Web browser such as Internet Explorer
or Netscape are required.
ii
202-10015-01
Page 4

Contents
Chapter 1
About This Manual
Audience, Versions, Conventions ...................................................................................1-1
How to Use this Manual ..................................................................................................1-2
How to Print this Manual .................................................................................................1-3
Chapter 2
Introduction
What's Included? ............................................................................................................2-1
What’s in the Box? ..........................................................................................................2-2
Chapter 3
Installation
What You Need Before You Begin ..................................................................................3-1
System Requirements .. ... ... ... .......................................... .... ... ... ... ............................3-1
Installing .........................................................................................................................3-2
Upgrading ........................................................................... ............................................3-3
Getting Started ................................................................................................................3-3
VPN Client Connection Indicators ..................................................................................3-3
Uninstalling the NETGEAR ProSafe VPN Client ............................................................3-4
Keyboard Shortcuts ........................................................................................................3-5
Chapter 4
Configuring L2TP Connections
Basic Steps .....................................................................................................................4-1
How to Configure an L2TP Dial-Up Network Connection ................ ............................... 4-1
For Windows 95/98/Me ............................................................................................4-1
For Windows NT 4.0 ................................................................................................4-2
For Windows 2000 ...................................................................................................4-3
For Windows XP ......................................................................................................4-4
How to Configure a Security Policy ................................................................................4-5
When Using a Modem to Establish the L2TP Connection ......................................... ..... 4-5
Contents iii
202-10015-01M-10207-01, Reference Manual v2
Page 5

Chapter 5
Using the Security Policy Editor
What is the Security Policy Editor? .................................................................................5-1
Basic Steps to Configure a Security Policy .....................................................................5-1
How to Secure All Connections ... .... ... ... .......................................... ... .... ... ... ... ... .... ... ... ..5-2
How to Configure Global Policy Settings ........................................................................5-3
How to Configure Other Connections .............................................................................5-4
How to Add and Configure a Connection .......................................................................5-5
How to Enter a Preshared Key .......................................................................................5-8
How to Configure a Gateway ..........................................................................................5-9
Configure My Identity ....................................................................................................5-10
Configure Security Policy Connection Options .......................... ................................... 5-12
Configure Authentication (Phase 1) ..............................................................................5-13
Configure Key Exchange (Phase 2) .............................................................................5-14
Edit a Distinguished Name ...........................................................................................5-16
Configure and Manage Connections ............................................................................5-17
Add and Configure a Connection ...........................................................................5-17
Copy a Connection .................................................................................................5-20
Move a Connection ................................................................................................5-20
Rename a Connection .......... .... ...................................... .... ... ... ... .... ... ... ... ... ..........5-20
Delete a Connection ............................... ... ... ... ... .... ... ... ....................................... ...5-21
Manage Proposals ........................................................................................................5-21
Add a Proposal .......................................................................................................5-21
Copy a Proposal .....................................................................................................5-22
Move a Proposal ....................................................................................................5-22
Delete a Proposal ................................... ... ... ... ... .... ... ....................................... ... ...5-23
Manage Redundant Gateways .....................................................................................5-23
Add a Redundant Gateway ....................................................................................5-24
Copy a Redundant Gateway ..................................................................................5-25
Move a Redundant Gateway ..................................................................................5-25
Rename a Redundant Gateway ...... ... .... ... ... ..........................................................5-25
Delete a Redundant Gateway ............ .... ... ... ..........................................................5-26
Disable Redundant Gateways ................................... ... ... .... ... ... ... .... ... ... ... ... .... ... ...5-26
Manage the Security Policy ..........................................................................................5-26
Edit a Security Policy .............................................................................................5-27
iv Contents
202-10015-01M-10207-01, Reference Manual v2
Page 6

Import a Security Policy .........................................................................................5-28
Reload the Security Policy .............................................. .... ... ... ... .... ......................5-28
Deactivate the Security Policy ............................ ....... ...... ....... ... ....... ...... ...... ....... ...5-29
Reactivate the Security Policy ............................ ....... ...... ....... ... ....... ...... ...... ....... ...5-29
Configure the Client to Retrieve a New Policy from a Policy Server or Web Address 5-3 0
Register with a Policy Management Application ....................................................5-31
Retrieve a New Policy Manually .............................................................................5-32
Chapter 6
Using the Certificate Manager
What is the Certificate Manager? ...................................................................................6-1
Getting Started with the Certificate Manager ......................................... ..................6-2
What are Certificates? ..............................................................................................6-2
CA Enrollment Methods and Procedures .................................................................6-3
Obtain Certificates .................................................... .... ... ... ... ....................................... ..6-4
With Online (SCEP) Enrollment ...............................................................................6-4
CAs that Support SCEP ..................................... ... ... .... ... ... ... .... ... ... ..................6-4
Retrieve a CA Certificate Online ........................................................................6-5
Configure a CA Certificate .................................................................................6-6
Use an HTTP Proxy Server for Online Certificate Requests and CRL Updates 6-6
Import a CA Certificate ......................................................................................6-7
Select a CSP .....................................................................................................6-8
Request a Personal Certificate ..........................................................................6-8
Define How Often to Check for and Retrieve New Personal Certificates ........6-10
Retrieve a Personal Certificate Manually ........................................................6-10
Manage Certificate Requests ..........................................................................6-11
With Manual (File-Based) Enrollment .................................................................... 6-11
Import a CA Certificate ....................................................................................6-12
Request a Personal Certificate ........................................................................6-13
Create a Personal Certificate File to Import ....................................................6-14
Import a Personal Certificate ...........................................................................6-15
Select a CSP ...................................................................................................6-17
View and Delete Certificate Requests .............................................................6-17
Obtain Certificates Through Internet Explorer ........................ ............. ............. ......6-18
Manage Certificates ......................................................................................................6-18
Verify a Certificate ..................................... ... ... ... .... ... ... ... .... ... ................................6-19
Contents v
202-10015-01M-10207-01, Reference Manual v2
Page 7

Export a CA Certificate ...........................................................................................6-19
Delete a Certificate .......................... ... .... ... ....................................... ... ... ... ... .... ......6-20
RA Certificates ....................................... ... ....................................... ... ... ... ... .... ......6-21
Personal Certificates ..............................................................................................6-22
Export a Personal Certificate .................................................................................6-24
Delete a Certificate .......................... ... .... ... ....................................... ... ... ... ... .... ......6-25
Manage Certificate Revocation Lists (CRLs) ................................................................6-26
Import a CRL ..........................................................................................................6-27
Update all CRLs Manually ......................................................................................6-27
View a CRL ............................................................................................................6-28
Delete a CRL ....................................................................... ... ... ... .... ... ...................6-28
Manage the Trust Policy ...............................................................................................6-28
Set the Trust Policy ................................................................................................6-29
Set the Trust Policy and View Trusted Root CA Certificates ..................................6-29
Chapter 7
Using Sessions
Authenticate Yourself ......................................................................................................7-1
Automatically Start and End Secure Sessions ...............................................................7-1
Start and End a Secure Session Manually .....................................................................7-2
Chapter 8
Distributing Customized Profiles
Create a Customized Installation Containing a Security Policy ......................................8-1
Create a Customized Installation Containing a Security Policy and a CA Certificate .....8-2
Create a Customized Installation Containing a Security Policy, CA Certificate, and Personal
Certificate .......................................................................................................................8-2
Chapter 9
Troubleshooting
System Tray Icons ..........................................................................................................9-1
Remove the Client Icon from the System Tray .. ....................................... ... .... ... ... ..9-2
Restore the Client Icon to the System Tray .............................................................9-2
Log Viewer ......................................................................................................................9-2
Freeze the Log Viewer ....... ... .......................................... .........................................9-3
Unfreeze the Log Viewer ..........................................................................................9-3
Clear Log Viewer Messages ....................................................................................9-3
Save the Log Viewer Messages ................................................ ................ ...............9-4
Print the messages in the Log Viewer ......................................................................9-4
vi Contents
202-10015-01M-10207-01, Reference Manual v2
Page 8

Configure Global Policy Settings ....................................................................................9-4
Network Address Translation (NAT) ...............................................................................9-6
Connection Monitor ..... ... .... .......................................... .......................................... ........9-7
Manual keys ...................................................................................................................9-9
Enable Manual Keys ................................................. ... ... .... ... ... ... .... ... ... ... ... ..........9-10
Enter Inbound and Outbound Manual Keys ................. ... .... ... ... ... .... ... ... ...... .... ... ...9-11
Start a Secure Connection with Manual Keys ..................................... ... ... ... .... ......9-13
Disable Manual Keys ................... ... ... .... ... ... .......................................... ................9-13
Appendix A
Networks, Routing, and Firewall Basics
Related Publications ...................................................................................................... A-1
Basic Router Concepts .................................................................................................. A-1
What is a Router? ................................................................................................... A-1
Routing Information Protocol ................................................................................... A-2
IP Addresses and the Internet ......................................... .... ... ... ... .... ... ... ... ... .... ... ... . A-2
Netmask .................................... ................................................................ ..............A-4
Subnet Addressing .................................................................................................. A-4
Private IP Addresses ................................. ... ... ... ....................................... ... .... ... ... . A-7
Single IP Address Operation Using NAT ................................................................. A-8
MAC Addresses and Address Resolution Protocol ................................................. A-9
Related Documents ................................................................................................. A-9
Domain Name Server .............................................................................................. A-9
IP Configuration by DHCP .............. ... .... ... ... .......................................... ... ... .... ... .. A-10
Internet Security and Firewalls .................................................................................... A-10
What is a Firewall? .................................................................................................A-11
Stateful Packet Inspection ............................... ... .... ... ... ... .... ... ................................A-11
Denial of Service Attack .........................................................................................A-11
Appendix B
Virtual Private Networking
What is a VPN? ............................................................................................................. B-1
What Is IPSec and How Does It Work? ......................................................................... B-2
IPSec Security Features .............. ... ... .... ... ... ... ... .......................................... ........... B-2
IPSec Components ............................................ .... ... ... ... .... .................................... B-2
Encapsulating Security Payload (ESP) ................................................................... B-3
Authentication Header (AH) ...................................................... ... .... ... ... ... ... .... ... ... . B-4
Contents vii
202-10015-01M-10207-01, Reference Manual v2
Page 9

IKE Security Association ....... .... ... ... ... .... ... ... ... ... .... ... .......................................... .... B-4
Mode ...................................... ...................... .................... ...................... ........... B-5
Key Management .................................................................................................... B-6
Understand the Process Before You Begin ................................................................... B-6
VPN Process Overview ................................ ... ... ....................................... ... ... ... .... ... ... . B-6
Network Interfaces and Addresses ......................................................................... B-7
Interface Addressing ......................................................................................... B-7
Firewalls ........................................................................................................... B-8
Setting Up a VPN Tunnel Between Gateways ........................................................ B-8
VPNC IKE Security Parameters .................................................................................. B-10
VPNC IKE Phase I Parameters ............................................................................. B-10
VPNC IKE Phase II Parameters .............................................................................B-11
Testing and Troubleshooting .........................................................................................B-11
Additional Reading ...... ... .... .......................................... .......................................... ......B-11
Appendix C
NETGEAR ProSafe VPN Client
to NETGEAR FVS318 or FVM318 VPN Routers
Configuration Summary ................................................................... .............................. C-1
The Use of a Fully Qualified Domain Name (FQDN) ................. ... ... ... .... ... ... ... ... .... ... ... . C-2
Step-By-Step Configuration of FVS318 or FVM318 Gateway A ....................................C-3
Step-By-Step Configuration of the NETGEAR VPN Client B .........................................C-6
Testing the VPN Connection ..... ... .... ... ... ... .... ... ... ... ... .... ... ... ... .... .................................. C-12
From the Client PC to the FVS318 ........................................................................ C-12
From the FVS318 to the Client PC ...................................... ... ... ... .... ... ... ... ... .... ... .. C-13
Monitoring the VPN Connection from the PC ..............................................................C-14
Monitoring the VPN Connection from the FVS318 ...................................................... C-16
Appendix D
NETGEAR VPN Client
to NETGEAR FVL328 or FWAG114 VPN Router
Configuration Profile .............................................................. .... ... ... ... .... ... ... ... ... ...........D-1
Step-By-Step Configuration of FVL328 or FWAG114 Gateway ..................................... D-2
Step-By-Step Configuration of the NETGEAR VPN Client B .........................................D-8
Testing the VPN Connection ..... ... .... ... ... ... .... ... ... ... ... .... ... ... ... .... .................................. D-15
From the Client PC to the FVL328 .................. ... .... ... ... ... .... ... ... ... .... ... ... ... ... .... ... .. D-15
From the FVL328 to the Client PC ..... .... ... ... ... ... .... ... ... ... .... ... ............................... D-16
Monitoring the PC VPN Connection .......................................... ... ... ... .... ... ... ... ... .... ... .. D-17
viii Contents
202-10015-01M-10207-01, Reference Manual v2
Page 10

Viewing the FVL328 VPN Status and Log Information ................................................D-19
Glossary
Numeric .........................................................................................................................G-1
A ....................................................................................................................................G-1
C ..................................... ........................................................................... ....................G-2
D ..................................... ........................................................................... ....................G-2
E ....................................................................................................................................G-3
F ....................................................................................................................................G-4
G ..................................... .............................................. .................................................G-4
I .................................... ............. .......... ............. ............. ............. ............. ............ ...........G-4
L ...................................... ................. ............. ................ ................ ................ .................G-6
M ..................................... ............. ............. ............. ............. ............. ............. .................G-6
N ..................................... ........................................................................... ....................G-7
P ....................................................................................................................................G-7
Q ..................................... .............................................. .................................................G-9
R ..................................... ........................................................................... ....................G-9
S ....................................................................................................................................G-9
T ..................................................................................................................................G-10
V ..................................................................................................................................G-10
W .................................................................................................................................G-10
Index
Contents ix
202-10015-01M-10207-01, Reference Manual v2
Page 11

x Contents
202-10015-01M-10207-01, Reference Manual v2
Page 12
Chapter 1
About This Manual
Thank your for purchasing the NETGEAR ProSafe VPN Client. This chapter describes the target
audience, versions, conventions, and features of this manual.
Audience, Versions, Conventions
This reference manual assumes that the reader has basic to intermediate computer and Internet
skills. However, basic co mputer network, Internet, and firewall technologies tutorial information is
provided in the Appendices and on the NETGEAR Web site.
This guide uses the following formats to highlight special messages:
Note: This format is used to highlight information of importance or special interest.
This manual is written for the NETGEAR VPN Client according to these versions.:
Table 1-1. Product, Firmware Version, Manual Version, and Publication Date
Product NETGEAR ProSafe VPN Client
Manual Part Number 202-10015-01
Manual Publication Date November 2003
Note: Product updates are available on the NETGEAR, Inc. We b site at http://
www.netgear.com/support/main.asp. Documentation updates are available on the
NETGEAR, Inc. Web site at http://www.netgear.com/docs.
About This Manual 1
202-10015-01
Page 13

Reference Manual for the NETGEAR ProSafe VPN Client
4 About This Manual
202-10015-01
Page 14

Chapter 2
Introduction
This chapter describes the features of the NETGEAR ProSafe VPN Client.
The NETGEAR ProSafe VPN Client is a remote access and end-point security product that
secures communications over the Internet and other public networks to create a virtual private
network (VPN) between users. The NETGEAR VPN Client secures data communications sent
from a desktop or portable computer across a public or private TCP/IP network. The client protects
the office computer user and the home and mobile workforce.
The NETGEAR VPN Client supports secure client-to-gateway or client-to-client communications.
For example, employees can telecommute from their homes to the office through the Internet or
dial-in connections for secure client-to-gateway communications. Organizations that require a
low-cost solution for secure communications among their employees or members across a private
LAN, WAN, or individual dial-up connections can use the NETGEAR VPN Client for secure
client-to-client communications.
The NETGEAR VPN Client starts automatically when the user's computer starts, and runs
transparently at all times behind other software programs. A system tray icon indicates the status
of communications for the client.
What's Included?
The NETGEAR ProSafe VPN Client contains two primary components:
• Security Policy Editor is where you create, import, and manage connections and their
associated proposals that make up your security policy.
• Certificate Manager allows users to request and retrieve, import, and store the certificates
users receive from certificate authorities (CAs), and to also set the trust policy.
There are also two diagnostic tools:
• Log Viewer lists the IKE negotiations that occur during Authenticatio n (Phase 1).
• Connection Monitor displays statistical and diagnostic information for each active
connection.
Introduction 2-1
202-10015-01
Page 15

Reference Manual for the NETGEAR ProSafe VPN Client
What’s in the Box?
The product package should contain the following items:
• NETGEAR ProSafe VPN Client
• Resource CD (230-10007-01), including:
— This manual
— Application Notes, Tools, and other helpful information
• Warranty and support information card
2-2 Introduction
202-10015-01
Page 16

Chapter 3
Installation
This chapter describes how to install your NETGEAR ProSafe VPN Client.
What You Need Before You Begin
You need to verify that your computer meets the minimum system requirements.
System Requirements
Before installing the NETGEAR ProSafe VPN Client, please make sure that these minimum
requirements have been met:
• IBM-compatible computer with Pentium processor or equivalent (not Alpha platforms)
• Compatible operating systems with minimum RAM:
Operating system Minimum RAM
Microsoft® Windows® 95 16 MB
Windows 98 and Windows NT
Windows Me and 2000 Professional 64 MB
Windows XP Home and Professional 64 MB; 128 MB recommended
Some versions of Windows may ask for the original Windows operating system installation
files to complete the installation of the VPN Client driver software
• 10 MB hard disk space
• Native Microsoft TCP/IP communications protocol
• For dial-up connections:
– Non-encrypting modem
– Native Microsoft PPP dialer
• For network connections, Ethernet card and connection
• Microsoft Internet Explorer 4.0 or later
Installation 3-1
®
Workstation 4.0 32 MB
202-10015-01
Page 17
Reference Manual for the NETGEAR ProSafe VPN Client
Installing
Use the procedure below to install the NETGEAR ProSafe VPN Client.
1. If you're installing this product on Windows NT or Windows 2000 or XP, log on as
administrator or its equivalent.
2. Run the setup.exe file on the installation CD-ROM or in the installation package.
3. Work through the installation wizard. Unless otherwise instructed, accept the defaults.
Note: The SafeNet VPN Adapter, which supports L2TP, is installed only when these network
components are already installed on your computer:
Operating system Component
Windows 95 Dial-Up Networking with the Microsoft Dial-Up Networking 1.3 Upgrade
Windows 98 and Me Dial-Up Networking
Windows NT Remote Access Server (RAS)
Because Windows 2000 and XP use the native Windows L2TP adapter, the SafeNet L2TP
adapter isn't installed on computers running these operating systems.
4. When the installation completes, click Finish.
5. To complete the client installation, make sure that your compute r restarts.
Note: The NETGEAR ProSafe VPN Client lets you configure and switch among
multiple profiles for multiple tunnels. You can “Import” predefined configuration
profiles. The FVS318.SPD and FVL328.SPD profile files on the NETGEAR ProSafe
VPN Client Resource CD (230-10007-01) include all the settings identified in the
configuration procedures published in these appendices: “NETGEAR ProSafe VPN
Client to NETGEAR FVS318 or FVM318 VPN Routers“ on page C-1 and “NETGEAR
VPN Client to NETGEAR FVL328 or FWAG114 VPN Router“ on page D-1.
3-2 Installation
202-10015-01
Page 18

Reference Manual for the NETGEAR ProSafe VPN Client
Upgrading
To upgrade to this version of the NETGEAR ProSafe VPN Client, take these steps:
1. Uninstall the current version on your computer through the Control Panel Add/Remove
Programs application:
a. In the uninstall wizard, on the Maintenance dialog box, click Remove. This removes all
the client product's components, but not your security policy.
b. The Uninstall Security Policy dialog box prompts you to delete your IPSec security
policy, which includes any certificates and private keys:
– To keep it, click No. You can import this security policy after you install the new
version of the NETGEAR ProSafe VPN Client.
– To delete it, click Yes.
c. When the Maintenance Complete dialog box opens, click Finish.
d. To complete the uninstall, make sure that your computer restarts.
2. Install this new version of the NETGEAR ProSafe VPN Client.
Getting St arted
The NETGEAR ProSafe VPN Client contains two primary modules:
• Security Policy Editor to configure and maintain the security policy
• Certificate Manager to request, store, and administer certificates
To learn how to use NETGEAR VPN Client, go to Start>Programs>NETGEAR ProSafe VPN
Client>NETGEAR ProSafe VPN Client Help.
VPN Client Connection Indicators
The NETGEAR ProSafe VPN Client provides the following three indicators which give you
feedback on the status of your wireless connection:
The System Tray (SysTray) resides on one end of the taskbar in the Microsoft Windows desktop.
Installation 3-3
202-10015-01
Page 19
Reference Manual for the NETGEAR ProSafe VPN Client
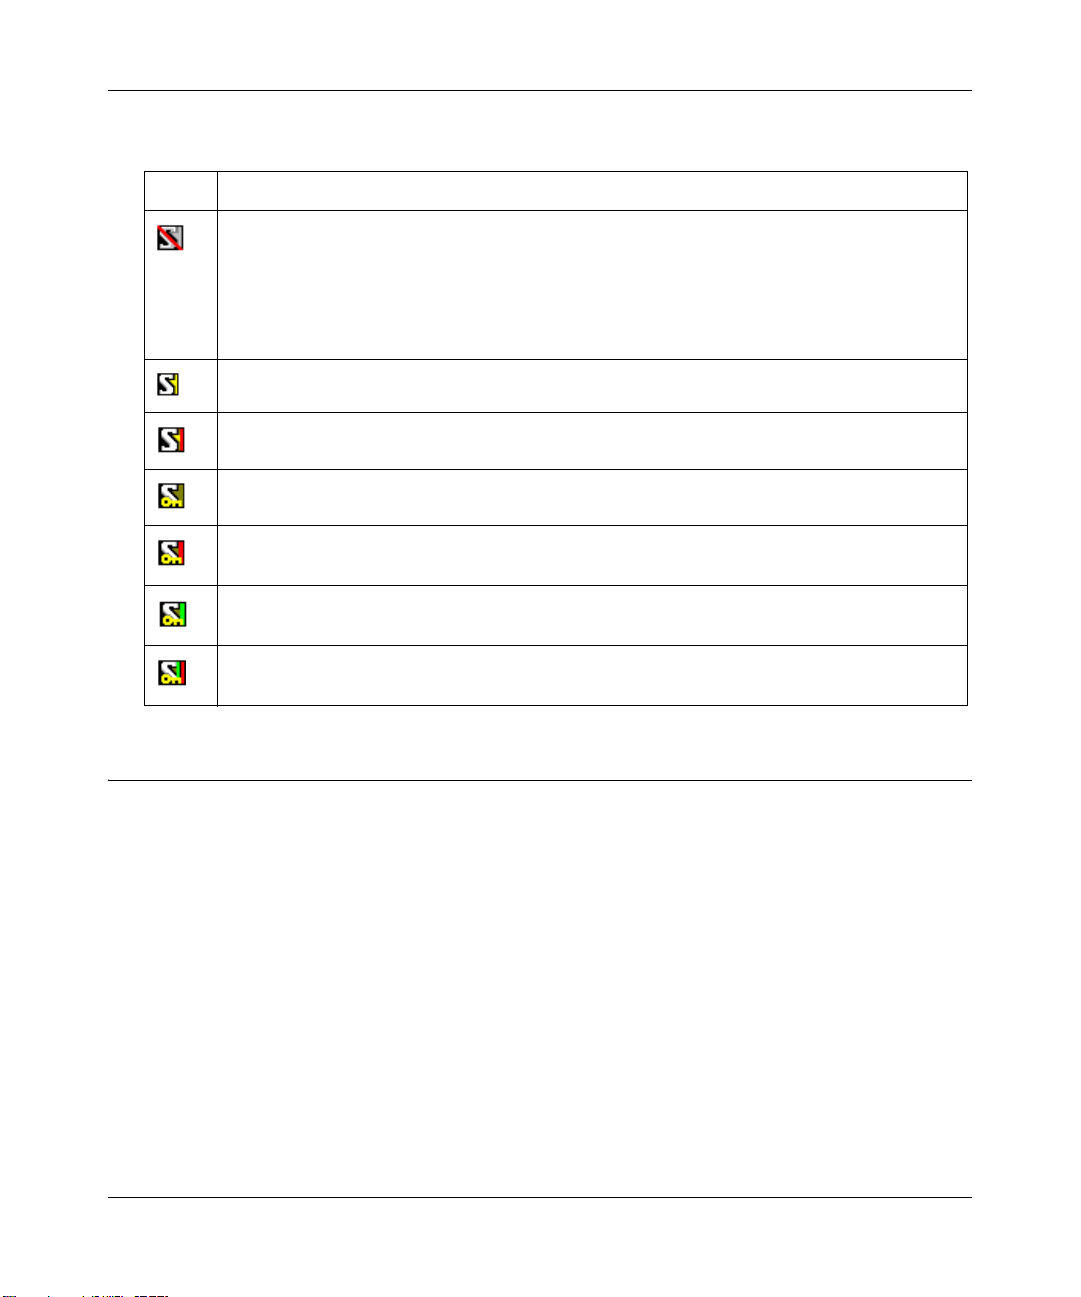
Table 3-1.
Icon Explanation
• The Windows operating system did not start the IREIKE service properl y. To start this
service, restart your computer. If this icon continues to display, you may need to reinstall
the client.
or
• Your security policy is deactivated—that is, disabled. To reactivate it, go to Reactivate the
security polity.
Your computer is ready to establish connections or transmit data.
Your computer has established no secure connections and is transmitting unsecured data.
Your computer has established at least one secure connection, but is transmitting no data.
Your computer has established at least one secure connection and is transmitting only
unsecured data.
Your computer has established at least one secure connection and is transmitting only
secured data.
Your computer has established at least one secure connection and is transmitting secured
and unsecured data.
Uninstalling the NETGEAR ProSafe VPN Client
When you remove NETGEAR ProSafe VPN Client and its components, you have the option to
keep your security policy, certificates, and private keys to use when you upgrade or reinstall the
client.
Note: Before you upgrade the client, read the readme file and Release Notes provided with the
new version.
1. Open the Control Panel Add/Remove Programs application.
2. Remove NETGEAR ProSafe VPN Client. The details depend on the v ersion of Windows on
your computer.
3. Work through the uninstall wizard:
a. When the Maintenance dialog box opens, click Remove.
3-4 Installation
202-10015-01
Page 20

Reference Manual for the NETGEAR ProSafe VPN Client
When prompted to remove all installed components, click Yes.
b.
Note: This does not remove the IPSec security policy, certificates, or private keys.
c. When prompted to remove the IPSec security policy, which includes certificates and
private keys, in most cases, click No. You can import this policy after you reinstall this
client version or upgrade to a newer client version; this can save a lot of time.
d. When the maintenance complete message opens, click Finish.
Make sure that the computer restarts; this is required to complete the uninstall.
Keyboard Shortcuts
The client supports standard Windows keyboard shortcuts for accessibility. For a complete list of
Windows keyboard shortcuts, refer to the keyboard shortcuts help topics in Windows.
Installation 3-5
202-10015-01
Page 21

Reference Manual for the NETGEAR ProSafe VPN Client
3-6 Installation
202-10015-01
Page 22

Chapter 4
Configuring L2TP Connections
This chapter describes how to use configure VPN tunnels using the NETGEAR ProSafe VPN
Client.
Basic Steps
The client supports Layer 2 Tunneling Protocol (L2TP) connections through a virtual adapter: the
SafeNet VPN Adapter. The specific steps required vary with the Windows operating system
installed on your computer.
To create and secure an L2TP connection, perform the se tasks in the sequence that your network
security administrator recommends:
• Configure a network connection to the remote party’s L2TP network server.
• Configure the security policy for L2TP.
• If you are establishing the L2TP or virtual adapter connection over a physical dial-up
connection—that is, a modem—add another dial-up connection adapter.
How to Configure an L2TP Dial-Up Network Connection
Configuring a dial-up network connection for L2TP requires you to use the Dial-Up Networking
(DUN) features of the Windows operating system. The steps vary by operating system.
For Windows 95/98/Me
1. Create the connection to the other party's L2TP network server:
a. On the desktop, double-click My Computer.
b. Double-click Dial-Up Networking. The Dial-Up Networking dialog box opens.
c. Double-click Make New Connection. The Make New Connection wizard opens.
Configuring L2TP Connections 4-1
202-10015-01
Page 23

Reference Manual for the NETGEAR ProSafe VPN Client
Note: If this is the first dial-up connection for your computer, the Welcome to Dial-Up
d.
Networking page opens instead. Follow the prompts to start the Make New Connection
wizard.
e. In the Type a name for the computer you are using box, type the name for the
connection.
f. In the Select a device box, click SafeNet_VPN x Adapter, where x is the number of the
VPN adapter.
g. Click Next.
h. In the Host name or IP address box, type the IP address of the remote party's L2TP
network server (LNS).
i. Click Next.
j. Click Finish.
2. Change properties for this connection:
a. In My Computer, double-click Dial-Up Networking. The Dial-Up Networking dialog
box opens.
b. Right-click the specific connection, and then click Properties. The connection_name
dialog box opens.
c. On the tabs, locate the settings to change, and then make the changes.
d. Click OK until you return to the Dial-up Networking window.
e. Close the window.
For Windows NT 4.0
1. Double-click My Computer.
2. Double-click Dial-up Networking. The Dial-Up Networking dialog box opens.
Note: If this is the first dial-up connection for your computer, the Welcome to Dial-Up
Networking page opens instead. Follow the prompts until the Dial-Up Networking dialog
box opens.
3. Click New. The New Phonebook Entry page opens.
4. Click the Basic tab.
5. In the Entry name box, type the name for the connection.
4-2 Configuring L2TP Connections
202-10015-01
Page 24

Reference Manual for the NETGEAR ProSafe VPN Client
In the Phone number box, type the IP address of the remote party's LNS.
6.
7. In the Dial using box, click SafeNet_VPN x Adapter, where x is the number of the VPN
adapter.
8. Click the Server tab.
9. Click OK.
For Windows 2000
1. On the Windows desktop, click Start>Settings>Network and Dial-up Connections. The
Network and Dial-up Connections window opens.
2. Double-click Make New Connection. The Network Connection Wizard opens.
Note: If this is the first dial-up connection for your computer, you may be prompted to provide
some preliminary data. Follow the prompts until you return to the Network Connection
Wizard.
3. On the Network Connection Type page, take these steps:
a. Click Connect to a private network through the Internet.
b. Click Next.
4. On the Select a Device page, take these steps:
a. In the Select the devic es to use in this connection list, as many of the check boxes that
apply; you must select at least one. If you're not sure which ones to select, contact your
network administrator.
b. Click Next.
5. On the Public Network page, take these steps:
a. Click Do not dial the initial configuration.
b. Click Next.
6. On the Destination Address page, identify the remote party's L2TP server:
a. In the Host name or IP address box, type the IP address of the remote party's L2TP
network server.
b. Click Next.
7. On the Connection Availability page, select whether to make this connection available to
only you or all others who use your computer:
Configuring L2TP Connections 4-3
202-10015-01
Page 25

Reference Manual for the NETGEAR ProSafe VPN Client
Ask your network administrator which option to select, and then click that option.
a.
b. Click Next.
8. On the Completing the Network Connection Wizard page, take these steps:
a. Type the name for this connection; the default is Virtual Private Connection.
b. Click Finish.
For Windows XP
1. On the Windows desktop, click Start>Settings>Network Connections. The Network
Connections window opens.
2. Double-click Make New Connection. The Network Connection Wizard opens.
3. Click Next. The Network Connection Type page opens.
4. Note: If this is the first dial-up connection for your computer, you may be prompted to provide
some preliminary data. Follow the prompts until you return to the Network Connection
Wizard.
5. Click Connect to the network at my workplace.
6. Click Next. The Network Connection page opens.
7. Click Virtual Private Network connection.
8. Click Next. The Connection Name page opens.
9. In the Workplace box, type the name for this connection.
10. Click Next. The VPN Server Selection page opens.
11. Type the hostname or IP address of the remote party's L2TP server.
12. Click Next. The Connection Availability page opens.
13. For the Create the connection for option, accept the default, Anyone's use, or click My use
only.
14. Click Next. The Completing the New Connection Wizard page opens.
15. If you like, select the Add a shortcut to this connection to my desktop check box.
16. Click Finish.
4-4 Configuring L2TP Connections
202-10015-01
Page 26

Reference Manual for the NETGEAR ProSafe VPN Client
How to Configure a Security Policy
1. In the Security Policy Editor, in the Network Security Policy list, click the specific secure
connection .
2. In the Remote Party Identity and Addressing group, configure the remote party's information.
Note: When configuring security for L2TP, the remote party is the L2TP network server
(LNS).
a. In the ID Type box at the top of the group, click one of these remote party identifiers:
• Domain name
• IP address
• Email address
• Distinguished name
•Any
b. In the IP Address box, type the IP address of the LNS.
c. In the Protocol box, click UDP.
d. In the Port box, click L2TP.
e. Unless otherw ise instructed, make sure that the Connect using check box is clear.
3. Ask the remote party if you need to change the Port value to L2TP in My Identity.
4. When you configure the Key Exchange (Phase 2) proposal, in the Encapsulation box, click
Transport, which is the typical L2TP connection setting.
5. Click Save.
When Using a Modem to Establish the L2TP Connection
Note: If you use a network or broadband connection, such as cable or DSL, to establish an L2TP
connection on a network, skip this topic; it doesn't apply. If you have questions, contact your
network security administrator.
If you establish the L2TP connection from your computer through a physical di al-up connectio n—
that is, a modem—your computer requires two Microsoft dial-up connections or adapters:
• One for the L2TP connection, which is a virtual connection
Configuring L2TP Connections 4-5
202-10015-01
Page 27

Reference Manual for the NETGEAR ProSafe VPN Client
• One for the physical dial-up connection
Therefore, you must add another dial-up connection through Windows. The specific steps required
to add a second dial-up connection differ among the various Windows operating systems. This is
the general procedure:
1. On your computer, in Windows help, look up network adapters, network connections, or
add a connection.
2. In Control Panel, open the Network or Network and Dial-up Connections application.
3. Follow the instructions in the help to add another dial-up connection or adapter.
Note: In Windows 95 and 98, dial-up adapters may be labeled Dial-Up Adapter and Dial-Up
Adapter#2 (VPN Support).
If you need additional help, contact your network security administrator or IT staff.
4-6 Configuring L2TP Connections
202-10015-01
Page 28

Chapter 5
Using the Security Policy Editor
This chapter describes how to use the Security Policy Editor of the NETGEAR VPN Client.
What is the Security Policy Editor?
The Security Policy Editor is the client module in which you (or your network security
administrator) create, import, and export security policies. Only one security policy is in effect at
any time.
The policy contains connections and proposals that define the address of the remote (or other)
party, the security level for the connection, how you identify yourself to the other party, and other
attributes concerning the proposals and connections.
The sequence of the connections in the Network Security Policy list in the Security Policy Editor
determines the order in which the client tests for a match between an incoming transmission and
the proposed policies, and in turn defines the connection's security policy.
There are two ways to open the Security Policy Editor:
• On the Windows desktop, click Start>Progr ams>N ETGEAR ProSafe VPN
Client>Security Policy Editor.
• Right-click the NETGEAR ProSafe VPN Cl ient icon>Security Policy Editor.
Basic Steps to Configure a Security Policy
Caution: Before attempting to configure the security policy, check with your network security
administrator: your security policy may have been configured when the client was installed.
Using the Security Policy Editor 5-1
202-10015-01
Page 29

Reference Manual for the NETGEAR ProSafe VPN Client
Table 5-1. Summary of steps
Step Task
1 • Create one connection that secures all communications, with the option to direct all
connections to a specific gateway
or
• Create multiple connections and specify which ones to secure
2 Select options that apply to all connections in the security policy
3 Identify yourself (the user) through one of these methods:
Select the personal certificate
Let the client automatically select the personal certificate du ring IKE negotiation
Enter the specific preshared key
4 Select the Phase 1 mode:
Main Mode (high security)
Aggressive Mode (low security)
Manual keys (for troubleshooting only)
5 Add proposals, if needed, and select these options:
Encryption algorithm
Hash algorithm
SA life
Key (Diffie-Hellman) group
6 Add proposals, if needed, and select the options for Encapsulated Security Payload (ESP)
or Authentication header (AH)
7 Identify backup gateways on the network
8 For network administrators or installers only: Create and deploy a customized client
installation package, with the security policy you configured, to users
How to Secure All Connections
You can create a single connection called All Connections in your security policy that secures all
IP communications between your computer and every other party.
1. In the Security Policy Editor, click Options>Secure>All Connections. A secure connection
called All Connections is added to the Network Security Policy list.
2. To route a ll secure communications from your computer through a specific, secure,
IPSec-compliant network gateway, such as a firewall or router, go to Configure a gateway.
3. Click Save.
5-2 Using the Security Policy Editor
202-10015-01
Page 30

Reference Manual for the NETGEAR ProSafe VPN Client
Configure My Identity for this connection.
4.
5. Exit the Security Policy Editor.
How to Configure Global Policy Settings
Global policy settings are program preferences that apply to all secure IP communications. You
can change these at any time to match to your security policy.
1. In the Security Policy Editor, click Options, and then click Global Policy Settings. The
Global Policy Settings dialog box opens.
2. In the Retransmit Interval box, type the length of time, in seconds, that the client waits
before resending an IKE protocol packet that has not been responded to. The de fault is 8
seconds.
Note: If the client selects a redundant gateway when you know that the primary one is
available, try entering a higher number for Retransmit Interval.
3. In the Number of retries box, type the number of times your computer resends an IKE
protocol packet before abandoning the exchange. The default is 3 tries.
4. Status notifications are messages that inform communicating parties what the time-out periods
are and whether their security proposals have been accepted or rejected.
To send these messages, select the Send status notifications to peer host check box.
5. An internal network IP address is a virtual IP address assigned to the client user. Remote users
can appear as internal users on a private network to, for example, access a WINS server or
browse the network.
To enable remote users to appear as internal users on a private network, select the Allow to
Specify Internal Network Address check box.
Note: If you select this check box, you must enter a private internal network IP address when
Configuring My Identity.
6. To enable logging the Log Viewer's IKE negotiation messages to the isakmp.log file in the
client's installation directory , select the Enable logging to a file check box. This can facilitate
remote troubleshooting by allowing a user to send a file with these messages instead of
repeatedly freezing and printing the Log Viewer.
Notes:
Using the Security Policy Editor 5-3
202-10015-01
Page 31

Reference Manual for the NETGEAR ProSafe VPN Client
• The maximum size for the isakmp.log file is 100 KB. When the client computer, the client,
and the IKE service restart and the isakmp.log file size exceeds 100 KB, this isakmp.log
file is deleted and a new one created.
• On computers running Windows 95 and 98 , when the isakmp.log file size exceeds 64 KB,
Notepad prompts the user to try WordPad instead because of the file's size. When the user
tries WordPad, however, WordPad prompts the user that it can't open the file because it is
in use by another program (the IKE service).
In this case, to view the file, try one of these options:
– Rename it, and then open it in WordPad.
– Open a read-only version of the file in Microsoft Word.
– Clear the Enable logging to a file check box, and then open the file.
7. If you don't use a smart card and reader or similar device to authenticate your identity, skip this
step.
If you do use a smart card and reader or similar device, the client can, when it detects that the
smart card or reader is removed, delete active keys and end these communications sessions.
This provides extra security. Only connections that use the keys on your smart card are
affected.
To enable this feature , select the Smart card removal clears key s ch ec k box.
8. Click OK.
9. Click Save.
How to Configure Other Connections
The security policy includes a connection called Other Connections. This connection, non-secure
by default, is designed to allow all non-encrypted IP traffic through and let you to access the
Internet and other public networks unsecured.
The client processes connections in the order in which they display in the Network Security
Policy list. Because Other Connections is the catchall or default rule for communications that don't
conform to the proposals for individual connections, it is always last in the connections list.
1. In the Security Policy Editor, click Options, point to Secure, and then click Specified
Connections.
2. In the Network Security Policy list, click Other Connections.
5-4 Using the Security Policy Editor
202-10015-01
Page 32

Reference Manual for the NETGEAR ProSafe VPN Client
In the Connection Security group, click a security level:
3.
• Secure secures communications for this connection.
• Non-secure , the default, allows communications for this connection to pass through
unsecured, or not encrypted.
• Block prohibits all communications for this connection from passing through.
4. If you selected Non-secure or Block in the Connection Security group, the Internet Interface
group is available:
a. In the Name list, click the interface for your computer to use to connect to a network. The
default, Any, lets your computer select any available interface.
For devices with associated IP addresses, the IP Addr box shows the IP address.
b. In the Port box, click the protocol port through which your computer connects to the
remote party. The default, All, secures all protocol ports.
The port's standard numeric designation shows next to the Port box.
5. Click Save.
a. If you selected Secure in the Connection Security group, is your network protected by a
secure IPSec-compliant gateway, such as a firewall or router?
• If it is, go to Configure a gateway.
• If it is not, continue with the next step.
b. The Connection Security setting determines your next step:
• If you selected Secure, Configure My Identity for this connection.
• If you selected Non-secure or Block, you can add and configure connections.
How to Add and Configure a Connection
You can create and configure multiple connections for your security policy.
Before you can configure a connection, make sure that you have identification information for the
remote party , such as network IP address, domain name, or email address. If the remote party (user
or network) is protected by a secure IPSec-compliant gateway device, obtain that gateway's IP
address, too.
1. In the Security Policy Editor, Configure Other Connections.
Using the Security Policy Editor 5-5
202-10015-01
Page 33

Reference Manual for the NETGEAR ProSafe VPN Client
In the Network Security Policy list, if the My Connections folder does not appear, click
2.
Options, point to Secure, and then click Specified Connections.
3. Click (or Edit>Add Connection). A highlighted New Connection entry displays in the
Network Security Policy list.
4. Rename the new connection.
5. In the Connection Security group, take these steps:
a. Click the security level:
• Secure secures communications for this connection. This is the default.
• Non-secure allows communications for this connection to pass through
unsecured, or not encrypted.
• Block prohibits all communications for this connection from passing through.
b. When the Secure security level is selected, the Only Connect Manually check box
appears. By default, the check box is clear; this means that the client establishes and
terminates connections automatically as needed. You can, however, initiate and end secure
sessions manually.
To require the user to manually establish and termina te all secure sessions using this
connection (with the Connect and Disconnect options on the client icon's shortcut menu),
select the Only Connect Manually check box.
If a connection for which the Only Connect Manually check box is selected isn't
manually connected, traffic that would otherwise go over this connection is bypassed, as
though there were no connection configured for this traffic. Traffic that would go over that
connection if it were active is instead compared against the remaining connections in the
Network Security Policy box to determine how to handle it.
6. In the Remote Party Identity and Addressing group, in the ID Type box at the top of the
group, click an identifier for the other party. Boxes become available below the ID Type box
to enter information about the ID type you selected:
Table 5-2: Remote Party Addressing
ID Type option In boxes below ID Type box, type…
IP Address IP address
Domain Name domain name and IP address
Email Address email address
5-6 Using the Security Policy Editor
202-10015-01
Page 34

Reference Manual for the NETGEAR ProSafe VPN Client
IP Subnet subnet address and mask
IP Address Range first and last IP addresses for the range
Distinguished Name IP address
To edit a distinguished name, go to edit a distinguished
name
Any (default) IP address
To create a generic security policy for multiple users, select Any.
7. In the Protocol box, click the protocol for the remote party to use to connect with you. The
default, All, secures all protocol ports. Selecting the exact protocol port tightens your security
policy.
8. If you clicked UDP or TCP in the Protocol box, in the Port box, click a protocol port. The
standard numeric designation for this port displays next to the Port box.
9. Your Connection Security selection determines your next step:
• If you selected Secure and a secure IPSec-compliant gateway device, such as a
firewall or router, protects the remote user or network, go to Configure a gateway.
• If you selected Secure and the remote user or network is not protected by a secure
IPSec-compliant gateway, make sure that the Connect using check box is clear.
• If you selected Non-secure or Block , the Internet Interface group opens:
a. In the Name box, click the interface for your computer to use to connect to a network. The
default, Any, enables your computer to select any available interface. For devices with
associated IP addresses, the read-only IP Addr box shows the IP address.
b. In the Port box, click the protocol port for your computer to connect to the remote party
through. The default, All, secures all protocol ports. The number displayed next to the
Port box is the port's standard designation.
10. Click Save.
11. Configure My Identity for this connection.
Using the Security Policy Editor 5-7
202-10015-01
Page 35

Reference Manual for the NETGEAR ProSafe VPN Client
How to Enter a Preshared Key
A preshared key is an alphanumeric character string that can be used instead of certificates to
authenticate the identity of communicating parties during Phase 1 IKE negotiations. This character
string, which can contain from 8 through 255 characters, is called preshared because the remote
party needs it before you can communicate with it. Both parties must enter this preshared key in
their IPSec-compliant devices, such as a firewall, gateway encryptor, router, or software client.
Preshared keys can be included with the security policy when it is exported or included in a
customized client installation.
When you use preshared keys, you don't have to deal with CAs and certificates. Preshared keys,
however, do not provide the same level of security as certificates.
Before you begin to configure the security policy, decide whether to use certificates or preshared
keys.
To use preshared keys instead of certificates for authentication, enter the preshared key when you
Configure My Identity for a selected connection.
Note: Preshared keys are not global policy settings; therefore, you must assign the key to each
applicable connection individually.
1. In the Security Policy Editor, in the Network Security Policy list, expand the specific secure
connection .
2. In this connection, click My Identity.
3. In the Select Certificate box, click None.
4. Click Pre-Shared Key. The Pre-shared Key dialog box opens.
5. Click Enter Key.
6. Type the key.
7. Click OK.
8. Click Save.
9. Complete configuring My Identity.
5-8 Using the Security Policy Editor
202-10015-01
Page 36

Reference Manual for the NETGEAR ProSafe VPN Client
How to Configure a Gateway
When configuring a secure connection—Other Connections, All Connections, or a Specific
connection—in the Security Policy Editor, and your network or, for specific connections only, the
remote party's network routes secure IP communications through a gateway device, such as a
firewall or router, you must identify the gateway and its addressing.
1. In the Security Policy Editor, in the Network Security Policy list, click the particular secure
connection .
2. In the right pane, select the Connect using check box. When configuring a specific
connection, this is in the Remote Party Identity and Addressing group.
3. In the adjoining box, click the gateway to use.
4. In the ID Type box immediately below the Connect using check box, click an identifier for
this gateway.
Note: To create a generic security policy for multiple users, select Any (the default).
5. Complete the boxes that become available, based on the gateway identifier you specified in ID
Type:
• If you clicked IP Address, you can edit the gateway's IP address in a box below the ID
Type box.
• If you clicked Domain Name:
a. You can edit the gateway's IP address in a box below the ID Type box.
b. In the box adjacent to the ID T y pe box, select how to specify the gateway: click Gateway
IP Address or Gateway Hostname (DNS name).
c. In the box below the Gateway IP Address/Hostname box, type the value for the selected
gateway option.
• If you clicked Distinguished Name or Any:
a. In the box adjacent to the ID Type box, select how to specify the gateway: click Gateway
IP Address or Gateway Hostname (DNS name).
b. In the box below the Gateway IP Address/Hostname box, type the value for the selected
gateway option.
To change the distinguished name, go to Edit a distinguished name.
6. Click Save.
Using the Security Policy Editor 5-9
202-10015-01
Page 37

Reference Manual for the NETGEAR ProSafe VPN Client
Configure My Identity
The remote party that you want to communicate securely with uses the information in My Identity
to verify that you really are who you indicate that you are. This is done with either a preshared key
that you and the remote party have or a certificate. This information also distinguishes you from
the remote party during the key exchange process.
The ID types available for identifying yourself in My Identity come from the subject information
fields of the personal certificate request that you completed when you requested a personal
certificate from a CA.
1. In the Security Policy Editor, in the Network Security Policy list, expand the specific secure
connection .
2. Click My Identity.
3. If you are using preshared keys, go to Enter a preshared key.
4. If you are using certificates:
a. In the Select Ce rtificate box, you can specify a personal certificate or let the client select
one:
– To select a particular personal certificate, click that certificate.
– For the client to select a personal certificate automatically , click Select automatically
during IKE negotiation, the default for new security policies. This option facilitates
creating a policy.
b. In the ID T ype box, click the informatio n and format that identifies you to remote parties.
A box opens below the ID Type box with the particular subject information, in the ID type
you clicked, from the personal certificate that you selected in the Select Certificate box.
If you selected Select automatically during IKE negotiation in the Select Certificate
box, the default ID type is Distinguished Name; each personal certificate contains this.
Caution: The ID type is a search criterion that the client uses when automatically
selecting a certificate. This means that if it doesn't find a personal certificate with the ID
type selected, the connection attempt fails.
5. If the Port box is enabled, click the protocol port through which your computer will connect to
the other party . The default, All, secures all protocol ports. Selecting the exact protocol port
tightens your security policy.
The port's standard numeric designation shows next to the Port box.
5-10 Using the Security Policy Editor
202-10015-01
Page 38

Reference Manual for the NETGEAR ProSafe VPN Client
In the Virtual Adapter box, you can configure the client to use a virtual adapter to handle
6.
private IP addressing. If certain programs that work with the client are “IP address-aware,”
your computer is assigned a private Windows Internet Naming Service (WINS) server address,
or both, you may need to do this.
In the Virtual Adapter box, click an option:
• Disabled—No virtual adapter is used. This is the default.
• Required—When the client tries to launch the connection with the virtual adapter, IP
address-aware programs know the assigned address for the virtual adapter and use it as the
source IP address. If the launch fails, the connection attempt fails.
• Preferred—Uses the same procedure as Required with one exception: if the connection
launch using the virtual adapter IP address fails, the client uses address substitution to
dynamically change the server IP address throughout the session.
7. If you selected the Allow to Specify Internal Network Address check box when you
Configured Global Policy Settings, and the Internal Network IP Address box opens, type an
IP address in it.
8. In the Internet Interface group, in the Name box, click the interface for your computer to use
to connect to a network. The default, Any, enables your computer to select any available
interface.
For devices with associated IP addresses, the IP Addr box shows the IP address.
Caution: If the Name box contains an entry other than Any, do not change it. This was
configured by your network security administrator. The only instance in which you may need
to change this entry is to assist your network security administrator in troubleshooting
connection problems.
9. Click Save.
Using the Security Policy Editor 5-11
202-10015-01
Page 39

Reference Manual for the NETGEAR ProSafe VPN Client
Configure Security Policy Connection Options
Before you configure the options for Security Policy in a connection, take these steps:
• Make sure that the connection is secure: In the Connection Security group, click Secure .
• Configure My Identity for this connection.
The Phase 1 negotiation mode selected for Security Policy determines how the security association
(SA) is established for each connection through IKE negotiations.
1. In the Security Policy Editor, in the Network Security Policy list, expand the specific secure
connection .
2. Expand Security Policy.
3. In the Select Phase 1 Negotiation Mode group, click an option:
• Main Mode ensures the highest level of security when the communicating parties are
negotiating authentication (Phase 1).
• Aggressive Mode is quicker than Main Mode, because it eliminates several steps when
the communicating parties are negotiating authentication (Phase 1).
• Use Manual Keys requires no negotiations; SafeNet recommends using this for
troubleshooting only.
4. T o activate the perfect forward secrecy (PFS) feature, which requires exchanging independent
keying material each time Key Exchange keys are generated, select the Enable Perfect
Forward Secrecy (PFS) check box.
5. If you selected the Enable Perfect Forward Secrecy (PFS) check box, in the PFS Key
Group list, click a Diffie-Hellman Group 1, 2, or 5.
6. To set a counter that determines if a packet is unique, select the Enable Replay Detection
check box.
7. Click Save.
The Phase 1 Negotiation Mode you selected determines your next step:
• If you selected Main Mode or Aggressive Mode, configure Authentication (Phase 1).
• If you selected Use Manual Keys, configure Key Exchange (Phase 2).
5-12 Using the Security Policy Editor
202-10015-01
Page 40

Reference Manual for the NETGEAR ProSafe VPN Client
Configure Authentication (Phase 1)
After you configure Security Policy for a secure connection, the next step is to configure
authentication proposals for this policy, one connection at a time.
Note: If you are using manual keys, skip this topic, and go to Configure Key Exchange (Phase 2).
1. In the Security Policy Editor , in the Network Security Policy list, expand a secure connection
.
2. For the selected connection, expand Security Policy. Authentication (Phase 1) and Key
Exchange (Phase 2) appear .
3. Expand Authentication (Phase 1).
4. Your next step depends on whether you are configuring the first proposal or a subsequent one:
• For the first proposal, click Proposal 1.
• For subsequent proposals, create a new one from scratch or copy an existing one as a base:
– To create one from scratch, click Create New Proposal.
– To copy an existing proposal, click the source proposal, and then click Copy.
5. In the Authentication Method and Algorithms group, select these options for this proposal:
a. In the Authentication Method box, accept the default option, based on how you
configured My Identity:
– If you entered a preshared key, Pre-Shared Key
– If you selected a certificate, RSA Signatures
If your gateway is configured for Extended Authentication (XAUTH), you can select an
XAUTH version of the default option.
b. In the Encryption Algorithm box, click an option:
– For minimal security, DES
– For medium security, Triple-DES (the default)
– For maximum security, AES-128, AES-192, or AES-256
c. In the Hash Algorithm box, click an option:
– For minimal security, MD5
– For maximum security, SHA-1 (the default)
Using the Security Policy Editor 5-13
202-10015-01
Page 41

Reference Manual for the NETGEAR ProSafe VPN Client
In the SA Life box, click an option. Unspecified is the default.
d.
e. If you clicked Seconds for SA Life, in the adjacent box, type the number of seconds.
f. In the Key Group box, click Diffie-Hellman Group 1, Group 2 (the default), or
Group 5.
6. Click Save.
7. Configure Key Exchange (Phase 2).
Configure Key Exchange (Phase 2)
After you add and configure the authentication proposals for Security Policy, the next step is to
add and configure the key exchange proposals for that policy, one connection at a time.
1. Configure Authentication (Phase 1).
2. In the Security Policy Editor, in the Network Security Policy list, expand a secure connection
.
3. For the selected connection, expand Security Policy. Authentication (Phase 1) and Key
Exchange (Phase 2) appear .
4. Expand Key Exchange (Phase 2). Proposals appear.
5. Your next step depends on whether you are configuring the first proposal or a subsequent one:
• For the first proposal, click Proposal 1.
• For a subsequent proposal, you can start from scratch or copy an existing one as a base:
– To start from scratch, click Create New Proposal.
– To copy an existing proposal, click the source proposal, and then click Copy.
6. In the IPSec Protocols group, configure these options:
a. In the SA Life box, click the measurement unit. Your selection opens various boxes for
you to enter additional information.
Note: If you click Unspecified, no boxes are enabled; skip step “b”.
b. In the enabled boxes, type a value.
c. In the Compression box, click Deflate; this value increases the transmission speed.
7. Encapsulation Protocol (ESP) and Authentication Protocol (AH) are mutually exclusive
check boxes. Select the one that meets your requirements:
5-14 Using the Security Policy Editor
202-10015-01
Page 42

Reference Manual for the NETGEAR ProSafe VPN Client
• T o encrypt and authenticate the data, select the Encapsulation Pr otocol (ESP) check box.
a. In the Encryption Algorithm box, click an option:
– For minimal security, DES
– For medium security, Triple-DES (the default)
– For maximum security, AES-128, AES-192, or AES-256
– For no security, Null
b. In the Hash Algorithm box, click an option:
– For minimal security, MD5
– For maximum security, SHA-1 (the default)
– DES-MAC
c. In the Encapsulation box, accept Tunnel (the default) or click Transport.
Note: If you selected the Connect using check box and a gateway when you configured
All Connections or a specific connection to be secured, Tunnel is the only option.
• To ensure that the data has not been altered, select the Authentication Protocol (AH)
check box.
a. In the Hash Algorithm box, click an option:
– For minimal security, MD5
– For maximum security, SHA-1 (the default)
b. In the Encapsulation box, accept Tunnel (the default) or click Transport.
Note: If you selected the Connect using check box and a gateway when you configured
All Connections or a specific connection to be secured, Tunnel is the only option.
8. If, when you configured Security Policy, you selected Use Manual Keys in the Select Phase 1
Negotiation Mode group, the Inbound Keys and Outbound Keys buttons are enabled. Go to
Enter manual keys.
9. Click Save.
Using the Security Policy Editor 5-15
202-10015-01
Page 43

Reference Manual for the NETGEAR ProSafe VPN Client
Edit a Distinguished Name
When you identify yourself (your computer) or a remote party in a connection, and you select the
distinguished name identifier as the ID type, the client typically retrieves your distinguished name
information from your personal certificate.
The distinguished name that the remote party identifies itself with must match the distinguished
name entered in the Remote Party Identity and Addressing group. Enter the distinguished name
exactly as it displays in the remote party's security policy, matching spelling, case, punctuation,
and spaces.
1. In the Security Policy Editor, when performing one of these tasks, click Edit Name:
• Configuring a gateway
• Adding a redundant gateway
• Adding and configuring a connection
• Configuring Other Connections
The Edit Distinguished Name dialog box opens.
2. You can enter subject information in LDAP—with distinguished names (DNs) and their
relative distinguished name (RDN) components—or non-LDAP (the default) format.
Warning! Do not mix LDAP and non-LDAP format. This information may not translate
between the two. Your entry in one format may not display if you select the other format.
• To use the non-LDA P format, take these steps:
a. Make sure that the Enter Name in LDAP Format check box is clear.
b. Enter the relevant personal information.
• To use the LDAP forma t , take these steps:
a. Select the Enter Name in LDAP Format check box. The box labels change to RDNs.
5-16 Using the Security Policy Editor
202-10015-01
Page 44

Reference Manual for the NETGEAR ProSafe VPN Client
In the Subject Name in LDAP Format box, enter the relevant personal information, from
b.
specific to general. Preface each type of information with the correct RDN component,
and an equals sign (=):
RDN Information Example
CN First and last name CN=Kerry Smith
OU Department; there can be multiple OUs OU=HR
OU=New York office
O Company O=ispname Company
S State (two-letter abbreviation) S=MD
C Country C=US
postalCode ZIP or postal code postalCode=21210
E Email address E=ksmith@ispname.com
c. To start a new line to enter another RDN component—for example, to add the O after an
OU on a new line—place the cursor in this box, and then press <Enter>.
3. Click Save.
Configure and Manage Connections
You can create and configure multiple connections for your security policy.
Before you can configure a connection, make sure that you have identification information for the
remote party , such as network IP address, domain name, or email address. If the remote party (user
or network) is protected by a secure IPSec-compliant gateway device, obtain that gateway's IP
address, too.
Add and Configure a Connection
1. In the Security Policy Editor, configure Other Connections.
2. In the Network Security Policy list, if the My Connections folder does not appear, click
Options, point to Secure, and then click Specified Connections.
Using the Security Policy Editor 5-17
202-10015-01
Page 45

Reference Manual for the NETGEAR ProSafe VPN Client
Click (or Edit>Add Connection). A highlighted New Connection entry displays in the
3.
Network Security Policy list.
4. Rename the new connection.
5. In the Connection Security group, take these steps:
a. Click the security level:
• Secure secures communications for this connection. This is the default.
• Non-secure allows communications for this connection to pass through
unsecured, or not encrypted.
• Block prohibits all communications for this connection from passing through.
b. When the Secure security level is selected, the Only Connect Manually check box
appears. By default, the check box is clear; this means that the client establishes and
terminates connections automatically as needed. You can, however, Initiate and end secure
sessions manually.
To require the user to manually establish and termina te all secure sessions using this
connection (with the Connect and Disconnect options on the client icon's shortcut menu),
select the Only Connect Manually check box.
If a connection for which the Only Connect Manually check box is selected isn't
manually connected, traffic that would otherwise go over this connection is bypassed, as
though there were no connection configured for this traffic. Traffic that would go over that
connection if it were active is instead compared against the remaining connections in the
Network Security Policy box to determine how to handle it.
5-18 Using the Security Policy Editor
202-10015-01
Page 46

Reference Manual for the NETGEAR ProSafe VPN Client
In the Remote Party Identity and Addressing group, in the ID Type box at the top of the
6.
group, click an identifier for the other party. Boxes become available below the ID Type box
to enter information about the ID type you selected:
ID Type option In boxes below ID Type box, type…
IP Address IP address
Domain Name domain name and IP address
Email Address email address
IP Subnet subnet address and mask
IP Address Range first and last IP addresses for the range
Distinguished Name IP address
To edit a distinguished name, go to Edit a distinguished name
Any (default) IP address
To create a generic security policy for multiple users, select Any.
7. In the Protocol box, click the protocol for the remote party to use to connect with you. The
default, All, secures all protocol ports. Selecting the exact protocol port tightens your security
policy.
8. If you clicked UDP or TCP in the Protocol box, in the Port box, click a protocol port. The
standard numeric designation for this port displays next to the Port box.
9. Your Connection Security selection determines your next step:
• If you selected Secure and a secure IPSec-compliant gateway device, such as a
firewall or router, protects the remote user or network, go to Configure a gateway.
• If you selected Secure and the remote user or network is not protected by a secure
IPSec-compliant gateway, make sure that the Connect using check box is clear.
• If you selected Non-secure or Block , the Internet Interface group opens:
a. In the Name box, click the interface for your computer to use to connect to a network. The
default, Any, enables your computer to select any available interface.
For devices with associated IP addresses, the read-only IP Addr box shows the IP
address.
Using the Security Policy Editor 5-19
202-10015-01
Page 47

Reference Manual for the NETGEAR ProSafe VPN Client
In the Port box, click the protocol port for your computer to connect to the remote party
b.
through. The default, All, secures all protocol ports. The number displayed next to the
Port box is the port's standard designation.
10. Click Save.
11. Configure My Identity for this connection.
Copy a Connection
1. In the Security Policy Editor, in the Network Security Policy list, click the connection to
copy.
2. Click . A new connection named Copy of connection name displays in the Network
Security Policy list.
3. Rename the copied connection.
4. Press <Enter>.
5. Click Save.
Move a Connection
The client attempts connections and their proposals in the sequence they appear in the Network
Security Policy list in the Security Policy Editor. To change this selection order, you can move a
connection up or down in this list.
Note: Other Connections is always the last connection attempted; its place at the bottom of the
Network Security Policy list is fixed.
1. In the Security Policy Editor, in the Network Security Policy list, click the connection to
move.
2. Click to move the connection up or to move it down.
3. Click Save.
Rename a Connection
1. In the Security Policy Editor, in the Network Security Policy list, right-click the connection
to rename, and then click Rename.
2. Type a new name, with a maximum of 80 alphanumeric characters, for this connection.
5-20 Using the Security Policy Editor
202-10015-01
Page 48

Reference Manual for the NETGEAR ProSafe VPN Client
Press <Enter>.
3.
4. Click Save.
Delete a Connection
1. In the Security Policy Editor, in the Network Security Policy list, click the connection to
delete.
2. Click .
3. When a confirmation message opens, click Yes.
4. Click Save.
Manage Proposals
When you add a connection and configure its Security Policy, the Security Policy Editor provides
one proposal (Proposal 1) for Authentication (Phase 1) and Key Exchange (Phase 2). If you need
additional proposals, copy one or add one.
Add a Proposal
1. In the Security Policy Editor, in the Network Security Policy list, expand a secure connection
.
2. Expand Security Policy for the secure connection. Authentication (Phase 1) and Key
Exchange (Phase 2) appear .
3. Click the type of proposal to add:
• Authentication (Phase 1)
• Key Exchange (Phase 2)
4. Click Create New Proposal.
5. Click Save.
Using the Security Policy Editor 5-21
202-10015-01
Page 49

Reference Manual for the NETGEAR ProSafe VPN Client
Copy a Proposal
You can copy proposals for Authentication (Phase 1) or Key Exchange (Phase 2) in the selected
connection only. You cannot copy proposals to another phase or connection.
1. In the Security Policy Editor, in the Network Security Policy list, expand a secure connection
.
2. Expand Security Policy for the secure connection. Authentication (Phase 1) and Key
Exchange (Phase 2) appear .
3. Depending on the type of proposal you want to copy, click a proposal for Authentication
(Phase 1) or Key Exchange (Phase 2) that you want to copy.
4. Click . The new proposal appears below the copied proposal; its number is the copied
proposal incremented by one. Each proposal's number below the new one is incremented by
one from before the copy operation. Proposal labels are fixed; you can't ch ange them.
Example:
There are four proposals for a connection. You copied Proposal 2; the new proposal is
Proposal 3. Proposals 3 and 4 are now Proposals 4 an d 5.
5. Click Save.
Move a Proposal
The client attempts proposals in the order they are listed, in the particular phase for a connection,
in the Network Security Policy list. To change the selection order, you can move a proposal up or
down.
When you change a proposal's position in the list, the client renumbers the proposals to maintain
sequential numbering. When you have finished moving proposals, make sure that the proposals are
in the order you want them tried.
1. In the Security Policy Editor, in the Network Security Policy list, expand the specific secure
connection .
2. For this secure connection, expand Security Policy.
3. Depending on the location of the proposal to move, expand Authentication (Phase 1) or Key
Exchange (Phase 2).
4. Click the proposal to move.
5. Click to move the proposal up or to move it down.
5-22 Using the Security Policy Editor
202-10015-01
Page 50

Reference Manual for the NETGEAR ProSafe VPN Client
Repeat steps 4 and 5 as necessary.
6.
7. Click Save.
Delete a Proposal
In the Network Security Policy list in the Security Policy Editor, there must be at least one
proposal each for Authentication (Phase 1) and Key Exchange (Phase 2).
1. In the Security Policy Editor, in the Network Security Policy list, expand a secure connection
.
2. Expand Security Policy for the secure connection. Authentication (Phase 1) and Key
Exchange (Phase 2) display.
3. Depending on the location of the proposal you want to delete, expand Authentication (Phase
1) or Key Exchange (Phase 2). The proposals for the phase display.
4. Click the proposal to delete.
5. Click .
6. When a confirmation message box opens, click Yes.
7. Click Save.
Manage Redundant Gateways
A redundant gateway is an alternate network access gateway to establish a connection with the
client when the primary gateway is busy, offline, or otherwise not available.
Before you can add redundant gateways for a secure connection, you must configure the primary
gateway in the Security Policy Editor.
In most cases, use the same security policy information to configure all redundant gateways for a
single connection. However, these exceptions must be unique to each device:
• Distinguished name
• IP address
• Preshared key
Each secure connection can have a maximum of 10 redundant gateways, plus the primary. The
original secure connection is always the primary gateway.
Using the Security Policy Editor 5-23
202-10015-01
Page 51

Reference Manual for the NETGEAR ProSafe VPN Client
The client selects the alternates in the sequence in which they are listed for the particular
connection in the Network Security Policy list. The client “rolls over” to a redundant gateway only
when the primary gateway does not respond. If the client receives a response from the primary
gateway, it continues trying to establish a connection.
When the security association (SA) times out, the client tries to connect with the primary gateway.
If the primary gateway is busy, it returns to the last active redundant gateway.
Add a Redundant Gateway
1. In the Security Policy Editor, in the Network Security Policy list, click the specific secure
connection that has a gateway configured—that is, the Connect using check box and a
gateway are selected.
2. On the toolbar, click Edit, point to Add, and then click Redundant Gateway . The New Name
for RGW X dialog box, where X is a sequence number from 1 through 10, opens.
3. Type a name for this redundant gateway, and then click OK. The new gateway displays
below Security Policy for this connection in the Network Security Policy list.
4. In the Redundant Gateway Identity and Addressing group, in the ID Type box, click an
identifier for this gateway. Boxes become available, based on the identifier you select.
Note: To create a generic security policy for multiple users, for ID Type, click Any.
5. Complete the gateway identity-related boxes; for details, go to Configure a gateway.
6. Your next step depends on how My Identity is configured for this connection:
• If you selected a certificate—in the My Identity group, for Select Certificate, a certificate
name appears—go to the next step.
• If you entered a preshared key—in the My Identity group, for Select Certificate, None
appears—take these steps:
a. Click Pre-Shared Key. The Pre-shared Key dialog box opens.
b. Click Enter Key.
c. Enter the key that matches the preshared key in the gateway's configuration.
d. Click OK.
7. Click Save.
5-24 Using the Security Policy Editor
202-10015-01
Page 52

Reference Manual for the NETGEAR ProSafe VPN Client
Copy a Redundant Gateway
A quick way to add redundant gateways to a connection is to copy another redundant gateway in
the same connection. You can copy redundant gateway within a connection only, not between
connections.
1. In the Security Policy Editor, in the Network Security Policy list, expand a secure connection
.
2. Right-click a redundant gateway , and then click Copy. The New Name for RGW X dialog
box, where X is the sequence number, 1 through 10, opens.
3. Type a name for this new connection.
4. Click OK.
5. Click Save.
Move a Redundant Gateway
When the primary gateway is not available, the client tries redundant gateways in the order in
which they appear for a connection in the Network Security Policy list. You can change the
selection order by moving a gateway up or down in a connection's list. Redundant gateways can be
moved only in their connection.
1. In the Security Policy Editor, in the Network Security Policy list, expand the specific secure
connection .
2. Select a redundant gateway .
3. Click to move the gateway up or to it down.
4. Repeat steps 2 and 3 as necessary.
5. Click Save.
Rename a Redundant Gateway
1. In the Security Policy Editor, in the Network Security Policy list, expand the specific secure
connection .
2. Right-click a redundant gateway , and then click Rename. The New Name for RGW X
dialog box opens, where X is the sequence number 1 through 10.
3. Type the new name.
Using the Security Policy Editor 5-25
202-10015-01
Page 53

Reference Manual for the NETGEAR ProSafe VPN Client
Click OK.
4.
5. Click Save.
Delete a Redundant Gateway
1. In the Security Policy Editor, in the Network Security Policy list, expand a secure connection
.
2. Click the redundant gateway to delete.
3. Click .
4. When a confirmation dialog box opens, click Yes.
5. Click Save.
Disable Redundant Gateways
You can disable all redundant gateways for a selected secure connection without deleting them.
You can also enable them again later.
1. In the Security Policy Editor, in the Network Security Policy list, select the specific secure
connection .
2. In the Remote Party Addressing and Identity group, clear the Connect using check box.
3. Click Save.
Manage the Security Policy
When you export a security policy, the client creates an .spd file that contains all the connections,
proposals, global policy settings, and My Identity information from the security policy. You can
include this security policy file in a customized client installation; make it available to users on a
Web site, CD-ROM, or other location or medium; or save it as a backup of your security policy.
1. In the Security Policy Editor, click File>Export Security Policy. The Export Policy To
dialog box opens.
2. In the Save As dialog box, navigate to the directory to save this file to and enter the filename.
The default location and name is C:\policy.spd.
Note: If you are creating a customized installation, rename this file IPSecPolicy.spd.
5-26 Using the Security Policy Editor
202-10015-01
Page 54

Reference Manual for the NETGEAR ProSafe VPN Client
To password-protect this policy file during the export/import process only, take these steps:
3.
a. Select the Protect Exported Policy check box.
b. In the Password box, enter a password that contains at least eight alphanumeric
characters.
c. In the Confirm box, retype the password.
4. T o limit or prevent users who Import this policy or install it from changing it, lock it when you
export it:
• To a llow users to edit the entire security policy, accept the default, Policy is unlocked.
• To allow users to change only their My Identity settings, click Policy is partially locked.
• To prohibit users from changing anything in the security policy, but let them view it, click
Policy is completely locked.
5. Click OK.
6. Click Save.
Edit a Security Policy
After you add and configure connections for a security policy, you can change the options.
1. In the Security Policy Editor, in the Network Security Policy list, click a connection; expand
secure connections to open the components of the policy to edit.
2. In the right pane, change the particular settings. For details, refer to the help topic on
configuring the specific entity you're editing.
3. Click Save.
Note: If secure connections are active, the client prompts you to reset active connections:
• To reset active connections, which drops and disconnects all active connections and
applies the new policy immediately, click Yes.
• To store the changes, but delay saving them until the active connections end, click No.
Then, when you're ready to put the new policy into effect, reload the security policy .
Note: If you don't explicitly reload the policy, it goes into effect the next time you log on
to Windows or restart your computer.
Using the Security Policy Editor 5-27
202-10015-01
Page 55

Reference Manual for the NETGEAR ProSafe VPN Client
Import a Security Policy
Caution: When you import a security policy, it overwrites the existing policy on your computer.
1. Obtain the name and location of the policy file to import (an .spd file).
2. In the Security Policy Editor, click File>Import Security Policy. The Import Policy From
dialog box opens.
3. Navigate to the .spd file to import; when its file name displays in the File name box, click
Open.
4. A policy file can be password-protected and encrypted when it is exported from the client. To
import it, you must enter the password used when the policy file was exported.
If the Policy Protection Password dialog box opens, this policy file is password-protected.
Unless you enter the password, you can't import the file and policy.
a. Obtain the password.
b. In the Password box, type the password.
c. Click OK. The Policy Import dialog box opens.
• If the New policy resets existing connections check box on the Policy Management
dialog box in Security Policy Editor is selected, the Reset existing connections
check box on the Policy Import dialog box is also selected. This means that the client
will reset, or drop, all active connections.
– If the New policy resets existing connections check box on the Policy
Management dialog box is clear, the Reset existing connections check box is
also clear.
– Based on your preference, select or clear the Reset existing connections check
box; this does not change the New policy resets existing connections check box
on the Policy Management dialog box.
• When an import confirmation message box opens, click OK.
Note: After the policy is imported, it is no longer encrypted.
Reload the Security Policy
Importing a security policy or editing the existing one makes a new policy available to replace the
current one. If you do not reset existing connections, which the client prompts you to do, the new
policy does not go into effect (and active connections are not dropped).
5-28 Using the Security Policy Editor
202-10015-01
Page 56

Reference Manual for the NETGEAR ProSafe VPN Client
When the client doesn't appear to be working properly, try performing this task. It disconnects all
connections and loads the current security policy from scratch.
When you're ready to put the new policy into service, which will overwrite the current policy and
drop (terminate) any existing connections, take this step:
Right-click the client icon, and then click Reload Security Policy or, if there are any active
secure communications sessions, Disconnect All. All sessions end, and either the current
security policy or a new security policy is loaded.
Note: If you don't explicitly reload the policy or reset existing connections, the edited policy or
imported policy takes effect the next time you log on to Windows or restart your computer.
Deactivate the Security Policy
To allow all communications to transmit unsecured or not encrypted, you can override or
deactivate your security policy. The client continues to run in the background, but secures no
communications.
When you deactivate your security policy, you can't communicate with other parties on secure
connections unless they also disable their security policy.
You can deactivate the security policy in one of two ways:
• In the Security Policy Editor, take these steps:
a. Click Options>Secure>None. The Network Security Policy list and the connections are
read-only, but are not deleted.
b. Click Save.
c. Exit the Security Policy Editor.
• In the Windows system tray, right-click the icon, and then click Deactivate Security Policy.
In both cases, in a few seconds, the client icon's Deactivate Security Policy menu option becomes
Activate Security Policy , and the icon changes to .
Reactivate the Security Policy
Right-click the client icon , and then click Activate Security Policy; this option changes to
Deactivate Security Policy, and the icon changes to .
Using the Security Policy Editor 5-29
202-10015-01
Page 57

Reference Manual for the NETGEAR ProSafe VPN Client
Configure the Client to Retrieve a New Policy from a Policy Server or Web Address
The client can be configured to periodically check for and then retrieve a new security policy from
a Web address, or uniform resource locator (URL). Or, if the client is managed by a policy
management application, the client registers with its policy server , and then polls this policy server
to look for and retrieve new security policies.
If your client isn't preconfigured with the policy distribution URL or policy server details, your
network security administrator must provide these to you.
1. In the Security Policy Editor, click Options>Policy Mana gement . The Policy Management
dialog box opens.
2. Select the Use Policy Server check box.
3. By default, the New policy resets existing connections check box is clear. This means that the
client does not drop all connections when it retrieves a new policy.
For the client to drop all connections when it retrieves this policy, select this check box.
4. In the Policy Polling Interval (minutes) box, specify how often the client checks for and
retrieves a new policy from the Web address in the Policy URL box; type the number of
minutes, from 1 through 9999999, between these checks. The default is 1440 minutes (24
hours).
5. In the Policy Distribution Point group, select where to check for new policies:
• If it's a policy management application's policy server, take these steps:
a. Click Register and retrieve my policy from a VPN Policy Manager.
b. In the Server Name box, type the policy server’s machine name or IP address.
c. In the Server Port box, type the server’s assigned port number. The default is 389.
d. In the Policy Subtree box, type the location, typically the organization unit (OU) and
organization (O) on the policy server, where security polices are stored. The default is
ou=VPN Client, o=SafeNet.
e. The clie nt can register with the policy server with certificates or some other way.
T o register without certificates, in Perform policy server registration, accept the default,
without. Otherwise, click with.
• If it's an URL, take these steps:
a. Retrieve my policy from the following URL (the default).
5-30 Using the Security Policy Editor
202-10015-01
Page 58

Reference Manual for the NETGEAR ProSafe VPN Client
In the Policy URL box, type the Web address, starting with http://, to poll.
b.
6. Click OK.
7. Click Save.
When the client finds and retrieves a new policy for you, a confirmation message box opens.
Register with a Policy Management Application
Perform this task only if your network security administrator instructs you to do so.
The client can be managed by enterprise VPN policy management applications. These products
typically serve as the initial and ongoing distribution point (policy server) for the client's security
policies.
For the client to check for and retrieve a new security policy from a policy management product's
policy server, the location and polling frequency of the LDAP policy server and that there is a
policy server must be configured on the Security Policy Editor's Policy Management dialog box.
Obtain the specifics from your network security administrator; your entries must exactly match
those expected by the policy management product's LDAP server. Your client may be
preconfigured with this information.
Then, if the policy management application requires this step, the client must enroll or register
with the management product. This registration may occur automatically when the CA is
SCEP-compliant and the client submits a personal certificate request.
1. In the Security Policy Editor, click File>Register Client. The VPN Policy Server
Registration dialog box opens.
2. In the Name box (the only one that you must complete), type your name (CN is the RDN).
3. In the Department box, type your department's name (OU is the RDN) .
4. In the Organization box, type your company's name (O is the RDN).
5. In the State box, type your company's name (S is the RDN).
6. Click OK.
7. When a registration confirmation message box opens, click OK.
Using the Security Policy Editor 5-31
202-10015-01
Page 59

Reference Manual for the NETGEAR ProSafe VPN Client
Retrieve a New Policy Manually
When the client is configured to automatically check for and retrieve new security policies from a
policy management product or a policy server on a Web site, you can manually check this source
for a new or updated policy.
• In the Security Policy Editor, click File>Retrieve Policy.
The client checks the Web address or LDAP server configured on the Policy Management
dialog box.
A message box opens confirming the success or failure of the retrieval attempt.
5-32 Using the Security Policy Editor
202-10015-01
Page 60

Chapter 6
Using the Certificate Manager
This chapter describes how to configure the advanced features of your NETGEAR ProSafe VPN
Client.
What is the Certificate Manager?
The Certificate Manager is the client module where you obtain and manage the certificates you
receive from certificate authorities (CAs), set the trust policy, and view certificate revocation lists
(CRLs).To learn how to perform all the various certificate-related tasks, refer to the topics in the
Certificate Manager book in the help.
The Certificate Manager includes these tabs for you to perform the tasks listed above:
• My Certificates
• Root CA Certificates
• Trust Policy
• CA Certificates
• RA Certificates
• CRLs
• Requests
There are three ways to open the Certificate Manager:
• On the Windows desktop, click Start>Progr ams>N ETGEAR ProSafe VPN
Client>Certificate Manager.
• Right-click the client icon, and then click Certificate Manager.
• In the Security Policy Editor, click Options>Certificate Manager.
Using the Certificate Manager 6-1
202-10015-01
Page 61

Reference Manual for the NETGEAR ProSafe VPN Client
Getting Started with the Certificate Manager
If you are using preshared keys for authentication in your VPN, or secure connection, to the other
party , you don't have to open the Certificate Manager; skip all the topics in the Certificate Manager
book in the help.
If you are using certificates for authentication with the remote party to your VPN, and don't
already have a CA and personal certificate, you need to obtain these. However, depending on your
network and installed applications and hardware at any particular site, specific tasks may not
apply; additional tasks may be required. For details on the tasks to perform, contact your network
security administrator.
These are the typical tasks to perform to obtain and manage certificates:
1. Select a CA.
2. Determine its enrollment method; go to CD enrollment methods and procedures.
3. Obtain a CA and personal certificate. There are three methods for doing this:
• Online enrollment
• File-based enrollment
• Through Internet Explorer
The help contains topics on these methods; go to the Obtain certificates book in the
Certificate Manager book.
4. Manage the various certificates obtained. In the help, go to the Manage certificates book in
the Certificate Manager book.
5. Work with certificate revocation lists (CRLs).
6. Set the trust policy.
What are Certificates?
T o set up a VPN, or secure connection, between the client installed on your computer and a remote
party, both parties must identify themselves, and then verify that each is really who it indicates it
is. One way to do this is with a preshared key that both parties know in advance.
A more secure way to identify the two parties is through certificates. A certificate is an electronic
document that contains a public key and is digitally signed by the third-party entity that issued it,
called a certificate authority (CA) or certification authority. Because it validates the identities of
the two VPN parties, it must be trusted. set the trust policy in the Certificate Manager.
6-2 Using the Certificate Manager
202-10015-01
Page 62

Reference Manual for the NETGEAR ProSafe VPN Client
There are two types of CA certificates:
• A root CA certificate is signed by and issued to itself—that is, the issuer and subject are the
same.
• A subordinate or intermediate CA certificate is issued by a CA other than itself. A subordinate
certificate can be issued by a root CA or another subordinate CA.
Also required for the client user is a personal certificate, which contains information about the user
(client) that uniquely identifies it. This is requested by the client, and issued by a subordinate CA.
CAs that support SCEP may also employ a registration authority (RA), which is a network
authority that collects and verifies certificate request information for the CA, and then signs
responses on behalf of the CA. The CA, however, actually issues the certificates. These CAs may
include RA certificates with CA certificates.
CA Enrollment Methods and Procedures
To communicate securely with certifica tes, you need three certificates issued by a CA:
1. Root CA certificate
2. Subordinate CA certificate
Note: CAs that support Simple Certificate Enrollment Protocol (SCEP) may employ a
registration authority (RA). The CA may include one or more RA certificates with the CA
certificate.
3. Personal certificate (and keys)
To obtain certificates, you must enroll with a CA. There are two ways to enroll through the client:
• Online enrollment, which uses SCEP. SafeNet recommends this method.
a. Obtain the CA's certificate server DNS name or IP address to make this request. Follow
the instructions for the particular CA.
You can also obtain personal and CA certificates for IPSec through Microsoft Internet
Explorer or an email program.
Note: To access the Microsoft CSP, Internet Explorer 5.01 or later must be installed on
your computer.
b. Retrieve a CA certificate online.
c. Request a pe rsonal certificate online.
Using the Certificate Manager 6-3
202-10015-01
Page 63

Reference Manual for the NETGEAR ProSafe VPN Client
Retrieve the personal certificate.
d.
• Manual (file-based) enrollment, which requires cutting and pasting text from a text editor.
CAs handle this method in various ways; all start with a certificate request file. Follow the
instructions provided by the CA.
These are the typical steps:
a. Obtain a CA certificate manually.
b. Import a CA certificate.
c. Create a certificate request file for a personal certificate.
The Certificate Manager automatically generates the public/private key pair you need. The
public key goes with your request; the private key resides on the hard drive of your
computer.
d. Prepare the personal certificate file to import.
e. Import the personal certificate file.
Obtain Certificates
With Online (SCEP) Enrollment
CAs that Support SCEP
Simple Certificate Enrollment Protocol (SCEP) allows clients and servers certificates to obtain
certificates from CAs online. The listed CAs support SCEP.
6-4 Using the Certificate Manager
202-10015-01
Page 64

Reference Manual for the NETGEAR ProSafe VPN Client
Table 6-1.
Certificate Authority Telephone Web site
Entrust Technologies, Inc (972) 943-7300
iPlanet (888) 786-8111
Microsoft Corporation (425) 882-8080
RSA Security (Keon) (877) 772-4900
VeriSign, Inc. (650) 961-7500
www.entrust.com
www.iplanet.com
www.microsoft.com
www.rsasecurity.com
www .verisign.com
Retrieve a CA Certificate Online
Before you can request a personal certificate online, you must retrieve a CA certificate—root or
subordinate—online. For a list of the CAs that offer online retrieval, go to CAs that support SCEP.
When you retrieve a CA certificate online, the CA may also include registration authority (RA)
certificates, which you can view or verify in the Certificate Manager.
Note: If you access the Internet through a firewall, make sure that the Use HTTP proxy server for
online certificate requests and CRL updates check box check box is selected on the Certificate
Settings dialog box in the Security Policy Editor.
1. In the Certificate Manager, click the tab for the CA certificate type to retrieve:
• For a root CA certificate, Root CA Certificates
• For a subordinate CA certificate, CA Certificates
2. Click Retrieve CA Certificate. The Retrieve CA Certificate Online dialog box opens.
3. In the CA Domain box, type the CA's domain name, such as abc123.com.
4. In the Online Certificate Server box, type the complete URL, including the schema, such as
http://, of the CA's certificate server.
5. Unless your network security administrator instructs you otherwise, leave the Place
certificate in local machine store check box selected (the default). This adds the certificate to
the store for all users who log on to this computer (local machine).
Caution! In Windows NT and Windows 2000 and XP, you must be logged on as
administrator or its equivalent to add this certificate to the local machine store.
Using the Certificate Manager 6-5
202-10015-01
Page 65

Reference Manual for the NETGEAR ProSafe VPN Client
Click OK. In a few seconds, the Root or CA Certificate Store dialog box opens and prompts
6.
you to add the CA certificate to the client's root or CA store, according to the type of CA
certificate you retrieved.
7. Click Yes. The certificate displays on the appropriate tab, Root CA Certificates or CA
Certificates, in the Certificate Manager. If the retrieved CA certificate included RA
certificates, these display on the RA Certificates tab.
Configure a CA Certificate
If you did not request your CA certificate online, but the CA you requested it from supports SCEP,
before you can request a personal certificate online—that is, through SCEP enrollment—you must
change this CA certificate's parameters to make it appear as if you requested it online. When the
client is managed by a policy management application, the CA certificate may need to be
configured, too.
For root CA certificates, you can also specify whether the certificate is trusted for IP security
(IPSec).
1. In Certificate Manager, click the tab for the specific certificate type:
• For a root CA certificate, Root CA Certificates
• For a subordinate CA certificate, CA Certificates
2. On this tab, click the certificate to configure.
3. Click Configure. The Configuration Parameters dialog box opens.
4. In the CA Domain box, type the CA's domain name, such as alphabeta.com.
5. In the Online Certificate Server box, type the complete URL, including the schema, such as
http://, of the CA's certificate server.
6. For Root CA certificates only: To specify that this certificate is trusted for IPSec
communications, select the Trust this certificate for IP security check box.
The next time you view or verify this certificate, for Enh KeyUsage, IP security end system
appears as the value.
7. Click OK.
Use an HTTP Proxy Server for Online Certificate Requests and CRL Updates
These blocks of IP addresses are reserved for private use by the Internet Assigned Numbers
Authority (IANA):
6-6 Using the Certificate Manager
202-10015-01
Page 66

Reference Manual for the NETGEAR ProSafe VPN Client
• 10.0.0.0 through 10.255.255.255
• 172.16.0.0 through 171.31.255.255
• 192.168.0.0 through 192.168.255.255
If your network uses an HTTP proxy server to translate private IP addresses to routable IP
addresses, you must configure this option and enter the HTTP proxy server's DNS or IP address.
Note: When your computer accesses the Internet through a firewall, before you request and
retrieve a CA certificate online, make sure that the Use HTTP proxy server for online certificate
requests and CRL updates option is selected.
1. In the Security Policy Editor, click Options>Certificate Settings. The Certificate Settings
dialog box opens.
2. Select the Use HTTP proxy server for online certificate requests and CRL updates check
box.
3. In the Proxy DNS name or IP address box, type the DNS or IP address.
4. Click OK.
5. Click Save.
Import a CA Certificate
In these two situations, you must import a CA certificate into the Certificate Manager:
• As part of obtaining a CA certificate manually, you downloaded a CA certificate to your
computer from the CA's Web site
• To obta in a CA certificate file that was exported from the Certificate Manager or a policy
management application
1. In the Certificate Manager, click the tab for the certificate type to import:
• For a root CA certificate, the Root CA Certificates tab
• For a CA certificate, the CA Certificates tab
If the CA certificate you import has RA certificates associated with it, these are imported with
the CA certificate.
2. Click Import Certificate. The Import CA Certificate dialog box opens.
3. Navigate to the certificate file; make sure that its name displays in the File name box.
Using the Certificate Manager 6-7
202-10015-01
Page 67

Reference Manual for the NETGEAR ProSafe VPN Client
Unless your network security administrator instructs you to change it, leave the Import
4.
certificate to local machine store check box selected (the default).
Caution: In Windows NT and Windows 2000 and XP, you must be logged on as
administrator or its equivalent to add this certificate to the local machine store (for all users
who log on to this computer).
5. Click Import.
6. When a confirmation message box opens, click Yes.
Select a CSP
You can select a cryptographic service provider (CSP) when requesting a personal certificate,
regardless of the method. You can also designate a default CSP to use for all personal certificate
requests.
1. In the Security Policy Editor, click Options>Certificate Settings. The Online or File-based
Certificate Request dialog box opens.
2. Click Advanced. The Advanced Certificate Enrollment Settings dialog box opens.
3. Click the specific CSP in the list.
4. If the Key Size box is enabled, click the key size to use.
5. To designate the settings on this dialog box as the default for all personal certificate requests,
select the Save as default CSP settings check box.
6. By default, the Place certificate and keys in local machine store check box is clear, which
places the imported certificate in your—the logged-on user's—personal certificate store.
Unless your network security administrator instructs you to change it, accept the default.
Caution: In Windows NT and Windows 2000 and XP, you must be logged on as
administrator or its equivalent to add this certificate to the local machine store.
7. Click OK.
Request a Personal Certificate
After you retrieve or import a CA certificate, you must request a personal certificate from this CA.
If your client was installed with a CA certificate, the Online Certificate Request or File-based
Certificate Request dialog box opens automatically the first time your computer restarts after client
installation.
When the CA supports SCEP, submit the request online. For CAs that don't support SCEP , create a
certificate request to submit to the CA manually.
6-8 Using the Certificate Manager
202-10015-01
Page 68

Reference Manual for the NETGEAR ProSafe VPN Client
Note: If you requested your CA certificate manually from CA that supports SCEP, and want to
request a personal certificate online, configure the CA certificate before requesting the personal
certificate.
1. In the Certificate Manager, click the My Certificates tab.
2. Click Request Certificate. The Online Certificate Request or File-based Certificate
Request dialog box opens.
3. For online certificate requests only: In the Enrollment method group, make sure that Online is
selected.
4. In the Subject Name group, complete the personal information boxes, as required by the CA.
Note: To use LDAP format when completing these boxes, selec t the Enter Subject Name in
LDAP format check box, and then go to Edit a distinguished name.
5. If this CA requires it, complete at least one box in the Subject Alternate Name group,
according to the CA's instructions. These boxes may be completed automatically.
6. For online certificate requests only: In the Online Request Information group, take these
steps:
a. In the Challenge Phrase box, type an alphanumeric character string for the CA to confirm
your identity with if you ask to revoke your certificate. The CA makes sure that you are
the person the certificate says you are before rescinding your certificate. Record this
phrase.
b. In the Confirm Challenge box, retype the challenge phrase.
c. In the Issuing CA list, click the CA you are requesting the certificate from.
Caution: Make this selection carefully; you can't reverse your decision later.
In the Key Generation Options group, specify whether the private key associated with the
personal certificate you're requesting can be exported to, for example, transfer it to another
computer or make a backup copy. By default, the private key cannot be exported; the
Generate exportable key check box is clear. To make the key exportable, select the Generate
exportable key check box.
7. To select the CSP or assign the default CSP, click Advanced.
8. Click OK.
• For online certificate requests only: This submits your request. The Key Generation
message box opens while the client generates a public/private key pair, and then closes.
The Online Certificate Request message box opens when the client submits your
request.
Using the Certificate Manager 6-9
202-10015-01
Page 69

Reference Manual for the NETGEAR ProSafe VPN Client
When the CA receives (accepts) your request, a confirmation message may open; click
OK.
It may take some time for the CA to approve your request. The client checks the CA at a
defined interval for approved personal certificates to retrieve. To change this polling
interval, go to Define how often to check for personal certificates to retrieve.
• For file-based certificate requests only: When a message box opens confirming that the
certificate request file was created, click OK.
T o find out how to send the certificate request file to the CA and receive the certificate file
when the CA returns it; this process varies with each CA, contact the specific CA.
Define How Often to Check for and Retrieve New Personal Certificates
For CAs that support SCEP, the client periodically checks for, or polls, the CA's certificate server
to look for and retrieve any new personal certificates approved in response to online certificate
requests, which display on the Requests tab in the Certificate Manager . You can set the time period
between these automatic pools.
1. In the Security Policy Editor, click Options>Certificate Settings. The Certificate Settings
dialog box opens.
2. In the Online certificate request polling interval (minutes) box, specify how often the client
checks the CA's certificate server for approved personal certificates requests; type the number
of minutes, from 1 through 999999, between polls. The default is 15 minutes.
3. Click OK.
4. Click Save.
Retrieve a Personal Certificate Manually
After you submit your online request for a personal certificate, the CA must receive the request,
and then approve it. Some time may elapse between these two events. The approval creates the
personal certificate. The client automatically checks this CA for the approved certificate at the
interval defined on the Certificates Setting dialog box in the Certificate Manager, and then
retrieves and displays it on the My Certificates tab in the Certificate Manager.
You can check for and retrieve your approved personal certificate manually, too, if you don't want
to wait for the client.
1. In the Certificate Manager, click the Requests tab.
2. Click Retrieve.
6-10 Using the Certificate Manager
202-10015-01
Page 70

Reference Manual for the NETGEAR ProSafe VPN Client
Note: If the CA hasn't approved your request yet, a message alerts you of this. Try again later
or wait for the client to retrieve it.
3. If the CA has approved your request, the client prompted you to add this personal certificate;
click Yes. The request is removed from the Requests tab, and the retrieved certificate displays
on the My Certificates tab.
Manage Certificate Requests
View a Certificate Request
You can view the information about a pending request for a CA or personal certificate until you or
the client you retrieve a valid certificate, you import one, or you
1. In the Certificate Manager, click the Requests tab.
2. Click the certificate request to view.
3. Click View. A dialog box opens with information about the selected certificate request.
4. To close the certificate request, click anywhere in the dialog box.
delete the certificate request.
Delete a Certificate Request
You can delete a pending certificate request that displays on the Requests tab in the Certificate
Manager. When you retrieve or import a valid certificate, the Certificate Manager automatically
removes this certificate request.
1. In the Certificate Manager, click the Requests tab.
2. Click the specific certificate request.
3. Click Delete.
4. When a confirmation message opens, click Yes.
5. If prompted to delete the key container, click Yes.
With Manual (File-Based) Enrollment
The procedure for obtaining a CA certificate manually varies with each CA. These are the typical
steps.
1. On the CA's Web site, complete the registration process.
Using the Certificate Manager 6-11
202-10015-01
Page 71

Reference Manual for the NETGEAR ProSafe VPN Client
Download the CA certificate from the CA's Web site to your computer through the Internet
2.
Explorer certificate management. For details, refer to Windows or Internet Explorer help.
3. In the Certificate Manager, on the Root CA Certificates or CA Certificates tab (depending
on the certificate you're importing), import the CA certificate.
4. To complete the process, follow the instructions from the specific CA.
Note: Before you can request a personal certificate online from this CA, you must configure the
CA certificate.
Import a CA Certificate
In these two situations, you must import a CA certificate into the Certificate Manager:
• As part of obtaining a CA certificate manually, you downloaded a CA certificate to your
computer from the CA's Web site
• To obta in a CA certificate file that was exported from the Certificate Manager or a policy
management application
1. In the Certificate Manager, click the tab for the certificate type to import:
• For a root CA certificate, the Root CA Certificates tab
• For a CA certificate, the CA Certificates tab
If the CA certificate you import has RA certificates associated with it, these are imported with
the CA certificate.
2. Click Import Certificate. The Import CA Certificate dialog box opens.
3. Navigate to the certificate file; make sure that its name displays in the File name box.
4. Unless your network security administrator instructs you to change it, leave the Import
certificate to local machine store check box selected (the default).
Caution: In Windows NT and Windows 2000 and XP, you must be logged on as
administrator or its equivalent to add this certificate to the local machine store for all users
who log on to this computer.
5. Click Import.
6. When a confirmation message box opens, click Yes.
6-12 Using the Certificate Manager
202-10015-01
Page 72

Reference Manual for the NETGEAR ProSafe VPN Client
Request a Personal Certificate
After you retrieve or import a CA certificate, you must request a personal certificate from this CA.
If your client was installed with a CA certificate, the Online Certificate Request or File-based
Certificate Request dialog box opens automatically the first time your computer restarts after client
installation.
When the CA supports SCEP, submit the request online. For CAs that don't support SCEP , create a
certificate request to submit to the CA manually.
Note: If you requested your CA certificate manually from CA that supports SCEP, and want to
request a personal certificate online, configure the CA certificate before requesting the personal
certificate.
1. In the Certificate Manager, click the My Certificates tab.
2. Click Request Certificate. The Online Certificate Request or File-based Certificate
Request dialog box opens.
3. For online certificate requests only: In the Enrollment method group, make sure that Online is
selected.
4. In the Subject Name group, complete the personal information boxes, as required by the CA.
Note: To use LDAP format when completing these boxes, selec t the Enter Subject Name in
LDAP format check box, and then go to Edit a distinguished name.
5. If this CA requires it, complete at least one box in the Subject Alternate Name group,
according to the CA's instructions. These boxes may be completed automatically.
6. For online certificate requests only: In the Online Request Information group, take these
steps:
a. In the Challenge Phrase box, type an alphanumeric character string for the CA to confirm
your identity with if you ask to revoke your certificate. The CA makes sure that you are
the person the certificate says you are before rescinding your certificate. Record this
phrase.
b. In the Confirm Challenge box, retype the challenge phrase.
c. In the Issuing CA list, click the CA you are requesting the certificate from.
Caution: Make this selection carefully; you can't reverse your decision later.
Using the Certificate Manager 6-13
202-10015-01
Page 73

Reference Manual for the NETGEAR ProSafe VPN Client
In the Key Generation Options group, specify whether the private key associated with the
personal certificate you're requesting can be exported to, for example, transfer it to another
computer or make a backup copy. By default, the private key cannot be exported; the
Generate exportable key check box is clear. To make the key exportable, select the Generate
exportable key check box.
7. To select the CSP or assign the default CSP, click Advanced.
8. Click OK.
• For online certificate requests only: This submits your request. The Key Generation
message box opens while the client generates a public/private key pair, and then closes.
The Online Certificate Request message box opens when the client submits your
request.
When the CA receives (accepts) your request, a confirmation message may open; click
OK.
It may take some time for the CA to approve your request. The client checks the CA at a
defined interval for approved personal certificates to retrieve. To change this polling
interval, go to Define how often to check for personal certificates to retrieve.
• For file-based certificate requests only: When a message box opens confirming that the
certificate request file was created, click OK.
T o find out how to send the certificate request file to the CA and receive the certificate file
when the CA returns it; this process varies with each CA, contact the specific CA.
Create a Personal Certificate File to Import
After you create and manually submit a personal certificate request file to a CA, and the CA
approves the request, this CA returns a certificate to you in an email. You must create a certificate
file from the email so that you can Import the personal certificate to the Certificate Manager.
The certificate request approval process varies with each CA. This is an example of the typical
process:
1. Submit the personal certificate request file you created, CertReq.req, to the CA, according to
the instructions the CA or your network security administrator provides.
When the CA approves your certificate request, it sends you an email that contains the
certificate.
This is a sample email returned by the CA:
6-14 Using the Certificate Manager
202-10015-01
Page 74

Reference Manual for the NETGEAR ProSafe VPN Client
Dear Applicant,
Your Administrator has approved your request for an IPSec certificate.
If you have any questions or problems, please contact your Administrator by replying to this
email message.
THE COMMON NAME OF THIS CERTIFICATE: Kerry Smith
-----BEGIN CERTIFICATE-----
MIICzCCAmigAwIBAgIQRFfr0rQ4W2xUCfmYzDKCqDANBgkqhkiG9w0BAQQFADCB
zjEXMBUGA1UEChMOVmVyaVNpZ24sIEluYy4xRzBFBgNVBAsTPkZvciBWZXJpU2ln
biBhdXRob3JpemVkIHRlc3Rpbmcgb25seS4gTm8gYXNzdXJhbmNlcyAoQykgVlMx
OTk4MUcwRQYDVQQLEz53d3cudmVyaXNpZ24uY29tL3JlcG9zaXRvcnkvVGVzdENQ
MA0GCSqGSIb3DQEBBAUAA4GBACBA6T+yqr8xoJfBv2T0P1AcLxG9tjOMuUPELvV
mg4jNB2Jj9oD+iIpEp4yf4NhKq6N3p8vcdXXz2FMxhNMHGAqY8mwKhRAPQrJKnVi
/o9Adoh7SQ3Aoh4ds8CfRcgcrHdQeQBdgszwzRJMTNKP3zj/qvRevIZ/h72MbfWl
gnvK
-----END CERTIFICATE-----
2. Copy the entire certificate, from -----BEGIN CERTIFICATE----- through -----END
CERTIFICATE-----, inclusive.
Note: When working with Microsoft Certificate Server, copy only the data between
-----BEGIN CERTIFICATE----- and -----END CERTIFICATE-----, not inclusive, and
insert a carriage return at the end.
3. Paste the certificate into a text editor, such as Notepad. Do not use a full featured word
processor such as MicorSoft Word that will add extra formatting data to the file. Name it
CertReq.der, and save it to the same drive and directory that the certificate request file,
CertReq.req, resides in.
4. Import the personal certificate to the Certificate Manager.
Import a Personal Certificate
In these two situations, you must import a personal certificate to the Certificate Manager:
• If you created a personal certificate file from the email that the CA when you manually
requested a personal certificate
• To bring a pers onal certificate file exported from the Certificate Manager (not necessarily in
your client) to your client's Certificate Manager
Using the Certificate Manager 6-15
202-10015-01
Page 75

Reference Manual for the NETGEAR ProSafe VPN Client
Note: Make sure that you have the password entered to protect the private key when this
personal certificate was exported.
1. In the Certificate Manager, click the My Certificates tab.
2. Click Import Certificate. The Import Certificate dialog box opens.
3. In the Import Type group, select the certificate and private key type to import:
• For online certificate enrollment, click PKCS12 Personal Certificate.
• For older certificate and key types, click Certificate and Private Key File.
• For a manual certificate request, click Certificate Request Response File.
4. By default, the Import certificate to local machine store check box is clear , which places the
imported certificate in your—the logged-on user's—personal certificate store. Unless your
network security administrator instructs you to change it, accept the default.
Caution: In Windows NT and Windows 2000 and XP, you must be logged on as
administrator or its equivalent to add this certificate to the local machine store.
5. The import type you selected determines the boxes available for you to complete:
•In the Certificate File box, type the drive, directory, and file name/file type of the
personal certificate or certificate request response file to import or click Browse to locate
it.
The default certificate request response filename is
C:\temp_directory_for_OS\Cert.p7r.
•In the Key File box, type the drive, directory, and file name of the private key file to
import or click Browse to locate it.
•In the Password box, type the password used when the file was exported.
6. Unless your network security administrator advises you to change it, leave the Import
certificate to local machine store check box selected (the default).
7. Click Import.
8. When the key import confirmation message opens, click OK.
Note: If the import fails, try selecting a different import type.
9. When prompted to add this personal certificate, click Yes.
6-16 Using the Certificate Manager
202-10015-01
Page 76

Reference Manual for the NETGEAR ProSafe VPN Client
Select a CSP
You can select a cryptographic service provider (CSP) when requesting a personal certificate,
regardless of the method. You can also designate a default CSP to use for all personal certificate
requests.
1. In the Security Policy Editor, click Options>Certificate Settings. The Online or File-based
Certificate Request dialog box opens.
2. Click Advanced. The Advanced Certificate Enrollment Settings dialog box opens.
3. Click the specific CSP in the list.
4. If the Key Size box is enabled, click the key size to use.
5. To designate the settings on this dialog box as the default for all personal certificate requests,
select the Save as default CSP settings check box.
6. By default, the Place certificate and keys in local machine store check box is clear, which
places the imported certificate in your—the logged-on user's—personal certificate store.
Unless your network security administrator instructs you to change it, accept the default.
Caution: In Windows NT and Windows 2000 and XP, you must be logged on as
administrator or its equivalent to add this certificate to the local machine store.
7. Click OK.
View and Delete Certificate Requests
You can view the information about a pending request for a CA or personal certificate until you or
the client you retrieve a valid certificate, you import one, or you Delete the certificate request.
1. In the Certificate Manager, click the Requests tab.
2. Click the certificate request to view.
3. Click View. A dialog box opens with information about the selected certificate request.
4. To close the certificate request, click anywhere in the dialog box.
You can delete a pending certificate request that displays on the Requests tab in the Certificate
Manager. When you retrieve or import a valid certificate, the Certificate Manager automatically
removes this certificate request.
1. In the Certificate Manager, click the Requests tab.
2. Click the specific certificate request.
3. Click Delete.
Using the Certificate Manager 6-17
202-10015-01
Page 77

Reference Manual for the NETGEAR ProSafe VPN Client
When a confirmation message opens, click Yes.
4.
5. If prompted to delete the key container, click Yes.
Obtain Certificates Through Internet Explorer
You can use CA and personal certificates obtained outside the client—for example, through
Microsoft Internet Explorer or your email program—with the client. In some email programs,
personal certificates are called digital IDs.
To obtain certificates through Internet Explorer, go to the Web page the CA or your network
security administrator directs you to, and then follow the directions provided. You don't need to go
through the client's Certificate Manager to request certificates.
Note: To access the Microsoft CSP, make sure that Internet Explorer 5.01 or later is installed on
your computer.
Manage Certificates
When you view a certificate, a new window opens with various certificate attributes, such as its
name, serial number, key size, and validity dates.
1. In the Certificate Manager, click the tab for the type of certificate to view:
• For a personal certificate, My Certificates
By default (the All option is selected), the tab lists all personal certificates issued to you
and your computer (Users and This machine).
– For a list of the personal certificates issued to you, the logged-on user, click Users.
– For a list of the personal certificates issued to your computer (the local machine), click
This machine.
• For a root CA certificate, Root CA Certificates
– Clear the Show only trusted roots check box; this lists all root CA certificates on the
computer.
• For a subordinate CA certificate, CA Certificates
• For an RA certificate, RA Certificates
2. Click the specific certificate to view.
6-18 Using the Certificate Manager
202-10015-01
Page 78

Reference Manual for the NETGEAR ProSafe VPN Client
Click View. A box opens with information about the selected certificate.
3.
4. To close the certificate, click anywhere in this certificate box.
Verify a Certificate
After you import or retrieve a certificate, you can check whether it is valid or verified.
1. In the Certificate Manager, take the steps for the specific certificate type:
• For a personal certificate:
– Click the My Certificates tab.
– If the certificate you want to verify isn't listed on the tab, in Show certificates for,
click All. This displays every personal certificate on the computer on the tab.
• For a root CA certificate:
– Click the Root CA Certificates tab.
– If the certificate you want to verify isn't listed on the tab, clear the Show only trusted
roots check box. Every root CA certificate on the computer displays on the tab.
• For a subordinate CA certificate, click the CA Certificates tab.
• For an RA certificate, click the RA Certificates tab.
– Click the certificate to verify.
– Click Verify. The client checks the validity dates and attempts to check the certi ficate
against its revocation list. A dialog box opens with this information:
• Current status of the certificate: valid/verified or invalid/not verified, depending on the
certificate type
• If the certificate is invalid or not verified, a brief explanation of why
• The certificate's contents and attributes, such as its name, serial number, and key size
2. To close this dialog box, click OK.
Export a CA Certificate
Exporting a CA certificate copies it to a file to, for example, transfer it to another computer, create
a backup copy, or include it in a customized client installation.
Using the Certificate Manager 6-19
202-10015-01
Page 79

Reference Manual for the NETGEAR ProSafe VPN Client
When a CA certificate has associated RA certificates, the CA certificate export file also contains
these RA certificates.
1. In the Certificate Manager, click the tab for the certificate type to export:
• For a root CA certificate, the Root CA Certificates tab
• For a subordinate CA certificate, the CA Certificates tab
2. Click the certificate to export.
3. Click Export. The Export CA Certificate dialog box opens.
4. Navigate to the destination drive and directory for the file.
5. In the File name box, enter the filename of the certificate you are exporting. The default
filename is C:\temp_directory_path_for_OS\CaCert.cser.
Note: If you're creating a customized client installation, accept the default filename.
6. Click Save.
Delete a Certificate
Note: When you delete a CA certificate, the client also deletes any associated RA certificates.
1. In the Certificate Manager, take the steps for the specific certificate type:
• For a personal certificate:
– Click the My Certificates tab.
– If the certificate to delete isn't listed on the tab, in the Show certificates for group,
click All. All personal certificates on the computer display on the tab.
• For a root CA certificate:
– Click the Root CA Certificates tab.
– Clear the Show only trusted roots check box. All root CA certificates on the
computer display on the tab.
• For a subordinate CA certificate, click the CA Certificates tab.
• For an expired RA certificate, the only RA certificates you can directly delete, click the
RA certificates tab.
– Click the certificate to delete.
– Click Delete.
6-20 Using the Certificate Manager
202-10015-01
Page 80

Reference Manual for the NETGEAR ProSafe VPN Client
– When a delete confirmation message box opens, click OK.
RA Certificates
When you view a certificate, a new window opens with various certificate attributes, such as its
name, serial number, key size, and validity dates.
1. In the Certificate Manager, click the tab for the type of certificate to view:
• For a personal certificate, My Certificates
By default (the All option is selected), the tab lists all personal certificates issued to you
and your computer (Users and This machine).
– For a list of the personal certificates issued to you, the logged-on user, click Users.
– For a list of the personal certificates issued to your computer (the local machine), click
This machine.
• For a root CA certificate, Root CA Certificates
– Clear the Show only trusted roots check box; this lists all root CA certificates on the
computer.
• For a subordinate CA certificate, CA Certificates
• For an RA certificate, RA Certificates
2. Click the specific certificate to view.
3. Click View. A box opens with information about the selected certificate.
4. To close the certificate, click anywhere in this certificate box.
After you import or retrieve a certificate, you can check whether it is valid or verified.
1. In the Certificate Manager, take the steps for the specific certificate type:
• For a personal certificate:
– Click the My Certificates tab.
– If the certificate you want to verify isn't listed on the tab, in Show certificates for,
click All. This displays every personal certificate on the computer on the tab.
• For a root CA certificate:
– Click the Root CA Certificates tab.
Using the Certificate Manager 6-21
202-10015-01
Page 81

Reference Manual for the NETGEAR ProSafe VPN Client
– If the certificate you want to verify isn't listed on the tab, clear the Show only trusted
roots check box. Every root CA certificate on the computer displays on the tab.
• For a subordinate CA certificate, click the CA Certificates tab.
• For an RA certificate, click the RA Certificates tab.
– Click the certificate to verify.
– Click Verify. The client checks the validity dates and attempts to check the certi ficate
against its revocation list. A dialog box opens with this information:
• Current status of the certificate: valid/verified or invalid/not verified, depending on the
certificate type
• If the certificate is invalid or not verified, a brief explanation of why
• The certificate's contents and attributes, such as its name, serial number, and key size
2. To close this dialog box, click OK.
Personal Certificates
In these two situations, you must import a personal certificate to the Certificate Manager:
• If you created a personal certificate file from the email that the CA when you manually
requested a personal certificate
• To bring a pers onal certificate file exported from the Certificate Manager (not necessarily in
your client) to your client's Certificate Manager
Note: Make sure that you have the password entered to protect the private key when this
personal certificate was exported.
1. In the Certificate Manager, click the My Certificates tab.
2. Click Import Certificate. The Import Certificate dialog box opens.
3. In the Import Type group, select the certificate and private key type to import:
• For online certificate enrollment, click PKCS12 Personal Certificate.
• For older certificate and key types, click Certificate and Private Key File.
• For a manual certificate request, click Certificate Request Response File.
4. By default, the Import certificate to local machine store check box is clear , which places the
imported certificate in your—the logged-on user's—personal certificate store. Unless your
network security administrator instructs you to change it, accept the default.
6-22 Using the Certificate Manager
202-10015-01
Page 82

Reference Manual for the NETGEAR ProSafe VPN Client
Caution: In Windows NT and Windows 2000 and XP, you must be logged on as
administrator or its equivalent to add this certificate to the local machine store (for all users
who log on to this computer).
5. The import type you selected determines the boxes available for you to complete:
•In the Certificate File box, type the drive, directory, and file name/file type of the
personal certificate or certificate request response file to import or click Browse to locate
it.
The default certificate request response filename is
C:\temp_directory_for_OS\Cert.p7r.
•In the Key File box, type the drive, directory, and file name of the private key file to
import or click Browse to locate it.
•In the Password box, type the password used when the file was exported.
6. Unless your network security administrator advises you to change it, leave the Import
certificate to local machine store check box selected (the default).
7. Click Import.
8. When the key import confirmation message opens, click OK.
Note: If the import fails, try selecting a different import type.
9. When prompted to add this personal certificate, click Yes.
When you view a certificate, a new window opens with various certificate attributes, such as its
name, serial number, key size, and validity dates.
1. In the Certificate Manager, click the tab for the type of certificate to view:
• For a personal certificate, My Certificates
By default (the All option is selected), the tab lists all personal certificates issued to you
and your computer (Users and This machine).
– For a list of the personal certificates issued to you, the logged-on user, click Users.
– For a list of the personal certificates issued to your computer (the local machine), click
This machine.
• For a root CA certificate, Root CA Certificates
– Clear the Show only trusted roots check box; this lists all root CA certificates on the
computer.
• For a subordinate CA certificate, CA Certificates
Using the Certificate Manager 6-23
202-10015-01
Page 83

Reference Manual for the NETGEAR ProSafe VPN Client
• For an RA certificate, RA Certificates
2. Click the specific certificate to view.
3. Click View. A box opens with information about the selected certificate.
4. To close the certificate, click anywhere in this certificate box.
After you import or retrieve a certificate, you can check whether it is valid or verified.
1. In the Certificate Manager, take the steps for the specific certificate type:
• For a personal certificate:
– Click the My Certificates tab.
– If the certificate you want to verify isn't listed on the tab, in Show certificates for,
click All. This displays every personal certificate on the computer on the tab.
• For a root CA certificate:
– Click the Root CA Certificates tab.
– If the certificate you want to verify isn't listed on the tab, clear the Show only trusted
roots check box. Every root CA certificate on the computer displays on the tab.
• For a subordinate CA certificate, click the CA Certificates tab.
• For an RA certificate, click the RA Certificates tab.
– Click the certificate to verify.
– Click Verify. The client checks the validity dates and attempts to check the certi ficate
against its revocation list. A dialog box opens with this information:
• Current status of the certificate: valid/verified or invalid/not verified, depending on the
certificate type
• If the certificate is invalid or not verified, a brief explanation of why
• The certificate's contents and attributes, such as its name, serial number, and key size
2. To close this dialog box, click OK.
Export a Personal Certificate
Exporting a personal certificate copies it to a file so that you can, for example, transfer it to another
computer or create a backup copy.
6-24 Using the Certificate Manager
202-10015-01
Page 84

Reference Manual for the NETGEAR ProSafe VPN Client
Caution: The private key is exported with the personal certificate only if, when the personal
certificate was requested, the Generate exportable key check box was selected. If this check box
was not selected then, you can't export the private key.
1. In the Certificate Manager, click the My Certificates tab.
2. Click the personal certificate to export.
3. Click Export. The Export Certificate and Private Key dialog box opens.
4. In the File name box, enter the drive, directory, and filename for the personal certificate file.
The default filename is C:\temp_directory_path_for_OS\Cert.p12.
5. In the Password box, type an alphanumeric password.
6. In the Confirm Password box, retype the password. Record it, too; whoever imports this file
will need it.
7. Click Export.
Delete a Certificate
Note: When you delete a CA certificate, the client also deletes any associated RA certificates.
1. In the Certificate Manager, take the steps for the specific certificate type:
• For a personal certificate:
– Click the My Certificates tab.
– If the certificate to delete isn't listed on the tab, in the Show certificates for group,
click All. All personal certificates on the computer display on the tab.
• For a root CA certificate:
– Click the Root CA Certificates tab.
– Clear the Show only trusted roots check box. All root CA certificates on the
computer display on the tab.
• For a subordinate CA certificate, click the CA Certificates tab.
• For an expired RA certificate, the only RA certificates you can directly delete, click the
RA certificates tab.
– Click the certificate to delete.
– Click Delete.
– When a delete confirmation message box opens, click OK.
Using the Certificate Manager 6-25
202-10015-01
Page 85

Reference Manual for the NETGEAR ProSafe VPN Client
Manage Certificate Revocation Lists (CRLs)
A certificate revocation list (CRL) is a list of certificates that the issuing CA rescinded before their
expiration dates. This may occur when, for example, a user's name or address changes or the user
leaves the company. When you retrieve or import a certificate from a CA, it typically contains a
CRL. If it doesn't, you can import one. You can view a CRL on the CRLs tab in the Certificate
Manager.
The client can periodically poll, or check for, CA CRL distribution sites and then retrieve the latest
CRLs. You must define the site and polling interval.
1. In the Certificate Manager, view a personal certificate.
2. On the certificate, if the CRL Dist. Point entry contains an URL, jot down what precedes the
:// in the URL: http, file, or ldap.
3. In the Security Policy Editor, click Options>Certificate Settings. The Certificate Settings
dialog box opens.
4. The CRL Dist. Point entry on the personal certificate you just viewed determines your next
step:
• If there was no CRL Dist. Point entry , clear the Enable automatic CRL retrieval check
box.
• If the CRL Dist. Point entry contained an URL, take these steps:
– Select the Enable automatic CRL retrieval check box.
–In the CRL retrieval interval (hours) box, specify how often the client checks for
and retrieves new CRLs from the CA; type the number of hours, from 1 through 24,
between these checks. The default is 24 hours.
– The URL's scheme name determines whether you must complete the Default LDAP
Server for CRLs box:
6-26 Using the Certificate Manager
202-10015-01
Page 86

Table 6-2:
Reference Manual for the NETGEAR ProSafe VPN Client
URL
Scheme
Name
file or http CRLS are published to a
ldap Distinguished name of the
5.
Click OK.
6. Click Save.
Definition Action
Leave the Default LDAP
Web server. The certificate
contains this Web server's
address.
distribution point on the
LDAP directory server.
This doesn't specify the
LDAP server for the client to
check for CRLs.
Server for CRLs box
blank.
In the Default LDAP
Server for CRLs box, type
the LDAP server's IP
address, domain name, or
complete URL.
Import a CRL
If your CA didn't include a CRL in its CA certificate file, you can manually import a CRL to the
Certificate Manager.
1. In the Certificate Manager, click the CRLs tab.
2. Click Import CRL. The Import CRL dialog box opens.
3. Navigate to the CRL file to import so that its file name displays in the File name box. The file
type is typically .crl.
4. Click Import.
5. Click Close.
Update all CRLs Manually
Instead of waiting for the client to check for and retrieve new CRLs automatically at defined
intervals, you can manually update all the CRLs.
1. In the Certificate Manager, click the CRLs tab.
Using the Certificate Manager 6-27
202-10015-01
Page 87

Reference Manual for the NETGEAR ProSafe VPN Client
Click Update All CRLs.
2.
3. Click Close.
View a CRL
1. In the Certificate Manager, click the CRLs tab.
2. Click the CRL to view.
3. Click View. A dialog box with information about the selected CRL opens.
4. To close this dialog box, click OK.
Delete a CRL
If you no longer need the CRL for a particular CA, you can delete it from the Certificate Manager.
1. In the Certificate Manager, click the CRLs tab.
2. Click the CRL to delete.
3. Click Delete.
4. When a confirmation message box opens, click OK.
5. Click Close.
Manage the Trust Policy
In the Certificate Manager, when you trust a root CA certificate, the client considers this CA, its
subordinate CAs, and the certificates issued by these CAs as valid for IPSec communications,
Conversely , when a root CA certificate is not trusted for IPSec sessions, neither are the certificates
issued by it or its subordinate CAs.
The trust policy specifies the trusted root CAs:
• Root CAs specifically configured for IPSec communications (the default)
The client selects this option when it imports a root CA or reinstalls it after you upgrade the
client, if you saved your certificates.
There are two ways to identify a trusted root CA certificate in the Certificate Manager:
6-28 Using the Certificate Manager
202-10015-01
Page 88

Reference Manual for the NETGEAR ProSafe VPN Client
•On the Configuration Parameters dialog box, the Trus t this certificate for IP security
check box is selected.
• When you view or verify the certificates, for Enh KeyUsage, the option IP security end
system appears.
• Root CAs that have issued a personal certificate to any of the computer's users
• All root CAs installed on your computer (the local machine)
The trust policy also applies to personal certificates issued by a CA in the trust hierarchy for
remote parties that your security policy allows you to communicate with.
Set the Trust Policy
The trust policy for certificates specifies which root CA certificates the client considers valid for
IPSec communications. When you set the trust policy on the Trust Policy tab in the Certificate
Manager, the trust policy selected on the Root CA Certificates and Root CA Certificates tabs
changes to reflect the Trust Policy tab setting.
1. In the Certificate Manager, click the Trust Policy tab.
2. In the Specify which root certificate authorities (CAs) to trust group, select the trust policy:
• To trust only those root CA certificates configured to be trusted for IPSec sessions, click
Trust specific root CAs.
• T o trust only root CA certificates that issued a personal certificate to any of the computer's
users, click Trust CAs that have issued a local pers onal certificate .
• T o trust all the root CAs installed on your computer, click Trust all r oot CAs installed on
this computer
Caution: Depending on the operating system and Internet Explo r er version installed on
your computer, there may be at least 100 root CA certificates on your computer. Before
you select this option, carefully consider the security ramifications.
The trust policy you select takes effect immediately.
Set the Trust Policy and View Trusted Root CA Certificates
Typically, you select the trust policy for the client on the Certificate Manager's Trust Policy tab.
The Root CA Certificates tab displays the trusted root CA certificates.
Using the Certificate Manager 6-29
202-10015-01
Page 89

Reference Manual for the NETGEAR ProSafe VPN Client
You can, however, change the trust policy on the Root CA Certificates tab, and view a real-time
list of the trusted root CA certificates. When you change the trust policy on this tab, the client
dynamically updates the trust policy selected on the Trust Policy tab.
1. In the Certificate Manager, click the Root CA Certificates tab.
2. Select the Show only trusted roots check box. Based on the trust policy specified in the Trust
policy--trust these roots for IPSec group, all the trusted root CA certificates display in the
list.
The Trust policy--trust these roots for IPSec options match those on the Trust Policy tab,
with different labels:
Table 6-3:
Trust policy options:
Root CA Certificates tab Trust Policy tab
Configured roots (defaul t) Trust specific root CAs (default)
Issuers of my certs Trust CAs that have issued a local
personal certificate
All roots Trust all root CAs installed on this
computer
Caution: Depending on the operating system and Internet Explorer version installed on your
computer, there may be at least 100 root CA certificates on your computer. Before clicking All
roots, carefully consider the security ramifications.
3. In the Trust policy--trust these roots for IPSec group, click the trust policy option to apply;
this takes effect immediately. The list of trusted root CAs is updated to reflect the change.
6-30 Using the Certificate Manager
202-10015-01
Page 90

Chapter 7
Using Sessions
This chapter describes how to perform network management tasks with your NETGEAR ProSafe
VPN Client.
Authenticate Yourself
You may be prompted to enter your username and password when you attempt to establish a VPN;
enter this information on the dialog box that opens. This is to authenticate who you, the user, are to
the network, before the connection is initiated.
Automatically Start and End Secure Sessions
By default, the client automatically establishes and terminates connections, based on the remote
party's identity, when needed.
For example, suppose that you want to check your office email from home. The security policy in
the client installed on your home computer contains a VPN to access the office network's mail
server. When you start your email program at home, and select the proper profile, the client
initiates the secure connection behind the scenes. The remote party's identity determines which
connection the client selects. All that you'll probably see is a connection logon dialog box, if it's
required. After the client connects to the network mail server, you can access your office email.
The connection remains “up” or active until one of these occurs:
• It's dropped by the network, the Internet, or your ISP.
• You turn your computer off.
• When importing or reloading the security policy, you select the Reset existing connections
option.
• You terminate it manually with the Disconnect or Disconnect All option on the client icon's
shortcut menu.
Using Sessions 7-1
202-10015-01
Page 91

Reference Manual for the NETGEAR ProSafe VPN Client
Note: You may be required to start and end secure sessions manually or choose to work with
secure connections that way.
Start and End a Secure Session Manually
By default, the client automatically establishes and terminates secure connections—VPNs—based
on the remote party's identity . You can, however , directly connect to a specific destination with the
Connect option on the client icon's shortcut (right-click) menu. Starting the secure connection by
selecting this option is analogous to picking up the handset of a telephone and selecting a speed
dial number or entering the other party's number to initiate a phone call.
For example, when you're in the office, you connect directly to your corporate network; to access
this network remotely, from home or on the road, you must use a VPN connection. With the
manual connection feature, you can select the specific connection to use.
If the Only Connect Manually check box check box is selected for a specific connection, the client
doesn't automatically initiate or end secure sessions for this connection; you must manually
connect and disconnect such sessions.
1. In the Windows system tray, right-click the client icon, point to Connect, and then click the
connection name.
2. T o terminate the secure communications session, right-click the client icon, click Disconnect,
and then click the connection name to end.
7-2 Using Sessions
202-10015-01
Page 92

Chapter 8
Distributing Customized Profiles
A customized installation is the standard client installation package modified to include a security
policy, a CA certificate, and perhaps a personal certificate. If preshared keys are to be employed,
you can include these instead of CA and personal certificates. Because personal certificates are
unique to each individual, a single personal certificate cannot be distributed to multiple users.
Adding these entities to the basic client installation package can facilitate managing corporate
security policies for multiple users. You can create multiple customized installations for users with
different security needs.
The customized installation package options are presented below.
Create a Customized Installation Containing a Security Policy
1. Configure the security policy for the users.
Note: If you want users to employ preshared keys instead of certificates, configure one in My
Identity for the security policy.
2. Export the security policy; name the file IPSecPolicy.spd.
3. Add the IPSecPolicy.spd file to the NETGEAR ProSafe VPN Client installation directory.
4. Deploy this customized installation to users on a network drive, Web site, CD-ROM, or other
location or medium, such as a directory or .zip or .exe file.
5. Make sure that the users have installation instructions and the specific information they need
to either use preshared keys or obtain a CA certificate and personal certificate. Help topics
describe these tasks.
Distributing Customized Profiles 8-1
202-10015-01
Page 93

Reference Manual for the NETGEAR ProSafe VPN Client
Create a Customized Installation Containing a Security Policy and a CA Certificate
1. Obtain a CA certificate.
2. Export this CA certificate; name the file CaCert.cser.
3. Configure a security policy.
4. Export the security policy; name the file IPSecPolicy.spd.
5. Add the CaCert.cser and the IPSecPolicy.spd files to the same directory that the setup.exe
file is located in on the NETGEAR ProSafe VPN Client installation media.
6. Deploy this customized installation to users on a network drive, Web page, CD-ROM, or
other location/medium as a directory or .zip or .exe file.
7. Tell users how to install the product and perform these tasks:
a. Add the CA certificate to the Root Store, when prompted.
b. Complete the online personal certificate request form that opens automatically. They need
their domain name and IP address and, if they are allowed to transfer their personal
certificate to another computer, they must select the Generate exportable key option.
Create a Customized Installation Containing a Security Policy, CA Certificate, and Personal Certificate
Note: Because personal certificates are unique to each individual, a single personal certificate
cannot be distributed to multiple users.
1. Obtain a CA certificate.
2. Export the CA certificate; name the file CaCert.cser.
3. Request a personal certificate for each user to receive this customized installation.
Note: When you create the certificate request, click Generate exportable key.
4. Export the personal certificate, which includes the private key; name the file IPSecCerts.p12.
5. Configure a security policy.
8-2 Distributing Customized Profiles
202-10015-01
Page 94

Reference Manual for the NETGEAR ProSafe VPN Client
Export the security policy; name the file IPSecPolicy.spd.
6.
7. Add the CaCert.cser, IPSecCerts.p12, and the IPSecPolicy.spd file s to the same directory
that the setup.exe file is located in on the NETGEAR ProSafe VPN Client installation
media.
8. Deploy this customized installation to users on a network drive, Web page, CD-ROM, or
other location/medium as a directory or .zip or .exe file.
9. Make sure that users have installation instructions and the password entered when you
exported the personal certificates.
Distributing Customized Profiles 8-3
202-10015-01
Page 95

Reference Manual for the NETGEAR ProSafe VPN Client
8-4 Distributing Customized Profiles
202-10015-01
Page 96

Chapter 9
Troubleshooting
System Tray Icons
The client icon displays in the Windows system tray. The icon may change very quickly to reflect
the real-time communications status for active connections; it may even appear to blink.
Table 9-1. System Tray Icons
Icon Explanation
• The Windows operating system did not start the IREIKE service properl y. To start this
service, restart your computer. If this icon continues to display, you may need to reinstall
the client.
or
• Your security policy is deactivated—that is, disabled. T o reac tivate it, go to Reactivate the
security policy
.
Your computer is ready to establish connections or transmit data.
Your computer has established no secure connections and is transmitting unsecured data.
Your computer has established at least one secure connection, but is transmitting no data.
Your computer has established at least one secure connection and is transmitting only
unsecured data.
Your computer has established at least one secure connection and is transmitting only
secured data.
Your computer has established at least one secure connection and is transmitting secured
and unsecured data.
Troubleshooting 9-1
202-10015-01
Page 97

Reference Manual for the NETGEAR ProSafe VPN Client
Remove the Client Icon from the System Tray
Although it is not recommended, the client icon can be removed from the system tray. Typically,
this occurs inadvertently. This has no affect on the communications status of active connections.
• In the Windows system tray, right-click the client icon, and then click Remove Icon.
Restore the Client Icon to the System Tray
If you remove the client icon from the system tray, you can put it back.
1. In Windows Explorer, locate this file on your computer, mostly likely on the C: drive:
NETGEAR VPN Client installation directory/Program Files/NETGEAR ProSafe VPN
Client/Safecfg.exe.
2. Double-click the file Safecfg.exe. The client icon reappears in the system tray.
3. Exit Windows Explorer.
Log Viewer
The Log Viewer lists the IKE negotiations that occur during Authentication (Phase 1). These
messages can be a helpful diagnostic tool when troubleshooting problems that occur in this phase.
Ongoing negotiations overwrite the messages displayed in the Log Viewer; the client does not save
logged messages. T o preserve currently displayed messages, you can freeze the log, and then save
or print its contents.
You can also save logged messages to the isakmp.log file in the client installation directory. You
can send the log file to a remote network administrator or customer support center instead of
repeatedly freezing and saving the Log Viewer's contents and sending these files.
There are two ways to open the Log Viewer:
• On the Windows desktop, click Start>Progr ams>N ETGEAR ProSafe VPN Client>Log
Viewer.
• Right-click the client icon, and then click Log V iewer.
9-2 Troubleshooting
202-10015-01
Page 98

Reference Manual for the NETGEAR ProSafe VPN Client
Freeze the Log Viewer
The client doesn't save logged messages; ongoing negotiations overwrite the messages displayed
in the Log Viewer. To preserve the currently displayed messages, you can pause or freeze the log,
and then save or print its contents.
Or, to save all the logged messages to a file, enable the file isakmp.log on the Global Policy
Settings dialog box in the Security Policy Editor.
• In the Log Viewer, click Freeze. The button's label changes to Unfreeze.
Unfreeze the Log Viewer
When the Log Viewer is frozen or halted, you must unfreeze it to restart the logging and scrolling
of IKE negotiation messages in the Log Viewer.
• In the Log Viewer, click Unfreeze. The button's label changes to Freeze.
Clear Log Viewer Messages
You can't recover the messages that you clear manually from the Log Viewer.
1. In the Log Viewer, click Clear.
Troubleshooting 9-3
202-10015-01
Page 99

Reference Manual for the NETGEAR ProSafe VPN Client
Save the Log Viewer Messages
1. In the Log Viewer, click Freeze.
2. Click Save Log.
3. In the Save As dialog box, follow the standard Windows Save As procedure. By default, the
file is named IKEx.log, where x is an incremental number.
Print the messages in the Log Viewer
1. In the Log Viewer, click Freeze.
2. Click Print.
3. In the Print dialog box, follow the standard Windows Print procedure.
Configure Global Policy Settings
Global policy settings are program preferences that apply to all secure IP communications. You
can change these at any time to match to your security policy.
1. In the Security Policy Editor, click Options, and then click Global Policy Settings. The
Global Policy Settings dialog box opens.
2. In the Retransmit Interval box, type the length of time, in seconds, that the client waits
before resending an IKE protocol packet that has not been responded to. The de fault is 8
seconds.
Note: If the client selects a redundant gateway when you know that the primary one is
available, try entering a higher number for Retransmit Interval.
3. In the Number of retries box, type the number of times your computer resends an IKE
protocol packet before abandoning the exchange. The default is 3 tries.
4. Status notifications are messages that inform communicating parties what the time-out periods
are and whether their security proposals have been accepted or rejected.
To send these messages, select the Send status notifications to peer host check box.
5. An internal network IP address is a virtual IP address assigned to the client user. Remote users
can appear as internal users on a private network to, for example, access a WINS server or
browse the network.
9-4 Troubleshooting
202-10015-01
Page 100

Reference Manual for the NETGEAR ProSafe VPN Client
To enable remote users to appear as internal users on a private network, select the Allow to
Specify Internal Network Address check box.
Note: If you select this check box, you must enter a private internal network IP address when
configuring My Identity.
6. To enable logging the Log Viewer's IKE negotiation messages to the isakmp.log file in the
client's installation directory , select the Enable logging to a file check box. This can facilitate
remote troubleshooting by allowing a user to send a file with these messages instead of
repeatedly freezing and printing the Log Viewer.
Notes:
• The maximum size for the isakmp.log file is 100 KB. When the client's computer, the
client, and the IKE service restart and the isakmp.log file size exceeds 100 KB, this
isakmp.log file is deleted and a new one created.
• On computers running Windows 95 and 98 , when the isakmp.log file size exceeds 64 KB,
Notepad prompts the user to try WordPad instead because of the file's size. When the user
tries WordPad, however, WordPad prompts the user that it can't open the file because it is
in use by another program (the IKE service).
In this case, to view the file, try one of these options:
• Rename it, and then open it in WordPad.
• Open a read-only version of the file in Microsoft Word.
• Clear the Enable logging to a file check box, and then open the file.
7. If you don't use a smart card and reader or similar device to authenticate your identity, skip this
step.
If you do use a smart card and reader or similar device, the client can, when it detects that the
smart card or reader is removed, delete active keys and end these communications sessions.
This provides extra security. Only connections that use the keys on your smart card are
affected.
To enable this feature , select the Smart card removal clears key s ch ec k box.
8. Click OK.
9. Click Save.
Troubleshooting 9-5
202-10015-01
 Loading...