

Netgear XWN5001 Owner's Manual
Powerline 500 WiFi Access Point (XWN5001)
User Manual
350 East Plumeria Drive
San Jose, CA 95134
USA
October 2012
202-11003-01
v1.0

Powerline 500 WiFi Access Point (XWN5001)
Support
Thank you for choosing NETGEAR.
After installing your device, locate the serial number on the label of your product and use it to register your product
at https://my.netgear.com. You must register your product before you can
NETGEAR recommends registering your product through the NETGEAR
support, visit http://support.netgear.com.
Phone (US & Canada only): 1-888-NETGEAR.
Phone (Other Countries): Check the li
http://support.netgear.com/general/cont
NETGEAR recommends that you use only the official NETGEAR support resources.
st of phone numbers at
act/default.aspx.
use NETGEAR telephone support.
website. For product updates and web
Trademarks
NETGEAR, the NETGEAR logo, and Connect with Innovation are trademarks and/or registered trademarks of
NETGEAR, Inc. and/or its subsidiaries in the United States and/or other countries. Information is subject to change
without notice. NETGEAR, Inc. All rights reserved.
Revision History
Publication Part Number Ver sio n Publish Date Comments
202-11003-01 v1.0 October 2012 First publication
2

Contents
Chapter 1 Getting Started
Chapter 2 Using NETGEAR genie
Hardware Features. . . . . . . . . . . . . . . . . . . . . . . . . . . . . . . . . . . . . . . . . . . . 6
LED and Feature Descriptions . . . . . . . . . . . . . . . . . . . . . . . . . . . . . . . . . 7
How the Powerline AV 500 Access Point Fits in Your Network . . . . . . . . . . 8
Set Up the Powerline Network . . . . . . . . . . . . . . . . . . . . . . . . . . . . . . . . . . 10
Set Up a New Powerline Network . . . . . . . . . . . . . . . . . . . . . . . . . . . . . 10
Add the Access Point to an Existing Powerline Network . . . . . . . . . . . . 11
Set Up the Access Point Wireless Network . . . . . . . . . . . . . . . . . . . . . . . . 12
Method A: Use NETGEAR genie for Wireless Setup . . . . . . . . . . . . . . . 12
Method B: Use the WPS Button for Wireless Setup . . . . . . . . . . . . . . . . 15
Join the Access Point Wireless Network . . . . . . . . . . . . . . . . . . . . . . . . . . 16
Powerline Network Security . . . . . . . . . . . . . . . . . . . . . . . . . . . . . . . . . . . . 16
Use the Security Button to Set the Encryption Key . . . . . . . . . . . . . . . . . . 17
Install NETGEAR genie . . . . . . . . . . . . . . . . . . . . . . . . . . . . . . . . . . . . . . . 20
Powerline Utility Screen . . . . . . . . . . . . . . . . . . . . . . . . . . . . . . . . . . . . . . . 21
Security Icon. . . . . . . . . . . . . . . . . . . . . . . . . . . . . . . . . . . . . . . . . . . . . . 22
View the Link Rate between Powerline Devices . . . . . . . . . . . . . . . . . . . . 23
Change the Name of a Powerline Device. . . . . . . . . . . . . . . . . . . . . . . . . . 24
Turn LEDs Off or On. . . . . . . . . . . . . . . . . . . . . . . . . . . . . . . . . . . . . . . . . . 25
Set the Powerline Encryption Key . . . . . . . . . . . . . . . . . . . . . . . . . . . . . . . 25
Reset a Device to Factory Settings . . . . . . . . . . . . . . . . . . . . . . . . . . . . . . 27
Add a Device to the Powerline Network . . . . . . . . . . . . . . . . . . . . . . . . . . . 28
Wireless Settings . . . . . . . . . . . . . . . . . . . . . . . . . . . . . . . . . . . . . . . . . . . . 29
Access NETGEAR Web genie . . . . . . . . . . . . . . . . . . . . . . . . . . . . . . . . . . 30
Advanced Wireless Settings. . . . . . . . . . . . . . . . . . . . . . . . . . . . . . . . . . . . 32
Upgrade the Firmware . . . . . . . . . . . . . . . . . . . . . . . . . . . . . . . . . . . . . . . . 33
Chapter 3 Troubleshooting
This chapter includes:. . . . . . . . . . . . . . . . . . . . . . . . . . . . . . . . . . . . . . . . . 34
Basic Functioning . . . . . . . . . . . . . . . . . . . . . . . . . . . . . . . . . . . . . . . . . . . . 35
Troubleshooting Tips . . . . . . . . . . . . . . . . . . . . . . . . . . . . . . . . . . . . . . . . . 35
LEDs. . . . . . . . . . . . . . . . . . . . . . . . . . . . . . . . . . . . . . . . . . . . . . . . . . . . 35
If You Do Not See All Your Devices with the NETGEAR genie . . . . . . . . . 36
If You Do Not See the Powerline Icon on Your Network Map . . . . . . . . . . 37
Symantec Endpoint Protection . . . . . . . . . . . . . . . . . . . . . . . . . . . . . . . . 37
Appendix A Supplemental Information
Technical Specifications . . . . . . . . . . . . . . . . . . . . . . . . . . . . . . . . . . . . . . . 41
Safety Information . . . . . . . . . . . . . . . . . . . . . . . . . . . . . . . . . . . . . . . . . . . 42
3

Powerline 500 WiFi Access Point (XWN5001)
Appendix B Notification of Compliance
Index
4

1. Getting Started
This chapter describes your Powerline 500 WiFi Access Point (XWN5001) and how your access
point can fit into a home network. It also explains the security features and how to customize the
encryption key for added security.
This chapter includes:
• Hardware Features
• How the Powerline AV 500 Access Point Fits in Your Network
• Set Up the Powerline Network
• Set Up the Access Point Wireless Network
• Join the Access Point Wireless Network
• Powerline Network Security
• Use the Security Button to Set the Encryption Key
For more information about the topics covered in this manual, visit the support website at
http://support.netgear.com.
1
5
Powerline 500 WiFi Access Point (XWN5001)
Powerline 500 WiFi Access Point
Ethernet cable
Power
LED
Factory
Reset
button
On/Off
switch
Ethernet
port
Security
button
Powerline
LED
Wireless
LED
Ethernet
LED
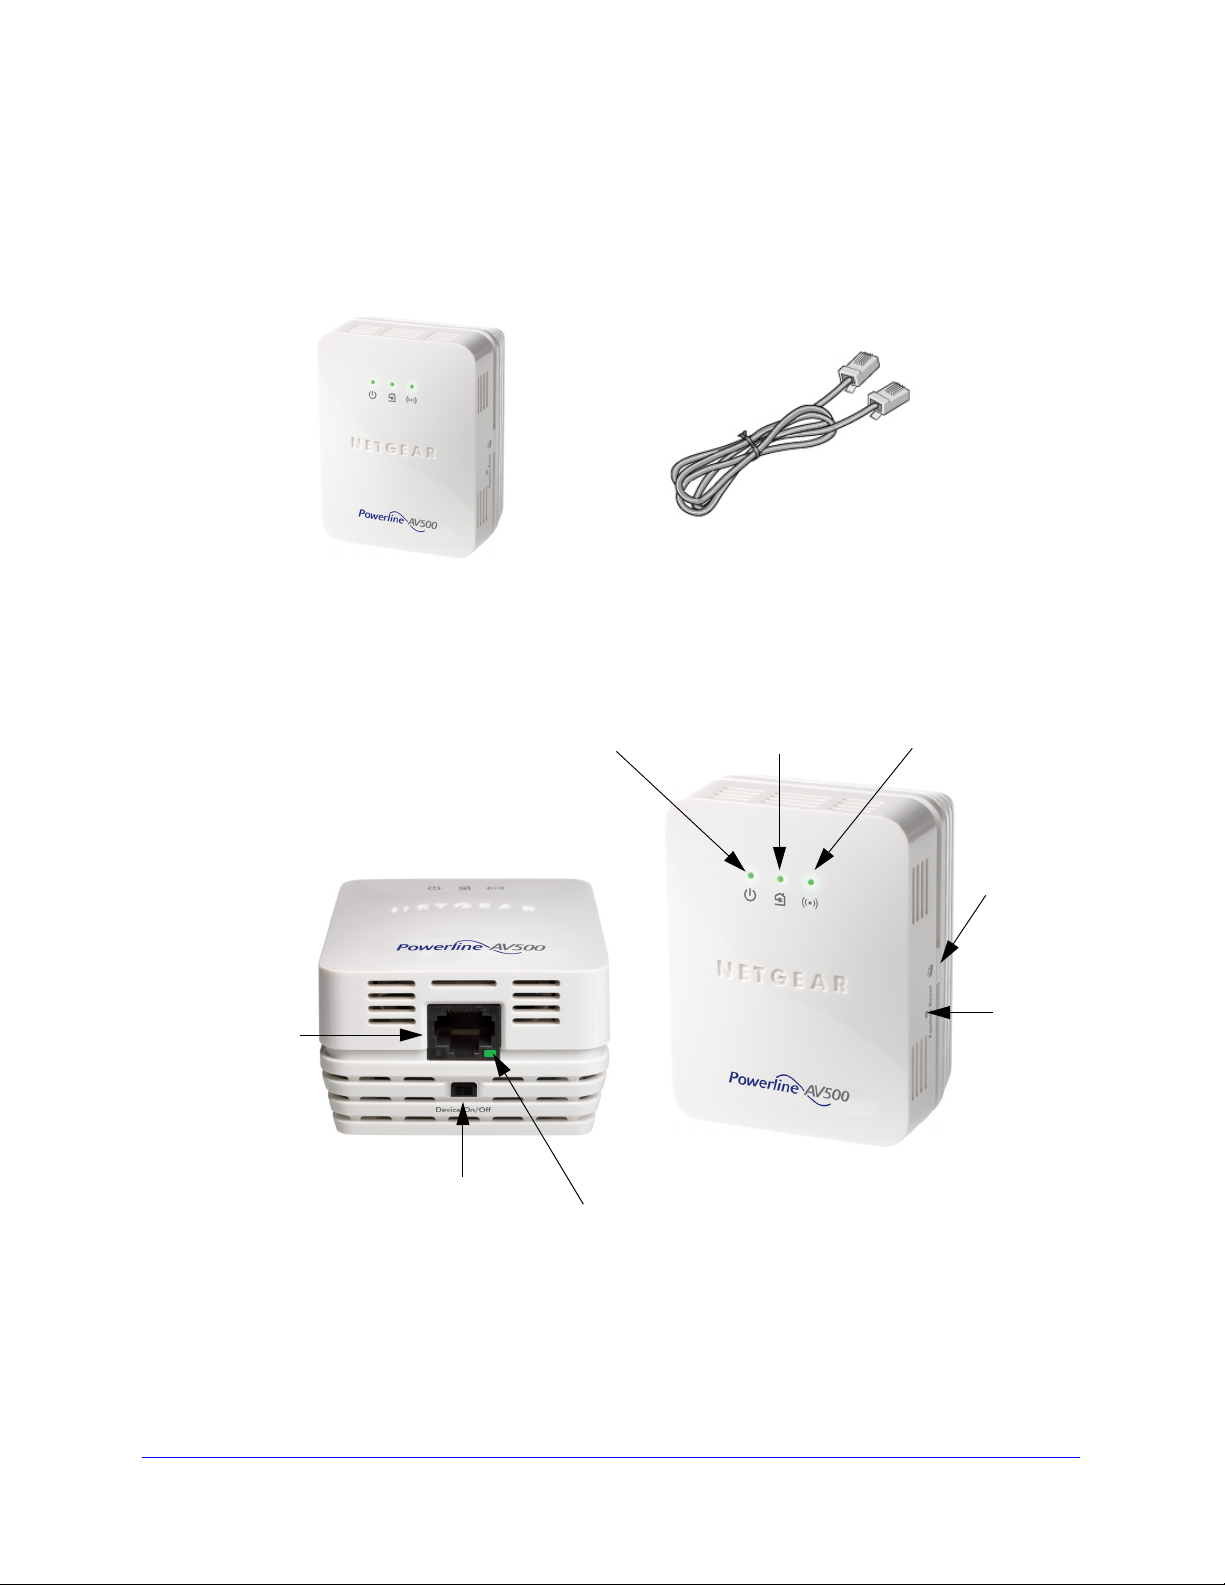
Hardware Features
The package includes a Powerline 500 WiFi Access Point (XWN5001) and an Ethernet
cable.
Figure 1. Package contents
Figure 2. Powerline 500 WiFi Access Point (XWN5001)
Getting Started
6
Powerline 500 WiFi Access Point (XWN5001)
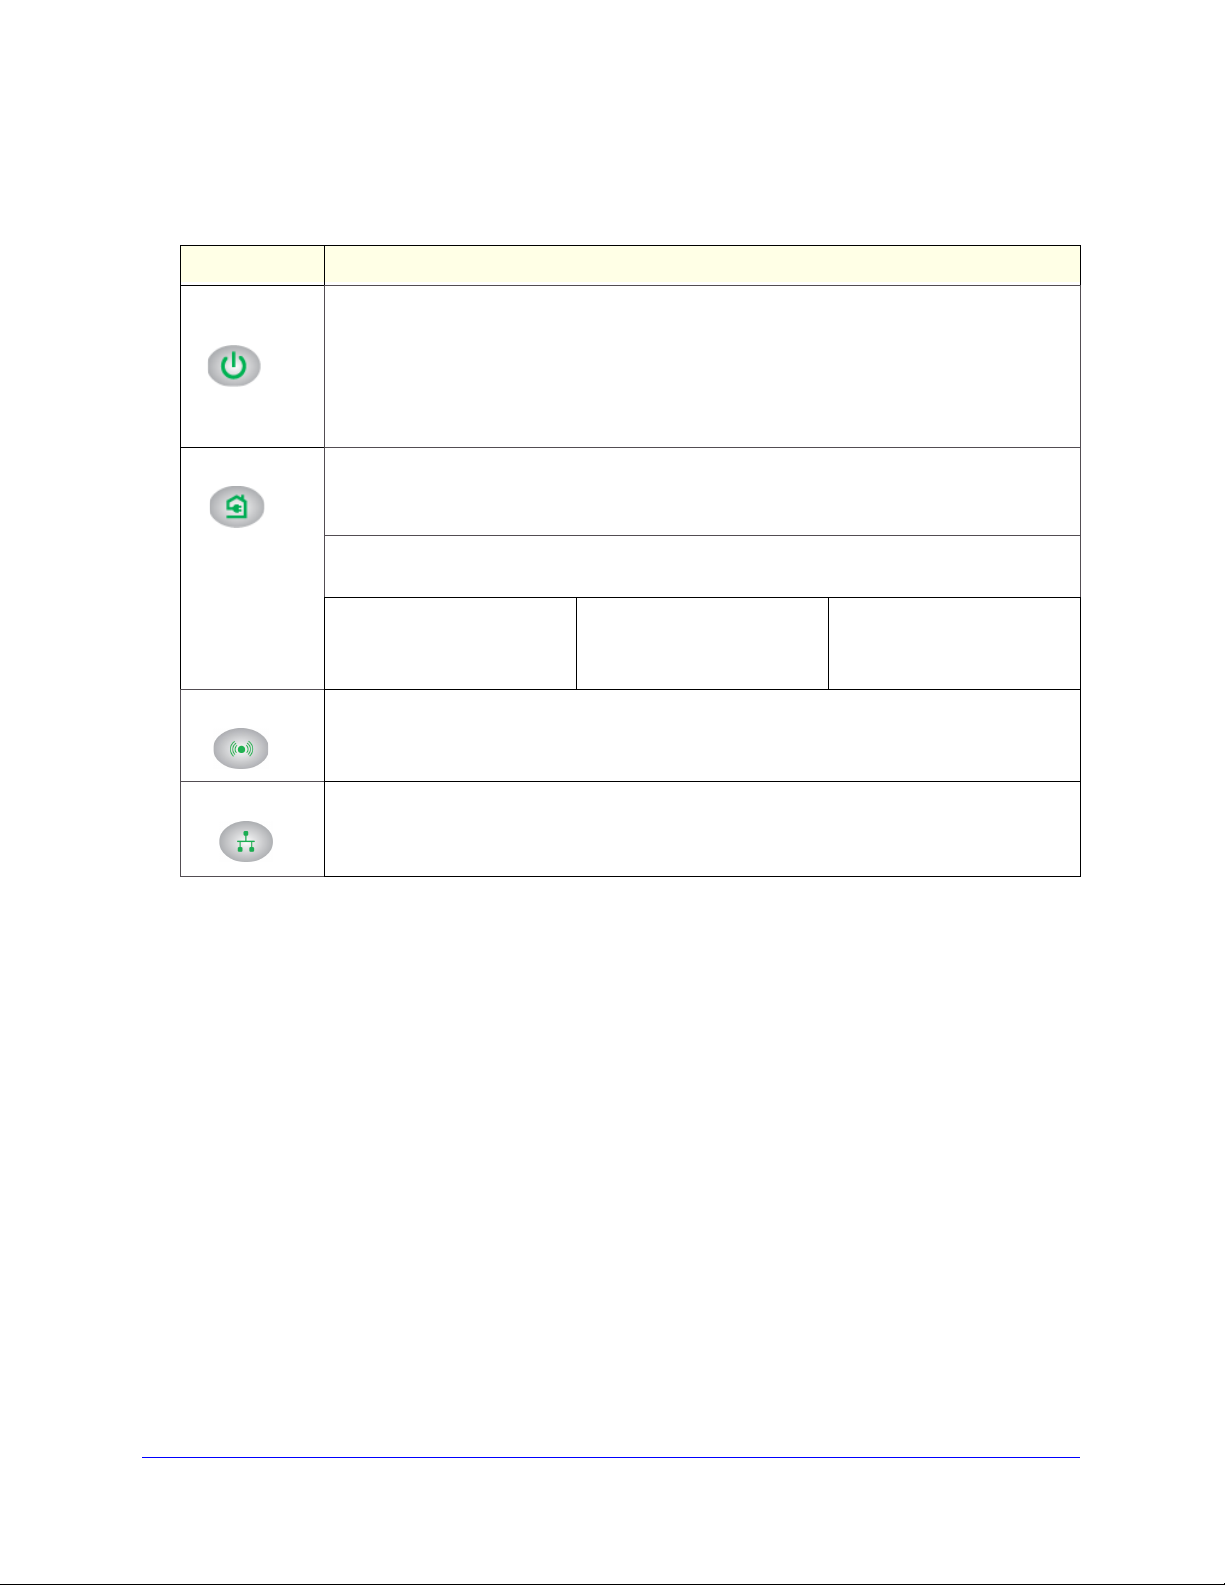
LED and Feature Descriptions
Table 1. LED descriptions
Item Description
Power
LED
Powerline LED • Solid. The device is connected to a Powerline network.
Wireless LED • Solid green. The wireless radio is on.
Ethernet LED
• Solid green. The electrical power is on.
• Blinking green. The device is in the process of restarting or setting up security.
• Amber. Power saving mode. The unit enters power saving mode if the Ethernet port is not
linked for more than 10 minutes.
• Off. There is no electrical power, or power has been turned off through the NETGEAR
genie.
• Off. The device has not found any other compatible Powerline devices using the same
encryption key or has been turned off through the NETGEAR genie.
The Pick A Plug feature lets you pick the electrical outlet with the fastest link rate, indicated by
the color displayed by the LED:
Green. Link rate > 80 Mbps
(Best)
Good for HD video
• Off. The wireless radio is off.
• Solid green. The device has an active Ethernet connection.
• Off. There is no Ethernet connection.
Amber. Link rate > 50 < 80
Mbps (Better)
Good for SD video
Red. Link rate < 50 Mbps
(Good)
Good for data
Buttons
• Factory Reset. Use the Factory Reset button to return your Powerline device to its
default factory settings. Press the Factory Reset button for 2 seconds, and then release
it.
• Security. The Security button has the following three functions:
- Once the Powerline devices are active, you can use the Security button to add
encryption to your Powerline network. See
Encryption Key on page 17.
- You can use the Security button to clone the WiFi network of your wireless router or
gateway without typing the network name (SSID) and password. See
the WPS Button for Wireless Setup on page 15.
- The Security button provides an easy way (WPS) for your wireless client to join the
WiFi network access point. See
Join the Access Point Wireless Network on page 16.
• On/Off. Use the On/Off switch to turn the device on and off.
Getting Started
Use the Security Button to Set the
Method B: Use
7

Powerline 500 WiFi Access Point (XWN5001)
Ethernet Port
Plug one end of the Ethernet cable that comes with the Powerline 500 WiFi Access Point
(XWN5001) into this port and the other end either into your router, or into the computer or
another peripheral device.
Product Label
The product label shows unique details specific to your device. The product label is on the
back of the device. The label contains the following information.
• Model number
• Powerline MAC address
• Ethernet/wireless MAC address
• Serial number
• Device password
• WPS security PIN
• Default wireless network name (SSID)
• Default network key
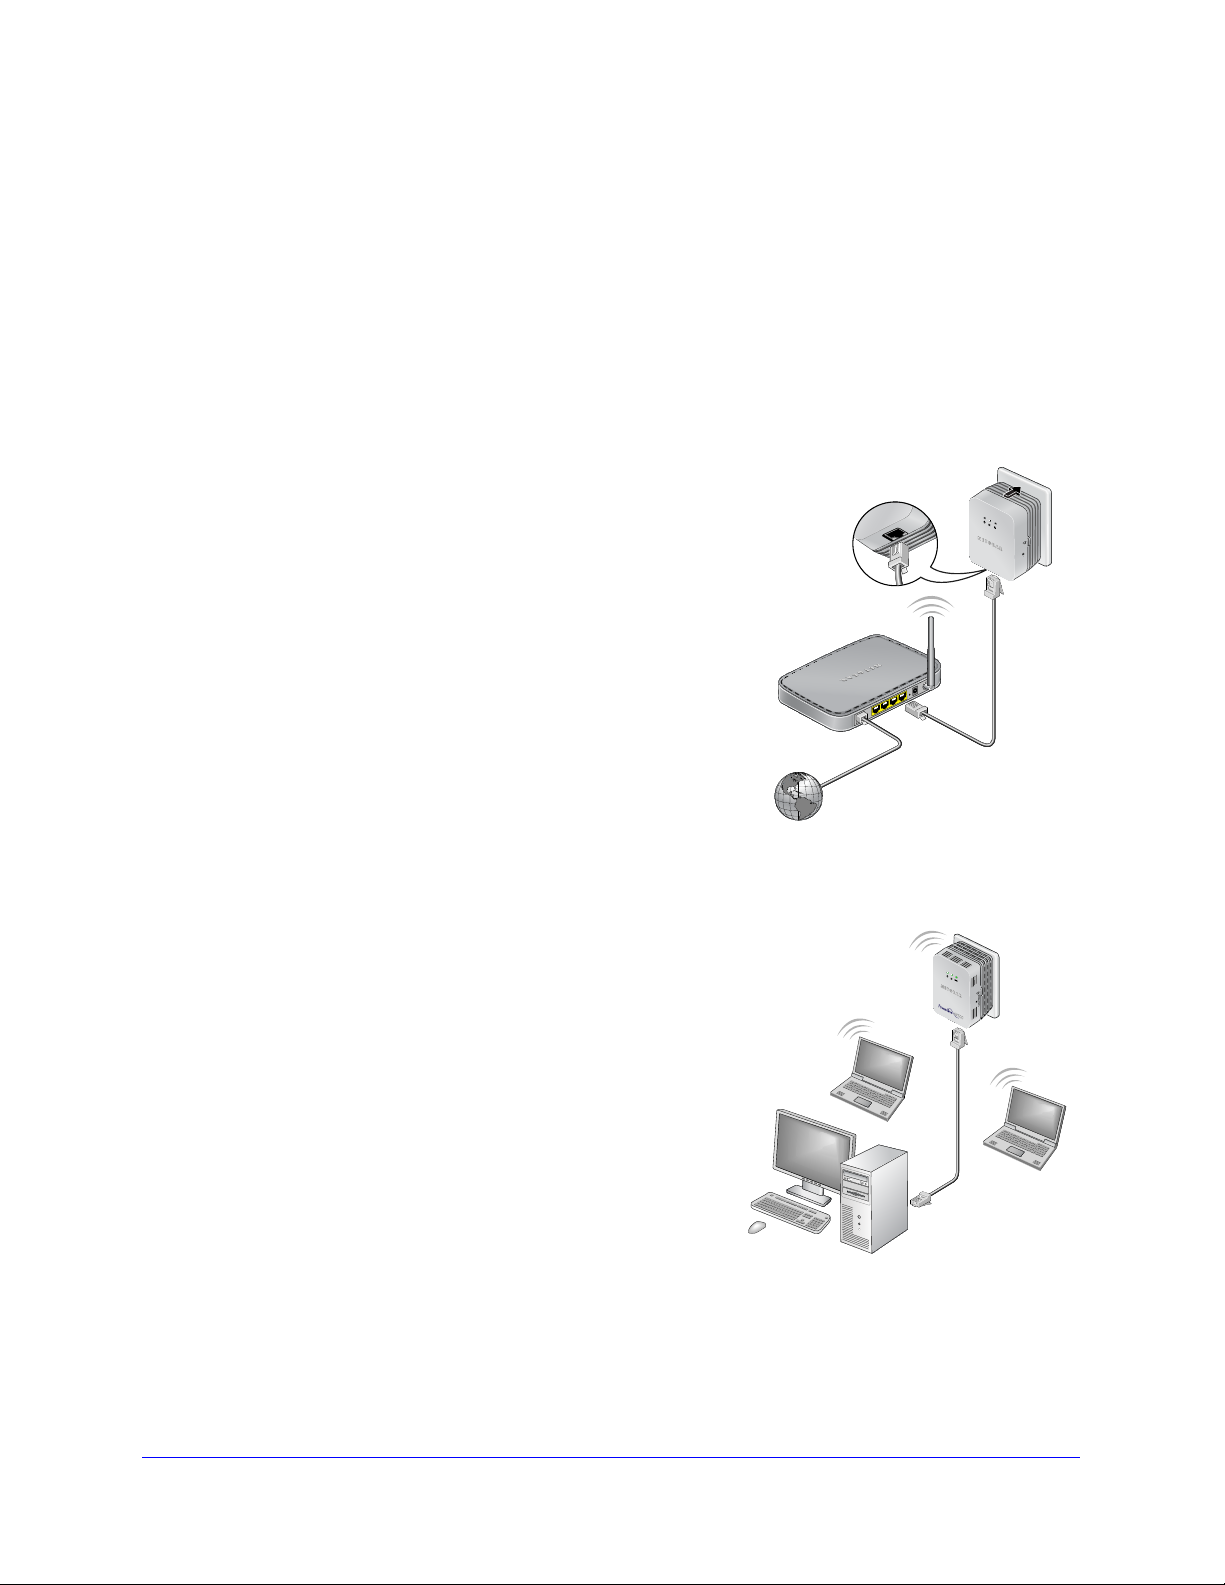
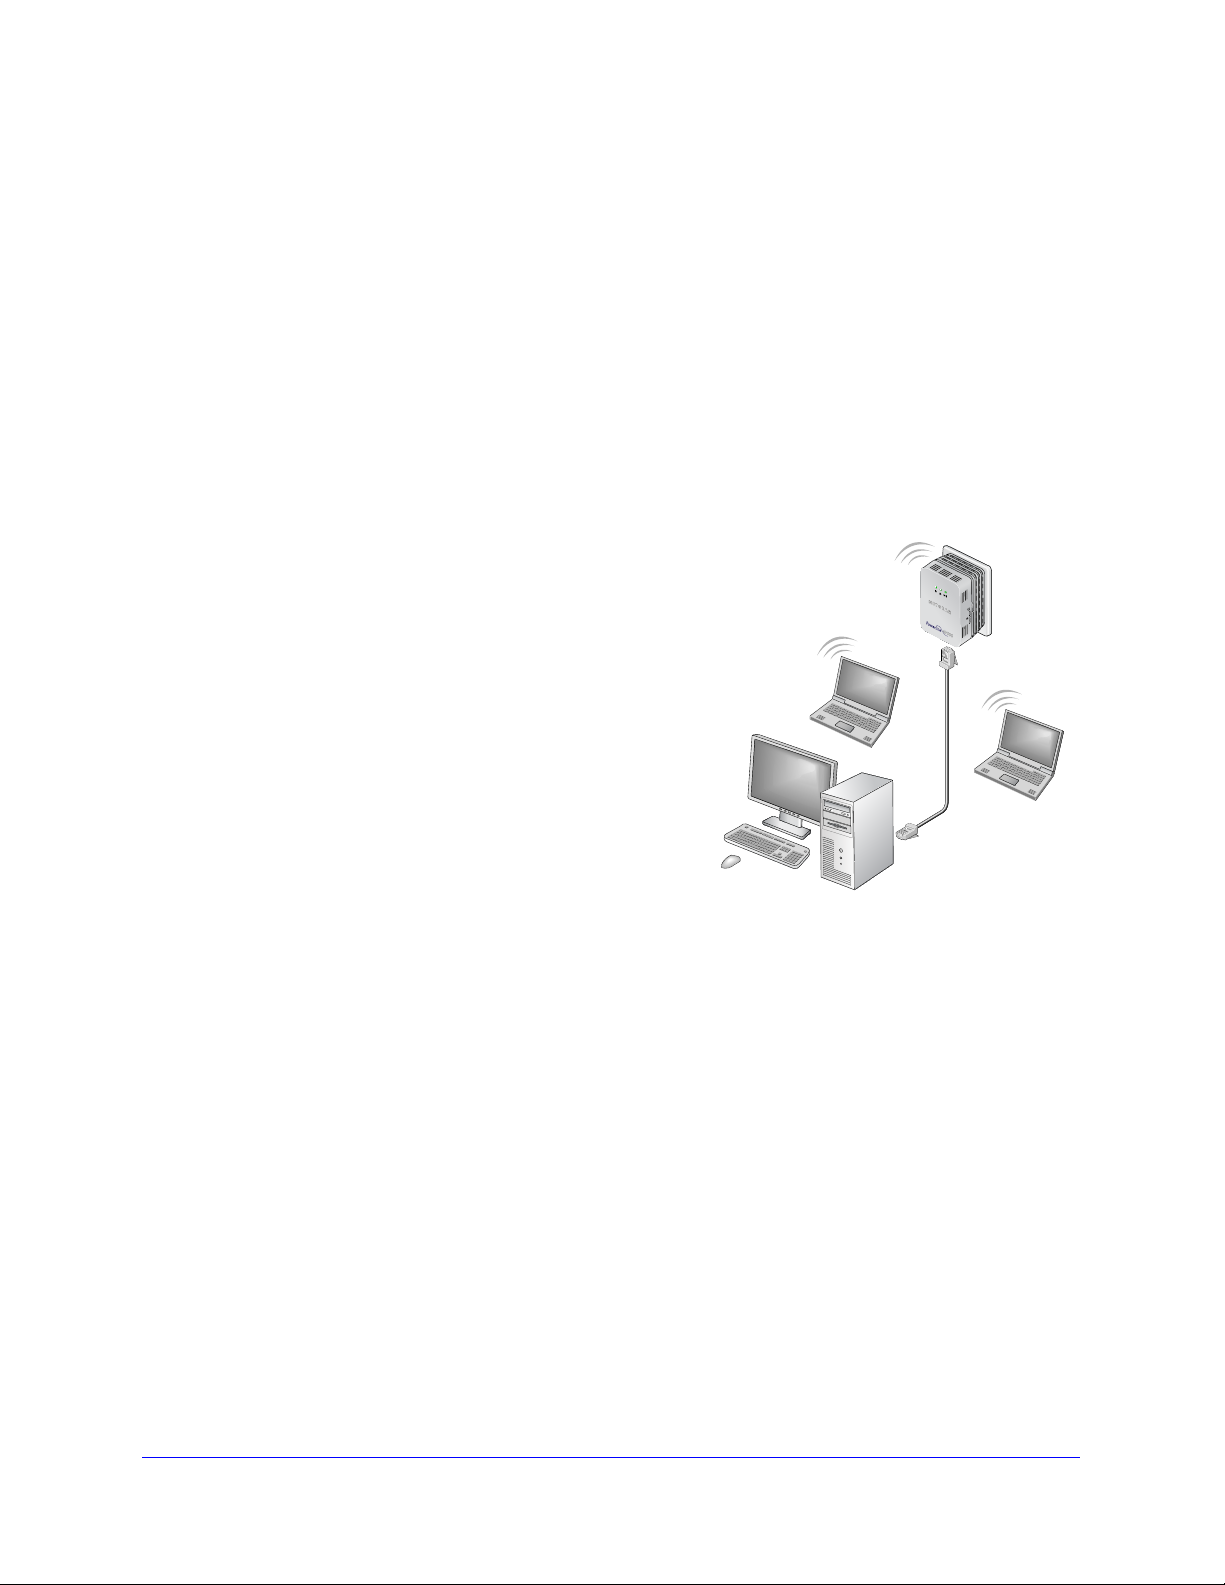
How the Powerline AV 500 Access Point Fits in Your Network
You can use one or more Powerline 500 WiFi Access Points to extend your home network
anywhere in your house using your electrical power lines.
A Powerline network consists of two or more compatible Powerline devices that communicate
with each other. One of the Powerline devices is connected with an Ethernet cable to your
router so that the Powerline network is linked to your local area network (LAN). That way
each Powerline device can communicate with the router and use its Internet connection.
Getting Started
8
Powerline 500 WiFi Access Point (XWN5001)
Reset
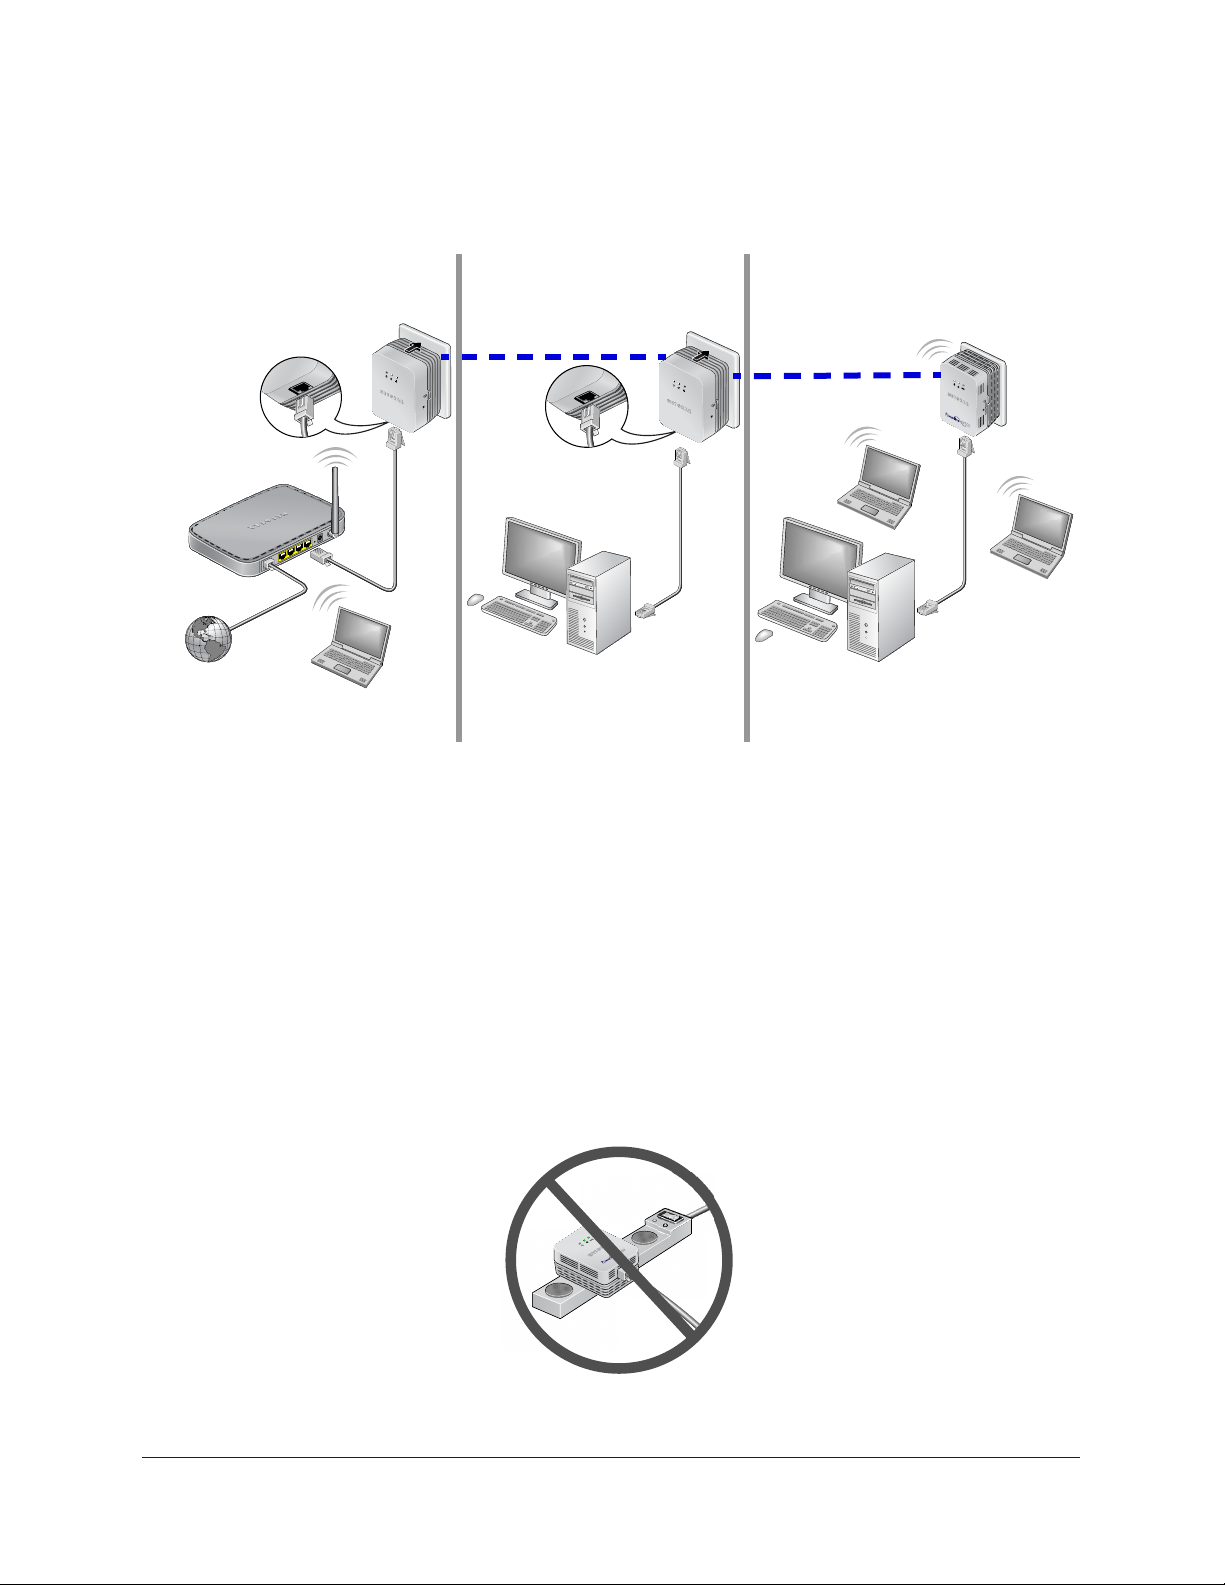
Reset
Room 1
Room 2
Room 3
Powerline
Powerline
XWN5001
The following illustration shows an existing Powerline network with one Powerline device in
Room 1, a second Powerline device in Room 2, and a Powerline 500 WiFi Access Point
(XWN5001) in Room 3:
Figure 3. Powerline access point connected to the Powerline network and wireless network
To form a Powerline network you need at least two compatible Powerline devices (including
the Powerline 500 WiFi Access Point).
For best performance, plan the locatio
• Use a
n electrical outlet that is not controlled by a wall switch to avoid someone
n of your Powerline devices:
unknowingly turning off the power to the outlet.
• Do not p
lug Powerline products into a power strip, extension cord, or surge protector as
this might prevent them from working correctly or reduce the network performance.
• A
void plugging Powerline products into electrical outlets located near an appliance that
uses a lot of power, such as a washer or dryer, or a refrigerator. This could potentially
prevent the Powerline devices from working correctly, or reduce network performance.
Getting Started
9
Powerline 500 WiFi Access Point (XWN5001)
Reset
Set Up the Powerline Network
You can set up a Powerline network that includes the access point or you can add the access
point to an existing Powerline network.
Set Up a New Powerline Network
Different Powerline models can share the network. All NETGEAR Powerline AV products are
compatible.
To set up a new Powerline network:
First device
1. Make su
re that your WiFi router or gateway is
connected to the Internet and that your Ethernet
wired connections are working.
a. On
a computer that is connected to your router or
gateway using an Ethernet cable, open a web
browser and navigate to a web page.
b. On
a computer or device that is connected to your
wireless network, open a web browser and
navigate to a web page.
2. Plug the first
Powerline device (sold separately) into a
wall outlet near your router or gateway. Then, connect
the device to the LAN port on your router or gateway
using an Ethernet cable.
For more detailed instructions, see the installation guide that came in the package.
3. During setu
near your router or gateway.
4. Use
the provided Ethernet cable to connect the
p, plug the access point into a wall outlet
XWN5001
access point to an Ethernet port on a computer for
initial setup.
The Powerline devices attempt to detect each other
and f
orm a Powerline network. This process could
take a few minutes.
ait for each Powerline device to be recognized by
5. W
the Powerline network.
The Power and Powerline LEDs should light. This
process could
take as little as 5 seconds, or up to 80
seconds. If the Powerline LEDs are green or amber,
the devices are successfully connected. A red LED
indicates a slow link rate. In this case, move the device or access point to another
electrical outlet with a faster connection.
6. S
et up the access point wireless network as explained in Set Up the Access Point
Wireless Network on
page 12.
Getting Started
10
Powerline 500 WiFi Access Point (XWN5001)
Add the Access Point to an Existing Powerline Network
If you have an existing Powerline network, make sure one of the Powerline devices is
connected to your WiFi router or gateway so that the Powerline network is linked to your local
area network (LAN) and WiFi network. Your existing Powerline network must have two or
more compatible Powerline devices that communicate with each other.
To add the access point to an existing Powerline network:
f you used the Security buttons or the NETGEAR genie to secure your Powerline
1. I
network, press the Reset button on each Powerline device to return it to its factory
settings.
This is the quickest way to allow your new Powerline 500 WiFi Access Point to
co
mmunicate with the other Powerline devices.
2. Conn
ect a computer to the access point for initial
setup.
Use the supplied Ethernet cable to connect the
access point to an Ethernet port on a computer.
3. For
convenience during setup, plug the access
point into an electrical outlet near your router.
The access point attempts to detect the other
comp
atible Powerline devices in your network
and join the Powerline network. This process
could take a few minutes.
4. Check
the Powerline LEDs to make sure that the
Powerline devices are communicating with each
other. If the LEDs are green or amber, the devices
are successfully connected. A red LED indicates a
slow link rate. In this case, move the device or access point to another electrical outlet with
a faster connection.
5. S
et up the access point wireless network as explained in Set Up the Access Point
Wireless Network on p
age 12.
Getting Started
11
Powerline 500 WiFi Access Point (XWN5001)
Set Up the Access Point Wireless Network
You need to set up the access point so that it can join your wireless network. To do this, you
can use either NETGEAR genie or Wi-Fi Protected Setup (WPS).
your router does not have WPS, or you are not sure, use Method A.
• If
• If
your router does have WPS, use Method B.
Method A: Use NETGEAR genie for Wireless Setup
To use NETGEAR genie to manually configure the wireless settings of your XWN5001:
1. Downloa
on page 20.
2. T
emporarily connect your computer to the Ethernet port on the XWN5001.
3. Lau
• Click the NETGEAR ge
• Select S
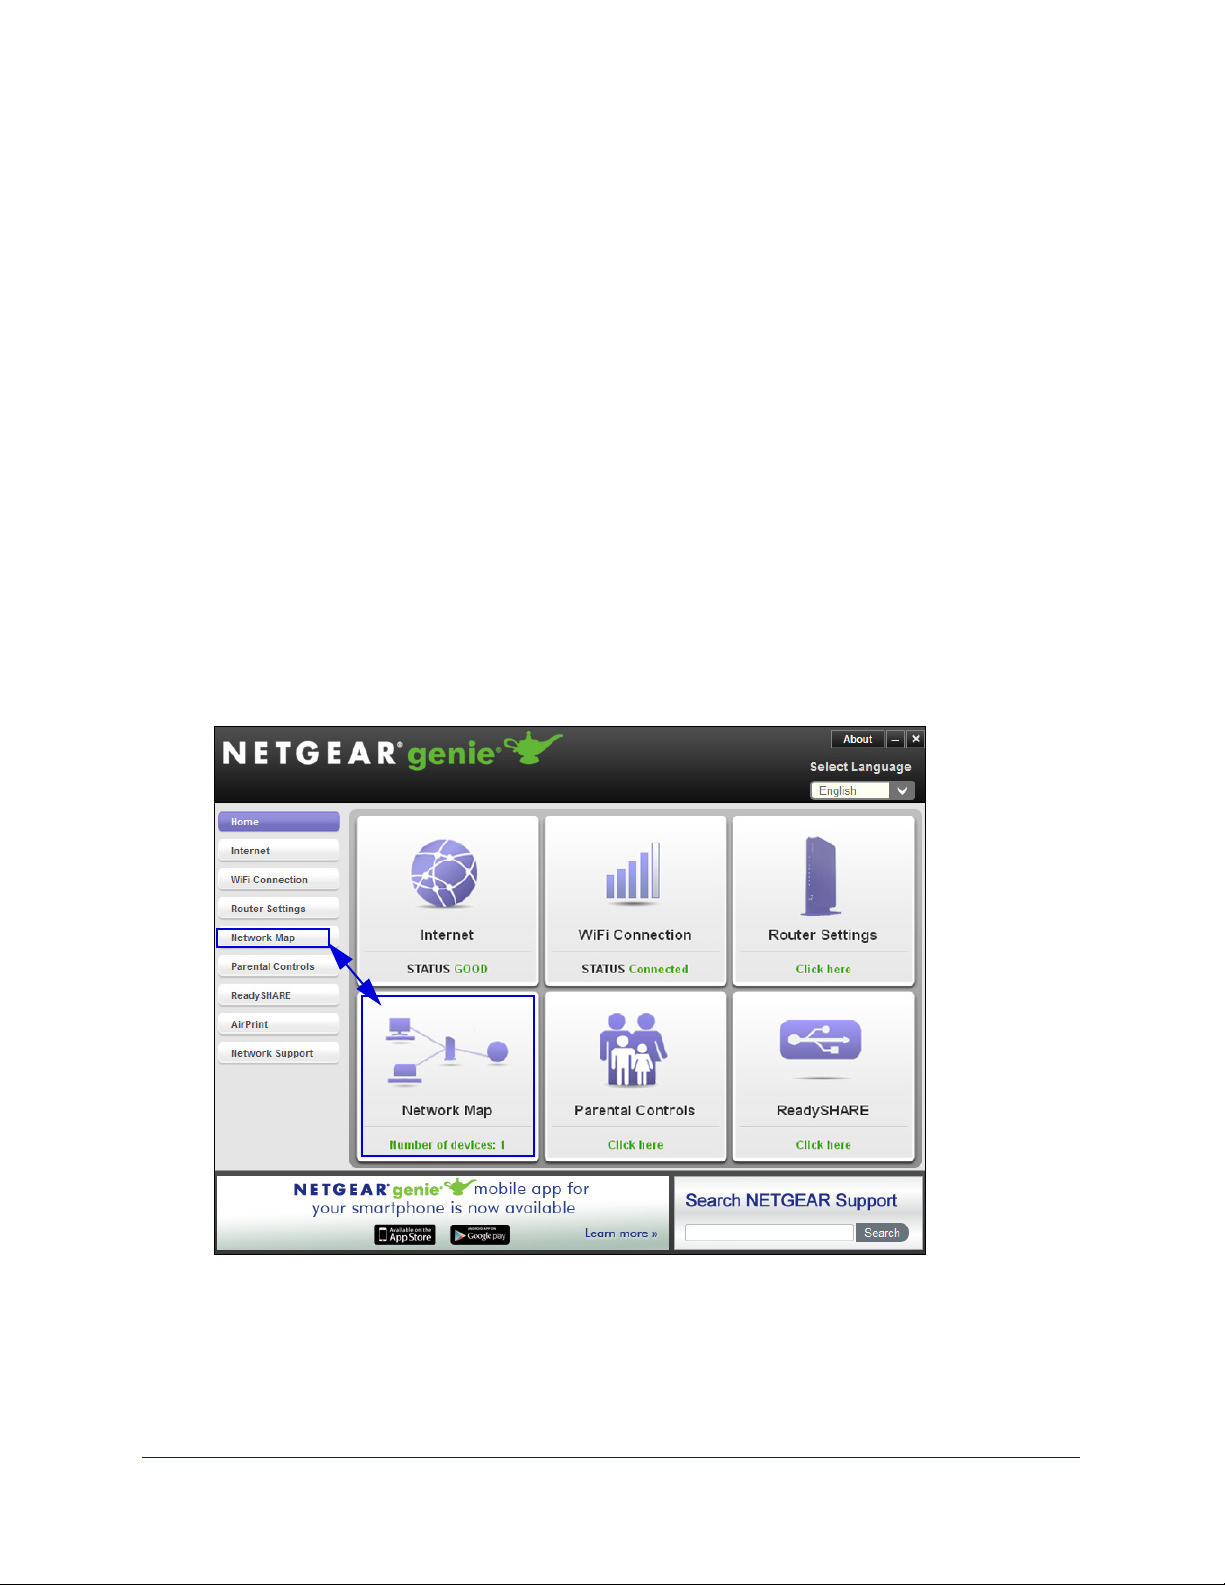
4. Click Network M
d and install NETGEAR genie on your computer. See Install NETGEAR genie
nch NETGEAR genie in one of two ways:
nie shortcut icon on your desktop.
tart > All Programs > NETGEAR genie.
ap or select it from the list of menu items on the left.
Getting Started
12
Powerline 500 WiFi Access Point (XWN5001)
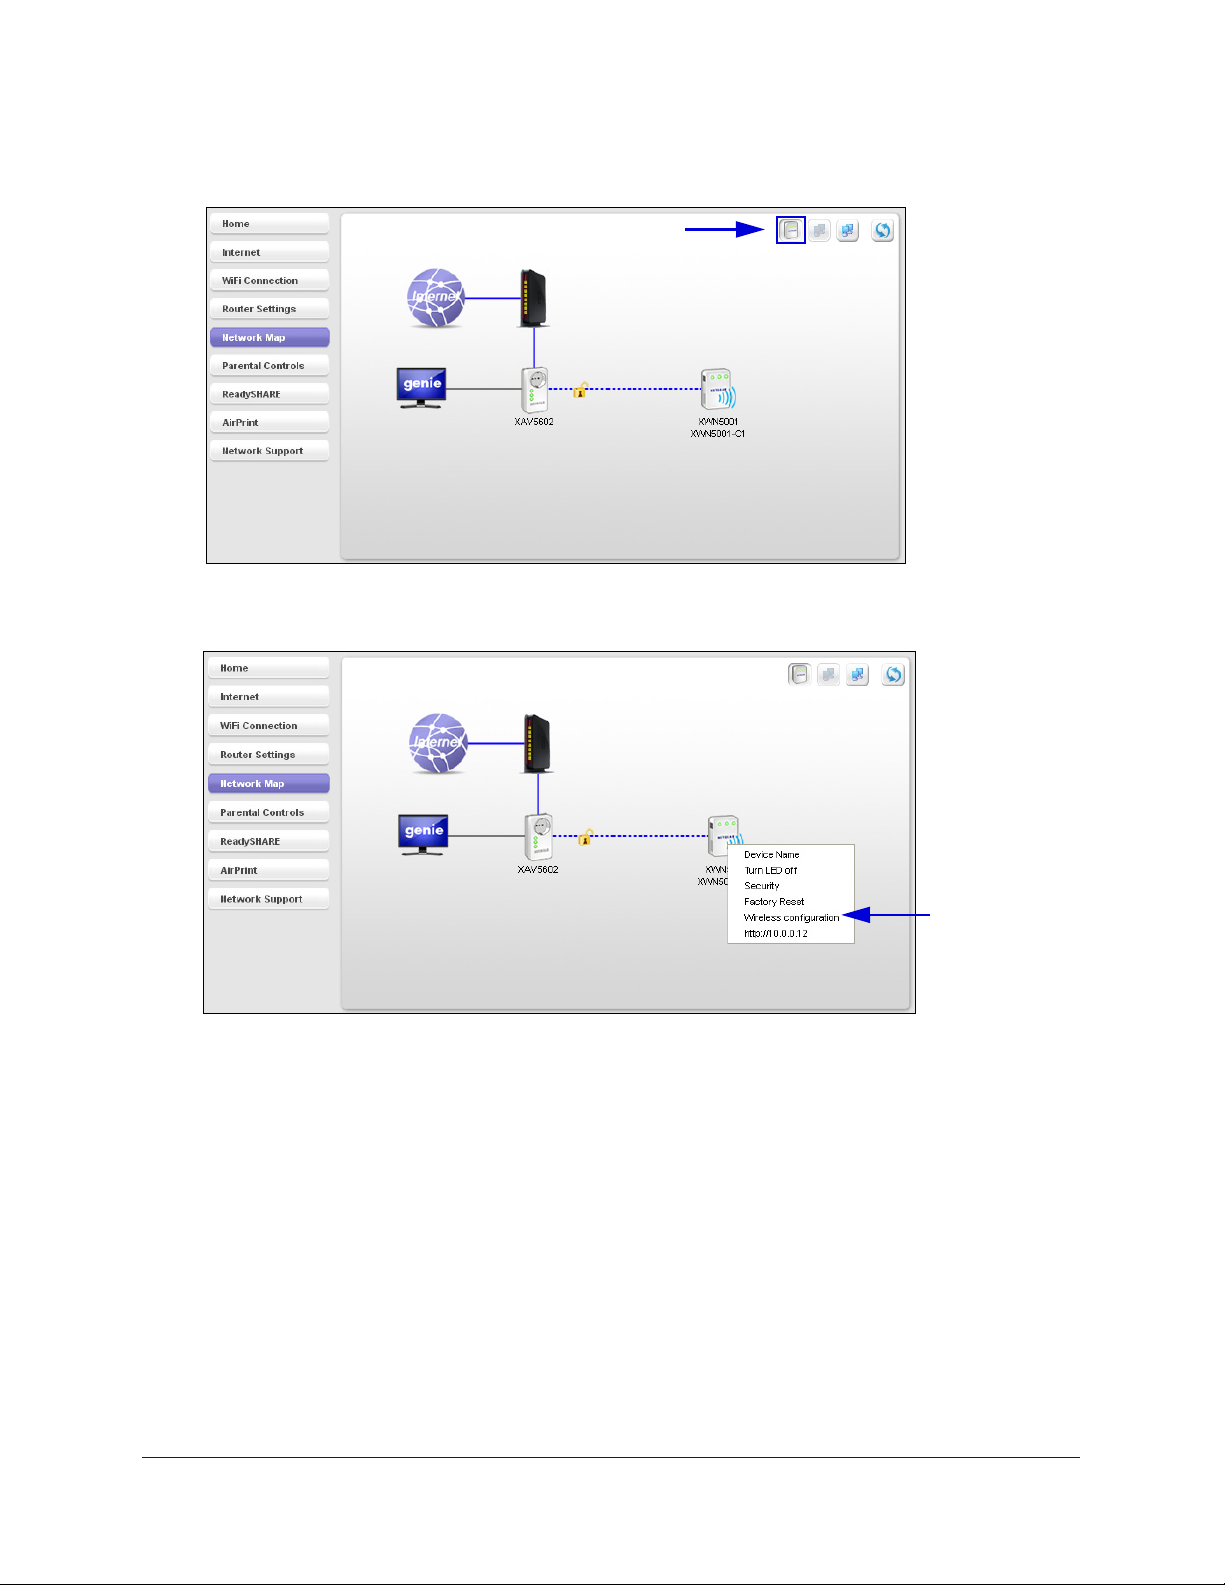
5. Click the Powerline icon on the Network Map screen. The Powerline Utility screen displays.
6. On the Powerline Utility screen, right-click the XWN5001 icon.
7. From the pop
-up menu that displays, select Wireless configuration.
Getting Started
13
Powerline 500 WiFi Access Point (XWN5001)
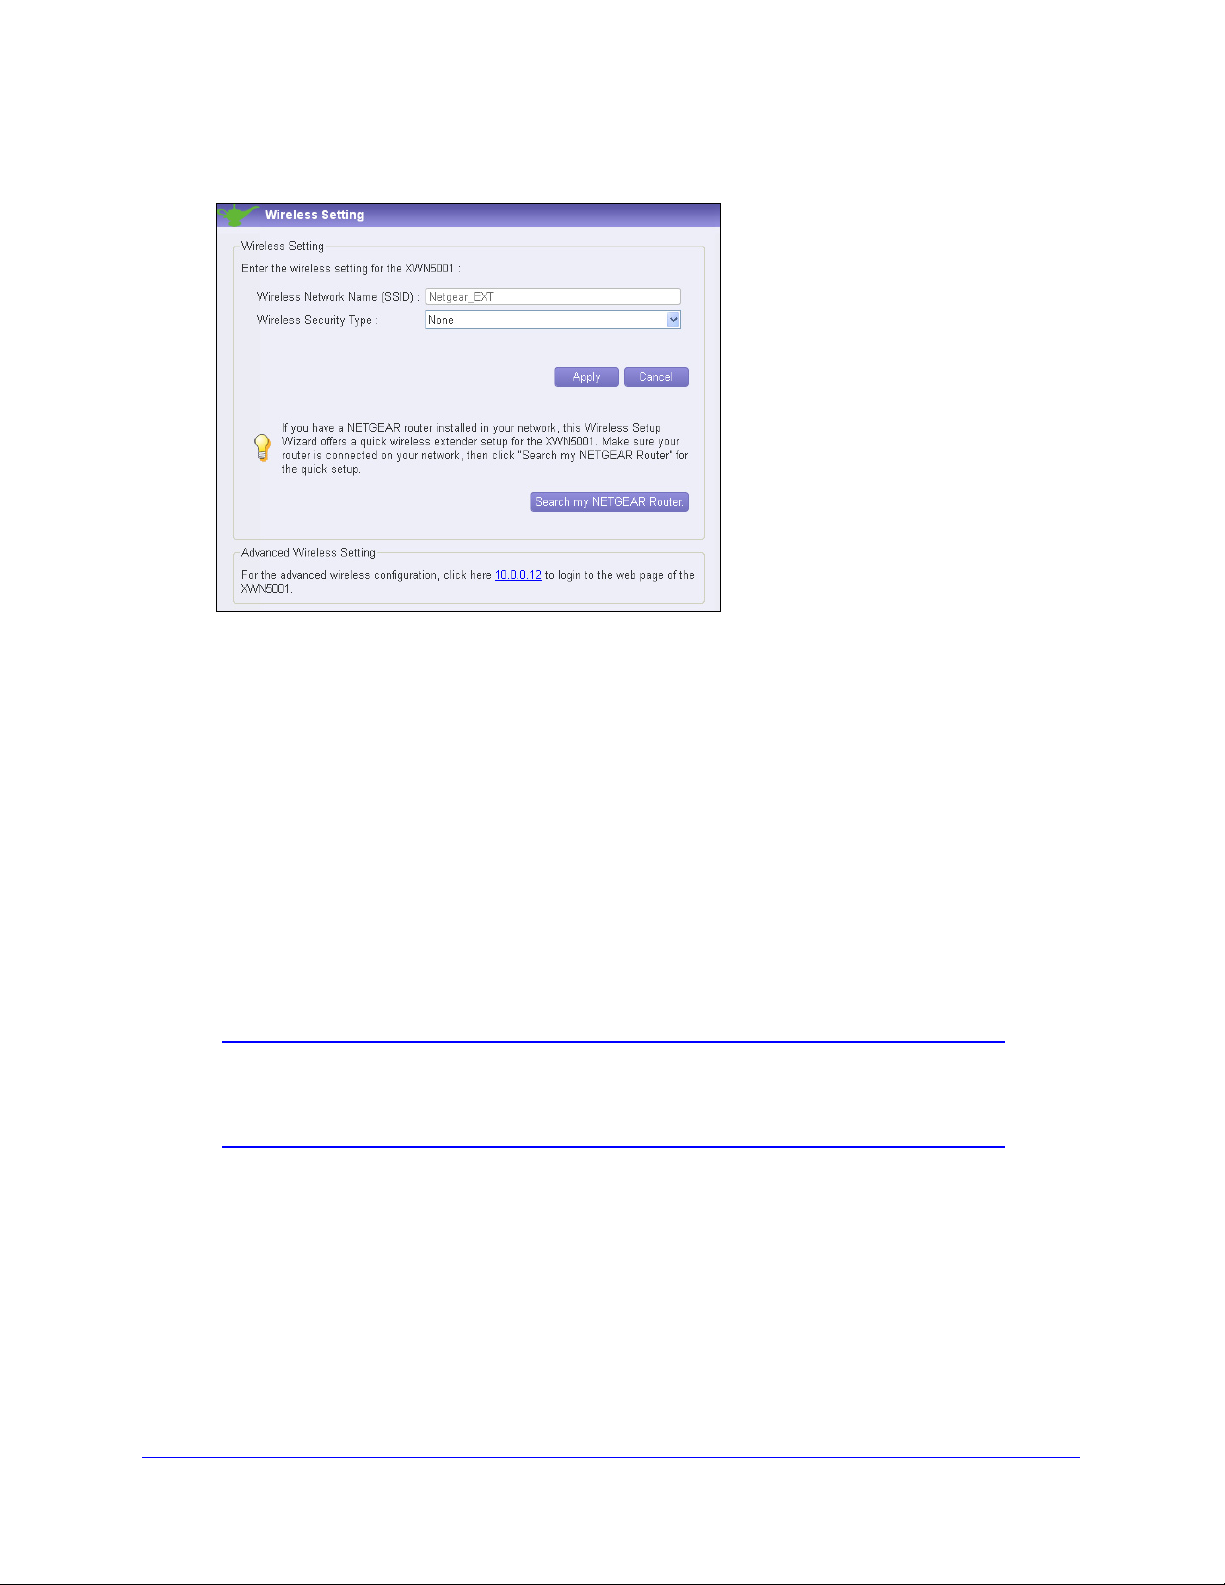
The following screen displays:
8. Enter the following wireless settings:
• Wireless Netw
• Wireless
ork Name (SSID)
Security Type
• Passphrase
If you want to clone your existing
wireless network, enter the same wireless settings that
your router or gateway uses.
If you want to create a new WiFi network, enter n
ew wireless settings. Creating a new
WiFi network lets you have a second network in another zone of your house.
9. Click Apply
10. Wh
en you are finished with the wireless settings, disconnect the Ethernet cable from the
to save your changes.
XWN5001.
Note: You can access advanced wireless settings by right-clicking the
device icon and selecting the IP address on the pop-up menu. The
login and password are admin and password.
Getting Started
14

Powerline 500 WiFi Access Point (XWN5001)
Method B: Use the WPS Button for Wireless Setup
You can use this method if you have a wireless router, or a modem router with a WPS (Wi-Fi
Protected Setup) button. The WPS button might be labeled WPS, or it could look similar to
or .
To use the WPS button on your router or gateway to clone your existing wireless
network:
1. Pre
ss and hold the Security button on the XWN5001 (about 10 seconds) and release it.
The Wireless LED starts to blink.
2. Press the WPS but
When the Wireless LED stops blinking, t
ton on the wireless router or gateway.
he cloning is finalized and the XWN5001
recreates a WiFi access point with the same SSID and password as your router or
gateway.
You now have two WiFi networks with the same parameters (SSID and password). When
re roaming in your house, your wireless client (laptop, tablet, or smartphone)
you a
switches from one network (router or gateway) to the other (XWN5001), depending on
the signal quality.
Note: This method clones your wireless client and, at the same time,
secures the connection with a random password.
Getting Started
15
 Loading...