

Netgear XAVN2001, XAVNB2001 Owner's Manual
XAVN2001 Powerline AV 200 Wireless-N Extender
User Manual
350 East Plumeria Drive
San Jose, CA 95134
USA
July 2011
202-10547-01
v1.0

XAVN2001 Powerline AV 200 Wireless-N Extender
©2011 NETGEAR, Inc. All rights reserved.
No part of this publication may be reproduced, transmitted, transcribed, stored in a retrieval system, or translated
into any language in any form or by any means without the written permission of NETGEAR, Inc.
Technical Support
Thank you for choosing NETGEAR. To register your product, get the latest product updates, or get support online,
visit us at
Phone (US & Canada only): 1-888-NETGEAR
Phone (Other Countries): Check the list of phone numbers at
http://support.netgear.com.
http://support.netgear.com/app/answers/detail/a_id/984.
Trademarks
NETGEAR, the NETGEAR logo, ReadyNAS, ProSafe, Smart Wizard, Auto Uplink, X-RAID2, and NeoTV are
trademarks or registered trademarks of NETGEAR, Inc. Microsoft, Windows, Windows NT, and Vista are
registered trademarks of Microsoft Corporation. Other brand and product names are registered trademarks or
trademarks of their respective holders.
Statement of Conditions
To improve internal design, operational function, and/or reliability, NETGEAR reserves the right to make changes
to the products described in this document without notice. NETGEAR does not assume any liability that may occur
due to the use, or application of, the product(s) or circuit layout(s) described herein.
2

Contents
Chapter 1 Getting Started
Chapter 2 Powerline Utility
Hardware Features. . . . . . . . . . . . . . . . . . . . . . . . . . . . . . . . . . . . . . . . . . . . 5
LED and Feature Descriptions . . . . . . . . . . . . . . . . . . . . . . . . . . . . . . . . .6
How the Powerline AV 200 Extender Fits in Your Network . . . . . . . . . . . . . 7
Set Up the Powerline Network . . . . . . . . . . . . . . . . . . . . . . . . . . . . . . . . . . . 8
Set Up a New Powerline Network . . . . . . . . . . . . . . . . . . . . . . . . . . . . . .8
Add the Powerline Extender to an Existing Powerline Network . . . . . . . .9
Set Up the Extender Wireless Network . . . . . . . . . . . . . . . . . . . . . . . . . . .10
Method A: Use the Powerline Utility for Wireless Setup. . . . . . . . . . . . . 10
Method B: Use the WPS Button for Wireless Setup. . . . . . . . . . . . . . . . 11
Join the Powerline Extender Wireless Network . . . . . . . . . . . . . . . . . . . . .12
Powerline Network Security . . . . . . . . . . . . . . . . . . . . . . . . . . . . . . . . . . . . 12
Use the Security Button to Set the Encryption Key . . . . . . . . . . . . . . . . . .13
Set the Encryption Key . . . . . . . . . . . . . . . . . . . . . . . . . . . . . . . . . . . . . . . . 14
Install the Powerline Utility . . . . . . . . . . . . . . . . . . . . . . . . . . . . . . . . . . . . . 16
Powerline Utility Screen . . . . . . . . . . . . . . . . . . . . . . . . . . . . . . . . . . . . . . . 17
Security Icon. . . . . . . . . . . . . . . . . . . . . . . . . . . . . . . . . . . . . . . . . . . . . . 17
Change the Name of a Powerline Device. . . . . . . . . . . . . . . . . . . . . . . . . . 18
Turn LEDs Off or On. . . . . . . . . . . . . . . . . . . . . . . . . . . . . . . . . . . . . . . . . . 19
Set the Powerline Encryption Key . . . . . . . . . . . . . . . . . . . . . . . . . . . . . . .19
Reset a Device to Factory Settings . . . . . . . . . . . . . . . . . . . . . . . . . . . . . .20
Add a Device to the Powerline Network . . . . . . . . . . . . . . . . . . . . . . . . . . .21
Set Up Quality of Service (QoS). . . . . . . . . . . . . . . . . . . . . . . . . . . . . . . . . 22
Wireless Settings . . . . . . . . . . . . . . . . . . . . . . . . . . . . . . . . . . . . . . . . . . . . 24
Advanced Wireless Settings. . . . . . . . . . . . . . . . . . . . . . . . . . . . . . . . . . . . 26
Chapter 3 Troubleshooting
Basic Functioning . . . . . . . . . . . . . . . . . . . . . . . . . . . . . . . . . . . . . . . . . . . .28
Troubleshooting Tips . . . . . . . . . . . . . . . . . . . . . . . . . . . . . . . . . . . . . . . . . 28
LEDs. . . . . . . . . . . . . . . . . . . . . . . . . . . . . . . . . . . . . . . . . . . . . . . . . . . . 28
If You Do Not See All Your Devices with the Powerline Utility . . . . . . . . . .29
Appendix A Supplemental Information
Technical Specifications . . . . . . . . . . . . . . . . . . . . . . . . . . . . . . . . . . . . . . . 31
Safety Information . . . . . . . . . . . . . . . . . . . . . . . . . . . . . . . . . . . . . . . . . . .32
Appendix B Notification of Compliance
Index
3

1. Getting Started
This chapter describes your XAVN2001 Powerline AV 200 Wireless-N Extender, and how your
adapters can fit into a home network. It also explains the security features and how to customize
the encryption key for added security. For more information about the topics covered in this
manual, visit the support website at http://support.netgear.com.
This chapter includes the following sections:
• Hardware Features
• How the Powerline AV 200 Extender Fits in Your Network
• Set Up the Powerline Network
• Powerline Network Security
• Set Up the Extender Wireless Network
• Join the Powerline Extender Wireless Network
• Use the Security Button to Set the Encryption Key
• Use the Security Button to Set the Encryption Key
• Set the Encryption Key
1
4
XAVN2001 Powerline AV 200 Wireless-N Extender
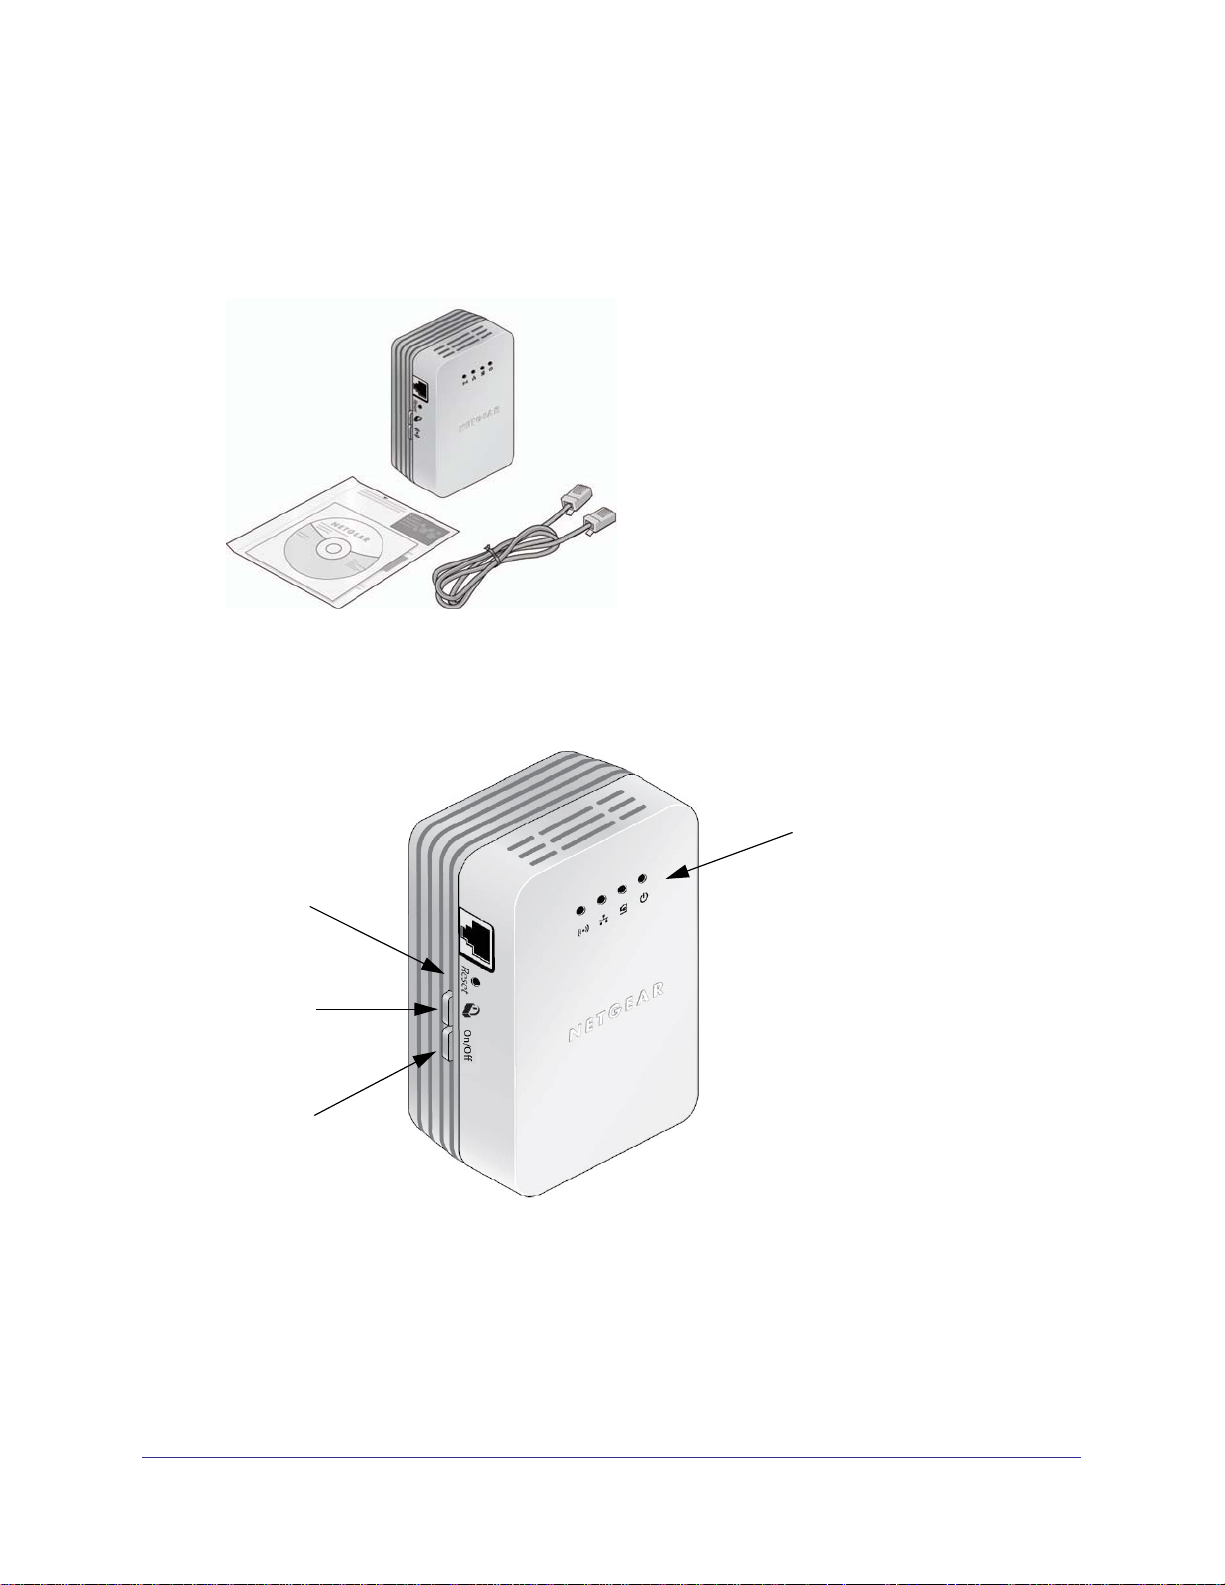
Hardware Features
The package includes a XAVN2001 Powerline AV 200 Wireless-N Extender, a Resource CD,
and an Ethernet cable.
Powerline AV 200 Extender
Resource CD
Ethernet cable
Figure 1. Package contents
The following illustration shows the front and side panels of the XAVN2001:
LEDs
Reset
button
Security
button
On/Off
button
Figure 2. XAVN2001 Powerline AV 200 Wireless-N Extender
Getting Started
5
XAVN2001 Powerline AV 200 Wireless-N Extender
LED and Feature Descriptions
The following table describes the status LEDs on the Powerline AV 200 Wireless-N Extender.
Table 1. LED descriptions
Item Description
Power
LED
Powerline LED
Ethernet LED
Buttons
• Solid green. The electrical power is on.
• Blinking green.The adapter is in the process of restarting or setting up security.
• Amber. Power saving mode. The unit enters power saving mode if the Ethernet port is not
linked for more than 10 minutes.
• Off. There is no electrical power, or power has been turned off through the Powerline
Utility.
• Solid. The adapter is connected to a Powerline network.
• Blinking. The adapter is sending or receiving data.
• Off. The adapter has not found any other compatible Powerline devices using the same
encryption key, or has been turned off through the Powerline Utility.
The Pick A Plug feature lets you pick the electrical outlet with the strongest link rate, indicated
by the color displayed by the LED:
Green. Link rate > 80 Mbps
(Best) - Good for HD video
• Solid. The Ethernet port is linked, but there is no activity.
• Blinking. There is traffic on the Ethernet port.
• Off. There is no Ethernet connection, or it has been turned off through the Powerline
Utility.
Amber. Link rate > 50, < 80
Mbps
(Better) - Good for SD Video
Red. Link rate < 50 Mbps
(Good) - Good for data
Three buttons are located on the side of the Powerline Extender:
• Reset. Press the Reset button for 1 second, and then release it to return the Powerline
adapter to its factory default settings.
• Security. After you plug in your new AV adapters, press the Security button for 2
seconds on both of the AV adapters. You have to press both buttons within 2 minutes.
The Security button does not work in power saving mode. The unit enters power saving
mode if the Ethernet port is idle (not linked) for more than 10 minutes.
• On/Off. This button is used for wireless setup with WPS. See Method B: Use the WPS
Button for Wireless Setup on page 11.
Ethernet Port
Plug one end of the Ethernet cable that comes with the XAVN2001 Powerline AV 200
Wireless-N Extender into this port and the other end either into your router, or into the
computer or another peripheral device.
Getting Started
6
XAVN2001 Powerline AV 200 Wireless-N Extender
Product Label
The product label shows unique details specific to your adapter. The product label is located
on the back of the adapter. The label contains the following information.
• Model number
• MAC address
• Device password
• Serial number
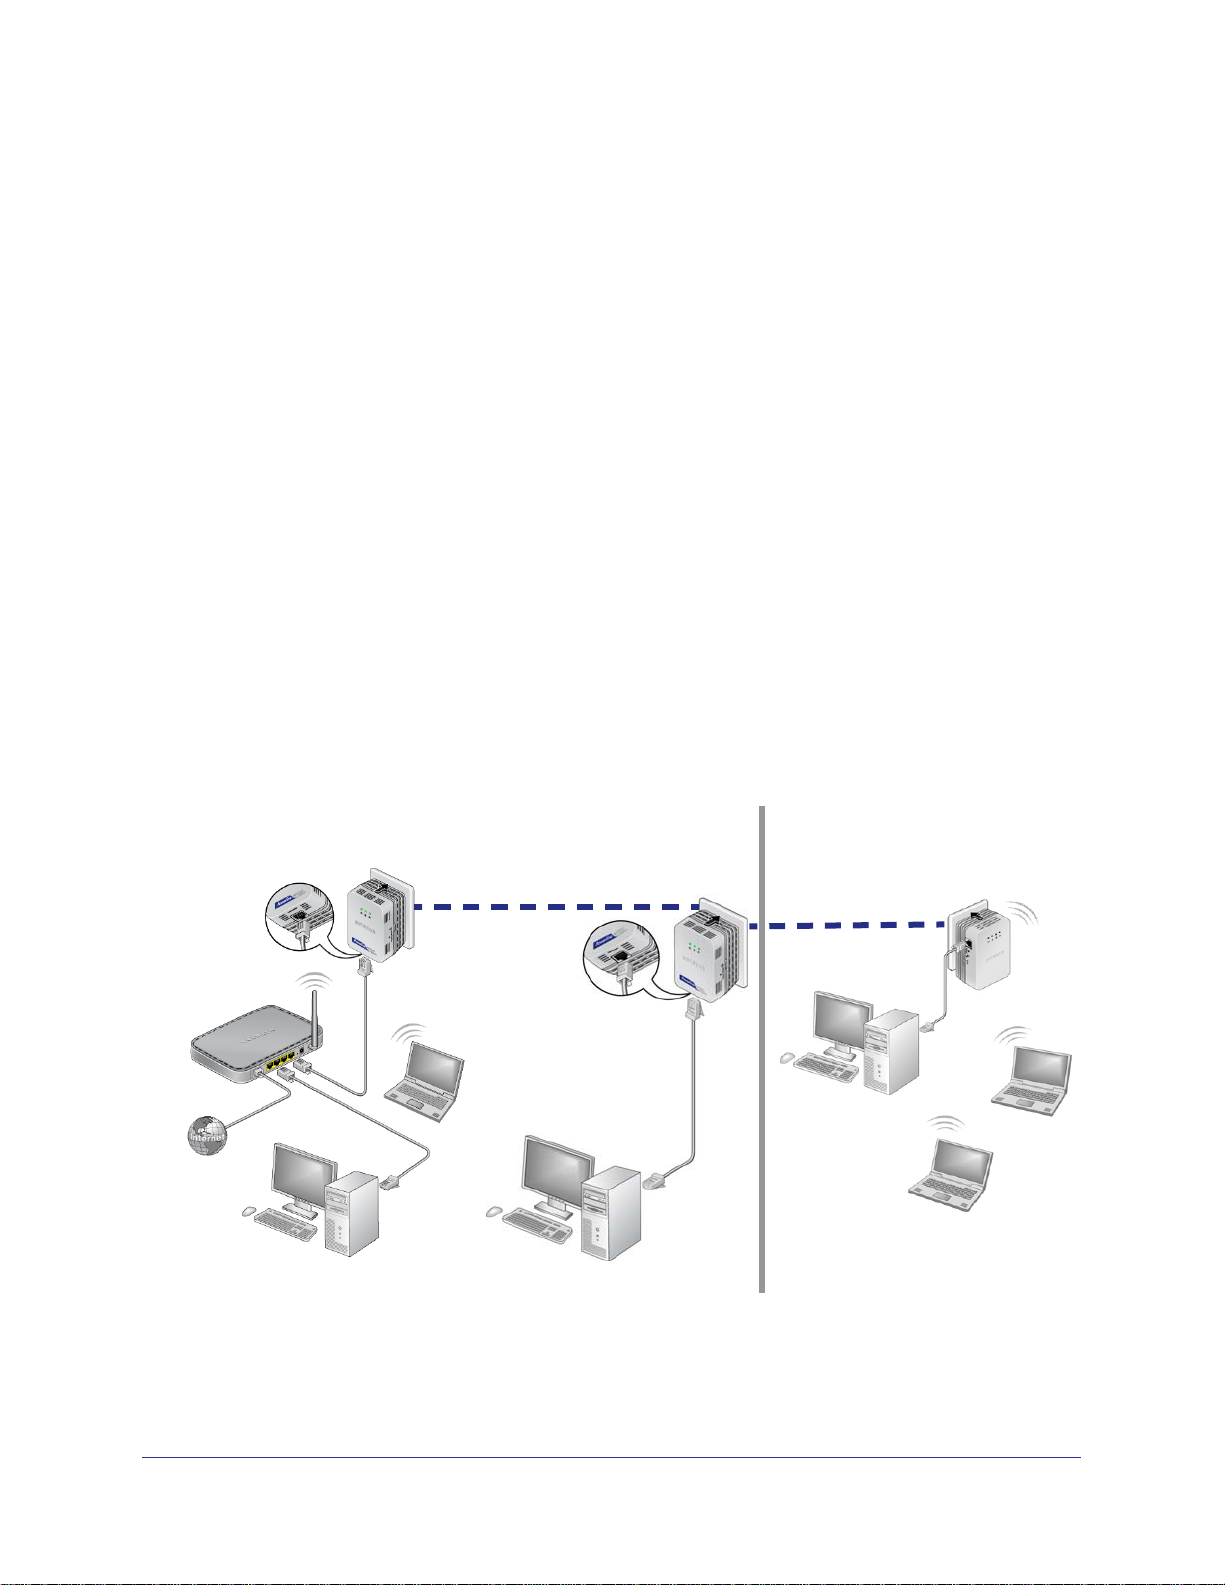
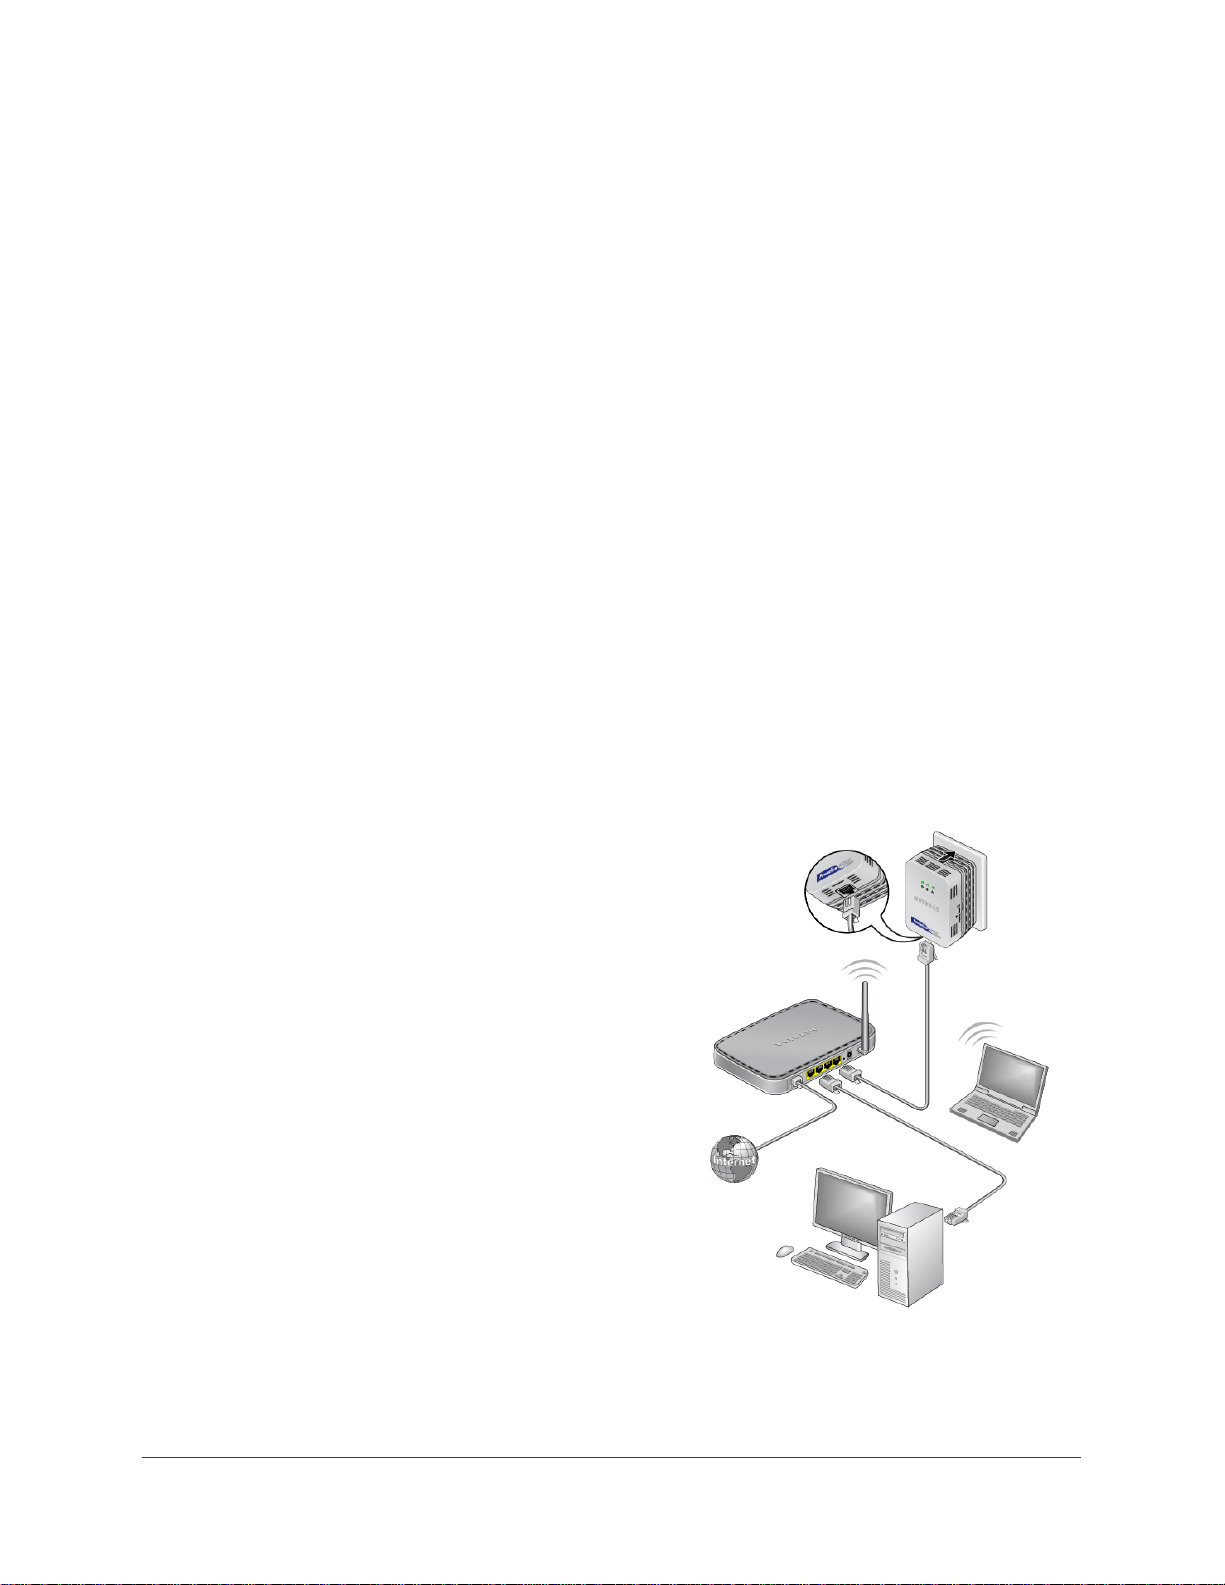
How the Powerline AV 200 Extender Fits in Your Network
You can use one or more Powerline AV 200 Wireless-N Extenders to extend your home
network anywhere in your house using your electrical power lines.
A Powerline network consists of two or more compatible Powerline devices that
communicate with each other. One of the Powerline devices is connected with an Ethernet
cable to your router so that the Powerline network is linked to your local area network (LAN).
That way each Powerline device can communicate with the router and use its Internet
connection.
The following illustration shows an existing Powerline network with one Powerline device in
Room 1, a second Powerline device in Room 2, and an XAVN2001 Powerline extender in
Room 3:
Room 1
Powerline
Room 2
Room 3
Powerline
Figure 3. Powerline extender connected to the Powerline network and wireless network
To form a Powerline network you need at least two compatible Powerline devices (including
the Powerline AV 200 Wireless-N Extender).
Getting Started
7
XAVN2001 Powerline AV 200 Wireless-N Extender
For best performance, plan the location of your Powerline devices:
• Use an electrical outlet that is not controlled by a wall switch to avoid someone
unknowingly turning off the power to the outlet.
• Do not plug in Powerline products to a power strip, extension cord, or surge protector as
this might prevent them from working correctly or reduce the network performance.
• Avoid plugging Powerline products into electrical outlets located near an appliance that
uses a lot of power, such as a washer or dryer, or a refrigerator. This could potentially
prevent the adapters from working correctly, or reduce network performance.
Set Up the Powerline Network
You can set up a Powerline network that includes the Powerline Extender, or you can add the
Powerline Extender to an existing Powerline network.
Set Up a New Powerline Network
Different Powerline adapter models can share the network. All NETGEAR Powerline AV
products (models XAV101, XAV1004, XAV2001, XAV2501, and XAVN2001) are compatible.
To set up a new Powerline network:
1. Make sure that your home router is up and running and that Ethernet wired connections
are working.
2. Install the first Powerline adapter based on the
installation instructions that came in the package.
Plug a compatible NETGEAR Powerline adapter
(sold separately) into a wall outlet near your
router, and connect it to the LAN port on your
router using an Ethernet cable.
3. For convenience during setup, plug the Powerline
Extender into a wall outlet near your router.
Getting Started
8
XAVN2001 Powerline AV 200 Wireless-N Extender
4. Connect a computer to the Powerline
Extender for initial setup.
Use the supplied Ethernet cable to connect
the Powerline Extender to an Ethernet port
on a computer.
The Powerline devices attempt to detect
each other and form a Powerline network.
This could take a few minutes.
5. Plug any additional Powerline devices you
are using into power outlets near the other
computers and devices to be included in
your Powerline network.
6. Wait for each Powerline adapter or extender
to be recognized by the Powerline network.
The Power, Ethernet, and Powerline LEDs should turn on. This could take as little as 5
seconds, or up to 80 seconds. If the Powerline LEDs are green or amber, the devices are
successfully connected. A red LED indicates a weak link rate. In this case, move the
adapter or the extender to another electrical outlet with a better connection.
7. Set up the Powerline Extender wireless network as explained in Set Up the Extender
Wireless Network on page 10.
Add the Powerline Extender to an Existing Powerline Network
Your existing Powerline network needs to have two or more compatible Powerline devices
that communicate with each other. (models XAV101, XAV1004, XAV2001, XAV2501, and
XAVN2001). One of these Powerline devices has to be cabled with Ethernet to your router so
that the Powerline network is linked to your local area network (LAN).
To add the Powerline Extender to an existing Powerline network:
1. If you used the Security buttons or the Powerline Utility to secure your Powerline
network, press the Reset button on each Powerline device to return it to its factory
settings.
This is the quickest way to allow your new Powerline AV 200 Wireless-N Extender to
communicate with the other Powerline devices.
Getting Started
9

XAVN2001 Powerline AV 200 Wireless-N Extender
2. Connect a computer to the Powerline
Extender for initial setup.
Use the supplied Ethernet cable to connect
the Powerline Extender to an Ethernet port
on a computer.
3. For convenience during setup, plug the
Powerline Extender into an electrical outlet
near your router.
The Powerline Extender attempts to detect
the other compatible Powerline devices in
your network and join the Powerline
network. This could take a few minutes.
4. Check the Powerline LEDs to make sure
that the Powerline devices are
communicating with each other. If the LEDs are green or amber, the devices are
successfully connected. A red LED indicates a weak link rate. In this case, move the adapter
or the extender to another electrical outlet with a better connection.
5. Set up the Powerline Extender wireless network as explained in Set Up the Extender
Wireless Network on page 10.
Set Up the Extender Wireless Network
You need to set up the extender so that it can join your wireless network. To do this you can
use either the Powerline Utility or Wi-Fi Protected Setup (WPS).
• If your router does not have WPS, or you are not sure, use Method A.
• If your router does have WPS, use Method B.
Method A: Use the Powerline Utility for Wireless Setup
To set up your Extender wireless network:
1. On the computer that is cabled to the Powerline Extender (XAVN2001), insert the
Resource CD, and install the Powerline Utility.
2. Follow the onscreen prompts:
• If you have a NETGEAR router, the Utility automatically finds the router, retrieves the
wireless settings, and then prompts you to confirm the settings.
• If the router is not a NETGEAR router, or the NETGEAR router is not detected,
manually enter the wireless settings.
3. Disconnect the Ethernet cable from the Powerline Extender (XAVN2001).
4. Move the Powerline Extender to the area (or dead zone), where you want to extend wireless
coverage, and plug it into an electrical outlet.
Getting Started
10
XAVN2001 Powerline AV 200 Wireless-N Extender
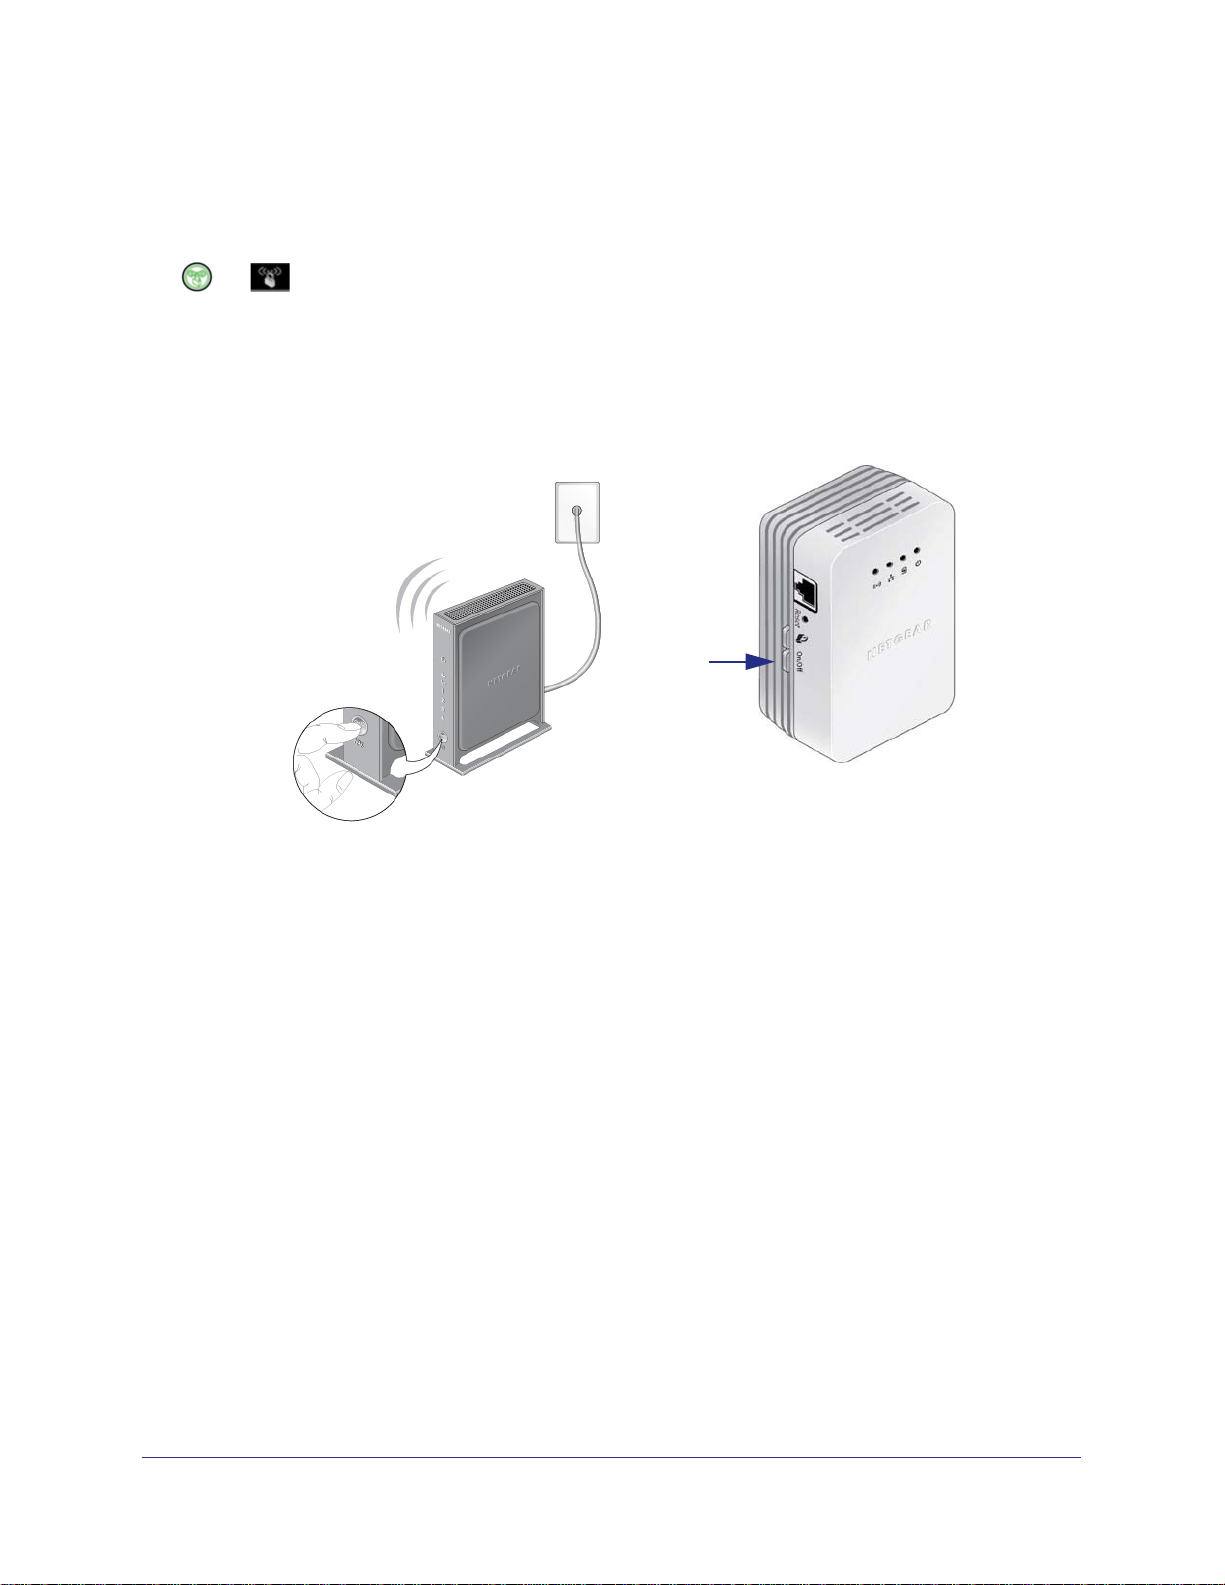
Method B: Use the WPS Button for Wireless Setup
You can use this method if you have a wireless router, or modem router with a WPS (Wi-Fi
Protected Setup) button. The WPS button might be labeled WPS, or it could look similar to
or .
To use WPS to set up your Extender wireless network:
1. If you have not already done so, plug the Powerline AV 200 Wireless-N Extender into a
wall outlet close to your router to ensure that it is within the router’s wireless coverage
area.
2. Press the WPS button on the router.
On/Off
button
WPS
button
3. Within 2 minutes, press and hold the Powerline AV 200 Wireless-N Extender On/Off
button for about 7 seconds until the Wireless LED starts blinking.
This activates the auto-configuration on the Powerline AV 200 Wireless-N Extender. The
LED stops flashing when setup is successful.
4. Move the Powerline AV 200 Wireless-N Extender t
o the area (or dead zone), where you
want to extend the wireless coverage.
5. Ensure that all Powerline devices are communicating by checking the Powerline LEDs. If the
LEDs are green or amber, the devices are successfully connected. A red LED indicates a
weak link rate of 50 Mbps or less. In this case, move that Powerline device to another
electrical outlet with a better connection.
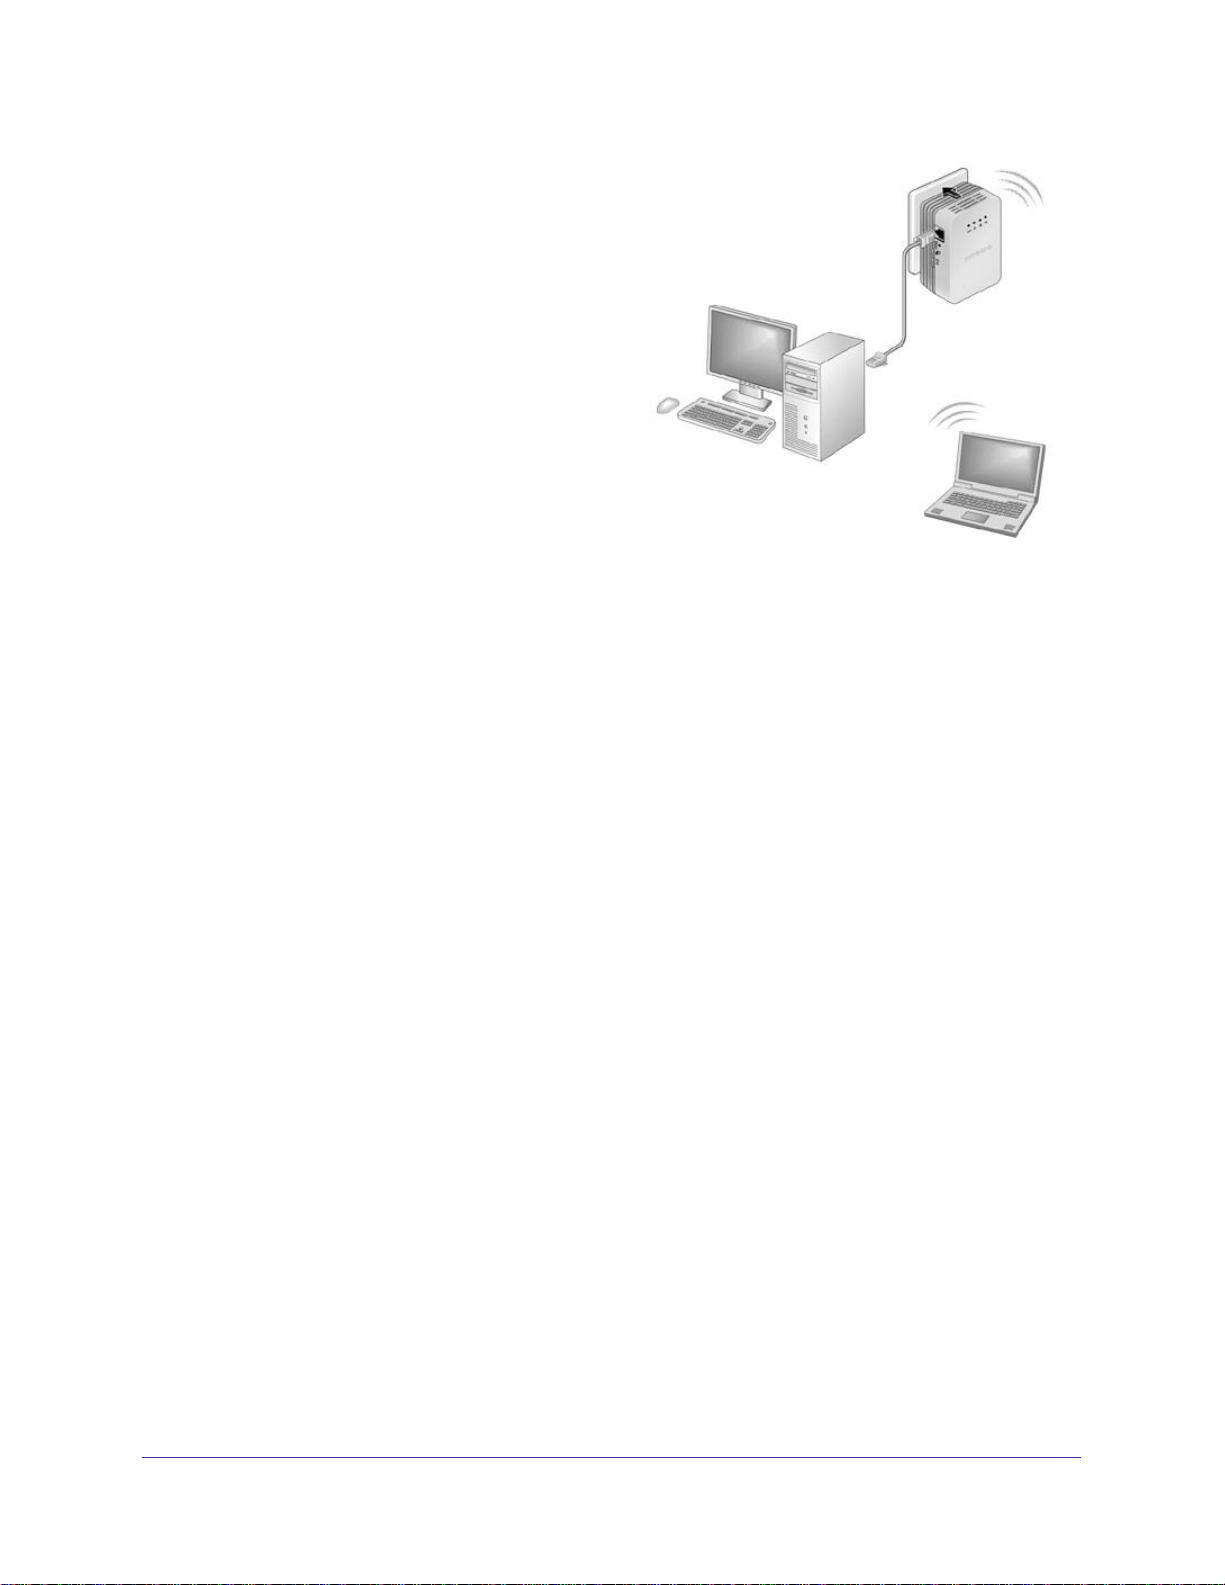
Wireless devices in that “dead” area can now connect to your network through the
Powerline AV 200 Wireless-N Extender.
Getting Started
11

XAVN2001 Powerline AV 200 Wireless-N Extender
Join the Powerline Extender Wireless Network
Use one of these methods to connect other wireless devices (such as a laptop, game
console, and so on), to your network through the Powerline Extender.
To join the wireless network using a WPS button:
1. Press the WPS button on your wireless computer or device.
2. Press the On/Off button on the Powerline Extender about 2 seconds, until the Wireless LED
starts flashing, then release it.
When the Wireless LED stops flashing, the wireless device is securely connected to the
XAVN2001 Wireless Extender.
To join the wireless network without a WPS button:
If your wireless device does not have a WPS button, you need to use the software that
manages your wireless connections for your wireless device and manually enter the wireless
settings to connect to the extender.
Powerline Network Security
A Powerline network consists of two or more Powerline adapters using the same network
encryption key. Securing your network is crucial. By encrypting the information you send over
the Powerline network, you help to keep it secure from hackers. If you do not set up security
on your network, anyone nearby with a Powerline network can potentially use their
connection to gain access to your network and information you send over the Internet. This is
especially relevant in settings such as apartment buildings, office buildings, dorm rooms, and
other more populated areas.
Powerline devices connected to the same network have to use an identical encryption key in
order to communicate with each other. The security used by Powerline network is similar to
the SSID and encryption keys used in wireless networks.
There are two ways to secure your Powerline network.
• Use the Security button located on the adapter to automatically generate a random
encryption key. See Set the Encryption Key.
• Use the Powerline Utility to configure your Powerline network with an encryption key that
you specify. If you are already using Powerline or HomePlug devices, then you will need
to use the Powerline Utility. If not already installed, the Powerline Utility should be
installed on your computer. See Install the Powerline Utility on page 16.
For information about using the Powerline Utility to configure Powerline security or to
prioritize Powerline network traffic using the Quality of Service (QoS) feature, see
Chapter 2.
To return the XAVN2001 to its factory default settings, press its Reset button for 1 second.
Getting Started
12
 Loading...