

Page 1
XAV1004 Powerline AV Ethernet Adapter User Guide
NETGEAR, Inc.
350 East Plumeria Drive
San Jose, CA 95134 USA
202-10470-01
v1.1
September 2009
Page 2

© 2009 by NETGEAR, Inc. All rights reserved.
Technical Support
Please refer to the support information card that shipped with your product. By registering your product at http://
www.netgear.com/register, we can provide you with faster expert technical support and timely notices of product and
software upgrades.
NETGEAR, INC. Support Information
Phone: 1-888-NETGEAR, for US & Canada only. For other countries, see your Support information card.
E-mail: support@netgear.com
North American NETGEAR website: http://www.netgear.com
Trademarks
NETGEAR, the NETGEAR logo, ProSafe, Smart Wizard, and Auto Uplink are trademarks or registered trademarks of
NETGEAR, Inc. Microsoft, Windows, Windows NT and Vista are registered trademarks of Microsoft
Corporation.Other brand and product names are registered trademarks or trademarks of their respective holders.
Statement of Conditions
In the interest of improving internal design, operational function, and/or reliability, NETGEAR reserves the right to
make changes to the products described in this document without notice.
NETGEAR does not assume any liability that may occur due to the use or application of the product(s) or circuit
layout(s) described herein.
Safety Instructions
Use the following safety guidelines to ensure your own personal safety and to help protect your system from potential
damage.
To reduce the risk of bodily injury, electrical shock, fire, and damage to the equipment, observe the following
precautions.
• Observe and follow service markings.
- Do not service any product except as explained in your system documentation.
- Opening or removing covers that are marked with the triangular symbol with a lightning bolt may expose you to
electrical shock. Only a trained service technician should service components inside these compartments.
• If any of the following conditions occur, unplug the product from the electrical outlet and replace the part or contact
your trained service provider:
- The power cable, extension cable, or plug is damaged.
- An object has fallen into the product.
- The product has been exposed to water.
- The product has been dropped or damaged.
- The product does not operate correctly when you follow the operating instructions.
• Keep your system away from radiators and heat sources. Also, do not block cooling vents.
• Do not spill food or liquids on your system components, and never operate the product in a wet environment. If the
system gets wet, see the appropriate section in your troubleshooting guide or contact your trained service provider.
ii
v1.1, September 2009
Page 3

• Do not push any objects into the openings of your system. Doing so can cause fire or electric shock by shorting out
interior components.
• Use the product only with approved equipment.
• Allow the product to cool before removing covers or touching internal components.
• Operate the product only from the type of external power source indicated on the electrical ratings label. If you are
not sure of the type of power source required, consult your service provider or local power company.
• To help avoid damaging your system, be sure that the voltage selection switch (if provided) on the power supply is
set to match the power available at your location:
- 115 volts (V), 60 hertz (Hz) in most of North and South America and some Far Eastern countries such as South
Korea and Taiwan
- 100 V, 50 Hz in eastern Japan and 100 V, 60 Hz in western Japan
- 230 V, 50 Hz in most of Europe, the Middle East, and the Far East
• Also, be sure that attached devices are electrically rated to operate with the power available in your location.
• Use only approved power cables. If you have not been provided with a power cable for your system or for any AC
powered option intended for your system, purchase a power cable that is approved for use in your country. The
power cable must be rated for the product and for the voltage and current marked on the product’s electrical ratings
label. The voltage and current rating of the cable should be greater than the ratings marked on the product.
• To help prevent electric shock, plug the system and peripheral power cables into properly grounded electrical
outlets.
• Observe extension cable and power strip ratings. Make sure that the total ampere rating of all products plugged into
the extension cable or power strip does not exceed 80 percent of the ampere ratings limit for the extension cable or
power strip.
• Position system cables and power cables carefully; route cables so that they cannot be stepped on or tripped over. Be
sure that nothing rests on any cables.
• Do not modify power cables or plugs. Consult a licensed electrician or your power company for site modifications.
• Always follow your local and national wiring rules.
• Move products with care; ensure that all casters and stabilizers are firmly connected to the system. Avoid sudden
stops and uneven surfaces.
Safety and Regulatory Notices
FCC Statement
The XAV1004 has been tested and complies with the specifications for a Class B digital device, pursuant to Part 15 of
the FCC Rules.
Operation is subject to the following two conditions:
(1) This device may not cause harmful interference, and
(2) This device must accept any interference received, including interference that may cause undesired operation.
These limits are designed to provide reasonable protection against harmful interference in a residential installation. This
equipment generates, uses, and can radiate radio frequency energy and, if not installed and used according to the
instructions, may cause harmful interference to radio communications. However, there is no guarantee that interference
will not occur in a particular installation. If this equipment does cause harmful interference to radio or television
v1.1, September 2009
iii
Page 4

reception, which is found by turning the equipment off and on, the user is encouraged to try to correct the interference by
one or more of the following measures:
• Reorient or relocate the receiving antenna
• Increase the separation between the equipment or devices
• Connect the equipment to an outlet other than the receiver’s
• Consult a dealer or an experienced radio/TV technician for assistance
Canadian Department of Communications Industry Canada (IC) Notice
This Class B digital apparatus complies with Canadian ICES-003. Cet appareil numérique de la classe B est conforme à
la norme NMB-003 du Canada.
Europe – EU Declaration of Conformity
Marking by the above symbol indicates compliance with EN 55022, EN 55024, EN 61000-3-2, EN 61000-3-3, and
EN 50412-2-1.
For EU Declaration of Conformity, please visit:
http://kb.netgear.com/app/answers/detail/a_id/11621/sno/0
Product and Publication Details
Model Number: XAV1004
Publication Date: September 2009
Product Family: Powerline AV Ethernet Adapter
Product Name: XAV1004 Powerline AV Ethernet Adapter
Home or Business Product: Home
Language: English
Publication Part Number: 202-10470-01
v1.1, September 2009
iv
Page 5

Contents
XAV1004 Powerline AV Ethernet Adapter User Guide
About This Manual
Conventions, Formats, and Scope .....................................................................................i
How to Print This Manual .................................................................................................. ii
Revision History ................................................................................................................. ii
Chapter 1
Installation and Basic Configuration
Package Contents ..........................................................................................................1-1
How the Powerline AV Ethernet Adapter Fits in Your Network ......................................1-2
XAV1004 Front View ......................................................................................................1-3
XAV1004 Rear View .......................................................................................................1-4
Installing Your Powerline AV Ethernet Adapter ..............................................................1-6
Quality of Service (QoS) ..........................................................................................1-6
Connecting Devices to the XAV1004 .......................................................................1-7
Chapter 2
Securing and Configuring Your Powerline Network
Understanding Powerline Network Security ...................................................................2-1
Changing the Default Encryption Key using Push 'N' Secure ..................................2-2
Installing the Powerline Utility (Recommended) .............................................................2-2
Using the Firmware Upgrade Tool ...........................................................................2-4
Resetting to Factory Defaults ...................................................................................2-4
Running the Powerline Utility ..........................................................................................2-6
Main Powerline Tab .................................................................................................2-6
Powerline Security Tab ............................................................................................2-7
Prioritizing Traffic on the Powerline Network (QoS) .....................................................2-12
Powerline Utility Logs .............................................................................................2-13
v1.1, September 2009
v
Page 6

Chapter 3
Troubleshooting
Product Registration, Support, and Documentation .......................................................3-1
Basic Functioning ...........................................................................................................3-1
Troubleshooting Tips ......................................................................................................3-2
Problems After Changing Network Encryption Key ........................................................3-2
Changing the Network Encryption Key, One Unit at a Time ....................................3-3
Appendix A
Technical Specifications
v1.1, September 2009
vi
Page 7

About This Manual
The NETGEAR® XAV1004 Powerline AV Ethernet Adapter User Guide describes how to install,
configure and troubleshoot the XAV1004 Powerline AV Ethernet Adapter. The information in this
manual is intended for readers with intermediate computer and Internet skills.
Conventions, Formats, and Scope
The conventions, formats, and scope of this manual are described in the following paragraphs:
• Typographical Conventions. This manual uses the following typographical conventions:
Italic Emphasis, books, CDs, file and server names, extensions
Bold User input, IP addresses, GUI screen text
Fixed Command prompt, CLI text, code
italic URL links
• Formats. This manual uses the following formats to highlight special messages:
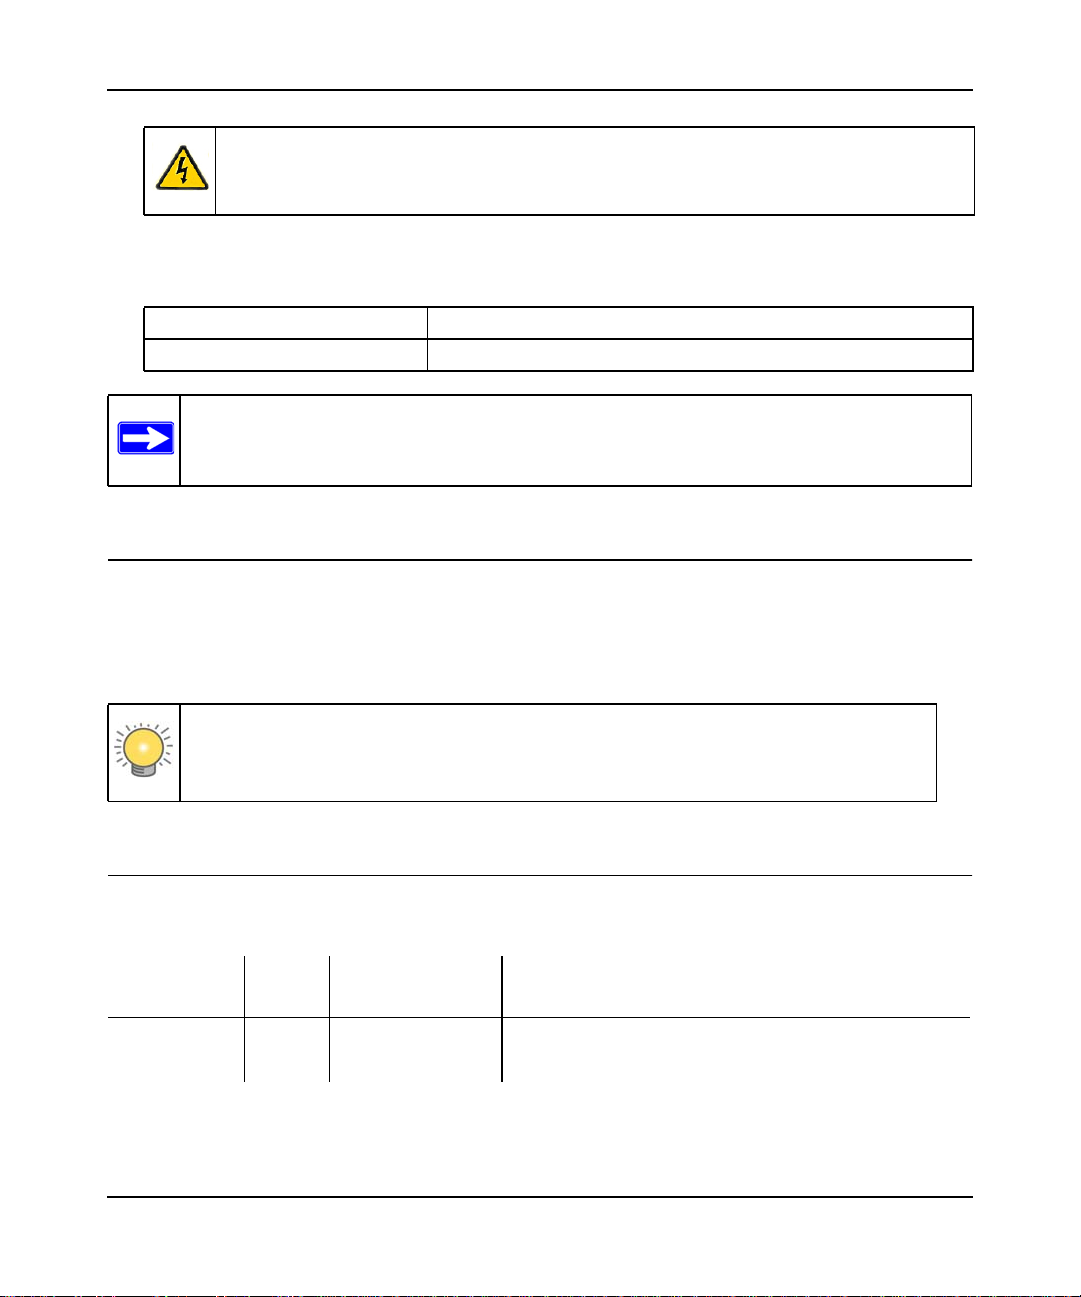
Note: This format is used to highlight information of importance or special interest.
Tip: This format is used to highlight a procedure that will save time or resources.
Warning: Ignoring this type of note may result in a malfunction or damage to the
equipment.
v1.1, September 2009
i
Page 8
XAV1004 Powerline AV Ethernet Adapter User Guide
Danger: This is a safety warning. Failure to take heed of this notice may result in
personal injury or death.
• Scope. This manual is written for the Powerline AV Ethernet Adapter according to these
specifications:
Product Version XAV1004 Powerline AV Ethernet Adapter
Manual Publication Date September 2009
Note: Product updates are available on the NETGEAR, Inc. website at
http://www.netgear.com/support.
How to Print This Manual
To print this manual, your computer must have the free Adobe Acrobat reader installed in order to
view and print PDF files. The Acrobat reader is available on the Adobe Web site at
http://www.adobe.com.
Tip: If your printer supports printing two pages on a single sheet of paper, you can
save paper and printer ink by selecting this feature.
Revision History
Part Number
202-10470-01 1.0 June 2009 New Powerline device
202-10470-01 1.1 September 2009 Adjusted link rate speed
Version
Number
Date Description
v1.1, September 2009
ii
Page 9

Chapter 1
Installation and Basic Configuration
This chapter describes the XAV1004 Powerline AV Ethernet Adapter and explains how to install it
and use the Security button to customize the encryption. For information about using the
XAV1004 configuration utility to configure Powerline security or to prioritize Powerline network
traffic with Quality of Service (QoS) features, see Chapter 2, “Securing and Configuring Your
Powerline Network.”
Package Contents
The product package should contain the following items:
• NETGEAR XAV1004 Powerline AV Ethernet Adapter
• Installation Guide
• An Ethernet cable
• A power cord
• Resource CD, including:
– The Powerline Configuration Utility
– This manual
If any of the parts are incorrect, missing, or damaged, contact your NETGEAR dealer. Keep the
carton, including the original packing materials, in case you need to return the Powerline AV
Ethernet Adapter for repair.
v1.1, September 2009
1-1
Page 10
XAV1004 Powerline AV Ethernet Adapter User Guide
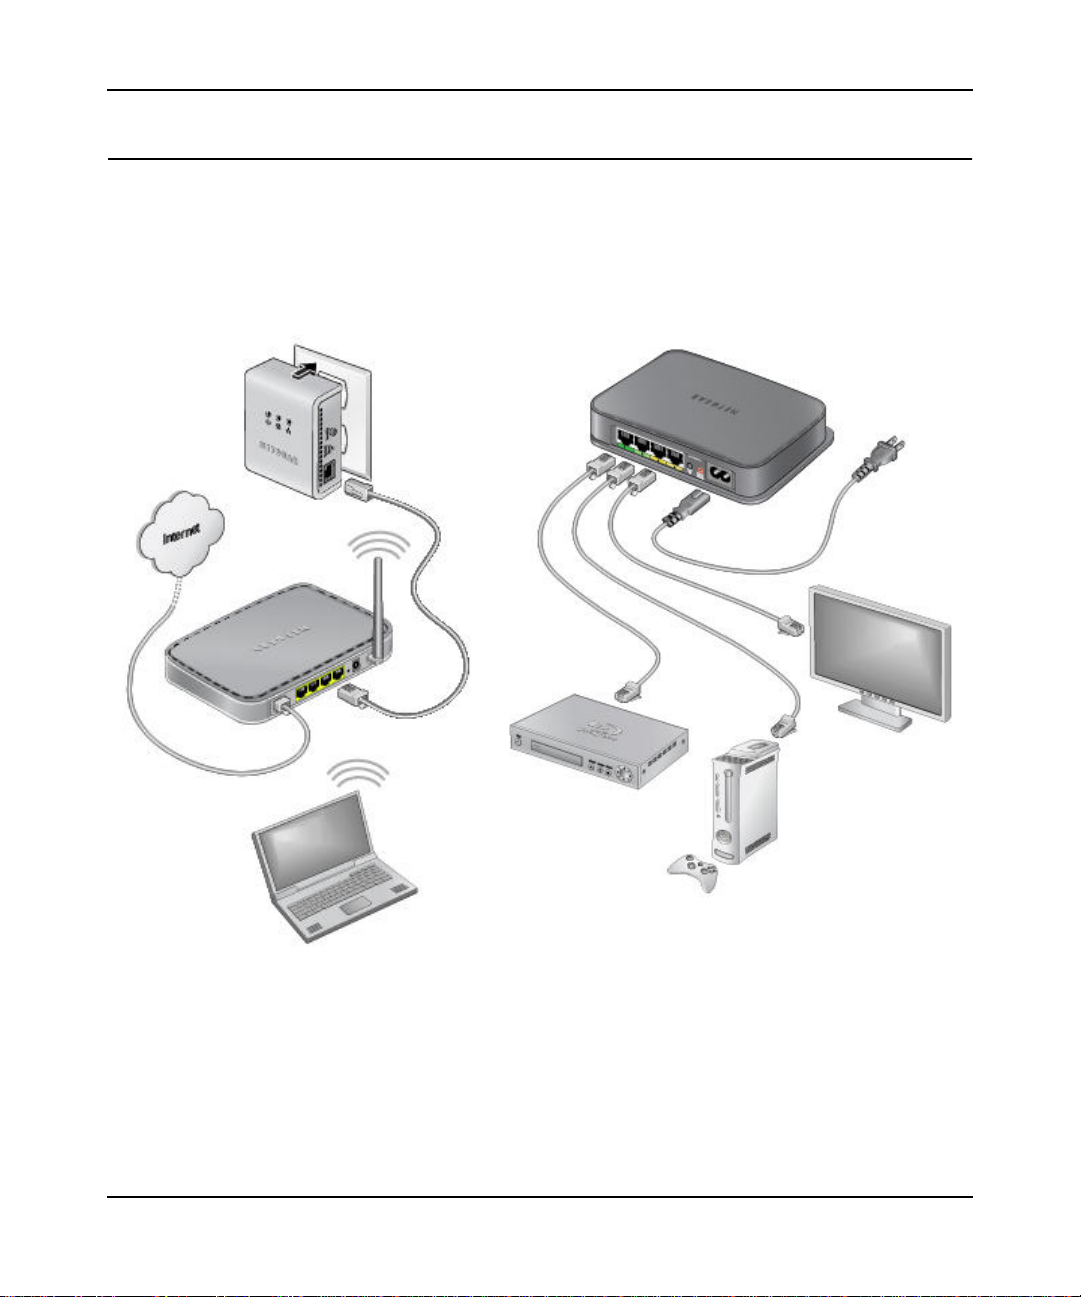
How the Powerline AV Ethernet Adapter Fits in Your Network
You can use Powerline AV Ethernet Adapters to extend your Ethernet network anywhere in your
house using your existing electrical power line. The following figure shows an example of a
Powerline network that uses both an XAV101 and an XAV1004 Powerline device. The Powerline
network connects to an Ethernet network:
XAV1004
XAV101
Power Cord
Ethernet Cable
Ethernet Cables
Router
Blu-ray DVD Player
Gaming Console
Notebook
TV
Figure 1-1
Installation and Basic Configuration 1-2
v1.1, September 2009
Page 11
XAV1004 Powerline AV Ethernet Adapter User Guide
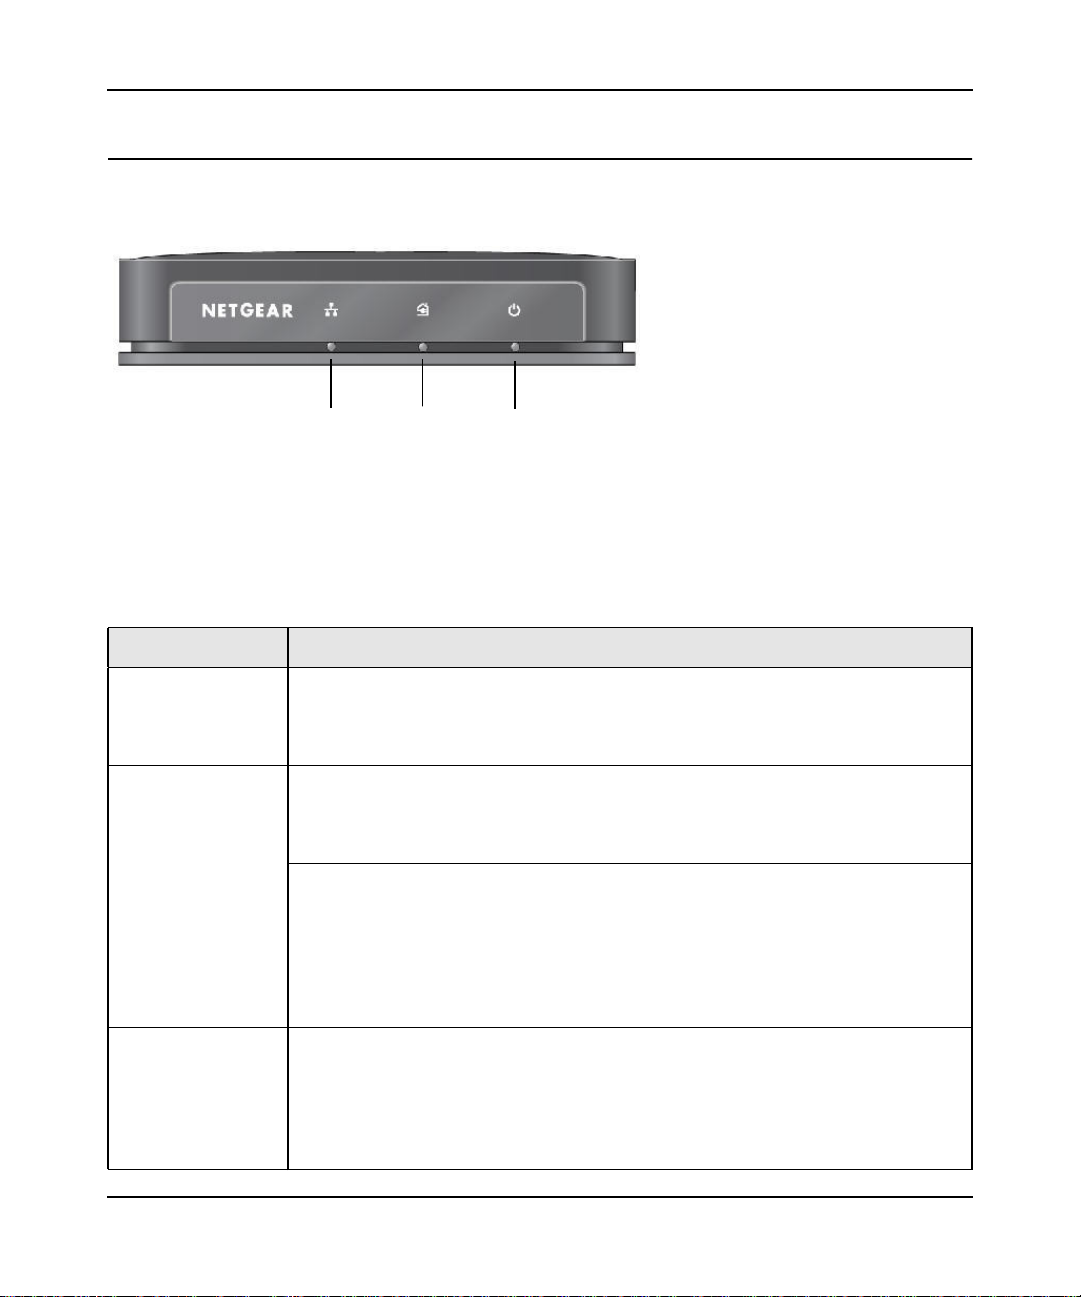
XAV1004 Front View
The front view of the XAV1004 is shown in the following illustration:
Ethernet
LED
Powerline
LED
(“Pick A Plug”)
Power
LED
Figure 1-2
The following table describes the status lights (LEDs) on the front of the XAV1004.
Table 1-1. XAV1004 LEDs
Item Description
Ethernet LED • Solid green. The Ethernet port is linked, but there is no activity.
• Blinking green. There is traffic between an Ethernet port and the Powerline
network.
• Off. There is no Ethernet connection.
Powerline LED • Solid. The adapter is connected to a Powerline network.
• Fast blinking. The adapter is sending or receiving data.
• Off. The adapter has not found any other compatible Powerline devices using the
same Powerline network encryption key.
The Pick A Plug feature shows by the color of the LED the speed of the Powerline
link for the electrical outlet where the device is connected:
• Green. The link rate is faster than 80 Mbps.
• Amber. The link rate is between 50 Mbps and 80 Mbps.
• Red. The link rate is slower than 50 Mbps.
If the LED is not green, try another outlet. You may get a better link rate, and the LED
will turn green.
Power LED • Solid green. The electrical power is on.
• Fast blinking. The adapter is setting itself up after the reset or Security button was
pressed.
• Slow blinking. The adapter goes into power saving mode if no Ethernet device is
connected.
• Off. There is no electrical power.
Installation and Basic Configuration 1-3
v1.1, September 2009
Page 12
XAV1004 Powerline AV Ethernet Adapter User Guide
Table 1-1. XAV1004 LEDs (continued)
Item Description (continued)
Ethernet ports Use these four ports to connect to connect the XAV1004 to peripheral devices, such
as gaming consoles, DVD players, internet phones, or storage devices. The ports
use a QoS priority algorithm to determine levels of service. For more information
about connecting devices to these ports, see “Connecting Devices to the XAV1004”
on page 1-7.
Security button Configure security (see “Changing the Default Encryption Key using Push 'N' Secure”
on page 2-2).
Reset button To reset, use a sharp object such as a pen or a paper clip to briefly press and hold
this button (for no more than two seconds). The adapter automatically returns to
factory default settings, and then restarts.
Note: Pressing the reset button longer than recommended may interfere with
resetting the adapter.
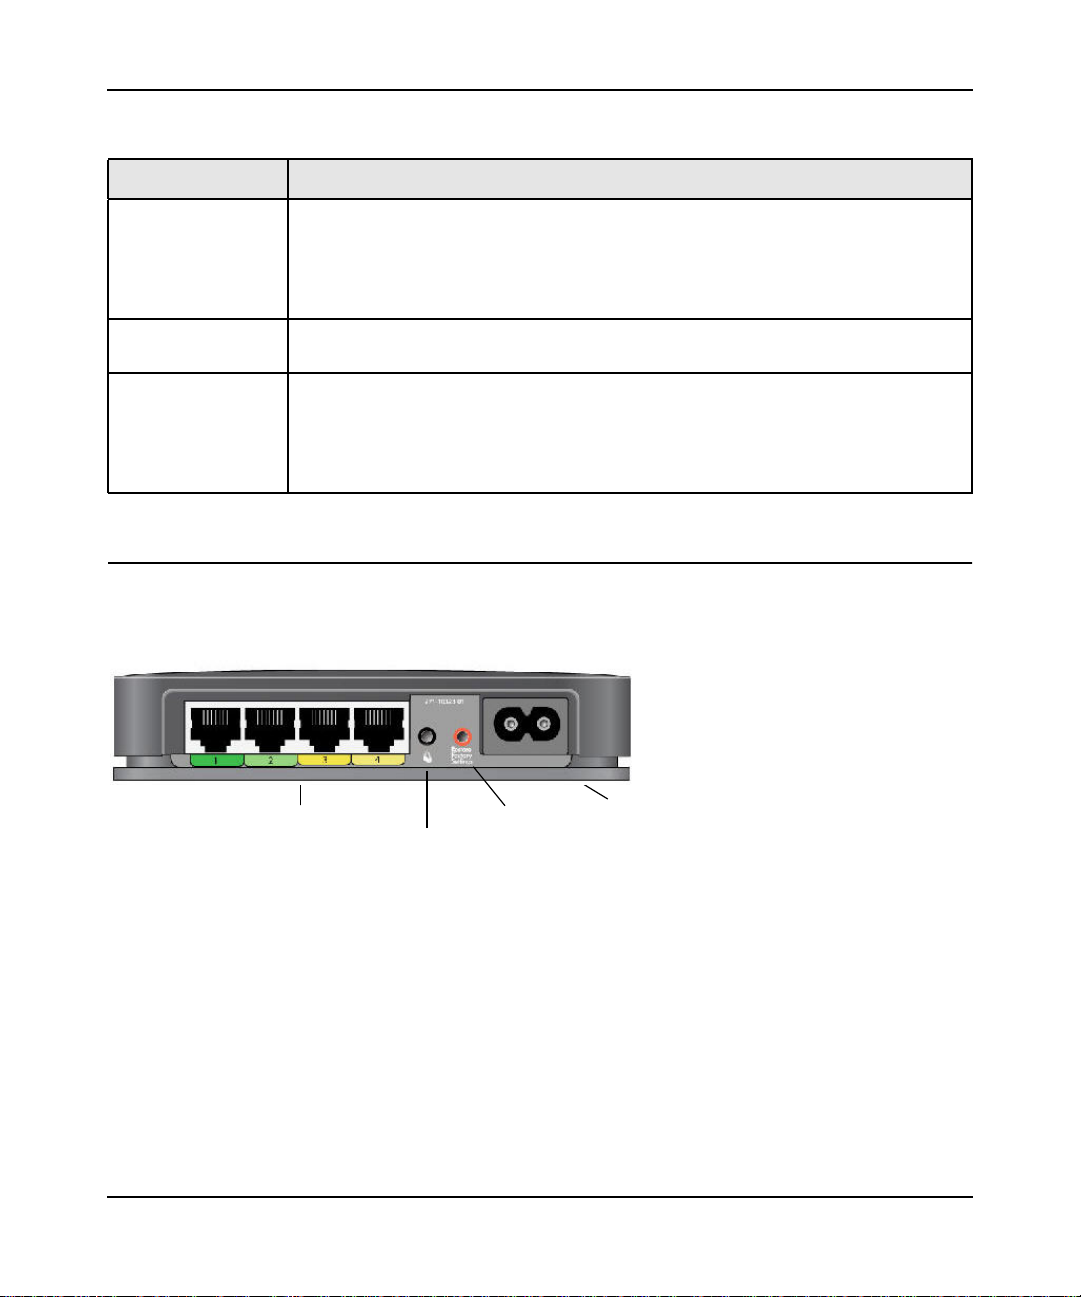
XAV1004 Rear View
The front view of the XAV1004 is shown in the following illustration:
Ethernet
ports
Security
button
Reset
button
Power
Figure 1-3
Installation and Basic Configuration 1-4
v1.1, September 2009
Page 13
XAV1004 Powerline AV Ethernet Adapter User Guide
Table 1-2. XAV1004 Ethernet Ports and Buttons
Item Description
Ethernet ports Use these four ports to connect to connect the XAV1004 to peripheral devices, such
as gaming consoles, DVD players, internet phones, or storage devices. The ports
use a QoS priority algorithm to determine levels of service. For more information
about connecting devices to these ports, see “Connecting Devices to the XAV1004”
on page 1-7.
Security button Configure security (see “Changing the Default Encryption Key using Push 'N' Secure”
on page 2-2).
Reset button To reset, use a sharp object such as a pen or a paper clip to briefly press and hold
this button (for no more than two seconds). The adapter automatically returns to
factory default settings, and then restarts.
Note: Pressing the reset button longer than recommended may interfere with
resetting the adapter.
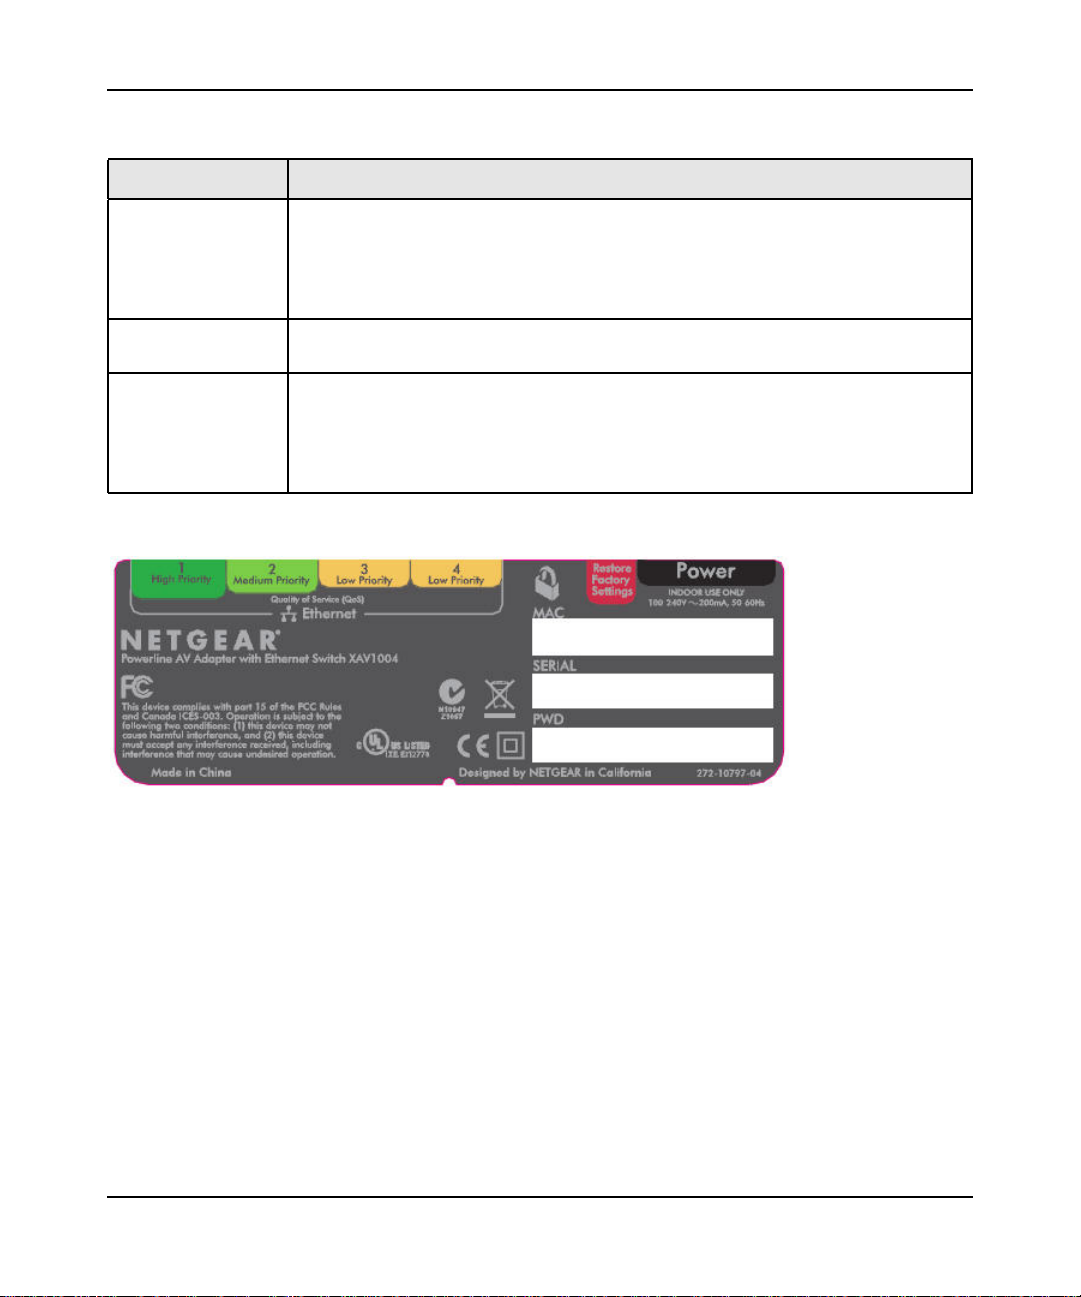
XAV1004 Label
Figure 1-4
The label on the rear panel of the XAV1004 contains the items listed below.
• Model number
• MAC address
• Serial number
• Device password (PWD)
Installation and Basic Configuration 1-5
v1.1, September 2009
Page 14
XAV1004 Powerline AV Ethernet Adapter User Guide
Installing Your Powerline AV Ethernet Adapter
To prepare for installation:
1. Familiarize yourself with the Powerline AV Ethernet Adapter. The front panel has three lights:
Ethernet, Powerline, and Power. The back panel has four Ethernet ports, a Security button, and
a Reset button.
2. Plan the location of your Powerline devices:
• Do not connect the Powerline AV Ethernet Adapter to a power strip, extension cord, or
surge protector as this might prevent it from working correctly, or degrade the network
performance.
• Use an electrical outlet that is not controlled by a wall switch to avoid someone
unknowingly turning off the power to the outlet.
• Using the Powerline AV Ethernet Adapter plugged into an electrical outlet that is located
near an appliance that uses a lot of power, such as a washer or dryer, might prevent the
adapter from working correctly, or degrade the network performance.
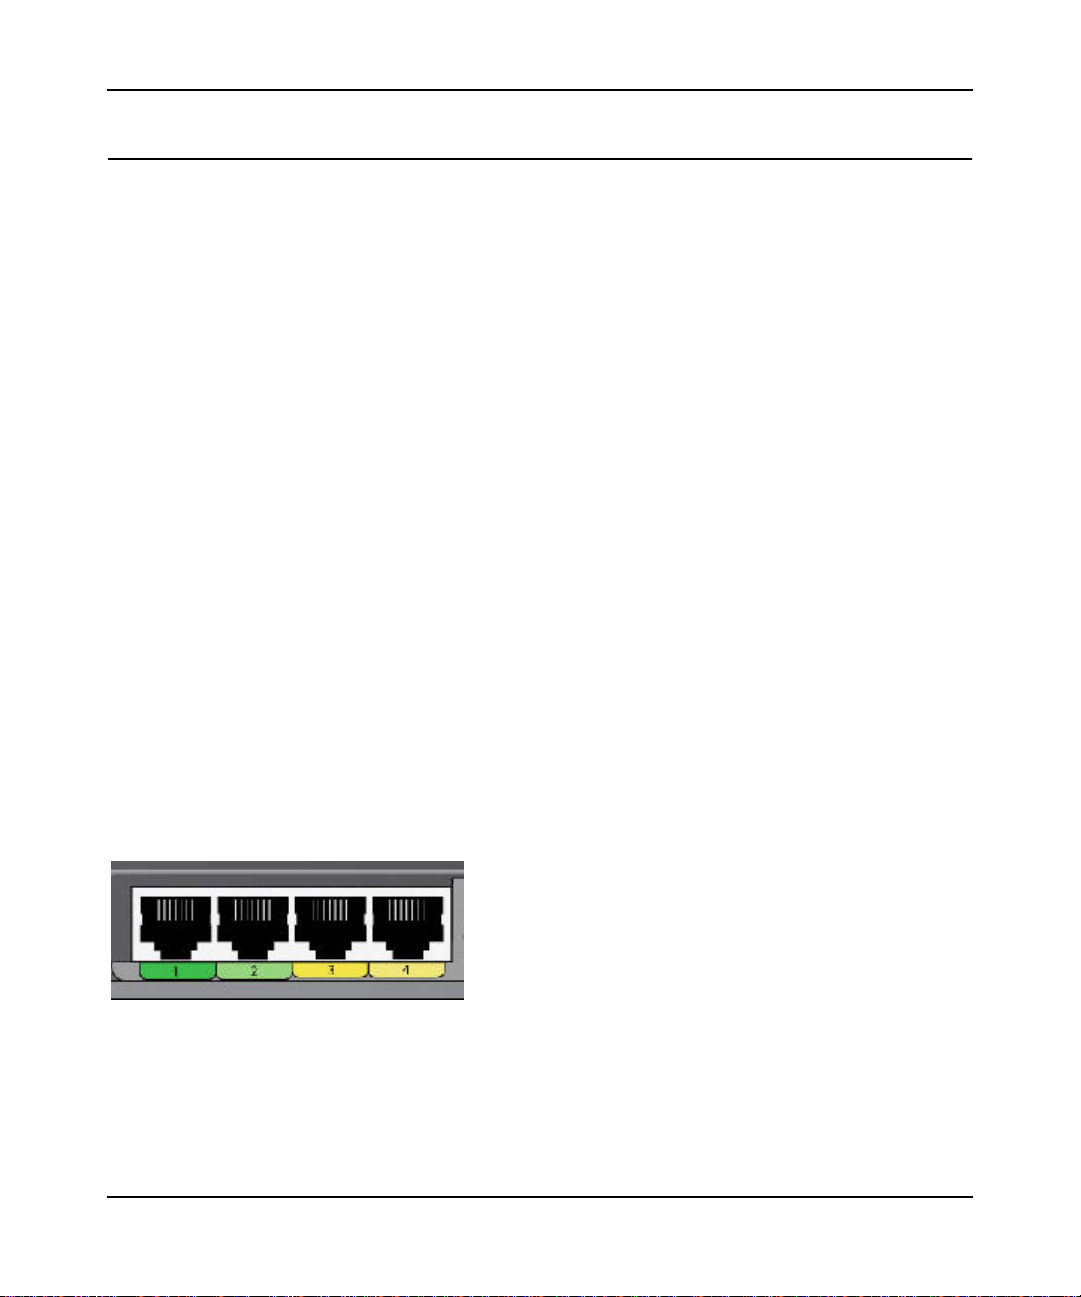
Quality of Service (QoS)
The XAV1004 supports both Powerline network-based and port-based Quality of Service (QoS).
Powerline network-based QoS configures the priority of forwarded packets in the network. For
more information about this type of QoS, see “Prioritizing Traffic on the Powerline Network
(QoS)” on page 2-12.
In port-based QoS, a different level of service and pre-assigned priority is offered on each Ethernet
port.
Figure 1-5
• Port 1 (dark green) offers HIGH priority to provide uninterrupted service for any device that is
connected to it. If you are using a server-type device, such as a media server or NAS storage
device that would stream HD media, you would want to put this device on Port 1.
Installation and Basic Configuration 1-6
v1.1, September 2009
Page 15
XAV1004 Powerline AV Ethernet Adapter User Guide
If you are not using any streaming media devices, you can use Port 1 for gaming, video, or
internet telephones, anything where you do not want a delay or interruption. Whatever Port 1
doesn’t use is available for Port 2.
• Port 2 (light green) offers a MEDIUM priority quality of service, and gets the next priority
after Port 1. Use for gaming, video, or internet telephones.
• Ports 3 and 4 offer a LOW priority quality of service, and readily handle networking data
devices, such as printers.
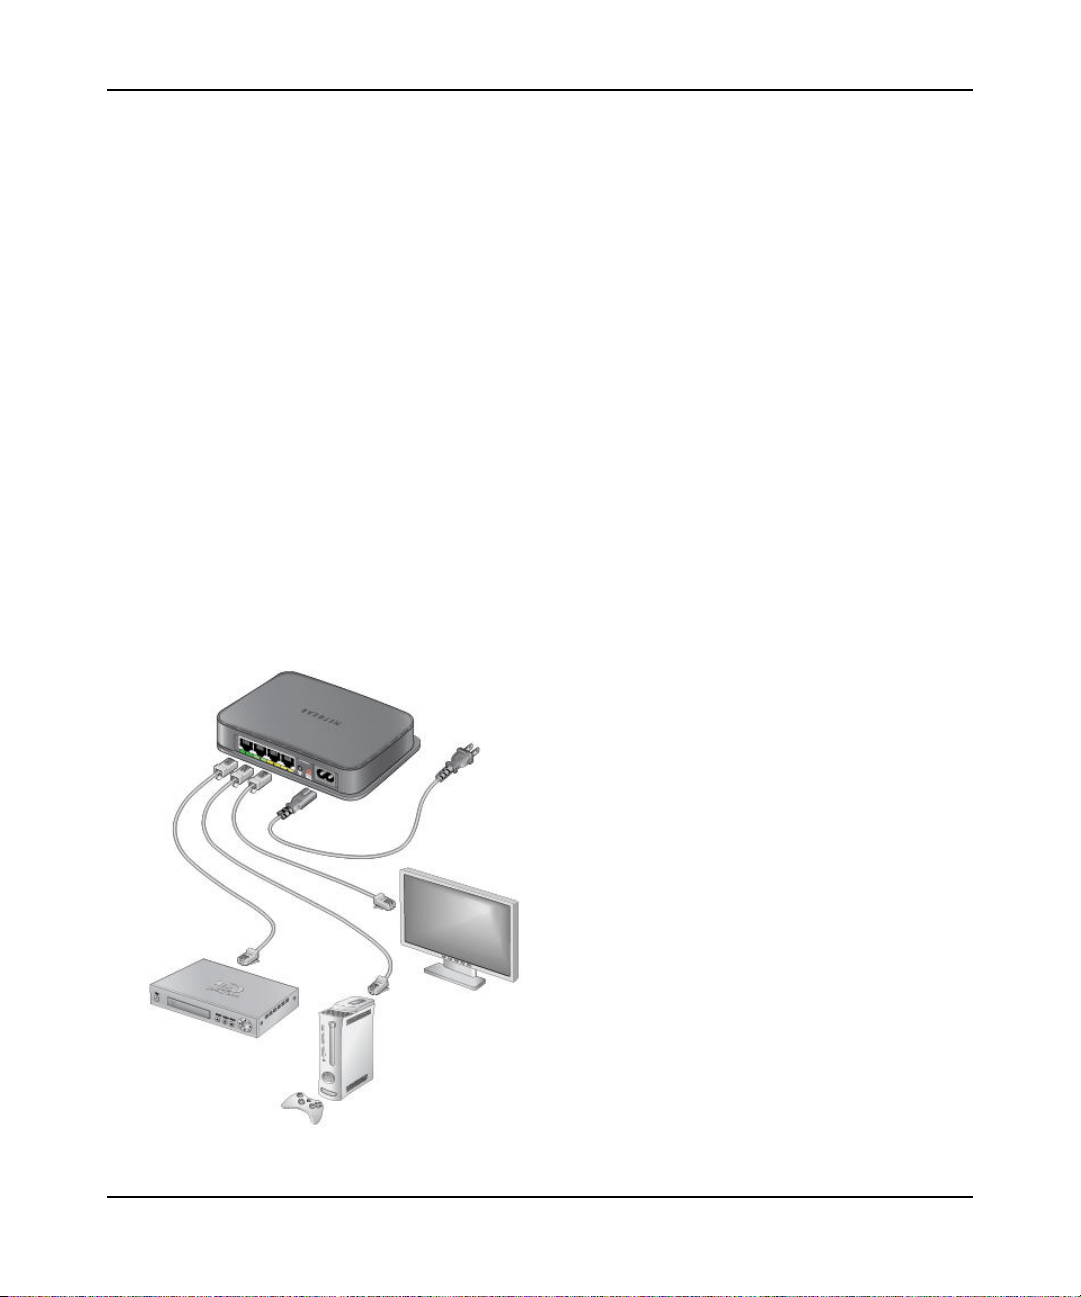
Connecting Devices to the XAV1004
You can connect multimedia devices, such as media servers, storage devices, gaming consoles,
video players, or internet telephones to the four Ethernet ports on the XAV1004.
When you are connecting peripheral devices to the XAV1004, keep in mind how the devices will
be used so that each device has the appropriate Quality of Service (QoS) priority (see “Quality of
Service (QoS)” on page 1-6).
To connect devices to your XAV1004, follow these steps:
1. Use an Ethernet cable to connect each peripheral device to an Ethernet port on the XAV1004.
One Ethernet cable is provided with your XAV1004.
Figure 1-6
Installation and Basic Configuration 1-7
v1.1, September 2009
Page 16

XAV1004 Powerline AV Ethernet Adapter User Guide
2. When all peripheral devices are connected, connect the XAV1004 power cord into the unit and
into a power outlet.
3. Wait up to 80 seconds for the XAV1004 to be recognized by the Powerline network.
Installation and Basic Configuration 1-8
v1.1, September 2009
Page 17

Chapter 2
Securing and Configuring Your Powerline Network
This chapter describes Powerline network security, and describes how to use the XAV1004
Powerline Utility. You can use the Powerline Utility to configure encryption for your Powerline
network and to check the link rate of traffic passing through the Powerline network.
Understanding Powerline Network Security
Powerline devices on the same network must use an identical encryption key. The Powerline AV
Ethernet Adapter default encrypted password is HomePlugAV. If you do not set up security,
anyone nearby with a Powerline network can use this password to gain access to your network.
Use the Security button on the Powerline AV Ethernet Adapter to change the Powerline encryption
key.
Note: If you need to return the Powerline AV Ethernet Adapter to its factory default
settings, use the Reset button or the NETGEAR XAV1004 Configuration Utility on
your Resource CD.
Encryption of the information you send over the Powerline AV Ethernet Adapter helps keep it
secure. This is especially important in locations with many people, such as apartment buildings.
A Powerline network consists of Powerline adapters with the same network encryption key. The
security used by Powerline AV Ethernet Adapters is similar to the SSID and encryption keys used
in wireless networks, but you do not need software to configure your Powerline AV Ethernet
Adapters.
There are two ways to secure your Powerline network.
• Use Push 'N' Secure to automatically generate the encryption on each device in your Powerline
network. See the following section, Changing the Default Encryption Key using Push 'N'
Secure.”
• Use the XAV1004 Powerline Utility, on your Resource CD, to configure your Powerline
network with a network encryption key that you specify. If you are already using HomePlug
devices then you might need to use this utility. See “Running the Powerline Utility” on
page 2-6.
2-1
v1.1, September 2009
Page 18
XAV1004 Powerline AV Ethernet Adapter User Guide
Changing the Default Encryption Key using Push 'N' Secure
Push 'N' Secure lets you set the default encryption key on each Powerline device in your Powerline
network. To set the encryption key for each device, follow these steps:
1. Verify that the XAV1004 is connected to an electrical outlet, and make sure the device’s
encryption key is set to HomePlugAV (the default value). If the encryption key is not set to the
default, follow the instructions in the Note below for resetting it to the default value.
2. If you are using other Powerline devices, such as one or more XAV101 adapters, in your
network, connect each of those to an electrical outlet as well, following the instructions in
step 1.
3. To use a private encryption key instead of the default key, follow these steps:
a. Press the Security button on the back of the XAV1004 for no more than two seconds.
The Power LED will start blinking after you release the button. The adapter will produce a
new, randomly generated network encryption key that each Powerline adapter will use.
b. Press the Security button on any other Powerline devices in your network, as described in
step a.
c. Within two minutes of pushing the security button of the first adapter, push the security
button of the second adapter for no more than two seconds.
Both buttons must be pushed within two minutes.
This securely configures your Powerline network with the same network encryption key.
The adapters retain security settings even if they are unplugged.
Note: To replace a private key, reset the unit back to its factory defaults by
pressing the Restore Factory Settings button for 0.5 second, and follow the
procedure above.
4. If your network has more than two adapters, push the button on the additional adapter for no
more than two seconds, then push the button on any adapter in your existing network for no
more than two seconds. Both buttons must be pushed within two minutes.
Installing the Powerline Utility (Recommended)
It is not necessary to run this utility in order to use your Powerline device. Even if you are running
your XAV1004 with other Powerline devices, your XAV1004 works fine using the default settings.
Securing and Configuring Your Powerline Network 2-2
v1.1, September 2009
Page 19

XAV1004 Powerline AV Ethernet Adapter User Guide
You should install this utility if you want to do any of the following:
• Set your own unique Powerline network encryption key
• Check the link rate of traffic passing through the Powerline network.
• Enable or disable the LEDs.
• Upgrade the firmware to the latest version.
To install the Powerline Utility:
1. Insert the Resource CD into a CD drive on the computer that is connected to your router or
1
Powerline device (XAV101 or XAV1004)
. The CD automatically starts and displays the
following screen:
Figure 2-1
If the CD does not start automatically:
• Go to My Computer on the Windows Start menu, and double-click the drive that
represents the location of the Resource CD or
1. All devices on a Powerline network can be managed from one computer. If you add another Powerline AV
Ethernet Adapter to a Powerline network, you can install the Powerline configuration utility on the computer
connected locally to the new adapter, or open the utility on the computer originally used to set up the Powerline
network encryption key. You can use any computer to manage the network, but this procedure assumes that you
are working from the computer that is connected to a Powerline adapter.
Securing and Configuring Your Powerline Network 2-3
v1.1, September 2009
Page 20

XAV1004 Powerline AV Ethernet Adapter User Guide
• Select the CD drive, and click the Autorun.exe executable file.
2. Click Next, and follow the wizard prompts. When the wizard is done, it informs you that it has
finished installing the utility on your computer.
3. Click Finish. The NETGEAR Powerline Utility icon appears on your desktop.
Using the Firmware Upgrade Tool
When you install the Powerline utility, it checks the current firmware version of your devices and
prompts you to upgrade each device to the latest version. Be sure the adapter you will upgrade is
plugged in to a power source, and connected to your computer with an Ethernet cable before you
run the Upgrade Tool.
1. Go to the XAV1004 program group and select the Upgrade Tool.
2. Click Next to proceed.The Upgrade Tool finds the adapter.
3. Follow the screen prompts to proceed with the upgrade.
Note: If the firmware on the attached adapter is already up-to-date, the Upgrade Tool
will notify you accordingly.
4. At the end, click Finish when done. Repeat this process to upgrade all the adapters in your
network.
Resetting to Factory Defaults
This option returns the network encryption key to its default value of HomePlugAV. It also returns
the firmware to the default firmware version.
Only one device at a time can be reset.
Note: If you customized your network encryption key, the local Powerline device will be
disconnected from the network when you reset it to the factory default. To avoid
this problem, reset all remote devices before you reset the local device.
To reset all the devices in your network to the factory defaults:
Securing and Configuring Your Powerline Network 2-4
v1.1, September 2009
Page 21

XAV1004 Powerline AV Ethernet Adapter User Guide
1. On the Main tab, click the device name for a remote Powerline device to highlight it.
Figure 2-2
2. Click Factory Reset, and a confirmation message displays.
3. Click OK to reset the device. A message indicates whether or not the operation succeeded.
4. After you have reset each device, check that the Main tab lists all devices in the network. If it
does not, click the Scan button to see all the devices in the network.
Securing and Configuring Your Powerline Network 2-5
v1.1, September 2009
Page 22

XAV1004 Powerline AV Ethernet Adapter User Guide
Running the Powerline Utility
You can start the Powerline Utility by clicking the NETGEAR Powerline Utility icon on your
desktop, or from the Windows Program menu. The Powerline Utility displays its Main tab:
4
Figure 2-3
Note the message at the bottom of the screen regarding the power saving feature. If the unit goes
into power saving mode, the configuration utility will not find it. Keeping a connected Ethernet
cable plugged into the device will keep it active.
Main Powerline Tab
The following table describes the features in the Main Tab.
Table 2-1. Configuration Utility Main Tab
Field or Button Description
Powerline Devices This shows whether the utility is currently scanning for Powerline devices, or the
number of Powerline devices detected, after the scan has completed.
Network Type The type of network for the local Powerline device. The default setting is Public.
Device Name The device name is initially set by the utility.
MAC Address The MAC address for the Powerline device. This is also on the product label,
which might not be visible when the device is plugged in.
Securing and Configuring Your Powerline Network 2-6
v1.1, September 2009
Page 23

XAV1004 Powerline AV Ethernet Adapter User Guide
Table 2-1. Configuration Utility Main Tab (continued)
Field or Button Description
Location This column shows whether the device is local or remote. The local device is the
one connected with an Ethernet cable to the computer that you are using to run
this utility.
Quality This indicates the Quality of Service (QoS), or the type of traffic that can be
handled smoothly: HD Video, DVD Video, or Data.
• HD Video. The device can handle high-definition video traffic smoothly. This
status will be shown if the transmit and receive link speed is faster than
80 Mbps.
• SD Video. The transmit and receive link speed is faster than 50 Mbps.
• Data. The device cannot handle video data smoothly. This status will be shown
if the transmit or receive link speed is slower than 50 Mbps.
Link Rate (Mbps) The link rate for each Powerline device.
LED Status The LEDs are enabled by default.
Firmware Version The firmware version for each Powerline device.
Note: Use the provided stand alone firmware upgrade tool to update the
firmware. See “Using the Firmware Upgrade Tool” on page 2-4.
Rename button Change a device name.
Factory Reset button Reset a device to its factory defaults. See “Resetting to Factory Defaults” on
page 2-4.
LED On/Off button Enable or disable the LEDs for a Powerline device.
Scan button Scan the network for Powerline devices.
Powerline Security Tab
Use the Powerline Security tab to do the following:
• Changing the Network Encryption Key
• Adding a Device to a Powerline Network
• Adding a Device from a Locally Connected Computer
• Adding a Device from a Remotely Connected Computer
• Returning to the Default Network Encryption Key
• Setting Up Your Custom Network Encryption Key
Securing and Configuring Your Powerline Network 2-7
v1.1, September 2009
Page 24
XAV1004 Powerline AV Ethernet Adapter User Guide
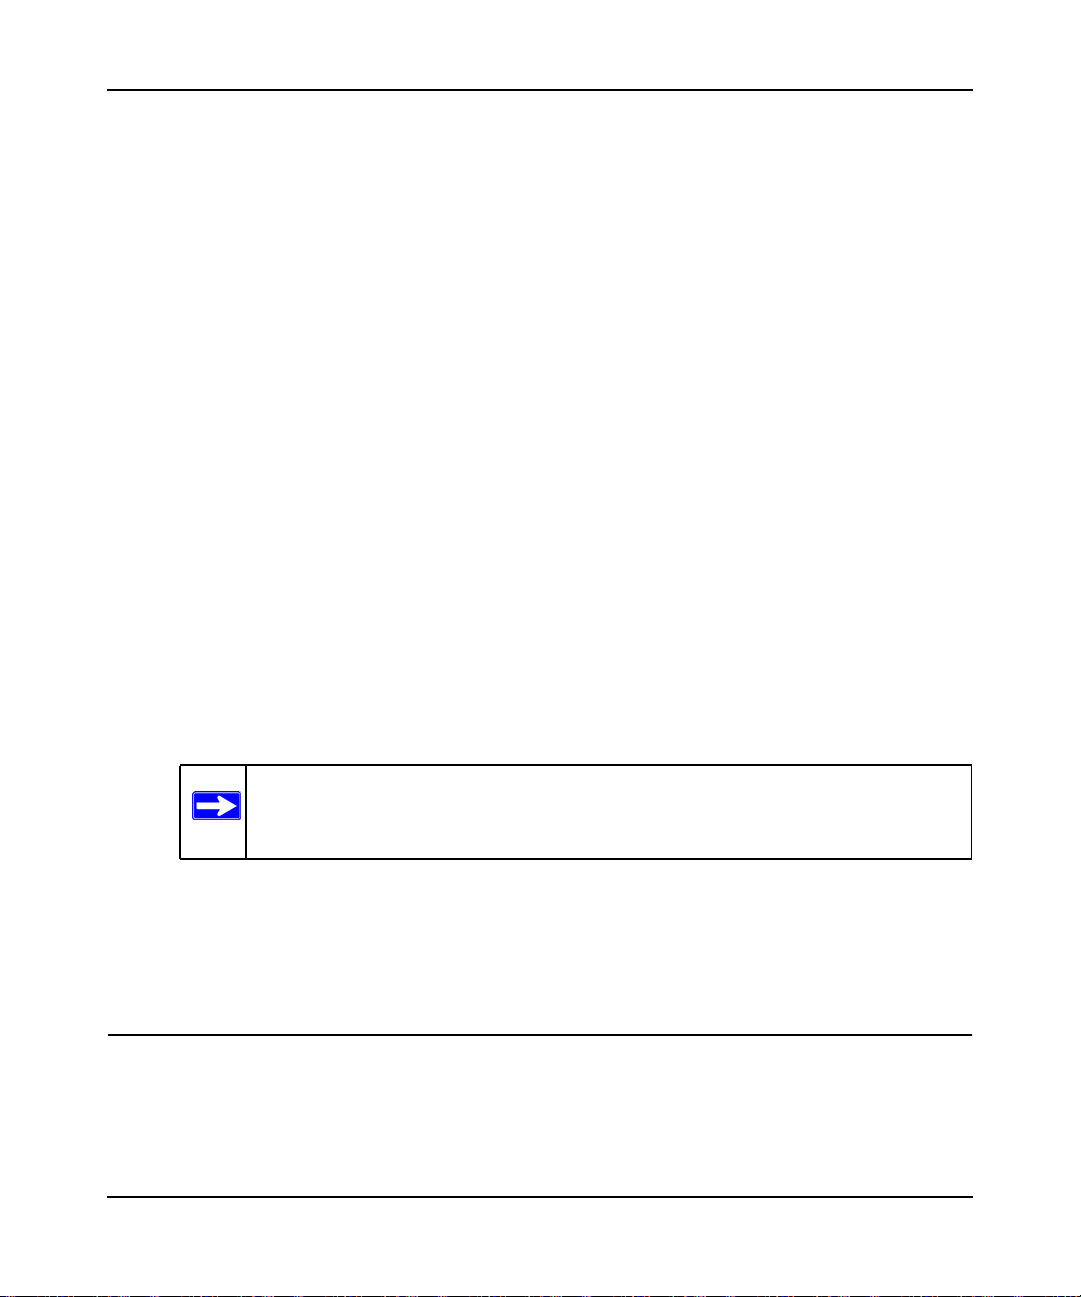
Changing the Network Encryption Key
You can change the network encryption key from the Security tab:
Figure 2-4
1. To change the encryption key for a remote device, you must enter the password for the device.
The password is printed on the product label.
Note: Be sure to save the encryption key for your records after you change it. The
encryption key will always display as HomePlugAV after changing.
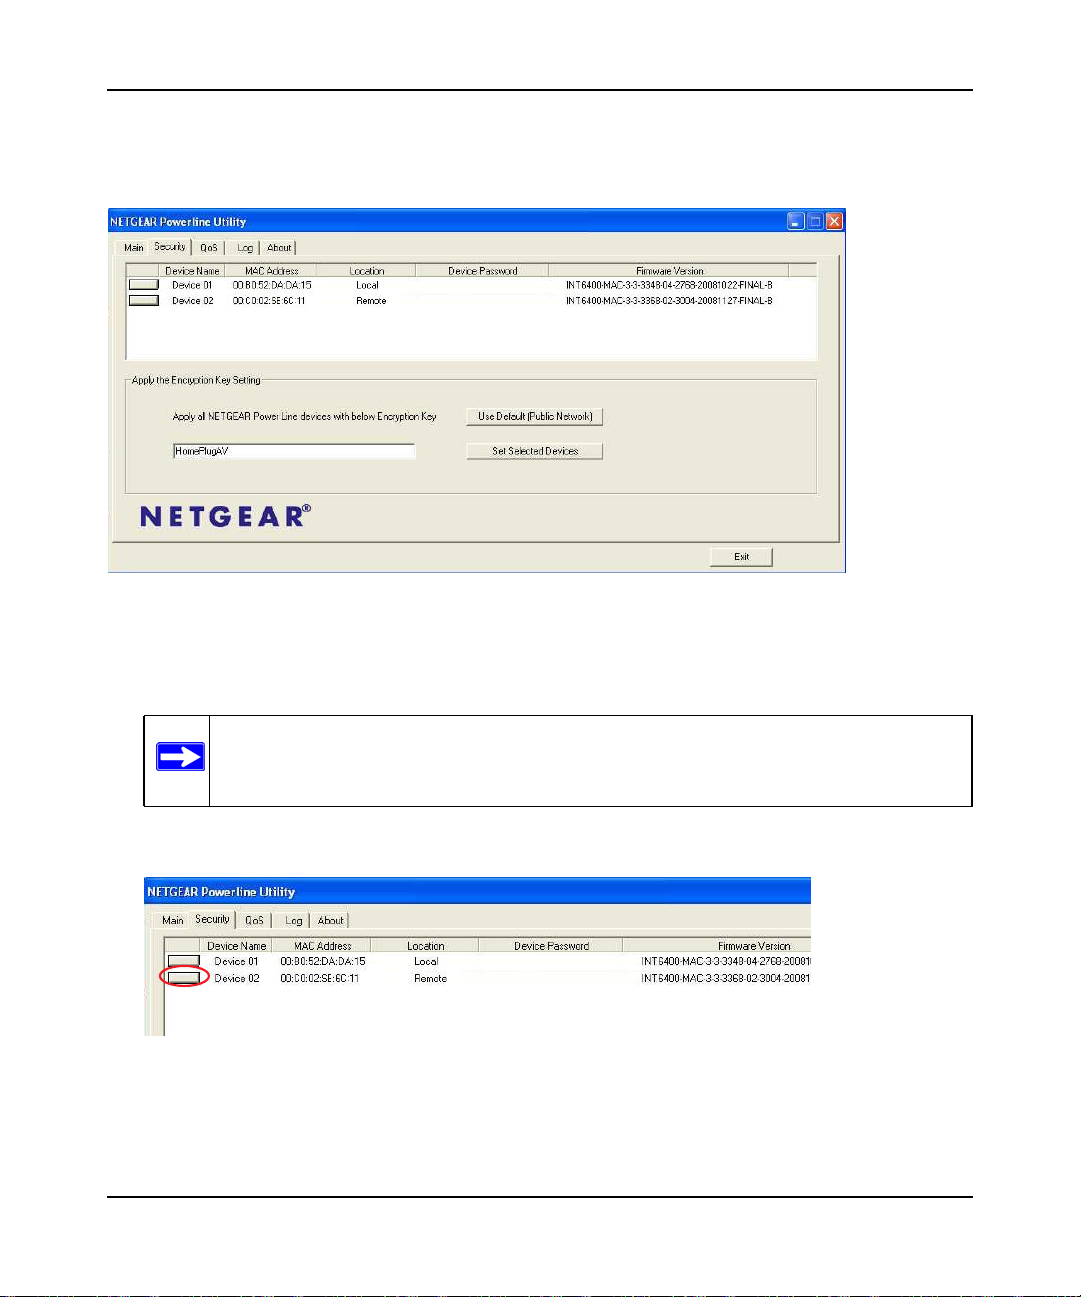
2. Click the rectangle in front of the remote Powerline device to select it.
Figure 2-5
Securing and Configuring Your Powerline Network 2-8
v1.1, September 2009
Page 25
XAV1004 Powerline AV Ethernet Adapter User Guide
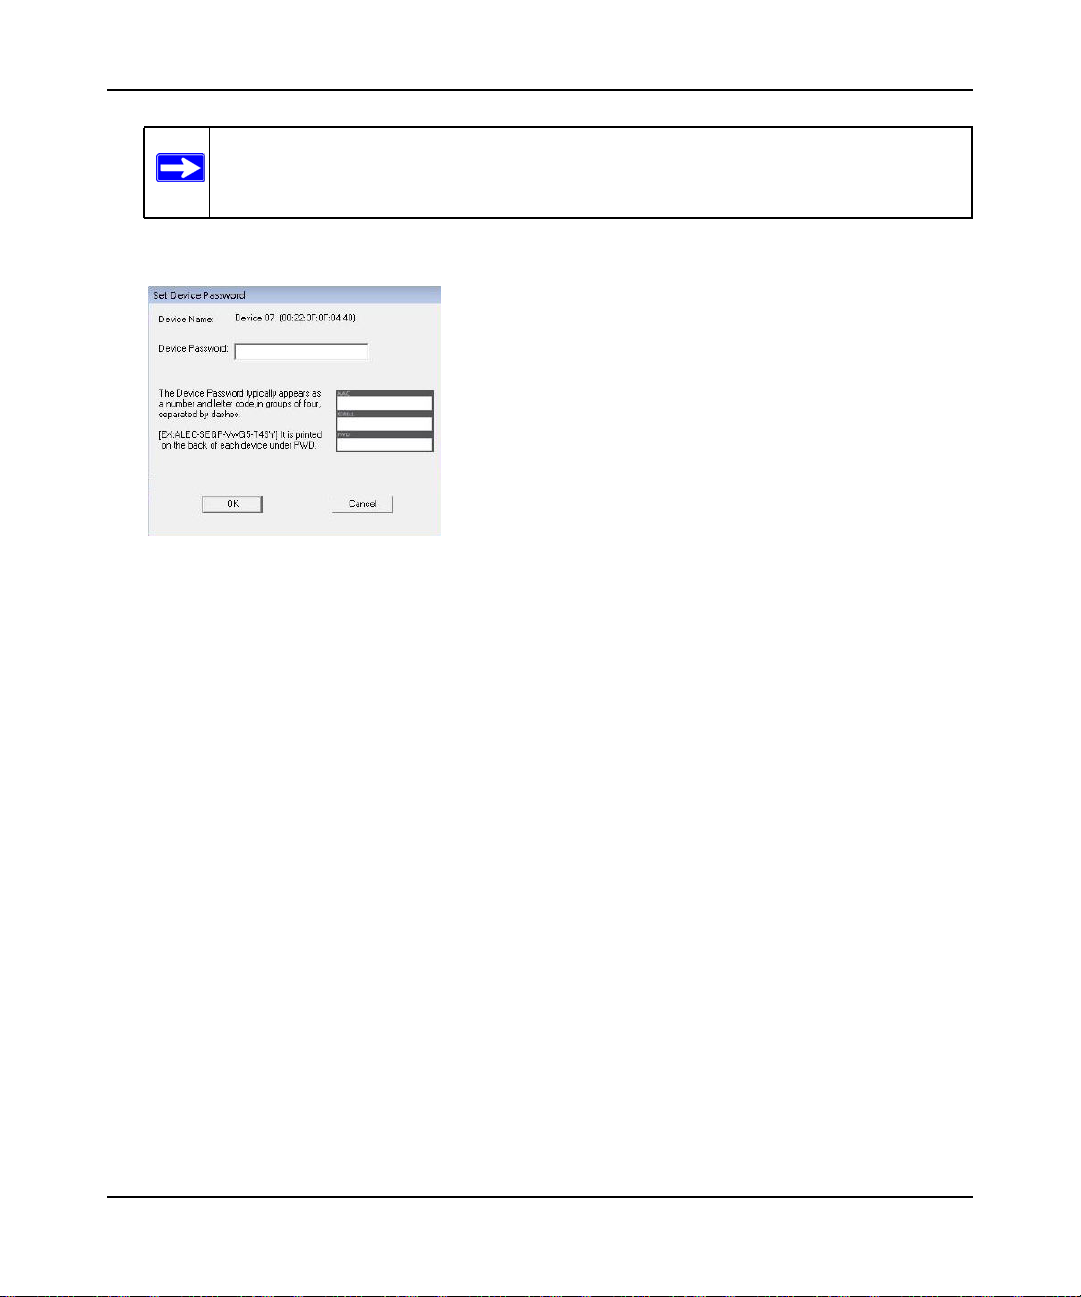
Note: Be sure to change the password of remote devices before changing it on the
local device so that you can maintain connectivity throughout this process.
3. Enter the device password in the Set Device Password window:
Figure 2-6
The device password is on the product label.
4. Click OK.
5. Type the network encryption key into the Apply the Encryption Key Setting field, and click
Set Selected Devices.
6. Select the Main tab, and click Scan. Check that the devices in the Powerline network appear in
the device list. It may take a minute or two for all devices in the network to be detected.
Adding a Device to a Powerline Network
If you are adding a device to a Powerline network, and the network encryption key has been left at
its default setting, all you need to do is plug the new device into a power outlet.
If the network encryption key has been customized:
• You can use the Security button to add the new device to your network (see “Changing the
Default Encryption Key using Push 'N' Secure” on page 2-2).
• You can use the Powerline Utility to add the new device to the network, as described in the
following sections.
The procedure for setting the network encryption key depends on whether the computer running
the Powerline Utility is connected directly to the new Powerline AV Ethernet Adapter (local) or is
connected to a different device in the Powerline network (remote).
Securing and Configuring Your Powerline Network 2-9
v1.1, September 2009
Page 26

XAV1004 Powerline AV Ethernet Adapter User Guide
Adding a Device from a Locally Connected Computer
Follow these steps:
1. Plug the new Powerline AV Ethernet Adapter into an available AC power outlet. Connect the
Ethernet cable that came with the adapter to the adapter’s Ethernet port and an Ethernet port
on the computer.
2. Start the Powerline Utility, which displays its Main tab. Wait for the utility to detect the new
device.
3. Click the Security tab.
Figure 2-7
4. Select the check box next to the Device Name column, for the device marked as Local in the
Location column.
5. Type the network encryption key into the Apply the Encryption Key Setting field, and click
Set Selected Devices.
6. Select the Main tab, and click Scan. Check that the devices in the Powerline network appear in
the device list. It may take a minute or two for all devices in the network to be detected.
Adding a Device from a Remotely Connected Computer
If you are using a custom network encryption key, first, set all the devices to the default network
encryption key of HomePlugAV so that they can communicate with each other. Then set all the
devices to the network encryption key that you want to use.
Securing and Configuring Your Powerline Network 2-10
v1.1, September 2009
Page 27

XAV1004 Powerline AV Ethernet Adapter User Guide
Returning to the Default Network Encryption Key
Follow these steps:
1. Plug the new device into an AC power outlet.
2. Start the XAV1004 Configuration Utility and wait for the utility to detect the devices in your
Powerline network. Check that all the devices in the established network are displayed on the
Main tab.
Note: Before you can reset a remote device, you must enter its password. The
password is printed on the product label.
3. On the Security tab, select each check box next to the Device Name column to select every
device.
4. Click Use Default (Public Network). The Apply the Encryption Key Setting field changes
to the default, HomePlugAV.
5. Click Set Selected Devices.
Setting Up Your Custom Network Encryption Key
When all the devices are set to the default network encryption key and are plugged in, they are
listed on the Main tab. Follow these steps to set up a custom network encryption key for all the
Powerline devices:
1. On the Main tab, click Scan. Wait for the new device to be listed. The new device can be
identified by its MAC address.
Note: Before you can change the encryption key for a remote device, you must enter
its password. The password is printed on the product label.
2. On the Security tab, select each check box next to the Device Name column to select every
device.
3. Type your network encryption key in the Apply the Encryption Key Setting field.
4. Click Set Selected Devices.
The utility displays a message indicating that the operation was successful.
Securing and Configuring Your Powerline Network 2-11
v1.1, September 2009
Page 28
XAV1004 Powerline AV Ethernet Adapter User Guide
5. Select the Main tab, and then click Scan. Check that all devices are detected with your
network encryption key.
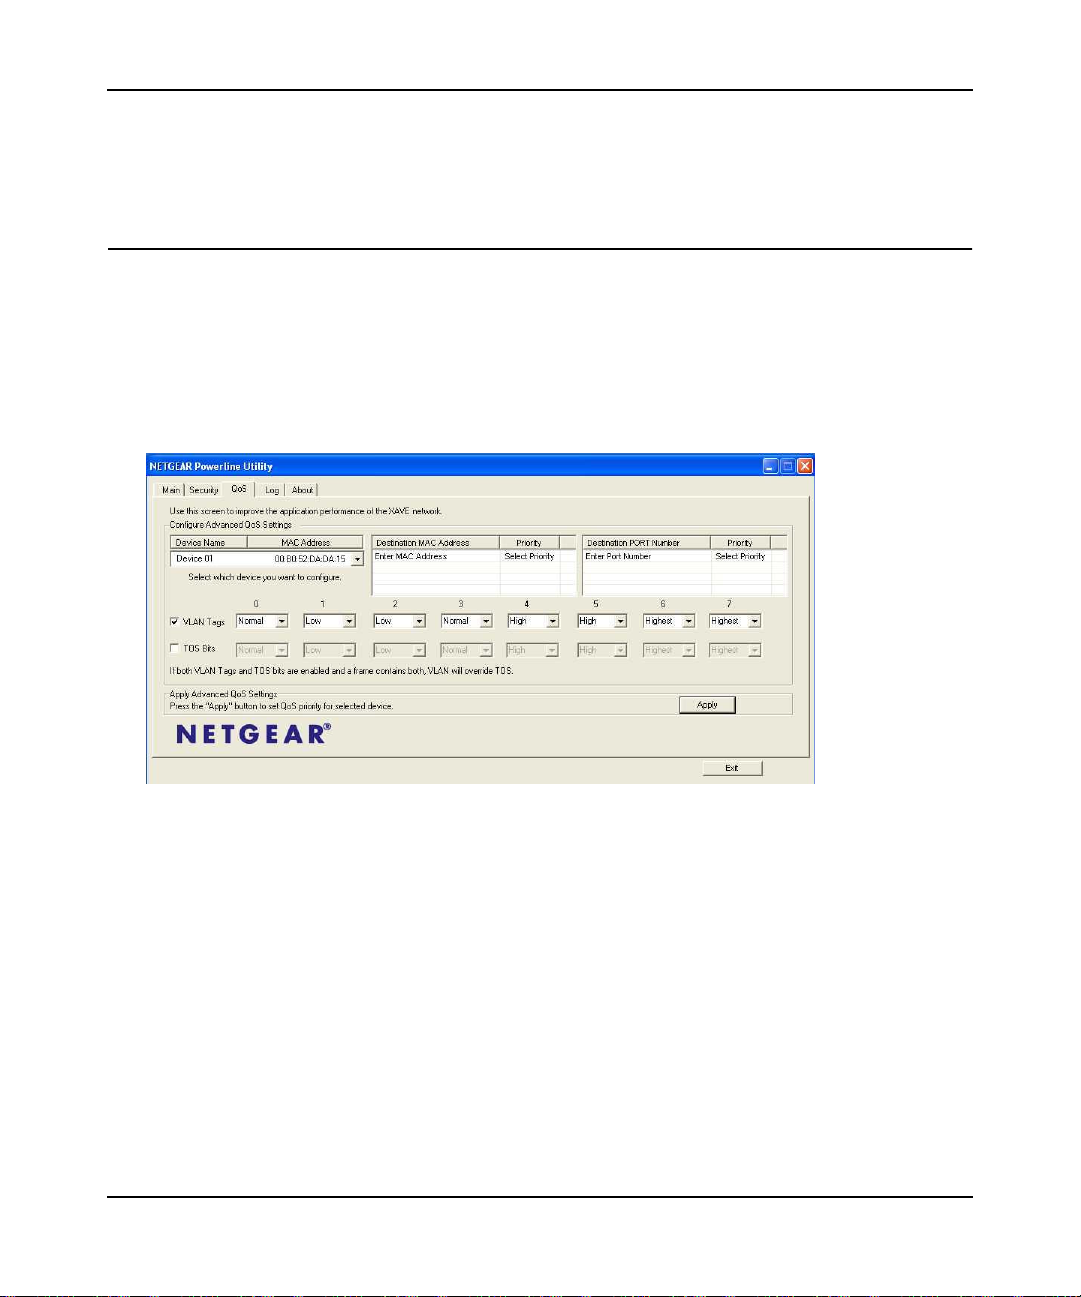
Prioritizing Traffic on the Powerline Network (QoS)
You can prioritize data traffic on your Powerline network by setting the Quality of Service (QoS)
for each Powerline device in your network.
On the QoS tab, you can configure the priority for packets forwarding in the powerline network by
setting priority values for each device in your network. You do this by defining priorities for
VLAN (Virtual Local Area Network) Tags and TOS (Type of Service) Bits.
Figure 2-8
On the QoS tab, do the following:
1. Select the device that you want to configure by highlighting it.
2. Enter the Destination MAC Address, and select the priority.
3. Enter the Destination IP PORT Number, and select the priority.
4. Select the priorities for each VLAN tag from the drop-down lists.
Securing and Configuring Your Powerline Network 2-12
v1.1, September 2009
Page 29
XAV1004 Powerline AV Ethernet Adapter User Guide
5. (Optional) Select TOS Bits, and select the priorities for each TOS bit from the drop down lists.
Note: If both VLAN Tags and TOS Bits are enabled and a frame contains both, the
VLAN values will override the TOS values.
6. Click Apply to set the QoS priority for the selected device.
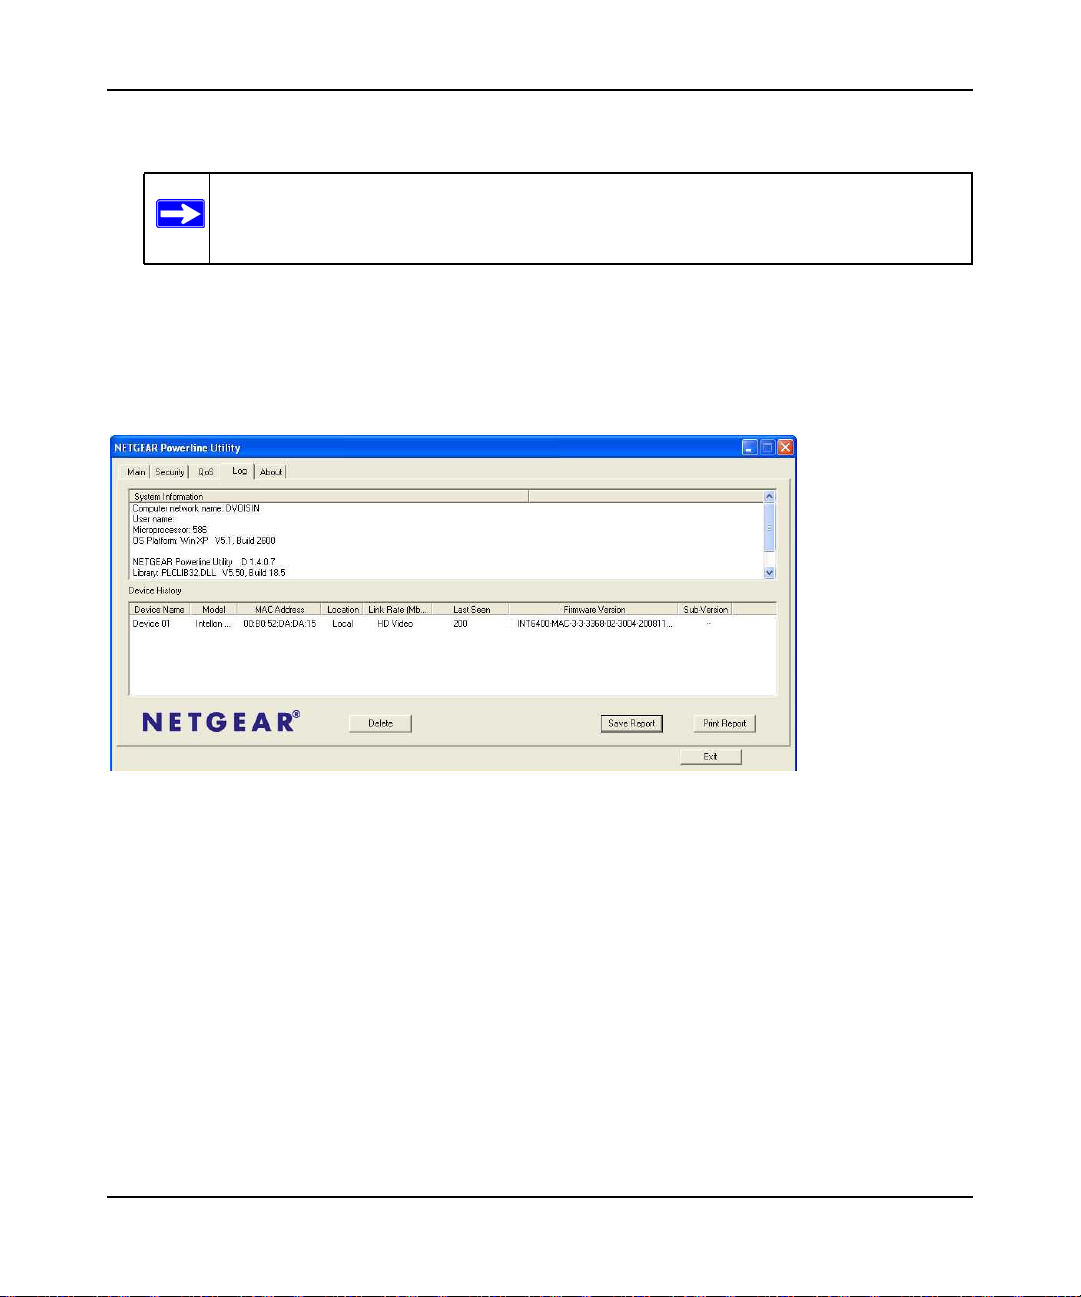
Powerline Utility Logs
The Log tab shows system information and a device history table:
Figure 2-9
You can delete a device from the device history, save a report, or print a report.
Securing and Configuring Your Powerline Network 2-13
v1.1, September 2009
Page 30

Chapter 3
Troubleshooting
This chapter gives information about troubleshooting your XAV1004 Powerline AV Ethernet
Adapter.
Product Registration, Support, and Documentation
Register your product at http://www.netgear.com/register. Registration is required before you can
use our telephone support service.
Product updates and Web support are always available by going to:
http://www.netgear.com/support.
When the Powerline AV Ethernet Adapter is connected to the Internet, click the Knowledge Base
or the Documentation link under the Web Support menu to view support information or the
documentation for the Powerline AV Ethernet Adapter.
Basic Functioning
After you turn on power to the XAV1004 device, the following sequence of events should occur:
1. When power is first applied, verify that the Power LED is on.
2. After approximately 10 seconds, verify that:
a. The power LED is solid green.
b. The Powerline LED is lit.
c. The Ethernet LED on the Powerline AV Ethernet Adapter lights or blinks.
If any of these conditions does not occur, refer to the appropriate following section.
3-1
v1.1, September 2009
Page 31
XAV1004 Powerline AV Ethernet Adapter User Guide
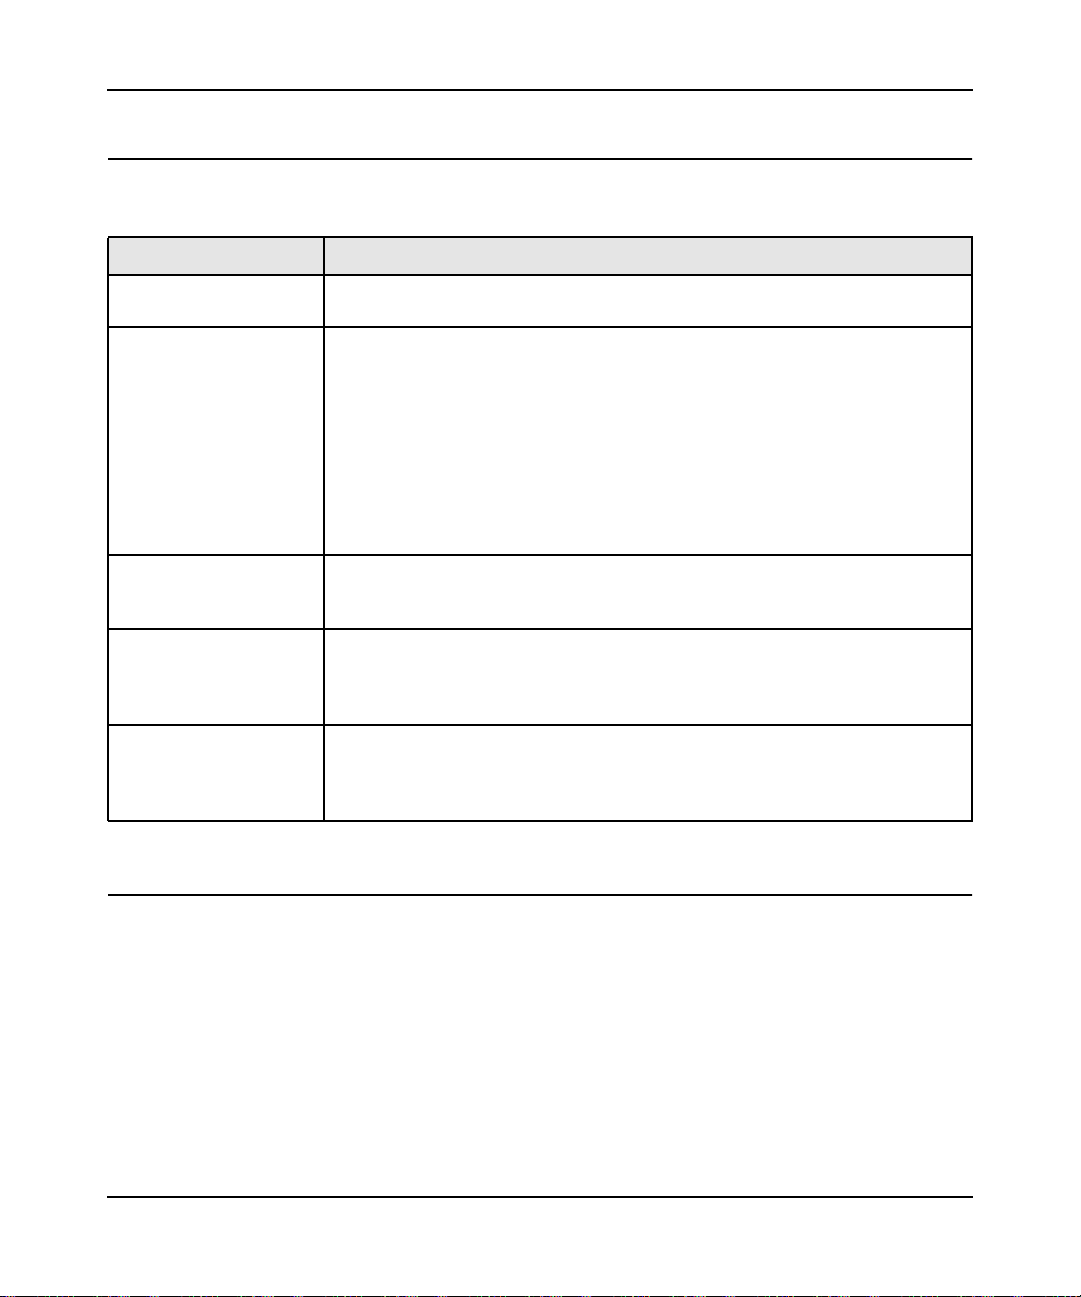
Troubleshooting Tips
The following table lists problems and recommendations.
Problem Recommendation
Power LED is off. Make sure that power is supplied to the electrical outlet, and the Powerline
device is not plugged into an extension cord, power strip, or surge protector.
Powerline LED is off. The devices cannot find each other. Make sure that the Powerline devices are
plugged into outlets with power, and that they use the same network encryption
key.
• If you did not change the network encryption key, move the Powerline device
to a closer location.
• If the problem occurred after you changed the network encryption key using
the XAV1004 Configuration Utility on the CD, press the Reset button to return
the Powerline AV Ethernet Adapters to their default settings. If this fixes the
problem, see the User Manual for instructions about setting the network
encryption key.
Powerline LED is red The color of the Powerline LED indicates the speed of the Powerline link. If the
LED is red, the speed is less than 50 Mbps. Switch to another electrical outlet
until the LED displays solid green.
Ethernet LED is not
blinking.
Problem using the reset
or Security button.
There is no data traffic. Make sure that:
• Your router and modem are switched on and that the Ethernet cable that came
in the box is connected to the Powerline adapter port and a router LAN port.
• The PC connected directly to the router can access the Internet.
The reset and Security buttons are located on the side panel of the Powerline
AV Ethernet Adapter.
• Pressing the Reset button longer than two seconds will not reset the device.
• Pressing the Security button longer than two seconds will not activate security.
Problems After Changing Network Encryption Key
If your Powerline devices stopped communicating after you used the NETGEAR XAV1004
Configuration Utility to change the network encryption key, proceed as follows:
Troubleshooting 3-2
v1.1, September 2009
Page 32

XAV1004 Powerline AV Ethernet Adapter User Guide
1. Open the XAV1004 Powerline Utility and select the Security tab.
Figure 3-1
2. Select the local device.
3. For each remote device, enter its password (printed on the product label), and then select it.
4. Click the Use Default (Public Network) button, and then click the Set Selected Devices
button.
5. Select the Main tab, and check that the utility detects all the Powerline AV Ethernet Adapters
in your Powerline network.
If the utility detects all your Powerline devices, you can specify a new network encryption key as
described in “Changing the Network Encryption Key” in Chapter 2. If the utility does not detect
them all, see the following section, “Changing the Network Encryption Key, One Unit at a Time.
Changing the Network Encryption Key, One Unit at a Time
If the utility does not detect all the devices, you must connect your computer to each Powerline
device and set up the network encryption key one at a time, as follows:
1. Select the Security tab in the XAV1004 Configuration Utility.
2. Type the network encryption key that you want to assign in the Apply the Encryption Key
setting field, and then click Set Selected Devices.
3. Select the Main tab, and then click Scan. Check that the utility detects all the devices that have
been individually set to the same network encryption key.
Troubleshooting 3-3
v1.1, September 2009
Page 33

Appendix A
Technical Specifications
This appendix provides technical specifications for the XAV1004 Powerline AV Ethernet Adapter.
Network Protocol and Standards Compatibility
Data and Routing Protocols: IEEE 802.3 (10BASE-T), IEEE 802.3u (100BASE-Tx)
Power
Power Consumption: 110VAC/60Hz, 5W Max.
220VAC/50Hz, 6W Max.
Physical Specifications
Dimensions: Height: 31 mm
Width: 142 mm
Depth: 102 mm
Weight: 0.48 lbs (217 g)
Environmental Specifications
Operating temperature: 0 to 40 C (32º to 104º F)
Operating humidity: 10-90% maximum relative humidity, noncondensing
Storage humidity 5-95% maximum relative humidity, noncondensing
Security
Encryption type: 128-bit AES
Bridge Performance
MAC addresses: 64
Bandwidth 200 Mbps
Powerline Performance
Compatibility: Can co-exist without interference with HomePlug v1.0 or HomePlug v1.0
Turbo certified devices; is compatible with HomePlugAV certified devices
Data Transfer Rate: Up to 200 Mbps with real throughput greater than 80 Mbps
Frequency band: 2-30 Mbps
Technical Specifications A-1
v1.1, September 2009
Page 34

XAV1004 Powerline AV Ethernet Adapter User Guide
Modulation type: OFDM symbol modulation
Electromagnetic Emissions
Meets requirements of: FCC Part 15 Class B; CE-EMC Class B; 3-home FCC Certificate
Safety Agency Approvals
Meets requirements of: UL 60950 /cUL IEC60950; CE LVD; TUV CB
Technical Specifications A-2
v1.1, September 2009
 Loading...