

Page 1

ReadyNAS RAIDiator 4.1
Software Manual
Models:
Duo
NV+
1100
350 East Plumeria Drive
San Jose, CA 95134
USA
November 2011
202-10926-01
Page 2

ReadyNAS Duo, NV+, and 1100
© 2011 NETGEAR, Inc. All rights reserved
No part of this publication may be reproduced, transmitted, transcribed, stored in a retrieval system, or translated
into any language in any form or by any means without the written permission of NETGEAR, Inc.
Technical Support
Thank you for choosing NETGEAR. To register your product, get the latest product updates, get support online, or
for more information about the topics covered in this manual, visit the Support website at
http://support.netgear.com.
Phone (US & Canada only): 1-888-NETGEAR
Phone (Other Countries): Check the list of phone numbers at
http://support.netgear.com/app/answers/detail/a_id/984
Trademarks
NETGEAR, the NETGEAR logo, and Connect with Innovation are trademarks and/or registered trademarks of
NETGEAR, Inc. and/or its subsidiaries in the United States and/or other countries. Information is subject to change
without notice. Other brand and product names are registered trademarks or trademarks of their respective
holders. © 2011 NETGEAR, Inc. All rights reserved.
Statement of Conditions
To improve internal design, operational function, and/or reliability, NETGEAR reserves the right to make changes
to the products described in this document without notice. NETGEAR does not assume any liability that may occur
due to the use, or application of, the product(s) or circuit layout(s) described herein.
2
Page 3

Contents
Chapter 1 Get Started
Chapter 2 Manage Storage Space
System Requirements . . . . . . . . . . . . . . . . . . . . . . . . . . . . . . . . . . . . . . . . .7
Additional Documentation. . . . . . . . . . . . . . . . . . . . . . . . . . . . . . . . . . . . . . .7
Get Started. . . . . . . . . . . . . . . . . . . . . . . . . . . . . . . . . . . . . . . . . . . . . . . . . .7
About RAIDar . . . . . . . . . . . . . . . . . . . . . . . . . . . . . . . . . . . . . . . . . . . . . . .10
About FrontView. . . . . . . . . . . . . . . . . . . . . . . . . . . . . . . . . . . . . . . . . . . . .12
Basic Disk Configuration Concepts . . . . . . . . . . . . . . . . . . . . . . . . . . . . . .16
RAID. . . . . . . . . . . . . . . . . . . . . . . . . . . . . . . . . . . . . . . . . . . . . . . . . . . .16
Volumes . . . . . . . . . . . . . . . . . . . . . . . . . . . . . . . . . . . . . . . . . . . . . . . . .16
X-RAID and Flex-RAID. . . . . . . . . . . . . . . . . . . . . . . . . . . . . . . . . . . . . .17
Manage Your Storage Space with X-RAID. . . . . . . . . . . . . . . . . . . . . . . . .17
Add a Disk . . . . . . . . . . . . . . . . . . . . . . . . . . . . . . . . . . . . . . . . . . . . . . .18
Increase Storage Space By Replacing All Disks . . . . . . . . . . . . . . . . . .18
Manage Your Storage Space with Flex-RAID . . . . . . . . . . . . . . . . . . . . . .19
Change to Flex-RAID . . . . . . . . . . . . . . . . . . . . . . . . . . . . . . . . . . . . . . .19
Create a Volume. . . . . . . . . . . . . . . . . . . . . . . . . . . . . . . . . . . . . . . . . . .20
Add a Disk to a Volume . . . . . . . . . . . . . . . . . . . . . . . . . . . . . . . . . . . . .21
Replace a Disk in a Volume . . . . . . . . . . . . . . . . . . . . . . . . . . . . . . . . . .22
Use USB Storage Devices . . . . . . . . . . . . . . . . . . . . . . . . . . . . . . . . . . . . .23
Manage a USB Storage Device . . . . . . . . . . . . . . . . . . . . . . . . . . . . . . .24
Automatically Copy a USB Device’s Contents . . . . . . . . . . . . . . . . . . . .24
Chapter 3 Secure Files
Select a Security Mode. . . . . . . . . . . . . . . . . . . . . . . . . . . . . . . . . . . . . . . .27
Select a Security Mode. . . . . . . . . . . . . . . . . . . . . . . . . . . . . . . . . . . . . .27
Set Up a Domain Server. . . . . . . . . . . . . . . . . . . . . . . . . . . . . . . . . . . . .28
Manage Users and Groups . . . . . . . . . . . . . . . . . . . . . . . . . . . . . . . . . . . .29
Manage Users . . . . . . . . . . . . . . . . . . . . . . . . . . . . . . . . . . . . . . . . . . . .29
Customize Private Home Shares . . . . . . . . . . . . . . . . . . . . . . . . . . . . . .31
Manage Groups . . . . . . . . . . . . . . . . . . . . . . . . . . . . . . . . . . . . . . . . . . .34
Import and Export Users. . . . . . . . . . . . . . . . . . . . . . . . . . . . . . . . . . . . .35
Change and Recover the Admin Password . . . . . . . . . . . . . . . . . . . . . . . .38
3
Page 4

ReadyNAS Duo, NV+, and 1100
Chapter 4 Store Files
Basic Share Concepts . . . . . . . . . . . . . . . . . . . . . . . . . . . . . . . . . . . . . . . .40
Data Organization. . . . . . . . . . . . . . . . . . . . . . . . . . . . . . . . . . . . . . . . . .40
File-Sharing Protocols . . . . . . . . . . . . . . . . . . . . . . . . . . . . . . . . . . . . . .41
Access Rights. . . . . . . . . . . . . . . . . . . . . . . . . . . . . . . . . . . . . . . . . . . . .42
Manage File-Sharing Protocols . . . . . . . . . . . . . . . . . . . . . . . . . . . . . . . . .43
Create a Share. . . . . . . . . . . . . . . . . . . . . . . . . . . . . . . . . . . . . . . . . . . . . .46
Create a Share with the User or Domain Security Mode . . . . . . . . . . . .46
Create a Share with the Share Security Mode. . . . . . . . . . . . . . . . . . . .46
Manage Share Access. . . . . . . . . . . . . . . . . . . . . . . . . . . . . . . . . . . . . . . .47
Manage Share Access with the User or Domain Security Mode . . . . . .48
Manage Share Access with the Share Security Mode . . . . . . . . . . . . . .57
Set Options for a Share . . . . . . . . . . . . . . . . . . . . . . . . . . . . . . . . . . . . . . .59
Hide a Share. . . . . . . . . . . . . . . . . . . . . . . . . . . . . . . . . . . . . . . . . . . . . .59
Use the Recycle Bin on CIFS Shares. . . . . . . . . . . . . . . . . . . . . . . . . . .59
Cache Files Locally Using CIFS. . . . . . . . . . . . . . . . . . . . . . . . . . . . . . .60
Enable Syncing Using NFS . . . . . . . . . . . . . . . . . . . . . . . . . . . . . . . . . .60
Set Permissions for New Files and Folders . . . . . . . . . . . . . . . . . . . . . .61
Broaden Rename and Delete Privileges . . . . . . . . . . . . . . . . . . . . . . . .62
Reset Ownership and Permissions On Any Share. . . . . . . . . . . . . . . . .62
Access a Share . . . . . . . . . . . . . . . . . . . . . . . . . . . . . . . . . . . . . . . . . . . . .64
Access a Share from a Windows Device . . . . . . . . . . . . . . . . . . . . . . . .64
Access a Share from a Mac OS X Device . . . . . . . . . . . . . . . . . . . . . . .64
Access a Share From a UNIX or Linux Device. . . . . . . . . . . . . . . . . . . .65
Access a Share Using FTP . . . . . . . . . . . . . . . . . . . . . . . . . . . . . . . . . . 65
Access a Share Using a Web Browser. . . . . . . . . . . . . . . . . . . . . . . . . .65
Access a Share Using ReadyNAS Remote . . . . . . . . . . . . . . . . . . . . . .66
Chapter 5 Stream Multimedia Files
Stream Multimedia Files for iTunes with Firefly . . . . . . . . . . . . . . . . . . . . .70
Set Up iTunes Streaming . . . . . . . . . . . . . . . . . . . . . . . . . . . . . . . . . . . . 70
Use Smart Playlists . . . . . . . . . . . . . . . . . . . . . . . . . . . . . . . . . . . . . . . . 71
Select Which Music Files to Stream. . . . . . . . . . . . . . . . . . . . . . . . . . . .72
Change the Server Name and Password. . . . . . . . . . . . . . . . . . . . . . . .72
Change How to Scan Media Files . . . . . . . . . . . . . . . . . . . . . . . . . . . . .73
Stream Multimedia Files for TiVo and Xbox with ReadyDLNA. . . . . . . . . .74
Share Photos With ReadyNAS Photos . . . . . . . . . . . . . . . . . . . . . . . . . . .75
Get Started with ReadyNAS Photos. . . . . . . . . . . . . . . . . . . . . . . . . . . .75
Create Photo Albums . . . . . . . . . . . . . . . . . . . . . . . . . . . . . . . . . . . . . . . 75
View and Share Photos . . . . . . . . . . . . . . . . . . . . . . . . . . . . . . . . . . . . .76
Set Up Discovery Services. . . . . . . . . . . . . . . . . . . . . . . . . . . . . . . . . . . . .77
4
Page 5

ReadyNAS Duo, NV+, and 1100
Chapter 6 Back Up Files
Back Up a Mac to a ReadyNAS System with Time Machine . . . . . . . . . . .79
Back Up a ReadyNAS System Remotely with ReadyNAS Vault . . . . . . . .80
Back Up to or from a ReadyNAS System. . . . . . . . . . . . . . . . . . . . . . . . . .80
Create a Backup Job . . . . . . . . . . . . . . . . . . . . . . . . . . . . . . . . . . . . . . .81
Assign Backup Jobs to the Backup Button. . . . . . . . . . . . . . . . . . . . . . .85
Edit a Backup Job. . . . . . . . . . . . . . . . . . . . . . . . . . . . . . . . . . . . . . . . . .86
Recover Backed-up Data . . . . . . . . . . . . . . . . . . . . . . . . . . . . . . . . . . . .86
Use Snapshots . . . . . . . . . . . . . . . . . . . . . . . . . . . . . . . . . . . . . . . . . . . .87
Chapter 7 Other Services
Create and Access a Local Website. . . . . . . . . . . . . . . . . . . . . . . . . . . . . .90
Set Up a Printer . . . . . . . . . . . . . . . . . . . . . . . . . . . . . . . . . . . . . . . . . . . . .90
Chapter 8 Manage the ReadyNAS System
Set the Time and Time Zone . . . . . . . . . . . . . . . . . . . . . . . . . . . . . . . . . . .93
Set the Language. . . . . . . . . . . . . . . . . . . . . . . . . . . . . . . . . . . . . . . . . . . .94
Send Alerts. . . . . . . . . . . . . . . . . . . . . . . . . . . . . . . . . . . . . . . . . . . . . . . . .94
Change The Account Used to Send Email Alerts. . . . . . . . . . . . . . . . . .95
Change Who Receives Alerts. . . . . . . . . . . . . . . . . . . . . . . . . . . . . . . . .95
Determine When to Send Alerts. . . . . . . . . . . . . . . . . . . . . . . . . . . . . . .96
Turn the ReadyNAS System On and Off . . . . . . . . . . . . . . . . . . . . . . . . . .96
Turn the ReadyNAS System Off Now. . . . . . . . . . . . . . . . . . . . . . . . . . .96
Restart the ReadyNAS System . . . . . . . . . . . . . . . . . . . . . . . . . . . . . . .97
Turn the ReadyNAS System On and Off Using a Schedule. . . . . . . . . .97
Turn Off the ReadyNAS System Automatically to Prevent Damage . . .98
Back Up and Restore Settings . . . . . . . . . . . . . . . . . . . . . . . . . . . . . . . . . .98
Manage Add-Ons . . . . . . . . . . . . . . . . . . . . . . . . . . . . . . . . . . . . . . . . . . . .99
Manage Installed Add-Ons. . . . . . . . . . . . . . . . . . . . . . . . . . . . . . . . . . .99
Install an Add-On . . . . . . . . . . . . . . . . . . . . . . . . . . . . . . . . . . . . . . . . . .99
Improve Performance. . . . . . . . . . . . . . . . . . . . . . . . . . . . . . . . . . . . . . . .100
Set Network Settings . . . . . . . . . . . . . . . . . . . . . . . . . . . . . . . . . . . . . . . .101
Set TCP/IP Address Information. . . . . . . . . . . . . . . . . . . . . . . . . . . . . .101
Set Your ReadyNAS System to Work as a DHCP Server . . . . . . . . . .102
Change Host Name . . . . . . . . . . . . . . . . . . . . . . . . . . . . . . . . . . . . . . .102
Set Ethernet Options . . . . . . . . . . . . . . . . . . . . . . . . . . . . . . . . . . . . . .103
Enable WINS Support. . . . . . . . . . . . . . . . . . . . . . . . . . . . . . . . . . . . . .103
Enable Jumbo Packet Support. . . . . . . . . . . . . . . . . . . . . . . . . . . . . . .104
View Log Files . . . . . . . . . . . . . . . . . . . . . . . . . . . . . . . . . . . . . . . . . . . . .104
Appendix A Notification of Compliance
Index
5
Page 6

1. Get Started
This manual describes how to use RAIDiator 4.1 firmware for the ReadyNAS Duo, ReadyNAS
NV+, and 1100 storage systems.
This chapter includes the following topics:
• System Requirements
• Additional Documentation
• Get Started
• About RAIDar
• About FrontView
1
6
Page 7

ReadyNAS Duo, NV+, and 1100
System Requirements
You can use RAIDiator 4.1.8 to manage any ReadyNAS Duo or ReadyNAS NV+ on your
local network. To use RAIDiator, you need the following:
• A computer with Microsoft Windows 7, Vista, XP, 2000, Mac OS, UNIX, or Linux
operating system
• Microsoft Internet Explorer 7.0+, Apple Safari, 2.0+, Mozilla Firefox 2.0+, Opera 9.5+,
or Google Chrome 10+ browser
Additional Documentation
For detailed information about configuring, managing, and using your ReadyNAS Duo, NV+,
or 1100 storage system, see the hardware manual for your system. Manuals are available at
http://www.readynas.com/documentation.
NETGEAR maintains a community website that supports ReadyNAS products. Visit
http://readynas.com for reviews, tutorials, a comparison chart, software updates,
documentation, an active user forum, and much more.
Get Started
This section describes the steps to get your ReadyNAS storage system up and running.
To get started with your ReadyNAS system:
1. Before you start your ReadyNAS system, set it up according to the instructions in the
hardware manual for your system.
Manuals are available at http://www.readynas.com/documentation.
2. If your ReadyNAS system does not have any disks, install at least one.
You must use disks listed on the ReadyNAS Hardware Compatibility List, which is
available at
For more information about how to install disks, see the hardware manual for your
system.
3. Turn on your ReadyNAS system.
4. Download the version of RAIDar for your computer.
You can download RAIDar at http://www.readynas.com/downloads.
5. Launch the installer and follow the onscreen instructions to install RAIDar.
6. Launch RAIDar.
7. Highlight your ReadyNAS system and click the Setup button.
http://www.readynas.com/hard_disk_hcl.
Your browser opens and displays a dialog box asking you to enter the user name and
password for the ReadyNAS system.
Get Started
7
Page 8

ReadyNAS Duo, NV+, and 1100
8. Enter the default user name and password and click the Next button.
Following are the default credentials:
• User name. admin
• Password. netgear1
They are both case-sensitive.
FrontView displays in Setup Wizard mode. The first screen displays basic information
about your ReadyNAS system.
9. In each screen, enter your information, click the Apply button, and click the Next button.
If you do not click the Apply button before you click the Next button, the changes are not
saved.
The Setup Wizard has these screens:
• Clock. Make sure the time and time zone are correct. For more information, see Set
the Time and Time Zone on page 93.
• Contacts. The ReadyNAS system can send email messages to administrators about
important events, such as when a disk is failing. Enter up to three email addresses for
the people you want to receive these messages, and then enter information for an
email account that can send these messages. The account from which the email
messages are sent does not need to be the same as one of the administrative email
addresses. For more information, see
Send Alerts on page 94.
• Ethernet. Most of this information is standard and does not need to be changed in
most environments. For more information, see
Set Network Settings on page 101.
• Global Settings. Change the name for the ReadyNAS system and its DNS settings.
You might want to change the name to something more descriptive. The DNS settings
are standard and do not need to be changed in most environments. For more
information, see
Set Network Settings on page 101.
• Admin Password. You can change the password you need to enter before you can
use FrontView and choose a security question to answer if you want to recover that
password. If you forget the password, visit a special website, answer the security
question and provide the email address entered here. If you enter both correctly, a
new password is emailed to the email address. For more information, see
Change
and Recover the Admin Password on page 38.
• Security Mode. This screen displays only if you have a ReadyNAS NV+ or 1100. You
can choose how to protect the files on your shares. NETGEAR recommends selecting
user mode, which lets you create a user account for each person who can access the
shares, and then set a user name and password for each. NETGEAR does not
recommend using share mode because it does not work with recent versions of Mac
OS X or Windows. NETGEAR does not recommend domain mode because it
requires a WIndows server or Active Directory server on your local network. For more
information, see
Select a Security Mode on page 27.
• Accounts. Create user accounts for the people who access your ReadyNAS system.
For more information, see
Manage Users and Groups on page 29.
Get Started
8
Page 9

ReadyNAS Duo, NV+, and 1100
• Standard File Protocols. Choose the protocols used to make the files available to
users. For more information, see
Store Files on page 39.
• Streaming Services. If you want to stream multimedia files from your ReadyNAS
system to other devices on your network, choose how to do it. For more information,
see
Stream Multimedia Files on page 69.
• Installed Addons. Choose whether to use ReadyNAS Photos and ReadyNAS
Remote. ReadyNAS Photos lets you share your photographs with others. ReadyNAS
Remote lets you access your files from a computer that is not on the local network.
For more information about add-ons, see
Manage Add-Ons on page 99. For more
information about ReadyNAS Photos, see Share Photos With ReadyNAS Photos on
page 75. For more information about ReadyNAS Remote, see Access a Share Using
ReadyNAS Remote on page 66.
• Share List and Add Shares. Create the shares that contain the files you want others
to access. Your system comes with two shares already created: media and backup.
For more information, see
Store Files on page 39.
• USB Printers. If you connect a printer to the USB port of your ReadyNAS system,
you can configure it here. For more information, see
Set Up a Printer on page 90.
Pay special attention to the Admin Password and Security Mode screens. Choose a
different admin password from the default password. If you have a ReadyNAS NV+ or
1100, change the security mode because share mode, which is the default mode, is not
compatible with recent versions of Mac OS X and Windows.
At any time, you can exit the Setup Wizard by clicking the Switch to Advanced Control
button. You can set the options included in these screens later.
10. (Optional) Click the Register Product button and follow the prompts to register your
ReadyNAS system.
You must register your storage system before you can use NETGEAR telephone support.
Get Started
9
Page 10
ReadyNAS Duo, NV+, and 1100
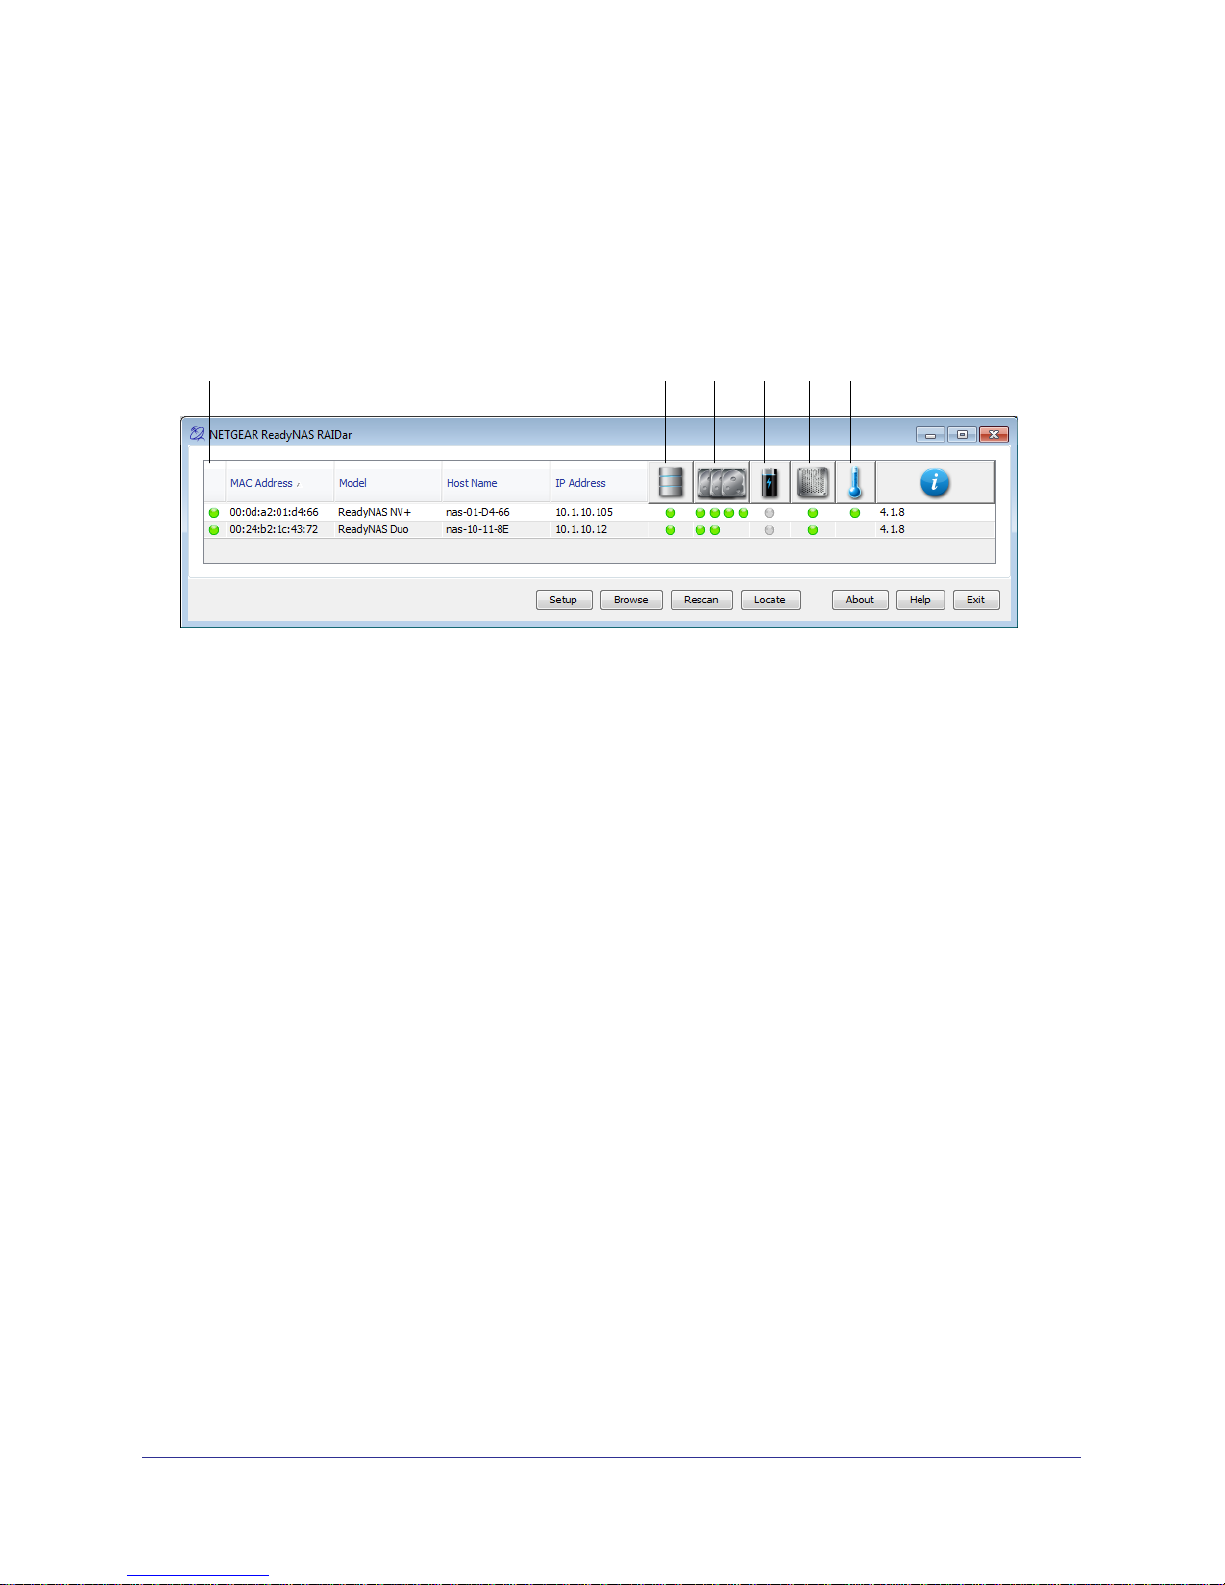
About RAIDar
RAIDar is a software application that you use to discover ReadyNAS storage systems on
your network. RAIDar displays several icons to help you determine the status of your system
and buttons along the bottom perform actions on the systems, as shown in the following
figure.
1 2 3 4 5 6
Figure 1. RAIDar icons
1. Overall status
2. Volume status
3. Disk status
4. UPS status
5. Fan status
6. Temperature
Hover your pointer over a status light for more detailed information about that component. For
example, hover the pointer over the temperature status light for the exact temperature, and
hover it over the volume status light for the total size of the volume.
Get Started
10
Page 11
ReadyNAS Duo, NV+, and 1100
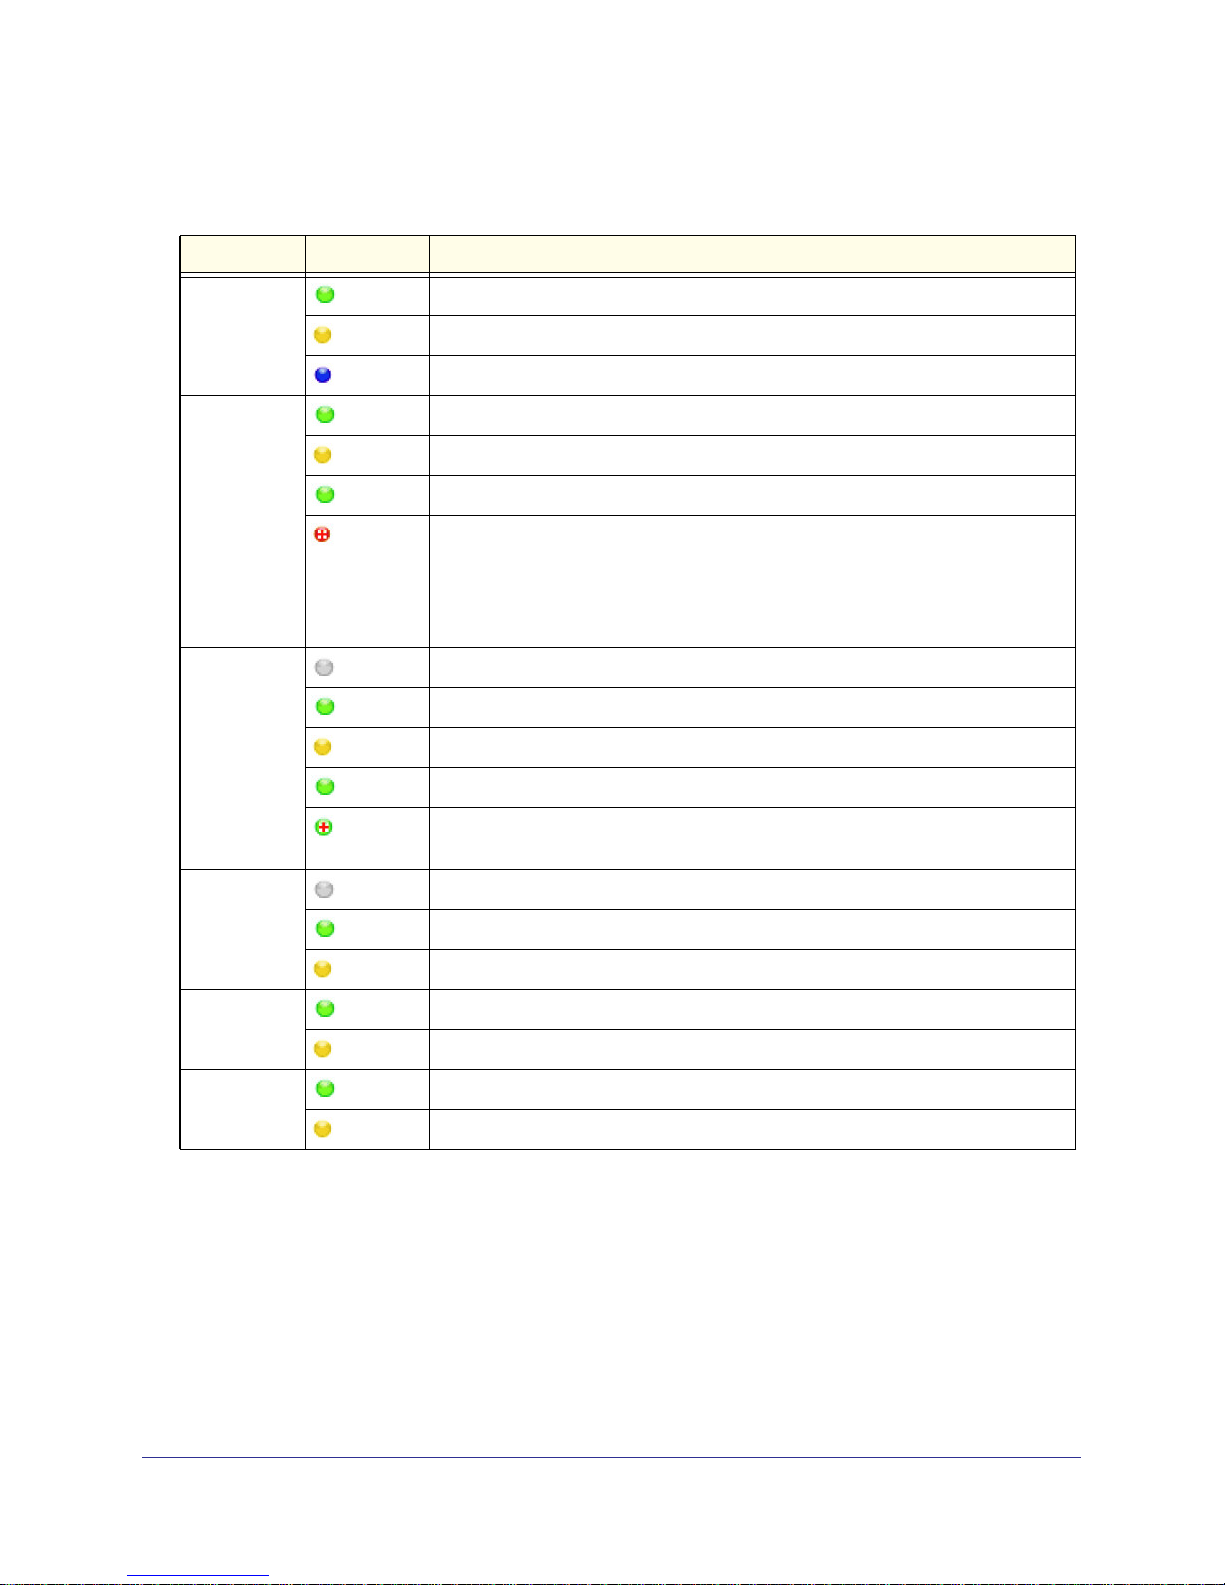
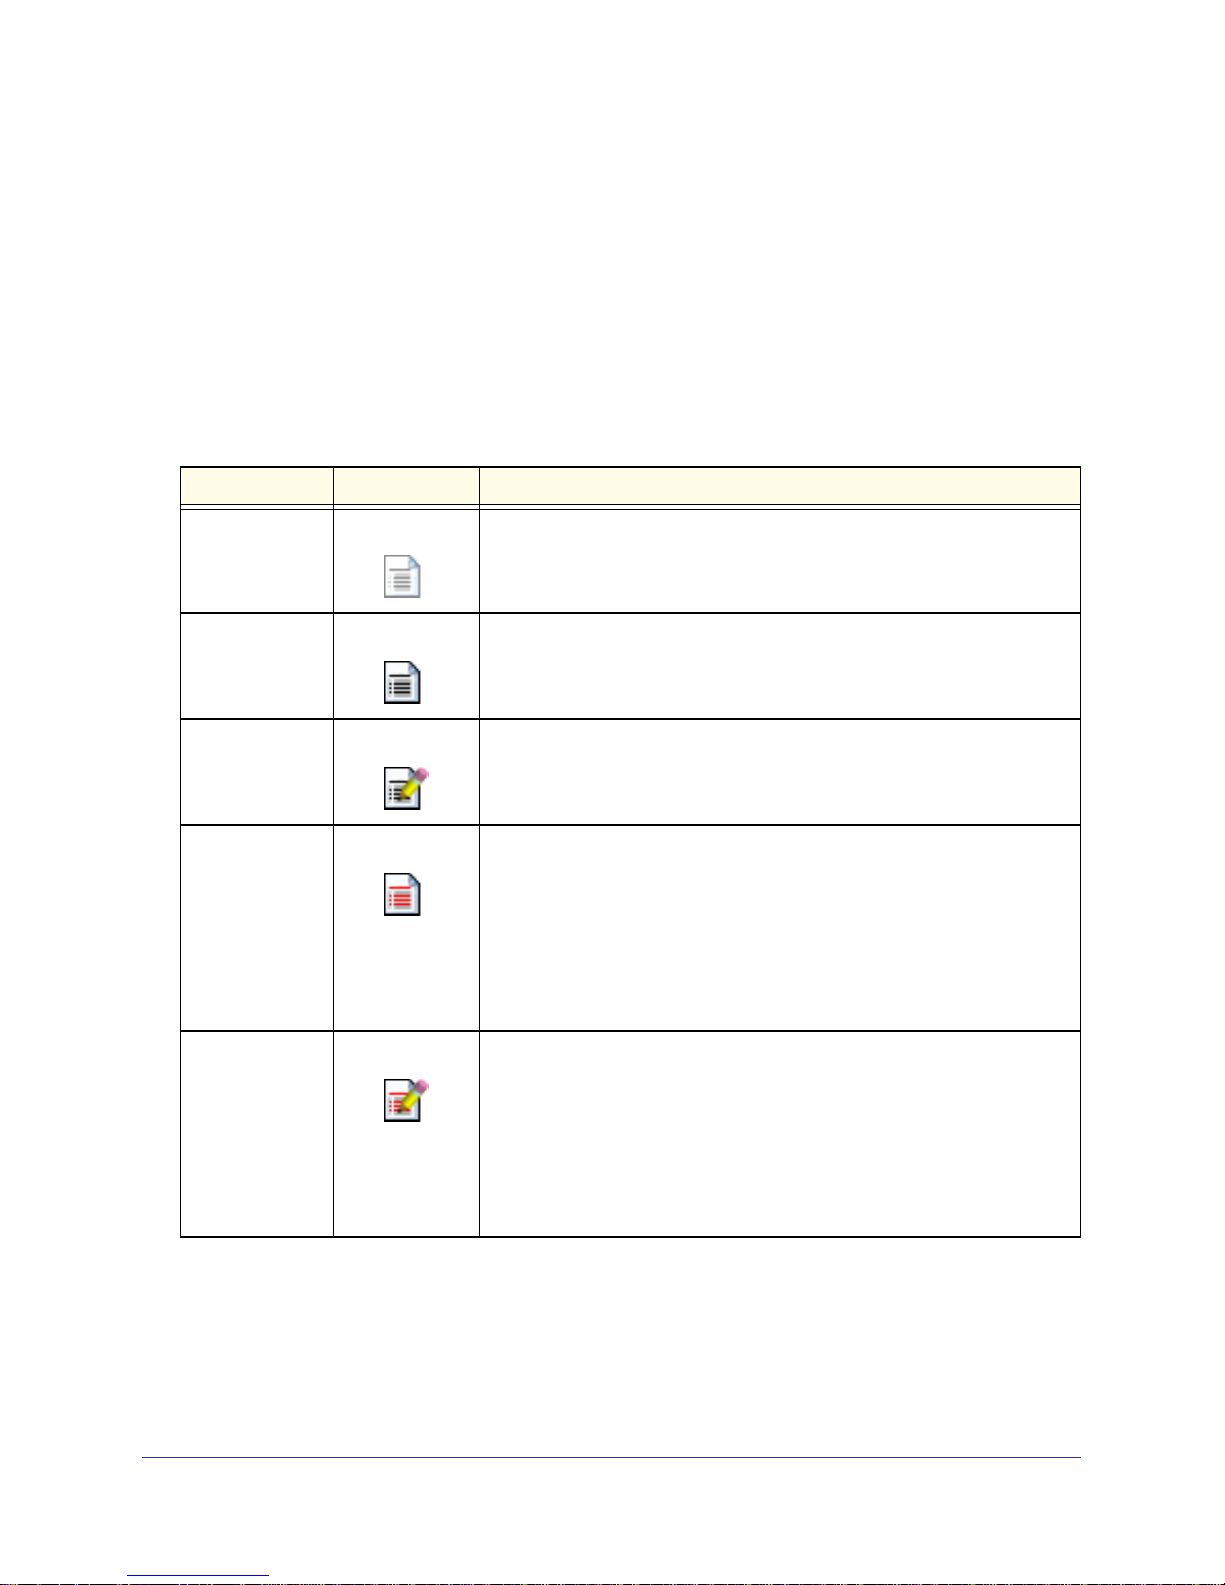
The following table provides a description of each LED icon.
Table 1. RAIDar LED icon descriptions
Icon LED icon Description
Overall status
Volume status
Disk status
The system is operating normally.
The system is failing or needs attention.
The system is performing a lengthy procedure such as installing an update.
The volume is operating normally.
The volume is failing or needs attention.
(Blinking) The volume is syncing.
The volume is on life support because it experienced multiple disk failures. The
volume’s data might be lost. Contact NETGEAR technical support for help.
If the volume went into life support mode because you accidentally removed
more functional disks, NETGEAR technical support might be able to help you
recover the data.
No disk is installed in the corresponding bay.
The disk is operating normally.
The disk is failing or needs attention.
(Blinking) The disk is syncing.
The disk is a spare. If another disk fails, the ReadyNAS system uses this disk as
a replacement.
UPS status
Fan status
Temperature
No UPS device is available.
This UPS device is operating normally.
This UPS device is failing and needs attention.
The fan is operating normally.
The fan is failing and needs attention.
The temperature is within acceptable limits.
The temperature is at a dangerous level.
Get Started
11
Page 12

ReadyNAS Duo, NV+, and 1100
The buttons along the bottom of the RAIDar screen perform the following actions on the
highlighted ReadyNAS system:
• Setup. Launches FrontView for the selected system. FrontView opens in a browser
window and lets you change the settings for your ReadyNAS system.
• Browse. Displays the shares available on the highlighted system. This button is available
only in the Windows version of RAIDar.
• Rescan. Updates the list of ReadyNAS systems on the network and the status of each
one.
• Locate. Blinks the LEDs on the highlighted system. This is useful if you have multiple
ReadyNAS storage systems and you need to determine which RAIDar entry corresponds
to which system.
• About. Displays information about RAIDar.
• Help. Displays help about RAIDar.
• Exit. Closes RAIDar.
About FrontView
FrontView is the web-based management interface for your ReadyNAS system. FrontView
makes it easy to create shares to store files, create user accounts, choose who can access
your files, create backup jobs to protect your files, and more.
FrontView displays in your web browser, so you can use it on any computer or device that
supports the following browsers:
• Microsoft Internet Explorer 7.0+
• Apple Safari 2.0+
• Mozilla Firefox 2.0+
• Opera 9.5+
• Google Chrome 10+
When you first launch FrontView, it opens in Setup Wizard mode, which steps you through
the process of setting up your ReadyNAS system. When you finish the Setup Wizard, or
when you click the Switch to Advanced Control button, FrontView uses Advanced Control
mode, which displays more options and lets you choose which settings to edit.
Get Started
12
Page 13
ReadyNAS Duo, NV+, and 1100
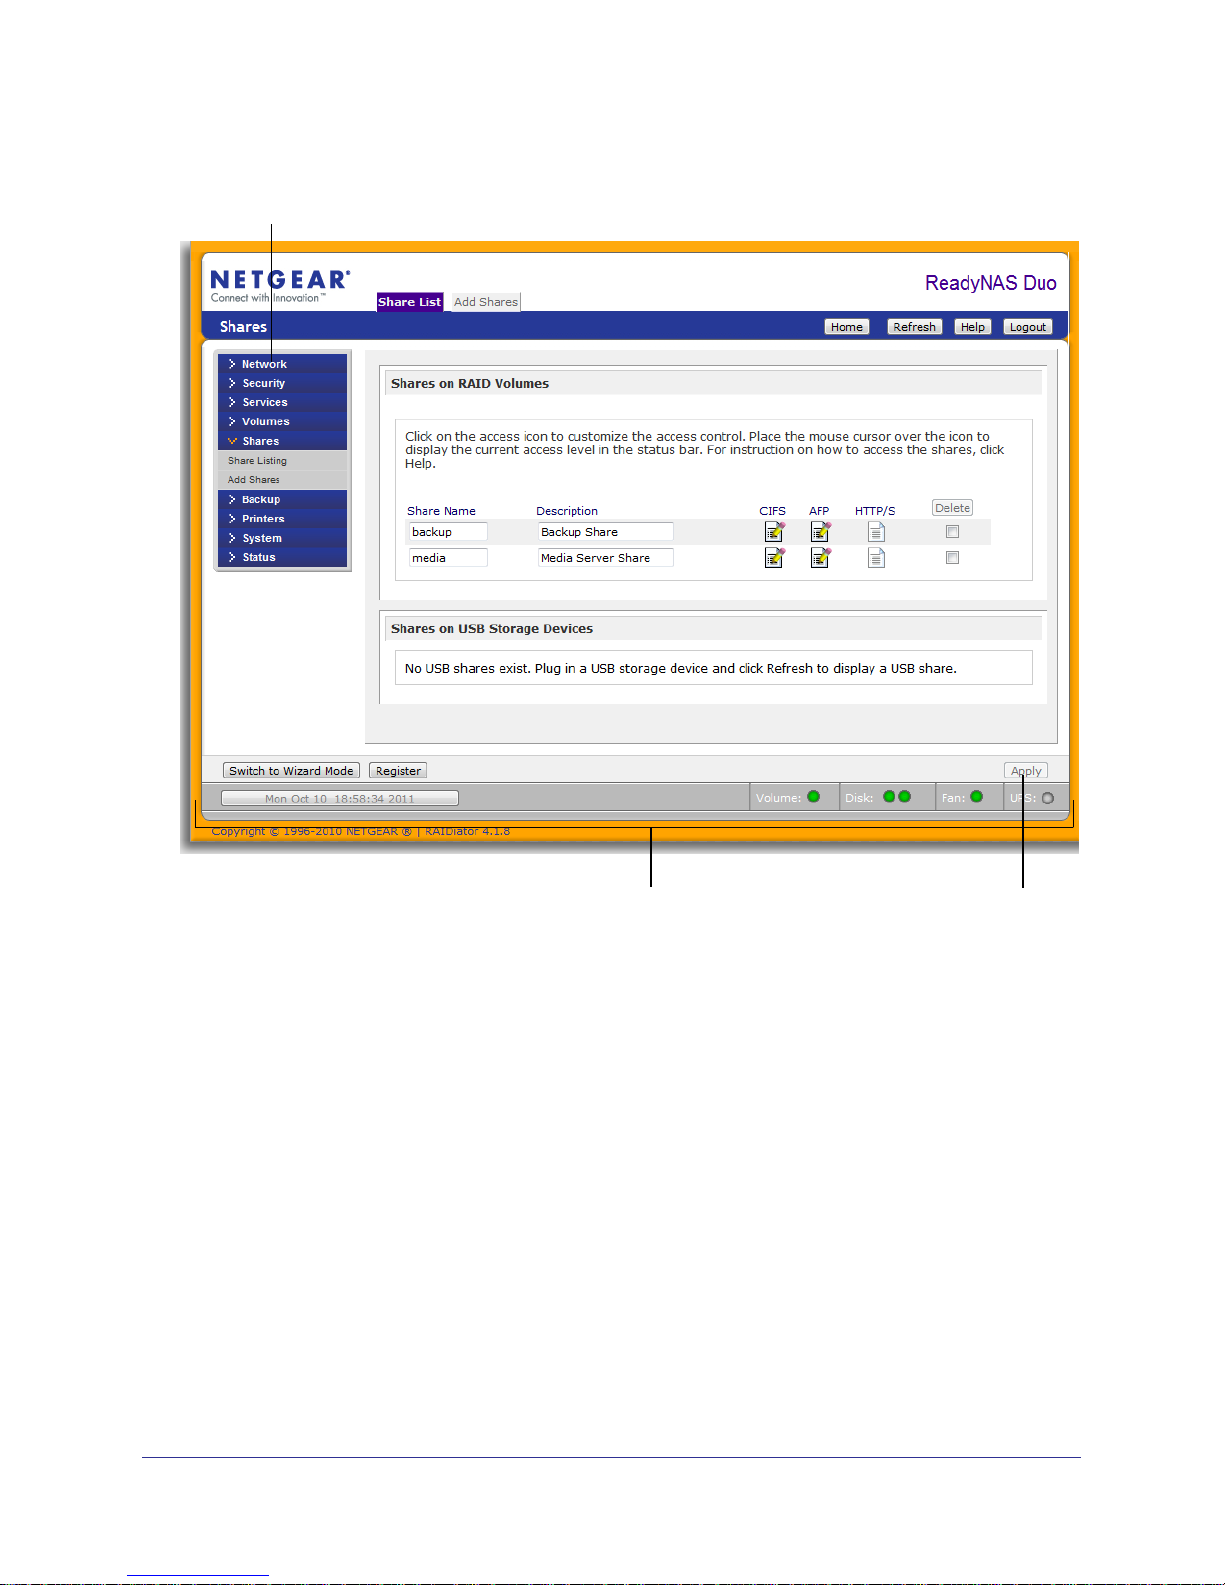
The following figure shows FrontView in Advanced Control mode.
1
2 3
Figure 2. ReadyNAS FrontView main menu in Advanced Control mode
1. Main menu
2. Status bar
3. Apply button
The status bar displays the current time and the status of the ReadyNAS system’s
components. It uses the same status lights as RAIDar, as described in About RAIDar on
page 10. Hover your pointer over a status light to display more information about that
component, such as the size of a disk or the presence of a UPS connection. Click the current
time to change the time or set the time zone.
After you set up your ReadyNAS system, if you need to change your settings, use FrontView.
Get Started
13
Page 14

ReadyNAS Duo, NV+, and 1100
To use FrontView:
1. Launch RAIDar.
For more information about RAIDar, see Get Started on page 7.
2. Highlight your ReadyNAS system and click the Setup button.
A dialog box displays prompting you to log in to your system.
3. Provide your credentials.
Following are the default credentials:
• User Name. admin
• Password. netgear1
You should have changed your password when you used the Setup Wizard. This is an
important step in safeguarding your data. If you changed your password, enter the
password you created instead of the default password.
4. From the FrontView main menu, select an item to view and edit its options.
If you do not see the main menu, click the Switch to Advanced Control button.
5. When you are done editing the options, click the Apply button.
Your changes are not saved if you do not click the Apply button.
Get Started
14
Page 15

2. Manage Storage Space
This chapter describes how to manage the disks in your ReadyNAS system, including how to
increase the amount of storage space and how to choose between X-RAID and Flex-RAID. You
can also attach a USB storage device to your ReadyNAS system to increase storage space.
This chapter includes the following topics:
• Basic Disk Configuration Concepts
• Manage Your Storage Space with X-RAID
• Manage Your Storage Space with Flex-RAID
• Use USB Storage Devices
2
15
Page 16

ReadyNAS Duo, NV+, and 1100
Basic Disk Configuration Concepts
To get the most out of your ReadyNAS storage system, it is helpful to understand some disk
configuration concepts. Understanding these concepts is the first step to making good
decisions about how to configure, manage, and use your ReadyNAS storage system.
You can configure your storage system’s hard disks in a variety of ways. The most common
way to configure disks is using one of the many RAID technologies.
RAID
RAID is short for redundant array of independent disks. RAID is a storage technology that
balances data protection, system performance, and storage space by determining how the
storage system distributes data. Many different ways of distributing data have been
standardized into various RAID levels. Each RAID level offers a trade-off between data
protection, system performance, and storage space. For example, one RAID level might
improve data protection but reduce storage space. Another RAID level might increase
storage space but reduce system performance.
Your ReadyNAS storage system supports X-RAID®, a proprietary single-volume RAID
architecture that is easy to administer, and Flex-RAID, which allows you to format your disks
in a variety of industry-standard RAID levels.
Volumes
In the most general sense, volumes are data storage devices. Your computer treats an
internal hard drive as a volume. It also treats a portable USB thumb drive as a volume.
Volumes can be either physical or logical. Usually, the term physical volume refers to a hard
disk drive. When this term is used in this way, a two-bay storage system can have up to two
physical volumes (hard disk drives), a four-bay storage system can have up to four physical
volumes, and a six-bay storage system can have up to six physical volumes.
The term logical volume refers to the way that you divide, or partition, your storage space, for
example:
• Each logical volume can correspond to a hard disk drive.
• A logical volume can be made up of more than one hard disk drive.
In this manual, the term volume refers to a logical volume and the terms hard disk drive and
disk refer to a physical volume.
Manage Storage Space
16
Page 17

ReadyNAS Duo, NV+, and 1100
X-RAID and Flex-RAID
Your ReadyNAS system gives you two ways to choose which type of RAID technology to
use: X-RAID and Flex-RAID.
• X-RAID. NETGEAR’s proprietary single-volume architecture that automatically chooses
which type of RAID set is best depending on the number of disks in your ReadyNAS
system. X-RAID chooses to protect your data against disk failure whenever possible. If
your ReadyNAS system contains two or more disks and a disk fails, no files are lost and
users can continue to access the ReadyNAS system as normal. When you add a disk to
your ReadyNAS system, it is formatted in the background while users continue to access
your unit.
• Flex-RAID. Offers more flexibility because it lets you choose how many volumes to
create, which type they should be, and whether to use a disk as a hot spare. (If another
disk fails, the hot spare automatically replaces it.) With Flex-RAID, adding a disk to a
volume takes more work than with X-RAID because you need to take your system offline
as you manually back up your data, add the disk, and restore your data.
Manage Your Storage Space with X-RAID
X-RAID is the default disk management system for ReadyNAS NV+ and ReadyNAS Duo. It
chooses which type of RAID set is best for you depending on the number of disks in your
ReadyNAS system, protecting your data against disk failure whenever possible.
With one disk installed, X-RAID uses all its capacity for storage. But if the disk fails, you lose
all your files.
WIth two or more disks installed, you are protected against disk failure. With just two disks,
the disks are mirrored: Each disk holds a complete copy of your data. With three or four
disks, one disk’s worth of capacity contains information that is used to recover your files in
case of disk failure, and the rest of the capacity is available for storing. The capacity of a
ReadyNAS system with X-RAID is determined by the number of disks installed, as follows:
• If your system has two disks, you have one disk’s worth of storage space.
• If your system has three disks, you have two disks’ worth of storage space.
• If your system has four disks, you have three disks’ worth of storage space.
When you add a disk, your ReadyNAS system automatically formats it in the background and
adds it to the X-RAID volume while users continue to access the unit normally. If you have at
least two disks installed, when a disk fails, the administrator receives an email message to
replace the disk as soon as possible. Meanwhile, users can continue to access the
ReadyNAS system.
If all the disk bays in your ReadyNAS system are filled, you can still expand your storage
space. Just replace all the disks with larger ones, one at a time.
Manage Storage Space
17
Page 18

ReadyNAS Duo, NV+, and 1100
Add a Disk
You can add a disk to your ReadyNAS system to protect yourself against disk failure or to
increase your storage space. If you add a second disk to your unit, the disks are mirrored. If
you add a third or fourth disk, one disk’s worth of capacity is used for storing disk recovery
information.
To add a disk:
1. Find a disk that is compatible with your ReadyNAS system.
A list of compatible disks is at http://www.readynas.com/hard_disk_hcl.
For best performance, use disks that are the same make, model, and size. If you use
disks of different sizes, your ReadyNAS system treats the disks as though they were all
the same size as the smallest disk. For example, if you have four disks, where three are 1
TB and one is 500 GB, it treats all the disks as if they were 500 GB and gives you only 1.5
TB of space for files.
2. Follow the instructions in your hardware manual to add a disk.
Your ReadyNAS system sends one email message to the administrator when it starts
formatting the new disk and another email message when it finishes formatting.
Depending on the size of the disks and the number of files on your system, this process
might take several hours, but you can continue to use your system as normal.
Increase Storage Space By Replacing All Disks
If all the disk bays in your ReadyNAS system are filled, you can expand your storage space
by replacing all the disks with larger ones. To avoid losing data, replace the disks one at a
time. Because replacing one disk can take several hours, the entire process can take a day
or more; however, you do not lose any files and you can use your system without interruption
during the entire process.
To increase storage space by replacing all disks:
1. Find disks that are compatible with your ReadyNAS system.
A list of compatible disks is at http://www.readynas.com/hard_disk_hcl.
For best performance, use disks that are the same make, model, and size. If you use
disks of different sizes, your system treats the disks as though they were all the same size
as the smallest disk.For example, if you have four disks, where three are 1 TB and one is
500 GB, it treats all the disks as if they were 500 GB and gives you only 1.5 TB of space
for files.
2. Follow the instructions in your hardware manual to replace a disk.
Your system sends an email message to the administrator when it starts formatting the
new disk and another email message when it finishes formatting.
3. When the disk is formatted, replace the next disk, until they are all replaced.
When the last disk is formatted, your system is available with the larger capacity.
Manage Storage Space
18
Page 19

ReadyNAS Duo, NV+, and 1100
Manage Your Storage Space with Flex-RAID
Flex-RAID lets you choose how many volumes to create, which RAID level to use, and
whether to use a disk as a hot spare. If another disk fails, the hot spare automatically
replaces it. Flex-RAID supports three industry-standard RAID levels:
• RAID 0. Uses all the space on the disks to store data, but it does not protect against disk
failure. It provides the best write performance of all the RAID levels because it stripes
data across all disks and it can write to all disks in parallel. If one disk fails, you lose all
the data. You can create a RAID 0 volume with one or more disks. Its capacity is the size
of the smallest disk in the volume multiplied by the number of disks in the volume. For
example, a four-disk RAID 0 volume yields the capacity of all four disks, assuming they
are identical in size.
• RAID 1. Offers the most protection against disk failure, because each disk in the volume
contains a full copy of the volume’s data. The data in a RAID 1 is protected as long as just
one disk is OK. Its capacity is the size of the smallest disk in the volume.
• RAID 5. Balances capacity and performance while protecting your data. RAID 5 stripes
data across three or more disks and stores parity information about each disk. If one disk
fails, RAID 5 technology uses the parity information about the remaining disks to
reconstruct the data that was on the failed disk, and the volume continues to serve data
without interruption, although it might be slower. When you replace the failed, the
reconstructed data is written to the new disk. The capacity of a RAID 5 volume is the
smallest disk in the volume multiplied by one less than the number of disks in the volume.
For example, a four-disk RAID 5 volume provides the capacity of three disks, assuming
all four disks are identical in size.
Change to Flex-RAID
Your ReadyNAS system uses X-RAID by default. To change to Flex-RAID, perform a factory
reset and choose Flex-RAID with RAIDar. Be aware that a factory reset erases all the data
and settings on your ReadyNAS system and that the process might take several hours.
To change to Flex-RAID:
1. Back up all the data and settings you want to save from your ReadyNAS system.
For information about backing up files, see Back Up Files on page 78. For information
about backing up settings, see Back Up and Restore Settings on page 98.
2. Launch RAIDar.
You will use it later to change between the two modes.
3. Perform a factory reset reboot.
For more information about how to perform a factory reset reboot, see the hardware
manual for your system.
4. In RAIDar, watch for Setup to display in your ReadyNAS system’s Info column.
It might take a few minutes for Setup to display in RAIDar.
Manage Storage Space
19
Page 20
ReadyNAS Duo, NV+, and 1100
5. Highlight your system and click the Setup button.
The ReadyNAS Volume Setup screen displays.
6. Select the Flex-RAID radio button.
If you do not pick a format within 10 minutes, your system reboots in the same mode that
it was previously using.
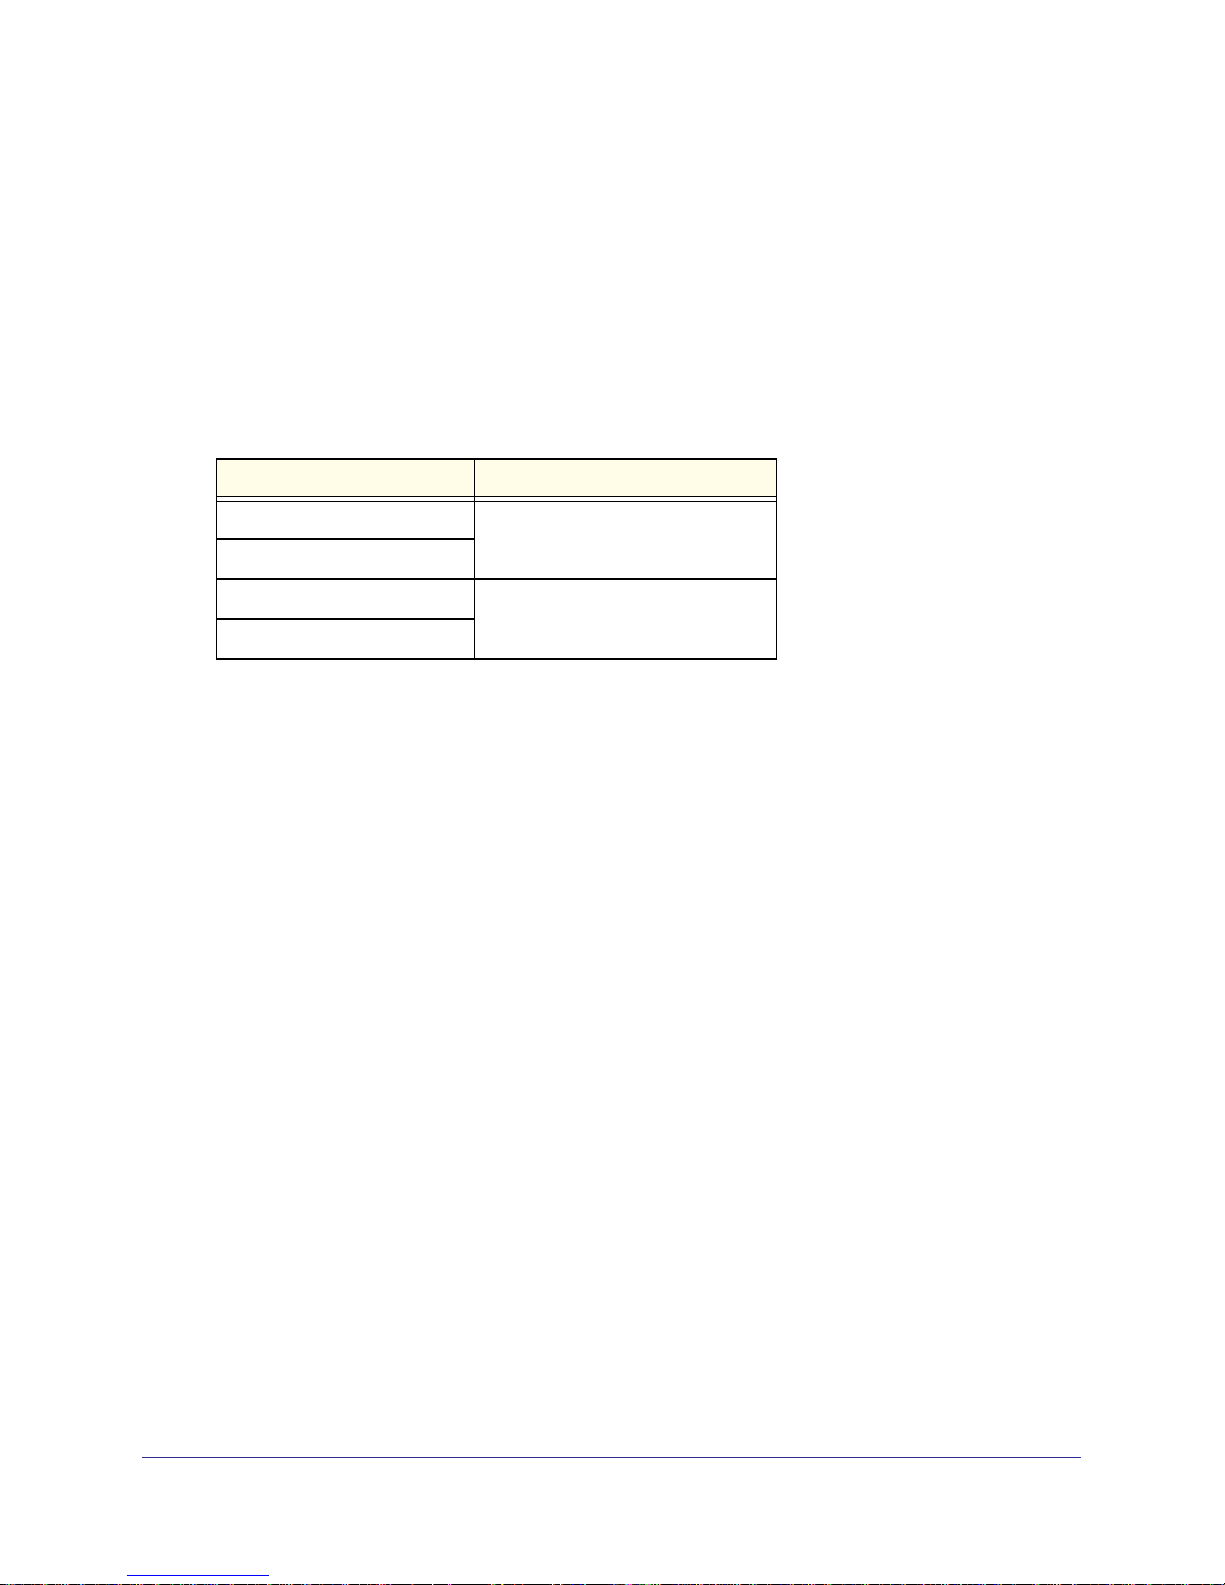
7. From the Select the desired RAID level drop-down list, select a RAID level.
If you select Auto, your ReadyNAS system automatically selects a RAID level based on
the number of disks that are installed in your system, as follows:
Number of installed disks RAID level automatically selected
1 RAID 1
2
3 RAID 5
4
8. Click the Next button.
You are prompted to confirm the volume creation command.
9. Confirm the command.
The volume is formatted. This can take quite a while, depending on the size of your hard
disk drives.
10. (Optional) Restore any backed-up data and settings.
For more information about restoring files, see Recover Backed-up Data on page 86. For
more information about restoring settings, see Back Up and Restore Settings on page 98.
Create a Volume
You can create up to four data volumes. Each disk can have up to two data partitions.
To create a volume:
1. From the FrontView main menu, select Volumes > Volume Settings.
2. If it is not already selected, click the Add Volumes tab.
3. Select the check box to the left of each disk that you want to include
4. From the Select RAID level drop-down list, select a RAID level.
in the RAID set.
Manage Storage Space
20
Page 21

ReadyNAS Duo, NV+, and 1100
5. From the Space reserved for snapshots drop-down list, select how much space to reserve
for a snapshot.
A snapshot is a read-only copy of the volume’s files as they were at a specific time. The
volume stores information about the changes that happened to the files after that time to
a separate area of the volume. If the amount of space needed for the changes surpasses
the area reserved, the volume stops maintaining the snapshot.
6. In the Desired volume size field, enter a size for the new volume.
You can enter size smaller than the one already listed.
7. Click the Apply button and click the Restart Now button.
Your ReadyNAS system restarts. When the volume is created, you receive an email
message.
Add a Disk to a Volume
To add a disk to a volume, you must delete the volume and then recreate it with the additional
disk.
To add a disk to a volume:
1. Back up the data in the volume.
For more information, see Back Up Files on page 78.
2. From the FrontView main menu, select Volumes > Volume Settings.
3. Click the tab for the volume you want to delete.
If you have just one volume, it is called Volume C.
4. Click Delete Volume.
You receive an email message when the deletion process starts and another when the
deletion process finishes.
5. Insert a new compatible disk.
For a list of compatible disks, see http://www.readynas.com/hard_disk_hcl.
For best performance, use disks that are the same make, model, and size. If you use
disks of different sizes, your system treats the disks as though they were all the same
size as the smallest disk. For example, if you have four disks, and three are 1 TB and one
is 500 GB, it treats all the disks as if they were 500 GB and gives you only 1.5 TB of
space for files.
You receive an email message alerting you that a new disk was inserted.
6. Create a new volume including the additional disk.
For more information, see Create a Volume on page 20.
7. Restore your backed-up data to the new volume.
For more information, see Recover Backed-up Data on page 86.
Manage Storage Space
21
Page 22

ReadyNAS Duo, NV+, and 1100
Replace a Disk in a Volume
You can replace a disk in a volume if you suspect it is about to fail or if you want to increase
the volume’s capacity. If the volume is formatted to use RAID 1 or RAID 5, you can replace a
disk without losing data.And if you want to increase your volume’s capacity, you can replace
each disk in the set one at a time until they are all replaced, without losing any data. If the
volume is formatted to use RAID 0, back up your data to avoid losing it.
To replace a disk in a RAID 1 or RAID 5 volume:
1. Remove the disk from your ReadyNAS system.
You receive an email message alerting you that the disk was removed and your data is no
longer protected.
2. Insert a new compatible disk.
For a list of compatible disks, see http://www.readynas.com/hard_disk_hcl.
For best performance, use disks that are the same make, model, and size. If you use
disks of different sizes, your system treats the disks as though they were all the same size
as the smallest disk. For example, if you have four disks, and three are 1 TB and one is
500 GB, your system treats all the disks as if they were 500 GB and gives you only 1.5 TB
of space for files.
You receive an email message alerting you that a new disk was inserted.
3. From the FrontView main menu, select Volumes > Volume Settings.
4. Click the Make Hot Spare button beside the new disk.
Because a disk is missing, RAIDiator automatically adds the new hot spare to the volume.
To replace a disk in a RAID 0 volume:
1. Back up the data in the volume.
For more information, see Back Up Files on page 78.
2. From the FrontView main menu, select Volumes > Volume Settings.
3. Click the tab for the volume you want to delete.
If you have just one volume, it is called Volume C.
4. Click Delete Volume.
You receive an email message when the deletion process starts and another when the
deletion process finishes.
5. Remove the disk from your ReadyNAS system.
You receive an email message alerting you that the disk was removed and your data is no
longer protected.
Manage Storage Space
22
Page 23

ReadyNAS Duo, NV+, and 1100
6. Insert a new compatible disk.
For a list of compatible disks, see http://www.readynas.com/hard_disk_hcl.
For best performance, use disks that are the same make, model, and size. If you use
disks of different sizes, your system treats the disks as though they were all the same
size as the smallest disk. For example, if you have four disks, and three are 1 TB and one
is 500 GB, your system treats all the disks as if they were 500 GB and gives you only 1.5
TB of space for files.
You receive an email message alerting you that a new disk was inserted.
7. Create a new volume including the new disk.
For more information, see Create a Volume on page 20.
8. Restore your backed-up data to the new volume.
Use USB Storage Devices
You can connect a USB storage device, such as a disk drive or a digital camera, to any USB
port on your ReadyNAS system. You can then format it, copy its contents to your ReadyNAS
system, or let others access its contents. This section describes how to format it and copy its
contents. You let users access the device’s contents in much the same way you let users
access the contents of your ReadyNAS shares. For more information, see
Store Files on
page 39.
After you set your options for a USB device and disconnect it, the options are remembered
the next time you connect the device to your ReadyNAS system.
The USB device must be formatted with one of these formats:
• FAT32
• NTFS
• EXT2
• EXT3
Manage Storage Space
23
Page 24

ReadyNAS Duo, NV+, and 1100
Manage a USB Storage Device
After you connect a USB device to your ReadyNAS, you can format it, locate it, or check its
file system.
To manage a USB storage device:
1. Connect the device to any USB port on your ReadyNAS system.
2. From the FrontView main menu, select Volumes > USB Storage.
3. From the drop-down list beside the device’s entry, select any of these options:
• Locate. Flashes the device’s LED light so you can find it more easily.
• Check Filesystem. Checks the device’s file system for problems.
• Format FAT32. Formats the device’s file system as FAT 32, erasing any content on it.
FAT32 is recognized by most newer Windows, Linux, and Unix systems and imposes
a 4 GB limitation per file.
Format EXT3. Formats the device’s file system as EXT3, erasing any content on it.
EXT3 is recognized by Linux systems and some network storage systems, retains file
ownership information, and imposes no size limitation per file.
• Disconnect. Prepares the device for disconnection. This writes out any data in the
write cache to the device to ensure that you do not lose the data.
4. Click Go.
Automatically Copy a USB Device’s Contents
You can copy the contents of a USB storage device to your ReadyNAS system whenever you
connect the device. For example, you can copy pictures from a digital camera or music from
an MP3 player.
To avoid overwriting previously copied files, the files are copied to a folder whose name is the
date and time that the files were copied.
To set up a USB device to automatically copy its contents:
1. Connect the device to any USB port on your ReadyNAS system.
2. From the FrontView main menu, select Volumes > USB Storage.
3. In the USB Flash Device Option pane, select the When a USB flash device is detected,
automatically copy the content to check box.
Manage Storage Space
24
Page 25

ReadyNAS Duo, NV+, and 1100
4. Determine where to copy the files:
• From the Share drop-down list, select the name of the share.
• In the Path field, enter the path name.
For example, to copy the files to the Vacation folder in the Pictures folder on the media
share, from the Share drop-down list, select media, and in the Path field, enter
Pictures/Vacation.
5. In the Copy as owner field, enter the name of the user you want to own the copied files on
the ReadyNAS system.
The default owner is admin.
6. Click the Apply button.
Your settings are saved.
Manage Storage Space
25
Page 26

3. Secure Files
Before you can let users access files on your ReadyNAS system, you need to select a security
mode to protect those files. Then, depending on the mode you select, you need to create user
accounts to specify who can access the files.
This chapter includes the following topics:
• Select a Security Mode
• Manage Users and Groups
• Change and Recover the Admin Password
3
26
Page 27

ReadyNAS Duo, NV+, and 1100
Select a Security Mode
The ReadyNAS Duo supports only the user security mode.
The ReadyNAS NV+ and 1100 support up to three security modes for protecting the files on
your shares:
• Share mode. This security mode offers just two levels of security for a share: Either you
protect it with a password or you do not. If you do not password protect it, anyone can
access it. If you do password protect it, anyone with the password can access it.
NETGEAR recommends that you do not use this security mode because it is not
supported by Windows 7 or later and Mac OS X v10.6 or later. Also, it is available only on
some versions of the ReadyNAS NV+ and 1100.
• User mode. This security mode provides many more security options than the share
mode. You can create any number of users, and select how much access to give each
one: You can let the user just read files, or you can let the user read, create, and modify
files. Each user must enter a password before accessing a share.
• Domain mode. This security mode is similar to user mode, except information about
users comes from a Windows server or Active Directory server that is on your local
network.
User mode is preferred for home and small office users because it is supported by the latest
versions of Windows and Mac OS X, provides strong security, and does not require a server.
Select a Security Mode
This procedure applies only to the ReadyNAS NV+ and 1100.
To select a security mode:
1. From the FrontView main menu, select Security > Security Mode.
2. Select either Share, User, or Domain.
3. Enter the name of the workgroup.
4. Click the Apply button.
Your settings are saved.
If you select the user mode, you then need to create accounts for the people who will use
your ReadyNAS system.
Secure Files
27
Page 28

ReadyNAS Duo, NV+, and 1100
Set Up a Domain Server
If your ReadyNAS NV+ or 1100 storage system is on the same network as a Windows server
or Active Directory server, you can use the user and group information that is on the server. If
you select the Display users from trusted domains option, the user and group information
displays in the Accounts screen and you can add information that is specific to your
ReadyNAS system, as follows:
• Specify disk quotas for users and groups.
• Specify email addresses for users, so they can be notified about their disk quotas.
NETGEAR does not recommend using domain mode if the server has more than 1,000
users.
This procedure applies only to the ReadyNAS NV+ and 1100.
To set up a domain server:
1. From the Domain Type drop-down list, select ADS (Active Directory server) or Domain.
2. Enter the name of the domain.
3. If you select ADS, enter the address of the realm and the OUs (organizational units).
Specify nested OUs by separating them with commas. Enter the lowest-level OU first.
4. (Optional) If you want your system to detect the IP address for the domain controller
automatically, in the Domain Controller pane, select Auto detect.
If auto detect fails, enter the IP address in the field.
5. Enter the domain administrator’s name and password.
6. (Optional) To display users from the server in the Accounts screen, select the Display users
from trusted domains check box.
If you have a large number of users, you might want to clear this check box to avoid
slowing FrontView when it displays the Accounts screen.
7. Click the Apply button.
Your settings are saved.
Secure Files
28
Page 29

ReadyNAS Duo, NV+, and 1100
Manage Users and Groups
If you selected the user security mode, you can set up user accounts. Create a user account
for each person who accesses your ReadyNAS system. When you create a share, use these
accounts to specify who can access its files.
To manage large numbers of users more efficiently, create groups. A group can contain any
number of users, and a user can belong to as many groups as you want. If you frequently
give the same list of users the same access rights to different shares, create a group that is
made up of those users.
Each user has a private home share where he or she can store personal files. Unlike a public
share, a private home share has the same name as the user name for the account and can
be accessed only by that user and by the ReadyNAS system’s administrator. You can disable
private home shares if you want to use only public shares.
Manage Users
With FrontView, you can add new users, modify existing users, and choose how to handle
the users’ private home shares.
Add Users
In the Add User screen, you can add up to five users at a time.
To add users:
1. From the FrontView main menu, select Security > User & Group Accounts.
2. Click the Add User tab.
3. For each user, follow these steps:
a. Enter the name for the user.
This is also the name for the user’s private home share.
b. (Optional) If you want the user to receive notifications, enter the user’s email
address.
The user is notified when the account is created and when the user’s data quota is
approached.
c. (Optional) If you want to specify a specific user ID (UID), enter the UID.
You need to know the UID if you plan to connect to the user’s private home share
over NFS. If you do not enter a UID, one is automatically generated.
d. Select the user’s primary group.
You can add the user to other groups in the Manage Groups screen. For more
information, see
Manage Groups on page 34.
Secure Files
29
Page 30

ReadyNAS Duo, NV+, and 1100
e. Enter the user’s password.
If you want the user to be able to change his or her password, see Manage Users
Passwords on page 31.
f. (Optional) If you want to set a limit on the amount of data that the user can copy to
all the ReadyNAS system’s shares, enter a quota.
The quota applies to all the system’s shares. For example, if the user copies 400 MB
of files to the media share and 100 MB to the user’s private home share, that is a total
of 500 MB towards that user’s quota.
If you specified an email address, the user receives a email message when the
amount of data on the shares approaches the quota.
4. Click the Apply button.
Your settings are saved.
Change a User’s Name, Password, Email Address, or Quota
After you create a user, you can change the user’s name, password, email address, and
quota.
To change a user’s name, password, email address, or quota:
1. From the FrontView main menu, select Security > User & Group Accounts.
2. From the drop-down list at the top of the screen, select Manage users.
3. Click the All tab.
4. Do any of the following:
• To change the name of the user, edit the Name field.
The user’s name is updated whereever it is used and the name of the user’s private
share also changes.
• To change the email address for the user, edit the Email field.
The user is notified when the account is created and when the data quota for that user
is approached.
• To change the password for the user, edit the Password field.
if you want the user to be able to change his or her own password, see Manage Users
Passwords on page 31.
• To change limit on the amount of total amount of data that the user can copy to the
ReadyNAS system’s shares, enter it in the Quota field.
The quota applies to all the system’s shares. For example, if the user copies 400 MB
of files to the media share and 100 MB to the user’s private home share, that is a total
of 500 MB towards that user’s quota.
5. Click the Apply button.
Your settings are saved.
Secure Files
30
Page 31

ReadyNAS Duo, NV+, and 1100
Manage Users Passwords
You can let users choose their own passwords. Note that the ReadyNAS system
administrator can always change another user’s password.
To allow users to change their passwords:
1. From the FrontView main menu, select Security > User & Group Accounts.
2. From the drop-down list at the top of the screen, select Preferences.
3. From the Allow users to change their passwords drop-down list, select Enabled.
4. Click the Apply button.
Your settings are saved.
To change a password as a user:
1. Using a web browser, go to http://<NAS_IP_address>/shares.
Note that <NAS_IP_address> is the IP address of the ReadyNAS system.
For example, if the IP address is 10.1.10.102, enter http://10.1.10.102/shares/.
2. If asked, log in with your user name and password.
3. Click Password.
4. Enter the current password, and then enter the new password twice.
5. Click the Apply button.
Your settings are saved.
Customize Private Home Shares
If you want to use only public shares, you can disable private home shares. And if you use
private home shares, you can control how to access them, where they are created, whether
to use the Recycle Bin from network-attached devices that support the CIFS file-sharing
protocol, and when to warn users about disk quotas.
Disable Private Home Shares
If you want to use users and groups to control access to public shares, but you do not want to
use private home shares, you can prevent users from accessing their private home shares.
To prevent users from accessing home shares:
1. From the FrontView main menu, select Security > User & Group Accounts.
2. From the drop-down list at the top of the screen, select Preferences.
Secure Files
31
Page 32

ReadyNAS Duo, NV+, and 1100
3. From the Private home shares for users drop-down list, select Disabled.
Any files in existing shares are not erased, and users can access those files if you enable
home shares again.
4. Click the Apply button.
Your settings are saved.
Select Where to Create New Private Home Shares
If you connected an external drive to your ReadyNAS system, or if you are using Flex-RAID
to manage your volumes, your ReadyNAS system contains multiple volumes. You can select
which volume contains the private home shares for new users.
To select where to create new home shares:
1. From the FrontView main menu, select Security > User & Group Accounts.
2. From the drop-down list at the top of the screen, select Preferences.
3. From the Default home volume for new users drop-down list, select a volume.
When you create new users, their home shares are created on that volume. The home
shares for existing users remain where they are.
4. Click the Apply button.
Your settings are saved.
Manage Private Home Shares Access
Private home shares are automatically available with CIFS and AFP, as long as those
protocols are enabled. You can also share private home shares with NFS and FTP.
To manage private home share access:
1. From the FrontView main menu, select Security > User & Group Accounts.
2. From the drop-down list at the top of the screen, select Preferences.
3. (Optional) To let users access their home shares over NFS, from the Export home shares
over NFS drop-down list, select Enabled.
The private home shares are not secure over NFS because you do not need to enter a
user name or password to access them.
4. (Optional) To let users access their home shares over FTP, from the Make home shares
available over FTP drop-down list, select Enabled.
5. Click the Apply button.
Your settings are saved.
Secure Files
32
Page 33

ReadyNAS Duo, NV+, and 1100
Use the Recycle Bin in Private Home Shares
You can decide whether files that users delete are immediately deleted or are moved to a
Recycle Bin on the share. You can also determine when items in the Recycle Bin are
permanently deleted.
This option is available only for network-attached devices that use the CIFS file-sharing
protocol.
To use the Recycle Bin for home shares:
1. From the FrontView main menu, select Security > User & Group Accounts.
2. From the drop-down list at the top of the screen, select Preferences.
3. From the Recycle Bin for private home shares drop-down list, select Enabled.
4. (Optional) To automatically delete files that have been in the Recycle Bin for a number of
days, in the Remove Recycle Bin files older than this many days field, enter a number of
days.
5. (Optional) To automatically delete files when the contents of the Recycle Bin reach a certain
size, in the Limit Recycle Bin to this many MB field, enter a limit in megabytes.
6. Click the Apply button.
Your settings are saved.
Warn Users about Disk Quotas
You can determine when your ReadyNAS system warns users that they are about to exceed
the total amount of data they can copy to all of the ReadyNAS system’s shares.
A user receives a warning only if you entered an email address for that account.
To select when to warn users about disk quotas:
1. From the FrontView main menu, select Security > User & Group Accounts.
2. From the drop-down list at the top of the screen, select Preferences.
3. From the Warn user when disk quota is drop-down list, select a percentage.
4. Click the Apply button.
Your settings are saved.
Secure Files
33
Page 34

ReadyNAS Duo, NV+, and 1100
Manage Groups
With FrontView, you can add new groups, modify existing ones, and add users to a group.
Add Groups
In the Add Group screen, you can add up to five groups at a time.
To add groups:
1. From the FrontView main menu, select Security > User & Group Accounts.
2. From the drop-down list at the top of the screen, select Manage Groups.
3. Click the Add Group tab.
4. For each group, follow these steps:
a. Enter a name for the group.
b. (Optional) If you want to specify a specific group ID (UID), enter a GID.
You need to know the GID if you plan to connect to users’ home shares over NFS. If
you do not enter a GID, one is automatically generated.
c. (Optional) To set a limit on the amount of total amount of data that the primary users
in this group can copy to all the ReadyNAS system’s shares, enter a quota.
When the quota is approached, the group’s users and the ReadyNAS system
administrator’s receive an email message.
5. Click the Apply button.
Your settings are saved.
Manage Users in a Group
You can use FrontView to manage the users in a group.
To manage users in a group:
1. From the FrontView main menu, select Security > User & Group Accounts.
2. From the drop-down list at the top of the screen, select Manage Groups.
3. Click the All tab.
4. In the Secondary Members field beside the group’s name, edit the list of the user names.
Separate each user name with a comma.
5. Click the Apply button.
Your settings are saved.
If you enter an incorrect user name, FrontView displays a warning saying that the user
was not added.
Secure Files
34
Page 35

ReadyNAS Duo, NV+, and 1100
Change a Group Name or Quota
You can change the name or disk quota assigned to existing groups.
To change a group name, group ID, or quota:
1. From the FrontView main menu, select Security > User & Group Accounts.
2. From the drop-down list at the top of the screen, select Manage Groups.
3. Click the All tab.
4. (Optional) To change the name of the group, edit the Name field.
5. (Optional) To change the limit on the amount of total amount of data that the primary users
in this group can copy to all the ReadyNAS system’s shares, edit the Quota field.
6. Click the Apply button.
Your settings are saved.
Import and Export Users
You can export and import information about the users and groups on your ReadyNAS
system. This lets you transfer the users and groups from one ReadyNAS system to another.
If you need to create lots of users and groups at once, you can create a text file with
information about all the users and groups and import it.
For users, an export file includes this information about each user:
• User name
• Password
• Primary group
• Email address
• User ID
• Quota
For groups, an export file includes this information about each group:
• Group name
• Group ID
• Quota
• List of member names
Secure Files
35
Page 36

ReadyNAS Duo, NV+, and 1100
Export Users and Groups
To export users:
1. From the FrontView main menu, select Security > User & Group Accounts.
2. From the drop-down list at the top of the screen, select Export Users.
3. Click Download User List.
The user list downloads to your web browser’s downloads folder.
To export groups:
1. From the FrontView main menu, select Security > User & Group Accounts.
2. From the drop-down list at the top of the screen, select Export Group.
3. Click Download Group List.
The group list downloads to your web browser’s downloads folder.
Create User and Group Files
You can create a list of users or groups in any text editor and import it to your ReadyNAS
system. This is helpful if you have a long list of users or groups.
Each line in the file specifies a single user or group and contains the same fields used in the
Add Users or Add Groups screen. The fields are separated by commas and spaces around
the commas are ignored. If a field is blank, the default is used instead.
User Text Files
For users, each line contains the following:
<user_name>, <password>, <primary_group_ID>, <email_address>, <user_ID>, <quota>
The user name and password are required and the other fields are optional.
For example, the following line creates the user fred with the password rock45, email address
fred@example.com, a quota of 10 Mb, and sets the primary group ID and user ID to defaults:
fred, rock45, , fred@example.com, , 10
Group Text Files
For groups, each line contains the following:
<group_name>, <group_ID>, <quota>, <user_1>:<user_2>:<user_3>...
The group name is required, and the other fields are optional. Note that user names are
separated by colons instead of commas.
For example, the following line creates a group named marketing with the members maria,
fred, and sam and sets the group ID and quota to defaults:
marketing, , , maria:fred:sam
Secure Files
36
Page 37

ReadyNAS Duo, NV+, and 1100
Import Users and Groups
To import users:
1. Create a text file containing a comma-separated list of users that you want to import.
2. From the FrontView main menu, select Security > User & Group Accounts.
3. From the drop-down list at the top of the screen, select Import Users.
4. Click Choose File.
A dialog box displays.
5. Select the file and click the Open button.
The dialog box closes.
6. Click the Import Users button.
The specified users are added to your user list.
To import groups:
1. Create a text file containing a comma-separated list of groups that you want to import.
2. From the FrontView main menu, select Security > User & Group Accounts.
3. From the drop-down list at the top of the screen, select Import Groups.
4. Click Choose File.
A dialog box displays.
5. Select the file and click the Open button.
The dialog box closes.
6. Click the Import Groups button.
The specified groups are added to your group list.
Secure Files
37
Page 38

ReadyNAS Duo, NV+, and 1100
Change and Recover the Admin Password
You can change the password you need to enter before you can use FrontView. You can also
choose a security question to be asked if you forget the password. If you forget your
password, you can visit a special website to answer the security question. If you answer
correctly, a new password is emailed to the specified email address.
If you forget the password and the answer to the security question, reinstall your system’s
operating system to reset the password. This resets all your system’s settings to their default
values but does not erase any of your system’s files. For more information, see the hardware
manual for your system.
To change the admin password:
1. From the FrontView main menu, select Security > Admin Password.
2. In the New admin password field, enter a new password.
3. In the Retype admin password field, enter the new password.
4. If you want to change the security question and answer, in the Password recovery question
field, enter a new question, and in the Password recovery answer field, enter a new answer.
5. If you want to change the email address where the password is sent after you answer the
security question, in the Password recovery email address field, enter a new email address.
If you need to recover your password later, you must remember the email address you
entered here and enter it exactly.
6. Click the Apply button.
Your settings are saved.
To recover the admin password:
1. Using a web browser, go to http://<NAS_IP_address>password_recovery.
Note that <NAS_IP_address> is your ReadyNAS system’s IP address. For example, if the
IP address is 10.1.10.103, enter http://10.1.10.103/password_recovery.
2. Enter the email address you entered when you set the password.
You must enter exactly as you did then. It is case sensitive.
3. Enter the answer to the security question.
It is case-sensitive.
4. Click Reset password and email.
If you entered the correct email address and answer, an email message is sent to the
email address with a new password.
If you cannot remember the correct email address and answer, you can reinstall your
system’s operating system, which resets all the system’s settings to the defaults, but does
not erase any files stored on it. For more information, see the hardware manual for your
system.
Secure Files
38
Page 39

4. Store Files
This chapter describes how to create shares so users can store files on your ReadyNAS system,
how users can access them, who can access them, and other options. This chapter also
describes how users can access your shares.
This chapter includes the following topics:
• Basic Share Concepts
• Manage File-Sharing Protocols
• Create a Share
• Manage Share Access
• Set Options for a Share
• Access a Share
4
39
Page 40

ReadyNAS Duo, NV+, and 1100
Basic Share Concepts
The volume or volumes on your ReadyNAS storage system are divided into shares, which
are similar to folders or directories.
Data Organization
Shares are the way that you group your data. You might want to group your data by type, for
example:
• Photos
• Music
• Videos
• Documents
Another option is to group your data by user:
• Tom
• Rick
• Mary
Organizations might choose to group data by department:
• Accounting
• Sales
• Personnel
You can combine these schemes or come up with your own scheme.
Your ReadyNAS storage system comes with two shares already created:
• backup
• media
If you want, you can delete or rename these shares. You can create other shares to organize
your data.
Store Files
40
Page 41

ReadyNAS Duo, NV+, and 1100
File-Sharing Protocols
Shares can be accessed over a network. Network access to data stored on your ReadyNAS
system is managed by file-sharing protocols, which handle the transfer of data. You can
access a share on your ReadyNAS from other network-attached devices (for example, a
laptop or a tablet) if the share is enabled for a file-sharing protocol that the network-attached
device supports. You can enable a share to support more than one fire-sharing protocol.
The following table lists the file-sharing protocols that your ReadyNAS storage system
supports.
Table 2. Supported file-sharing protocols
Protocol Description Recommendation
CIFS
(Common Internet
File Service)
NFS
(Network File
Service)
AFP
(Apple File Protocol)
FTP
(File Transfer
Protocol) and
FTPS
(FTP with SSL
encryption)
HTTP
(Hypertext Transfer
Protocol) and
HTTPS
(HTTP with SSL
encryption)
Used mainly by Microsoft Windows
computers and sometimes by Mac OS X
computers, this protocol is enabled by
default. It is sometimes referred to as the
SMB (Server Message Block) file-sharing
protocol.
Used by Linux and Unix computers. Your
ReadyNAS system supports NFS v3 over
UDP and TCP.
Used by Mac OS 9 and Mac OS X
computers. Your ReadyNAS system supports
AFP 3.2.
Used by many public file upload and
download sites. FTPS is more secure than
FTP.
Used on the Internet. HTTPS is more secure
than HTTP.
If Windows users will access your storage
system, enable this protocol.
If Linux or Unix users will access your
storage system, enable this protocol.
If only Mac OS 9 and OS X users will
access your storage system, enable this
protocol. However, in a mixed Windows
and Mac environment, NETGEAR
recommends using CIFS only.
If users will access your storage system
using FTP, enable this protocol.
If users will access your storage system
from a device with a web browser,
including a smart phone or tablet
computer, enable this protocol.
HTTPS is enabled by default and cannot
be disabled because FrontView uses
HTTPS to manage your ReadyNAS
system.
Rsync Fast file-transfer protocol that uses a
delta-transfer algorithm that sends only the
differences between the source file and the
existing file.
If users will access your storage system
from a device that supports Rsync, enable
this protocol.
Store Files
41
Page 42
ReadyNAS Duo, NV+, and 1100
When users access a share, it displays in their computer like a hard disk, and users can
interact with it like they interact with a hard disk, depending on the access rights that are
granted to the share and protocol combination.
Access Rights
For each share you create, you can determine the access rights for each file-sharing protocol
that you enable for that share. The following table lists access rights and shows the icon that
FrontView uses for each access right.
Table 3. Access rights options
Access right FrontView icon Description
Disabled
Read-only
Read/write
Read-only with
exceptions
Read/write with
exceptions
No one can access this share using this protocol.
Users can read files on this share using this protocol, but cannot edit or
create files on this share using this protocol.
Users can read, edit, and create files on this share using this protocol.
Unless otherwise specified, users can only read files on this share using
this protocol. At least one of the following exceptions exists:
• Access to this share using this protocol is read-only and allowed only for
specified hosts.
• Access to this share using this protocol is read-only except for one or
more users or groups that are granted read/write permission.
• Access to this share using this protocol is disabled except for one or
more users or groups that are granted read-only privilege.
Unless otherwise specified, users can read, edit, and create files on this
share using this protocol. At least one of the following exceptions exists:
• Access to this share using this protocol is read-only and allowed only for
specified hosts.
• Access to this share using this protocol is read-only except for one or
more users or groups that are granted read/write permission.
• Access to this share using this protocol is disabled except for one or
more users or groups that are granted read-only privilege.
Store Files
42
Page 43

ReadyNAS Duo, NV+, and 1100
Manage File-Sharing Protocols
By default, the CIFS and HTTPS file-sharing protocols are enabled on your ReadyNAS
storage system. If users access a share with another protocol, enable it in the Standard File
Protocols screen, which is shown in the following figure.
Figure 3. Standard File Protocol screen
Store Files
43
Page 44

ReadyNAS Duo, NV+, and 1100
For best performance, enable only those file-sharing protocols that you use. For example, if
you do not use Linux or Unix computers to transfer files to and from your ReadyNAS system,
disable the NFS file-sharing protocol. Disabling file-sharing protocols that you do not use
maximizes system memory and improves system performance.
To enable or disable the CIFS file-sharing protocol:
1. From the FrontView main menu, select Services > Standard File Protocols.
2. Select or clear the CIFS check box.
3. Click the Apply button.
Your changes are saved.
To enable or disable the NFS file-sharing protocol:
1. From the FrontView main menu, select Services > Standard File Protocols.
2. Select or clear the NFS check box.
3. (Optional) If access to NFS shares is slow, adjust the NFS thread count.
4. Click the Apply button.
Your changes are saved.
To enable or disable the AFP file-sharing protocol:
1. From the FrontView main menu, select Services > Standard File Protocols.
2. Select or clear the AFP check box.
3. (Optional) If you are enabling the AFP file-sharing protocol, choose how to advertise the
shares available over AFP:
• If Mac computers using Mac OS X v10.1 or earlier are accessing the share, select
Advertise AFP service over AppleTalk.
• If Mac computers using Mac OS X v10.2 or later are accessing the share, Select
Advertise AFP service over Bonjour.
4. Click the Apply button.
Your changes are saved.
Store Files
44
Page 45

ReadyNAS Duo, NV+, and 1100
To enable or disable the FTP file-sharing protocol:
1. From the FrontView main menu, select Services > Standard File Protocols.
2. Select or clear the FTP check box.
3. If you are enabling the FTP file-sharing protocol, manage the following options:
• Authentication mode. If you want to allow only anonymous access to all FTP
shares, from the Authentication mode drop-down list, select Anonymous. Users can
log in only by using ‘anonymous” as their user name and their email address as the
password. Users cannot log in with their user names.
If you want users to log in with their user names and passwords, from the
Authentication mode drop-down list, select User.
• Upload resumption. If uploads sometimes fail before they finish, from the Allow
upload resumes drop-down list, select Enabled. If you lose your connection to the
ReadyNAS system during an upload, log in to the FTP share again, start the upload,
and it continues from where it left off.
4. Click the Apply button.
Your changes are saved.
To enable or disable the HTTP file-sharing protocol:
1. From the FrontView main menu, select Services > Standard File Protocols.
2. Select or clear the HTTP check box.
3. (Optional) If you are enabling the HTTP file-sharing protocol, set the following options:
• Redirect default Web access to this share. Select a share from this drop-down list if
you want to automatically redirect http://<ReadyNAS_IP_address> to that share. This
is useful if you do not want to expose your default share listing to outsiders. To
redirect to a share, create an index file (such as index.htm or index.html) in your
target share and enable the HTTP protocol for read-only access to that share.
• Login authentication on this share. Specifies whether or not authentication is
required if users are browsing to the user-created web content on this share.
4. Click the Apply button.
Your changes are saved.
To enable or disable the Rsync file-sharing protocol:
1. From the FrontView main menu, select Services > Standard File Protocols.
2. Select or clear the Rsync check box.
3. Click the Apply button.
Your changes are saved.
Store Files
45
Page 46

ReadyNAS Duo, NV+, and 1100
Create a Share
You can use FrontView to create a share.
Create a Share with the User or Domain Security Mode
With the user or domain security mode, you can create a share with just a name.
To create a share under the user or domain security mode:
1. From the FrontView main menu, select Shares > Add Shares.
You can create up to five new shares at once. For each share, follow these steps:
a. In the Name and Description fields, enter a name and description for the share.
b. To let anyone access the share by connecting to it as a guest, select Public access.
2. Click the Apply button.
The specified shares are created. Anyone on a Mac or Windows PC who has an account
on the ReadyNAS system can read, write, and create files on the share. If you select
public access for a share, anyone who connects to that share as a guest can read, write,
and create files on the share.
Create a Share with the Share Security Mode
With the share security mode, you can create a share with a name, a password, and a limit
on the amount of data it can contain. The share security mode is available only on some
versions of ReadyNAS NV+ and 1100 storage systems. This security mode is deprecated
because it is not supported by Windows 7 or later and Mac OS X v10.6 or later.
To create a share under the share security mode:
1. From the FrontView main menu, select Shares > Add Shares.
You can create up to five new shares at once. For each share, follow these steps:
a. in the Name and Description fields, enter a name and description for the share.
b. To secure your share, enter a password.
If you leave the Password field blank, any user can access the share without entering
a password.
c. To set a limit on the amount of data that the share can contain, enter a quota.
When the amount of data stored on the share approaches the quota, the ReadyNAS
system’s administrator receives a warning email message.
If you set quota to zero, no quota is enforced.
2. Click the Apply button.
Store Files
46
Page 47
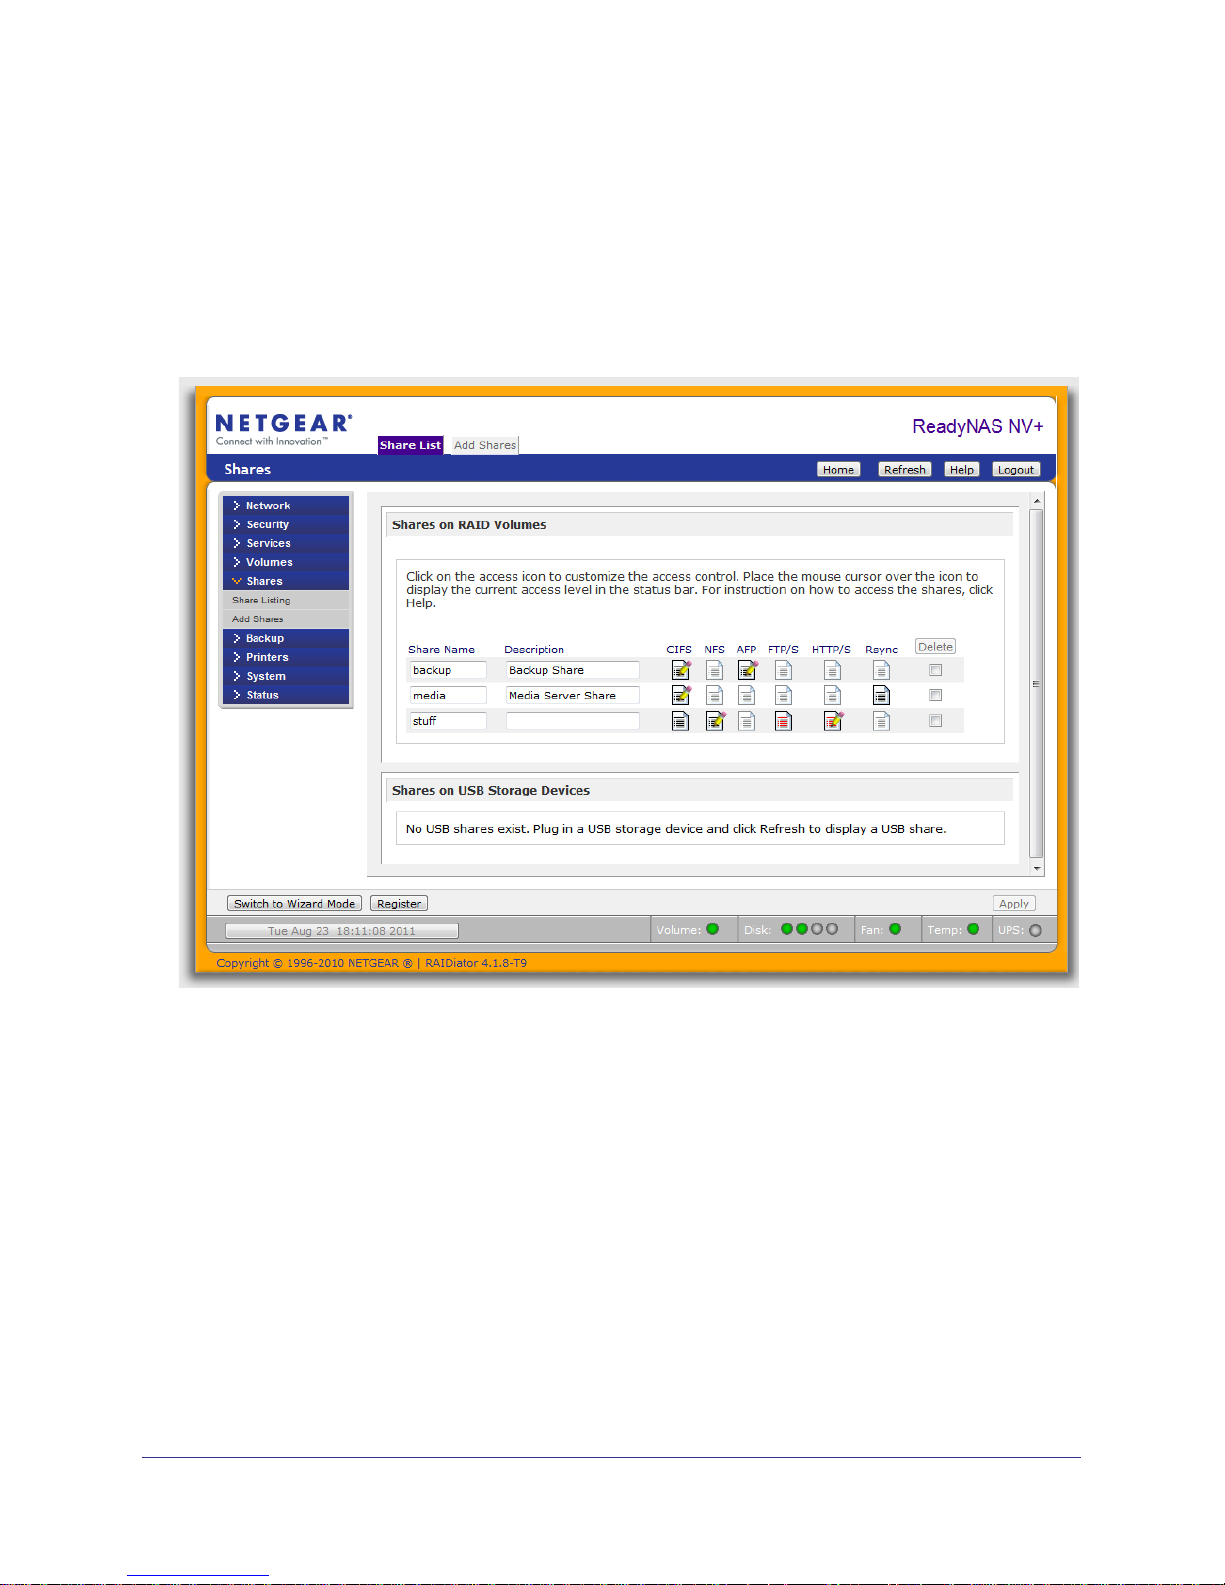
ReadyNAS Duo, NV+, and 1100
The specified shares are created. Anyone on a Mac or Windows computer who has the
share’s password can read, write, and create files on the share.
Manage Share Access
Use FrontView’s Share Listing screen, which is shown in the following figure, to choose who
can access your shares.
Figure 4. Share Listing screen
After you create a share, it is available to some users by default. If you use the user or
domain security mode, it is available to all Windows and Mac users who have an account on
your ReadyNAS system. If you use the share security mode, the share available to anyone
with the share’s password.
To make a share available to others users, determine what type of devices they are likely to
use to access the share, and then make the share available over the appropriate file-sharing
protocol or protocols.
For more information, see File-Sharing Protocols on page 41.
Store Files
47
Page 48

ReadyNAS Duo, NV+, and 1100
A share can have different access rights for each file-sharing protocol that it is enabled for it.
To change the access rights for a share, click the icon that is under the file-sharing protocol
that you want to use to share it. When you specify what type of access to give users, you
have three choices:
• No access. A user cannot read, edit, or create files on the share.
• Read-only access. A user can only read files, and cannot edit or create files.
• Read/write access. A user can read, edit, and create files.
For more information, see Access Rights on page 42.
Manage Share Access with the User or Domain Security Mode
With the user or domain security mode, you can specify which users can access a share and
what kind of access they can have. You can specify who can access it with users and groups
you create, as described in
Select Who Can Access a Share Using CIFS with the User Mode
Manage Users and Groups on page 29.
If users access your share with CIFS, you have these choices for security:
• If your ReadyNAS system is on a small local network and you can trust everyone on the
network, you can let anyone on the network access the share.
• If you need more security, you can specify that only users with accounts on your
ReadyNAS server can access the share, and give them all the same level of access.
• If you need more flexibility, you can specify which users can access the share, and what
type of access each can have.
• For the most security, you can specify that a user must be at a specific computer to
access the share. If that computer is in a locked room, users must know the correct user
name and password and they need a key to the room.
To specify a computer, you use its IP address, for example, 10.1.10.104.
To let anyone access your share using CIFS:
1. From the FrontView main menu, select Shares > Share Listing.
2. To the right of the share you want to change, click the icon for CIFS.
If FrontView does not display an icon for CIFS, you need to enable this file-sharing
protocol on your ReadyNAS system. For more information, see
Manage File-Sharing
Protocols on page 43.
3. From the Default Access drop-down list, select the access to give anyone who can access
your share.
4. In the Share Access Restrictions pane, select the Allow guest access check box.
5. Click the Apply button.
If a user connects to your share as a guest, that user has the access specified in the
Default Access drop-down list.
Store Files
48
Page 49

ReadyNAS Duo, NV+, and 1100
To let anyone with a ReadyNAS account access your share using CIFS:
1. From the FrontView main menu, select Shares > Share Listing.
2. To the right of the share you want to change, click the icon for CIFS.
If FrontView does not display an icon for CIFS, you need to enable this file-sharing
protocol on your ReadyNAS system. For more information, see
Manage File-Sharing
Protocols on page 43.
3. From the Default Access drop-down list, select the access to give anyone who can access
your share.
4. Click the Apply button.
Anyone with an account on your ReadyNAS can connect to the share with a user name
and password, and the user has the access specified in the Default Access drop-down
list.
To specify which users can access a share using CIFS:
1. From the FrontView main menu, select Shares > Share Listing.
2. To the right of the share you want to change, click the icon for CIFS.
If FrontView does not display an icon for CIFS, you need to enable this file-sharing
protocol on your ReadyNAS system. For more information, see
Manage File-Sharing
Protocols on page 43.
3. Determine which users can access the share, as follows:
• To give some users read/write access and give all other users read-only access,
follow these steps:
a. From the Default Access drop-down list, select Read-only.
b. In the Share Access Restrictions pane, select the Write-enabled users check
box.
c. In the Write-enabled users field and the Write-enabled groups field, enter the
names of users and groups to whom you want to grant read/write access.
• To give some users read-only access and give all other users read/write access,
follow these steps:
a. Select Read/write from the Default Access drop-down list.
b. In the Share Access Restrictions pane, select the Read-only users check box.
c. In the Read-only users field and the Read-only groups field, enter the names of
users and groups to whom you want to grant read-only access.
• To give some users read-only access, give some users read/write access, and give all
other users no access, follow these steps:
a. Select Disabled from the Default Access drop-down list.
b. In the Share Access Restrictions pane, select the Read-only users check box.
c. In the Read-only users field and the Read-only groups field, enter the names of
users and groups to whom you want to grant read-only access.
Store Files
49
Page 50

ReadyNAS Duo, NV+, and 1100
d. Select the Write-enabled users check box.
e. In the Write-enabled users field and the Write-enabled groups field, enter the
names of users and groups to whom you want to grant read/write access.
4. Click the Apply button.
If a user name is specified in the Read-only users, Read-only groups, Write-enabled
users, or Write-enabled groups fields, that user has that access to the share. If a user is
not specified in one of those fields, the user has the access specified in the Default
Access drop-down list.
To specify which computers can access a share using CIFS:
1. From the FrontView main menu, select Shares > Share Listing.
2. To the right of the share you want to change, click the icon for CIFS.
If FrontView does not display an icon for CIFS, you need to enable this file-sharing
protocol on your ReadyNAS system. For more information, see
Manage File-Sharing
Protocols on page 43.
3. In the Share Access Restrictions pane, select the Hosts allowed access check box.
4. Enter a comma-separated list of IP addresses for the computers that you want to grant
access rights.
5. Click the Apply button.
Users at other computers cannot access the share, even if their user name or group is
listed in another field.
Select Who Can Access a Share Using AFP with the User Security Mode
If users access your share with AFP, you have these choices for security:
• If your ReadyNAS system is on a small local network and you can trust everyone on the
network, you can let anyone on the network access the share.
• If you need more security, you can specify which users can access the share and what
type of access they can have.
• If you need more flexibility, you can specify which users can access the share, and what
type of access each can have.
To let anyone access a share using AFP:
1. From the FrontView main menu, select Shares > Share Listing.
2. To the right of the share you want to change, click the icon for AFP.
If FrontView does not display an icon for AFP, you need to enable this file-sharing
protocol on your ReadyNAS system. For more information, see
Protocols on page 43.
Manage File-Sharing
3. From the Default Access drop-down list, select the access to give anyone who can access
your share.
Store Files
50
Page 51

ReadyNAS Duo, NV+, and 1100
4. Select the Allow guest access check box.
5. Click the Apply button.
If a user connects to your share as a guest, that user has the access specified in the
Default Access drop-down list.
To let anyone with a ReadyNAS account access a share using AFP:
1. From the FrontView main menu, select Shares > Share Listing.
2. To the right of the share you want to change, click the icon for AFP.
If FrontView does not display an icon for AFP, you need to enable this file-sharing
protocol on your ReadyNAS system. For more information, see
Manage File-Sharing
Protocols on page 43.
3. From the Default Access drop-down list, select the access to give anyone who can access
your share.
4. Click the Apply button.
Anyone with an account on your ReadyNAS system can connect to the share with a user
name and password, and the user has the access specified in the Default Access
drop-down list.
To select who can access a share using AFP:
1. From the FrontView main menu, select Shares > Share Listing.
2. To the right of the share you want to change, click the icon for AFP.
If FrontView does not display an icon for AFP, you need to enable this file-sharing
protocol on your ReadyNAS system. For more information, see
Protocols on page 43.
3. Determine which users can access the share, as follows:
• To give some users read/write access and give all other users read-only access,
follow these steps:
a. From the Default Access drop-down list, Select Read-only.
b. In the Share Access Restrictions pane, select the Write-enabled users check
box.
c. In the Write-enabled users field and the Write-enabled groups field, enter the
names of users and groups to whom you want to grant read/write access.
• To give some users read-only access and give all other users read/write access,
follow these steps:
a. From the Default Access drop-down list, Select Read/write.
b. In the Share Access Restrictions pane, select Read-only users.
c. In the Read-only users field and the Read-only groups field, enter the names of
users and groups to whom you want to grant read-only access.
Manage File-Sharing
Store Files
51
Page 52

ReadyNAS Duo, NV+, and 1100
• To give some users read-only access, give other users read/write access, and give all
other users no access, follow these steps:
a. From the Default Access drop-down list, Select Disabled.
b. In the Share Access Restrictions pane, select the Read-only users check box.
c. In the Read-only users field and the Read-only groups field, enter the names of
users and groups to whom you want to grant read-only access.
d. In the Share Access Restrictions pane, select the Write-enabled users check
box.
e. In Write-enabled users field and the Write-enabled groups field, enter the names
of users and groups to whom you want to grant read/write access.
4. Click the Apply button.
If a user name is specified in the Read-only users, Read-only groups, Write-enabled
users, or Write-enabled groups fields, that user has that access to the share. If a user
name is not specified in one of those fields, the user has the access specified in the
Default Access drop-down list.
Select Who Can Access a Share Using NFS with the User Security Mode
If users access your share with NFS, you can specify which computers have access to it, and
what type of access each one has.
To specify a computer, you use its IP address, for example, 10.1.10.104.
To select which computers access a share using NFS:
1. From the FrontView main menu, select Shares > Share Listing.
2. To the right of the share you want to change, click the icon for NFS.
If FrontView does not display an icon for NFS, you need to enable this file-sharing
protocol on your ReadyNAS system. For more information, see
Protocols on page 43.
3. Determine which computers can access the share, as follows:
• To give some computers read/write access and give all other computers read-only
access, follow these steps:
a. From the Default Access drop-down list, select Read-only.
b. In the Share Access Restrictions pane, select the Write-enabled hosts check
box and enter the IP addresses for the computers that you want to have
read/write access.
• To give some computers read-only access and give all other computers read/write
access, follow these steps:
Manage File-Sharing
a. Select Read/write from the Default Access drop-down list.
b. In the Share Access Restrictions pane, select the Read-only hosts check box
and enter the IP addresses for the computers that you want to have read-only
access.
Store Files
52
Page 53

ReadyNAS Duo, NV+, and 1100
• To give some computers read-only access, give some computers read/write access,
and give all other computers no access, follow these steps:
a. From the Default Access drop-down list, select Disabled.
b. In the Share Access Restrictions pane, select the Read-only hosts check box
and enter the IP addresses for the computers that you want to have read-only
access.
c. In the Share Access Restrictions pane, select the Write-enabled hosts check
box and enter the IP addresses for the computers that you want to have
read/write access.
4. Click the Apply button.
If a computer is specified in the Read-only hosts or Write-enabled hosts fields, users at
that computer have that access to the share. If a computer is not specified in one of those
fields, users at that computer have the access specified in the Default Access drop-down
list.
Select Who Can Access a Share Using FTP with the User Security Mode
If users access your share with FTP, you have these choices for security:
• If your ReadyNAS system is on a small local network and you can trust everyone on the
network, you can let anyone on the network access the share anonymously.
• If you need more security, you can specify which users can access the share and what
type of access they can have.
• For the most security, you can specify that a user must be at a specific computer to
access the share. If that computer is in a locked room, users must know the correct user
name and password and they need a key to the room.
To specify a computer, you use its IP address, such as 10.1.10.104.
To let anyone access a share anonymously using FTP:
1. From the FrontView main menu, select Services > Standard File Protocols.
2. Select the FTP check box if it is not already selected.
3. From the Authentication mode drop-down list, select Anonymous.
4. From the FrontView main menu, select Shares > Share Listing.
5. To the right of the share you want to change, click the icon for FTP/S.
6. From the Default Access drop-down list, select the access to give anyone who can access
your share.
7. Click the Apply button.
Anyone can connect to the share and the user has the access specified in the Default
Access drop-down list.
Store Files
53
Page 54

ReadyNAS Duo, NV+, and 1100
To select who can access a share using FTP:
1. From the FrontView main menu, select Services > Standard File Protocols.
2. Select the FTP check box if it is not already selected.
3. From the Authentication mode drop-down list, choose User.
4. From the FrontView main menu, select Shares > Share Listing.
5. To the right of the share you want to change, click the icon for FTP/S.
6. Determine which computers can access the share, as follows:
• To give some users read/write access and give all other users read-only access,
follow these steps:
a. From the Default Access drop-down list, select Read-only.
b. In the Share Access Restrictions pane, select the Write-enabled hosts check
box.
c. In the Write-enabled users field and the Write-enabled groups field, enter the
user names and group names to whom you want to grant read/write access.
• To give some users read-only access and give all other users read/write access,
follow these steps:
a. From the Default Access drop-down list, select Read/write.
b. In the Share Access Restrictions pane, select the Read-only hosts check box.
c. In the Read-only users field and the Read-only groups field, enter the user
names and group names to whom you want to grant read/write access.
• To give some computers read-only access, give some computers read/write access,
and give all other computers no access, follow these steps:
a. From the Default Access drop-down list, Select Disabled.
b. In the Share Access Restrictions pane, select the Write-enabled hosts check
box.
c. In the Write-enabled users field and the Write-enabled groups field, enter the IP
addresses of the computers that you want to have read/write access.
d. In the Share Access Restrictions pane, select the Read-only hosts check box.
e. In the Read-only users field and the Read-only groups field, enter the IP
addresses of the computers that you want to have read/write access.
7. Click the Apply button.
If a user name is specified in the Read-only users, Read-only groups, Write-enabled
users, or Write-enabled groups fields, that user has that access to the share. If a user
name is not specified in one of those fields, the user has the access specified in the
Default Access drop-down list.
Store Files
54
Page 55

ReadyNAS Duo, NV+, and 1100
To select which computers can access a share using FTP:
1. From the FrontView main menu, select Shares > Share Listing.
2. To the right of the share you want to change, click the icon for FTP/S.
If FrontView does not display an icon for FTP, you need to enable this file-sharing
protocol on your ReadyNAS system. For more information, see
Manage File-Sharing
Protocols on page 43.
3. To specify that users must be at a specific computer before they have read-only access to
the share, follow these steps:
a. In the Share Access Restrictions pane, select the Read-enabled hosts check box.
b. In the Read-enabled hosts field, enter a comma-separated list of the IP addresses of
the computers.
Users at other computers cannot access the share, even if their user names or
groups are listed in another field.
4. To specify that users must be at a specific computer before they have read/write access to
the share, follow these steps:
a. In the Share Access Restrictions pane, select the Write-enabled hosts check box.
b. In the Write-enabled hosts field, enter a comma-separated list of the network
addresses for the computers
Users at other computers cannot access the share, even if their user names or
groups are listed in another field.
5. Click the Apply button.
If a computer is specified in the Read-only hosts or Write-enabled hosts fields, users at
that computer have that access to the share. If a computer is not specified in one of those
fields, users at that computer cannot access the share.
Select Who Can Access a Share Using HTTP with the User Security Mode
If users access your share with HTTP, you have these choices for security:
• If your ReadyNAS system is on a small local network and you can trust everyone on the
network, you can let anyone on the network access the share.
• If you need more security, you can specify which users can access the share and what
type of access they can have. Every user has the same type of access.
• For the most security, you can specify that a user must be at a specific computer to
access the share. If that computer is in a locked room, users must know the correct user
name and password and they need a key to the room.
To specify a computer, you use its IP address, for example, 10.1.10.104.
Store Files
55
Page 56

ReadyNAS Duo, NV+, and 1100
To select which users can access a share using HTTP:
1. From the FrontView main menu, select Shares > Share Listing.
2. To the right of the share you want to change, click the icon for HTTP/S.
3. From the Default Access drop-down list, select the type of access you want to give users, as
follows:
• To let users read files on the share, without being able to edit or create files, select
Read-only from the drop-down list.
• To let users read, edit, and create files, select Read/write.
• To prevent users from accessing the share using the protocol, select Disabled.
4. In the Share Access Restrictions pane, choose the users to whom you want to grant access
rights as specified in the Default Access drop-down list.
• To give all users the access specified in the Default Access drop-down list, clear the
Hosts allowed access check box.
• To give only some users the access specified in the Default Access drop-down list,
follow these steps:
a. Select the Hosts allowed access check box.
b. To specify that users must be at specified computers to access the share, in the
Hosts allowed access field, enter a comma-separated list of the IP addresses for
the computers.
Users at other computers cannot access the share, even if their user names or
groups are listed in another field.
c. In the Users allowed access field and the Groups allowed access field, enter the
user names and group names
5. Click the Apply button.
Your settings are saved.
Select Who Can Access a Share Using Rsync with the User or Domain Security
Modes
You can determine access rights, restrict access to specific users or computers, and
password-protect share access using the Rsync file-sharing protocol.
To select which users can access a share using Rsync:
1. From the FrontView main menu, select Shares > Share Listing.
2. To the right of the share you want to change, click the icon for Rsync.
3. From the Default Access drop-down list, select the type of access you want to give users, as
follows:
• To let users read files on the share, without being able to edit or create files, select
Read-only.
• To let users read, edit, and create files, select Read/write.
• To prevent users from accessing the share using the protocol, select Disabled.
Store Files
56
Page 57

ReadyNAS Duo, NV+, and 1100
4. In the Share Access Restrictions pane, select which users you want to have the access
rights specified in the Default Access drop-down list, as follows:
• To give all users that access, clear the Hosts allowed access check box.
• To give only some users that access, select the Hosts allowed access check box
and enter the IP addresses for the users’ computers.
5. In the Rsync Password Options pane, enable or disable password protection for Rsync
share access, as follows:
• To enable password protection, select the Enable password protection check box
and create at least one Rsync user account and password. You can create a
maximum of two Rsync user accounts and passwords for each share. These
credentials are completely separate from your ReadyNAS storage system’s user
accounts.
• To disable password protection, clear the Enable password protection check box.
6. Click the Apply button.
Your settings are saved.
Manage Share Access with the Share Security Mode
To choose who can access a share with the share security mode, you need to specify what
type of access users to give users. You can also specify that only users at specified
computers can access a share.
Manage Share Access Using CIFS, HTTP, or Rsync with the Share Security Mode
When you enable the CIFS, HTTP, or Rsync file-sharing protocols, you determine what type
of access you want to give users, and then determine whether to give that access to all users
or just users at specific computers.
To select which computers can access a share with CIFS, HTTP, or Rsync:
1. From the FrontView main menu, select Shares > Share Listing.
2. To the right of the share you want to change, click the icon for the file-sharing protocol.
3. From the Default Access drop-down list, select the type of access you want to give users,
as follows:
• To give users read-only access, select Read-only.
• To give users read/write access, select Read/write.
• To prevent users from accessing the share using the selected protocol, select
Disabled.
Store Files
57
Page 58

ReadyNAS Duo, NV+, and 1100
4. In the Share Access Restrictions pane, select which users to whom you want to grant the
access rights specified in the Default Access drop-down list.
• To give all users that access, clear the Hosts allowed access check box.
• To give only some users that access, select the Hosts allowed access check box
and enter a comma-separated list of the IP addresses for the users’ computers.
5. Click the Apply button.
Your settings are saved.
Select Who Can Access a Share Using AFP With the Share Security Mode
When you enable the AFP file-sharing protocol for a share, you determine what type of
access to give all users.
To select which computers can access a share with AFP:
1. From the FrontView main menu, select Shares > Share Listing.
2. To the right of the share you want to change, click the icon for AFP.
3. From the Default Access drop-down list, select the type of access you want to give all users,
as follows:
• To give all users read-only access, select Read-only.
• To give all users read/write access, select Read/write.
• To prevent all users from accessing the share over AFP, select Disabled.
4. Click the Apply button.
Your settings are saved.
Select Who Can Access a Share Using FTP or NFS with the Share Security Mode
When you enable the FTP or NFS file-sharing protocols for a share, you determine what type
of access to grant most people, then specify that people at specific computers can have a
different type of access.
To choose which computers can access a share Using FTP and NFS:
1. From the FrontView main menu, select Shares > Share Listing.
2. To the right of the share you want to change, click the icon for the file-sharing protocol.
3. From the Default Access drop-down list, select the type of access you want to grant most
users, as follows:
• To give users read-only access, select Read-only.
• To give users read/write access, select Read/write.
• To prevent users from accessing the share using the protocol, select Disabled.
Store Files
58
Page 59

ReadyNAS Duo, NV+, and 1100
4. Enter exceptions in the Share Access Restrictions pane, as follows:
• To specify computers that can have read-only access, select the Read-only hosts
check box and enter IP addresses in the field.
• To specify computers that can have read/write access, select the Write-enabled
hosts check box and enter the IP addresses in the field.
5. Click the Apply button.
Your settings are saved.
Set Options for a Share
You can set many options for your shares. For example, you can choose whether to hide a
share from users who cannot access it, whether the share should use the Recycle Bin, and
how to optimize access. You can also reset the access permissions for the files on a share if
they become corrupted.
Hide a Share
Even if users cannot see what is in a share, they can still see its name in server listings in
Mac OS X Finder and Windows Explorer. If you want to hide a share completely, you can
prevent it from appearing in listings, and users must enter its full path name to access it.
After you select this option, file sharing protocols that do not support hiding are disabled for
this share, including AFP.
To hide a share:
1. From the FrontView main menu, select Shares > Share Listing.
2. Click the icon for CIFS.
3. In the Share Display Option pane, select Hide this share.
4. Click the Apply button.
Your settings are saved.
Use the Recycle Bin on CIFS Shares
You can determine whether files that users delete are immediately deleted or are moved to a
Recycle Bin on the share. You can also determine when items in the Recycle Bin are
permanently deleted.
When you delete a file from a share on a network-attached device using the CIFS protocol,
the file is moved to the Recycle Bin folder that is located on the share. To see a share’s
deleted files, open the share’s Recycle Bin folder.
This option is available only when you connect to the share using the CIFS file-sharing
protocol, and it also applies to private home shares that are accessed using CIFS.
Store Files
59
Page 60

ReadyNAS Duo, NV+, and 1100
To enable the Recycle Bin:
1. From the FrontView main menu, select Shares > Share Listing.
2. Click the icon for CIFS.
3. In the Recycle Bin pane, select the Enable Recycle Bin check box.
4. To automatically delete files that have been in the Recycle Bin for a number of days, in
Remove files older than field, enter a number of days.
5. To automatically delete files when the contents of the Recycle Bin reach a certain size, in
Limit Recycle Bin to field, enter a number of megabytes.
6. Click the Apply button.
Your settings are saved.
Cache Files Locally Using CIFS
When a share is shared with CIFS, you can cache the share’s files locally, so it is quicker to
access frequently used files. This is called opportunistic locking or oplocks. Do not enable
this option if any of your shares contains a file that is accessed by multiple users at once,
such as a QuickBooks database.
To cache files locally when using a CIFS share:
1. From the FrontView main menu, select Shares > Share Listing.
2. Click the icon for CIFS.
3. In the Opportunistic Locking pane, select the Enable Oplocks for this share check box.
4. Click the Apply button.
Your settings are saved.
Enable Syncing Using NFS
If you frequently lose the connection to an NFS server, you can enable syncing so you are
less likely to lose data. When you enable syncing, each write request is committed to disk
before the NFS client acknowledges that the write request finishes. If you are not
experiencing problems with lost connections, disable syncing to speed data transfers.
To enable syncing when using an NFS share:
1. From the FrontView main menu, select Shares > Share Listing.
2. Click the icon for NFS.
3. In the Advanced NFS Options pane, select the Enable sync mode check box.
4. Click the Apply button.
Your settings are saved.
Store Files
60
Page 61

ReadyNAS Duo, NV+, and 1100
Set Permissions for New Files and Folders
The permission for newly created files is read/write for the owner and owner’s primary group
and read-only for everyone else. The permissions for newly created folders is read/write for
everyone. If the default does not satisfy your security requirement, you can change it here.
You can choose set permissions for new files and folders for shares available over CIFS or
AFP.
The options available in FrontView vary based on the security mode you select for your
ReadyNAS system.
To set permissions for new files and folders on a CIFS share:
1. From the FrontView main menu, select Shares > Share Listing.
2. Click the icon for CIFS.
3. (Optional) In the Advanced CIFS Permission pane, select the Automatically set
permissions on new files and folders check box.
4. (Optional) Select the Do not allow ACL settings to be more restrictive than this check
box.
Be careful when using this option. It can change file and folder access rights in
unexpected ways.
5. (Optional) To choose group permission settings for new files, use the Group rights and
Everyone rights drop-down lists, as follows:
• From the Group rights drop-down list, select the permission right for members of the
file owner’s primary group.
• From the Everyone rights drop-down list, select the permission right for everyone not
in the file owner’s primary group.
6. (Optional) To choose group permission settings for new folders, use the Group rights and
Everyone rights drop-down lists, as follows:
• From the Group rights drop-down list, select the permission right for members of the
file owner’s primary group.
• From the Everyone rights drop-down list, select the permission right for everyone not
in the file owner’s primary group.
7. Click the Apply button.
Your settings are saved.
To set permissions for new files and folders on an AFP share:
1. From the FrontView main menu, select Shares > Share Listing.
2. Click the icon for AFP.
3. In the Advanced AFP Permission pane, select Automatically set permissions on new
files and folders.
Store Files
61
Page 62

ReadyNAS Duo, NV+, and 1100
4. (Optional) To choose group permission settings for new files, use the Group rights and
Everyone rights drop-down lists as follows:
• From the Group rights drop-down list, select the permission right for members of the
file owner’s primary group.
• From the Everyone rights drop-down list, select the permission right for everyone not
in the file owner’s primary group.
5. (Optional) To choose group permission settings for new folders, use the Group rights and
Everyone rights drop-down lists as follows:
• From the Group rights drop-down list, select the permission right for members of the
file owner’s primary group.
• From the Everyone rights drop-down list, select the permission right for everyone not
in the file owner’s primary group.
6. Click the Apply button.
Your settings are saved.
Broaden Rename and Delete Privileges
By default, only a file’s owner, that is, the person who created it, can delete or rename it.
However, you can allow anyone with read/write access to the share to delete or rename files
in it.
To broaden rename and delete privileges:
1. From the FrontView main menu, select Shares > Share Listing.
2. To the right of the share for which you want to change privileges, click the icon for any
protocol.
3. Click the Advanced Options tab.
4. Select the Grant rename and delete privileges to non-owners of files check box.
5. Click the Apply button.
Your settings are saved.
Reset Ownership and Permissions On Any Share
If the ownership and permission settings on a share become corrupt and users cannot
access or create files, you might need to reset the ownership and permissions for all the files
on that share. Changing the security mode on a ReadyNAS NV+ or 1100 from Share to User
is a common way to cause ownership and permission problems.
Resetting the ownership and permissions for a share is a lengthy process that can have
unexpected consequences. Users might not be able to create or view files if you do this
incorrectly. The values you set here override the values set for the file-sharing protocols.
Before you try this procedure, make sure users are logging in to the share with the correct
user name and password and that their access rights are set correctly.
Store Files
62
Page 63

ReadyNAS Duo, NV+, and 1100
To reset ownership and permissions for files and folders on any share:
1. From the FrontView main menu, select Shares > Share Listing.
2. To the right of the share for which you want to reset ownership or permissions, click the icon
for any protocol.
3. Click the Advanced Options tab.
4. To change the owner and permission rights for the share’s files, do any of the following:
• To set the owner for files on the share, in the Share folder owner field, enter the user
name.
• To set the primary group for files on the share, in Share folder group, enter the group
name.
• To set access rights for the files’ owner, from the Share folder owner rights drop-down
list, select an access right option.
• To set access rights for the files’ owner’s group, from the Share folder group rights
drop-down list, select an access right option.
• To set access rights for everyone not in the owner’s group, from the Share folder
everyone rights drop-down list, select an access right option.
If you are not sure how to set these fields, create a new share, and use the new share’s
settings for the original share, with one exception: If the share folder owner of the new
share is the same as the share’s name, use the name of the original share as the Share
Folder Owner for the original share. You can delete the new share when you finish.
5. Select the Set ownership and permission for existing files and folders check box.
Depending on the number of files on the share, this operation can take a long time to
finish. This check box clears when the operation finishes.
6. Click the Apply button.
Your settings are saved.
Store Files
63
Page 64

ReadyNAS Duo, NV+, and 1100
Access a Share
Depending on how you set up your share, you can access it from many different kinds of
devices. Not only can you access it from a Mac, Windows, UNIX, or Linux device, you can
also access it from any device with a web browser, including smart phones and tablet
computers. You can even access a share when you are not using the same local network as
the ReadyNAS system.
Access a Share from a Windows Device
Your ReadyNAS system’s CIFS shares display in Windows Explorer.
To access a share from a Windows device as a guest:
In the address bar of a Windows Explorer window, enter the IP address of your
ReadyNAS system.
To access a share from a Windows device as a user:
1. Select Map Network Drive.
The location of this option varies depending on what version of Windows you are running.
See the documentation that came with your operating system.
2. Select a letter for the drive.
3. Click Browse and select the share.
4. If asked, enter your user name and password.
The share appears in the Windows Explorer window.
Access a Share from a Mac OS X Device
If your ReadyNAS system has CIFS or AFP shares, the system displays in the sidebar of a
Finder window. Click the ReadyNAS system. You can connect to it like you connect to any
other server.
To access a share from a Mac OS X device:
1. Select Go > Network to view a list of all network servers.
2. Double-click your ReadyNAS system.
3. If you are asked for a password, do one of the following:
• If you are using the share security mode, enter the name of the share as the user
name and then enter the share’s password.
• If you are using the user or domain security mode, enter your user name and
password and click Connect.
Store Files
64
Page 65

ReadyNAS Duo, NV+, and 1100
Access a Share From a UNIX or Linux Device
From a UNIX or Linux computer, you can access any share on your ReadyNAS system that
is available over NFS.
To access a share from a UNIX or Linux device:
Enter the following command:
mount <IP_address>:/
<IP_address> is the IP address of your ReadyNAS system and <share_name> is the
name of the share you want to access. For example, if your ReadyNAS system’s IP
address is 10.1.10.103 and the share you want to access is named media, enter:
mount 10.1.10.103:/media media
<share_name> <share_name>
Access a Share Using FTP
With any FTP client application or program, you can access any share on your ReadyNAS
system that is available over FTP. If you set the FTP authentication mode to user, log in with
your user name and password. If you set the authentication mode to anonymous, use
anonymous as your user name and use your email address as your password.
Access a Share Using a Web Browser
If your share is available over HTTP or HTTPS, you can access it from any device with a web
browser, including smart phones and tablet computers. You can view and download the files
on a share. And if you have read/write access, you can also upload, delete, edit, and move
files.
To access a share with a web browser:
1. In a web browser, enter the URL for your ReadyNAS system.
2. If you are asked for a user name and password, enter them.
3. To view a share’s contents in another window, click it.
4. If you have read-only access to the share, you can view or download files by clicking them.
If you have read/write access to the share, you can do any of the following:
• To download a file, click it.
• To upload a file to the server, click Upload. In the dialog box that displays, click
Choose File, select the file, and then click Upload.
• To delete files, click the check boxes beside the files and then click Delete.
• To rename a file, click the check box beside the file, click Rename, and enter the new
name.
• To edit a text file, click the check box beside the file and then click Edit.
• To create a new text file, click New File. In the dialog box that displays, enter a name
for the file. In the next dialog box, enter the file’s contents and then click Save.
Store Files
65
Page 66

ReadyNAS Duo, NV+, and 1100
• To create a new directory, click New Directory and then enter the name of the
directory.
• To copy files to a new location, click the check boxes beside the files and then click
Copy. Open the directory where you want to move the files, and then click Paste.
• To move files to a new location, click the check boxes beside the files and then click
Cut. Open the directory where you want to move the files, and then click Paste.
Access a Share Using ReadyNAS Remote
ReadyNAS Remote lets you access your ReadyNAS system’s shares no matter where you
are with your Mac or Windows computer, or an Android phone, iPhone, iPad, or iPod Touch.
For example, you can edit your documents at your office when you are home, or read a file
stored at home while you are away.
Before you can remotely access a share from any device, you must install ReadyNAS
Remote on your computer and enable ReadyNAS Remote on your ReadyNAS system.
Before you can remotely access a share from Mac OS X or Windows devices, you must
ensure that you can access the share over CIFS (
CIFS with the User Mode on page 48).
Select Who Can Access a Share Using
Before you can remotely access a share from an iPhone, iPad, or iPod Touch, you must
ensure that you can access it over FTP (
Select Who Can Access a Share Using FTP with the
User Security Mode on page 53).
To install ReadyNAS Remote on your computer:
1. Download ReadyNAS Remote software for your computer or device, and install it.
If you have a Mac or Windows computer, download the software at
http://remote.readynas.com/download.html.
If you have an Android phone, iPhone, iPad, or iPod Touch, download the software from
the Android Market or Apple’s App Store.
You can access your ReadyNAS system remotely with an Android phone, iPhone, iPad,
or iPod Touch, but you cannot create a new account from one.
2. If ReadyNAS Remote does not launch automatically when you download it, manually launch
it.
3. If you do not already have a ReadyNAS account, create one.
Click New User or Get a new account.
Store Files
66
Page 67

ReadyNAS Duo, NV+, and 1100
To set up ReadyNAS Remote on your ReadyNAS system:
1. Make sure you enabled the correct protocols on your ReadyNAS system, as follows:
• If you want to remotely access your share from a Mac or Windows computer, enable
CIFS as described in
Manage File-Sharing Protocols on page 43.
• If you want to remotely access your share from an Android phone, iPhone, iPad, or
iPod Touch, enable FTP as described in
Manage File-Sharing Protocols on page 43.
2. In the FrontView main menu, select Services > Installed Addons.
3. Select the ReadyNAS Remote check box and click Save.
4. Click the Manage ReadyNAS Remote button.
5. In the ReadyNAS Remote application, and click the Find button.
6. In the Found list, select the user name for the account your created and click the Add
button, enter the email address for the account you created.
The user name is added to the Allowed list.
7. Click the Apply Settings button.
To access a share remotely from a Mac OS X device:
1. Launch ReadyNAS Remote.
2. From the ReadyNAS Remote menu on the right side of the menu bar, select Login and
enter your account name and password.
3. From the ReadyNAS Remote menu on the right side of the menu bar, select Connect to
ReadyNAS.
Finder displays a list of the remote ReadyNAS systems you can access.
4. Double-click the ReadyNAS system you want to access.
5. Do one of the following:
• To log in as a user, click Registered User, enter your user name and password, and
click Connect.
This might be different from your ReadyNAS Remote user name and password.
• To log in as a guest, click Guest and click Connect.
6. Select the share to access and click OK.
Store Files
67
Page 68

ReadyNAS Duo, NV+, and 1100
To access a share remotely from a Windows device:
1. Launch ReadyNAS Remote.
2. Right-click the ReadyNAS Remote icon in the task bar, select Login, and enter your account
name and password.
3. Right-click the ReadyNAS Remote icon in the task bar, and select Connect to ReadyNAS.
Windows Explorer displays a list of the remote ReadyNAS systems you can access.
4. Double-click the ReadyNAS system you want to access.
Windows Explorer displays a list of the shares on that ReadyNAS system.
5. Double-click a share to access it.
To access a share remotely from an Android phone, iPhone, iPad, or iPod Touch:
1. Download the ReadyNAS Remote app from the Android Market or Apple’s App Store.
2. Launch the ReadyNAS Remote app and follow the instructions to connect to your share.
Store Files
68
Page 69

5. Stream Multimedia Files
You can store multimedia files, such as music and videos on your ReadyNAS system and stream
them to computers, televisions, and other devices. You can also store images and photos that
you can share with others.
This chapter includes the following topics:
• Stream Multimedia Files for iTunes with Firefly
• Stream Multimedia Files for TiVo and Xbox with ReadyDLNA
• Share Photos With ReadyNAS Photos
• Set Up Discovery Services
5
69
Page 70

ReadyNAS Duo, NV+, and 1100
Stream Multimedia Files for iTunes with Firefly
With Firefly, you can stream music and video from your ReadyNAS system to any computer,
TV set-top box, or device in your house that has iTunes and other music streaming players
including as Sonos and Roku SoundBridge. You can also set up smart playlists that sort your
music according to genre, artist, year, and other categories.
Set Up iTunes Streaming
You can quickly start streaming media to any device with iTunes.
To start iTunes streaming:
1. From the FrontView main menu, select Services > Streaming Services.
2. Select iTunes Streaming Server.
3. Click the Apply button.
4. Open the share named media on your computer and copy your music files to the Music
folder on that share.
If you want your music to reside on a different location on your ReadyNAS system, see
Select Which Music Files to Stream on page 72.
5. From the FrontView main menu, select Services > Streaming Services and click the
Connect to the Firefly setup link.
6. In Firefly, click Start Full Scan.
To listen to music in iTunes:
1. Launch iTunes.
2. In the iTunes sidebar under Shared, click the name of your iTunes server.
By default, it is called “Itunes server.” If you want to change the name, see Change the
Server Name and Password on page 72.
3. Click Play.
Stream Multimedia Files
70
Page 71

ReadyNAS Duo, NV+, and 1100
Use Smart Playlists
You can create smart playlists that sort your music according to genre, artist, year, and more.
Then you can listen to those playlists on any device that supports iTunes.
To create a smart playlist:
1. From the FrontView main menu, select Services > Streaming Services and click the
Connect to the Firefly setup link.
2. Click Smart playlists.
3. Click Add new playlist.
4. Enter a name in the Name field.
5. Click Wizard and select your criteria.
6. Click Create.
To edit a smart playlist:
1. From the FrontView main menu, select Services > Streaming Services, and the click
the Connect to the Firefly setup link.
2. Click Smart playlists.
3. Click Edit beside the playlist’s name, and do any of the following:
• Change the name in the Name field.
• Click Wizard and change your criteria.
4. Click Update.
To use a smart playlist in iTunes:
1. Launch iTunes.
2. In the iTunes sidebar under Shared, click the triangle beside your iTunes server name and
click the triangle beside Playlists.
3. Click Play.
Stream Multimedia Files
71
Page 72

ReadyNAS Duo, NV+, and 1100
Select Which Music Files to Stream
You can change where your multimedia files are stored on your ReadyNAS system or store
multimedia files in multiple locations.
To select which music files to stream:
1. From the FrontView main menu, select Services > Streaming Services and click the
Connect to the Firefly setup link.
2. In the Firefly main menu, click Configuration.
3. Do any of the following:
• To change the location for a music folder, edit the Music folder field.
• To add a new folder of music, click Add music folder and enter the path name for the
folder.
Firefly lists music from the listed folders in iTunes.
• To change which types of files are listed in iTunes, edit the list of file extensions in
Extensions.
4. Click Save.
5. From the Firefly main menu, click Server status.
6. Click Start Full Scan.
Change the Server Name and Password
You can change the name used to identify your ReadyNAS system in the iTunes sidebar or
assign a password that users need to enter before they can use your files.
To change server name and password:
1. From the FrontView main menu, select Services > Streaming Services and click the
Connect to the Firefly setup link.
2. Click Configuration.
3. Do any of the following:
• To change the name that appears in the iTunes sidebar, edit the Sever Name field.
• To require that users enter a password when playing music on the ReadyNAS system,
enter a password in the Music Password field.
• To require that users enter a password when changing Firefly preferences, enter a
password in the Admin password field.
4. Click Save.
Stream Multimedia Files
72
Page 73

ReadyNAS Duo, NV+, and 1100
Change How to Scan Media Files
Scanning your multimedia files updates your ReadyNAS system’s list of available songs so
that recently added songs appear in iTunes. Scanning also tags untagged songs with
important information such as a song’s duration. You can scan your songs immediately or
you can choose how often to scan your files automatically.
Some media files are not tagged with data that gives iTunes such important information such
as the duration of a song. When scanning your multimedia files, you can compute this
information for untagged files. You can determine how aggressively and accurately to
compute it. If a file is tagged with this information, this information is not computed for it.
To change how to scan media files:
1. From the FrontView main menu, select Services > Streaming Services and click the
Connect to the Firefly setup link.
2. Click Configuration.
3. Do any of the following:
• To choose how accurately to calculate data about media files that were not tagged
with information such as duration, from the Scan Type drop-down list, select one of
the following options:
• 0 - Normal. Quickest and least accurate.
• 1 - Aggressive. Slower and more accurate.
• 2 - Painfully Aggressive. Slowest and fully accurate.
Many media files are tagged with this data, and this calculation is not needed for
them.
• To choose how often to scan for new media files, in the Rescan Interval field, enter a
time in seconds. The default is 86,400 seconds, or every 24 hours.
• To scan for new media files even if no iTunes clients are accessing the media files,
from the Always Scan drop-down list, select Yes.
4. Click Save.
To scan for new media files immediately:
1. From the FrontView main menu, select Services > Streaming Services and click the
Connect to the Firefly setup link.
2. Click Start Full Scan.
Stream Multimedia Files
73
Page 74

ReadyNAS Duo, NV+, and 1100
Stream Multimedia Files for TiVo and Xbox with
ReadyDLNA
You can stream multimedia files to any device on your local network that uses the Digital
Living Network Alliance (DLNA) standard, including TiVo and Xbox.
To start ReadyDLNA streaming:
1. On your computer, open the ReadyNAS system share named media and copy your
music files to it.
If you want your music to reside on a different location on your ReadyNAS system, see
Select Which Music Files to Stream on page 72.
2. From the FrontView main menu, select Services > Streaming Services.
3. Select the ReadyDLNA check box.
4. To play your content on TiVo devices, select the Enable TiVo support check box.
5. Click the Apply button.
Your media files are scanned automatically.
To select which music files to stream:
1. From the FrontView main menu, select Services > Streaming Services.
2. Do any of the following:
• To change the location for a music folder, from the Share drop-down list, choose a
new share and edit the Folder field.
• To add a new folder of music, click the Add new folder button and choose the correct
share and folder.
The media from the listed folders appears in TiVo.
• To change which types of files are listed in iTunes, from the Content Types drop-down
list, choose an option.
3. Click the Apply button.
Your settings are saved.
To scan media files:
1. From the FrontView main menu, select Services > Streaming Services.
2. Do any of the following:
• To scan for new media files automatically, select the Automatically update database
check box and click the Apply button.
• To scan for new media files immediately, click the Rescan media files button.
Stream Multimedia Files
74
Page 75

ReadyNAS Duo, NV+, and 1100
Share Photos With ReadyNAS Photos
ReadyNAS Photos lets you store photos on your ReadyNAS system, create photo albums
with them, and then share them with anyone with an email address.
Get Started with ReadyNAS Photos
You can enable ReadyNAS Photos on your ReadyNAS system, create an account, and then
log in.
To enable ReadyNAS Photos:
1. From the FrontView main menu, select Services > Installed Add-ons.
2. Select the ReadyNAS Photos check box.
3. Click the Apply button.
4. Click the Install ReadyNAS Photos button.
5. Download and install the software for your computer.
To log in to ReadyNAS Photos:
1. Launch ReadyNAS Photos.
2. If you do not have an account, click Sign Up, and fill out the form, including a user name
and password.
3. Enter your user name and password and click the right arrow.
4. If you see a list of ReadyNAS systems, click the system where you want to store the photos.
If you need to provide a user name and password to access the media share on that
system, enter it in the dialog box that displays and click Connect.
Create Photo Albums
You can use ReadyNAS Photos to import photos and create albums from them.
To create a new photo album from individual photos:
1. In ReadyNAS Photos, click New Album.
If you do not see New Album, click Photos Home and click New Album.
2. In the Album Name field, enter a name for the new photo album.
3. Click the folder icon and select the photos to import.
4. Click the right arrow button.
The photos are imported and the new album displays in your album list.
Stream Multimedia Files
75
Page 76

ReadyNAS Duo, NV+, and 1100
To create a new photo album from a folder of photos:
1. Make sure the photos for the album are in one folder, and that the name of the folder is
the name you want for the album.
2. In ReadyNAS Photos, click Import Albums.
If you do not see Import Albums, click Photos Home and click Import Albums.
3. Select the folder to import and click the button with the right arrows.
The folder displays in the Selected Folders list.
4. Click Start.
The photos are imported and the new album displays in your album list.
View and Share Photos
You can view photos on a computer and share them with anyone with an email address.
To view photos:
1. In ReadyNAS Photos, click the photo album.
If you do not see any photo albums, click Photos Home and click the photo album.
2. Do any of the following:
• To view a slideshow of the images, click the slideshow button.
• To view small versions of all the photo, click the Thumbnail or List button.
• To see a larger version of a photo, click it.
• To rotate a photo right or left, click the Rotate buttons.
• To delete a photo, click the Trash button.
To share a photo album:
1. In ReadyNAS Photos, click the photo album.
If you do not see any photo albums, click Photos Home and click the photo album.
2. Click Share.
3. Enter a comma-separated list of email addresses, and, optionally, enter a message about
the album.
4. Click Share.
Stream Multimedia Files
76
Page 77

ReadyNAS Duo, NV+, and 1100
Set Up Discovery Services
Discovery services let a computer know about services that other computers and servers are
making available for use. Your ReadyNAS system can use discovery services to let
computers know about such services as multimedia files and printers. The discovery services
are turned on by default, but you can turn them off if you need extra security.
Your ReadyNAS system supports two discovery services:
• Bonjour is included in Mac OS X. In other operating systems, it is used by some
applications such as iTunes.
• UPnP (Universal Plug and Play) is used by many devices to find multimedia files.
To enable or disable discovery services:
1. From the FrontView main menu, select Services > Discovery Services.
2. Manage the discovery services, as follows:
• To enable Bonjour, select the Bonjour Service check box.
If you enable Bonjour, the Advertise check boxes become active. Select or clear
these check boxes to determine what features Bonjour advertises.
• To disable Bonjour, clear the Bonjour Service check box.
• To enable UPnP, select the uPnP check box.
• To disable UPnP, clear the uPnP check box.
3. Click the Apply button.
Your settings are saved.
Stream Multimedia Files
77
Page 78

6. Back Up Files
This chapter describes several ways you can back up files with your ReadyNAS system. You can
back up Mac computers to your ReadyNAS system with Time Machine, you can back up your
ReadyNAS system to a remote location with ReadyNAS Vault, or you can create other backup
jobs on your ReadyNAS system with FrontView.
This chapter includes the following topics:
• Back Up a Mac to a ReadyNAS System with Time Machine
• Back Up a ReadyNAS System Remotely with ReadyNAS Vault
• Back Up to or from a ReadyNAS System
6
78
Page 79

ReadyNAS Duo, NV+, and 1100
Back Up a Mac to a ReadyNAS System with Time Machine
If you have a Mac, you can use Time Machine to back it up to your ReadyNAS system. In
FrontView, enable Time Machine support on your ReadyNAS system. Then, on your Mac,
select your ReadyNAS system as your backup disk.
To enable Time Machine support:
1. From the FrontView main menu, select Backup > Time Machine.
2. Select Enable Time Machine support.
3. In the Password field, create a password.
The user name is ReadyNAS and cannot be changed.
4. In the Capacity field, enter a maximum size in GB for the Time Machine share.
If you leave this field blank or enter zero, your Time Machine backup can use all available
space on your ReadyNAS system. If you enter a size, the backup can use whatever is
smaller: all available space or the size entered.
5. Click the Apply button.
The AFP protocol is enabled, if it was not enabled already.
To back up your Mac to your ReadyNAS system:
1. Open System Preferences and click Time Machine.
2. Click Select Disk.
3. Select ReadyNAS and click Use Backup Disk or Use for Backup.
A dialog box displays.
4. Enter ReadyNAS as the user name, enter the password you created in the previous
procedure, and click Connect.
Your Mac starts to back up your files to the ReadyNAS system. The first backup can take
several hours.
Back Up Files
79
Page 80

ReadyNAS Duo, NV+, and 1100
Back Up a ReadyNAS System Remotely with ReadyNAS
Vault
ReadyNAS Vault keeps your data safe even if your ReadyNAS system is damaged or
destroyed in a fire, flood, theft, or other disaster. The data is backed up remotely over a
secure connection. You can use any web browser, even a browser on a smart phone, to set
up the backup schedule and view your backed-up files. You can also let other people access
your files, if you want. For more information, see
To set up ReadyNAS Vault:
1. From the FrontView main menu, select Backup > ReadyNAS Vault.
2. Select Enable ReadyNAS Vault support and click the Apply button.
3. Click the click here to register link to create a free temporary account.
4. Enter your email address and password and click Register.
5. Click Manage ReadyNAS Vault.
http://www.netgear.com/readynasvault.
A website opens that lets you set your ReadyNAS Vault options.
Back Up to or from a ReadyNAS System
You can back up files from your ReadyNAS system to another computer, or from another
computer to the ReadyNAS system. The backup can happen automatically at any time you
set or when you press the Backup button on the front of your ReadyNAS system.
Either the backup source or destination must be on the ReadyNAS system. You cannot use
the ReadyNAS system to back up from one remote location to another.
The backup jobs described in this manual are best for backing up data files and documents. If
you want to back up every file on a PC, including the operating system, so that you can
restore the files and boot from the restored copy, use third-party backup software that can
back up a computer to a ReadyNAS system.
Back Up Files
80
Page 81

ReadyNAS Duo, NV+, and 1100
Create a Backup Job
You can use FrontView to create a backup job for your ReadyNAS system.
To create a backup job:
1. If you need to back up a large share while users are accessing it, consider creating a
snapshot of the share and backing up the snapshot.
For more information, see Use Snapshots on page 87.
2. From the FrontView main menu, select Backup > Add a New Backup Job.
3. In the Select backup source pane, determine what to back up, as follows:
• To back up data on the ReadyNAS system, see Select a Location on Your ReadyNAS
System on page 82.
• To back up data that is not on the ReadyNAS system, see Select a Remote Location
on page 82.
4. In the Select backup destination pane, determine the destination for the backup, as follows:
• If the data you are backing up is local, choose a remote location for the destination.
For more information, see
• If the data you are backup up is remote, choose a location on the ReadyNAS system
for the destination. For more information, see
System on page 82.
Select a Remote Location on page 82.
Select a Location on Your ReadyNAS
5. In the Choose backup schedule pane, determine when to perform the backup job.
For more information, see Determine When to Perform the Backup on page 84.
6. In the Choose backup options pane, set backup job options.
For more information, see Set Backup Options on page 85.
7. Click the Apply button.
Your settings are saved.
Back Up Files
81
Page 82

ReadyNAS Duo, NV+, and 1100
Select a Location on Your ReadyNAS System
Select a backup source or destination on your ReadyNAS system.You have the following
options:
• Share. Each share is listed in the source and destination drop-down lists by name.
• Volume. Each volume is listed in the source and destination drop-down lists by name. If
you are using X-RAID, your ReadyNAS system has only one volume, C. When you
choose a volume as a backup source, all shares, private home shares, and hidden
shares in the volume are backed up, each to a separate folder on the destination.
You cannot choose a volume as a backup destination. Instead, choose a share on the
volume.
• USB device. Each USB port on your ReadyNAS system is listed in the source and
destination drop-down lists. Choose a port to back up to or from the device attached to
that port. You can set up a backup even though no device is attached to the port. If no
device is attached when the backup is triggered, the backup fails.
If you want to disconnect the device when the backup completes, select Unmount USB
drive after backup.
• Private home share. Each user’s private share is listed in the source and destination
menus by name.
• All home shares. Available in only the source drop-down list, this option backs up all the
private home shares, each to its own folder on the destination.
• Folder. To back up to or from only one folder, click Browse and select the folder.
Select a Remote Location
Select a location that is not on the ReadyNAS system as the source or destination for the
backup. You have the following options:
• Windows or NAS server using archive bits. Select the Remote: Windows/NAS
(Archive Bit) menu option to back up a Windows or NAS server. It is available only in the
Source drop-down list. When performing an incremental backup, the ReadyNAS system
uses a file’s archive bit to determine whether to back up the file.
• In the Host field, enter the path name for the server in one of the following forms:
• //<server_name>/<path_name>
• //<IP_address>/<path_name>
• //<server_name>/<share_name>/<path_name>
• In the User name and Password fields, enter the user name and password for the
server.
• If you want to back up to a specific folder on the server, click Browse and select the
folder.
Back Up Files
82
Page 83

ReadyNAS Duo, NV+, and 1100
• Windows or NAS server using timestamps. Select the Remote: Windows/NAS
(Timestamp) menu option to back up to or from a Windows or NAS server. It is available
in both the source and destination drop-down lists. When this location is the source and
an incremental backup is being performed, the ReadyNAS system uses timestamps to
determine which files to back up.
• In the Host field, Enter the path name for the server in one of the following forms:
• //<server_name>/<path_name>
• //<IP_address>/<path_name>
• //<server_name>/<share_name>/<path_name>
• In the User name and Password fields, enter the user name and password for the
server.
• If you want to back up to a specific folder on the server, click Browse and select the
folder.
• HTTP server. Select the Remote: Website menu option to back up to or from an HTTP
server. It is available in both the source and destination drop-down lists.
• In the Host field, enter the path name for the server in one of the following forms:
• http://www.<URL>/<path_name>
• http://<IP_address>/<path_name>
• In the User name and Password fields, enter the user name and password for the
server.
• If you want to back up to a specific folder on the server, click Browse and select the
folder.
• FTP server. Select the Remote: FTP site menu option to back up to or from an FTP
server. It is available in both the source and destination drop-down lists.
• In the Host field, enter the path name for the server in the one of the following forms
• ftp://<server_name>/<path_name>
• ftp://<IP_address>/<path_name>
• In the User name and Password fields, enter the user name and password for the
server.
• If you want to back up to a specific folder on the server, click Browse and select the
folder.
• NFS server. Select the Remote: NFS site menu option to back up to or from an NFS
server. It is available in both the source and destination drop-down lists.
• In the Host field, enter the path name for the server in one of the following forms:
• <server_name>:/<path_name>
• <IP_address>:/<path_name>
• If you want to back up to a specific folder on the server, click Browse and select the
folder.
You do not need to enter a user name or password.
Back Up Files
83
Page 84

ReadyNAS Duo, NV+, and 1100
• Rsync server. Select the Remote: Rsync server menu option to back up to or from an
Rsync server. It is available in both the source and destination drop-down lists.
Make sure you enable the Rsync file-sharing protocol if you choose this option, as
described in
Manage File-Sharing Protocols on page 43.
• In the Host field, enter the path name for the server in one of the following forms:
• <server_name>::<module_name>/<path name>
• <IP_address>::<module_name>/<path_name>
• In the User name and Password fields, enter the user name and password for the
server.
• If you want to back up to a specific folder on the server, click Browse and select the
folder.
• If you want to compress the backup to save space, select Enable Compression. You
cannot browse the files in the backup if it is compressed.
• If you want to delete files in the backup when they are deleted in the source, select
Remove deleted files on target. This option saves space but you cannot recover a
file that a user accidentally deleted.
• If you want to ensure that the backed up files are compatible with older versions of
Windows. select Enable FAT32 compatibility mode.
• If you do not want to back up specific files or folders, in the Add files and directories
to be excluded field, enter the path names of the files or folders that you want to
exclude as a comma-separated list.
• USB device. This option lets you back up to or from a device connected to a USB port on
the ReadyNAS system. Any USB device attached to your ReadyNAS system is available
in both the source and destination drop-down lists.
• If you want to back up to or from a specific folder on device, click Browse and select
the folder.
• If you want to disconnect the device when the backup finishes, select Unmount USB
drive after backup.
Determine When to Perform the Backup
You have the following options:
• To perform the backup only when you initiate it, clear the Perform backup every check
box.
• To perform the backup at a regular interval, select the Perform backup every check box
and set a schedule.
Backups are performed at 5 minutes past the hour to give you time to create a snapshot of
the data before the data is backed up. For more information about snapshots, see
Snapshots on page 87.
Use
Back Up Files
84
Page 85

ReadyNAS Duo, NV+, and 1100
Set Backup Options
You can set any of the following options in the Choose backup options pane:
• To choose how often to perform a full backup, select an option from the Schedule full
backup drop-down list. Incremental backups are performed for all other backups. You
can perform a full backup every time, just the first time, or every few weeks.
A full backup backs up all the files from the destination. An incremental backup backs up
only the files that have changed since your last backup. Performing an incremental
backup is quicker, but performing lots of incremental backups can take a lot of disk space.
• To delete all items in the backup destination before performing a full backup, select the
Remove the contents of the backup destination before a full backup is performed
check box. All items in the backup destination are erased, even if they are not part of the
backup. You cannot recover items that were deleted before the last full backup.
Note: Before you select this option, ensure that you correctly set your
backup source and destination. If you reverse them, you might
permanently delete your source files. NETGEAR recommends that
you enable this option only if the destination device is very low on
storage space.
• To choose what information is sent to the administrators’ email addresses after a backup
is completed, select an option from the On backup completion, send drop-down list. You
can choose to send a message only when errors occur, to always send a complete listing
of what was backed up, or to always send a message with status and error messages.
• To change the owner of the backed-up files in the backup destination to be the owner of
the backup share, select the After backup is complete, change ownership of files in
the backup destination check box. Use this option only if you use the share security
mode and you want to make sure all users can access the backed-up files in the backup
destination.
Assign Backup Jobs to the Backup Button
You can assign a backup job to the Backup button on the front of your ReadyNAS system.
This makes performing a backup as simple as pressing the Backup button.
To assign a back up job to the Backup button:
1. From the FrontView main menu, select Backup > Backup Jobs.
2. In the Backup Button Setup pane, use the drop-down lists to determine which backup jobs
to perform when the backup button is pressed.
When you press the Backup button, the jobs are performed in the order listed.
Back Up Files
85
Page 86

ReadyNAS Duo, NV+, and 1100
Edit a Backup Job
After you create a backup job, you can edit it later.
To edit a backup job:
1. From the FrontView main menu, select Backup > Backup Jobs.
2. In the Backup Schedule pane, click the job number button for the backup job.
3. Edit the job the same way that you would create one.
For more information, see Create a Backup Job on page 81.
Recover Backed-up Data
You can create a recovery backup job in much the same way you originally backed up the
data: Create a new backup job that is the “recovery” job, and use the backup job’s source as
the recovery job’s destination and the backup job’s destination as the recovery job’s source.
You also need to set a few options correctly to avoid accidentally erasing the recovered data.
To recover backed-up data:
1. From the FrontView main menu, select Backup > Add a New Backup Job.
2. In the Select backup source pane, choose the original backup job’s destination.
Ensure that the settings in the recovery job’s source pane are exactly the same as the
settings in the backup job’s destination pane.
For more information, see Select a Location on Your ReadyNAS System on page 82 and
Select a Remote Location on page 82.
3. In the Select backup destination pane, select the original backup job’s source.
Ensure that the settings in the recovery job’s destination pane are exactly the same as
the settings in the backup job’s source pane.
4. In the Choose backup schedule pane, clear the Perform back every check box.
Do not set up a schedule for the recovery job, or else you might accidentally erase the
recovered data. Instead, you perform the recovery job once manually.
5. In the Choose backup options pane, set these options:
• From the Schedule full backup drop-down list, select Every time.
• Clear the Remove the contents of the backup destination before a full backup is
performed check box.
You can set the other options in this pane as you want. For more information, see Set
Backup Options on page 85.
Back Up Files
86
Page 87

ReadyNAS Duo, NV+, and 1100
6. Click the Apply button.
The recovery job is saved.
7. From the FrontView main menu, select Backup > Backup Jobs.
8. Click the Go button beside the recovery job you created.
Your data is recovered.
Use Snapshots
If you back up a large share while users are still editing files on it, you might end up with a
backup that is inconsistent and unusable. For example, if a user moves a file that has not
been backed up into a folder that has already been backed up, that file will not appear in the
backup and will be lost. You can schedule the backup to occur when no one is accessing the
share, but if that is not possible, you can use a snapshot.
A snapshot is a read-only copy of the volume’s files as they were at a specific time. When
users change files after that time, information about those changes is stored in a special area
on your system’s volume. When users access the share, the ReadyNAS system merges
information from the snapshot with information about changes on the fly and serves
up-to-date data.
A ReadyNAS system serves data more slowly when it is keeping a snapshot, so you might
want to create snapshot of a volume only when you are backing it up.
When creating the backup job for a snapshot, you need to select the name of the snapshot
as the source. To do that, you need to create a snapshot before you create the back up job,
as described in
Create a Snapshot Now on page 88. The name of a share’s snapshot is the
share’s name plus “-snap.” For example, the snapshot for “media” is “media-snap.”
If the amount of space needed for the changes surpasses the size of the reserved space, the
volume snapshot expires. So, when you create a snapshot schedule, be sure the snapshot is
available long enough for the backup job to finish.
Set Up a Snapshot Schedule
You can use FrontView to set up a snapshot schedule.
To set up a snapshot schedule:
1. From the FrontView main menu, select Volumes > Volume Settings.
2. Click the Snapshot tab.
If FrontView does not display a Snapshot tab, your volume is not set up for snapshots.
3. In the Snapshot schedule pane, set the schedule for taking snapshots.
Ensure that the snapshot schedule overlaps the backup schedule.
To give you enough time to create a snapshot before its backup begins, snapshots start
on the hour and backups start at 5 minutes past the hour.
Back Up Files
87
Page 88

ReadyNAS Duo, NV+, and 1100
4. From the lasting drop-down list, select how long you want the snapshot to last.
Because using a snapshot can slow your ReadyNAS system, you might want it to last just
long enough for the backup to finish. Make sure the snapshot is available for the full
duration of the backup.
5. Click Save.
Determine How Much Space to Reserve For Snapshots
Make sure the space is large enough to handle any changes that happen while the snapshot
is active. When the reserved space is used up, the snapshot expires.
Creating, modifying, and deleting files all take up space. For example, when a 1 MB file is
deleted, 1 MB of the reserved space is used.
To determine how much space to reserve for snapshots:
1. From the FrontView main menu, select Volumes > Volume Settings.
2. Click the Snapshot tab.
If FrontView does not display a Snapshot tab, your volume is not set up for snapshots.
3. In the Snapshot space pane, determine how much space to reserve for snapshots.
4. Click Save.
Create a Snapshot Now
You can create a snapshot outside of the usual snapshot schedule, if you want to start a long
backup or if you want to set up a backup that uses snapshots.
To take a snapshot now:
1. From the FrontView main menu, select Volumes > Volume Settings.
2. Click the Snapshot tab.
If FrontView does not display a Snapshot tab, your volume is not set up for snapshots.
3. Click Take a snapshot now.
Back Up Files
88
Page 89

7. Other Services
This chapter explains how you can use your ReadyNAS system to host a local website or to
share a USB printer with others.
This chapter covers the following topics:
• Create and Access a Local Website
• Set Up a Printer
7
89
Page 90

ReadyNAS Duo, NV+, and 1100
Create and Access a Local Website
You can host a local website on your ReadyNAS system that anyone on your local network
can view.
To host a local website:
1. Create a share for your website and copy your website’s files to it.
2. From the FrontView main menu, select Shares > Share Listing.
3. To the right of the share that contains the website, click the icon for HTTP.
4. From the Default Access drop-down list, select Read-only.
5. Clear the Hosts allowed access check box.
6. Click the Apply button.
7. From the FrontView main menu, select Services > Standard File Protocols.
8. In the HTTP pane, from the Redirect default web access to this share drop-down list, select
the name of the share.
9. Click the Apply button.
Your settings are saved.
To access the local website:
1. Launch a web browser.
2. Enter the IP address for your ReadyNAS system.
Set Up a Printer
After you connect a USB printer to a USB port on your ReadyNAS system, any computer that
supports IPP, CIFS/SMB, or Bonjour printing can use it. And with FrontView, you can view the
printer’s queued-up jobs and delete any that are blocking the system.
To set up a printer on a Windows computer over Bonjour:
1. On your Windows computer, download and install Bonjour Print Services for WIndows,
available at
2. Use the Bonjour Printer Wizard to set up the printer.
To set up a printer on a Windows computer over CIFS/SMB:
1. On your Windows computer, launch RAIDar.
2. Select the ReadyNAS system that is connected to the printer and click Browse.
3. Double-click the printer’s icon.
http://www.apple.com/support/bonjour.
Other Services
90
Page 91

ReadyNAS Duo, NV+, and 1100
To view and manage print jobs:
1. From the FrontView main menu, select Printers > Print Queue Service.
2. To delete some jobs, select the check box beside the jobs that you want to delete and click
Delete Print Job.
Other Services
91
Page 92

8. Manage the ReadyNAS System
This chapter describes how to set various options for your ReadyNAS system. This chapter
includes the following topics:
• Set the Time and Time Zone
• Set the Language
• Send Alerts
• Turn the ReadyNAS System On and Off
• Back Up and Restore Settings
• Manage Add-Ons
• Improve Performance
• Set Network Settings
• View Log Files
8
92
Page 93

ReadyNAS Duo, NV+, and 1100
Set the Time and Time Zone
You can set the time zone for your ReadyNAS system. You can also set the correct time
manually or let your system set the time automatically.
To set the time zone:
1. From the FrontView main menu, select System > Clock.
2. From the Timezone drop-down list, select your time zone.
3. Click the Apply button.
Your settings are saved.
To set the time manually:
1. From the FrontView main menu, select System > Clock.
2. In the Select Current Time pane, use the drop-down lists to select the correct time.
If the drop-down lists are dimmed, the time is being set automatically. Clear the
Synchronize clock with the following NTP server(s) check box to set the time
manually.
3. Click the Apply button.
Your settings are saved.
To set the time automatically:
1. From the FrontView main menu, select System > Clock.
2. In the NTP Options pane, select the Synchronize clock with the following NTP
server(s) check box.
You can use the NTP servers that are already entered or you can delete them and enter
your own.
3. Click the Apply button.
Your settings are saved.
Manage the ReadyNAS System
93
Page 94

ReadyNAS Duo, NV+, and 1100
Set the Language
You can set the language that the ReadyNAS system uses for file listings and automatically
generated email messages. Choose the language used by most of the users who access
your ReadyNAS system.
This setting does not control the language of the labels in FrontView or RAIDar. To change
the language for them, use System Preferences in Mac OS X or the Control Panel in
Windows.
To set the language:
1. From the FrontView main menu, select System > Language.
2. From the Language Setting drop-down list, select a language
3. If you select a Unicode language from the Language Setting drop-down list, select the
Allow Unicode for user, group and share names check box to use Unicode characters in
the names of users, groups, and shares.
To disable this option later, you must perform a factory reset, which erases all the data on
your ReadyNAS system.
4. If you enabled the FTP protocol and your FTP client uses a different character encoding
than your ReadyNAS system, select the Enable character encoding conversion for FTP
clients check box to convert the characters.
5. Click the Apply button.
Your settings are saved.
Send Alerts
Your ReadyNAS system can send emails to let users and administrators know about
important events. It can let users know that an account has been created for them and that
they are reaching their quotas. It can also let administrators know when they system needs
attention.
This section describes how to determine the email account from which administrative and
user alert messages are sent. You can also determine who receives administrative alert
messages and when administrative alert messages are sent. To determine who receives user
messages, see
Manage Users and Groups on page 29.
Manage the ReadyNAS System
94
Page 95

ReadyNAS Duo, NV+, and 1100
Change The Account Used to Send Email Alerts
You can change the account used to send email messages to administrators and users.
Administrators receive email messages about problems with the ReadyNAS system. Users
receive email messages when they are near or exceed their disk quotas.
This account does not need to be one of the accounts to which email messages are sent.
To change the account used to send email alerts:
1. From the FrontView main menu, select System > Alerts.
2. Click the Contacts tab.
3. From the Email Provider drop-down list, select an email provider.
If your provider is not listed, select Custom.
4. In the User and Password fields, enter the user name and password for your account
5. If you select Custom from Email Provider drop-down list, in the SMTP server, SMTP port,
From, and Use TLS fields, enter your email provider’s information.
If you are not sure what to enter in these fields, contact your email provider.
6. (Optional) If you want to make sure the email addresses you entered are correct, click Send
Test Message.
A message is sent to each address you listed.
7. Click the Apply button.
Your settings are saved.
Change Who Receives Alerts
You can use FrontView to change who you want to receive email alerts when something
happens to your system.
To change who receives alerts:
1. From the FrontView main menu, select System > Alerts.
2. Click the Contacts tab.
3. In the Alert Contact 1, Alert Contact 2, and Alert Contact 3 fields, enter the email addresses
that you want to receive alerts.
4. (Optional) If you want to make sure the email addresses you entered are correct, click Send
Test Message.
A message is sent to each address you listed.
5. Click the Apply button.
Your settings are saved.
Manage the ReadyNAS System
95
Page 96

ReadyNAS Duo, NV+, and 1100
Determine When to Send Alerts
You can determine what events trigger an email message being sent to administrators,
including the disk becoming full or the system’s becoming dangerously hot. All events are
selected by default. If you receive email messages about events that you are aware of, you
can clear the check boxes for the events that triggered them. NETGEAR recommends
leaving all the event check boxes selected.
To determine when to send alerts:
1. From the FrontView main menu, select System > Alerts.
2. Click the Enter the email addresses that you want to receive alerts tab.
3. In the Alert Events pane, select the check boxes for the conditions that you want to trigger
an email alert message.
You cannot turn off alerts for some conditions. These events are dimmed.
4. Click the Apply button.
Your settings are saved.
Turn the ReadyNAS System On and Off
You can turn off the ReadyNAS system with FrontView if you cannot access its buttons. You
can also choose to shut it down automatically at set times.
Turn the ReadyNAS System Off Now
You can turn the system off with the buttons on its front. If your system is not nearby, you can
also shut it down with FrontView.
To turn the ReadyNAS system off now:
1. From the FrontView main menu, select System > Shutdown.
2. Select the Shutdown and turn off device radio button.
3. Click the Apply button.
Your ReadyNAS system shuts down.
Manage the ReadyNAS System
96
Page 97

ReadyNAS Duo, NV+, and 1100
Restart the ReadyNAS System
If you suspect the files on your ReadyNAS system are corrupted or the quotas are incorrect, you
can check them by restarting your ReadyNAS system from FrontView.
To restart the ReadyNAS system:
1. From the FrontView main menu, select System > Shutdown.
2. Select the Shutdown and reboot device radio button.
3. (Optional) If you suspect the files on your ReadyNAS system are corrupted, select the
Perform volume scan on next boot check box.
The next time you start your ReadyNAS system, the scan is performed. This scan can
take up to an hour to complete, depending on the size of your disk.
4. (Optional) If you suspect the quotas on your ReadyNAS system are incorrect, select the
Check and fix quotas on next boot check box.
The next time you start your ReadyNAS system, the scan is performed. This scan can
take up to an hour to complete, depending on the size of your disk.
5. Click the Apply button.
Your ReadyNAS system shuts down and restarts. If you selected any scans, they are
performed when your system reboots, and your system is available for use when the
scans finish.
Turn the ReadyNAS System On and Off Using a Schedule
You can set up a schedule for turning your ReadyNAS system on and off automatically. Each
day of the week can have a different schedule.
To turn the ReadyNAS system on and off on a schedule:
1. From the FrontView main menu, select System > Power.
2. In the Power Timer pane, select the Enable power timer check box.
3. Use the drop-down lists in this pane to establish a schedule for turning your ReadyNAS
system on and off.
Some ReadyNAS systems cannot be turned on automatically. If your system does not
support this feature, Power ON is not available in the Action drop-down list.
If you select the blank entry in the Action drop-down list, the ReadyNAS system is left as
is and is not turned on or off.
4. Click the Apply button.
Your settings are saved.
Manage the ReadyNAS System
97
Page 98

ReadyNAS Duo, NV+, and 1100
Turn Off the ReadyNAS System Automatically to Prevent
Damage
You can have your ReadyNAS system turn itself off automatically when a dangerous
condition happens, for example, if the system’s temperature is too high or if a disk fails.
To turn the ReadyNAS system off automatically to prevent damage:
1. From the FrontView main menu, select System > Alerts.
2. Click the Alerts tab.
3. In the Other Alert Settings pane, select any of the following:
• To turn the ReadyNAS system off when a disk fails or no longer responds, select the
Power-off ReadyNAS when a disk fails or no longer responds check box.
• To turn the ReadyNAS system off when its temperature is dangerously high, select
the Power-off ReadyNAS when disk temperature exceeds safe levels check box.
4. Click the Apply button.
Your settings are saved.
Back Up and Restore Settings
You can back up the settings and preferences you have set on your ReadyNAS system, in
case you set up another ReadyNAS system to be just like it. Then you can restore those
settings on another system.
If you want to back up the files stored on your ReadyNAS system, see Chapter 6, Back Up
Files.
To back up settings:
1. From the FrontView main menu, select System > Config Backup.
2. Click the Backup tab.
3. Select what to back up:
• To back up the shares users can access, the rights users have for each share, and
the protocols the enabled for shares, select Share Access.
• To back up the file-sharing protocols and streaming and discovery services that are
enabled, select Services.
• To back up the names and settings for users and groups, select Users and Groups.
• To back up information about network settings and interfaces, such as IP addresses
and host names, select Network Settings.
Manage the ReadyNAS System
98
Page 99

ReadyNAS Duo, NV+, and 1100
• To back up other settings, including definitions of backup jobs and email alert settings,
select Miscellaneous Settings.
• To back up 50 MB worth of files on the shares, select Data Volumes.
• To back up all this information, select Everything.
4. Click Download configuration archive and determine where to store the archive.
The settings are stored in a zip file at the selected location.
To restore saved settings:
1. From the FrontView main menu, select System > Config Backup.
2. Click the Restore tab, click Choose File, and select the configuration archive.
3. Click Restore.
Manage Add-Ons
Add-ons let you add new abilities to your ReadyNAS system, such as the ability to use a type
third-party backup software with your ReadyNAS system or the ability to stream multimedia
files to different types of devices. To see what add-ons are available, visit
http://www.readynas.com/addons and http://www.readynas.com/community_addons.
Manage Installed Add-Ons
To manage installed add-ons:
1. From the FrontView main menu, select Services > Installed Add-ons.
Each add-on displays in its own pane.
2. To remove an add-on, click the Remove button in its pane.
3. If you make changes to an add-on’s options, click the Save button in its pane.
Install an Add-On
After you download an add-on from http://www.readynas.com/addons and
http://www.readynas.com/community_addons, you need to install it on your ReadyNAS
system.
To install an add-on:
1. From the FrontView main menu, select System > Update.
2. Click the Local tab.
3. Click Choose File and select the add-on file.
Most add-on files use the .bin extension.
Manage the ReadyNAS System
99
Page 100

ReadyNAS Duo, NV+, and 1100
4. Click Upload and verify image.
Your ReadyNAS system makes sure the file is valid.
5. Click Perform System Update.
Your ReadyNAS system installs the add-on.
6. To use the add-on, from the FrontView main menu, select Services > Installed Add-ons.
Improve Performance
This section describes options let you improve your ReadyNAS system’s performance, if you
are willing to accept some limitations or risk losing data. Following are some other options
that improve performance:
• If your client computers and your router support jumbo frames, see Enable Jumbo Packet
Support on page 104.
• If your ReadyNAS system does not contain any files that are accessed by multiple users
at once, such as a Quickbooks database, see
page 60.
Cache Files Locally Using CIFS on
To improve performance:
1. From the FrontView main menu, select System > Performance.
2. Set any of the following options:
• If you do not mind losing some data in the case of power failure, select Enable disk
write cache. This option allows the disk to acknowledge disk write requests before
the data is written out. This can boost to write performance, but carries the slight risk
that unwritten data in the write cache might be lost as a result of a power failure.
• If your ReadyNAS system has UPS protection, select the Disable full data
journaling. You might lose data if a power failure suddenly occurs. This option
substantially increases disk write performance.
• If you do not mind a long system check after a power failure, select Disable
journaling. File system journaling allows disk checks of only a few seconds verses
possibly an hour or longer without journaling. This option improves disk write
performance slightly.
• If Windows NT 4.0 users do not access your ReadyNAS system, you can select
Optimize for OS X. It provides the best performance in Mac OS X environments
when connected to a ReadyNAS system through the CIFS file-sharing protocol. It is
incompatible with Windows NT 4.0 computers.
Manage the ReadyNAS System
100
 Loading...