


ReadyNAS Surveillance
Add-on Manual
Firmware:
RAIDiator 4.2.17 or later
ReadyNAS OS 6.0.4 or later
March 2014
202-11009-03
350 East Plumeria Drive
San Jose, CA 95134
USA

ReadyNAS Surveillance Add-on
Support
Thank you for selecting NETGEAR products.
After installing your device, locate the serial number on the label of your product and use it to register your product at
https://my.netgear.com. You must register your product before you can use NETGEAR telephone support. NETGEAR
recommends registering your product through the NETGEAR website. For product updates and web support, visit
http://support.netgear.com.
Phone (US & Canada only): 1-888-NETGEAR.
Phone (Other Countries): Check the list of phone numbers at http://support.netgear.com/general/contact/default.aspx.
Compliance
For regulatory compliance information, visit http://www.netgear.com/about/regulatory.
See the regulatory compliance document before connecting the power supply.
Trademarks
NETGEAR, the NETGEAR logo, and Connect with Innovation are trademarks and/or registered trademarks of
NETGEAR, Inc. and/or its subsidiaries in the United States and/or other countries. Information is subject to change
without notice. © 2014 All rights reserved.
2

Contents
Chapter 1 Getting Started
Chapter 2 Camera Setup
About ReadyNAS Surveillance . . . . . . . . . . . . . . . . . . . . . . . . . . . . . . . . . . . . . . . . . . 6
Compatible Products . . . . . . . . . . . . . . . . . . . . . . . . . . . . . . . . . . . . . . . . . . . . . . . 7
ReadyNAS Surveillance Features . . . . . . . . . . . . . . . . . . . . . . . . . . . . . . . . . . . . . 7
Requirements. . . . . . . . . . . . . . . . . . . . . . . . . . . . . . . . . . . . . . . . . . . . . . . . . . . . . . . . 8
Install Surveillance. . . . . . . . . . . . . . . . . . . . . . . . . . . . . . . . . . . . . . . . . . . . . . . . . . . . 8
Make Sure That You Have the Licenses You Need . . . . . . . . . . . . . . . . . . . . . . . . . 9
Log In to ReadyNAS Surveillance . . . . . . . . . . . . . . . . . . . . . . . . . . . . . . . . . . . . . . . 9
ReadyNAS Surveillance Toolkit . . . . . . . . . . . . . . . . . . . . . . . . . . . . . . . . . . . . . . . . 10
ReadyNAS Surveillance Mobile App . . . . . . . . . . . . . . . . . . . . . . . . . . . . . . . . . . . . 12
Add Cameras . . . . . . . . . . . . . . . . . . . . . . . . . . . . . . . . . . . . . . . . . . . . . . . . . . . . . . . 15
Add Cameras by Searching . . . . . . . . . . . . . . . . . . . . . . . . . . . . . . . . . . . . . . . . . 15
Add Cameras Manually. . . . . . . . . . . . . . . . . . . . . . . . . . . . . . . . . . . . . . . . . . . . . 16
View or Change Camera Settings . . . . . . . . . . . . . . . . . . . . . . . . . . . . . . . . . . . . . . 17
View or Change Camera Parameters . . . . . . . . . . . . . . . . . . . . . . . . . . . . . . . . . . . 19
Specify Lens Settings . . . . . . . . . . . . . . . . . . . . . . . . . . . . . . . . . . . . . . . . . . . . . . . . 20
Set Up a Second Video Stream . . . . . . . . . . . . . . . . . . . . . . . . . . . . . . . . . . . . . . . . 21
View Camera Status . . . . . . . . . . . . . . . . . . . . . . . . . . . . . . . . . . . . . . . . . . . . . . . . . 22
Chapter 3 Recordings & Events
Set the Recording Mode . . . . . . . . . . . . . . . . . . . . . . . . . . . . . . . . . . . . . . . . . . . . . . 24
Set Up Events and Actions . . . . . . . . . . . . . . . . . . . . . . . . . . . . . . . . . . . . . . . . . . . . 25
Set Up Camera Events . . . . . . . . . . . . . . . . . . . . . . . . . . . . . . . . . . . . . . . . . . . . . 25
System Events. . . . . . . . . . . . . . . . . . . . . . . . . . . . . . . . . . . . . . . . . . . . . . . . . . . . 26
Recording Schedule. . . . . . . . . . . . . . . . . . . . . . . . . . . . . . . . . . . . . . . . . . . . . . . . . . 27
Copy a Scheduled Event to Another Day . . . . . . . . . . . . . . . . . . . . . . . . . . . . . 28
Add Event Contacts . . . . . . . . . . . . . . . . . . . . . . . . . . . . . . . . . . . . . . . . . . . . . . . 29
I/O Boxes . . . . . . . . . . . . . . . . . . . . . . . . . . . . . . . . . . . . . . . . . . . . . . . . . . . . . . . . . . 30
Email Setup. . . . . . . . . . . . . . . . . . . . . . . . . . . . . . . . . . . . . . . . . . . . . . . . . . . . . . . . . 31
SMTP Server Setup. . . . . . . . . . . . . . . . . . . . . . . . . . . . . . . . . . . . . . . . . . . . . . . . 31
Chapter 4 Management
Activate a License . . . . . . . . . . . . . . . . . . . . . . . . . . . . . . . . . . . . . . . . . . . . . . . . . . . 34
Transfer Licenses . . . . . . . . . . . . . . . . . . . . . . . . . . . . . . . . . . . . . . . . . . . . . . . . . . . . 36
Remove the ReadyNAS Surveillance Add-on . . . . . . . . . . . . . . . . . . . . . . . . . . . . 37
Manage Users . . . . . . . . . . . . . . . . . . . . . . . . . . . . . . . . . . . . . . . . . . . . . . . . . . . . . . 38
3

ReadyNAS Surveillance Add-on
View Logs . . . . . . . . . . . . . . . . . . . . . . . . . . . . . . . . . . . . . . . . . . . . . . . . . . . . . . . . . . 40
Manage the Configuration File . . . . . . . . . . . . . . . . . . . . . . . . . . . . . . . . . . . . . . . . 40
Save and Load Configurations . . . . . . . . . . . . . . . . . . . . . . . . . . . . . . . . . . . . . . 41
Create and Manage Back Ups of Your Video Records . . . . . . . . . . . . . . . . . . . . . 42
Set Up a Backup Schedule . . . . . . . . . . . . . . . . . . . . . . . . . . . . . . . . . . . . . . . . . . 42
Set Up a Backup Server . . . . . . . . . . . . . . . . . . . . . . . . . . . . . . . . . . . . . . . . . . . . 43
Backup System Tool . . . . . . . . . . . . . . . . . . . . . . . . . . . . . . . . . . . . . . . . . . . . . . . 44
Set Up a Backup Job . . . . . . . . . . . . . . . . . . . . . . . . . . . . . . . . . . . . . . . . . . . . . . . 45
Delete Recorded Video. . . . . . . . . . . . . . . . . . . . . . . . . . . . . . . . . . . . . . . . . . . . . 46
CMS Service Setup . . . . . . . . . . . . . . . . . . . . . . . . . . . . . . . . . . . . . . . . . . . . . . . . . . 47
Chapter 5 Live View
Access Live View . . . . . . . . . . . . . . . . . . . . . . . . . . . . . . . . . . . . . . . . . . . . . . . . . . . . 49
Remote Live Viewer Tool . . . . . . . . . . . . . . . . . . . . . . . . . . . . . . . . . . . . . . . . . . . 49
Surveillance Mobile App . . . . . . . . . . . . . . . . . . . . . . . . . . . . . . . . . . . . . . . . . . . 50
Live View Screen . . . . . . . . . . . . . . . . . . . . . . . . . . . . . . . . . . . . . . . . . . . . . . . . . . . . 50
Camera List Right-Click Menu . . . . . . . . . . . . . . . . . . . . . . . . . . . . . . . . . . . . . . 50
Information, Navigation, and Playing Video . . . . . . . . . . . . . . . . . . . . . . . . . . . 51
Camera Screen Right-Click Button . . . . . . . . . . . . . . . . . . . . . . . . . . . . . . . . . . 52
I/O Control Panel . . . . . . . . . . . . . . . . . . . . . . . . . . . . . . . . . . . . . . . . . . . . . . . . . 52
Apply a Privacy Mask . . . . . . . . . . . . . . . . . . . . . . . . . . . . . . . . . . . . . . . . . . . . . . . . 53
Live View Settings. . . . . . . . . . . . . . . . . . . . . . . . . . . . . . . . . . . . . . . . . . . . . . . . . . . 56
General Settings . . . . . . . . . . . . . . . . . . . . . . . . . . . . . . . . . . . . . . . . . . . . . . . . . . 56
Set Up the Stream Profile for Each Camera . . . . . . . . . . . . . . . . . . . . . . . . . . . 57
Customize the On screen Display. . . . . . . . . . . . . . . . . . . . . . . . . . . . . . . . . . . . 58
Set the Monitor Display for Auto Scan . . . . . . . . . . . . . . . . . . . . . . . . . . . . . . . 59
Set Up Notifications . . . . . . . . . . . . . . . . . . . . . . . . . . . . . . . . . . . . . . . . . . . . . . . 60
Set Up Joystick Control . . . . . . . . . . . . . . . . . . . . . . . . . . . . . . . . . . . . . . . . . . . . 61
Set Up Live View Sound for an Event. . . . . . . . . . . . . . . . . . . . . . . . . . . . . . . . . 62
E-Map . . . . . . . . . . . . . . . . . . . . . . . . . . . . . . . . . . . . . . . . . . . . . . . . . . . . . . . . . . . . . 62
Set Up an E-Map. . . . . . . . . . . . . . . . . . . . . . . . . . . . . . . . . . . . . . . . . . . . . . . . . . 63
Chapter 6 Search and Playback
Access Playback. . . . . . . . . . . . . . . . . . . . . . . . . . . . . . . . . . . . . . . . . . . . . . . . . . . . . 67
Search Recorded Video. . . . . . . . . . . . . . . . . . . . . . . . . . . . . . . . . . . . . . . . . . . . . . . 68
Playback Screen . . . . . . . . . . . . . . . . . . . . . . . . . . . . . . . . . . . . . . . . . . . . . . . . . . 70
Playback Settings . . . . . . . . . . . . . . . . . . . . . . . . . . . . . . . . . . . . . . . . . . . . . . . . . . . 71
Intelligent Search. . . . . . . . . . . . . . . . . . . . . . . . . . . . . . . . . . . . . . . . . . . . . . . . . . . . 73
Post Processing Tool . . . . . . . . . . . . . . . . . . . . . . . . . . . . . . . . . . . . . . . . . . . . . . . . . 74
Save a Video. . . . . . . . . . . . . . . . . . . . . . . . . . . . . . . . . . . . . . . . . . . . . . . . . . . . . . . . 75
Save an Image . . . . . . . . . . . . . . . . . . . . . . . . . . . . . . . . . . . . . . . . . . . . . . . . . . . . . . 76
Print an Image . . . . . . . . . . . . . . . . . . . . . . . . . . . . . . . . . . . . . . . . . . . . . . . . . . . . . . 77
Back Up Recorded Video . . . . . . . . . . . . . . . . . . . . . . . . . . . . . . . . . . . . . . . . . . . . . 77
4

1. Getting Started
This chapter covers the following topics:
• About ReadyNAS Surveillance
• Requirements
• Make Sure That You Have the Licenses You Need
• Install Surveillance
• Log In to ReadyNAS Surveillance
• ReadyNAS Surveillance Toolkit
• ReadyNAS Surveillance Mobile App
You can also visit the ReadyNAS Surveillance Community Support Forum at
www.readynas.com/forum/viewforum.php?f=151.
1
5
ReadyNAS Surveillance Add-on
About ReadyNAS Surveillance
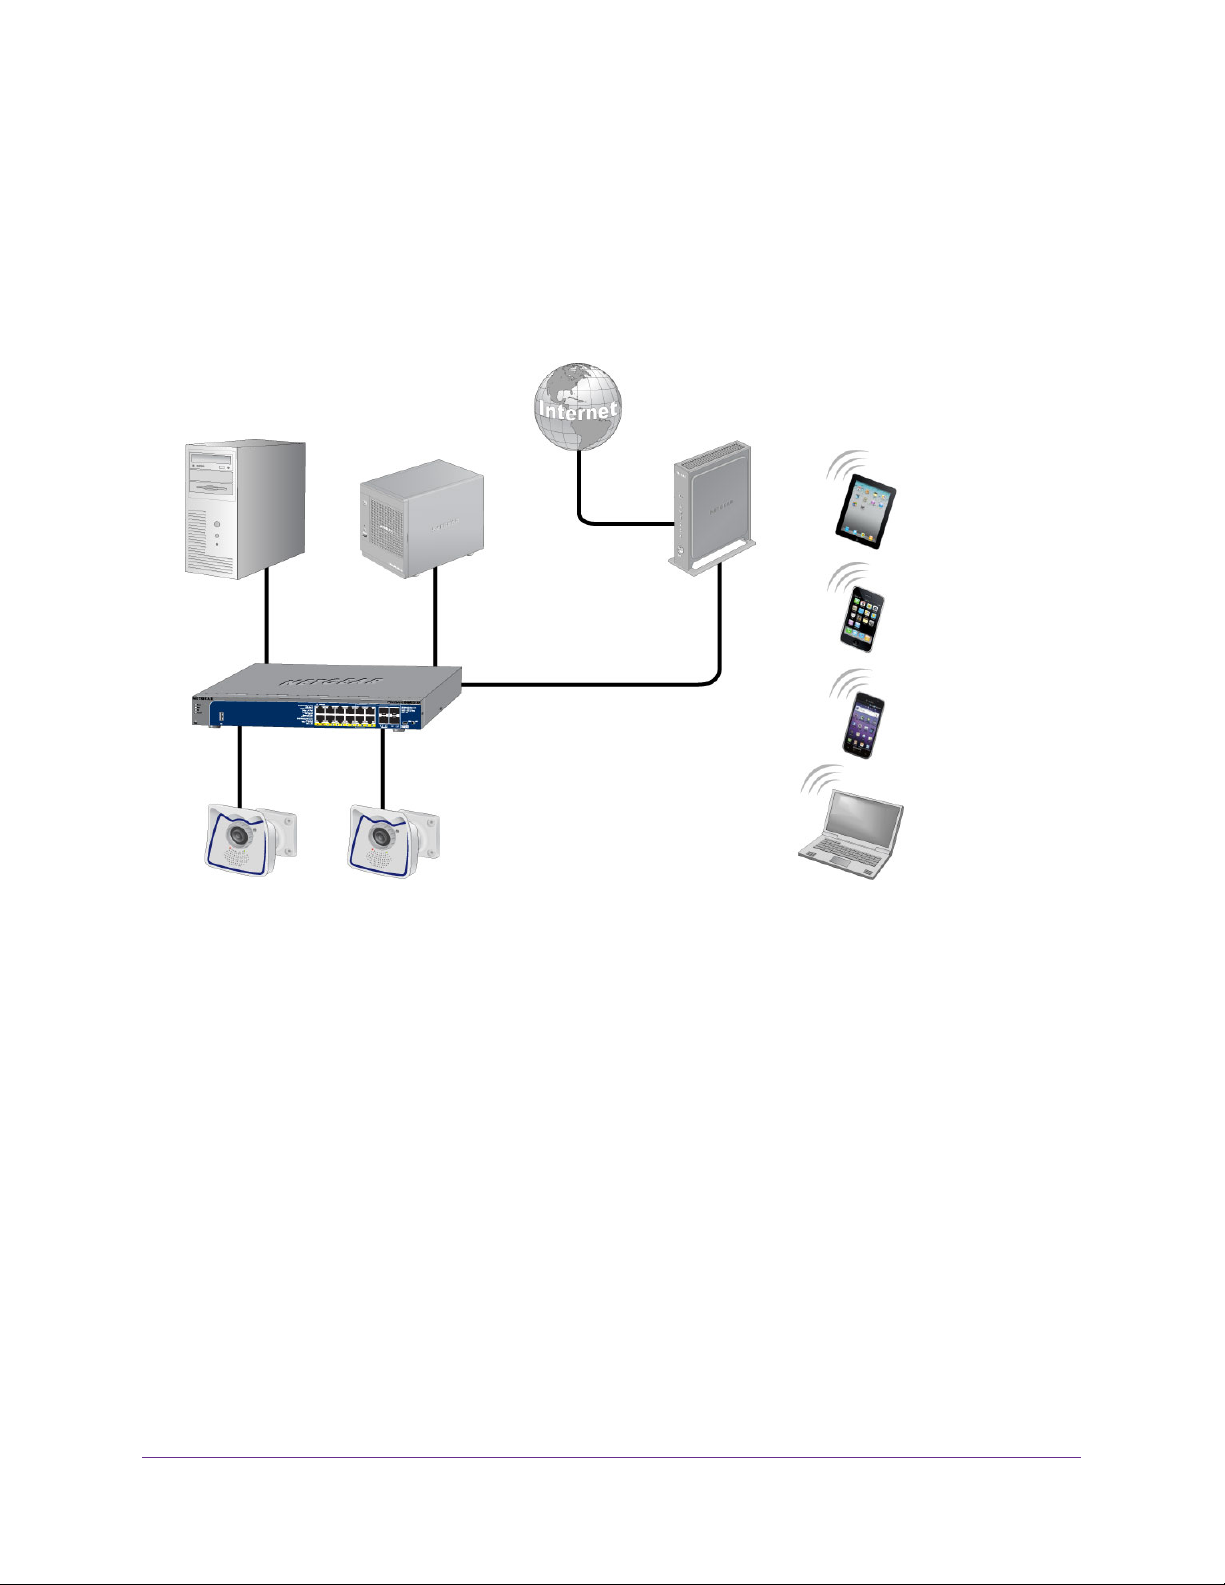
The ReadyNAS Surveillance Add-on puts network video recorder (NVR) software onto the
same ReadyNAS storage system that you can use to store your video data. You use
Surveillance to manage your IP cameras, stream video, and store video data. The following
illustration shows a small network that uses two IP cameras with a single ReadyNAS system.
Access
Surveillance
from your PC
IP cameras
Figure 1. Network with ReadyNAS Surveillance and two IP cameras
ReadyNAS
system with
NVR software
Router
Mobile devices
use Live View
for streaming
video
Use the
NETGEAR NVR
toolkit on your
laptop
You can use a free trial version of ReadyNAS Surveillance for 30 days. After that, you need
one or more licenses to run the software. Before you install ReadyNAS Surveillance, you
must install your ReadyNAS storage system and set it up as described in your ReadyNAS
installation guide and user manual.
You can work with ReadyNAS Surveillance in several ways:
• Surveillance Add-on. For ReadyNAS devices running RAIDiator 4.2.x firmware, the
main software that you install through FrontV
iew. It loads the NVR software onto your
ReadyNAS storage system, and allows you to use your Internet browser to specify
settings for your system, to use Live View, and to use Playback.
• ReadyNAS Surveillance toolkit.
A group of Windows-based applications that let you
use Live View and Playback, and manage some settings such as those for backing up
video data without using FrontView.
• Live V
iew for mobile devices. Use this app to view streaming video on your phone or
mobile device.
Getting Started
6
ReadyNAS Surveillance Add-on
Compatible Products
• ReadyNAS Surveillance is compatible with ReadyNAS Ultra, Pro, and rack-mount
products using firmware 4.2.x or ReadyNAS 100, 300, 500, 700 series, 2120, 3220, 4220
devices using firmware 6.x.
• ReadyNAS Surveillance is compatible with major IP camera vendors including
ACTi, Arecont, IQinVision, Mobotix, Panasonic, Sony, Vivotek, and many other brands.
For a complete list visit
http://www.netgear.com/business/products/storage/ReadyNAS-surveillance/.
Note: The camera firmware version is important. The list includes the tested
firmware level. A different version, including a later version, might not
work.
Axis,
ReadyNAS Surveillance Features
The Surveillance Home application supports some of the features of the ReadyNAS
Surveillance application. Some ReadyNAS products support the full ReadyNAS Surveillance
feature set. Some support the ReadyNAS Surveillance Home application feature set. To
determine which ReadyNAS products support which feature set, check the ReadyNAS
Surveillance datasheet.
Table 1. Comparison of ReadyNAS Serveillance and Surveillance Home Features
Feature ReadyNAS Surveillance ReadyNAS Surveillance Home
Camera input/output Yes No
Scheduled recording Yes No
Motion detection-based
recording
30-day free trial license
supporting 64 cameras*
Camera licenses included None
* Check the ReadyNAS Surveillance datasheet for the maximum number of cameras
supported by each product.
Yes No
Yes No
1
Getting Started
7

ReadyNAS Surveillance Add-on
Requirements
To use Surveillance with a compatible ReadyNAS unit and cameras, you need the following:
• RAIDiator firmware version 4.2.17+ or ReadyNAS OS 6.0.4+
• Licenses based on the number of cameras that you are using (a free 30-day trial license
comes with the Surveillance Add-on)
• Some features require Microsoft Internet Explorer 8+
• Microsoft Visual C++ 2005 SP1 Redistributable package (vcredist_x86.exe), which you
are prompted to download and install during the ReadyNAS Surveillance installation.
• Java installed on the PC
No specific version of Java is required, but if you have problems installing cameras or
with the operation of any features, install the latest version.
Install Surveillance
On Windows Server 2008, the ReadyNAS Surveillance Toolkit needs to be installed before
the Add-on. See
ReadyNAS Surveillance Add-on, you can purchase a license or use the free 30-day trial
version.
To install Surveillance on RAIDiator 4.2.x–based devices:
1. Make sure that your ReadyNAS storage unit is installed and working on your network.
2. To display the FrontView screen for your ReadyNAS storage system, use the RAIDar
discovery tool.
3. In FrontView, from the main menu, select Add-ons > Installed.
4. Click the Surveillance Add-on button.
The software is installed and a message displays notifying you that you have a free
30-day trial license.
To install Surveillance on ReadyNAS OS 6.x–based devices:
1. Make sure that your ReadyNAS storage unit is installed and working on your network
with an Internet connection.
2. Access the local admin page for the ReadyNAS device.
You can use ReadyCLOUD, the local IP address, or RAIDar.
3. Select Apps > Installed.
4. Turn on the Surveillance app.
5. Wait a few minutes while the application accesses the Internet configures itself.
6. To start the application, click the Launch button .
ReadyNAS Surveillance Toolkit on page 10. When you download the
Getting Started
8

ReadyNAS Surveillance Add-on
Make Sure That You Have the Licenses You Need
You need a license for each ReadyNAS storage system that will use the ReadyNAS
Surveillance Add-on. To buy a license, contact your local reseller or e-commerce site. When
you purchase a license, you must activate it. See Activate a License on page 34.
You can transfer an active license from one ReadyNAS unit to another, but you cannot
duplicate a single license for use on multiple ReadyNAS units. See Transfer Licenses on
page 36.
Log In to ReadyNAS Surveillance
To log in:
1. In FrontV
2. Click the Manage ReadyNAS Surveillance button.
You are prompted to log in:
3. (Optional) Select a language from the drop-down list.
4. In the user name field, type admin.
5. In the password field, type password.
Note: Previous versions of ReadyNAS Surveillance used the default
iew, from the main menu, select Add ons > Installed.
password netgear1. If you upgrade to the latest version and have
never changed the default password, the password is changed to
password.
The Surveillance screen displays. The main menu is in the upper right corner:
• Settings. Set up Surveillance to work with your cameras and specify recording
events and associated actions such as email notifications.
• Live V
• Playback. V
iew. View live streaming video.
iew recorded video.
Getting Started
9
ReadyNAS Surveillance Add-on
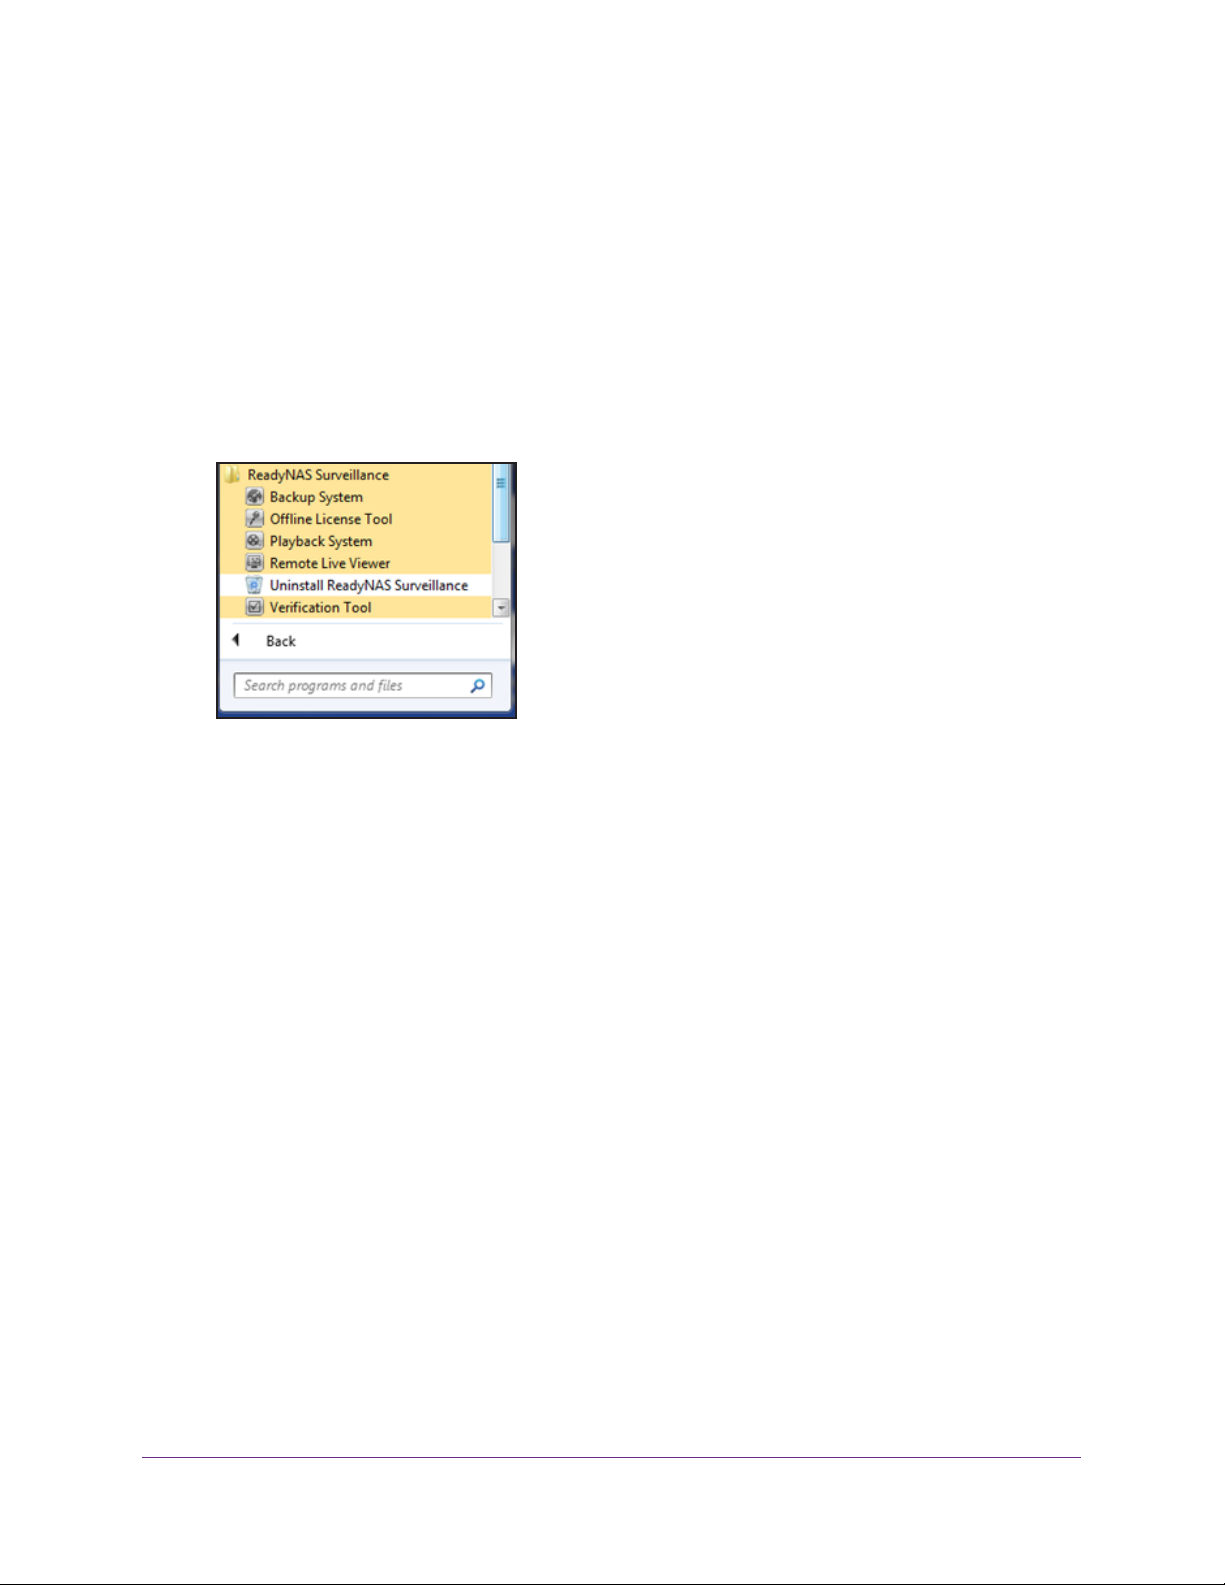
ReadyNAS Surveillance Toolkit
The toolkit is a Windows-based group of applications that you can use to work with
ReadyNAS Surveillance on ReadyNAS storage systems running 6.x firmware. This toolkit is
especially useful if your computer or mobile device is not on the same local area network
(LAN) as the ReadyNAS storage unit.
Note: On Windows Server 2008, the ReadyNAS Surveillance Toolkit needs
to be installed before the Add-on.
The toolkit includes the following:
• Backup System
• Of
fline License Tool
• Playback System
• Remote Live V
• V
erification Tool
iewer
To install the ReadyNAS Surveillance Toolkit:
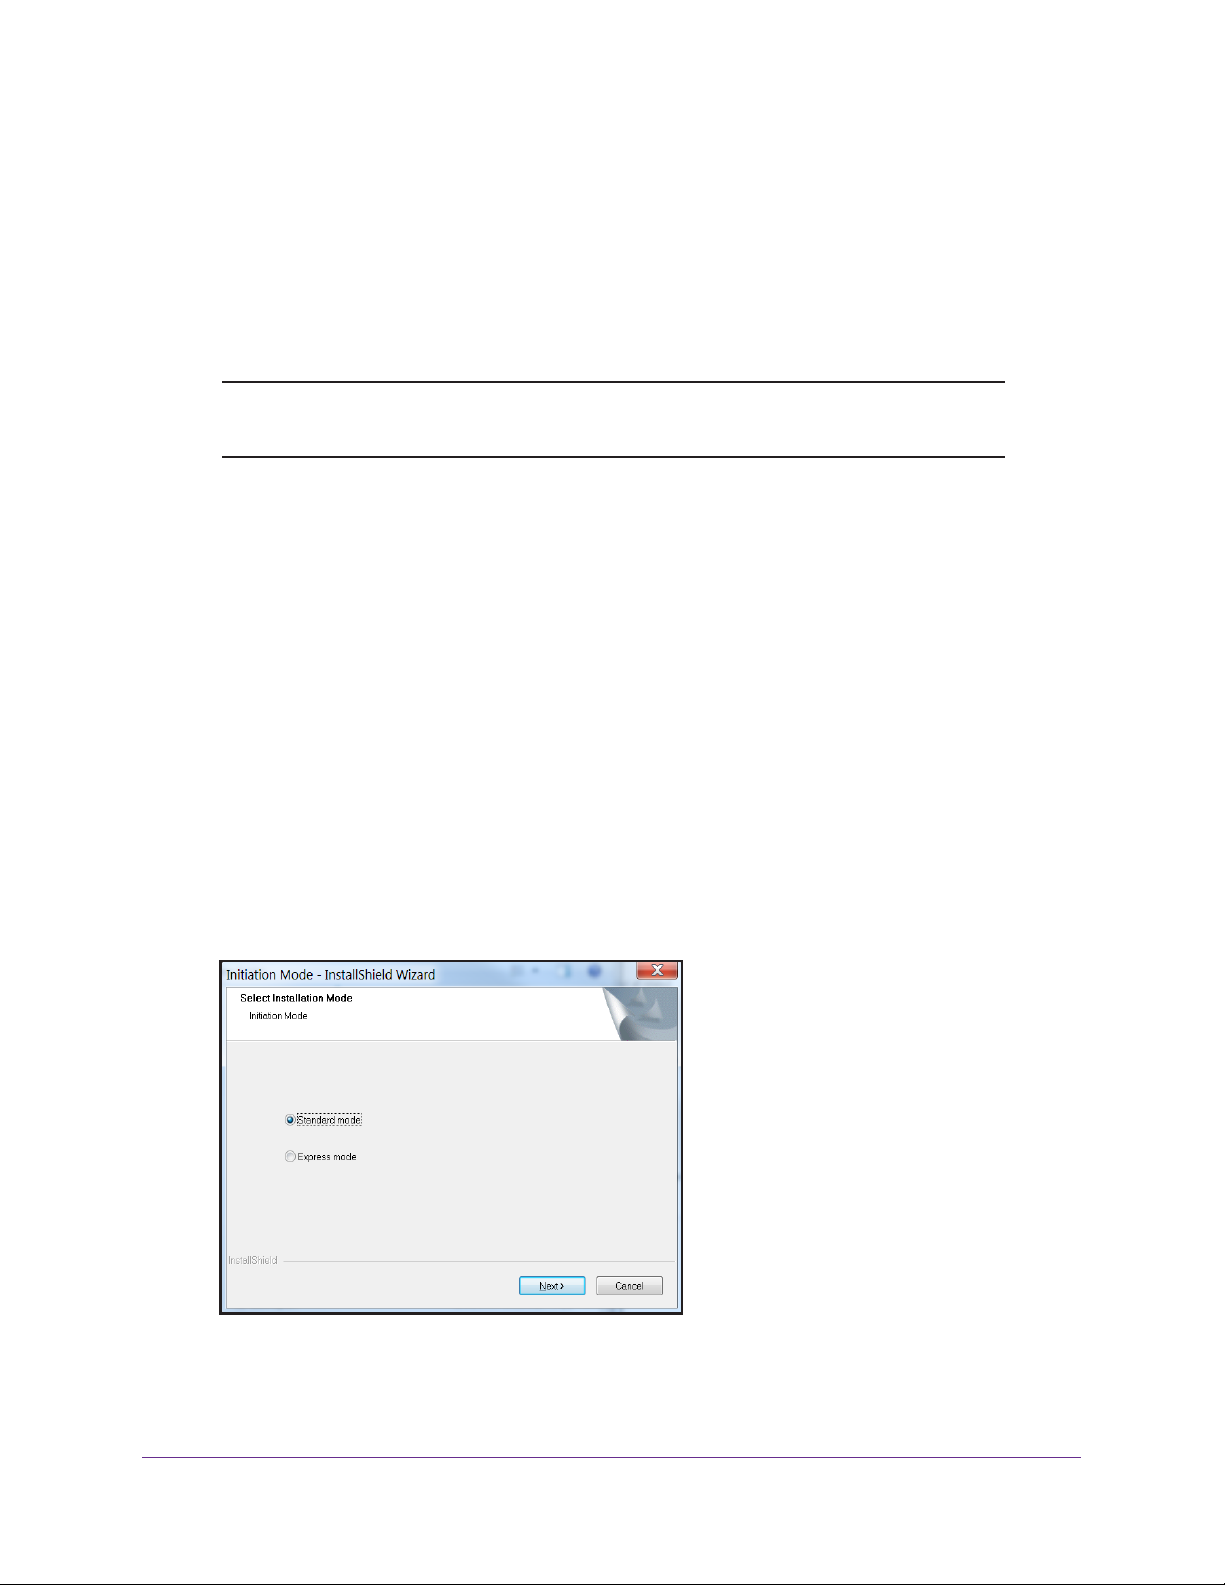
1. Download the W
at: http://support.netgear.com/product/RNNVR01L-1000S.
2. Unzip the file and double-click the setup.exe file.
3. When prompted, select a setup language or leave English selected.
4. Select Standard mode or Express mode installation.
indows Application package from the ReadyNAS download website
5. To accept the license agreement for the ReadyNAS Surveillance Toolkit, and to enter your
user name and company, click the Next button and follow the wizard steps.
Getting Started
10
ReadyNAS Surveillance Add-on
6. Select the Complete or Custom button and click the Next button.
7. T
o begin the installation, click the Install button.
The install progress screen displays. That screen is replaced as the wizard prepares the
V
isual C++ 2005 Redistributable package, which contains the runtime libraries you need
to use the ReadyNAS Surveillance Toolkit.
8. On the InstallShield W
To uninstall the toolkit:
izard Complete pane, click Finish.
1. On the Windows Start menu, select All Programs > ReadyNAS Surveillance >
Uninstall ReadyNAS Surveillance.
2. Select the Remove radio button and click the Next button.
3. Follow the wizard prompts to uninstall the software.
Getting Started
11
ReadyNAS Surveillance Add-on
ReadyNAS Surveillance Mobile App
Y ou can use the ReadyNAS Surveillance mobile app to view live video and take snapshots of
it on your iPhone, iPad, or Android phone.
To set up the app:
1. Download and install the ReadyNAS Surveillance app from the
Google Play Store.
2. T
o launch the app, tap the Surveillance icon .
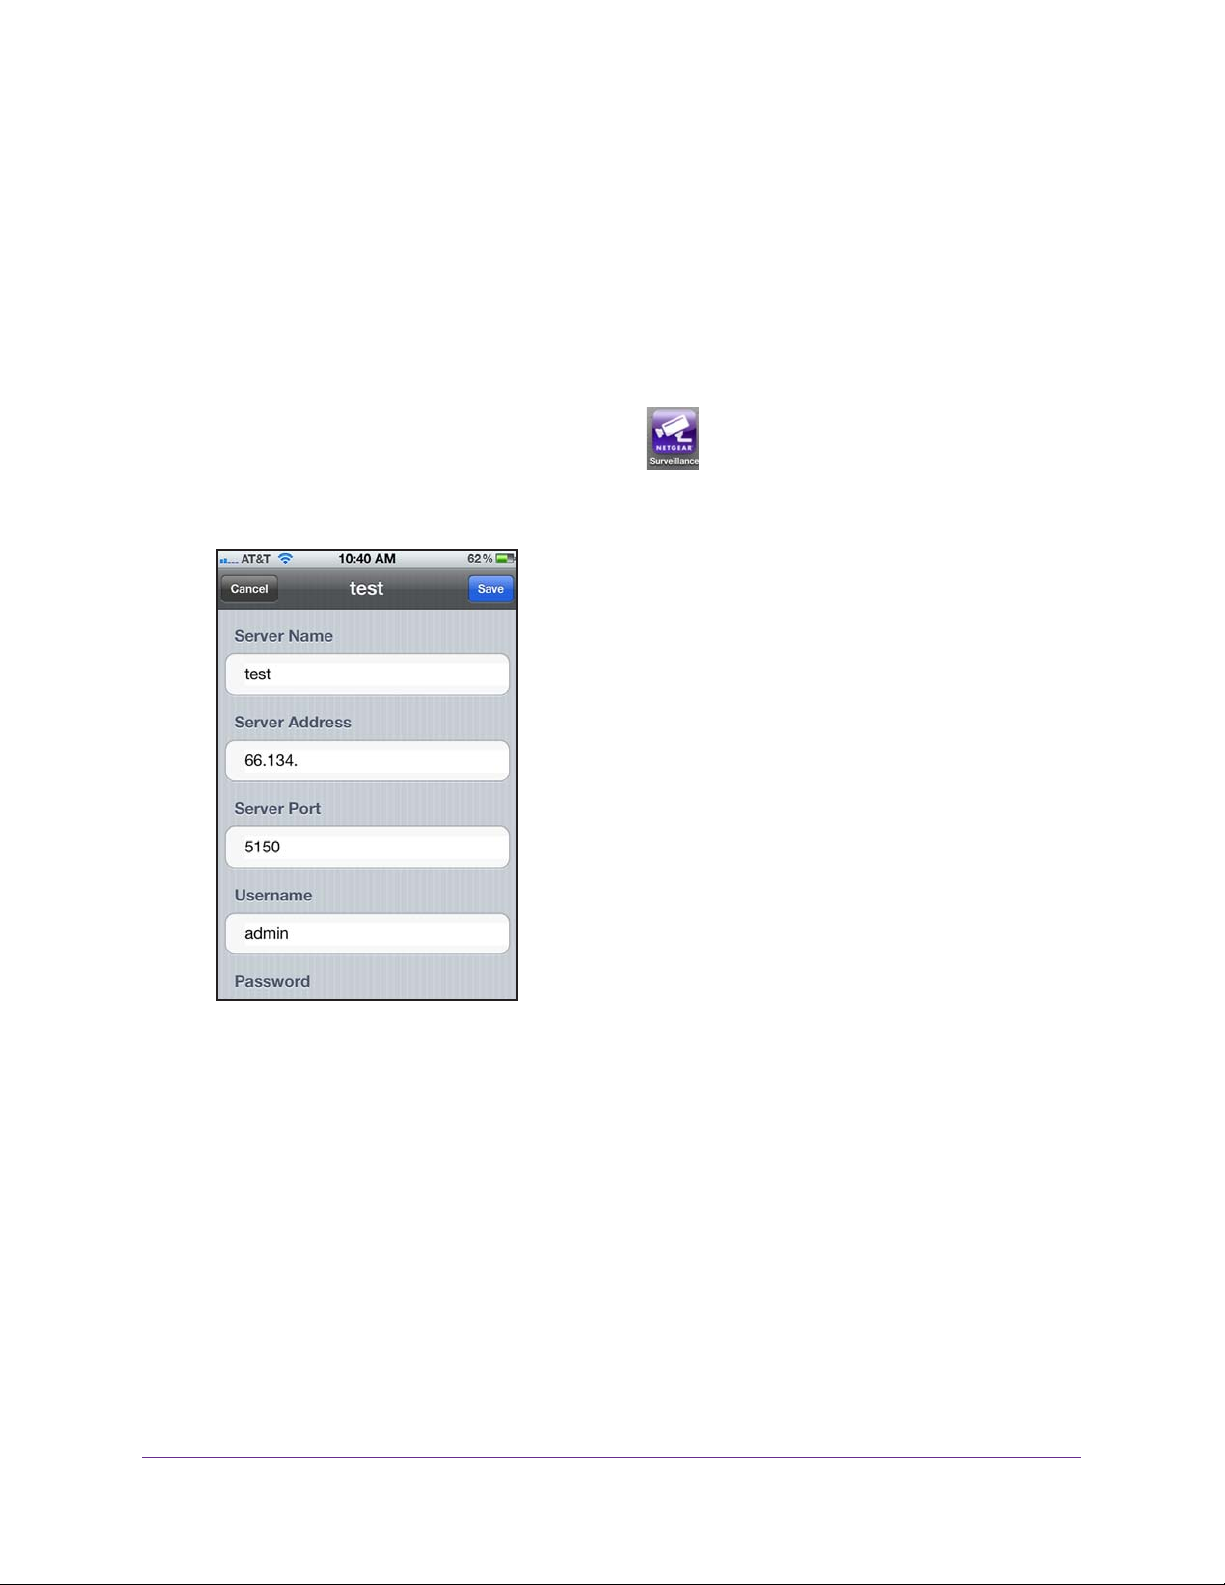
3. In the My Sites screen, tap the + button to add a server
.
The server settings screen displays:
XXX.XXX
Apple App Store or
4. Specify the location of the server (ReadyNAS system) to access that has the video that you
want to view.
• Server Name.
• Server Address.
Type a meaningful name for this ReadyNAS system.
The external IP address of the router on the LAN that has the
ReadyNAS system. You can use a tool like What Is My IP to identify the router’s
external IP address.
• Server Port.
The default port for Surveillance Live View is 5150. You must set up port
forwarding in the router at the IP address you just specified. (You must log in to your
router to set up the port forwarding.)
• User name. T
ype admin (lowercase), which is the user name to access ReadyNAS
Surveillance.
Getting Started
12
• Password. Enter the password that you set up for the admin user name. The default
is password, but NETGEAR recommends that you change it to a more secure
password.
5. T
ap the Save button to save your settings.
This server is added to the My Sites screen.
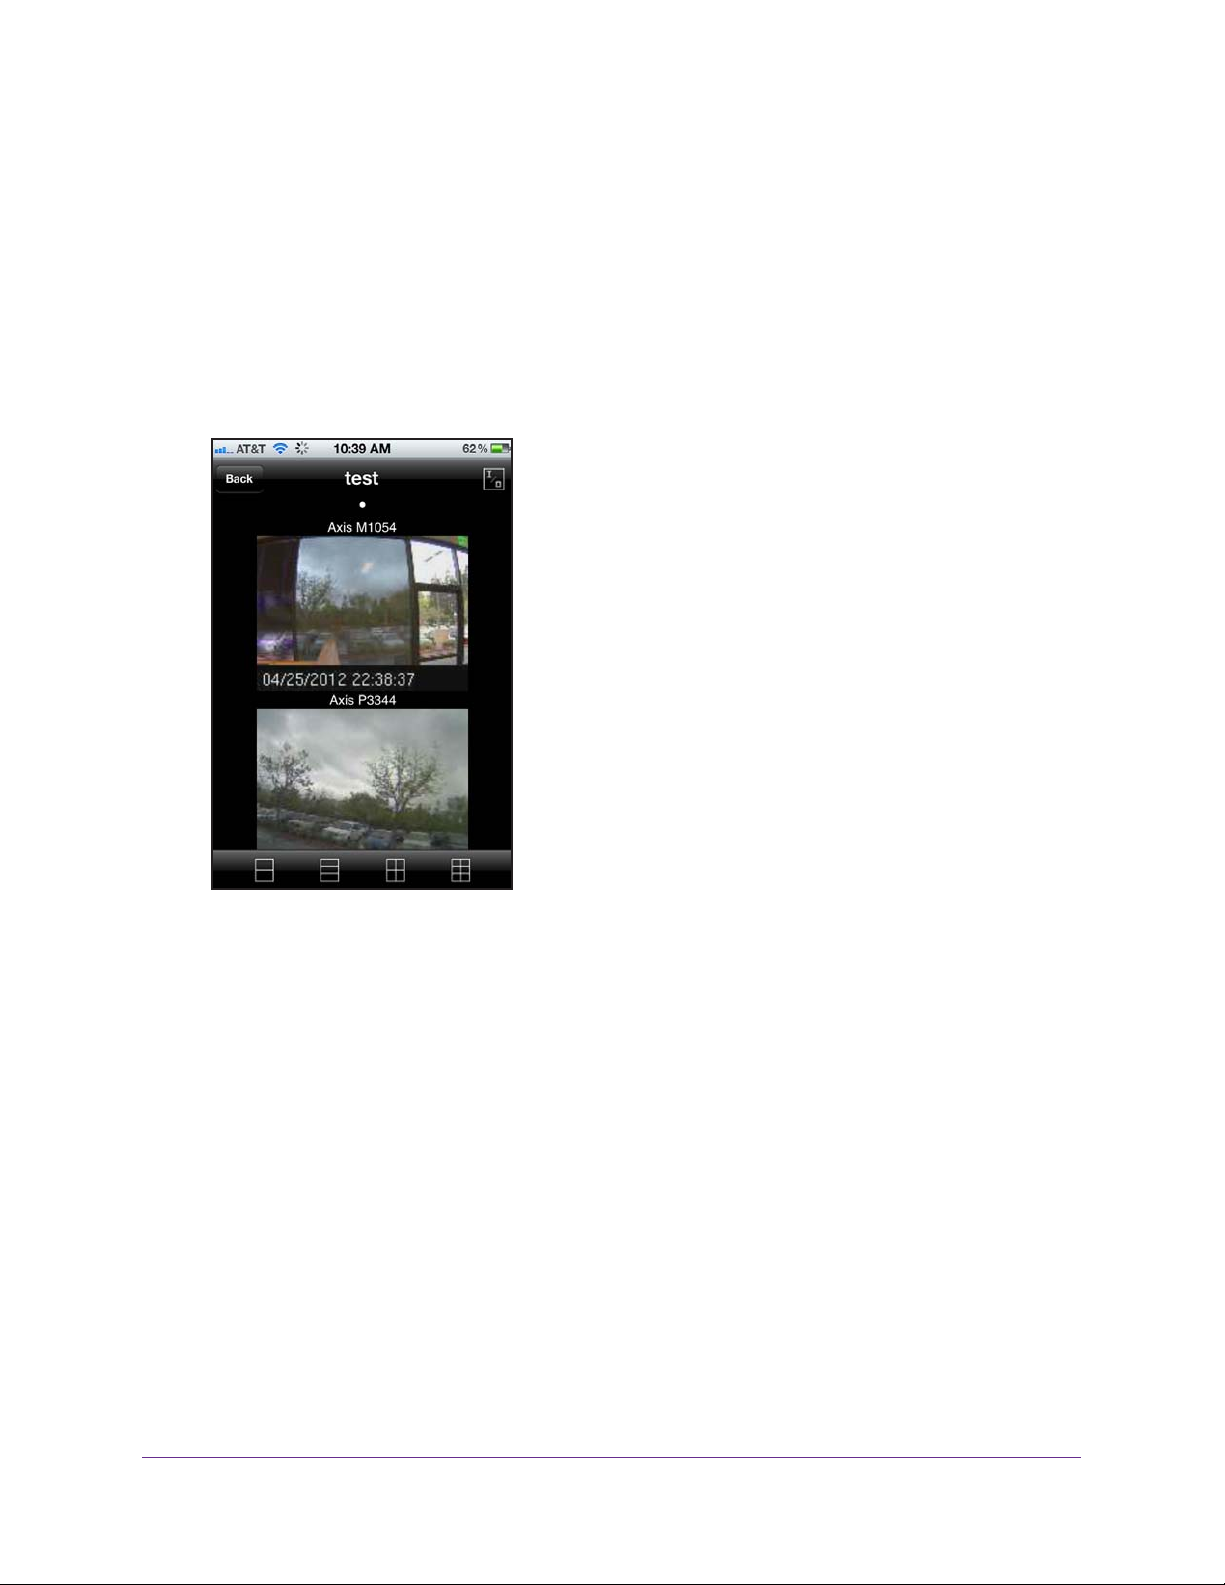
To use the app:
1. T
ap the server.
The video displays:
ReadyNAS Surveillance Add-on
2. (Optional) You can use the icons at the bottom of the screen to adjust the viewing grid.
Getting Started
13

2. Camera Setup
This chapter covers the following topics:
• Add Cameras
• View or Change Camera Settings
• View or Change Camera Parameters
• Specify Lens Settings
• Set Up a Second Video Stream
• View Camera Status
2
14
ReadyNAS Surveillance Add-on
Add Cameras
You can search for cameras on the network and add them, or you can add them manually.
You can either search for UPnP cameras, or use the camera search tool. Before searching,
UPnP cameras, make sure that the cameras support UPnP.
Before adding the cameras, use the camera manufacture’s documentation to install and set
up the cameras, including username and password and note the access URL and the
network protocols supported (for example, HTTP
using UDP). Many cameras support multiple protocols.
Add Cameras by Searching
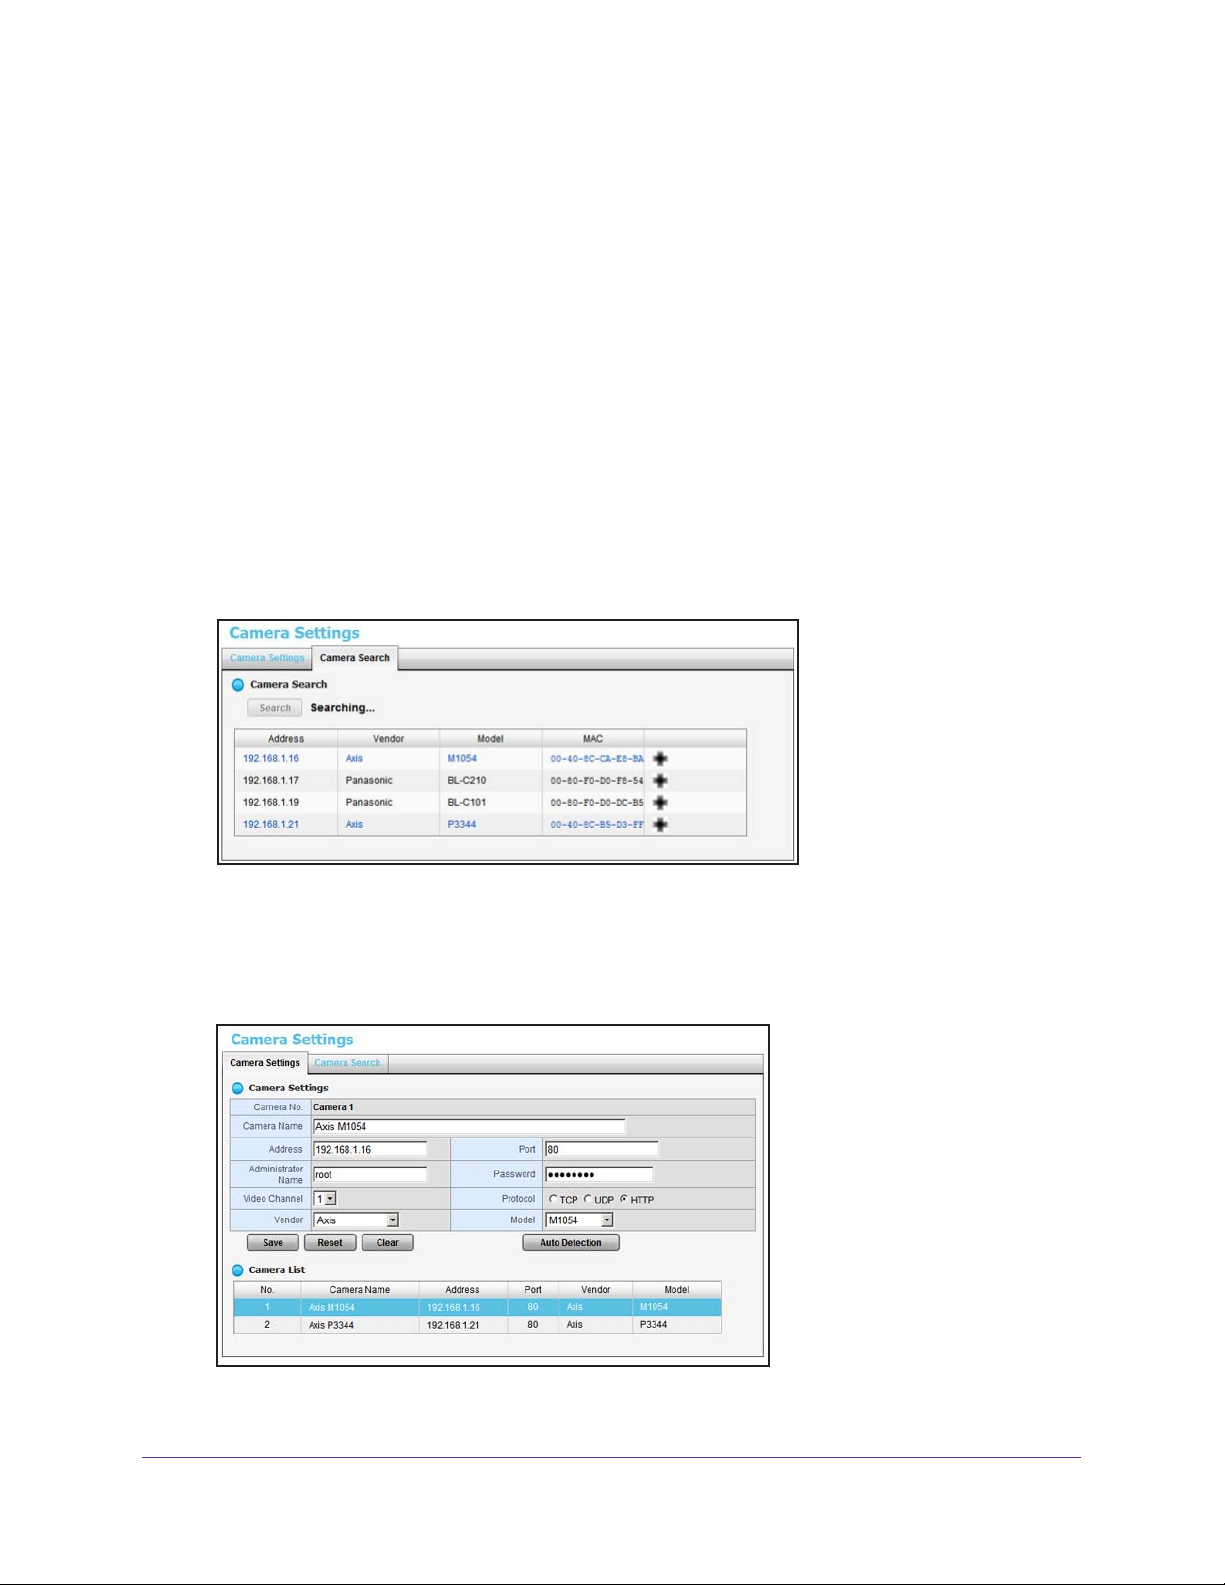
To search for and add cameras:
1. Select IP Camera > Camera Settings > Camera Search.
2. Click the Search button.
, HTTPS, TCP, UDP--note the port number if
The screen expands and lists all the currently available cameras. The inserted cameras
are shown in blue.
3. To add a camera to your camera list, click the + icon.
The Camera Settings screen displays.
4. Type the camera name, user name, and password.
Camera Setup
15
ReadyNAS Surveillance Add-on
Assign each camera to a different video channel. After the trial period, a license key is
needed for each channel.
For better compatibility between the camera and the ReadyNAS system, make sure that
the privilege of camera credential is admin level.
5. Click the Add button.
The updated camera list displays.
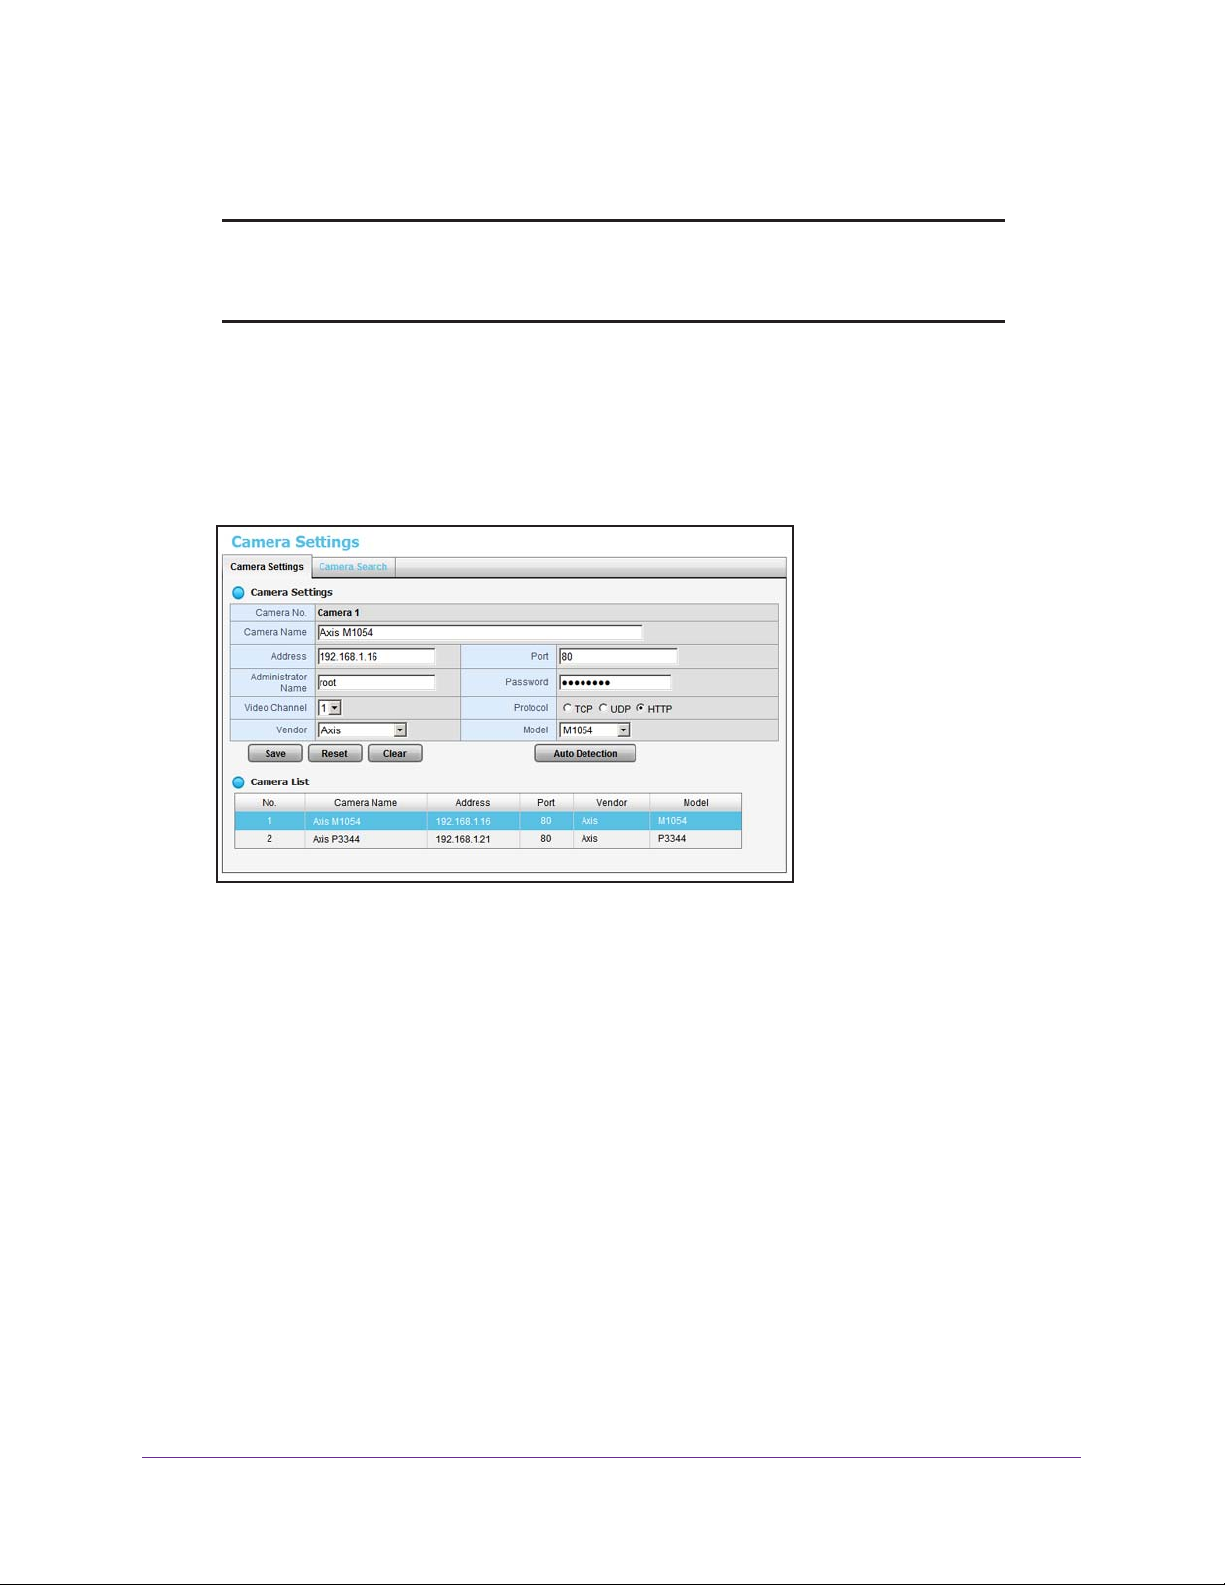
Add Cameras Manually
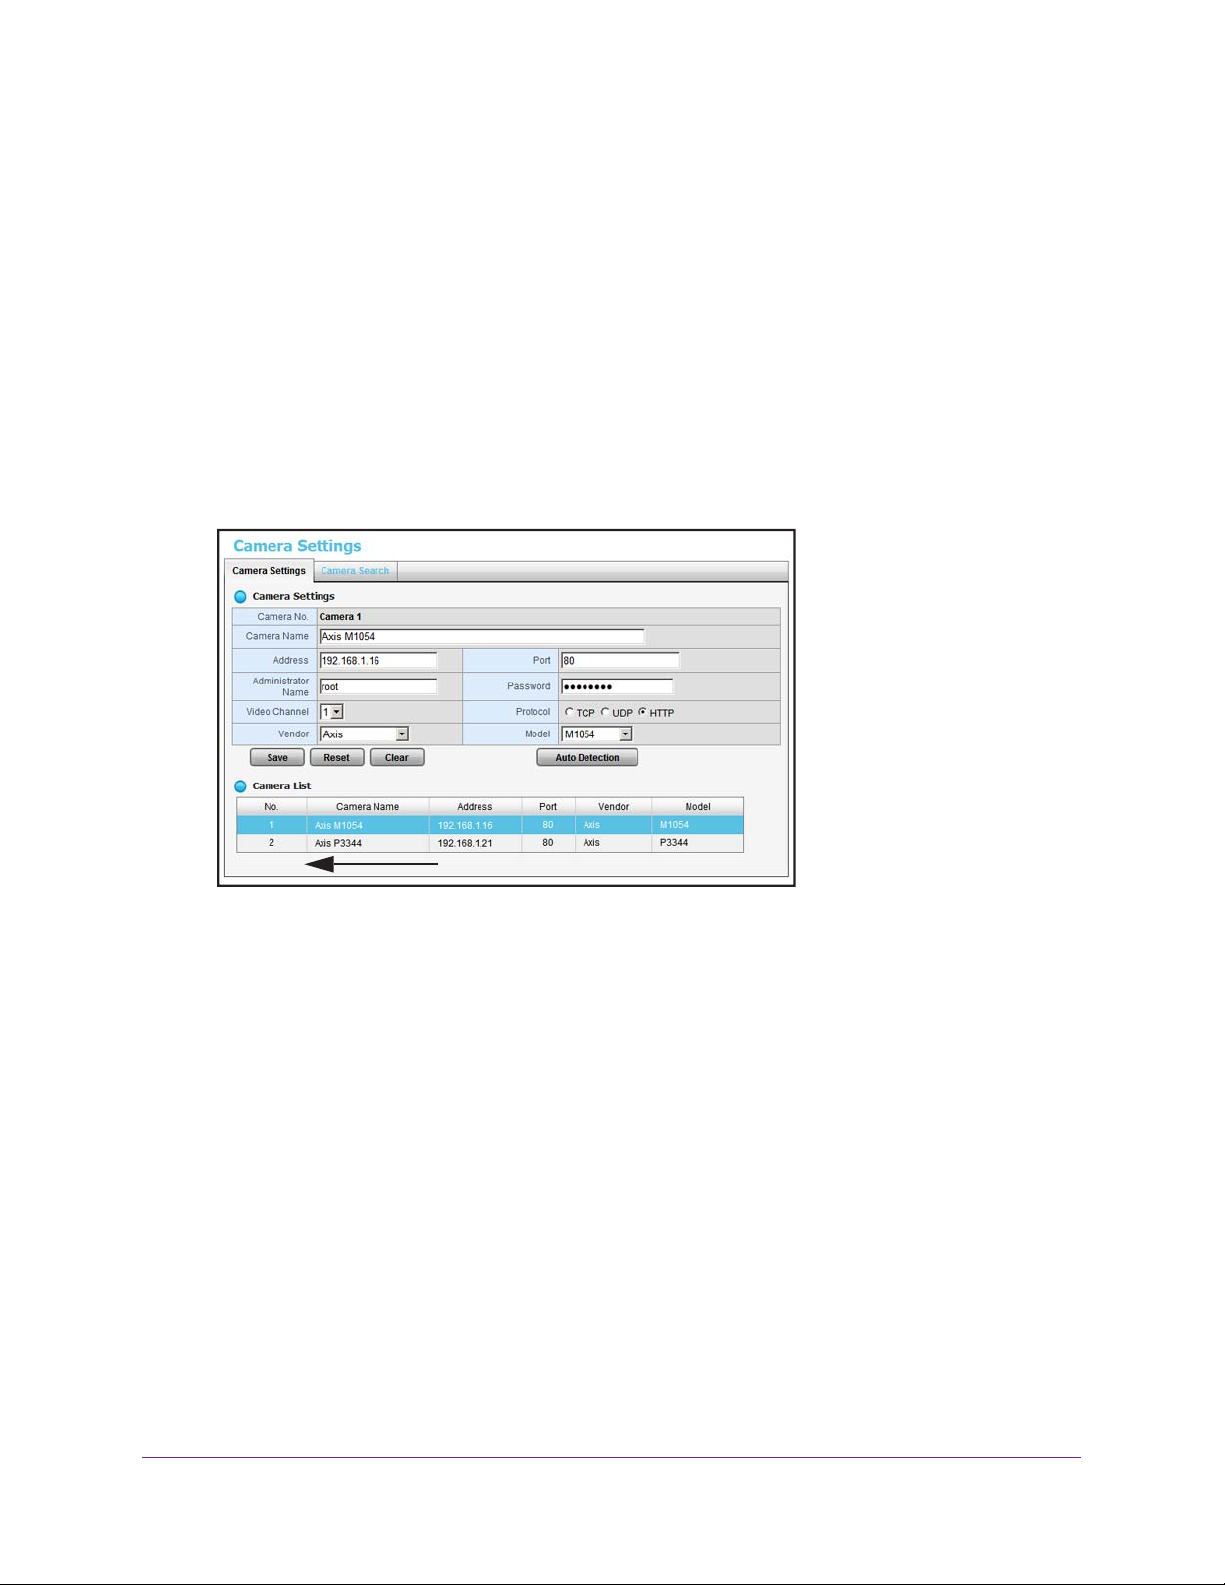
To manually add a camera:
1. Select IP Camera > Camera Settings.
The number of rows in
the Camera list depends
on your license.
2. Click the next available row in the Camera List and enter the camera’s information:
• Camera name. Name of the camera.
• Address. IP address.
• Port. T
ransmission port.
• Administrator Name. Login user name.
• Password. Login password.
3. T
o save time, you can click the Auto Detection button to automatically detect the
channel, protocol, vendor, and model. If you prefer, you can enter this information
manually:
• Camera Channel.
The assigned channel number for each camera source.
• Protocol. Data transmission protocol.
• V
endor. Camera vendor name.
• Model. Camera model name.
For better compatibility between camera and system, make sure that the privilege of
camera credential is admin level.
Camera Setup
16
ReadyNAS Surveillance Add-on
4. Click the Save button.
Note: You can use the Reset button to return to the latest saved settings of
the selected camera. The Clear button returns all the settings to their
default values.
View or Change Camera Settings
To view or change camera settings:
1. Select IP Camera > Camera Settings.
The Camera Settings tab is selected.
2. If you want to change the settings, click a camera to select it.
3. Modify the information for this camera:
• Camera Name.
• Address.
• Port.
• Administrator Name. Login user name.
• Password. Login password.
4. Enter channel, protocol, vendor
To save time, you can click the Auto Detection button to automatically detect the
channel, protocol, vendor
manually:
• V
• Protocol. Data transmission protocol.
• V
The transmission port.
ideo Channel. The camera number of the video feed.
endor. Camera vendor name.
The name of the camera.
The IP address.
, and model details.
, and model. If you prefer, you can enter this information
Camera Setup
17

ReadyNAS Surveillance Add-on
• Model. Camera model name.
5. Click the Save button.
You can use this method to replace a camera if needed.
Camera Setup
18
ReadyNAS Surveillance Add-on
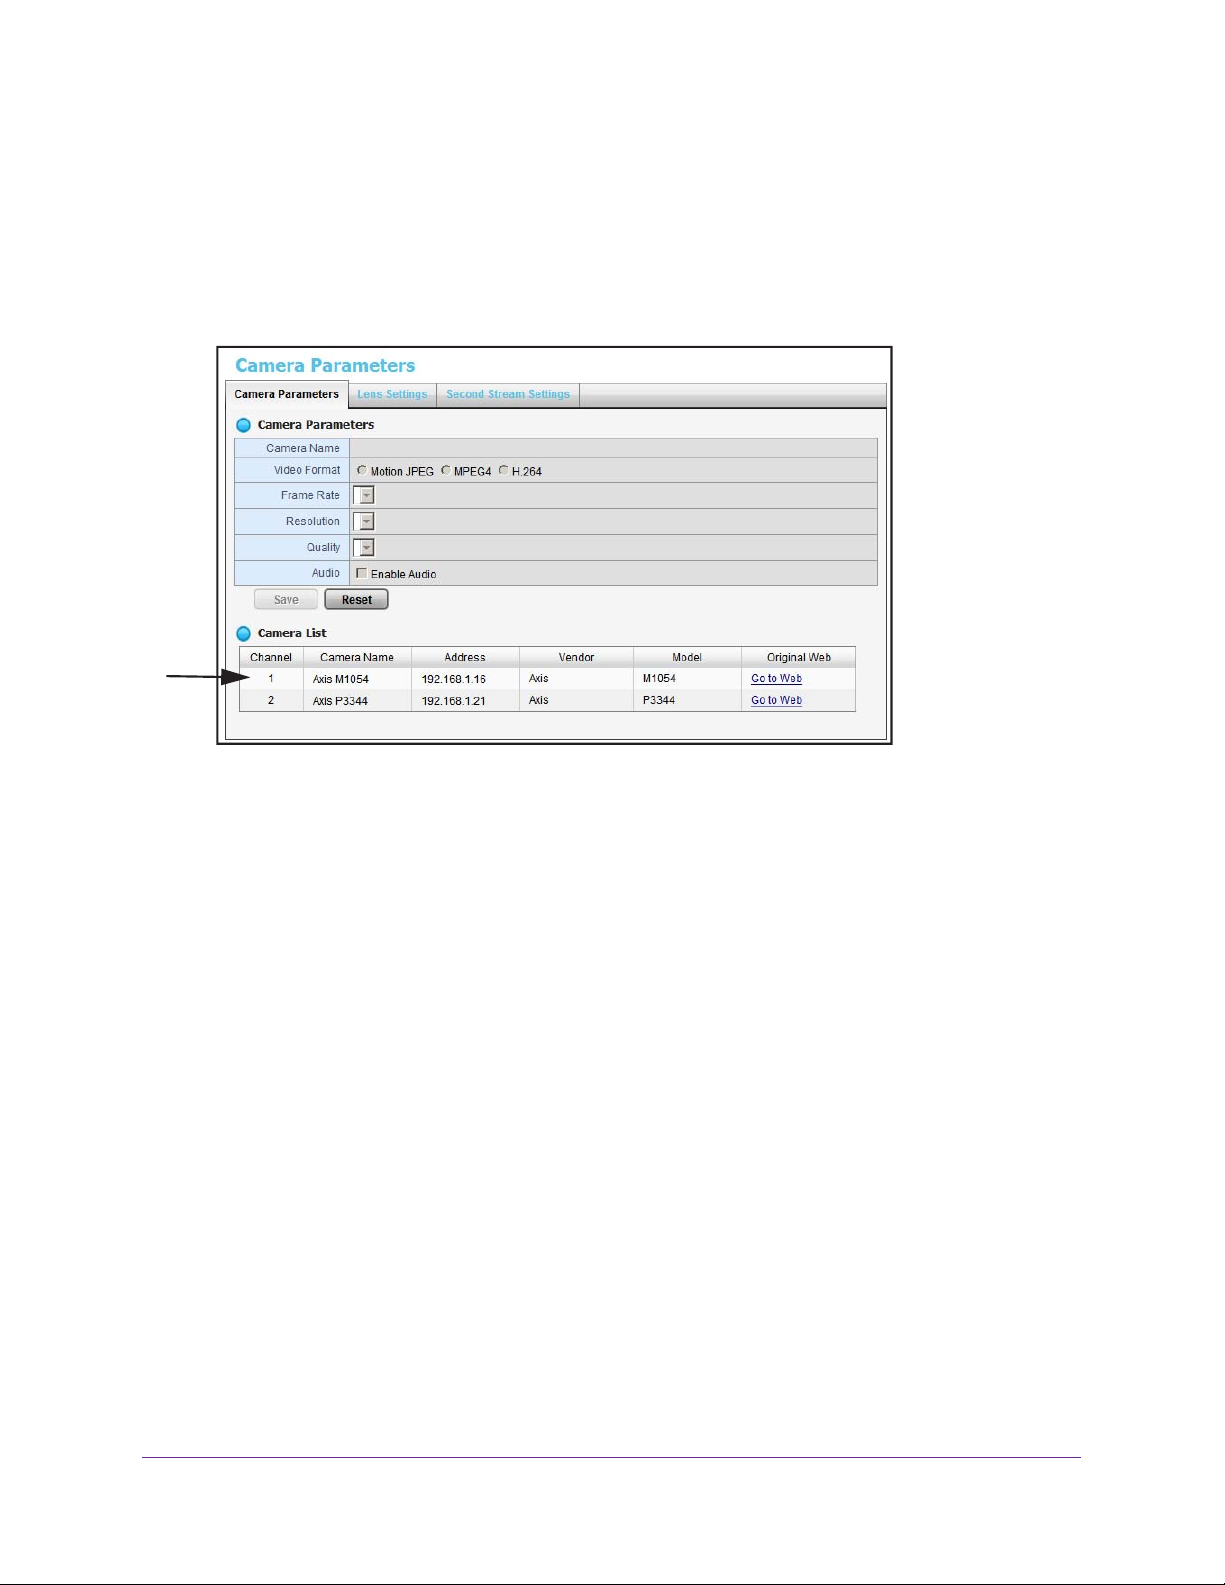
View or Change Camera Parameters
You can view and change details about each camera.
To view or change camera parameters:
1. Select IP Camera > Camera Parameters.
The Camera Parameters tab displays.
2. In the Camera List, click the camera that you want to modify
3. Modify the information for this camera:
• Camera Name. Name of the camera.
• V
ideo Format. Select the format that this camera supports.
• Frame Rate. Select the frame rate of the camera.
• Resolution. Select the resolution of the camera.
• Quality. Select the image quality of the camera.
Settings for better quality, higher resolution, and higher frame rate increase the effective
bit rate used to connect to the ReadyNAS and decrease Estimated Remaining
Recording T
Remaining Recording Time. Choose combinations to produce the recording quality and
recording time you need.
You can use the ReadyNAS Surveillance Bandwidth and Storage Calculator,
http://www.readynas.com/?page_id=6396 to estimate your bandwidth and storage
requirements.
4. Click the Save button.
ime, while lower settings reduce the bit rate and increase the Estimated
.
Camera Setup
19
ReadyNAS Surveillance Add-on
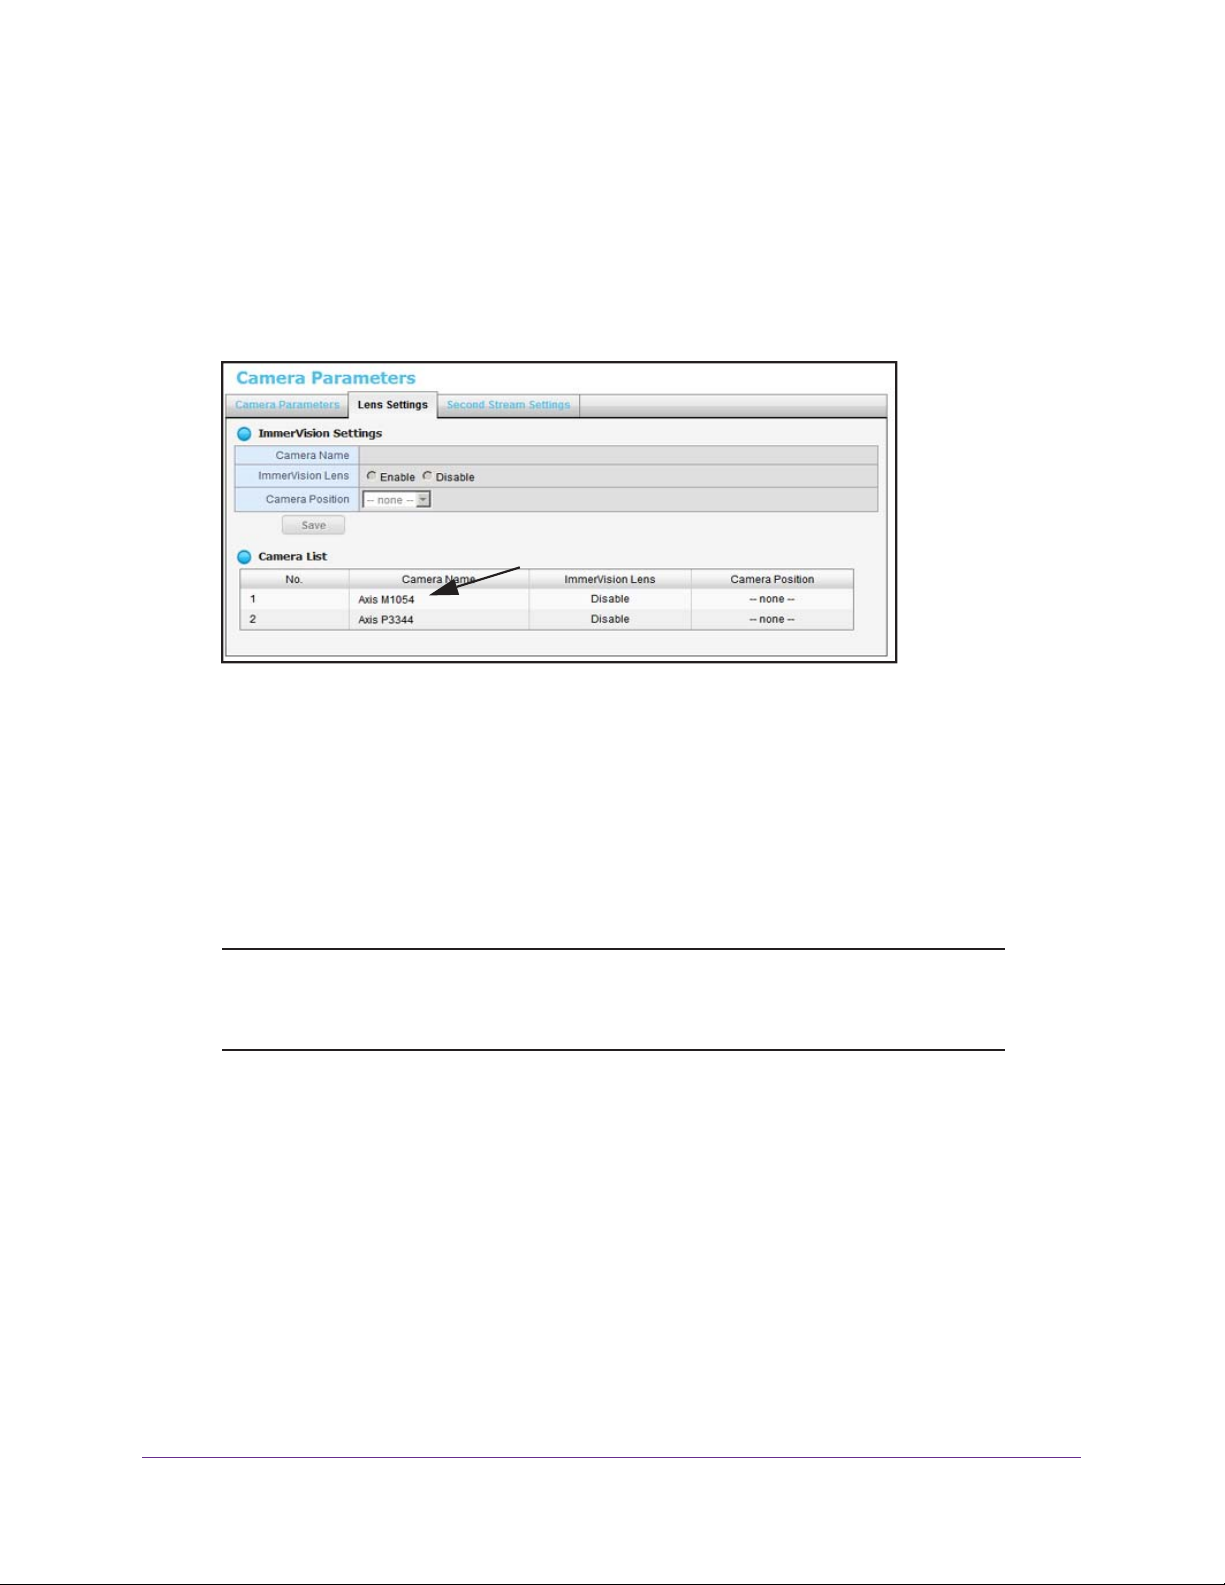
Specify Lens Settings
You can specify whether each camera uses an ImmerVision lens and its position.
To specify lens settings:
1. Select IP Camera > Camera Parameters > Lens Settings.
2. In the Camera List, click the camera that you want to modify.
3. Modify the information for the camera:
• Camera Name. Name of the camera.
• ImmerV
button.
• Camera Position. Select the position of the camera as wall, ceiling, or ground.
4. Click the Save button.
Note: If you enable the lens and it is not installed correctly or not installed at
ision Lens. If an ImmerVision lens is installed, select the Enable radio
all, a warning message displays if someone tries to operate the lens
on the Live View screen.
Camera Setup
20

ReadyNAS Surveillance Add-on
Set Up a Second Video Stream
You can set up two streams. The main video stream can be viewed from a computer on the
network, or at a remote location with an Internet connection that has the bandwidth to support
the flow of information. The settings for the main stream are shown in the Camera
Parameters screen. See View or Change Camera Parameters on page 19.
The second stream uses a lower frames-per-second (FPS) live stream display and is meant
to be viewed from smartphones or mobile devices.
To set up a second stream:
1. Select IP Camera > Camera Parameters > Second Stream Settings.
2. Adjust the following settings as needed:
• Stream Profile.
access this camera, select the Enable radio button.
• Low Profile.
view.
• Minimum Profile.
multiview.
3. Click the Save button.
The default status is Disabled. If you want to allow a mobile client to
The stream profile, under 300 kbps, is designed for mobile client single
The stream profile, under 100 kbps, is designed for mobile client
Camera Setup
21
ReadyNAS Surveillance Add-on
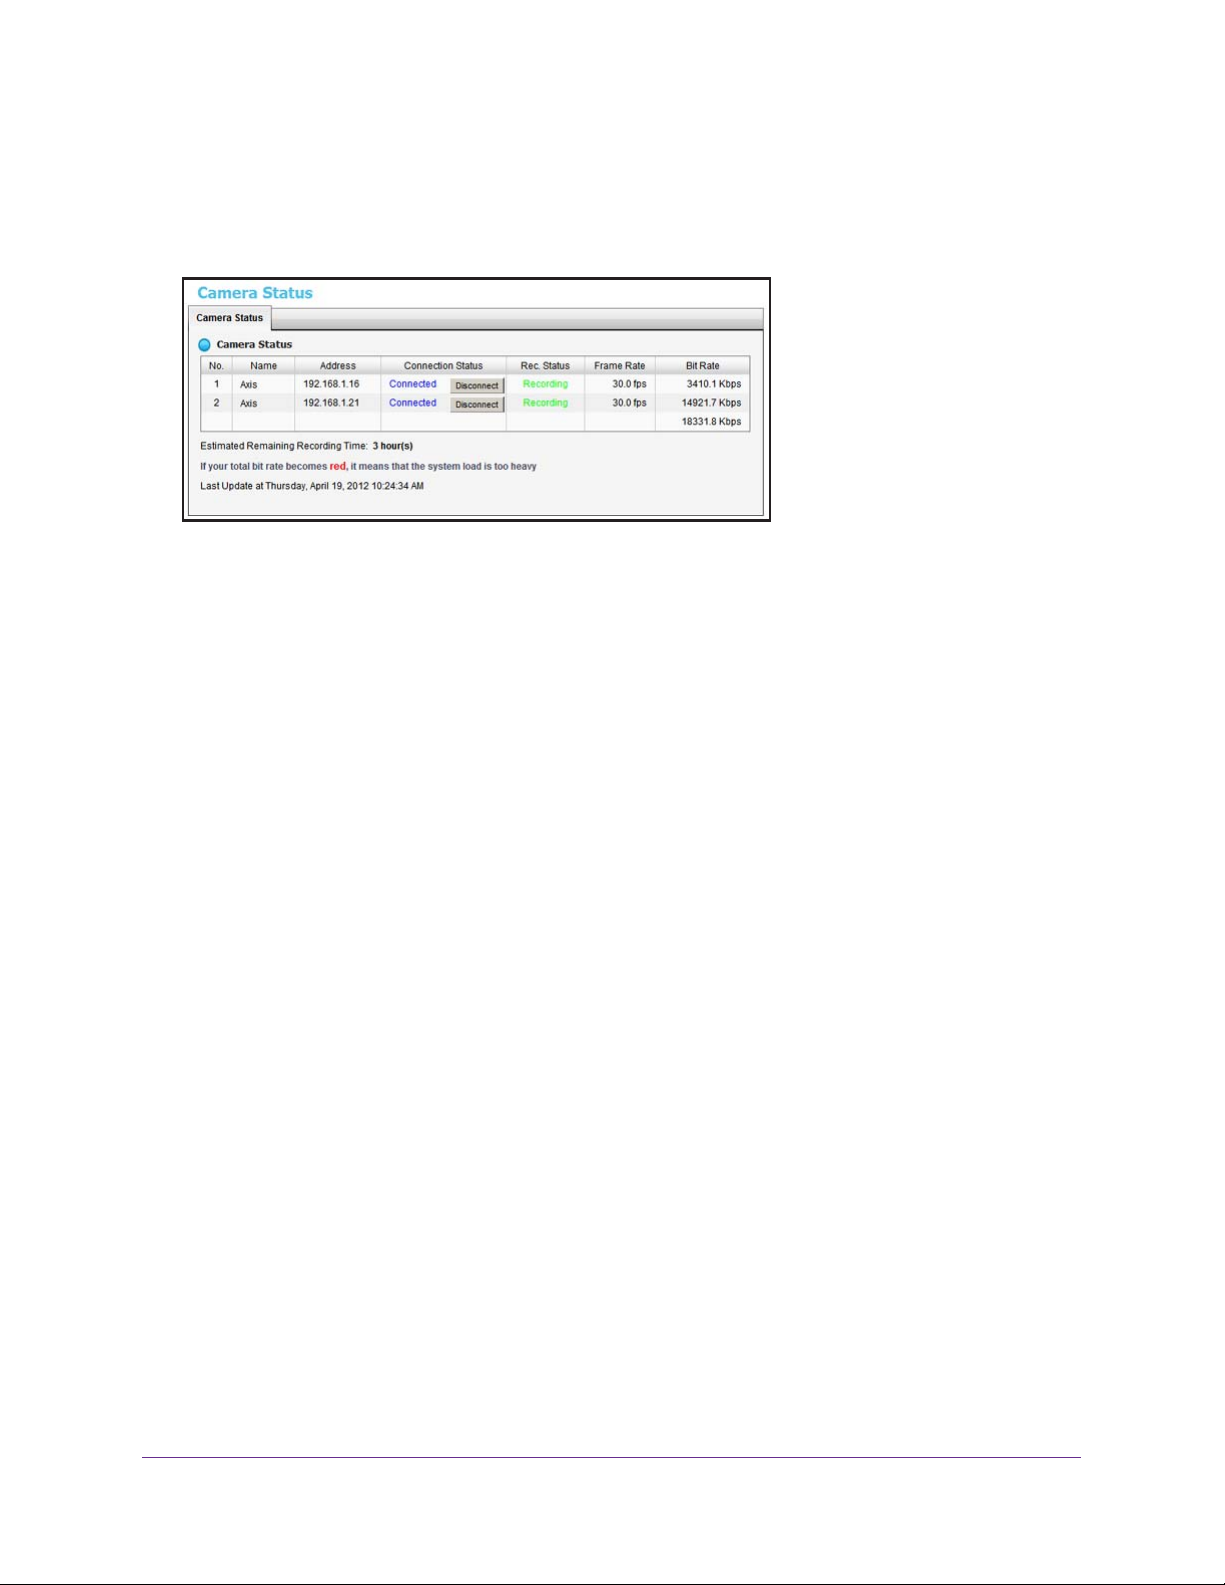
View Camera Status
To view the camera status, select IP Camera > Camera Status.
The following information displays:
• Connection Status. The status of the connection. Click the Connect or Disconnect
button to change the connection status.
• Rec. Status. The recording schedule of this camera.
• Frame Rate. The frame rate of this camera.
• Bit Rate. The transmission bit rate of this camera.
• Estimated Remaining Recording Time. The current free capacity divided by the
dynamic total bit rate.
If the value in the Bit Rate column is red, it means that the system load is too heavy.
Camera Setup
22

3. Recordings & Events
This chapter covers the following topics:
• Set the Recording Mode
• Set Up Events and Actions
• Recording Schedule
• I/O Boxes
• Email Setup
3
23
ReadyNAS Surveillance Add-on
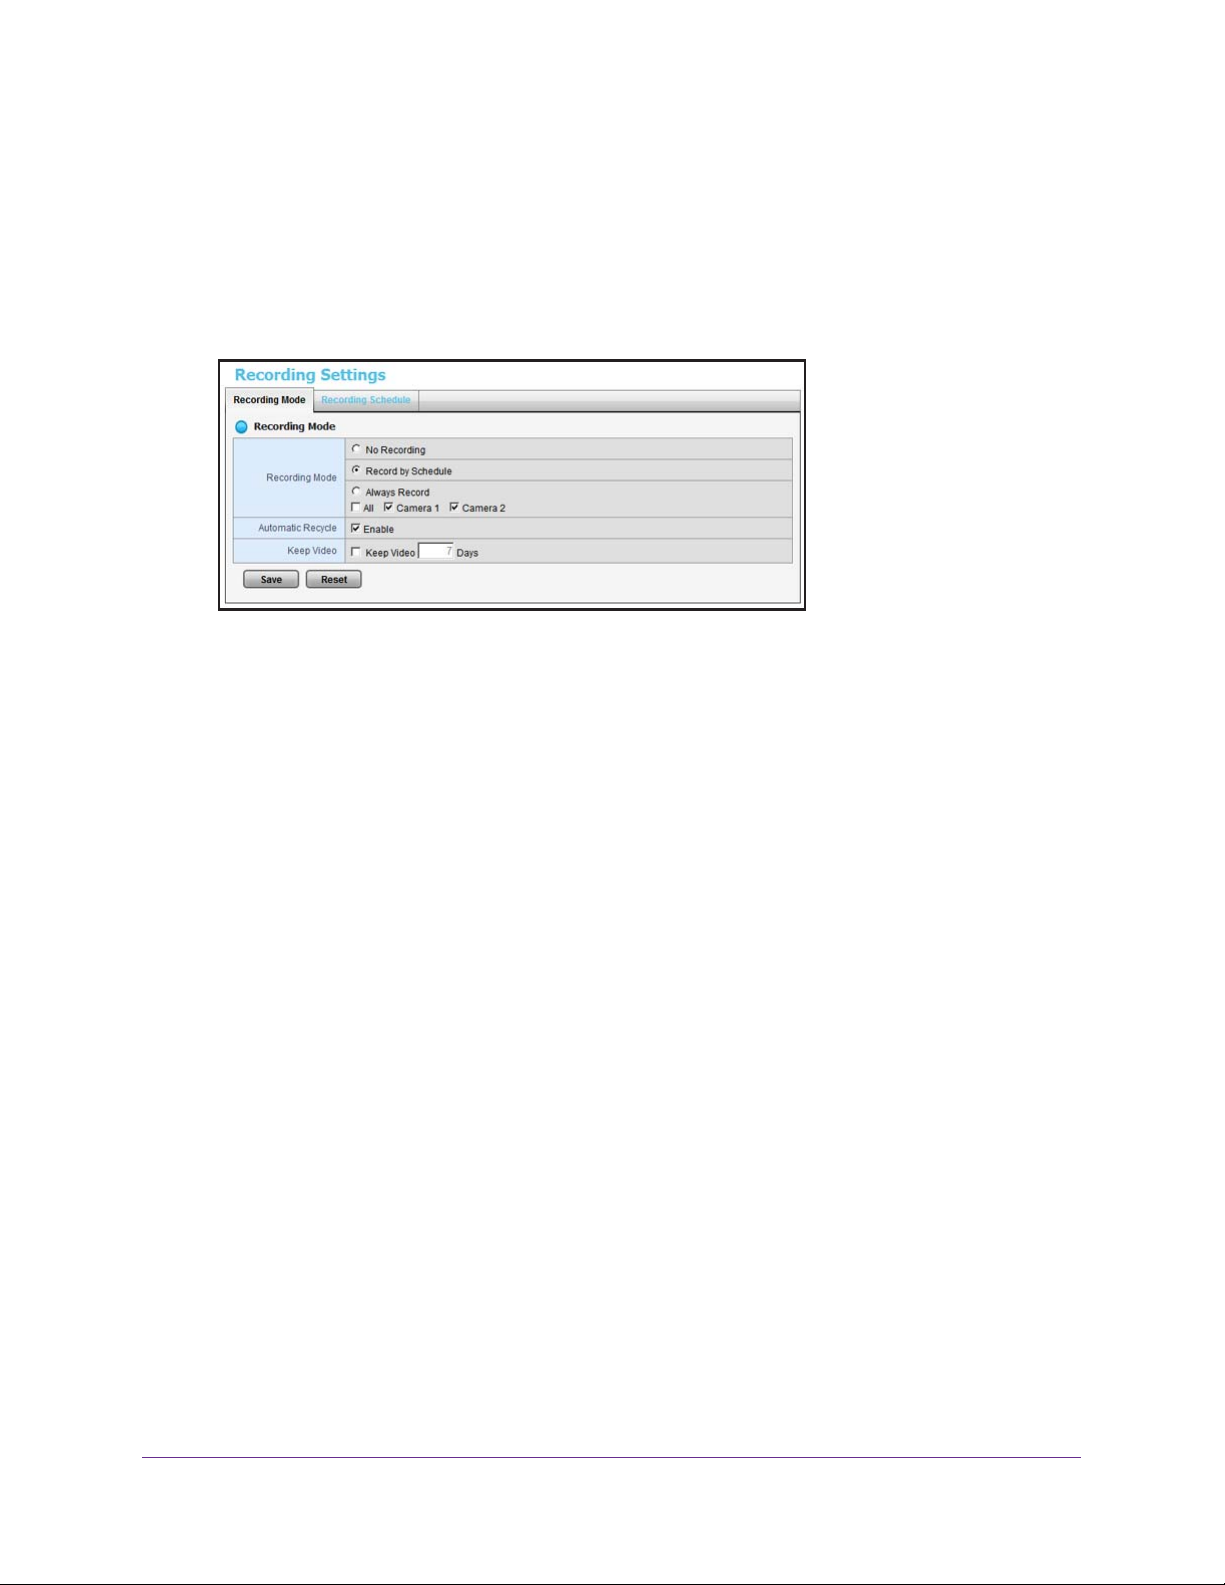
Set the Recording Mode
The recording mode determines when each camera records video.
To set the recording mode:
1. Select Recording & Event > Recording Settings > Recording Mode.
2. Select the recording mode that you want to use:
• No Recording. Do not record video.
• Record by Schedule. Record video based on a schedule.
• Always Record.
you select Always Record, the selected cameras start to record immediately.
• Automatic Recycle. Select the Enable check box if you want to recycle disk space
automatically when the disk is full.
• Keep V
If both the Automatic Recycle check box and the Keep V
the Automatic Recycle setting overrides the Keep Video setting. In other words, if your
disk gets full, newer video content is written on top of older content, which erases the
older content.
3. Click the Save button.
ideo. Set a period during which the recorded video clips are retained.
Automatically record video continuously on the selected cameras. If
ideo check box are selected,
Recordings & Events
24
 Loading...