

Page 1

ReadyNAS Duo v2 and
NV+ v2 Hardware Manual
350 East Plumeria Drive
San Jose, CA 95134
USA
March 2012
202-10895-04
Page 2

ReadyNAS Duo v2 and NV+ v2
© NETGEAR, Inc. All rights reserved.
No part of this publication may be reproduced, transmitted, transcribed, stored in a retrieval system, or translated
into any language in any form or by any means without the written permission of NETGEAR, Inc.
NETGEAR, the NETGEAR logo, and Connect with Innovation are trademarks and/or registered trademarks of
NETGEAR, Inc. and/or its subsidiaries in the United States and/or other countries. Information is subject to change
without notice. © NETGEAR, Inc. All rights reserved.
Technical Support
Thank you for choosing NETGEAR. To register your product, get the latest product updates, or get support online,
visit us at http://support.netgear.com.
Phone (US & Canada only): 1-888-NETGEAR
Phone (Other Countries): See support information card.
Statement of Conditions
To improve internal design, operational function, and/or reliability, NETGEAR reserves the right to make changes
to the products described in this document without notice. NETGEAR does not assume any liability that may occur
due to the use, or application of, the product(s) or circuit layout(s) described herein.
2
Page 3

Table of Contents
Chapter 1 Getting Started
Additional Documentation. . . . . . . . . . . . . . . . . . . . . . . . . . . . . . . . . . . . . . .6
Setup Location . . . . . . . . . . . . . . . . . . . . . . . . . . . . . . . . . . . . . . . . . . . . . . .7
System Requirements . . . . . . . . . . . . . . . . . . . . . . . . . . . . . . . . . . . . . . . . .7
Diskless Units. . . . . . . . . . . . . . . . . . . . . . . . . . . . . . . . . . . . . . . . . . . . . . . .8
Chapter 2 ReadyNAS Duo v2
Front and Side Panels . . . . . . . . . . . . . . . . . . . . . . . . . . . . . . . . . . . . . . . .11
Drive Bays . . . . . . . . . . . . . . . . . . . . . . . . . . . . . . . . . . . . . . . . . . . . . . . . .12
Rear Panel . . . . . . . . . . . . . . . . . . . . . . . . . . . . . . . . . . . . . . . . . . . . . . . . .14
Status Information . . . . . . . . . . . . . . . . . . . . . . . . . . . . . . . . . . . . . . . . . . .15
System Shutdown. . . . . . . . . . . . . . . . . . . . . . . . . . . . . . . . . . . . . . . . . . . .15
Boot Menu . . . . . . . . . . . . . . . . . . . . . . . . . . . . . . . . . . . . . . . . . . . . . . . . .16
Chapter 3 ReadyNAS NV+ v2
Front and Side Panels . . . . . . . . . . . . . . . . . . . . . . . . . . . . . . . . . . . . . . . .19
Drive Bays . . . . . . . . . . . . . . . . . . . . . . . . . . . . . . . . . . . . . . . . . . . . . . . . .20
Rear Panel . . . . . . . . . . . . . . . . . . . . . . . . . . . . . . . . . . . . . . . . . . . . . . . . .22
Status Information . . . . . . . . . . . . . . . . . . . . . . . . . . . . . . . . . . . . . . . . . . .23
System Shutdown. . . . . . . . . . . . . . . . . . . . . . . . . . . . . . . . . . . . . . . . . . . .23
Boot Menu . . . . . . . . . . . . . . . . . . . . . . . . . . . . . . . . . . . . . . . . . . . . . . . . .24
Chapter 4 Disks
Previously Formatted Disks . . . . . . . . . . . . . . . . . . . . . . . . . . . . . . . . . . . .27
Adding a Disk . . . . . . . . . . . . . . . . . . . . . . . . . . . . . . . . . . . . . . . . . . . . . . .28
Failed Disk Notification. . . . . . . . . . . . . . . . . . . . . . . . . . . . . . . . . . . . . . . .29
Replacing a Disk. . . . . . . . . . . . . . . . . . . . . . . . . . . . . . . . . . . . . . . . . . . . .30
3
Page 4

ReadyNAS Duo v2 and NV+ v2
Appendix A Defaults and Technical Specifications
Factory Default Settings. . . . . . . . . . . . . . . . . . . . . . . . . . . . . . . . . . . . . . .33
Duo v2 Technical Specifications . . . . . . . . . . . . . . . . . . . . . . . . . . . . . . . .34
NV+ v2 Technical Specifications . . . . . . . . . . . . . . . . . . . . . . . . . . . . . . . .35
Safety Warnings. . . . . . . . . . . . . . . . . . . . . . . . . . . . . . . . . . . . . . . . . . . . .36
Electrical Safety Precautions . . . . . . . . . . . . . . . . . . . . . . . . . . . . . . . . .36
General Safety Precautions . . . . . . . . . . . . . . . . . . . . . . . . . . . . . . . . . .36
Electrostatic Discharge (ESD) Precautions . . . . . . . . . . . . . . . . . . . . . .37
Appendix B Compliance Notification
Index
4
Page 5

1. Getting Started
Congratulations on your purchase of a NETGEAR ReadyNAS® storage system. This ReadyNAS
Duo v2 and NV+ v2 Hardware Manual describes the physical features of the Duo v2 and NV+ v2
storage systems.
This chapter contains the following sections:
• Additional Documentation
• Setup Location
• System Requirements
• Diskless Units
1
5
Page 6

ReadyNAS Duo v2 and NV+ v2
Additional Documentation
For detailed information about configuring, managing, and using your ReadyNAS Duo v2 or NV+
v2 storage system, see the ReadyNAS RAIDiator 5.3 for Home Software Manual, which is
available at
NETGEAR maintains a community website that supports ReadyNAS products. Visit
http://readynas.com for reviews, tutorials, a comparison chart, software updates, documentation,
an active user forum, and much more.
http://www.readynas.com/documentation.
Getting Started
6
Page 7

ReadyNAS Duo v2 and NV+ v2
Setup Location
Your ReadyNAS Duo v2 or NV+ v2 is suitable for use in a home or small office environment
where it can be freestanding. The small, compact size makes it suitable for sitting on a desk
or on a closet shelf.
Choose a location for your unit that meets these criteria:
• Cables can be connected easily.
• Water or moisture cannot enter the case.
• Airflow around the unit and through the vents in the side of the case is not restricted.
• The air is as free of dust as possible.
• Temperature operating limits are not likely to be exceeded.
• If you are using an uninterruptable power supply (UPS) for protection, the power
cable can be securely and safely connected to the UPS.
System Requirements
Your ReadyNAS Duo v2 or NV+ v2 requires the following:
• Ethernet connection
• Microsoft Windows 7, Vista, XP, 2000, Mac OS, UNIX, or Linux operating system
• Microsoft Internet Explorer 7.0+, Apple Safari, 2.0+, Mozilla Firefox 2.0+, Opera 9.5+,
or Google Chrome 10+ browser
• Hard disk drive or drives from the NETGEAR Hardware Compatibility List; see
http://www.readynas.com/hard_disk_hcl.
Getting Started
7
Page 8
ReadyNAS Duo v2 and NV+ v2
Diskless Units
If you purchased a ReadyNAS storage system without a pre-installed hard disk drive or
drives, you must follow this procedure before you use your unit. The following procedure is
illustrated with a Duo v2, but the same steps apply for an NV+ v2.
To prepare a diskless unit for first use:
1. Obtain at least one hard disk drive that appears on the NETGEAR Hardware
Compatibility List.
See http://www.readynas.com/hard_disk_hcl.
If you are using a previously formatted disk, see the precautions listed in Previously
Formatted Disks on page 27.
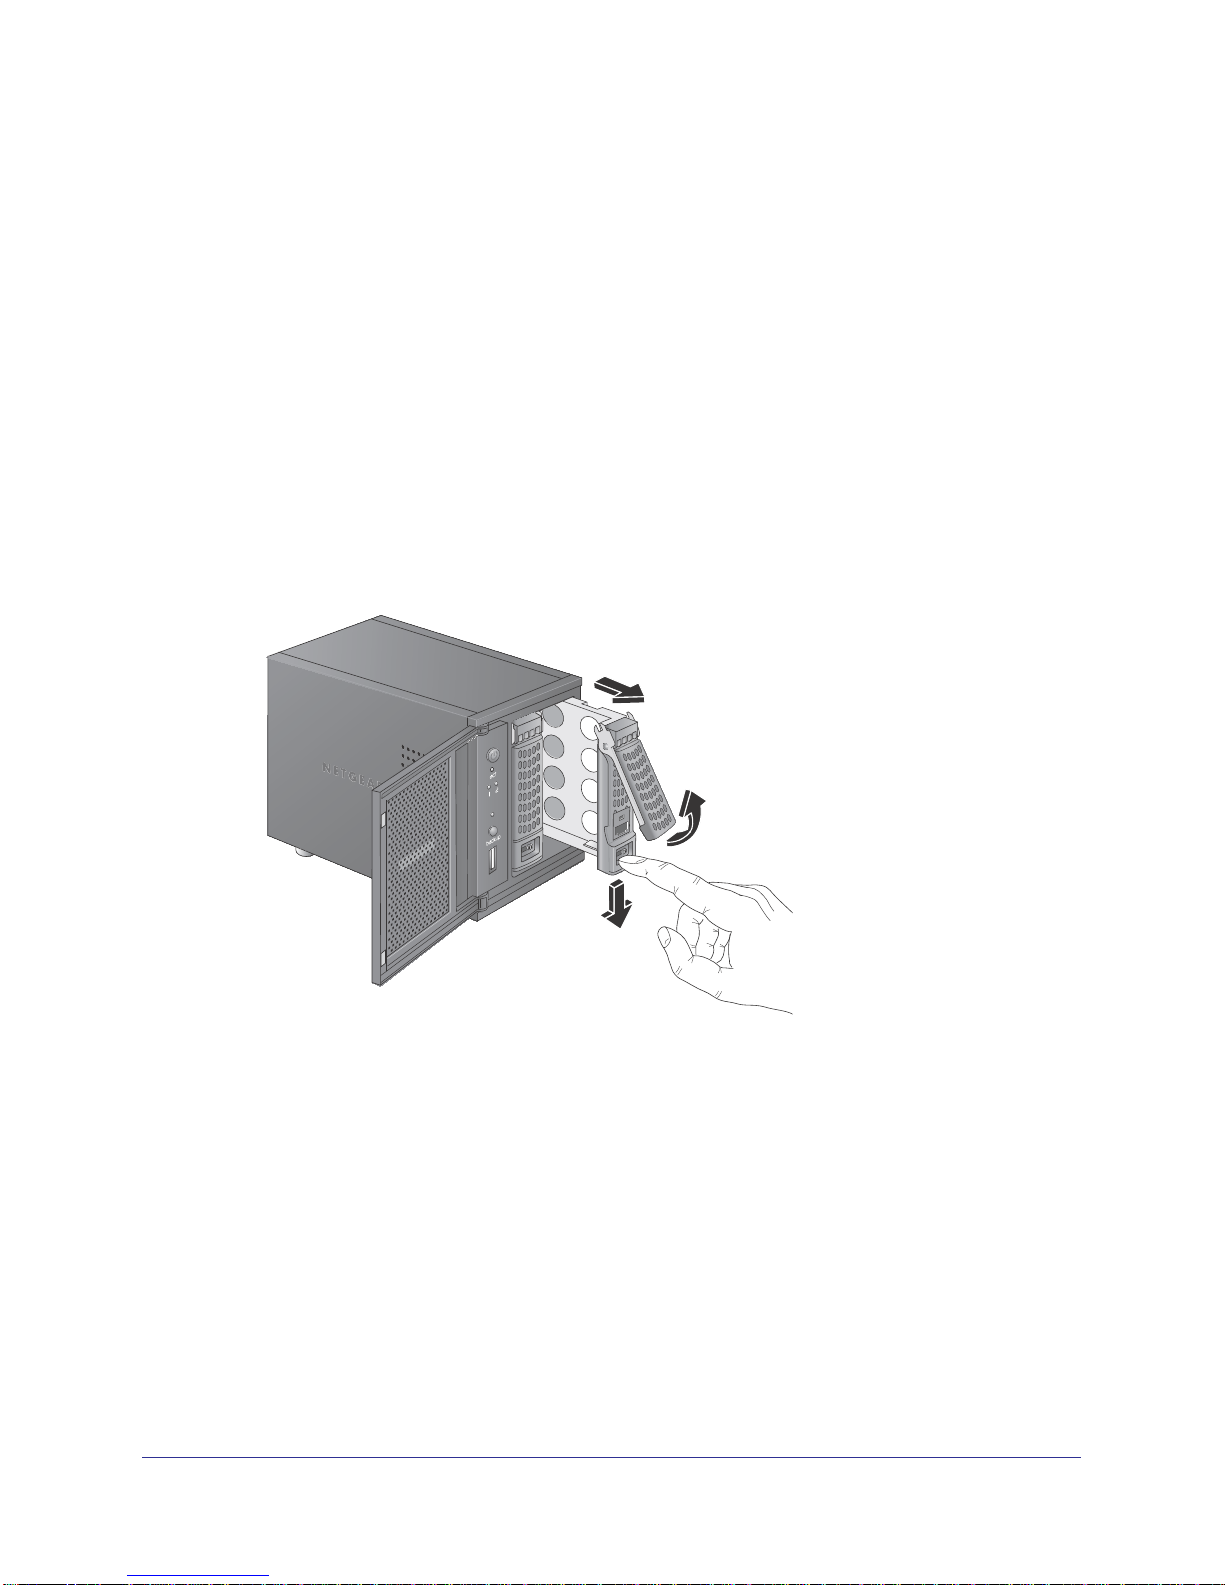
2. With the unit turned off, insert a disk into a drive bay, as follows:
a. Press the disk tray release latch.
The tray handle pops out.
Getting Started
8
Page 9
ReadyNAS Duo v2 and NV+ v2
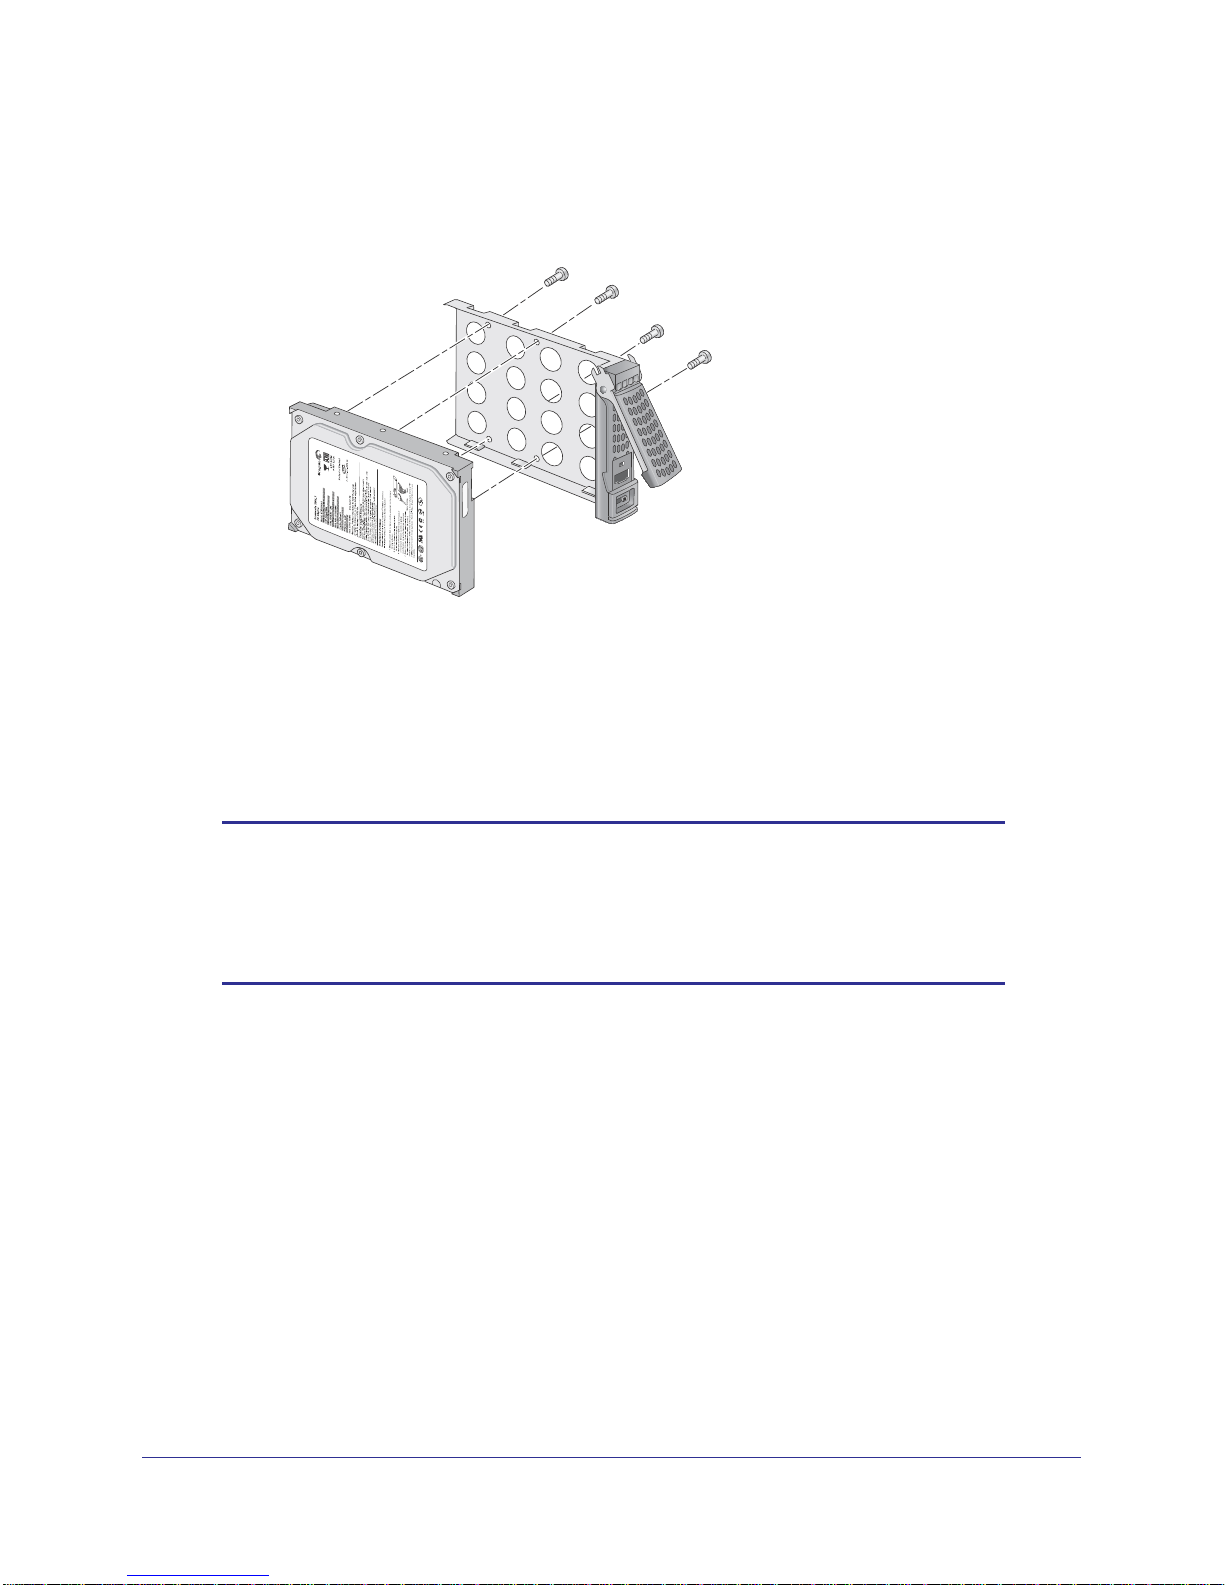
b. Pull out the disk tray, place the new disk on the tray, and assemble the disk and tray
with the screws that came with your unit.
Make sure that the hard disk connectors face the interior of the disk bay.
c. Slide the disk tray back into the unit and press the handle to secure the disk.
3. Turn the unit on.
4. If you are using previously formatted disks, perform a factory reboot.
For more information, see Boot Menu on page 16 and Previously Formatted Disks on
page 27.
Note: Note: This process erases all data and formats the disk as
TM
X-RAID2
. If you are using a previously formatted disk that contains
data you want to preserve, you must move the data to an external
drive before using the previously formatted disk in your ReadyNAS
unit.
The factory reboot process can take up to 30 minutes while your unit tests and formats
the disk, installs the operating system, and creates a volume. This process can take up to
30 minutes; you can follow the progress in RAIDar. For more information about RAIDar,
see the ReadyNAS RAIDiator 5.3 for Home Software Manual, which is available at
http://www.readynas.com/documentation.
If you are installing multiple disks at the same time, they must synchronize. This might
take several hours, depending on the disk size. You can continue to use your ReadyNAS,
although access is slower until the volume synchronization finishes.
Getting Started
9
Page 10

2. ReadyNAS Duo v2
This chapter provides an overview of the physical features of the ReadyNAS Duo v2 and
includes the following sections:
• Front and Side Panels
• Drive Bays
• Rear Panel
• Status Information
• System Shutdown
• Boot Menu
2
10
Page 11
ReadyNAS Duo v2 and NV+ v2
Front and Side Panels
The following figure shows the front and side panels of ReadyNAS Duo v2.
1
2
3
8
Figure 1. ReadyNAS Duo v2 front and side panels
1. Power button and LED
2. Disk activity LED
3. Exhaust vent
4. USB 2.0 port
5. Backup button
6. USB and backup status LED
7. Disk 1 and disk 2 LEDs
8. Drive bay door
4 56
7
ReadyNAS Duo v2
11
Page 12

ReadyNAS Duo v2 and NV+ v2
Drive Bays
The following figure shows the drive bays of ReadyNAS Duo v2.
1
Figure 2. ReadyNAS Duo v2 drive bay
1. Drive bay door
2. Disk tray handle
3. Recessed drive tray locking mechanism
4. Drive tray release latch
5. Drive bays
2
3
4
5
ReadyNAS Duo v2
12
Page 13
ReadyNAS Duo v2 and NV+ v2
The following figure shows a ReadyNAS Duo v2 disk tray.
1
Figure 3. ReadyNAS Duo v2 disk tray
1. Hard drive
2
3
4
5
2. Disk tray
3. Disk tray handle
4. Recessed disk tray locking mechanism
5. Disk tray release latch
ReadyNAS Duo v2
13
Page 14

ReadyNAS Duo v2 and NV+ v2
Rear Panel
The following figure shows the rear panel of ReadyNAS Duo v2.
1
2
3 4
Figure 4. ReadyNAS Duo v2 rear panel
5
1. Exhaust fan
2. Kensington lock
3. Reset button
4. USB 3.0 ports
5. 1-gigabit Ethernet port with LED status indicators
6. Power adapter socket
6
ReadyNAS Duo v2
14
Page 15

ReadyNAS Duo v2 and NV+ v2
Status Information
You can obtain information about the status of your unit by reviewing the indicators listed in
the following table.
Indicator Description
Power button and LED Press this button to turn on the ReadyNAS. The LED has these states:
• Blinking. Booting or shutting down
• On. Powered on
• Off. Powered off
Disk LEDs (1, 2) Each disk bay has an LED associated with it on the front panel of the unit. The
disk LEDs have these states:
• On. Power is on and the disk is operating normally.
• Blinking. The disk was removed, failed, or is resynchronizing.
• Off. The disk bay is empty.
Disk activity LED The disk activity LED has these states:
• Blinking. A disk is active.
• Off. No disks are active.
Rear panel Ethernet port
LEDs
Two LED status indicators are built into this port, one green and one amber.
They indicate port speed and activity as follows:
• Green on, amber off. 1000 Mbps connection speed, no activity
• Green blinking, amber off. 1000 Mbps connection speed, activity
• Green off, amber on. 10 Mbps or 100 Mbps connection speed, no activity
• Green off, amber blinking. 10 Mbps or 100 Mbps connection speed, no
activity
• Green off, amber off. No connection
System Shutdown
You can shut down your unit in these ways:
• Using the Power button:
• Preferred shutdown. Press the Power button twice to initiate a graceful shutdown.
• Forced shutdown. If the unit is not responding, unplug it.
• Using the ReadyNAS Dashboard. For information about using the ReadyNAS
Dashboard to shut down your Duo v2, see the ReadyNAS RAIDiator 5.3 for Home
Software Manual, which is available at http://www.readynas.com/documentation.
ReadyNAS Duo v2
15
Page 16

ReadyNAS Duo v2 and NV+ v2
Boot Menu
Use the boot menu to restart or troubleshoot your ReadyNAS unit. Your unit has the following
boot modes:
• Normal. Initiates a normal boot process, just like booting using the Power button.
• Factory default. Initiates a short disk test that takes approximately 5 minutes, then
begins a 10-minute time-out period waiting for RAIDar. During the 10-minute time-out
period, the system can be powered off safely without causing any data loss. After 10
minutes, or if you select the factory default option with RAIDar during the time-out period,
the factory default process begins.
WARNING!
The factory default reboot process resets the unit to factory
settings, erases all data, resets all defaults, and reformats the disk
to X-RAID2.
• OS reinstall. Reinstalls the firmware from the internal flash to the disks. Use the OS
reinstall boot mode when the system crashes and corrupts some configuration files. OS
reinstall boot mode also resets some settings on your unit, such as Internet protocol
settings and the administrator password, to defaults.
• Tech support. Boots into a low-level diagnostic mode. Use the tech support boot mode
only when instructed to do so by a NETGEAR Technical Support representative.
• Skip volume check. After a system crash, the system tries to scan and fix the volume
using a file system check. If several problems are found on a disk, this process can stall,
causing the system not to boot. Use this option to skip the scan and let the system boot.
WARNING!
Use the skip volume check boot mode only when instructed to do
so by a NETGEAR Technical Support representative, otherwise
data loss might occur.
• Memory test. Performs a memory test. The pass or fail result is reported using the unit’s
LEDs. Contact a NETGEAR technical support representative to interpret memory test
results.
• Disk test. Performs an offline full disk test. This can take 4 hours or more, depending on
the size of your disks. Any problems are reported in the RAIDar discovery tool.
ReadyNAS Duo v2
16
Page 17

ReadyNAS Duo v2 and NV+ v2
To access the boot menu:
1. Power off your unit.
2. Using a straightened paper clip, press and hold the Reset button.
3. Press the Power button to power on the unit.
4. Continue to press the Reset button until the Power button LED, USB and backup status
LED, disk 1 LED, and disk 2 LED illuminate.
5. Press the Backup button to scroll through boot mode options.
The unit shows the boot mode options using the LEDs, as described in the following
table:
Boot Mode Status Indicator
Description Power
Normal Power LED illuminates.
Factory default Disk 1 LED illuminates.
OS reinstall Disk 2 LED illuminates.
Tech support USB and backup status LED illuminates.
Skip volume check Power LED and disk 1 LED illuminate.
Memory test Power LED and disk 2 LED illuminate.
Disk test Power LED and USB and backup status
LED illuminate.
LED
Disk 1
LED
Legend:
• On:
• Off:
6. Press and release Reset button to confirm your boot menu selection.
The system boots in the selected boot mode.
Disk 2
LED
USB &
Backup
LED
ReadyNAS Duo v2
17
Page 18

3. ReadyNAS NV+ v2
This chapter provides an overview of the physical features of the ReadyNAS NV+ v2 and
includes the following sections:
• Front and Side Panels
• Drive Bays
• Rear Panel
• Status Information
• System Shutdown
• Boot Menu
3
18
Page 19

ReadyNAS Duo v2 and NV+ v2
23 4 5 6
Front and Side Panels
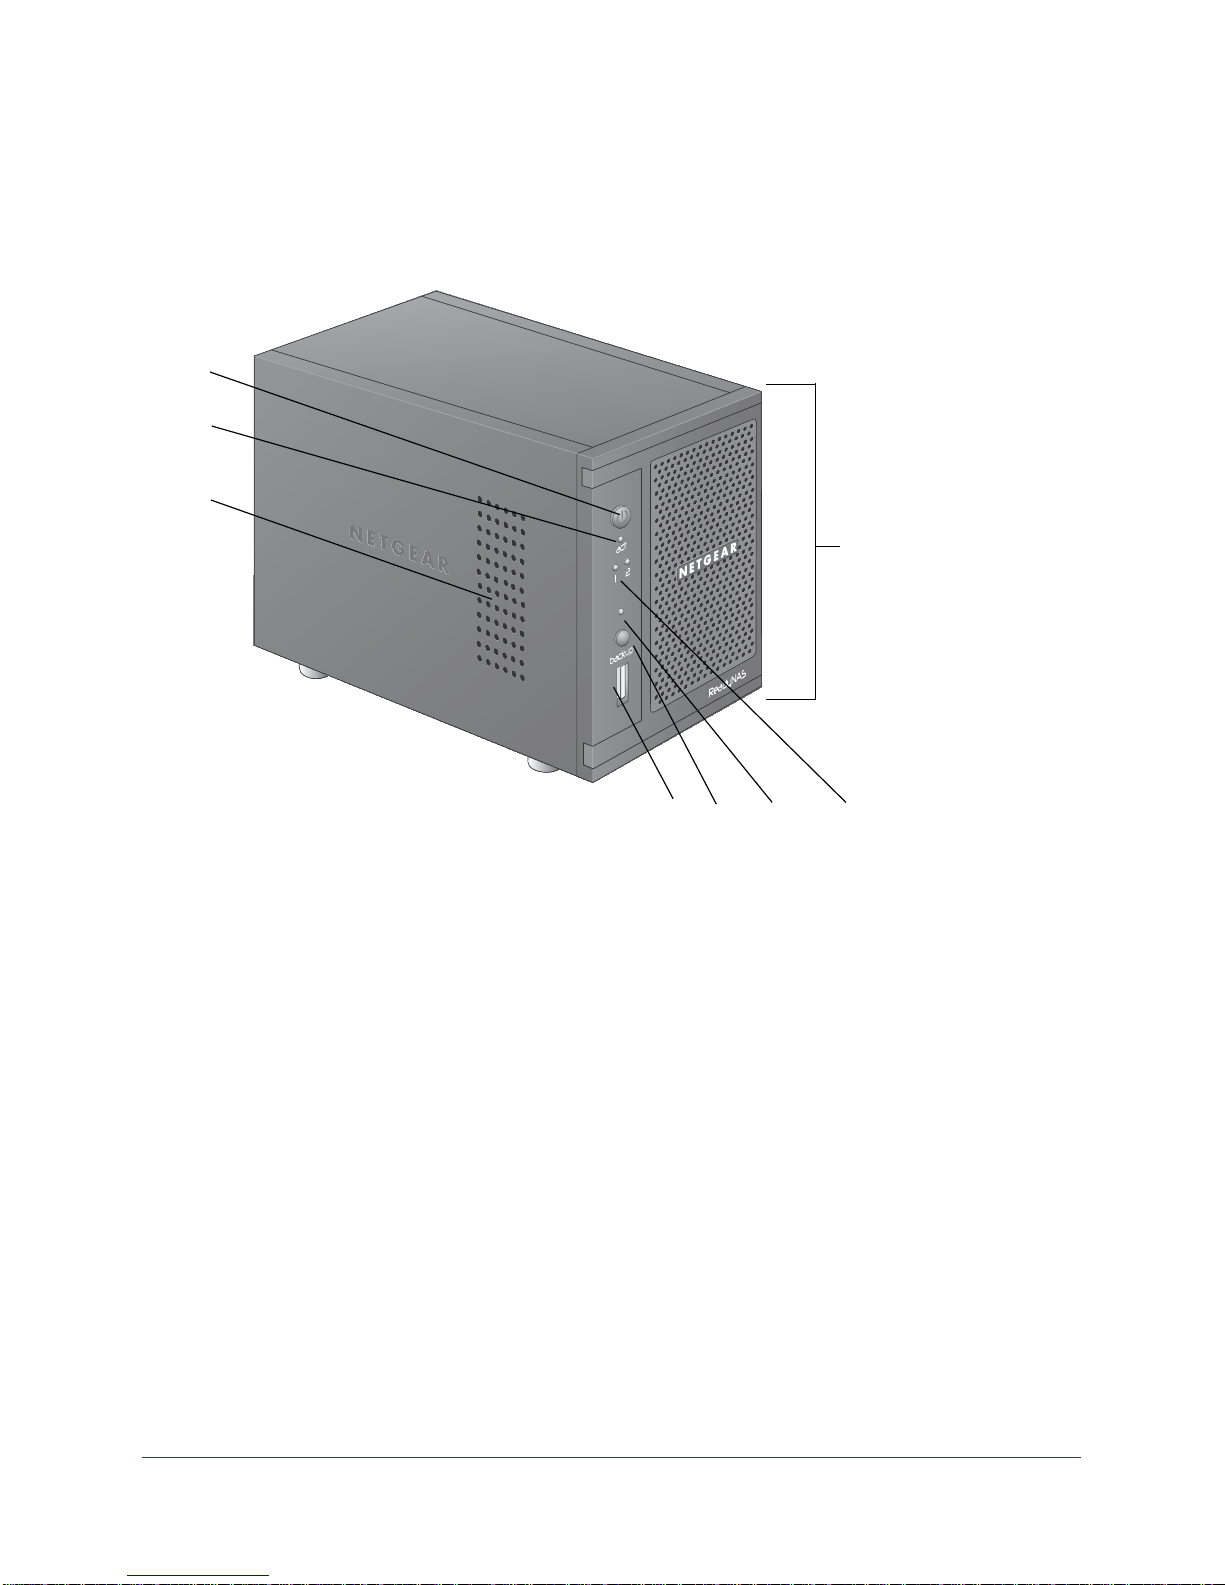
The following figure shows the front and side panels of ReadyNAS NV+ v2.
1
7
Figure 5. ReadyNAS NV+ v2 front and side panels
1. Exhaust vents
2. USB 2.0 port
3. Backup button and backup LED
4. Disk LEDs
5. Disk activity LED
6. Power button and LED
7. Drive bay door
8. Status display screen
8
ReadyNAS NV+ v2
19
Page 20

ReadyNAS Duo v2 and NV+ v2
Drive Bays
The following figure shows the drive bays of ReadyNAS NV+ v2.
2
3
4
1
Figure 6. ReadyNAS NV+ v2 drive bay
1. Drive bay door
2. Disk tray handle
3. Recessed drive tray locking mechanism
4. Drive tray release latch
5. Drive bays
5
ReadyNAS NV+ v2
20
Page 21

ReadyNAS Duo v2 and NV+ v2
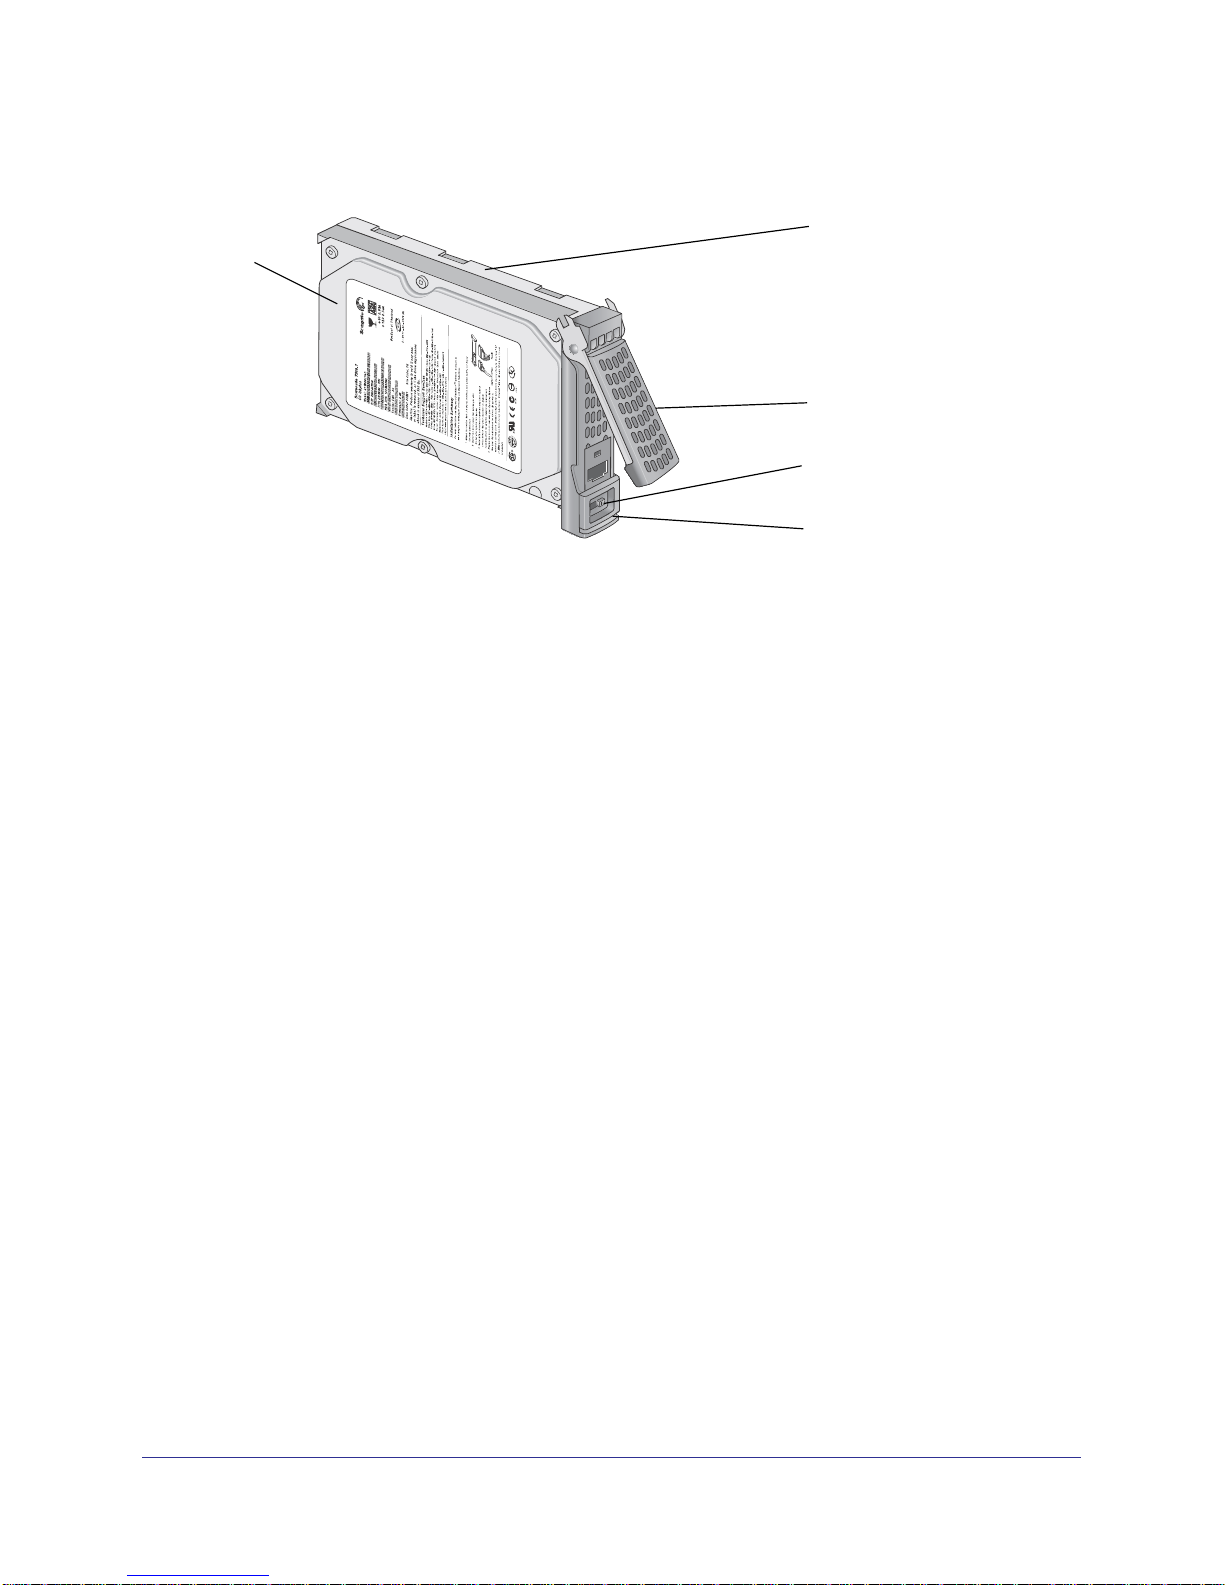
The following figure shows a ReadyNAS NV+ v2 disk tray.
1
Figure 7. ReadyNAS NV+ v2 disk tray
1. Hard drive
2
3
4
5
2. Disk tray
3. Disk tray handle
4. Recessed disk tray locking mechanism
5. Disk tray release latch
ReadyNAS NV+ v2
21
Page 22

ReadyNAS Duo v2 and NV+ v2
Rear Panel
The following figure shows the rear panel of ReadyNAS NV+ v2.
123
4
5
6
7
Figure 8. ReadyNAS NV+ v2 rear panel
1. Reset button
2. USB 3.0 ports
3. Power cable socket
4. 1-gigabit Ethernet port with LED status indicators
5. Exhaust fan
6. Cable clip
7. Kensington lock
ReadyNAS NV+ v2
22
Page 23

ReadyNAS Duo v2 and NV+ v2
Status Information
You can obtain information about the status of your unit by reviewing the indicators listed in
the following table.
Indicator Description
Power button and LED Press this button to turn on the ReadyNAS. The LED has these states:
• Blinking. Booting or shutting down
• On. Powered on
• Off. Powered off
Disk LEDs (1, 2, 3, 4) Each disk bay has an LED associated with it on the front panel of the unit. The
disk LEDs have these states:
• On. Power is on and the disk is operating normally.
• Blinking. The disk was removed, failed, or is resynchronizing.
• Off. The disk bay is empty.
Disk activity LED The disk activity LED has these states:
• Blinking. A disk is active.
• Off. No disks are active.
Rear panel Ethernet port
LEDs
Two LED status indicators are built into this port, one green and one amber.
They indicate port speed and activity as follows:
• Green on, amber off. 1000 Mbps connection speed, no activity
• Green blinking, amber off. 1000 Mbps connection speed, activity
• Green off, amber on. 10 Mbps or 100 Mbps connection speed, no activity
• Green off, amber blinking. 10 Mbps or 100 Mbps connection speed, no
activity
• Green off, amber off. No connection
System Shutdown
You can shut down your unit in these ways:
• Using the Power button:
• Preferred shutdown. Press the Power button twice to initiate a graceful shutdown.
• Forced shutdown. If the unit is not responding, unplug it.
• Using the ReadyNAS Dashboard. For information about using the ReadyNAS
Dashboard to shut down your NV+ v2, see the ReadyNAS RAIDiator 5.3 for Home
Software Manual, which is available at http://www.readynas.com/documentation.
ReadyNAS NV+ v2
23
Page 24

ReadyNAS Duo v2 and NV+ v2
Boot Menu
Use the boot menu to restart or troubleshoot your ReadyNAS unit. Your unit has the following
boot modes:
• Normal. Initiates a normal boot process, just like booting using the Power button.
• Factory default. Initiates a short disk test that takes approximately 5 minutes, then
begins a 10-minute time-out period waiting for RAIDar. During the 10-minute time-out
period, the system can be powered off safely without causing any data loss. After 10
minutes, or if you select the factory default option with RAIDar during the time-out period,
the factory default process begins.
WARNING!
The factory default reboot process resets the unit to factory
settings, erases all data, resets all defaults, and reformats the disk
to X-RAID2.
• OS reinstall. Reinstalls the firmware from the internal flash to the disks. Use the OS
reinstall boot mode when the system crashes and corrupts some configuration files. OS
reinstall boot mode also resets some settings on your unit, such as Internet protocol
settings and the administrator password, to defaults.
• Tech support. Boots into a low-level diagnostic mode. Use the tech support boot mode
only when instructed to do so by a NETGEAR Technical Support representative.
• Skip volume check. After a system crash, the system tries to scan and fix the volume
using a file system check. If several problems are found on a disk, this process can stall,
causing the system not to boot. Use this option to skip the scan and let the system boot.
WARNING!
Use the skip volume check boot mode only when instructed to do
so by a NETGEAR Technical Support representative, otherwise
data loss might occur.
• Memory test. Performs a memory test. The pass or fail result is reported using the unit’s
LEDs. Contact a NETGEAR technical support representative to interpret memory test
results.
• Disk test. Performs an offline full disk test. This can take 4 hours or more, depending on
the size of your disks.Any problems are reported in the RAIDar discovery tool.
ReadyNAS NV+ v2
24
Page 25

ReadyNAS Duo v2 and NV+ v2
To access the boot menu:
1. Power off your unit.
2. Using a straightened paper clip, press and hold the Reset button.
3. Press the Power button to power on the unit.
4. Continue to press the Reset button until the status display screen shows a boot menu
message.
5. Press the Backup button to scroll through boot mode options.
The status display screen shows the current boot mode option.
6. When the status display screen shows the boot mode you need, press and release Reset
button to confirm your boot menu selection.
The system boots in the selected boot mode.
ReadyNAS NV+ v2
25
Page 26

4. Disks
Use only supported disks in your ReadyNAS storage system. If you use non-supported disks,
NETGEAR Technical Support will not provide assistance. For a list of supported disks, see
theNETGEAR Hardware Compatibility List at
For information about configuring disks on your ReadyNAS storage system, see the ReadyNAS
RAIDiator 5.3 for Home Software Manual
http://www.readynas.com/documentation.
This chapter includes the following topics:
• Previously Formatted Disks
• Adding a Disk
• Failed Disk Notification
• Replacing a Disk
http://www.readynas.com/hard_disk_hcl.
, which is available at
4
26
Page 27

ReadyNAS Duo v2 and NV+ v2
Previously Formatted Disks
You must take care when using previously formatted disks in your ReadyNAS unit, as
described in the following table.
Table 1. Previously Formatted Disk Precautions
Unit Status Precaution
ReadyNAS unit has no disks
(diskless)
ReadyNAS unit is operating with
one or more disks
Turn the unit off and insert the disk as described in Diskless Units on
page 8. Then, perform a factory default reboot as described in Boot Menu
on page 16.
Note: This process erases all data and reformats the previously formatted
disk to X-RAID2. If you want to preserve the data on the disk, you must
move the data to an external drive before using the previously formatted disk
in your ReadyNAS unit.
You cannot use previously formatted disk in your unit without following this
process. For example, if you try to use a disk that was formatted for a Duo
v1, an NV+ v1, or a Windows operating system, RAIDar displays a “Corrupt
Root” error message.
With the unit running, insert the disk in an empty disk bay as described in
Adding a Disk on page 28. The unit automatically formats the disk in the
same format as your existing disks.
Note: This process erases all data on the previously formatted disk. If you
want to preserve the data on the disk, you must move the data to an external
drive before using the previously formatted disk in your ReadyNAS unit.
Previously formatted disks must appear on the NETGEAR Hardware Compatibility List,
which is available at http://www.readynas.com/hard_disk_hcl.
Disks
27
Page 28

ReadyNAS Duo v2 and NV+ v2
Adding a Disk
You can add a hard disk to an empty disk bay. You do not need to shut down your unit before
adding a disk.
If you are adding a previously formatted disk to your Duo v2, NV+ v2, see the precautions in
Previously Formatted Disks on page 27.
To add a disk:
1. Press the disk tray release latch.
The tray handle pops out.
2. Pull out the disk tray, place the new disk on the tray, and assemble the disk and tray
with the screws that came with your unit.
Make sure that the hard disk connectors face the interior of the disk bay.
Disks
28
Page 29

ReadyNAS Duo v2 and NV+ v2
3. Slide the disk tray back into the unit and press the handle to secure the disk.
The volume automatically synchronizes with the new disk in the background. This might
take several hours, depending on the disk size. You can continue to use your ReadyNAS,
although access is slower until the volume synchronization finishes. You are notified by
email when the process is complete.
If you are adding disks to a diskless unit, see the ReadyNAS RAIDiator 5.3 for Home
Software Manual, which is available at
http://www.readynas.com/documentation, for
information about using RAIDar to discover your unit on your local area network for the
first time.
Failed Disk Notification
If a disk fails, you are notified by email. Email alerts must be set up for notifications to be
sent. In addition, the ReadyNAS Dashboard provides information about the failed disk.
NETGEAR recommends replacing a failed disk with the same disk model. Use the
ReadyNAS Dashboard to determine the disk vendor and model used in your unit.
For information about setting up email alerts and using the ReadyNAS Dashboard, see the
ReadyNAS RAIDiator 5.3 for Home Software Manual, which is available at
http://www.readynas.com/documentation.
WARNING!
No matter how many hard drives are installed in your unit, ensure
that all drive trays remain in the drive bays to maintain adequate
airflow.
Disks
29
Page 30

ReadyNAS Duo v2 and NV+ v2
Replacing a Disk
In the case of a failed disk, the unit provides email alerts and status messages about the
need to replace a disk. ReadyNAS supports hot-swap bays, so you do not need to power
down your unit when replacing a disk.
If you are replacing a disk with a previously formatted disk, see the precautions in Previously
Formatted Disks on page 27.
To replace a disk:
1. Press the disk tray pull release latch.
The disk tray handle pops out.
Disks
30
Page 31

ReadyNAS Duo v2 and NV+ v2
2. Pull out the disk tray and replace the disk.
1
23
1. Hard drive
2. Empty disk tray
3. Assembled disk tray
Make sure that the hard disk connectors face the interior of the disk bay.
3. Slide the disk tray back into the unit and press the handle to secure the disk.
The volume automatically synchronizes with the new disk in the background. This might
take several hours, depending on the disk size. You can continue to use your ReadyNAS,
although access is slower until the volume synchronization finishes. You are notified by
email when the process is complete.
Disks
31
Page 32

A. Defaults and Technical Specifications
This appendix includes the following sections:
• Factory Default Settings
• Duo v2 Technical Specifications
• NV+ v2 Technical Specifications
A
32
Page 33

ReadyNAS Duo v2 and NV+ v2
Factory Default Settings
The following table lists factory default settings for ReadyNAS Duo v2 and NV+ v2.
Feature Default
Login
User login URL when the ReadyNAS is
not connected to a DHCP server
Admin user name (case-sensitive) admin
Admin login password (case-sensitive) password
Management
System configuration ReadyNAS Dashboard web-based configuration and
Discovery, multi-unit status monitoring,
and RAID formatting utility
LAN Connections
MAC address See sticker on unit
MTU size 1500
Ethernet port Auto Sense 10/100/1000BASE-T, RJ-45
LAN IP address DHCP acquired
https://192.168.168.168/admin
status monitoring
RAIDar for Windows, Mac, and Linux
Defaults and Technical Specifications
33
Page 34

ReadyNAS Duo v2 and NV+ v2
Duo v2 Technical Specifications
The ReadyNAS Duo v2 storage system meets the following technical specifications:
General:
• 2-bay storage
• Marvell single-core processor
• 256MB DDR3
• One 1-gigabit Ethernet port
• One USB 2.0 port (front)
• Two USB 3.0 ports (back)
• X-RAID2
Physical dimensions (h x w x d):
• 142 x 101 x 220 mm
• 5.60 x 3.98 x 8.70 in
Physical weight:
• 2.07 kg / 4.56 lb without disks
Power consumption:
• 24.2 W typical (with 2 x 1 TB spinning)
• 21.3 W idle
Electrical:
• Input: DC 12.0V, 5A
Thermal:
• Software controlled 92 mm chassis cooling fan
• High temperature email alert with auto shutdown
Environmental compliance:
• 32° to 104° F
• 20% to 80% Humidity (non-condensing)
• FCC, UL, CE, RoHS, C-tick, VCCI, CCC, KCC compliance
Defaults and Technical Specifications
34
Page 35

ReadyNAS Duo v2 and NV+ v2
NV+ v2 Technical Specifications
The ReadyNAS NV+ v2 storage system meets the following technical specifications:
General:
• 4-bay storage
• Marvell single-core processor
• 256MB DDR3
• One 1-gigabit Ethernet port
• One USB 2.0 port (front)
• Two USB 3.0 ports (back)
• X-RAID2
Physical dimensions (h x w x d):
• 170 x 250 x 285 mm
• 6.70 x 10.00 x 11.20 in
Physical weight:
• 6.70 kg / 14.90 lb without disks
Power consumption:
• 48.4 W typical (with 4 x 1TB spinning)
• 41.1 W idle
Electrical:
• Input: DC 12.0V, 5A
Thermal:
• Software controlled 92 mm chassis cooling fan
• High temperature email alert with auto shutdown
Environmental compliance:
• 32° to 104° F
• 20% to 80% Humidity (non-condensing)
• FCC, UL, CE, RoHS, C-tick, VCCI, CCC, KCC compliance
Defaults and Technical Specifications
35
Page 36

ReadyNAS Duo v2 and NV+ v2
Safety Warnings
1. Install the socket outlet near the equipment in an easily accessible location.
2. Observe the on-board battery precautions.
DANGER:
RISK OF EXPLOSION IF BATTERY IS REPLACED BY AN
INCORRECT TYPE. DISPOSE OF USED BATTERIES ACCORDING
TO THEIR INSTRUCTIONS.
3. Connect the units and their associated LAN connections only to equipment within the same
building.
Electrical Safety Precautions
Follow basic electrical safety precautions to protect yourself from harm and the ReadyNAS
from damage:
• Be aware of the locations of the power on/off switch on the chassis as well as the room's
emergency power-off switch, disconnection switch, or electrical outlet. If an electrical
accident occurs, you can then quickly remove power from the system.
• Always disconnect power from the system when removing or installing main system
components, such as the main board or memory modules. When disconnecting power,
first power down the system with the operating system and then unplug the power cords
of all the power supply units in the system.
• Use only one hand when working with powered-on electrical equipment. This is to avoid
making a complete circuit, which will cause electrical shock. Use extreme caution when
using metal tools, which can easily damage any electrical components or circuit boards
they come into contact with.
• Do not use mats designed to decrease static electrical discharge as protection from
electrical shock. Instead, use rubber mats that have been specifically designed as
electrical insulators.
• Use only power supply cords that include a grounding plug and plug them into grounded
electrical outlets.
General Safety Precautions
Follow these rules to ensure general safety:
• Keep the area around the ReadyNAS clean and free of clutter.
• See the technical specifications in this manual for details about your specific ReadyNAS
unit.
Defaults and Technical Specifications
36
Page 37

ReadyNAS Duo v2 and NV+ v2
• Replace the on-board battery only with the same battery or an equivalent type of battery
recommended by the manufacturer. Dispose of used batteries according to the
manufacturer's instructions.
DANGER:
Installing the battery upside down reverses its polarities and creates a
danger of explosion.
• Main board replaceable soldered-in fuses: Only trained service technicians can replace
the self-resetting PTC (positive temperature coefficient) fuses on the main board, using
only new fuses that are the same as or equivalent to the ones being replaced. Contact
Technical Support for details and support.
Electrostatic Discharge (ESD) Precautions
Electrostatic discharge (ESD) is generated by two objects with different
electrical charges coming
discharge is created to neutralize this difference, which can damage
electronic components and printed circuit boards. The following measures
are generally sufficient to neutralize this difference before contact is made
to protect your equipment from ESD:
into contact with each other. An electrical
• Use a grounded wrist strap designed to prevent static discharge.
• Keep all components and printed circuit boards (PCBs) in their antistatic bags until ready
for use.
• Touch a grounded metal object before removing the board from the antistatic bag.
• Do not let components or PCBs come into contact with your clothing, which might retain a
charge even if you are wearing a wrist strap.
• Handle a board by its edges only; do not touch its components, peripheral chips, memory
modules, or contacts.
• When handling chips or modules, avoid touching their pins.
• Put the main board and peripherals back into their antistatic bags when not in use.
• For grounding purposes, make sure your computer chassis provides excellent
conductivity between the power supply, the case, the mounting fasteners and the main
board.
Defaults and Technical Specifications
37
Page 38

B. Compliance Notification
B
Regulatory Compliance Information
This section includes user requirements for operating this product in accordance with National
laws for usage of radio spectrum and operation of radio devices. Failure of the end-user to
comply with the applicable requirements may result in unlawful operation and adverse action
against the end-user by the applicable National regulatory authority.
This product's firmware limits operation to only the channels allowed in a particular Region or
Country. Therefore, all options described in this user's guide may not be available in your version
of the product.
FCC Requirements for Operation in the United States
FCC Information to User
This product does not contain any user serviceable components and is to be used with
approved antennas only. Any product changes or modifications will invalidate all applicable
regulatory certifications and approvals
This device complies with Part 15 of the FCC Rules. Operation is subject to the following two
conditions: (1) This device may not cause harmful interference, and (2) this device must
accept any interference received, including interference that may cause undesired operation.
FCC Guidelines for Human Exposure
This equipment complies with FCC radiation exposure limits set forth for an uncontrolled
environment. This equipment should be installed and operated with minimum distance of 20
cm between the radiator and your body.
This transmitter must not be co-located or operating in conjunction with any other antenna or
transmitter.
38
Page 39

ReadyNAS Duo v2 and NV+ v2
FCC Declaration Of Conformity
We, NETGEAR, Inc., 350 East Plumeria Drive, San Jose, CA 95134, declare under our sole
responsibility that the NETGEAR ReadyNAS Duo v2 and NV+ v2 comply with Part 15 of FCC
Rules.
Operation is subject to the following two conditions:
• This device may not cause harmful interference, and
• This device must accept any interference received, including interference that may cause
undesired operation.
FCC Radio Frequency Interference Warnings & Instructions
This equipment has been tested and found to comply with the limits for a Class B digital
device, pursuant to Part 15 of the FCC Rules. These limits are designed to provide
reasonable protection against harmful interference in a residential installation. This
equipment uses and can radiate radio frequency energy and, if not installed and used in
accordance with the instructions, may cause harmful interference to radio communications.
However, there is no guarantee that interference will not occur in a particular installation.
If this equipment does cause harmful interference to radio or television reception, which can
be determined by turning the equipment off and on, the user is encouraged to try to correct
the interference by one or more of the following methods:
• Reorient or relocate the receiving antenna.
• Increase the separation between the equipment and the receiver.
• Connect the equipment into an electrical outlet on a circuit different from that which the
radio receiver is connected.
• Consult the dealer or an experienced radio/TV technician for help.
Modifications made to the product, unless expressly approved by NETGEAR, Inc., could void
the user's right to operate the equipment.
Canadian Department of Communications Radio Interference Regulations
This digital apparatus, NETGEAR ReadyNAS Duo v2 and NV+ v2, do not exceed the Class B
limits for radio-noise emissions from digital apparatus as set out in the Radio Interference
Regulations of the Canadian Department of Communications.
Compliance Notification
39
Page 40

ReadyNAS Duo v2 and NV+ v2
European Union
The NETGEAR ReadyNAS Duo v2 and NV+ v2 comply with essential requirements of EU EMC
Directive 2004/108/EC and Low Voltage Directive 2006/95/EC as supported by applying the
following test methods and standards:
• EN55022: 2006 / A1: 2007
• EN55024: 1998 / A1: 2001 / A2: 2003
• EN60950-1: 2005 2nd Edition
• EN 61000-3-2: 2006
• EN 61000-3-3: 1995 w/A1: 2001+A2: 2005
Compliance Notification
40
Page 41

Index
B
battery 36
boot menu
Duo v2 16
NV+ v2 24
C
compliance 38
D
Declaration Of Conformity 39
disk
adding 28
failure 29
previously formatted 27
replacing 30
supported 26
disk tray
Duo v2 13
NV+ v2 21
diskless units 8, 27
drive bay
Duo v2 12
NV+ v2 20
G
general safety 36
H
Hardware Compatibility List 7, 26, 27
L
LEDs
Duo v2 15
NV+ v2 23
location, unit 7
N
NV+ v2 18
P
previously formatted disks 27
R
rear panel
Duo v2 14
NV+ v2 22
E
electrical safety 36
electrostatic discharge 37
email alerts 29
ESD 37
F
factory default settings
Duo v2 33
NV+ v2 33
failed disk 29
FCC 38
front panel
Duo v2 11
NV+ v2 19
S
safety 36
safety warning 36
setup location 7
shutdown, forced
Duo v2 15
NV+ v2 23
shutdown, graceful
Duo v2 15
NV+ v2 23
shutdown, preferred
Duo v2 15
NV+ v2 23
side panel
Duo v2 11
NV+ v2 19
41
Page 42

socket outlet 36
status information
Duo v2 15
NV+ v2 23
status, system
Duo v2 15
NV+ v2 23
supported disks 26
system requirements 7
system shutdown 15, 23
Duo v2 15
NV+ v2 23
system status
Duo v2 15
NV+ v2 23
T
technical specifications
Duo v2 34
NV+ v2 35
technical support 2
trademarks 2
troubleshooting with boot menu
Duo v2 16
NV+ v2 24
ReadyNAS Duo v2 and NV+ v2
U
unit location 7
V
volume synchronization 9, 29
volume synhronization 31
42
 Loading...