

Page 1
Manuel du matériel
ReadyNAS
Duov2 et NV+v2
350 East Plumeria Drive
San Jose, CA 95134,
Etats-Unis
Mars 2012
202-10905-02
Page 2

ReadyNAS Duo v2 et NV+ v2
© 2012 NETGEAR, Inc. Tous droits réservés.
Il est interdit de reproduire, de transmettre, de conserver dans un système central ou de traduire le contenu de
cette publication sous quelque forme et par quelque moyen que ce soit sans la permission écrite préalable de
NETGEAR, Inc.
Assistance technique
Merci d'avoir choisi NETGEAR. Pour enregistrer votre produit, obtenir les dernières mises à jour ou accéder à
l'assistance en ligne, rendez-vous sur http://support.netgear.com.
Téléphone (pour les Etats-Unis et le Canada uniquement) : 1-888-NETGEAR
Pour les autres pays, reportez-vous à la carte d'informations sur l'assistance technique.
Marques commerciales
NETGEAR, le logo NETGEAR et Connect with Innovation sont des marques commerciales et/ou des marques
déposées de NETGEAR, Inc. et/ou des filiales de NETGEAR aux Etats-Unis et/ou dans d'autres pays. Ces
informations sont susceptibles d'être modifiées sans préavis. © 2012 NETGEAR, Inc. Tous droits réservés.
Conditions
Afin d'améliorer la conception, les fonctions opérationnelles et/ou la fiabilité, NETGEAR se réserve le droit
d'apporter des modifications aux produits décrits dans ce document sans préavis. NETGEAR décline toute
responsabilité quant aux conséquences de l'utilisation des produits ou des configurations de circuits décrits
ci-après.
2
Page 3

Table des matières
Chapitre 1 Démarrage
Documentation supplémentaire . . . . . . . . . . . . . . . . . . . . . . . . . . . . . . . . . . 6
Emplacement d'installation. . . . . . . . . . . . . . . . . . . . . . . . . . . . . . . . . . . . . . 7
Configuration requise . . . . . . . . . . . . . . . . . . . . . . . . . . . . . . . . . . . . . . . . . . 7
Unités sans disque . . . . . . . . . . . . . . . . . . . . . . . . . . . . . . . . . . . . . . . . . . . . 8
Chapitre 2 ReadyNAS Duo v2
Panneaux avant et latéral. . . . . . . . . . . . . . . . . . . . . . . . . . . . . . . . . . . . . . 11
Baies de lecteur . . . . . . . . . . . . . . . . . . . . . . . . . . . . . . . . . . . . . . . . . . . . . 12
Panneau arrière . . . . . . . . . . . . . . . . . . . . . . . . . . . . . . . . . . . . . . . . . . . . . 14
Informations d'état . . . . . . . . . . . . . . . . . . . . . . . . . . . . . . . . . . . . . . . . . . . 15
Arrêt du système . . . . . . . . . . . . . . . . . . . . . . . . . . . . . . . . . . . . . . . . . . . . 15
Menu de démarrage . . . . . . . . . . . . . . . . . . . . . . . . . . . . . . . . . . . . . . . . . . 16
Chapitre 3 ReadyNAS NV+ v2
Panneaux avant et latéral. . . . . . . . . . . . . . . . . . . . . . . . . . . . . . . . . . . . . . 19
Baies de lecteur . . . . . . . . . . . . . . . . . . . . . . . . . . . . . . . . . . . . . . . . . . . . . 20
Panneau arrière . . . . . . . . . . . . . . . . . . . . . . . . . . . . . . . . . . . . . . . . . . . . . 22
Informations d'état . . . . . . . . . . . . . . . . . . . . . . . . . . . . . . . . . . . . . . . . . . . 23
Arrêt du système . . . . . . . . . . . . . . . . . . . . . . . . . . . . . . . . . . . . . . . . . . . . 23
Menu de démarrage . . . . . . . . . . . . . . . . . . . . . . . . . . . . . . . . . . . . . . . . . . 24
Chapitre 4 Disques
Disques préalablement formatés . . . . . . . . . . . . . . . . . . . . . . . . . . . . . . . . 27
Ajout d'un disque . . . . . . . . . . . . . . . . . . . . . . . . . . . . . . . . . . . . . . . . . . . . 28
Notification d'un disque défaillant . . . . . . . . . . . . . . . . . . . . . . . . . . . . . . . . 29
Remplacement d'un disque . . . . . . . . . . . . . . . . . . . . . . . . . . . . . . . . . . . . 30
Annexe A Paramètres par défaut et caractéristiques techniques
Paramètres par défaut . . . . . . . . . . . . . . . . . . . . . . . . . . . . . . . . . . . . . . . . 33
Caractéristiques techniques Duo v2. . . . . . . . . . . . . . . . . . . . . . . . . . . . . . 34
Caractéristiques techniques NV+ v2 . . . . . . . .
Avertissement de sécurité . . . . . . . . . . . . . . . . . . . . . . . . . . . . . . . . . . . . . 36
Précautions de sécurité électrique . . . . . . . .
Précautions générales de sécurité . . . . . . . . . . . . . . . . . . . . . . . . . . . . . 37
Précautions relatives à la décharge électrostatique (DES) . . . . . . . . . . 37
. . . . . . . . . . . . . . . . . . . . . 35
. . . . . . . . . . . . . . . . . . . . . 36
3
Page 4

ReadyNAS Duo v2 et NV+ v2
Annexe B Notification de conformité
Index
4
Page 5

1. Démarrage
Merci d'avoir acheté un système de stockage NETGEAR ReadyNAS®. Ce Manuel du matériel
ReadyNAS Duo v2 et NV+ v2 décrit les caractéristiqu
Duo v2 et NV+ v2.
Ce chapitre comprend les sections suivantes :
• Documentation supplémentaire
• Emplacement d'installation
• Configuration requise
• Unités sans disque
es physiques des systèmes de stockage
1
5
Page 6

ReadyNAS Duo v2 et NV+ v2
Documentation supplémentaire
Pour en savoir plus sur la configuration, la gestion et l'utilisation de votre système de stockage
ReadyNAS Duo v2 ou NV+ v2, reportez-vous au Guide du
Home, disponible à l'adresse http://www.readynas.com/documentation.
logiciel ReadyNAS RAIDiator 5.3 for
NETGEAR possède un site communautaire qui prend
le site à l'adresse http://readynas.com. Vous y trouverez des aperçus, des didacticiels, un tableau
comparatif, des mises à jour logicielles, de la documentation, un forum actif et bien plus.
en charge les produits ReadyNAS. Visitez
Démarrage
6
Page 7

ReadyNAS Duo v2 et NV+ v2
Emplacement d'installation
Votre ReadyNAS Duo v2 ou NV+ v2 convient à un usage à domicile ou dans un petit bureau où
il peut être autonome. Sa petite taille compacte le rend parfaitement adapté à une installation
sur un bureau ou sur l'étagère d'une armoire.
Choisissez un emplacement pour votre unité
• les câ
• l'ea
• l'air circule librement aut
• l'air est
• les limit
• si vou
bles peuvent être connectés sans peine ;
u et l'humidité ne peuvent pas pénétrer dans le boîtier ;
our de l'unité et par les grilles de ventilation latérales ;
aussi exempt de poussière que possible ;
es de température de fonctionnement ne risquent pas d'être atteintes ;
s utilisez un onduleur (UPS) pour des motifs de protection, le câble
d'alimentation peut y être branché en toute sécurité.
qui répond aux critères suivants :
Configuration requise
Votre ReadyNAS Duo v2 ou NV+ v2 exige la configuration minimale suivante :
• Connexion
• Système d'exp
• Navigateur
version ultérieure, Mozilla Firefox 2.0 et version ultérieure, Opera 9.5 et version
ultérieure ou Google Chrome 10 et version ultérieure
• Disque dur ou lecteurs figurant dans la liste de compatibilité matérielle NETGEAR ;
consultez la page http://www.readynas.com/hard_disk_hcl
Ethernet
loitation Microsoft Windows 7, Vista, XP, 2000, Mac OS, UNIX ou Linux
Microsoft Internet Explorer 7.0 et version ultérieure, Apple Safari 2.0 et
Démarrage
7
Page 8
ReadyNAS Duo v2 et NV+ v2
Unités sans disque
Si vous avez acheté un système de stockage ReadyNAS sans disque dur ou lecteurs installés,
vous devez suivre cette procédure avant d'utiliser votre unité. La procédure ci-dessous illustre
un système de stockage Duo v2, mais cette procédure est identique pour le système de
stockage NV+ v2.
Pour préparer une unité sans disque en vue d'une première utilisation :
1. Procu
2. V
rez-vous au moins un des disques durs figurant sur la liste de compatibilité
matérielle NETGEAR.
Accédez à la page http://www.readynas.com/hard_disk_hcl.
Si vous utilisez un disque préalablement formaté, consulte
de la section Disques préalablement formatés à la
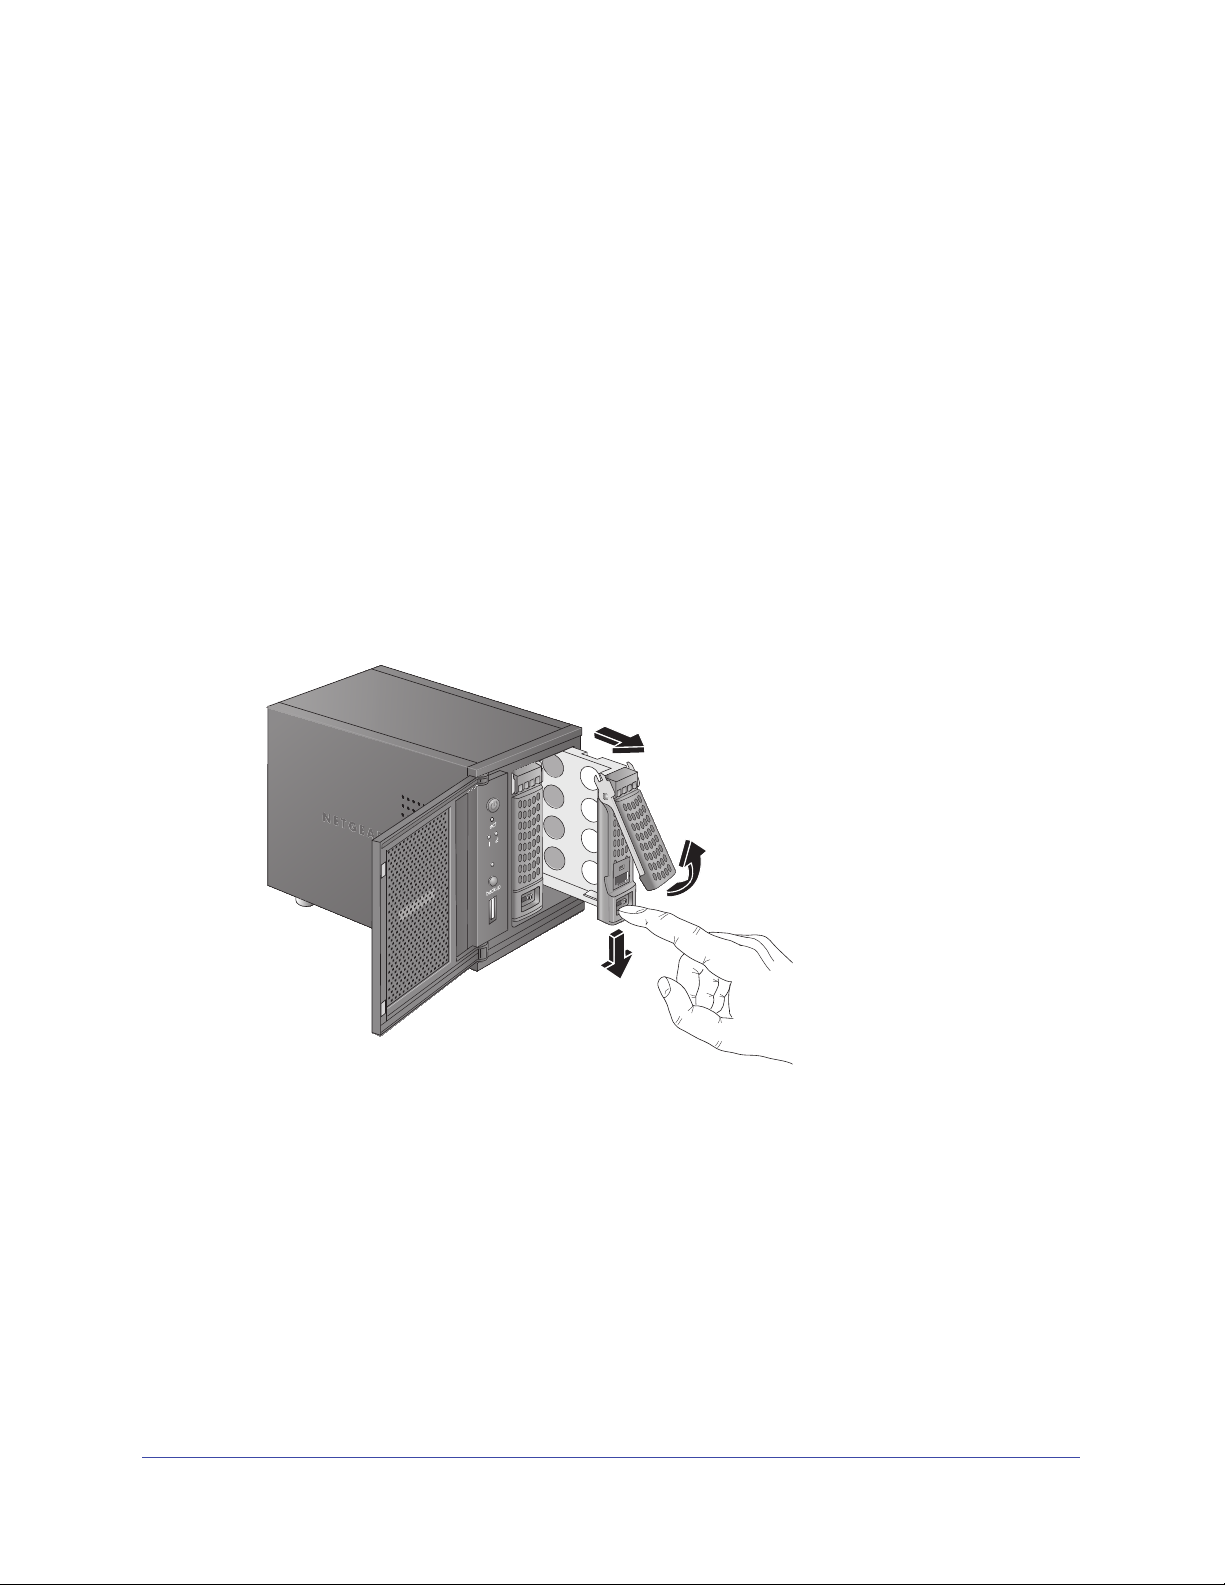
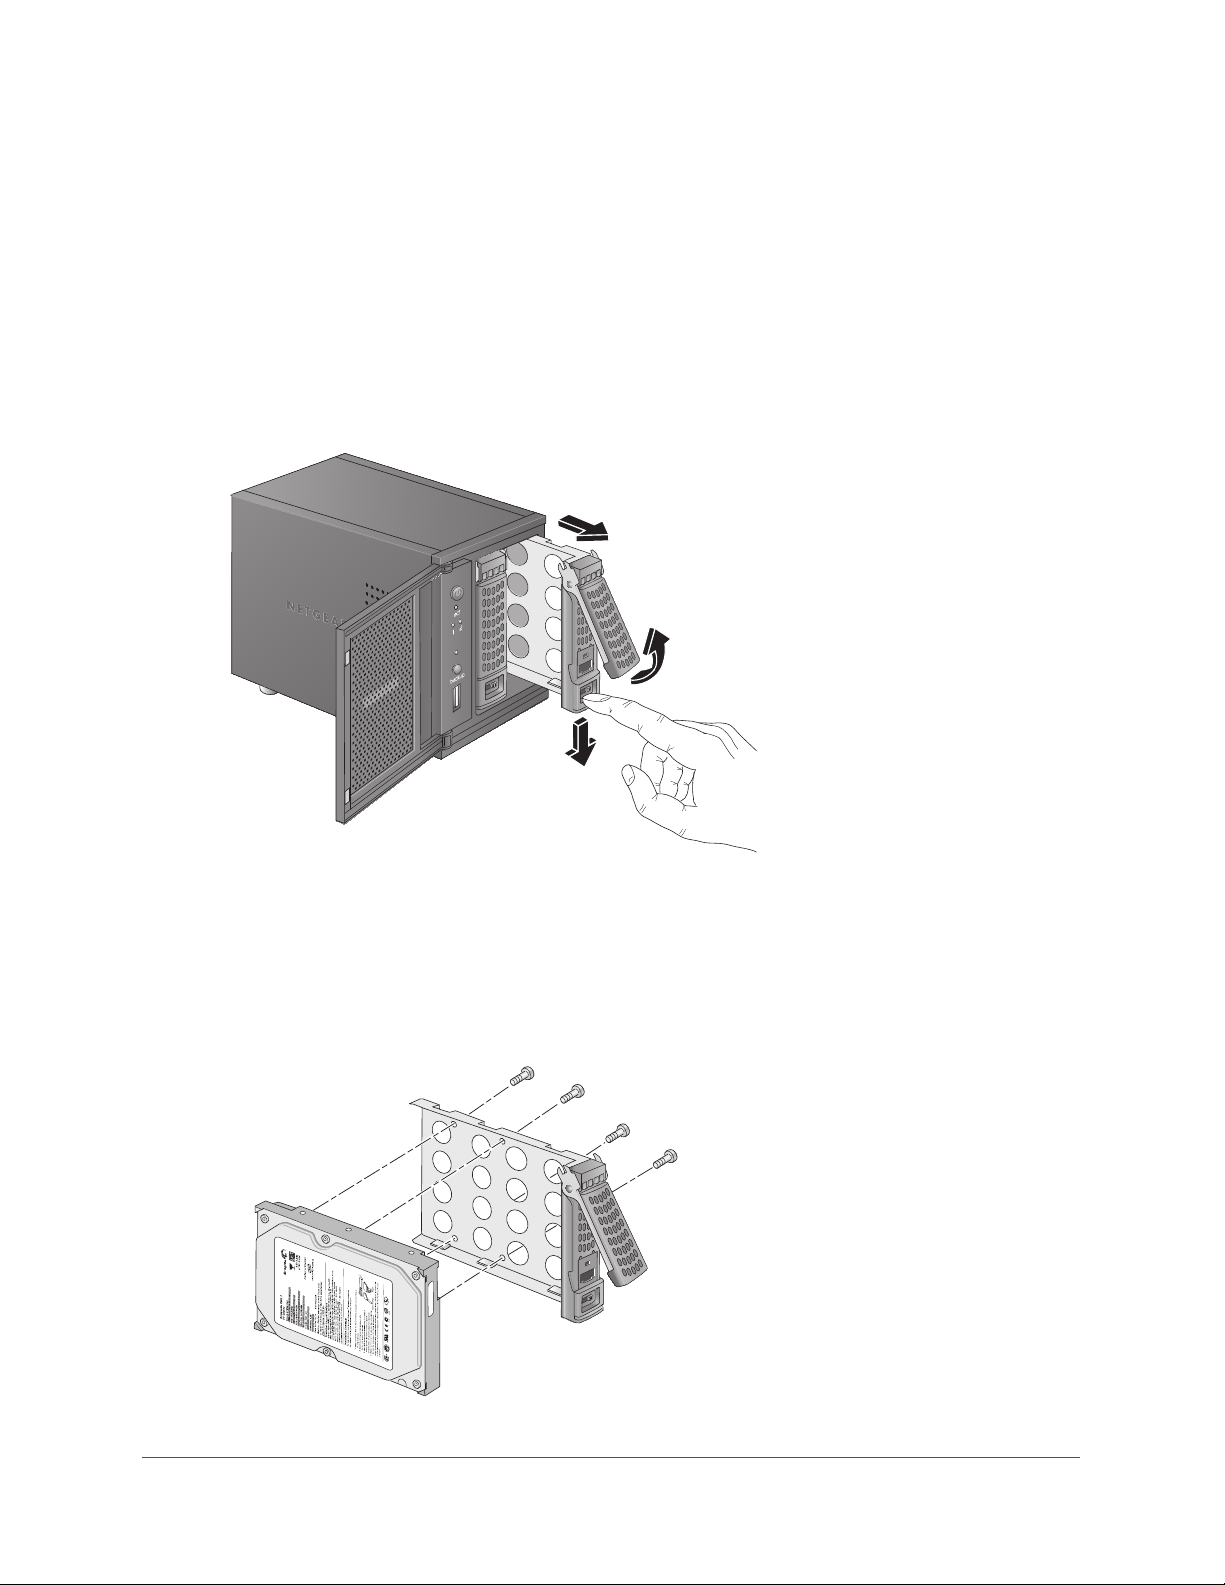
eillez à ce que l'unité soit éteinte, puis insérez un disque dans la baie de lecteur en
procédant comme suit :
a. Appuyez sur le loq
uet de blocage du tiroir disque.
page 27.
z les précautions d'utilisation
Celui-ci se déverrouille automatiquement.
Démarrage
8
Page 9
ReadyNAS Duo v2 et NV+ v2
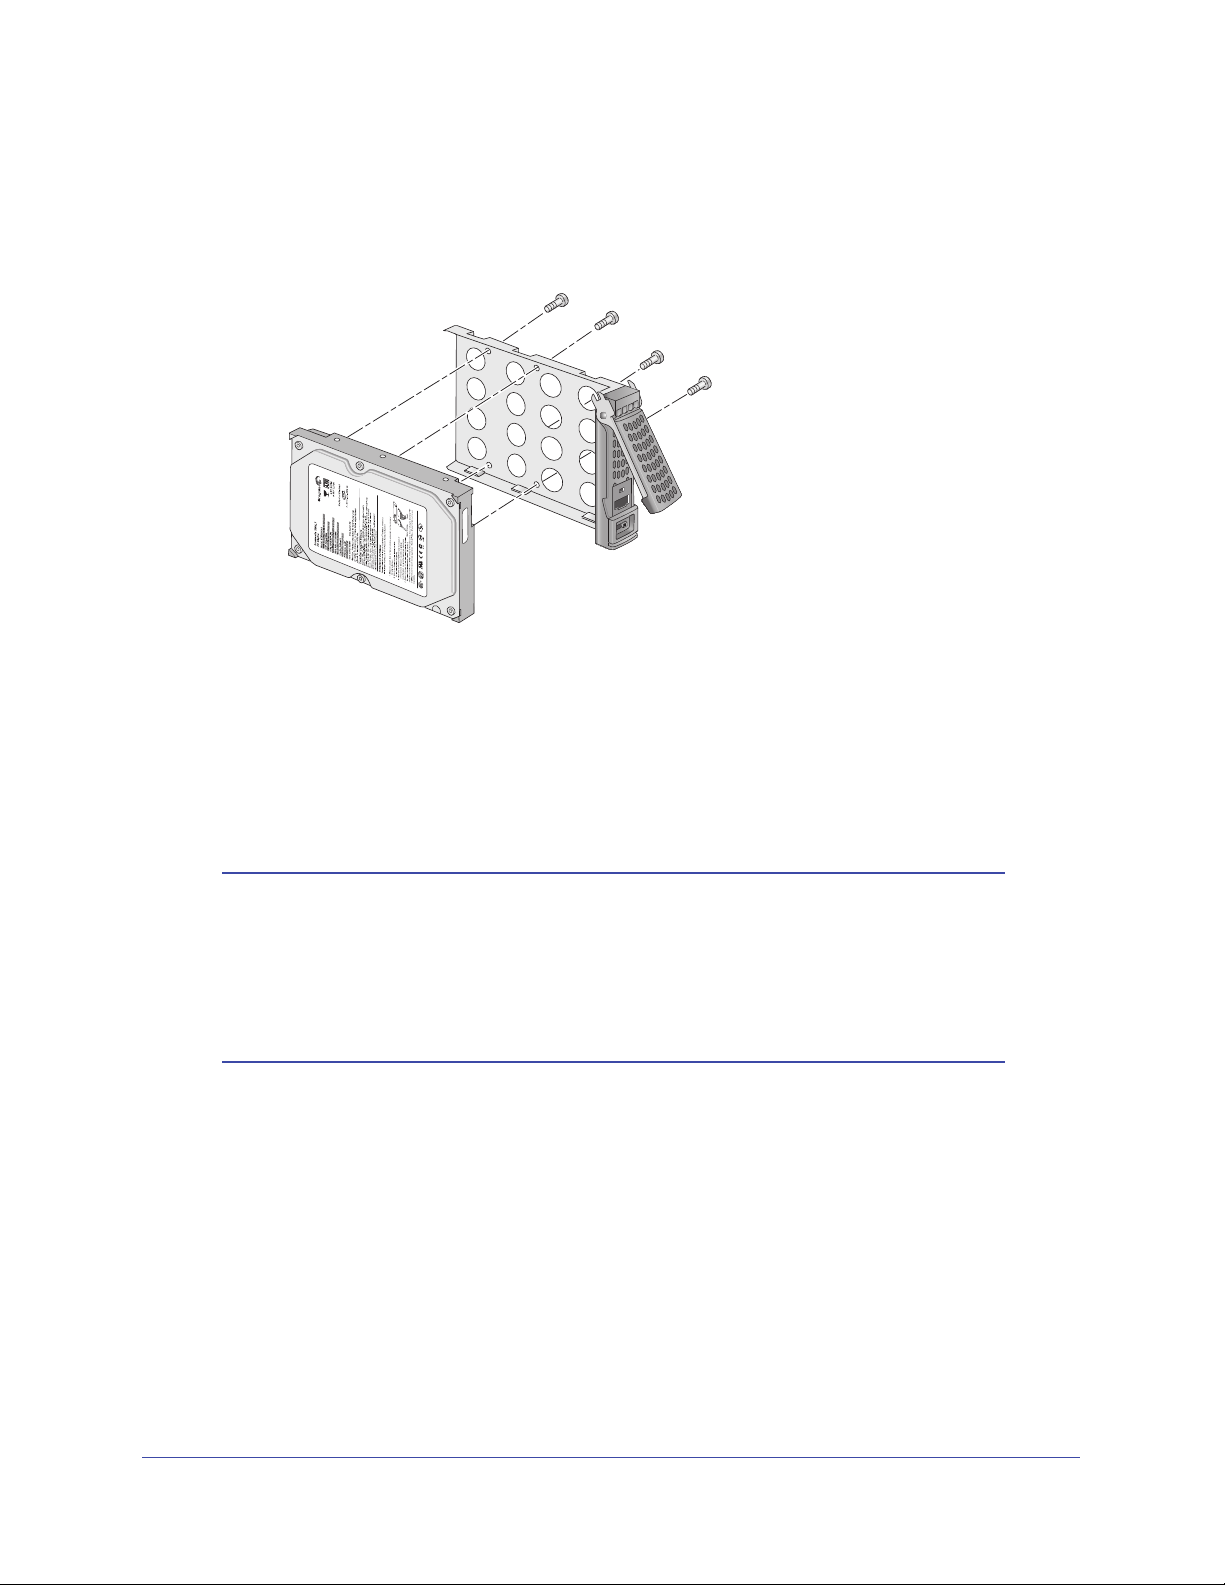
b. Retirez le tiroir disque, placez le nouveau disque sur le tiroir, puis fixez le disque au
tiroir à l'aide des vis fournies avec votre unité.
Assurez-vous que les connecteurs du disque dur sont o
baie de disque.
c. Remettez le tiroir da
ns l'unité et appuyez sur la poignée pour verrouiller le disque.
3. Allumez l'unité.
4. Si
vous utilisez des disques préalablement formatés, effectuez une réinitialisation des
paramètres d'usine.
Pour en savoir plus, consultez les sections Menu de démarrage à la
préalablement formatés à la p
age 27.
rientés vers l'intérieur de la
page 16 et Disques
Remarque : cette procédure efface toutes les données et formate le
disque au format X-RAID2
TM
. Si vous utilisez un disque
préalablement formaté contenant des données que vous
voulez conserver, vous devez déplacer les données vers
un lecteur externe avant d'utiliser le disque préalablement
formaté dans votre unité ReadyNAS.
Le processus de réinitialisation des paramètres d'usine peut prendre jusqu'à 30 minutes,
le temps que l'unité teste et formate le disque, installe le système d'exploitation et crée un
volume. Ce processus peut durer jusqu'à 30 minutes. Vous pouvez suivre son état
d'avancement dans RAIDar. Pour en savoir plus sur RAIDar, reportez-vous au Guide du
logiciel ReadyNAS RAIDiator 5.3 for Home,
disponible à l'adresse
http://www.readynas.com/documentation.
Si vous installez plusieurs disques à la fois, ceux-ci de
vront être synchronisés. Ce
processus peut prendre plusieurs heures, selon la taille des disques. Vous pouvez
continuer d'utiliser l'unité ReadyNAS, cependant l'accès sera plus lent jusqu'à ce que le
volume ait fini la synchronisation.
Démarrage
9
Page 10

2. ReadyNASDuov2
Ce chapitre présente les caractéristiques physiques du ReadyNAS Duo v2. Il est composé des
sections suivantes :
• Panneaux avant et latéral
• Baies de lecteur
• Panneau arrière
• Informations d'état
• Arrêt du système
• Menu de démarrage
2
10
Page 11
ReadyNAS Duo v2 et NV+ v2
3
8
4 56
7
1
2
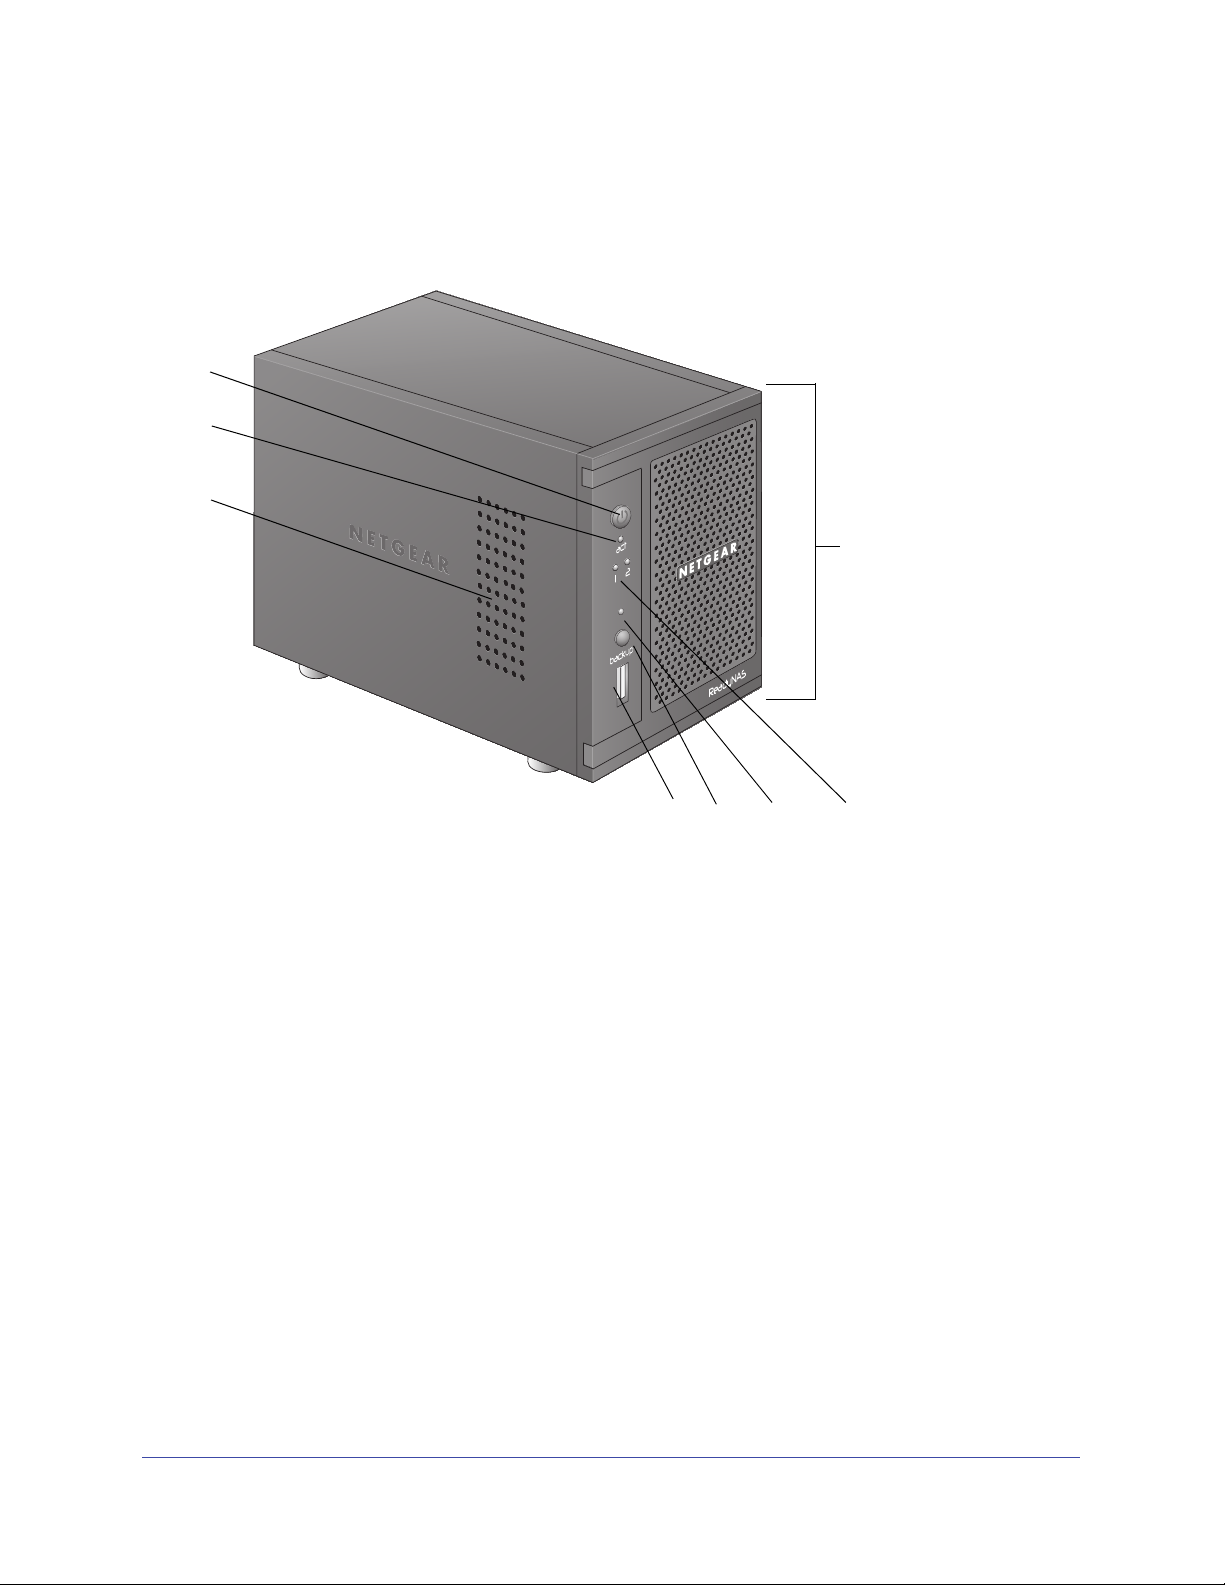
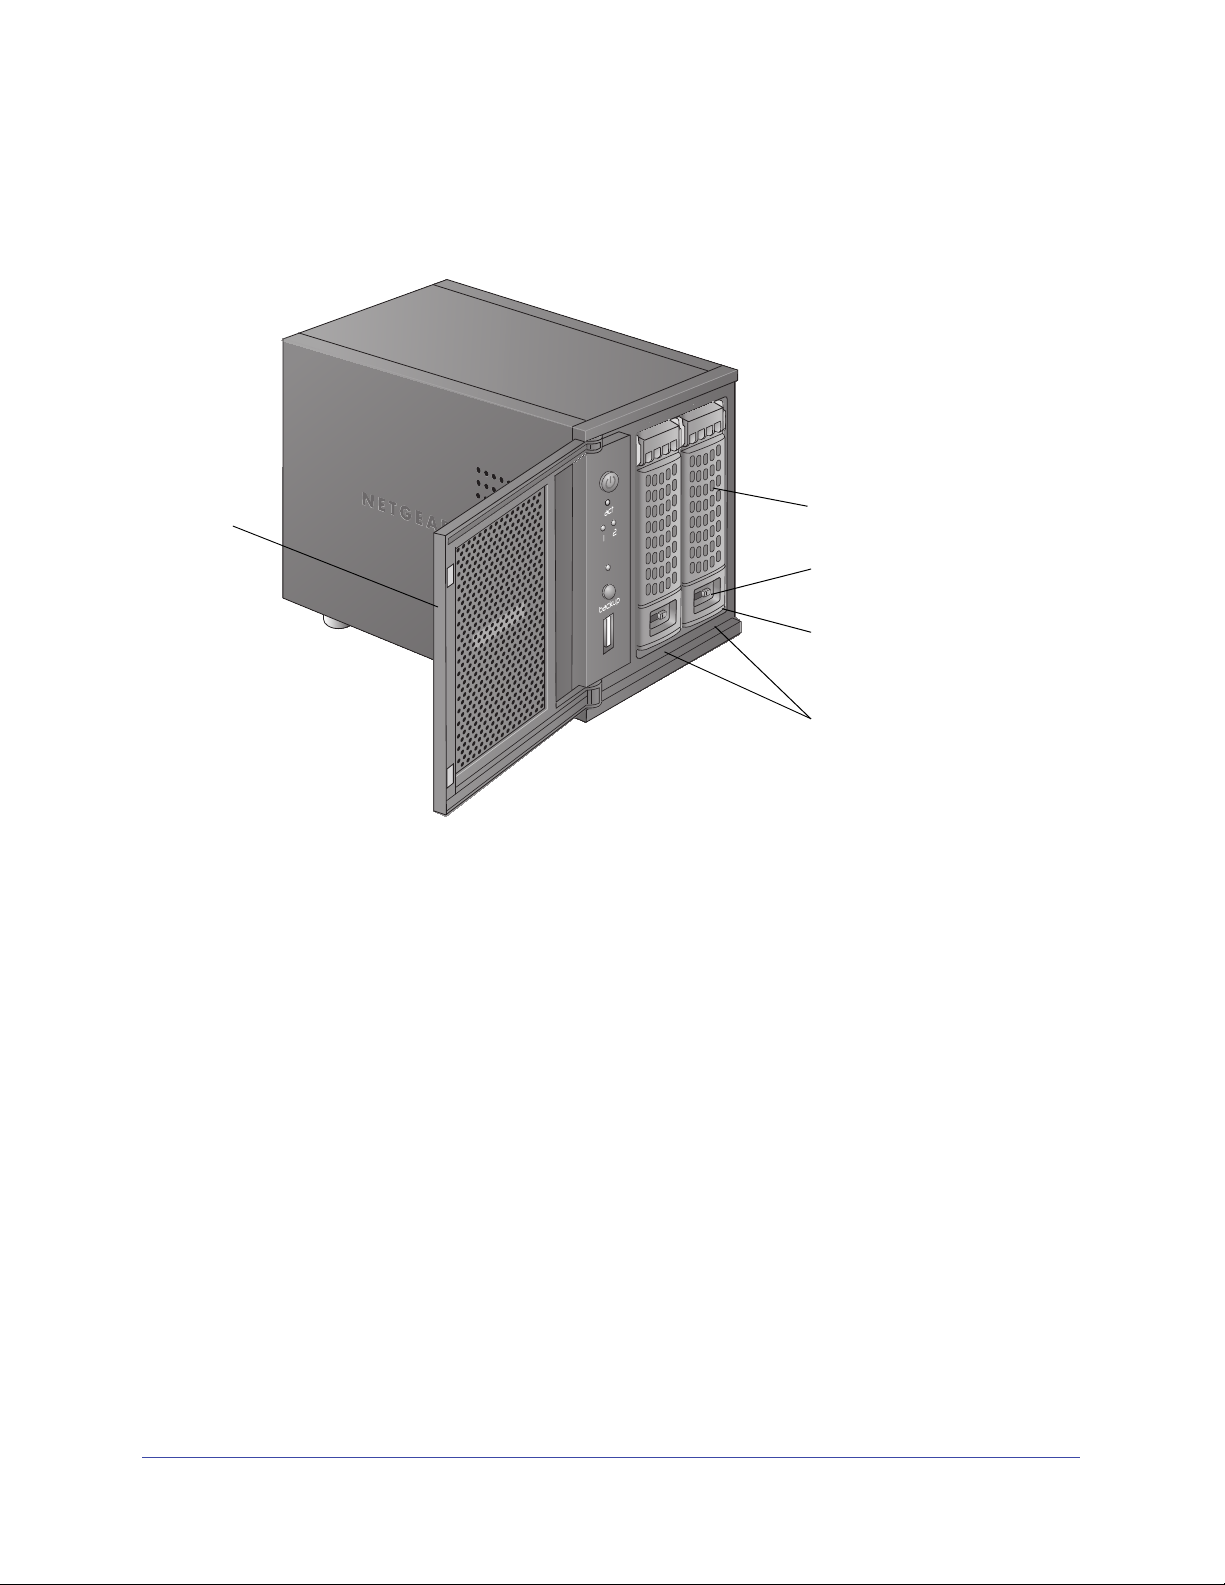
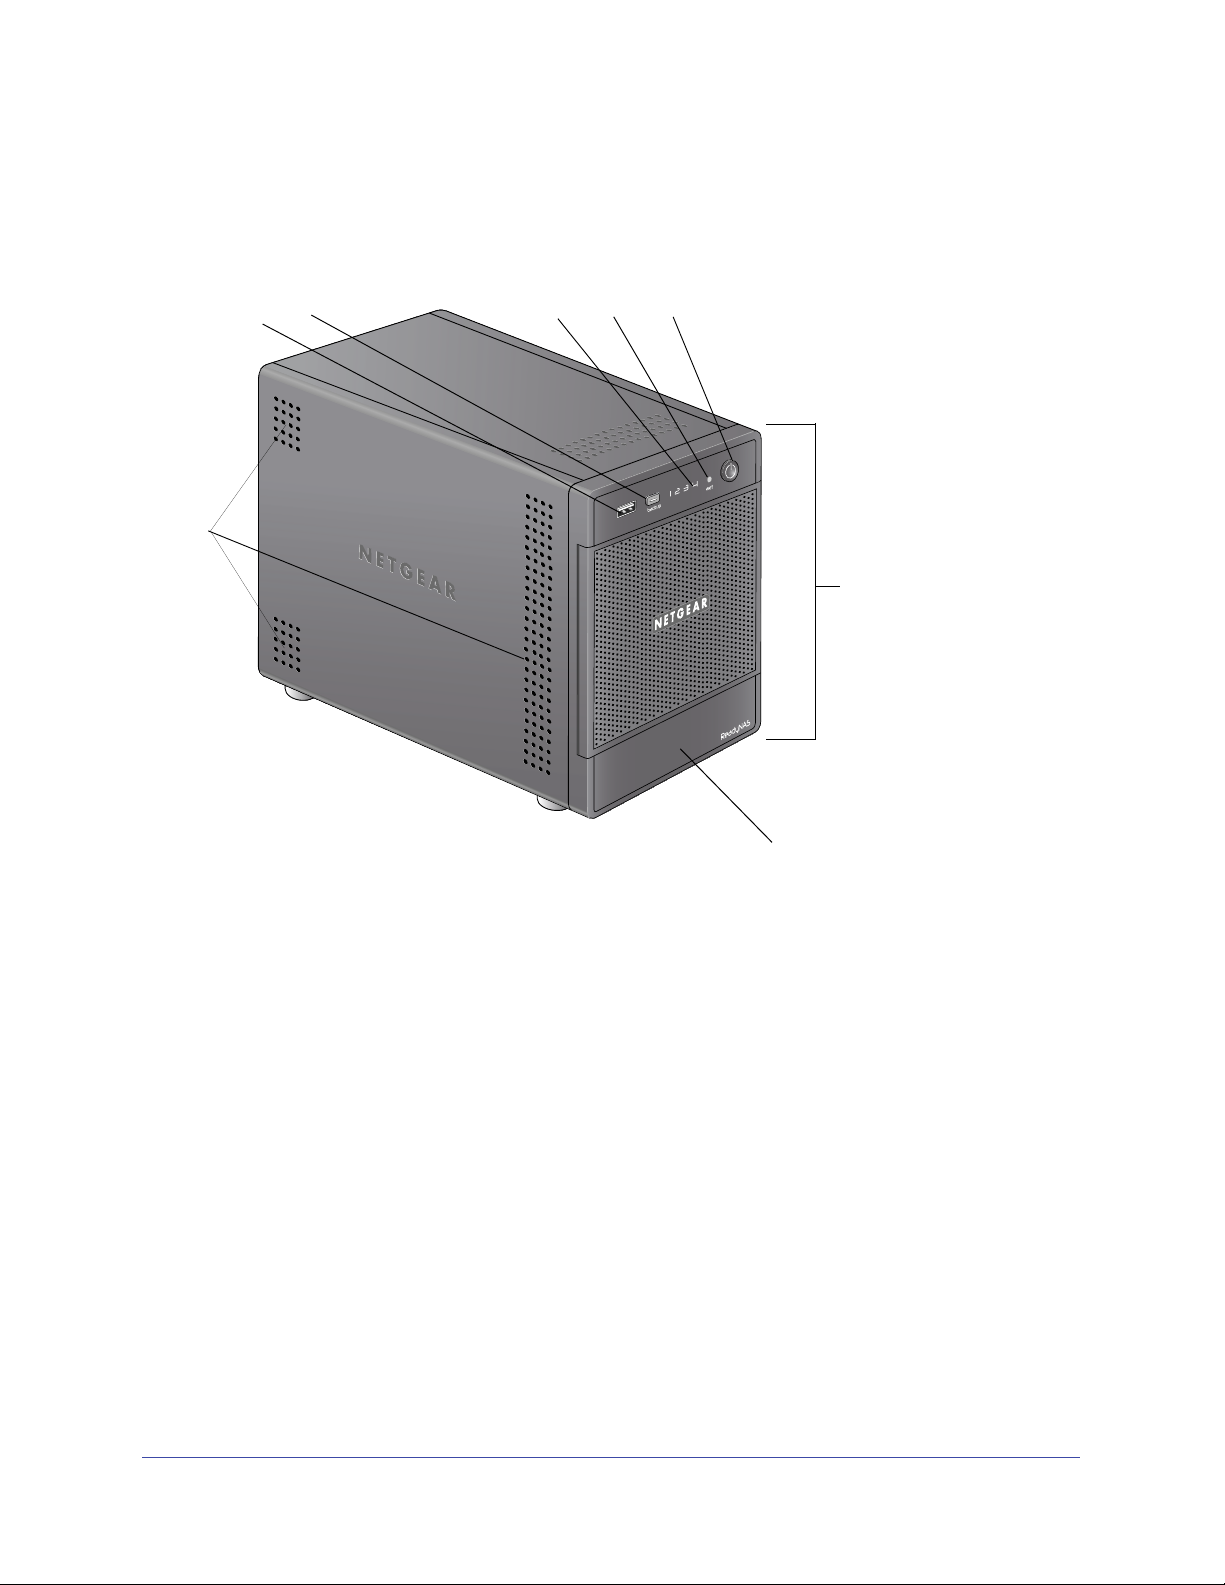
Panneaux avant et latéral
Le schéma suivant illustre les panneaux avant et latéral du ReadyNAS Duo v2.
Figure 1. Panneaux avant et latéral du ReadyNAS Duo v2
1. Bouton et voyant d'alimentation
2. Voyant d'activité du disque
3. Grille de ventilation
4. Port USB 2.0
5. Bouton de sauvegarde
6. Voyant d'état USB/sauvegarde
7. Voyants des disques 1 et 2
8. Porte de la baie du lecteur
ReadyNAS Duo v2
11
Page 12
ReadyNAS Duo v2 et NV+ v2
1
2
3
4
5
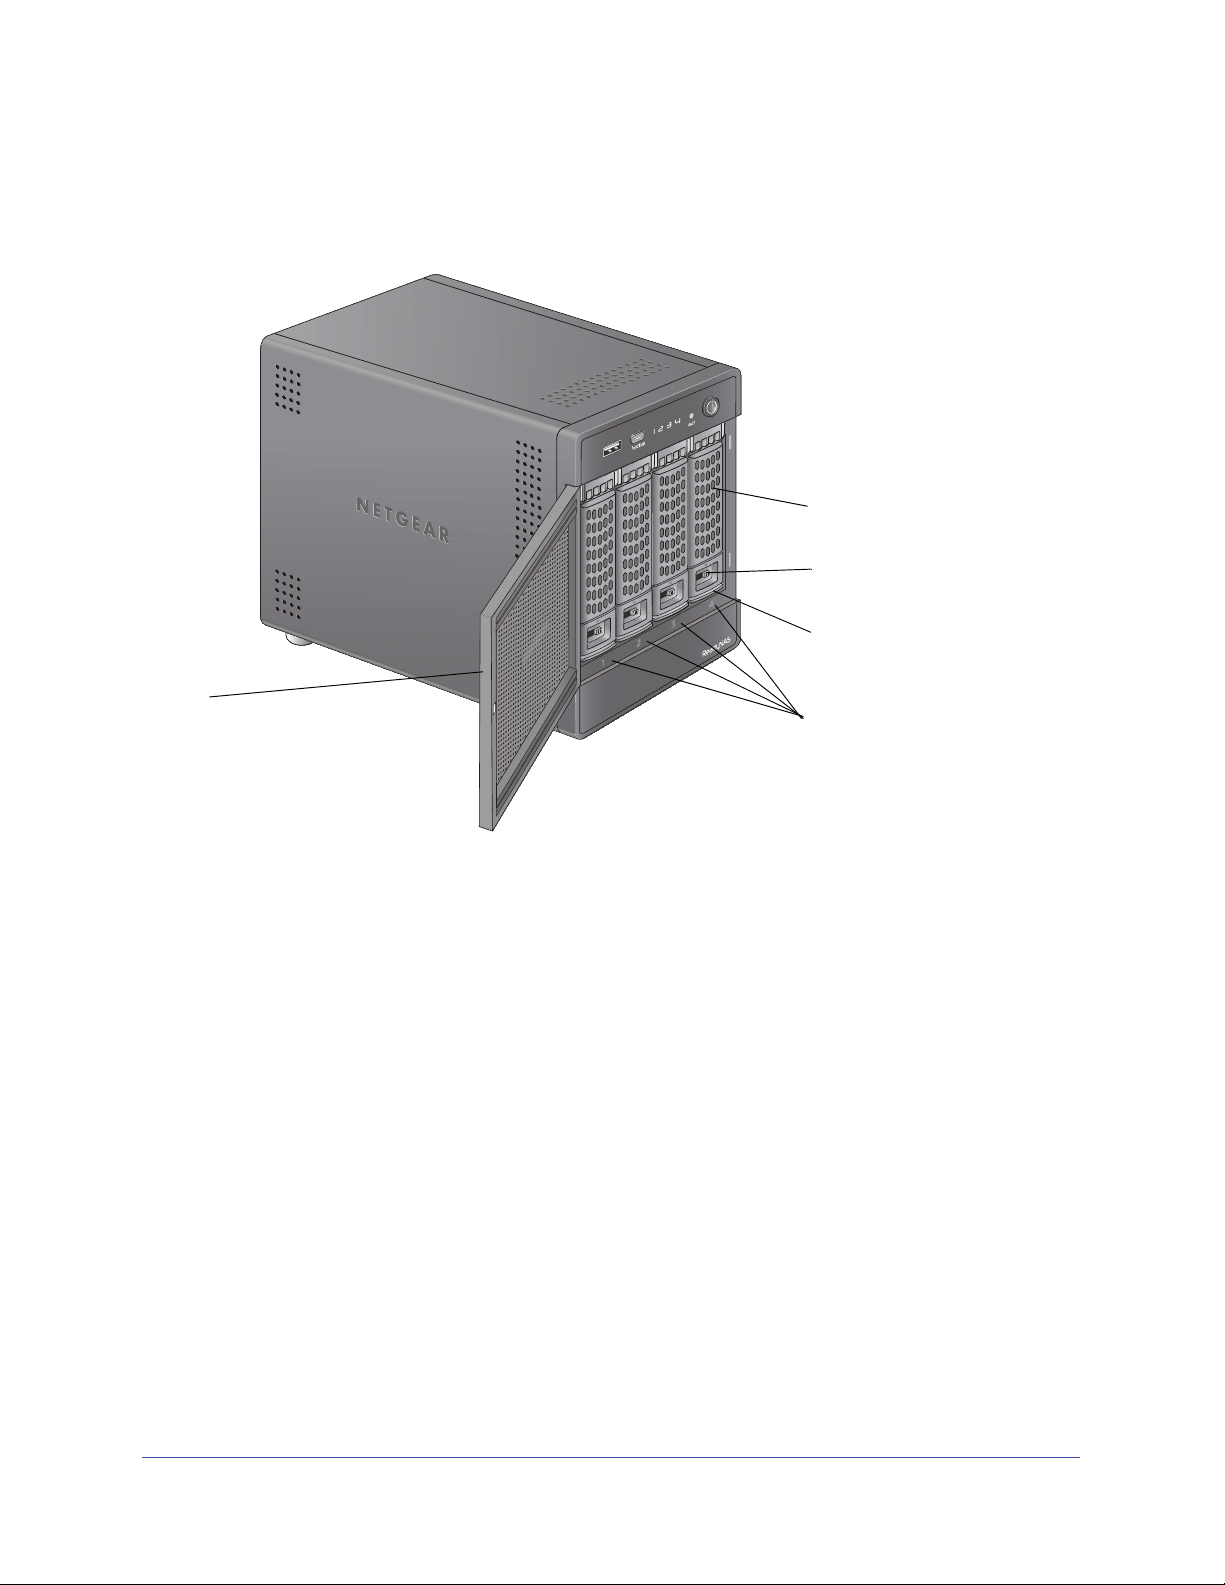
Baies de lecteur
Le schéma suivant illustre les baies de lecteur du ReadyNAS Duo v2.
Figure 2. Baies de lecteur du ReadyNAS Duo v2
1. Porte de la baie du lecteur
2. Poignée du tiroir disque
3. Mécanisme de verrouillage du tiroir disque encastré
4. Loquet de blocage du tiroir disque
5. Baies de lecteur
ReadyNAS Duo v2
12
Page 13
ReadyNAS Duo v2 et NV+ v2
1
2
3
4
5
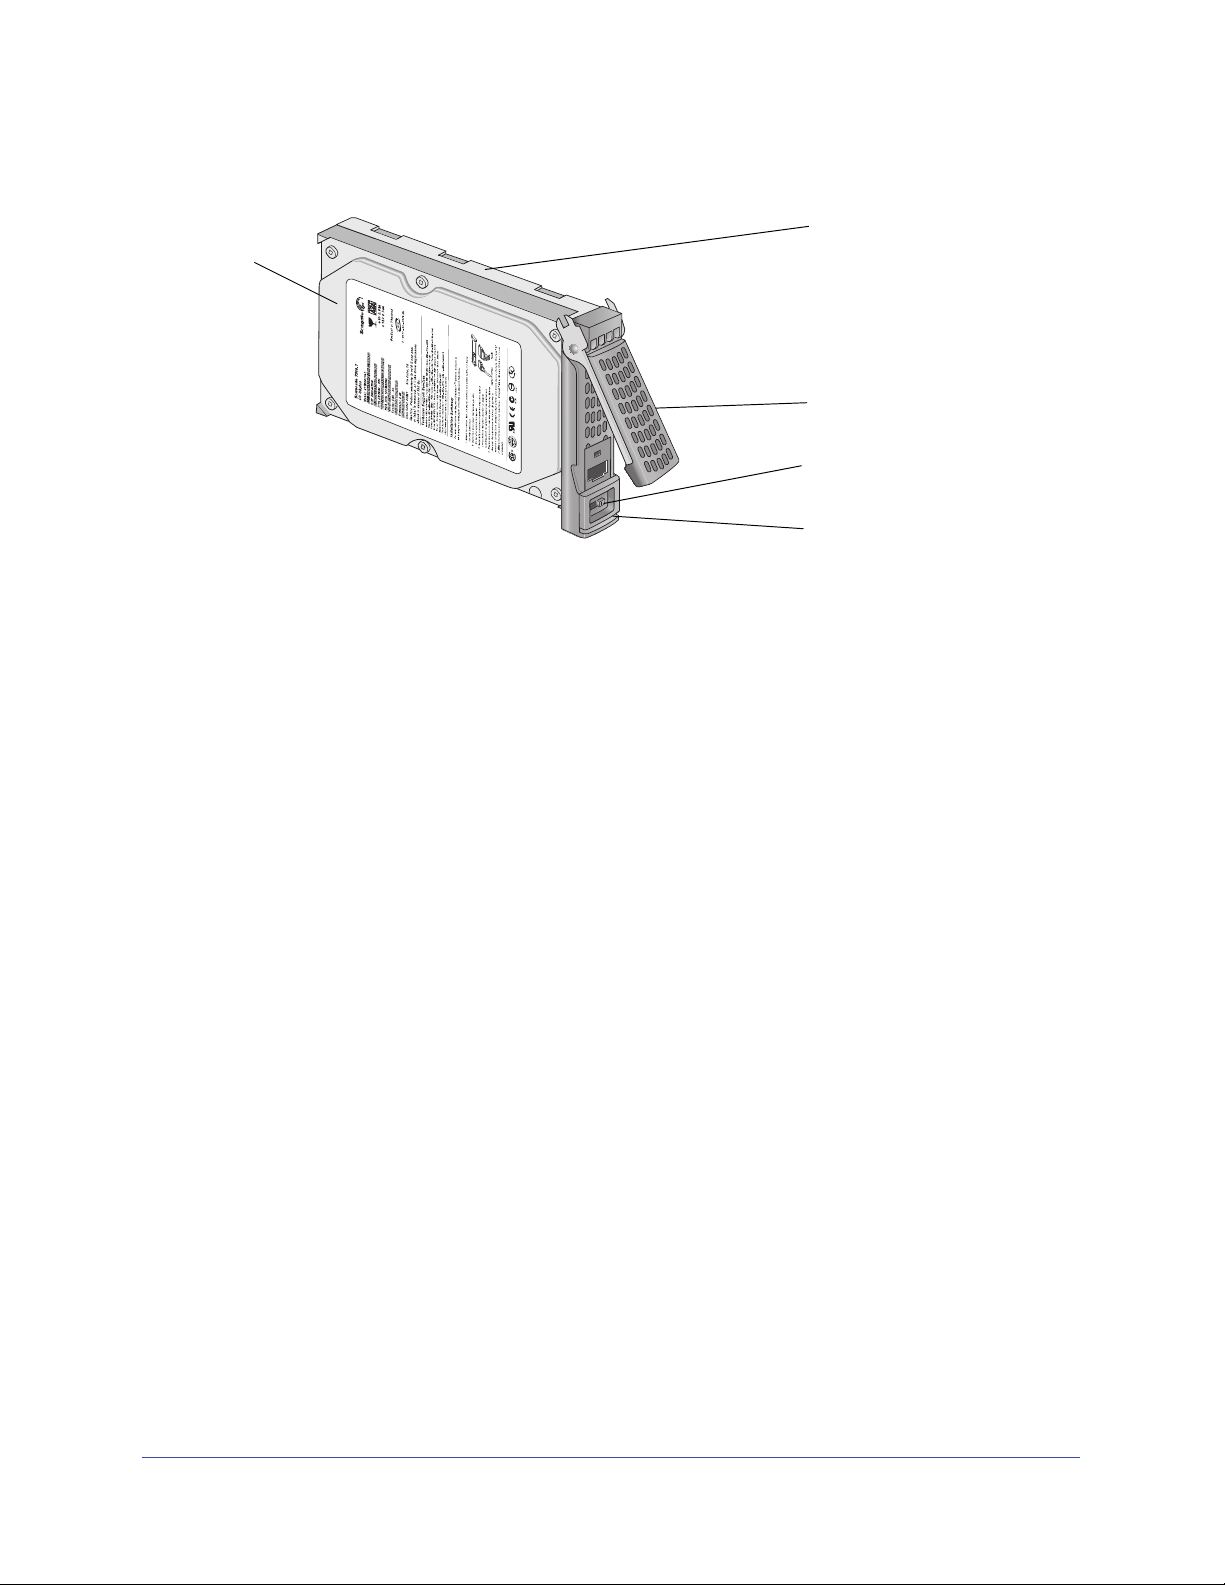
La figure suivante illustre un tiroir disque du ReadyNAS Duo v2.
Figure 3. Tiroir disque du ReadyNAS Duo v2
1. Disque dur
2. Tiroir disque
3. Poignée du tiroir disque
4. Mécanisme de verrouillage du tiroir disque encastré
5. Loquet de blocage du tiroir disque
ReadyNAS Duo v2
13
Page 14
ReadyNAS Duo v2 et NV+ v2
1
2
3
456
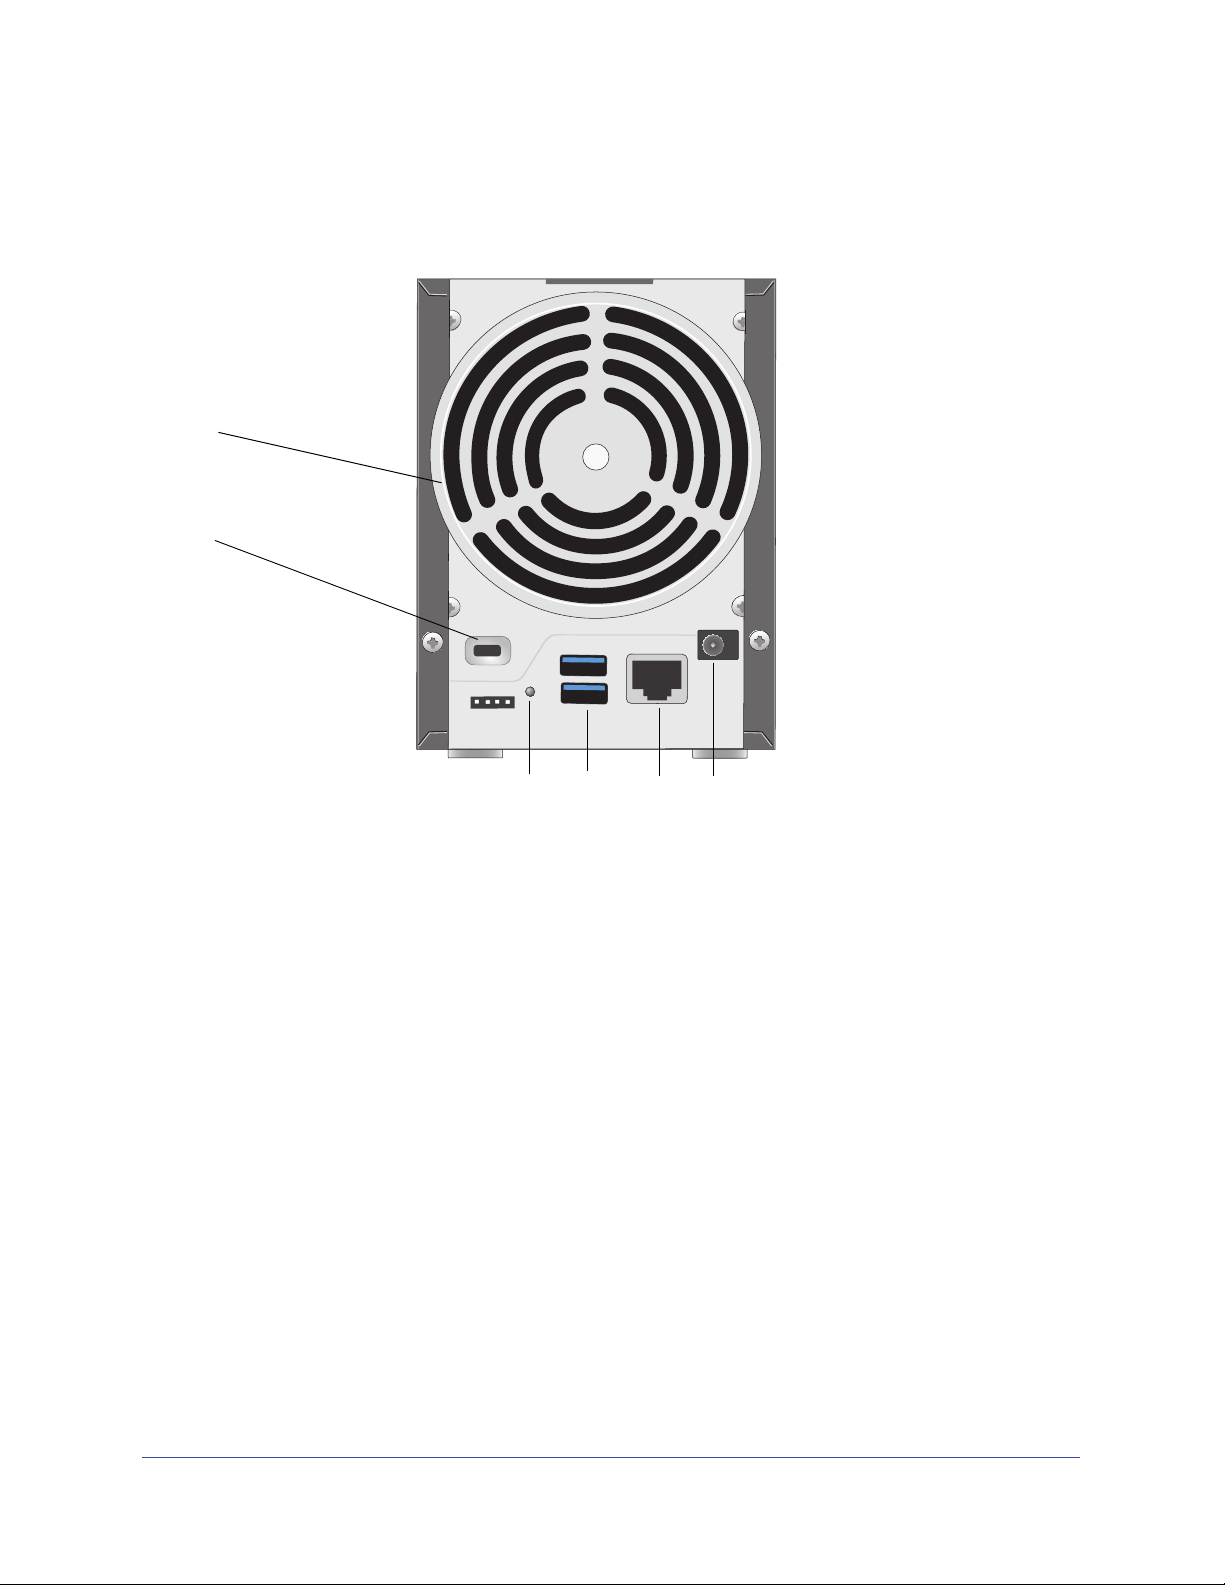
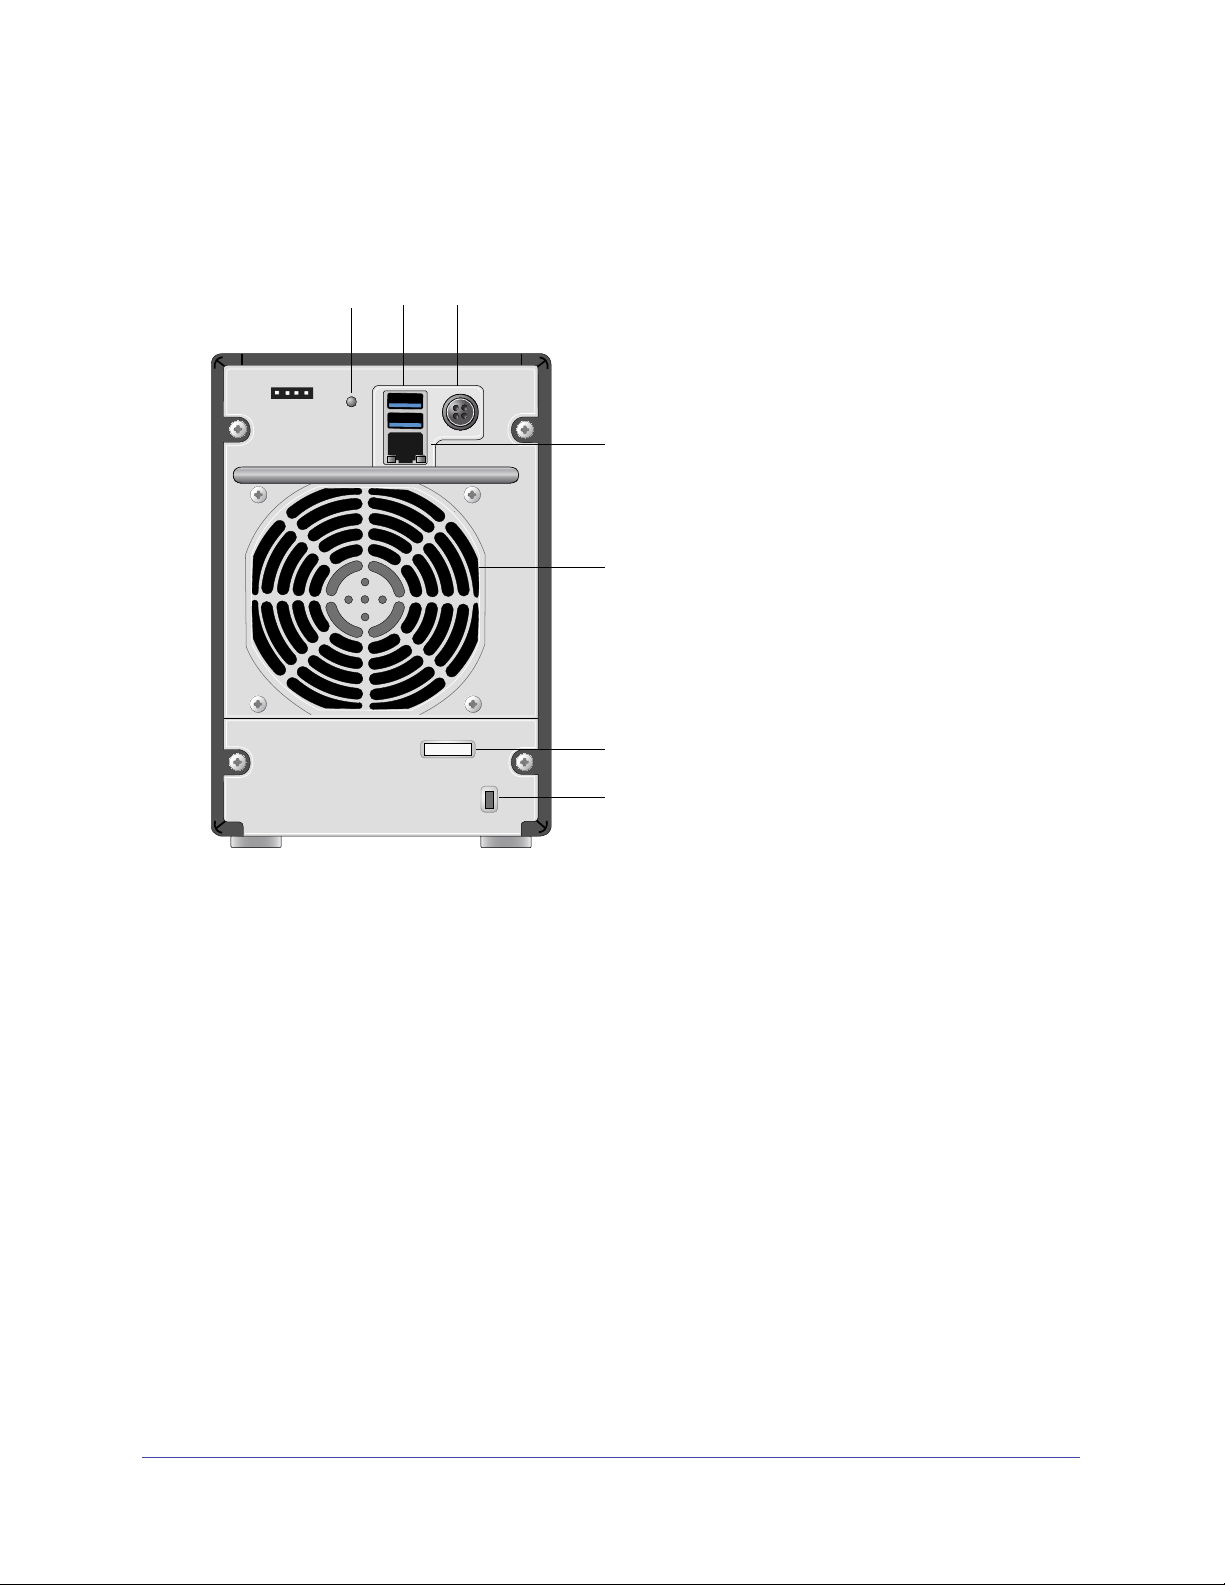
Panneau arrière
Le schéma suivant illustre le panneau arrière du ReadyNAS Duo v2.
Figure 4. Panneau arrière du ReadyNAS Duo v2
1. Grille de ventilation
2. Verrou de sécurité Kensington
3. Bouton de réinitialisation
4. Ports USB 3.0
5. Port 1 gigabit Ethernet avec voyants d'état
6. Prise de l'adaptateur secteur
ReadyNAS Duo v2
14
Page 15

ReadyNAS Duo v2 et NV+ v2
Informations d'état
Pour obtenir des informations sur l'état de votre unité, vous devez consulter le tableau
suivant dans lequel sont répertoriés les différents voyants.
Voyant Description
Bouton et voyant
d'alimentation
Voyants de disque (1, 2) Chaque baie de disque dispose d'un voyant qui lui est associé et qui est placé
Voyant d'activité du disque Les états du voyant d'activité du disque sont les suivants :
Voyants du port Ethernet
du panneau arrière
Appuyez sur ce bouton pour allumer le ReadyNAS. Les états de ce voyant sont
les suivants :
gnotant. En cours de démarrage ou d'arrêt
• Cli
• Allumé. Sous
• Eteint. Hors tension
anneau avant de l'unité. Les états des voyants de disque sont les
sur le p
suivants :
• Allumé. Le
gnotant. Le disque a été enlevé, est défaillant ou en cours de
• Cli
resynchronisation.
eint. La baie de disque est vide.
• Et
gnotant. Un disque est actif.
• Cli
eint. Aucun disque n'est actif.
• Et
Ce port intègre deux voyants d'état, l'un vert et l'autre orange. Ils indiquent la
vitesse et l'activité du port comme suit :
ert allumé, orange éteint. Vitesse de connexion de 1 000 Mbit/s, aucune
• V
activité
ert clignotant, orange éteint. Vitesse de connexion de 1 000 Mbit/s,
• V
activité
ert éteint, orange allumé. Vitesse de connexion de 10 Mbit/s ou
• V
100 Mbit/s, aucune activité
ert éteint, orange clignotant. Vitesse de connexion de 10 Mbit/s ou
• V
100 Mbit/s, aucune activité
ert éteint, orange éteint. Aucune connexion
• V
tension
disque est sous tension et fonctionne normalement.
Arrêt du système
Il existe plusieurs façons d'arrêter votre unité :
• Utilisatio
• Mé
• Arrêt forcé. Si l'unité
• Utilisatio
l'utilisation du tableau de bord de l'unité ReadyNAS pour arrêter votre Duo v2,
portez-vous au Guide du logiciel ReadyNAS RAIDiator 5.3 for Home, disponible
re
l'adresse http://www.readynas.com/documentation.
n du bouton d'alimentation
thode d'arrêt préférée : Appuyez deux fois sur le bouton d'alimentation pour un
arrêt en douceur.
ne répond pas, débranchez-la.
n du tableau de bord de l'unité ReadyNAS. Pour en savoir plus sur
ReadyNAS Duo v2
à
15
Page 16

ReadyNAS Duo v2 et NV+ v2
AVERTISSEMENT !
AVERTISSEMENT !
Menu de démarrage
Utilisez le menu de démarrage pour redémarrer ou dépanner votre unité ReadyNAS. Votre
unité dispose des modes de démarrage suivants :
• Normal (
l'aide du bouton d'alimentation.
• Fa
• OS reinstall (Réinstallation du système d'exploitation). Réinstalle le micrologiciel
• T
• Skip volume
ctory Default (Restaurer les valeurs par défaut). Lance un court test disque qui dure
approximativement 5 minutes et qui est suivi d'un délai d'attente de 10 minutes pour
RAIDar. Au cours de ces 10 minutes, le système peut être mis hors tension en toute
sécurité sans aucune perte de données. Une fois les 10 minutes écoulées ou si vous
sélectionnez l'option de restauration des valeurs par défaut pendant le délai d'attente de
RAIDar, la procédure de restauration peut commencer.
(firmware) sur les disques à partir de la mémoire flash interne. Utilisez le mode de
réinstallation du système d'exploitation lors du blocage du système et de la corruption de
certains fichiers de configuration. Le mode de démarrage par réinstallation du système
d'exploitation réinitialise certains paramètres de votre unité, comme les paramètres du
protocole Internet et le mot de passe de l'administrateur.
ech support (Support technique). Démarre en mode de diagnostic de bas niveau.
Utilisez le mode de démarrage avec support technique uniquement à la demande d'un
technicien du support technique NETGEAR.
bloqué, celui-ci essaie de détecter et de résoudre le problème sur le volume à l'aide de
l'outil de vérification système de fichiers. Si plusieurs erreurs sont trouvées sur le disque,
cette procédure peut se bloquer, empêchant le système de redémarrer. Utilisez cette
option pour ignorer le balayage et laisser le système redémarrer.
Normal). Lance une procédure de démarrage normal, comme un démarrage à
La procédure de redémarrage pour la restauration des paramètres
par défaut réinitialise l'unité, supprime toutes les données, rétablit
tous les paramètres par défaut et reformate le disque en X-RAID2.
check (Ne pas effectuer le contrôle du volume). Une fois le système
Utilisez le mode de démarrage par ignorance de l'outil de vérification
du volume uniquement à la demande d'un technicien du support
technique NETGEAR, sinon vous risquez de subir une perte de
données.
• Memory test (Test mémoire). Réalise un test mémoire. La réussite ou l'échec du test
mémoire est indiqué(e) à l'aide des voyants de l'unité. Contactez un technicien du
support technique NETGEAR pour interpréter les résultats du test mémoire.
• Disk test (T
prendre jusqu'à 4 heures en fonction de la taille de vos disques. Les problèmes sont
reportés dans l'outil de recherche RAIDar.
est disque). Réalise un test disque complet hors ligne. Cette procédure peut
ReadyNAS Duo v2
16
Page 17
ReadyNAS Duo v2 et NV+ v2
Pour accéder au menu de démarrage :
1. Mettez votre unité hors tension.
2. Au moyen d'un trombone déplié
, appuyez sur le bouton de réinitialisation et maintenez-le
enfoncé.
3. Appuye
z sur le bouton d'alimentation pour remettre l'unité sous tension.
4. Cont
inuez d'appuyer sur le bouton de réinitialisation jusqu'à ce que le voyant du bouton
d'alimentation, le voyant d'état USB/sauvegarde, le voyant du disque 1 et celui du disque 2
soient allumés.
5. Appuye
z sur le bouton de sauvegarde pour sélectionner les différents modes de
démarrage.
L'unité affiche les options du mode de déma
rrage à l'aide des voyants, comme décrit
dans le tableau suivant :
Mode de
démarrage
Normal Le voyant d'alimentation est allumé.
Factory Default
estaurer les
(R
valeurs par défaut)
OS reinstall
éinstallation du
(R
système
d'exploitation)
Description Voy ant
Le voyant du disque 1 est allumé.
Le voyant du disque 2 est allumé.
Voyant d'état
d'alimentation
Voyant du
disque 1
Voyant du
disque 2
Voy ant
USB/
sauvegarde
Tech support
pport technique)
(Su
Skip volume check
(Ne pas effectuer le
contrôle du volume)
Memory test
(Test mémoire)
Disk test
(Test disque)
Le voyant d'état USB/sauvegarde est
allumé.
Le voyant d'alimentation et le voyant
du disque 1 sont allumés.
Le voyant d'alimentation et le voyant
sque 2 sont allumés.
du di
Le voyant d'alimentation et le voyant
d'
état USB/sauvegarde sont allumés.
Légende :
• Allu
• Etein
mé :
t :
6. Appuyez et relâchez le bouton de réinitialisation pour confirmer la sélection de votre menu
de démarrage.
Le système démarre dans le mode de démarrage sélectionné.
ReadyNAS Duo v2
17
Page 18

3. ReadyNASNV+v2
Ce chapitre présente les caractéristiques physiques du ReadyNAS NV+ v2. Il est composé des
sections suivantes :
• Panneaux avant et latéral
• Baies de lecteur
• Panneau arrière
• Informations d'état
• Arrêt du système
• Menu de démarrage
3
18
Page 19
ReadyNAS Duo v2 et NV+ v2
1
7
23 4 5 6
8
Panneaux avant et latéral
Le schéma suivant illustre les panneaux avant et latéral du ReadyNAS NV+ v2.
Figure 5. Panneaux avant et latéral du ReadyNAS NV+ v2
1. Grilles de ventilation
2. Port USB 2.0
3. Bouton et voyant de sauvegarde
4. Voyants de disque
5. Voyant d'activité du disque
6. Bouton et voyant d'alimentation
7. Porte de la baie du lecteur
8. Ecran d'affichage de l'état
ReadyNAS NV+ v2
19
Page 20
ReadyNAS Duo v2 et NV+ v2
1
2
3
4
5
Baies de lecteur
Le schéma suivant illustre les baies de lecteur du ReadyNAS NV+ v2.
Figure 6. Baie de lecteur du ReadyNAS NV+ v2
1. Porte de la baie du lecteur
2. Poignée du tiroir disque
3. Mécanisme de verrouillage du tiroir disque encastré
4. Loquet de blocage du tiroir disque
5. Baies de lecteur
ReadyNAS NV+ v2
20
Page 21

ReadyNAS Duo v2 et NV+ v2
1
2
3
4
5
La figure suivante illustre un tiroir disque du ReadyNAS NV+ v2.
Figure 7. Tiroir disque du ReadyNAS NV+ v2
1. Disque dur
2. Tiroir disque
3. Poignée du tiroir disque
4. Mécanisme de verrouillage du tiroir disque encastré
5. Loquet de blocage du tiroir disque
ReadyNAS NV+ v2
21
Page 22
ReadyNAS Duo v2 et NV+ v2
123
4
5
6
7
Panneau arrière
Le schéma suivant illustre le panneau arrière du ReadyNAS NV+ v2.
Figure 8. Panneau arrière du ReadyNAS NV+ v2
1. Bouton de réinitialisation
2. Ports USB 3.0
3. Prise du cordon d'alimentation
4. Port 1 gigabit Ethernet avec voyants d'état
5. Grille de ventilation
6. Serre-câble
7. Verrou de sécurité Kensington
ReadyNAS NV+ v2
22
Page 23

ReadyNAS Duo v2 et NV+ v2
Informations d'état
Pour obtenir des informations sur l'état de votre unité, vous devez consulter le tableau suivant
dans lequel sont répertoriés les différents voyants.
Voyant Description
Bouton et voyant
d'alimentation
Voyants de disque
(1, 2, 3, 4)
Voyant d'activité du disque Les états du voyant d'activité du disque sont les suivants :
Voyants du port Ethernet
anneau arrière
du p
Appuyez sur ce bouton pour allumer le ReadyNAS. Les états de ce voyant sont
les suivants :
gnotant. En cours de démarrage ou d'arrêt
• Cli
• Allumé. Sous
• Eteint. Hors tension
Chaque baie de disque dispose d'un voyant qui lui est associé et qui est placé
panneau avant de l'unité. Les états des voyants de disque sont les suivants :
sur le
• Allumé. Le
gnotant. Le disque a été enlevé, est défaillant ou en cours de
• Cli
resynchronisation.
eint. La baie de disque est vide.
• Et
gnotant. Un disque est actif.
• Cli
• Eteint. Aucun disque n'est actif.
Ce port intègre deux voyants d'état, l'un vert et l'autre orange. Ils indiquent la
vitesse et l'activité du port comme suit :
ert allumé, orange éteint. Vitesse de connexion de 1 000 Mbit/s, aucune
• V
activité
ert clignotant, orange éteint. Vitesse de connexion de 1 000 Mbit/s,
• V
activité
ert éteint, orange allumé. Vitesse de connexion de 10 Mbit/s ou
• V
100 Mbit/s, aucune activité
ert éteint, orange clignotant. Vitesse de connexion de 10 Mbit/s ou
• V
100 Mbit/s, aucune activité
ert éteint, orange éteint. Aucune connexion
• V
tension
disque est sous tension et fonctionne normalement.
Arrêt du système
Il existe plusieurs façons d'arrêter votre unité :
• Utilisatio
• Mé
• Arrêt forcé. Si l'unité
• Utilisation du t
du tableau de bord de l'unité ReadyNAS pour arrêter votre NV+ v2, reportez-vous au
Guide du logiciel ReadyNAS RAIDiator 5.3 for Home,
http://www.readynas.com/documentation.
n du bouton d'alimentation
thode d'arrêt préférée : Appuyez deux fois sur le bouton d'alimentation pour un
arrêt en douceur.
ne répond pas, débranchez-la.
ableau de bord de l'unité ReadyNAS. Pour en savoir plus sur l'utilisation
ReadyNAS NV+ v2
disponible à l'adresse
23
Page 24
ReadyNAS Duo v2 et NV+ v2
AVERTISSEMENT !
AVERTISSEMENT !
Menu de démarrage
Utilisez le menu de démarrage pour redémarrer ou dépanner votre unité ReadyNAS. Votre
unité dispose des modes de démarrage suivants :
• Normal (
l'aide du bouton d'alimentation.
• Fa
• OS reinstall (Réinstallation du système d'exploitation). Réinstalle le micrologiciel
• T
• Skip volume
ctory Default (Restaurer les valeurs par défaut). Lance un court test disque qui dure
approximativement 5 minutes et qui est suivi d'un délai d'attente de 10 minutes pour
RAIDar. Au cours de ces 10 minutes, le système peut être mis hors tension en toute
sécurité sans aucune perte de données. Une fois les 10 minutes écoulées ou si vous
sélectionnez l'option de restauration des valeurs par défaut pendant le délai d'attente de
RAIDar, la procédure de restauration peut commencer.
(firmware) sur les disques à partir de la mémoire flash interne. Utilisez le mode de
réinstallation du système d'exploitation lors du blocage du système et de la corruption de
certains fichiers de configuration. Le mode de démarrage par réinstallation du système
d'exploitation réinitialise certains paramètres de votre unité, comme les paramètres du
protocole Internet et le mot de passe de l'administrateur.
ech support (Support technique). Démarre en mode de diagnostic de bas niveau.
Utilisez le mode de démarrage avec support technique uniquement à la demande d'un
technicien du support technique NETGEAR.
bloqué, celui-ci essaie de détecter et de résoudre le problème sur le volume à l'aide de
l'outil de vérification système de fichiers. Si plusieurs erreurs sont trouvées sur le disque,
cette procédure peut se bloquer, empêchant le système de redémarrer. Utilisez cette
option pour ignorer le balayage et laisser le système redémarrer.
Normal). Lance une procédure de démarrage normal, comme un démarrage à
La procédure de redémarrage pour la restauration des paramètres
par défaut réinitialise l'unité, supprime toutes les données, rétablit
tous les paramètres par défaut et reformate le disque en X-RAID2.
check (Ne pas effectuer le contrôle du volume). Une fois le système
Utilisez le mode de démarrage par ignorance de l'outil de vérification
du volume uniquement à la demande d'un technicien du support
technique NETGEAR, sinon vous risquez de subir une perte de
données.
• Memory test (Test mémoire). Réalise un test mémoire. La réussite ou l'échec du test
mémoire est indiqué(e) à l'aide des voyants de l'unité. Contactez un technicien du
support technique NETGEAR pour interpréter les résultats du test mémoire.
• Disk test (T
prendre jusqu'à 4 heures en fonction de la taille de vos disques. Les problèmes sont
reportés dans l'outil de recherche RAIDar.
est disque). Réalise un test disque complet hors ligne. Cette procédure peut
ReadyNAS NV+ v2
24
Page 25

ReadyNAS Duo v2 et NV+ v2
Pour accéder au menu de démarrage :
1. Mettez votre unité hors tension.
2. Au moyen d'un tro
mbone déplié, appuyez sur le bouton de réinitialisation et
maintenez-le enfoncé.
3. App
uyez sur le bouton d'alimentation pour remettre l'unité sous tension.
4. Main
tenez le bouton de réinitialisation enfoncé jusqu'à ce que l'écran d'affichage de
l'état affiche un message du menu de démarrage.
5. App
uyez sur le bouton de sauvegarde pour sélectionner les différents modes de
démarrage.
L'écran d'affichage de l'état affiche l'option de mode de démarrage sélectionnée.
orsque l'écran d'affichage de l'état affiche le mode de démarrage de votre choix,
6. L
appuyez sur le bouton de réinitialisation, puis relâchez-le pour confirmer le choix du
menu de démarrage.
Le système démarre dans le mode de démarrage sélectionné.
ReadyNAS NV+ v2
25
Page 26

4. Disques
Utilisez uniquement des disques pris en charge dans votre système de stockage ReadyNAS. Si
vous utilisez des disques non pris en charge, le support technique NETGEAR ne pourra pas
vous fournir d'assistance. Pour obtenir la liste des disques pris en charge, consultez la liste de
compatibilité matérielle NETGEAR à l'adresse http://www.readynas.com/hard_disk_hcl.
Pour en savoir plus sur la configuration des disques de votre système de stockage ReadyNAS,
reportez-vo
http://www.readynas.com/documentation.
Ce chapitre aborde les sujets suivants :
• Disques préalablement formatés
• Ajout d'un disque
• Notification d'un disque défaillant
• Remplacement d'un disque
us au Guide du logiciel ReadyNAS RAIDiator 5.3 for Home, disponible à l'adresse
4
26
Page 27

ReadyNAS Duo v2 et NV+ v2
Disques préalablement formatés
Vous devez prendre certaines précautions lorsque vous utilisez des disques préalablement
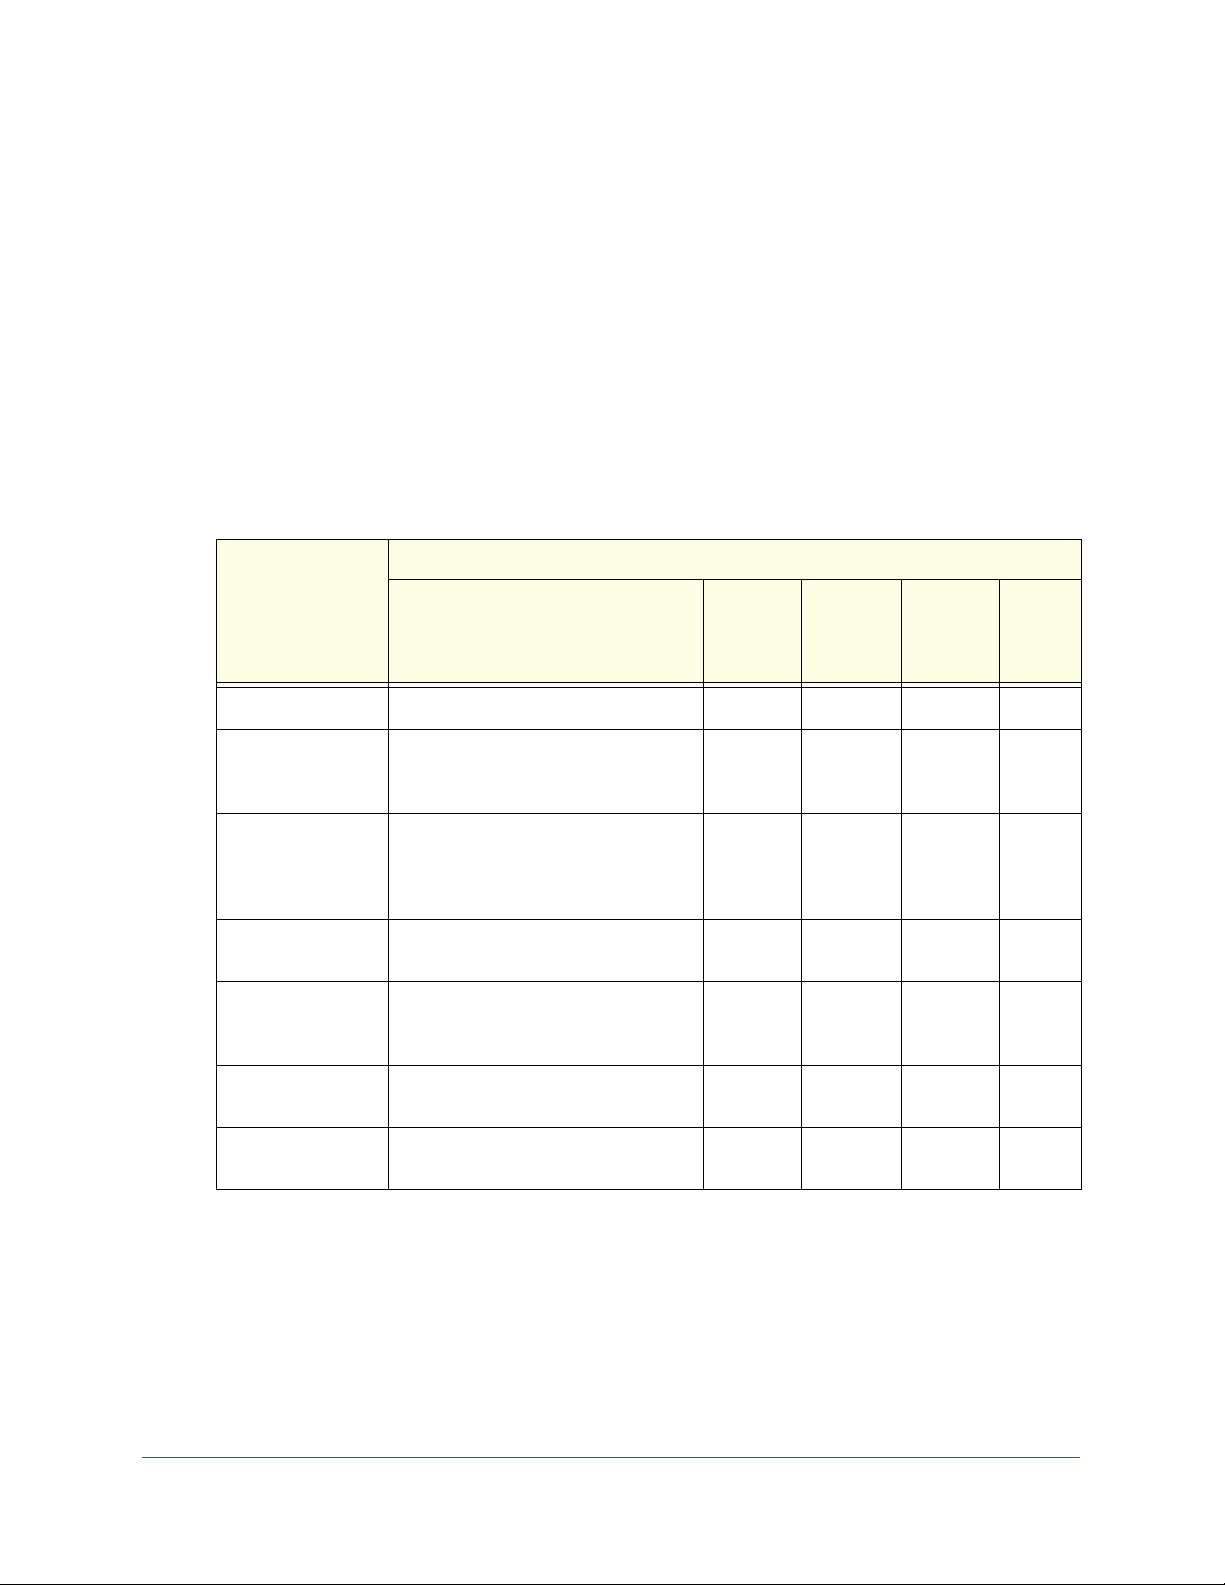
formatés dans votre unité ReadyNAS, comme décrit au tableau suivant.
Tableau 1. Précautions relatives à l'utilisation de disques préalablement formatés
Etat de l'unité Précaution
L'unité ReadyNAS n'a pas de
e (unité sans disque).
disqu
L'unité ReadyNAS fonctionne
avec un ou pl
usieurs disques
Eteignez l'unité, puis insérez le disque comme décrit à la section Unités
sans disque à la page 8. Effectuez ensuite une réinitialisation des
paramètres par défaut, comme décrit dans la section Menu de démarrage à
la page 16.
Remarque : cette procédure efface toutes les données et formate le disque
au format X-RAID2
disque, vous devez les déplacer vers un lecteur externe avant d'utiliser le
disque préalablement formaté dans votre unité ReadyNAS.
Vous ne pouvez pas utiliser de disque préalablement formaté dans votre
té sans suivre cette procédure. Par exemple, si vous essayez d'utiliser
uni
un disque qui a été formaté pour un Duo v1, un NV+ v1 ou un système
d'exploitation Windows, RAIDar affiche un message d'erreur « Racine
corrompue ».
Une fois l'unité allumée, insérez le disque dans une baie de disque vide,
comme décrit à la section Ajout d'un disque à la page 28. L'unité formate
automatiquement le disque au même format que vos disques existants.
Remarque : cette procédure efface toutes les données présentes sur le
ue préalablement formaté. Si vous voulez conserver les données
disq
présentes sur le disque, vous devez les déplacer vers un lecteur externe
avant d'utiliser le disque préalablement formaté dans votre unité
ReadyNAS.
. Si vous voulez conserver les données présentes sur le
Les disques préalablement formatés doivent figurer dans la liste de compatibilité matérielle
NETGEAR, d
isponible à l'adresse http://www.readynas.com/hard_disk_hcl.
Disques
27
Page 28
ReadyNAS Duo v2 et NV+ v2
Ajout d'un disque
Vous pouvez ajouter un disque dur à une baie de lecteur vide. Il n'est pas nécessaire
d'éteindre votre unité pour ajouter un disque.
Si vous ajoutez des disques préalablement formatés à votre Duo v2, NV+ v2, consultez les
précautions à
Pour ajouter un disque :
prendre à la section Disques préalablement formatés à la p
age 27.
1. Appuyez sur le loquet de blocag
Celui-ci se déverrouille automatiquement.
2. Retirez le tiroir disque,
à l'aide des vis fournies avec votre unité.
placez le nouveau disque sur le tiroir, puis fixez le disque au tiroir
e du tiroir disque.
Assurez-vous que les connecteurs du disque dur son
de disque.
Disques
28
t orientés vers l'intérieur de la baie
Page 29
ReadyNAS Duo v2 et NV+ v2
AVERTISSEMENT !
3. Remettez le tiroir dans l'unité et appuyez sur la poignée pour verrouiller le disque.
Le volume se synchronise automatiquement avec le nou
Ce processus peut prendre plusieurs heures, selon la taille des disques. Vous pouvez
continuer d'utiliser l'unité ReadyNAS, cependant l'accès sera plus lent jusqu'à ce que le
volume ait fini la synchronisation. Une fois ce processus terminé, vous recevez une
notification par courriel.
Si vous ajoutez des disques à un
ReadyNAS RAIDiator 5.3 for Home, dispo
http://www.readynas.com/documentation, pour p
RAIDar pour détecter votre unité sur votre réseau local la première fois.
e unité sans disque, reportez-vous au Guide du logiciel
nible à l'adresse
lus d'informations sur l'utilisation de
veau disque en tâche de fond.
Notification d'un disque défaillant
En cas de défaillance d'un disque, un courriel de notification vous est envoyé. Les alertes par
courriel doivent être configurées de façon à ce que des notifications soient envoyées. Par
ailleurs, le tableau de bord de l'unité ReadyNAS vous fournit des informations sur le disque
défaillant.
NETGEAR vous conseille de remplacer le disque d
Utilisez le tableau de bord de l'unité ReadyNAS pour déterminer le fournisseur et le modèle
du disque utilisé dans votre unité.
Pour en savoir plus sur la configuration des alertes par courriel et l'utilisation du tableau de
b
ord de l'unité ReadyNAS, reportez-vous au Guide du logiciel ReadyNAS RAIDiator 5.3 for
Home, dispo
nible à l'adresse http://www.readynas.com/documentation.
éfaillant par un disque de même modèle.
Quel que soit le nombre de disques durs installés, tous les tiroirs
disque doivent rester dans les baies de lecteur pour maintenir une
circulation d'air adéquate.
Disques
29
Page 30

ReadyNAS Duo v2 et NV+ v2
Remplacement d'un disque
Dans le cas d'un disque défaillant, l'unité émet des alertes par courriel et des messages
d'état sur la nécessité de remplacer le disque. ReadyNAS prend en charge les baies
remplaçables à chaud. Il n'est donc pas nécessaire de l'éteindre en cas de remplacement
d'un disque.
Si vous remplacez le disque par un disque préala
d'utilisation de la section Disques préalablement formatés à
Pour remplacer un disque :
1. Appuyez sur le loquet d
e blocage du tiroir disque.
blement formaté, consultez les précautions
la page 27.
Celui-ci se déverrouille automatiquement.
Disques
30
Page 31

ReadyNAS Duo v2 et NV+ v2
1
23
2. Retirez le tiroir disque, puis remplacez le disque.
1. Disque dur
2. Tiroir disque vide
3. Tiroir disque assemblé
Assurez-vous que les connecteurs du disque dur sont orientés vers l'intérieur de la baie
e disque.
d
3. Remettez
Le volume se synchronise automatiquement avec le nou
le tiroir dans l'unité et appuyez sur la poignée pour verrouiller le disque.
veau disque en tâche de fond.
Ce processus peut prendre plusieurs heures, selon la taille des disques. Vous pouvez
continuer d'utiliser l'unité ReadyNAS, cependant l'accès sera plus lent jusqu'à ce que le
volume ait fini la synchronisation. Une fois ce processus terminé, vous recevez une
notification par courriel.
Disques
31
Page 32

A Paramètres par défaut et caractéristiques
techniques
Cette annexe est composée des sections suivantes :
• Paramètres par défaut
• Caractéristiques techniques Duo v2
• Caractéristiques techniques NV+ v2
A
32
Page 33
ReadyNAS Duo v2 et NV+ v2
Paramètres par défaut
Le tableau suivant détaille les paramètres par défaut des systèmes de stockage ReadyNAS
Duo v2 et NV+ v2.
Fonction Par défaut
Identifiant de connexion
Adresse de connexion pour l'utilisateur si
le ReadyNAS n'est pas connecté à un
serveur DHCP
Nom d'utilisateur admin (sensible à la
casse)
Mot de passe admin (sensible à la casse) password
Gestion
Configuration du système Contrôle de l'état et de la co
Utilitaire de découverte, de contrôle de
état sur plusieurs unités et de formatage
l'
RAID
Connexions réseau local
Adresse MAC Voir l'étiquette sur le produit
Taille du MTU 1 500
Port Ethernet RJ-45 10/100/1000BASE-T à détection automatique
Adresse IP du réseau local DHCP acquis
https://192.168.168.168/admin
admin
nfiguration via un navigateur
avec le tableau de bord ReadyNAS
RAIDar pour Windows, Mac et Linux
Paramètres par défaut et caractéristiques techniques
33
Page 34

ReadyNAS Duo v2 et NV+ v2
Caractéristiques techniques Duo v2
Le système de stockage ReadyNAS Duo v2 répond aux caractéristiques techniques
suivantes :
Général :
tockage à 2 baies
• S
• Processeur monocœur Marve
• 25
• Un po
• Un po
• Deux port
• X-RAID2
Dimensions (H x L x P) :
• 14
• 5,6
Poids physique :
• 2,0
Consommation électrique :
• S
• Ina
6 Mo DDR3
rt 1 gigabit Ethernet
rt USB 2.0 (avant)
s USB 3.0 (arrière)
2 x 101 x 220 mm
0 x 3,98 x 8,70 pouces
7 kg sans disques
tandard : 24,2 W (avec 2 disques de 1 To actifs)
ctif : 21,3 W
ll
Données électriques :
• Entré
Données thermiques :
• V
• Ale
Conformité environnementale :
• De 0
• De 20
• Conformité FCC, UL, CE, RoHS
e : CC 12,0 V, 5A
entilateur de refroidissement du châssis de 92 mm contrôlé par logiciel
rte par courriel de température élevée avec arrêt automatique
à 40 °C
% à 80 % d'humidité (sans condensation)
Paramètres par défaut et caractéristiques techniques
, C-tick, VCCI, CCC, KCC
34
Page 35

ReadyNAS Duo v2 et NV+ v2
Caractéristiques techniques NV+ v2
Le système de stockage ReadyNAS NV+ v2 répond aux caractéristiques techniques
suivantes :
Général :
• S
tockage à 4 baies
• Proce
• 256 Mo DDR3
sseur monocœur Marvell
• Un port 1
• Un port USB 2.0
• Deux
• X-RA
Dimensions (H x L x P) :
• 170 x 250
• 6,70
Poids physique :
• 6,7 kg sans d
Consommation électrique
tandard : 48,4 W (avec 4 disques de 1 To actifs)
• S
• Inactif :
Données électriques :
• Entrée :
gigabit Ethernet
(avant)
ports USB 3.0 (arrière)
ID2
x 285 mm
x 10,00 x 11,20 pouces
isques
41,1 W
CC 12,0 V, 5A
Données thermiques :
entilateur de refroidissement du châssis de 92 mm contrôlé par logiciel
• V
• Alerte
Conformité environnementale :
• De 0 à 4
• De 20 %
• Conformité
par courriel de température élevée avec arrêt automatique
0 °C
à 80 % d'humidité (sans condensation)
FCC, UL, CE, RoHS, C-tick, VCCI, CCC, KCC
Paramètres par défaut et caractéristiques techniques
35
Page 36

ReadyNAS Duo v2 et NV+ v2
DANGER :
Avertissement de sécurité
1. Installez la prise de courant à proximité de l'équipement dans un emplacement
facilement accessible.
2. Respectez les précautions relatives à la batterie embarquée.
RISQUE D'EXPLOSION SI LA BATTERIE EST REMPLACEE PAR UN
TYPE INCORRECT. POUR JETER LES ANCIENNES BATTERIES,
VEUILLEZ SUIVRE LA PROCEDURE DETAILLEE DANS LES
INSTRUCTIONS.
3. Connectez les unités et les connexions au réseau local uniquement au matériel situé dans
le même bâtiment.
Précautions de sécurité électrique
Respectez les précautions de sécurité électrique élémentaires pour vous protéger contre
toute blessure et pour protéger le ReadyNAS contre tout dégât :
• Repé
• Débra
• Utilisez u
• N'utilisez
• Utilisez u
rez les emplacements du bouton d'alimentation sur le châssis ainsi que du bouton
d'alimentation d'urgence de la salle, du bouton de mise hors tension ou de la prise
électrique. En cas d'accident électrique, vous pourrez alors rapidement couper
l'alimentation du système.
nchez toujours l'alimentation du système lorsque vous retirez ou installez des
composants du système principal, notamment la carte mère ou les modules de mémoire.
Lorsque vous débranchez l'alimentation, mettez d'abord le système qui exécute le
système d'exploitation hors tension, puis débranchez les cordons d'alimentation de toutes
les unités d'alimentation du système.
ne seule main lorsque vous travaillez sur du matériel électrique sous tension,
cela en vue d'éviter de créer un circuit complet, qui provoquerait un choc électrique.
Soyez extrêmement vigilant lorsque vous utilisez des outils métalliques car ils peuvent
facilement endommager les composants électriques ou circuits intégrés s'ils entrent en
contact avec eux.
pas de tapis conçus pour réduire la décharge d'électricité statique en tant que
protection contre les chocs électriques. Utilisez plutôt les tapis en caoutchouc qui ont été
spécifiquement conçus pour servir d'isolants électriques.
niquement des cordons d'alimentation qui comportent une prise de mise à la
terre et raccordez-les à des prises électriques avec terre.
Paramètres par défaut et caractéristiques techniques
36
Page 37

ReadyNAS Duo v2 et NV+ v2
DANGER :
Précautions générales de sécurité
Suivez ces règles pour garantir la sécurité générale :
• Mainten
• Reporte
davantage de détails sur votre unité ReadyNAS spécifique.
• Remplace
de batterie recommandé par le fabriquant. Pour jeter les anciennes batteries, veuillez
suivre la procédure détaillée dans les instructions du fabricant.
• Fusibles soudés remplaçables de la carte mère : les fusibles à coefficient positif de
température auto-réinitialisables sur la carte mère ne doivent être remplacés que par des
techniciens de maintenance dûment formés. Les nouveaux fusibles devront être
identiques ou équivalents à ceux que vous devez remplacer. Contactez le service
d'assistance pour plus d'informations et pour obtenir de l'aide.
ez la zone autour du ReadyNAS propre et dégagée.
z-vous aux caractéristiques techniques contenues dans ce manuel pour obtenir
z la batterie embarquée uniquement par une batterie identique ou par un type
Si vous installez la batterie en sens inverse, vous inversez ses polarités
et encourez un risque d'explosion.
Précautions relatives à la décharge électrostatique (DES)
La décharge électrostatique se produit lorsque deux objets de charge
électrique différente entrent en contact. Une décharge électrique se crée
pour neutraliser cette différence, ce qui peut endommager les composants
lectriques et les circuits imprimés. Les mesures suivantes suffisent
é
généralement à neutraliser cette différence avant que le contact se fasse
afin de protéger votre matériel contre une décharge électrostatique :
• utilisez un bracelet antist
• con
• touchez un ob
• n
• man
• lorsque vous manip
• remettez
• afin
servez tous les composants et les circuits imprimés dans leurs sacs antistatiques
jusqu'à ce qu'ils soient prêts à l'utilisation ;
jet métallique relié à la terre avant de retirer la carte du sac antistatique ;
e laissez pas des composants ou circuits imprimés entrer en contact avec vos vêtements,
car ceux-ci peuvent contenir une charge, même si vous portez un bracelet antistatique ;
ipulez une carte uniquement par les bords ; ne touchez pas ses composants, les
puces périphériques, les modules de mémoire ou les contacts ;
la carte mère et les périphériques dans leurs sacs antistatiques lorsque vous ne
les utilisez pas ;
d'assurer la mise à la terre, vérifiez que le châssis de votre ordinateur fournit une
excellente conductivité entre l'alimentation, le boîtier, les systèmes d'attache de montage
et la carte mère.
atique conçu pour empêcher les décharges d'électricité statique ;
ulez des puces ou des modules, évitez tout contact avec les broches ;
Paramètres par défaut et caractéristiques techniques
37
Page 38

B Notification de conformité
Informations relatives à la conformité légale
B
Cette section comprend les exigences relatives à l'utilisa
les lois nationales portant sur l'utilisation du spectre des radiofréquences et le fonctionnement
des périphériques sans fil. Le non-respect par l'utilisateur des exigences applicables peut entraîner
une utilisation illégale et l'engagement de poursuites judiciaires par les autorités nationales
compétentes.
Le micrologiciel (firmware) de ce produit limite son fo
une région ou un pays particulier. En conséquence, certaines options répertoriées dans le guide
de l'utilisateur peuvent être inactives dans votre version du produit.
Exigences de la FCC pour le fon
Informations de la FCC à destination des utilisateurs
Aucun composant de ce produit ne peut être réparé par l'utilisateur. Ce produit doit
uniquement être utilisé avec des antennes agréées. Toute modification apportée au produit
invalide les normes et certificats légaux applicables.
Cet appareil est conforme à l'article 15 de la réglementation de la FCC. Son fonctionnement
st soumis aux deux conditions suivantes : (1) cet appareil ne produit pas d'interférences
e
nuisibles, et (2) cet appareil doit accepter toute interférence reçue, notamment celles qui
peuvent entraîner un fonctionnement non souhaité.
Directives de la FCC en matière d'exposition
ctionnement aux Etats-Unis
tion de ce produit en conformité avec
nctionnement aux canaux autorisés dans
Cet équipement est conforme aux limites d'exposition aux radiations de la FCC définies pour
un environnement non contrôlé. Lorsque vous installez et utilisez l'équipement, laissez une
distance minimale de 20 cm entre l'élément rayonnant et vous.
Ce transmetteur ne doit pas être colocalisé ni fonctionner avec d'autres antennes ou
tra
nsmetteurs.
38
Page 39

ReadyNAS Duo v2 et NV+ v2
Déclaration de conformité de la FCC
Nous, NETGEAR, Inc., 350 East Plumeria Drive, San Jose, CA 95134, Etats-Unis, déclarons
(et assumons l'entière responsabilité de cette déclaration) que les appareils NETGEAR
ReadyNAS Duo v2 et NV+ v2 sont conformes à la section 15 des règles de la FCC.
Le fonctionnement est soumis aux deu
• Ce prod
• Cet app
uit ne risque pas de causer des interférences électromagnétiques nuisibles, et
areil doit accepter toute interférence reçue, notamment celles qui peuvent
x conditions suivantes :
entraîner un fonctionnement non souhaité.
Instructions et avertissements de la FCC relatifs aux interférences radioélectriques
Cet appareil a été testé et certifié conforme aux restrictions pour les appareils numériques de
Classe B, conformément à l'article 15 de la réglementation de la FCC. Ces restrictions visent
à garantir une protection suffisante contre les interférences nuisibles dans une installation à
domicile. Cet appareil utilise des fréquences radio et peut en diffuser. S'il n'est pas installé et
utilisé conformément aux instructions, il peut provoquer des interférences nuisibles aux
communications radio. Cependant, il se peut que des interférences se produisent dans une
installation particulière.
Pour déterminer si cet appareil produit des interférences nuisibles à la réception de la radio
u de la télévision, éteignez puis rallumez l'appareil. Le cas échéant, nous vous
o
recommandons de suivre les instructions ci-dessous pour éliminer les interférences :
• Réorie
• Eloignez davant
• Branchez l'app
ntez l'antenne de réception.
age l'appareil du récepteur.
areil sur un circuit électrique différent de celui sur lequel le récepteur radio
est branché.
• Consu
ltez le vendeur ou un technicien expérimenté pour obtenir de l'assistance.
Toute modification apportée au produit, excepté dans le
cas où elle a été expressément
approuvée par NETGEAR, Inc., peut engendrer l'annulation du droit de l'utilisateur à utiliser
l'appareil.
Réglementation sur les interférences radio du Département canadien des
communicatio
Les appareils numériques NETGEAR ReadyNAS Duo v2 et NV+ v2 respecte
ns
nt les restrictions
des émissions radio destinées aux appareils numériques de Classe B établies par la réglementation
canadienne sur les interférences radio.
Notification de conformité
39
Page 40

Union européenne
ReadyNAS Duo v2 et NV+ v2
Les appareils NETGEAR ReadyNAS Duo v2 et NV+ v2 son
t conformes avec les exigences
essentielles de la directive relative à la compatibilité électromagnétique 2004/108/EC de l'UE et
de la directive basse tension 2006/95/EC. Cette conformité a été démontrée en appliquant les
méthodes et normes de test suivantes :
• EN5502
• EN5502
• EN6095
• EN 610
• EN 610
2 : 2006 / A1 : 2007
4 : 1998 / A1 : 2001 / A2 : 2003
0-1 : 2005 2e édition
00-3-2 2006
00-3-3 1995 avec A1 : 2001 + A2 : 2005
Notification de conformité
40
Page 41

Index
A
alertes par courriel 29
arrêt du système
Duo v2 15
NV+ v2 23
arrêt en douceur
Duo v2
NV+ v2
arrêt forcé
Duo v2
NV+ v2 23
assistance technique
avertissement de sécurité 36
15, 23
15
23
15
2
B
baie du lecteur
Duo v2 12
20
NV+ v2
batterie 36
C
caractéristiques techniques
Duo v2 34
35
NV+ v2
configuration requise
conformité
38
7
disques préalablement formatés
disques pris en charge 26
27
E
emplacement d'installation 7
emplacement de l'unité
emplacement, unité 7
état du système
15
Duo v2
NV+ v2
état, système
Duo v2
NV+ v2 23
23
15
7
F
FCC 38
I
informations d'état
15
Duo v2
NV+ v2 23
L
liste de compatibilité matérielle 7, 26, 27
D
décharge électrostatique 37
déclaration de conformité 39
dépannage à l'aide du menu de démarrage
16
Duo v2
24
NV+ v2
DES 37
disque
28
ajout
défaillance
préalablement formaté
pris en charge
remplacement
disque défaillant
29
27
26
30
29
M
marques commerciales 2
menu de démarrage
16
Duo v2
NV+ v2
méthode d'arrêt, préférée
Duo v2
NV+ v2
24
15
23
N
NV+ v2 18
41
Page 42

P
panneau arrière
14
Duo v2
NV+ v2 22
panneau avant
11
Duo v2
NV+ v2 19
panneau latéral
11
Duo v2
19
NV+ v2
paramètres par défaut
33
Duo v2
NV+ v2 33
prise de courant
36
S
sécurité 36, 37
sécurité électrique 36
sécurité générale
synchronisation du volume
37
ReadyNAS Duo v2 et NV+ v2
9, 29, 31
T
tiroir disque
13
Duo v2
NV+ v2 21
U
unités sans disque 8, 27
V
voyants
15
Duo v2
NV+ v2 23
42
Page 43

NETGEAR ReadyNAS
Duo User Guide
NETGEAR, Inc.
4500 Great America Parkway
Santa Clara, CA 95054 USA
202-10366-01
v1.1
April 2008
Page 44

© 2008 by NETGEAR, Inc. All rights reserved.
Technical Support
Registration on the website or over the phone is required before you can use our telephone support service. The phone
numbers for worldwide regional customer support centers are on the Warranty and Support Information card that came
with your product.
Go to http://kbserver.netgear.com for product updates and Web support.
Trademarks
NETGEAR, the NETGEAR logo, ReadyNAS, X-RAID, FrontView, RAIDar, RAIDiator , Networ k Storage Processor,
and NSP are trademarks or registered trademarks of NETGEAR, Inc. Microsoft, Windows, Windows NT and Vista are
registered trademarks of Microsoft Corporation. Other brand and product names are registered trademarks or trademarks
of their respective holders.
Statement of Conditions
In the interest of improving internal design, operational function, and/or reliability, NETGEAR reserves the right to
make changes to the products described in this document without notice.
NETGEAR does not assume any liability that may occur due to the use or application of the product(s) or circuit
layout(s) described herein.
Certificate of the Manufacturer/Importer
It is hereby certified that the ReadyNAS Duo has been suppressed in accordance with the conditions set out in the
BMPT-AmtsblVfg 243/1991 and Vfg 46/1992. The operation of some equipment (for example, test transmitters) in
accordance with the regulations may, however , be subject to certain restricti ons. Please refer to the notes in the operating
instructions.
The Federal Office for Telecommunications Approvals has been notified of the placing of this equipment on the market
and has been granted the right to test the series for compliance with the regulations.
Bestätigung des Herstellers/Importeurs
Es wird hiermit bestätigt, daß dasReadyNAS Duo gemäß der im BMPT-AmtsblVfg 243/1991 und Vfg 46/1992
aufgeführten Bestimmungen entstört ist. Das vorschriftsmäßige Betreiben einiger Geräte (z.B. Testsender) kann jedoch
gewissen Beschränkungen unterliegen. Lesen Sie dazu bitte die Anmerkungen in der Betriebsanleitung.
Das Bundesamt für Zulassungen in der Telekommunikation wurde davon unterrichtet, daß dieses Gerät auf den Markt
gebracht wurde und es ist berechtigt, die Serie auf die Erfüllung der Vorschriften hin zu überprüfen.
Voluntary Control Council for Interference (VCCI) Statement
This equipment is in the Class B category (information equipment to be used in a residential area or an adjacent area
thereto) and conforms to the standards set by the Voluntary Control Council for Interference by Data Processing
Equipment and Electronic Office Machines aimed at preventing radio interference in such residential areas. When used
near a radio or TV receiver, it may become the cause of radio interference. Read instructions for correct handling.
ii
v1.1, April 2008
Page 45

Product and Publication Details
Model Number:
Publication Date: April 2008
Product Family: Network Storage
Product Name: ReadyNAS Duo
Home or Business Product: Home
Language: English
Publication Part Number: 202-10366-01
Publication Version Number: 1.1
v1.1, April 2008
iii
Page 46

iv
v1.1, April 2008
Page 47

Contents
NETGEAR ReadyNAS Duo User Guide
About This Manual
Conventions, Formats, and Scope .................................................................................... x
How to Use This Manual .................................................................................................. xi
How to Print This Manual ................................................................................................. xi
Revision History ..................... ... ... .... ... ... ... ....................................... ... .... ... ... ... ... ..............xii
Chapter 1
Configuring Your ReadyNAS Duo
Setting Up Your Network Connection .............................................................................1-2
Ethernet Interface Settings ........................................ ... ... .... ... ... ... ............................1-2
Global Network Settings ............................ ... ....................................... ... ... ... .... ... ... ..1-4
Setting Up Security ................................... .... ..................................................................1-6
Admin Password ......................................................................................................1-6
Setting Up User and Group Accounts ......................................................................1-7
Selecting Services for Share Access ............................................................................1-11
Standard File Protocols ... ... ... .... ... ... ... ....................................... ... .... ... ... ... ... .... ... ...1-11
Streaming Services ................................................................................................1-13
Discovery Services .................................................................................................1-15
Installed AddOns ....................................................................................................1-15
Understanding V olume Management ...........................................................................1-20
Volume Management for X-RAID ...........................................................................1-20
USB Storage ................................................ ... ....................................... ... ... .... ... ...1-22
Managing Your Shares .............................................................. ... ... ... .... ... ... ................1-24
Adding Shares .................................... .... ... ... ... ... ....................................... ... .... ... ...1-24
Managing Shares ............ ... ... .... ...................................... .... ... ... ... .... ... ...................1-25
USB Shares ............. .... ...................................... .... ... ... ... .... ... ................................1-31
Configuring Backup Jobs ..............................................................................................1-32
Adding a New Backup Job ..................... ... .............................................................1-33
Viewing the Backup Schedule ................................................................................1-38
v1.1, April 2008
v
Page 48

NETGEAR ReadyNAS Duo User Guide
Programming the Backup Button ........................................ ... ... ... .... ... ... ... ... .... ... ...1-39
Viewing the Backup Log .........................................................................................1-39
Editing a Backup Job .............................................................................................1-40
Setting Up Printers ...... ... ..............................................................................................1-40
Print Shares over CIFS/SMB ....... ... ... .... ... ... ... ... .... ... ... ....................................... ...1-40
IPP Printing ............................................... ... ... ... .... ...................................... .... ... ...1-41
Managing Print Queues ............ ... ... ....................................... ... ... .... ... ... ................1-41
Managing Your ReadyNAS Duo System ............................................................ .... ... ...1-42
Clock ......................................................................................................................1-42
Alerts ............................................ ....................................................................... ...1-43
Performance ................................. ...... ....... ... ...... ....... ...... ....... ...... ....... ...... ....... ......1-45
Language ............................................................................................................... 1-48
Updating ReadyNAS Duo .................. .... ... ... ..........................................................1-49
Power Management ...............................................................................................1-51
Shutdown ............................................................................................................... 1-53
Chapter 2
Accessing Shares from Your Operating System
Windows .........................................................................................................................2-1
MAC OS X ......................................................................................................................2-2
AFP over Bonjour .....................................................................................................2-3
AFP over AppleTalk ..................................................................................................2-4
MAC OS 9 ......................................................................................................................2-6
Linux/Unix ................................. ............................................. .........................................2-7
Web Browser ............................................................ ....................................... ... .... ... ... ..2-8
FTP/FTPS ........................... ............. ............. ............ ............. ............. ............. .............2-1 1
Rsync .............................. ............. .......... ............. ............. ............. ............. ............. ......2-12
Networked DVD Players and UPnP AV Media Adapters ..............................................2-13
Chapter 3
Maintenance and Administration
Viewing System St atus ...................................................................................................3-1
Health ................................. ................................ ................................. ..................... 3-1
Logs .........................................................................................................................3-2
Replacing a Failed Disk ............................ .... ..................................................................3-3
Ordering a Replacement Disk ..................................................................................3-3
Replacing a Failed Disk on the ReadyNAS Duo ....................................... ...............3-3
vi Contents
v1.1, April 2008
Page 49

NETGEAR ReadyNAS Duo User Guide
Resynchronizing the Volume ..........................................................................................3-5
Resetting Your System (System Switch) ........................................................................3-5
Changing User Passwords .............................................................................................3-6
Appendix A
ReadyNAS Duo Glossary
Appendix B
General Glossary
Index
Contents vii
v1.1, April 2008
Page 50

NETGEAR ReadyNAS Duo User Guide
viii Contents
v1.1, April 2008
Page 51

About This Manual
Congratulations on your purchase of a ReadyNAS™ Duo from NETGEAR, Inc. If you have not
already done so, please read the printed Installation Guide provided with your product and the
ReadyNAS Setup Manual on the Installation CD.
The ReadyNAS Setup Manual takes you step-by-step through the Setup Wizard and quickly
prepares the ReadyNAS Duo for your network. The NETGEAR® ReadyNAS Duo User Guide
explains each of the available options in detail, including many of the advanced options not
described during the Setup Wizard process. The manual includes:
Chapter 1, “Configuring Your ReadyNAS Duo,” describes all the menus and tabs available in the
FrontView Advanced Control mode.
Chapter 2, “Accessing Shares from Your Operating System.” If you have already configured the
ReadyNAS Duo and you need help in accessing the shares on the ReadyNAS Duo, skip to this
chapter.
Chapter 3, “Maintenance and Administration”:
• If a disk fails, learn about the proper procedure for replacing the failed disk in “Replacing a
Failed Disk.”
• If you need to reinstall the firmware or reset the system back to the factory default
configuration, see “Resetting Your System (System Switch)” for an explanation of both.
• “Changing User Passwords” covers users other than administrators can access FrontView to
change their password.
Appendix A, “ReadyNAS Duo Glossary,” covers questions on what constitutes a valid input for
hostname, workgroup, or password.
Appendix B, “General Glossary,” provides definitions for some of the technical terminologies
used in this document.
v1.1, April 2008
ix
Page 52
NETGEAR ReadyNAS Duo User Guide
Conventions, Formats, and Scope
The conventions, formats, and scope of this manual are described in the following paragraphs:
• Typographical Conventions. This manual uses the following typographical conventions:
Italic Emphasis, books, CDs, file and server names, extensions
Bold User input, IP addresses, GUI screen text
Fixed Command prompts, CLI text, code
italic URL links
• Formats. This manual uses the following formats to highlight special messages:
Note: This format is used to highlight information of importance or special interest.
Tip: This format is used to highlight a procedure that will save time or resources.
Warning: Ignoring this type of note might result in a malfunction or damage to the
equipment.
Danger: This is a safety warning. Failure to take heed of this notice might result in
personal injury or death.
• Scope. This manual is written for the ReadyNAS Duo according to these specifications:
Product Version 1.1
Manual Publication Date April 2008
x About This Manual
v1.1, April 2008
Page 53

NETGEAR ReadyNAS Duo User Guide
How to Use This Manual
The HTML version of this manual includes the following:
• Buttons, and , for browsing forward or backward through the manual one page
at a time.
• A button that displays the table of contents and a button that displays an index.
Double-click on a link in the table of contents or index to navigate directly to where the topic
is described in the manual.
• A button to access the full NETGEAR, Inc. online knowledge base for the product
model.
• Links to PDF versions of the full manual and individual chapters.
How to Print This Manual
To print this manual, you can choose one of the following options, according to your needs.
• Printing a page from HTML. Each page in the HTML version of the manual is dedicated to
a major topic. Select File > Print from the browser menu to print the page contents.
• Printing from PDF. Your computer must have the free Adobe Acrobat Reader installed for
you to view and print PDF files. The Acrobat Reader is available on the Adobe website at
http://www.adobe.com.
– Printing a PDF chapter. Use the PDF of This Chapter link at the top left of any page.
• Click the PDF of This Chapter link at the top left of any page in the chapter you want
to print. The PDF version of the chapter you were viewing opens in a browser
window.
• Click the print icon in the upper left corner of your browser window.
– Printing a PDF version of the complete manual. Use the Complete PDF Manual link
at the top left of any page.
• Click the Complete PDF Manual link at the top left of any page in the manual. The
PDF version of the complete manual opens in a browser window.
About This Manual xi
v1.1, April 2008
Page 54

NETGEAR ReadyNAS Duo User Guide
• Click the print icon in the upper left corner of your browser window.
Tip: If your printer supports printing two pages on a single sheet of paper, you can
save paper and printer ink by selecting this feature.
Revision History
Part Number
202-10336-01 1.0 Feb. 2008 First publication
202-103336-01 1.1 April 2008 Documentation modifications
Version
Number
Date Description
xii About This Manual
v1.1, April 2008
Page 55

Chapter 1
Configuring Your ReadyNAS Duo
The Advanced Control mode shows all of the settings available in the Setup Wizard plus some
more advanced features. The basic network settings and other, optional, more advanced features
are included in this chapter.
Figure 1-1
When you first switch to this mode, you see the menus on the left that allow you to quickly jump to
the screen you want.
As you click the menu buttons, you notice a similar theme across all screens. At the top right
corner is the command bar that typically provides options to return to the Home screen, refresh the
browser window, display Help where available, or to log out of this session. For security reasons,
Logout acts only as a reminder to close the current browser session, which is necessary to securely
log out.
,.
Figure 1-2
1-1
v1.1, April 2008
Page 56

NETGEAR ReadyNAS Duo User Guide
Toward the bottom left, there are two buttons that allow you to switch back and forth between the
Setup Wizard mode and the Advanced Control mode. At the bottom of the screen is the status bar
including the date button on the left which, which clicked, links you to the Clock screen. The
status lights to the right give a quick glimpse of the system device status.
Figure 1-3
Move the mouse pointer over the status light to display device information, or click a status light to
display the status in more detail. Above the Status Lights is the Apply button. Use this to save any
changes on the current screen.
You can access your Network settings by selecting Network from the main menu. From the
Network menu, you can then navigate to your basic network settings screens such as Interfaces,
Global Settings, WINS and DHCP.
Setting Up Your Network Connection
This section allows you to refine your local network interface settings as well as your global
settings that allow access to your workgroup and share folders.
Ethernet Interface Settings
Select Network > Interfaces, and then select the Ethernet tab. From this screen you can specify
your network interface-specific settings.
In the Standard Setting section, you can specify the IP address, network mask, speed/duplex
mode, and MTU settings. In most networks where a DHCP server is enabled, you can simply
specify the Use values from a DHCP server option to automatically set the IP address and
network mask.
1-2 Configuring Your ReadyNAS Duo
v1.1, April 2008
Page 57

NETGEAR ReadyNAS Duo User Guide
Figure 1-4
• IP Assignment. Select either Use values from a DHCP server or Use values below.
– If you elect to assign the IP address using Use values from a DHCP server, NETGEAR
advises that you set the lease time on the DHCP server/router to a value of at least a day.
Otherwise, you might notice that the ReadyNAS Duo IP address changes even when
ReadyNAS Duo has been powered down for only a few minutes. Most DHCP servers
allow you to assign a static IP address for specified MAC addresses. If you have this
option, this would be a good way to ensure your ReadyNAS Duo maintains the same IP
address even in DHCP mode.
– If you assign a static IP address by selecting Use values below, be aware that the browser
will lose connection to the ReadyNAS Duo device after the IP address has been changed.
To reconnect after assigning a static IP address, open RAIDar and click Rescan to locate
the device, and then reconnect.
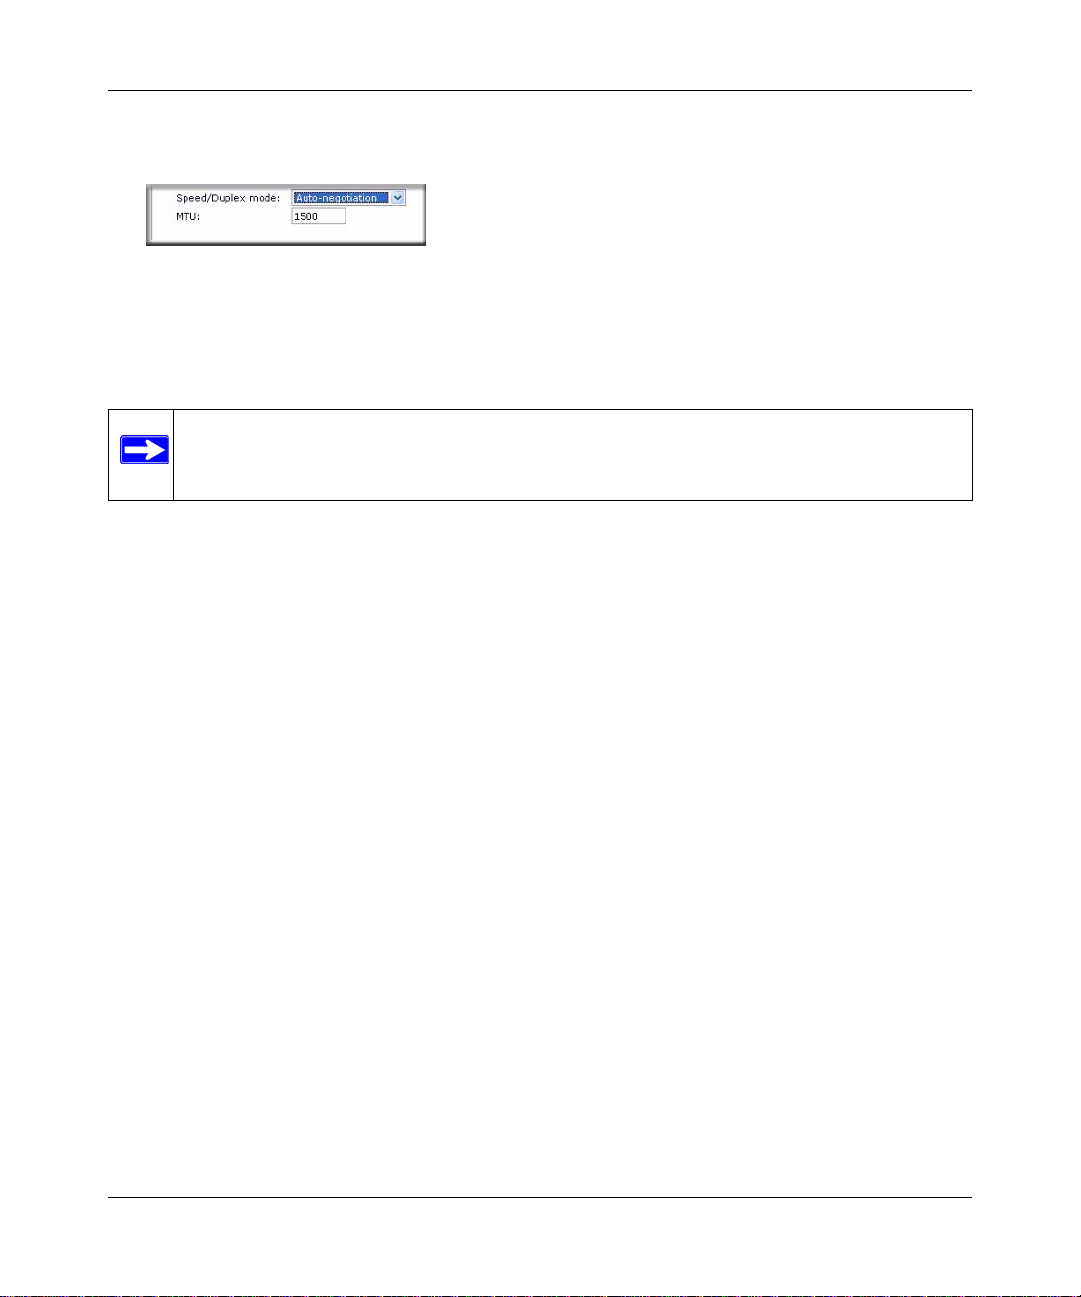
• Speed/Duplex Mode. If you have a managed switch that works best if the devices are forced
to a particular speed or duplex mode, you can select the setting you want. NETGEAR advises
that you keep the setting in an Auto-negotiation mode otherwise.
Figure 1-5
Configuring Your ReadyNAS Duo 1-3
v1.1, April 2008
Page 58
NETGEAR ReadyNAS Duo User Guide
• MTU. In some network environments, changing the default MTU value can fix throughput
problems. NETGEAR advises that you leave the default setting otherwise.
Figure 1-6
In the Performance Setting area, the Enable jumbo frames option allows you to optimize the
ReadyNAS Duo for large data transfers such as multiple streams of video playback. Select this
option if your NIC and your gigabit switch support jumbo frames.
Note: The ReadyNAS Duo supports a 7936 byte frame size, so for optimal performance,
a switch capable of this frame size or larger should also be used.
Global Network Settings
It is important that all of your Network settings are correctly specified. When you first install the
ReadyNAS Duo, the default settings are used. However, you can customize some of these settings;
for example, you could change your Workgroup name.
• Hostname
The Hostname you specify is used to advertise the ReadyNAS Duo on your network. You can
use the hostname to address the ReadyNAS Duo in place of the IP address when accessing the
ReadyNAS Duo from Windows, or over OS X using SMB. This is also the name that appears
in the RAIDar scan list.
The default hostname is nas- followed by the last three bytes of your primary MAC address.
•Default Gateway
The Default Gateway specifies the IP address of the system where your network traffic is
routed if the destination is outside your subnet. In most homes and smaller offices, this is the
IP address of the router connected to the cable modem or your DSL service.
If you selected the DHCP option in the Ethernet or Wireless tab, the Default Gateway field is
automatically populated with the setting from your DHCP server. If you selected the Static
option, you can manually specify the IP addresses of the default gateway server here.
1-4 Configuring Your ReadyNAS Duo
v1.1, April 2008
Page 59

NETGEAR ReadyNAS Duo User Guide
•Workgroup
The W orkgroup is the file loca tion name where your ReadyNAS Duo share folders reside. The
default name is NETGEAR. This name is broadcast on your Network. This name can be
changed to a name that is more familiar and recognizable. Just enter a new name and click
Apply.
Figure 1-7
• DNS Settings
The DNS area allows you to specify up to three Domain Name Service servers for hostname
resolution. The DNS service translates host names into IP addresses.
If you selected the DHCP option in the Ethernet or Wireless tab, the Domain Name Server
fields are automatically populated with the DNS settings from your DHCP server. If you
selected the Static option, you can manually specify the IP addresses of the DNS servers and
the domain name here.
Configuring Your ReadyNAS Duo 1-5
v1.1, April 2008
Page 60

NETGEAR ReadyNAS Duo User Guide
Setting Up Security
The Security tab allows you to set the administrator password, administer security, and set up the
password recovery feature on the ReadyNAS Duo. You will also be able to set up your User and
Group Accounts.
Admin Password
The Admin Password tab allows you to change the administrator user password. The administrator
user is the only user that can access FrontView, and this user has administrative privileges when
accessing shares. Be sure to set a password different from the default password, and make sure that
this password is kept in a safe place. Anyone who obtains this password can effectively change or
erase the data on the ReadyNAS Duo.
Figure 1-8
As a safeguard, you are requeste d to enter a pas sword recovery question, the expected answer, and
an e-mail address. If, in the future, you forget the password, you can go to
https://<ReadyNAS ip_address>/password_recovery. Successfully answering the questions there
resets the Admin Password, and that new password is sent to the e-mail address you enter on this
screen.
1-6 Configuring Your ReadyNAS Duo
v1.1, April 2008
Page 61

NETGEAR ReadyNAS Duo User Guide
Figure 1-9
Setting Up User and Group Accounts
In the User & Group Accounts security mode, the Accounts tab screen allows you to manage
user and group accounts on the ReadyNAS Duo.
Managing Users
To manage user accounts:
1. Select Manage Users from the drop-down menu.
2. Click the Add User tab to add a new user. You can add up to five users at a time. For each
user, add the following information:
•User name,
• E-mail address
• User ID
• Select a group from the Group pull-down menu.
• Password
• Disk quota.
3. Click Apply to save your settings.
Figure 1-10
Configuring Your ReadyNAS Duo 1-7
v1.1, April 2008
Page 62

NETGEAR ReadyNAS Duo User Guide
Only the user name field is required; however, you should specify a user e-mail address if you
intend to set up disk quotas. Without an e-mail address, the user will not be warned when disk
usage approaches the specified disk quota limit. If you do not wish to assign a disk quota, enter 0.
If you wish to add a large number of users, select Import user list from the pull-down menu.
Figure 1-11
Here, you can upload a CSV (Comma Separated Value) formatted file containing the user account
information. The format of the file is:
name1,password1,group1,email1,uid1,quota1
name2,password2,group2,email2,uid2,quota2
name3,password3,group3,email3,uid3,quota3
:
Please note the following:
• Spaces around commas are ignored.
• The name and password fields are required.
• If a listed group account does not exist, it is automatically created.
• Group and quota are set to the defaults if not specified.
• E-mail notification is not sent to the user if the field is omitted or left blank.
• UID is automatically generated if not specified.
• Empty fields are replaced with account defaults.
Examples of acceptable formats are as follows (note that you can omit follow-on commas and
fields if you wish to accept the system defaults for those fields, or you can leave the fields empty):
fred,hello123
In this example, user fred has a password set to hello123, belongs to the default group, receives no
e-mail notification, has a UID assigned automatically, and has a default quota.
barney,23stone,,barney@bedrock.com
In this example, user barney has a password set to 23stone, belongs to the default group, receives
e-mail notification sent to barney@bedrock.com, has a UID assigned automatically, and has a
default quota.
1-8 Configuring Your ReadyNAS Duo
v1.1, April 2008
Page 63

NETGEAR ReadyNAS Duo User Guide
wilma,imhiswif,ourgroup,wilma@bedrock.com,225,50
In this example, user wilma has a password imhiswif, belongs to the group ourgroup, receives email notification sent to wilma@bedrock.com, has a UID set to 225, and a quota set to 50 MB.
Managing Groups
To add a new group:
1. Select Manage Groups from the drop-down menu in the upper right corner.
2. Select the Add Group tab if it is not already selected. You can add up to five groups at a time.
If you expect to have just one big set of users for one group, you can forego adding a new
group and accept the default users group.
3. Click Apply to save your settings.
If you want, a user can belong to multiple groups. Once you have created user accounts, you can
specify secondary groups that the user can belong to. This allows for finer-grain settings for share
access. For instance, you can have user Smithy in the General group also belong to the Finance
group so Smithy can access shares restricted to only the Finance Group.
When adding a new group, you can specify the amount of disk space you wish to allocate that
group by setting a disk quota. A value of 0 denotes no limit. You can also set the Group ID, or
GID, of the group that you are adding. You can leave this field blank and let the system
automatically assign this value unless you wish to match your GID to your NFS clients.
Figure 1-12
After adding your groups, you can view or change your groups by clicking the alphabetical index
tab, or click All to list all groups.
Configuring Your ReadyNAS Duo 1-9
v1.1, April 2008
Page 64
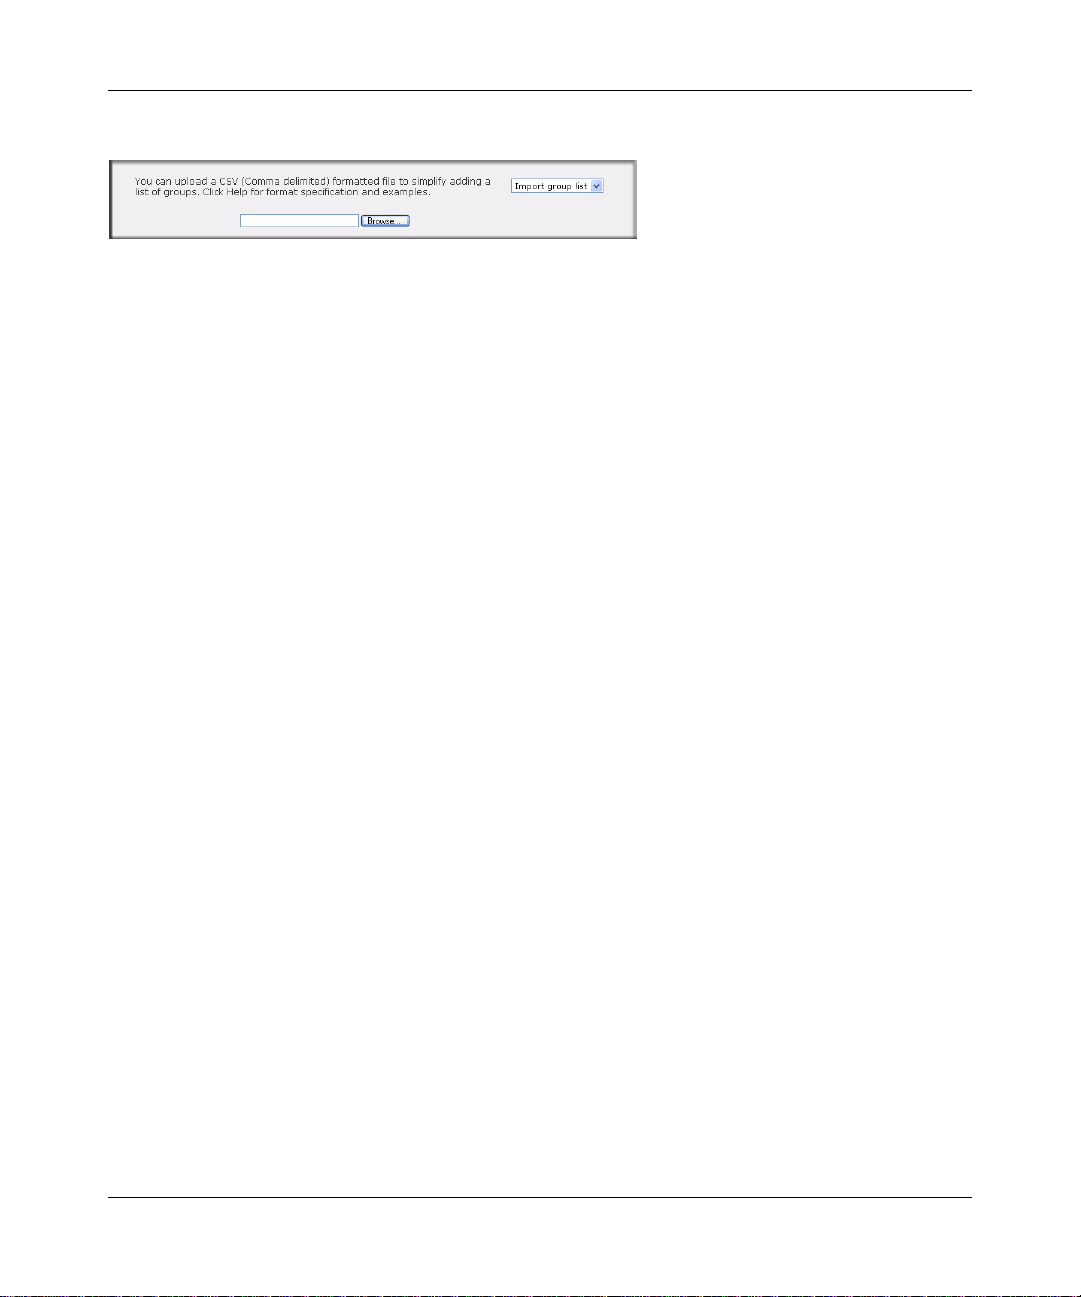
NETGEAR ReadyNAS Duo User Guide
If you wish to add a large number of groups, select Import group list from the pull-down menu.
Figure 1-13
You can upload a CSV (Comma Separated Value) formatted file containing the group account
information. The format of the file is:
name1,gid1,quota1,member11:member12:member13
name2,gid2,quota2,member21:member22:member23
name3,gid3,quota3,member31:member32:member33
:
Please note the following:
• Spaces around commas are ignored.
• The name field is required.
• Quota is set to default if not specified.
• GID is automatically generated if not specified.
• Empty fields are replaced with account defaults.
• Group members are optional.
Examples of acceptable formats are as follows (note that you can omit follow-on commas and
fields if you wish to accept the system defaults for those fields, or you can leave the fields empty):
flintstones
In this example, the group flintstones is created with an automatically assigned GID and
default quota.
rubble,1007,5000,barney:betty
In this example, the group rubble has a GID of 1007, a quota of 5000 MB, with members
barney and betty.
1-10 Configuring Your ReadyNAS Duo
v1.1, April 2008
Page 65

NETGEAR ReadyNAS Duo User Guide
Setting Accounts Preferences
You can set various account defaults by selecting Preferences option from the pull-down menu.
Figure 1-14
Selecting Services for Share Access
The Services screen allows you to manage various services for share access. This in effect controls
the type of clients you wish to allow access to the ReadyNAS Duo. Four types of services are
available: Standard File Protocols, Streaming Services, Discovery Services and Installed AddOns.
These different services are explained in the following sections.
Standard File Protocols
The standard file protocols are common file-sharing services that allow your workstation clients to
transfer files to and from the ReadyNAS Duo using built-in file manager-over-network file
protocols supported by the client operating system. The available services are:
• CIFS (Common Internet File Service). Sometimes referred to as SMB. This protocol is used
mainly by Microsoft Windows clients, and sometimes by Mac OS X clients. Under Windows,
when you click on My Network Places Network Neighborhood, you are going across CIFS.
This service is enabled by default and cannot be disabled.
• NFS (Network File Service). NFS is used by Linux and Unix clients. Mac OS 9/X users can
access NFS shares as well through console shell access. The ReadyNAS Duo supports NFS v3
over UDP and TCP.
• AFP (Apple File Protocol). Mac OS 9 and OS X works best using this protocol as it handles
an extensive character set. However, in mixed PC and Mac environments, it is advisable to use
CIFS/SMB, unless enhanced character set support is necessary on the Mac.The ReadyNAS
Duo supports AFP 3.1.
Configuring Your ReadyNAS Duo 1-11
v1.1, April 2008
Page 66

NETGEAR ReadyNAS Duo User Guide
• FTP (File Transfer Protocol). Widely used in public file upload and download sites.
ReadyNAS Duo supports anonymous or user access for FTP clients, regardless of the security
mode selected. If you wish, you can elect to set up port forwarding to nonstandard ports for
better security when accessing files over the Internet.
• HTTP (Hypertext Transfer Protocol). Used by Web browsers. ReadyNAS Duo supports
HTTP file manager, allowing Web browsers to read and write to shares using the Web browser.
This service can be disabled in lieu of HTTPS to allow for a more secure transmission of
passwords and data. With the option to redirect default Web access to a specified share, you
can transparently force access to http://readynas_ip to http://readynas_ip/share. This is
useful if you do not want to expose your default share listing page to outsiders. All you need in
the target share is an index file such as index.htm or index.html. You have the option of
enabling or disabling login authentication to this share.
• HTTPS (HTTP with SSL encryption). This service is enabled by default and cannot be
disabled. Access to FrontView is strictly through HTTPS for this reason. If you want remote
Web access to FrontView or your HTTPS shares, you can specify a nonstandard port (default
is 443) that you can forward on your router for better security . You can also regenerate the SSL
key based on the hostname or IP address that users will use to address the ReadyNAS Duo.
This allows you to bypass the default dummy certificate warnings whenever users access the
ReadyNAS Duo over HTTPS.
• Rsync. An extremely popular and efficient form of incremental backup made popular in the
Linux platform but now available for various other Unix systems as well as Windows and
Mac. Enabling rsync service on the ReadyNAS Duo allows clients to use rsync to initiate
backups to and from the ReadyNAS Duo.
1-12 Configuring Your ReadyNAS Duo
v1.1, April 2008
Page 67

NETGEAR ReadyNAS Duo User Guide
Figure 1-15
Streaming Services
The built-in streaming services on the ReadyNAS Duo allow you to stream multi-media content
directly from the ReadyNAS Duo, without the need to have your PC or Mac po wered on.
Configuring Your ReadyNAS Duo 1-13
v1.1, April 2008
Page 68

NETGEAR ReadyNAS Duo User Guide
Figure 1-16
• SlimServer provides music streaming to the popular Squeezebox music players from Slim
Devices. You can click the http setup link for more detailed configuration options.
• iTunes Streaming Server enables iTunes clients to stream media files straight from the
ReadyNAS Duo. You can click the http setup link for more detailed configuration options.
• UPnP AV provides media streaming service to stand-alone networked home media adapters
and networked DVD players that support the UPnP AV protocol or are Digital Living Network
Alliance (DLNA) standard compliant. The ReadyNAS Duo comes with a reserved media
share that is advertised and recognized by the players. Simply copy your media files to the
Videos, Music, and Pictures folders in that share to display them on your player. If you wish,
you can specify a different media path where your files reside.
1-14 Configuring Your ReadyNAS Duo
v1.1, April 2008
Page 69

NETGEAR ReadyNAS Duo User Guide
• Home Media Str eaming Server provides streaming of v ideos, musi c, and pictures to popu lar
networked DVD players. The streaming players often utilize the streaming client developed by
Syabas. Similar to UPnP AV , this service is used to stream videos, music, and pictures from the
reserved media share to these adapters. If you wish to change the location where the media
files are stored, you can specify a different share and folder path. Note that this path is shared
between the UPnP AV and this service.
Discovery Services
• Bonjour service provides a simple way of discovering various services on the ReadyNAS
Duo. Bonjour currently provides an easy way to connect to FrontView, IPP printing, and AFP
services. OS X has built-in Bonjour support, and you can download Bonjour for Windows
from Apple’s website.
• UPnP provides a means for UPnP-enabled clients to discover the ReadyNAS Duo on your
LAN.
Figure 1-17
Installed AddOns
Two add-ons allow you to download files unattended using the Bit Torrent technology and share
your photos on the ReadyNAS photo-share site.
• Bit Torrent. The ReadyNAS Duo enables peer-to-peer file sharing and allows the ReadyNAS
Duo to queue and index torrent download files.
• ReadyNAS Photos. The ReadyNAS Duo allows you to share photos with select users on the
Internet. You must install ReadyNAS Photos software which is available on the ReadyNAS
site. Simply click Install ReadyNAS Photos and follow the on-screen prompts. Once you have
Configuring Your ReadyNAS Duo 1-15
v1.1, April 2008
Page 70

NETGEAR ReadyNAS Duo User Guide
enabled this feature and downloaded the software, you will be able to share photos located in
your Pictures folder.
To download ReadyNAS Photos software:
1. Click Install ReadyNAS Photos. The ReadyNAS Photos Installers screen displays.
Figure 1-18
2. Select the install version that is appropriate for your operating system. When the installation
has completed, the ReadyNAS Photos icon will be installed on your desktop.
3. Create a ReadyNAS Photos profile. You will need the User ID and Password that you selected
to log in to ReadyNAS Photos.
Figure 1-19
1-16 Configuring Your ReadyNAS Duo
v1.1, April 2008
Page 71

NETGEAR ReadyNAS Duo User Guide
4. When the ReadyNAS Photos login screen displays, enter your User ID and Password and click
the arrow.
Figure 1-20
5. A screen similar to the one below will display. Connect ReadyNAS Photos to your ReadyNAS
Duo by clicking Connect.
Figure 1-21
Configuring Your ReadyNAS Duo 1-17
v1.1, April 2008
Page 72

NETGEAR ReadyNAS Duo User Guide
6. The Add New Album screen displays. Click on the Click here to add alb um link to add your
first album. To add subsequent albums, select Import Albums from the menu bar.
Hi Smithy
Figure 1-22
7. From the Import Albums screen select the Photo Albums you want to add from the Bookmarks
pull-down menu. Highlight the album you want to add and click ADD, and then click START.
The new album will display.
Figure 1-23
1-18 Configuring Your ReadyNAS Duo
v1.1, April 2008
Page 73

NETGEAR ReadyNAS Duo User Guide
8. Double-click on the album image to open the al bum . You can rotate or delete any photos prior
to sharing your photos. You can also select a specific photos to share by moving each photo
thumbnail into the Selection Tray.
Figure 1-24
9. After you have corrected your photos or selected certain photos to share, select Share from the
menu. The Share Dialog will display.
a. Enter the email address or User ID of each buddy.
b. Select either the Share this Album radio button or the Share Items in Selection Tray to
determine which photos to share.
c. From the pull-down menu, select the photo album name (if you are sharing an album) or,
if you are sending select photos from the selection tray, then you can create a specific
name.
d. Enter a message to accompany to the photos.
Configuring Your ReadyNAS Duo 1-19
v1.1, April 2008
Page 74

NETGEAR ReadyNAS Duo User Guide
Figure 1-25
10. Click Share. An email will be sent to your share buddy; you will also be notified by email that
the shared photos have been sent.
Understanding Volume Management
The ReadyNAS Duo uses X-RAID, an NETGEAR-patented expandable R A ID technology. Some
benefits of X-RAID technology are:
• One-volume technology, but supports volume expansion, either by with the addition of more
disks or the replacement of an existing disk with larger capacity disks.
• You can start out with one disk, and add an additional more disk when you need it.
• Volume management is automatic. Add a second disk, and it becomes a mirror to the first—the
expansion occurring while redundancy is maintained.
Volume Management for X-RAID
The X-RAID technology offers a simplified approach to volume management. X-RAID works on
the premise that what most people want to do with their data volume over time is either adding
redundancy or expanding it without the headaches usually associated with doing that. By using
simple rules, X-RAID is able to hide all the complexities yet provide volume management features
previously available only in enterprise-level storage solutions.
• X-RAID Redundancy Overhead. To maintain redundancy from disk failure, X-RAID
requires a one-disk overhead. In a two-disk X-RAID volume, the usable capacity is one disk.
1-20 Configuring Your ReadyNAS Duo
v1.1, April 2008
Page 75

NETGEAR ReadyNAS Duo User Guide
• X-RAID has One Data Volume. X-RAID devices have only one data volume. This volume
encompasses one to two disks, utilizing the capacity of the smallest disk from each disk. For
instance, if you had one 80 GB disk and one 250 GB disk, only 80 GB from is used in the
volume. (The leftover space on the 250 GB disk is reclaimed only when the 80 GB disk is
replaced with a 250 GB or greater capacity disk. See “Replacing Your Disk for More
Capacity” on page 1-21.”)
Figure 1-26
Adding a Second Disk for Redundancy
A one-disk X-RAID device has no redundancy and provides no protection from a disk failure.
However, if and when you feel the need for redundancy, simply power down the device, add a new
disk with at least the capacity of the first disk, and power on. Depending on the size of the disk,
within a few hours, your data volume will be fully redundant. The process occurs in the
background, so access to the ReadyNAS Duo is not interrupted.
After you receive your e-mail, the ReadyNAS Duo will have been expanded with the capacity
from your new disk(s).
Replacing Your Disk for More Capacity
A year or so down the line when you find the need more disk space, and 600 GB disks are
available at an attractive price, you can expand your volume capacity by replacing the existing
disks. Keep in mind that you must power down several times to replace out your old disks.
Configuring Your ReadyNAS Duo 1-21
v1.1, April 2008
Page 76

NETGEAR ReadyNAS Duo User Guide
First, power down the ReadyNAS Duo, replace the first disk with the large-capacity disk, and then
reboot. If your ReadyNAS Duo supports hot-swapping, you can hot-swap the disk without
powering down. The ReadyNAS Duo will detect that a new disk was put in place and
resynchronizes the disk with data from the removed disk. This process takes several hours,
depending on disk capacity . The disk is initialized and scanned for bad sectors first before the
rsync process is started. The total time from the start of initialization to the end of
resynchronization can be around 5 hours or more, depending on disk capacity . You will be notified
by e-mail upon completion.
USB Storage
The USB tab displays the USB disk and flash devices connected to the ReadyNAS Duo, and offers
various options for these devices. A flash device appears as USB_FLASH_1 and a disk device
appears as USB_HDD_1. If you have multiple devices, they appear appended by an increasing
device number; for example, USB_HDD_2. If the device contains multiple partitions, the
partitions are listed beneath the main device entry.
Figure 1-27
Partitions on the storage devices must be one of the following file system formats:
•FAT32
• NTFS
•Ext2
•Ext3
1-22 Configuring Your ReadyNAS Duo
v1.1, April 2008
Page 77

NETGEAR ReadyNAS Duo User Guide
T o the right of the access icons are command options for the device. The following commands are
available:
Disconnect This option prepares the USB partition for disconnection by correctly unmounting the file
system. In most cases, you can safely disconnect the device without first unmounting;
however, the Disconnect command ensures that any data still in the write cache is
written out to the disks and that the file system is properly closed. The Disconnect option
unmounts all partitions on the device. Once disconnected, physically remove and reconnect to the ReadyNAS Duo to regain access the USB device,.
Locate In cases where you attach multiple storage devices and wish to determine which device
corresponds to the device listing, the Locate command causes the device LED to blink, if
present.
Format FAT32 This option formats the device as a FAT32 file system. FAT32 format is easily
recognizable by most newer Windows, Linux, and Unix operating systems.
Format EXT3 This option formats the device as an EXT3 file system. Select this option if you will be
accessing the USB device mainly from Linux systems or ReadyNAS Duo devices. The
advantage of EXT3 over FAT32 is that file ownership and mode information can be
retained using this format, whereas this capability is not there with FAT32. Although not
natively present in the base operating system, Ext3 support for Windows and OS X can
be added. The installation images can be downloaded from the Web.
When the USB device is unmounted, you have the option of renaming it. The next time the same
device is connected, it will use the new name rather than the default USB_FLASH_n or
USB_HDD_n naming scheme.
The USB storage shares are listed in the Share screen, and access restrictions can be specified
there. The share names reflect the USB device names.
USB Flash Device Option
Toward the lower portion of the USB Storage screen is the USB Flash Device Option section (see
Figure 1-27 on page 1-22). There, you can elect to copy the content of a USB flash device
automatically on connection to a specified share. Files are copied into a unique timestamp folder to
prevent overwriting previous contents. This is useful for uploading pictures from digital cameras
and music from MP3 players without needing to power on a PC.
In User security mode, an additional option to set the ownership of the copied files is available.
Configuring Your ReadyNAS Duo 1-23
v1.1, April 2008
Page 78

NETGEAR ReadyNAS Duo User Guide
Managing Your Shares
The Shares menu provides all the options pertaining to share services for the ReadyNAS Duo
device. This entails share management (including data and print shares), volume management, and
share service management.
Figure 1-28
Adding Shares
To add a share:
1. From the main menu, select Volumes > Volume Settings. If more than one volume is
configured, click on the volume for which you want to add the share.
1-24 Configuring Your ReadyNAS Duo
v1.1, April 2008
Page 79

NETGEAR ReadyNAS Duo User Guide
2. Then select Shares > Add Shares. Deselect the Public Access checkbox if you want to enable
user authentication for access to this share using CIFS and/or AFP protocols.
Figure 1-29
3. Click Apply.
Managing Shares
Once you have added shares, you can manually fine-tune share access by selecting Share List. This
screen has two views, one for Share Security mode and one for User and Domain mode. They are
similar except for the password and disk quota prompts which appear only in Share mode.
Figure 1-30
If you want to delete a share, select the check box on the far right of the share listing and click
Delete.
The columns to the left of the Delete check box represent the services that are currently available.
The access icons in those columns summarize the status of the service and the access rights to the
Configuring Your ReadyNAS Duo 1-25
v1.1, April 2008
Page 80

NETGEAR ReadyNAS Duo User Guide
share for each of the services. Move the mouse pointer over the access icons to view the access
settings.
Figure 1-31
The settings are as follows:
• Disabled. Access to this share is disabled.
• Read-only Access. Access to this share is read-only.
• Read/Write Access. Access to this share is read/write.
• Read Access with exceptions. Either (1) access to this share is read-only and allowed only for
specified hosts, (2) access is read-only except for one or more users or groups that are granted
read/write permission, or (3) access is disabled except for one or more users or groups that are
granted read-only privilege.
• Write Access with exceptions – Either (1) access to this share is read/write and allowed only
for specified hosts, (2) access is read/write except for one or more users or groups that are
restricted to read-only access, or (3) access is disabled except for one or more users or groups
that are granted read/write privilege.
You can click on the access icons to display the Share Options screen, where you can set the access
rules for each file protocol. Keep in mind that access options differ between protocols.
1-26 Configuring Your ReadyNAS Duo
v1.1, April 2008
Page 81

NETGEAR ReadyNAS Duo User Guide
Setting Share Access
From the Share List screen, click the CIFS link adjacent to the Share whose share access you
want to change. In the following example, we selected the Children share; the CIFS (Windows)
share options screen looks like the following:
Figure 1-32
To set share access:
1. Select the Default Access pull-down menu at the top, select the access to be granted.
2. Select the Hosts allowed access check box and specify one or more hosts that you wish to
restrict access to in the adjacent field.
For example, select read-only for Default Access and list the hosts to whom you wish to allow
access. Access from all other hosts will be denied. To allow only host 192.168.2.101 read-only
access to the share, specify the following:
• Default: Read-only
• Hosts allowed access: 192.168.2.101
Multiple hosts can be separated with commas (see Appendix B, “General Glossary” for
information about valid host formats.) For example, if you wish to limit share access to particular
hosts, you can enter host IP addresses or valid DNS hostnames in the Host allowed access field. In
addition, you can enter a range of hosts using common IP range expressions such as:
192.168.2., 192.168.2.0/255.255.255.0, 192.168.2.0/24
These designations all allow hosts with IP addresses 192.168.2.1 through 192.168.2.254.
Toward the bottom of the CIFS screen are the Share Display Option, Recycle Bin, and Advanced
CIFS Permissions. Refer to the descriptions for these options in the sections that follow.
Configuring Your ReadyNAS Duo 1-27
v1.1, April 2008
Page 82

NETGEAR ReadyNAS Duo User Guide
Share Access Restriction. If you wish to limit share access to particular users and/or groups,
you can enter their names in the Read-only users, Read-only groups, Write-enabled users, and
Write-enabled group fields. The names must be valid accounts, either on the ReadyNAS Duo or
on the domain controller.
For instance, if you wish to allow read-only access to all and read/write access only user fred and
group engr, you would set the following:
• Default: Read-only
• Write-enabled users: fred
• Write-enabled groups: engr
If you wish to limit this access only to hosts 192.168.2.101 and 192.168.2.102, set the following:
• Default: Read-only
• Hosts allowed access: 192.168.2.101, 192.168.2.102
• Write-enabled users: fred
• Write-enabled groups: engr
If you wish to specify some users and groups for read-only access and some for read/write access,
and disallow all other users and groups, enter the following:
• Default: Disabled
• Hosts allowed access: 192.168.2.101, 192.168.2.102
• Read-only users: mary, joe
• Read-only groups: marketing, finance
• Write-enabled users: fred
• Write-enabled groups: engr
Note that access control differs slightly from service to service.
Share Display Option. Restricting access to a share does not prevent users from seeing the
share in the browse list. In certain instances, you might not want this, such as for backup shares
that you might want to prevent users from seeing.
T o hide a share, select the Hide this share… check box. Users who have access to this share must
specify the path explicitly. For example, to access a hidden share, enter \\host\share in the
Windows Explorer address bar.
1-28 Configuring Your ReadyNAS Duo
v1.1, April 2008
Page 83

NETGEAR ReadyNAS Duo User Guide
Figure 1-33
Recycle Bin. The ReadyNAS Duo can have a Recycle Bin for each share for Windows users.
The Enable Recycle Bin option is shown at the bottom of the CIFS screen.
When this check box is selected, whenever you delete a file, the file gets inserted into the Recycle
Bin folder in the share rather than being permanently deleted. This allows for a grace period during
which users can restore deleted files.
Figure 1-34
You can specify how long to keep the files in the Recycle Bin and how large the Recycle Bin can
get before files get permanently erased.
Advanced CIFS Permission. The Advanced CIFS Permission section offers options for
setting the default permission of new files and folders created through CIFS. The default
permission of newly created files is read/write for the owner and owner’s group and read-only for
Configuring Your ReadyNAS Duo 1-29
v1.1, April 2008
Page 84

NETGEAR ReadyNAS Duo User Guide
others (that is, everyone). Permission for newly created folders is read/write for everyone. If the
default does not satisfy your security requirement, you can change it here.
Opportunistic locking (often referred to as oplocks) enhances CIFS performance by allowing files
residing on the NAS to be cached locally on the Windows client, thus eliminating network latency
when the files are constantly accessed.
Figure 1-35
Advanced Options
The Advanced Options tab offers advanced low-level file manipulation options that can affect
remote file access through all file protocol interfaces. Care should be taken before you use these
options as anything that changes ownership and permissions might not be easily reversible.
1-30 Configuring Your ReadyNAS Duo
v1.1, April 2008
Page 85

NETGEAR ReadyNAS Duo User Guide
Figure 1-36
Advanced Share Permission. The Advanced Share Permission section offers the options to
override the default ownership and permission of the share folder on the embedded file system and
to permeate these settings to all files and folders residing on the selected share. The Set ownership
and permission for existing files and folders option performs a one-time change. Depending on
the size of the share, this can take a while to finish.
You can also grant rename and delete privilege to non-owners of the files option. In a coll aborative
environment, you might want to enable this option. In a more security-conscious environment, you
might want to disable this option.
USB Shares
USB storage devices are shared using the name of the device appended with the partition number.
You can change the base device name in Volumes > USB Storage, if you want. The ReadyNAS
Duo attempts to remember the name as long as there is a unique ID associated with the USB
device so that the next time the device is connected, the same share name(s) will be available.
Share access restrictions are not saved across disconnects, however.
Configuring Your ReadyNAS Duo 1-31
v1.1, April 2008
Page 86

NETGEAR ReadyNAS Duo User Guide
Figure 1-37
Note: Although access authorization is based on user login in non-Share mode, files
saved on the USB device, regardless of the user account, are with UID 0. This is to
allow easy sharing of the USB device with other ReadyNAS Duo and PC systems.
Configuring Backup Jobs
The Backup Manager integrated with the ReadyNAS Duo allows the ReadyNAS Duo to act as a
powerful backup appliance. Backup tasks can be controlled directly from the ReadyNAS Duo
without the need for a client-based backup application.
With the flexibility to support incremental backups over CIFS/SMB, NFS, and rsync protocols,
and full backups over FTP and HTTP protocols, the ReadyNAS Duo can act as a simple central
repository for both home and office environments. And with multiple ReadyNAS Duo systems,
you can set up one ReadyNAS Duo to back up another directly.
1-32 Configuring Your ReadyNAS Duo
v1.1, April 2008
Page 87

NETGEAR ReadyNAS Duo User Guide
Adding a New Backup Job
To create a new backup job, select Add a New Backup Job. A 4-step procedure screen for
creating a job displays.
Figure 1-38
Step 1 – Select Backup Source
The backup source can be located remotely, or it can be a public or a private home share, or all
home shares on the ReadyNAS Duo.
A USB device appears as a share, so if you want to back up a USB device, select a share name. If
you want to back up data from a remote source, select from one of the following:
• Windows/NAS (Timestamp). Select this if you wish to back up a share from a Windows PC.
Incremental backups use timestamps to determine whether files should be backed up.
• Windows/NAS (Archive Bit). Select this if you wish to back up a share from a Windows PC.
Incremental backups use the archive bit of files, similar to Windows, to determine whether
they should be backed up.
• Website. Select this if you wish to back up a website or a website directory. The backed up
files include files in the default index file and all associated files, as well as all index file links
to web page image files.
• FTP site. Select this if you wish to back up an FTP site or a path from that site.
• NFS server. Select this option if you wish to back up from a Linux or UNIX server across
NFS. Mac OS X users can also use this option by setting up a NFS share from the console
terminal.
Configuring Your ReadyNAS Duo 1-33
v1.1, April 2008
Page 88

NETGEAR ReadyNAS Duo User Guide
• Rsync server. Select this if you wish to perform backups from a rsync server. Rsync was
originally available for Linux and other flavors of UNIX, but h as lately become popul ar under
Windows and Mac for its efficient use of incremental file transfers. This is the preferred
backup method between two ReadyNAS Duo devices.
Once you have selected a backup source, you can enter the path from that source. If you selected a
ReadyNAS Duo share, you can either leave the path blank to backup the entire share, or enter a
folder path. Note that you should use forward slashes (/), in place of backslashes (\).
If you selected a remote source, each remote protocol uses a slightly different notation for the path.
If the path field is empty, selecting the remote source in the pull-down menu shows an example
format of the path. Following are some examples:
• Examples of an FTP path:
ftp://myserver/mypath/mydir
ftp://myserver/mypath/mydir/myfile
• Examples of a website path:
http://www.mywebsite.com
http://192.168.0.101/mypath/mydir
• Examples of a Windows or remote NAS path:
//myserver/myshare
//myserver/myshare/myfolder
//192.168.0.101/myshare/myfolder
• Examples of an NFS path:
myserver:/mypath
192.168.0.101:/mypath/myfolder
• Examples of a Rsync path:
myserver::mymodule/mypath
192.168.0.101::mymodule/mypath
• Examples of a local path:
myfolder
media/Videos
My Folder
1-34 Configuring Your ReadyNAS Duo
v1.1, April 2008
Page 89

NETGEAR ReadyNAS Duo User Guide
My Documents/My Pictures
With a remote source, you might need to enter a login and password to access the share. If you are
accessing a password-protected share on a remote ReadyNAS Duo server configured for Share
security mode, enter the name of the share name for login.
To make sure that you have proper access to the backup source, click Test Connection before
continuing.
Step 2 – Select Backup Destination
The Step 2 process is almost identical to Step 1 except that you are now specifying the backup
destination. If you selected a remote backup source, you need to select a public or a private home
share on the ReadyNAS Duo (either the source or destination must be local to the ReadyNAS
Duo). If you selected a ReadyNAS Duo share for the source, you can either enter another local
ReadyNAS Duo share for the destination, or you can specify a remote backup destination.
Figure 1-39
The remote backup destination can be a Windows PC/ReadyNAS Duo system, an NFS server, or a
rsync server. Note that you can select rsync for a remote ReadyNAS Duo if it is configured to
serve data over rsync.
Step 3 – Choose Backup Schedule
You can select a backup schedule as frequently as once every 4 hours daily or just once a week.
The backup schedule is offset by 5 minutes from the hour to allow you to schedule snapshots on
the hour (snapshots are almost instantaneous) and perform backups of those snapshots (see “USB
Storage” on page 1-22 to set up a snapshot schedule).
Configuring Your ReadyNAS Duo 1-35
v1.1, April 2008
Page 90

NETGEAR ReadyNAS Duo User Guide
If you wish, you can elect not to schedule the backup job so that you can invoke it manually
instead by clearing (deselecting) the Perform backup every... check box. (You might want to do
this if your ReadyNAS Duo has a backup button.)
Figure 1-40
Step 4 – Choose Backup Options
In this last step, you can set up how you want backups to be performed. To set up a backup
schedule:
1. Schedule a full backup. Select when you want full backups to be performed. You can elect to
do this just the first time, every week, every 2 weeks, every 3 weeks, every 4 weeks, or every
time this backup job is invoked.
The first full backup is performed at the next scheduled occurrence of the bac ku p d epending
on the schedule you specify, and the next full backup is performed at the weekly interval you
choose calculated from this first backup. Incremental backup is performed between the full
backup cycles.
Backups of a Web or FTP site only have the option to do a full backup every time.
2. Send a backup log. Backup logs can be sent to the users on the Alert contact list when the
backup is complete. It is a good idea to select this option to make sure that files are backed up
1-36 Configuring Your ReadyNAS Duo
v1.1, April 2008
Page 91

NETGEAR ReadyNAS Duo User Guide
as expected. You can elect to send only errors encountered during backup, full backup logs
consisting of file listings (can be large), or status and errors (status refe rs to completion status).
Note: Backup log e-mails are restricted to approximately 10K lines. To view the full
backup log (regardless of length), select Status > Logs and click the Download
All Logs link.
3. Remove files from backup destination. Select if you want to erase the destination path
contents before the backup is performed. Be careful not to reverse your backup source and
destination as doing so can delete your source files for good. It is safer to not select this option
unless your device is running low on space. Do experiment with a test share to make sure you
understand this option.
4. Remove deleted files on backup target for rsync. By default, files deleted in the backup
source will not get deleted in the backup destination. With rsync, you have the option of
simulating mirror mode by removing files in the backup destination deleted from the backup
source since the last backup. Select this option if you wish to do this. Experiment with a test
share to make sure that you understand this option.
5. Change ownership of backup files. The Backup Manager attempts to maintain original file
ownership whenever possible; however, this might cause problems in Share Security mode
when backup files are accessed. To work around this, you have the option of automatically
changing the ownership of the backed-up files to match the ownership of the share. This
allows anyone who can access the backup share to have full access to the backed-up files.
6. Click Apply to save your settings.
Before trusting your backup job to a schedule, it is a good practice to manually perform the backup
to make sure that access to the remote backup source or destination is granted, and that the backup
job can be done within the backup frequency you selected. This can be done after you save the
backup job.
Configuring Your ReadyNAS Duo 1-37
v1.1, April 2008
Page 92

NETGEAR ReadyNAS Duo User Guide
Viewing the Backup Schedule
After saving the backup job, a new job appears in the Backup Schedule section of the Backup Jobs
screen.
Figure 1-41
A summary of the backup jobs that have been scheduled are shown; jobs are numbered beginning
at 001.
To manage your backup jobs:
1. Click the Job number icon to modify the selected backup job.
2. Enable or disable job scheduling by selecting/clearing the Enable check box. Disabling the
job does not delete the job, but removes it from the automatic scheduling queue.
3. Click Delete to permanently remove the job.
4. Click Go to manually start the backup job. The status changes when the backup starts, when
an error is encountered, or when the job has finished.
5. Select the View Log link to check a detailed status of the backup.
6. click Clear Logs to refresh and clear the current log detail.
1-38 Configuring Your ReadyNAS Duo
v1.1, April 2008
Page 93

NETGEAR ReadyNAS Duo User Guide
Programming the Backup Button
On ReadyNAS Duo systems that have the Backup Button feature, you can program the button to
execute one or more pre-defined backup jobs.
Figure 1-42
Simply select the backup jobs in the order that you want them run and click Apply. Pressing the
Backup Button once starts the job(s).
Viewing the Backup Log
You can view the backup log while the job is in progress or after it has finished.
Figure 1-43
The log format might differ depending on the backup source and destination type that was
selected, but you can see when the job was started and finished, and whether it was completed
successfully or with errors.
Configuring Your ReadyNAS Duo 1-39
v1.1, April 2008
Page 94

NETGEAR ReadyNAS Duo User Guide
Editing a Backup Job
T o edit a backup job, y ou can either click the 3-digit job number button in the Backup Jobs screen,
or you can click the Edit Backup Job link while viewing that job log. You can then make
appropriate changes or adjustments to the job.
Setting Up Printers
The ReadyNAS Duo device supports automatic recognition of USB printers. If you have not
already done so, you can connect a printer now, wait a few seconds, and click Refresh to display
detected printers. The print share name automatically reflects the manufacturer and model of your
printer and is listed in the USB Printers section of the Print Queue service screen.
Figure 1-44
Print Shares over CIFS/SMB
The ReadyNAS Duo can act as a print server for up to two USB printers for your W indows or Mac
clients.
To set up a printer in Windows:
1. Click Browse in RAIDar or simply enter \\hostname in the Windows Explorer address bar to
list all data and printer shares on the ReadyNAS Duo.
2. Double-click the printer icon to assign a Windows driver.
1-40 Configuring Your ReadyNAS Duo
v1.1, April 2008
Page 95

NETGEAR ReadyNAS Duo User Guide
.
Figure 1-45
IPP Printing
The ReadyNAS Duo also supports the IETF standard Internet Printing Protocol (IPP) over HTTP.
Any client supporting IPP printing (IPP is available natively on the latest Windows XP OS and OS
X) can now use this protocol to utilize printers connected to the ReadyNAS Duo. The simplest
way to utilize IPP printing is to use Bonjour to discover and set up the print queue. Bonjour is built
into OS X and can be installed on Windows computers (Bonjour for Windows is available for
download from the Apple website at http://www.apple.com/macosx/features/bonjour/).
Managing Print Queues
From time to time, printers might run out of ink or paper, or simply jam up, forcing you to deal
with the print jobs stuck in a queue. The ReadyNAS Duo has a built-in print queue management to
handle this. Simply select the USB Printers tab or click Refresh to display the printers and the jobs
queued up for any “stuck” printers.
Figure 1-46
Select the radio button next to the print job and click Delete Print Job to remove a job (or all jobs)
from the print queue.
Configuring Your ReadyNAS Duo 1-41
v1.1, April 2008
Page 96

NETGEAR ReadyNAS Duo User Guide
Managing Your ReadyNAS Duo System
To set up and manage your ReadyNAS Duo effectively, make sure that you review the settings in
the following sections, and implement any necessary modifications or updates.
Clock
An accurate time setting on the Clock screen is required to ensure proper file timestamps. You can
access the Clock screen by selecting System > Clock from the main menu.
System Time
The Select Timezone section and the Select Current Time section of the Clock screen allow you to
set the Timezone, and the Date and Time.
Figure 1-47
1-42 Configuring Your ReadyNAS Duo
v1.1, April 2008
Page 97

NETGEAR ReadyNAS Duo User Guide
NTP Option
You can elect to synchronize the system time on the device with a remote NTP (Network Time
Protocol) server. You can elect to keep the default servers or enter up to two NTP servers closer to
your locale. You can find an available public NTP servers by searching the Web.
Alerts
In the event of a device or an enclosure failure, a quota violation, low-disk space warning, and
other system events requiring your attention, e-mail alerts are sent. The Alerts screen is accessed
by selecting System > Alerts from the main menu.
Alerts Contacts
The Contacts tab allows you to specify up to three e-mail addresses where system alerts will be
sent. The ReadyNAS Duo device has a robust system monitoring feature and sends e-mail alerts if
something appears to be wrong or when a device has failed. Make sure to enter a primary e-mail
address and a backup one if possible.
Figure 1-48
Some e-mail addresses can be tied to a mobile phone. This is a great way to monitor the device
when you are away from your desk.
Configuring Your ReadyNAS Duo 1-43
v1.1, April 2008
Page 98

NETGEAR ReadyNAS Duo User Guide
Alerts Settings
This ReadyNAS Duo device has been preconfigured with mandatory and optional alerts for
various system device warnings and failures. The Settings tab allows you to control the settings for
the optional alerts.
Figure 1-49
NETGEAR strongly recommends that you keep all alerts enabled; however, you might choose to
disable an alert if you are aware of a problem and wish to temporarily disable it.
At the bottom of the screen in the Other Alert Settings section, there are a couple of additional
options of note. Selecting the Power-off NAS when a disk fails or no longer responds option
gracefully powers off the ReadyNAS Duo if a disk failure or a disk remove event is detected.
Selecting the Power-off NAS when dis k temp er atu re exceeds safe level gracefully powers off
the ReadyNAS Duo when the disk temperature exceeds the nominal range.
SMTP
The ReadyNAS Duo device has a built-in e-mail message transfer agent (MTA) that is set up to
send alert e-mail messages from the device. Some corporate environments, however, might have a
firewall that blocks untrusted MTAs from sending out messages.
1-44 Configuring Your ReadyNAS Duo
v1.1, April 2008
Page 99

NETGEAR ReadyNAS Duo User Guide
If you were unable to receive the test message from the Alerts Settings tab, it might have been
blocked by the firewall. In that case, specify an appropriate SMTP server in this tab.
Figure 1-50
Internet Service Providers (ISPs) for home might also block untrusted MTAs. Furthermore, they
might allow you to specify their SMTP server but requires that you enter a user login and password
to send out e-mail—this is common with most DSL services. If this is the case, simply enter the
user name and password in the fields provided.
Performance
If you wish to tweak the system performance, select Performance from the main menu. Note that
some of the settings suggest that you utilize an Uninterruptible Power Supply (UPS) before
enabling that option:
• NETGEAR recommends that you select the Disable full data journaling only if the NAS has
UPS protection. Without battery backup, there is a small chance that parity written to a disk in
a RAID set might become out of sync with the data disks if a power failure suddenly occurs,
possibly causing incorrect data to be recovered if one disk fails. Without full data journaling,
disk write performance increases substantially.
Configuring Your ReadyNAS Duo 1-45
v1.1, April 2008
Page 100

NETGEAR ReadyNAS Duo User Guide
Figure 1-51
• Select Disable journaling if you understand the consequences of this action, and you do not
mind a long file system check (only after unexpected power failures). File system journaling
allows disk checks of only a few seconds verses possibly an hour or longer without journaling.
Disabling journaling improves disk write performance slightly.
Note: You can buy a UPS with USB monitoring at a very reasonable cost. By safely
allowing the performance options to be checked, you can effectively double
your write performance and provide uninterrupted service of your ReadyNAS
Duo for a very low price.
•The Optimize for OS X option provides the best performance in Mac OS X environments
when connected to the ReadyNAS Duo through the SMB/CIFS protocol. This option,
however, introduces compatibility issues with Windows NT 4.0; do not enable this option if
this device will be accessed by Windows NT 4.0 clients.
•The Enable fast CIFS writes option allows for fast write performance by enabling aggressive
write-back caching over CIFS. Do not enable this option in multi-user application
environments such as Quick Books where synchronized writes are necessary to keep files in
sync.
•The Force CIFS filename case-sensitivity option provides substantial performance
improvement when you access CIFS shares when many files are being copied; however,
before enabling this option, understand the ramifications.
1-46 Configuring Your ReadyNAS Duo
v1.1, April 2008
 Loading...