

Page 1

Qgy,,
, Inc.
NETGEAR
4500 Great America Parkway
Santa Clara, CA 95054
USA
M1-RH340NA-1
*M1-RH340NA-1*
Page 2
Qgy,,
Rear Panel
Start Here
Congratulations on your purchase of a NETGEAR
Internet Access ISDN Router.
These instructions show you how to configure your Windows
network and your NETGEAR router for Internet access through an
ISDN connection to an Internet service provider (ISP). For more
detailed information about installing your router or configuring
additional features, refer to Reference Guide for the Model RH340
Internet Access ISDN Router included on the RH340 Resources CD.
™
Model RH340
®
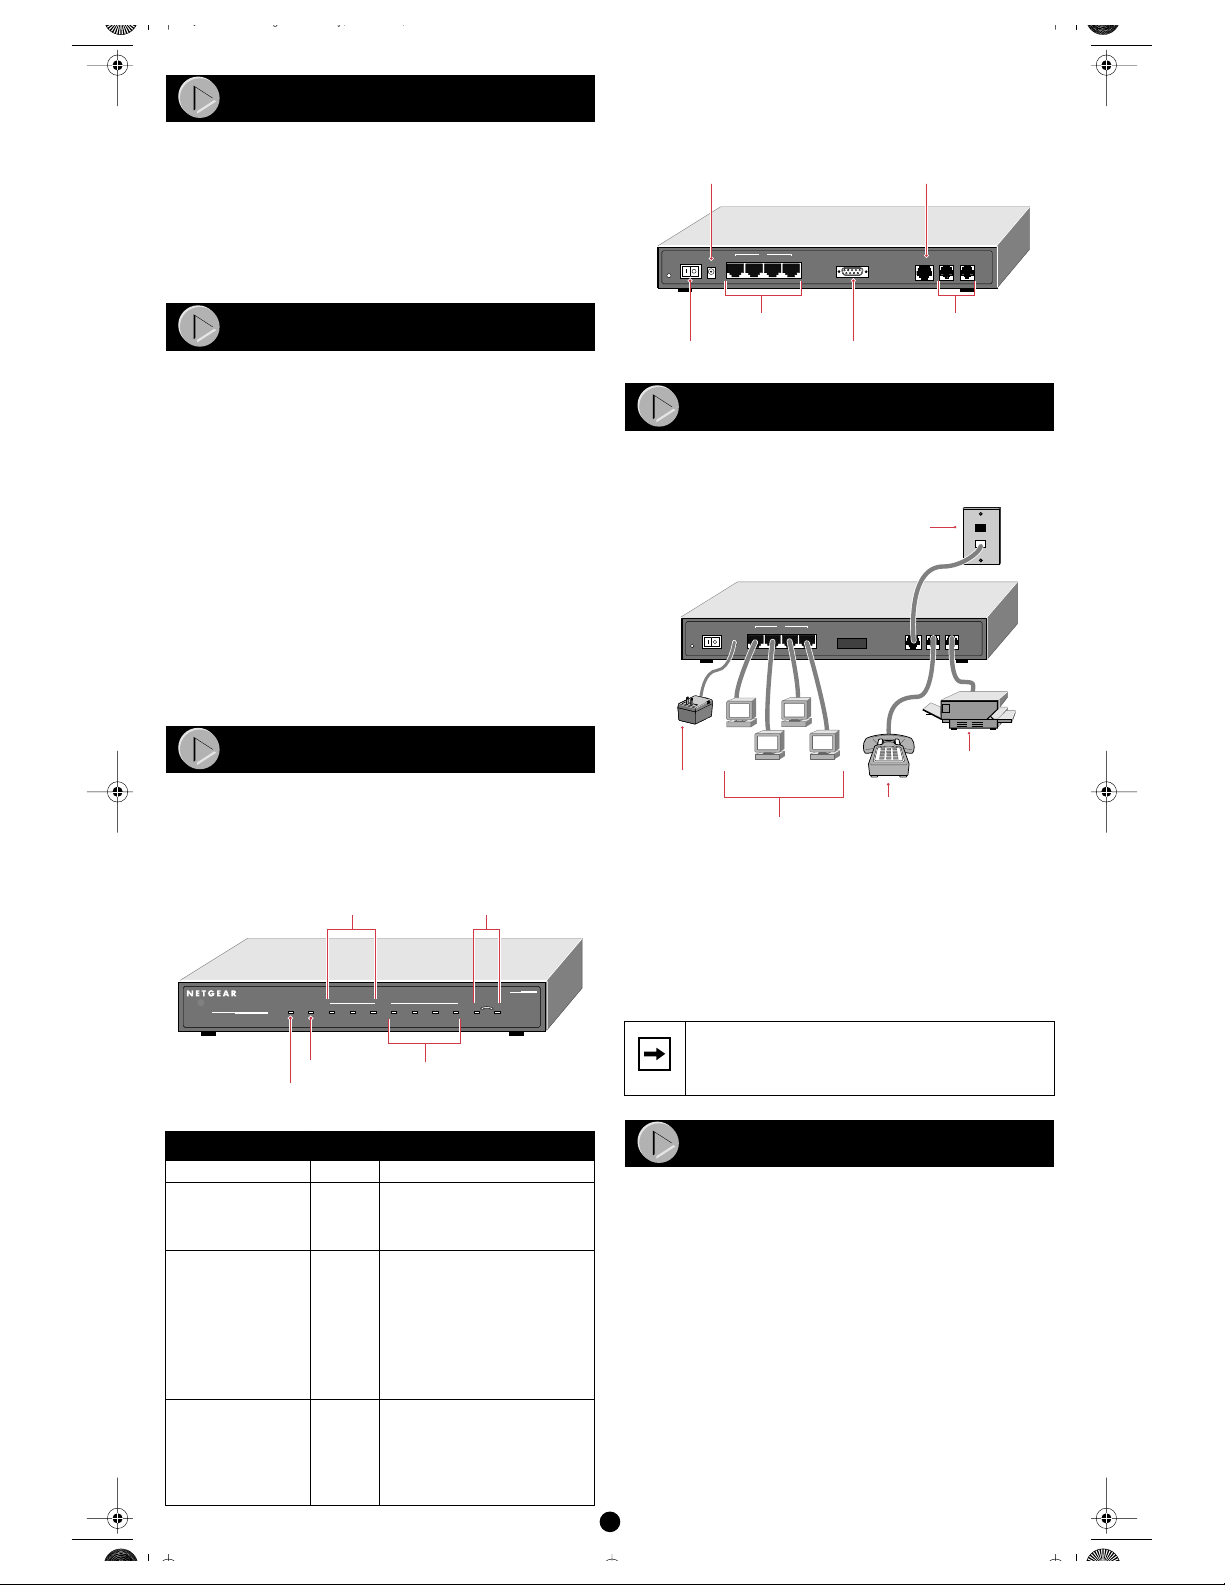
Refer to the diagram of the rear panel below to identify all ports on the
Model RH340 router when you make connections.
PC
Rear Panel of the Model RT340 Router
AC adapter outlet
LAN
4321
POWER
16VAC
MANAGER
ISDN PHONE 1 PHONE 2
ISDN port
Package Contents
Unpack the contents of the package and verify them against the
following list:
• Model RH340 Internet Access ISDN Router
• AC power adapter, 16 V AC output
• 10-foot 10BASE-T Ethernet cable (white)
• ISDN cable (black)
• 9-pin RS-232 serial cable
• 9-pin D-connector to 25-pin D-connector adapter
• This guide
• RH340 Resources CD containing FirstGear, Reference Manual,
and Application Notes
• Warranty and Registration Card
• Support Information Card
Call your local retailer if there are any wrong, missing, or damaged
parts. Keep the carton, including the original packing materials, to
repack the router if there is a need to return it for repair.
Product Illustration
Front Panel
The front panel of the Model RH340 router is illustrated in this
section.
Front Panel of the Model RH340 Router
ISDN LEDs Phone LEDs
MODEL
INTERFACE
U
Remote Access
ISDN
Router
PWR TEST D B1
ISDN LAN
B2 1 32412
Test LED LAN LEDs
Power LED
The table below describes the LEDs on the front panel of the router.
Label
PWR (Power)
TEST Blinking/
ISDN
D On The router is successfully
B1
B2
PHONE 1 On The analog device (telephone,
PHONE 2 On The analog device (telephone,
Activity Description
On Power is supplied to the router.
Off
On
On
This LED blinks during
initialization and then turns off,
indicating that the router is
functioning properly.
synchronized with the attached
ISDN line.
This ISDN B channel is making or
receiving a call.
This ISDN B channel is making or
receiving a call.
fax, or modem) connected to the
PHONE 1 port is in use.
fax, or modem) connected to the
PHONE 2 port is in use.
RT348
9455FA
Phone
ports
9456FA
Power switch
UTP LAN
ports
RS-232
Manager port
Hardware Installation
Refer to the following illustration for installing and connecting your
Model RH340 router.
Installing the Model RT340 Router
ISDN wall
connection
LAN
4321
AC power
adapter
POWER
PCs
MGR
Phone or other
analog devices
ISDN-U PHONE 1 PHONE 2
Phone or other
analog devices
8451FA
Connecting the Router
Connect the router to a power source, to your local area network
(LAN), and to your ISDN line as shown in the Hardware Installation
diagram.
To connect the router:
• Use the standard twisted pair Ethernet cable (provided in your
NETGEAR package) to connect your router to a PC.
• Use the black cable (provided in your NETGEAR package) to
connect your router to the ISDN line.
If you are connecting to another hub, use a standard
Note:
cable and connect the cable to the uplink port on the
external hub.
Preparation and Setup
In preparation for using the router to connect your PCs to the Internet,
you must do the following:
• Order ISDN service from your phone company.
• Configure your PCs for using the TCP/IP networking protocol.
• Order Internet service from an ISP.
Details of these steps are found in the following sections.
ISDN Checklist
When your line is installed, make sure you receive the following
information from the telephone company:
• Your directory numbers
• Your service profile identifier numbers (SPIDs)
• The switch type and protocol of the switch (for example,
National ISDN NI-1) used at your telephone company
Details of ordering your ISDN line can be found in Appendix B in
Reference Guide for the Model RH340 Internet Access ISDN Router
included on the RH340 Resources CD.
1
Page 3

Qgy,,
Your Network Checklist
The Model RH340 router uses the Internet Protocol (IP). The IP
configuration has the following requirements:
• All PCs must have Transmission Control Protocol/Internet
Protocol (TCP/IP) manually installed and selected as the
networking protocol.
• All PCs and the router must be assigned IP addresses. The
router’s DHCP function automatically assigns these for you, but
your PCs must be set to “Obtain an IP address automatically” in
the Network Control Panel.
• Be certain to check that “Obtain an IP address automatically” is
selected within the TCP/IP Properties in the Network Control
Panel. Refer to “Configuring TCP/IP Properties,” in the next
column, to confirm these settings.
ISP Checklist
If you are obtaining an ISDN account with an Internet service
provider (ISP), order a single-user account that provides a single
dynamic IP address unless you have a need for registered IP
addresses. Make sure you receive the following information from your
ISP:
• Login name
• Password
• Dial-up phone number of the ISP
• DNS server IP address(es) of the ISP
In addition, you should ask your ISP these questions:
• Will your IP address be dynamically assigned?
• Will your DNS server address be dynamically assigned?
If not, you will need to enter it in FirstGear’s Advanced Options.
• Does your ISP support the Multilink Protocol?
If you intend to connect both ISDN B channels simultaneously
for a 128 Kbps connection, your ISP must support the Multilink
Protocol.
Configuring TCP/IP Properties
NETGEAR recommends that you leave the TCP/IP setup parameters
at their factory default settings unless you have a specific reason to
change them. With the default settings, your PC is configured to
obtain its TCP/IP configuration information automatically from a
DHCP server on the local network. The Model RH340 router is
shipped preconfigured as a DHCP server and will assign the TCP/IP
configuration information described in the following section.
You must also be certain that your PC is set to “Obtain an IP address
automatically” in the Network Control Panel.
To confirm that the IP address will be automatically obtained:
1. Click on Start from the Windows toolbar.
2. Select Settings.
3. Select Control Panel.
4. Select Network.
5. Select the Configuration tab.
6. Within the Configuration window, select TCP/IP from the list
of network components shown.
If you have several TCP/IP entries in this window, choose the one
associated with your Ethernet adapter.
7. Click on Properties.
The TCP/IP menu opens.
8. Select the IP Address tab.
9. Select “Obtain an IP address automatically,” as illustrated
below.
Configuring TCP/IP
Configuring Windows 95 or Windows 98 for IP
Networking
All PCs must have an Ethernet network adapter card installed and
must have the TCP/IP networking protocol installed and configured.
TCP/IP installation may need to be done manually as described here.
To configure Microsoft
networking:
1. Click on Start from the Windows toolbar.
2. Select Settings.
3. Select Control Panel.
4. Select Network.
In the list of installed components, you must have Client for
Microsoft Networks, your Ethernet adapter, and TCP/IP.
Note:
components shown in the Network window in order to
install the adapter, TCP/IP, or Client for Microsoft
Networks.
If you need the adapter:
a. Click on the Add button.
b. Select Adapter, and then click on Add again.
c. Select the manufacturer and model of your Ethernet
adapter, and click on OK.
If you need TCP/IP:
a. Click on the Add button.
b. Select Protocol, and then click on Add again.
c. Select Microsoft.
d. Select TCP/IP, and click on OK.
If you need Client for Microsoft Networks:
a. Click on the Add button.
b. Select Client, and then click on Add again.
®
Windows 95 or Windows 98 for IP
It is not necessary to remove any other network
10. Click on OK.
To obtain the configuration information from the router:
1. Turn on the router. Be sure the router has been on for at least
one minute before continuing to step 2.
2. Reboot each PC on your network.
Verifying TCP/IP Properties
After your PC has been configured and rebooted, you can check the
TCP/IP configuration using the Windows utility winipcfg.exe (for
Windows NT
the Run window, type winipcfg at the prompt, and click on OK. In the
winipcfg display window, select your Ethernet adapter from the
drop-down menu, and verify the following information:
®
systems, use ipconfig.exe ). From the Start button, open
• The IP address should be between 192.168.0.2 and
192.168.0.31.
• The subnet mask should be 255.255.255.0.
• The default gateway should be 192.168.0.1.
Click on More Info, and verify the following:
• The DNS server should be 192.168.0.1.
2
Page 4

Qgy,,
Installing FirstGear
To configure your router, use the FirstGear
provided on the RH340 Resources CD.
Be sure the router is connected and has been
Note:
powered on for at least one minute before launching
FirstGear.
To install FirstGear:
1. Insert the NETGEAR RH340 Resources CD into the CD
drive of your PC, and run the Setup program.
a. Click on Start from the Windows toolbar.
b. Click on Run.
c. Click on Browse.
d. Click on the CD drive.
e. Select Setup.exe.
f. Click on OK.
The Setup window opens, which loads the FirstGear
program to your hard drive.
The Welcome Window opens.
2. Click on Next.
The Choose Destination Location window opens.
3. Click on Next to install the FirstGear program in the
Program Files folder. If you want to have the program placed
elsewhere, click on Browse to find an alternate location for
the software, and then click on Next.
The Select Program Folder window opens.
4. Be sure that “FirstGear for RH340” is shown in the Program
Folders entry field (the default name), or select a folder from
the Existing Folders list.
Or
You can type in a unique name for the folder. Verify that the
information on the screen is correct.
5. Click on Next.
The Setup Complete window opens.
6. Click on Finish.
FirstGear is now installed on your PC, and a FirstGear shortcut
icon now appears on the desktop of your PC.
You are now ready to launch FirstGear.
™
configuration software
3. Click on Next.
The Configuration Wizard ISDN Test window opens, as
illustrated below.
4. Click on the ISDN Test button.
The ISDN test begins. If the test is successful, the NETGEAR
message window opens, informing you the test was successful.
5. Click on OK.
If the ISDN test fails, trace information will be displayed to help
in troubleshooting. If so, refer to the “Troubleshooting” section
in this guide, recheck your ISDN setup information and the
physical connection, and then enter the correct ISDN
information. If the test continues to fail, refer to the
“Troubleshooting” section in the Reference Guide for the Model
RH340 Internet Access ISDN Router . After you enter the correct
information and the test is successful, the “test successful”
message screen opens.
6. Click on OK.
The Configuration Wizard ISP Information window opens, as
illustrated below.
Launching FirstGear
To launch FirstGear:
1. Double-click on the FirstGear icon on your desktop.
The Configuration Wizard ISDN Line Information -North
America window opens, as illustrated below.
2. Enter your ISDN information.
Be sure to enter your directory numbers in the local format (for
example, 5551111). Do not enter the area code unless it is
required for local dialing.
7. Enter your ISP account information.
Be sure to enter the ISP’s phone number as you
Note:
would dial it from your location (for example, 1 + area
code and the seven digit number only if it is not a local
call).
8. Click on Next.
The Configuration Wizard ISP Test window opens, as illustrated
below.
3
Page 5
Qgy,,
9. Click on ISP Test.
If the ISP test fails, recheck your ISP account information. Trace
information will be displayed to help in troubleshooting. If so,
refer to the “Troubleshooting” section on this page. If the test
continues to fail, refer to the “Troubleshooting” section in the
Reference Guide for the Model RH340 Internet Access ISDN
Router . After you enter the correct information and the test is
successful, the NETGEAR message screen opens.
10. Click on Yes when the FirstGear window opens, signifying
that the test was successful.
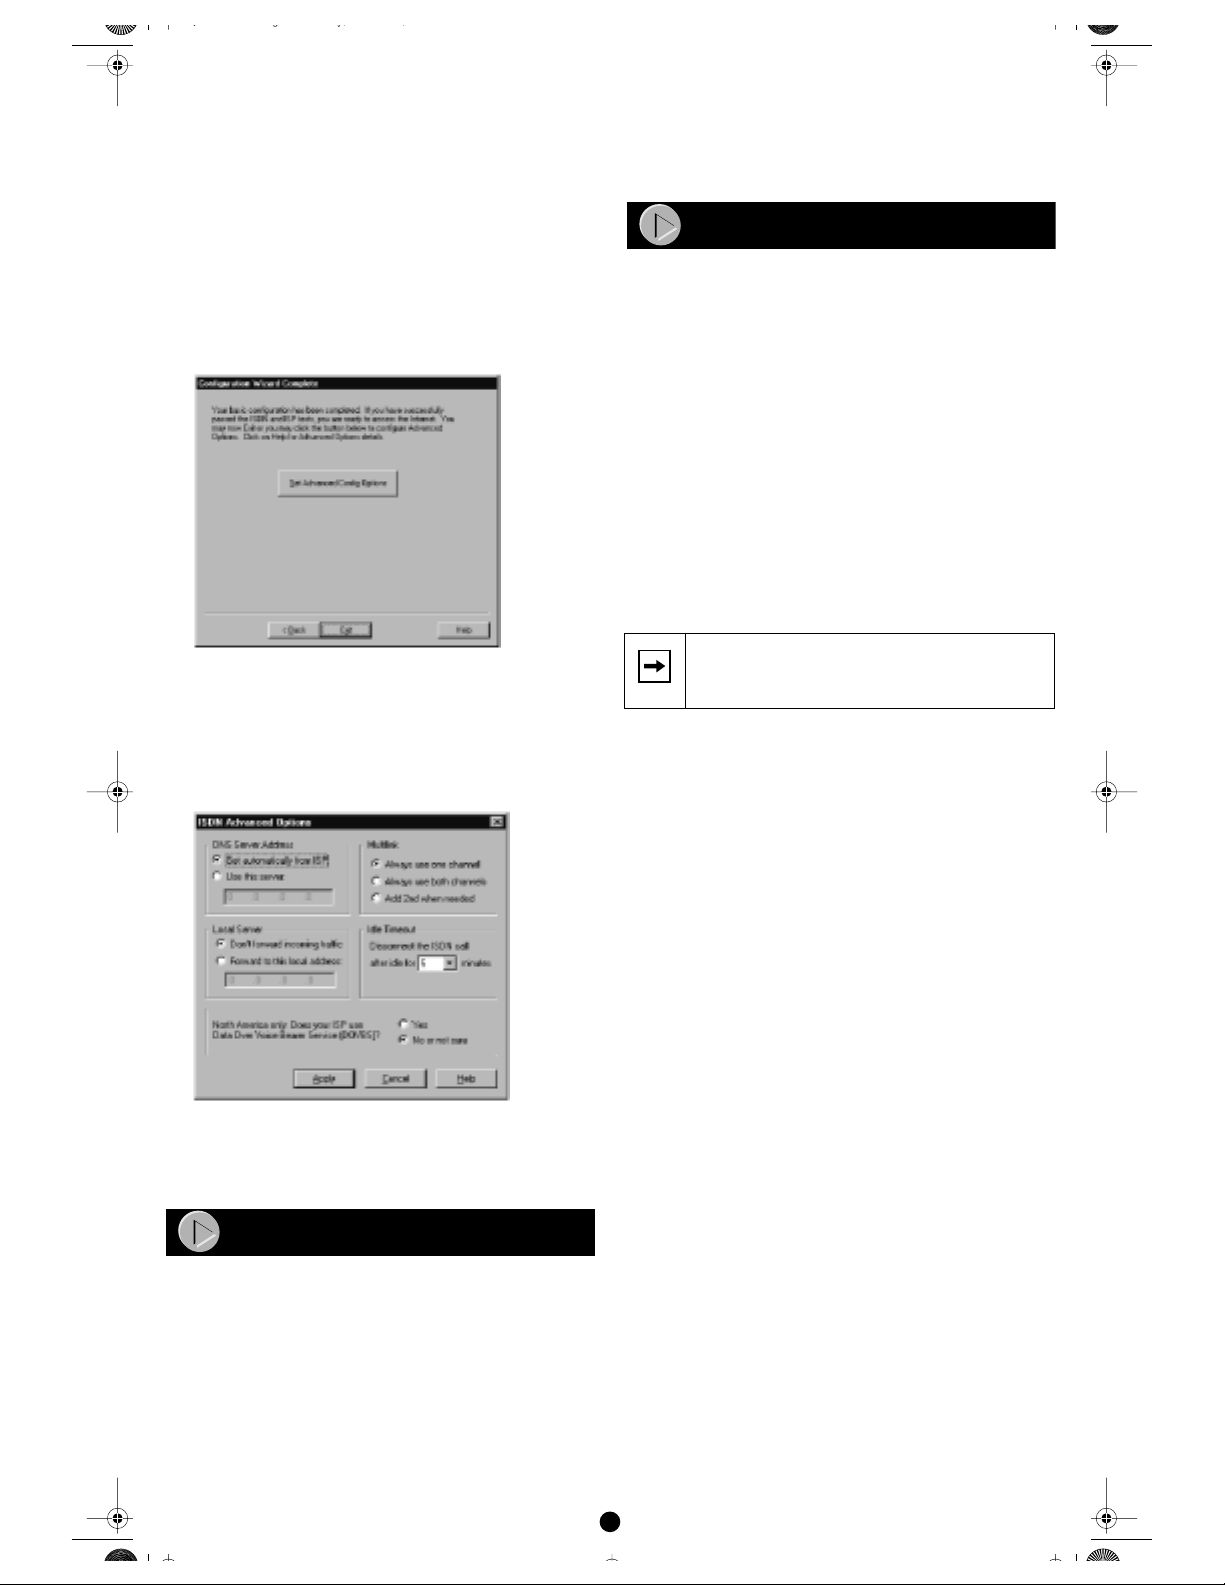
If the test is successful, the Configuration Window Complete
window opens, as illustrated below.
You are now configured for basic Internet functions (such as Web
access).
11. Click on Exit, or click on Set Advanced Config Options, as
illustrated below, for additional configuration features.
Or
After about five minutes of inactivity, the router will disconnect the
call. Upon further browser activity, the router will redial
automatically.
Additional applications information can be found in the Applications
folder on the RH340 Resources CD and on the NETGEAR Web site at
www.NETGEAR.com.
Troubleshooting
If FirstGear cannot find your router:
• Check the Ethernet connection between your PC and router. The
link LED on your Ethernet card and the corresponding port LED
on the router should be on.
• Be sure that the router has been on for at least one minute before
starting FirstGear.
If the ISDN connection test fails:
• Check that you entered the directory numbers in a correct format
for dialing locally. Do not enter the area code unless it is required
for local dialing.
• Recheck your directory numbers, SPIDs, and switch type.
• If your switch is running the National ISDN (NI-1) protocol,
select “National ISDN” rather than the switch model
(Nortel, AT&T).
If the ISP connection test fails:
• Check that you entered the phone number in the correct format
for dialing locally. Do not enter the area code unless it is required
for local dialing.
The Advanced Options window, illustrated below, provides the
configuration for the following procedures:
• Using a fixed DNS address
• Specifying a PC as a local server or game host
• Selecting Multilink options
• Changing the idle timeout
• Specifying DOVBS operation
For detailed information about the data to be entered in each FirstGear
screen, click on the Help button at the bottom of the screen. Your
Model RH340 router is now fully configured to provide Internet
access for your network.
Accessing The Internet
When your router and PCs are configured correctly, your router will
place a call to your ISP automatically whenever an application
requires access to the Internet. The router will also disconnect from
the ISP when the connection has been idle for approximately five
minutes. It is not necessary for you to run a dialer application such as
Dial-Up Networking to connect, log in, or disconnect. These functions
will be performed by the router as needed.
To access the Internet, launch a browser application such as
Microsoft’s Internet Explorer or Netscape’s Navigator. You should see
the router’s B1 LED illuminate, indicating that a call is being placed.
Soon the LAN activity LED will begin to flicker, indicating
communication between your router and your ISP. The browser
should then begin to display a page. This process may take up to one
minute.
Note:
In some areas, you must dial a local ISDN data call
using 1+ area code or you will receive a 56K connection
instead of a 64K connection.
If the router does not place a call when you launch your browser:
• Check that your PC has the router configured as its default
gateway. Verify the gateway address as described in the section
“Verifying TCP/IP Properties.”
• If your PC launches Windows Dial-up Networking, you will need
to change the Internet connection parameters. Access the Internet
Control Panel. Select the Connection tab. Depending on your
version of Dial-Up Networking, you will need to either:
a. Clear the check box labeled “Connect to the Internet
as needed.”
b. Select “Connect to the Internet using a local
area network.”
If your router connects, but you are unable to load any pages from the
Internet:
• Check that your PC has at least one DNS server address
configured. A DNS server is a host on the Internet that translates
Internet names (for example, a World Wide Web address) to
numeric IP addresses. Typically, your ISP will provide the
addresses of one or two DNS servers for your use. Following the
procedure described in the section “Verifying TCP/IP
Properties,” verify that a DNS server address is present.
More detailed troubleshooting information can be found in the
“Troubleshooting” chapter in the Reference Guide for the Model
RH340 Internet Access ISDN Router included on the RH340
Resources CD. Additional applications information can be found in
the Applications folder on the RH340 Resources CD and on the
NETGEAR Web site at www.NETGEAR.com.
4
Page 6

Qgy,,
© 2000 by NETGEAR, Inc. All rights reserved.
Trademarks
NETGEAR™ is a trademark of Netgear, Inc. Windows® is a registered trademark of Microsoft Corporation. Other brand and product names are
trademarks or registered trademarks of their respective holders. Information is subject to change without notice. All rights reserved.
Statement of Conditions
In the interest of improving internal design, operational function, and/or reliability, NETGEAR reserves the right to make changes to the products
described in this document without notice.
NETGEAR does not assume any liability that may occur due to the use or application of the product(s) or circuit layout(s) described herein.
Certificate of the Manufacturer/Importer
It is hereby certified that the Model RH340 Internet Access ISDN Router has been suppressed in accordance with the conditions set out in the
BMPT-AmtsblVfg 243/1991 and Vfg 46/1992. The operation of some equipment (for example, test transmitters) in accordance with the
regulations may, however, be subject to certain restrictions. Please refer to the notes in the operating instructions.
Federal Office for Telecommunications Approvals has been notified of the placing of this equipment on the market and has been granted the right
to test the series for compliance with the regulations.
VCCI-2 Statement
This equipment is in the 2nd Class category (information equipment to be used in a residential area or an adjacent area thereto) and conforms to
the standards set by the Voluntary Control Council for Interference by Data Processing Equipment and Electronic Office Machines aimed at
preventing radio interference in such residential areas.
When used near a radio or TV receiver, it may become the cause of radio interference.
Read instructions for correct handling.
Federal Communications Commission (FCC) Compliance Notice: Radio Frequency Notice
This device complies with part 15 of the FCC Rules. Operation is subject to the following two conditions:
• This device may not cause harmful interference.
• This device must accept any interference received, including interference that may cause undesired operation.
Note : This equipment has been tested and found to comply with the limits for a Class B digital device, pursuant to part 15 of the FCC Rules.
These limits are designed to provide reasonable protection against harmful interference in a residential installation. This equipment generates,
uses, and can radiate radio frequency energy and, if not installed and used in accordance with the instructions, may cause harmful interference to
radio communications. However, there is no guarantee that interference will not occur in a particular installation. If this equipment does cause
harmful interference to radio or television reception, which can be determined by turning the equipment off and on, the user is encouraged to try
to correct the interference by one or more of the following measures:
• Reorient or relocate the receiving antenna.
• Increase the separation between the equipment and receiver.
• Connect the equipment into an outlet on a circuit different from that to which the receiver is connected.
• Consult the dealer or an experienced radio/TV technician for help.
FCC Part 68 Compliance Statement
This equipment complies with Part 68 of FCC Rules. All direct connections to telephone network lines must be made using standard plugs and
jacks compliant with FCC Part 68.
EN 55 022 Declaration of Conformance
This is to certify that the Model RH340 Internet Access ISDN Router is shielded against the generation of radio interference in accordance with
the application of Council Directive 89/336/EEC, Article 4a. Conformity is declared by the application of EN 55 022 Class B (CISPR 22).
Bestätigung des Herstellers/Importeurs
Es wird hiermit bestätigt, daß das Model RH340 Internet Access ISDN Router gemäß der im BMPT-AmtsblVfg 243/1991 und Vfg 46/1992
aufgeführten Bestimmungen entstört ist. Das vorschriftsmäßige Betreiben einiger
Geräte (z.B. Testsender) kann jedoch gewissen Beschränkungen unterliegen. Lesen Sie dazu bitte die Anmerkungen in der Betriebsanleitung.
Das Bundesamt für Zulassungen in der Telekommunikation wurde davon unterrichtet, daß dieses Gerät auf den Markt gebracht wurde und es ist
berechtigt, die Serie auf die Erfüllung der Vorschriften hin zu überprüfen.
5
 Loading...