

Netgear ReadyRECOVER Installation Manual [zh]

ReadyRECOVER Software
User Manual
July 2014
202-11429-02
350 East Plumeria Drive
San Jose, CA 95134
USA

ReadyRECOVER Software
Support
Thank you for selecting NETGEAR products.
After installing your device, locate the serial number on the label of your
https://my.netgear.com. You must register your product before you can
recommends registering your product through the NETGEAR website. For product updates and web support, visit
h
ttp://support.netgear.com.
Phone (US & Canada only): 1
Phone (Other Countries): Check the list of
888-NETGEAR.
-
phone numbers at http://support.netgear.com/general/contact/default.aspx.
product and use it to register your product at
use NETGEAR telephone support. NETGEAR
Compliance
For regulatory compliance information, visit http://www.netgear.com/about/regulatory.
See the regulatory compliance document befo
re connecting the power supply.
Trademarks
NETGEAR, the NETGEAR logo, and Connect with Innovation are trademarks and/or registered trademarks of NETGEAR, Inc.
and/or its subsidiaries in the United States and/or other countries. Information is subject to change without notice.
© NETGEAR, Inc. All rights reserved.
2

Contents
Chapter 1 ReadyRECOVER Solution Overview
Chapter 2 Install and Configure ReadyDATA
Chapter 3 Install and Configure ShadowProtect Agents
ReadyDATA Hardware Installation . . . . . . . . . . . . . . . . . . . . . . . . . . . . . . . . . . . . . . .6
Determine the IP Address of Your ReadyDATA . . . . . . . . . . . . . . . . . . . . . . . . . . . .6
Change the Administrator Password . . . . . . . . . . . . . . . . . . . . . . . . . . . . . . . . . . . . .8
Supported Disks and Initial Startup . . . . . . . . . . . . . . . . . . . . . . . . . . . . . . . . . . . . . .8
Create a Volume and Select the RAID Level . . . . . . . . . . . . . . . . . . . . . . . . . . . . . . .9
Supported Platforms . . . . . . . . . . . . . . . . . . . . . . . . . . . . . . . . . . . . . . . . . . . . . . . . 14
Install ShadowProtect. . . . . . . . . . . . . . . . . . . . . . . . . . . . . . . . . . . . . . . . . . . . . . . . 14
Configure Your First Backup Job. . . . . . . . . . . . . . . . . . . . . . . . . . . . . . . . . . . . . . . 15
Browse Recovery Points . . . . . . . . . . . . . . . . . . . . . . . . . . . . . . . . . . . . . . . . . . . . . 22
Mount Recovery Points for File Recovery. . . . . . . . . . . . . . . . . . . . . . . . . . . . . . . 24
Full Volume Restore for Data Volumes . . . . . . . . . . . . . . . . . . . . . . . . . . . . . . . . . 25
Full System Restore or Bare Metal Recovery . . . . . . . . . . . . . . . . . . . . . . . . . . . . 28
Boot the Recovery Environment and Map to the VHDX Stores . . . . . . . . . . 29
Restore Volumes. . . . . . . . . . . . . . . . . . . . . . . . . . . . . . . . . . . . . . . . . . . . . . . . . . 31
Hardware Independent Restore . . . . . . . . . . . . . . . . . . . . . . . . . . . . . . . . . . . . . 36
3

1. ReadyRECOVER Solution Overview
1
ReadyRECOVER is a complete backup and recovery appliance designed for small and
medium-sized businesses. Next-generation file system technology guarantees data integrity,
efficient use of storage capacity, and minimal impact to computing resources. With
ReadyRECOVER, full backups are instantly created every 15 minutes and can be used
independently to quickly and reliably restore files, folders, or systems to any platform, physical or
virtual.
al
Traditional backup solutions create increment
resource-draining, full backup jobs to maintain data integrity and timely restore points. With
ReadyRECOVER, each snapshot is a space-efficient recovery point that never requires image
chain management or consolidation. In addition, each snapshot captures the entire target
system, the Windows operating system, all services, all applications, all settings, and all data for
fast full-system recovery.
image chains and require regular
ReadyRECOVER is a seamless integration of t
NETGEAR
The solution has storage-efficient data-protection capabilitie
• Protection of physical and virtual servers. T
• Synthetic full backups. Every b
• Fifteen-minute recovery points.
• Storage efficiency. The
• W
For more information about the topics covered in this manual, visit the suppo
http://suppo
®
and ShadowProtect backup and recovery software from StorageCraft.
- Windows physical servers
- VMware, Hype
provides quick single-file restoration and hardware-independent full restoration of server
operating systems and their applications to any supported platform (physical servers,
virtualization platforms).
of the total capacity of the server (64 TB maximum per logical drive).
all data is compressed when it is written and only unique blocks of ongoing backups must
be stored on disk. The more backups that are stored, the larger the savings become.
AN efficiency. F
changes are replicated with ReadyDATA replicate.
rt.netgear.com.
r-V, and Xen servers (Windows guest operating systems)
ackup is represented as a full image (.vhdx) and
storage consumption of this solution is highly efficient because
or customers replicating backup sets offsite, only incremental block
he ReadyDA
Backups can be set to 15-minute intervals, regardless
TA unified storage platform from
s that deliver the following benefits:
hese servers include the following:
rt website at
4

2. Install and Configure ReadyDATA
If you have not done so already, install and configure the ReadyDATA unified storage platform.
This chapter covers the following topics:
• ReadyDATA Hardware Installation
• Determine the IP Address of Your ReadyDATA
• Change the Administrator Password
2
5
ReadyRECOVER Software
ReadyDATA Hardware Installation
Information about installing the ReadyDATA 5200 and 516 is found in the following resource s:
• ReadyDATA
These documents are available on the resource CD that came with your produ
also obtain these manuals by clicking the ? icon in the ReadyDATA dashboard.
• The support website at http://support.netge
Hardware Manual and ReadyDATA OS Software Manual.
ct. You can
ar.com.
Determine the IP Address of Your ReadyDATA
If you have not discovered your ReadyDATA, connect the unit to your network and make sure
that a DHCP server can reach the ReadyDATA. By default, the ReadyDATA is configured to
receive an IPv4 IP address from a DHCP server.
If the ReadyDATA cannot locate a DHCP server, the unit is assigned an IP address through
Automatic Priva
Addressing Without a DHCP Server” in the ReadyDATA OS Software Manual.
RAIDar is a software application that you use to discover ReadyDATA systems on the
network. RAIDar is include
versions for Windows, Mac, and Linux operating systems. RAIDar is also available at
www.netgear.com/readydata.
To discover the ReadyDATA system and launch the dashboard:
te IP Addressing (APIP
d on the resource CD that
A). For more information, see “Automatic Private IP
came with your system, which includes
1. Install the appropriate version of RAIDar on a computer that is connected to the same
LAN as the Rea
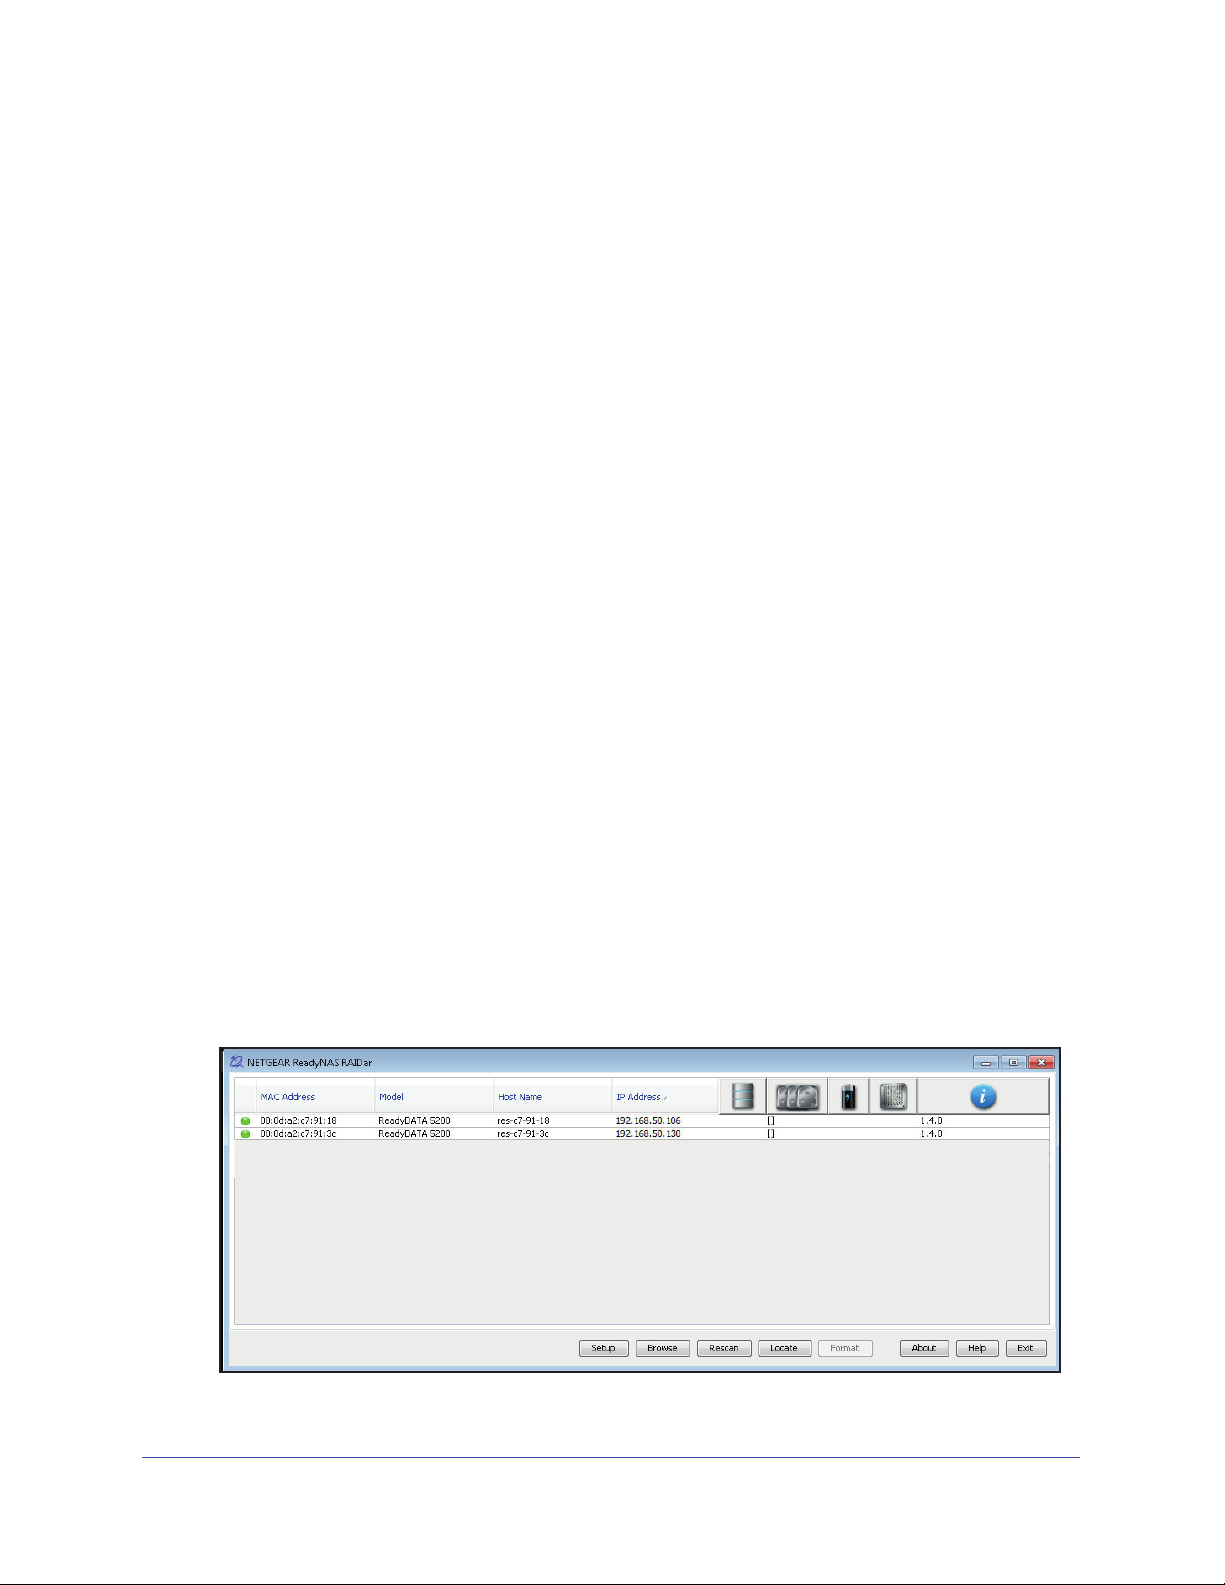
2. Launch the RAIDar utility.
RAI
Dar displays a screen that lists the systems on the network and prov
the status of each system that it discovers.
3. Highlight the ReadyDATA and click the Setup button.
dyDATA.
ides details about
Install and Configure ReadyDATA
6
ReadyRECOVER Software
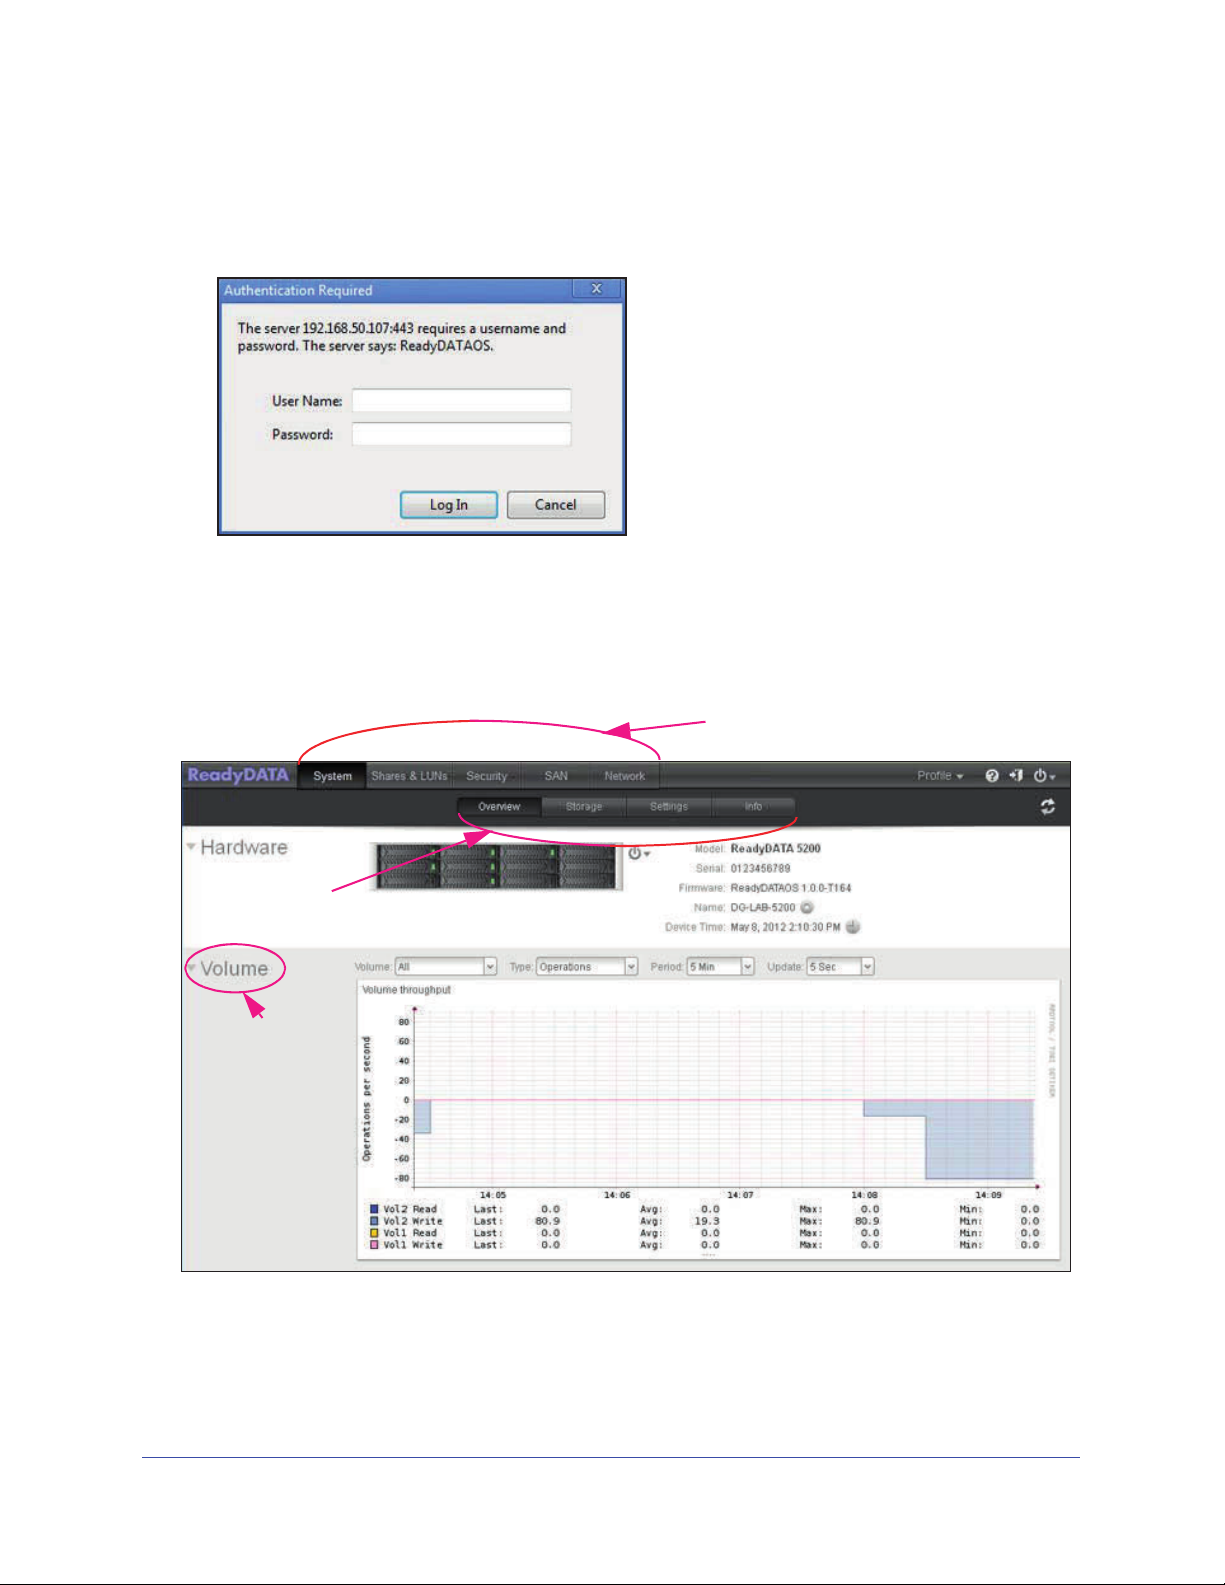
System configuration bar
Navigation bar
Section heading
RAIDar opens your default browser and prompts you to log in to the ReadyDATA.
If you are unable to discover your ReadyDATA , see the ReadyDAT
for troubleshooting steps.
4. Log in to the ReadyDATA using the def ault login credentials:
a. As the default use
b. As the default password, en
r name, enter admin (case-sensitive).
ter password (case-sensitive).
The dashboard screen displays.
A OS Software Manual
Install and Configure ReadyDATA
7
ReadyRECOVER Software
Change the Administrator Password
Choose an administrator password that is different from the default p assword and keep it in a
safe place. Anyone who obtains this password can change settings or erase data that is
stored on the ReadyDATA.
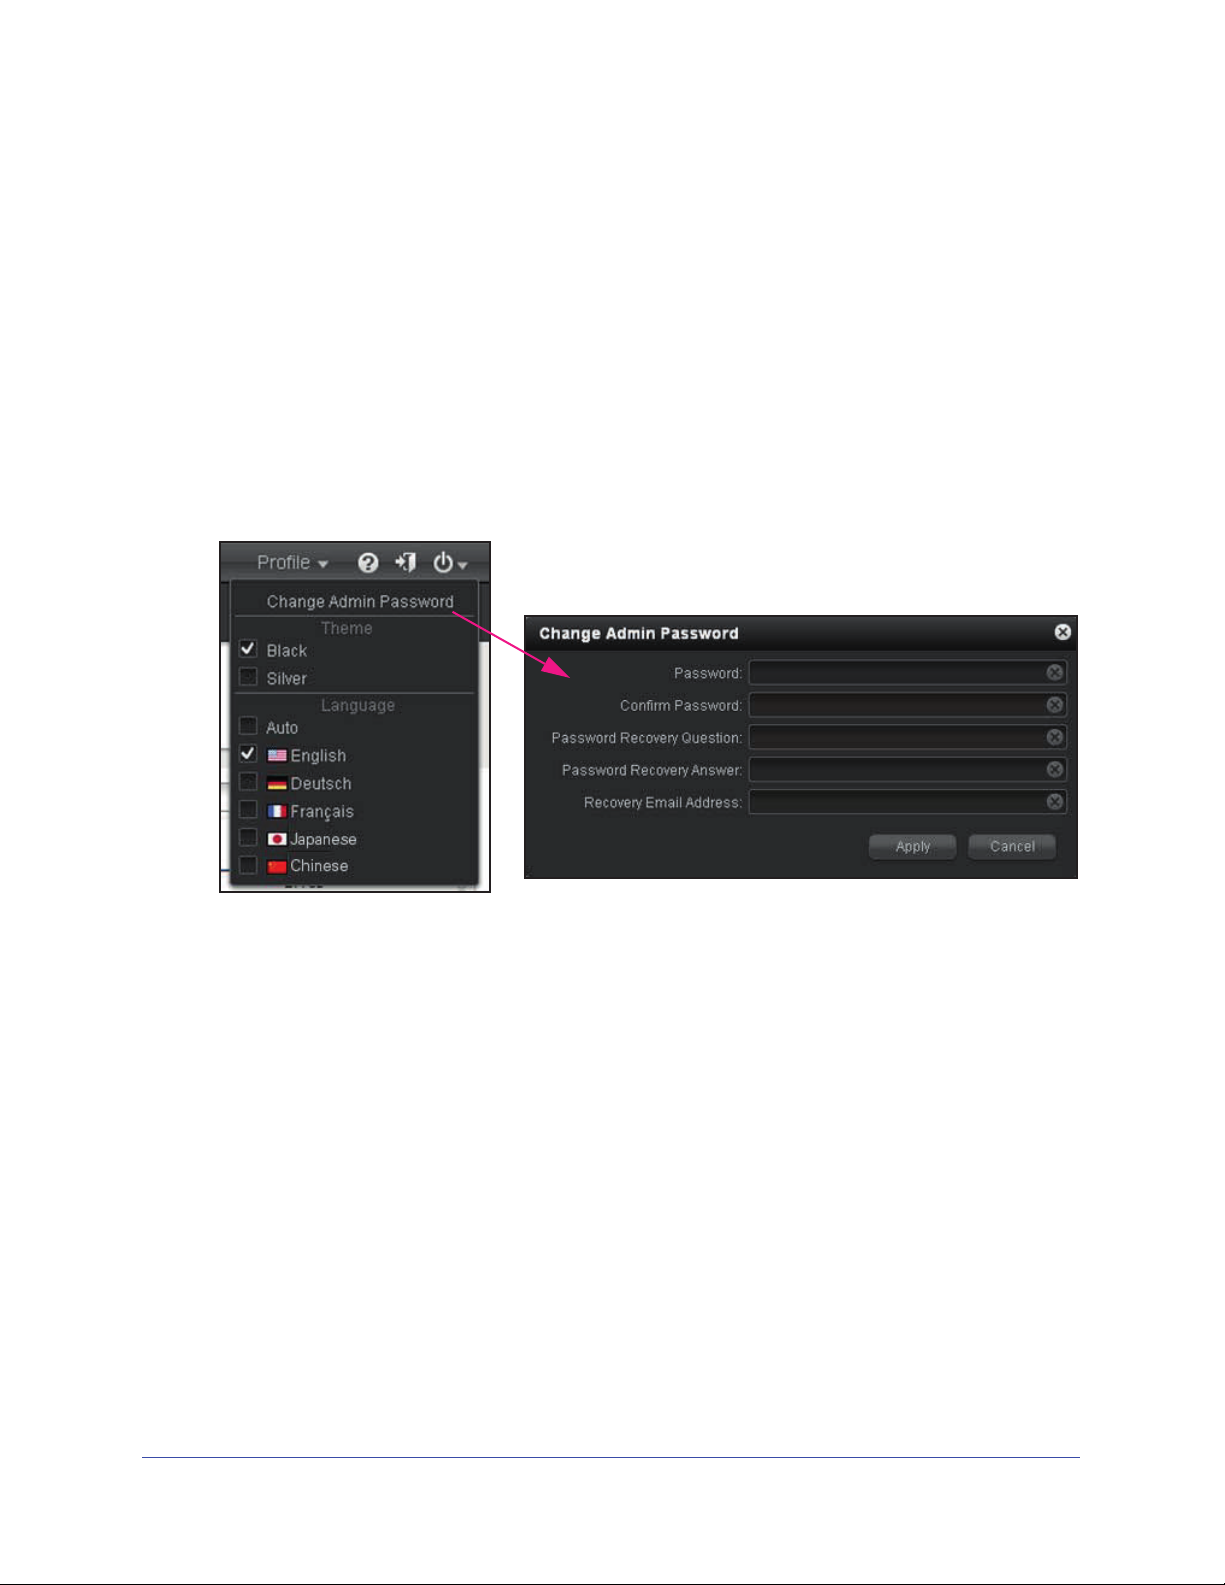
To change the administrator password:
1. On the navigation bar at the right, select Profile.
The Profile
2. Select Change Ad min Pa
The Change Admin Password pop-up screen displays:
3. Click the Apply button.
menu displays (see the following figure).
ssword.
Supported Disks and Initial Startup
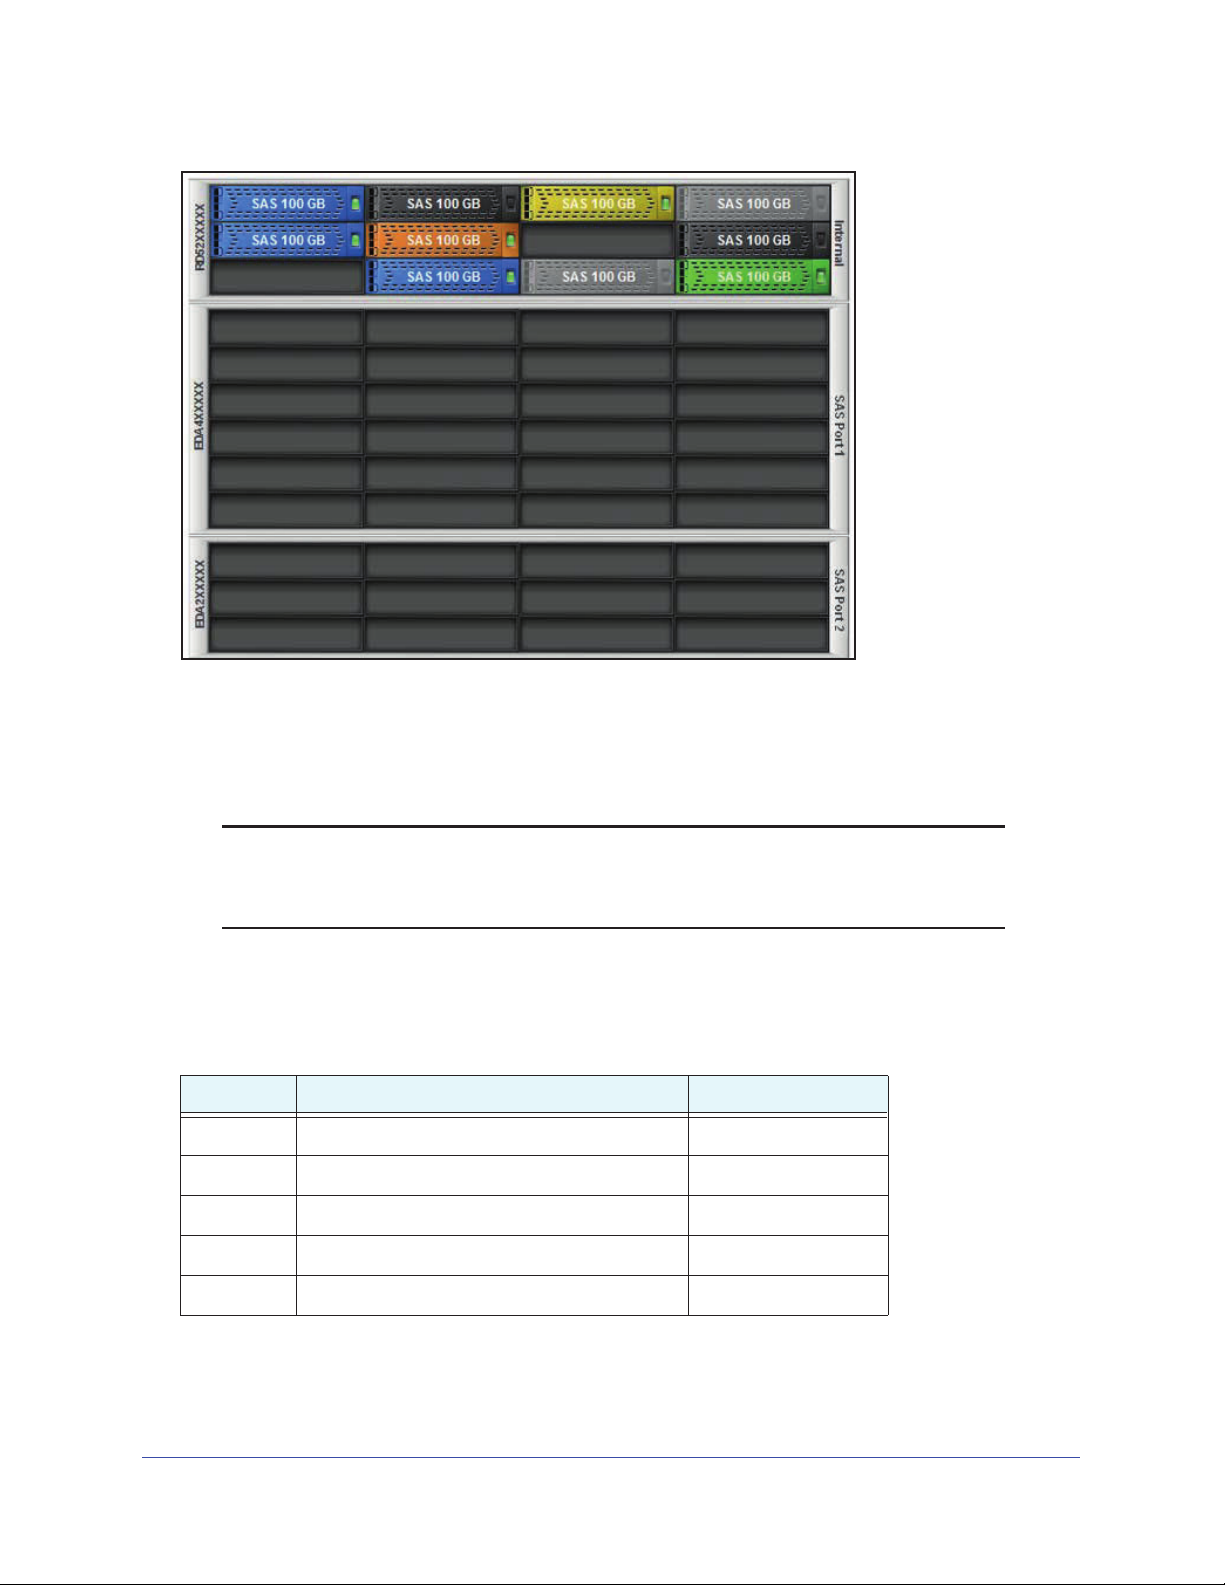
The ReadyDATA 5200 supports up to 12 disks. With optional expansion disk arrays that can
contain either 12 or 24 disks each, you can increase the total number of supported disks
to 60. The following figure shows a ReadyDAT
that supports 24 disks and another array that supports 12 disks.
The ReadyDATA 516 supports up to 6 disks an
For information about additional information about supported disk types, see the ReadyDATA
OS Software Manual for your system.
Install and Configure ReadyDATA
A 5200 with an optional expansion disk array
d does not supp
8
ort expansion disk arrays.
ReadyRECOVER Software
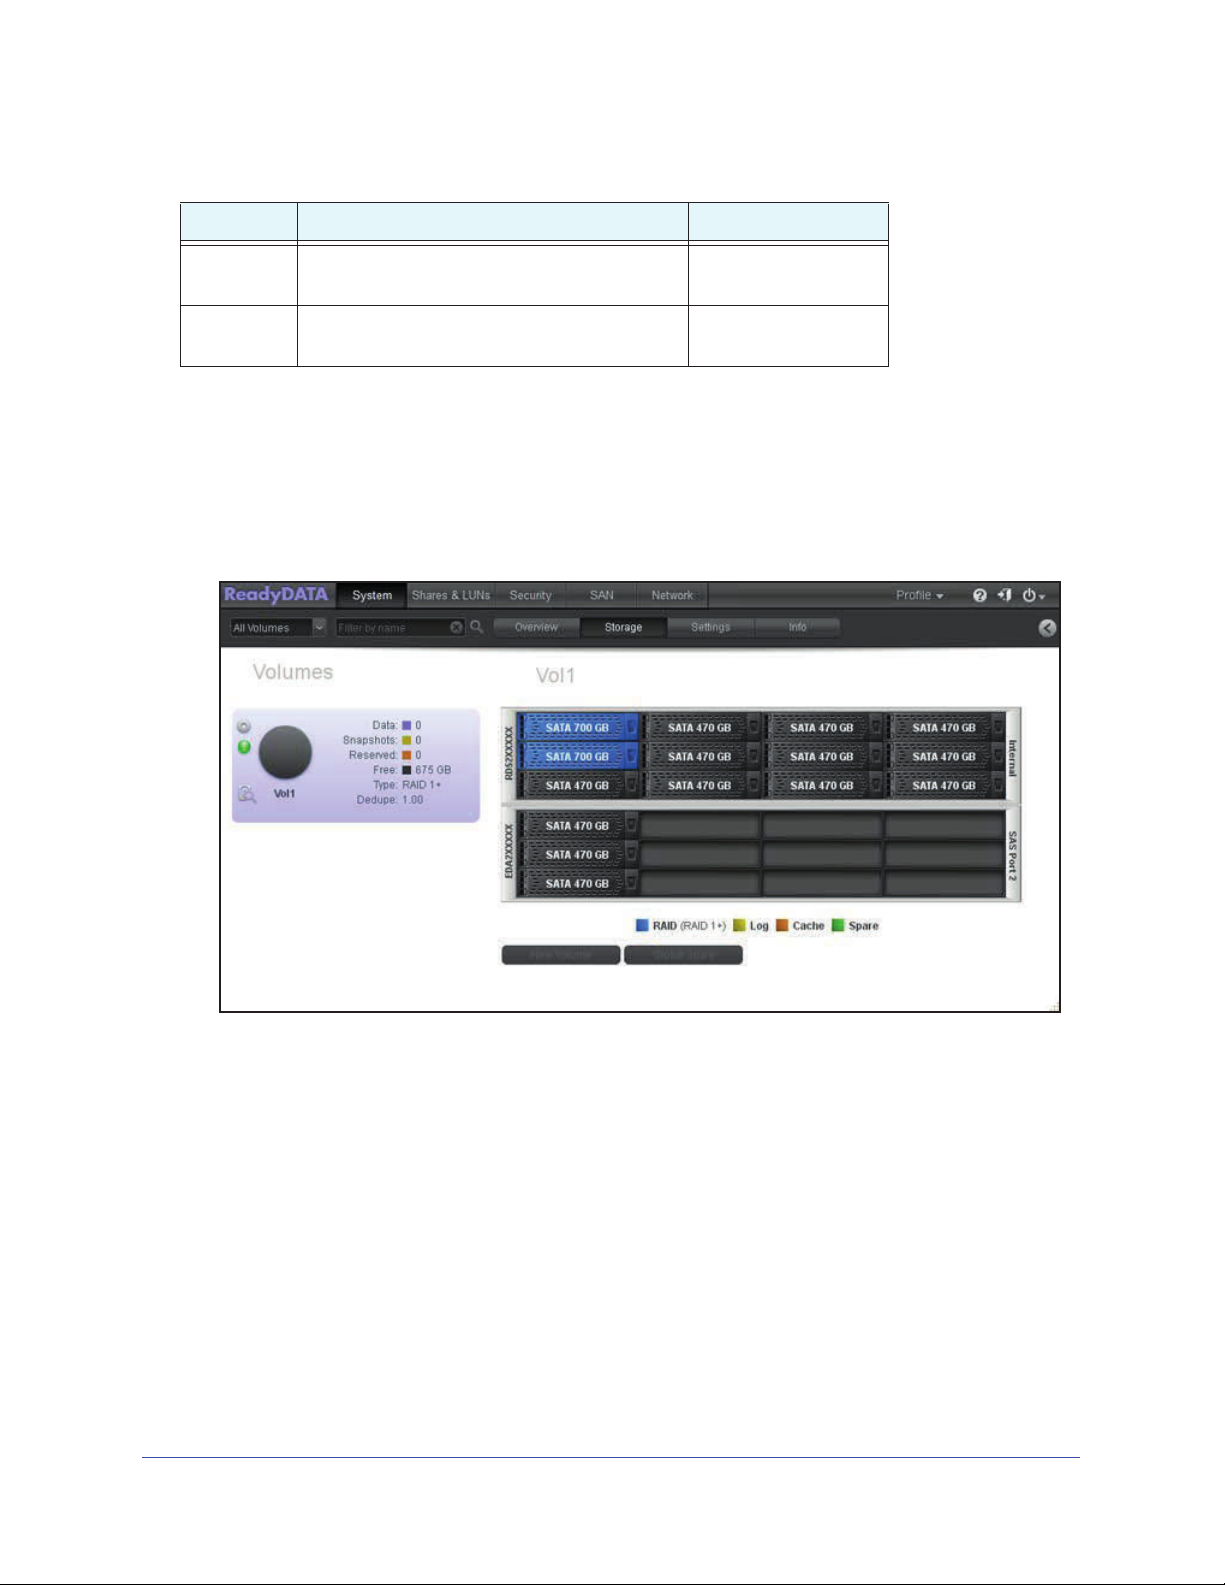
Figure 1. ReadyDATA 5200 with optional disk expansion arrays as displayed on Dashboard
Create a Volume and Select the RAID Level
Note: ReadyRECOVER requires a dedicated volume. Other workloads,
such as LUNs for virtualization or file server, must be serviced by
separate volumes.
For small ReadyRECOVER volumes with six disks or less, RAID 5 or RAID 6 can be used.
Larger ReadyRECOVER volumes with more than six disks should use RAID 50 or RAID 60.
Table 1. RAID level and required number of disks
RAID Level Number of Required Disks Redundancy
RAID 0 1 or more None
RAID 1 2 only (more disks are not supported in RAID 1) Supported
RAID 5 3 or more Supported for one disk
RAID 6 4 or more Supported for two disks
RAID 10 4 or more, but an even number Supported for all disks
Install and Configure ReadyDATA
9
ReadyRECOVER Software
Table 1. RAID level and required number of disks (continued)
RAID Level Number of Required Disks Redundancy
RAID 50 6 or more, but an even number Supported for one disk
per RAID 5 set
RAID 60 8 or more, but an even number Supported for two disks
per RAID 6 set
To create a volume and select the RAID level:
1. On the ReadyDATA screen, select System > Storage.
The Storage screen displays.
The following figure shows one optional expansion disk array and on
e volume. A new
system does not have any volumes.
2. In the enclosure, click the disks that you want to select as members of the volume.
You can select disks with a black color coding only. If you have an expansion disk array,
you can select d
isks from both the ReadyRECOVER Software and the expansion disk
array.
The selected disks are highlighte
d and all volu
New Volume button under the enclosure:
Install and Configure ReadyDATA
10
me buttons become available, including the
ReadyRECOVER Software
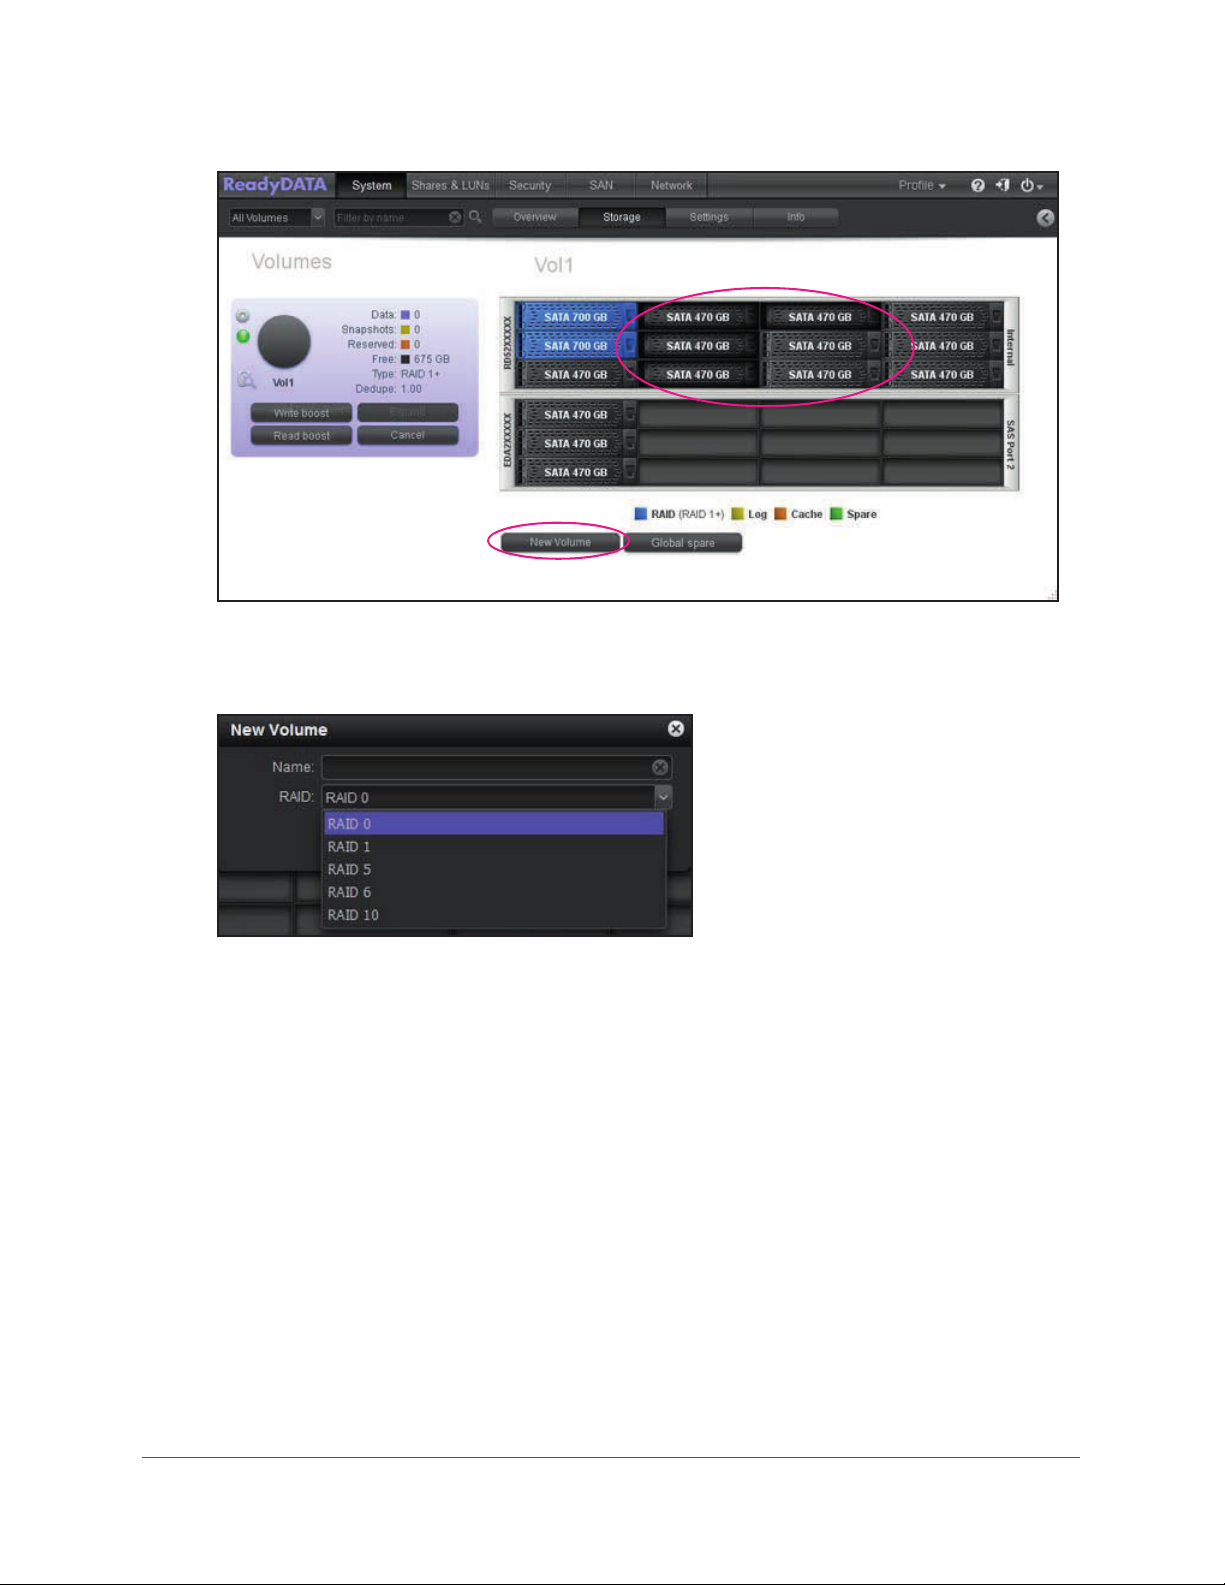
3. Below the enclosure, click New Volume button.
The New Volume pop-up screen displays:
The RAID levels that are displayed depend on the number of disks that you selected.
Note: For ReadyRECOVER, RAID 50 or RAID 60 should be used with disk
groups that a
re no larger than nine disks.
4. Configure the following settings:
• Name. Enter a name for the volume
. The volume name must begin with a letter, and
can contain only alphanumeric characters, underscores (_), hyphens (-), periods (.),
and colons (:). The volume names mirror, logs, and spare are reserved and cannot be
used, as are all names that begin with the c[0–9] pattern. However, you can use
names that begin with the C[a–z0–9] or c[a–z] pattern.
• RAID. From the drop-down
list, select the RAID level. The RAID level that you can
select depends on the number of disks that you selected in Step 2. For more
information, see Table 1 on page 9.
Install and Configure ReadyDATA
11

ReadyRECOVER Software
If you select RAID 5 and six or more disks (or RAID 6 and eight or more disks), a
screen opens letting you select RAID 5+0 instead of RAID 5 (or RAID 6+0 instead of
RAID 6).
5. Click the Create
The volume is created.
button.
Install and Configure ReadyDATA
12

3. Install and Configure
ShadowProtect Agents
To use ReadyRECOVER with your NETGEAR ReadyDATA unified storage platform, install and
configure the ShadowProtect backup and recovery software from StorageCraft. This chapter
covers the following topics:
• Supported Platforms
• Install ShadowProtect
• Configure Your First Backup Job
• Browse Recovery Points
• Mount Recovery Points for File Recovery
• Full Volume Restore for Data Volumes
• Full System Restore or Bare Metal Recovery
3
13
 Loading...