

Page 1

ReadyNAS Remote Troubleshooting Guide
NETGEAR
June 2010
Page 2
Symptom: I cannot see any shares from my PC
This symptom can be caused by a variety of reasons. To diagnose the problem, please
make sure your are on a PC that is on the same LAN as the ReadyNAS and follow
these steps:
1. From the PC, open a Windows File Explorer or IE and in the address line type:
\\192.168.x.x where 192.168.x.x is the local IP address of the ReadyNAS. If no
shares are present then you need to go to FrontView and create a shared folder
with CIFs access. If shares are present, go to step 2.
2. Log into FrontView and go to the Installed Add-ons page.
3. Check the version of ReadyNAS Remote. If not running the latest, please update
the addon. The latest add-ons can be found at
https://remote.readynas.com/download.html; if the latest is running, go to step 4.
4. If the latest version is installed, check that ReadyNAS Remote is running. You
can check this by viewing the LED indicator graphic in the upper right corner. If it
is green then it is running, go to step 5.
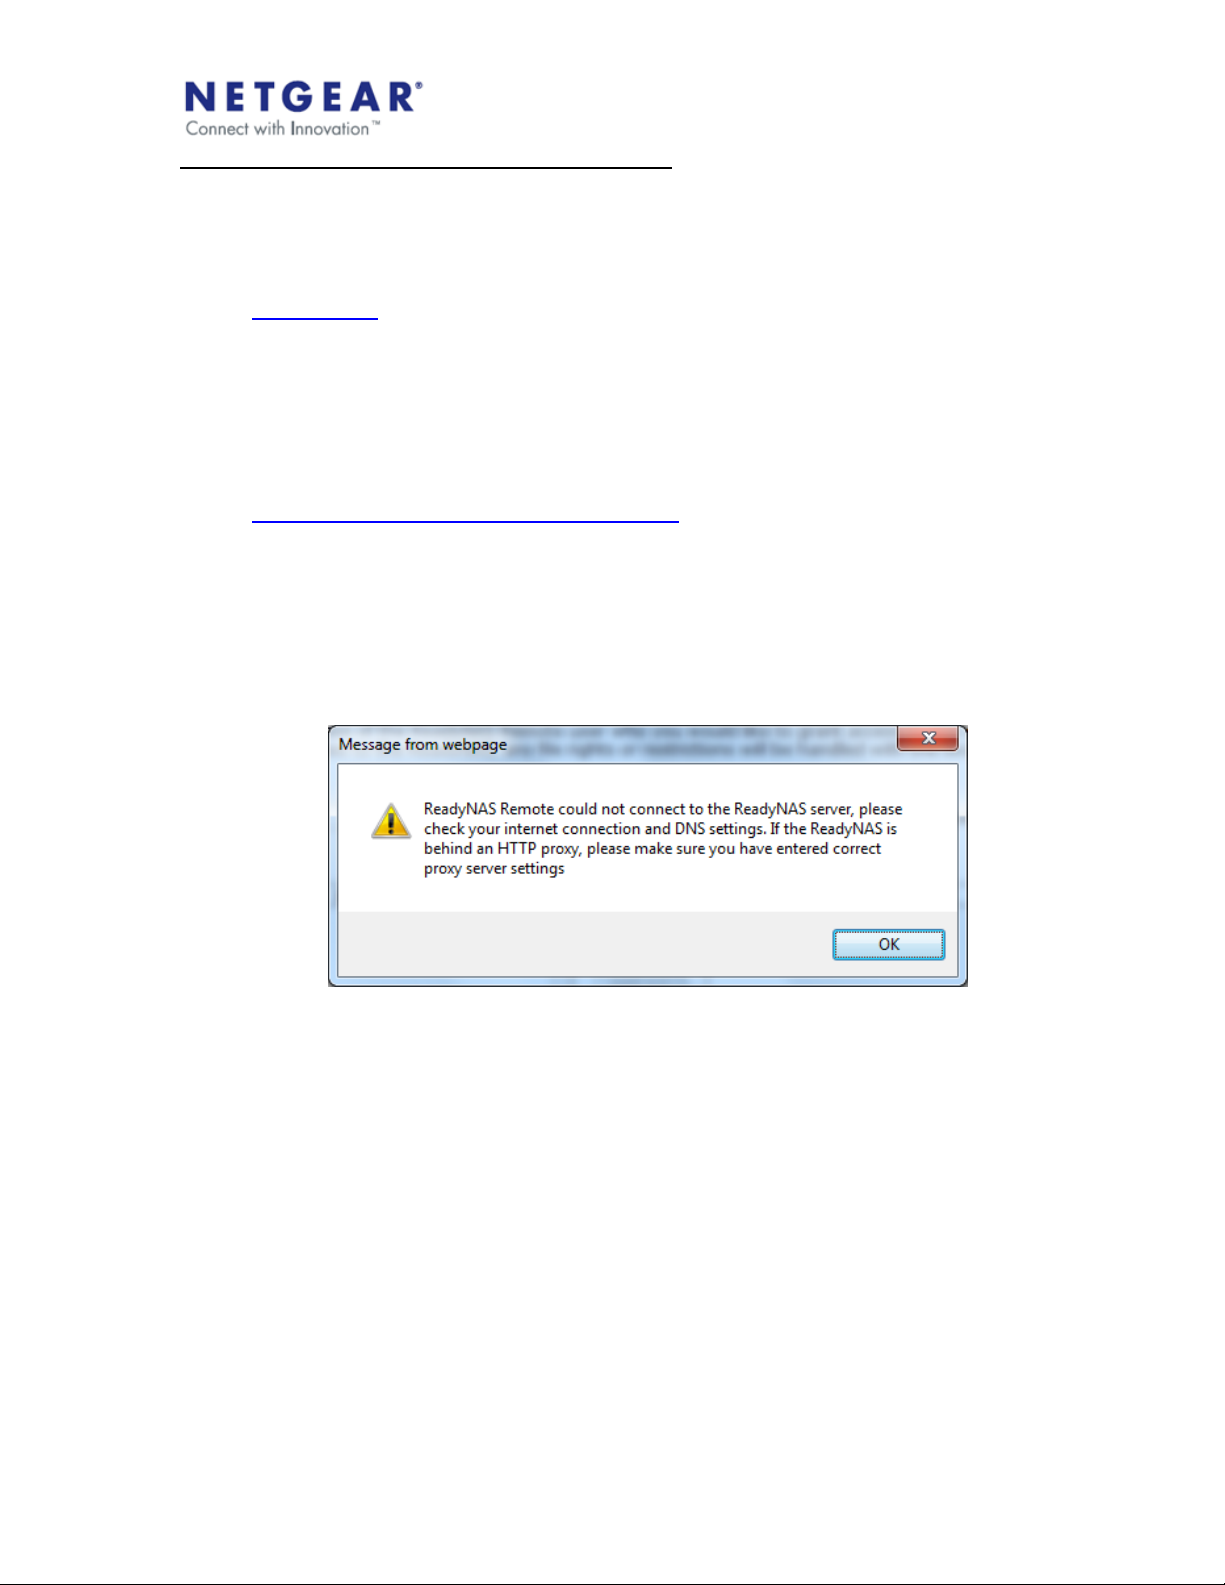
5. If it is running, press the Manage ReadyNAS Remote button to launch the
ReadyNAS Remote management page. If you receive the following message:
This indicates that the ReadyNAS Remote add-on could not connect over the
internet to the ReadyNAS Remote servers; this could be caused by improper
network setting or if the ReadyNAS is behind and HTTP proxy, go to step 6. If
you do not receive this message, go to step 8.
6. If you are sure you are not behind an HTTP proxy, then there must be a problem
with your network setting. If you are using DHCP and that DHCP server is used
for other devices on the LAN that are working properly, then SSH access to the
ReadyNAS is required to further troubleshoot the issue. If you are using a static
IP, you can try changing to DHCP to see if that resolves the issue otherwise
review your network settings. Please check that your IP address, subnet mask
and Default gateway and make sure they are on the same subnet. Next, check
your DNS server address. If you are not sure of your DNS server, it is safest to
set it to the address of your Default gateway. One way to check your DNS server
is go open a DOS Window on a PC that is on the same LAN and type ‘ipconfig
/all’ and in the output you will see the address if the DNS server being used by
the PC. If the issue is still not resolved, then SSH access to the ReadyNAS is
Page 3

required for further troubleshooting, please contact support or PM forum user
Cap1.
7. If you are behind a proxy, then see
http://www.readynas.com/download/remote/ReadyNAS_Remote_Advanced_setu
p_guide.pdf for details on setting a proxy server for ReadyNAS Remote.
8. Once you can property access the ReadyNAS Remote Management page, check
the “Allowed” list and make sure there are users in this list. If there are users in
this list, make note of them. If there are no users in the list or if there are only
email address preceded by *email invite* in the list and not usernames, then
create a new user using https://remote.readynas.com/index.jsp?pid=4. You can
use the same email address when creating this user. After the user is created,
search for this user by email address. You may see multiple username when
searching with the email and some may look like leaf_XXXXXXX, but please
select the username that you just created. If there are users in the list, proceed to
step 9.
9. If there are users in the list, press the Advanced Settings button and you will see
the configuration page. Check that Device ID is set; this value is set
automatically and should be set to hostname_MAC. If this value is empty, you
can try to change the hostname from within the FrontView settings and return to
this page to check to see if the Device ID is set. If changing the hostname is not
an option or if the Device ID is still empty, then SSH access to the ReadyNAS is
required for further troubleshooting, please contact support or PM forum user
Cap1. If the Device ID is set, go to set 10.
10. If the Device ID is set, make sure no other advanced options other than the proxy
settings if they are sure they are behind a proxy. Do not check “Specify Port for
Incoming Connections” that is optional and should only be set after everything
else checks out, go to step 11.
11. If you have made it to this step, then you should be running the latest version on
the ReadyNAS, be able to see the ReadyNAS Remote Management page
without any warning, users should be in the Allowed list, the device ID should not
be empty and no other advanced settings (other than possibly proxy) should be
set, go to step 12.
12. Check again that the LED indication, as in step 4, is green and now proceed to a
PC, step 13.
13. On the PC, first check that the Leaf Networks Adapter was properly installed. To
check this, open a DOS window and type ipconfig. You should see an entry
“Ethernet adapter Leaf Networks Adapter” if not you can try to uninstall and
reinstall ReadyNAS Remote or you can set the adapter manually, please see
http://www.readynas.com/download/remote/manual_install_adapter.pdf. If you
see “Ethernet adapter Leaf Networks Adapter” but the IP address is not in the
range 5.168.0.0 – 5.168.255.255, then you need to manually configure the
adapter, please see
http://www.readynas.com/download/remote/manual_config_adapter.pdf, if the
adapter is properly installed go to step 14.
Page 4

14. If your adapter is properly installed and configured, please login to the
ReadyNAS Remote application with the noted username from step 8. If you still
do not see your shares and you are on a Windows 7 or Vista machine, please
remove the gateway setting on the Leaf Networks Adapter, please see
http://www.readynas.com/download/remote/ReadyNAS%20Remote%20%20Removing%20gateway%20from%20virtual%20network%20adapter.pdf. If
you are not on Windows 7/Vista or still do not see any shares after logging in and
selecting Connect to ReadyNAS…, logout and go to Properties and select
Connection setting and make sure “Enable port forwarding” is not selected. If
you still do not see shares after logging into the ReadyNAS Remote application,
stay logged in and go to FrontView and go to the Installed Add-ons page. On
this page you can stop and start the ReadyNAS Remote addon by checking the
box in the upper of the add-on and pressing Save; this will stop the add-on. By
checking it again and pressing Save again it will start the add-on. You can
repeat this test a few times, if shares are still not showing up go to step 15.
15. If shares are still not showing up, it is likely that an antivirus program is blocking
ReadyNAS Remote. The configuration depends on the program, but in general
check that ReadyNASRemote.exe is in the trusted program list and that it is
allowed ALL protocols (not only TCP and UDP) in and out. Also, make sure that
the Leaf Networks Adapter is in the trusted network list.
16. If shares are still not available, please contact support or PM forum user Cap1.
Symptom: I can see shares when on the LAN but not when on the WAN
This should not happen, but it is does you can ask them to try to setup port forwarding
on the ReadyNAS side or even PC said if possible. If port-forwarding is not an option or
if it does not remedy the issue, please contact support or PM forum user Cap1.
Symptom: My connection to my shares is slow
This symptom can be caused by a variety of reasons.
1. First check if the connection of the LAN is slow or if only over the WAN, if it is
slow over the LAN (less than 50% of the LAN speed) go to step 2.
2. If it is slow over the LAN (less than 50% of the LAN speed), then check to see if
you are connected through the relay server. If you are using a relayed
connection, you should get a popup notification over the system try icon when
they connect that notifies them that they are using a relay to connect to your
ReadyNAS. If the ReadyNAS and PC are on the same LAN and subnet, then a
relay should not have to be used, please contact support or PM forum user
Cap1. If you are not using a relay then check the CPU load on the PC and on
the ReadyNAS (if possible) during a file transfer. If the CPU load is low then it
has to be a networking issue that is out of our control. That can also be checked
by accessing the file over the LAN directly using \\192.168.x.x in a file explorer
where 192.168.x.x is the local IP address of the ReadyNAS. If the connection is
only slow over the WAN, go to step 3.
3. If the connection is only slow over the WAN, then check to see if you are using a
relay. If you are not using a relay then the performance is limited but the WAN
connection between the PC and the ReadyNAS and there is nothing we can do
Page 5
for this issue. If the connection is slow over the WAN and they are using a relay,
go to step 4.
4. If the connection is slow over the WAN and you are using a relay, they can setup
port forwarding on either side PC or ReadyNAS (but not both). For more
information please see,
http://www.readynas.com/download/remote/ReadyNAS_Remote_Advanced_setu
p_guide.pdf
Symptom: I cannot see shares from my Mac
I cannot see shares from a Mac.
1. First make sure the Mac and ReadyNAS are on the same LAN and that the user
you are using to access the ReadyNAS is in the Allowed list.
2. If you still cannot see shares, then try from a PC on the same LAN. If you do not
have a PC, please contact support or PM forum user Cap1. If they have a PC
and cannot see the shares, see “I cannot see any shares from my PC”. If they
PC can see the shares but the Mac cannot see any shares, please contact
support or PM forum user Cap1.
Symptom: From my Mac I can see the ReadyNAS listed but when I click on it I do
not see any shares.
If you can see the ReadyNAS in the list but not access any shares.
1. Please make sure you have AFP enabled on the share on the ReadyNAS. By
default the Mac application uses AFP. If you do not want to enable AFP on the
ReadyNAS they can go to Properties then Connection Setting and select SMB.
 Loading...