

Page 1

Quick Start Guide
n-Hub NTC-20
Page 2

| Wireless M2M
2
Quick start guide
This quick start guide is designed to get you up and
running quickly with your new NetComm Wireless n-Hub.
More advanced set up instructions are provided in the user
guide which can be opened by clicking on the Help tab
on the Web-UI, or can be downloaded from
http://www.netcommwireless.com/product/m2m/ntc-20
Package contents
This package includes
1. 1 x NetComm Wireless n-Hub
2. 1 x Stand up base
3. 1 x Wireless security card
4. 1 x Quick start guide
Power supply accessories are delivered in a separate
package according to the country plug type where the
device will be used. The power supply package consists of:
5. 1 x Power supply cable with gure 8 connector and
wall plug for your region (AU/EU/UK/US)
6. 1 x Wall plug adapter for your region (AU/EU/UK/US)
If any of these items are missing or damaged, please contact
NetComm Wireless Support immediately. The NetComm
Wireless Support website can be found at:
http://support.netcommwireless.com
Page 3

| Wireless M2M
3
NTC-20 - n-Hub
1
2
6
4
5
NetCommWireless
Wireless Security Card
Keep this card in a secure place for easy access
to your NetComm Wireless M2M device
Wireless Network Name (SSID): XXXX XXXX
Wireless Security Key: XXXXXXXXXX
Bluetooth Device Name: XXXXXX
IMEI:
0123456789101112
3
Page 4

| Wireless M2M
4
Device overview
No. ITEM DESCRIPTION
1 LED Indicator
Indicates the overall status of the n-Hub. See
the LED indicator table for a list of statuses and
their meanings.
2 OLED Display OLED display with 128x64 pixel resolution.
3
button
This button is generally used to move the
highlighted option down each time it is pressed,
but can have other functions based on the
context. When not used to scroll, the button’s
function is displayed just above it on the OLED
display.
4
button
This button is generally used to select the
currently highlighted option, wake the screen
when the n-Hub is idle and power on the unit
when it has been switched off. When not used
to select the highlighted option, the button’s
function is displayed just above it on the OLED
display.
5
Micro USB 2.0
OTG Port
Provides connectivity for optional external
storage or a USB Ethernet dongle. Supplies
up to 0.5A to connected device.
The Micro USB port can be used to connect
directly to a PC using a USB cable.
Page 5

| Wireless M2M
5
NTC-20 - n-Hub
1
5
2
43
Page 6

| Wireless M2M
6
LED indicators
COLOUR STATE DESCRIPTION
Off Device is on and working normally.
On Hardware error.
Flash twice
every 5 sec
Message displayed on screen. Flashes as
long as message is on screen.
Flashing Powering up.
Flash twice
every 5 sec
Powered on with screen switched off.
On
Success (such as when a pair or transmit
action takes place).
Page 7

| Wireless M2M
7
NTC-20 - n-Hub
Getting started
Inserting the SIM card
1. Hold the n-Hub with the back panel facing you. Use both
thumbs to slide the top of the panel upwards to reveal the
SIM card holder.
Page 8
| Wireless M2M
8
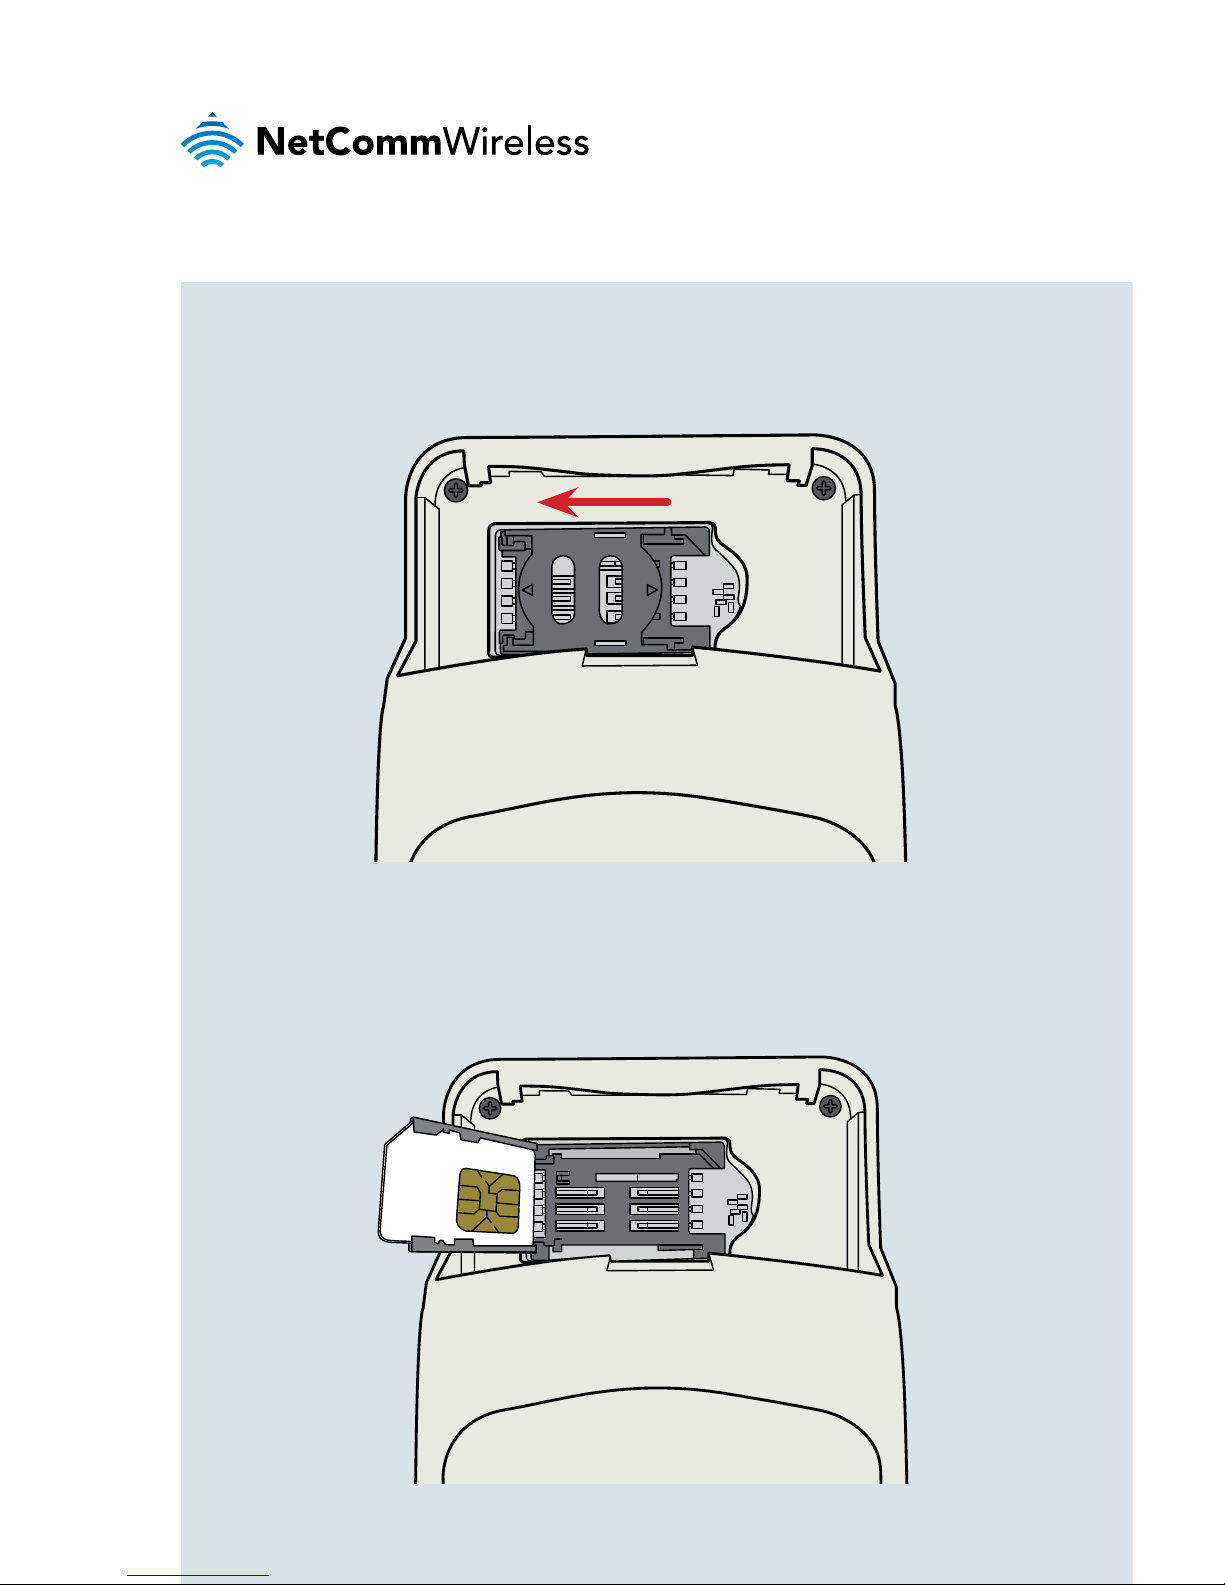
2. Slide the locking mechanism to the left so that the hinged
SIM tray can be moved.
3. Pull the SIM tray up and to the left, then insert the SIM
card with the gold side facing down in the orientation
as shown below.
OPEN
LOCK
Page 9

| Wireless M2M
9
NTC-20 - n-Hub
4. Lower the SIM card tray, then slide the SIM tray
locking mechanism to the right so that it is locked.
5. Replace the top panel that you removed in step 1
by sliding it down until it clicks into place.
OPEN
LOCK
Page 10

| Wireless M2M
10
Powering and
mounting the n-Hub
The n-Hub can be attached directly to a wall socket or
mounted on a table top.
Page 11

| Wireless M2M
11
NTC-20 - n-Hub
Directly into the wall socket
To attach the n-Hub directly to the wall socket, slide the wall
plug adapter on to your n-Hub. Plug the n-Hub directly into
the wall socket with the wall plug adapter attached and turn
on the power. Wait approximately 2 minutes for your n-Hub
to start up. The LCD screen displays the NetComm Wireless
logo and the word “Menu” at the bottom right side of the
screen when it has completed booting.
1 2
3 4
Page 12

| Wireless M2M
12
Using the gure 8 cable
1. To mount the n-Hub on a table top, thread the gure 8 end
of the power cable through the hole in the stand up base.
2. Connect the gure 8 power cable
to the power port of the n-Hub.
Page 13

| Wireless M2M
13
NTC-20 - n-Hub
3. Slide the cover for the power port into place
and push it until it locks in place.
Page 14

| Wireless M2M
14
4. Attach the stand up base to the bottom
of the n-Hub as shown below.
Page 15

| Wireless M2M
15
NTC-20 - n-Hub
6. Connect the power cable to a wall socket and turn on the
power. Wait approximately 2 minutes for your n-Hub to
start up. The LCD screen displays the NetComm Wireless
logo and the word “Menu” at the bottom right side of the
screen when it has completed booting.
5. Thread the power cable through the groove in the base.
Page 16

| Wireless M2M
16
Connecting
WiFi devices
The n-Hub runs a wireless access point by default, allowing
you to connect your wireless client devices immediately.
To connect a wireless client to the access point:
1. On your wireless device, scan for wireless networks
in range. The n-Hub’s SSID (network name) and
password are printed on the Wireless Security Card
included in the box.
2. Connect to the network name that matches the one listed
on the Wireless Security Card.
3. When prompted, enter the password as printed on the
Wireless Security Card. Your device connects to the
n-Hub’s access point and can access the Internet and
other devices connected to the n-Hub.
NetComm
Wireless
Wireless Security Card
Keep this card in a secure place for easy access
to your NetComm Wireless M2M device
Wireless Network Name (SSID): XXXX XXXX
Wireless Security Key: XXXXXXXXXX
Bluetooth Device Name: XXXXXX
IMEI:
0123456789101112
Connecting
1. Using your device, scan for the Wireless Network
Name (SSID) on the other side of this card.
2. When asked for your wireless security settings, enter the
Wireless Security Key.
Location
NetCommWireless
SC-00001 rev 2
Page 17

| Wireless M2M
17
NTC-20 - n-Hub
Connecting
Bluetooth devices
To pair a Bluetooth device:
1. Press the
or button on the front of the n-Hub
to wake the screen up.
2. Press the
button once to bring up the Main Menu.
3. Press the
button to scroll down to Bluetooth,
then press the
button to select it.
Page 18

| Wireless M2M
18
4. Press the button to scroll down to Start discover.
BPM
76
5. Press the button. The n-Hub begins scanning for
Bluetooth devices* within range that are ready to be paired.
example device
* The other device should be made discoverable just before starting
the Bluetooth process with the NTC-20.
Page 19

| Wireless M2M
19
NTC-20 - n-Hub
6. Set your Bluetooth device to be discoverable.
When it has been found by the n-Hub, it appears in the list.
Press the button to scroll down to the device in the list,
then press the
button to select it. Depending on your
Bluetooth device, it may pair immediately or prompt you
to conrm that the number displayed on both devices is
identical. If the numbers are identical, press the button
to conrm, then conrm it on your Bluetooth device.
The devices are paired.
To go back in the menu
scroll down using the button until <Back> is selected,
then press the
button.
Page 20

Product Warranty
For warranty information please visit:
http://www.netcommwireless.com/product/m2m/ntc-20
Safety and product care
Please refer to the user guide for safety and product care
information.
QSG-00087 rev 1
NETCOMM WIRELESS LIMITED ABN 85 002 490 486
Head Ofce, 18-20 Orion Road
Lane Cove, Sydney, NSW 2066, Australia
p: +61 2 8205 3888 f: +61 2 9424 2010
e: m2msales@netcommwireless.com
www.netcommwireless.com
 Loading...