

NetComm Vodafone MachineLink 3G, NWL-10, Vodafone MachineLink 3G Plus, NWL-12, Vodafone MachineLink 4G Configuration Manual
...
Vodafone MachineLink
SMS Tools Configuration Guide
SMS Tools Configuration Guide – Vodafone MachineLink
2 of 23
September 2016 v. 2.0
vodafone.netcommwireless.com
Document history
This guide covers the following products:
Vodafone MachineLink 3G (NWL-10)
Vodafone MachineLink 3G Plus (NWL-12)
Vodafone MachineLink 4G (NWL-22)
Ver.
Document description
Date
v. 1.0
Initial document release.
March 2013
V 1.1
Updated introduction with more information about GDSP platform
June 2013
v. 2.0
Revised content based on current firmware.
September 2016
Table i - Document revision history
Note – Before performing the instructions in this guide, please ensure that you have the latest firmware version installed on your router.
Visit http://vodafone.netcommwireless.com to download the latest firmware.
Copyright
Copyright© 2016 NetComm Wireless Limited. All rights reserved.
Copyright© 2016 Vodafone Group Plc. All rights reserved.
The information contained herein is proprietary to NetComm Wireless and Vodafone. No part of this document may be
translated, transcribed, reproduced, in any form, or by any means without prior written consent of NetComm Wireless
and Vodafone.
Trademarks and registered trademarks are the property of NetComm Wireless Limited or Vodafone Group or their
respective owners. Specifications are subject to change without notice. Images shown may vary slightly from the actual
product.
Note – This document is subject to change without notice.
SMS Tools Configuration Guide – Vodafone MachineLink
3 of 23
September 2016 v. 2.0
vodafone.netcommwireless.com
Contents
Introduction 4
Notation
The following symbols are used in this user guide:
The following note requires attention.
The following note provides a warning.
The following note provides useful information.

SMS Tools Configuration Guide – Vodafone MachineLink
4 of 23
September 2016 v. 2.0
vodafone.netcommwireless.com
Introduction
The SMS tools application has been developed to include basic SMS functionality such as sending a message, receiving a message and redirecting
an incoming message to another destination. You can also utilise this functionality to read and change run-time variables on the router.
The SMS diagnostics feature is enabled by default. When using a Vodafone GDSP SIM card with your router, you must use the GDSP web interface
to send and receive the SMS messages as the router is pre-configured with security settings to accept SMS messages from the GDSP platform. If
using a generic SIM card with your router, the messages must be formatted according to the API.
Basic functionality supported:
Ability to send a text message via a 3G network and store in permanent storage
Ability to receive a text message via a 3G network and store in permanent storage
Ability to forward incoming text messages via a 3G network to another remote destination which may be a TCP/UDP server or other
mobile devices.
Ability to read run-time variables from the device (e.g. uptime) and send result to a remote destination which may be a TCP/UDP
server or other mobile devices.
Ability to change live configuration on the device (e.g. connection APN)
Ability to execute supported commands (e.g. reboot)
The Setup page provides the options to enable or disable the SMS messaging functionality and SMS forwarding functionalities of the router. SMS
messaging is enabled by default.
Figure 1 - General SMS Configuration
SMS Tools Configuration Guide – Vodafone MachineLink
5 of 23
September 2016 v. 2.0
vodafone.netcommwireless.com
OPTION
DEFINITION
General SMS configuration
SMS messaging
Toggles the SMS functionality of the router on and off.
Messages per page (10-50)
The number of SMS messages to display per page. Must be a value between
10 and 50.
Encoding scheme
The encoding method used for outbound SMS messages. GSM 7-bit mode
permits up to 160 characters per message but drops to 50 characters if the
message includes special characters. UCS-2 mode allows the sending of
Unicode characters and permits a message to be up to 50 characters in length.
SMS forwarding configuration
Forwarding
Toggles the SMS forwarding function of the router on and off.
Redirect to mobile
Enter a mobile number as the destination for forwarded SMS messages.
TCP server address
Enter an IP address or domain name as the destination for forwarded SMS
messages using TCP.
TCP port
The TCP port on which to connect to the remote destination.
UDP server address
Enter an IP address or domain name as the destination for forwarded SMS
messages using UDP.
UDP port
The UDP port on which to connect to the remote destination.
Table 1 - SMS Setup Settings
SMS forwarding configuration
Incoming text messages can be redirected to another mobile device and/or a TCP/UDP message server.
Redirect to mobile
You can forward incoming text messages to a different destination number. This destination number can be another mobile phone or a router
phone number.
For Example:
If someone sends a text message and Redirect to mobile is set to “+61412345678”, the text message is stored on the router and forwarded to
“+61412345678” at the same time.
To disable redirection to a mobile, clear the Redirect to mobile field and click the Save button.
Redirect to TCP / UDP server address
You can also forward incoming text messages to a TCP/UDP based destination. The TCP or UDP server can be any kind of public or private server if
the server accepts incoming text-based messages.
The TCP/UDP address can be an IP address or domain name. The port number range is from 1 to 65535. Please refer to your TCP/UDP based SMS
server configuration for which port to use.
For Example:
If someone sends a text message and TCP server address is set to “192.168.20.3” and TCP port is set to “2002”, this text message is stored in the
router and forwarded to “192.168.20.3” on port “2002” at the same time.
To disable redirection to a TCP or UDP address, clear the TCP server address and UDP server address fields and click the Save button.
SMS Tools Configuration Guide – Vodafone MachineLink
6 of 23
September 2016 v. 2.0
vodafone.netcommwireless.com
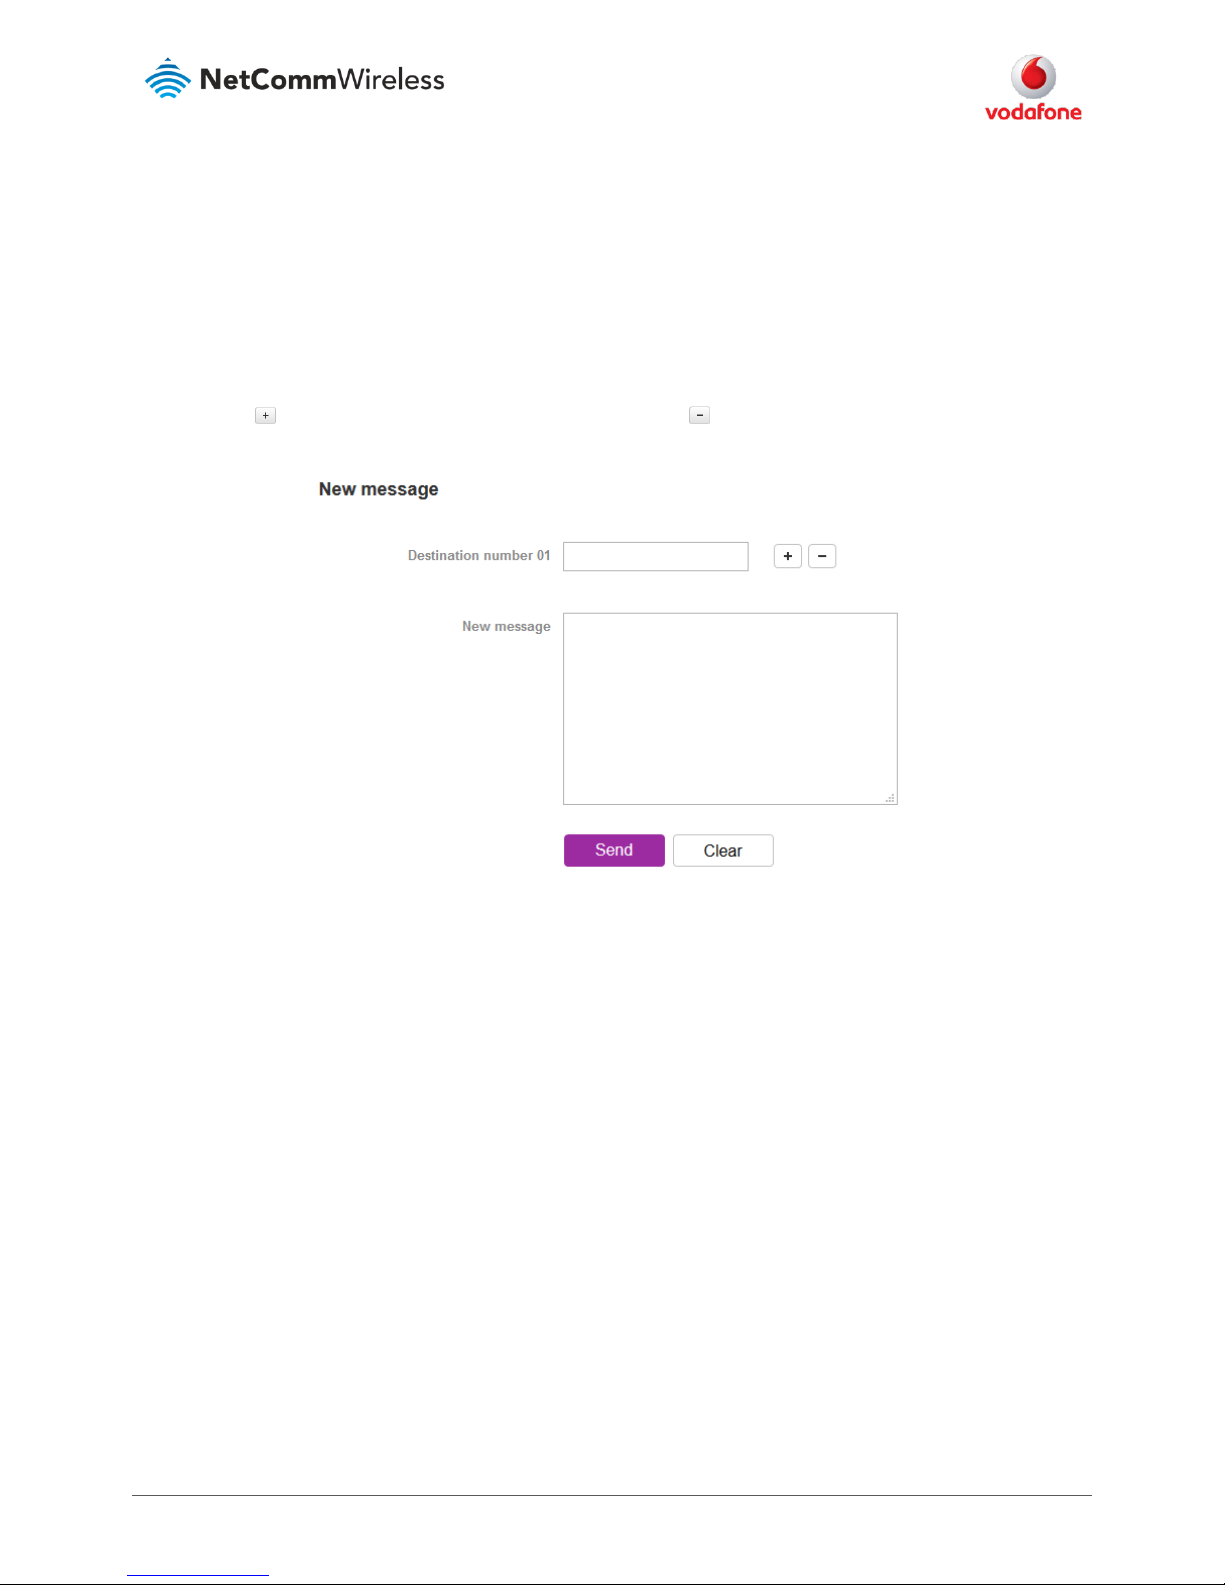
New message
The New message page can be used to send SMS text messages to a single or multiple recipients. To access the New message page, click on the
Services menu item from the top menu bar, select the SMS messaging menu on the left then select the New message menu item.
A new SMS message can be sent to a maximum of 9 recipients at the same time. After sending the message, the result is displayed next to the
destination number as “Success” or “Failure” if the message failed to send. By default, only one destination number field is displayed. Additional
destination numbers may be added one at a time after entering a valid number for the current destination number field. To add a destination
number, click the button and to remove the last destination in the list, click the button.
Figure 2 - SMS - New Message
Destination numbers should begin with the “+” symbol followed by the country calling code. To send a message to a destination number, enter
the “+” symbol followed by the country calling code and then the destination number.
For example:
To send a message to the mobile destination number 0412345678 in Australia (country calling code 61), enter “+61412345678”.
After entering the required recipient numbers, type your SMS message in the New message field. As you type your message, a counter shows how
many characters you have entered out of the total number available for your chosen encoding scheme. When you have finished typing your
message and you are ready to send it, click the Send button.
SMS Tools Configuration Guide – Vodafone MachineLink
7 of 23
September 2016 v. 2.0
vodafone.netcommwireless.com
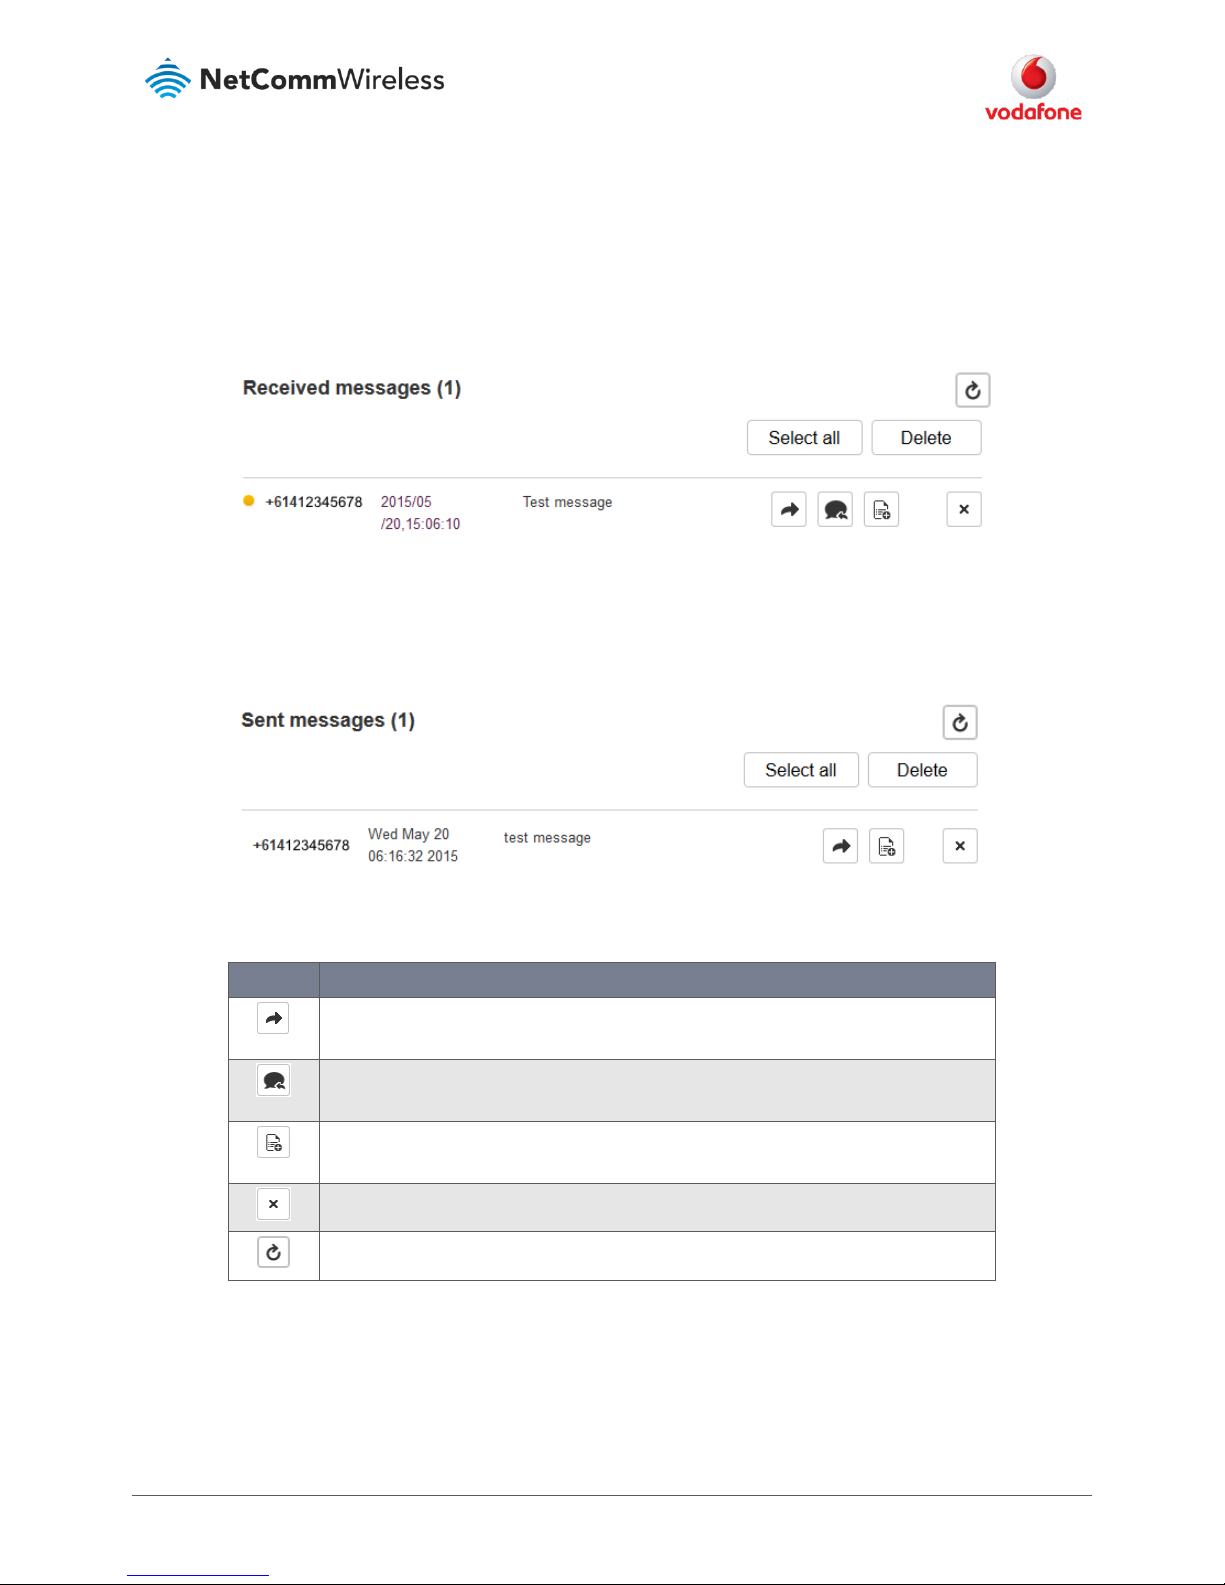
Inbox / Sent Items
The Inbox displays all received messages that are stored on the router while Sent Items displays all sent messages. To access the Inbox page, click
on the Services menu item from the top menu bar, select the SMS messaging menu on the left then select the Inbox menu item.
Figure 3 - SMS Inbox
To access the Sent items page, click on the Services menu item from the top menu bar, select the SMS messaging menu on the left then select
the Sent items menu item.
Figure 4 - SMS Outbox
Icon
Description
Forward button. Click this button to open a new message window where you can forward the
corresponding message to another recipient.
Reply button. Click this button to open a new message window where you can reply to the
sender.
Add to White list. Click this button to add the sender’s mobile number to the white list on the
router.
Delete button. Click this button to delete the corresponding message.
Refresh button. Click this button to refresh the inbox or outbox to see new messages.
Table 2 - Inbox/Outbox icons
 Loading...