

Page 1

User Guide
V90
VoIP Desktop Phone
Page 2

Want to network your home quickly and
easily without any hassles?
NetComm HomePlugs are the simplest method available to set up a home network, without any of the hassle of
laying meters of cable or drilling holes into walls. Simply put, a NetComm HomePlug turns the existing electrical
wiring in your home into a network capable of transmitting data at up to 200Mbps.
Setting up a network couldn’t be easier. Simply plug a Homeplug into an available power socket near a
computer, attach it to the computer with a short ethernet cable. Then plug in and connect a second homeplug
with your second home computer and that’s it, you’ve successfully networked two computers.
HomePlugs are extremly versatile and suit any number of tasks -
• Internet sharing and On-line Gaming - Connect your broadband modem to a HomePlug and then every other
PC or ethernet capable gaming console on your HomePlug network can access your internet connection
• Wireless Access Point - With a Wireless HomePlug you can create a wireless access point anywhere you want
• VoIP - Place a VoIP ATA anywhere in your home for big savings on your phone bill
• Home Entertainment - Stream high-def movies, audio or photos from a media server to set-top boxes or HTPCs
Another added bonus of a Homeplug network is that it moves with you. If you’re moving home or apatments,
or simply doing some redecorating and need to move your PC, you can take your HomePlug with you and have
your network up and running again in seconds. Try doing that with cables embedded in the wall!
And as your network grows, HomePlugs make it easy to add new network points, simply plug in a new HomePlug
and you’re ready to go.
Grab your NetComm HomePlug today, either:
Buy Online
http://www.netcomm.com.au/EOP/
and click on the Buy Now button
V90 VoIP Phone User Guide YML871Rev1
2 www.netcomm.com.au
Purchase by Phone
Tel – (02) 9424-2055
(Quote Ref - Home-2)
Page 3

Contents
Overview .......................................................................................................................................................4
NetComm V90 Physical Layout ..................................................................................................................5
NetComm V90 VoIP Phone Specification ....................................................................................................6
Shipping Contents ....................................................................................................................................7
Installation and Basic Configuration .............................................................................................................9
Hardware Installation ................................................................................................................................9
Configuring the NetComm V90 ..................................................................................................................9
Obtaining the NetComm V90 VoIP Phone IP Address ..........................................................................10
Accessing the NetComm V90 VoIP Phone Web Configuration ..............................................................10
Configuring the NetComm V90 VoIP Phone ........................................................................................11
More Configurations ...................................................................................................................................13
Preference .............................................................................................................................................13
Changing the Time Zone ..................................................................................................................13
Identifying the Time Server ...............................................................................................................13
Auto Provision and Central Management ...........................................................................................13
Disable # as Delimiter key ................................................................................................................14
Selecting Network Tones ..................................................................................................................14
Network Configuration ............................................................................................................................15
LAN Port Configuration .....................................................................................................................15
PC Port Configuration .......................................................................................................................15
Call Settings ...........................................................................................................................................16
Setting the SIP Authentication ID and Password .................................................................................16
Setting Call Forwarding ....................................................................................................................16
Selecting Ring Tones ........................................................................................................................16
Setting Voicemail number .................................................................................................................16
Phone Settings .......................................................................................................................................17
Setting the LCD Default display .........................................................................................................17
Auto Dial .........................................................................................................................................17
Tools .....................................................................................................................................................18
Performing an Online Upgrade ..........................................................................................................18
Changing the username and password of the unit ..............................................................................18
Reset Configuration Settings .............................................................................................................19
System Reboot ................................................................................................................................19
YML871 Rev1 V90 VoIP Phone User GuideV90 VoIP Phone User Guide
www.netcomm.com.au 3
Page 4

NetComm V90 VoIP Phone Operation ..........................................................................................................21
Making and Answering Calls ...................................................................................................................21
Making a Basic Call .........................................................................................................................21
Making a Hands-Free Call ................................................................................................................21
Answering an Incoming Call .............................................................................................................22
Dialing from the Phonebook ..............................................................................................................22
Dialing from the Call History .............................................................................................................22
Redialing the last number .................................................................................................................23
Using other Call Features* .......................................................................................................................24
Putting a Call on Hold .......................................................................................................................24
Transferring a Call ............................................................................................................................24
Using Voicemail ...............................................................................................................................24
Call Waiting .....................................................................................................................................24
Using the Flash Button .....................................................................................................................25
Other Phone Operations ..........................................................................................................................25
Checking Call History .......................................................................................................................25
Accessing Phonebook ......................................................................................................................25
Adjusting the Ring Volume ................................................................................................................26
Adjusting the Handset Receiver Volume .............................................................................................26
Adjusting the Speaker Volume ..........................................................................................................26
Adjusting the LCD Contrast ...............................................................................................................26
Resetting Phone Configuration ..........................................................................................................26
LCD Indicators........................................................................................................................................27
Date and Time .................................................................................................................................27
Unanswered Calls ............................................................................................................................27
Menu Display...................................................................................................................................27
Call Display .....................................................................................................................................27
Keypad Encoding Scheme ................................................................................................................27
Appendix A - Function Key ..........................................................................................................................29
Functions that can be used for the function keys: .....................................................................................30
Product Warranty ........................................................................................................................................31
V90 VoIP Phone User Guide YML871Rev1
4 www.netcomm.com.au
Page 5

CHAPTER 1 OVERVIEW
NetComm V90 VoIP Phone is a fully fledged VoIP Phone which is fully compatible with the SIP standard. It
is designed mainly as a third-party enterprise grade VoIP device, which makes it easy to integrate into an
existing SIP network.
The feature-rich NetComm V90 VoIP Phone is designed to work seamlessly with most of the existing SIP VoIP
systems currently available.
YML871 Rev1 V90 VoIP Phone User GuideV90 VoIP Phone User Guide
www.netcomm.com.au 5
Page 6

NetComm V90 Physical Layout
1
2
9
12
11
13
8
10
17
161514
3
4
5
6
7
1. LCD Display
2. VM Key – Call Voice Mail.
3. Hold Key – Hold current call
4. Conference Key
5. Transfer Key – Transfer current call
6. L1 – L4 line Keys – Profile/Contact selection key
7. Handset Key – To activate headset
8. OK Key – Menu navigation, Sending Invite Message.
9. Esc Key – Exiting Menus.
10. Del Key – Removing characters when typing.
11. Navigation key (Up – Phonebook, Down – Received Calls List, Right/Left - LCD Contrast and Handset/
Speaker Level)
12. Menu Key – Access menu
13. Keypad
14. Mute – Turns off Microphone
15. Speaker – Enables speaker for hands free operation
16. Redial – Redial last number
17. Function Keys – Programmable function keys
V90 VoIP Phone User Guide YML871Rev1
6 www.netcomm.com.au
Page 7

NetComm V90 VoIP Phone Specification
Advanced System Features
• Power over Ethernet (802.3af) Support
• Setup Wizard for different types of network environment and IP phone accounts
• Auto Configuration Support via TFTP and HTTP (Plug-n-Play operation - requires no user setup when
network access is available.)
• Smart Firmware Management Support via TFTP and HTTP (No need for manual firmware upgrade)
• Centralized management software for easy management for mass V90 deployment (Optional)
• Multiple SIP server and SIP account support (max 4).
• Programmable QoS Marking (both 802.1q VLAN and ToS/DiffServ)
• Compatibility in multi-vendor open architecture VoIP networks
• Retrieving time via NTP Servers and SIP message
• NAT/ Firewall Traversal Support with Border Session Controller or Stun Server
Key Features
• SIP 2.0 standardization deployed throughout
• Advanced audio processing – jitter buffer with packet delay and packet loss concealment
• Voice packetization & flexible voice compression
• Programmable voice packet payload size
• Dynamic & automatic negotiation of codec selection
• In-band and Out-band DTMF transport
• G.168 Echo Cancellation
• Two Ethernet ports supporting router and bridge mode
• Call Redial, Flash, Mute
• Caller ID / Caller ID Call Waiting
• Visual Message Waiting Indicator (MWI)
• Call hold/Forward/Transfer (attended/unattended call transfer)
• Phone Book Memory Dialing
• Speed Memory Dialing
• Hands Free Dialing
• Hotline Dialing
• Call history for incoming, outgoing and missed calls
• Programmable Generic Function Key Definitions (automatic adding prefixes/customized LCD menu)
• Dialing Plan (Digit Map)
• Soft Login/Logout key for SIP registration
• 128x64 dot matrix LCD with/without back light
• Full Duplex Speakerphone
• Programmable Phone Commands (via dialing keypad) for additional functions (Optional)
• Auto Provisioning Support
• Firmware upgrading, loading configuration, phone status reports and etc via Centralized Management tool
(Optional)
• Local Music on Hold
YML871 Rev1 V90 VoIP Phone User GuideV90 VoIP Phone User Guide
www.netcomm.com.au 7
Page 8

Standards Supported
• SIP V2.0 Standard (RFC 3261)
• SDP (RFC 2327)
• Digest authentication and MD5 encryption (SIP)
• ITU-T G.711 Alaw/Ulaw, G.729A, G.729AB, G.723.1 and GSM Voice Codec
• RTP (Real Time Data Transmission) RFC1889
• RTCP (Real Time Transport Control Protocol) RFC 3550
• Proprietary Firewall/Passthrough Technology
• Simple Traversal of UDP over NAT (STUN)
• Web-based Management
• PPP over Ethernet (PPPoE)
• PPP Authentication Protocol (PAP)
• Internet Control Message Protocol (ICMP)
• TFTP Client
• Hyper Text Transfer Protocol (HTTP)
• Dynamic Host Configuration Protocol (DHCP)
• Domain Name System (DNS)
• Out-band DTMF Relay: RFC 2833 and SIP Info
• SIP proxy address in DHCP (RFC 3361)
• RFC 3265 and RFC 3842 for Message Waiting Indication
Hardware Interface
• Ethernet PC & LAN Port (2 x RJ-45, 10/100BaseT)
• Headset Jack
• DC Jack
Note: If your network is not PoE (Power over Ethernet) enabled then you will require an external power adapter before you can use the
VoIP Phone. Please contact NetComm to purchase the correct power adapter for this product.
Shipping Contents
• The NetComm V90 VoIP Phone
Item Description
Warranty Registration
Quick Start Guide
Ethernet Cable
V90 VoIP Phone User Guide YML871Rev1
8 www.netcomm.com.au
Phone warranty card
Quick Start Guide
Straight-through cable
Page 9

CHAPTER 2 INSTALLATION AND
BASIC CONFIGURATION
Hardware Installation
1. Connect the handset to the base of the V90 VoIP Phone using the supplied cable.
2. Use the enclosed Ethernet cable to connect the LAN port to a hub/switch, or DSL Router/Cable Modem.
Note: If your network is not PoE (Power over Ethernet) enabled then you will require an external power adapter before you can use the
VoIP Phone. Please contact NetComm to purchase the correct power adapter for this product.
3. For first time installation, the phone will scan the network for available services which are DHCP, PPPoE,
and Fixed IP. Select the preferred service and enter the required information if needed. No user input is
required for DHCP service. User ID and Password are required for PPPoE. IP address, Netmask, and
Gateway IP Address are required for Fixed IP mode.
Notes: If you connect the unit to an existing router, please use DHCP mode.
Configuring the NetComm V90
To configure the V90 VoIP Phone, you need to access the unit Web Configuration. Please follow the step below
to access the Web Configuration:
• Obtain the V90 VoIP Phone IP address.
• Enter the IP address into a web browser.
• Log in to the V90 VoIP Phone web configuration page.
Obtaining the NetComm V90 VoIP Phone IP Address
To retrieve the IP address from the VoIP Phone:
• When the phone is in the on-hook state, press Menu.
• Press 3 (System Tools).
• Press 1 (Phone Status).
• Press 1 (LAN Port).
The LCD screen will display:
IP: xxx.xxx.xxx.xxx
– where xxx is any valid IP address between 0 and 255.
Accessing the NetComm V90 VoIP Phone Web Configuration
When trying to access the V90 Web Configuration, please configure the laptop or desktop computer to the
same subnet as the V90. The V90 Web Configuration Menu can be accessed from any web browser using
the following URL:
http://<phone-IP-address> – where <phone-IP-address> is the IP address of the phone.
Notes: This example use an IP address of “192.168.1.2” which might be different then your V90 IP address. The example shown use
Internet Explorer 7. Your web browser might look slightly different.
The default User Name is “admin” and the default Password is “admin”.
Enter the User Name and Password into the Log In screen and then click OK to log in to the V90 Web
Configuration. If the User name and Password are correct, the Status Screen will appear. This screen
provides you information regarding the phone and network settings.
YML871 Rev1 V90 VoIP Phone User GuideV90 VoIP Phone User Guide
www.netcomm.com.au 9
Page 10
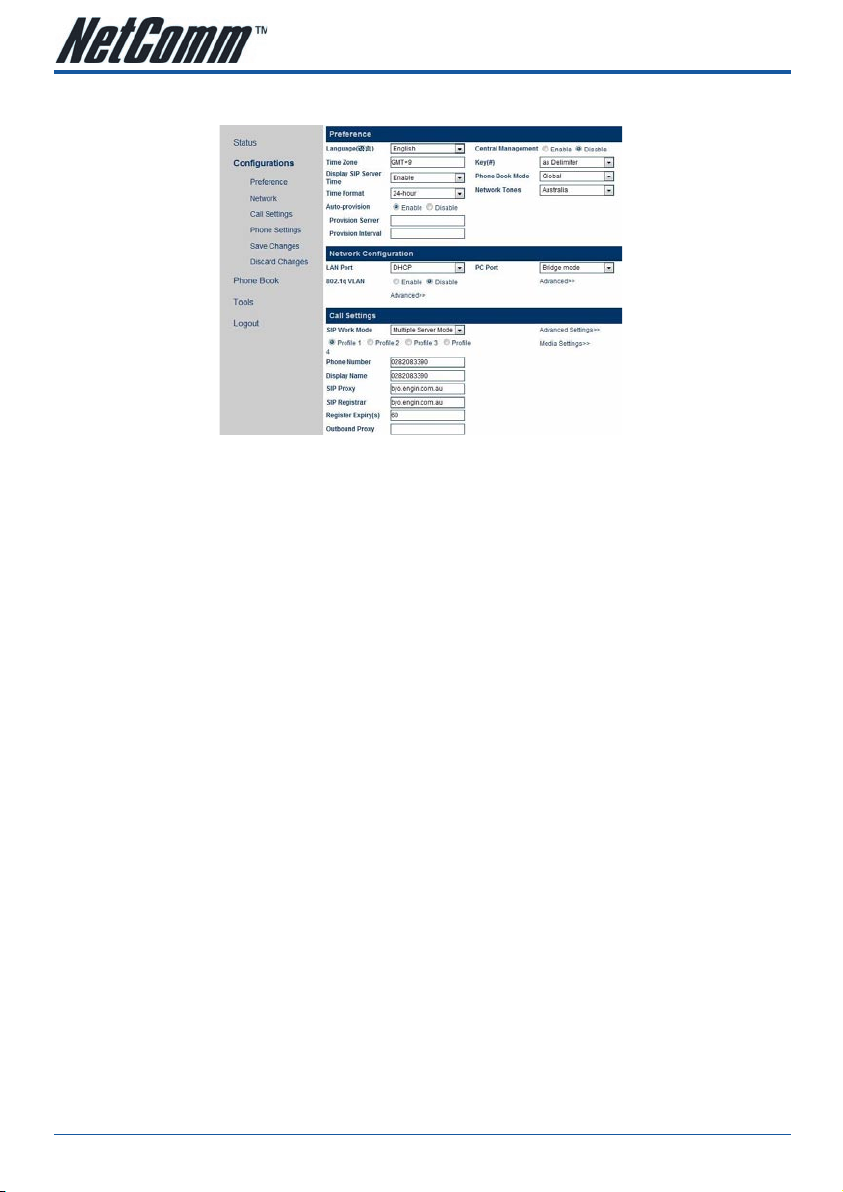
Configuring the NetComm V90 VoIP Phone
• Click on Configurations links on the left. The configuration page will appear
• For basic configuration, the following information is required to register your V90 to your VoIP service
provider. However, depending on your network setup and VoIP service provider, more advanced
information may be needed. Please consult your VoIP service provider if necessary.
• SIP Phone number
• Display name
(Optional, This name will be used for Call ID Name Delivery, so that the other party can see your name before answering.)
• SIP Proxy (IP Address or Fully Qualified Domain Name)
• SIP Registrar (IP Address or Fully Qualified Domain Name)
• Register Expiry(s)
• Home Domain (Optional, IP Address or Fully Qualified Domain Name)
• Authentication ID
• Password
• Click on the Advanced Settings for additional VoIP advance settings and Media Settings for packet length,
Codec, and network tones settings. For most VoIP Service Providers, these settings can be left as default.
• Click on Save Changes on the left menu to store the current settings.
The phone supports two registration modes, Multiple Server Mode and Single Server Mode.
- Multiple Server Mode (default) allows the phone to register with up to 4 account with different SIP providers.
In this configuration, the L1 to L4 buttons are predefined for Profile 1 to Profile 4 and this allows user to
choose which Profile (server) will be used for the call. Profile 1 is always used as default profile when a call
is made without specifying the designated profile.
- Single Server Mode allows the phone to register up to 4 accounts with the same VoIP provider. A backup
server option is also available and will be used once the registration to the primary server fails. In this
configuration, the L1 to L4 buttons are predefined for Contact 1 to Contact 4 and this allows user to choose
which Contact (account) will be used for the call. Contact 1 is always used as default contact when a call is
made without specifying the designated Contact.
Note: If a profile or contact is not configured, the corresponding Line button is disabled.
The V90 will automatically try to register all accounts. To change the mode, select the mode from the SIP Work
Mode drop down menu. And then click on each Profile/Contact to configure the respective profile/contact.
V90 VoIP Phone User Guide YML871Rev1
10 www.netcomm.com.au
Page 11

CHAPTER 3 MORE CONFIGURATIONS
Preference
Changing the Time Zone
The SIP Phone uses Network Time Protocol (NTP) to retrieve date and time information from an NTP server.
The time is in GMT ± offset. For example, Australian Eastern Standard Time is GMT +10.
To change the Time Zone:
On the Preferences screen under Configurations menu, enter GMT+x where x is the time difference between
your time zone and GMT.
Identifying the Time Server
The Time Server is the Network Time Protocol server where the V90 Phone retrieves date and time information.
To specify the Time Server:
On the Preference screen under Configurations, enter the IP address or the domain name (FQDN) of a valid
Time Server in the Time Server field (e.g. timekeeper.isi.edu. The default value is pool.ntp.org.
Auto Provision and Central Management
To disable the auto provisioning, click Disable on the Auto-Provision menu. To enable it, click Enable and type
in the server address in the Provision Server field. Default is enabled.
To enable Central management, click Enable on the Central Management menu and type in the password in
the Password field. Default is disabled.
Disable # as Delimiter key
By default, the # key will act as a delimiter key. To disable # key as the delimiter key, change the Key (#) menu
to as Dial Digits.
Phone Book Mode
The V90 phone supports two types of Phone Book system.
1. Global. All profile/contact use the one phone book.
2. By Line. Each profile or contact has separate phone book entries. And all entries in each phone book can
only be used by the corresponding profile/contact.
On the Preference screen under Configurations menu, select the phone book system you want to use from the
Phone Book Mode drop down menu.
Selecting Network Tones
To set the Network Tone:
On the Preference screen under Configurations menu, select a country on the list beside the label Network Tones.
YML871 Rev1 V90 VoIP Phone User GuideV90 VoIP Phone User Guide
www.netcomm.com.au 11
Page 12

Network Configuration
The Network Configurations screen allows you to set up the IP addresses of the LAN and PC port, Bridge
or Router mode (static IP for PC port), default Gateway Address, and Primary and Secondary DNS server
IP addresses.
Note: Default setting for V90 PC port is in Bridge mode.
LAN Port Configuration
The V90 VoIP Phone LAN port can be configured to obtain the IP address automatically via a DHCP server or
manually using Static IP.
If you obtain a static IP address from your ISP or network administrator, you can assign it to the V90 VoIP
Phone LAN port by changing the LAN Port to “Static IP” and then entering the following fields as provided.
1. Enter IP address of the phone in the IP Address field.
2. Enter subnet mask in the Subnet Mask field.
3. Enter IP address of the default router in the Default Route field.
4. Enter Primary and Secondary DNS addresses in their respective field.
Note: PPPoE mode should only be used by power users. It requires configuring your broadband router in Bridge mode. So, the V90 can
establish PPPoE connection with your ISP. In this mode, V90 PC port is normally configured in Router/Static IP mode.
PC Port Configuration
The PC Port default setting is Bridge Mode. In Bridge Mode, the V90 allows a PC connected to the phone to
pass through to the network. No PC Configuration settings are required.
To specify an IP address manually, choose Static IP and then enter the IP address and the subnet mask of the
PC port. After you change to Static IP, the V90 will act as a router for the computer connected to the PC port.
Note: Static IP is not recommended for home user connection.
V90 VoIP Phone User Guide YML871Rev1
12 www.netcomm.com.au
Page 13

Call Settings
Setting the SIP Authentication ID and Password
To set the SIP Authentication ID and Password.
On the Call Settings screen under Configurations screen, enter the Authentication ID and Password in
corresponding fields for each profile or contact.
Setting Call Forwarding
To set the call forwarding feature on the V90 VoIP Phone.
On the Call Settings screen under Configuration screen, change the Call Forward Type to Unconditional
Forward or Busy Forward depending on your needs and type in the intended phone number in the Call
Forward Number.
Notes: In Multiple Server Mode, each profile can be assigned with different Call Forwarding settings.
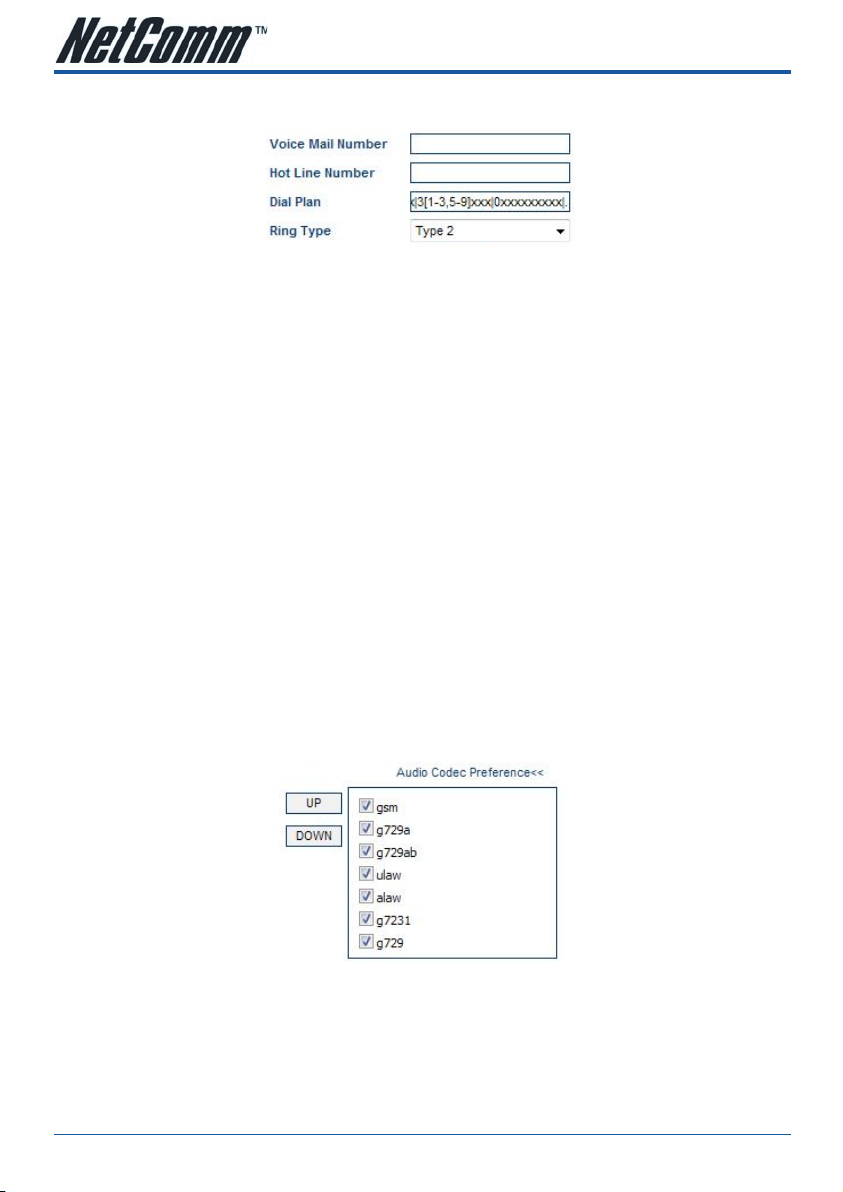
Setting Voicemail number
On the Phone Settings screen under Configurations screen, enter the voice mail number in the Voice Mail
Number field.
Notes: Please contact the VoIP service provider for the correct number. Not all VoIP service providers support this feature. There are
different Voicemail numbers for each profile in Multiple Server Mode.
Setting Hot Line number
Hot Line feature allows users to set a number that will be called by the phone automatically when in off-hook state.
On the Phone Settings screen under Configurations screen, enter the Hot Line number in the Hot Line
Number field.
Notes: There are individual Hot Line for each profile in Multiple Server Mode and only one Hot Line in Single Server Mode. The
corresponding profile will call the designated number when in off hook state.
Dial Plan
Standard SIP terminals, including the V90, (usually) use an en-block method for sending digits to a SIP Server.
That is, all digits required to complete the call must be dialled followed by a delimiter before the call will be
initiated by the terminal. In order to do this the V90 has three different methods that can be used separately
in conjunction with each other to achieve the desired result.
Methods for configuring dial plan:
• Dialing plan in Terminal (Dial Plan).
• Dialing Timeout (Auto Dial Timeout, default is 5 seconds).
• Delimiter Key (OK and # by default).
Symbols used for Dial Plan / Digimap
Symbol Function
x
.
|
[ ]
,
-
T
Any number (1, 2, 3, 4, 5, 6, 7, 8, 9, 0, #, *)
Terminate using delimiter or timeout
A logical OR
Used when representing a range of numbers
Used in conjunction with [ ] to for a divided range
Used in conjunction with [ ] for a range
Wait 4 seconds before terminating dialing
YML871 Rev1 V90 VoIP Phone User GuideV90 VoIP Phone User Guide
www.netcomm.com.au 13
Page 14
Example:
[1-2]xx|34xx|3[1-3,5-9]xxx|0xxxxxxxxx|.
• Dialing 1 or 2 will send invite after 3 digits.
• Dialing 31, 32 ,33, 35, 36, 37, 38, 39 will send INVITE after 5 digits.
• Dialing 34 will wait for two more digits before sending INVITE.
• Dialing 0 will send invite after 10 digits.
• The “.” On the end will allow for any number not specified in the digit map to be dialed normally requiring
the user to enter a delimiter or wait for a timeout. If the full-stop is not at the end of the Dial Plan, the V90
will display “INVALID NUMBER” for anything dialed that is outside of the scope specified in the dial plan.
Note: If the “.” Character is not included (eg. “3xxx|.”) as an option in the digimap then numbers that are not specified by the digimap
will not be sent to the system when dialed (ie. the V90 will not output an INVITE packet and “INVALID NUMBER” will be displayed on
the screen). Multiple Server Mode has different Dial Plan for each profile and Single Server Mode only has one Dial Plan for all four
contacts.
Selecting Ring Tones
Distinctive ring is supported in both Single Server Mode and Multiple Server Mode. Each Contact or Profile
contains a Ring Type field which can be assigned to one of the four predefined ring tones.
To set the Ring Tone:
On the Preference screen under Call Settings menu, select a ring tone type on the list beside the label Ring
Type1(2, 3 or 4 depending on the profile/contact selected). However, it will be best to select the Ring Tone via
the V90 Keypad Menu (Press Menu, 3, 5, choose the profile/contact and use the Up and Down keys to adjust)
since you can hear the Ring Tone selected while the selection is made.
Audio Codec Preference
This menu will allow the user to enable / disable individual codec and change their priority using the UP and
DOWN button.
Note: In Multiple Server Mode, user can set different Audio Codec Preference for different profiles.
Notes: Please consult your VoIP Service Provider for more information regarding the settings in Advanced Settings and Media Settings
under Call Settings page.
V90 VoIP Phone User Guide YML871Rev1
14 www.netcomm.com.au
Page 15

Phone Settings
Setting the LCD Default display
You can set up the phone LCD to display two lines of customize text during idle condition.
To set the Vendor Name (title) and Title on LCD (subtitle):
On the Phone Settings screen under Configurations menu, enter the text for these two fields as desired. If the
title field is not filled, the phone will display the phone number assigned by default.
Auto Dial
When enabled, the V90 will automatically dial the numbers that it has received so far after the auto dial period
has elapsed. To disabled this feature, click on Disable on the Auto Dial Menu. The default Auto dial is enabled
with the Auto Dial Timeout of 5 seconds.
Missed Call LED Indication
By default, the phone LED will flash to indicate that there is a missed call. To disable this feature, tick Disable
on Missed Call LED Indication menu.
Menu Configuration Password
By default, the phone prompts for a username and password to enter into the Device Config sub menu (Press
Menu, Device Config). To disable this feature, tick Disable on the Menu Configuration Password option.
Tools
Performing an Online Upgrade
WARNING! Performing an online upgrade is for experienced users or network administrators only!
To prepare the V90 VoIP Phone for online upgrade:
1. Click Tools on the left menu and then Online Upgrade.
2. Enter the IP address or domain name of the upgrade server and package name (e.g.
http://202.44.167.165/V90Upgrade/V90S-3.08-9.pkg).
3. Click Start.
4. The message below appears when the firmware upgrade is completed. Click OK to continue.
“Ugrade successful!”
“Current version: xxxxxxxxx”
WARNING!!! Do not disconnect any cables or close the web browser until the “Rebooting, Please Wait…”
message appears.
Notes: The unit can also be upgraded via FTP or TFTP server. Please follow the instructions above and use the respective address for
the FTP or TFTP Server.
Changing password of the unit
To change the unit password, click on Tools and then Change Password. Enter the new password and click
on Change.
YML871 Rev1 V90 VoIP Phone User GuideV90 VoIP Phone User Guide
www.netcomm.com.au 15
Page 16

Reset Configuration Settings
If you would like to reset the V90 VoIP Phone to factory default settings, click on Tools and then Reset Config
button. Press OK in the dialog box to confirm the reset. Please remember to use the default password to
access the phone again.
Note: This will reset the entire phone configuration back to factory settings. Please note that all settings in Phone Book will be erased
as well.
Note: Another way to reset the unit is by pressing *09987654 on the phone keypad while the handset is in on-hook state.
System Reboot
If you would like to reboot the V90 VoIP phone, click on Tools and then Reboot. Press OK in the dialog box to
confirm the reboot. The phone will then reboot automatically.
V90 VoIP Phone User Guide YML871Rev1
16 www.netcomm.com.au
Page 17

CHAPTER 4 NETCOMM V90 VOIP
PHONE OPERATION
Making and Answering Calls
Making a Basic Call
1. Pick up the handset
2. Dial the phone number
3. Press OK or # to dial out immediately (# key is configured as delimiter key by default). Depending on the
configuration mode, Profile 1 or Contact 1 will be used by default.
Making a Hands-Free Call
1. Press the Speaker button
2. Dial the phone number
3. Press OK or # to dial out immediately (# key is configured as delimiter key by default). Depending on the
configuration mode, Profile 1 or Contact 1 will be used by default.
Note:
- If no digit is detected within Auto Dial timeout, the NetComm V90 will dial out the digits that have been received so far (The default
Auto Dial timeout is 5 seconds).
- Pressing one of the line buttons instead of the OK button will select the profile / contact to be used for the call.
- An alternative way to make a call is to press a line button (L1, L2, L3, or L4) to select the appropriate profile/contact before dialing
a phone number.
Answering an Incoming Call
There are two ways to answer an incoming call:
1. Pick up the handset to answer the call normally.
2. Press the Speaker button to answer in speakerphone mode.
Note: The phone will automatically answer call from all profile/contact.
Dialing from the Phonebook
1. Pick up handset
2. Press Menu key
3. Choose PHONE BOOK
4. Choose the correct profile or contact (when Phone book is in By Line mode)
5. Choose VIEW
6. Press Up or Down key to view the Phone Book
7. Press Enter to select the highlighted entry
8. Select DIAL to dial out the number
YML871 Rev1 V90 VoIP Phone User GuideV90 VoIP Phone User Guide
www.netcomm.com.au 17
Page 18

Dialing from the Call History
1. Pick up handset
2. Press Menu
3. Select CALL HISTORY
4. Choose the correct profile or contact
5. Choose one category: ANSWERED CALLS, MISSED CALLS or DIALED CALLS
Or
A. Press UP to view the Missed Call List while on hook / idle then choose the correct profile or contact
B. Press DOWN to view the Answered Call List while on hook / idle then choose the correct profile or
contact
C. Press OK to view the Dialed Call List while on hook / idle then choose the correct profile or contact
6. Press Up or Down to view the entries in the category
7. Press Enter to select an entry
8. Select DIAL to dial out the entry selected
Dialing from the Speed Dial
1. Pick up handset
2. Press SPEED DIAL
3. Press the Up or Down key to select
4. Press Enter to dial out the entry.
Note: Contacts need to be added into Speed Dial list first before using speed dial.
Note: The Speed Dial key needs to be assign to a one of the Function key before you can use it. Please refer to Appendix A – Function
Keys for detail on how to assign Speed Dial key to the Function key.
Redialing the last number dialed
1. Pick up handset
2. Press L1, L2, L3, or L4 to select a profile / contact
3. Press REDIAL to dial out the last number dialed immediately
Or
1. Press REDIAL
2. Press UP or Down to select/high light the last number dialed from L1 to L4.
3. Press OK to dial the number selected. The phone goes into Speakerphone mode automatically and there
is no need to select the line.
4. Pick up the handset to talk using the handset (Speakerphone mode turns off automatically).
V90 VoIP Phone User Guide YML871Rev1
18 www.netcomm.com.au
Page 19

Using other Call Features*
Putting a Call on Hold
To put a call on hold:
1. Press Hold button
To release a call on hold:
1. Press Hold button again
Transferring a Call
To transfer a call to another extension:
1. Press Transfer button
2. Dial phone number
3. Press OK
4A. Hang up for unattended transfer.
4B. Wait for the call to be answered and then hang up for attended transfer.
Using Voicemail
To listen to your voicemail messages, (voicemail parameter must be set in the web configuration page):
1. Press VM (Voice Mail) button
2. Listen to the voice prompts and enter your access code
3. Listen to your messages
Three Way Conferencing
To initiate a three way conference call:
1. Dial the first party and wait for the call to be answered
2. Press L1, L2, L3, or L4 to select a profile / contact for the third party.
3. Dial the third party
4. Press the CONF (Conferencing) button
Call Waiting
When you are talking on the phone and another call comes in on your phone extension, a short tone sounds in
your handset and the LCD displays an incoming call message. To temporarily put a caller on hold and talk on
another incoming call press the corresponding L button for the incoming call.
To return to the previous call, press the L button for the original call. You can switch back and forth between
the calls repeatedly by pressing correct L button.
Note*: Call features in this section may require corresponding supports from your VoIP Service Provider. Please check with your VoIP
service provider regarding these features.
YML871 Rev1 V90 VoIP Phone User GuideV90 VoIP Phone User Guide
www.netcomm.com.au 19
Page 20

Other Phone Operations
Checking Call History
1. Press Menu
2. Select CALL HISTORY
3. Choose the correct profile or contact
4. Select one category: ANSWERED CALLS, MISSED CALLS or DIALED CALLS
5. Press Enter
6. Use the Up or Down key to find the number you want in the entries listed. You can either dial this number or
add the number to your phonebook.
Accessing Phonebook
The V90 VoIP Phone has phonebook with a maximum storage capacity of 100 records. To dial, edit, delete, or
add a number in the Phonebook:
1. Press Menu button
2. Select PHONE BOOK
3. Choose the correct profile or contact (when Phone book is in By Line mode)
4. Press Up and Down arrows to view the phone book entries
5. Press Enter to select an entry
6. Select an action displayed
Adding contacts to Speed Dial memory
1. Press Menu
2. Select PHONE BOOK
3. Select SPEED DIAL
4. Select the location
5. Select ADD NEW
6. Now you can choose contacts in your PHONE BOOK and assign it to this speed dial entry
Note: The NetComm V90 VoIP Phone has a capacity of 10 Speed Dial records.
Adjusting the Ring Volume
1. Press Menu
2. Select SYSTEM TOOLS
3. Select RING VOLUME
4. Press Up or Down to adjust the ring volume.
Note: Another way to adjust the ring volume is by pressing the Left Arrow or Right Arrow button while the phone is ringing.
Adjusting the Handset Receiver Volume
1. Pick up the handset (when the unit is registered to a SIP server)
2. Press Right or Left button to increase or decrease the handset receiver volume as shown on the LCD.
Adjusting the Speaker Volume
1. Press the Speaker button (when the unit is registered to a SIP server)
2. Press Right or Left button to increase or decrease the speaker volume as shown on the LCD.
V90 VoIP Phone User Guide YML871Rev1
20 www.netcomm.com.au
Page 21

Adjusting the LCD Contrast
1. While the phone is idle, press Right or Left button to increase or decrease the LCD Contrast level as
shown on the LCD.
Resetting Phone Configuration
To reset the V90 VoIP Phone to factory configuration:
1. Press Menu
2. Select SYSTEM TOOLS
3. Select RESET CONFIG
4. Press Enter
5. Enter the Username (default is admin) and Password (default is admin)
This will reset the entire phone configuration back to factory settings. Please note that all settings in PHONE
BOOK will be erased as well.
YML871 Rev1 V90 VoIP Phone User GuideV90 VoIP Phone User Guide
www.netcomm.com.au 21
Page 22

LCD Indicators
Date and Time
The V90 VoIP Phone displays the date and time at the top of the LCD screen. Ensure that the time zone
configuration (GMT±) is set to reflect the GMT time offset.
Unanswered Calls
When there are unanswered calls, the LCD screen will display the following message: X CALLS MISSED
You can use the CALL HISTORY to look up the numbers of calling parties.
Menu Display
When in Menu mode, use the scroll arrow button to highlight an item. Press Enter to select the item. Press
the digit key corresponds to the item desired to select the item immediately.
Call Display
During a call, the LCD screen displays the caller’s name, number and the duration of the call. If the caller
number matches an entry in the phone book, the name in the phone book will be displayed instead of the
Caller Name received. Call Duration is displayed in a call.
When remote party hangs up, the LCD screen displays: CALL END.
All the calls’ details can be found in Details of each entry in CALL HISTORY.
Keypad Encoding Scheme
When entering phone book entries, you must use V90 keypad to key in alphanumeric characters and special
characters. V90 uses the key encoding system similar to the one found in mobile phones.
When entering alphanumeric characters and special characters, you press a key multiple times to select the
desired alphanumeric characters and special characters. If the same key is not pressed after 1.5 seconds, the
displayed alphanumeric character or special character will be selected as your input.
The following table shows the encoding scheme for the available alphabets, numbers, and symbols.
Key Description
1
2
3
4
5
6
7
8
9
#
0
*
Del
1
2 A B C
3 D E F
4 G H I
5 J K L
6 M N O
7 P Q R S
8 T U V
9 W X Y Z
# @ % &
0
* . , < ! ?
Backspace
V90 VoIP Phone User Guide YML871Rev1
22 www.netcomm.com.au
Page 23

APPENDIX A FUNCTION KEY
The NetComm V90 VoIP Phone has five programmable function keys. These function keys can be defined
using the Web Configuration page under Configuration > Phone Settings.
Note: the above image shows the default configuration of the function keys
To redefine the function key, you need to tick Enable for the corresponding key and select or enter the new
variable for it.
YML871 Rev1 V90 VoIP Phone User GuideV90 VoIP Phone User Guide
www.netcomm.com.au 23
Page 24

Function that can be used for the function keys:
1. Phone Book. This will open up the Phone Book on the LCD screen. This function can be configured by
changing the Function Mode to Fixed and change the Function to Phone Book.
2. Do Not Disturb. This will disable all incoming calls on all profile/contact. This function can be configured
by changing the Function Mode to Fixed and change the Function to Do Not Disturb.
3. Show Pending Call List. This will open up all current pending call on all profile/contact on the LCD
screen. Use the Up and Down button to activate the call. This function can be configured by changing the
Function Mode to Fixed and change the Function to Show Pending Call List.
4. Call Forward. When pressed, this option will ask user to enter the desired call forward number and the
Call Forward Type. This function can be configured by changing the Function Mode to Fixed and change
the Function to Call Forward.
5. Speed Dial list. This will open the Speed Dial list. This function can be configured by changing the
Function Mode to Fixed and change the Function to Speed Dial.
6. Login and Logout. This function will logged out the V90 from the SIP server. Once in the logout state, no
calls will be allowed to or from the unit. To use this function, type in http://127.0.0.1:80/pages/systemtools/login-logout.xml in the Speed Dial field for the corresponding keys. Please note that this feature is
highly dependent on your VoIP service provider.
7. Speed Dial Button. This function will make the V90 VoIP Phone to dial the number store in the Speed Dial
field. For example, the user can put 121 in the Speed Dial field and when the key is pressed, the V95 will
try to dial 121. Please note that this feature is different to the speed dial list feature.
V90 VoIP Phone User Guide YML871Rev1
24 www.netcomm.com.au
Page 25

APPENDIX B: LEGAL & REGULATORY INFORMATION
This manual is copyright. Apart from any fair dealing for the purposes of private study, research, criticism or review, as permitted under the
Copyright Act, no part may be reproduced, stored in a retrieval system or transmitted in any form, by any means, be it electronic, mechanical,
recording or otherwise, without the prior written permission of NetComm Limited. NetComm Limited accepts no liability or responsibility, for
consequences arising from the use of this product.
NetComm Limited reserves the right to change the specifications and operating details of this product without notice.
NetComm is a registered trademark of NetComm Limited.
All other trademarks are acknowledged the property of their respective owners.
Customer Information
ACA (Australian Communications Authority) requires you to be aware of the following information and warnings:
(1) This unit shall be connected to the Telecommunication Network through a line cord which meets the requirements of the ACA TS008
Standard.
(2) This equipment has been tested and found to comply with the Standards for C-Tick and or A-Tick as set by the ACA . These standards are
designed to provide reasonable protection against harmful interference in a residential installation. This equipment generates, uses, and can
radiate radio noise and, if not installed and used in accordance with the instructions detailed within this manual, may cause interference to
radio communications. However, there is no guarantee that interference will not occur with the installation of this product in your home or
office. If this equipment does cause some degree of interference to radio or television reception, which can be determined by turning the
equipment off and on, we encourage the user to try to correct the interference by one or more of the following measures:
• Change the direction or relocate the receiving antenna.
• Increase the separation between this equipment and the receiver.
• Connect the equipment to an alternate power outlet on a different power circuit from that to which the receiver/TV is connected.
• Consult an experienced radio/TV technician for help.
(3) The power supply that is provided with this unit is only intended for use with this product. Do not use this power supply with any other
product or do not use any other power supply that is not approved for use with this product by NetComm. Failure to do so may cause damage
to this product, fire or result in personal injury.
YML871 Rev1 V90 VoIP Phone User GuideV90 VoIP Phone User Guide
www.netcomm.com.au 25
Page 26

Product Warranty
The warranty is granted on the following conditions:
1. This warranty extends to the original purchaser (you) and is not transferable;
2. This warranty shall not apply to software programs, batteries, power supplies, cables or other accessories supplied in or with the product;
3. The customer complies with all of the terms of any relevant agreement with NetComm and any other reasonable requirements of NetComm
including producing such evidence of purchase as NetComm may require;
4. The cost of transporting product to and from NetComm’s nominated premises is your responsibility; and,
5. NetComm does not have any liability or responsibility under this warranty where any cost, loss, injury or damage of any kind, whether direct,
indirect, consequential, incidental or otherwise arises out of events beyond NetComm’s reasonable control. This includes but is not limited to:
acts of God, war, riot, embargoes, acts of civil or military authorities, fire, floods, electricity outages, lightning, power surges, or shortages of
materials or labour.
6. The customer is responsible for the security of their computer and network at all times. Security features may be disabled within the factory
default settings. NetComm recommends that you enable these features to enhance your security.
The warranty is automatically voided if:
1. You, or someone else, use the product, or attempts to use it, other than as specified by NetComm;
2. The fault or defect in your product is the result of a voltage surge subjected to the product either by the way of power supply or
communication line, whether caused by thunderstorm activity or any other cause(s);
3. The fault is the result of accidental damage or damage in transit, including but not limited to liquid spillage;
4. Your product has been used for any purposes other than that for which it is sold, or in any way other than in strict accordance with the user
manual supplied;
5. Your product has been repaired or modified or attempted to be repaired or modified, other than by a qualified person at a service centre
authorised by NetComm; and,
6. The serial number has been defaced or altered in any way or if the serial number plate has been removed.
Limitations of Warranty
The Trade Practices Act 1974 and corresponding State and Territory Fair Trading Acts or legalisation of another Government (“the relevant acts”) in
certain circumstances imply mandatory conditions and warranties which cannot be excluded. This warranty is in addition to and not in replacement
for such conditions and warranties.
To the extent permitted by the Relevant Acts, in relation to your product and any other materials provided with the product (“the Goods”) the liability
of NetComm under the Relevant Acts is limited at the option of NetComm to:
• Replacement of the Goods; or
• Repair of the Goods; or
• Payment of the cost of replacing the Goods; or
• Payment of the cost of having the Goods repaired.
All NetComm ACN 002 490 486 products have a standard 12 months warranty from date of purchase. However some products have an
extended warranty option (refer to packaging). To be eligible for the extended warranty you must supply the requested warranty information
to NetComm within 30 days of the original purchase by registering on-line via the NetComm web site at
www.netcomm.com.au
V90 VoIP Phone User Guide YML871Rev1
26 www.netcomm.com.au
Page 27

Did you know your phones will disrupt
your ADSL2+ connection...
Even If You Have Older ADSL Filters?
Due to faster ADSL speeds, an inline ADSL2+ Microfilter stops your ADSL connection being disrupted by telephones
connected to the same line. Older filters cannot handle these speeds. A high-quality Microfilter from NetComm will
ensure you have a stable broadband Internet connection with no reduction in the quality of your telephone service.
Having one easy to install Microfilter for every telephone type device, including dial up modems and Foxtel, is
essential to reducing voice and data service problems and interruptions.
NetComm EM1550 ADSL2+ Microfilters conform to relevant ACA requirements and Telstra specifications
and will:
• Help you obtain faster technical support from your ISP
• Minimise unexplained disruption of your ADSL connection
• Work with all current ADSL connection speeds
• Microfilters are also splitters which allow you to connect the line between phone and modem
Grab your NetComm Microfilters today, either:
Visit a retailer closest to you...
Harvey Norman, Officeworks or Harris Technology.
YML871 Rev1 V90 VoIP Phone User GuideV90 VoIP Phone User Guide
www.netcomm.com.au 27
Order direct...
Visit www.netcomm.com.au/ADSL/EM1550.php
Phone (02) 9424-2055 (Quote Ref No - 1550)
Page 28

Product Warranty
NetComm products have a standard 12 months warranty from date of purchase. However some products have an extended
warranty option, via registering your product online at the NetComm website www.netcomm.com.au. Refer to the User Guide
for complete product warranty conditions, limitations of warranty and other legal and regulatory information.
Contact Information
If you have any technical difficulties with your product, please do not hesitate to contact NetComm’s Customer Support Department.
Email: support@netcomm.com.au
www.netcomm.com.au
Note: NetComm Technical Support for this product only covers the basic installation and features outlined in the Quick Start Guide. For further information regarding
the advanced features of this product, please refer to the configuring sections in the User Guide or contact a Network Specialist.
NetComm Limited ABN 85 002 490 486
PO Box 1200, Lane Cove NSW 2066 Australia
E – sales@netcomm.com.au W – www.netcomm.com.au
V90 VoIP Phone User Guide YML871Rev1
28 www.netcomm.com.au
 Loading...