

Page 1
NETCOMM LIBERTY™ SERIES
3G Travel Router t1
USER GUIDE
Page 2

3G Travel Router t1 User Guide YMLT1WN
2 www.netcomm.com.au
Preface
This manual provides information related to the installation, operation, and application of this device. The individual reading this manual is
presumed to have a basic understanding of telecommunications terminology and concepts.
If you nd the product to be broken or malfunctioning, please contact technical support for immediate service by email at
technicalsupport@netcomm.com.au
For product update, new product release, manual revision, or software upgrades, please visit our website at
www.netcommlimited.com
Important Safety Instructions
With reference to unpacking, installation, use and maintenance of your electronic device, the following basic guidelines are recommended:
• Do not use or install this product near water, to avoid re or shock hazard. For example, near a bathtub, kitchen sink or laundry tub,
or near a swimming pool. Also, do not expose the equipment to rain or damp areas (e.g. a wet basement).
• Do not connect the power supply cord on elevated surfaces. Allow it to lie freely. There should be no obstructions in its path and no
heavy items should be placed on the cord. In addition, do not walk on, step on or mistreat the cord.
• Use only the power cord and adapter that are shipped with this device.
• To safeguard the equipment against overheating, make sure that all openings in the unit that offer exposure to air are not blocked.
• Avoid using a telephone (other than a cordless type) during an electrical storm. There may be a remote risk of electric shock from
lightening. Also, do not use the telephone to report a gas leak in the vicinity of the leak.
• Never install telephone wiring during stormy weather conditions.
WARNING
• Disconnect the power line from the device before servicing.
Copyright
Copyright©2009 NetComm Limited. All rights reserved. The information contained herein is proprietary to NetComm Limited. No part of
this document may be translated, transcribed, reproduced, in any form, or by any means without prior written consent of NetComm Limited
NOTE:This document is subject to change without notice.
Save Our Environment
When this equipment has reached the end of its useful life, it must be taken to a recycling centre and processed separate from domestic
waste.
The cardboard box, the plastic contained in the packaging, and the parts that make up this router can be recycled in accordance with
regionally established regulations. Never dispose of this electronic equipment along with your household waste. You may be subject to
penalties or sanctions under the law. Instead, ask for disposal instructions from your municipal government.
Please be responsible and protect our environment.
Page 3

YMLT1WN 3G Travel Router t1 User Guide
www.netcomm.com.au 3
NetComm Liberty Series - 3G Travel Router t1
Table of Contents
Introduction ...............................................................................................................................................................................................5
Package Contents............................................................................................................................................................................................................5
Key Features ....................................................................................................................................................................................................................5
Placement ................................................................................................................................................................................................... 9
Getting Started .........................................................................................................................................................................................11
The LED Indicators of the 3G Travel Router t1 .................................................................................................................................................................11
The Connectors and Buttons of the 3G Travel Router t1..................................................................................................................................................11
Network and System Requirements ................................................................................................................................................................................12
Modem Requirements .....................................................................................................................................................................................................12
Conguring your Router and setting up your computer ...................................................................................................................................................14
Setting up your 3G Travel Router t1 .................................................................................................................................................................................15
Advanced Features ..................................................................................................................................................................................18
Login Procedure ..............................................................................................................................................................................................................18
Status .............................................................................................................................................................................................................................18
Internet Settings ............................................................................................................................................................................................................. 19
Advanced Routing ...........................................................................................................................................................................................................23
DHCP Client ....................................................................................................................................................................................................................23
Basic ...............................................................................................................................................................................................................................25
Security ...........................................................................................................................................................................................................................27
WPS ...............................................................................................................................................................................................................................29
Station List ...................................................................................................................................................................................................................... 29
Firewall ......................................................................................................................................................................................................31
MAC/IP/Port Filtering.......................................................................................................................................................................................................31
System Security ..............................................................................................................................................................................................................32
Content Filtering ..............................................................................................................................................................................................................32
Port Forwarding ..............................................................................................................................................................................................................33
DMZ ................................................................................................................................................................................................................................33
Administration ..........................................................................................................................................................................................35
Upload Firmware .............................................................................................................................................................................................................35
Setting Manager ..............................................................................................................................................................................................................36
Statistics .........................................................................................................................................................................................................................36
System Log .....................................................................................................................................................................................................................36
Troubleshooting ........................................................................................................................................................................................38
Establishing your Wireless Connection ...................................................................................................................................................41
Windows XP service pack 2 ............................................................................................................................................................................................41
Mac OSX 10.4 ................................................................................................................................................................................................................43
Windows Vista ................................................................................................................................................................................................................44
How to congure WEP/WPA-PSK/WPA2-PSK Wireless Security .....................................................................................................................................45
Legal & Regulatory Information ...............................................................................................................................................................48
Customer Information ......................................................................................................................................................................................................48
Federal Communication Commission Interference Statement ..........................................................................................................................................49
Product Warranty ............................................................................................................................................................................................................ 49
Limitations of Warranty ....................................................................................................................................................................................................50
www.netcomm.com.au/support ......................................................................................................................................................................................51
Page 4

INTRODUCTION
Page 5

YMLT1WN 3G Travel Router t1 User Guide
www.netcomm.com.au 5
NetComm Liberty Series - 3G Travel Router t1
Your 3G Travel Router t1
Congratulations on the purchase of your NetComm 3G Travel Router t1.
NetComm’s 3G Travel Router t1 is a versatile and portable solution for wireless mobile broadband for the home, ofce or on the road.
This device creates an instant Wireless N hotspot allowing you to share an Internet connection across multiple devices like smart phones,
gaming consoles or other computers. With wireless data speeds of up to 150Mbps it is 300% faster than Wireless G technology1.
Connection to the Internet is achieved through either a 3G USB modem or via a xed line (DSL/Cable/Satellite) connection to the routers WAN
port. The integrated Lithium-Ion battery delivers networking power for up to 5 hours in one power-charge-cycle, which means you can set up
your own Wireless network without searching for a power point.
Featuring automatic Internet failover, this device will keep you connected. In case the DSL/Cable/Satellite connection drops out, it activates
the 3G connection. The WAN port can also be congured optionally as a LAN port for a wired connection to a network client.
The device also features advanced security such as VPN pass-through, a full complement of wireless security options and a built in
rewall. The setup is simple via NetComm’s browser interface. The rmware can be updated via NetComm’s website to take advantage of
upcoming features.
The NetComm 3G Travel Router t1 supports an extensive range of 3G USB modems from most major 3G carriers and is compatible with
Mac OS X, Windows OS and Linux. For more information see www.netcomm.com.au for compatibility list.
Page 6

3G Travel Router t1 User Guide YMLT1WN
6 www.netcomm.com.au
Cordless Phones
If the performance of your wireless network is impaired after considering the above issues, and you have a cordless phone:
• Try moving cordless phones away from your Router and your wireless-enabled computers.
• Unplug and remove the battery from any cordless phone that operates on the 2.4GHz band (check manufacturer’s information). If
this xes the problem, your phone may be interfering with the Wi-Fi Router.
• If your phone supports channel selection, change the channel on the phone to the farthest channel from your wireless network.
For example, change the phone to channel 1 and move your Router to channel 11. See your phones user manual for detailed
instructions.
• If necessary, consider switching to a 900MHz or 5GHz cordless phone.
Choose the “Quietest” Channel for your Wireless Network
In locations where homes or ofces are close together, such as apartment buildings or ofce complexes, there may be wireless networks
nearby that can conict with your wireless network.
Use the Site Survey capabilities found in the Wireless Utility of your wireless adapter to locate any other wireless networks that are available
(see your wireless adapter’s user manual), and switch your Router and computers to a channel as far away from other networks as
possible.
• Experiment with more than one of the available channels, in order to nd the clearest connection and avoid interference from
neighbouring cordless phones or other wireless devices.
• For NetComm wireless networking products, use the detailed Site Survey and wireless channel information included with your
wireless network card. See your network card’s user guide for more information.
These guidelines should allow you to cover the maximum possible area with your Router. Should you need to cover an even wider area, you
should consider looking at building a hybrid network by combining your wireless network with a HomePlug Network. See the NetComm
website for more details on Ethernet-Over-Power HomePlug products.
Page 7

YMLT1WN 3G Travel Router t1 User Guide
www.netcomm.com.au 7
NetComm Liberty Series - 3G Travel Router t1
Package Contents
1. NetComm 3G Travel Router t1
2. 5VDC~2A Power Adapter
3. Ethernet CAT5E Crossover Cable
4. Quick Install Guide
5. CD-ROM (User’s Manual)
6. Li-lon Battery
Key Features
• Stylish and compact 3G Travel Router with internal Wi-Fi antenna and battery
• Creates instant Wireless hotspots to share the Internet connection of a 3G USB modem or DSL/Cable modem
• Supports Wireless N standard with data speeds up to 150Mbps1
• 1 USB 2.0 host port supports 3G modems, external storage and printers
• Compatible with all 3G/Next G TM/UMTS/ HSPDA/ EV-DO/ USB modems from leading vendors
• 1 WAN port for alternate wired Internet connection (DSL/Cable/Satellite via Ethernet)
• Ensures connectivity and business continuity with auto-Internet-failover from WAN port to 3G USB modem
• Mains-operated or up to 5 hours battery power if no power point is available
• Hassle-free internal Wi-Fi antenna (1Transmit/1Receive)
• Easy Wireless Protected Setup (WPS) by the single touch of a button to establish a secure wireless connection
• Full Wireless security - WEP, WPA, WPA2
• Browser based interface for conguration and management: OS independent and easy to use
Page 8

PLACEMENT OF YOUR T1
Page 9

YMLT1WN 3G Travel Router t1 User Guide
www.netcomm.com.au 9
NetComm Liberty Series - 3G Travel Router t1
Placement
Just like your mobile phone, a 3G USB Modem’s location will affect its signal strength to the 3G Mobile Base Station (Cell Tower). The data
speed achievable from a 3G USB modem is relative to this signal strength, which is affected by many environmental factors. Please keep
in mind that the 3G USB Modem will need adequate signal strength in order to provide Internet connectivity whilst choosing a location to
place your 3G Travel Router t1.
Similarly to the 3G USB Modem, the wireless connection between the Router and your Wi-Fi devices will be stronger the closer your
connected devices are to your Router. Your wireless connection and performance will degrade as the distance between your Router and
connected devices increases. This may or may not be directly noticeable, and is greatly affected by the individual installation environment.
If you have concerns about your network’s performance that might be related to range or obstruction factors, try moving the computer to
a position between three to ve meters from the Router in order to see if distance is the problem. If difculties persist even at close range,
please contact NetComm Technical Support.
Note: While some of the items listed below can affect network performance, they will not prohibit your wireless network from functioning; if you are concerned that your network is
not operating at its maximum effectiveness, this checklist may help.
Router Placement
Place your Router as close as possible to the centre of your wireless network devices. To achieve the best wireless network coverage for
your “wireless clients” (i.e., computers with built-in or USB Wireless Adapters, Laptops with built-in Wireless, Wireless PDA / iPhone, etc):
• In multi-storey homes, place the Router on a oor that is as close to the centre of the home as possible. This may mean placing the
Router on an upper oor.
• Avoid placing the Router near a cordless telephone that operates at the same radio frequency (2.4GHz).
Avoid obstacles and interference
Avoid placing your Router near devices that may emit radio “noise,” such as microwave ovens. Dense objects that can inhibit wireless
communication include:
• Refrigerators
• Washers and/or dryers
• Metal cabinets
• Large aquariums
• Metallic-based, UV-tinted windows
If your wireless signal seems weak in some spots, make sure that objects such as these are not blocking the signal’s path (between your
devices and the Router).
Page 10

PlacementGETTING STARTED
Page 11
YMLT1WN 3G Travel Router t1 User Guide
www.netcomm.com.au 11
NetComm Liberty Series - 3G Travel Router t1
Getting Started
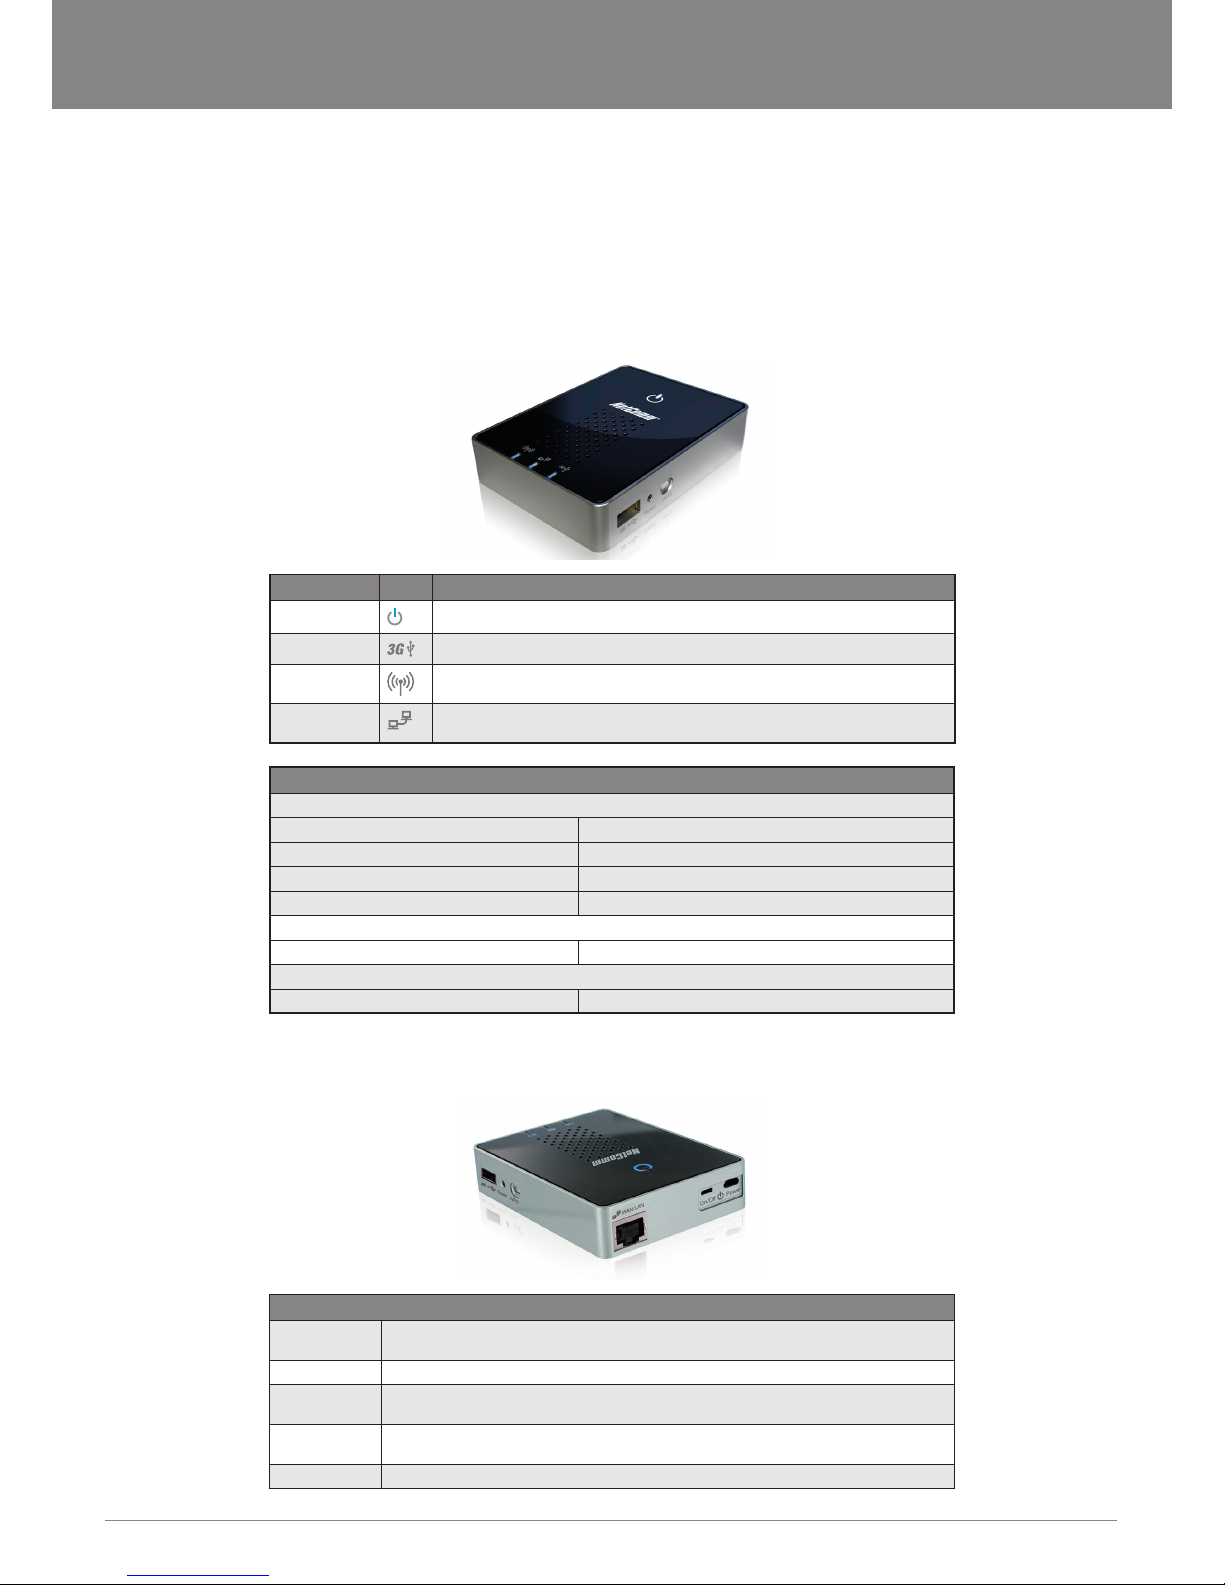
The LED Indicators of the 3G Travel Router t1
The Router has been designed to be placed on a desktop. The LED indicators are easily visible on the top of the Router to provide you with
information about network activity and status. See below for explanation of each of the features.
LED Icon Description
Power Lights up when powered ON.
3G
Lights up when the router is connected via 3G.
Wireless
Lights up when WLAN is enabled. Blinks on trafc.
WAN / LAN
Light up when specic Ethernet connection is established, Blinks on WAN / LAN trafc
and Blinks on Temporarily overridden to LAN mode.
The Power LED - Displaying Power and Battery Status
When Router is switched on and battery inside
Green: power adapter is pluggedin and battery is fully charged
Green in ashing: power is provided by battery
Amber: power adapter is plugged in and charging the battery
RED: Battery power is low
When device is on without battery inside
Amber: Power adapter is plugged in
When device is off and with battery inside
Amber: power adapter is plugged in and charging the battery
The Connectors and Buttons of the 3G Travel Router t1
Side Ports
Reset Press once to initiate LAN port function. Hold this button down for 10 seconds to reset to factory
defaults.
WPS Button Press once to initiate Wireless Protected Setup
3G USB
Modem
USB port for connecting a compatible 3G USB Modem
WAN / LAN RJ45 WAN Ethernet port for a Fixed Line (ADSL/Cable/Satellite) network connection (factory
default) or LAN port for wired Ethernet clients (computers, laptops etc.)
Power Power connector, connects to DC 5V 2A Power Adapter
Page 12

3G Travel Router t1 User Guide YMLT1WN
12 www.netcomm.com.au
Network and System Requirements
Before continuing with the installation of your 3G Travel Router t1, please conrm that you comply with the minimum system
requirements below.
• Compatible 3G USB Modem with Active SIM/Data Service if you want to use 3G Broadband service.
Note: Subject to terms and conditions from your 3G Mobile Broadband Service Provider.
• Computer with Windows, Macintosh, or Linux-based operating systems with a working Ethernet network adapter with TCP/IP
Protocol installed.
• A web browser such as Internet Explorer, Netscape Navigator, Mozilla Firefox, Opera, Safari etc.
Wireless Computer System Requirements
• Computer with a working IEEE 802.11b, 802.11g or 802.11n wireless adapter.
Modem Requirements
In order to use the WAN Ethernet port for Internet connectivity your xed line service (Cable/xDSL/Satellite) modem must be equipped with
an RJ45 Ethernet port. Many modems have both an RJ45 Ethernet port and a USB port. If you have a modem with both Ethernet and
USB, and are using the USB port at this time, you will be instructed to use the RJ45 Ethernet port during the installation procedure. If your
modem has only a USB port, you can request a different type of modem from your Internet Service Provider, or you can purchase a modem
that has an RJ45 Ethernet port on it.
Connecting your device to the Router
Follow the next steps to create a Wireless Local Area Network (WLAN) to provide Internet access to 802.11b, 802.11g and 802.11n wireless-equipped
computers or smartphones.
Step 1 – Connect the 3G USB Modem.
Plug the 3G USB modem into the USB port.
Note: The 3GT1Wn - 3G Travel Router t1 is designed to work with 3G USB Dongles that can be used as data modems (support tethered data). Please refer to your service
provider for detailed feature information. Please refer to the NetComm website for a list of compatible 3G USB Modems
Page 13
YMLT1WN 3G Travel Router t1 User Guide
www.netcomm.com.au 13
NetComm Liberty Series - 3G Travel Router t1
Charging your battery
If you use the 3G Router until the battery has completely drained, it will power off. If this occurs, let the unit charge overnight.
Note: The battery must be fully charged before using your 3G Router for the rst time.
To charge your battery please complete the following steps:
1. With the battery inserted into your 3G Router connect the supplied power adapter to the wall power outlet and to the micro USB socket on the
3G Router.
2. Leave it to charge until the power LED lights up solid Green.
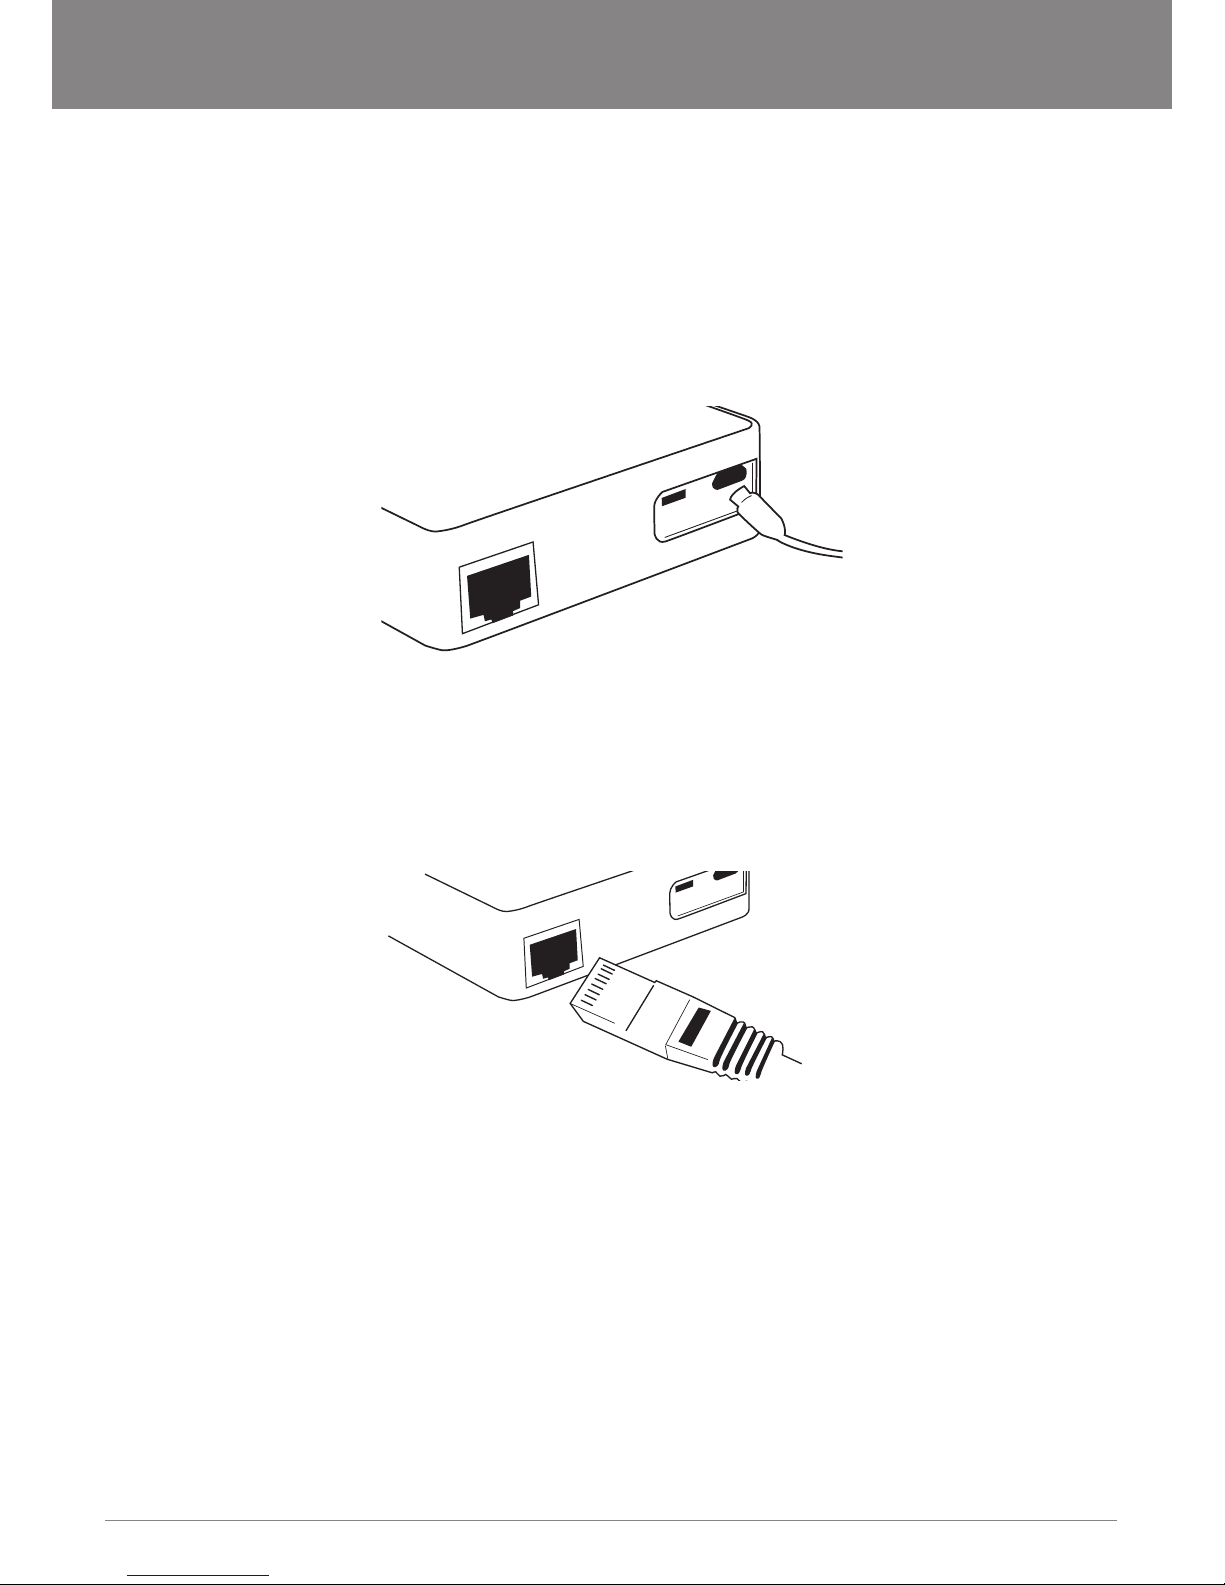
Step 2 – Plug in the power
Connect the power adapter to the port on the back panel of your 3G Router. Then plug the other end of the power adapter into a wall
outlet or power strip.
Step 3a – Connect a computer or smartphone via Wireless
Using your wireless device, scan the wireless networks in your area and select the network called NetComm Wireless, then click connect.
When the security prompt enter the security key a1b2c3d4e5
Step 3b – Connect a computer via Ethernet
Press the Reset button on the Router and connect one end of the Ethernet cable to the WAN/LAN Port on the back panel of the 3G Travel
Router t1, and the other end to the RJ45 Ethernet port of the laptop or desktop PC you would like to use.
Default Settings
LAN (Management)
Static IP Address: 192.168.20.1
Subnet Mask: 255.255.255.0
Default Gateway: 192.168.20.1
WAN (Internet)
WAN mode: DHCP
Wireless
SSID: NetComm Wireless
Channel: 11
Security: WPA-PSK
TKIP Key: a1b2c3d4e5
Modem Access
Username: admin
Password: admin
Page 14

3G Travel Router t1 User Guide YMLT1WN
14 www.netcomm.com.au
Conguring your Router and Setting up your computer
Having physically connected your Router, the next step is to congure the Router to establish a broadband connection. Depending on your
computers current settings you may rst need to recongure the TCP/IP (Network Settings) to access your Router. Follow the instructions
for your operating system.
Windows Vista computers
1. In the Windows task bar, click on Start and then click Control Panel.
2. Click on Network and Sharing Center. (Classic view only)
3. Click on Manage Network Connections on the left menu.
4. Right click on Local Area Connection and click on Properties
5. The Local Area Connection dialog box will display a list of currently installed network items. Ensure that the check box to the left
of the item labeled Internet Protocol Version 4 (TCP/IPv4) is checked. Select Internet Protocol Version 4 (TCP/IPv4) and click on
Properties.
6. In the Internet Protocol Version 4 (TCP/IPv4) properties dialog box, click the radio button labeled Obtain an IP address automatically.
Also click the radio button labeled Obtain DNS server address automatically.
7. Click OK twice to conrm your changes and close the Control Panel.
Windows® XP computers
1. In the Windows task bar, click the Start button, and then click Control Panel.
2. Click on Network & Internet Connections icon. (Category mode only).
3. Click the Network Connections icon.
4. In the LAN or High-Speed Internet window, right-click on the icon corresponding to your network interface card (NIC) and select
Properties. (Often, this icon is labeled Local Area Connection).
5. The Local Area Connection dialog box displays with a list of currently installed network items. Ensure that the check box to the left
of the item labeled Internet Protocol (TCP/IP) is checked. Select Internet Protocol TCP/IP and click on Properties.
6. In the Internet Protocol (TCP/IP) Properties dialog box, click the radio button labeled Obtain an IP address automatically. Also click
the radio button labeled Obtain DNS server address automatically.
7. Click OK twice to conrm your changes, and close the Control Panel.
Mac OSX 10.4
1. Click the Apple icon and choose System Preferences.
2. Click on the Network icon.
3. Set Location to Automatic and Show to Built In Ethernet.
4. Click on the TCP/IP tab.
5. In the Congure option, choose Use DHCP with automatic address.
6. Click on Apply Now.
Page 15
YMLT1WN 3G Travel Router t1 User Guide
www.netcomm.com.au 15
NetComm Liberty Series - 3G Travel Router t1
Setting up your 3G Travel Router t1
The next step is to establish the broadband connection to the Internet. Please follow the steps below to congure your router via the user
interface.
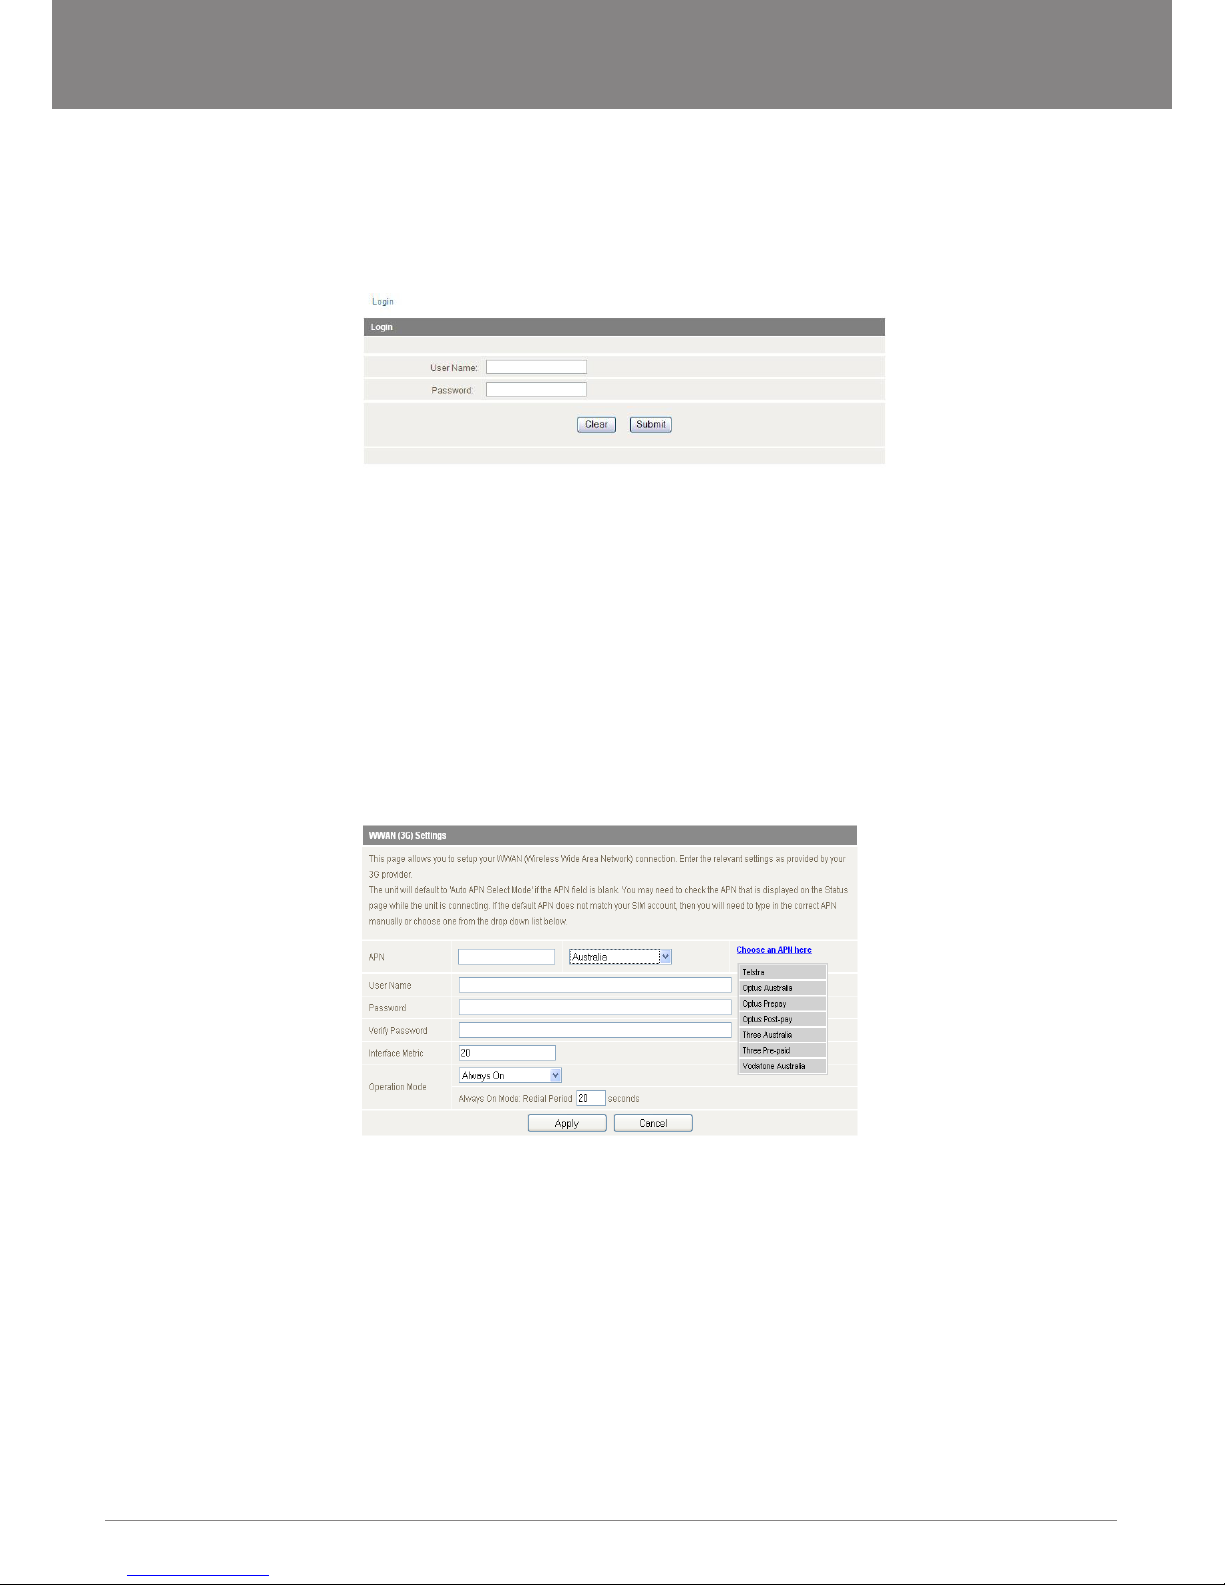
1. Open your web browser (e.g. Internet Explorer/Firefox/Safari) on your computer or smartphone and navigate to http://192.168.20.1/
2. Click Login and type “admin” (without quotes) in the Username and Password elds. Then click on Submit.
Note: admin is the default username and password for the unit.
3. Set up your WAN connection as follows:
Using the Router with a 3G Mobile Broadband Internet Service
Note: Before proceeding with this step, ensure that your 3G USB Dongle has been plugged into the USB port of your 3G Router
To congure a 3G WAN connection, please follow these steps:
• Mouseover Internet Settings and click on 3G Internet Settings
• Select your location and mouseover choose your APN here and from the drop down list, select your APN.
Otherwise if:
• Your SIM card requires a PIN code
• Your 3G broadband service provider requires you to input the username/password for your 3G connection.
• You wish to use other alternate 3G connection details (such as a special APN)
Please enter the relevant information on this screen as provided by your 3G broadband service provider
Page 16
3G Travel Router t1 User Guide YMLT1WN
16 www.netcomm.com.au
3G Internet Settings
• Click Apply to save the settings
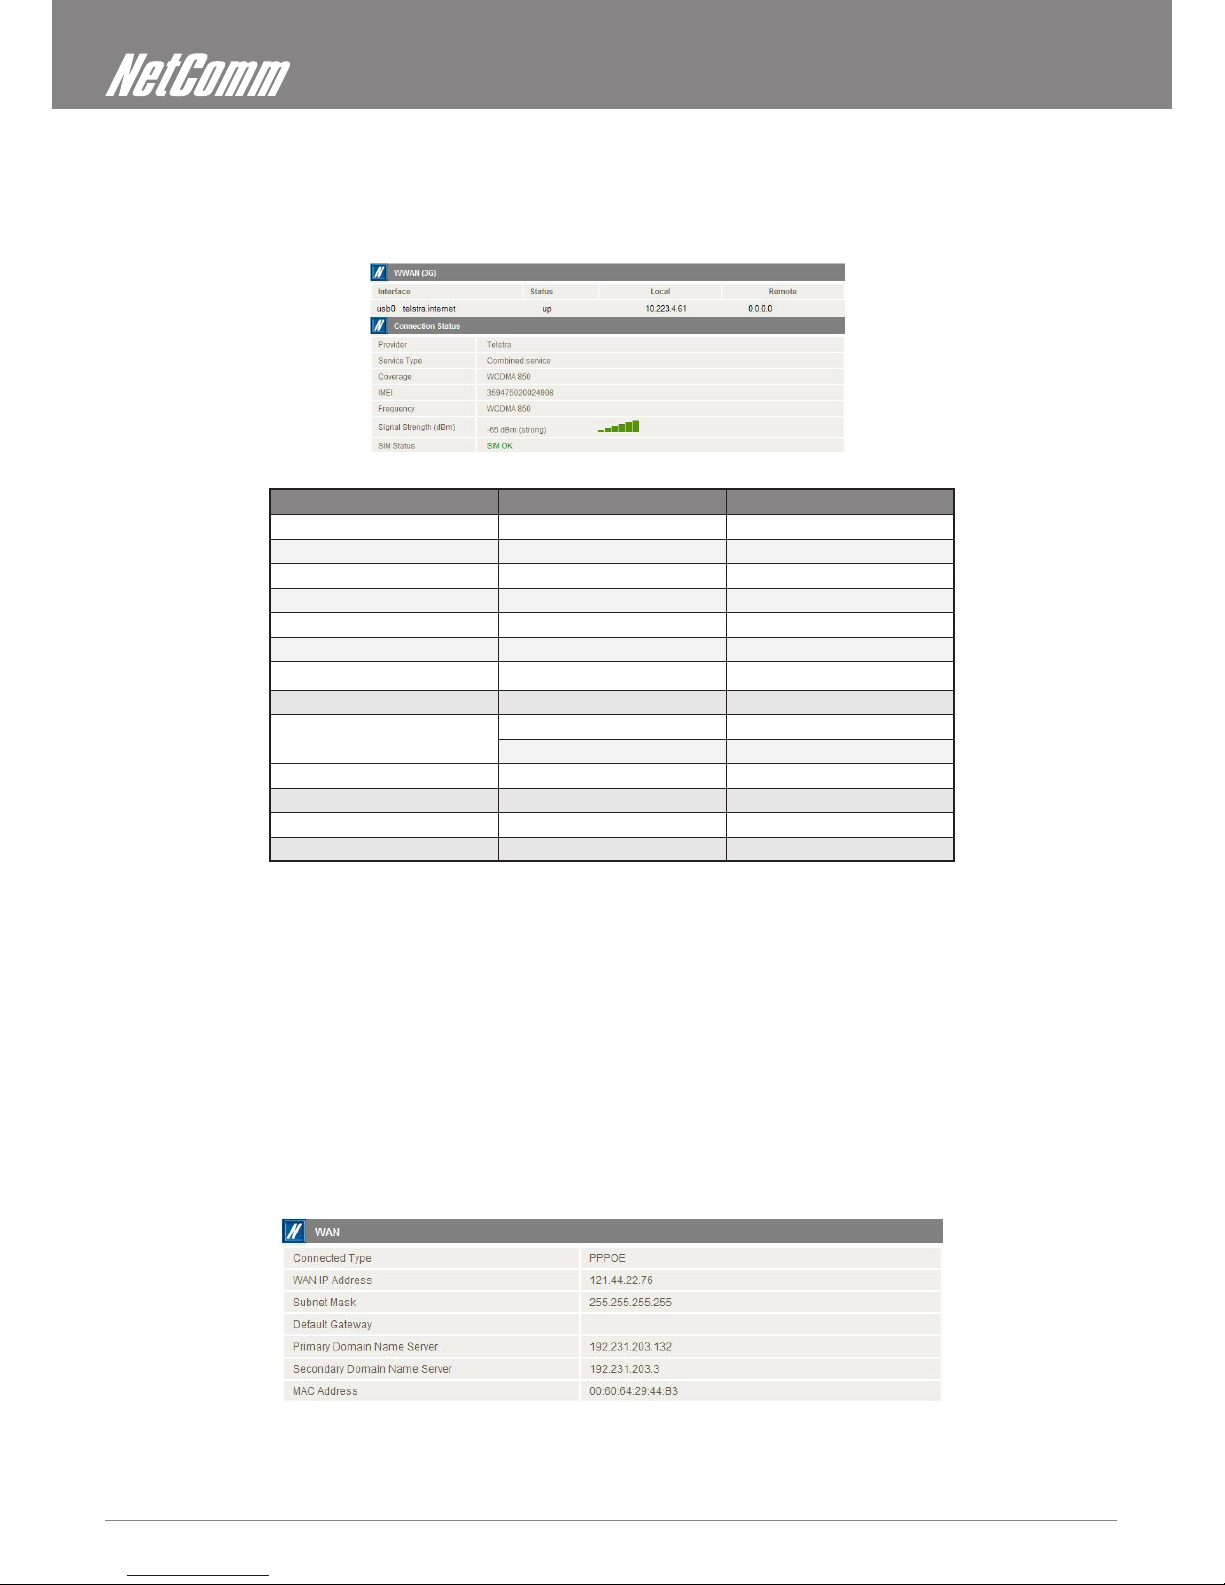
• If everything is congured properly, the Status page will show that your 3G service is online and the WAN IP address that has been
assigned.
3G Connection Status Page
APN (Access Point Name) for various providers
ISP APN Username/Password Required
Telstra telstra.Internet NO
BigPond telstra.bigpond YES
Three (Postpaid) 3netaccess NO
Three (Prepaid) 3services NO
Vodafone (Postpaid) vfInternet.au NO
Vodafone (Prepaid) vfprepaymbb NO
Optus (postpaid)
DODO
dodolns1 NO
WirelessBroadband NO
Virgin VirginBroadband NO
Primus primuslns1 NO
Crazy John purtona.net NO
Note: This table is up to date as of the printing of this manual
Using the 3G Router with a xed line Broadband Internet Service (DSL/Cable)
Note: Before proceeding with this step, ensure that your WAN connection has been plugged into the WAN port of your 3G Router
To congure a non WAN connection (Static, DHCP, PPPoE, PPTP), please follow these steps:
• Mouseover Internet Settings and click on WAN
• Select your WAN Connection type from the dropbox (Static, DHCP, PPPoE, PPTP)
• Enter the relevant information on this screen as supplied by your ISP
• Click Apply to save the settings
• If everything is congured properly, the Status page will show that your WAN service is online and the WAN IP address that has
been assigned.
Non-3G connection status page:
connect NO
Optus (pr
epaid) preconnect NO
Blink splns888a1 NO
Page 17

ADVANCED FEATURES
Page 18

3G Travel Router t1 User Guide YMLT1WN
18 www.netcomm.com.au
Advanced Features
This section explains other features that you may want to enable depending on your application. Some features can add extra stability and
error recovery. Other features are available to assist with integrating the 3GT1Wn with your application.
Login Procedure
1. Open your web browser (e.g. Internet Explorer/Firefox/Safari) and navigate to http://192.168.20.1/
2. Click Login and type “admin” (without quotes) in the Username and Password elds. Then click on Submit.
Note: admin is the default username and password for the unit.
Status
The status page provides system related information. It is shown on login to the Router, and can also be accessed by selecting Status from
the top menu.
By default, the status page will show System Info, Local Network, WWAN, Connection Status and Ethernet Status. To view either WAN,
PPPoE or PPTP individually, click on their relevant buttons. To view them all, click on the All Status button
Ethernet Port Status
The default setting for the Router’s Ethernet port is set to operate as a WAN port. But user congs allows the Ethernet port to be changed
from WAN to LAN or LAN to WAN.
Ethernet Port status Description
Current Current port status, either WAN or LAN
LAN Change the current port to LAN
WAN Change the current port to WAN
Page 19
YMLT1WN 3G Travel Router t1 User Guide
www.netcomm.com.au 19
NetComm Liberty Series - 3G Travel Router t1
Internet Settings
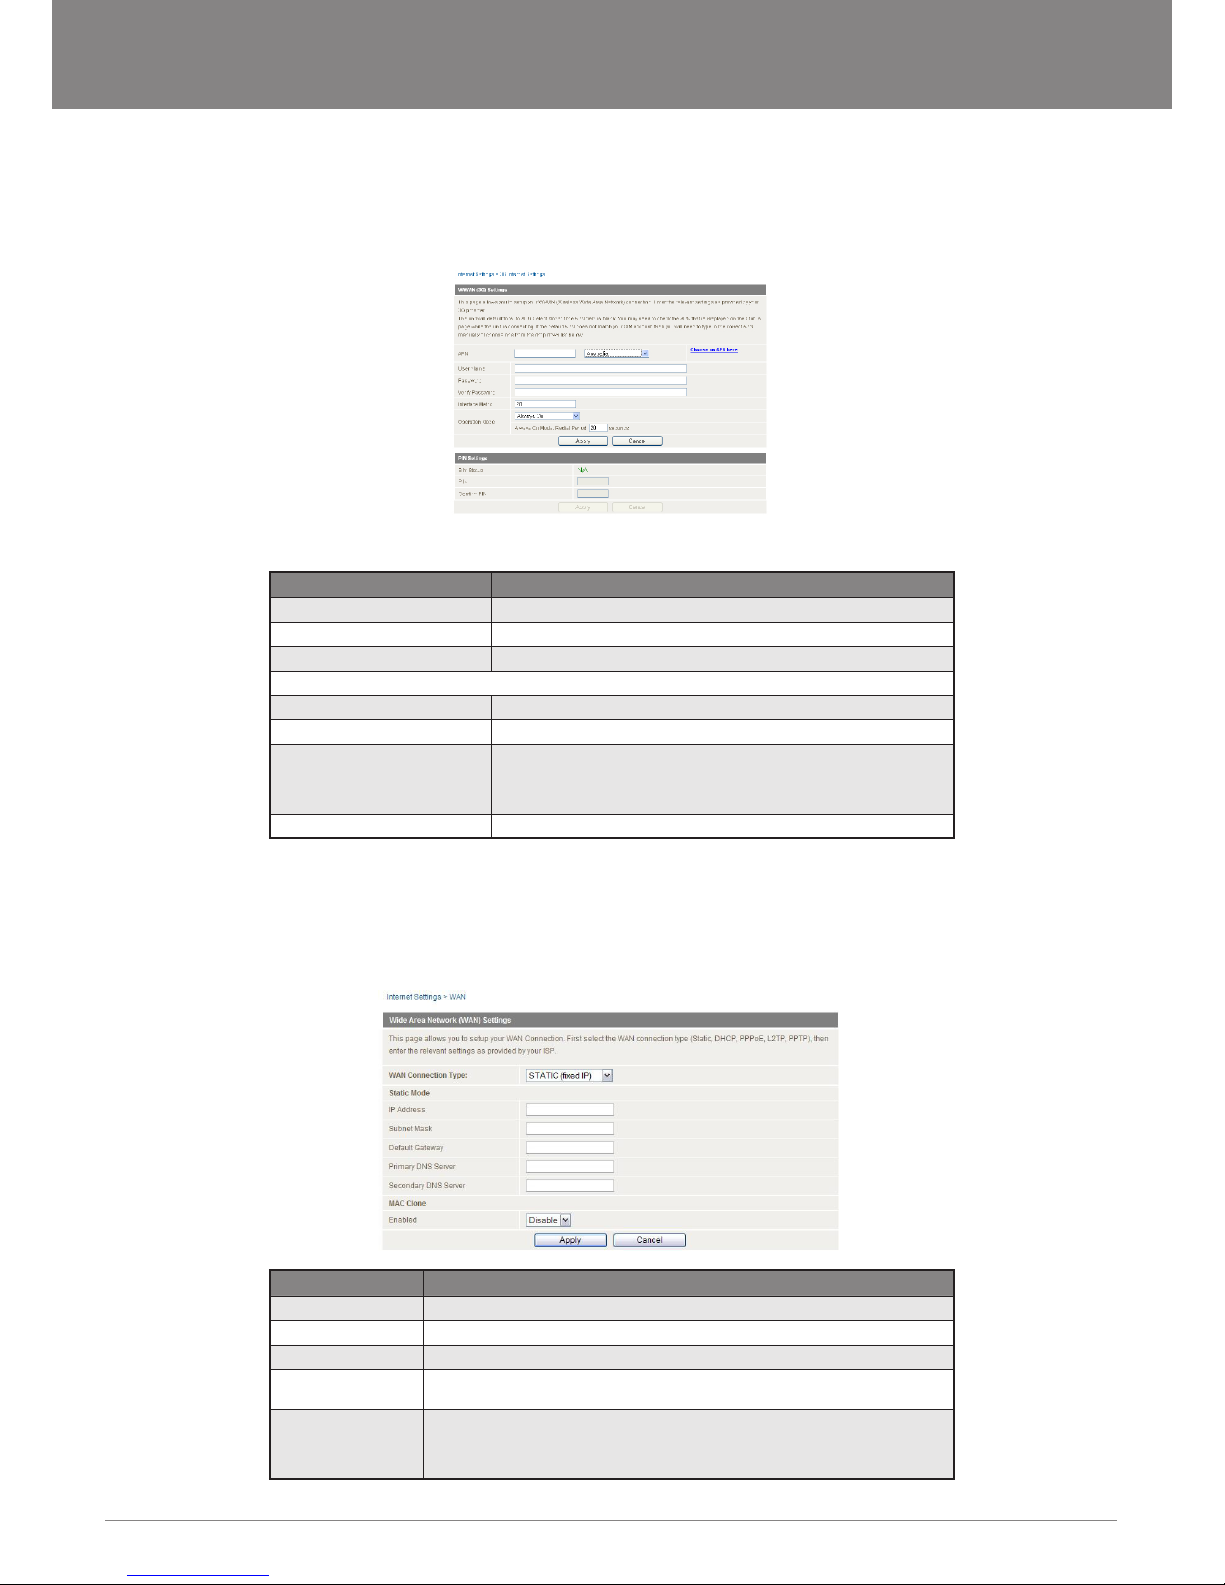
3G Internet Settings
This page allows you to setup your WWAN (Wireless Wide Area Network) connection. Enter the relevant settings as provided by your 3G
provider.
Note For 3G WAN connection: The 3G connection elds may not be necessary for your connection. The information on this page will only be used when your service provider
requires you to enter a User Name and Password to connect to the 3G network.
Name Description
APN: Enter the APN for your 3G USB modem
User Name: Enter your 3G username
Password: Enter your 3G password
Operation Mode; There are 3 options:
‘Always On’ Keeps the Internet connection alive, does not disconnect.
‘OFF’ Does not connect to the Internet.
‘Automatic 3G Backup’ The Automatic 3G Backup feature of the 3GT1Wn is designed to provide a
backup 3G Internet connection in case your primary connection should fail.
To use this feature, you will need both an Ethernet WAN connection (from an
xDSL modem/ISDN/Satellite etc) and a 3G WAN connection.
PIN: Enter the Pin Code for your SIM card
Note: For current APN’s of various providers, consult the Setting Up Your Router section of this user manual
WAN
Select the WAN connection type suitable for your environment and congure parameters according to the selected connection type.
STATIC (xed IP)
If your WAN connection uses a static IP address, please select Static IP Address and ll in the required information in the elds provided.
Name Description
IP Address: Type in the IP address assigned by your Internet Service Provider
Subnet Mask: Type in the Subnet mask assigned by your Internet Service Provider
Default Gateway: Type in the WAN Gateway assigned by your Internet Service Provider
Primary/ Secondary
DNS:
Type in the DNS address assigned by your Internet Service Provider
MAC Clone: Please input the MAC address of your computer here if your service provider only permits
computers with a certain MAC address to access the Internet. If you are using the
computer which used to connect to the Internet via a cable modem, you can simply press
the ‘Default’ button to ll the MAC address eld with the MAC address of your computer.
Click Apply to save the settings.
Page 20
3G Travel Router t1 User Guide YMLT1WN
20 www.netcomm.com.au
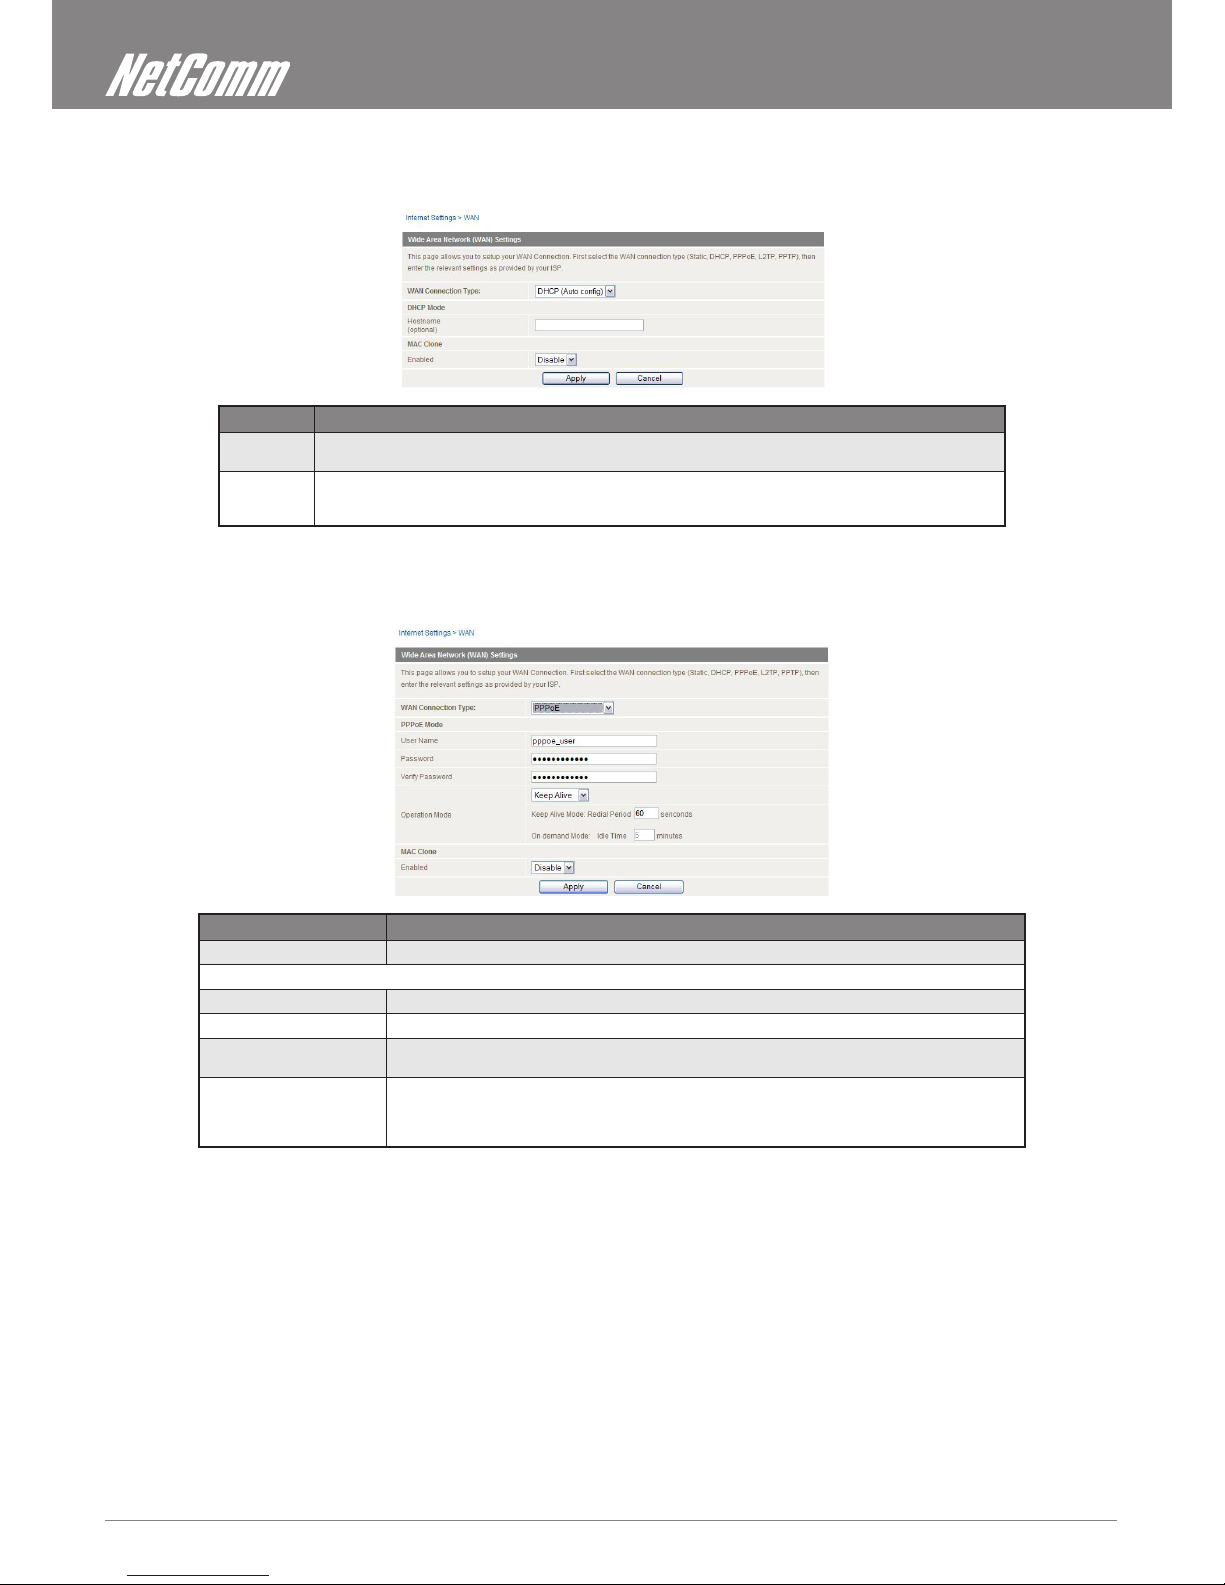
DHCP (Auto cong)
This connection will get the IP address from the Internet service provider. Choose this connection if you are connecting the router to a
Cable Modem service. Leave everything as default unless instructed by your Internet Service Provider.
Name Description
Hostname Please input the host name of your computer. This is optional, and only required if your service provider asks you to do
so.
MAC Clone Please input the MAC address of your computer here if your service provider only permits computers with a certain
MAC address to access the Internet. If you are using the computer which used to connect to Internet via a cable
modem, you can simply press the ‘Default’ button to ll the MAC address eld with the MAC address of your computer.
Click Apply to save the settings.
PPPoE (ADSL)
Most ADSL services use the PPP over Ethernet protocol. Use this if you connect your 3G Router to a bridged ADSL modem.
Name Description
Username/Password Type in your PPPoE account username and password.
Operation Mode; There are 3 options:
‘Keep Alive’ Keeps the Internet connection alive, does not disconnect.
‘On Demand’ Only connects to the Internet when there’s a connect attempt
‘Manual’ Only connects to the Internet when the ‘Connect’ button on this page is pressed, and disconnects when the
‘Disconnect’ button is pressed.
MAC Clone Please input the MAC address of your computer here if your service provider only permits computers with
a certain MAC address to access the Internet. If you are using the computer which used to connect to the
Internet via cable modem, you can simply press the ‘Default’ button to ll the MAC address eld with the MAC
address of your computer.
Click Apply to save the settings.
Page 21

YMLT1WN 3G Travel Router t1 User Guide
www.netcomm.com.au 21
NetComm Liberty Series - 3G Travel Router t1
PPTP
PPTP (Point to Point Tunneling Protocol) allows for a secure connection over the Internet by simply dialing in a local point provided by your
ISP provider. The following screen allows client PCs to establish a normal PPTP session and provides hassle-free conguration of the PPTP
client on each client PC.
Name Description
Server IP address: Type in the server IP address assigned by your Internet Service Provider.
PPTP Account/
Password:
Type in the username and password assigned by your provider.
Address Mode: Select Dynamic if your service uses a DHCP server, or select Static and type in the
IP address, Subnet Mask and Default Gateway assigned by your Internet Service
Provider.
Operation Mode; There are 3 options:
‘Keep Alive’ - Keeps the Internet connection alive, does not disconnect.
‘On Demand’ - Only connects to the Internet when there’s a connect attempt
‘Manual’ - Only connects to the Internet when the ‘Connect’ button on this page is pressed,
and disconnects when the ‘Disconnect button is pressed.
MAC Clone: Please input the MAC address of your computer here, if your service provider only
permits computers with a certain MAC address to access Internet. If you’re using
the computer which used to connect to Internet via cable modem, you can simply
press ‘Fill My MAC’ button to ll the MAC address eld with the MAC address of your
computer.
Click Apply to save the settings.
WAN Failover Backup
The WAN Failover Backup feature of the 3GT1Wn is designed to provide a backup 3G Internet connection in case your primary connection
should fail. To use this feature, you will need both an Ethernet WAN connection (from an xDSL modem/ISDN/Satellite etc) and a 3G WAN
connection.
To set up WAN failover on your 3G Router, rst tick “Enable automatic 3G backup”, then ll in the elds that appear.
Name Description
Internet Host: Enter an Internet address here to check the Internet connection
APN: Enter the APN for your 3G USB modem
User Name: Enter your 3G username
Password: Enter your 3G password
Click Apply to save the settings.
Page 22
3G Travel Router t1 User Guide YMLT1WN
22 www.netcomm.com.au
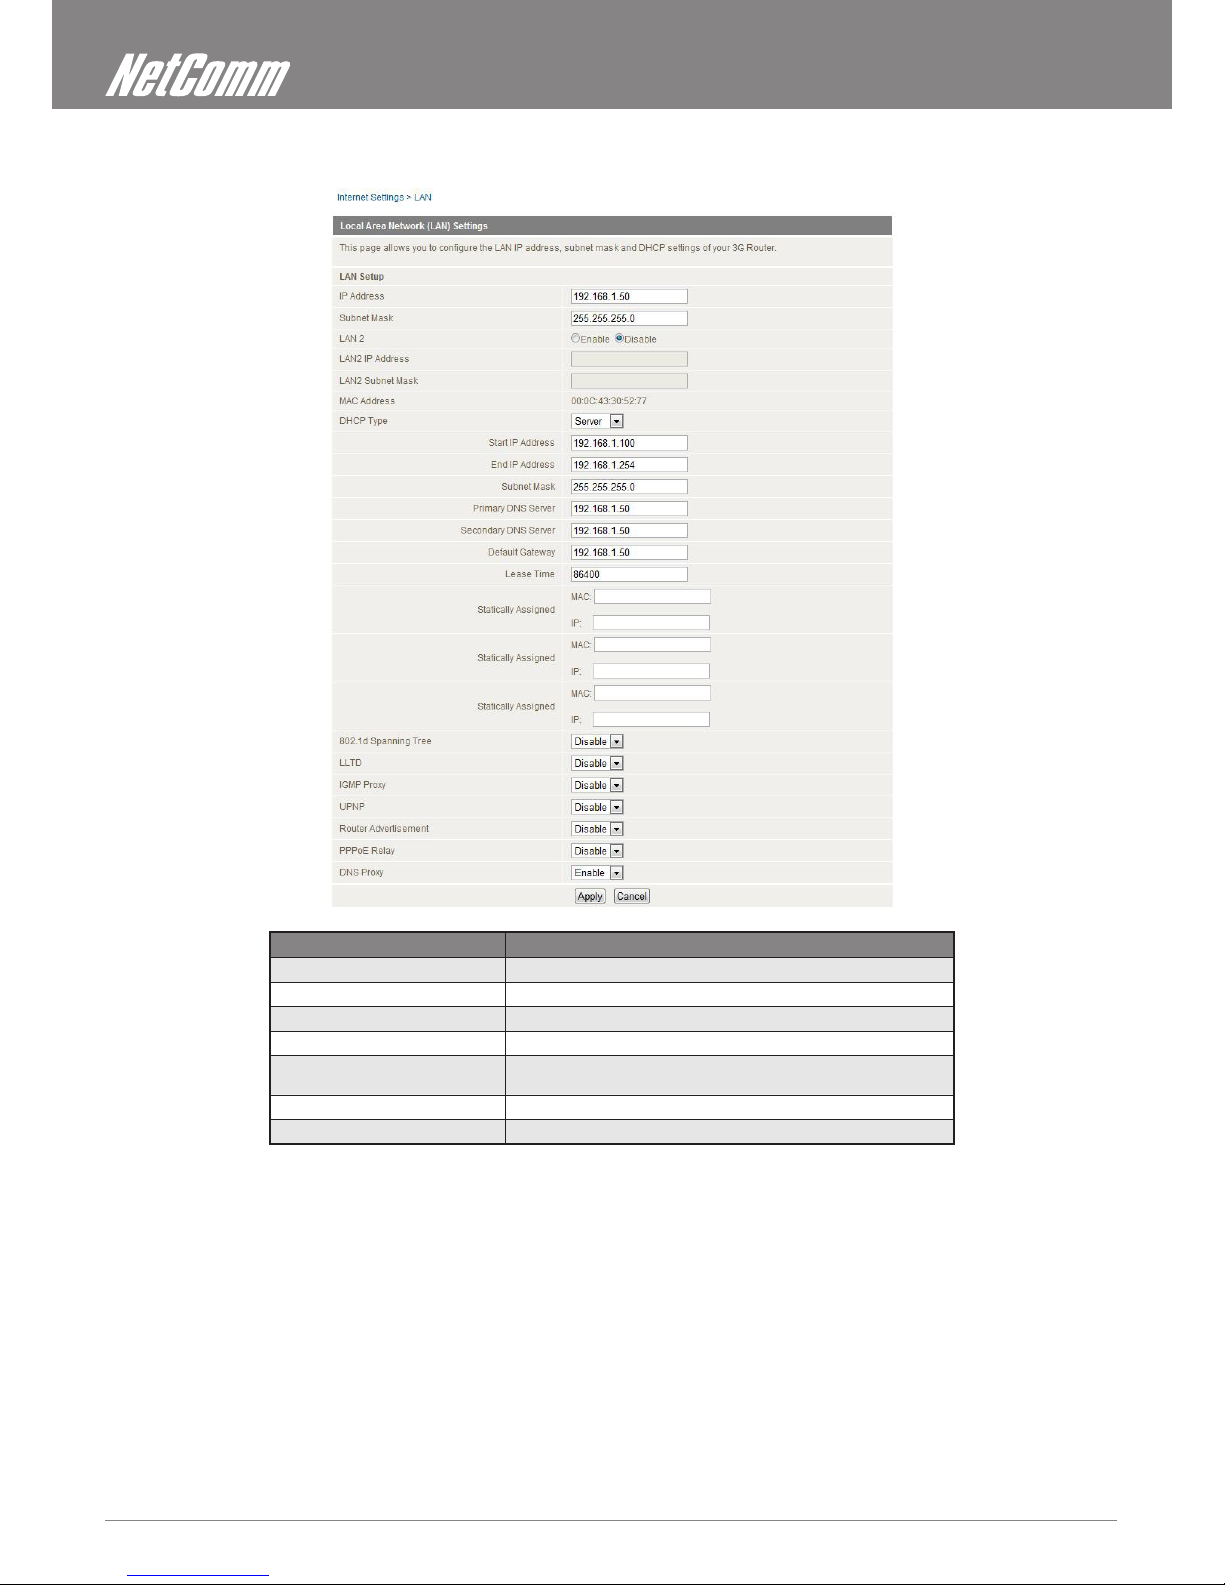
LAN
This Page allows you to change the LAN (Local Area Network) settings of your 3G Router.
Name Description
IP Address: The local IP address of this device.
Subnet Mask: The subnet mask of the local IP address
LAN 2: Used to congure a secondary LAN IP Address
MAC Address: The LAN MAC address of your 3G Router
DHCP Type: Please leave this set to ‘Enable’ unless you have another DHCP server on
the same network.
Primary DNS/Secondary DNS: (Optional) This feature allows you to manually assign DNS Servers
Lease Time: DHCP lease times of the DHCP clients of your 3G Router.
Click Apply to save the settings.
Page 23
YMLT1WN 3G Travel Router t1 User Guide
www.netcomm.com.au 23
NetComm Liberty Series - 3G Travel Router t1
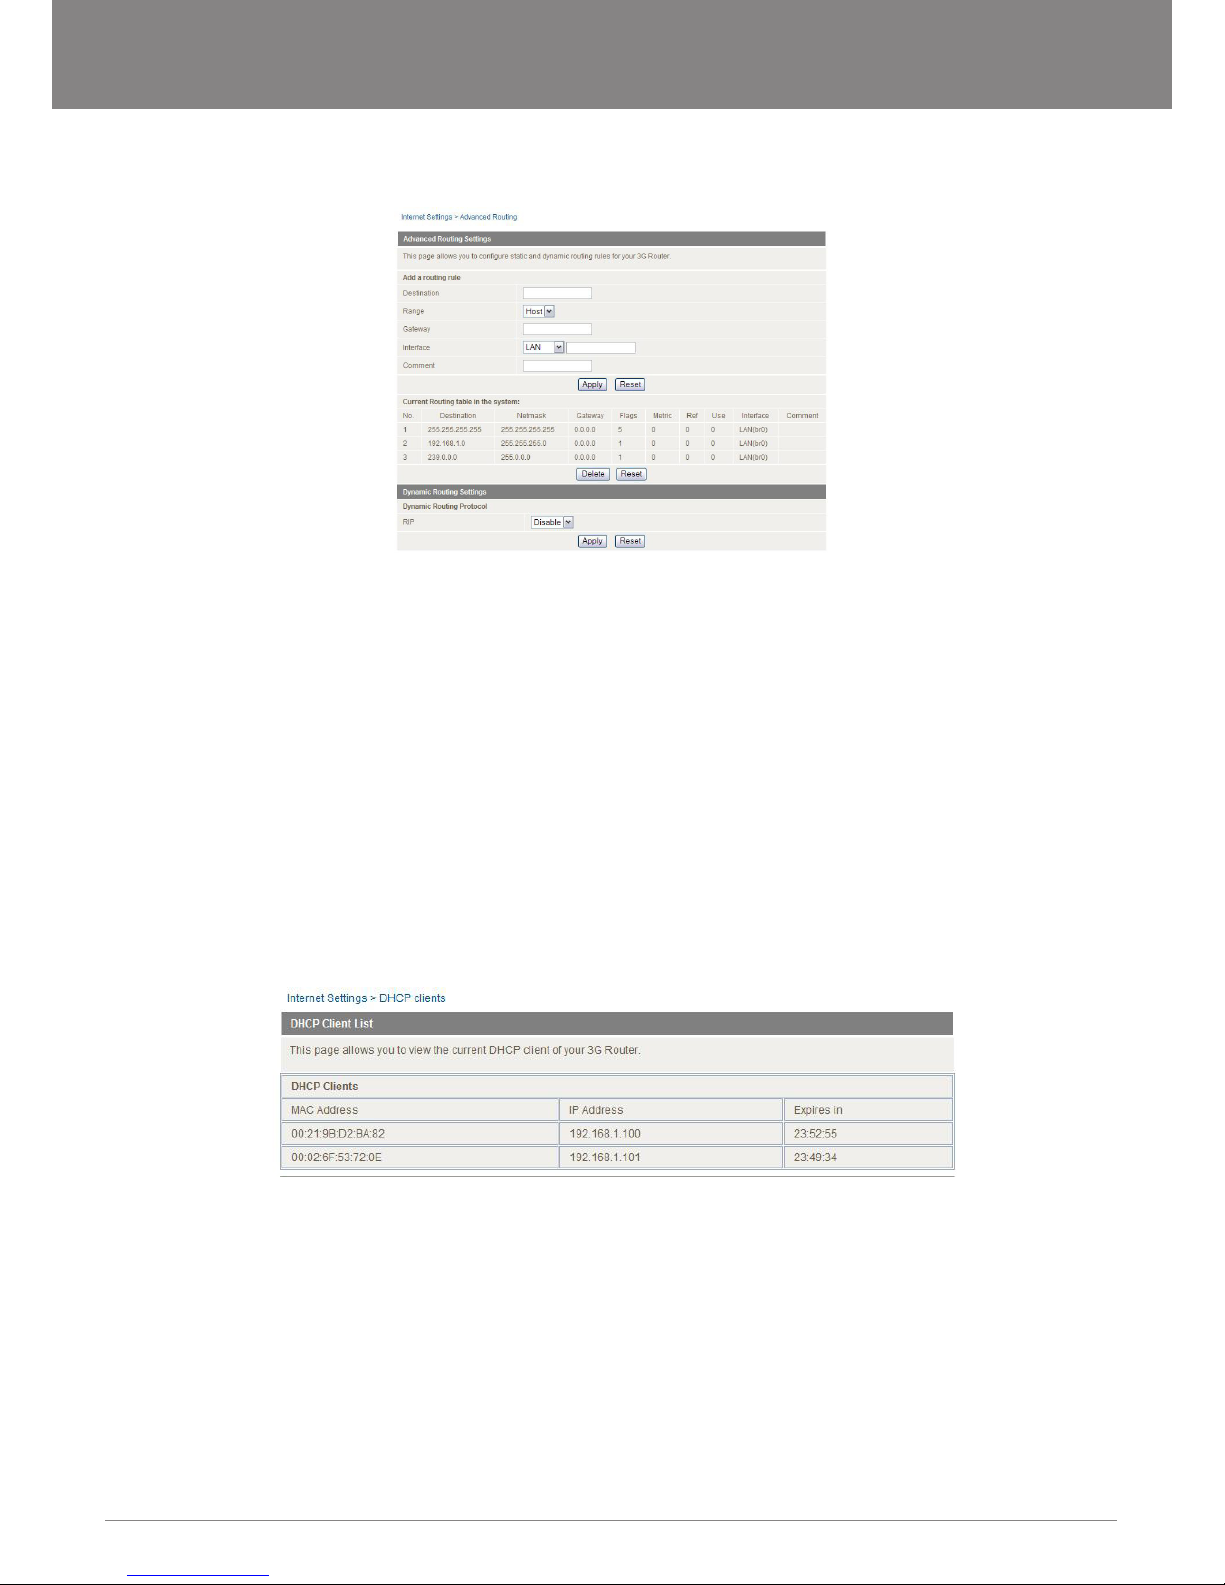
Advanced Routing
This page allows you to congure static and dynamic routing rules for your 3G Router.
Advanced Routing – Static
Static Routing allows computers that are connected to your 3G Router to communicate with computers on another LAN segment which
are connected to it via another router. To set a rule, you need to specify the following:
• Destination
• Sub Netmask
• Gateway
• Interface
Advanced Routing – Dynamic
Dynamic Routing uses the RIP protocol to allow the 3G Router to adapt to changes in the network. RIP enables the device to determine
the best route for each packet based on the “hop count” or number of hops between Source and Destination. To enable Dynamic Routing,
select Enable from the dropbox and click Apply.
DHCP Client
This page allows you to view the current DHCP client of your 3G Router.
Page 24

Placement
WIRELESS SETTINGS
Page 25
YMLT1WN 3G Travel Router t1 User Guide
www.netcomm.com.au 25
NetComm Liberty Series - 3G Travel Router t1
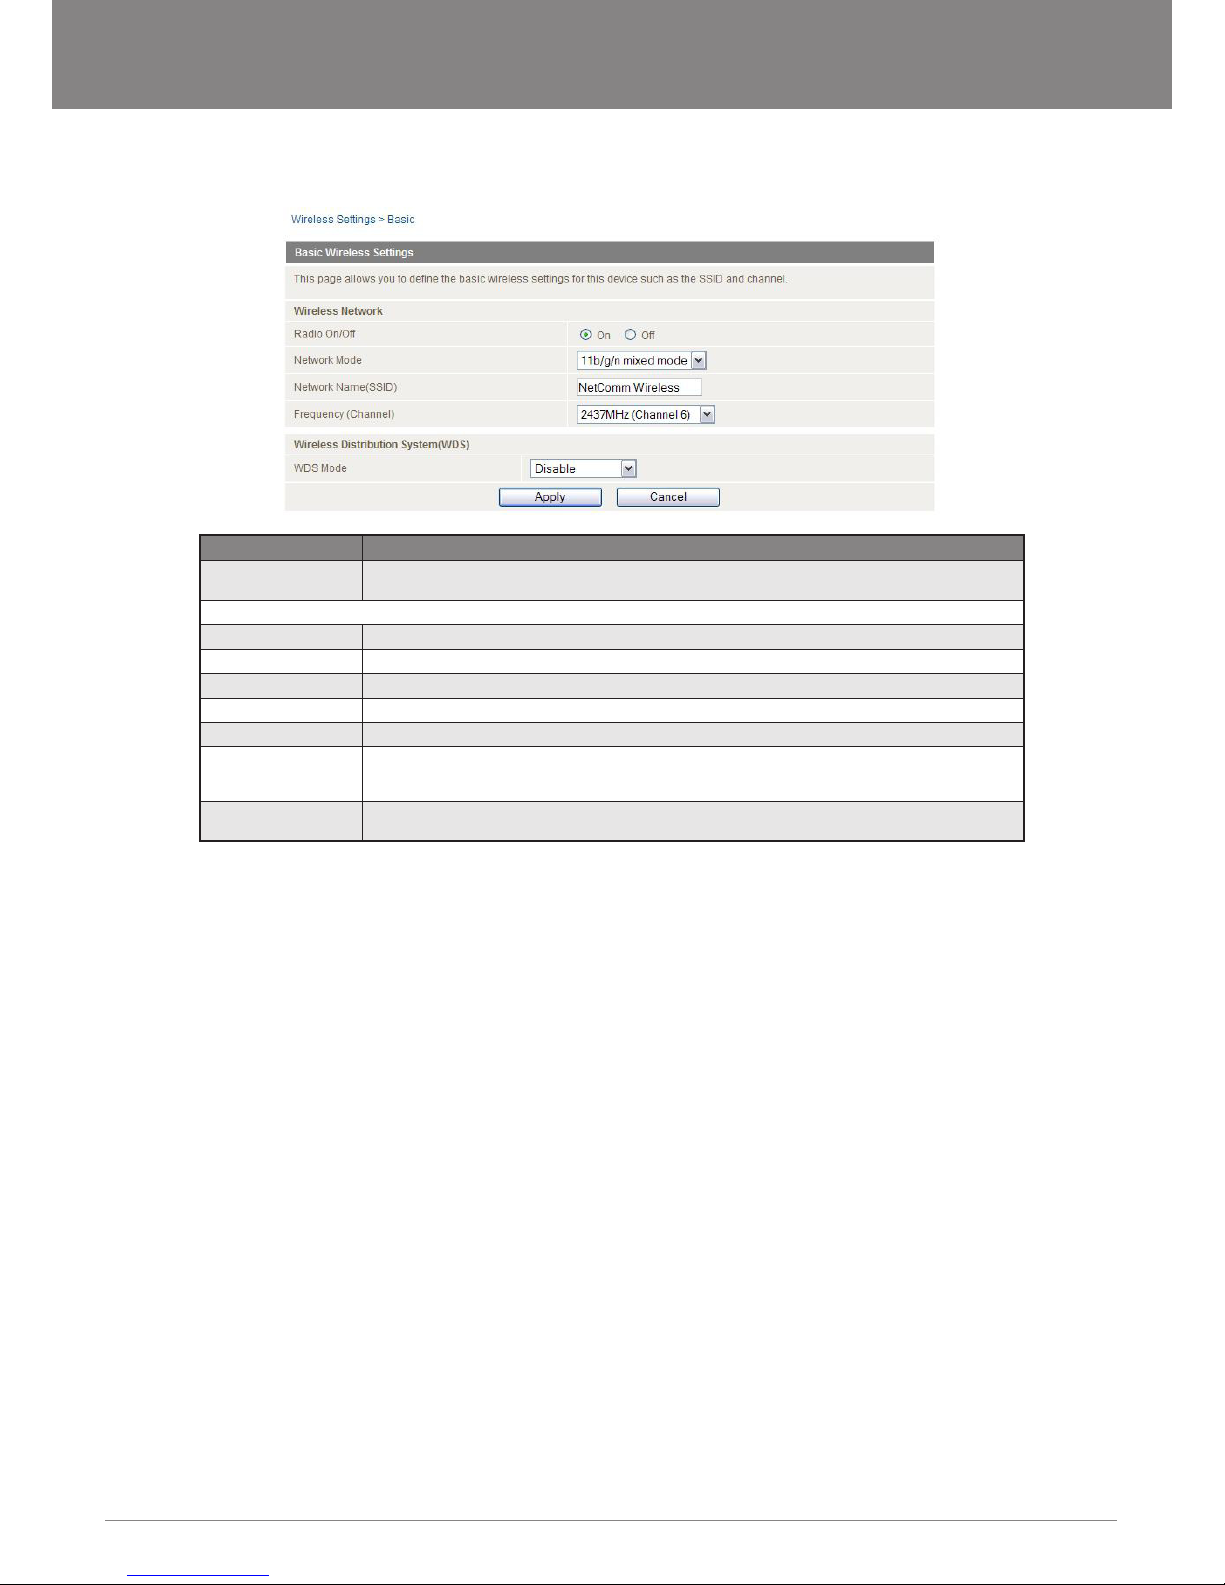
Basic
This page allows you to dene the basic wireless settings for this device such as the SSID and channel.
Name Description
Radio On/Off: On by default. Changing this option to Off will turn off the wireless feature on the unit and you will not be able to
connect to your 3G Router wirelessly.
Network Mode: You can select which wireless standards are able to connect to your wireless network:
11b/g mixed mode: Both 802.11b and 802.11g wireless devices are in your network.
11b only: Select this if all of your wireless clients are 802.11b.
11g only: Select this if all of your wireless clients are 802.11g.
11n only: Select this if all of your wireless clients are 802.11n.
11/b/g/n mixed mode: Select this if 802.11b and 802.11g and 802.11n wireless devices are in your network.
Network Name (SSID): The SSID (Service Set Identier) is the name of your wireless network. Use a unique name to identify your wireless
network so that you can easily connect from your wireless clients. This eld is case sensitive and can be up to 32
characters. You should change the default SSID for added security.
Frequency (Channel): This setting congures the frequency that the Wireless Radio uses for wireless connectivity. Select one channel
that you wish to use from the drop down list.
Click Apply to save the settings.
Page 26

3G Travel Router t1 User Guide YMLT1WN
26 www.netcomm.com.au
Advanced
This page allows you to modify the advanced wireless settings for your 3G Router. These settings should not be changed unless you are
aware of what effect they will have.
Name Description
Beacon Interval: Interval of time the wireless router broadcasts a beacon, used to synchronize the wireless network.
Data Beacon Rate (DTIM): Enter a value between 1 and 255 for the Delivery Trafc Indication Message (DTIM). A DTIM is a countdown informing clients of the
next window for listening to broadcast and multicast messages
Fragment Threshold: This species the maximum size of a packet during the fragmentation of data to be transmitted. If you set this value too low, it will
result in bad performance.
RTS Threshold: When the packet size is smaller than the RTS threshold, the wireless router will not use the RTS/CTS mechanism to send this packet.
AP Isolation: This feature allows you to isolate clients on your wireless network. To enable communication between the wireless clients connected
to your 3G Router, select Disabled. To cut the communication between the wireless clients, please choose Enabled.
TX Power: This determines the output power of the antenna
WMM Capable: WMM (Wi-Fi Multimedia) if enabled supports QoS (Quality of Service) for experiencing better audio, video and voice in applications
WMM Parameters: Click on the WMM Conguration button to congure the WMM parameters
Broadcast Network Name (SSID): Select ‘Disabled’ to hide the SSID of your 3G Router. If disabled, other people will not be able scan and detect this product’s SSID.
Click Apply to save the settings.
Page 27

YMLT1WN 3G Travel Router t1 User Guide
www.netcomm.com.au 27
NetComm Liberty Series - 3G Travel Router t1
Security
This page allows you to congure the wireless security for your 3G Router. Setting up sufcient wireless security can prevent unauthorised
access to your wireless network.
Name Description
SSID Choice: Select the SSID on which to congure the security settings
Security Mode: Select the security mode for the wireless network. See below for more information
Access Policy: This feature allows MAC Address Control, which prevents unauthorized clients from
accessing your wireless network. Select whether to allow/block users on the policy list, and
add their MAC addresses to the list on the format XX:XX:XX:XX:XX:XX
Click Apply to save the settings.
Security Mode
You may choose from the following wireless security options: Disabled, Open, Shared, WEPAUTO, WPA, WPA-PSK, WPA2, WPA2-PSK,
WPA-PSK-WPA2-PSK, WPA1-WPA2 or 802.1x.
Name Description
WEP: WEP (Wired Equivalent Privacy) is enabled by default to help prevent against unwanted
wireless users accessing your 3G Router. The default 64 bit Hexadecimal WEP key is:
a1b2c3d4e5
Page 28

3G Travel Router t1 User Guide YMLT1WN
28 www.netcomm.com.au
Name Description
WPA/WPA2: WPA (Wi-Fi Protected Access) authentication is suitable for enterprises. It must be used in
conjunction with an authentication server such as RADIUS to provide centralized access
control and management. It can provide stronger encryption and authentication solution
than non WPA modes.
Name Description
WPA-PSK/WPA2-
PSK:
A newer type of security is WPA-PSK (TKIP) and WPA2-PSK (AES). This type of security
gives a more secure network when compared to WEP. Use TKIP Encryption Type for WPAPSK and AES for WPA2-PSK. After that, please enter the key in the Passphrase eld. The
key needs to be more than 8 characters and less than 63 characters and it can be any
combination of letters and numbers. Please note that the conguration for WPA-PSK and
WPA2-PSK is identical.
Name Description
802.1x: In order to use 802.1X security, you need to have a RADIUS server on your network that will act as the
authentication server. Please type in the details for your RADIUS server in the elds required.
Note: After conguring wireless security, you also need to congure your wireless adapter to use the same security settings before you can connect wirelessly. Not all wireless
adapters support WPA-PSK/WPA2-PSK/WPA/WPA2 security; please refer to your wireless adapter user guide for more details. It is strongly recommended to set up a simple
wireless security such as WEP 64bit or WPA (when the wireless client supports WPA) in order to secure your network.
Page 29

YMLT1WN 3G Travel Router t1 User Guide
www.netcomm.com.au 29
NetComm Liberty Series - 3G Travel Router t1
WPS
WPS is the simplest way to establish a connection between wireless clients and your 3G Router. This method removes the need to
manually select the encryption mode and ll in the passphrase. You only need to press a button on both wireless client and wireless router,
and the WPS will do the rest for you. The wireless router supports two types of WPS:
Name Description
WPS via Push Button You have to push a specic button on the wireless client or in your wireless client utility
to start the WPS mode, and switch the wireless router to WPS mode. You can simply
push the WPS button of the wireless router, or click the ‘Start Process’ button in the web
conguration interface
WPS via PIN code You have to know the PIN code of the wireless client and switch it to WPS mode, then
input the wireless client PIN to the wireless router web interface.
Name Description
WPS: Use the dropbox to either enable or disable the WPS function.
WPS Current Status: If the wireless security (encryption) function of this wireless router is properly set, you will see a ‘Success’ message here. Otherwise, you will
see ‘Idle’.
WPS SSID: This is the network broadcast name (SSID) of the router.
WPS Auth Mode: It shows the active authentication mode for the wireless connection.
WPS PIN: This is the WPS PIN code of the wireless router. You may need this information when connecting to other WPS-enabled wireless devices.
WPS Mode: Select either PIN or PBC.
Station List
The Station List shows the wireless clients currently associated with your 3G Router.
Page 30

Placement
Firewall
Page 31

YMLT1WN 3G Travel Router t1 User Guide
www.netcomm.com.au 31
NetComm Liberty Series - 3G Travel Router t1
Firewall
MAC/IP/Port Filtering
This page allows you to setup MAC, IP and port ltering rules to protect your network from malicious activity. The ltering rules can be used
to either allow or block certain users and/or ports from accessing the Internet.
Basic Settings
Name Description
MAC/IP/Port Filtering: Select Enable to enable MAC/IP/Port Filtering
Default Policy: Select whether packets that do not match any rules are accepted or dropped
MAC/IP/Port Filtering Settings
Name Description
MAC Address: MAC address of a local computer
Dest IP Address: Destination IP Address for the lter rule
Source IP Address: Source IP Address for the lter rule
Protocol: Select the port number protocol type (TCP, UDP or both). If you are
unsure, then leave it to the default “TCP&UDP” setting
Dest Port Range: Destination Port Range of the lter rule
Source Port Range: Source Port Range of the lter rule
Action: Either accept or drop the packet that matches the rule
Comment: Add a comment to identify the rule (optional)
Click Apply to save the settings.
Page 32
3G Travel Router t1 User Guide YMLT1WN
32 www.netcomm.com.au
System Security
This page allows you to improve the security of your 3G Router through the SPI rewall and remote access settings.
Name Description
Remote Management (via WAN): Enable/Disable remote management on the WAN interface.
Deny ping from WAN interface: Select Enable to deny ICMP packets received on the WAN interface.
Otherwise, select Disable to allow ICMP packets received on the WAN
interface.
SPI Firewall: Enable/Disable the SPI (Stateful Packet Inspection) rewall to improve
the security of your 3G Router.
Click Apply to save the settings.
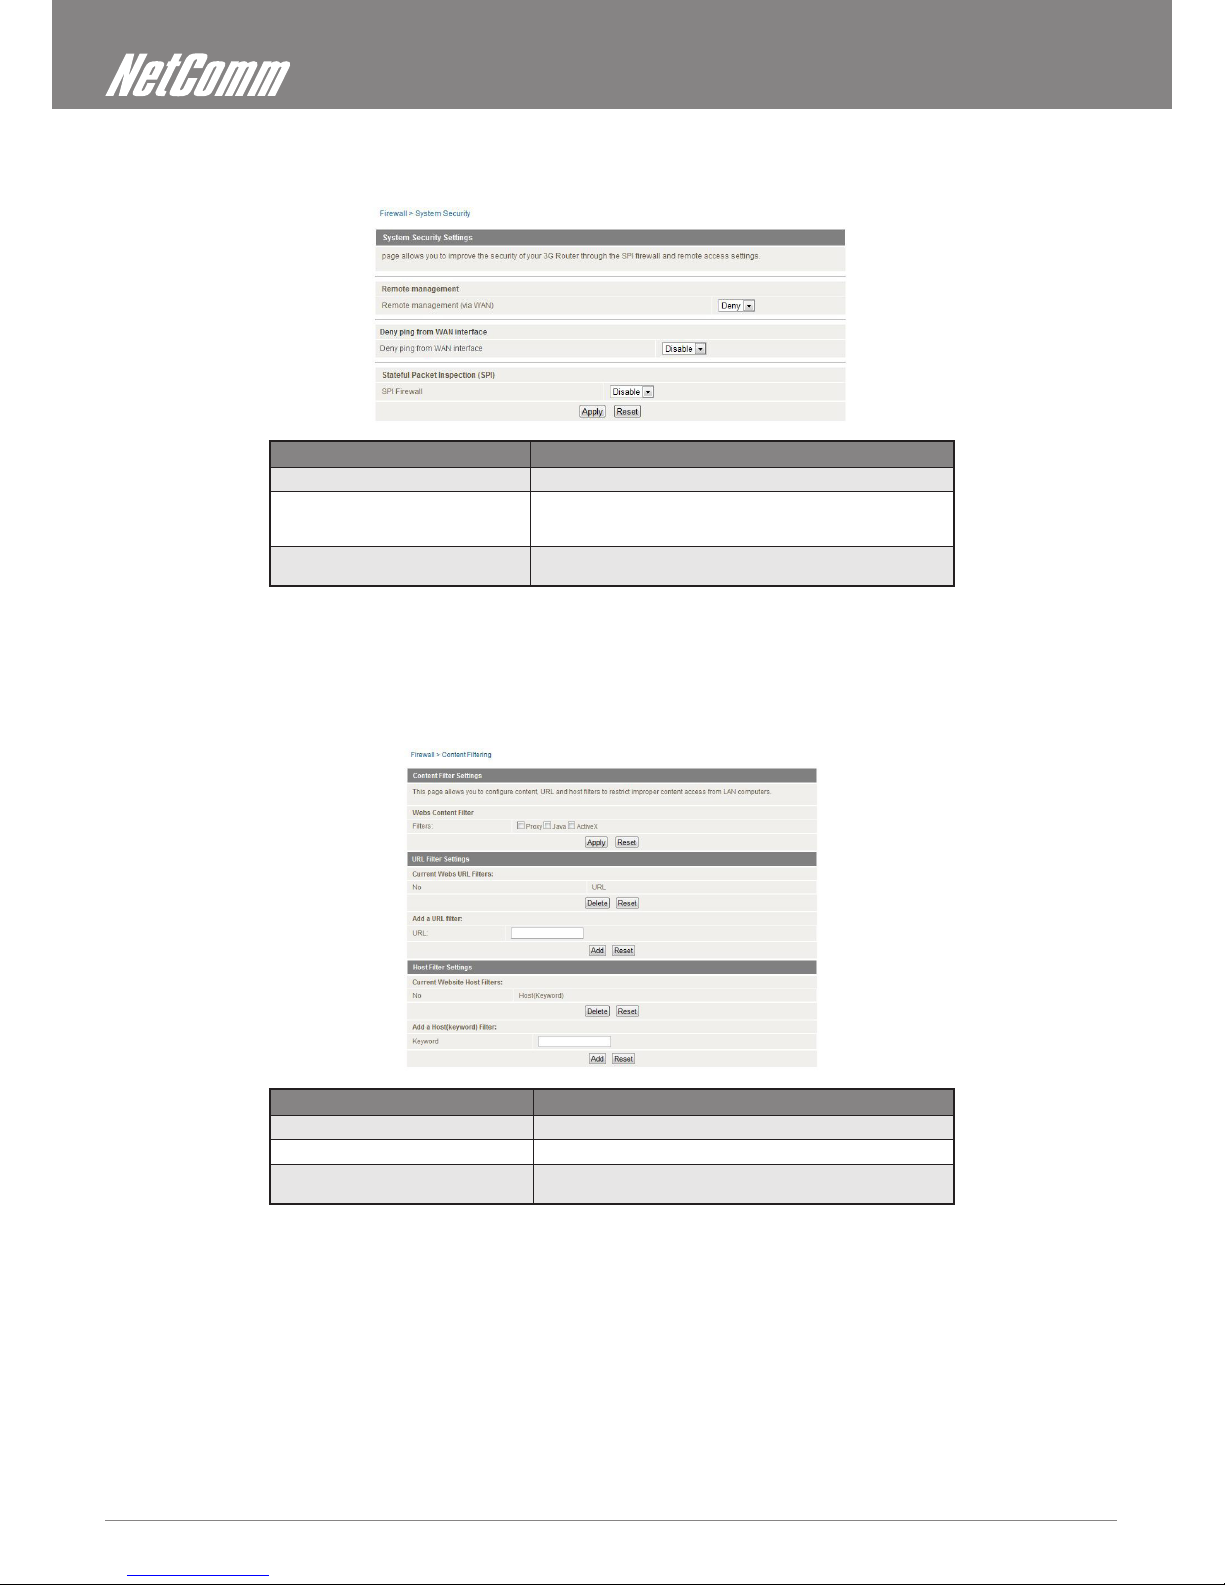
Content Filtering
This page allows you to congure content, URL and host lters to restrict improper content access from LAN computers
Name Description
Web Content Filter: Tick the boxes to enable Proxy, Java or ActiveX content ltering
URL Filter: Block access to a website by entering its full URL address.
Host Filter: Block access to block access to certain websites by entering a
keyword
Click Apply to save the settings.
Page 33
YMLT1WN 3G Travel Router t1 User Guide
www.netcomm.com.au 33
NetComm Liberty Series - 3G Travel Router t1
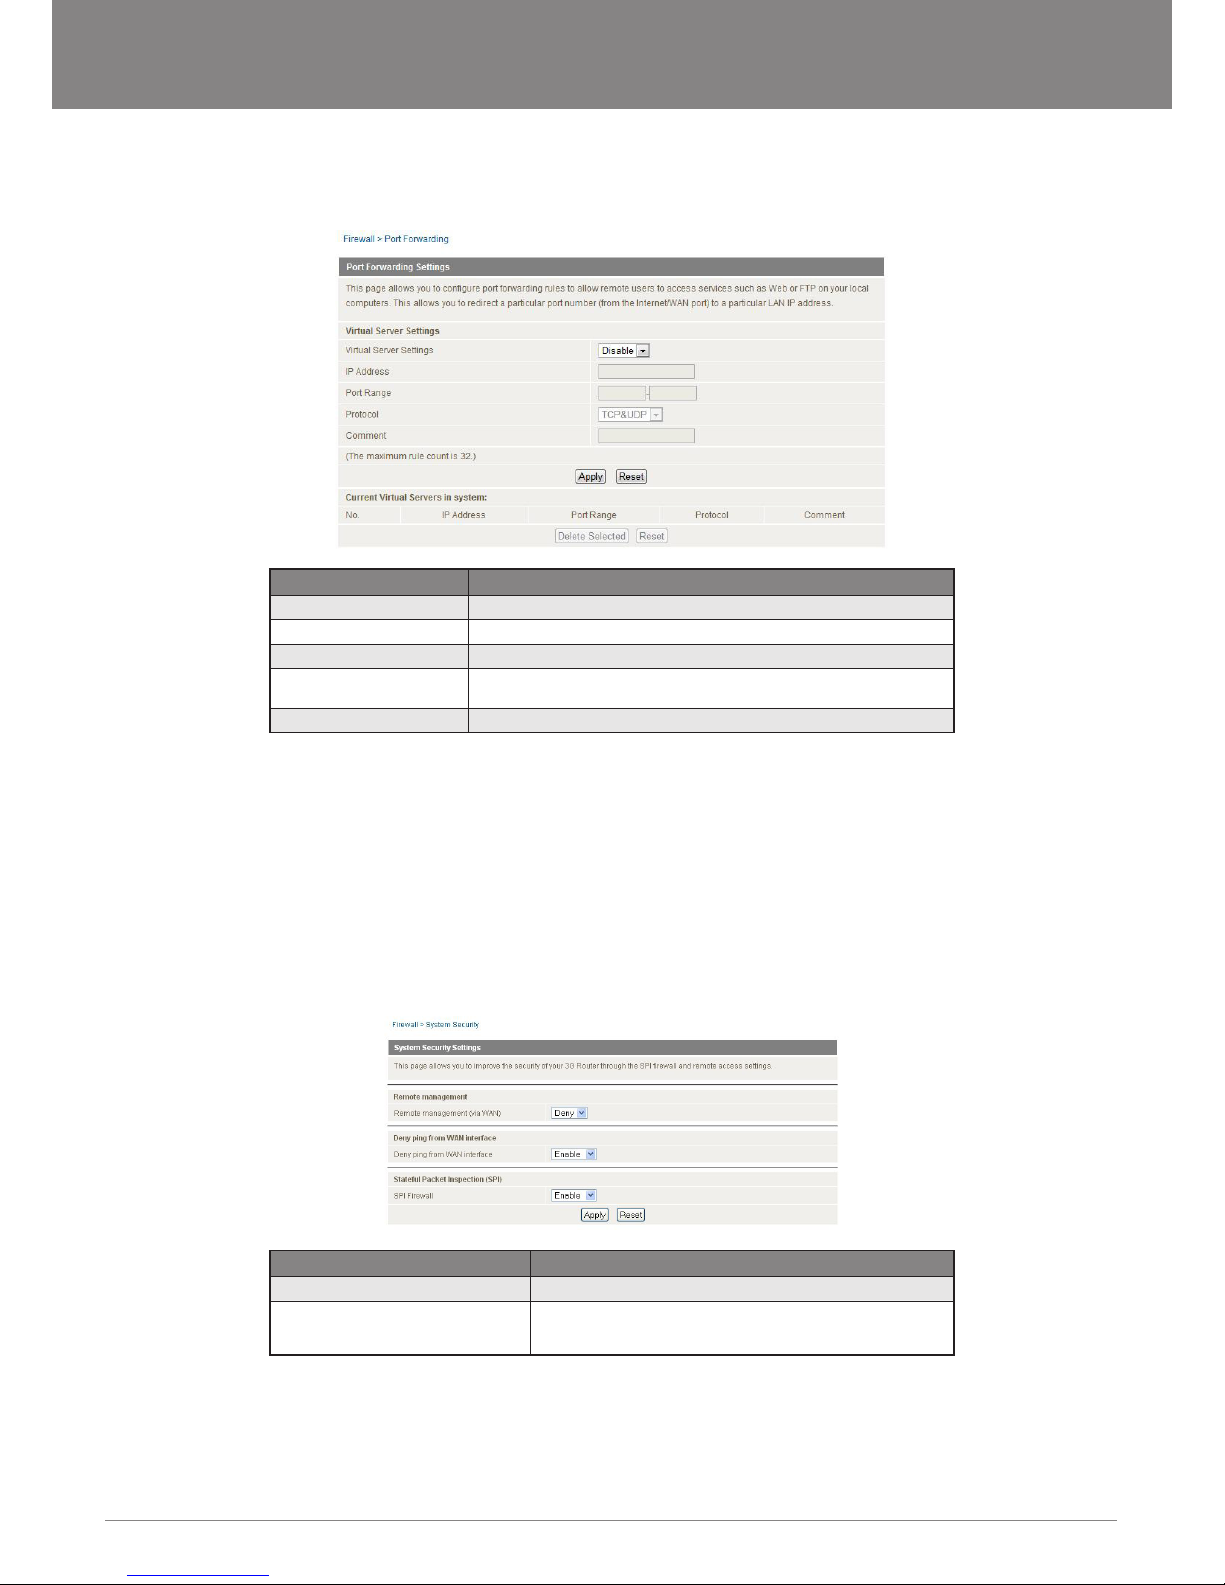
Port Forwarding
This page allows you to congure port forwarding rules to allow remote users to access services such as Web or FTP on your local
computers. This allows you to redirect a particular port number (from the Internet/WAN port) to a particular LAN IP address.
Name Description
Virtual Server Settings: Enable/Disable port forwarding
IP Address: The LAN IP address that the public port number packet will be sent to
Port Range: The public port numbers to be sent to the specic LAN IP address
Protocol: Select the port number protocol type (TCP, UDP or both). If you are unsure, then
leave it as the default “TCP&UDP” setting
Comment: Add a comment to identify the rule (optional)
Click Apply to save the settings.
DMZ
If you have a client PC that cannot run an Internet application (e.g. Games) properly from behind the NAT rewall, then you can open up the
rewall restrictions to allow unrestricted two-way Internet access by dening a DMZ Host.
The DMZ function allows you to re-direct all packets going to your WAN port IP address, to a particular IP address in your LAN. The
difference between the virtual server and the DMZ function is that the virtual server re-directs a particular service/Internet application (e.g.
FTP, websites) to a particular LAN client/server, whereas DMZ re-directs all packets (regardless of services) going to your WAN IP address
to a particular LAN client/server.
Name Description
DMZ Settings: Enable/disable DMZ.
DMZ IP Address: Fill-in the IP address of a particular host in your LAN Network that
will receive all the packets originally going to the WAN port/Public IP
address of your 3G Router.
Page 34

Placement
ADMINISTRATION
Page 35

YMLT1WN 3G Travel Router t1 User Guide
www.netcomm.com.au 35
NetComm Liberty Series - 3G Travel Router t1
Administration
Management
This page allows you to congure administrator system settings including the administrator username and password, NTP settings, and
DDNS settings.
Name Description
Select Language: Select a language for the web interface.
Administrator Settings
(account/password):
Congure a new administrator username and password.
NTP Settings: The NTP (Network Time Protocol) settings allow your router to synchronise its internal clock
with the global Internet Time. These settings will affect functions such as System Log entries
and Firewall settings.
DDNS: DDNS (Dynamic Domain Name Service) allows you to map the static domain name to a
dynamic IP address. To use this feature, you must sign up for an account from a DDNS
service provider. This router supports DynDNS, TZO and other common DDNS service
providers.
Click Apply to save the settings.
Upload Firmware
This page allows you to upgrade the Router’s rmware. To upgrade the rmware of your 3G Router, you need to download the rmware le
to your local hard disk, and then click the Browse button to locate the rmware le on your computer.
Once you have selected the new rmware le, click Apply to start the upgrade process.
Page 36

3G Travel Router t1 User Guide YMLT1WN
36 www.netcomm.com.au
Setting Manager
This page allows you to import/export the system settings, reset your 3G Router to factory defaults, or reboot your 3G Router.
Statistics
This page allows you to view the LAN, WAN and wireless statistics of your 3G Router.
System Log
All important system events are logged. You can use this function to check the event log of your 3G Router.
Page 37

TROUBLESHOOTING
Page 38

3G Travel Router t1 User Guide YMLT1WN
38 www.netcomm.com.au
Troubleshooting
This section provides an overview of common issues, and possible solutions for the installation and operation of your 3G Router.
1. Why your wireless client CAN NOT access the Internet?
When the 3G Router is congured to use Wireless encryption (WEP, WPA/WPA2 etc), you need to ensure your wireless adapter settings match your 3G
Routers settings. Please refer to your wireless adapter manual for more information. Ensure that the wireless client is associated with your 3G Router.
To check this connection (Windows XP), follow these steps:
• Click on Start > Control Panel > Network Connection
• Right Click on Wireless Network connection
• Select View Available Wireless Networks. The “Connect to Wireless Network” screen appears. Ensure you have selected the correct
wireless network.
Ensure the IP Address assigned to the wireless adapter is within the same subnet as your 3G Router. The 3G Router has a default IP
Address of 192.168.20.1. Wireless adapters must have an IP Address in the same range (e.g., 192.168.20.x). Although the subnet mask
must be the same for all the computers on the network, no two devices may have the same IP Address. Therefore, each device must
have a unique IP Address.
To check the IP Address assigned to the wireless adapter, follow the steps below:
• Click on Start > Run
• Type in CMD and press Enter.
• Type in “ipcong /all” and press Enter
• Type in “ping 192.168.20.1” to check if you can access the 3G Router
Note: If you have changed the default IP Address, ensure you ping the correct IP Address assigned to the 3GT1Wn.
2. Why does your wireless connection keep dropping?
Please try the following steps to improve the wireless signal quality. Ensure the battery of your 3G Router is fully charged.
• Try to keep the 3G Router at least 6 inches away from the wall or other objects.
• Try changing the channel on the Router to a different channel to avoid interference. Please refer to the Basic > Wireless section of this manual
• Keep your product away (at least 3-6 feet) from electrical devices that generate RF noise, like microwaves, monitors, electric motors, etc.
3. Cannot establish a wireless connection?
Note: An Ethernet connection is required to troubleshoot the 3GT1Wn Wireless Router.
When the 3G Router is congured to use Wireless encryption (WEP, WPA/WPA2 or any encryption), you need to ensure that your wireless
adapter settings match. Please refer to your wireless adapter manual for additional information.
• Move the 3G Router and the wireless client into the same room, and then test the wireless connection.
• Try to disable all security settings such as WEP, and MAC Address Control.
• Turn off the 3G Router and the client. Then turn the 3G Router back on again, and then turn on the client.
• Ensure that all devices are set to Infrastructure mode.
• Ensure that the LED indicators are indicating normal activity. If not, ensure that the AC power adapter is rmly connected or the
battery of the 3G Router is charged.
• Ensure that the IP Address, subnet mask, gateway and DNS settings are correctly entered on the computer.
• If you are using 2.4GHz cordless phones, X-10 equipment, or other home security systems, ceiling fans, or lights, your wireless
connection may degrade dramatically, or drop altogether.
• To avoid interference, you can change the wireless Channel on your 3G Router.
• Keep your product at least 3-6 feet away from electrical devices that generate RF noise. Examples include: microwaves, monitors,
electric motors, and so forth.
Page 39

YMLT1WN 3G Travel Router t1 User Guide
www.netcomm.com.au 39
NetComm Liberty Series - 3G Travel Router t1
4. Can not remember your encryption key. What should you do?
If you forgot your encryption key, the Wireless card will not be able to establish a connection to your 3G Router
.
To reset the encryption key(s), login to the 3G Router web conguration using an Ethernet connection.
5. How do you reset your 3G Router to its factory default settings?
To hard-reset the
3G Router
to its factory default settings, follow the steps listed below:
• Ensure that the router is powered on (for at least 1 minute).
• Press the reset button for at least ten seconds and release. At this point, the reset is in progress. Do not power off the unit at this point.
• After your 3G Router reboots, the default settings are now restored. This entire process takes several minutes to complete.
• Once you have reset the router to its default settings you will be able to access the device’s web conguration using
http://192.168.20.1 with username/password of “admin”.
6. What you can do if the Ethernet cable does not work properly
• The 3G Router’s Ethernet port is a WAN port by default, simply press the reset button down for one second for the WAN port to
switch to become a LAN port.
• Ensure that there is a solid cable connection between the Ethernet port on the 3G Router, and your NIC (Network Interface Card).
• Check that the settings on your network adapter are “Enabled,” and set to accept an IP address from the DHCP (Please refer to the
Computer Hardware Conguration section in this manual for additional information).
• If all settings appear to be correct, ensure that you are not using a crossover Ethernet cable. Although the 3G Router is MDI/MDIX
compatible, not all NIC are. Therefore, it is recommended that you use a straight through Ethernet cable when possible.
7. What you can do when your 3G Router has no power
• Plug in the power adapter provided to recharge your battery
Note: You can still use the 3G Router with no battery power, as long as the power adapter is plugged in.
Page 40

PlacementESTABLISHING YOUR WIRELESS CONNECTION
Page 41

YMLT1WN 3G Travel Router t1 User Guide
www.netcomm.com.au 41
NetComm Liberty Series - 3G Travel Router t1
Establishing your Wireless
Connection
The following examples use “NetComm Wireless” as the SSID and 64bit WEP with “a1b2c3d4e5” as the encryption key.
Windows XP service pack 2
Follow these steps:
1. Open Network Connections (Start -> Control Panel -> Network Connections):
2. Right-click on your Wireless Network Connection and select View Available Wireless Networks:
3. Select the wireless network you want to connect to and click Connect:
Page 42

3G Travel Router t1 User Guide YMLT1WN
42 www.netcomm.com.au
5. The connection will show Connected.
4. Enter the network key (“a1b2c3d4e5”) and click Connect:
Page 43

YMLT1WN 3G Travel Router t1 User Guide
www.netcomm.com.au 43
NetComm Liberty Series - 3G Travel Router t1
Mac OSX 10.4
Follow these steps:
1. Click on the Airport icon on the top right menu.
2. Click on the network name that you want to connect. This example uses “NetComm Wireless” as the network name.
3. On the new window, tick on Show Password and type in the network key in the Password eld. This example uses “a1b2c3d4e5”
as the key. After that, click on OK.
4. To check the connection, click on the Airport icon and there should be a tick next to the wireless name.
Page 44

3G Travel Router t1 User Guide YMLT1WN
44 www.netcomm.com.au
Windows Vista
Follow these steps:
1. Open Network and Sharing Center (Start > Control Panel (Classic View) > Network and Sharing Center).
2. Click on “Connect to a network”.
3. Choose “NetComm Wireless”.
4. Tick “Display Characters” and type in the network security key. This example uses “a1b2c3d4e5”.
Then click “Connect”.
5. Tick on both “Save this network” and “Start this connection automatically” and click on “Close”.
Notes: For other operating system (Windows 98SE, Windows ME, Windows 2000 etc) or if you use the wireless adaptor utility to congure your wireless connection, please consult
the wireless adapter documentation for additional information.
Page 45

YMLT1WN 3G Travel Router t1 User Guide
www.netcomm.com.au 45
NetComm Liberty Series - 3G Travel Router t1
How to congure WEP/WPA-PSK/WPA2-PSK Wireless Security
1. Open your web browser (i.e. Internet Explorer or Firefox) and navigate to http://192.168.20.1/.
2. Click on Login, then enter your User Name and Password (default: admin/admin).
3. Mouseover Wireless Settings and then click on Security. On this page you can congure the wireless security.
4. To use WEP, please congure the following:
• Change Security to WEP-AUTO
• Type in the key in the WEP Key 1 eld (This example uses “a1b2c3d4e5” key)
Notes: WEP key can only use numbers (0 to 9) and letters (A to F).
• Click on Save to save the settings
Page 46

3G Travel Router t1 User Guide YMLT1WN
46 www.netcomm.com.au
5. To use WPA-PSK/WPA2-PSK, please congure the following:
• Change Security to WPA-PSK or WPA2-PSK
• Change Encryption Type to TKIP for WPA-PSK or AES for WPA2-PSK
• Enter the WPA/WPA2 key in the Passphrase eld.
Notes: The key needs to be more than 8 characters and less than 63 characters and it can be any combination of letters and numbers.
• Click Apply to save the settings
Notes: Wireless client network cards must be WPA-compliant to connect to a WPA enable network, if in doubt check the wireless client network card documentation, or use WEP
security.
Notes: After changing the security settings, you might need to remove the current wireless settings on the computer and recongure the wireless computer according to the new
settings.
Page 47

Appendix
Page 48

3G Travel Router t1 User Guide YMLT1WN
48 www.netcomm.com.au
Legal & Regulatory Information
This manual is copyright. Apart from any fair dealing for the purposes of private study, research, criticism or review, as permitted under
the Copyright Act, no part may be reproduced, stored in a retrieval system or transmitted in any form, by any means, be it electronic,
mechanical, recording or otherwise, without the prior written permission of NetComm Limited. NetComm Limited accepts no liability or
responsibility, for consequences arising from the use of this product.
NetComm Limited reserves the right to change the specications and operating details of this product without notice.
NetComm is a registered trademark of NetComm Limited.
All other trademarks are acknowledged the property of their respective owners.
Customer Information
ACA (Australian Communications Authority) requires you to be aware of the following information and warnings:
(1) This unit shall be connected to the Telecommunication Network through a line cord which meets the requirements of the ACA TS008
Standard.
(2) This equipment has been tested and found to comply with the Standards for C-Tick and or A-Tick as set by the ACA . These standards
are designed to provide reasonable protection against harmful interference in a residential installation. This equipment generates,
uses, and can radiate radio noise and, if not installed and used in accordance with the instructions detailed within this manual, may
cause interference to radio communications. However, there is no guarantee that interference will not occur with the installation of this
product in your home or ofce. If this equipment does cause some degree of interference to radio or television reception, which can be
determined by turning the equipment off and on, we encourage the user to try to correct the interference by one or more of the following
measures:
• Change the direction or relocate the receiving antenna.
• Increase the separation between this equipment and the receiver.
• Connect the equipment to an alternate power outlet on a different power circuit from that to which the receiver/TV is connected.
• Consult an experienced radio/TV technician for help.
(3) The power supply that is provided with this unit is only intended for use with this product. Do not use this power supply with any other
product or do not use any other power supply that is not approved for use with this product by NetComm. Failure to do so may cause
damage to this product, re or result in personal injury.
Page 49

YMLT1WN 3G Travel Router t1 User Guide
www.netcomm.com.au 49
NetComm Liberty Series - 3G Travel Router t1
Federal Communication Commission Interference Statement
This equipment has been tested and found to comply with the limits for a Class B digital device, pursuant to Part 15 of the FCC Rules.
These limits are designed to provide reasonable protection against harmful interference in a residential installation. This equipment
generates, uses and can radiate radio frequency energy and, if not installed and used in accordance with the instructions, may cause
harmful interference to radio communications. However, there is no guarantee that interference will not occur in a particular installation. If
this equipment does cause harmful interference to radio or television reception, which can be determined by turning the equipment off and
on, the user is encouraged to try to correct the interference by one of the following measures:
• Reorient or relocate the receiving antenna.
• Increase the separation between the equipment and receiver.
• Connect the equipment into an outlet on a circuit different from that to which the receiver is connected.
• Consult the dealer or an experienced radio/TV technician for help.
FCC Caution: Any changes or modications not expressly approved by the party responsible for compliance could void the user’s
authority to operate this equipment.
This device complies with Part 15 of the FCC Rules. Operation is subject to the following two conditions: (
(1) This device may not cause harmful interference, and (2) this device must accept any interference received, including interference that
may cause undesired operation.
IMPORTANT NOTE:
FCC Radiation Exposure Statement:
This equipment complies with FCC radiation exposure limits set forth for an uncontrolled environment. This equipment should be installed
and operated with minimum distance 20cm between the radiator & your body.
This transmitter must not be co-located or operating in conjunction with any other antenna or transmitter.
Product Warranty
The warranty is granted on the following conditions:
1. This warranty extends to the original purchaser (you) and is not transferable;
2. This warranty shall not apply to software programs, batteries, power supplies, cables or other accessories supplied in or with the
product;
3. The customer complies with all of the terms of any relevant agreement with NetComm and any other reasonable requirements of
NetComm including producing such evidence of purchase as NetComm may require;
4. The cost of transporting product to and from NetComm’s nominated premises is your responsibility; and,
5. NetComm does not have any liability or responsibility under this warranty where any cost, loss, injury or damage of any kind,
whether direct, indirect, consequential, incidental or otherwise arises out of events beyond NetComm’s reasonable control. This
includes but is not limited to: acts of God, war, riot, embargoes, acts of civil or military authorities, re, oods, electricity outages,
lightning, power surges, or shortages of materials or labour.
6. The customer is responsible for the security of their computer and network at all times. Security features may be disabled within the
factory default settings. NetComm recommends that you enable these features to enhance your security.
Page 50

3G Travel Router t1 User Guide YMLT1WN
50 www.netcomm.com.au
GNU General Public License
This product includes software code that is subject to the GNU General Public License (“GPL”) or GNU Lesser General Public License
(“LGPL”). This code is subject to the copyrights of one or more authors and is distributed without any warranty. A copy of this software can be
obtained by contacting NetComm Limited on +61 2 9424 2059.
The warranty is automatically voided if:
1. You, or someone else, use the product, or attempts to use it, other than as specied by NetComm;
2. The fault or defect in your product is the result of a voltage surge subjected to the product either by the way of power supply or
communication line, whether caused by thunderstorm activity or any other cause(s);
3. The fault is the result of accidental damage or damage in transit, including but not limited to liquid spillage;
4. Your product has been used for any purposes other than that for which it is sold, or in any way other than in strict accordance with
the user manual supplied;
5. Your product has been repaired or modied or attempted to be repaired or modied, other than by a qualied person at a service
centre authorised by NetComm; and,
6.
The serial number has been defaced or altered in any way or if the serial number plate has been removed.
Limitations of Warranty
The Trade Practices Act 1974 and corresponding State and Territory Fair Trading Acts or legalisation of another Government (“the relevant
acts”) in certain circumstances imply mandatory conditions and warranties which cannot be excluded. This warranty is in addition to and
not in replacement for such conditions and warranties.
To the extent permitted by the Relevant Acts, in relation to your product and any other materials provided with the product (“the Goods”)
the liability of NetComm under the Relevant Acts is limited at the option of NetComm to:
• Replacement of the Goods; or
• Repair of the Goods; or
• Payment of the cost of replacing the Goods; or
• Payment of the cost of having the Goods repaired.
All NetComm ACN 002 490 486 products have a standard 12 months warranty from date of purchase. However some products have an
extended warranty option (refer to packaging). To be eligible for the extended warranty you must supply the requested warranty information
to NetComm within 30 days of the original purchase by registering on-line via the NetComm web site at
www.netcomm.com.au
Page 51

NetComm Liberty Series - 3G Travel Router t1
Product Warranty
NetComm products have a standard 12 months warranty from date of purchase. However some products have an extended
warranty option, via
registering your product online at the NetComm website www.netcommlimited.com.
Technical Support
If you have any technical difculties with your product, please refer to the support section of our website.
www.netcomm.com.au/support
Note: NetComm Technical Support for this product only covers the basic installation and features outlined in the Quick Start Guide. For further information regarding the advanced features of this product, please
refer to the conguring sections in the User Guide or contact a Network Specialist.
DYNALINK NZ 12c Tea Kea Place, Albany, Auckland,
New Zealand
P: 09 448 5548
F: 09 448 5549
E: sales@dynalink.co.nz
W: www.dynalink.co.nz
Trademarks and registered trademarks are the property of NetComm Limited or their respective owners. Specications are subject to change without notice. Images shown
may vary slightly from the actual product.
NETCOMM LIMITED Head Ofce
PO Box 1200, Lane Cove NSW 2066 Australia
P: 02 9424 2070 F: 02 9424 2010
E: int.sales@netcomm.com.au
W: www.netcommlimited.com.
 Loading...