

Page 1
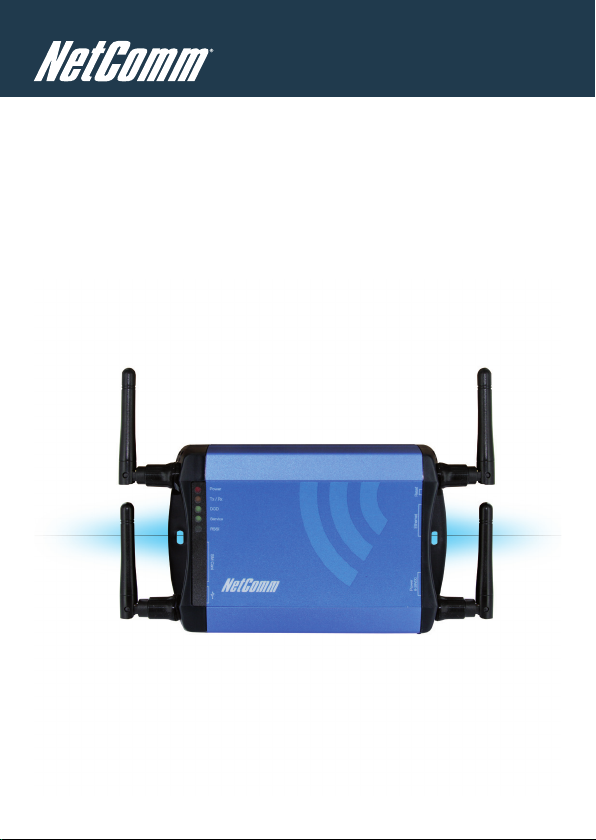
NTC-40W - HSPA+ M2M WiFi Router
NTC-40WV - HSPA+ M2M WiFi Router with Voice
Quick Start Guide
Page 2
Quick Start Guide
This guide covers the models NTC-40W and NTC-40WV. This guide will
provide a series of step by step instructions to ensure the conguration of
your Cellular Router goes as smoothly as possible.
Firstly please check that you have received all the items in your package:
No. Descr iption
1 NTC-40W / N TC-40W V HSPA+ Cellu lar Route r
1 Ethern et cable
1 Power Sup ply Unit
4 Antenn as
1 Quick S tart G uide
If any of these items are missing, please contact NetComm Technical Support.
2 NTC-40 Series Quick Start Guide
Page 3
NetComm Wireless M2M Series - NTC-40 Series
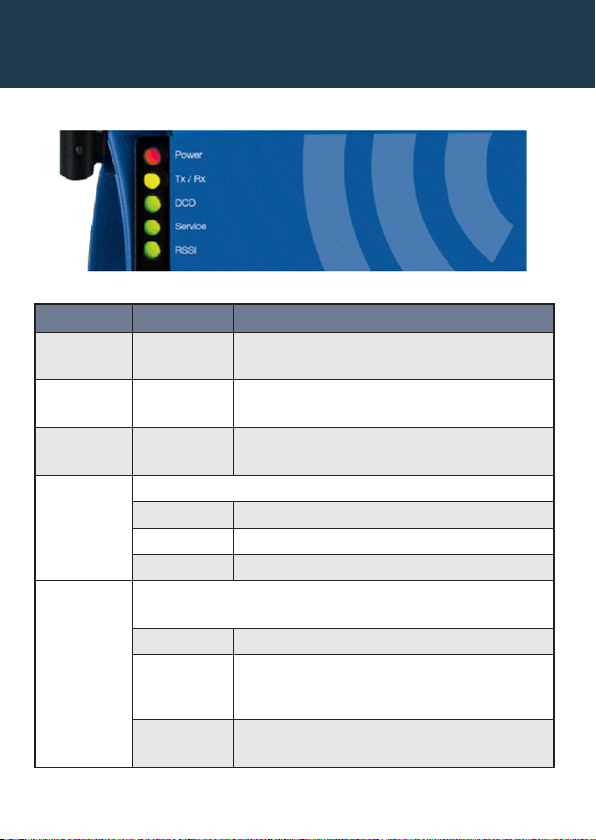
Overview of LEDs
Overview of Indicator Lights
LED Display Descr iption
POWER (red) Solid O N T he red Power LED indicates cor rect powe r is appli ed to
the DC powe r input j ack.
Tx Rx (amber) Solid O N T he ambe r LED will l ight upo n data bei ng sent to or
recei ved from th e cellu lar network.
DCD (gre en) Solid O N T he ambe r Carrier Detect L ED illum inates to in dicate a
Data co nnection.
Serv ice Type
(green)
RSSI (gr een) This green L ED indic ates the Re ceived S ignal S trength . There ar e three
The gre en LED wil l illuminate whe n cellul ar netwo rk cover age is dete cted.
Solid O N 3 G: indica tes UMTS/ HSPA availa ble cover age
Blink ing EDGE: indicates ED GE avail able cove rage
Off 2G: indic ates GSM/G PRS avail able cove rage only.
possi ble state s that the RS SI LED can o perate in, b ased upon signa l level.
Solid O N ST RONG - Ind icates th e RSSI leve l is -86d Bm, or greater
Flash ing
once pe r
Secon d
Off POOR - Ind icates th e RSSI leve l is less t han
MEDIUM - Indicates the RSSI l evel is -101dBm and
–86d Bm, (medi um)
-101dBm (po or)
NTC-40 Series Quick Start Guide 3
Page 4
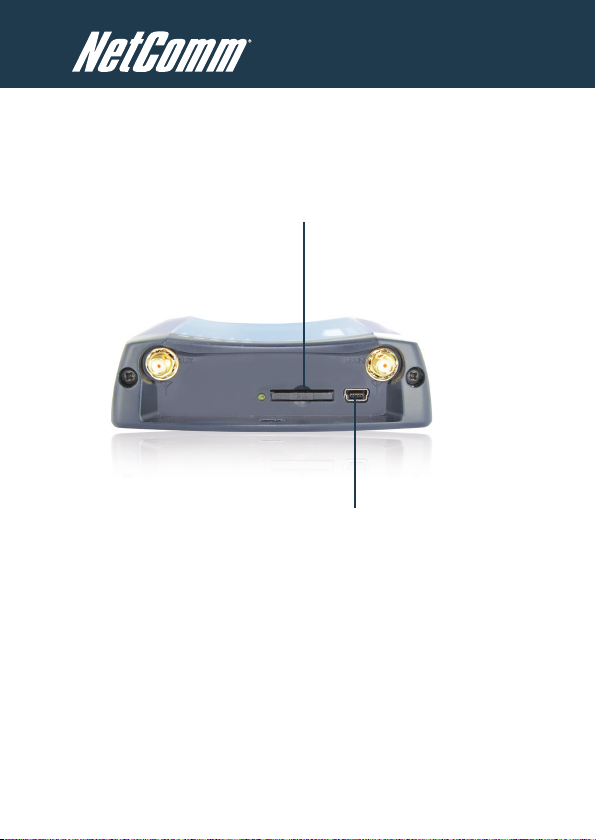
Overview of the Cellular Router Interfaces
SIM Card Reader
For insertion and removal
of the SIM card
Mini USB Port
For insertion of the Mini USB cable
4 NTC-40 Series Quick Start Guide
Page 5

NetComm Wireless M2M Series - NTC-40 Series
Receive Diversity
Antenna Socket
SMA Female
2Way Captive Power Terminal Block
Power terminal block and the wide voltage
range of 8-28V DC simplify the installation in
different industrial environments
Ethernet Port
Connect to a terminal using RJ45
cable or a number of terminals
through a hub or network router
Voice (RJ45) Port
Insert one end of the RJ-45 Cable
into the Voice Port and the other
end into a telephone
Only active on the NTC-40WV
Main Antenna
Socket
SMA Female
NTC-40 Series Quick Start Guide 5
Page 6

Overview of Cellular Router Interfaces
Field Descr iption
Main An tenna So cket SMA Fem ale
Recei ve Diver sity An tenna
Socket
Main Wi Fi Antenn a Socket SMA Fem ale
Recei ve Diver sity An tenna
Socket
5 Indic ator LEDs Indic ate visua lly the ac tivities and con nectio n state for power,
2-Way Captive Power Power term inal blo ck and the w ide volt age range of 8-28V DC
Terminal B lock simpl ify the i nstall ation in d iffer ent indu strial e nvironm ents
Reset B utton Reset ting the ro uter to facto ry defa ult valu es
Ethernet Port For direct c onnect ion to your device or n umber of d evices
Voice (RJ -45) Port To connect a te lephone direct ly to your rou ter
SIM Card Reader For insertio n and remov al of SIM Car d
SMA Fem ale
SMA female
serv ice type, data tra fc, dat a carri er connection and networ k
signa l streng th.
throug h a hub or net work rou ter.
Conguring your Router
You will need the following hardware components to set up the Cellular
Router:
Power Supply (8-28VDC)
Ethernet cable
Laptop or PC
Active SIM card
The router is primarily managed via web interface.
Before you power up the Cellular Router, please insert an active SIM card.
6 NTC-40 Series Quick Start Guide
Page 7

NetComm Wireless M2M Series - NTC-40 Series
Step One: Inserting the SIM card
Press the SIM Eject button to eject SIM card bay. Make sure the SIM card is
inserted correctly by inserting the SIM the gold side facing down on the SIM
card bay and in the direction as shown below:
Press the SIM
Eject button
Insert
SIM card
Step Two: Setting up the Cellular Router
Connect the supplied antennas to the Router by screwing them onto the
antenna connectors.
Connect the power adapter to the mains and plug the output into the power
jack of the router.The green Power LED on the panel should illuminate.
NTC-40 Series Quick Start Guide 7
Page 8

Step Three: Preparing your computer
Connect one end of the supplied Ethernet cable into a LAN Ethernet port
of your router. Connect the other end of the cable into the LAN port of your
computer.
Congure your PC’s Ethernet interface to be dynamically assigned an IP
address by doing the following:
Conguring your Network Adapter in Windows
Click on Start -> Control Panel -> Network Connections.
Right click on the Local Area Connection icon and select Properties to
open the conguration dialogue box of the Local Area Connection as below:
8 NTC-40 Series Quick Start Guide
Page 9

NetComm Wireless M2M Series - NTC-40 Series
Find and click Internet Protocol (TCP/IP) from the protocol list box and
then click the Properties button The TCP/IP. Conguration window will pop
up as illustrated below.
Under General tab, select radio button Obtain an IP address automatically
and Obtain DNS server address automatically.
Then press OK button to close TCP/IP conguration window.
Press the Close button to complete the computer preparation for the
Cellular Router.
NTC-40 Series Quick Start Guide 9
Page 10

Step Four: Accessing your Router’s conguration pages
There are two system management accounts for maintaining the system,
root and admin, and each of which has slightly different levels of
management capabilities.
The root manager account is empowered with full privilege while the admin
manager (administrator) can manage all settings of the Cellular Router
excepts functions like Firmware Upgrade, Device Conguration Backup and
Restore and Reset Cellular Router to factory default.
To login to the Cellular Router in root manager mode, please use the
following login details:
http://192.168.1.1
Usern ame: root
Password: admin
Enter the address below in your web browser and connect. The username
and password are dened below.
Whenever you make changes please refresh your web pages to prevent
errors due to caching of web pages.
http://192.168.1.1
Usern ame: admin
Password: admin
10 NTC-40 Series Quick Start Guide
Page 11

NetComm Wireless M2M Series - NTC-40 Series
Follow the steps below to access the Cellular Router’s web browser:
Open your web browser (e.g.Internet Explorer/Firefox/Safari) and
navigate to http://192.168.1.1/
Click Login and type admin in the Username and Password elds.
Then click on Submit.
NTC-40 Series Quick Start Guide 11
Page 12

Step Five: Unlocking the SIM
If the SIM card is locked you will need to unlock it with a PIN provided with
your SIM card.
You can nd out if the SIM is locked by viewing the SIM Status on the
Home page:
If the SIM Status is SIM Locked as above then click on the Internet Settings
menu and then the Security link on the left.
When you click on the ‘Security’ link you should see the following message:-
Click OK
Next, enter the PIN code and conrm the PIN code. Then click Save.
12 NTC-40 Series Quick Start Guide
Page 13

NetComm Wireless M2M Series - NTC-40 Series
Now Click on the link and the Home Status page should look as below with
SIM Status OK:
The SIM is now unlocked and can be used to connect to a 3G service.
NTC-40 Series Quick Start Guide 13
Page 14

Step Six: Connect to the Cellular Network
This section describes how to set up the Cellular Router to initiate a wireless
WAN connection.
There are 2 different ways to set up a wireless WAN connection via PPP:
Initiating the PPP Connection directly from the Cellular Router acting
as the PPP Client (most common).
Initiating the PPP Connection from a different PPP client (i.e. laptop
or router) with the Router running in transparent PPPoE mode. This
method is not documented in this quick start guide.
Initiating a PPP Connection from the Cellular Router
The status page of Cellular Router Setup will now be displayed as below.
The PPP status on the page should be DISABLED network (as indicated by
the large arrow) as your new device is not yet congured to connect to the
cellular network.
Click the Internet Settings > WWAN (3G) link on top panel of the screen to
open the Connection web page.
14 NTC-40 Series Quick Start Guide
Page 15

NetComm Wireless M2M Series - NTC-40 Series
To Connect Using a Connection Prole
The Router proles allow you to congure the settings that the router will use
to connect to a particular network.
By default, the Router is congured to use the AutoCong prole. This prole
should detect the correct APN and connection details in order to connect to
your 3G service.
If it does not, you will need to enter the connection details manually. To do
this, perform the following steps:
In the AutoCong prole, select to disable “Auto Connect” and click
“Save”.
Select one of the other proles and congure it with the details
provided by your 3G service provider.
Select to enable “Auto Connect” for this prole and click “Save”.
NTC-40 Series Quick Start Guide 15
Page 16

To Conrm a Successful Connection
Now click on the Status link to return to the status page. The WWAN Status
should be UP.
The Local eld shows the current IP address that the network has allocated
for the Router.
Congratulations - your new NetComm NTC-40W /
NTC-40WV Router is now ready to use!
For more detailed information on the conguration and activation of other
features, please visit our website www.netcomm.com.au and download the
user guide.
16 NTC-40 Series Quick Start Guide
Page 17

NetComm Wireless M2M Series - NTC-40 Series
Notes:
_________________________________________________________________
_________________________________________________________________
_________________________________________________________________
_________________________________________________________________
_________________________________________________________________
_________________________________________________________________
_________________________________________________________________
_________________________________________________________________
_________________________________________________________________
_________________________________________________________________
_________________________________________________________________
_________________________________________________________________
_________________________________________________________________
_________________________________________________________________
_________________________________________________________________
_________________________________________________________________
NTC-40 Series Quick Start Guide 17
Page 18

NETCOMM LIMITED Head Ofce
PO Box 1200, Lane Cove NSW 2066 Australia
P: 02 8205 3888 F: 02 9424 2010
E: int.sales@netcomm.com.au
W: www.netcomm-commercial.com.au
Product Warranty
NetComm products have a standard 12 months warranty from date
of purchase.
Technical Support
For rmware updates or if you have any technical difculties with your
product, please refer to the support section of our website.
www.netcomm-commercial.com.au/support
18 NTC-40 Series Quick Start Guide
 Loading...