

Page 1

Telstra Private IP WAN
Configuration Guide
NTC-402
Doc No. CG01068
Page 2

NTC-402 – Telstra Private IP WAN Configuration Guide
2 of 11
CG01068 v. 1.0 October 2018
© NetComm Wireless 2018
Copyright
Copyright© 2018 NetComm Wireless Limited. All rights reserved.
The information contained herein is proprietary to NetComm Wireless. No part of this document may be
translated, transcribed, reproduced, in any form, or by any means without prior written consent of NetComm
Wireless.
Trademarks and registered trademarks are the property of NetComm Wireless Limited or their respective owners.
Specifications are subject to change without notice. Images shown may vary slightly from the actual product.
Note – This document is subject to change without notice.
Document history
This document covers the following products:
NetComm Wireless NTC-402
VER.
D OC UM E N T D E S C R I P T I O N
D AT E
v 1.0
Telstra Private IP WAN Configuration Guide
October 2018
Table i. - Document revision history
Page 3

NTC-402 – Telstra Private IP WAN Configuration Guide
3 of 11
CG01068 v. 1.0 October 2018
© NetComm Wireless 2018
Contents
Overview ........................................................................................................................................................................... 4
Configuration Settings ....................................................................................................................................................... 4
Configuration Procedure .................................................................................................................................................... 5
Enable SIM and Log in............................................................................................................................................................................................ 5
Change APN ............................................................................................................................................................................................................ 6
Disable NAT and Network Monitoring ................................................................................................................................................................. 7
Disable SPI ............................................................................................................................................................................................................... 8
Enable Telnet, SSH and HTTP/S WAN ................................................................................................................................................................. 9
Set LAN IP to Framed Route ................................................................................................................................................................................ 10
Apply Settings - Refresh ....................................................................................................................................................................................... 10
Log in Using SIM Service ...................................................................................................................................................................................... 11
Confirm connection status ................................................................................................................................................................................... 11
Page 4
NTC-402 – Telstra Private IP WAN Configuration Guide
4 of 11
CG01068 v. 1.0 October 2018
© NetComm Wireless 2018
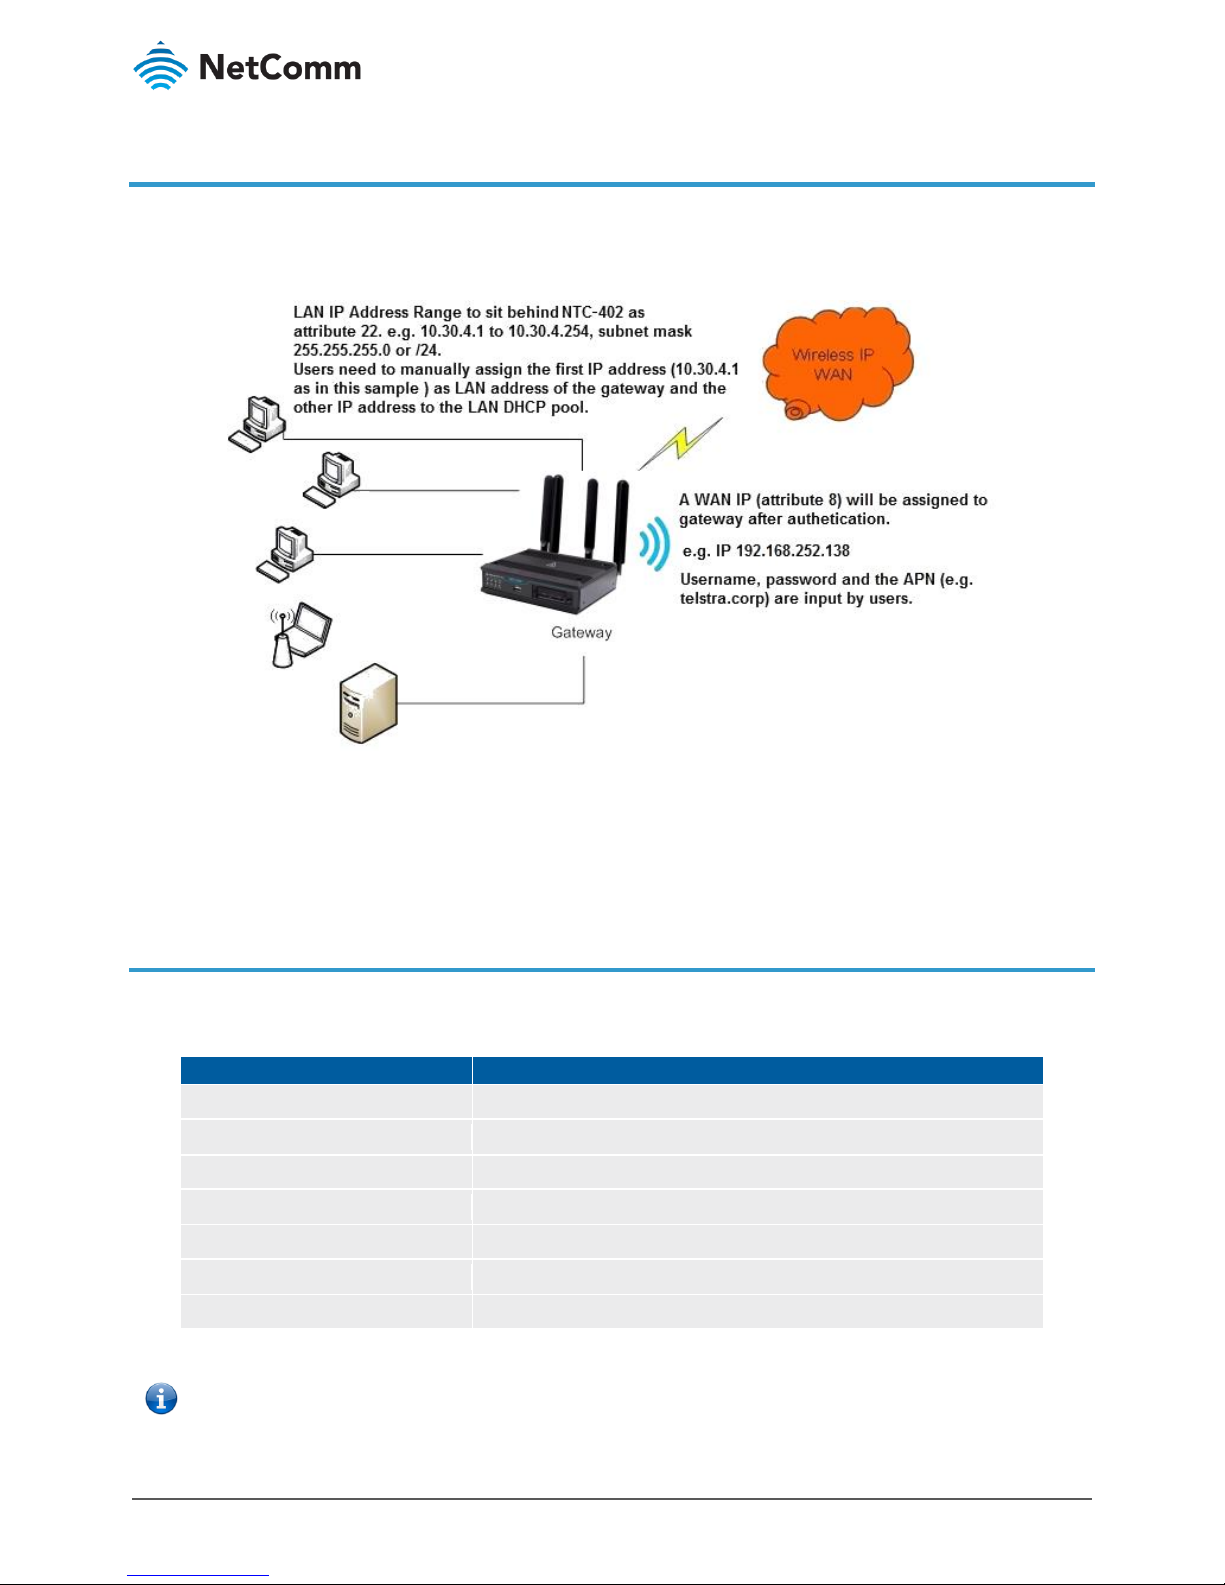
Overview
The following diagram depicts a Wireless IP WAN connection with a NetComm Wireless NTC-402 router using
framed routing to allow an IP subnet that is part of the IP WAN to sit behind the NTC-402. The settings for this
hypothetical example are set out in the table below.
The server/work station/printer that are directly connected to the router will be part of the IP WAN network and is
reachable easily from IP WAN. All computers/servers on the LAN side must be the next hop from the NTC-402.
Limitation of framed routing is only one hop beyond the NTC-402 on the IP WAN.
Configuration Settings
Before you begin the configuration process make sure you have gathered all the requisite information from Telstra.
The following table contains example configuration settings to help you with your configuration.
I TE M
D ET AI LS
APN (Attribute 30)
telstra.corp
Authentication Method
CHAP (attribute 3 is enabled)
Username (Attribute 1)
user2@netcomm.com.au
Password (Attribute 3)
FrameR0ute
Framed-IP-Address (Attribute 8)
192.168.252.138 (automatically assigned as router’s WAN IP)
Framed-IP-Netmask (Attribute 9)
255.255.255.255 or /32
Framed-Route (Attribute 22)
10.30.4.0/24
Table 1 – Example Configuration Settings
Note – Each customer will have unique settings for his/her account.
Page 5

NTC-402 – Telstra Private IP WAN Configuration Guide
5 of 11
CG01068 v. 1.0 October 2018
© NetComm Wireless 2018
Configuration Procedure
Enable SIM and Log in
Please follow below steps to set up IP WAN on your NTC-402 router.
1 Connect the NetComm Wireless NTC-402 router via the following steps:
a Use a small Phillips screwdriver to remove the two screws securing the metal plate covering the two
SIM slots on the front of the router.
b Insert your Telstra SIM card (until you hear a click) into one of the SIM slots found at the front of the
router.
c Connect an RJ45 networking cable to the LAN port of the router.
d Connect the other end of the RJ45 networking cable to a port on your computer.
e Plug in the router’s power cord and turn on the power switch at the power point.
f Wait approximately 1.5 minutes for the router to power up.
2 Log on to Web interface from a web browser:
a URL address is: http://192.168.20.1
b Username is: root
c The Password can be found printed on the router’s label and on the last page of the Quick Start
Guide.
Figure 1 –Log in screen
d Click the Login > button.
Page 6

NTC-402 – Telstra Private IP WAN Configuration Guide
6 of 11
CG01068 v. 1.0 October 2018
© NetComm Wireless 2018
Change APN
3 Open Basic Network >> WAN & Uplink and click the Internet Setup tab:
Figure 2 – Basic Networking > WAN & Uplink > Internet Setup tabbed page
4 Click the Edit button for WAN-1, additional groups of settings will display below the Internet Connection List
table.
5 Scroll down to the Connection with SIM-A Card section:
Figure 3 – Connection with SIM-A Card section of the Internet Setup tabbed page
6 Enter the following details in this section of the page:
I TE M
D ES CR I P T I ON
T EL ST RA S E T TI N G S
Network Type
Use the default setting: Auto
Auto
Dial-Up Profile
Manual Configuration – this will open the APN field on the
next line.
Manual Configuration
APN
Enter the APN (Access Point Name) of your service
provider.
telstra.corp
Page 7

NTC-402 – Telstra Private IP WAN Configuration Guide
7 of 11
CG01068 v. 1.0 October 2018
© NetComm Wireless 2018
I TE M
D ES CR I P T I ON
T EL ST RA S E T TI N G S
IP Type
Use the default setting: IPv4
IPv4
SIM PIN Code
Enter the PIN code that you received with the SIM from
your service provider.
Enter your SIM card’s
unique PIN.
Dial Number
Accept the default setting.
N/A
Authentication
Set to CHAP (Challenge Handshake Authentication
Protocol)
CHAP
Username
It is required for your Telstra supplied SIM and is case
sensitive.
user2@netcomm.com.au
Password
It is required for your Telstra supplied SIM.
FrameR0ute
IP Mode
Set to: Dynamic
Dynamic
Prim/Sec DPN
Not required
empty
Roaming
Accept the default setting of not enabled.
Enable
PDP header/data
compression
control
Accept the default setting: Off
Off
Save button
Click to save and apply the changes you have made.
Click to save.
Undo button
Click to close the section and discard any entries you have
made.
N/A
Table 2 – Virtual Server Rule Configuration page
Disable NAT and Network Monitoring
7 While remaining on the Internet Setup tabbed page scroll down to the 3G/4G Connection Common
Configuration section:
Figure 4 – 3G/4G Connection Common Configuration section
Page 8

NTC-402 – Telstra Private IP WAN Configuration Guide
8 of 11
CG01068 v. 1.0 October 2018
© NetComm Wireless 2018
8 Enter the following details in this page:
I TE M
D ES CR I P T I ON
T EL ST RA S E T TI N G S
NAT
Disable the NAT (Network Address Translation)
functionality.
Enable
Network Monitoring
Disable the Network Monitoring functionality.
Enable
Table 3 – Virtual Server Rule Configuration page
9 Scroll to the bottom of the Internet Setup tabbed page and click the Save button to apply the changes you
have made.
Disable SPI
10 Open Security >> Firewall and click the Options tab:
Figure 5 – Basic Networking > WAN & Uplink > Internet Setup tabbed page
11 Enter the following details in this page:
Firewall Options
I TE M
D ES CR I P T I ON
T EL ST RA S E T TI N G S
SPI
Disable the SPI (Stateful Packet Inspection, also known
as stateful firewall) functionality.
Enable
Allow Ping from WAN
Enable so that ping tests can be performed over the
wireless IP WAN.
Enable
Table 4 – Firewall Options
Page 9

NTC-402 – Telstra Private IP WAN Configuration Guide
9 of 11
CG01068 v. 1.0 October 2018
© NetComm Wireless 2018
Remote Administrator Host Definition
Separate definitions must be created for HTTP and HTTPS.
Before any changes can be made you must click the Edit button.
I TE M
D ES CR I P T I ON
T EL ST RA S E T TI N G S
ID No.
System generated reference number.
N/A
Interface
Default is All WAN.
All WAN
Protocol
To access the broadest range of web services, create one definition for
HTTP and one for HTTPS.
HTTP, HTTPS
IP
Any IP allows unlimited access to all URLs using the selected Protocol.
If you select Specific IP enter its IP address in the filed provided. You
must create a separate Host Definition for each specific address.
Any IP
Subnet Mask
This is unnecessary (N/A) if the IP is set to Any IP.
For each Specific IP address, select an appropriate Subnet Mask from
the drop down menu.
N/A
Service Port
For HTTP the default port is: 80
For HTTPS the default port is: 443
For HTTP: 80
For HTTPS: 443
Enable
Select Enable to activate the definition.
Action
Click the Edit button to enable changes to the definition.
Click Edit
Table 5 – Remote Administrator configuration
12 Click the Save button to apply the changes you have made.
Enable Telnet, SSH and HTTP/S WAN
13 Open Administration >> Configure & Manage and click the Telnet & SSH tab:
Figure 6 – Telnet & SSH settings
14 For Telnet make the following settings:
a Select LAN Enable
b Select WAN Enable
c Set the Service Port to 23
15 For SSH (Secure SHell) make the following settings:
a Select LAN Enable
Page 10

NTC-402 – Telstra Private IP WAN Configuration Guide
10 of 11
CG01068 v. 1.0 October 2018
© NetComm Wireless 2018
b Select WAN Enable
c Set the Service Port to 22
16 Click the Save button to apply the changes you have made.
Set LAN IP to Framed Route
17 Open Basic Network >> LAN & VLAN and click the Ethernet LAN tab:
Figure 7 – Ethernet LAN configuration
18 Set the LAN IP Address to: 10.30.4.1
19 Set the Subnet Mask to: 255.255.255.0(24)
20 Click the Save button to apply the changes you have made.
Apply Settings - Refresh
21 Open the command line and type: ipconfig /release
22 Press the Enter button.
Figure 8 – Command Prompt: ipconfig /release
23 Wait until the system is reconfigured.
Page 11

NTC-402 – Telstra Private IP WAN Configuration Guide
11 of 11
CG01068 v. 1.0 October 2018
© NetComm Wireless 2018
24 Then type: ipconfig /renew
25 Press the Enter button.
Figure 9 – Command Prompt: ipconfig /renew
26 The connection will be renewed.
Log in Using SIM Service
27 Open a browser and type into the address box: 10.30.4.1
Figure 10 – Log in to URL 10.30.4.1
28 Log in as usual.
Confirm connection status
29 Go to Status > Basic Network and open the WAN & Uplink tabbed page.
30 Go to the WAN Interface IPv4 Network Status section to confirm that you are connected to the Telstra
network using the correct IP Address, etc.:
Figure 11 – WAN Interface IPv4 Network Status
 Loading...