

Page 1
NetCommWireless
QUICK START GUIDE
NetComm
Wireless
NP731
Outdoor Dual Band
WiFi N Access Point
Page 2

NetComm
Wireless
WELCOME
Thank you for choosing a NetComm Wireless NP731 Outdoor Dual Band WiFi N Access
Point. This guide will help you set up, connect and congure your device quickly and easily.
PACKAGE CONTENTS
The NP731 package includes:
NP731 Outdoor Dual Band
WiFi N Access Point
10m RJ-45 Outdoor-grade
Ethernet cable
Dual Band 5dBi Outdoor
Omni Antenna
Ground Wire
(green)
PoE Injector
Detachment tool
(for RJ45 connector)
NetCommWireless
NetCommWireless
1 x Quick start guide
1 x Warranty card
Mounting Kit
Page 3
Outdoor Dual Band WiFi N Access Point - NP731
HOW IT WORKS
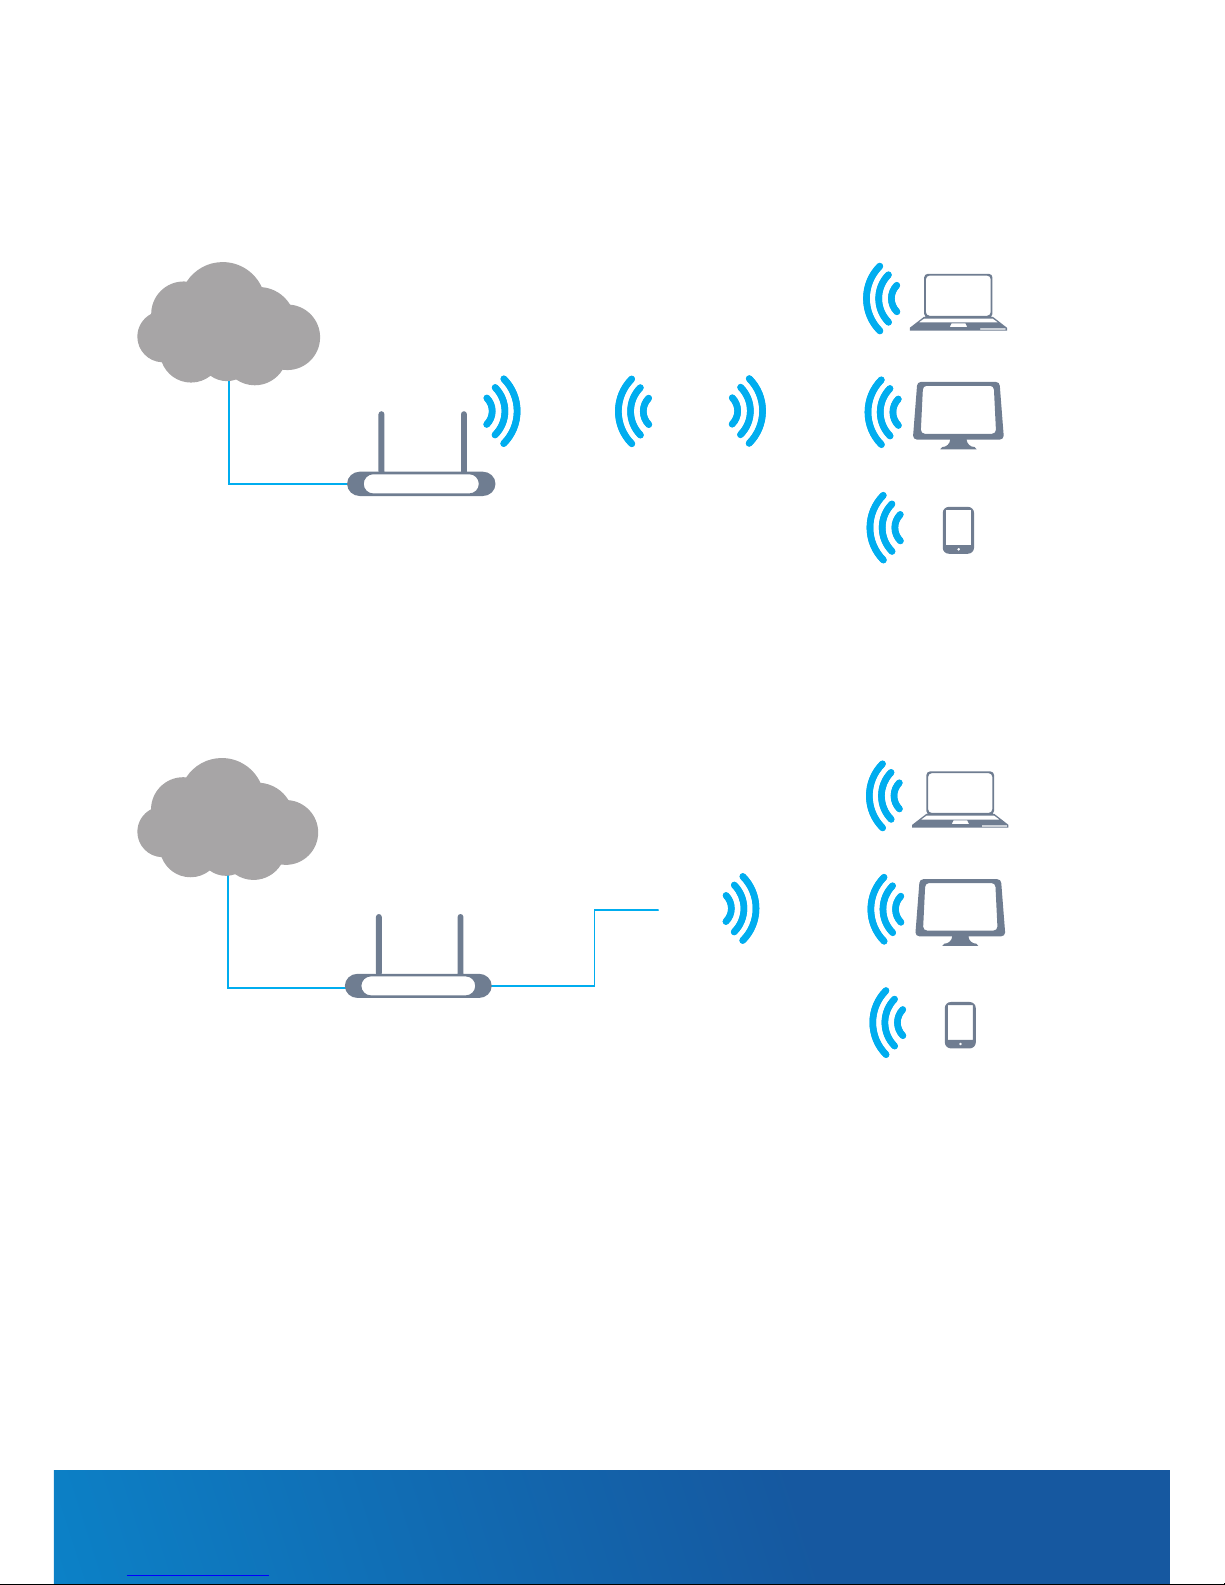
The NP731 has four modes of operation:
1. Repeater mode (default) – the NP731 repeats the wireless signal of your existing
network to provide coverage to a greater area of your premises.
2. Access Point mode – the NP731 connects to an existing router via Ethernet and
provides a wireless signal for wireless devices. This is useful in situations where there is no
existing wireless access point or where you wish to provide a wireless signal to a remote
area (up to 100 metres) from where the router is located.
3. CPE mode – the NP731 connects wirelessly to a remote network and provides access
to that network to clients connected via Ethernet. Use of a switch is required for multiple
clients. (Further details on this mode are available in the User Guide).
4. WDS mode – the NP731 connects to up to 16 other NP731 units to create a wireless
mesh network. This is similar to repeater mode but in WDS mode, the NP731 uses a
single MAC address to provide seamless roaming. (Further details on this mode are
available in the User Guide).
Laptop
PC
Smartphone
NP731
2.4/5GHz2.4/5GHz
Router
Internet
Laptop
PC
Smartphone
NP731
2.4/5GHz
Router
Internet
Ethernet cable
up to 100m
Page 4

NetComm
Wireless
HARDWARE INSTALLATION
The following diagram illustrates the basic network topology that should be used for testing
and conguration:
1. Connect the two Dual band antennas to the primary and secondary N-type antenna
connectors on the NP731
Laptop
NP731
PoE
Injector
P+D/OUT Data/IN
Powerpoint
Page 5

Outdoor Dual Band WiFi N Access Point - NP731
2. Unscrew the weather seal from the PoE port and disassemble it so that it is in three parts.
3. Place the Ethernet cable through the bottom piece (A) rst, as shown below.
4. Open the middle piece (B) and slide the Ethernet cable into it. Take care to orient the
middle piece as shown below.
5. Place the third piece (C) over the top with the same orientation as shown below.
6. Connect the weather sealed end of the Ethernet cable to the Ethernet port of the NP731.
Screw part A onto the Ethernet port of the NP731. Connect the other end of the Ethernet
cable to the P+D/OUT port of the PoE injector.
7. Connect one end of another Ethernet cable to the DATA/IN port of the PoE injector and
the other end of the cable to a computer.
8. Connect the power cord to the PoE injector and power it on.
Page 6

NetComm
Wireless
ACCESSING THE NP731’S USER INTERFACE
The NP731 has a static IP address of 192.168.1.254. To access the web management
interface, you must set the IP address of your computer to be within the range of 192.168.1.2
to 192.168.1.253.
Setting the IP address of your computer
To set the IP address of your computer:
1. Open the Control Panel then select Network and Sharing Center.
2. Select the Ethernet connection for the Unidentied network.
3. Click on the Properties button.
Page 7

Outdoor Dual Band WiFi N Access Point - NP731
4. Select Internet Protocol Version 4 (TCP/IPv4) and then click on the Properties button.
5. Select the Use the following IP address option, then enter an IP address between the
range of 192.168.1.2 and 192.168.1.253. In the Subnet mask eld, enter 255.255.255.0.
Click the OK button.
6. Close the Ethernet Properties and Ethernet Status windows.
Page 8

NetComm
Wireless
Logging in to the NP731
To access the NP731’s user interface:
1. Open a web browser and enter http://192.168.1.254 into the address bar. Press Enter.
2. The login page of the NP731 is displayed.
3. Enter admin into both the Username and Password elds, then click the Login button.
Page 9

Outdoor Dual Band WiFi N Access Point - NP731
CONNECTING THE NP731 TO YOUR ROUTER
Repeater Mode
Upon logging in to the NP731 web interface, you are presented with the System Overview
screen.
To congure the NP731 for use in repeater mode:
1. Click on the AP button at the top of the screen, then click on the General tab.
Page 10

NetComm
Wireless
2. Use the Band drop down list to select the same network band that your router
broadcasts on (2.4GHz / 5GHz). Use the Protocol drop down list to select the protocol
that your router uses. Click the Save button.
Depending on your chosen band, the NP731 may require a reboot. If it is required, the
NP731 displays the message in the screenshot below. If it is not required, skip to step 5:
3. Click the APPLY link to apply the conguration.
4. Click the OK button on the conrmation window.
The NP731 reboots to apply the settings. When the NP731 has nished rebooting,
continue to the next step.
Page 11

Outdoor Dual Band WiFi N Access Point - NP731
5. Click on the AP menu item then the Site Survey tab. Click the Scan button.
6. Enter the authentication credentials for the chosen network.
7. Click on the VAP Cong tab. For the VAP option, select Enable. In the ESSID eld, enter
the name you would like to use for the Virtual Access Point wireless network (i.e. the name
of the repeated wireless network). Click the Save button when you have nished.
Note: If the ESSID is set to be the same as the existing wireless network’s SSID then client devices can
automatically roam between the networks based on wireless signal strength.
Page 12

NetComm
Wireless
8. Click on the Security tab. Select the desired security settings of the repeated network
then click the Save button.
9. Before completing the conguration, we need to set the IP address of the NP731 to an IP
address within the DHCP range of your router. Many routers use different DHCP ranges
so you must refer to the documentation of your router to nd out what its DHCP range
is. Common DHCP address ranges are 192.168.1.xxx, 192.168.0.xxx, and 10.1.1.xxx.
You can congure the last octet of the IP address to be anything between 1 and 254 so
long as it does not conict with an existing device on the network. For example, to set the
NP731’s IP address to work with a router with a 192.168.0.x range, click on the System
menu, then Network Interface and enter the details as per the following screenshot:
10. Click the APPLY link to apply the conguration.
Page 13

Outdoor Dual Band WiFi N Access Point - NP731
11. Click the OK button on the conrmation window.
The NP731 reboots to apply the settings. Wait approximately 4 minutes before attempting
to connect a wireless client to the NP731. Now that the NP731 is congured for use, you
can connect it to a PoE switch with Ethernet cable up to100m to power it, or continue
using it with the PoE injector.
12. While the NP731 is rebooting, you may like to set your computer’s network card back
to its previous setting so that you can continue to use it with your router. Follow the
steps 1-4 of the “Setting the IP address of your computer” section. Instead of following
step 5, select the “Obtain an IP address automatically” and “Obtain DNS server address
automatically” options. Click the OK button then close the Ethernet Properties and
Ethernet Status windows.
Page 14

NetComm
Wireless
Access Point Mode
To use the NP731 in Access Point mode:
1. Click on the AP button at the top of the screen, then click on the General tab.
2. Use the Band drop down list to select the same network band that your router
broadcasts on. Click the Save button.
Depending on your chosen band, the NP731 may require a reboot. If it is required, the
NP731 displays the message in the screenshot below. If it is not required, skip to step 5:
Page 15

Outdoor Dual Band WiFi N Access Point - NP731
3. Before completing the conguration, we need to set the IP address of the NP731 to an IP
address within the DHCP range of your router. Many routers use different DHCP ranges
so you must refer to the documentation of your router to nd out what its DHCP range
is. Common DHCP address ranges are 192.168.1.xxx, 192.168.0.xxx, and 10.1.1.xxx.
You can congure the last octet of the IP address to be anything between 1 and 254 so
long as it does not conict with an existing device on the network. For example, to set the
NP731’s IP address to work with a router with a 192.168.0.x range, click on the System
menu, then Network Interface and enter the details as per the following screenshot:
4. Click the APPLY link to apply the conguration.
5. Click the OK button on the conrmation window.
The NP731 reboots to apply the settings. When the NP731 has nished rebooting,
continue to the next step.
Page 16

NetComm
Wireless
6. Click on the Repeater tab. Set Repeater Type to None. Click the Save button.
7. Click on the VAP Cong tab. For the VAP option, select Enable. In the ESSID eld, enter
the name you would like to use for the Virtual Access Point wireless network (i.e. the name
of the wireless network). Click the Save button when you have nished.
8. Click on the Security tab. Select the desired security settings of the AP network then click
the Save button.
9. Click the APPLY link to apply the conguration.
Page 17

Outdoor Dual Band WiFi N Access Point - NP731
10. Click the OK button on the conrmation window.
The NP731 reboots to apply the settings. Wait approximately 4 minutes before attempting
to connect a wireless client to the NP731. Now that the NP731 is congured for use, you
can connect it to a PoE switch with Ethernet cable up to100m, to power it or continue
using it with the PoE injector.
11. While the NP731 is rebooting, you may like to set your computer’s network card back
to its previous setting so that you can continue to use it with your router. Follow the
steps 1-4 of the “Setting the IP address of your computer” section. Instead of following
step 5, select the “Obtain an IP address automatically” and “Obtain DNS server address
automatically” options. Click the OK button then close the Ethernet Properties and
Ethernet Status windows.
Page 18

NetComm
Wireless
CHOOSING A LOCATION FOR YOUR
WIFE EXTENDER
Now that your Access Point is connected to your router, you can move it to a different
location to provide greater range for your network. Select a location to mount the NP731
that maximizes the range of your network in the direction where you wish to have wireless
network coverage.
Remember that in repeater mode, if the NP731 is far from the router, you may increase your
coverage but reduce the signal strength between your NP731 and the router. Conversely, if
the NP731 is close to the router, the coverage area may be reduced but signal strength
is increased.
In Access Point mode, you can place the NP731 in any area you wish to cover so long as the
Ethernet cable between the NP731 and the router is 100m or shorter.
Mounting the NP731
1. Screw nuts onto the U-shaped bolts and then place a split washer on each end.
2. Align the front panel of the NP731 with the pole, then insert the U-shaped bolts through
the holes provided on the corners of the NP731.
3. Secure the NP731 to the pole using the remaining nuts and washers as illustrated below.
NP731 Mounting Kit
Pole
Page 19

Outdoor Dual Band WiFi N Access Point - NP731
CONNECTING YOUR WIRELESS CLIENT DEVICE
TO THE NP731
1. On your wireless client device, scan for nearby wireless networks.
2. Select the wireless network that matches the ESSID that you previously congured.
3. Enter the authentication details that you previously congured.
4. Wait for the wireless client to connect. You have now completed the wireless client
connection to the NP731.
Page 20

NetComm
Wireless
QSG-00071 rev 1
Product Warranty
For warranty information please visit
http://www.netcommwireless.com/product/wi/np731
Safety and product care
Please refer to the user guide for safety and product care information.
NETCOMM WIRELESS LIMITED ABN 85 002 490 486
Head Ofce, 18-20 Orion Road
Lane Cove, Sydney, NSW 2066, Australia
p:
+61 2 9424 2000 f: +61 2 9424 2010
www.netcommwireless.com
 Loading...